Hosting a webinar on Zoom
Classes, seminars, conferences, and other large gatherings offer boundless learning opportunities, but in-person events like these are on pause during the coronavirus pandemic.
With more people working from home and learning new skills during their downtime, businesses, organizations, and even government entities are relying on video conferencing apps to bring everyone together for online seminars, classes, and conferences.
These webinars are particularly helpful if you need to organize a last-minute event, train employees located in different offices, or find a cost-effective solution that lets people collaborate in real time, even when they can’t be in the same room together.
Zoom has become the go-to application for these events.
You may be wondering about the difference between a Zoom meeting and a webinar. Basically, webinars are designed to handle larger groups than meetings. Webinars also include features and enhanced permission controls for hosts, whereas meetings are more collaborative and give participants more control.
Just so you know…
Add webinar registrants to your Zoom webinar automatically with Jotform’s free Zoom Scheduler!
How to schedule a Zoom video webinar
1. Purchase a Zoom webinar license.
Zoom offers webinar licenses for monthly and annual rates, allowing hosts to pay based on how often and for how long they expect to use the license.
The basic Video Webinars option costs $79 per month, or $690 per year with an annual discount. This option allows up to 500 attendees to your webinars and sessions as long as 30 hours, with options for more attendees at an additional cost.
For a more robust option, try the Event Platform plan at $99 per month or $890 per year. This plan also follows the 500 attendee limit with scaled pricing based on higher counts. In addition, it offers unlimited-length sessions, a more robust event management platform, and even analytics to help measure performance with attendance, ticketing, registration, and more.
2. Establish your Zoom video webinar details.
Once you purchase a license from Zoom, setting up a webinar is fairly easy.
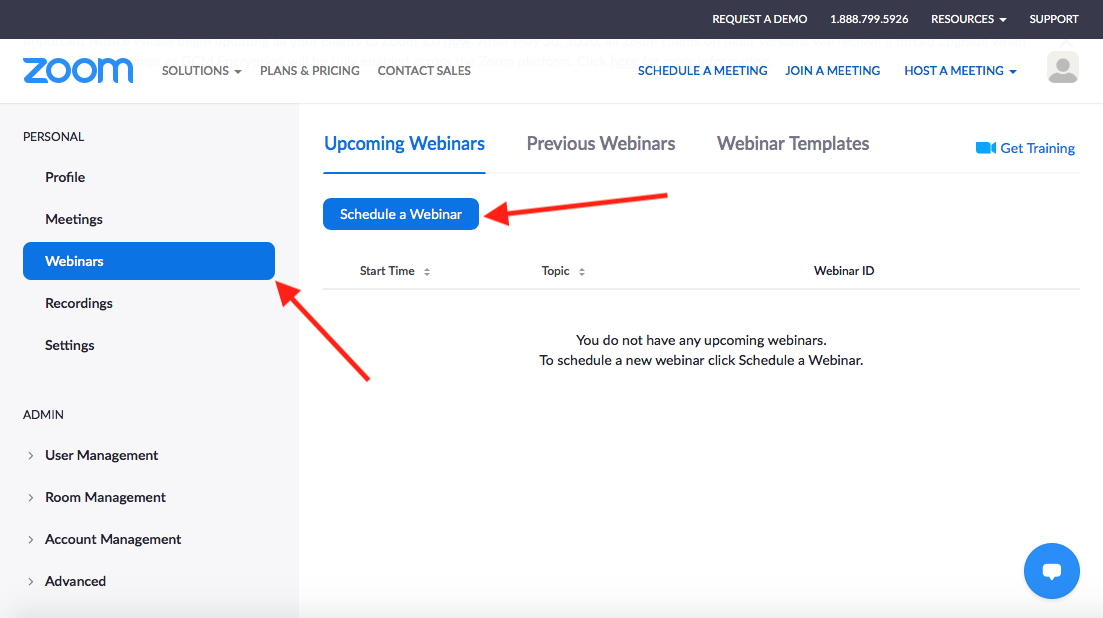
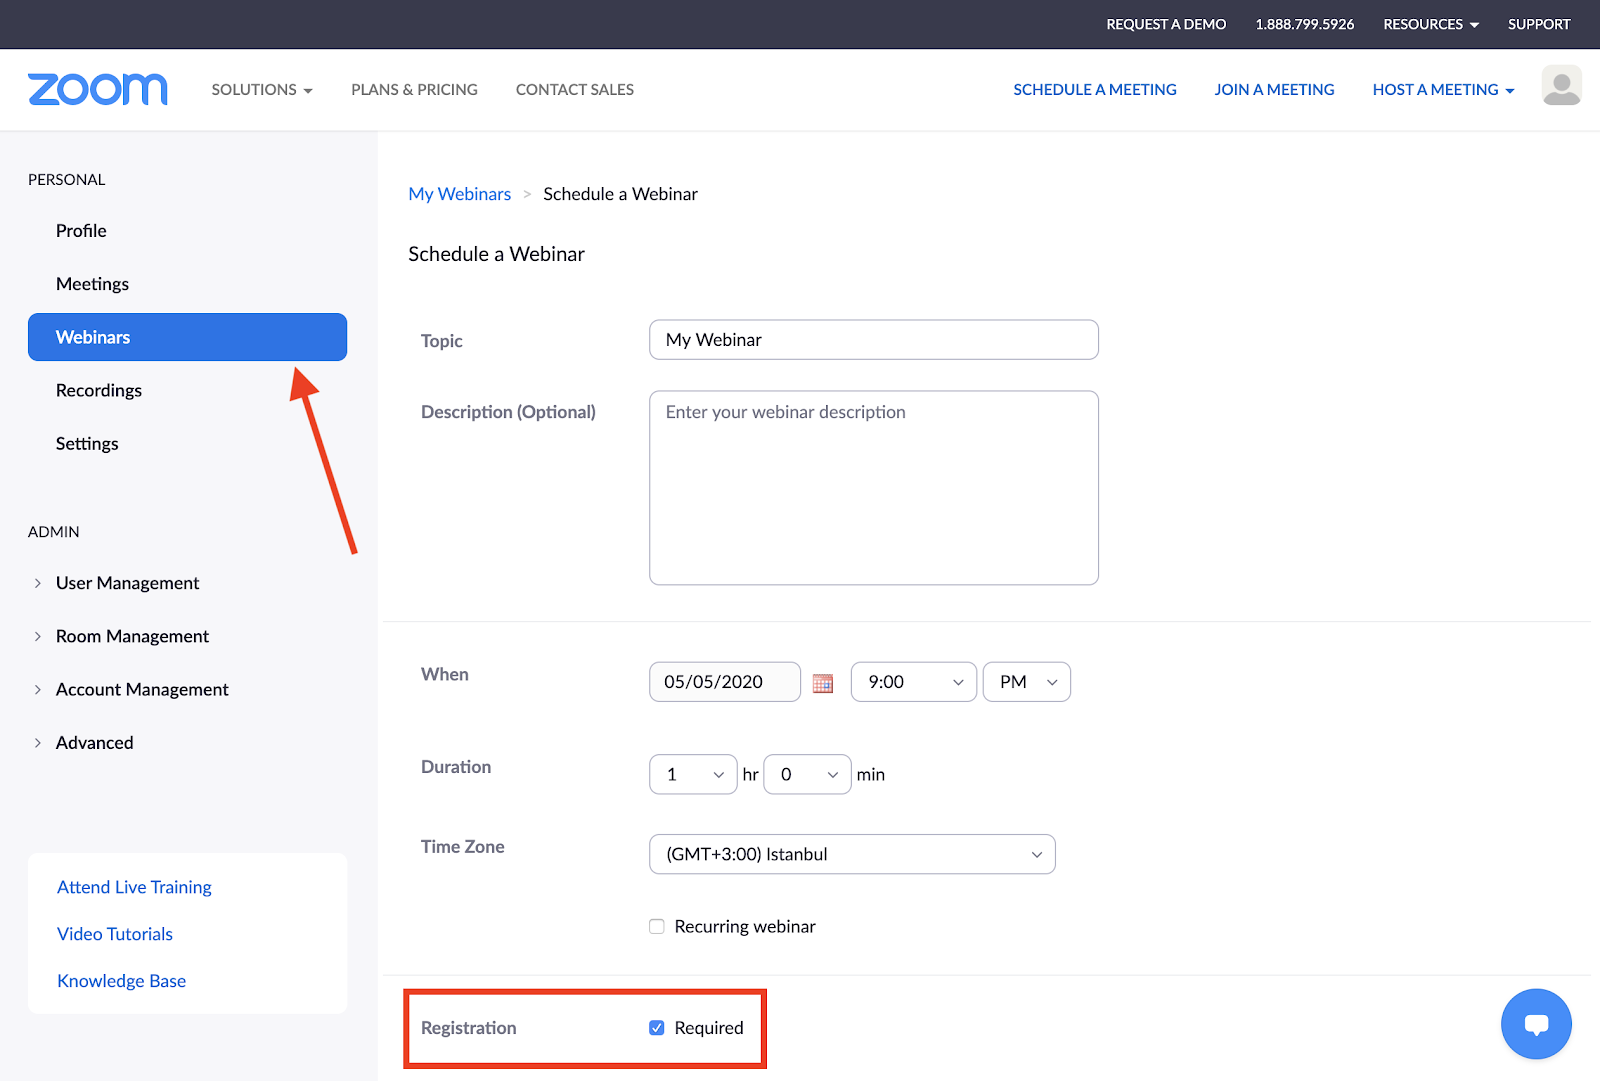
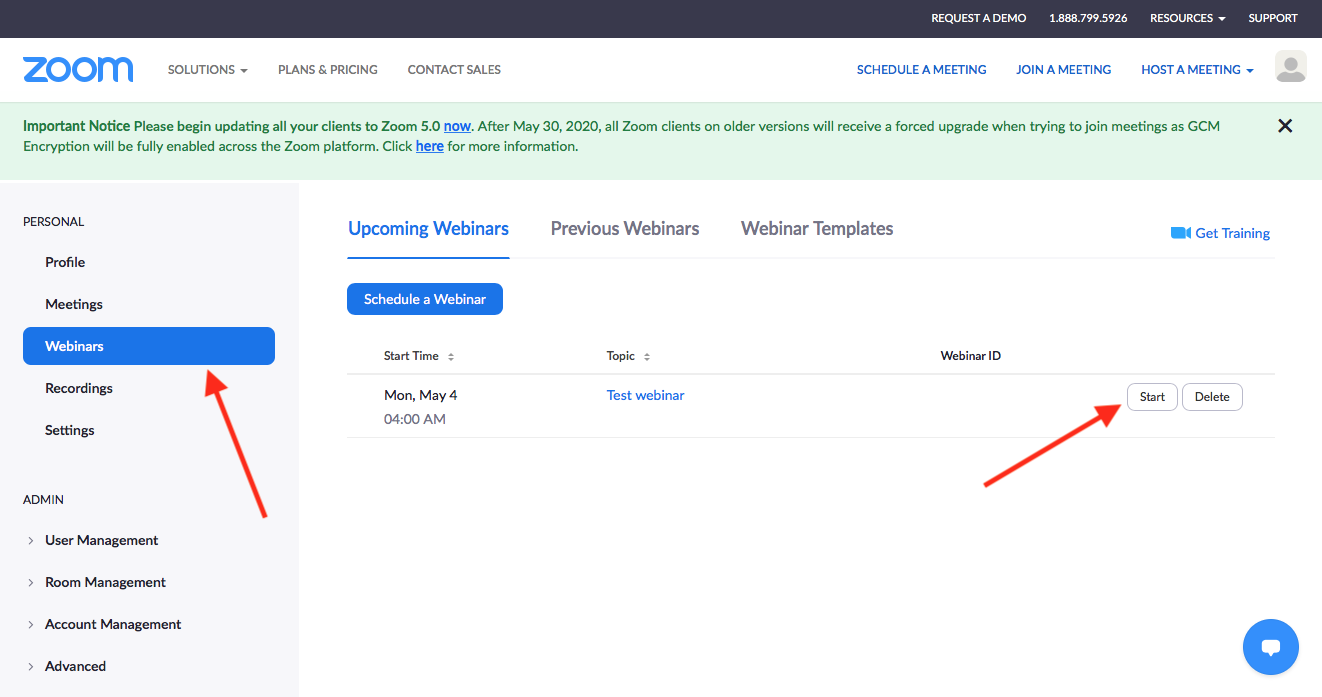
All you need to do is select the Webinars option in the Personal section of your Zoom web portal, and click on the Schedule a Webinar button.
In the menu that opens on the right side of your screen, enter the title for the webinar, add a description of it, and indicate when it will occur.
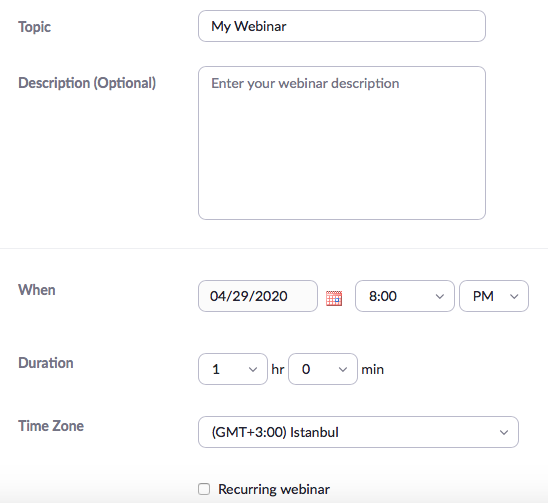
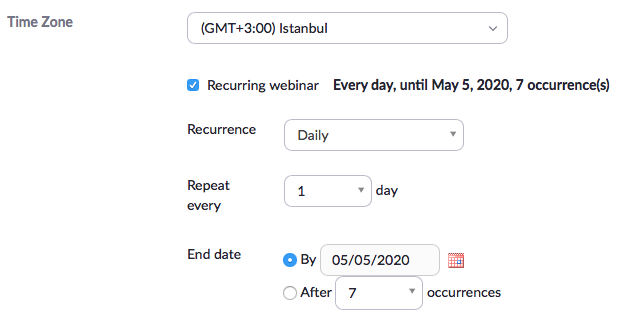
If you want to hold a webinar regularly, such as a monthly seminar, lecture, or talk, select the Recurring webinar checkbox. You can then specify when your virtual events should be held, how often they should repeat, and when they should end.
You can set additional parameters for your virtual event on this page. It’s possible to limit event access by requiring attendees to register for the webinar ahead of time and enter a password before entering. And you can indicate whether attendees can access the webinar by phone and if they can see you and any panelists when they enter the virtual event.
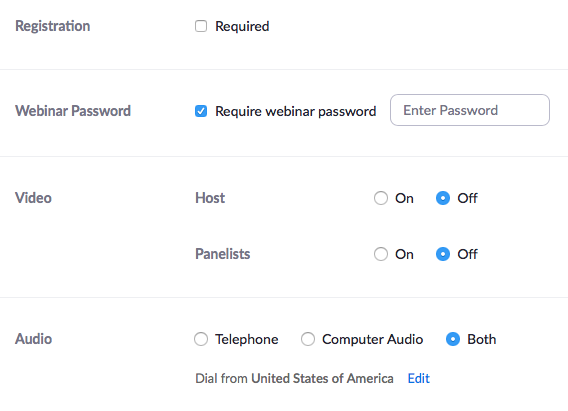
Before scheduling your webinar, you can specify whether there should be Q&A opportunities for attendees, a practice session beforehand, and a recording that starts automatically at the onset of the event.
Other licensed users on your Zoom account — called alternative hosts — can start the event in your place. These users will receive a notification email with a link to start the meeting. Alternative hosts cannot schedule meetings for you, although it’s possible to let another licensed user on your Zoom account take on webinar scheduling duties and serve as an alternative host for those events.
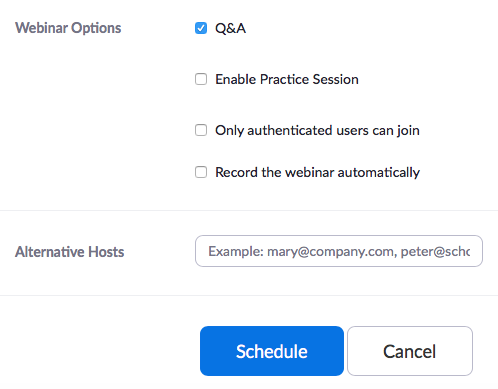
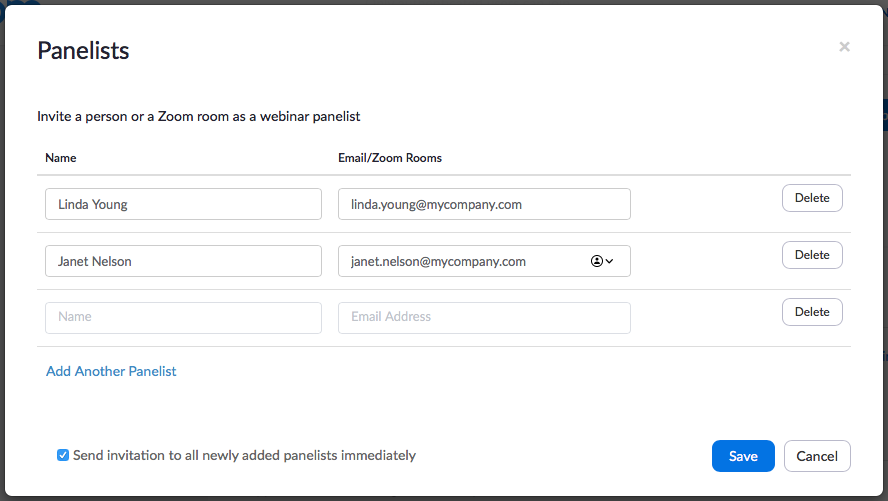
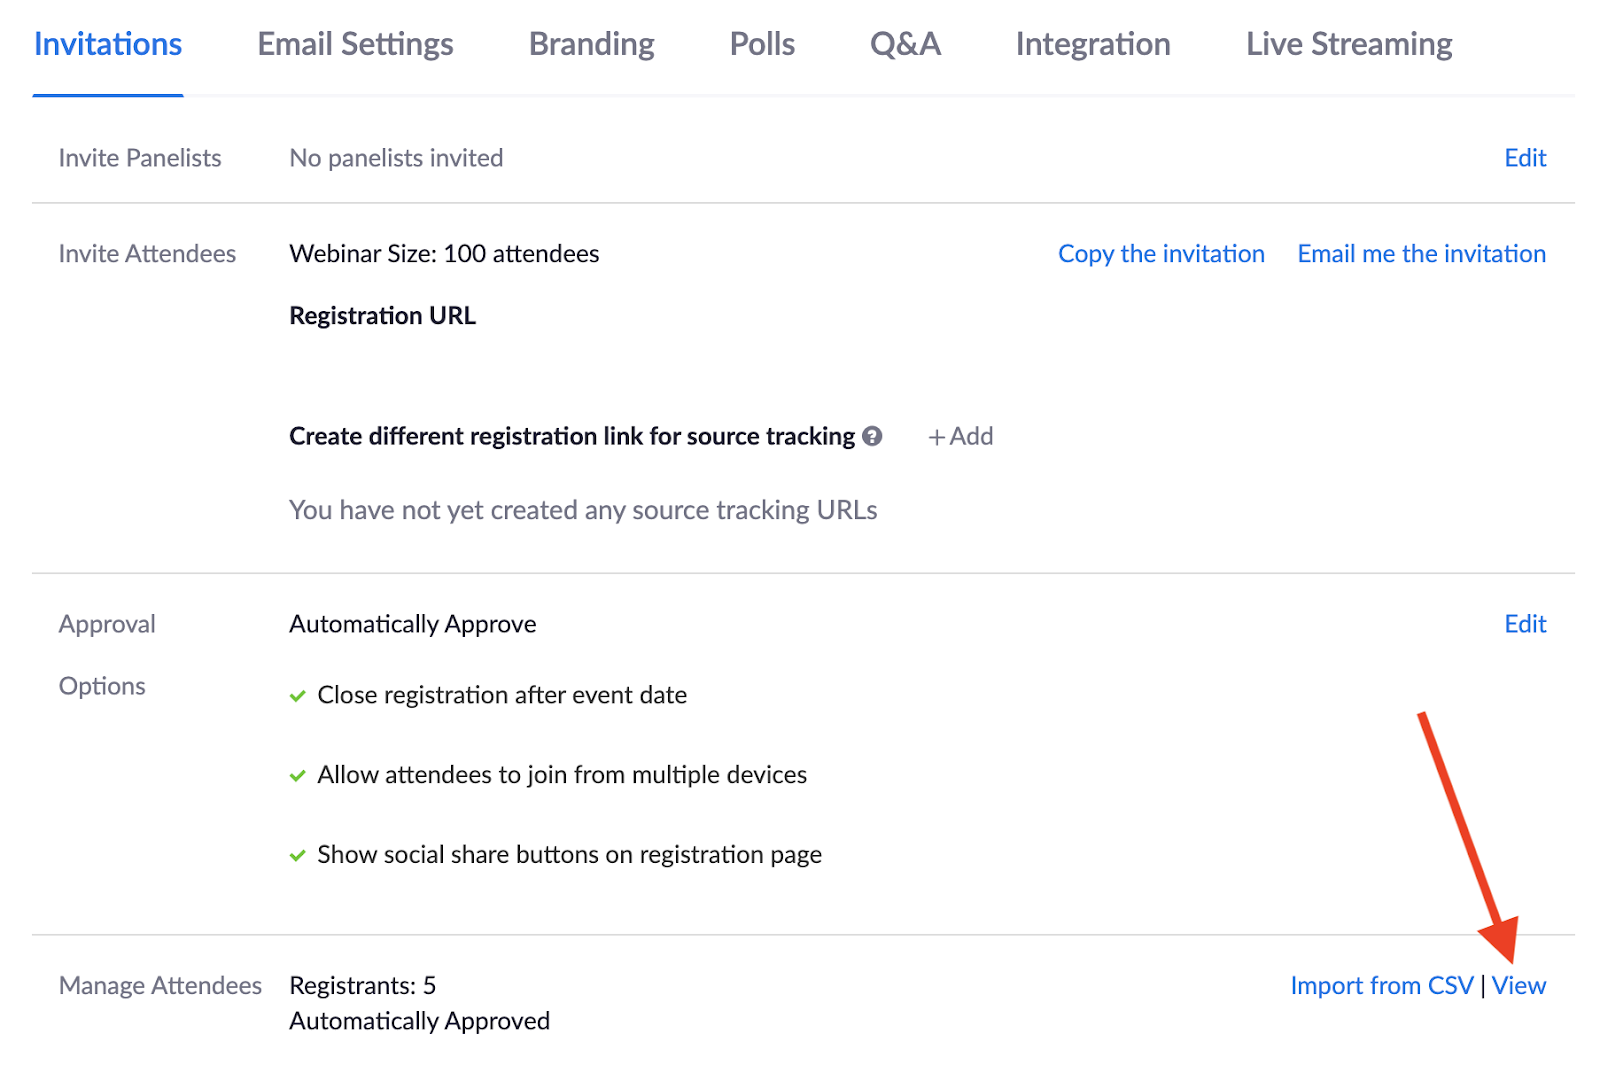
After scheduling the webinar, use the confirmation page that appears to add the newly created event to your calendar. At the bottom of the confirmation page, use the menu of options under the Invitations tab to invite panelists to your webinar and get event details you can share with attendees.
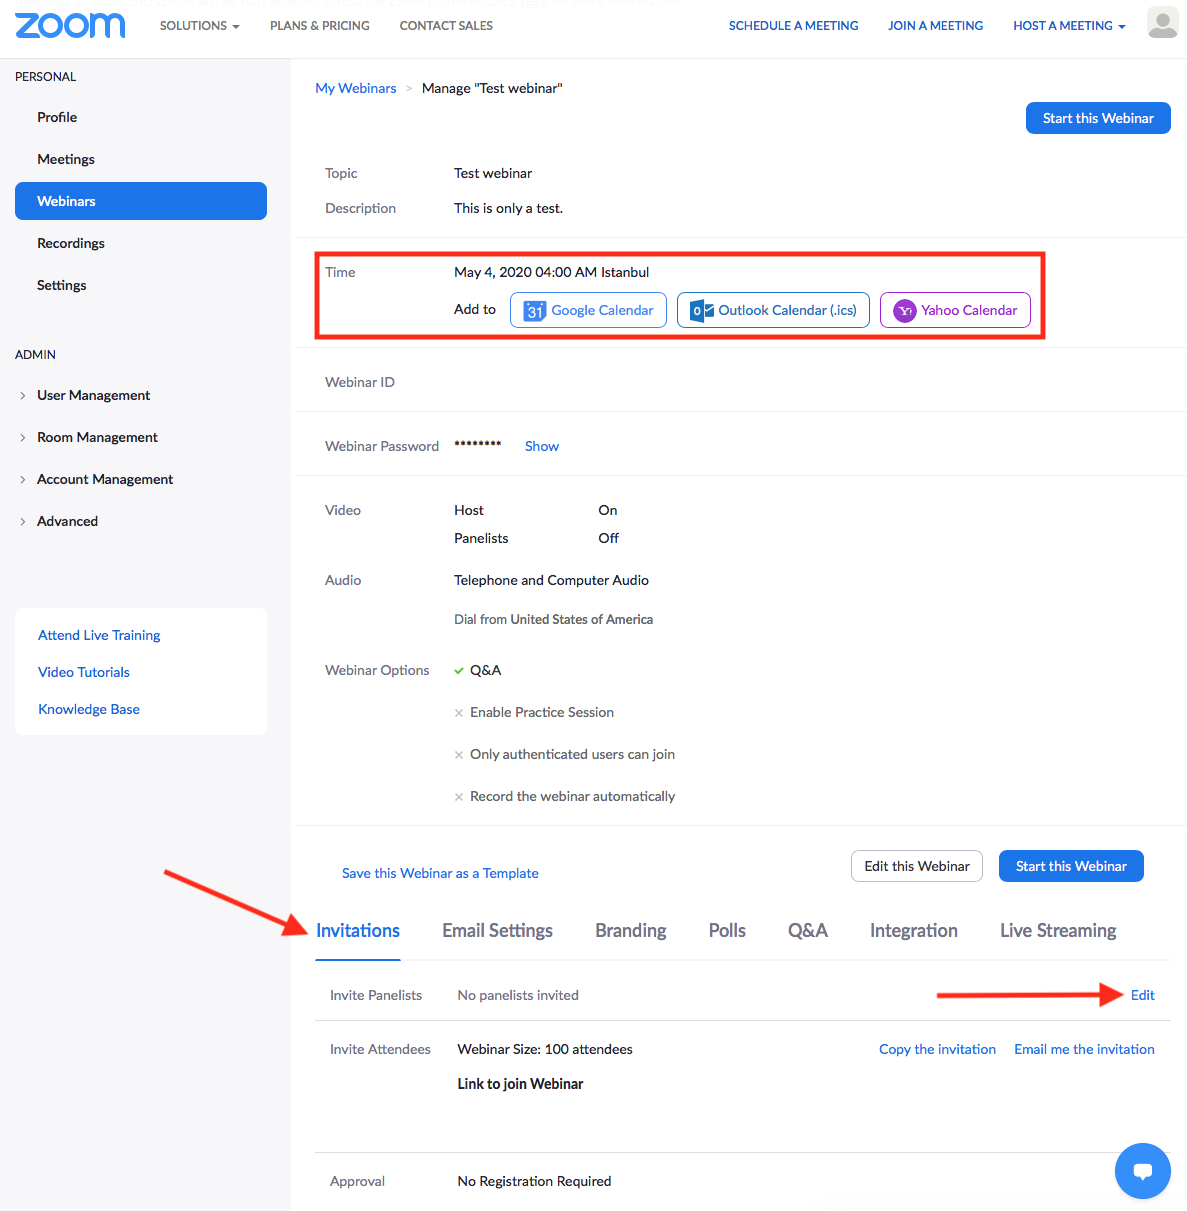
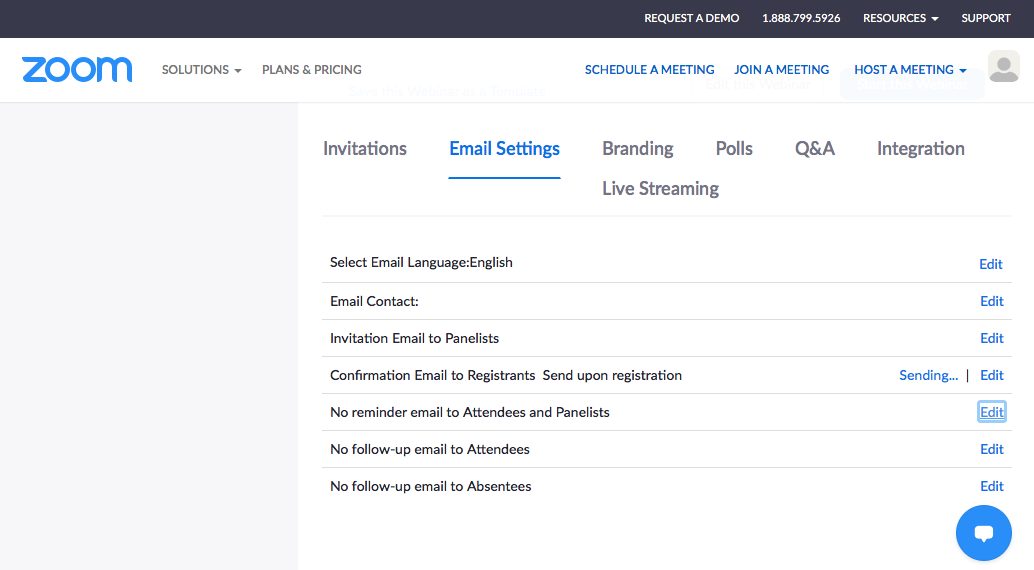
The Email Settings tab, meanwhile, allows you to set up the sequence of emails that panelists and participants will receive before and after your webinar.
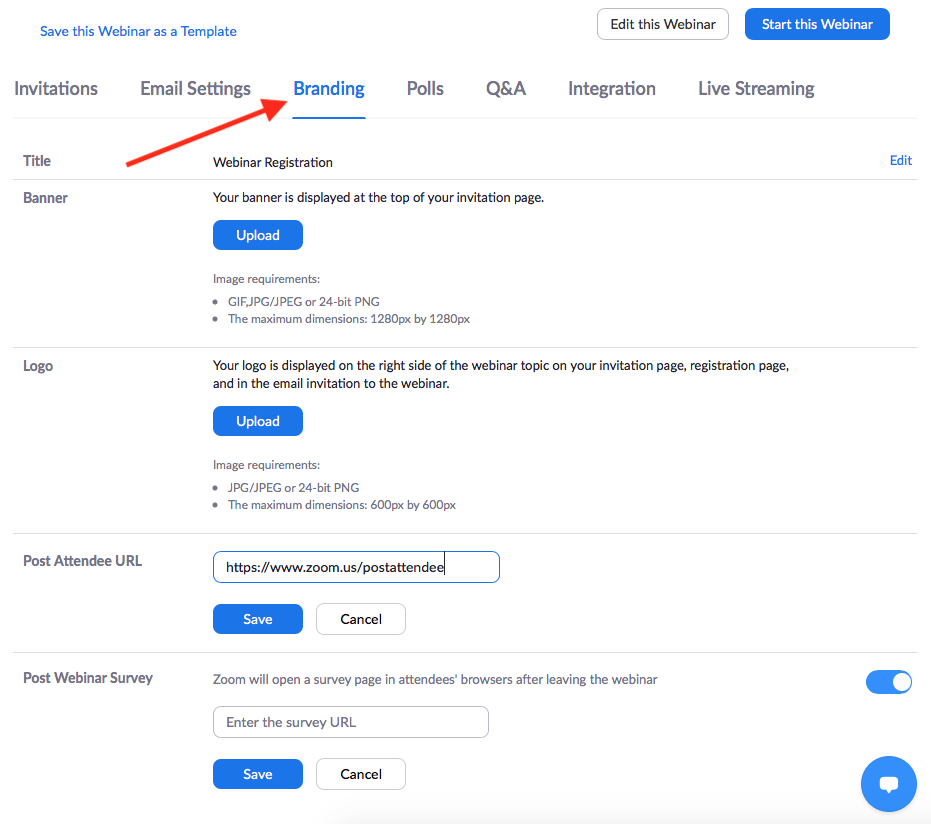
You can give your Zoom webinars a professional touch by clicking on the Branding tab and uploading the logos or banners you’d like to see on your event invitations. You can even send attendees a customized post-webinar survey, which will appear in their browser after they leave your virtual event.
3. Set up your webinar registration.
After you create an engaging webinar, set it up in Zoom, and secure a cadre of panelists and event coordinators, you have to get people to sign up for it.
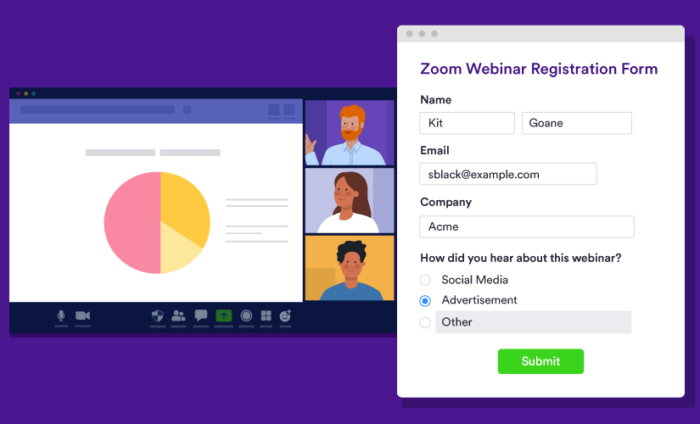
Jotform provides an easy way to collect information from attendees and gives you control over the look and feel of your registration form in Jotform.
Jotform enables you to ask questions in a variety of ways — from multiple-choice questions to dropdown menus — and design a form that’s as unique as your company or organization. You can use our Zoom webinar registration form template or design your own form.
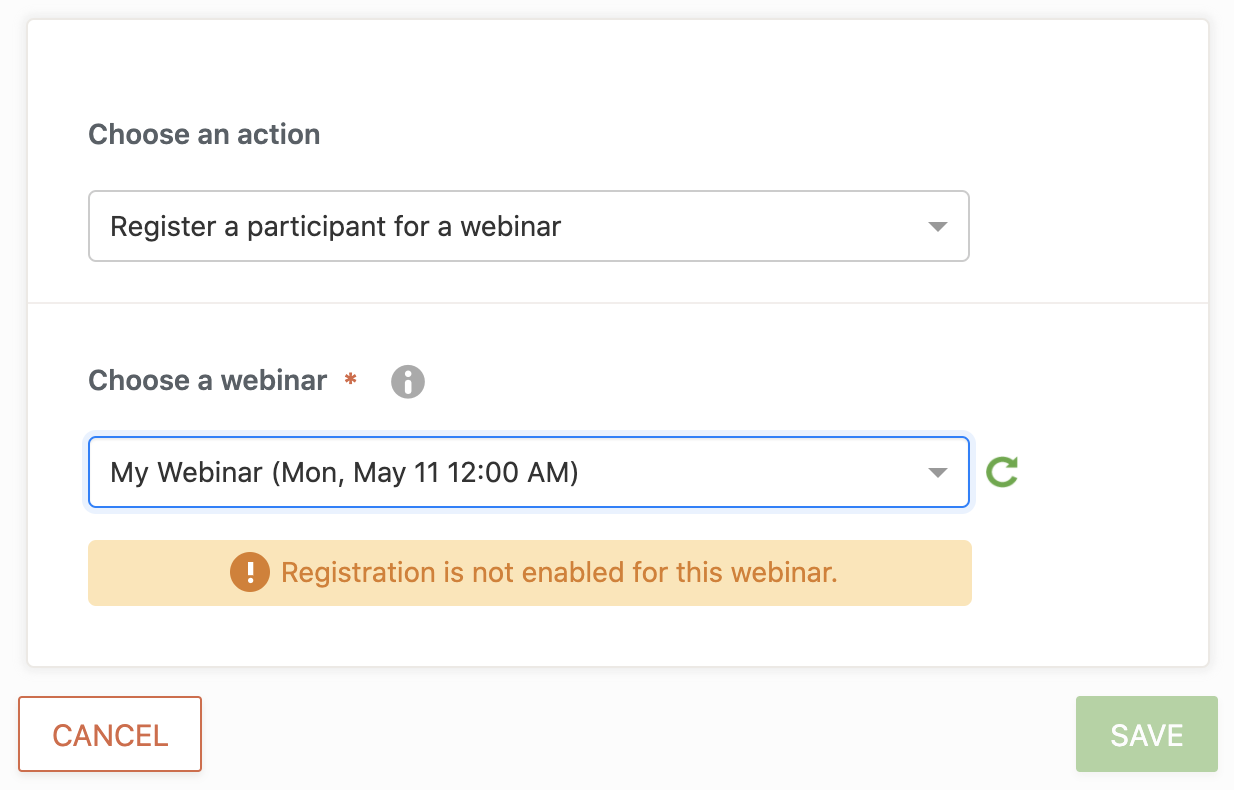
Once your form is ready to go, you can use Jotform’s new Zoom integration to automatically designate people as webinar attendees once they fill out and submit your form.
You can even collect webinar registration fees through Jotform by connecting your form to one of more than 30 integrations with payment processors, including PayPal, Square, Stripe, and Authorize.Net. Since Jotform doesn’t charge anything to use these integrations, you just need to pay the standard transaction fees charged by each payment processor.
If you set up the Zoom webinar to automatically approve registrants as attendees, then you can sit back, relax, and watch your webinar registration list grow. If you must manually approve registrants as attendees, then you have to sign into your Zoom account and approve each person who filled out your registration form in Jotform.
The information you collect from attendees doesn’t just have to live in your Jotform and Zoom accounts. In fact, you can use Jotform’s other integrations to update email marketing lists in Mailchimp and add attendees as contacts in Salesforce or HubSpot.
Just so you know…
Looking for the best way to collect webinar registrations? Jotform lets you create professional online forms to collect webinar registrations and fee payments directly through your website. You can even sync registrations to 100+ apps including Zoom, Mailchimp, and popular CRMs like HubSpot or Salesforce!
4. Finalize settings and open registration.
No one likes to see an event with very few attendees, even if it’s happening online.
Before collecting registration information from prospective attendees, you should ensure that registration is required for anyone to participate in your webinar. In the Personal section of your Zoom web portal, click on the Webinars option, and simply check the box that makes registration required.
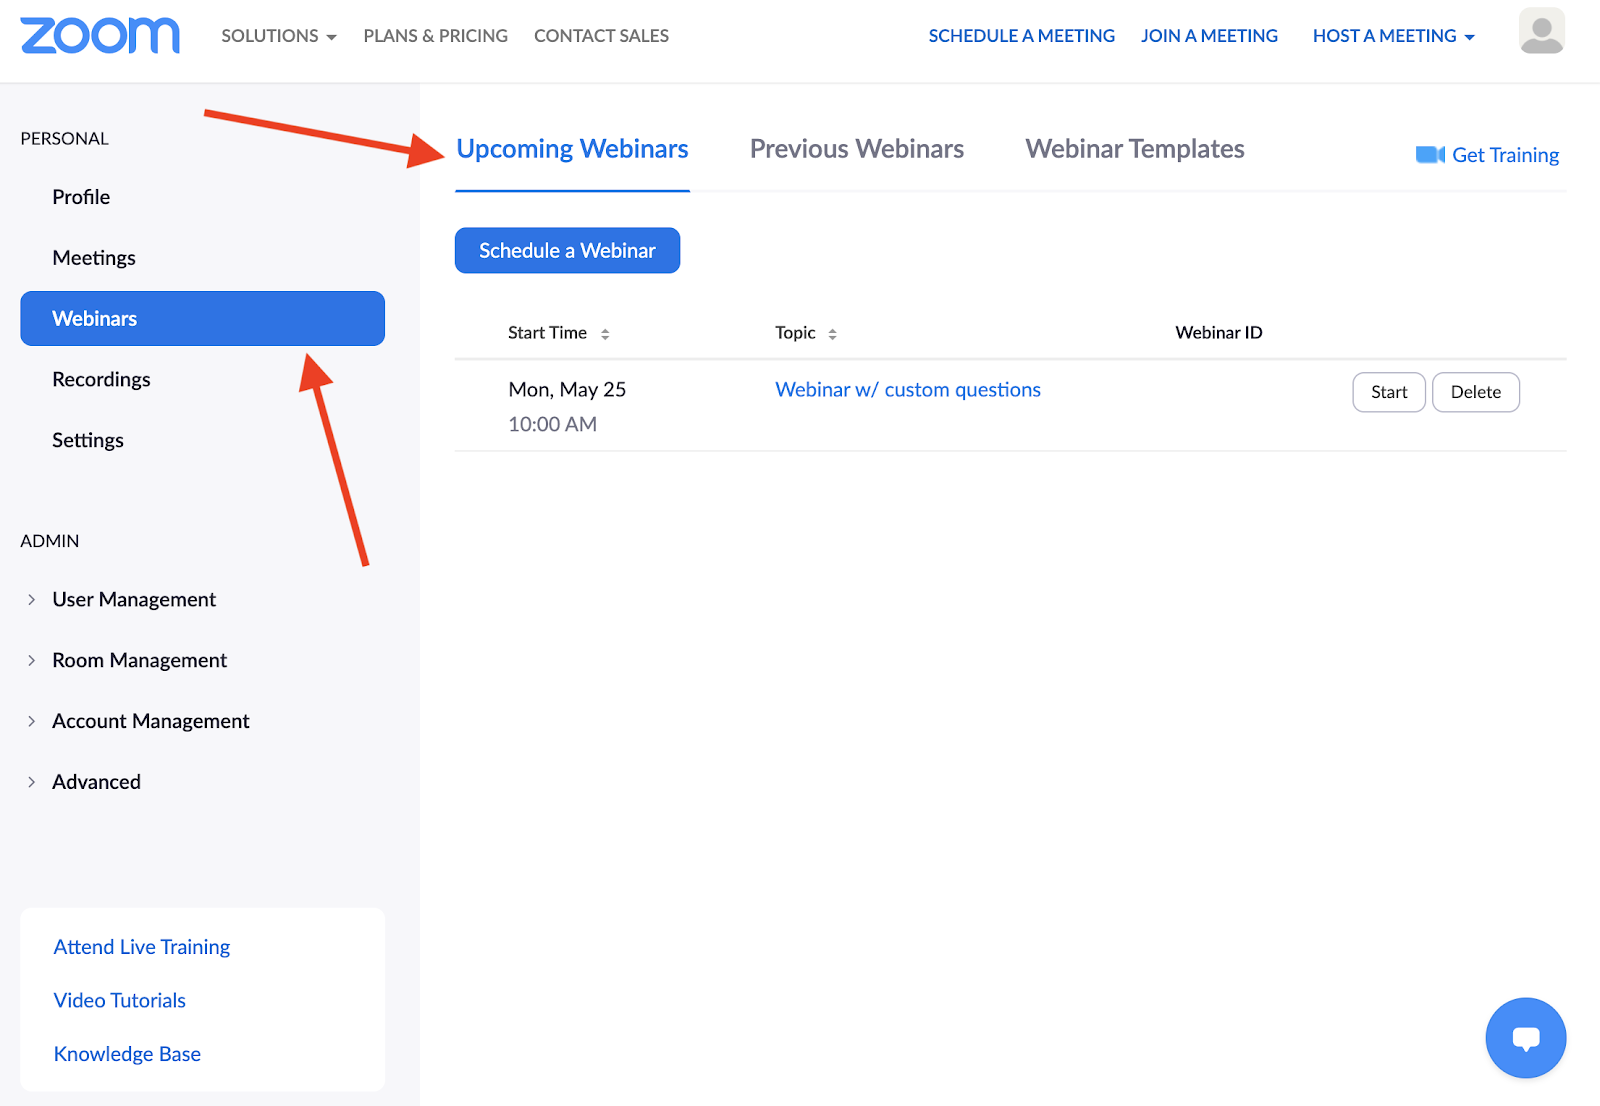
If you’ve already scheduled your webinar, you can change the settings for your virtual event in the same section of the Zoom web portal. Select the webinar that you want to edit under the Upcoming Webinars tab.
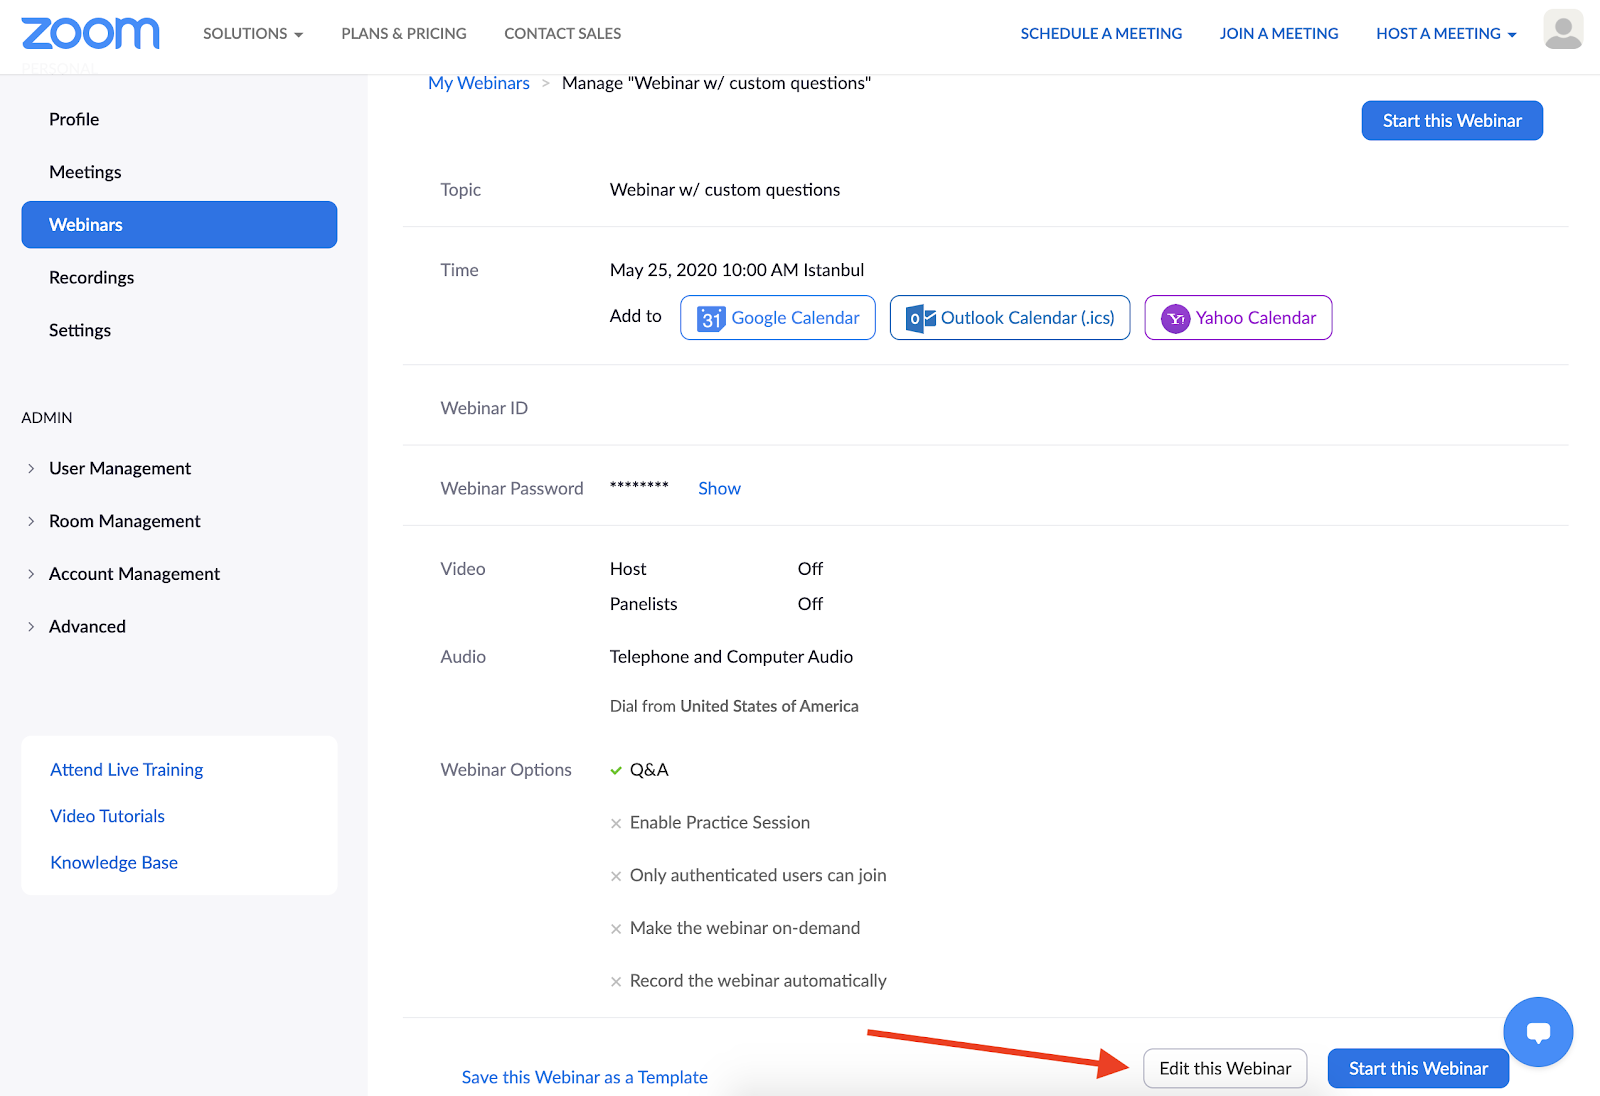
At the bottom of the page, click on Edit this Webinar. This will automatically redirect you to the webinar setup menu, where you can require registration beforehand.
Now that attendees must RSVP to join your webinar, you can specify what information must be provided and what happens once it arrives in Zoom. After selecting your webinar under the Upcoming Webinars tab, click Edit in the Approval Options section under the Invitations tab.
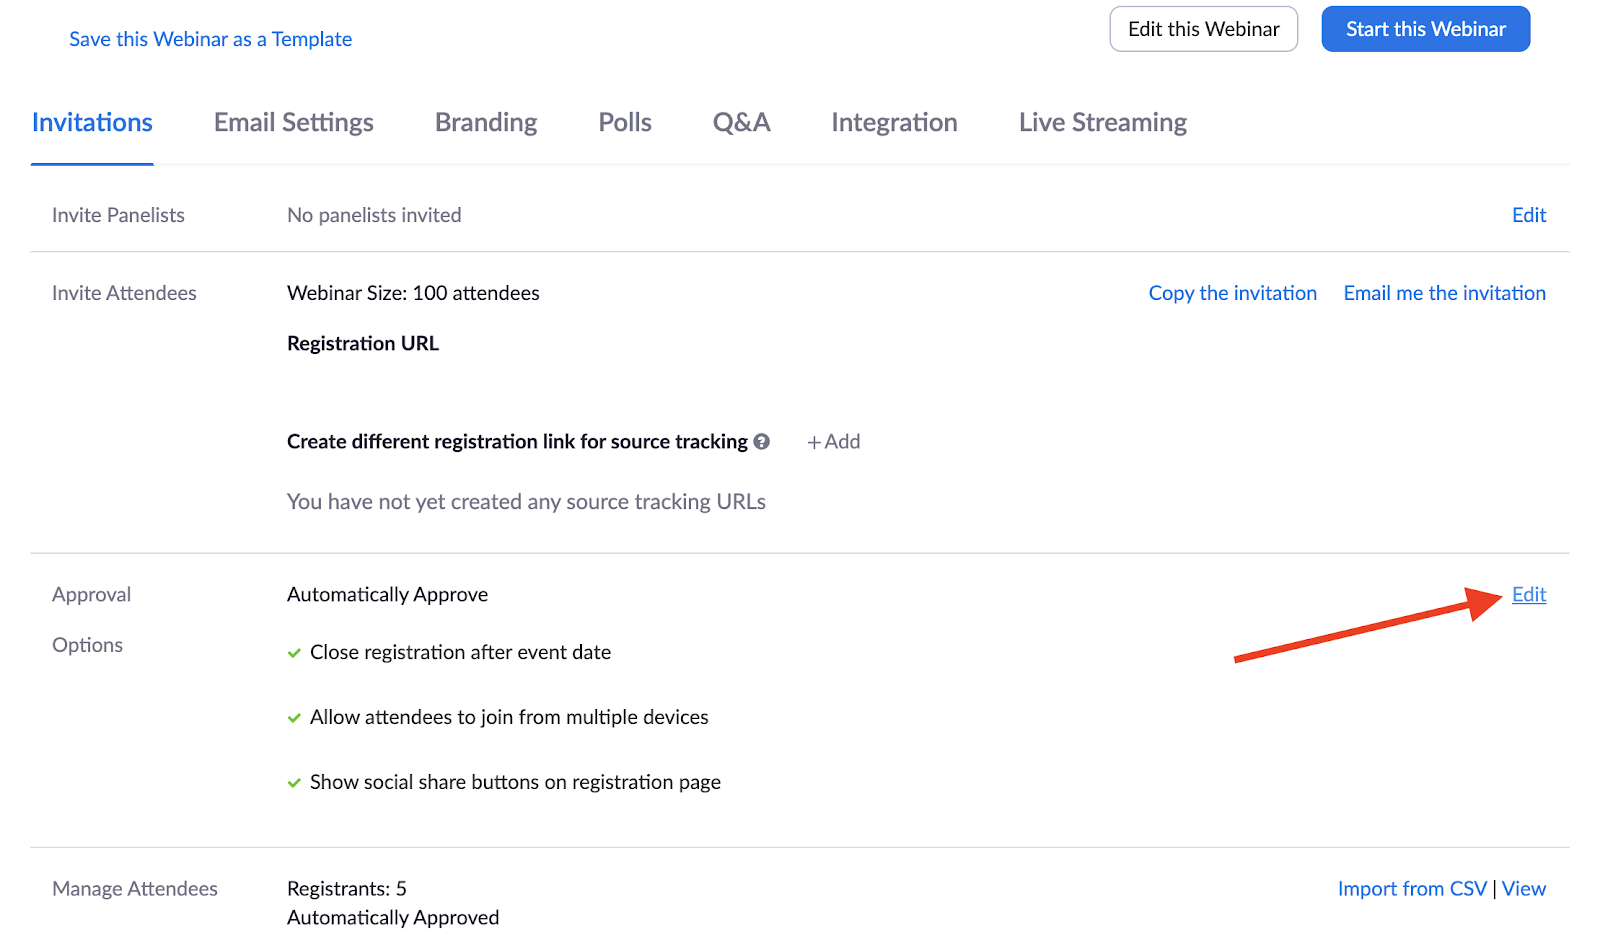
Use the Registration popup window that appears to indicate what should happen when attendees sign up for your webinar. You can, for instance, opt to either automatically add registrants as attendees or review each registrant in Zoom before manually adding them.
The latter option is particularly helpful if your webinar is intended for a certain group of people. Manually adding attendees to a webinar can also provide an extra layer of security to prevent Zoombombing attempts from unwanted guests.
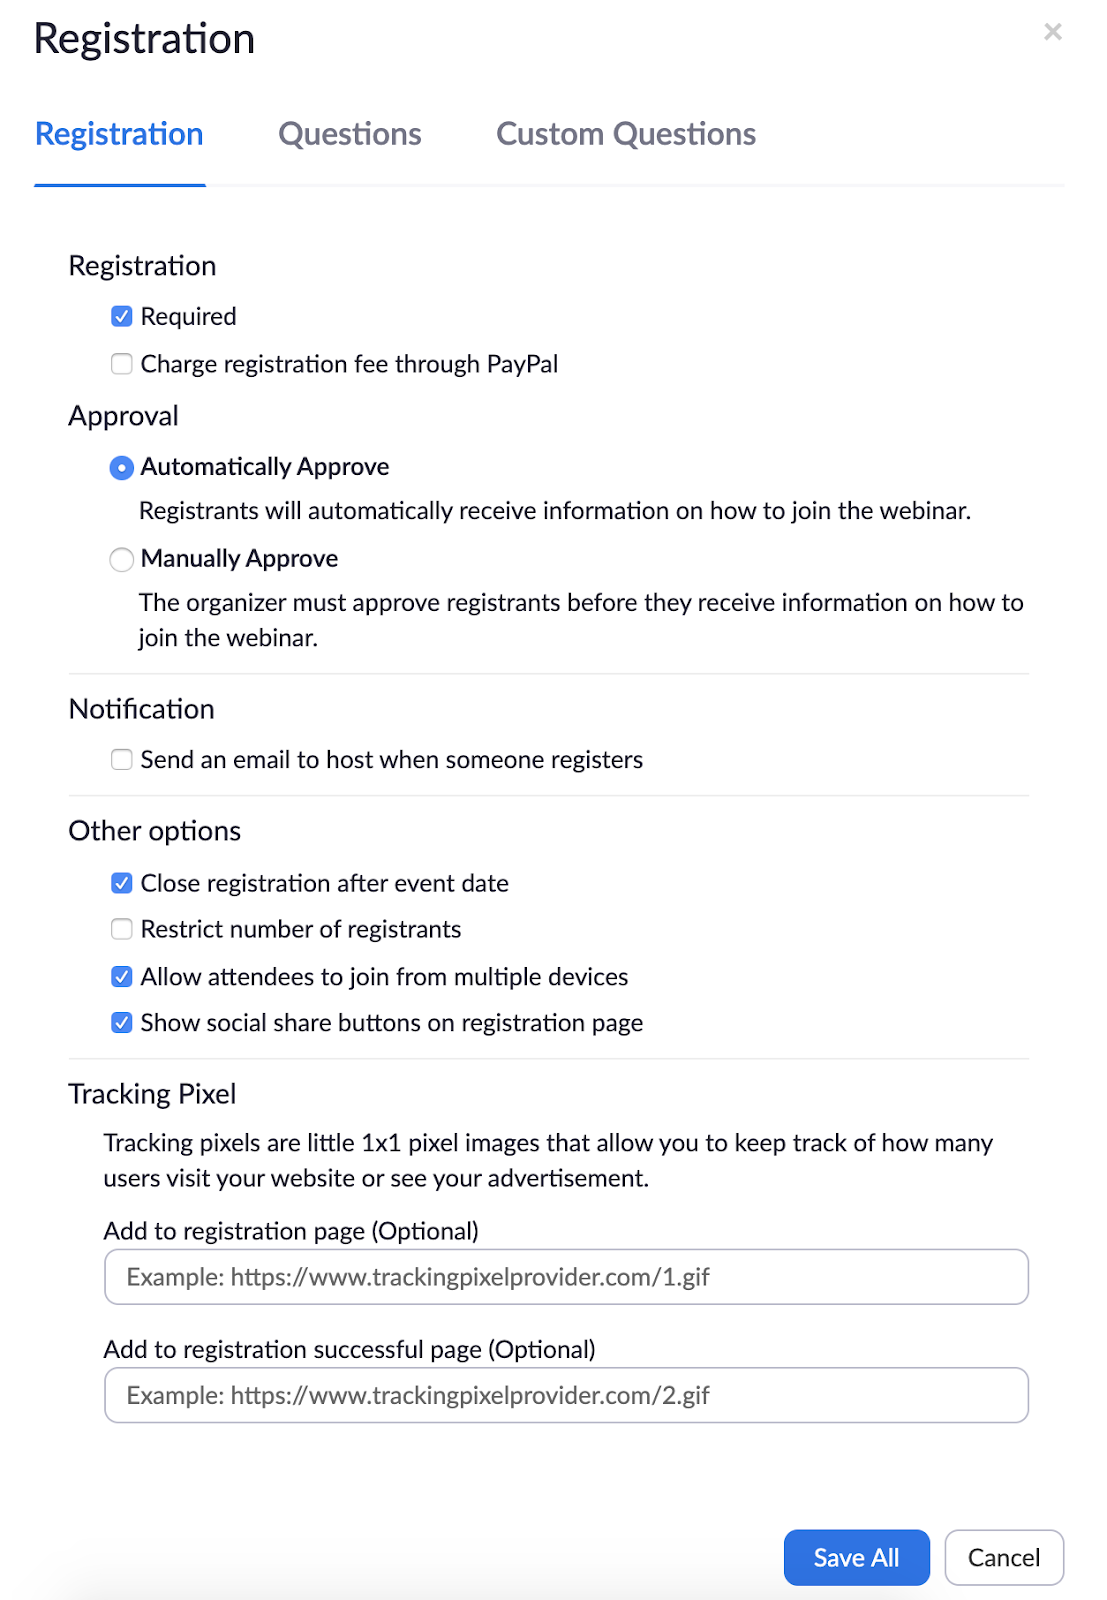
You can ask attendees to provide certain information when they register for your webinar, such as their job title, the name of their company, the number of employees, or their address. The best part is that you can require attendees to answer these registration questions in order to sign up for your webinar.
You can even collect registration fees through PayPal once people sign up for your webinar. When attendees complete a signup form through Zoom, they will be redirected to PayPal and pay the registration fee before receiving information to join your webinar.
By comparison, Jotform allows you to include any payment processor integration on your registration form and doesn’t redirect attendees elsewhere to make a payment. This allows attendees to pay registration fees while they’re filling out your form.
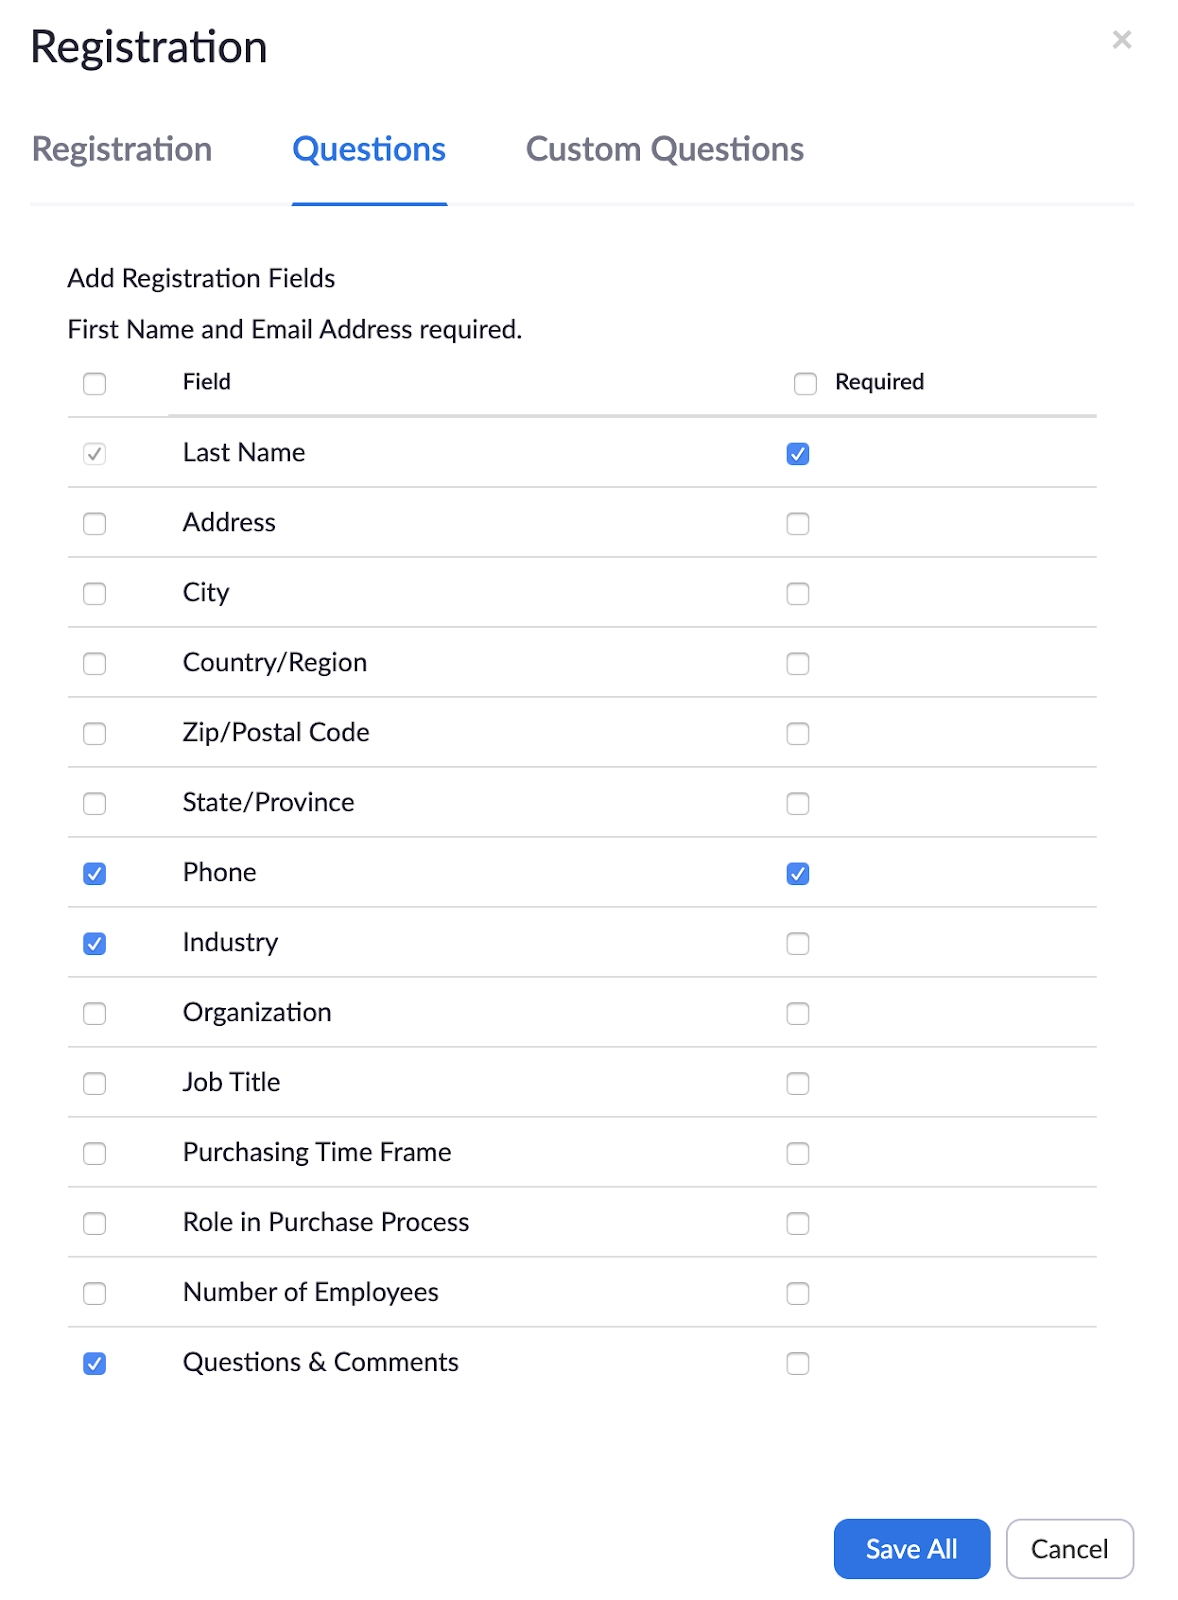
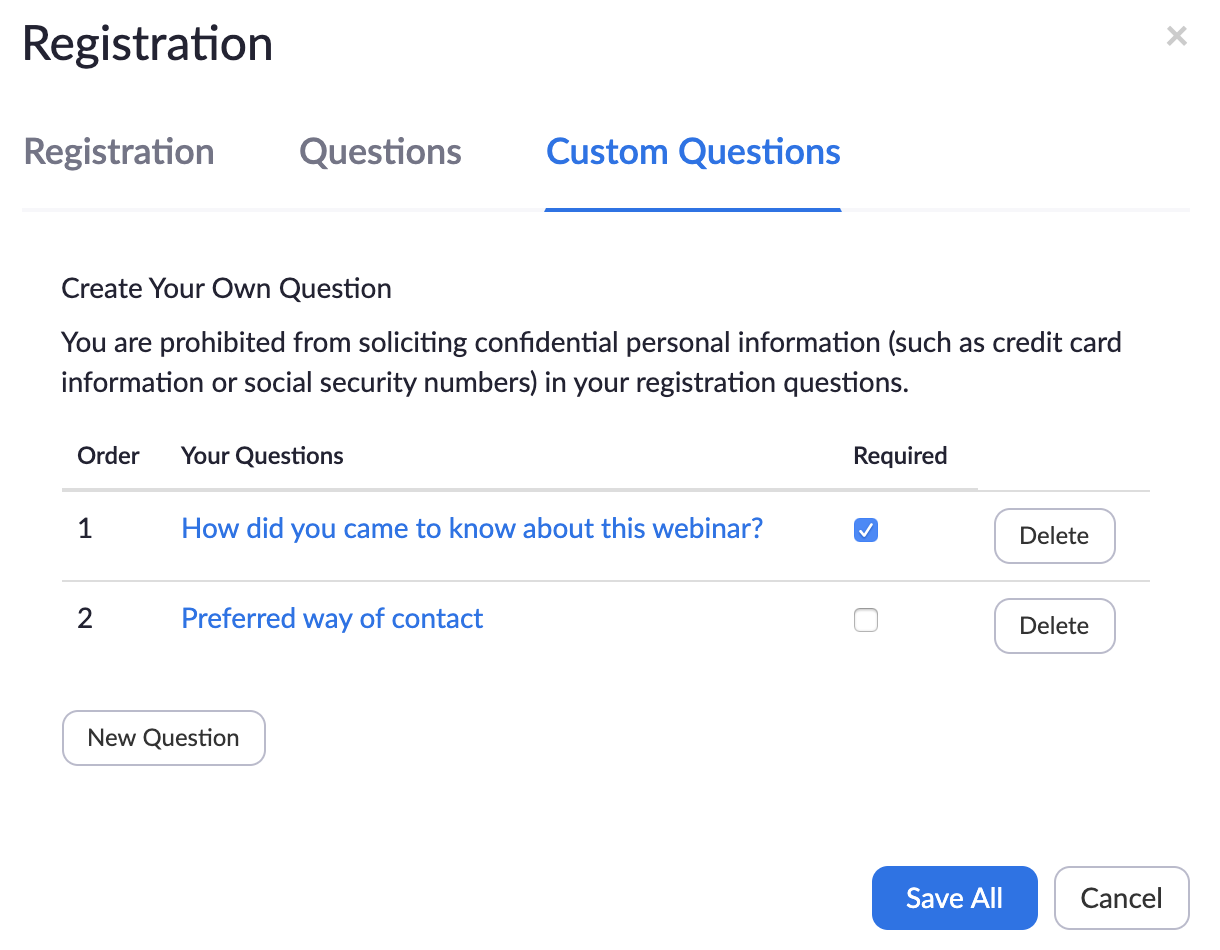
If questions that you want to ask aren’t listed under the Questions tab, simply click on the Custom Questions tab and create one that suits your needs. Like the registration questions provided by Zoom, you can require attendees to answer any of these questions before they can sign up for your webinar.
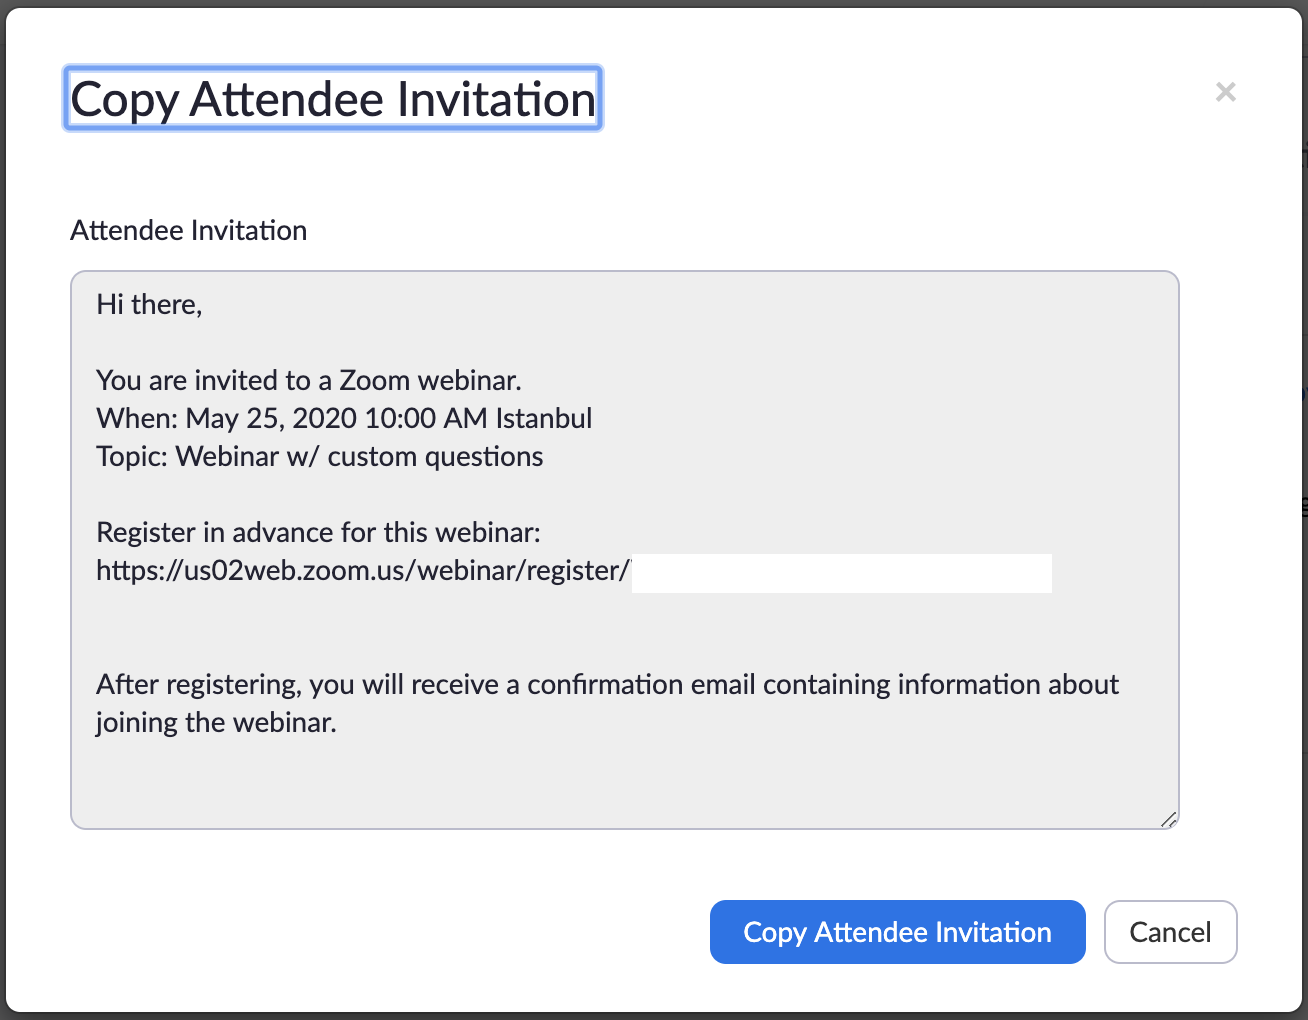
When you’re ready to invite attendees to your webinar, simply exit out of the Registration settings popup window and click on Copy the invitation under the Invitations tab.
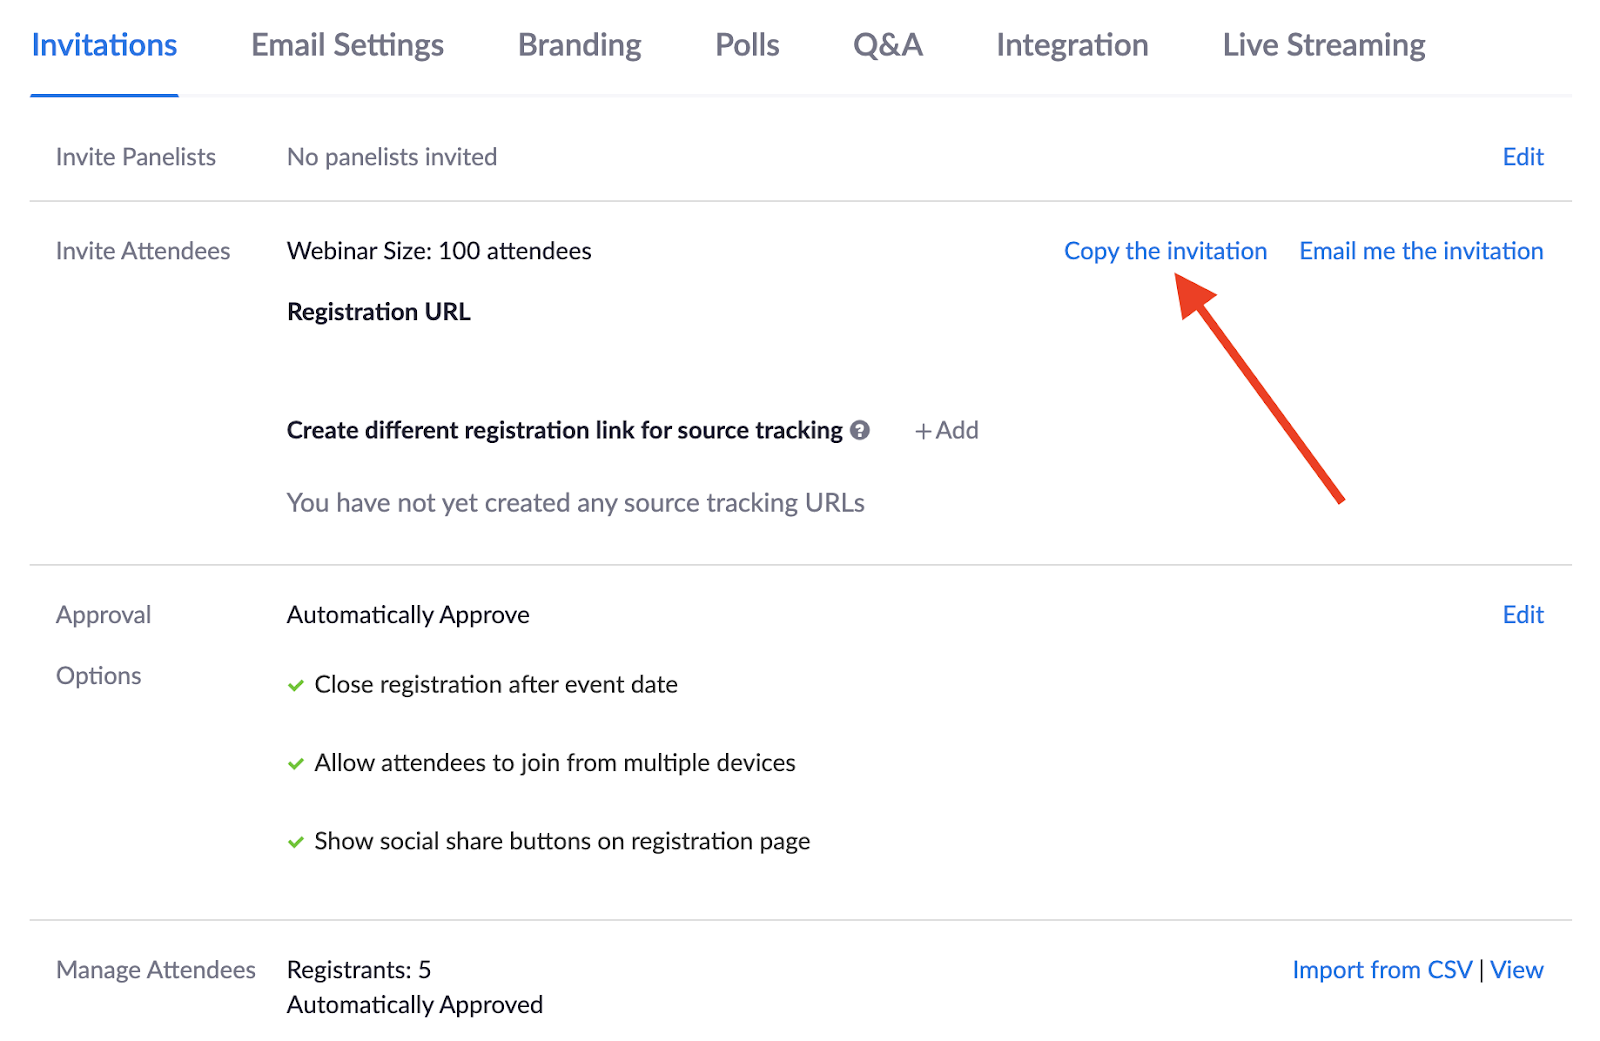
The popup window that appears will include an invitation template that you can copy, paste into an email, and send to prospective attendees.
Pro Tip
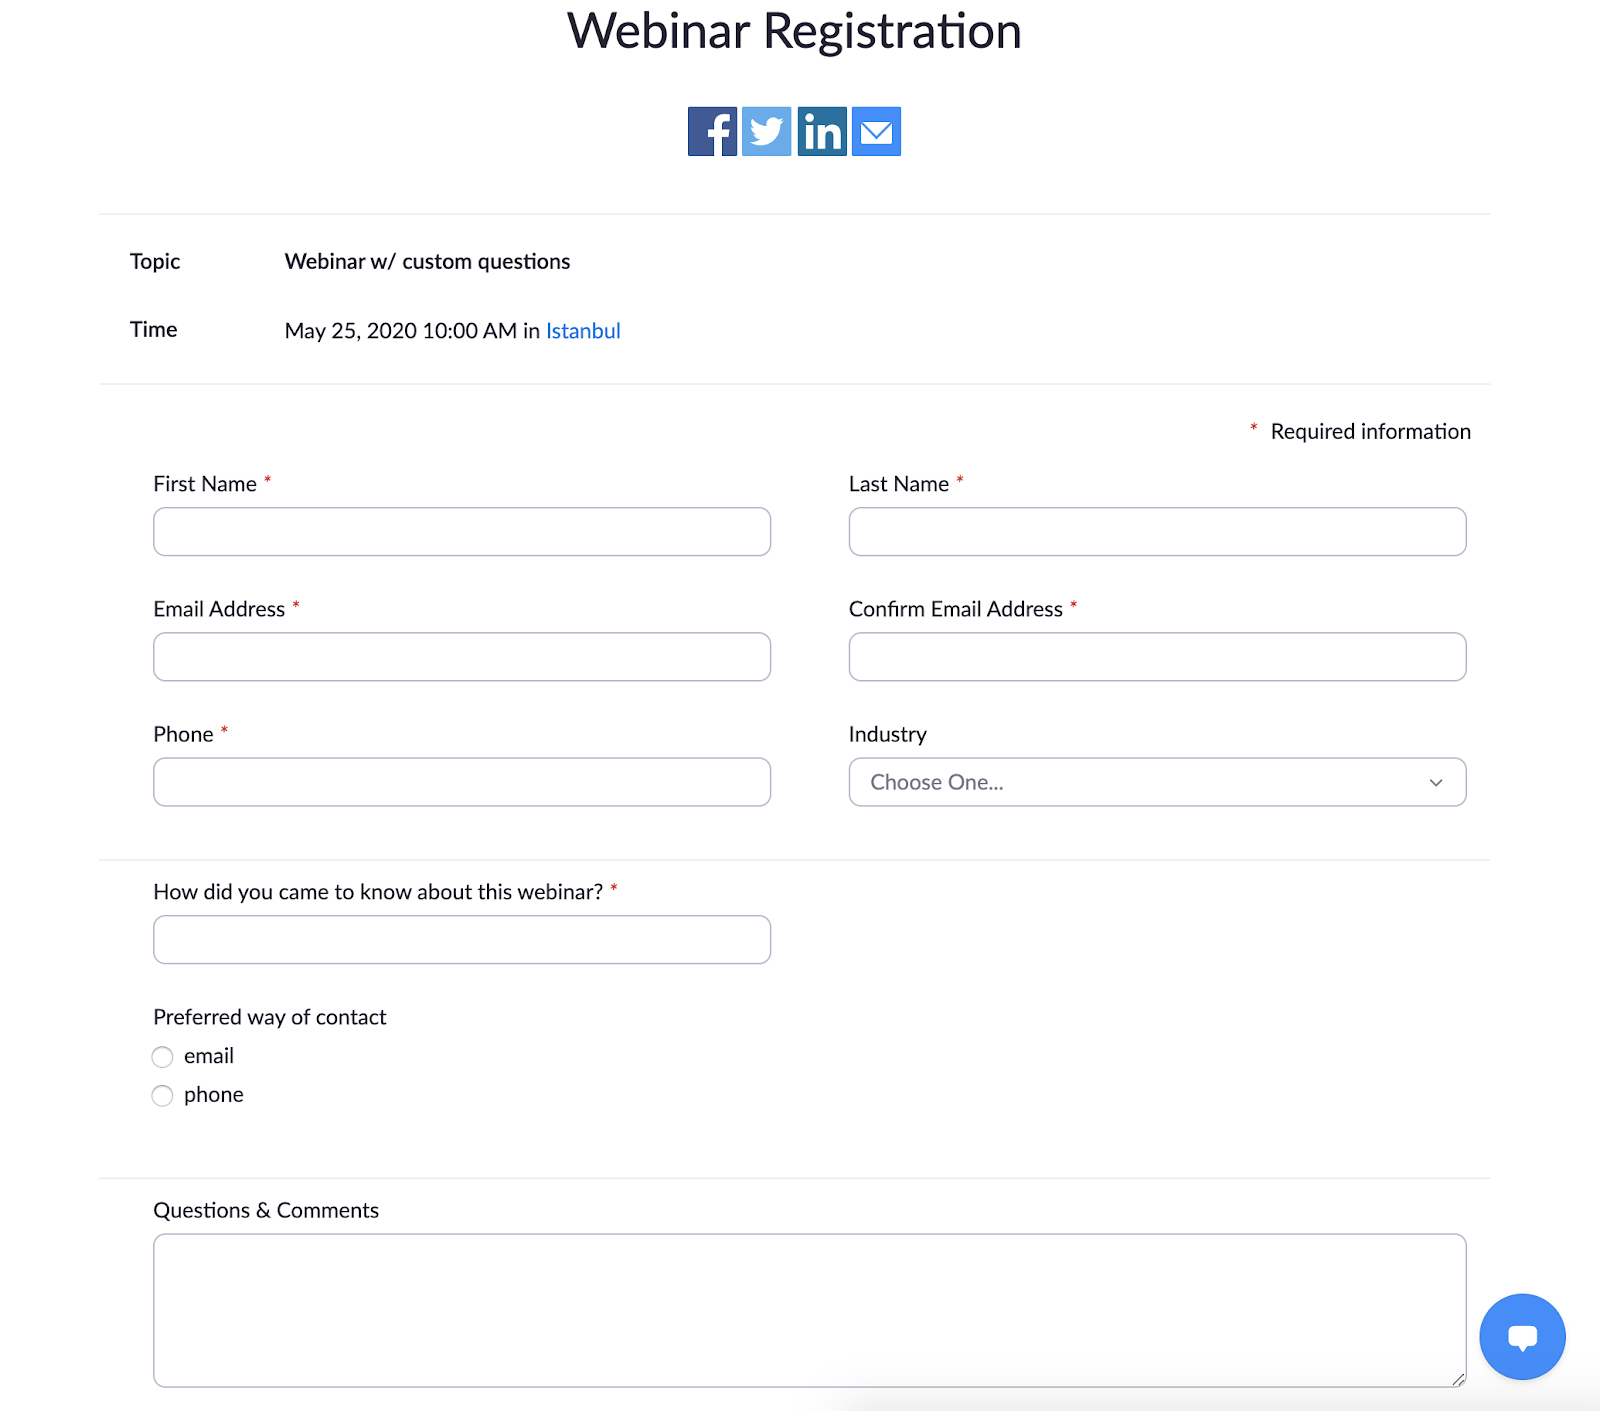
When prospective attendees click on the invitation link, they will see a simple registration form that lists all of the questions you want to ask. If you want something more than a simple form, try creating a registration form with Jotform. The Form Builder allows you to control almost every aspect of your registration form, from how it’s designed to how it’s shared with attendees.
5. Setup relevant co-hosts.
Since webinars often include a lot of panelists and attendees, you may need some help to ensure everything runs smoothly.
Designating someone as a co-host for a webinar enables a colleague to take over your administrative duties so you can facilitate discussions or take care of other pressing matters behind the scenes. You can have any number of co-hosts for your webinar, which can come in handy when you’re overseeing a large number of panelists and attendees.
Co-hosts and hosts share many of the same permission controls. Specific actions that only hosts can carry out include
- Starting and ending a webinar
- Creating or editing polls
- Putting panelists on hold
- Designating other panelists as co-hosts
If you haven’t already done so, you can enable Zoom’s co-host feature by selecting the Settings option in the Personal section of your Zoom web portal and clicking on the Meeting tab.
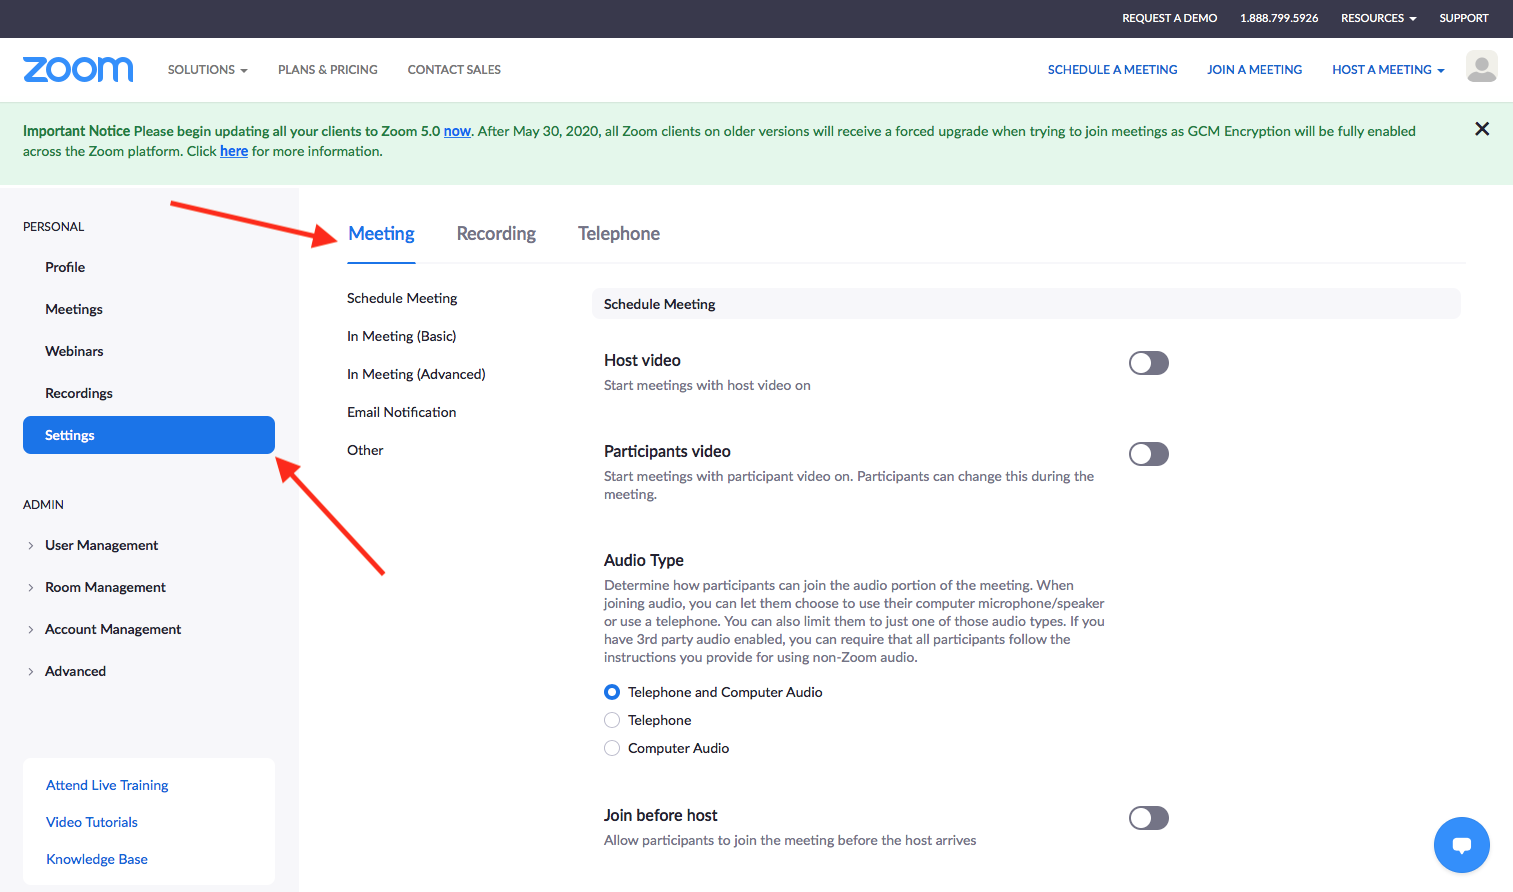
Scroll through the list of options under the Meeting tab, and use the toggle switch beside the Co-host option to enable this feature.

Panelists can be designated as co-hosts at any time during a webinar, but you can’t make this change before your virtual event takes place. You can, however, invite someone to be a panelist and then appoint them as a co-host during your webinar.
When the webinar is in session, simply hover your cursor over a panelist’s video screen and click on the More icon that appears as three horizontal dots. In the dropdown menu that appears below the icon, select Make Co-Host from the list of available options.
6. Hold practice sessions.
Practice makes perfect, and while there’s always room for improvement, Zoom’s practice session option allows you and any co-hosts to tie up loose ends and iron out any wrinkles before kicking off your webinar.
Much like rehearsals before performances, Zoom practice sessions enable you, alternative hosts, and panelists to run through webinar logistics and/or familiarize yourselves with the controls before going live.
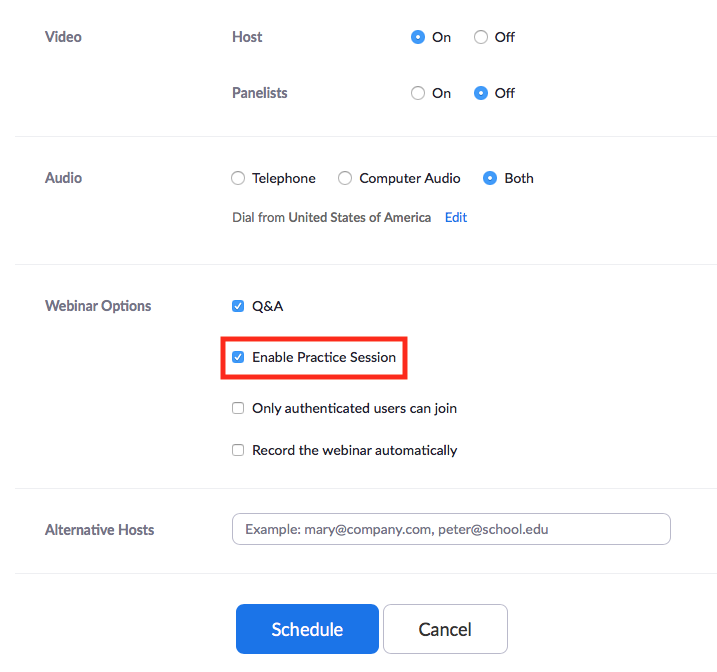
To ensure everyone gets the practice they need, you must enable the practice session option when you schedule a webinar. The practice session option is in the Schedule a Webinar menu under the Webinar Options section.
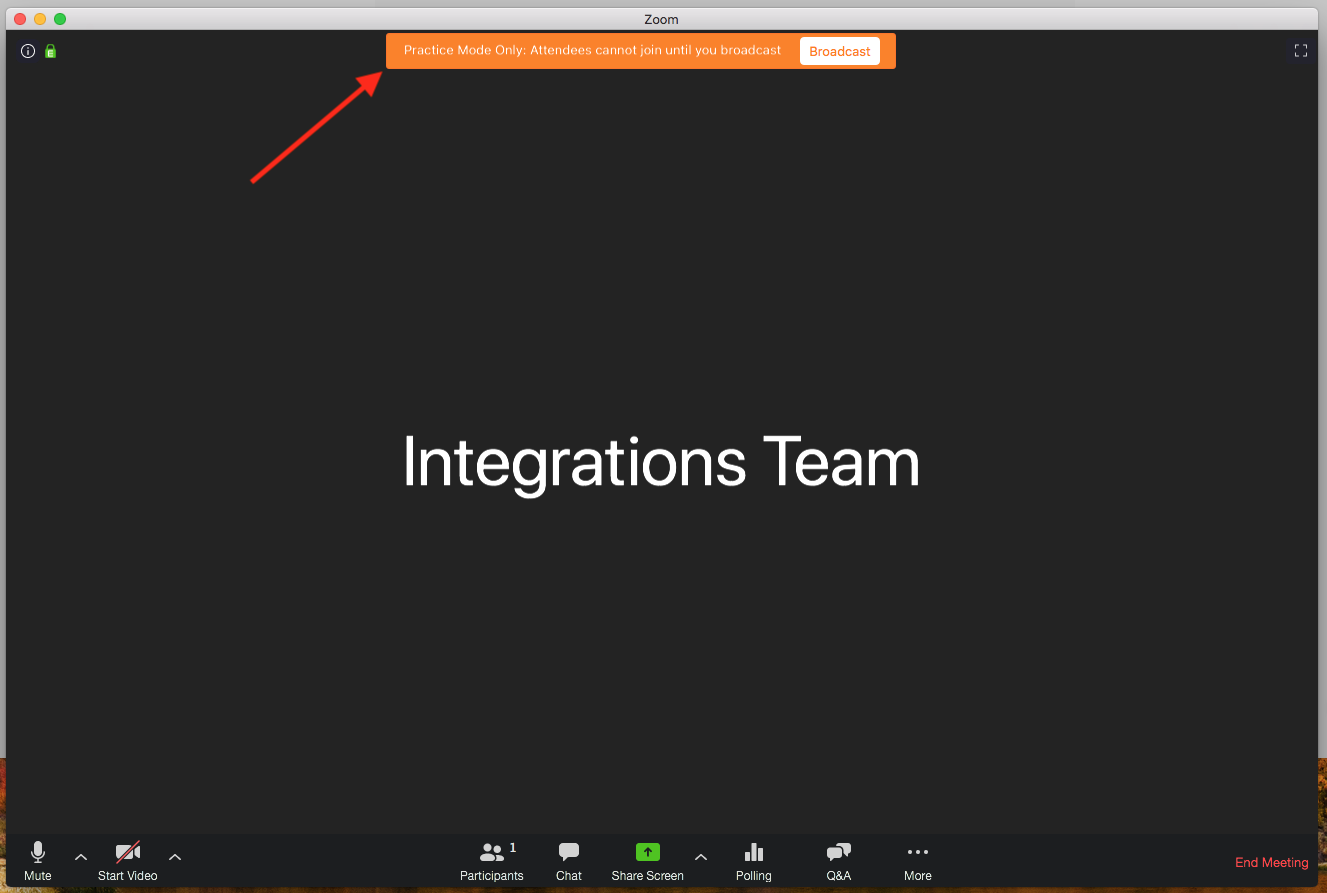
When you want to start a practice session, all you need to do is start a webinar before its scheduled date and time. Since practice sessions are closed to attendees, ensure that all of your intended panelists and alternative hosts receive the correct invitations. Only webinar hosts or predesignated alternative hosts can launch a practice session.
Anyone authorized to enter the practice session will see an orange notification banner, which lets everyone know that the webinar hasn’t started yet. Make sure that no one clicks on the Broadcast button unless you’re ready for the webinar to begin.
Conclusion
The growing demand for video conferencing apps underscores a clear need for people and businesses alike to stay connected even when they can’t be in the same room.
Zoom has quickly emerged as the video conferencing app of choice for its broad appeal and robust features that enable webinar organizers to maintain control over their online gatherings.
Jotform’s registration forms can take your virtual event to the next level by automatically adding attendees to webinars. With Jotform’s Zoom integration, you no longer have to manually send out webinar invitations to attendees. Once attendees fill out your branded, professional-looking form, their registration information will flow straight into your Zoom account.
Hosting and organizing a large event comes with its share of problems, but collecting vital registration data shouldn’t be one of them.
If you haven’t already done so by now, why not give Zoom’s video webinar capabilities and Jotform’s data-collection tools a go?
See how both software solutions can work together and create a frictionless workflow that broadens your reach in the virtual space.


Send Comment:
2 Comments:
More than a year ago
Good article!
If a person registers for my webinar as an attendee. Can I make him a panelist before the webinar? I don’t want to wait till the webinar date to promote him to panelist. Or do I have to ask him to cancel his webinar registration as an attendee and then send him a panelist invite?
More than a year ago
why you can use two devices at the same place can you look into this problems