3 Steps to Pricing Your Online Classes


If you want to sell online yoga classes, there are plenty of software options available to you. But picking the right software is just the beginning — you then have to learn how to set it up and use it.
If you’re a yoga teacher, you may not consider yourself very tech-savvy. After all, your focus is on the human body, not computers.
But you do need a way to earn a living from your practice that doesn’t consume all your free time, and selling classes online is a great option. You’ll just need a solution that’s clean, professional, and easy to use — one that lets you pursue your passions without having to take a lot of time and energy away from them.
Jotform is a form-building tool that lets you create forms to easily share with your clients, but it has a lot of other features that make it perfectly suited to collecting payments for online yoga classes as well.
On top of that, it’s super easy to use. You’ll be up and running in minutes, whereas other storefront software might take hours to set up. Here’s how to get started.
1. Create a class registration and payment form
Let’s assume that you’re using a video chat tool like Zoom to share your online yoga classes, whether for group sessions or one-on-one coaching. Now you need a way to charge for these classes.
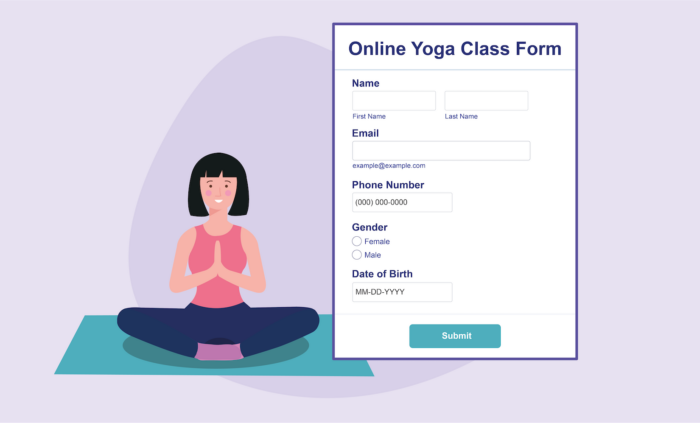
To get started, you’ll need a class registration form. Fortunately, Jotform has thousands of ready-made templates to help you get started, and there’s one already available for yoga classes.
To get started, click the link above and select Use Template.
Make the form your own
The template is a great place to start, but you’ll want to customize it to fit your needs. You’ll probably want to change the colors, logo, and pricing, for starters.
Let’s start with the colors. Click on the paint roller icon in the upper right corner. That will take you right to the color options for the form. From there, you can select a new color scheme with one click.
There are many other options for styling your form in the other tabs, and there are even more in the Advanced Designer, which you can find by clicking on the button at the bottom of the design panel.
You can add your own logo by clicking + Add Your Logo at the top of the form.
You might want to use a different image (or no image) in the form’s heading as well. To remove the existing image, click on it and then navigate to the Heading Image tab under Heading Properties in the panel on the right. Remove the existing image, and click Choose a File to upload a different one.
While you’re at it, you’ll probably want to change the heading text to reflect your class offerings.
Customize the form fields
Now that you’ve customized the form’s design, let’s look at the form itself.
You’ll probably want to keep the fields for name, email, and phone number as is, but you might not need the client’s street address. The gender options could be more inclusive, so feel free to add options as you see fit — or delete that question too.
To delete a form element, just click on the field you want to delete and then click the red trash can icon.
You can also delete the date field — Jotform keeps track of form submission dates automatically. You probably won’t need the client’s birth date either.
The session times and class level options may not match your class offerings, so let’s delete those next. The final question offers options for class pass subscriptions, but it doesn’t actually collect payments, so it can also be deleted.
You can always add additional questions that are pertinent to your classes by clicking the + Add Form Element button on the left.
Add payment options
Now it’s time to add payment options. Click the + Add Form Element button on the left, if it’s not open already. Then select the Payments tab. For this example, we’ll use PayPal to accept payments, but Jotform offers an array of payment gateways to choose from.
Drag the PayPal Personal element into your form where the class subscription information was.
Jotform will autopopulate the subscription options that were in the original form template. To edit this section, select the element and then click Payment Settings. Now add your PayPal email address to the settings menu and click Continue.
You’ll now see a list of class subscriptions from the original form (under Products). Hover over each one to see a gear icon (for the option to delete the item) and a pencil icon (to edit it).
First, delete all but one session. Then change the name of the remaining session to the class you’re offering, like yin yoga, for example. Now adjust the price. You can also add a description and a photo if you’d like.
After students have paid for a class, Jotform can automatically send them a link to the class Zoom session in a thank-you email. We’ll set that up next.
Send a Zoom link and thank-you message
Now go to the Settings tab in the orange bar at the top of the page. Then go to the Emails tab in the left menu.
Click the Add an email button, then select Autoresponder Email.
You’re now looking at the default message that’s sent to your students when they sign up for a class. The default email text communicates the basic information about the purchase, but you can customize it further as you see fit.
In the gray section at the top of the email, add a link to the Zoom session for the class along with any instructions and a thank-you message.
You can reuse the Zoom session ID, but that means people can continue to show up without paying after the first week. Instead, update the Zoom link in your thank-you email each week.
Pro Tip
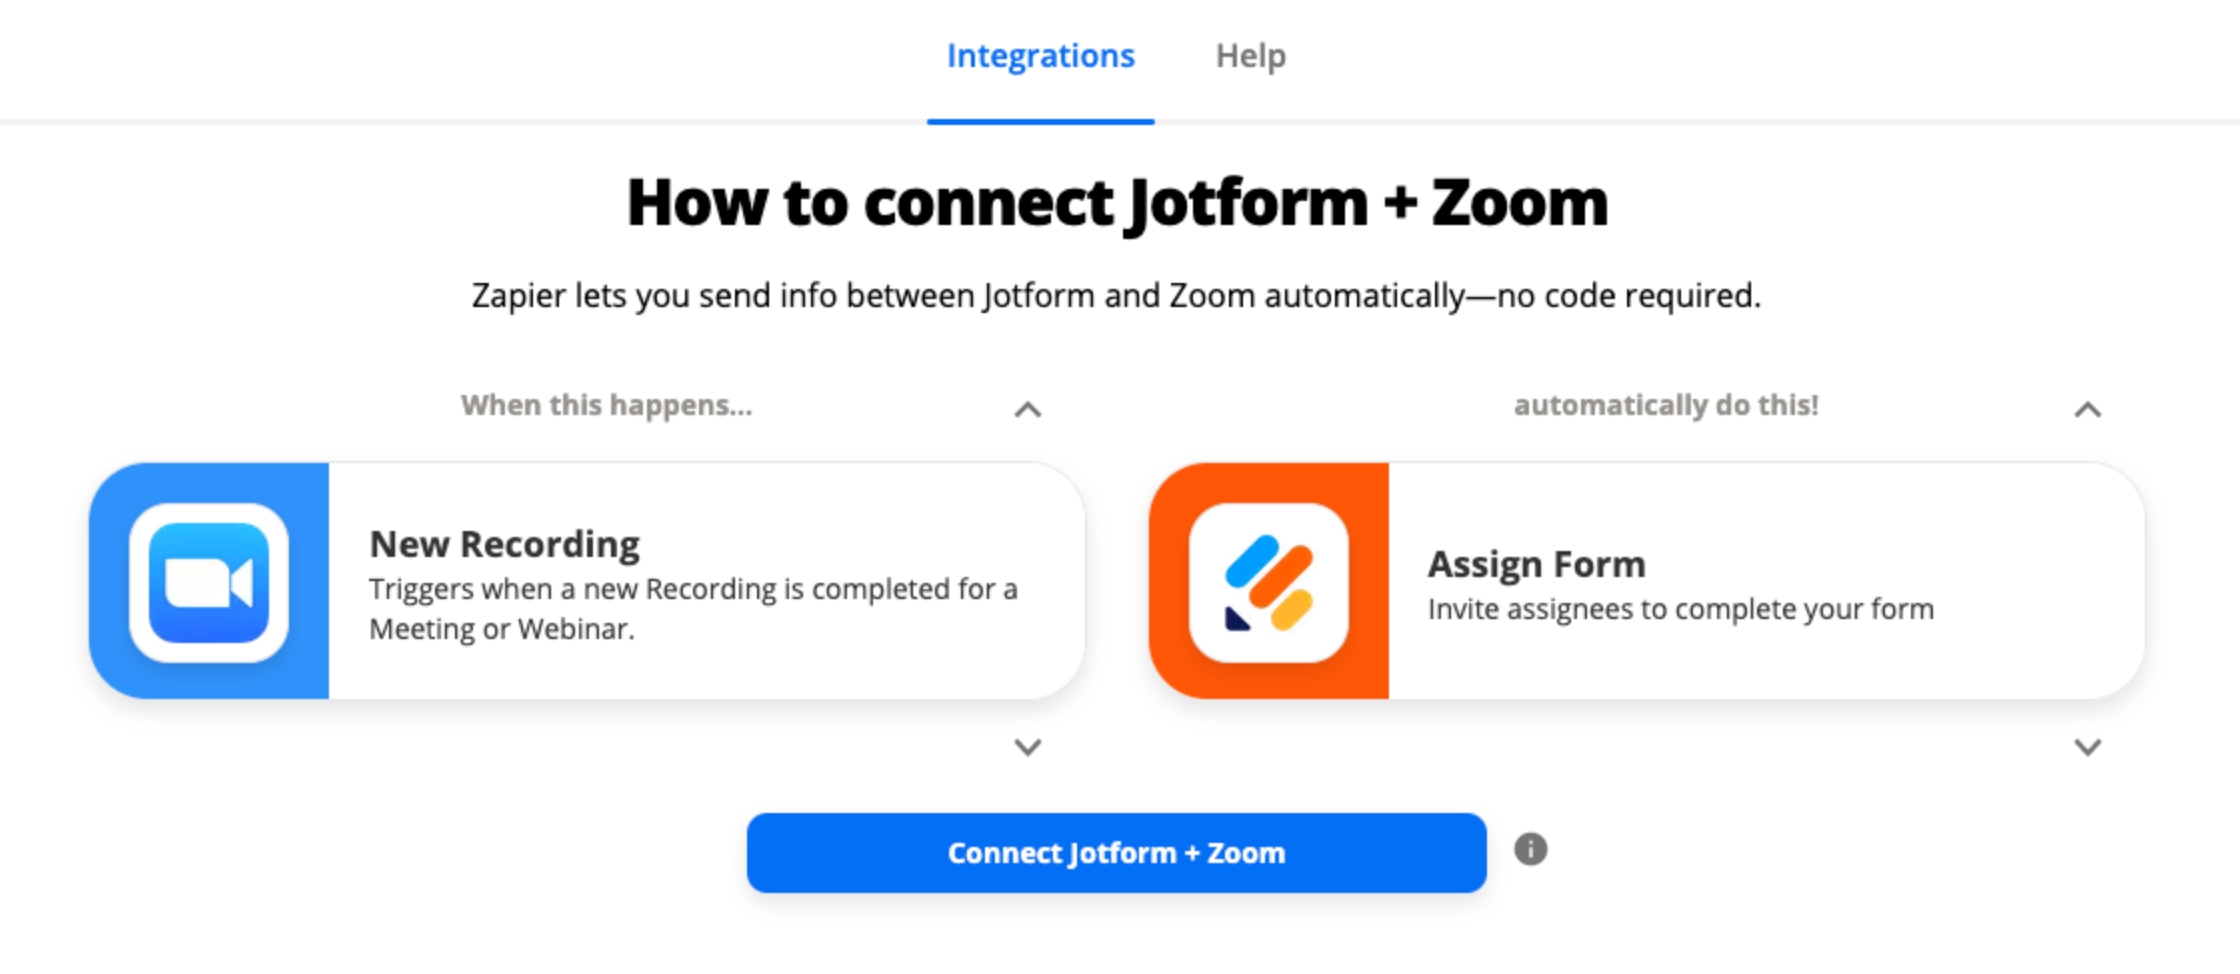
For an even more streamlined way to charge for online yoga classes, you can use the Jotform + Zoom integration through Zapier. You can configure this integration to automatically send a Jotform payment form to participants once a Zoom recording ends or add a Zoom registrant when a Jotform payment form is completed.
2. Schedule one-on-one sessions
If you do personal coaching and lessons with your students, Jotform gives you even more great options for scheduling and accepting payments. Jotform has an appointment scheduling widget and integrates directly with Zoom.
You can drag the appointment widget into your payment form and configure it to show your schedule. When someone books with you, the appointment scheduler will update to reflect your revised availability.
Jotform’s Zoom integration will automatically schedule an individual Zoom meeting when a student books with you. (Here’s an additional article on how to do that.)
Jotform also offers an integration with Google Calendar. So when your clients book a session, Jotform automatically updates your calendar system to reflect the booking.
3. Collect payments for in-person classes
Taking payments for your in-person classes is even easier because you don’t need a Zoom link. Your students sign up online before the class, and then you can use Jotform Tables to track payment and attendance.
You can use Jotform’s kiosk mode to allow students to fill out registration and payment forms onsite before class. All you need is a dedicated tablet or computer to display the form. After each person submits the form, it resets for the next client.
Using Jotform requires a lot less setup than using a dedicated storefront tool — and it’s not just for booking classes either.
You can use Jotform to get feedback on classes, find out what other kinds of classes your students want, and more. You can also use Jotform Tables to manage your student lists and track your income.
Jotform is easy to learn and grows along with your business, letting you focus on your teaching instead of technology.


Send Comment: