With Jotform’s Systeme.io integration, you can send form submissions to create contacts, update their details, and add or remove tags. Systeme.io is an all-in-one platform for building websites, selling products, managing contacts, and handling marketing.
Connecting Your Form to Systeme.io
Whether you’re setting up a new form or updating an existing one, connecting your Systeme.io account is quick and easy—here’s how to get started:
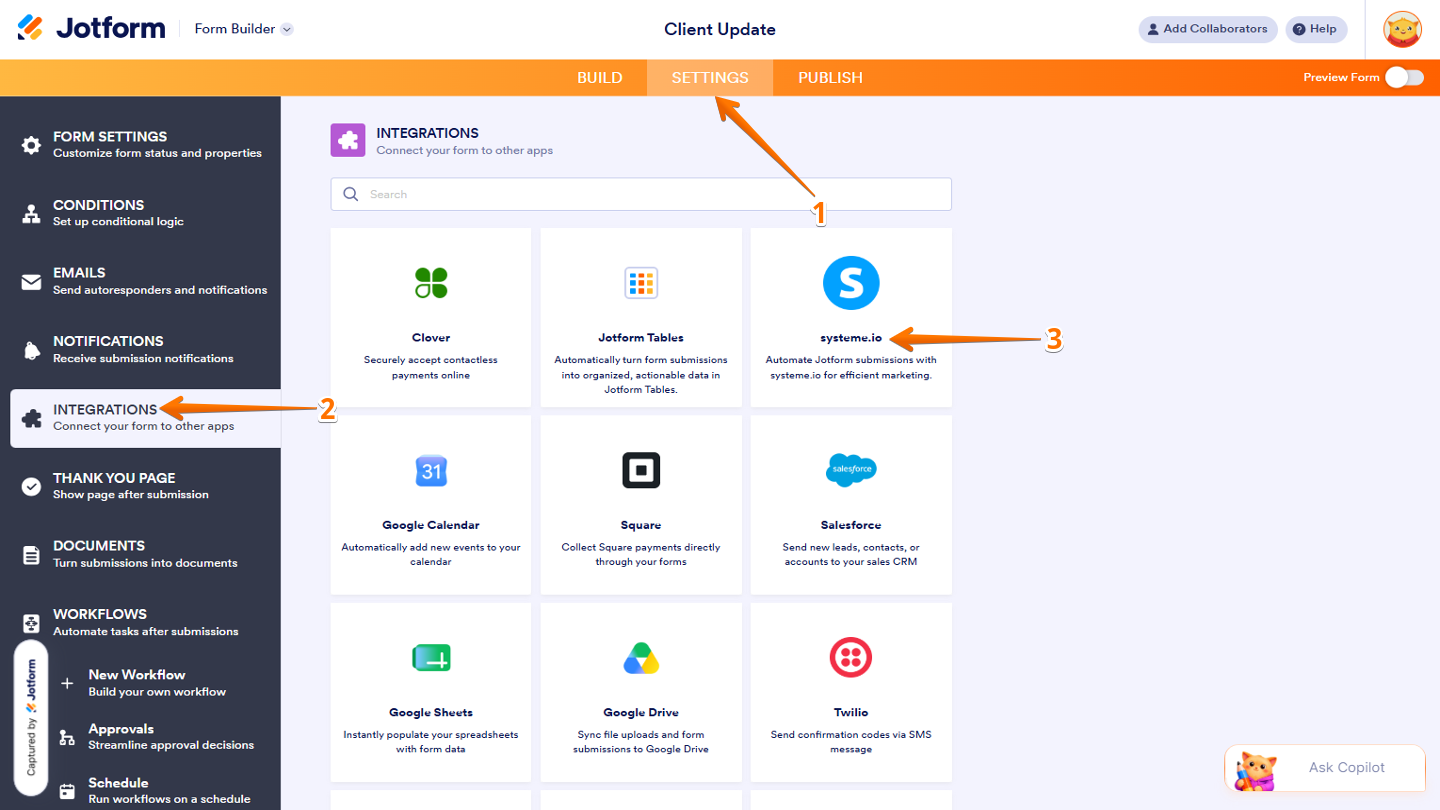
- In Form Builder, in the orange navigation bar at the top of the page, click on Settings.
- Then, in the menu on the left side of the page, click on Integrations.
- Now, in the Integrations section on the right, select Systeme.io.
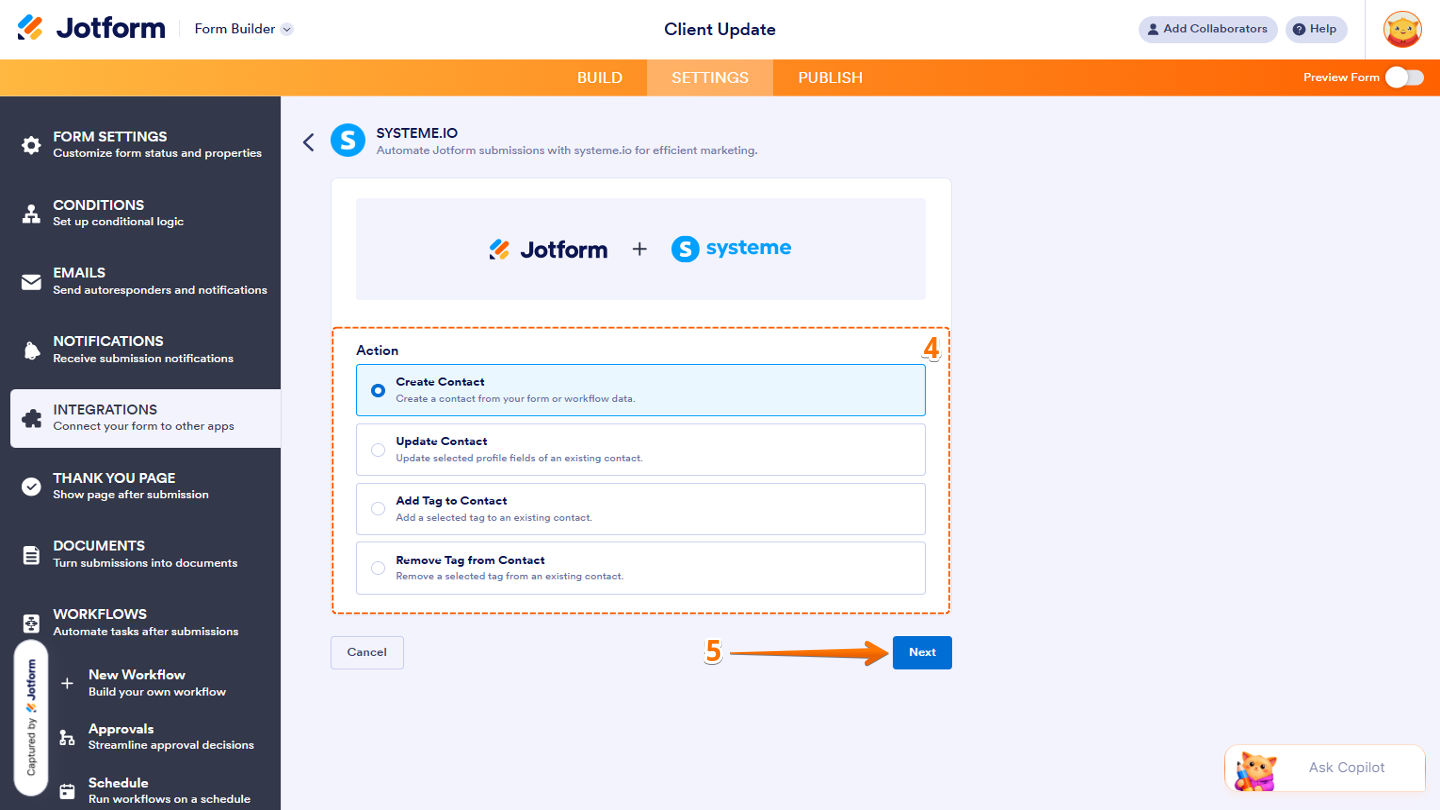
- Next, in the Action section, choose one of these options:
- Create Contact — Add a new contact using your form or workflow data.
- Update Contact — Change the details of an existing contact.
- Add Tag To Contact — Add a tag to an existing contact.
- Remove Tag From Contact — Remove a tag from an existing contact.
- Now, click on Next at the bottom of the page.
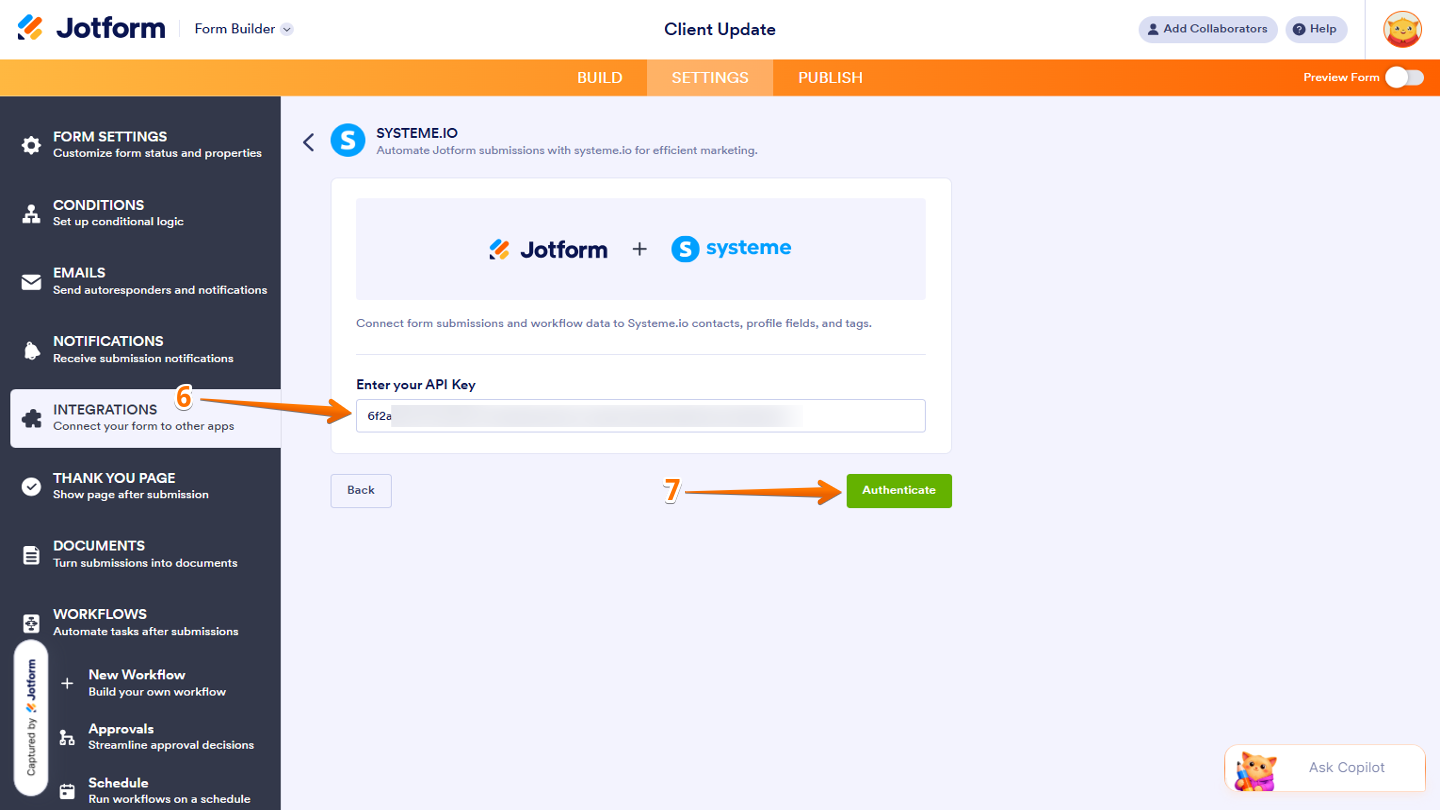
- Then, in the Enter Your API Key section, add your Systeme.io API Key.
- After that, click on Authenticate to continue.
The options you see will depend on the action you selected. Let’s go through each one below.
Creating a Contact
The Create Contact action adds new contacts to your Systeme.io account using your form submission data. To get going, here’s what you’ll do:
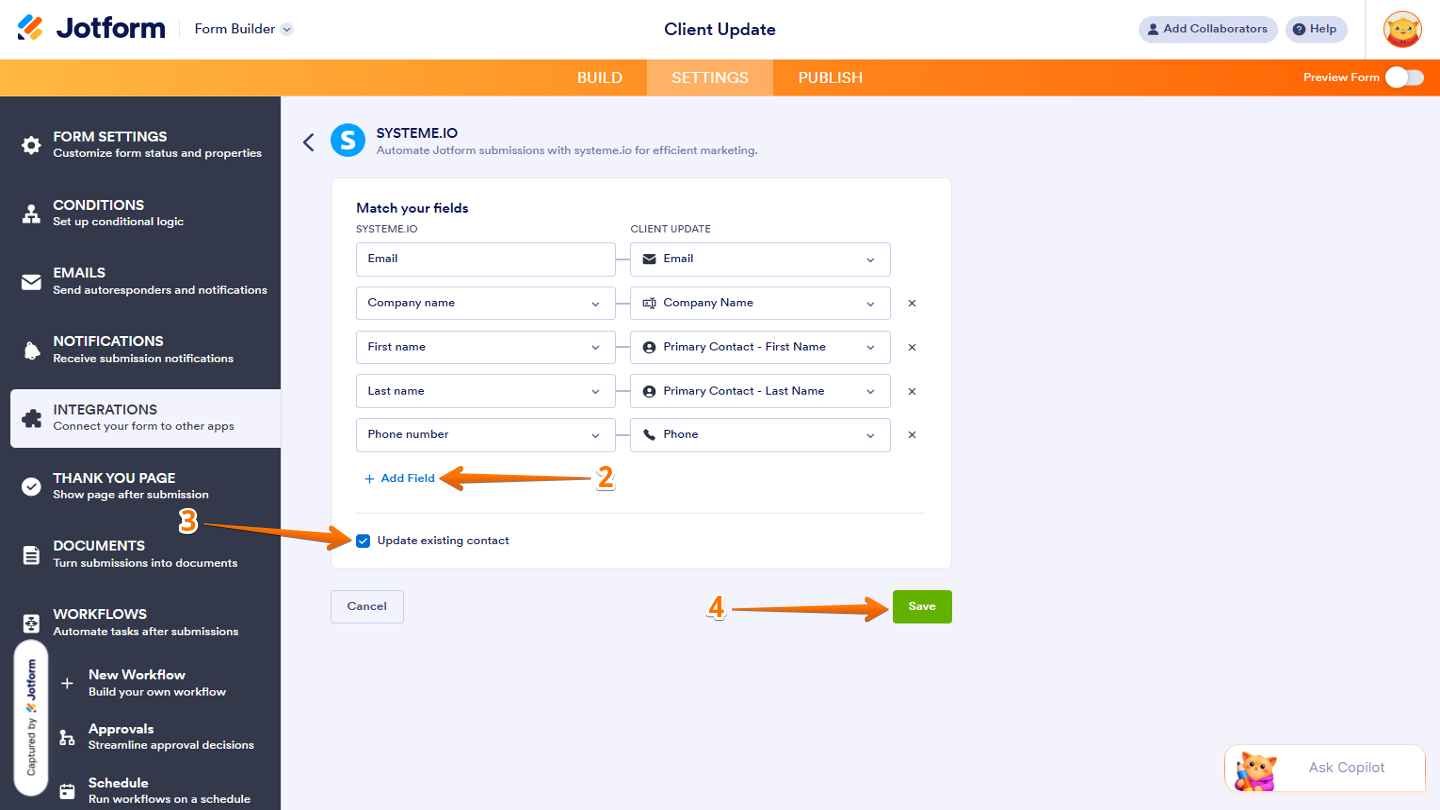
- On the next screen, after authenticating your account, under the Match Your Fields section, mapped your Jotform form fields to your Systeme.io fields.
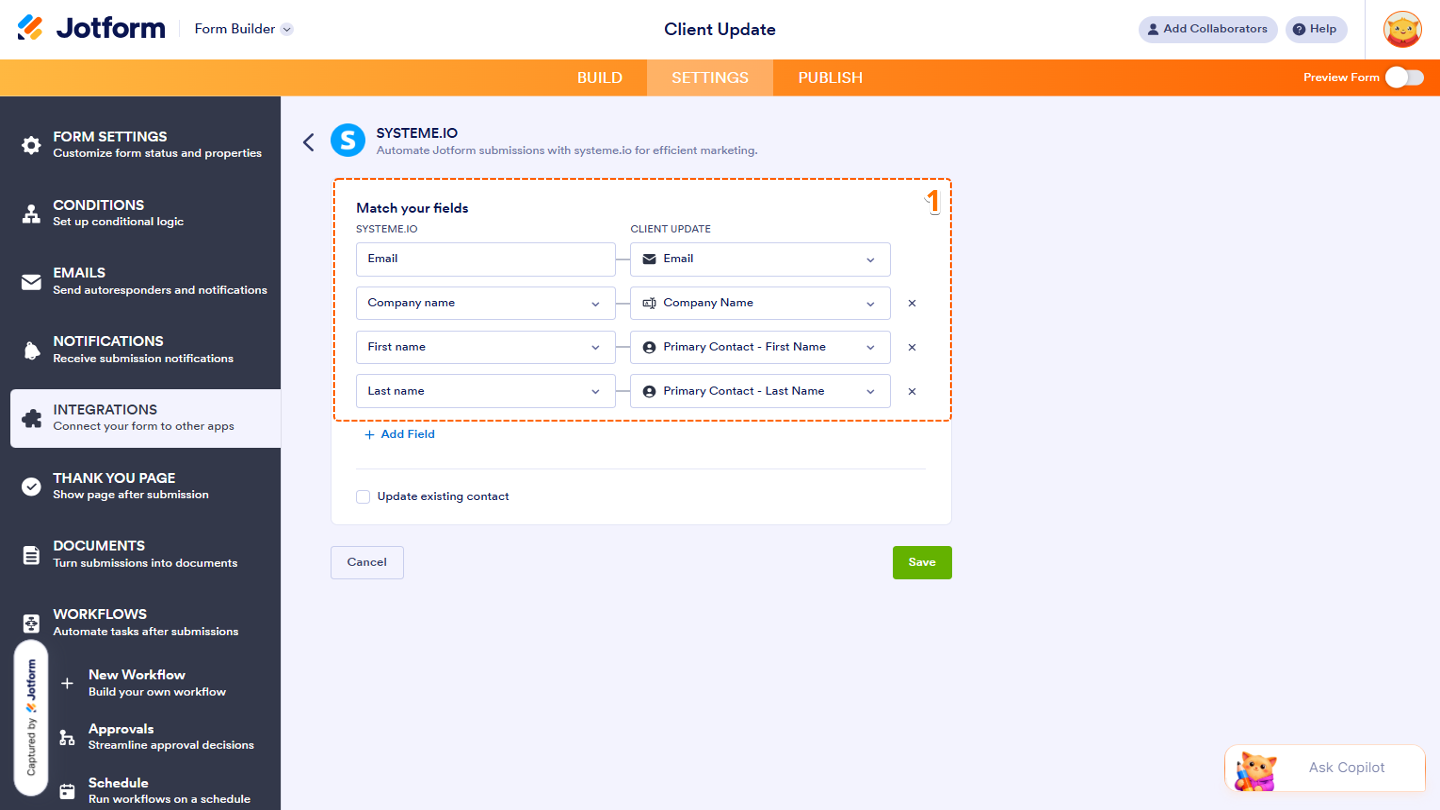
- To add more fields, click on Add Field at the bottom of the field list.
- Now, tick the box next to Update Existing Record if you want Systeme.io to update a contact when the selected field values match an existing record
- Once you’re done, click on Save.
Updating a Contact
With the Update Contact action, you can change an existing Systeme.io contact’s information using your Jotform submissions. You can choose how to find the contact and which details to update. Here’s what to do:
- On the next screen, after authenticating your account, configure these options:
- Find Contact By — Choose Contact ID or Email from the Dropdown menu.
- Select a Form Field — Select the form field that has the matching value.
- Match Your Fields — Map the form fields to the Systeme.io contact fields you want to update..
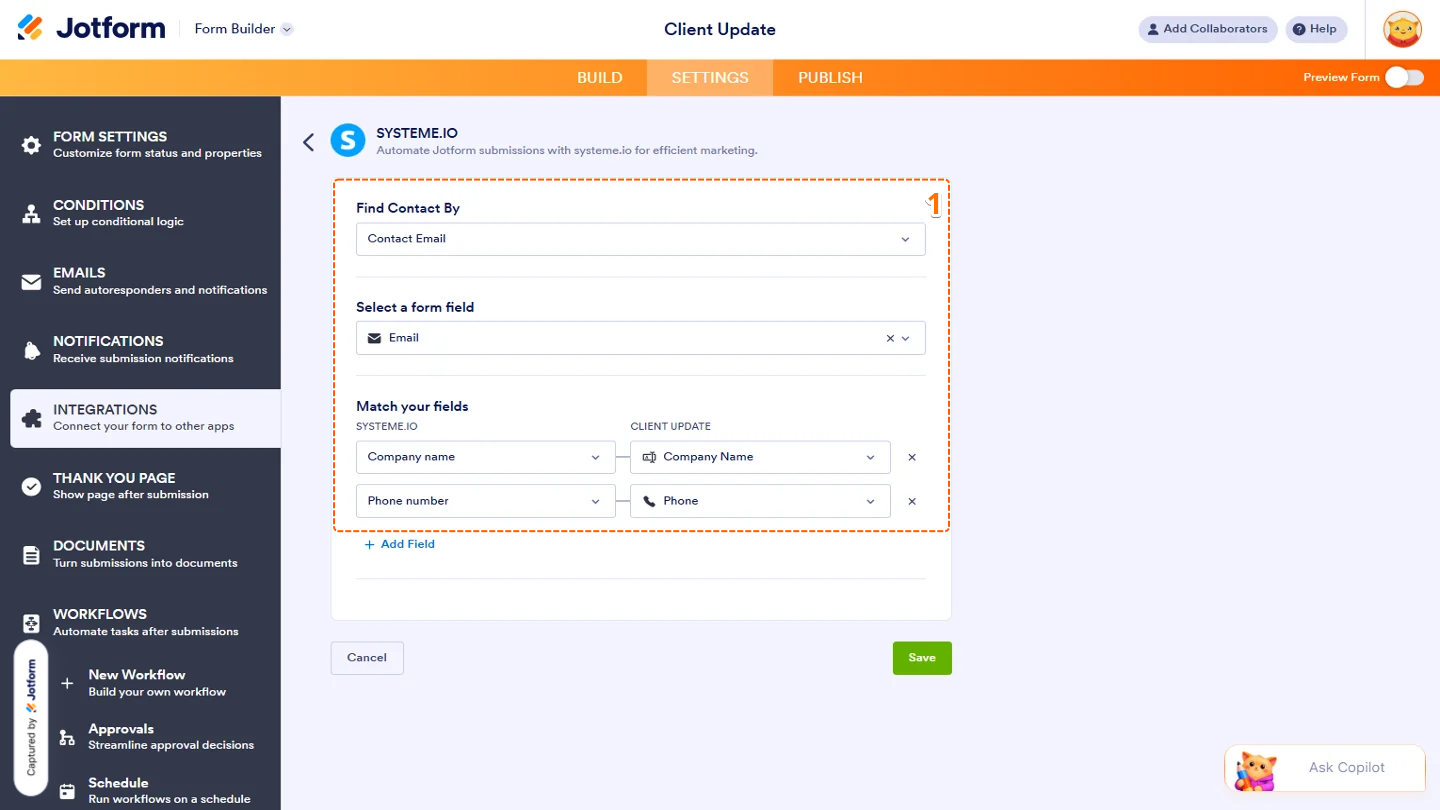
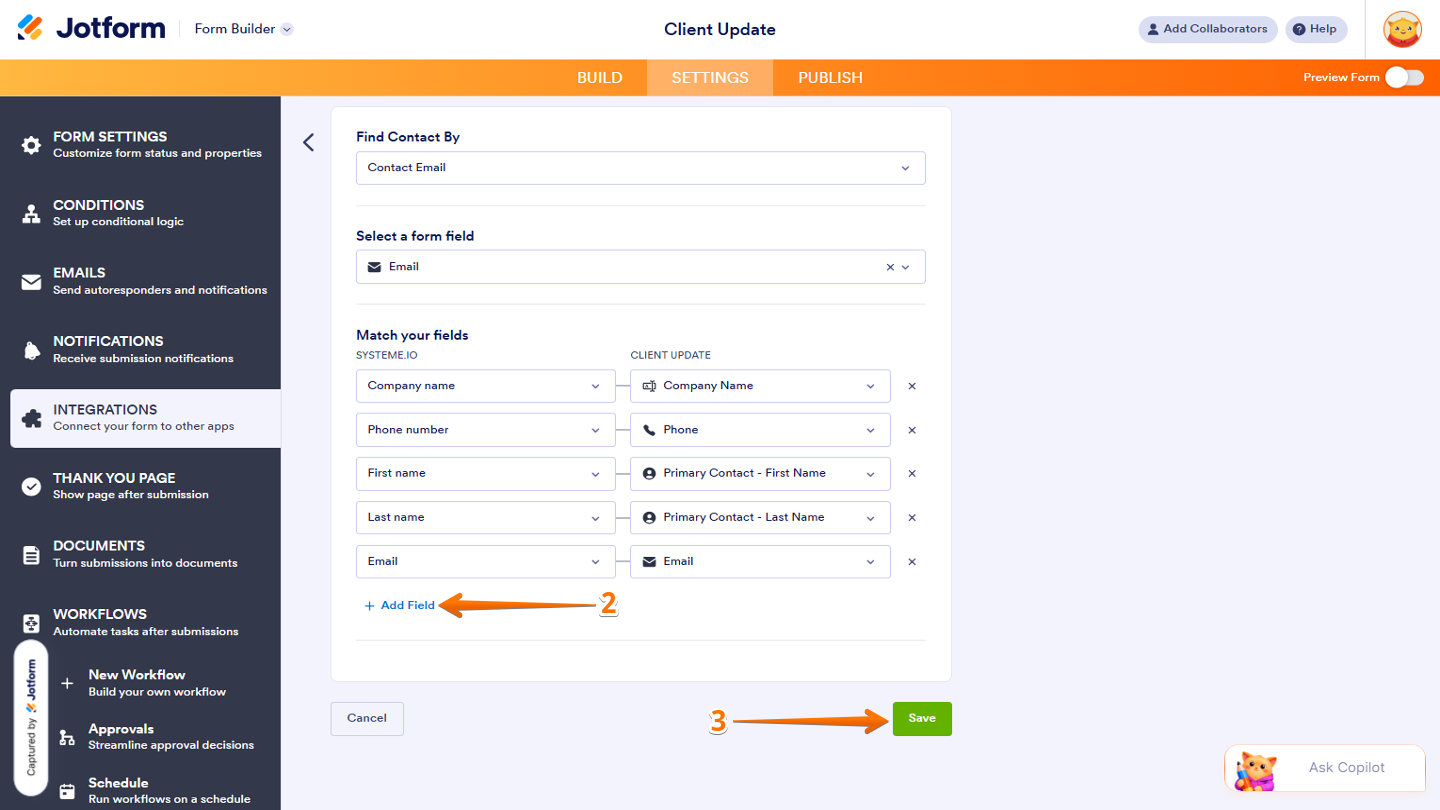
- To add more fields, click on Add Field at the bottom of the list.
- Once everything’s set, click on Save.
Adding a Tag to Contact
The Add Tag to Contact action lets you categorize existing Systeme.io contacts by assigning relevant tags based on your Jotform submissions. Here’s how:
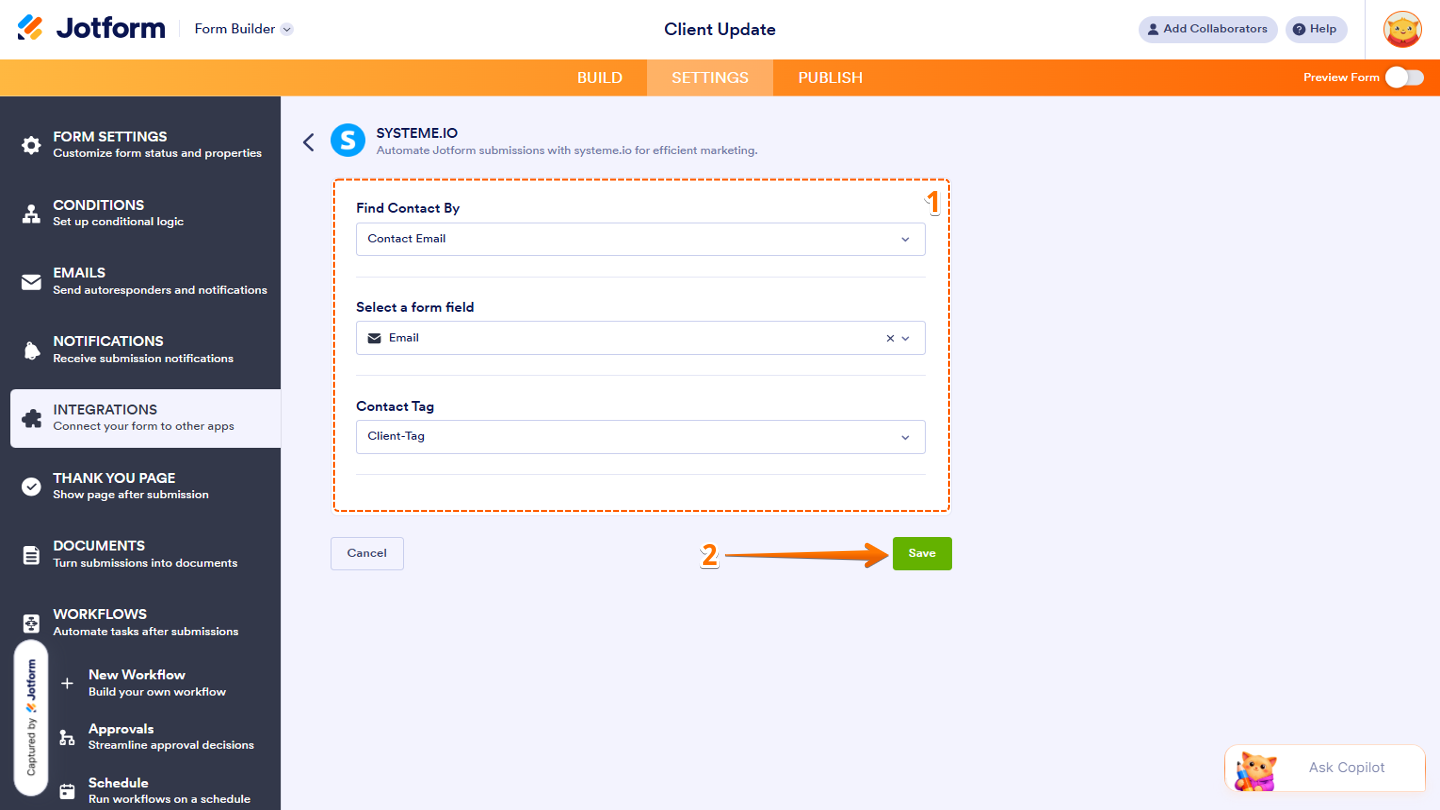
- On the next screen, after authenticating your account, configure these settings:
- Find Contact By — Click on the Downward Arrow icon and select Contact ID or Email.
- Select a Form Field — From the Dropdown menu, choose the field that contains the matching value.
- Contact Tag — Click on the Downward Arrow icon and select the tag you want to add.
- Once you’re done, click on Save.
Removing a Tag from Contact
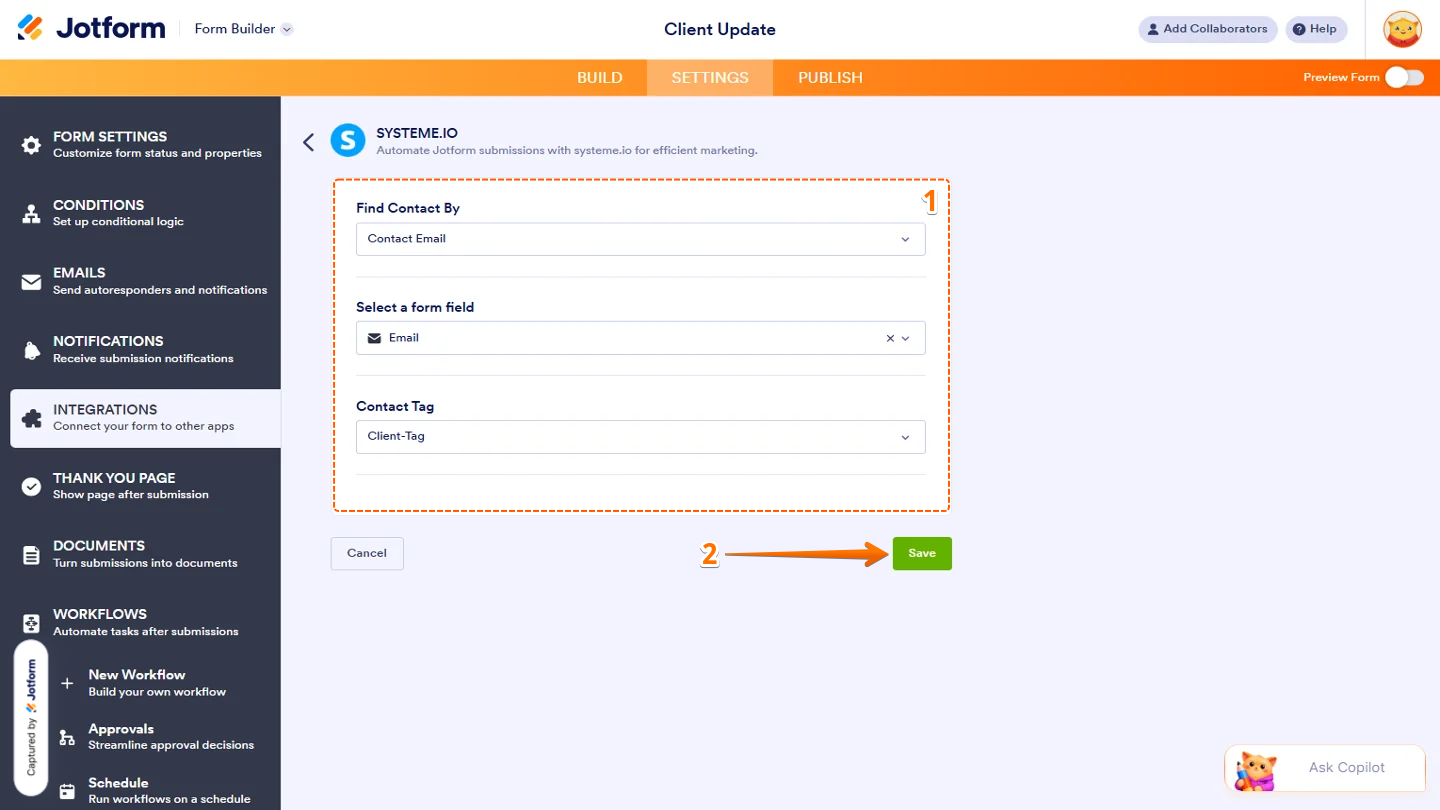
The Remove Tag from Contact action helps you manage your Systeme.io contacts by removing existing tags based on your Jotform submission data. Here’s what to do:
- On the next screen, after authenticating your account, configure these options:
- Find Contact By — Choose Contact ID or Email.
- Select a Form Field — Choose the field that has the matching value from the Dropdown menu.
- Contact Tag — Select the tag you want to remove.
- Once everything’s set, click on Save at the bottom.
Note
This action removes the tag from the contact without deleting the contact itself.
Managing Systeme.io Actions
After saving the integration, you can view the Systeme.io actions you’ve added. Here’s what you can do next:
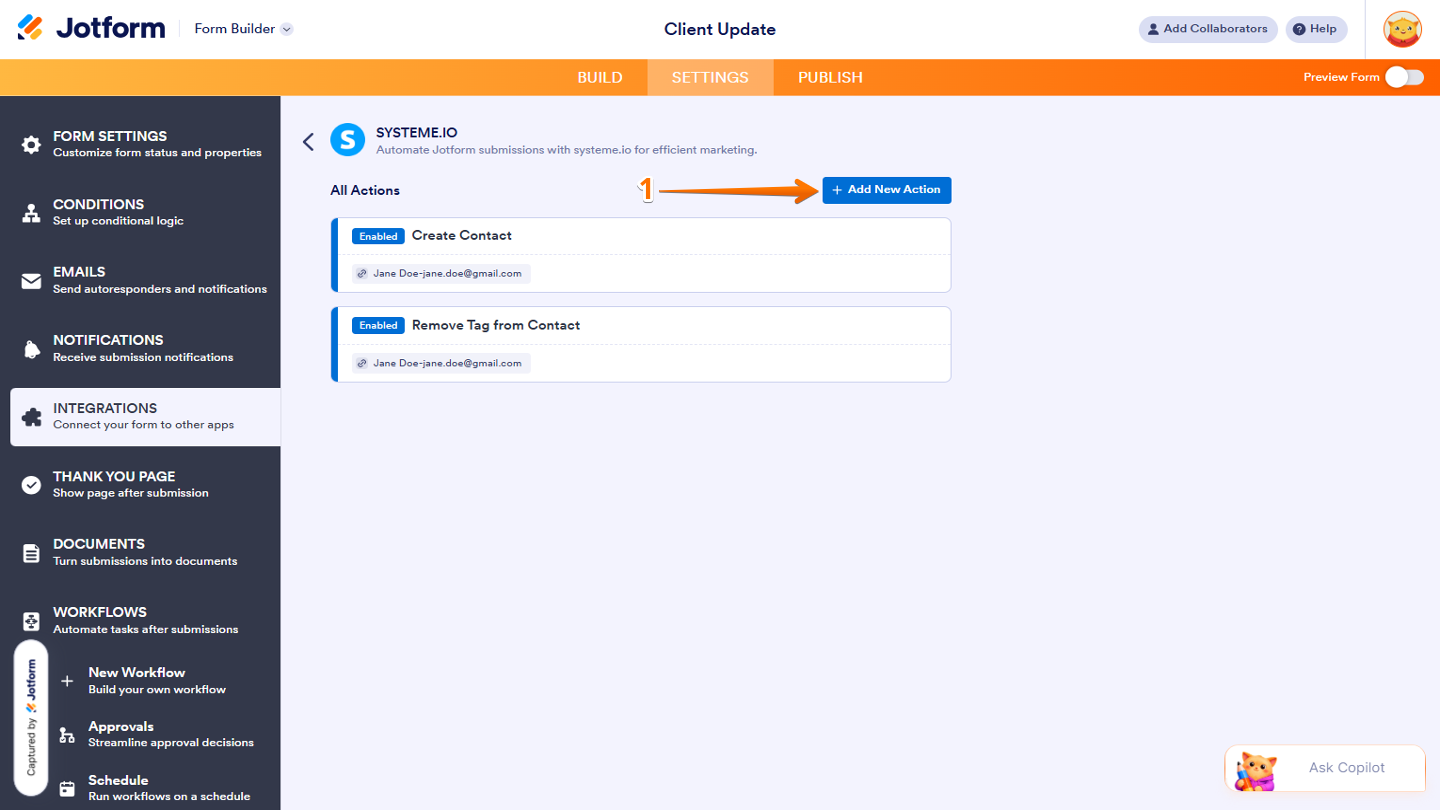
- While on the Systeme.io Integration page, click on Add New Action at the top-right of the page to create another action for your form.
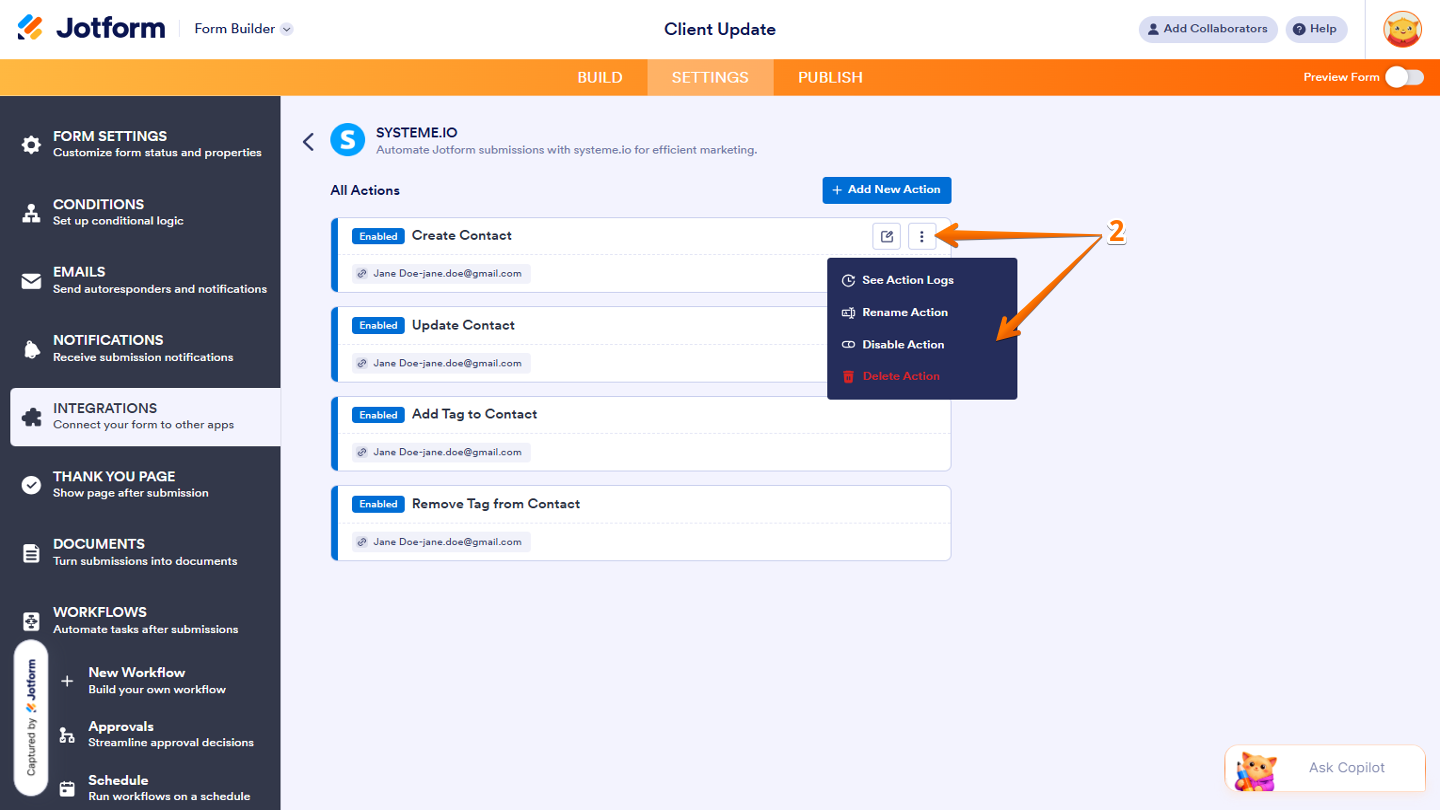
- Now, under the All Actions section, hover your mouse over an action and click on the Three Dots icon on the right side of it to access these options:
- See Action Logs — View successful and failed runs.
- Rename Action — Change the action’s title.
- Disable Action — Temporarily stop the integration from sending data.
- Delete Action — Remove the action from your form.
You’re all set! Submit a test entry through your form, then check Systeme.io to confirm that the contact details or tags match the action you selected.
Notes
- You’ll need to have an existing contact for the Update Contact, Add Tag to Contact, and Remove Tag from Contact actions.
- When choosing a contact, ensure the form field you selected has the correct Systeme.io contact ID or email address.
- Create the tags you want to use in Systeme.io before selecting them in Jotform. For a quick how-to, check out this article on How to Create a Tag in Systeme.io.
- The Systeme.io integration is available in both Form Builder and Workflow Builder. The Get Contact action is only available in Workflow Builder.

Send Comment: