With Jotform, you can easily add a Time element to your form to collect specific time inputs from respondents in a clear and organized way. The Time element lets users select or enter a time for appointments, schedules, or availability, making it easier for them to provide accurate responses and for you to manage time-based information across submissions. It’s a simple way to keep forms structured and efficient without relying on open-ended answers.
Here are a few ways to use it:
- Collect preferred appointment or meeting times in booking or scheduling forms.
- Gather availability details for interviews, consultations, or service requests.
- Use it in event registration forms to let attendees select session or arrival times.
- Add it to delivery or pickup forms to capture preferred time windows.
- Include it in internal request forms to schedule tasks, shifts, or support needs.
- Keep time-based responses consistent and easy to review across submissions.
Note
The Time element is available in both Classic and Card Forms. You can check out our guide on When to Use Card Forms to learn more.
Adding the Time Element
Whether you’re creating a new form or updating an existing one, you can add the Time element to your form in a few easy steps. Here’s how to do it:
- In Form Builder, click on Add Element on the left side of the page.
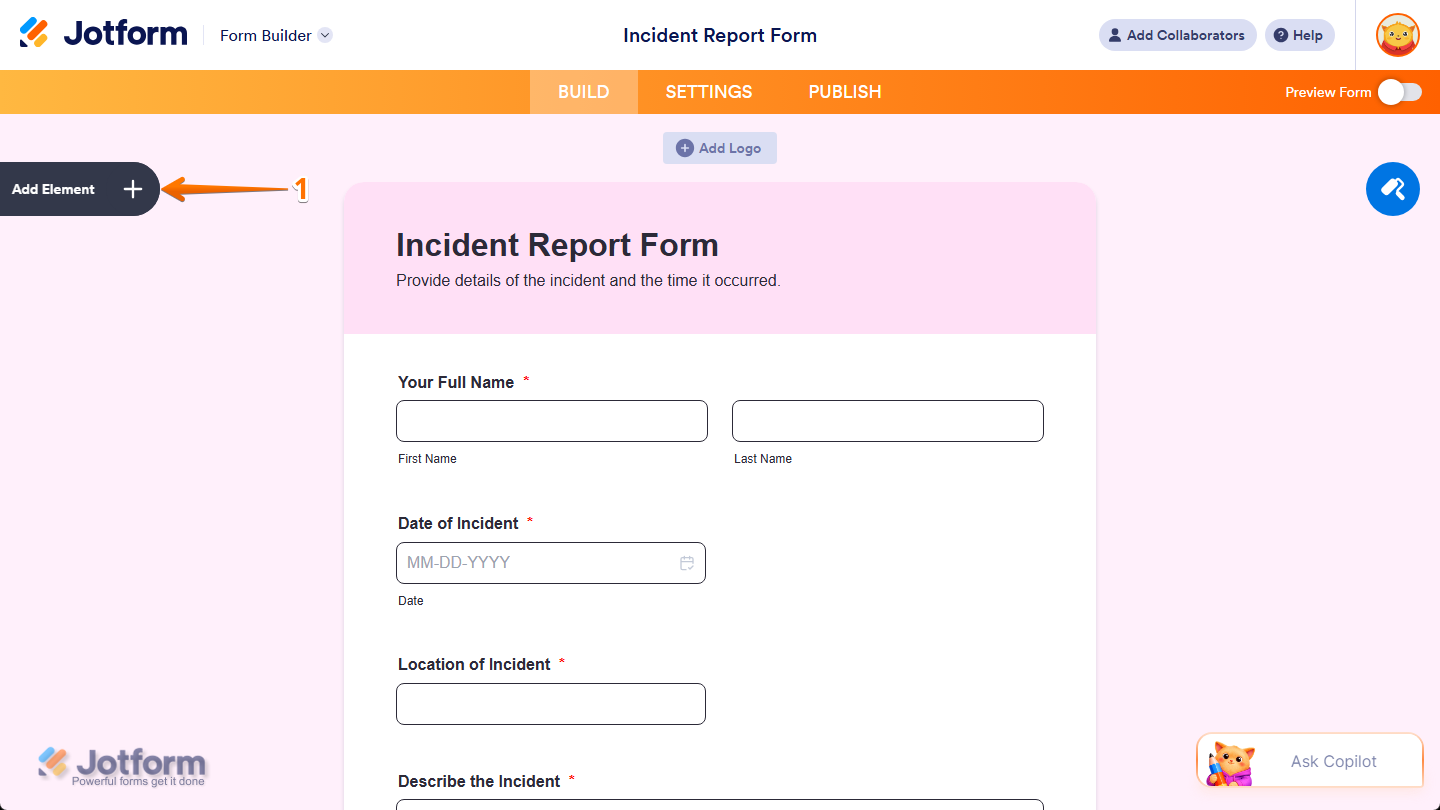
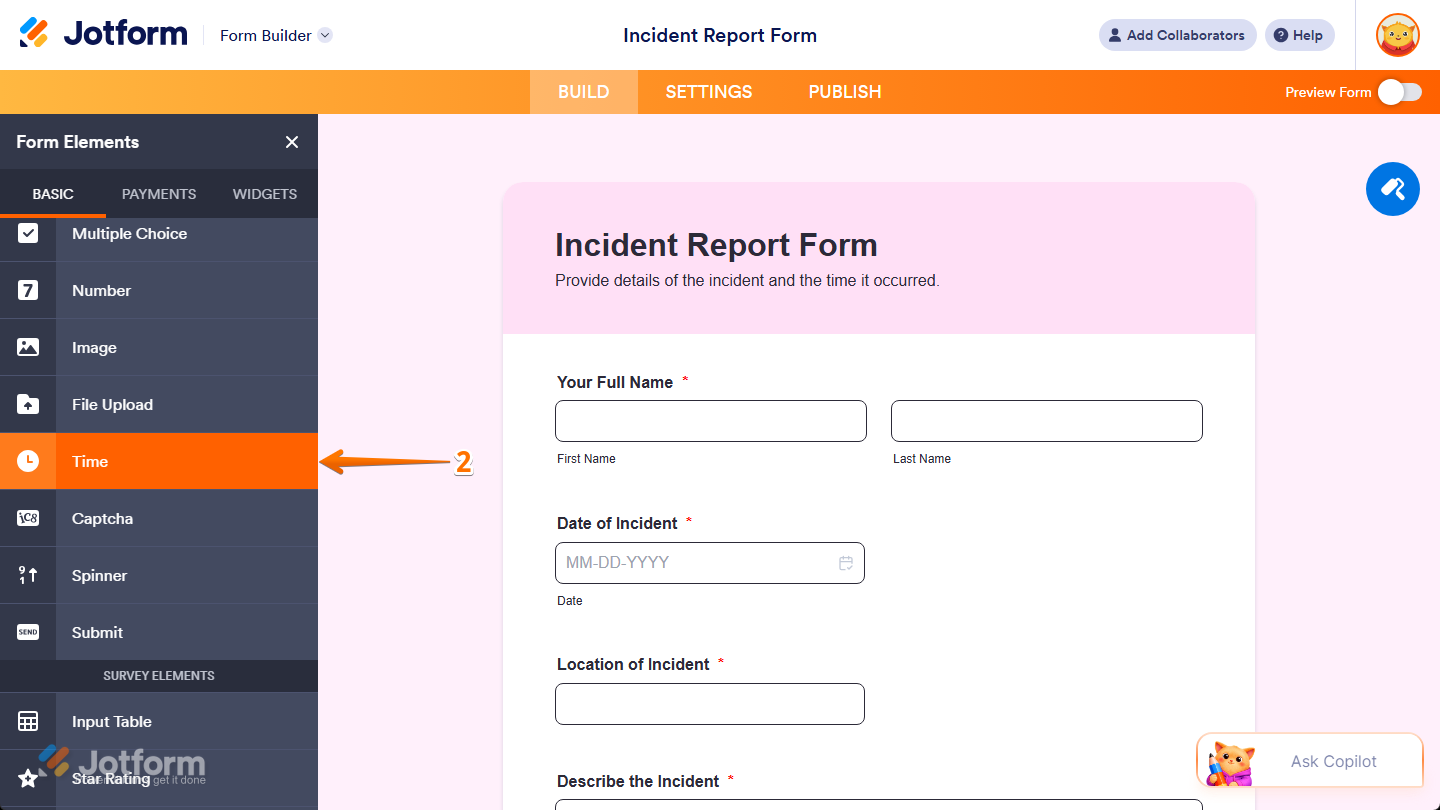
- Then, in the Form Elements menu, under the Basic tab, scroll down and then click on Time. Or, just drag and then drop it to where you want it to be on your form.
Once you’ve added the Time element to your form, you can adjust how it appears and works through the following tabs:
Configuring General Tab Properties
After adding the Time element, you can configure its basic properties to control how it looks and behaves on your form. Follow these quick steps to get started:
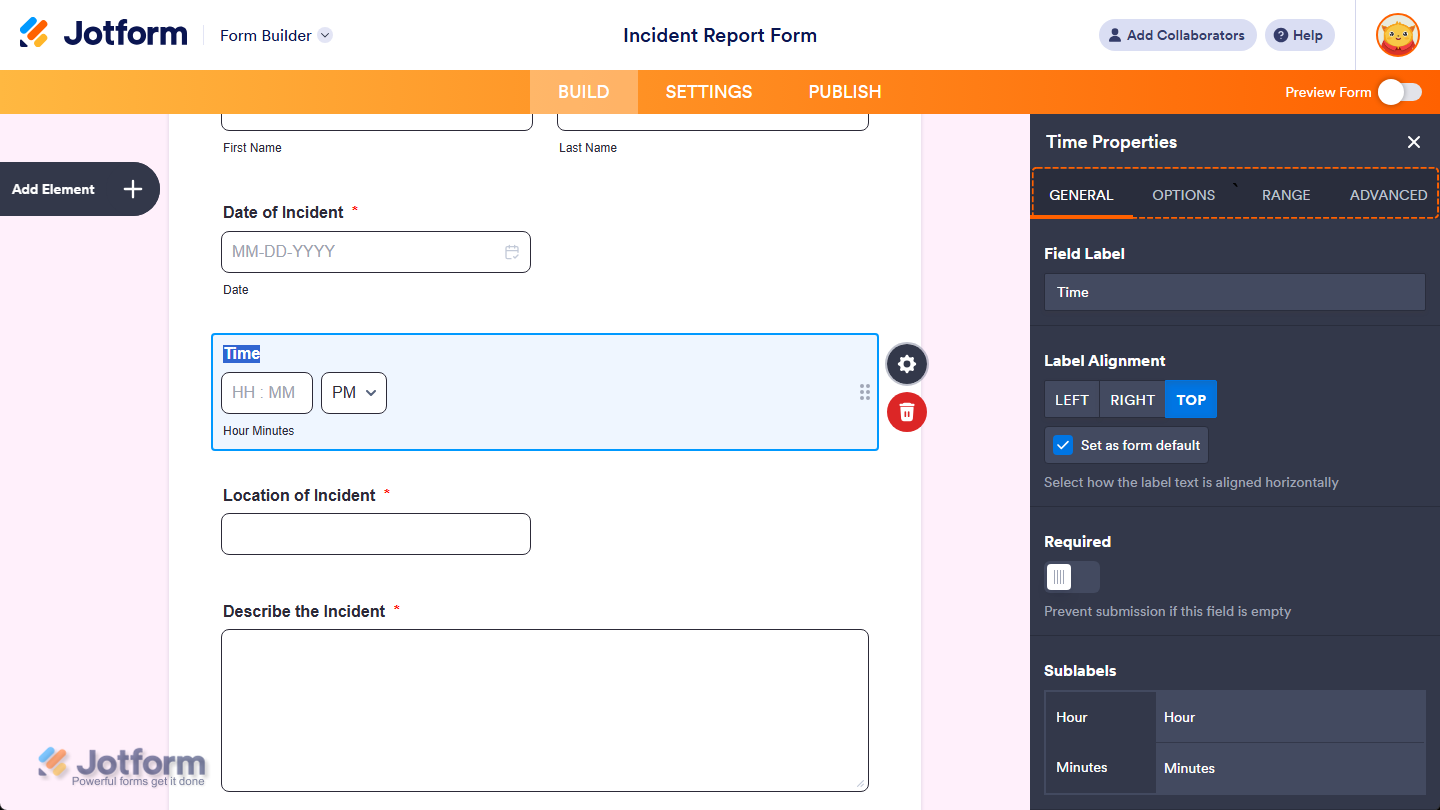
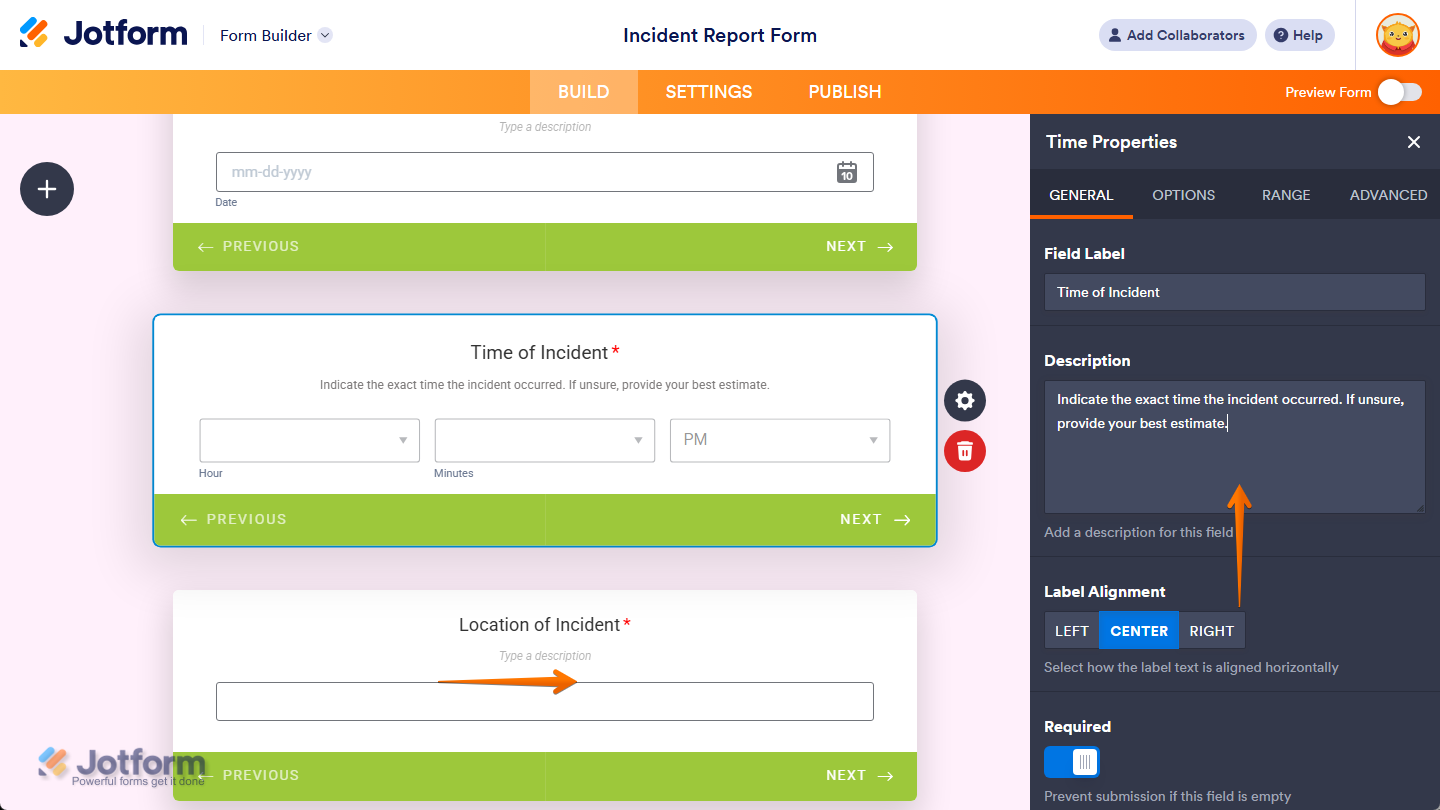
- In Form Builder, while your Time element is selected on your form, click on the Gear icon on the right side of it.
- Then, in the Time Properties menu that opens on the right side of the page, under the General tab, you’ll see a list of properties you can configure:
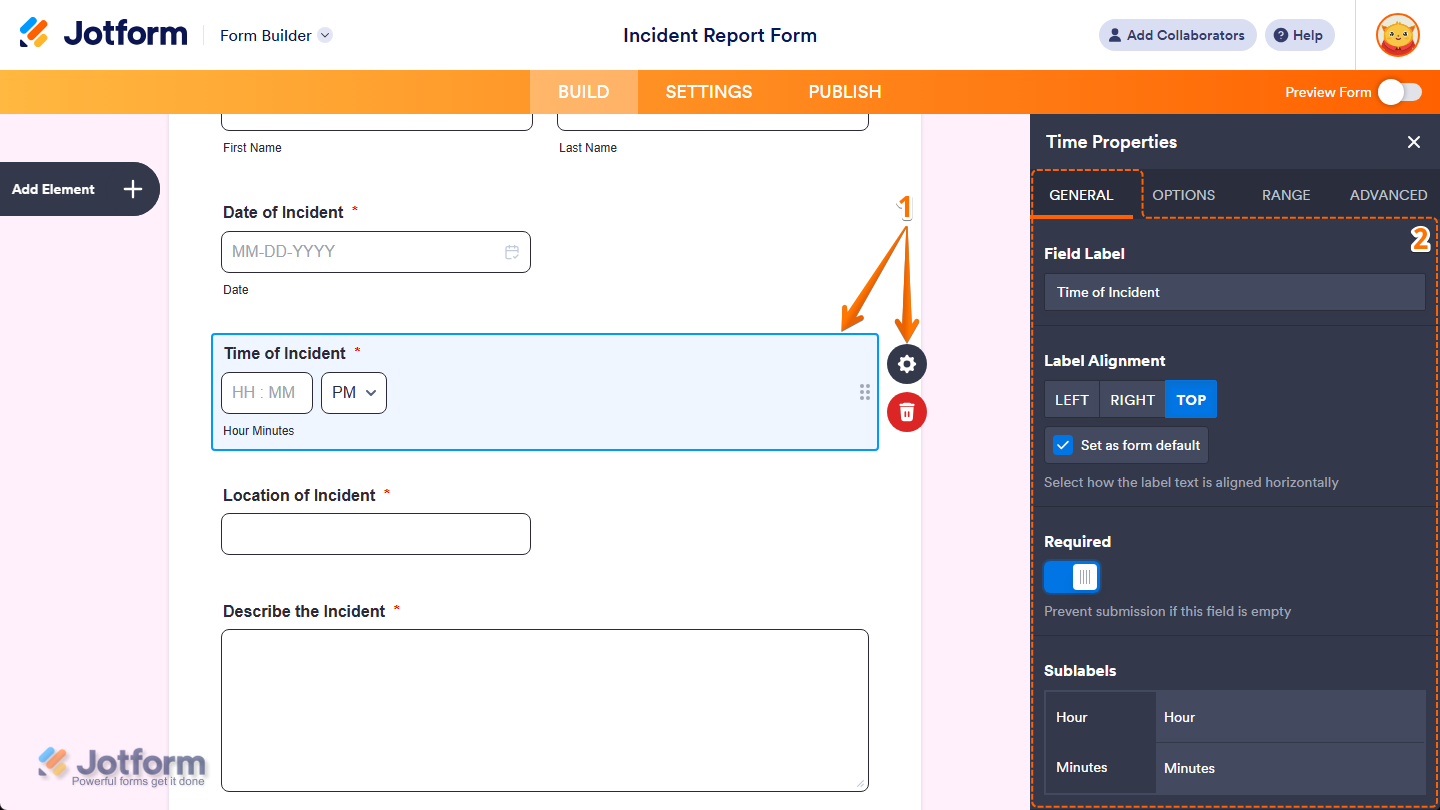
- Field Label — Delete the default text and enter a label in the input box if you want to customize your Time field’s question.
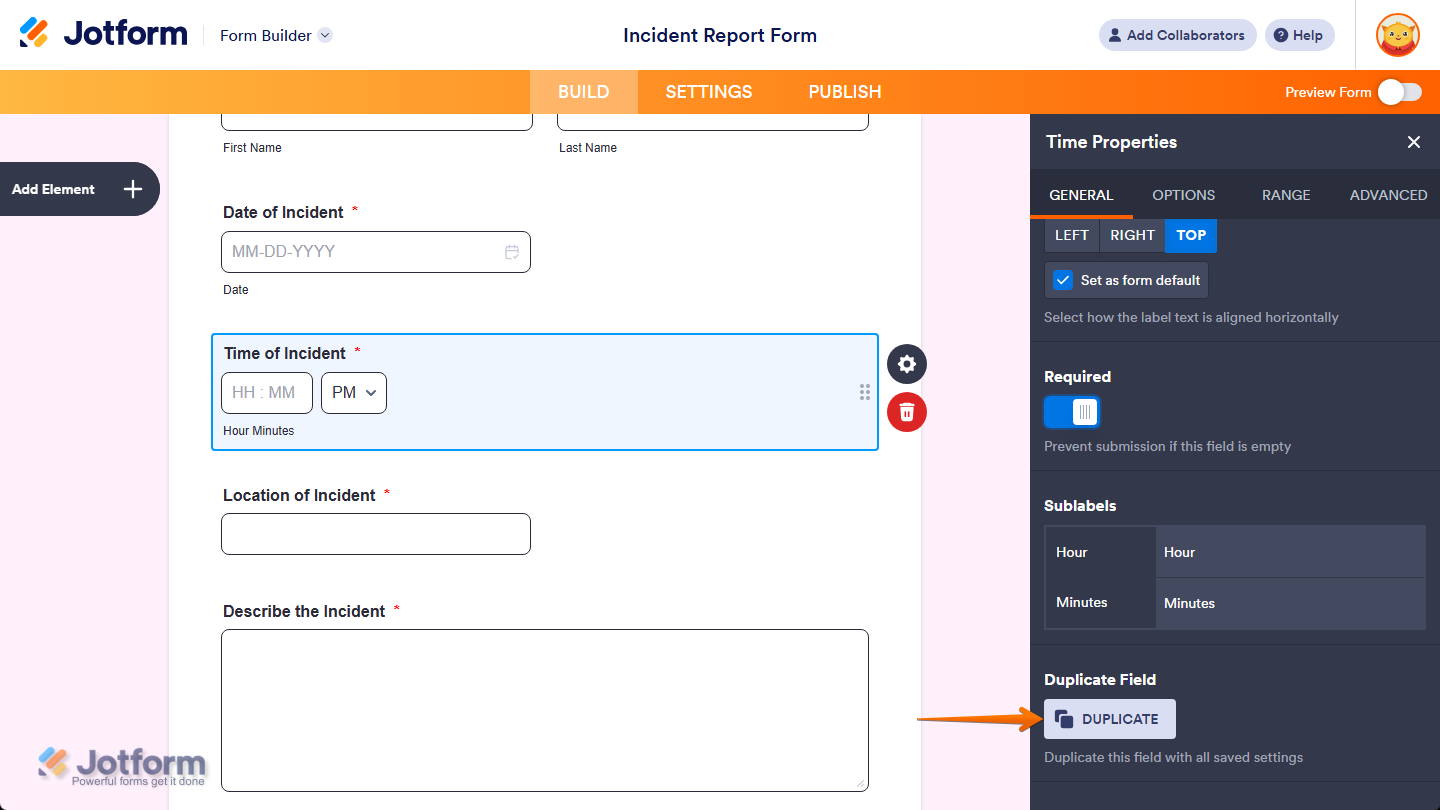
- Label Alignment — Keep this set to Center to position your Time field’s label in the middle of its width, or select Left or Right to position it on either side.
- Set as Form Default — Keep the check in the box next to this option, or remove it if you want other fields to retain their current label alignment when you change your Time field’s label alignment. You’ll only find this option in Classic Forms.
- Required — Toggle this on if you want respondents to complete your Time field before they can submit the form.
- Sublabels — Delete the default text next to the Hour and Minutes rows if you want to customize the text below the Hour and Minutes fields in your Time field.
In Card Forms, you can enter text in the Description property to add context or instructions that appear below your field label.
That’s it. You’ve configured the General tab properties of the Time element on your form. If you want to create a copy of your field with the same setup, click on the Duplicate button at the bottom of this tab.
Setting Up Options Tab Properties
With the Time element added to your form, you can tweak its properties to set how time values are shown and limited for respondents. Here’s what to do:
- In Form Builder, while your Time element is selected on your form, click on the Gear icon on the right side of it.
- Then, in the Time Properties menu that opens on the right side of the page, under the Options tab, you’ll see a list of properties you can set up:
- Time Format — Keep this set to AM/PM, or select 24 Hour to change the time format users can set in your Time field.
- Limit Time — You’ll only see this when the AM/PM time format is selected. Keep this set to Both AM & PM, or select AM Only or PM Only to limit the available time options users can choose in your Time field.
- Default Time — Keep this set to None, or select Current if you want your Time field to automatically set to the current time on the user’s device when the form loads, or Custom if you want to set a specific time for your Time field in the input box that appears.
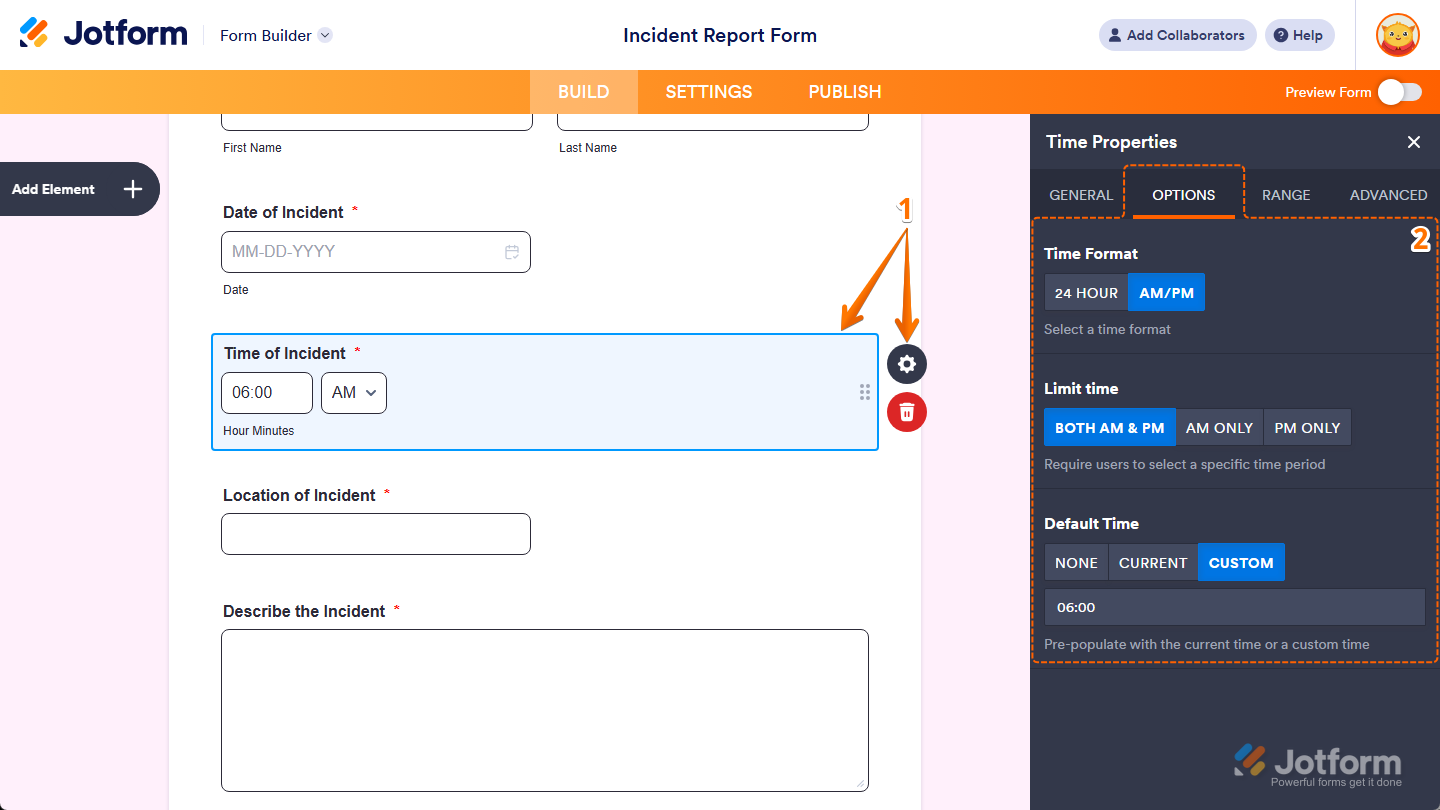
That’s it. You’ve defined the Options tab properties of the Time element on your form.
Managing Range Tab Properties
Once your Time element is in place, you can adjust its properties to display time ranges and durations in your form. Here’s how to proceed:
- In Form Builder, while your Time element is selected on your form, click on the Gear icon on the right side of it.
- Then, in the Time Properties menu that opens on the right side of the page, under the Range tab, you’ll see a list of properties you can enable:
- Time Range — Toggle this on if you want to show two time fields that users can use to submit start and end time values.
- Duration Indicator — You’ll only see this when the Time Range property is enabled. Toggle this on if you want users to see the time difference between the start and end times they enter.
- Until — You’ll only see this when the Time Range property is enabled. Delete the default text and enter a new one if you want to change the text shown between the start and end time fields.
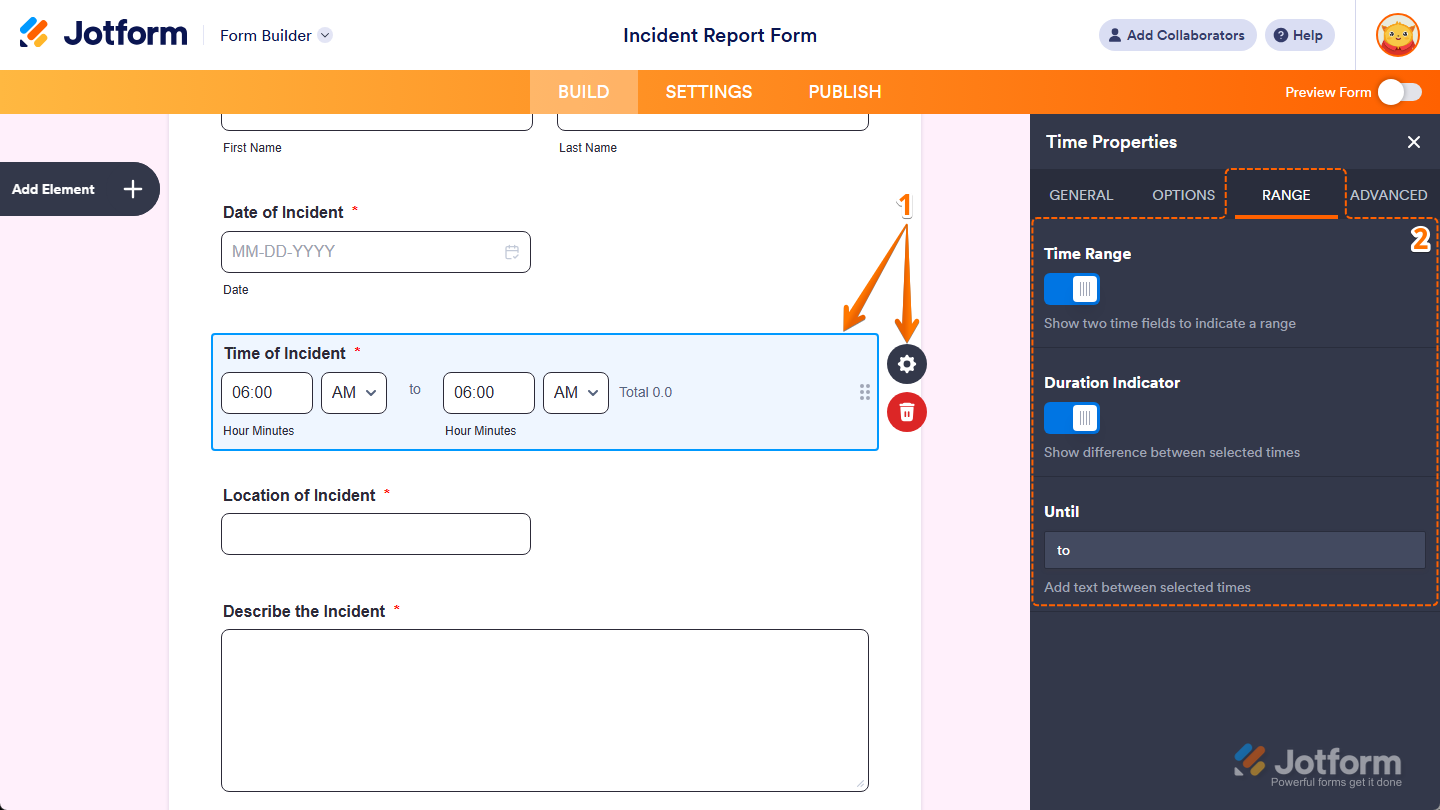
That’s it. You’ve set the Range tab properties of the Time element on your form.
Customizing Advanced Tab Properties
After you’ve added the Time element to your form, you can customize its additional properties to manage how it works with different form features. Here’s what to do next:
- In Form Builder, while your Time element is selected on your form, click on the Gear icon on the right side of it.
- Then, in the Time Properties menu that opens on the right side of the page, under the Advanced tab, you’ll see this list of properties you can customize:
- Hover Text — Enter the text you want to show as a short description when users hover their mouse over your Time field. You’ll only find this property in Classic Forms.
- Read Only — Toggle this on to prevent users from changing the current or custom time set in your Time field.
- Shrink — Toggle this on if you want to reduce your Time field’s width to half or to fit within the width of your form’s column. You can check out our guide on Setting Up Form Columns to learn more. You’ll only find this property in Classic Forms.
- Move to a New Line — You’ll only see this when the Shrink property is enabled. Toggle this on if you want to move your Time field to a new line instead of placing it next to another shrunk field.

- Next, scroll down to the bottom and continue customizing these properties:
- Hide Field — Toggle this on if you want to hide the Time field on your form. Take a look at our guide on How to Hide Form Elements for more details.
- Field Details — Click on this section to expand it and view, copy, or update your Time field’s Unique Name, which is used to reference it in integrations, calculations, and other advanced form features. Check out our guide on How to Find Field IDs and Unique Names to learn more.
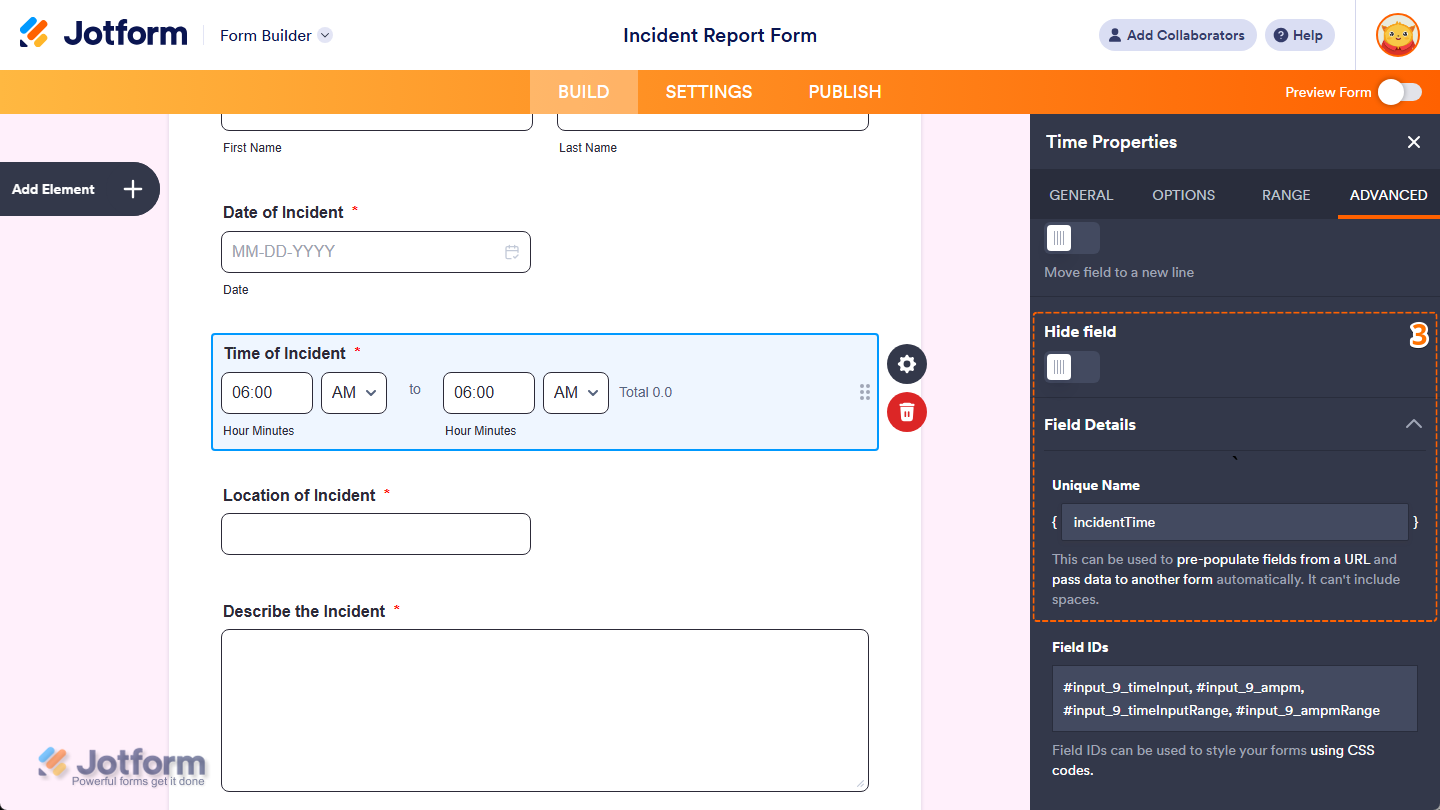
That’s it. You’ve customized the Advanced tab properties of the Time element on your form.
Note
Any changes you make in the Time Properties menu are automatically saved on your form.

Send Comment:
18 Comments:
October 28, 2025
Does Calendar in Jotform has 'time range" feature? I need to create a room-booking form to let our customers register/show the date, time and duration they want to book.
March 20, 2025
Hi
How do I have the time field as free text (numbers), not select from drop down?
April 26, 2022
Is this gone now? Can’t find just time
October 28, 2021
Can I use the time range or conditional logic in order to have a user complete a form 12 hours before they have to show up to an event? Meaning if the event is at 6pm on a Friday they must complete the form 12 before arriving and I want them to complete it no less then 12 hours.
May 24, 2019
The duration indicator no longer shows on the form while being filled out. It does however come through on the submissions. Is this something that can be fixed so when filling in the form the user can see the duration?
April 8, 2016
Can certain time-slots be taken out/restricted, such as the lunch hour or 6 - 7pm for example?
August 13, 2014
Jotform is amazing, thanks to all the team
August 12, 2014
I'm loving the metro/minimal designs here.
July 23, 2014
Jotform is awesome!
July 23, 2014
I'm in love with these fabulous templates! Jotform is a never ending surprising tool!
July 22, 2014
Absolutely fantastic! Thanks!
July 22, 2014
fantastic
July 22, 2014
Absolutely stunning!!
July 22, 2014
These are fantastic! JF just keeps on getting better!
July 22, 2014
I love the fact that each of the form designs say a lot about what the form is about. They also embrace a lot of modern designs - encore!
July 22, 2014
They're all extremely attractive! Thank you for sharing!
October 1, 2013
can I delete the Time fields? I only want Date field. Thank you.
November 21, 2011
This is kind of absurd. Wouldn't it be cleaner to just show copy and past with hours and then a minutes field?