If you already have an app with Jotform and want to expand its functionality, adding a product list is a great way to do it. This allows you to turn your app into a convenient space where customers can browse, select, and purchase products without having to navigate elsewhere.
Integrating a product list not only enhances the user experience but also streamlines the entire ordering process—from product discovery to checkout. Whether you’re offering physical items, digital downloads, or services, this feature helps you present your offerings clearly, organically, and accessibly.
With just a few steps, you can seamlessly incorporate a product list into your existing app and start accepting orders directly, making your app more dynamic, engaging, and business-ready.
Adding a Product List Element
Adding the Product List element to your existing app takes no time at all—here’s how:
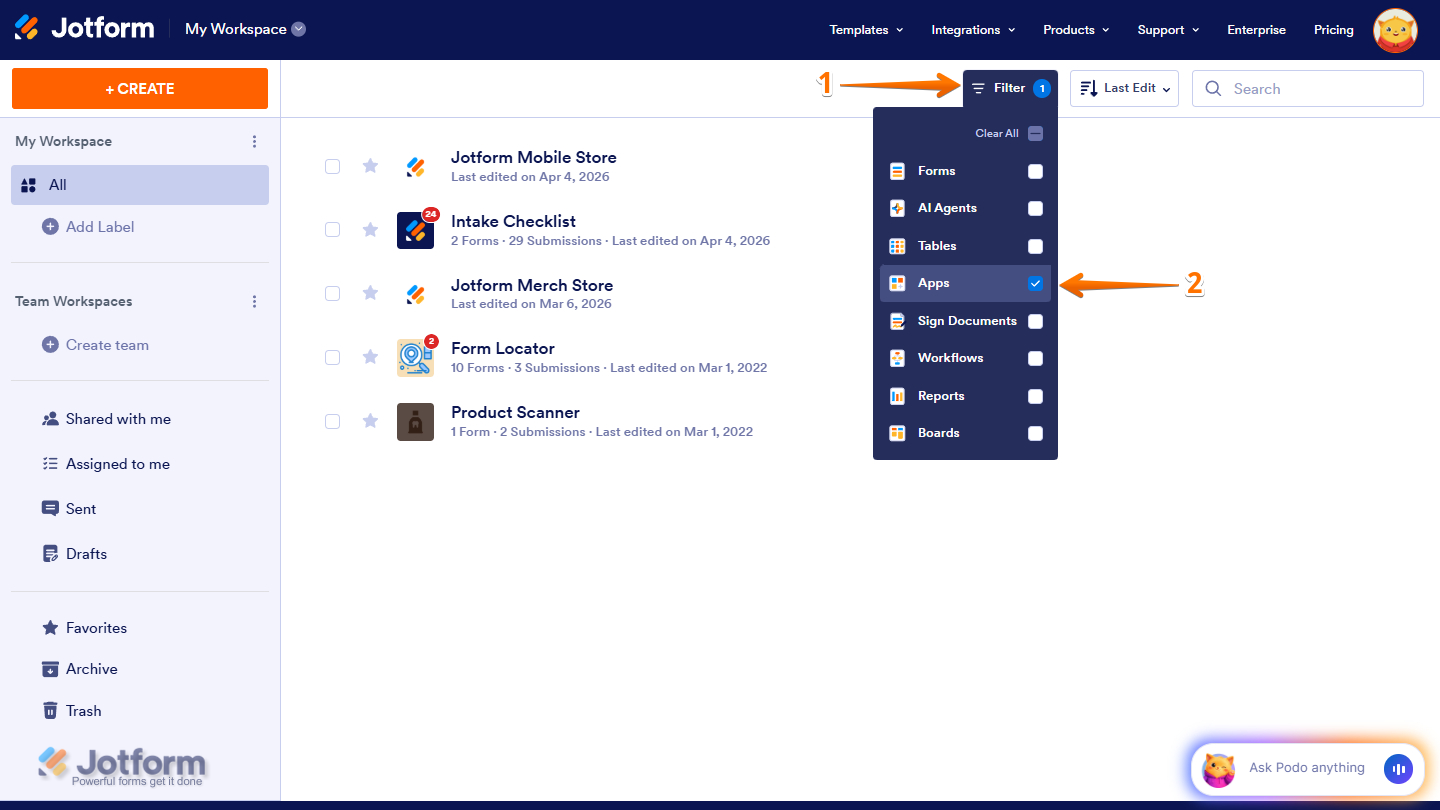
- On your Workspace page, click on Filter in the top-right corner of the screen.
- Then, in the Dropdown menu that opens, select Apps so only your apps are displayed on the screen.
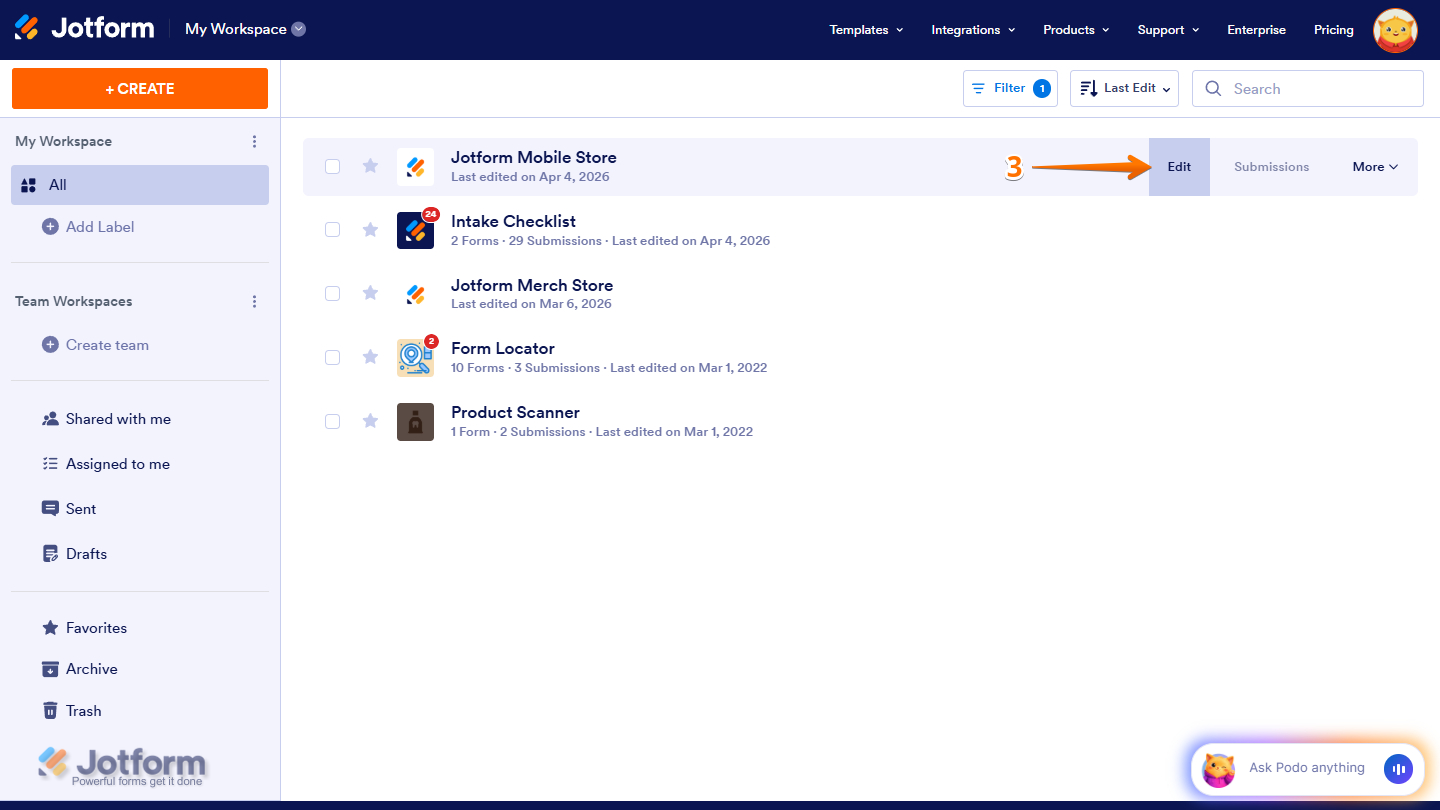
- Next, hover your mouse over the app you wish to add a product list to, and click on Edit.
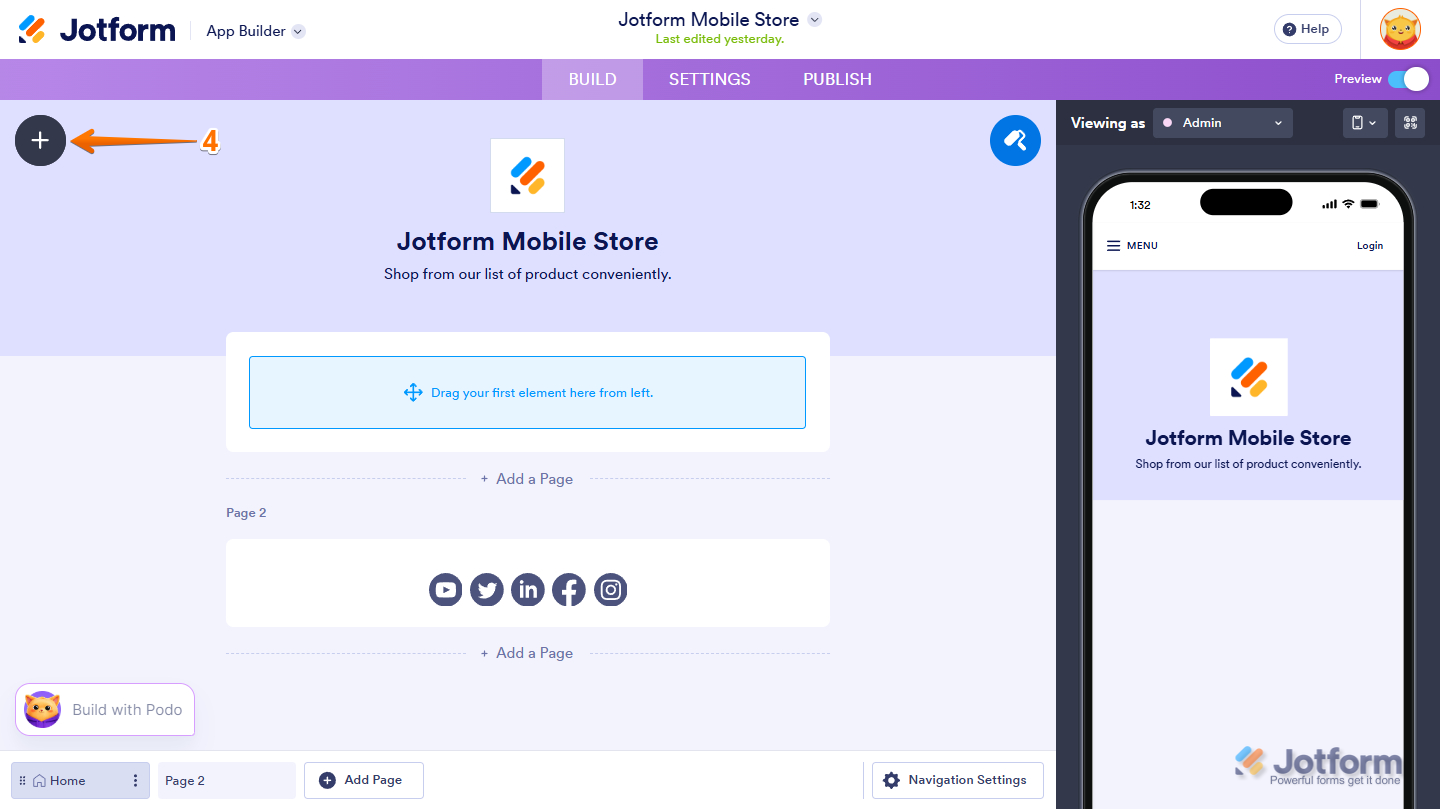
- In App Builder, click on the Plus icon on the left side of the page.
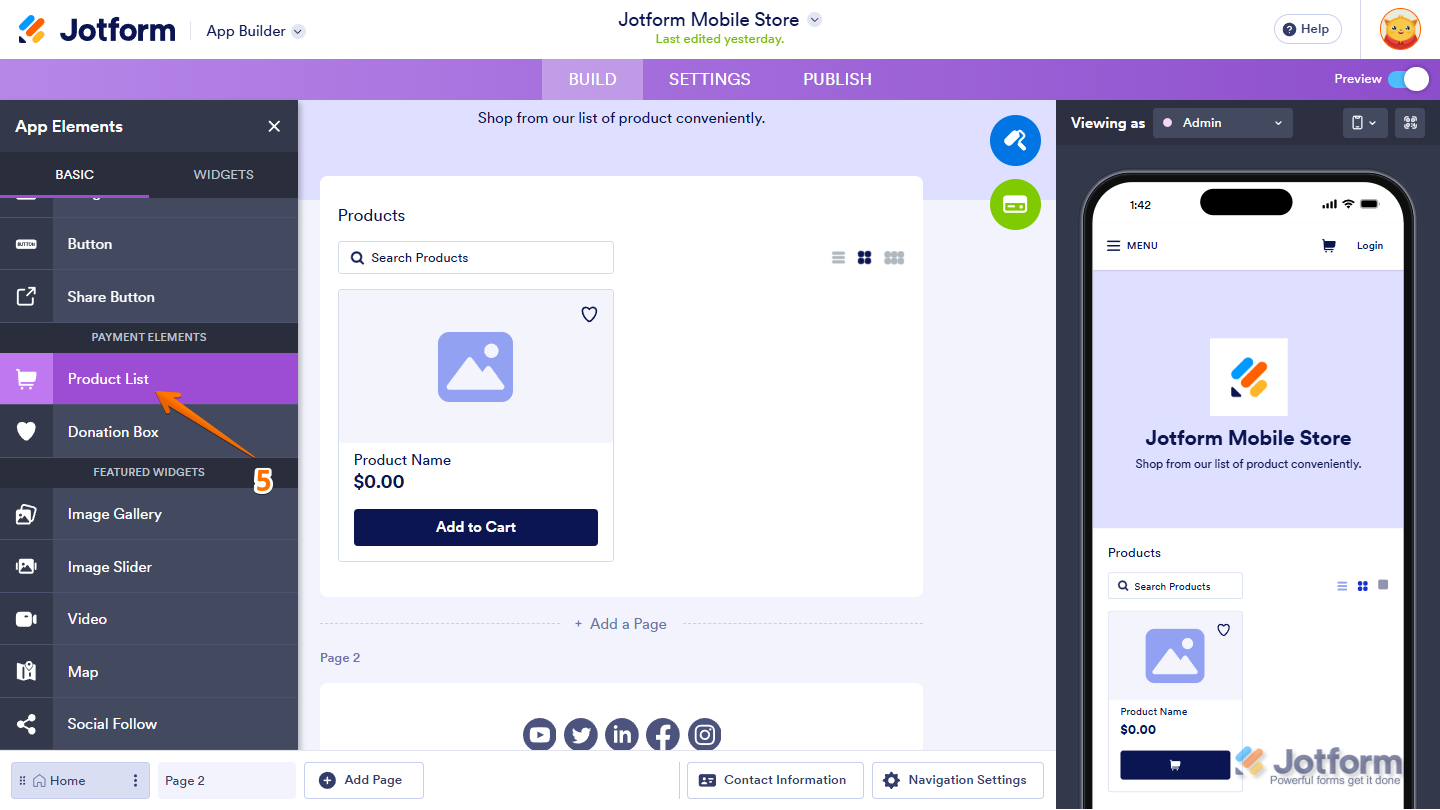
- Now, in the App Elements menu, under the Payment Elements section of the Basic tab, click on Product List to add it to your app. Or drag and drop it into the area where you want it in your app.
Pro Tip
You can also manage and edit your app anytime from the My Apps page. The page gives you quick access to your apps and allows you to edit them right away.
Adding Product Items to Your App
The next step is to populate the Product List by adding your products—complete with names, prices, images, and any other relevant details—so customers can start browsing and placing orders right away. Here’s what to do:
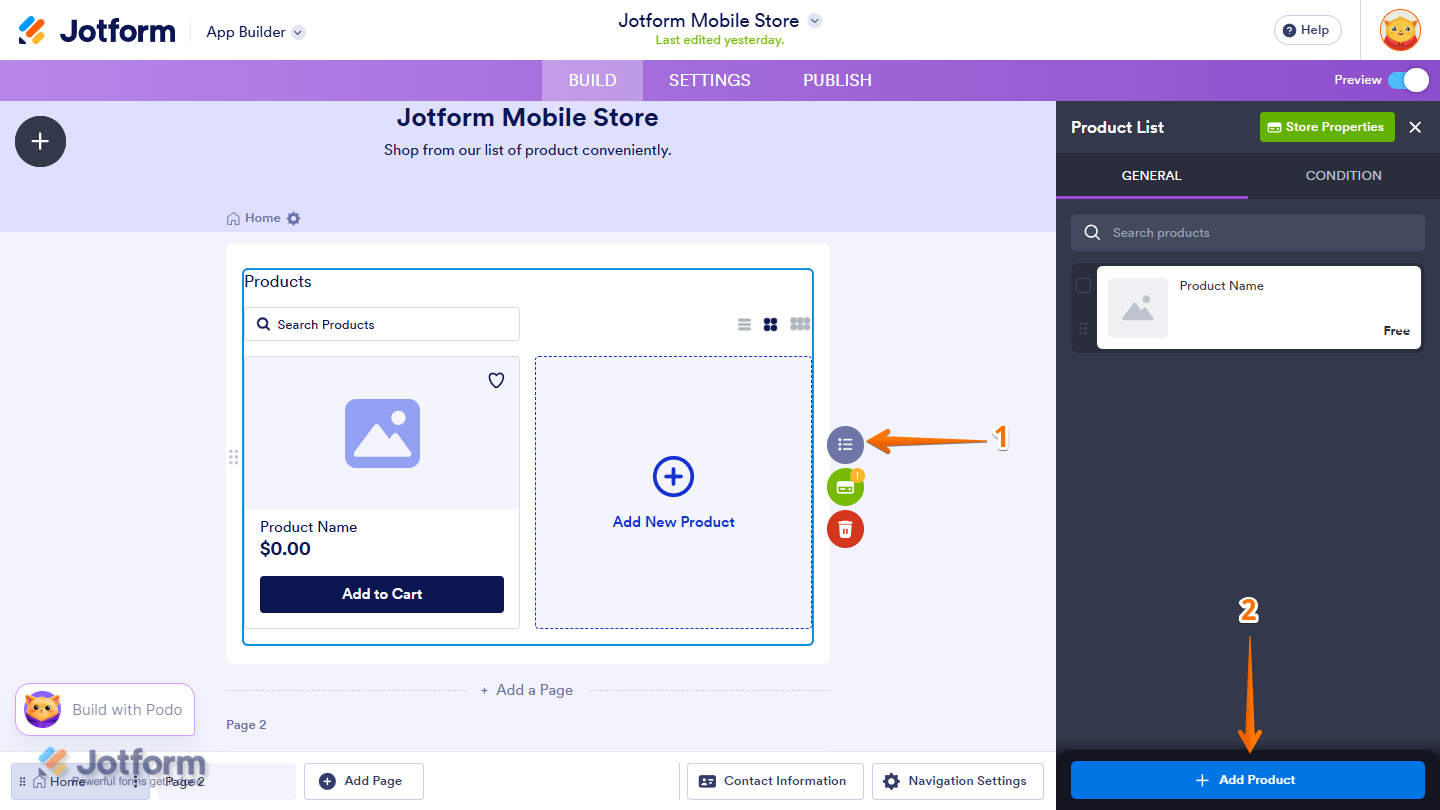
- In App Builder, click on the List icon on the right side of the Product List element.
- Then, in the Product List menu that opens, under the General tab, click on Add Product at the bottom.
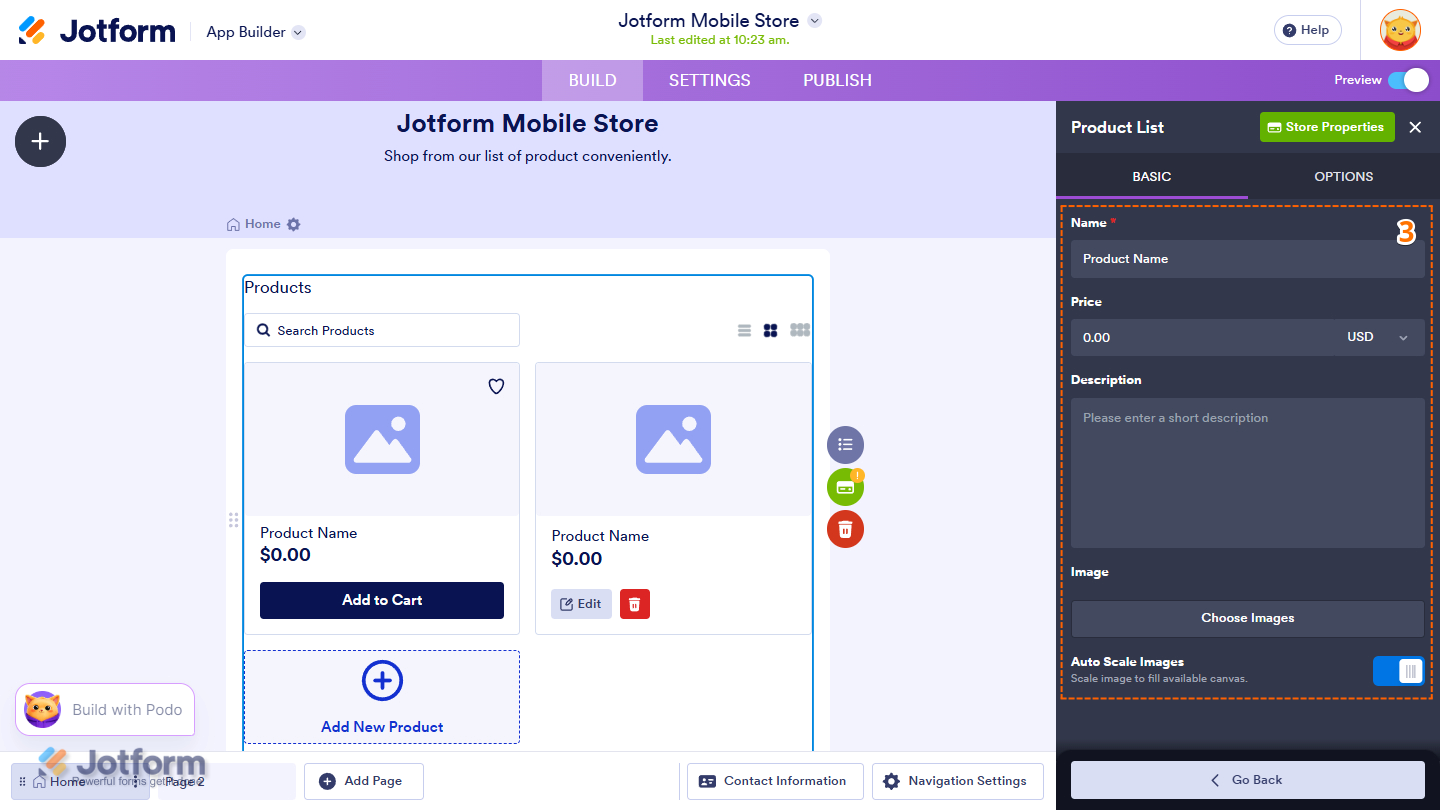
- Next, under the Basic tab, set up these things:
- Name — Enter the name of your product.
- Price — Set the item’s price.
- Description — Provide a clear and engaging description of the product.
- Image — Upload one or more images to showcase your product.
- Auto Scale Images — Toggle this option on or off to automatically adjust your images so they fit neatly within the Product List layout.
- Now, go to the Options tab, and configure these things:
- Add Quantity Selector — Enable this option to let customers choose how many units of the product they want to purchase.
- Add Product Option — Use this to include product variations, such as size, color, or other customizable options.

That’s it! You’ve now successfully added a product item to your app.
Setting up the Store Properties
Customers won’t be able to complete the order process without a payment gateway, so make sure to set one up to enable successful transactions.
You can also enhance the experience by customizing the Product List layout in the product settings and tailoring the checkout page to collect important customer details for a smoother, more organized ordering process.
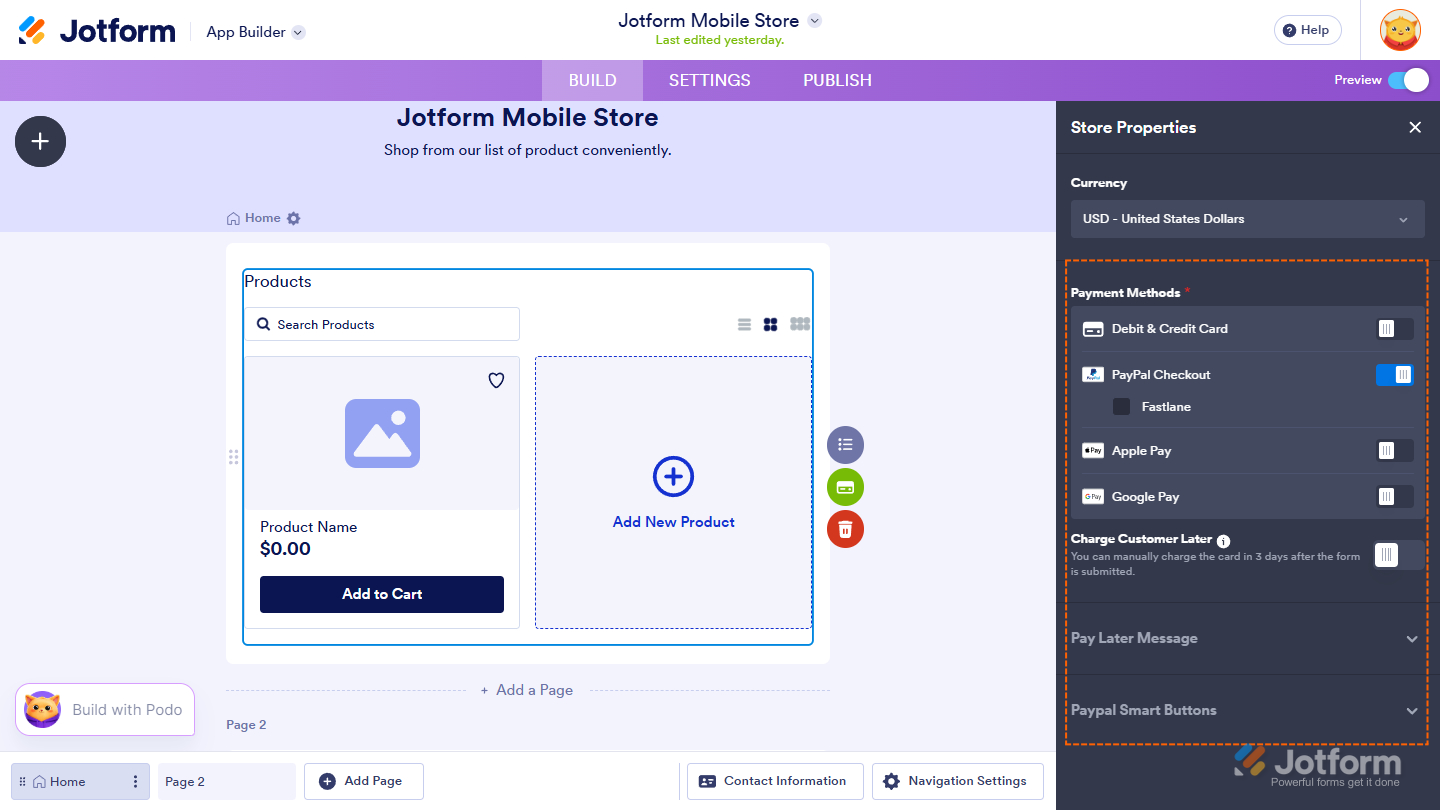
Adding Payment Connection
Adding a payment connection to the Product List only takes a second—here’s what to do:
- In App Builder, click on the Credit Card icon on the right side of the Product List element.
- Then, in the Store Properties menu that opens, under the Payment tab, click on Add Payment Connection.
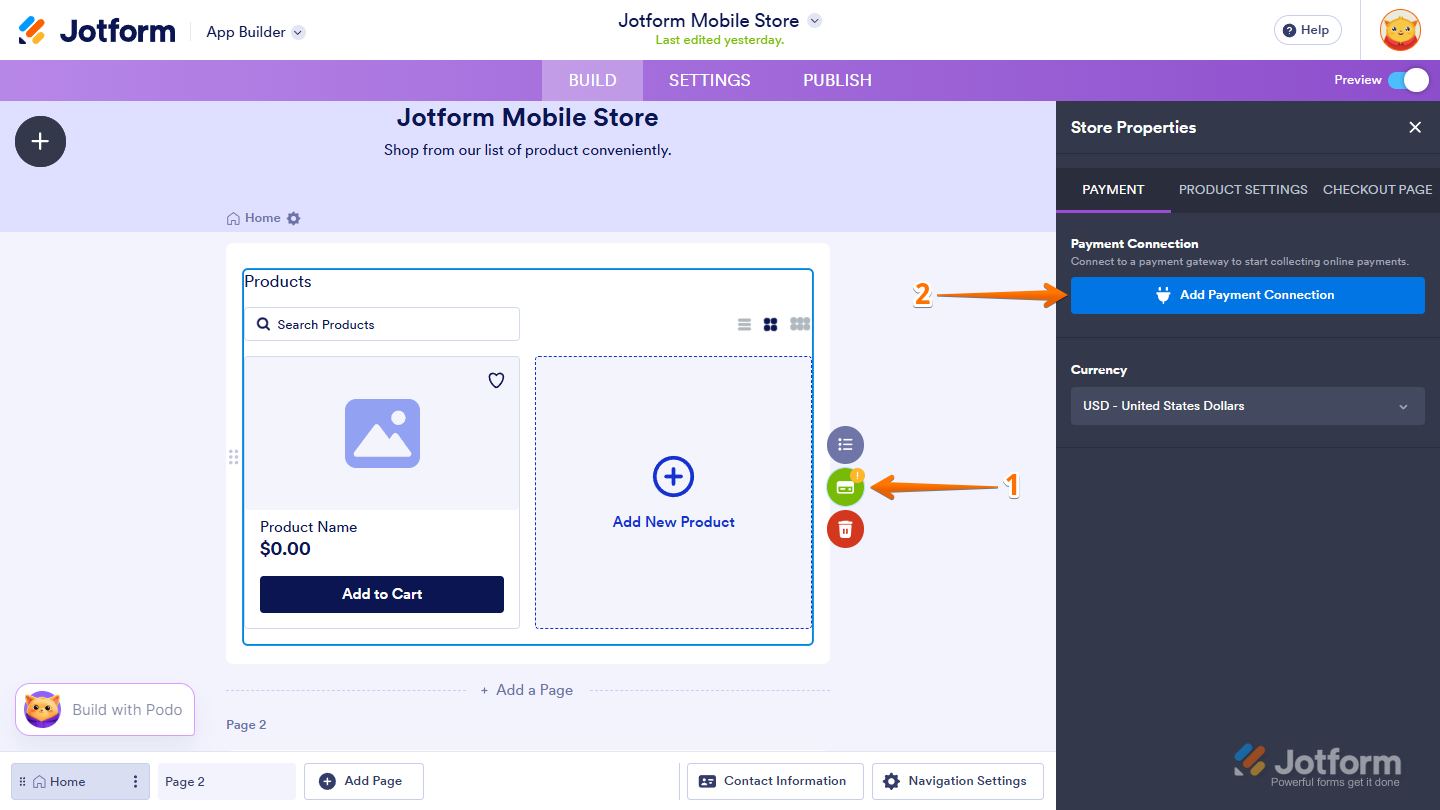
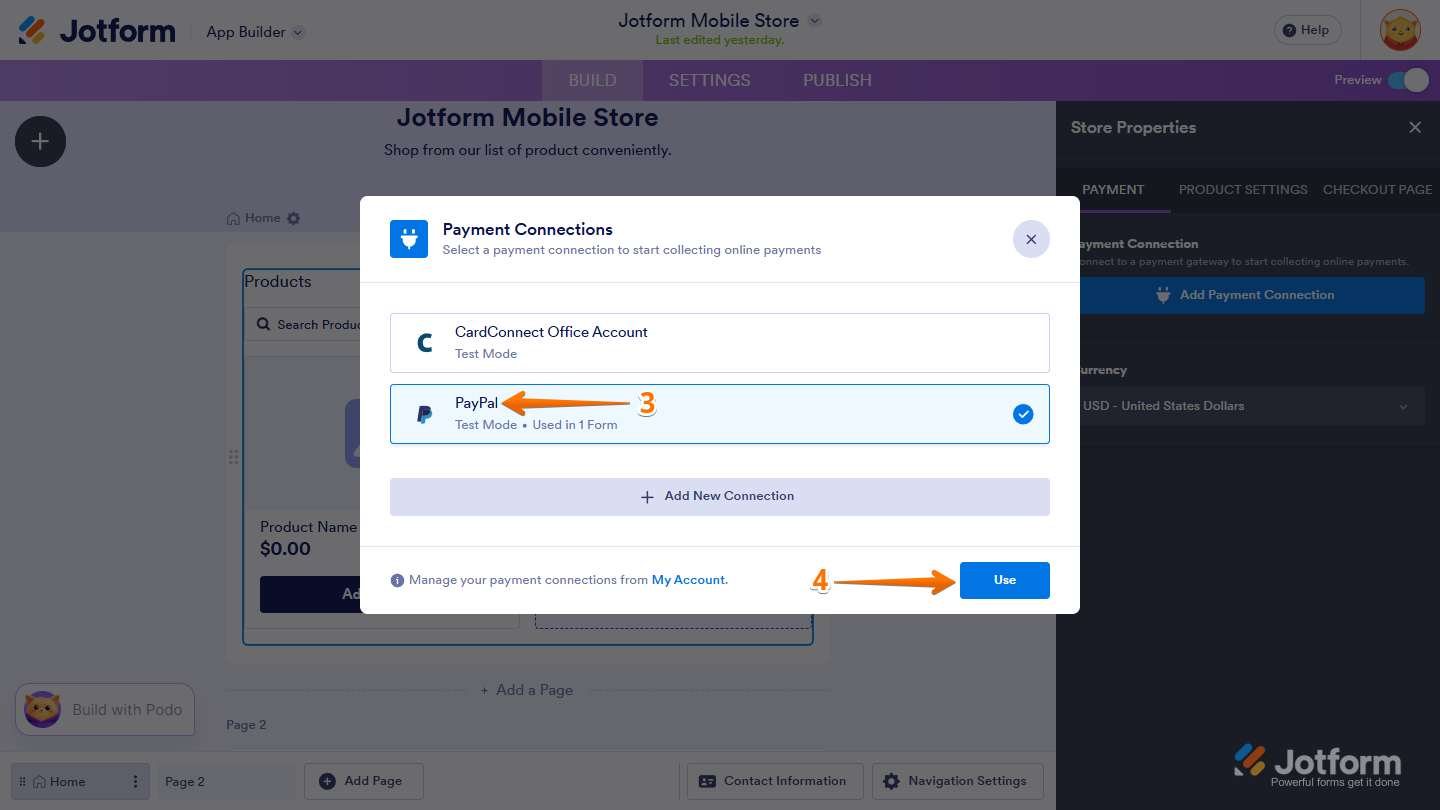
- Next, in the Payment Connections window that opens, select from one of the available connections—for example, PayPal.
- Now, click on Use at the bottom of the window.
That’s it for adding a payment connection! Based on the payment gateway, you’ll see a set of options at the bottom of the Payment Connection section. For PayPal, you’ll see Payment Methods, Pay Later Message, and PayPal Smart Buttons configurations.
Note
You can also manage your existing payment connections through the Connections tab of your account settings. Check out our guide on How to Add and Manage Reusable Payment Connections to learn more.
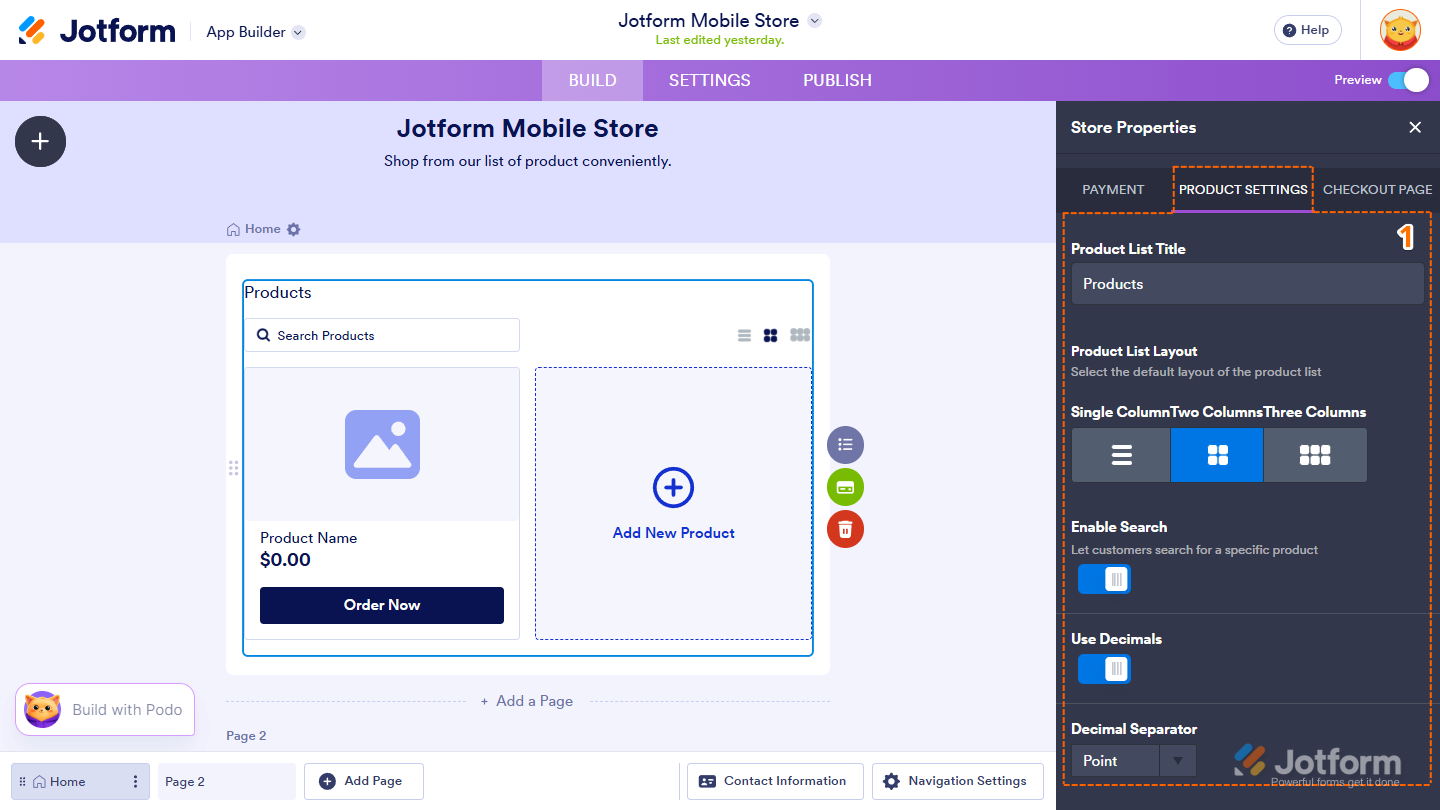
Configuring the Product Settings
For a better visual presentation, you can choose to display your product items in different column layouts. You can also add a search box. Here’s how to get going:
- While still viewing the Store Properties menu, go to the Product Settings tab, and configure these things:
- Product List Title — Set a clear and descriptive title for your Product List to help customers quickly understand what you’re offering.
- Product List Layout — Choose whether to display your items in a single, two, or three-column format to improve organization and visual appeal.
- Enable Search — Let users quickly find specific products by adding a search bar to your Product List.
- Use Decimals — Enable this option if your product prices include decimal values.
- Decimal Separator — Select Point or Comma to separate whole numbers from decimals, based on your preferred or regional format.
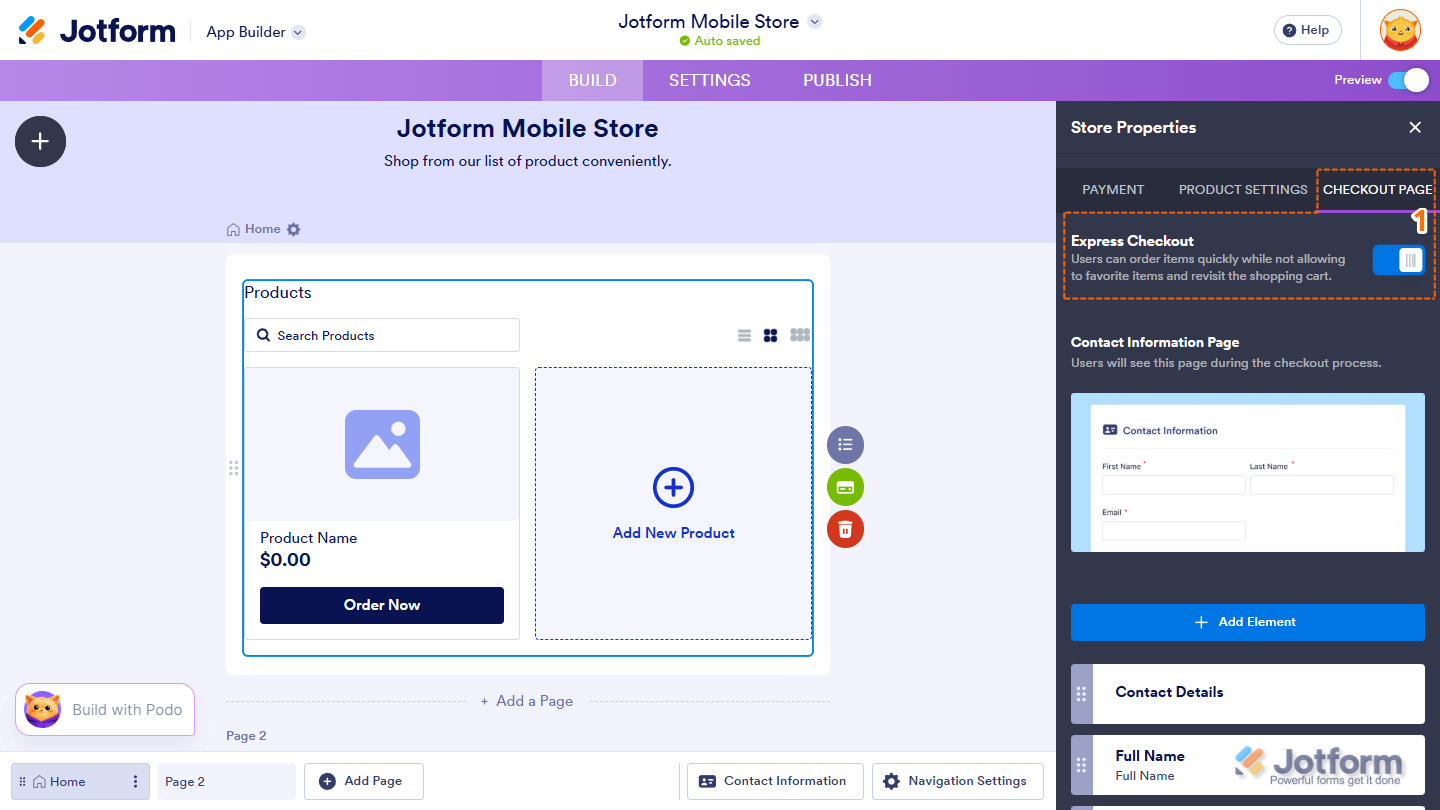
Setting up the Checkout Page
The checkout page is a vital part of your app, as it’s where customers finalize their orders and provide essential information. By customizing your checkout page, you can collect key details such as contact information, delivery address, and special instructions—making it easier to manage orders efficiently while providing a better overall experience for your customers. Here’s how to set it up:
- While still viewing the Store Properties menu, go to the Checkout Page tab, and select what you want to do:
- Express Checkout — Optionally enable this option to streamline checkout and let customers complete their orders faster with fewer steps.
- Then, scroll to the middle part of the tab, and click on Add Element to add new fields to the checkout page.
- Next, in the Dropdown menu that opens, select a field to add it.
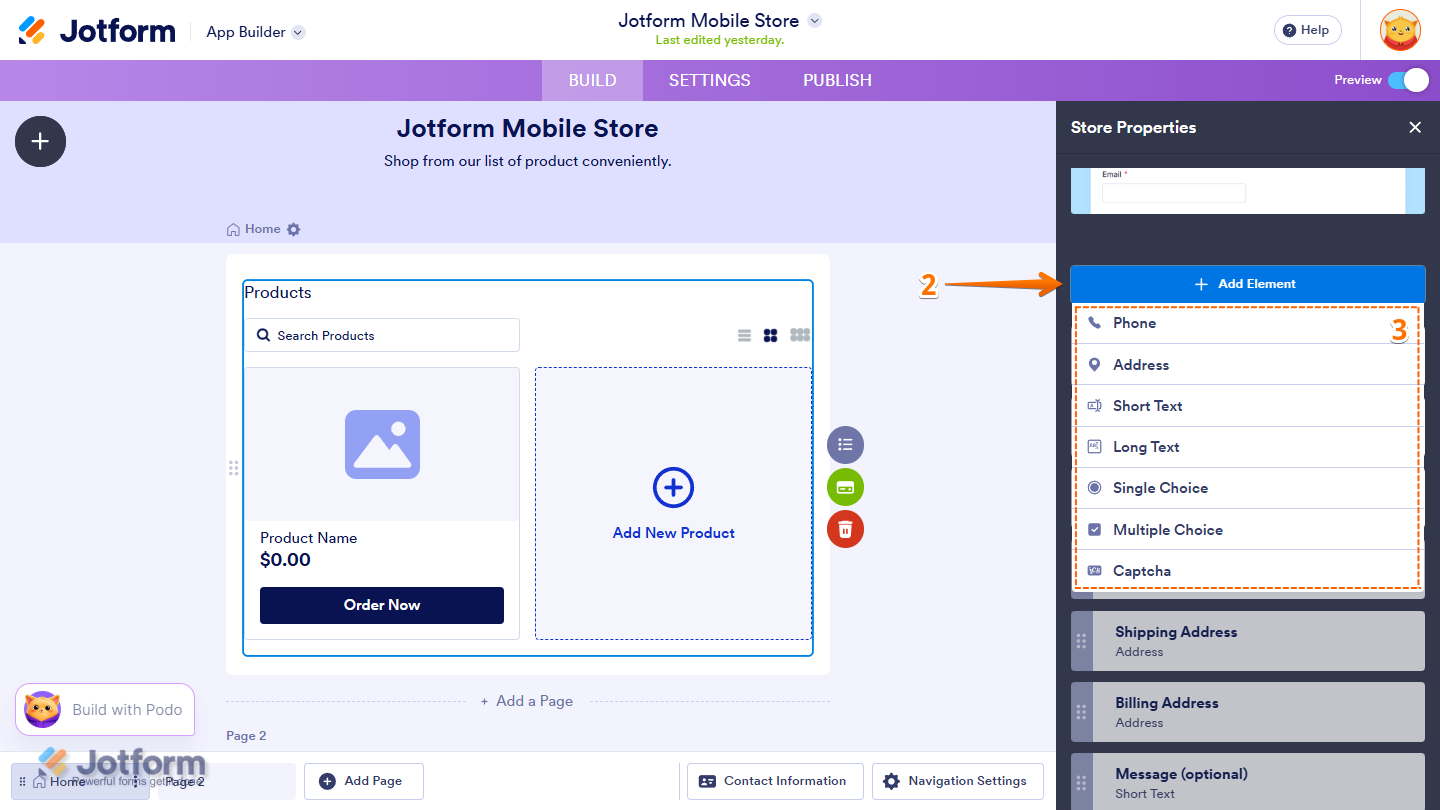
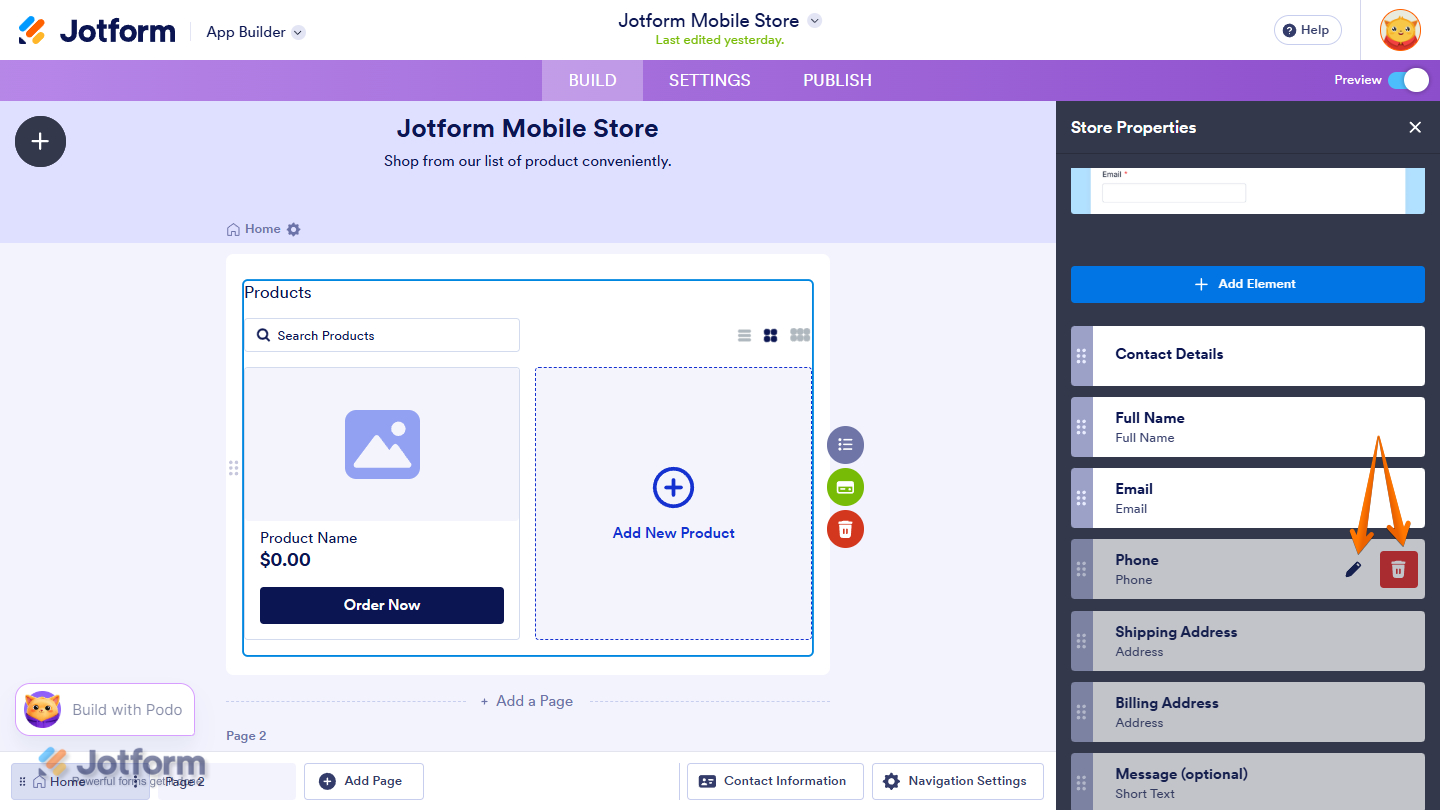
You can also edit an existing field by simply hovering your mouse over the element and clicking the Pencil icon. You can also delete by clicking the Trash Can icon. But note that you cannot delete the Full Name and Email fields.
That’s it! You’ve successfully added a Product List element and set it up in your existing app. Your app is now ready to showcase products and accept orders in a more organized and user-friendly way.

Send Comment:
6 Comments:
July 13, 2024
Please I am Isaac Godo, University of Cape Coast. Please when the app links are share, the button to install the app on your your home sreen does not respond, please might the problem be? How should i go about it
January 7, 2024
Is there a way to have an add-on option when checking out an item? I'd like to have an upsell option for customers.
December 29, 2023
Is it possible to have multiple product lists on the same form?
July 31, 2023
Is it possible to have the prices change based on the customers forms answers?
April 6, 2023
I want to use the product list but without the price and add to cart button. We are not ready to "OPEN"/sell online. However, I want to display pictures for the current items and share some information about them. Using the product list will keep me from having to start over once we officially launch. The "add to cart" button would be replaced with a "more info" button that opens each item's page with the product's information, usage and ingredients. How is the best (and simplest) way to achieve this?
January 6, 2023
Is it possible to bulk add products to the list? I've got a thousand different parts that my team will order. I'd like them to be able to use the search function to bring up matching items to the search instead of a massive list.