With Jotform’s Form Prefill, you can automatically fill in form fields using data from another form in your account. It pulls info from the main submission table of that form, so you can easily match fields. You’ll need to set it up manually, but it makes things quicker for anyone who’s filling out the same details again.
Setting up the Form Prefill Settings
Before using Form Prefill, you’ll need to pick a source form first—that’s where the data will come from. The form should already be set up so you can start matching its fields to your prefilled answers. Here’s how to set it up:
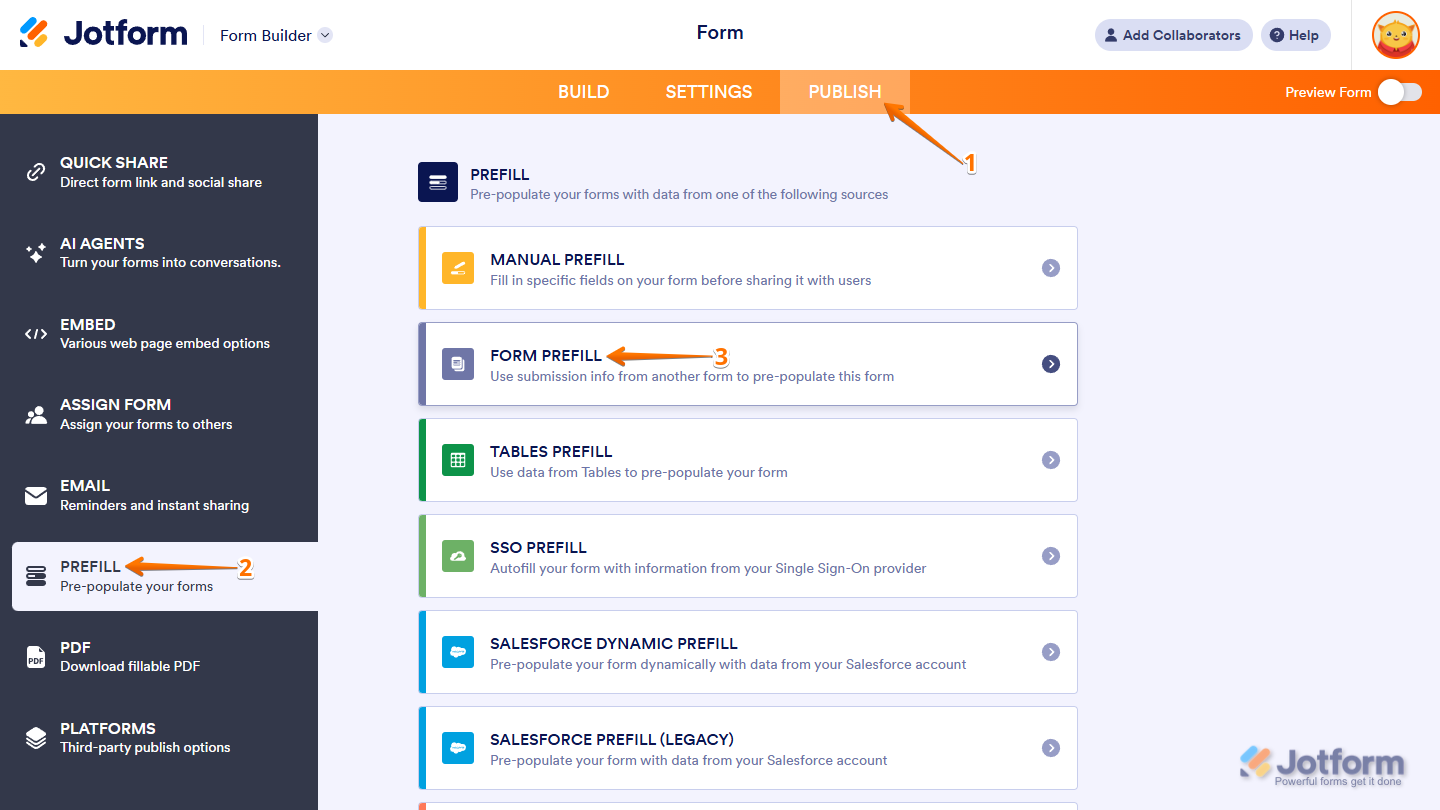
- In Form Builder, in the orange navigation bar at the top of the page, click on Publish.
- In the menu on the left, click on Prefill.
- Then, in the Prefill window on the right, click on Form Prefill.
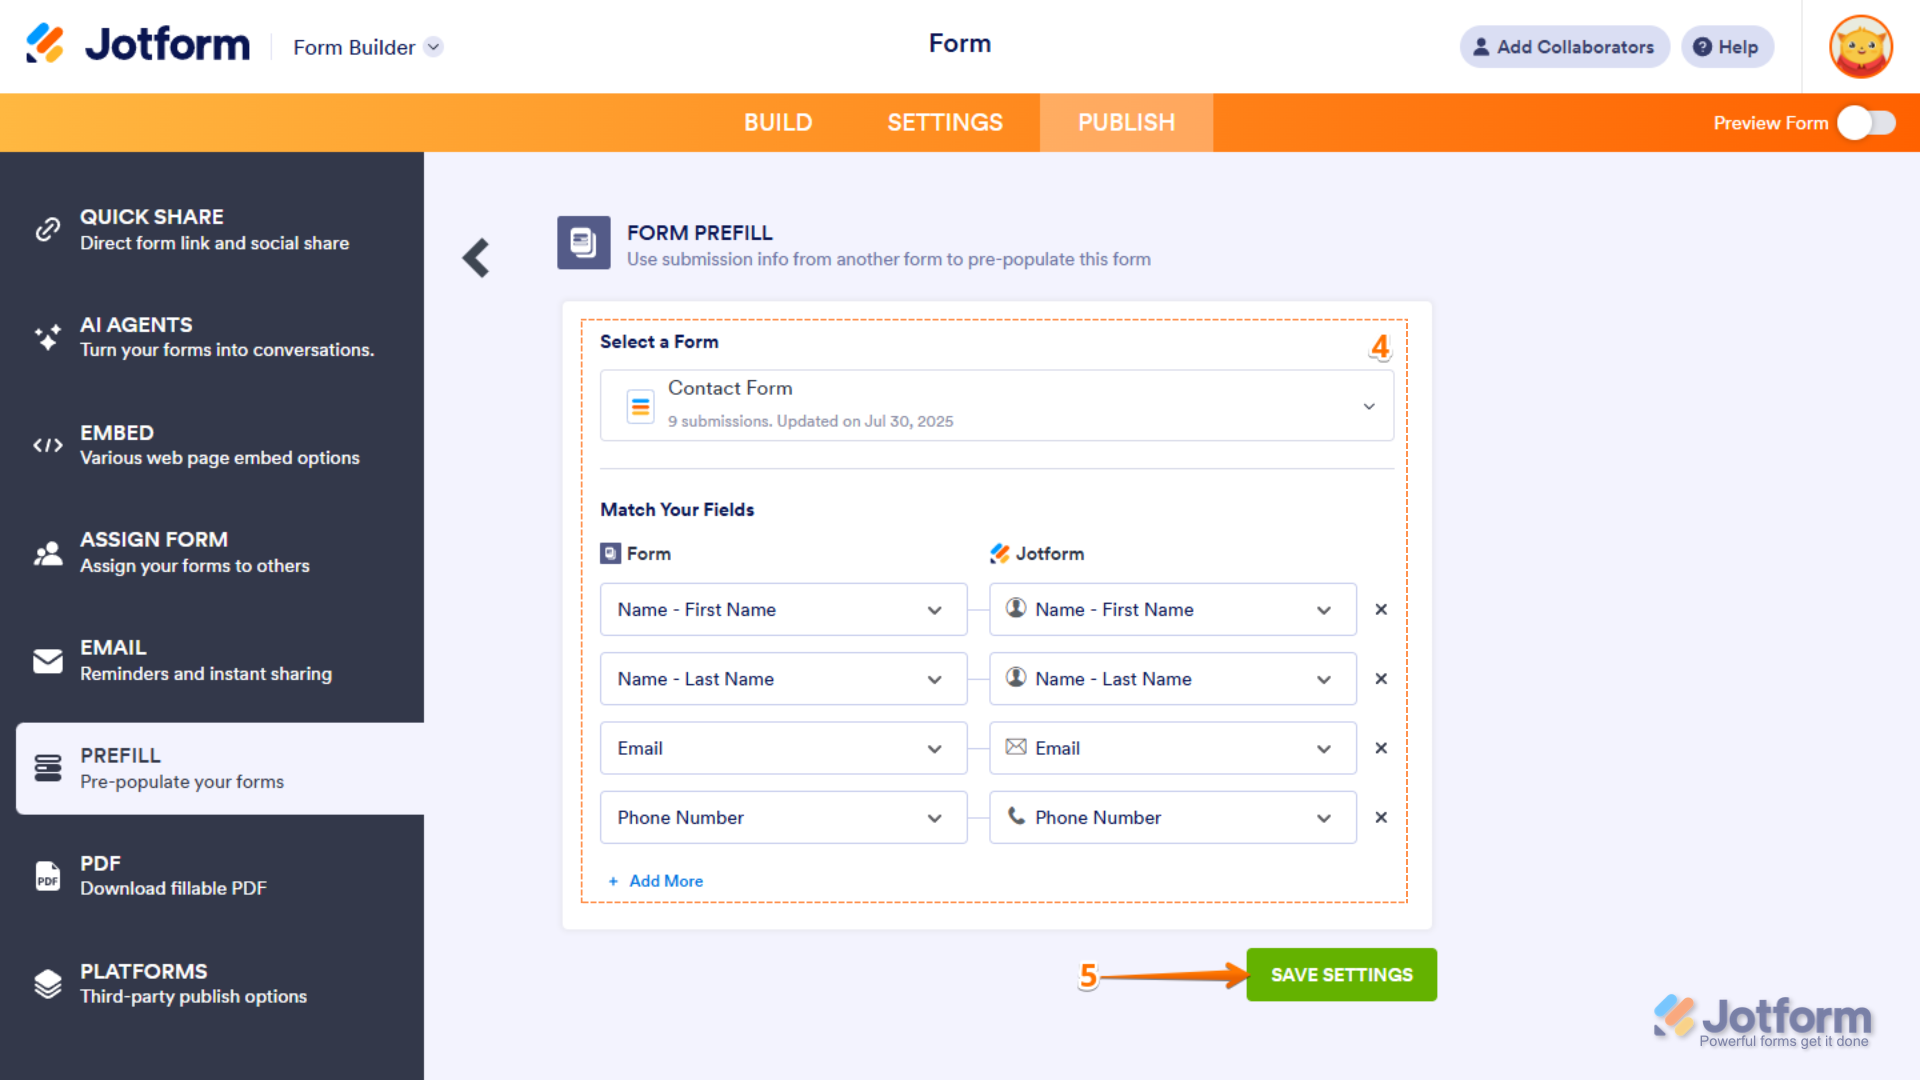
- Next, set things up like this:
- Pick a Form — Select the form you want to pull data from.
- Match Your Fields — Connect the fields from your source form (on the right) to the ones in your current form (on the left). Click on + Add More to match additional fields.
- Now, click on Save Settings to complete your settings.
Adding a Form Prefill Items
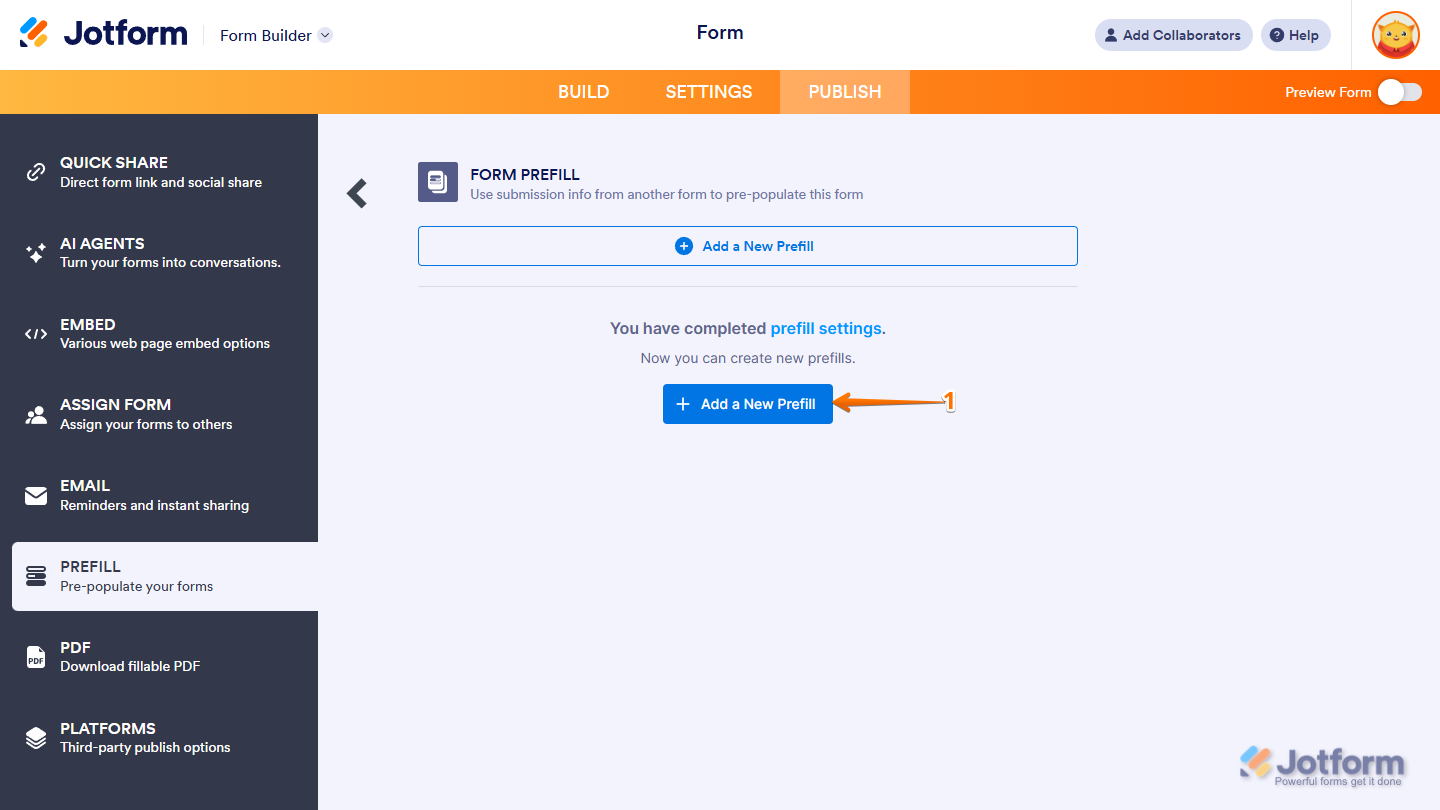
After setting up your Prefill Settings, you’re ready to start adding your prefill items. To get going, here’s what you’ll do:
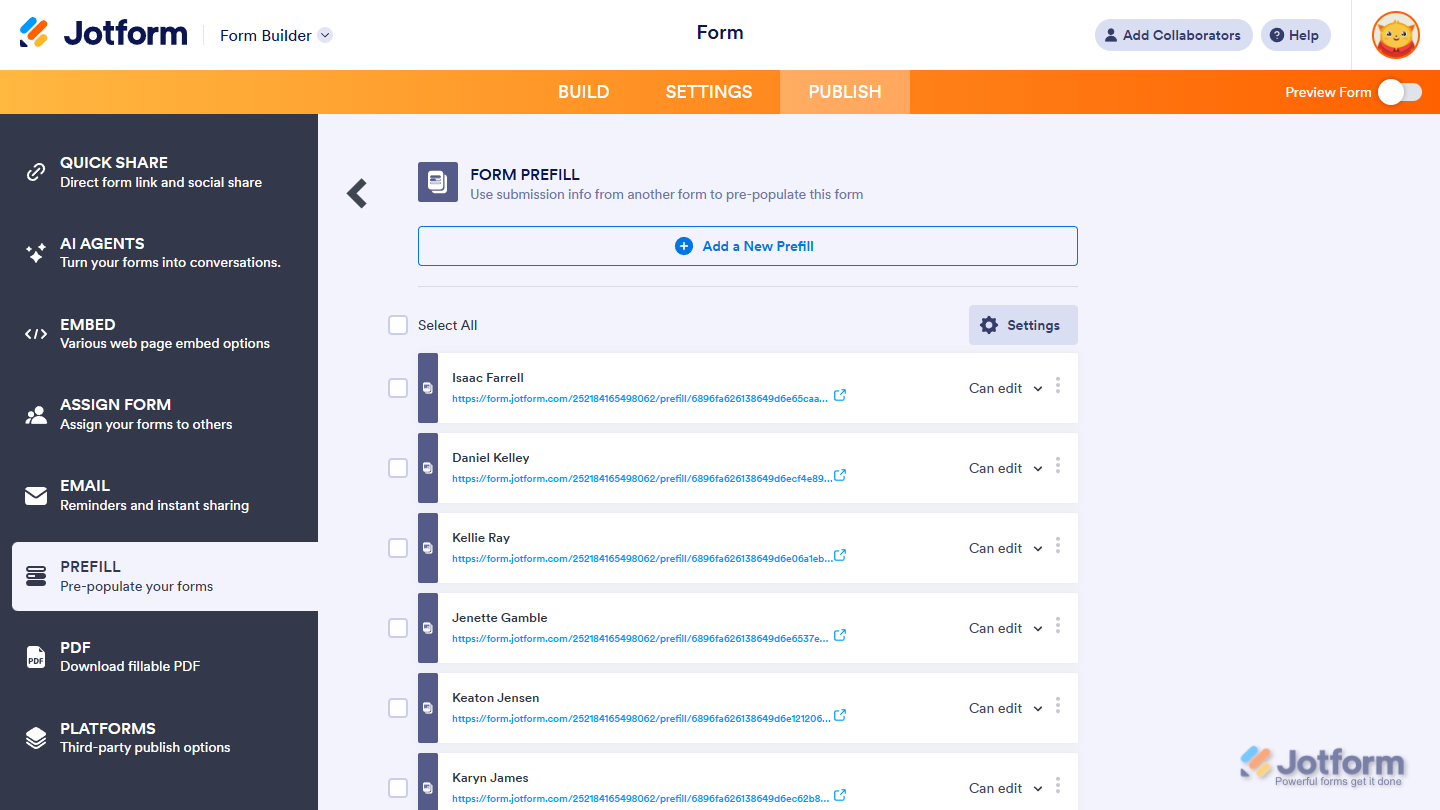
- In the Form Prefill window, click on Add a New Prefill.
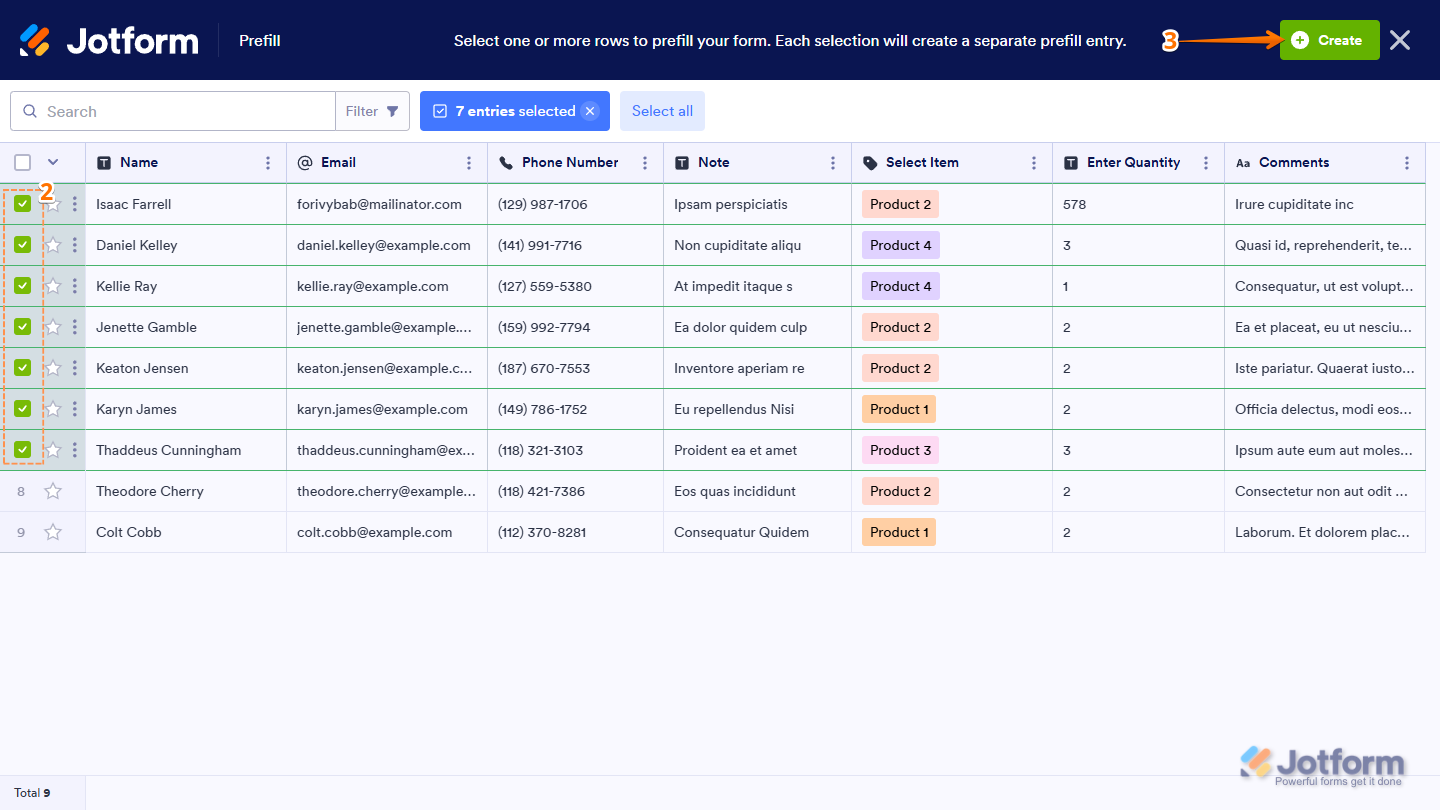
- In the Prefill window that opens, in the first column on the right side of the page, select the submissions.
- Now, at the top left side of the page, click on Create.
Notes
- You can choose all submissions if you want, but keep in mind—you can only create up to 20 prefilled URLs at once. If you select everything and hit Create, it won’t go through. Instead, you’ll see a message letting you know about the limit.
- You can also use filters to show only the submissions you need. Check out our guide on How to Filter Entries in Jotform Tables to learn more.
That’s it! The Prefilled URLs are now created. Each Prefilled URL is labeled based on the user’s name from the selected table.
Managing Multiple Form Prefill Items
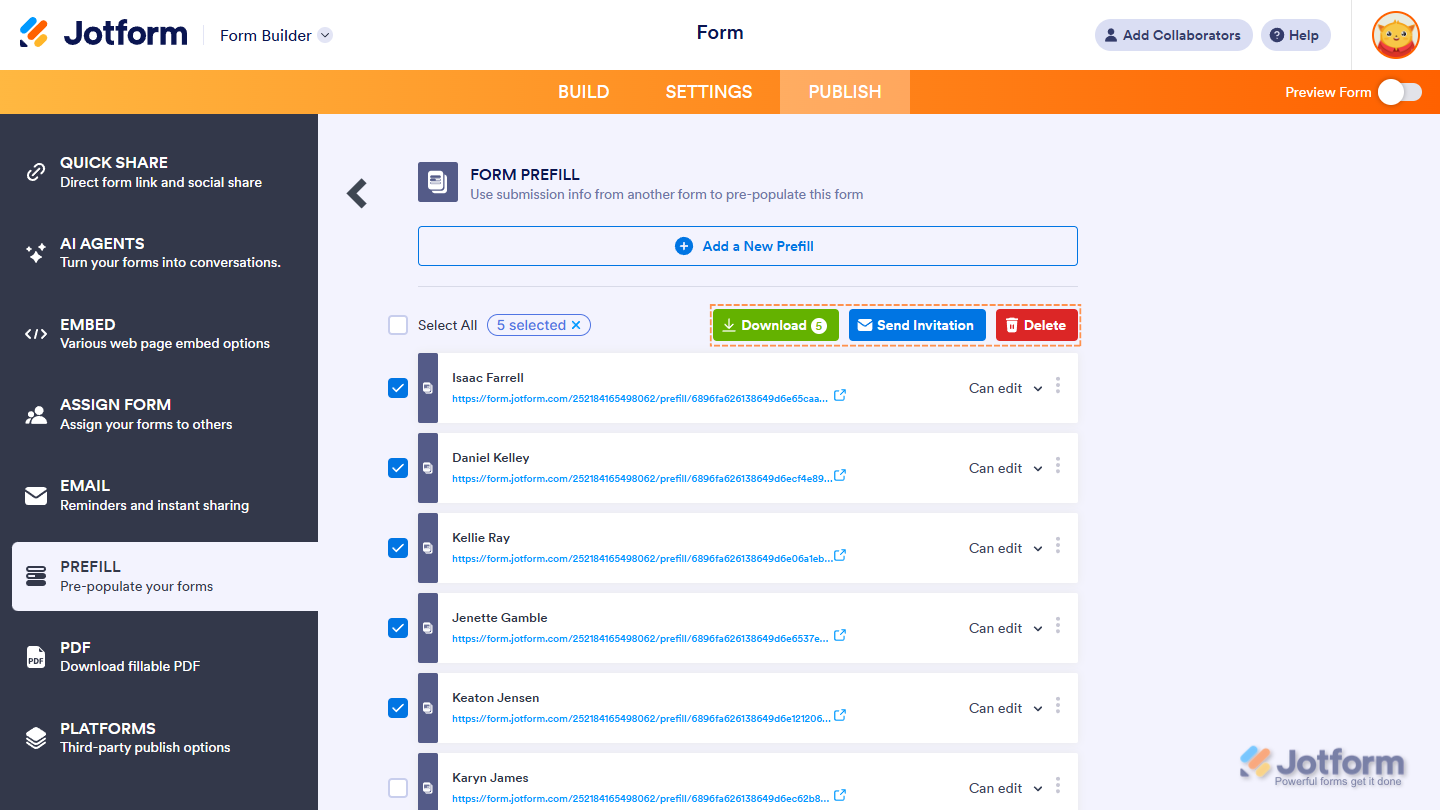
Once your prefilled items are ready, you can send them or copy their links. To manage several at once, select them from the list, and you’ll see these buttons:
- Download — Export all prefilled items as a CSV file.
- Send Invitation — Send the selected prefilled items to their recipients — up to 5 at a time.
- Delete — Remove the selected prefilled items — this action can’t be undone.
Note
You can select all prefilled URLs — but you can only send invitations to up to five people at a time. Sending more than that will show an error message.
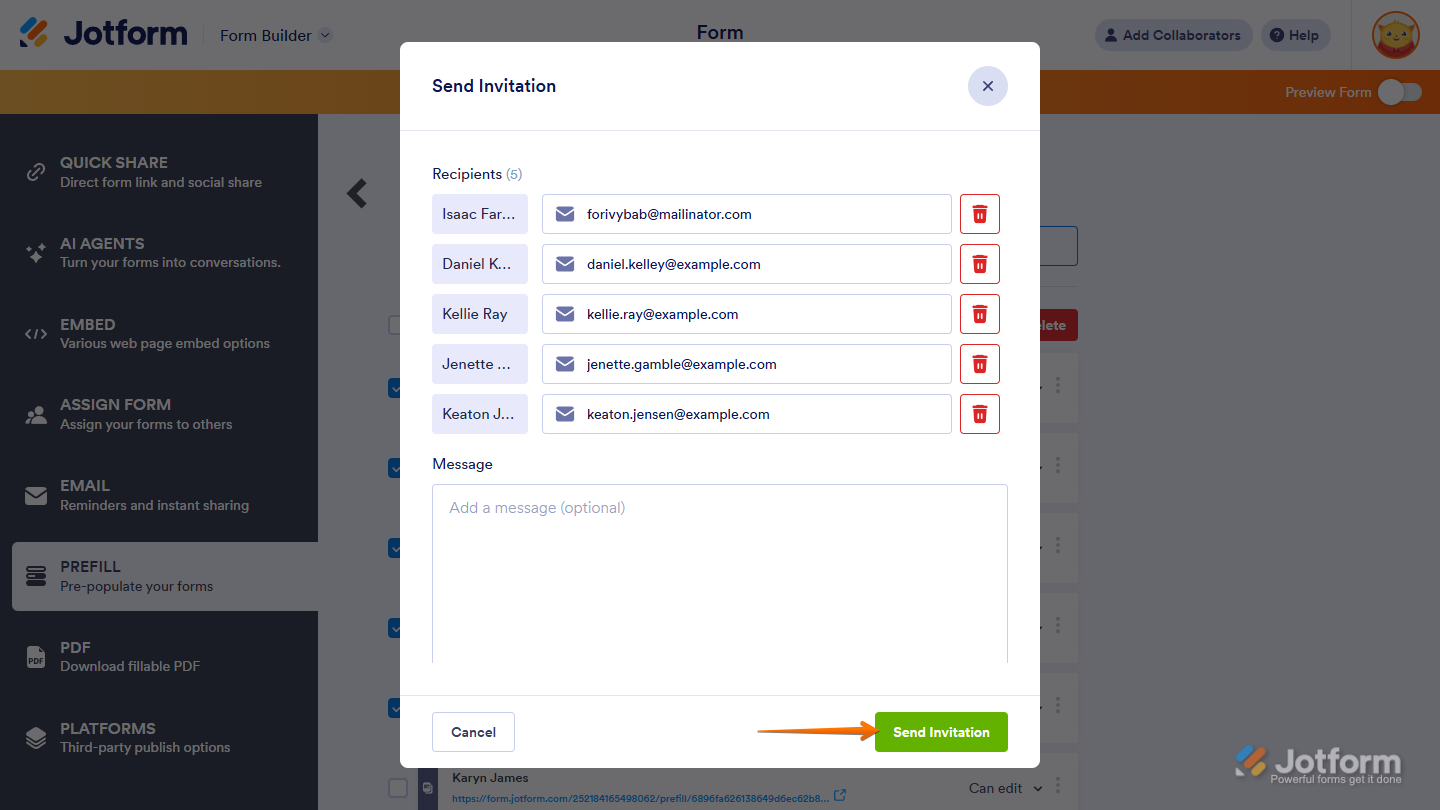
When you click on Send Invitation, a pop-up window automatically fills in the user’s email address as the recipient — but you can change it if needed. You can also add a message if you like. Once everything’s ready, click on Send Invitation at the bottom of the window.
Managing Individual Form Prefill Item
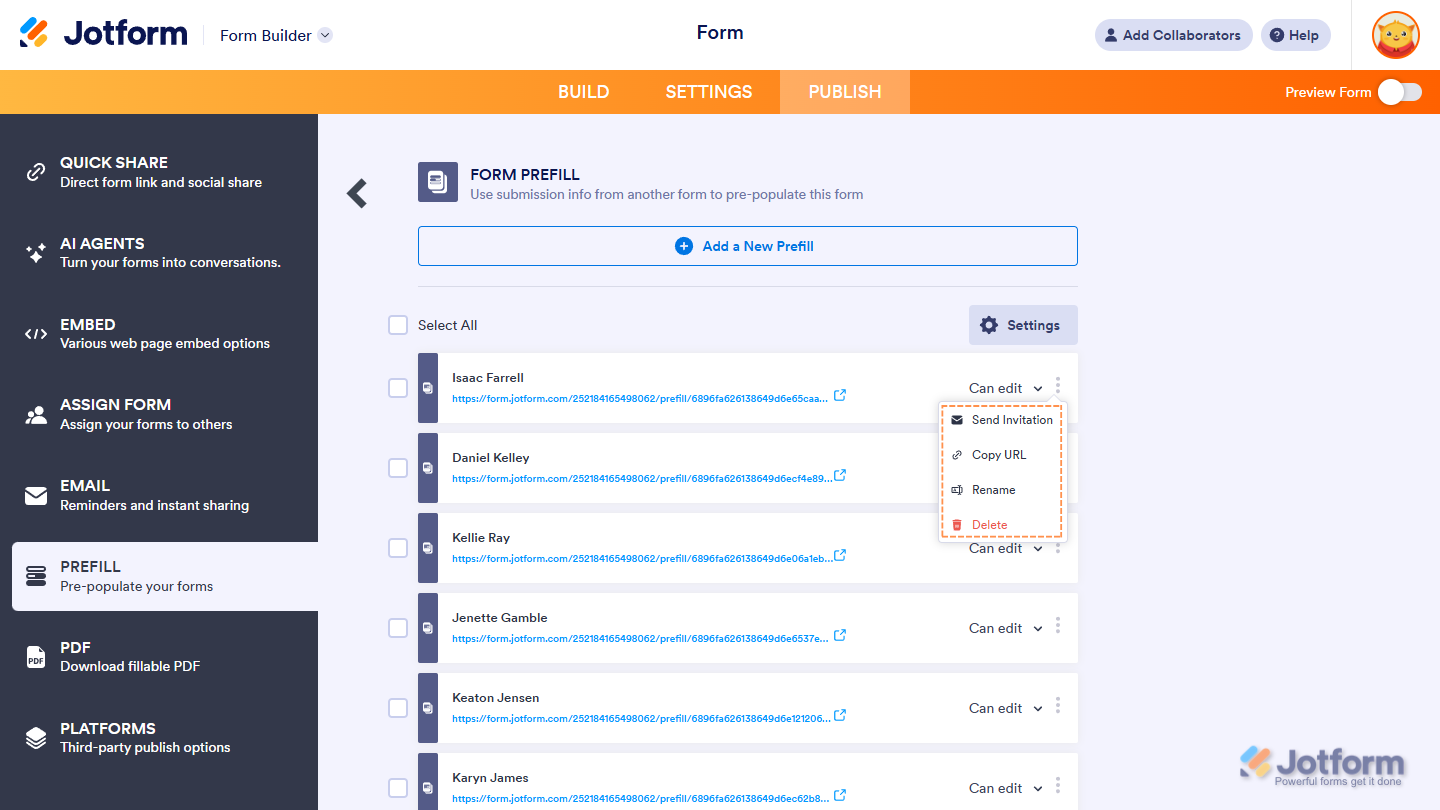
You can also manage the individual Form Prefill Item. On each Prefilled URL, clicking the Three Dots icon on its right will allow you to do the following:
- Send Invitation — Send the prefilled URL individually, or resend it if the recipient lost the previous invitation.
- Copy URL — Copy the prefilled URL — handy if you prefer to send it manually.
- Rename — Change the name of the prefilled URL.
- Delete — Remove the prefilled URL.
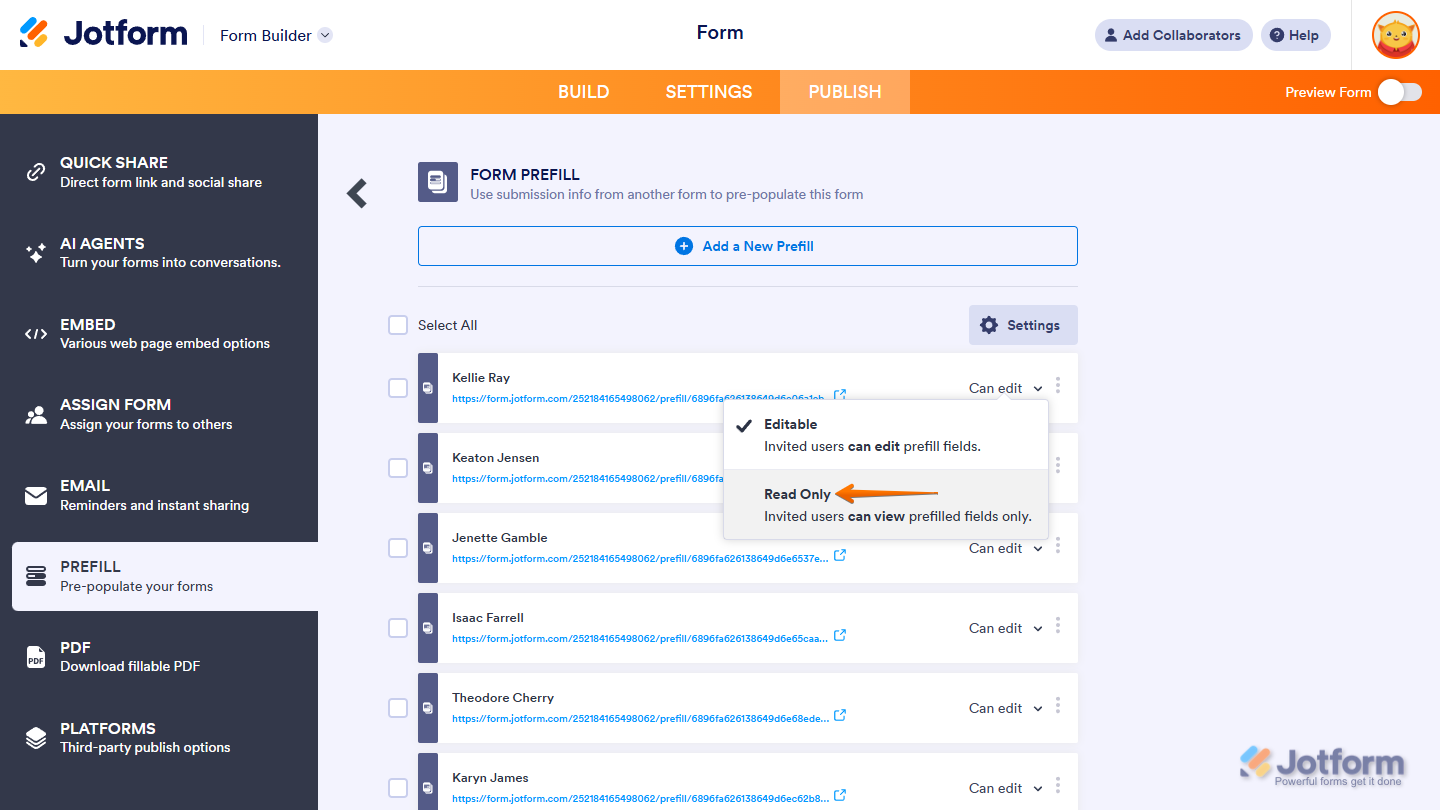
Changing Permission for Invited Users in Form Prefill
Users can edit the prefilled data — but if you want it to stay fixed, change the permission from Editable to Read Only. To do it, click on Editable and choose Read Only from the Dropdown menu.
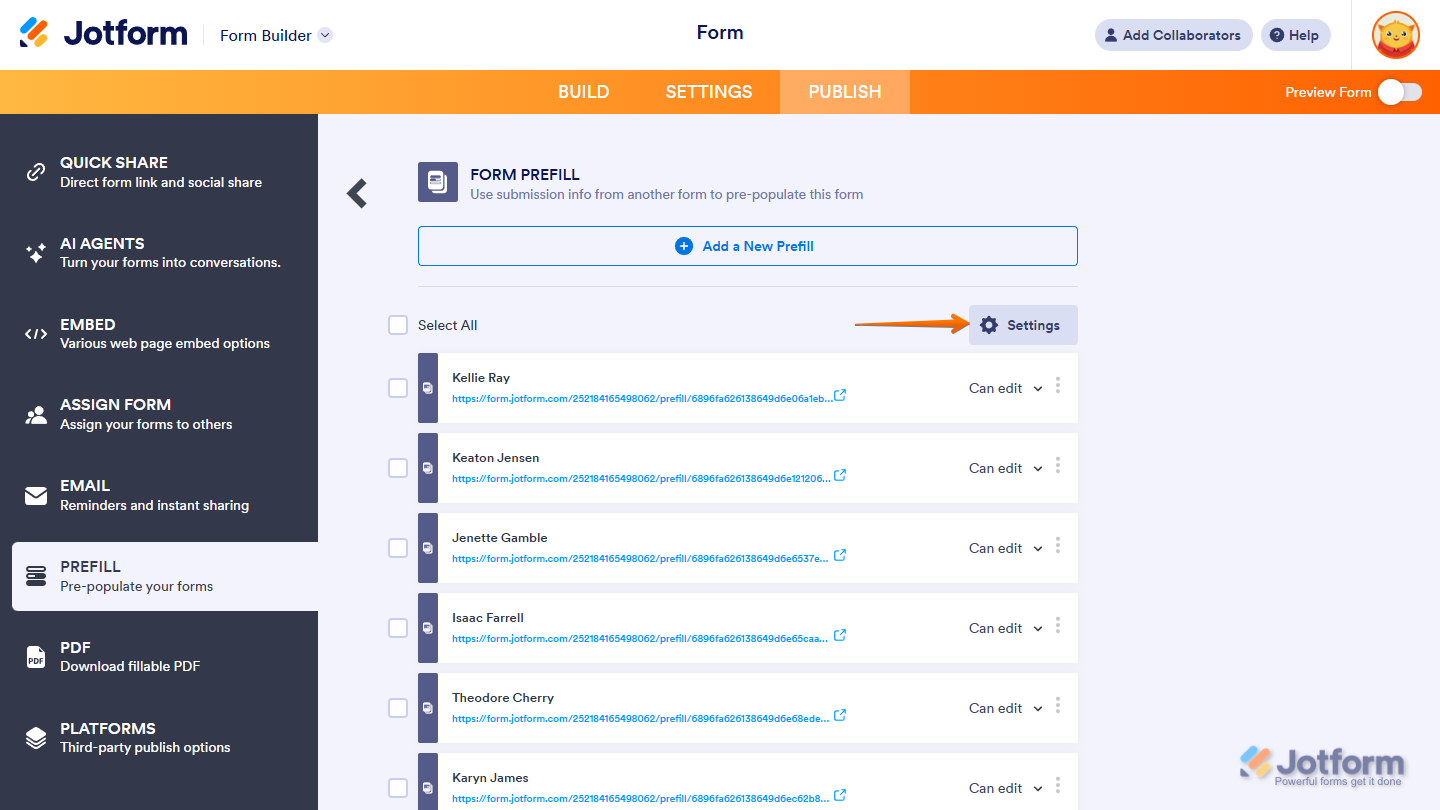
Changing the Settings of the Form Prefill
To add or remove mapped fields, click on Settings — then make your changes.
Supported Fields in Form Prefill
Form Prefill supports the following fields only:
- Full Name
- Address
- Short Text
- Long Text
- Phone
- Number
- Date Picker
- Time
- Dropdown
- Single Choice
- Multiple Choice
- Scale Rating
- Spinner


Send Comment:
17 Comments:
September 12, 2025
This is only for past submissions? Can you automate for it to do this each time a submission comes in the future?
December 1, 2024
Is there a way to collect names from one form and then use the prefill to prefill a dropdown box in another form so I can select multiple names. I need a way to have all the names automatically populate into another form without having to continue to add them to a form manually.
June 30, 2023
I'm trying to pre-fill a "fill in the blank" response to a "fill in the blank" question in a new form, but the fill in the blank question that I have created in the new jot form is not appearing as an option. I'm able to select the response from the prior form, however. Are there certain form elements that "fill in the blank" responses can be pre-filled to? And shouldn't "fill in the blank" be one of them? Thank you.
June 28, 2023
I have a "Offer Building" form that I want to give my clients the ability to define their own presets. I have them do this by filling out an "Onboarding" form where they define what they want those presets to be.
I'm envisioning here a drop down in the "Offer Building" form a place where they select their own email address, which then populates the corresponding defaults from the "Onboarding" form to the "Offer Building" form.
Can this be done?
May 5, 2023
I need to transfer information from a form that is filled out to a form that someone else will respond to. I have a client fill in what they are looking for and the vendor sends back the info. I need populate the code and name of client in the second form that is linked to the fist form. I set up prefill, but it does not work. Looks to only fill past submissions, not for future.
April 21, 2023
Is it possible to have the process automated whereby entering a response to "Field 1" on a form will populate "Fields 1- 9" based off previous responses in the 'tables' for the form?
October 12, 2022
I have a long membership form with many fields but I can only select 12 field for prefill. Can this be increased?
April 26, 2022
Sending an invitation email through the jotform system creates a bad link through which the payment never works if you try to fill the form from the invitation link. The exact link will work fine if you copy and paste the link into the browser (or copy and paste the link into an email from your own personal email and send it that way). But the send invitation button is VERY MUCH BROKEN! Our organization had over 50 people trying to click the automated invitation link, fill and pay - no one could get past the payment so no one could submit for a few weeks until I finally figured out that the link doesn't work unless copied and pasted.
April 14, 2022
Several mapped fields are not pulling over to the new form. What could be causing this issue? For example, FORM 1 "Preferred Name" is mapped to FORM 2 "Preferred Name". They are the same field type. I can't figure out what is happening.
March 29, 2022
Is it possible to use a 'encrypted data' enabled form to prefilled forms ?
Alternatively
How do you make their data accessible to users when you have used an 'encrypted data' enabled form to refill a form ?
Many thanks in advance
November 17, 2021
Buenas tardes, este prellenado se lo puede hacer desde una tabla?
Es decir crear un boton que me llene un formulario con determinados campos?
November 11, 2021
Is it possible to automate this process using workflow builder? form 1 informs form 2 and automatically sends it to predefined users conditionally based upon a field entry in form 1?
August 26, 2021
What is the difference between using the Prefill Form versus the prefill Table?
August 25, 2021
I need help with setting this up. I want to have information from form 1 go to form 2. I want to type in customer number eg 1234 and then all the details link with form 1 are generated.
Is this possible ?
August 13, 2021
This page is not well-written, and the small numbers it allows makes it not very useful.
July 27, 2021
It is written above:
"8. The Prefilled URLs are now created. Each of the Prefilled URLs is labeled based on the user's name from the selected table."
Can you explain this more? My test just use an email address field on my form which I created for another purpose.
Is there a way to chose which field is used to label each Prefill URL?
July 23, 2021
Is it possible to prefill from another form and have the prefilled data be in bold or italics?