Jotform Apps makes it easy to share your app with the people who’ll use it, whether they’re your customers, your team, or members of your community. You can share your app right from App Builder, and your users can open it on any device without having to download anything from an app store.
Here are the ways you can share your app:
- App Link — Copy your app’s link and share it anywhere, such as by email, in a chat, or on your website.
- Email Invitation — Send invitations to your users directly from App Builder.
- Social Media — Share your app’s link on WhatsApp, Facebook, LinkedIn, or X.
- QR Code — Let users open your app by scanning a QR code with their phones.
- App Stores — Publish your app on Google Play and the Apple App Store.
You can also control who can open your app with its access settings.
Sharing Your App Link
Each app has its own link that you can share anywhere, such as by email, in a chat, or on your website. Here’s how to get it:
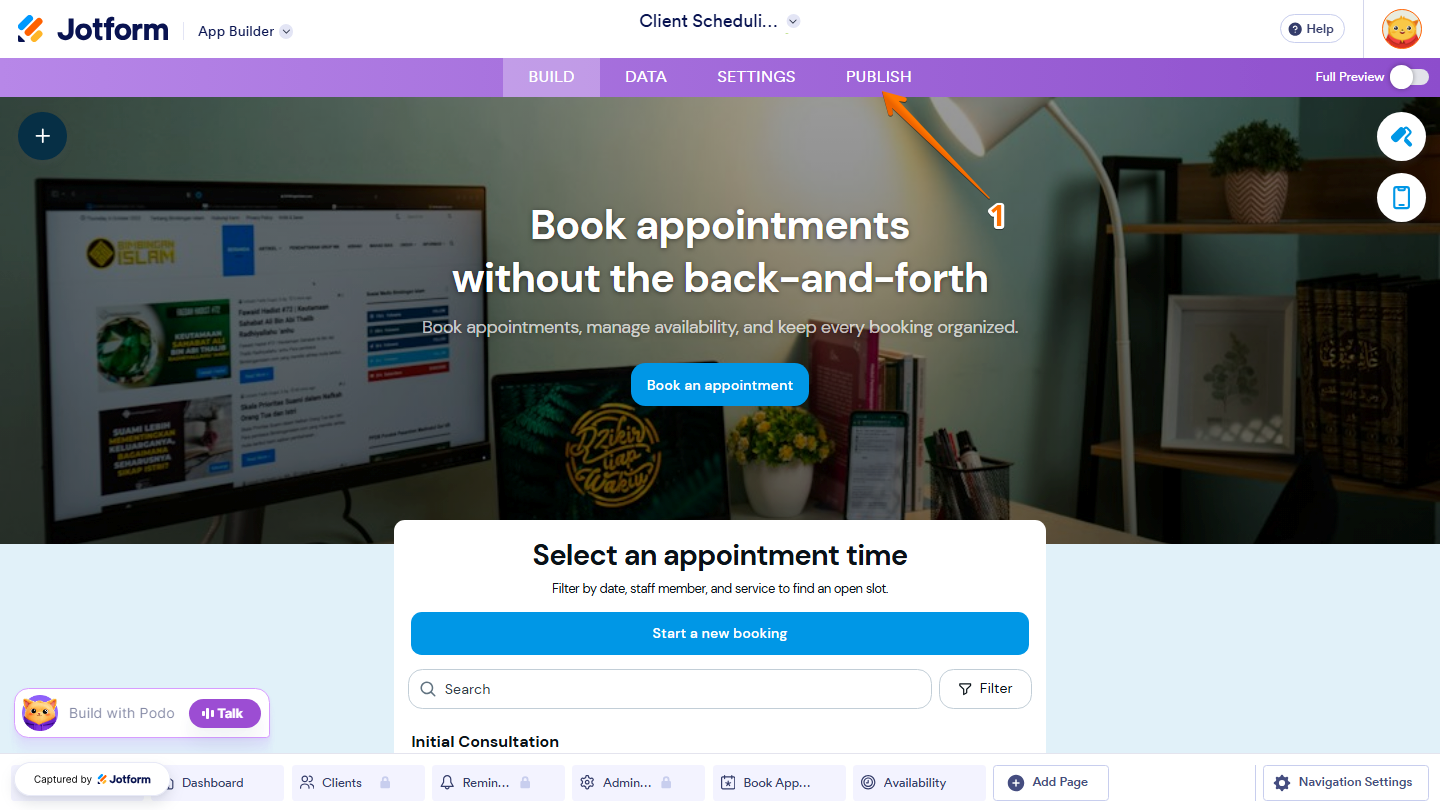
- In App Builder, in the purple navigation bar at the top of the page, click on Publish.
- Then, under the Your App Link section, click on Copy Link.
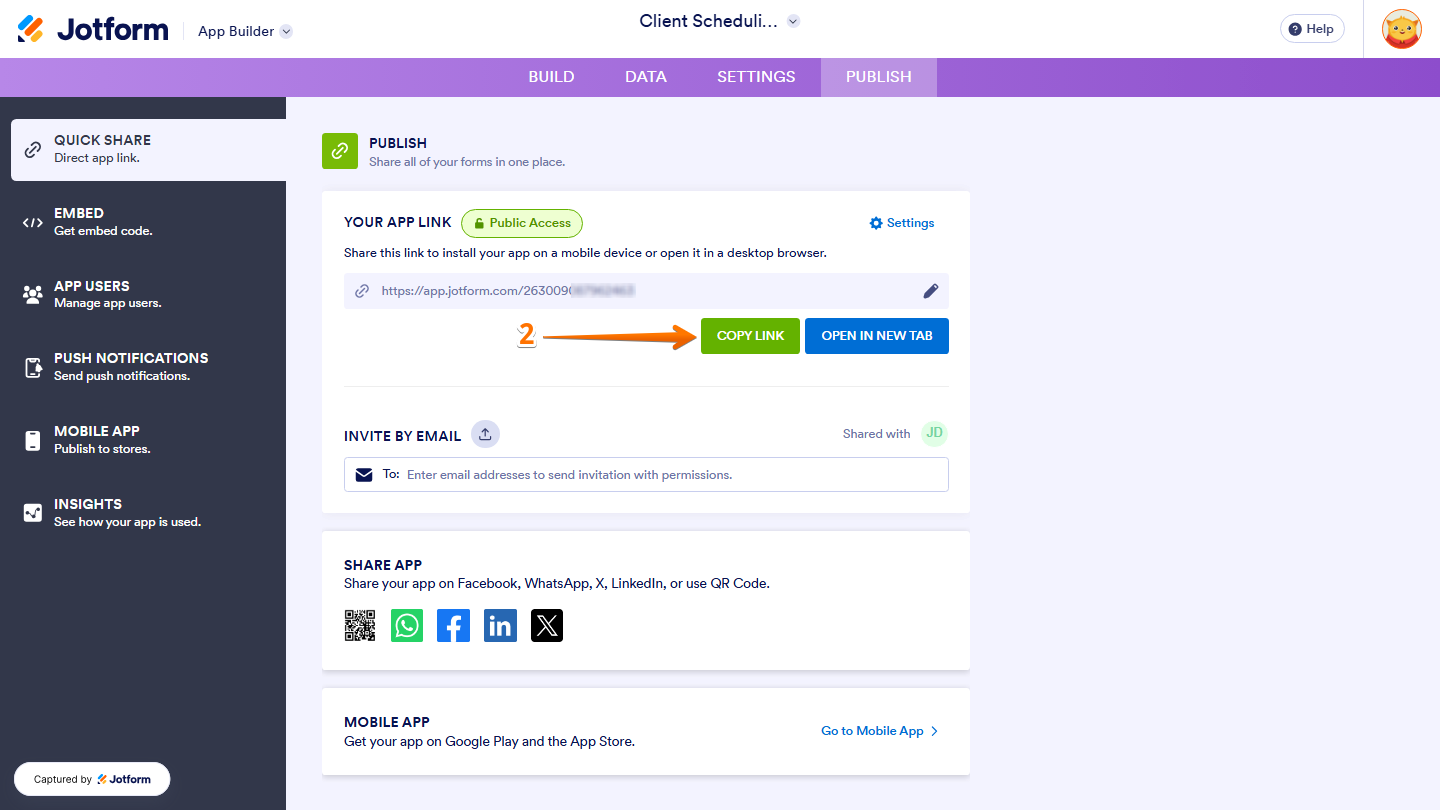
That’s it! You can now paste your app link wherever you want to share it.
Inviting Users by Email
You can also send email invitations to your users directly from App Builder. Here’s what to do:
- In the Quick Share menu, under the Invite by Email section, click on the To box and enter the email addresses of the people you want to invite.
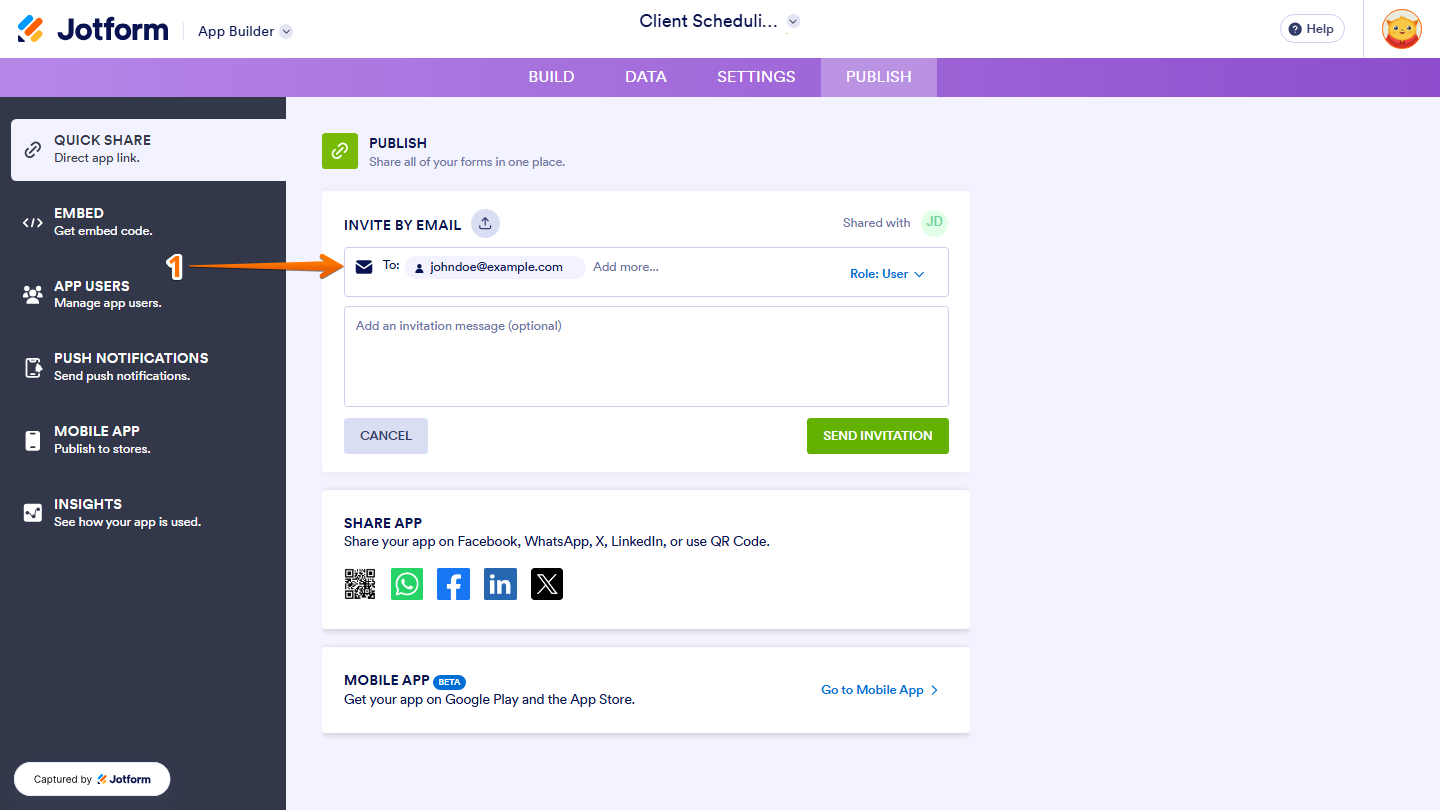
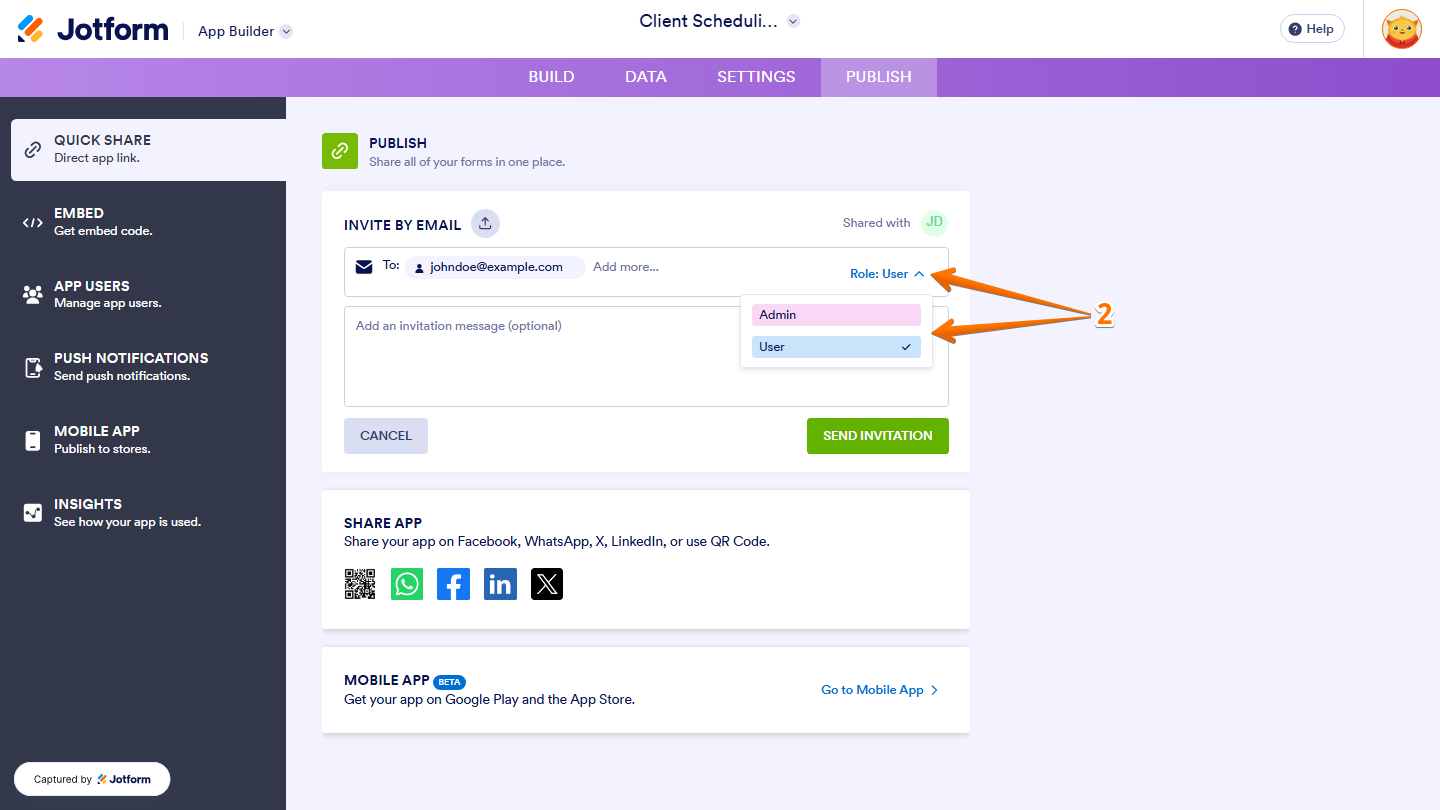
- Then, on the right side of it, click on the Downward Arrow icon and select the role you want to give them.
- Admin — Give this role to people who help you manage your app, such as your team members. You can show them pages and elements that other users can’t see.
- User — Give this role to people who use your app, such as your customers. This is the default role for new users.
- Next, in the Add an Invitation Message box, enter a short message for the people you’re inviting. This step is optional.
- Once you’re done, click on Send Invitation.
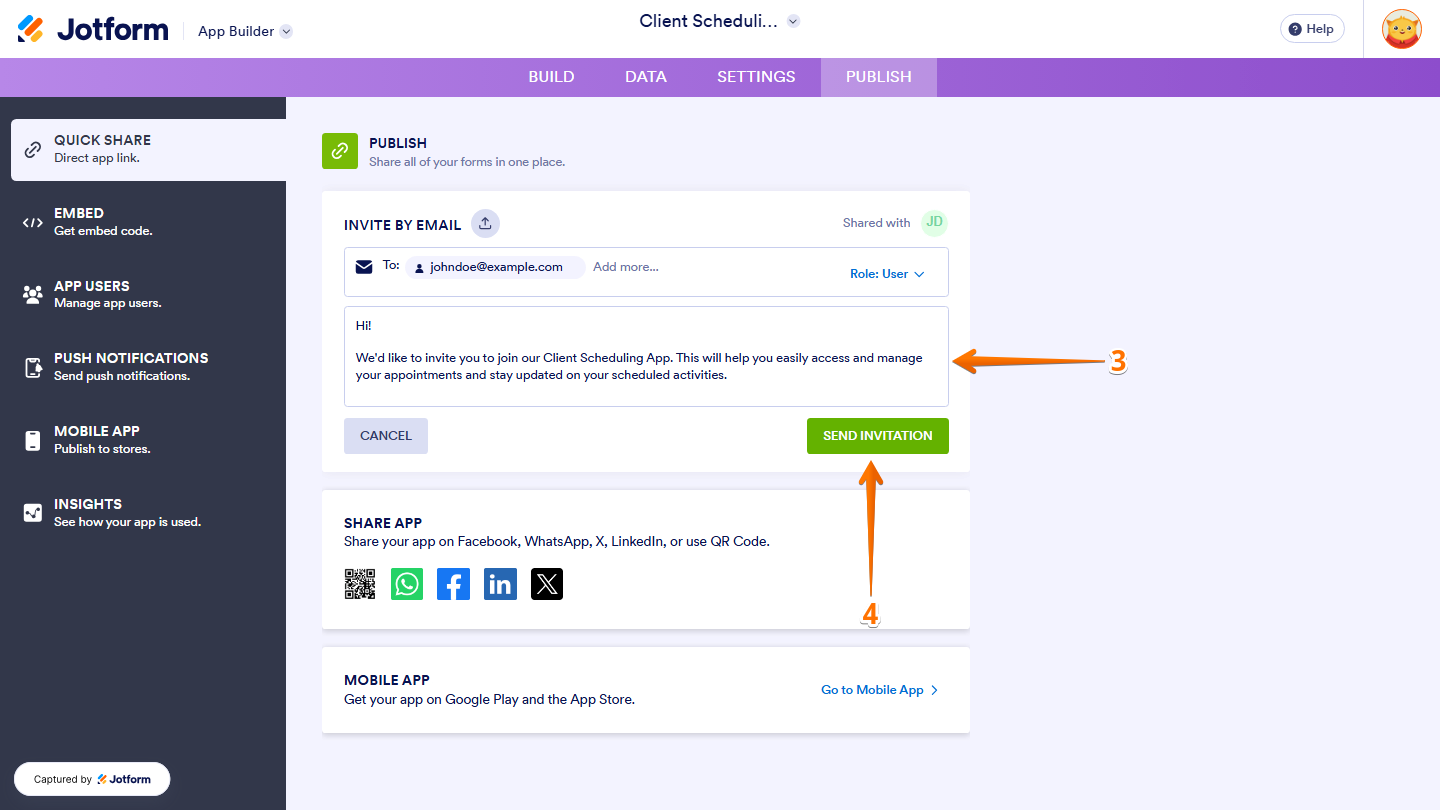
You’re all set! Invited users will receive an email with a button to open your app, and you’ll see them on the App Users page.
Note
- You can invite multiple users at once, but we recommend no more than 10 at a time.
- To invite a list of users, click on the Upload icon next to Invite by Email and upload a CSV (Comma-Separated Values) file.
Sharing Your App on Social Media
If you’d like to reach more people, you can share your app on social media. Here’s how:
- In the Quick Sharemenu, under the Share App section, click on the icon of the platform you want to share your app on:
- X
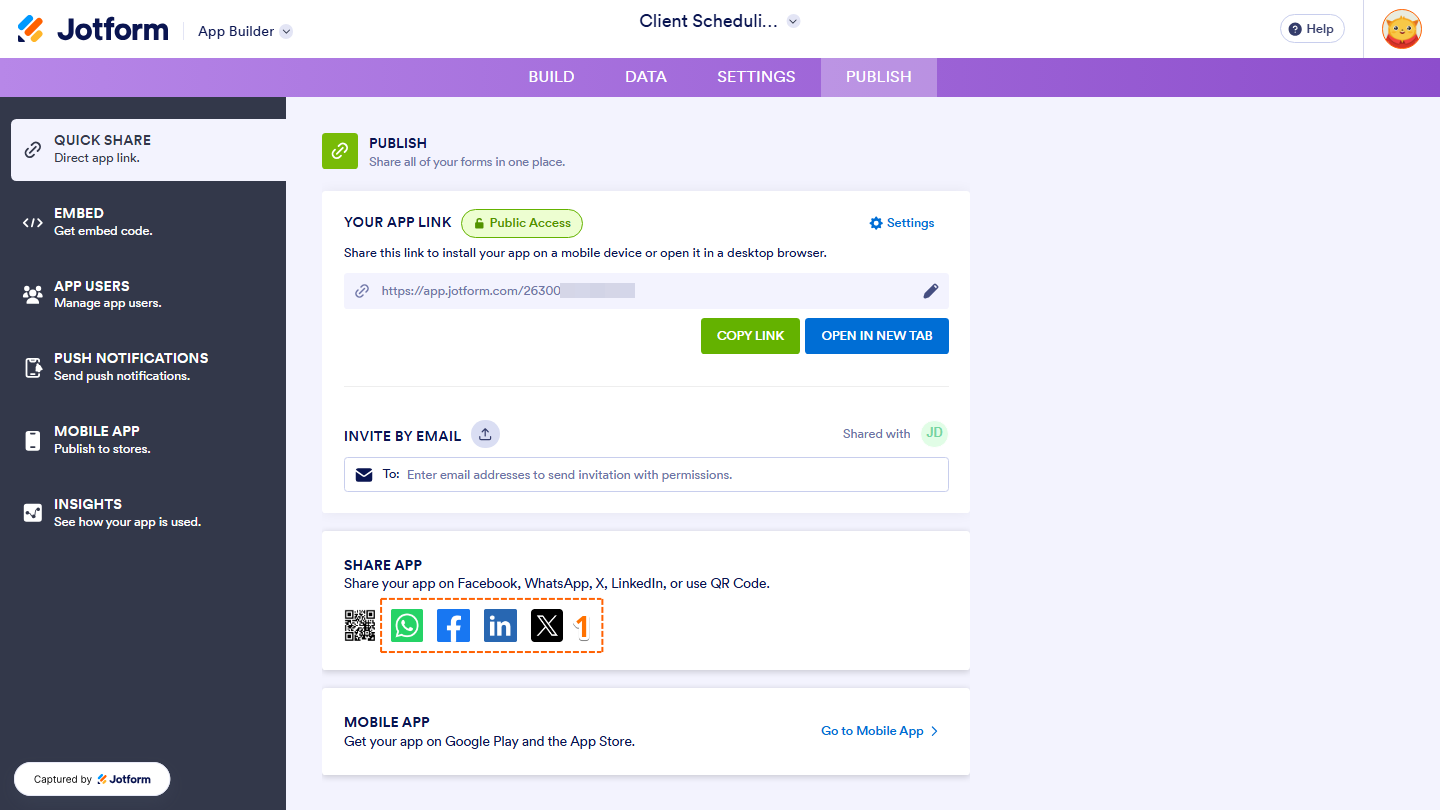
Your app link opens on the platform you selected, ready for you to post.
Sharing Your App With a QR Code
A QR code lets your users open your app by scanning it with their phones. You can add it to posters, flyers, and kiosks. Here’s how to get one:
- In the Quick Share menu, under the Share App section, click on the QR Code icon.

- Then, in the Share with QR Code window that opens, click on Download to save the QR code to your device, or click on Copy Code to embed it on your website.

Your QR code is ready to share! When users scan it, your app will open on their device.
Publishing Your App on App Stores
If you’d like your users to download your app from Google Play or the Apple App Store, you can publish it there too. Here’s how to get started:
- In the Quick Share menu, in the Mobile App section, click on Go to Mobile App.

- Then, on the Mobile App page that opens, click on Download for Android or Download for iOS, depending on which app store you’re publishing to.

For a full breakdown of how to do it, head over to our guide on How to Publish Jotform Apps on Google Play and Apple App Store.
Changing Your App’s Access Settings
Your app is set to Public by default, so anyone with the link can open it. You can change who has access at any time. Let’s set it up:
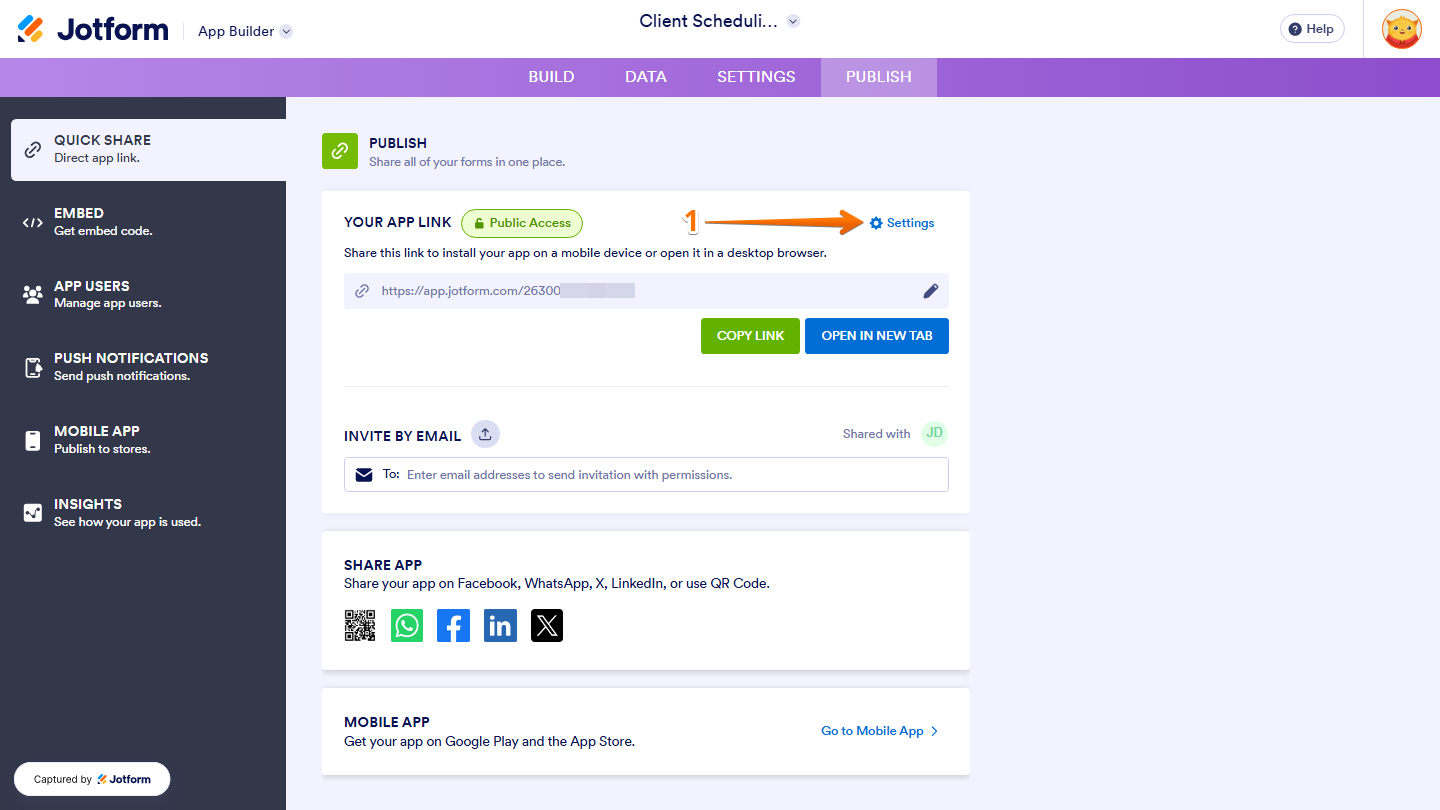
- In the Quick Share menu, on the right side of the Your App Link section, click on Settings.
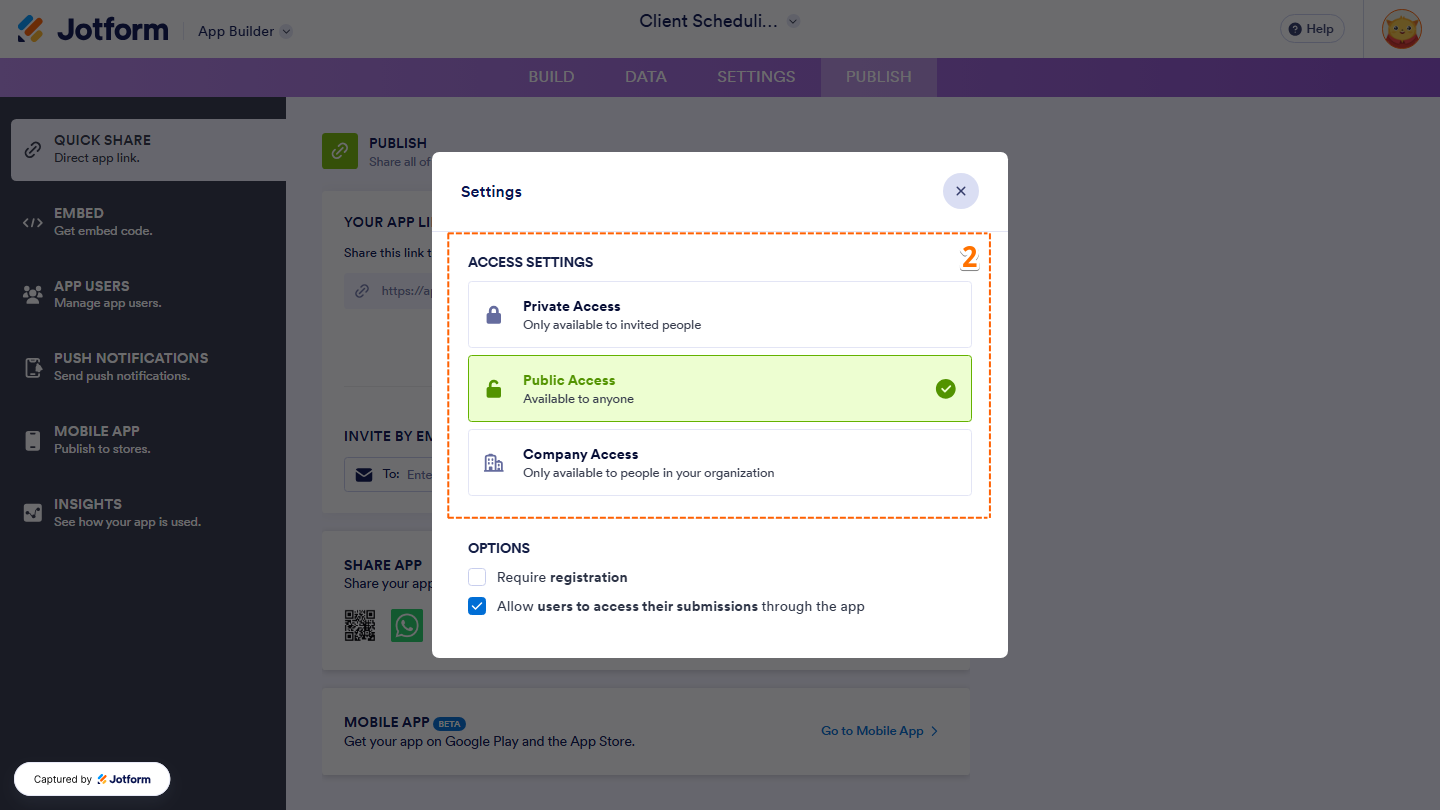
- Then, in the Settings window that opens, under Access Settings, select one of the following:
- Private Access — Only people you invite can open your app.
- Public Access — Anyone with your app link can open it.
- Company Access — Only people in your organization can open your app.
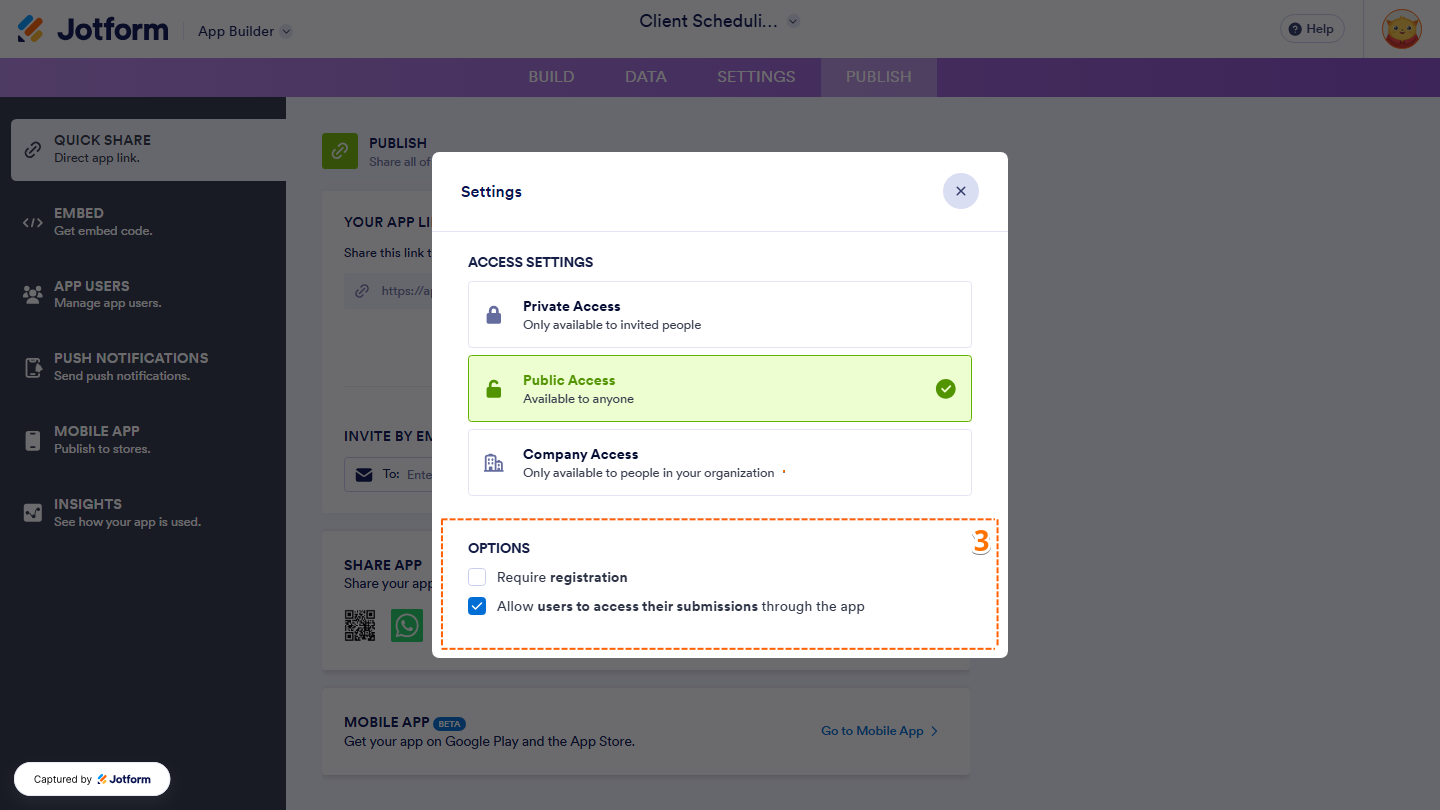
- Next, under the Options section, tick the options for the access type you selected:
- For Public Access:
- Require Registration — Users must sign up before they can view your app.
- Allow Users to Access Their Submissions Through the App — Users can view the submissions they’ve made in your app.
- For Public Access:
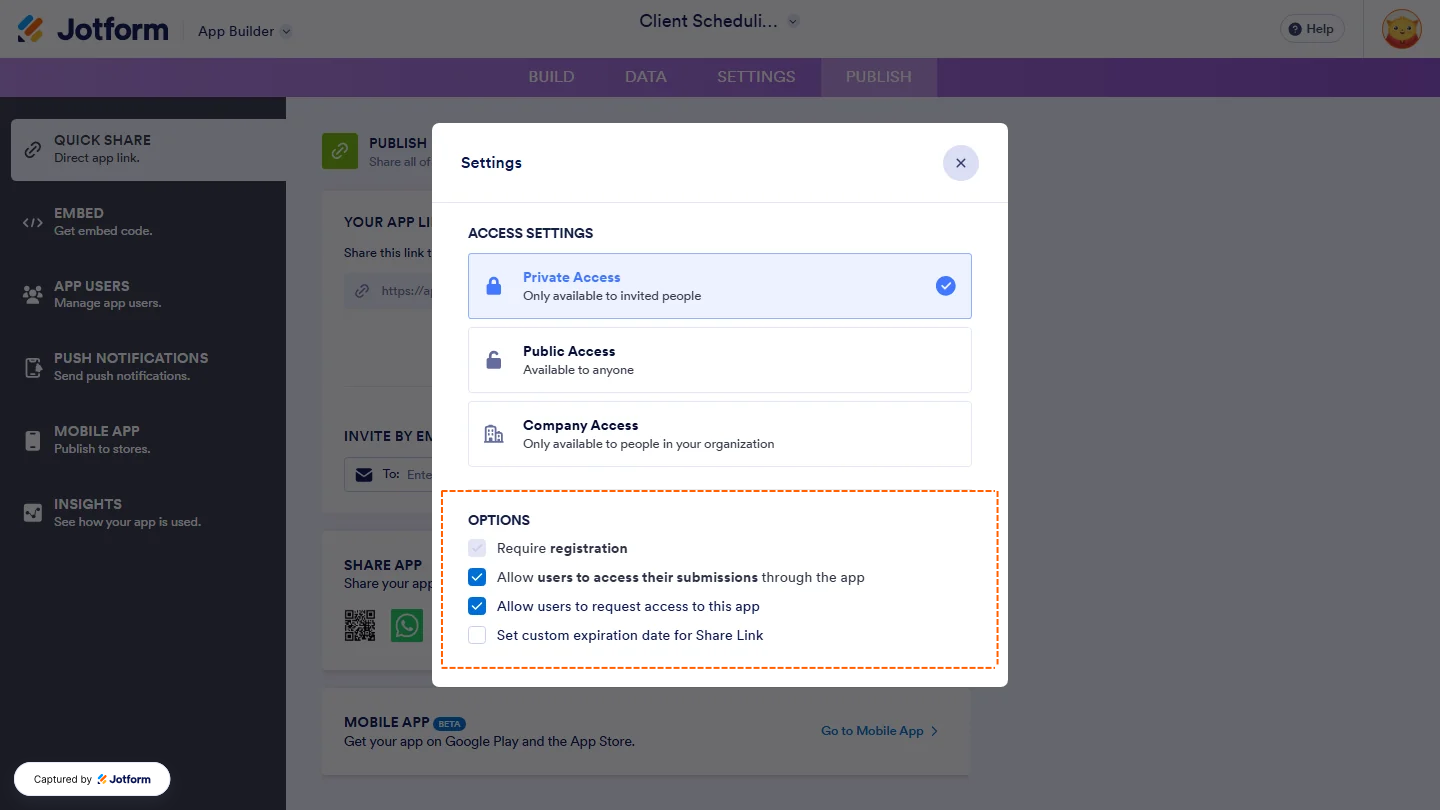
- For Private Access:
- Require Registration — This option is always on, so users must sign up before they can view your app.
- Allow Users to Access Their Submissions Through the App — Users can view the submissions they’ve made in your app.
- Allow Users to Request Access to This App — People you haven’t invited can send you a request to open your app.
- Set Custom Expiration Date for Share Link — Choose a date and time when your app link stops working.
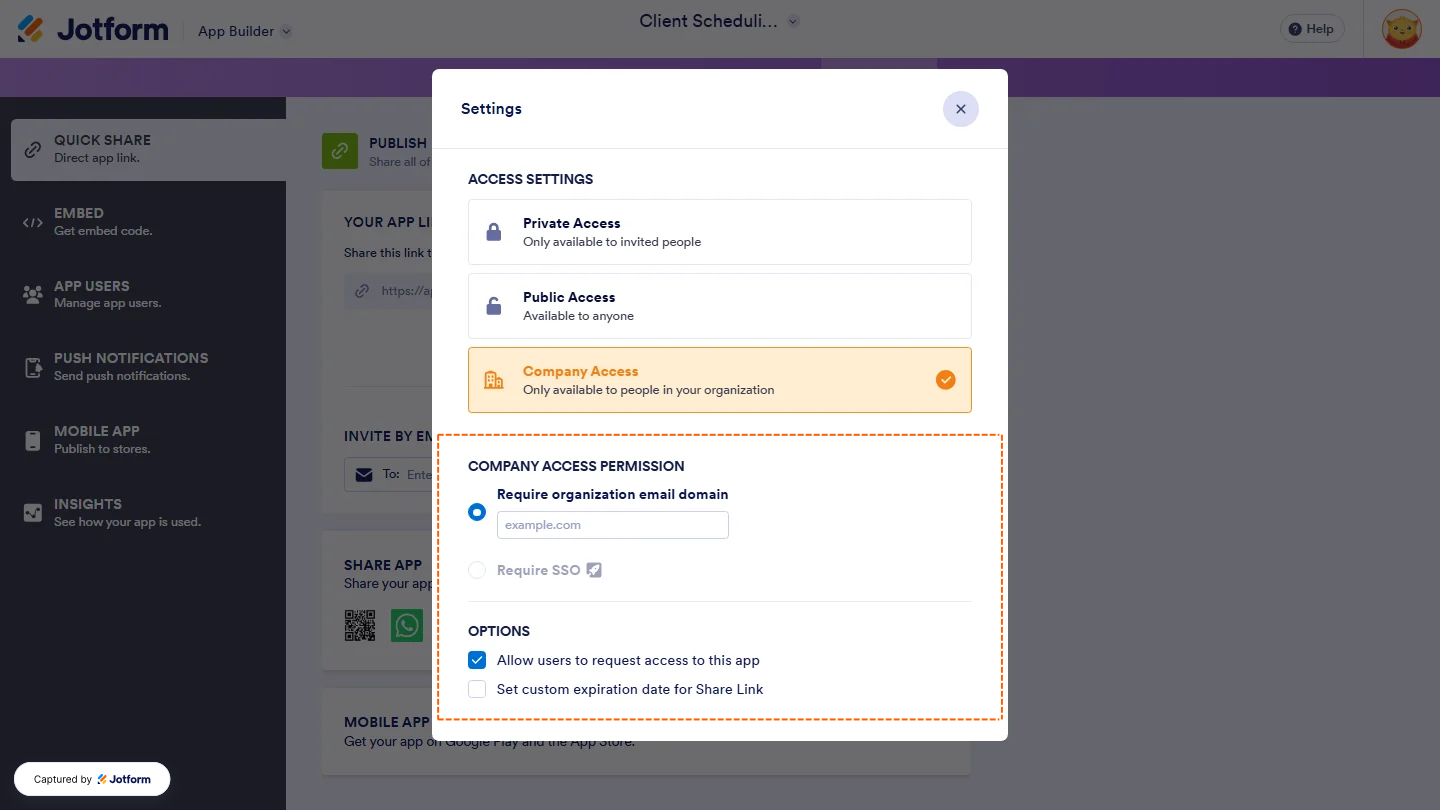
- For Company Access:
- Require Organization Email Domain — Under Company Access Permission, enter your organization’s email domain, such as example.com.
- Require SSO — Users must log in through your organization’s SSO (Single Sign-On) to open your app. This option is available only on Jotform Enterprise.
- Allow Users to Request Access to This App — People in your organization can send you a request to open your app.
- Set Custom Expiration Date for Share Link — Choose a date and time when your app link stops working.
Your app will now be available only to the users you allowed.


Send Comment:
15 Comments:
July 24, 2026
Não consigo fazer login no Jotform , já tentei várias vezes , mas a página começa a carregar porém ela fecha e logo depois sai do navegador.
May 31, 2026
To boys only sena
March 31, 2026
The email is sent with Jotform's Logo. How do we send it with our Company logo?
March 24, 2026
Hi, I need someone else be able edit an app, how do I do this? I have the free version.
February 3, 2026
Is it possible to export a JotFrom website so that it can be hosted by others??
February 7, 2025
How do you revoke APP access from a specific user? Such as a former employee, from a Human Resources App. I can see how to limit access via Private/Company Access features but I'm unclear on how to revoke it after approving an user. Thanks in advance!
October 5, 2024
How can I share a qr code to direct people to this jotform? We do have a landing page also, but we're having trouble getting the jotform on this landing page.
February 17, 2024
Hi ,
will the app work on safari if sent via whatsapp as a copy and paste of the link ?
Or do i have to send it via email to iPhone users ?
July 1, 2023
How can i add my publish my app play store
March 9, 2023
Thanks for sharing, I do believe that I understand how to share the app that I am working on with the members of my ministry. When they enter information from their cell phone via the application I would like for them to be able to access that information themselves as it is 100% discrete. I can see the information on a spreadsheet or table log on my phone. Not sure all of the ministers are aware of Excel are their other tables or data storage options that are available to link. I assume once we are able to come to a consensus on which one would be best each end user will need to link their own or if I link it can it be shared as well> Thanks.
March 2, 2023
My app is allowing one form public access without logging in but It ases for a login for the other form
October 27, 2022
Will you make an app that allows multiple access types? I would like to have one app for my company: a login for customers who will only see forms pertaining to them, and a staff login where staff can find internal company info.
June 24, 2022
I used the QR code for the app I created and it is public not private and it won't give me the option to add as an app on my employees phone it will only let me view it in a browser? I was able to add a different app I created to my own phone with no issues. please advise.
January 24, 2022
I have created an app for customers to order products. When I share the link, it prepopulates my name and email address. If I log out then this data is removed from the link. When I log back in, it returns. How do I share without it linking to my log-in?
November 21, 2021
Are you going to be creating an option to upload and share via Apple and Android platforms? If so, when approximately? Thanks!