Jotform provides Form Analytics to analyze data, improve responses, learn from customer behavior, and increase your conversion rate. If you need further analytics for your forms, you can use Google Analytics 4 (GA4) and Google Tag Manager (GTM).
A note before starting, the following setup only works on forms added to a website using the form’s source code. To learn more, see How to Get the Full Source Code of Your Form.
Form Tracking With Google Analytics 4
Google Analytics is a service that allows you to track events on your form. The following shows how to use Google Analytics on your form using a new property and data stream in an existing GA4 admin account but you can use your existing ones. See How to Set Up Analytics to get started with Google Analytics 4.
Assuming you already have a GA4 account, you need to
- Create a property
- Add a web data stream
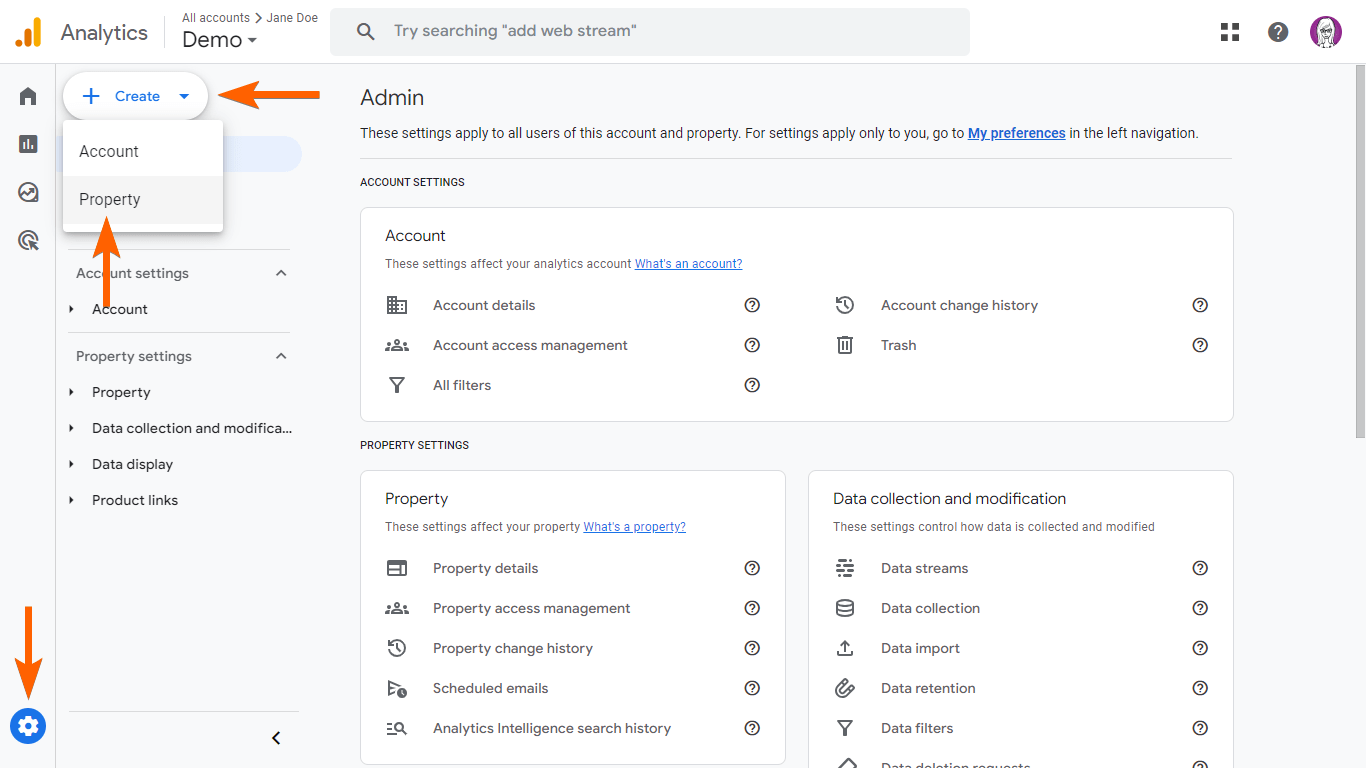
Creating a property
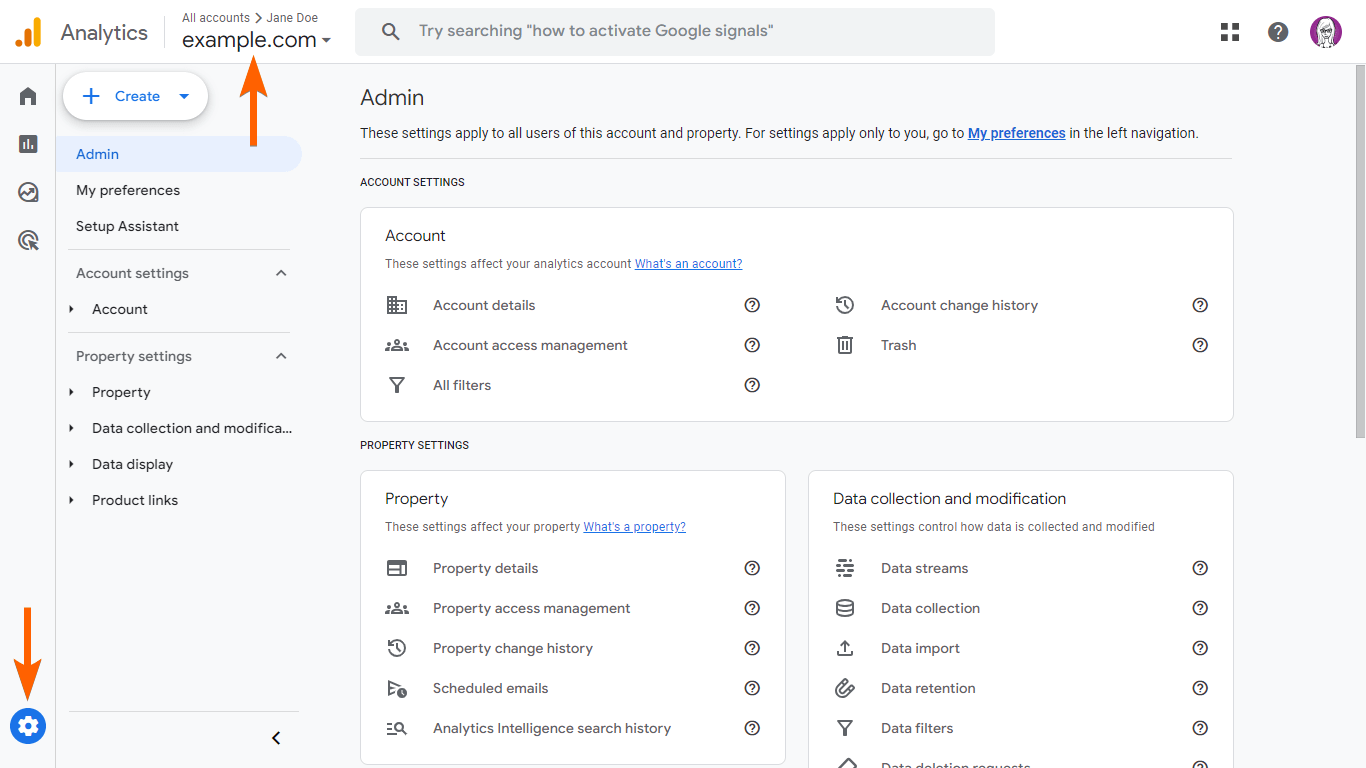
- In Google Analytics, go to Admin, then select Create > Property.
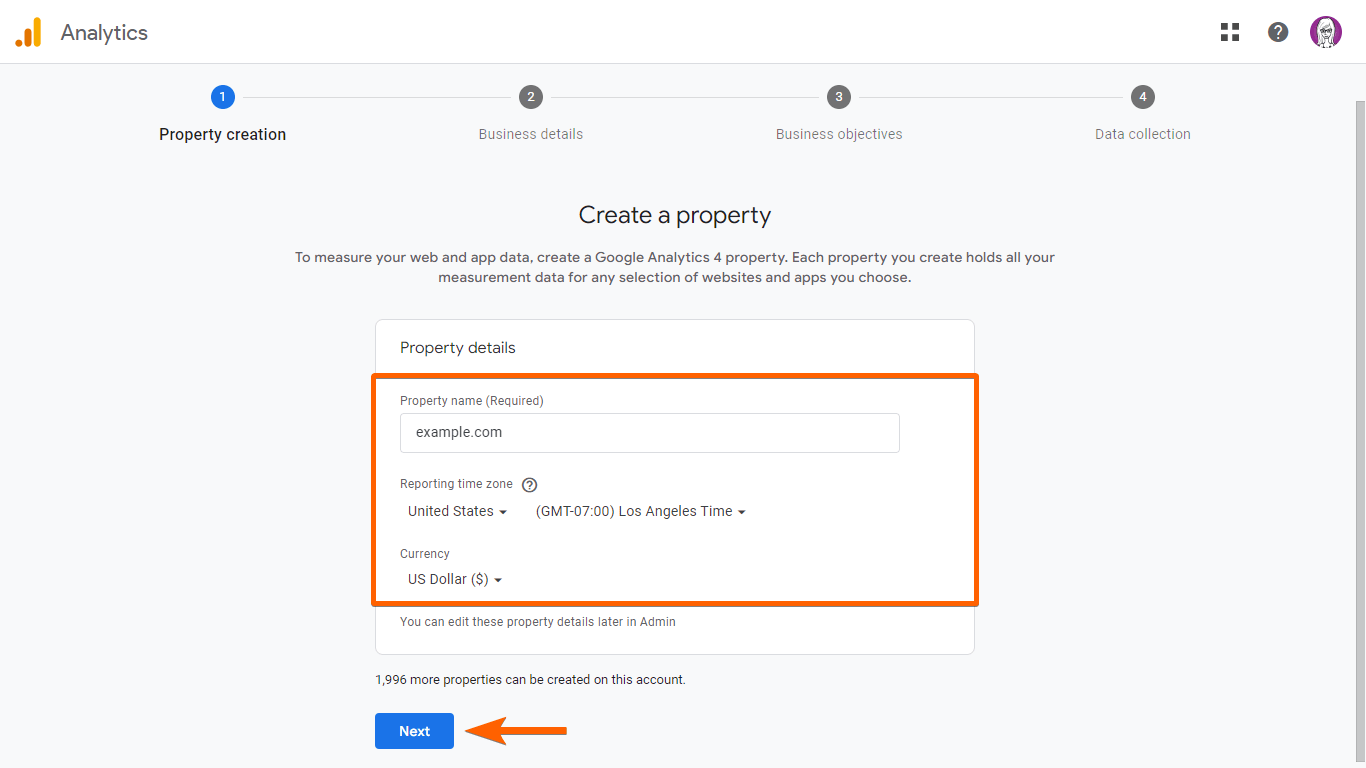
- Enter your desired property name and details, then select Next.
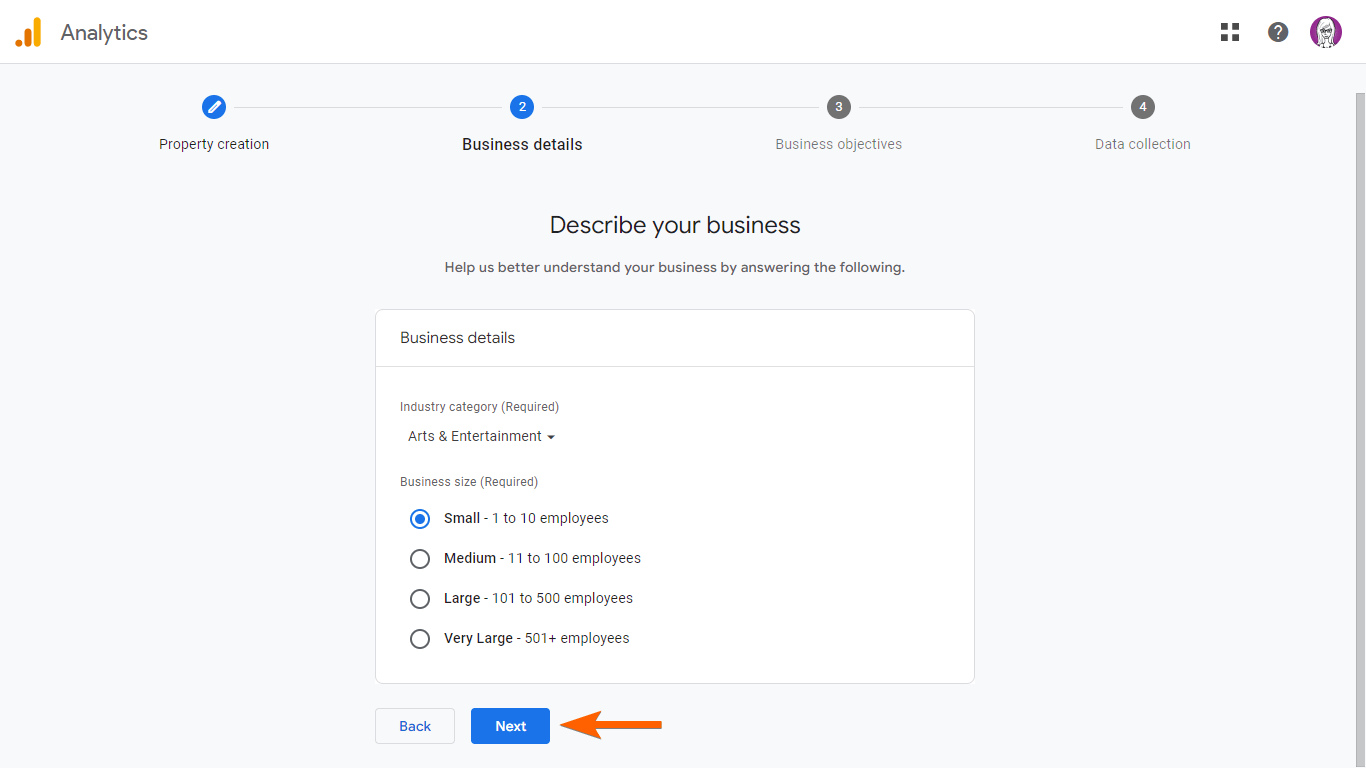
- Choose your industry category and business size, then select Next.
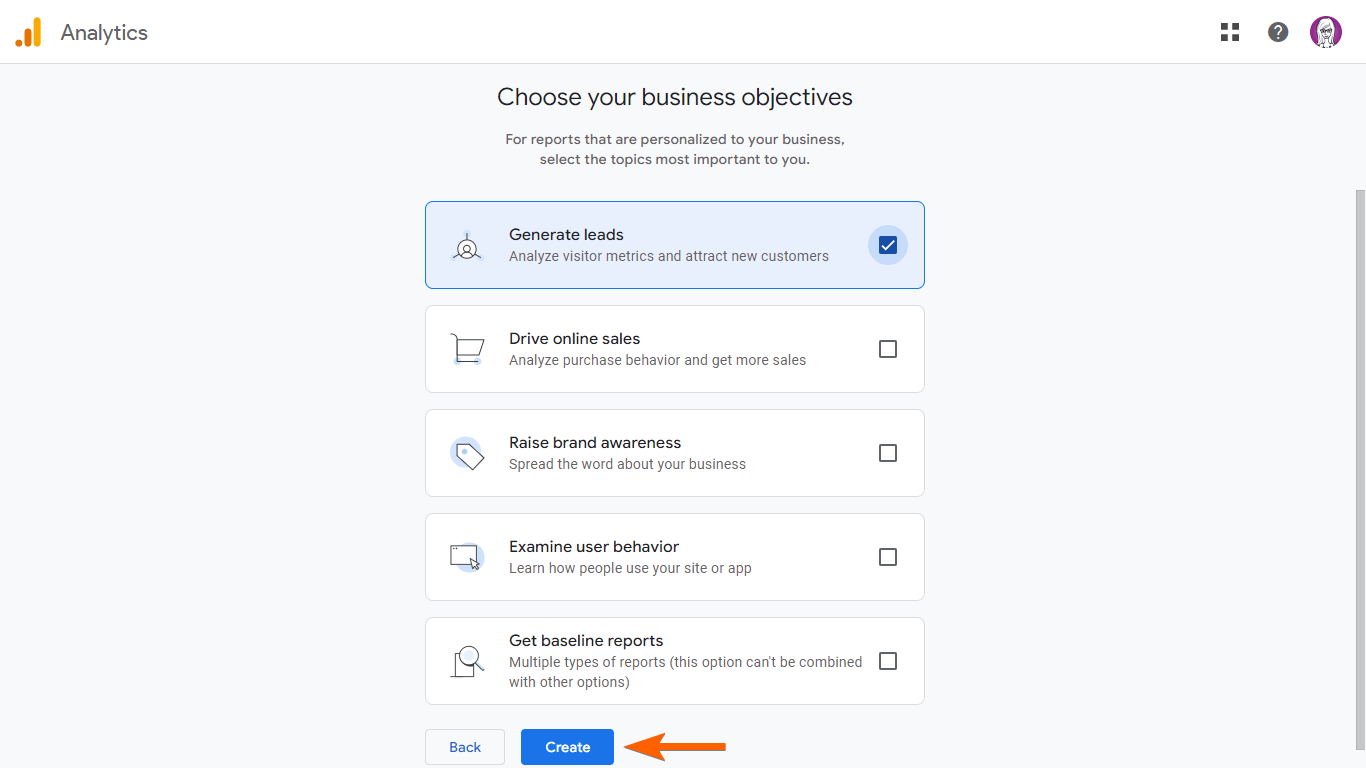
- Choose your business objectives, then select Create.
Once your property is ready, continue by adding a web data stream to it.
Adding a data stream
- In Google Analytics, choose your property at the top, then go to Admin.
Note: Skip to Step 3 if you’re continuing from “Creating a property.”
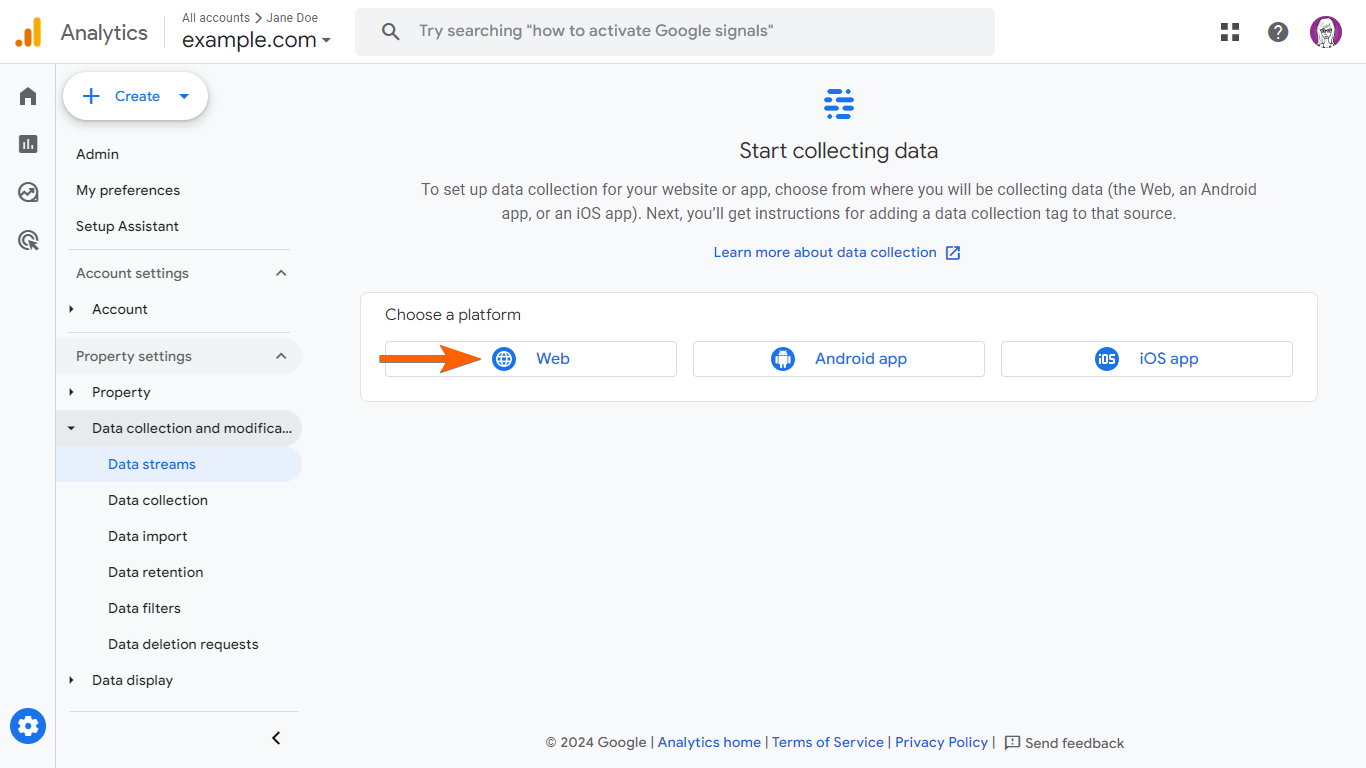
- In the left pane, go to Data collection and modification > Data streams.

- Select Web.
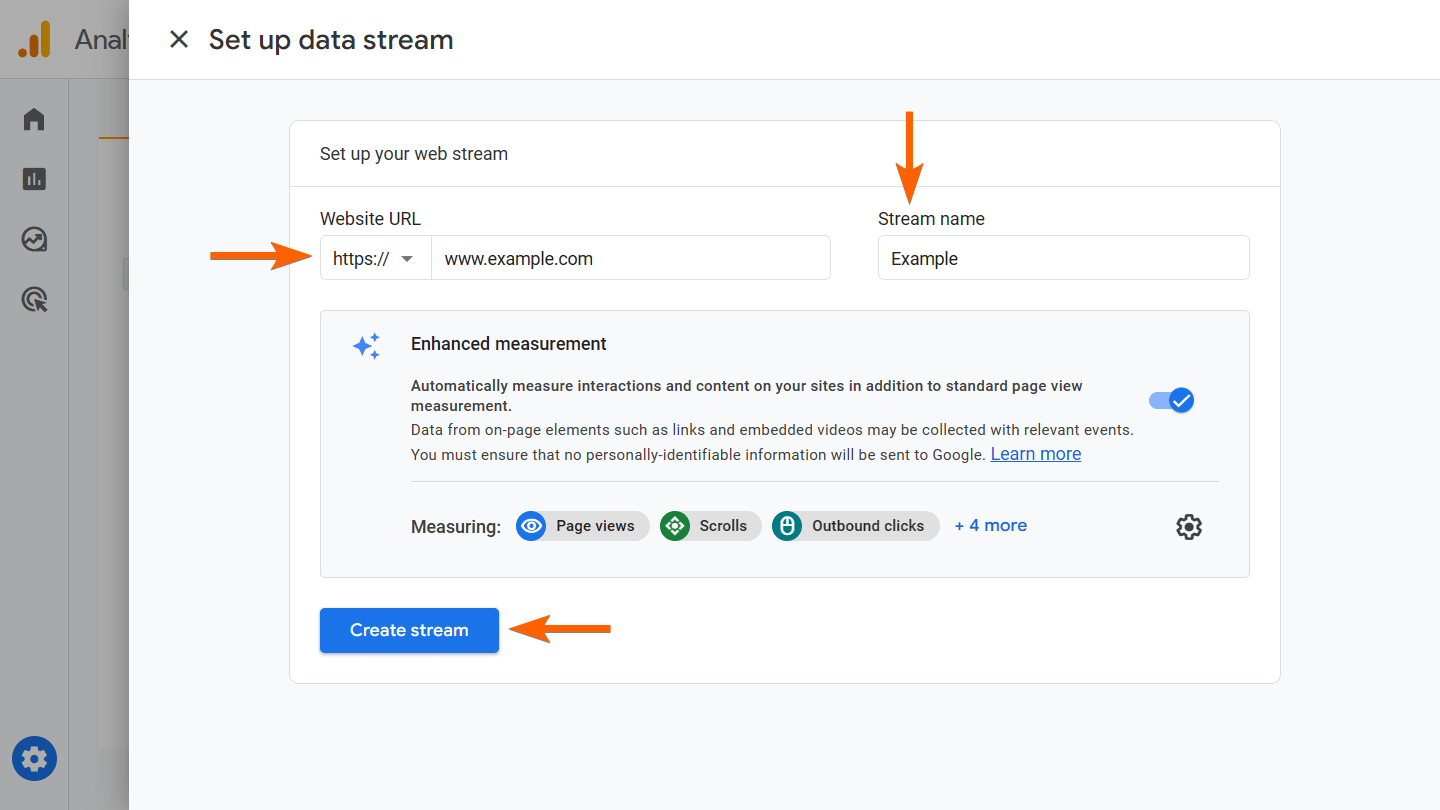
- Enter your website’s URL and your desired stream name, then select Create stream.
- Skip the tag installation for now and take note of the Measurement ID.
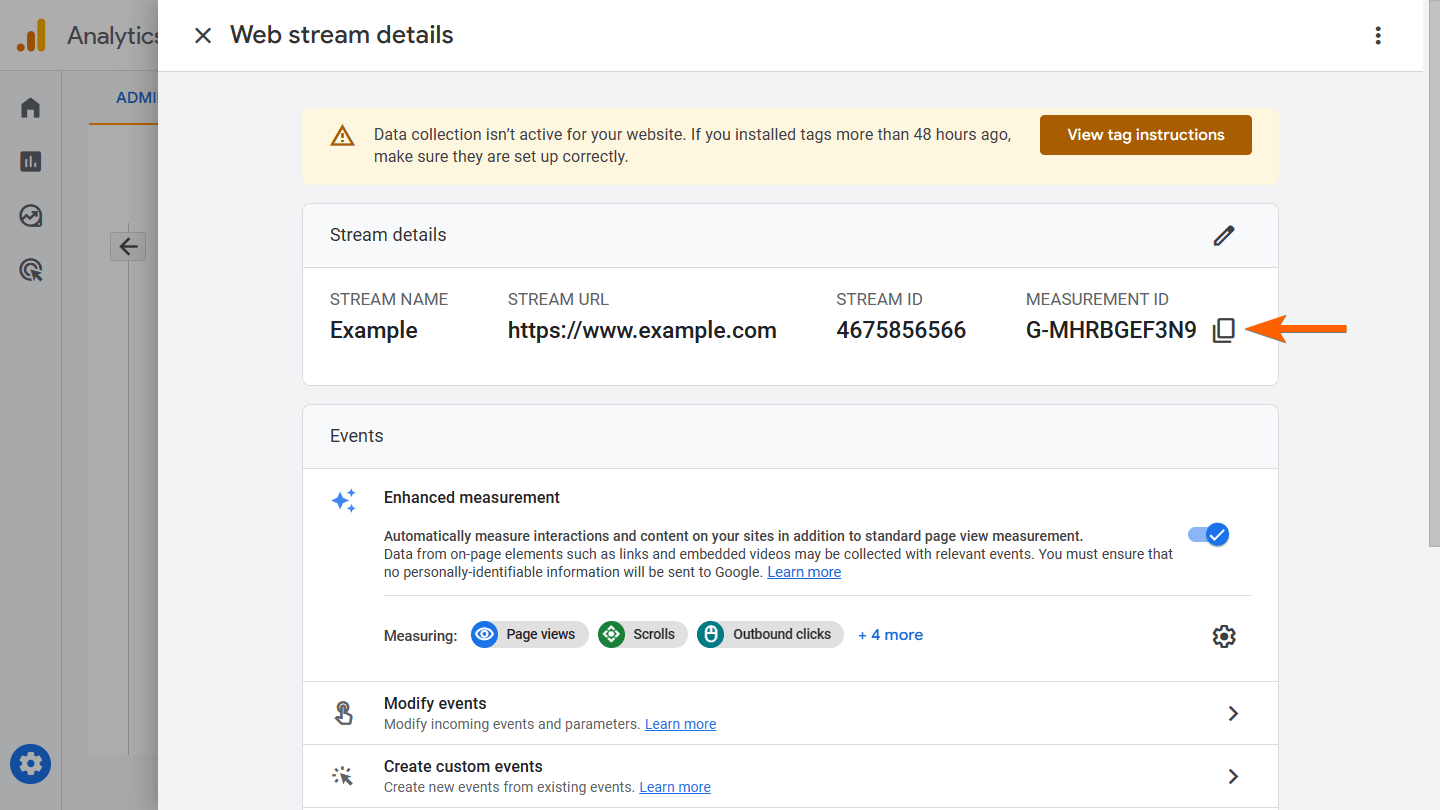
If you forgot your Measurement ID, you can get it by viewing your data stream in Admin > Data collection and modification > Data streams. Once your data stream is ready, continue by setting up your Goole Tag Manager.
Setting Up Google Tag Manager
Assuming you already have your GTM account and GA4 Measurement ID, you need to
- Set up variables
- Create a trigger
- Set up the tag
Setting up variables
- In GTM, go to Variables on the left, then select Configure in the upper-right corner.
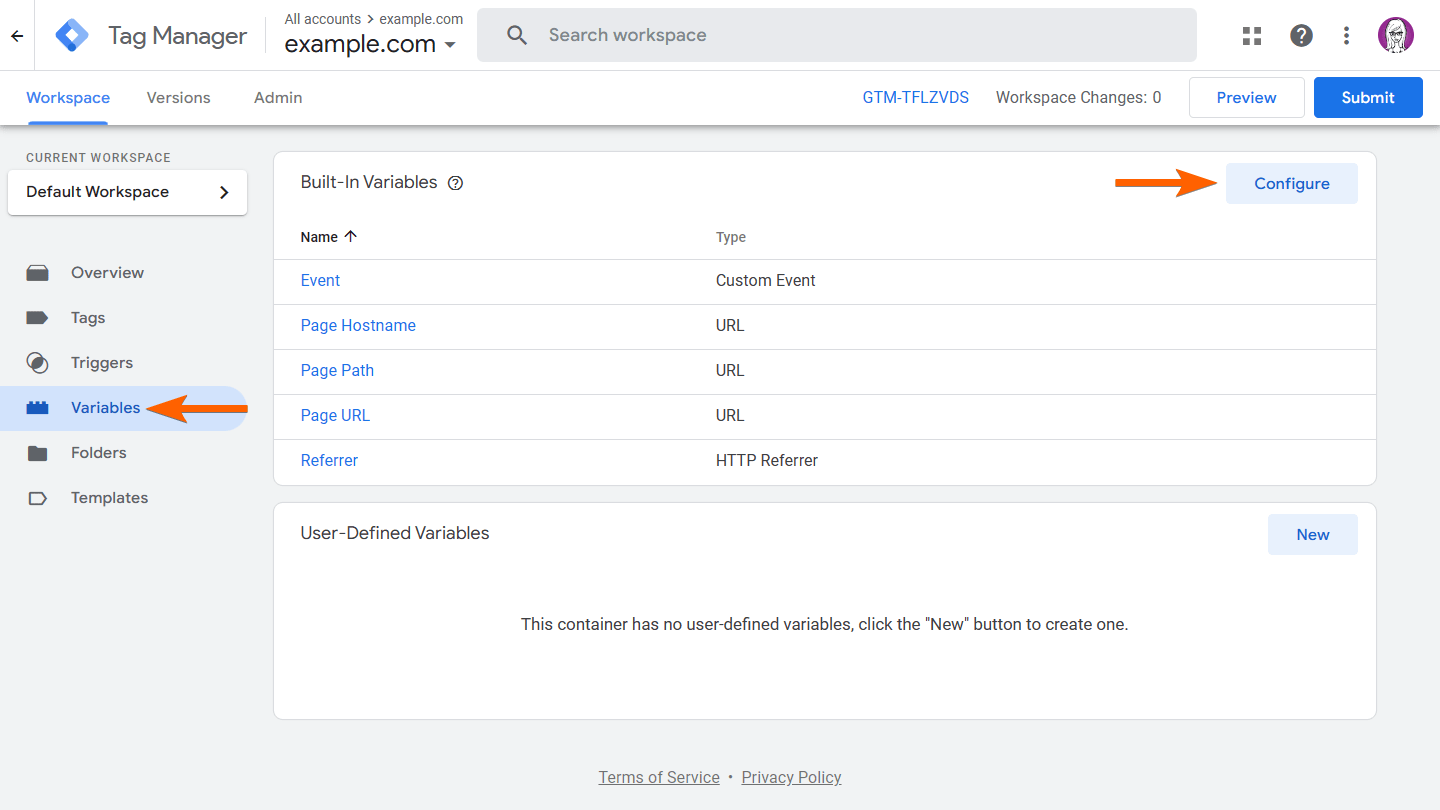
- In Configure Built-In Variables, scroll down to Forms and turn on all form variables.

- Close Configure Built-In Variables once you’re done.
Now that the form variables are ready, the next step is to create a trigger.
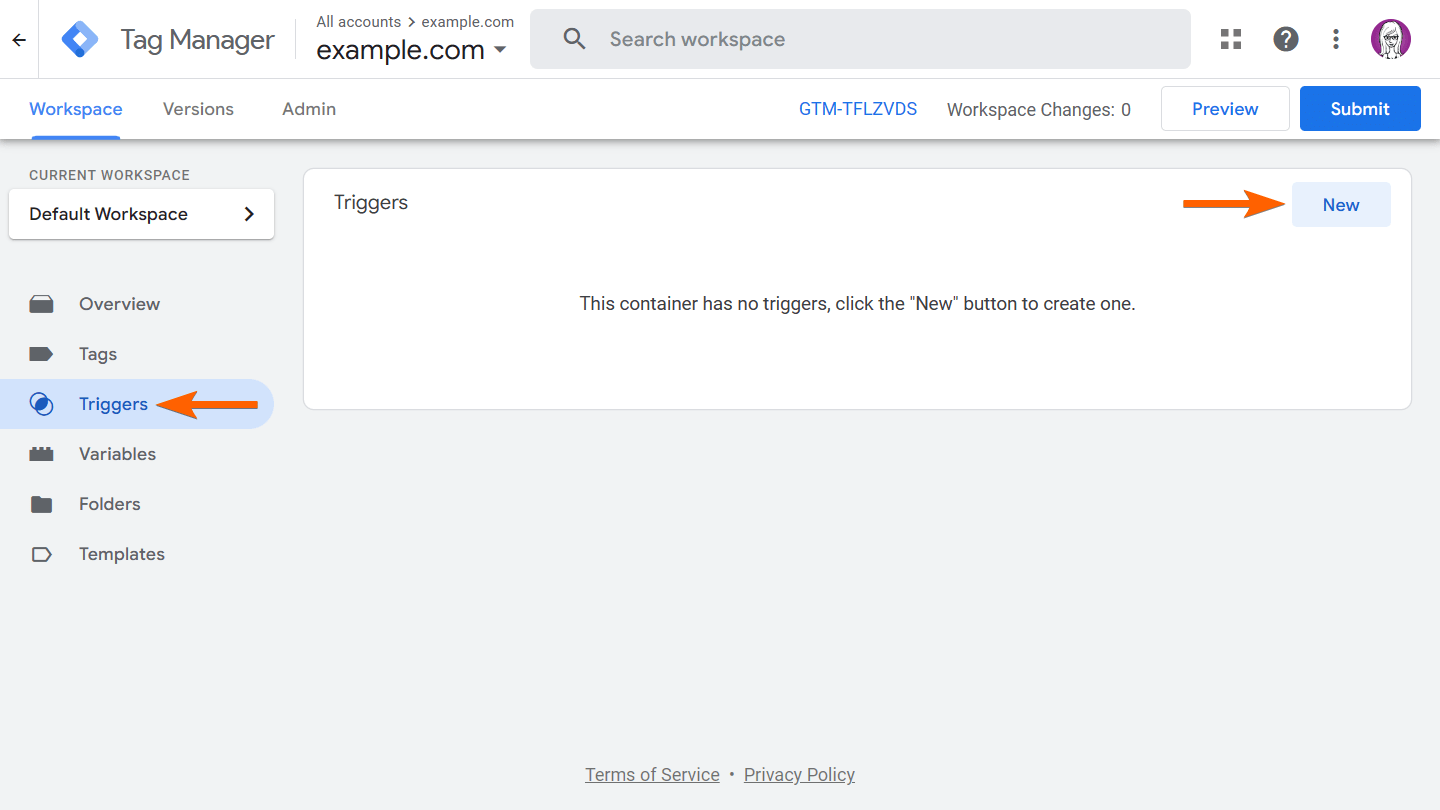
Creating a trigger
- In GTM, go to Triggers on the left, then select New in the upper-right corner.
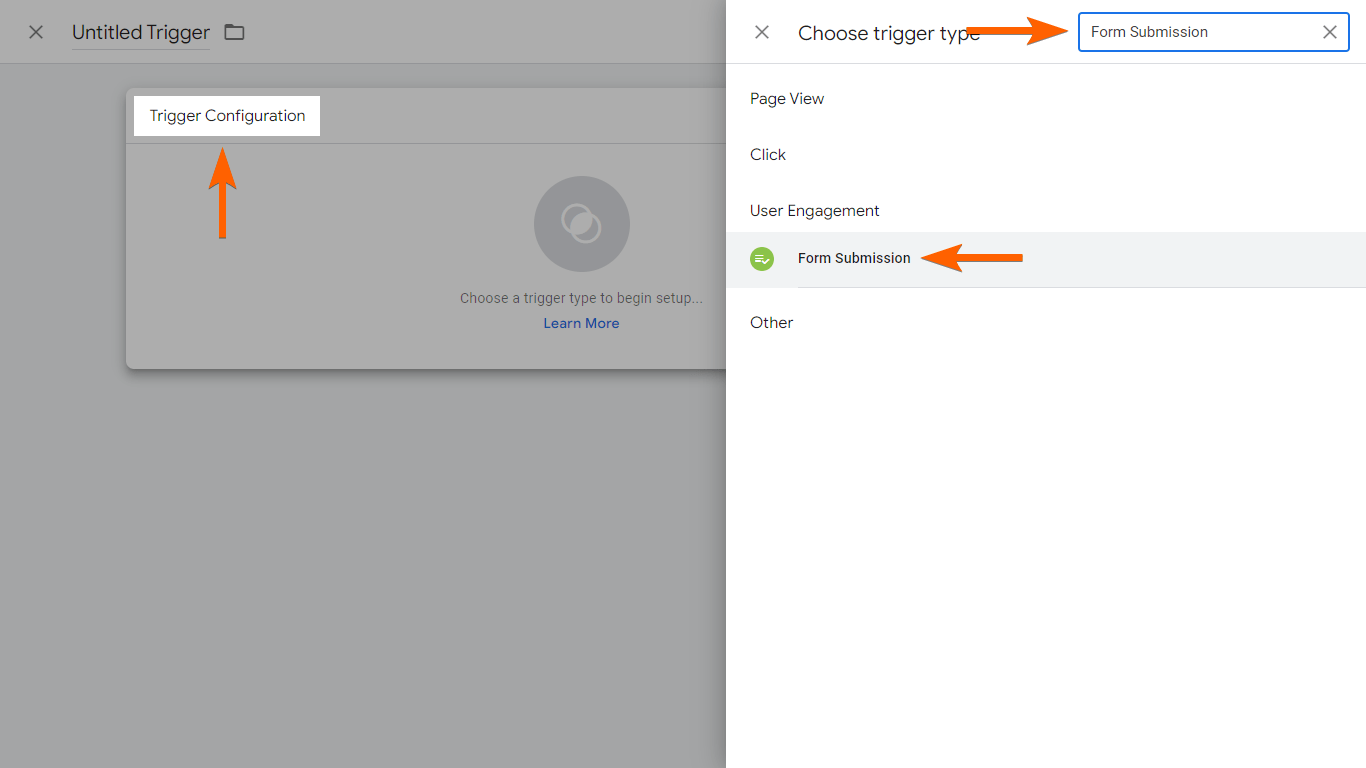
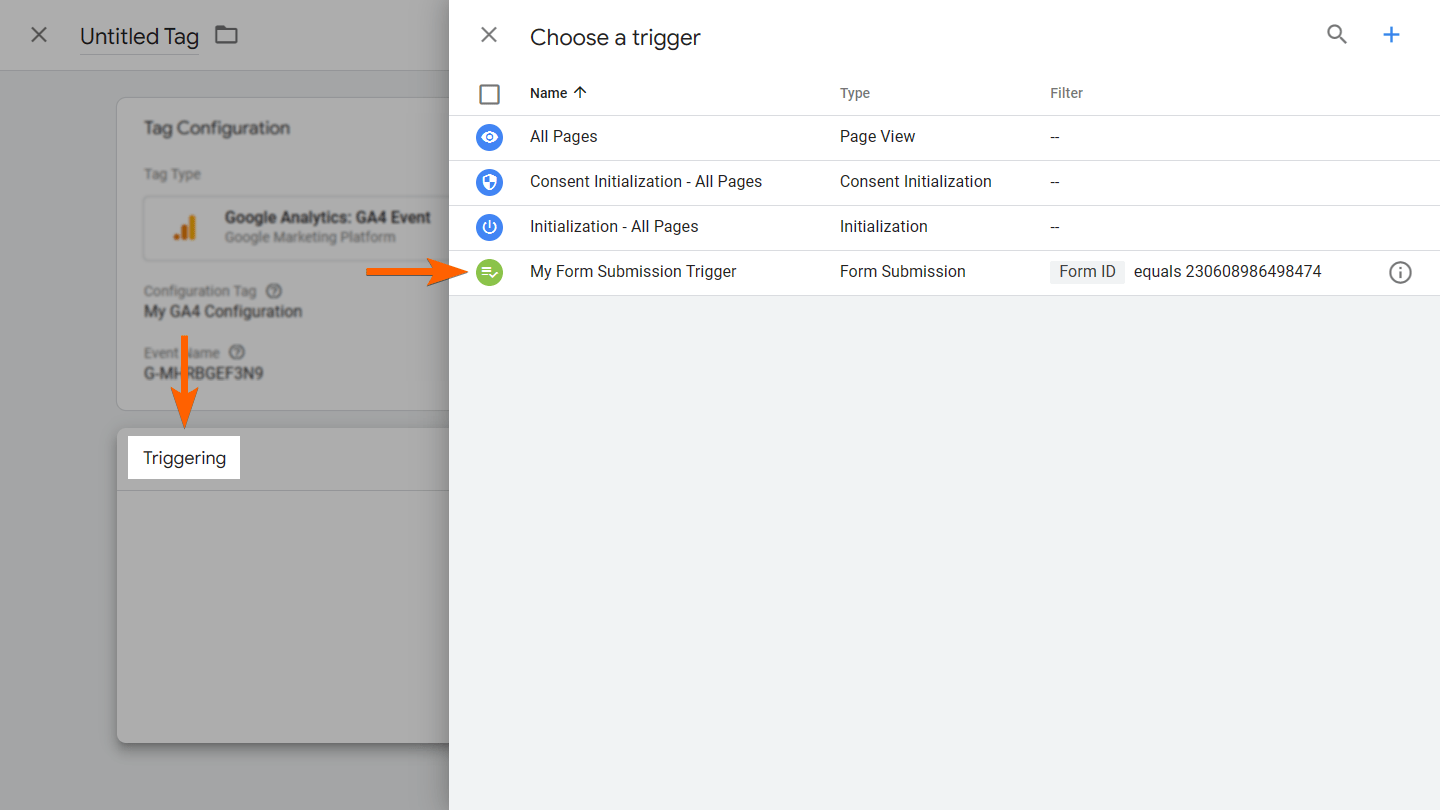
- Open Trigger Configuration, then search and select Form Submission.
- Turn on Check Validation and set the enable-trigger condition to
Page Path contains /.
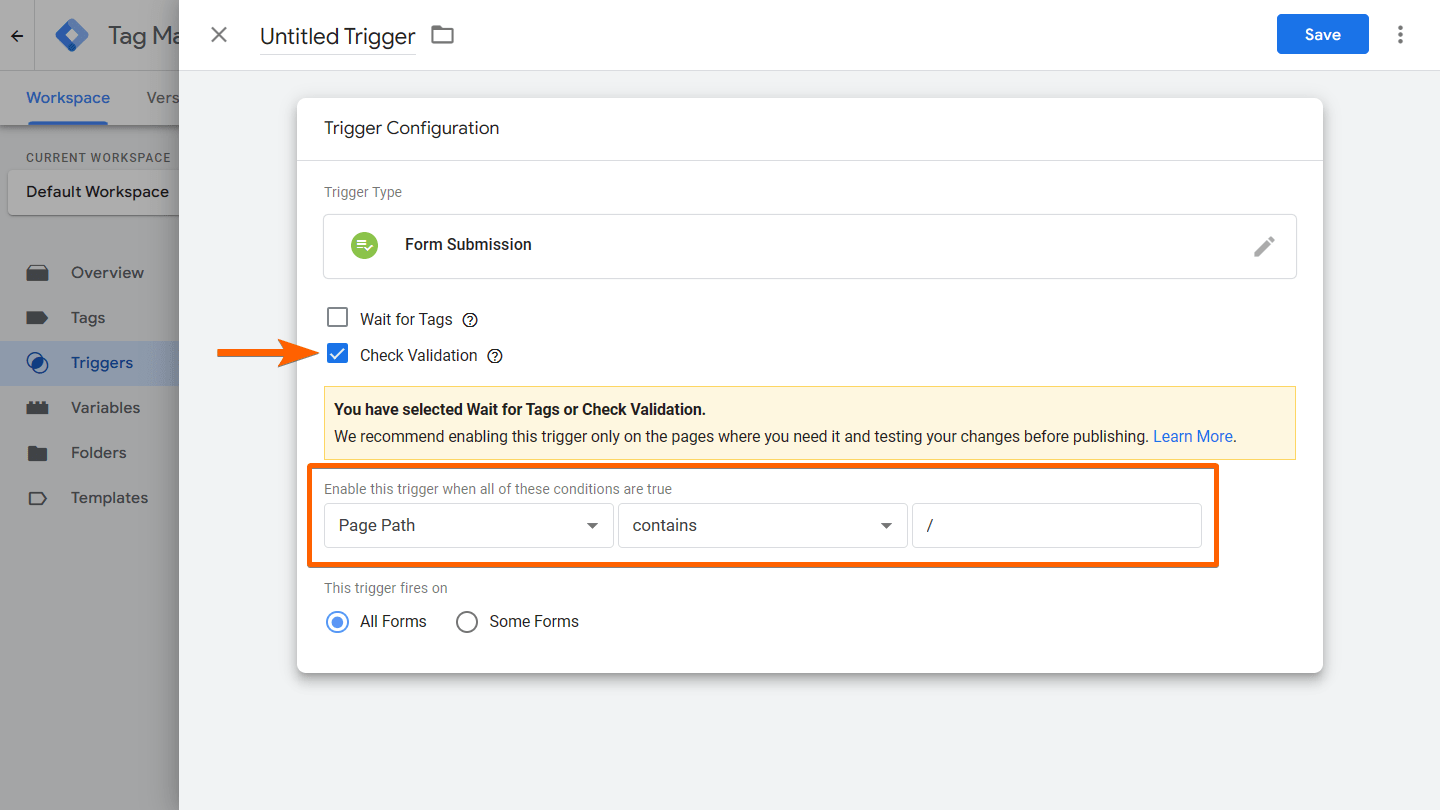
- Select Some Forms at the bottom and set the fire-trigger condition to
Form ID equals {form_id}where form_id is your Jotform form’s ID.
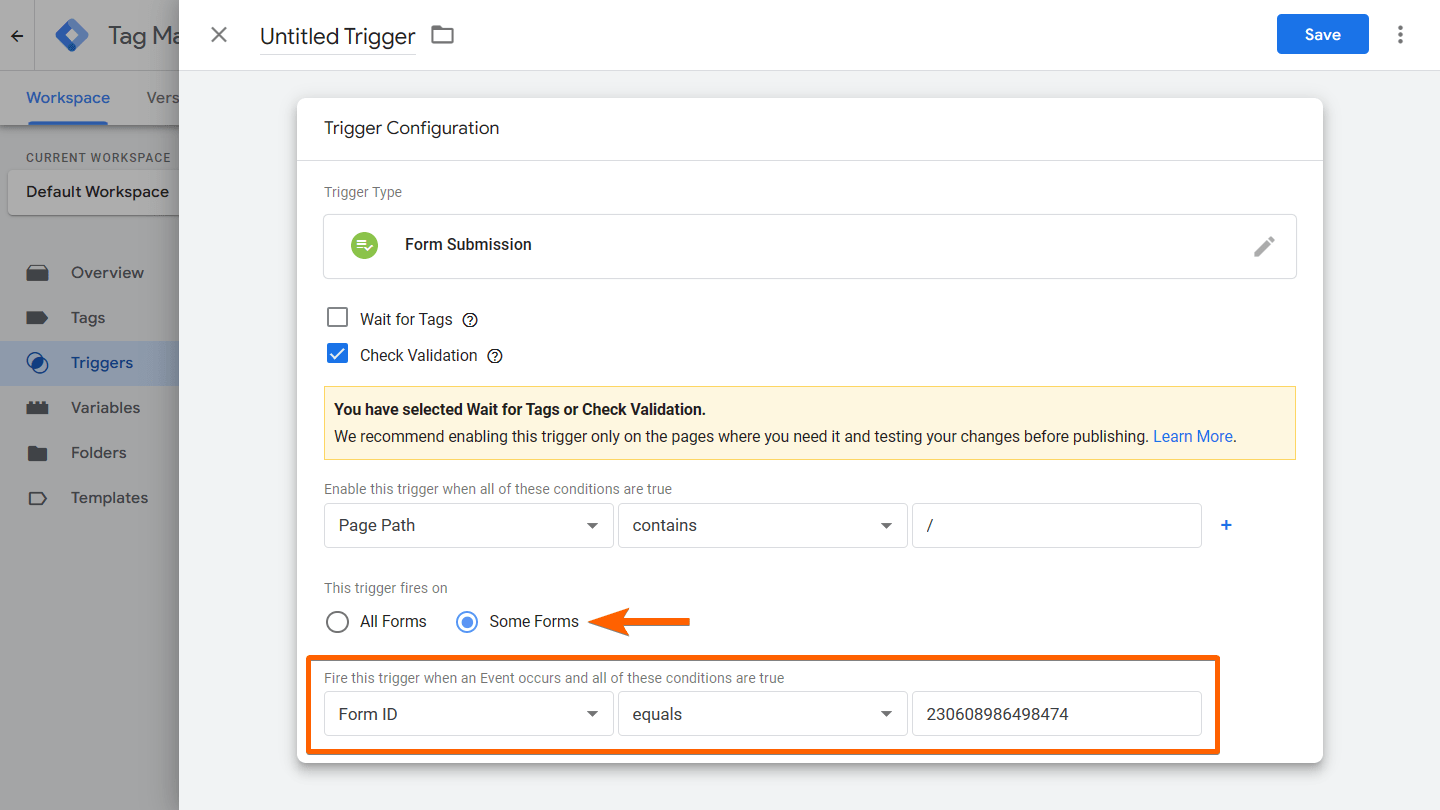

Note: Form ID is the set of numbers found at the end of your form URL.
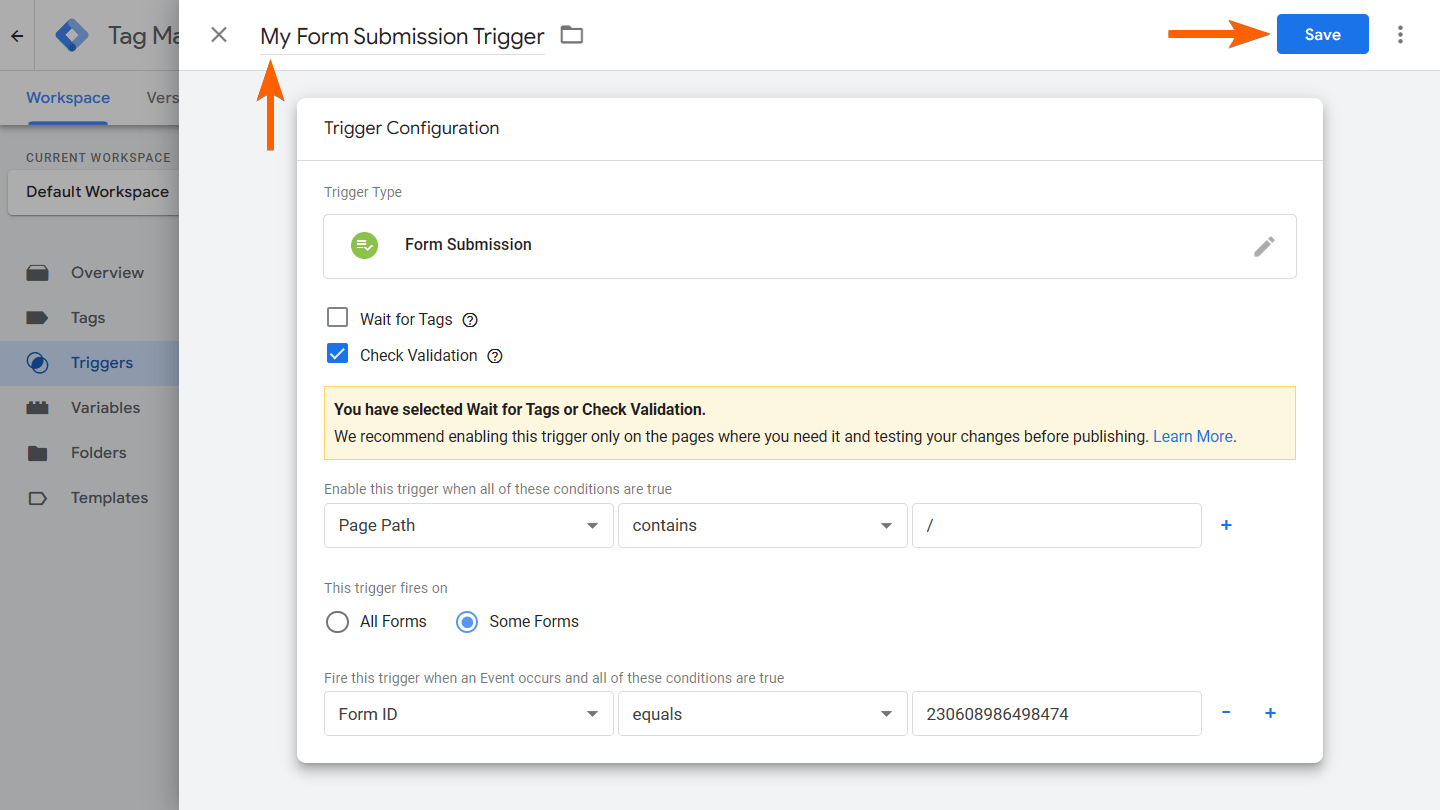
- Enter your desired trigger name at the top, then select Save in the upper-right corner.
Now that the trigger is ready, the next step is to set up the GA4 configuration and event tags.
Setting up tags
To set up Google Tag configuration
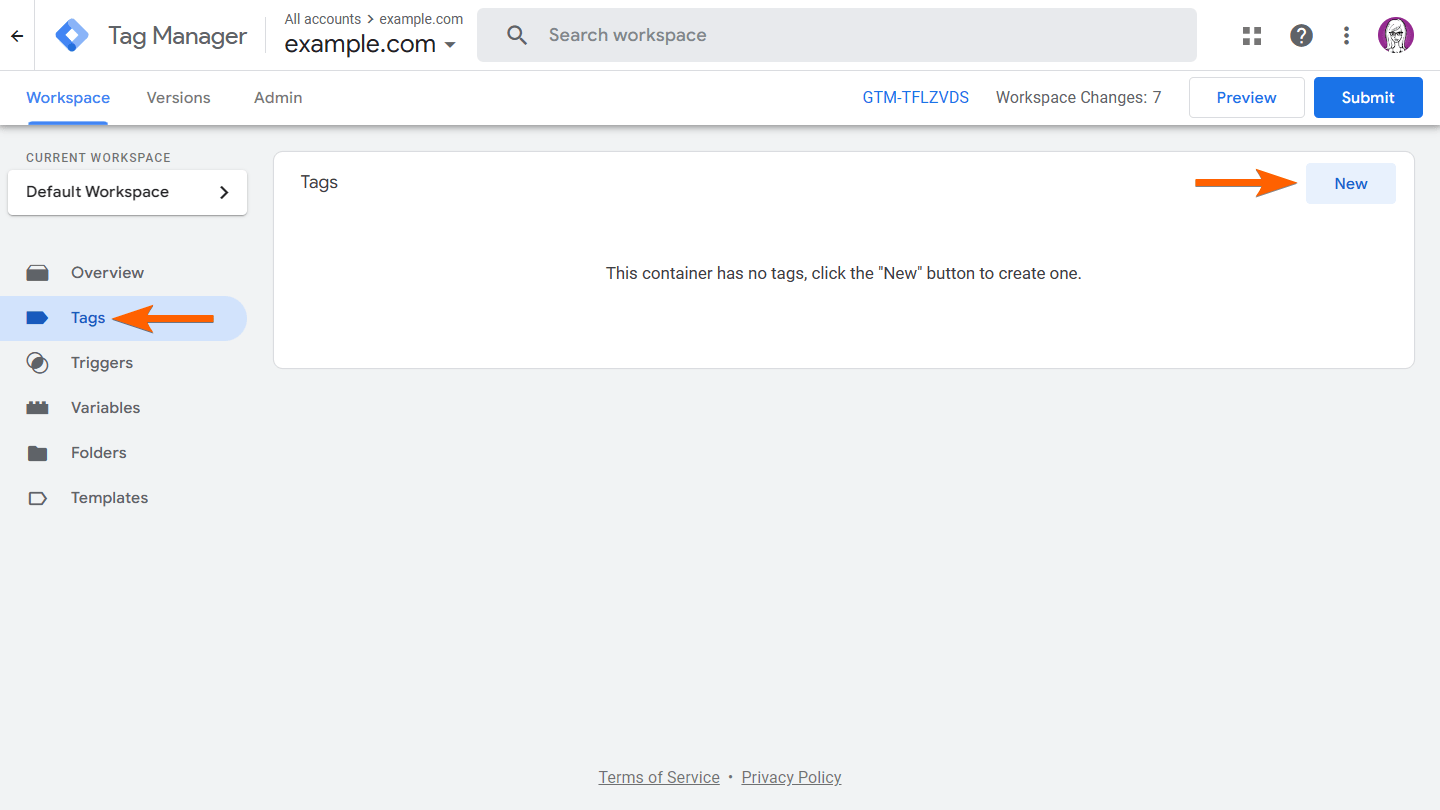
- In your GTM account, go to Tags on the left, then select New in the upper-right corner.
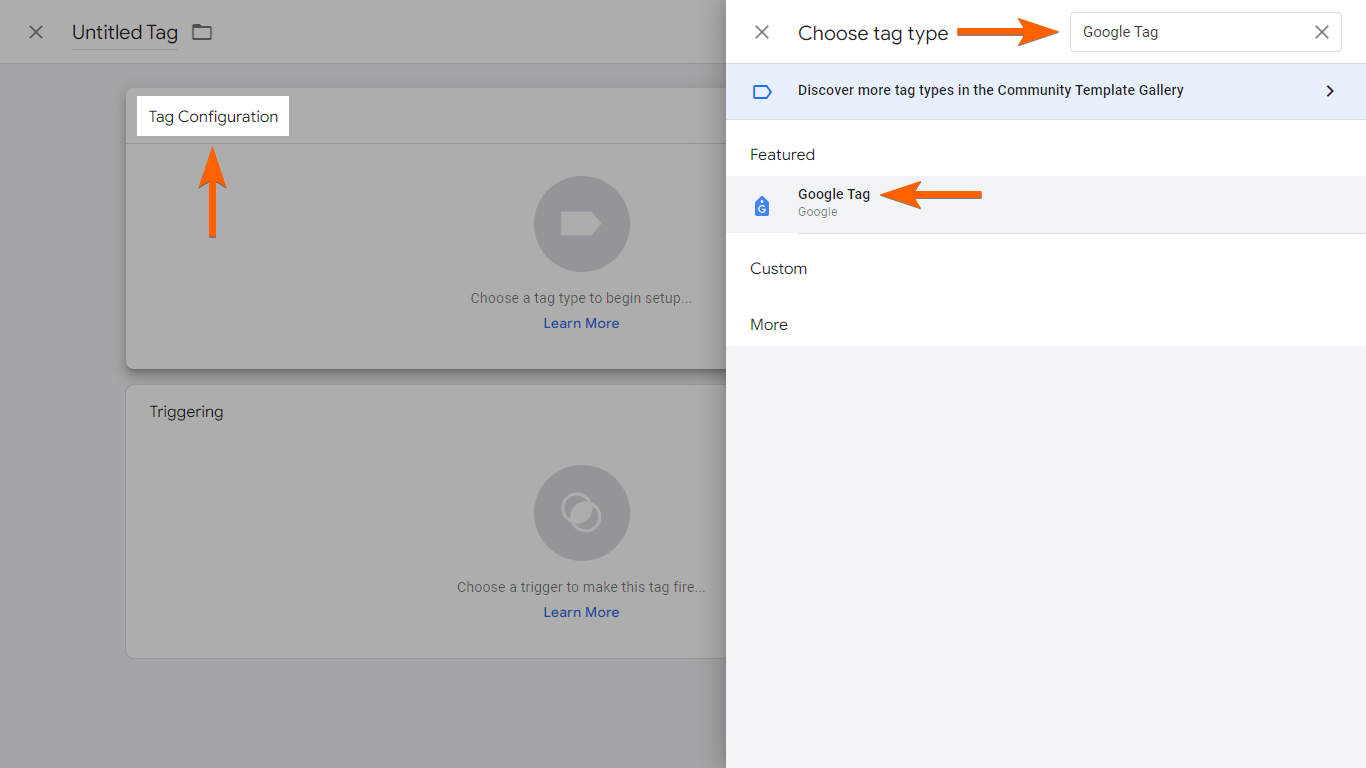
- Open Tag Configuration, then search and select Google Tag.
- Provide your Measurement ID under Tag ID.
- Under Configuration settings, add a send_page_view parameter and set its value to true.
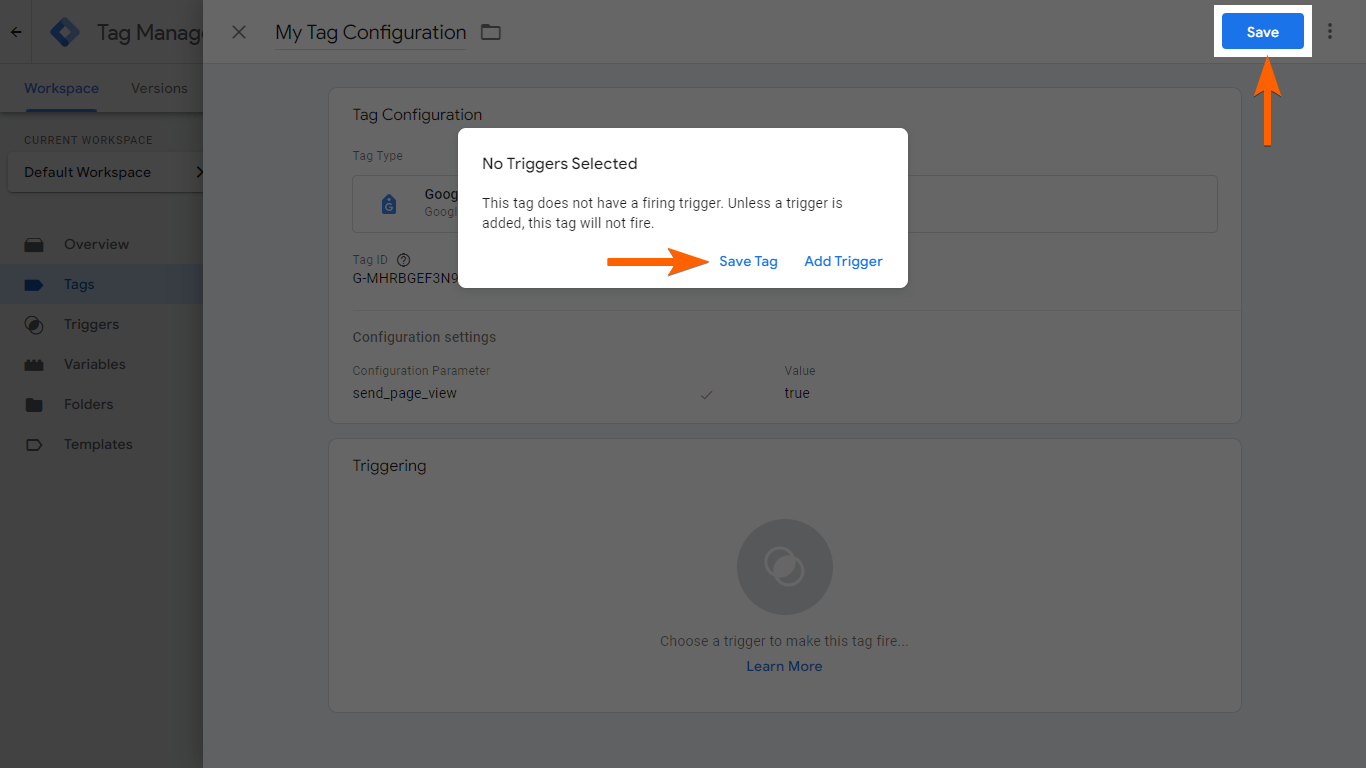
- Enter your desired tag name at the top.
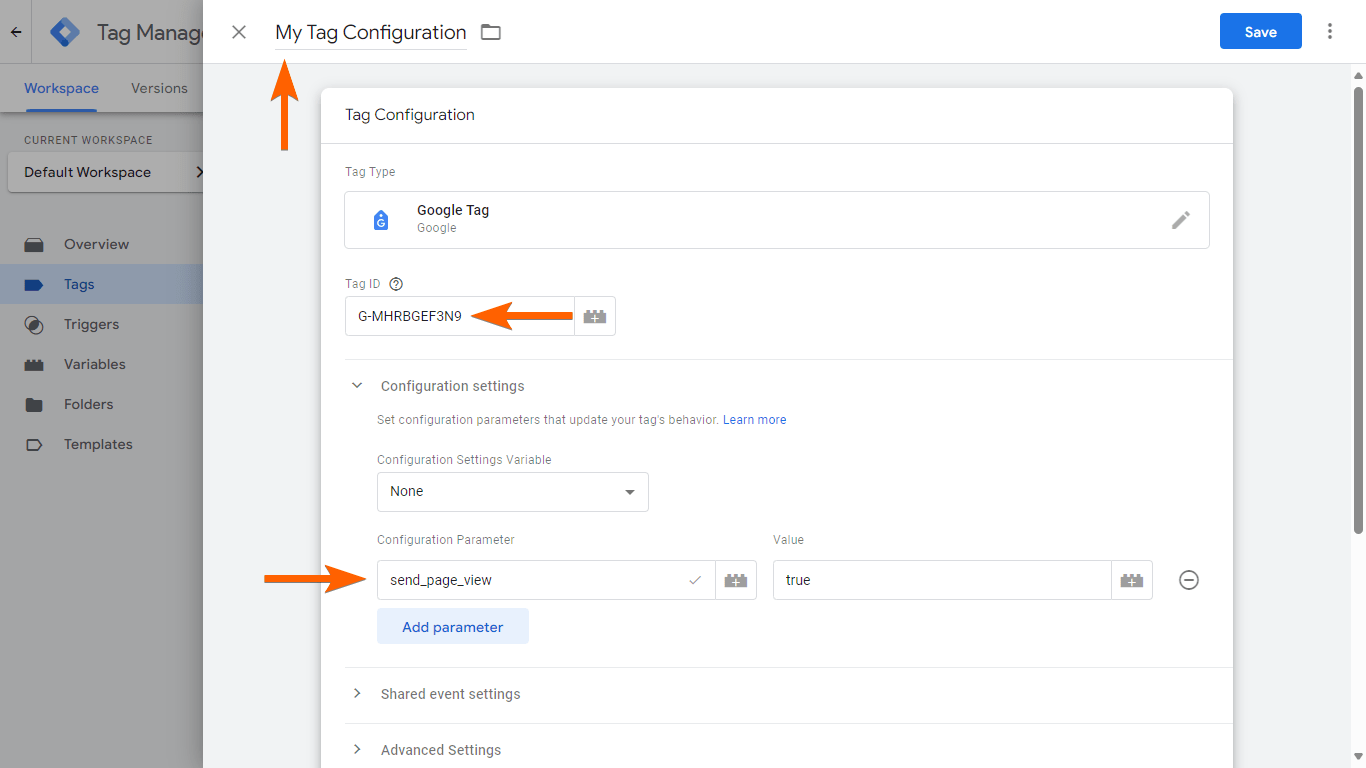
- Select Save in the upper-right corner, then Save Tag when prompted.
To set up GA4 Event
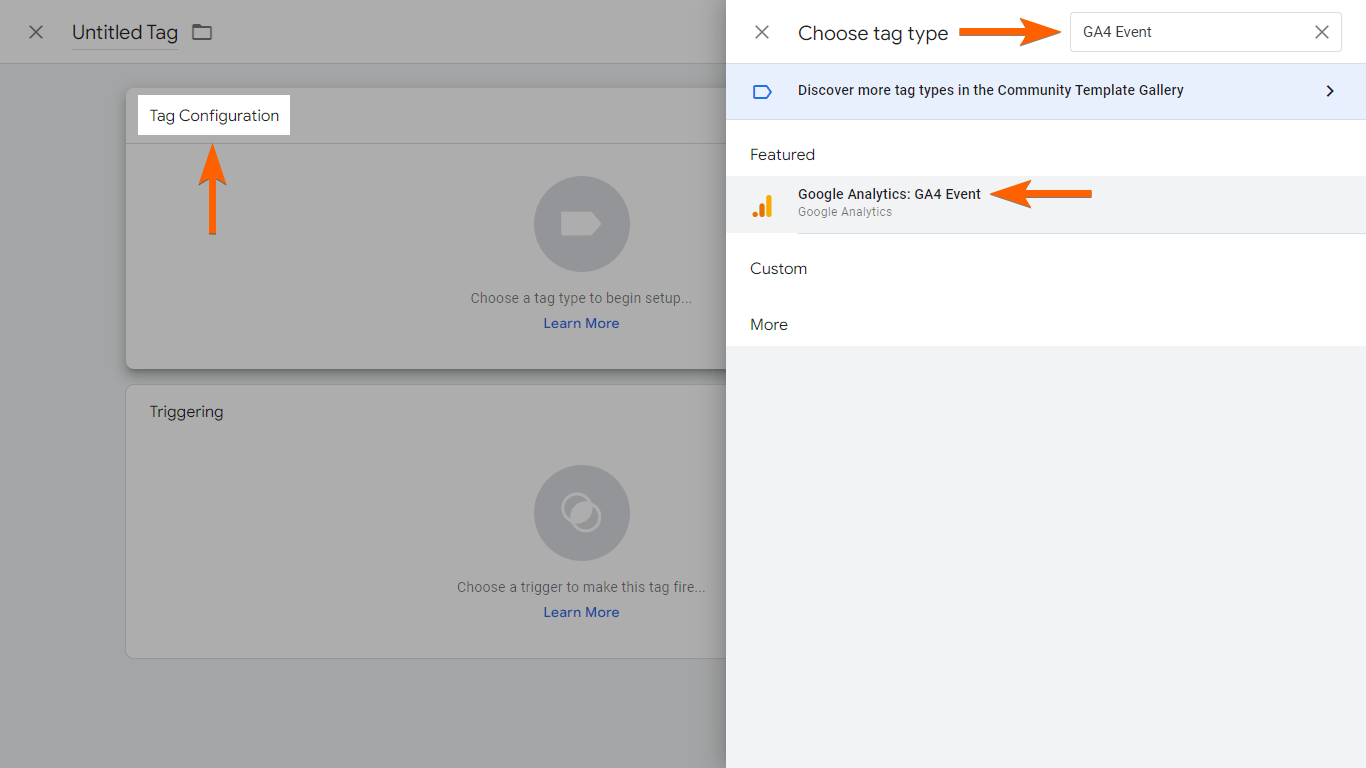
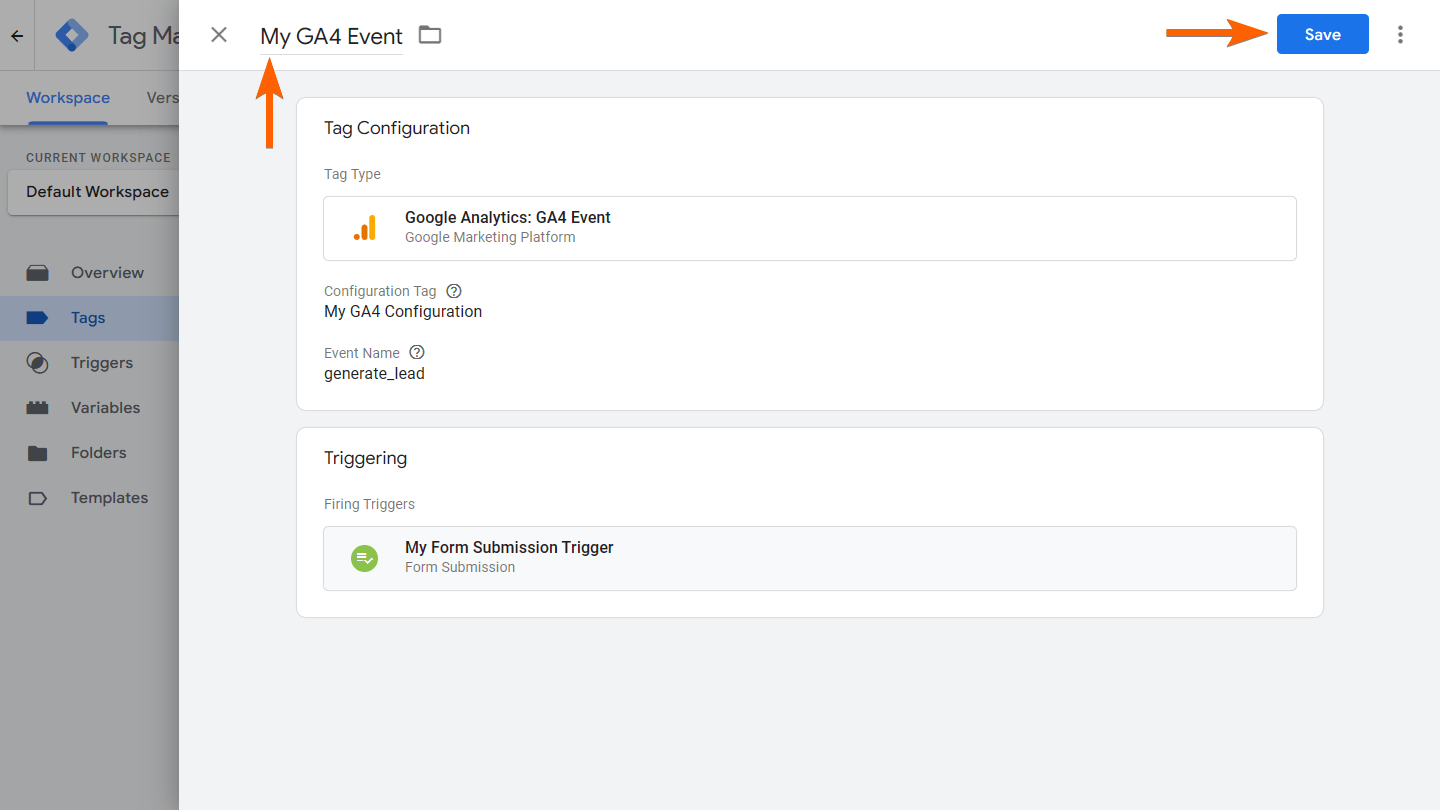
- Add a new tag, open Tag Configuration, then search and select Google Analytics: GA4 Event.
- In Tag Configuration, provide your Measurement ID, then enter generate_lead under Event Name.
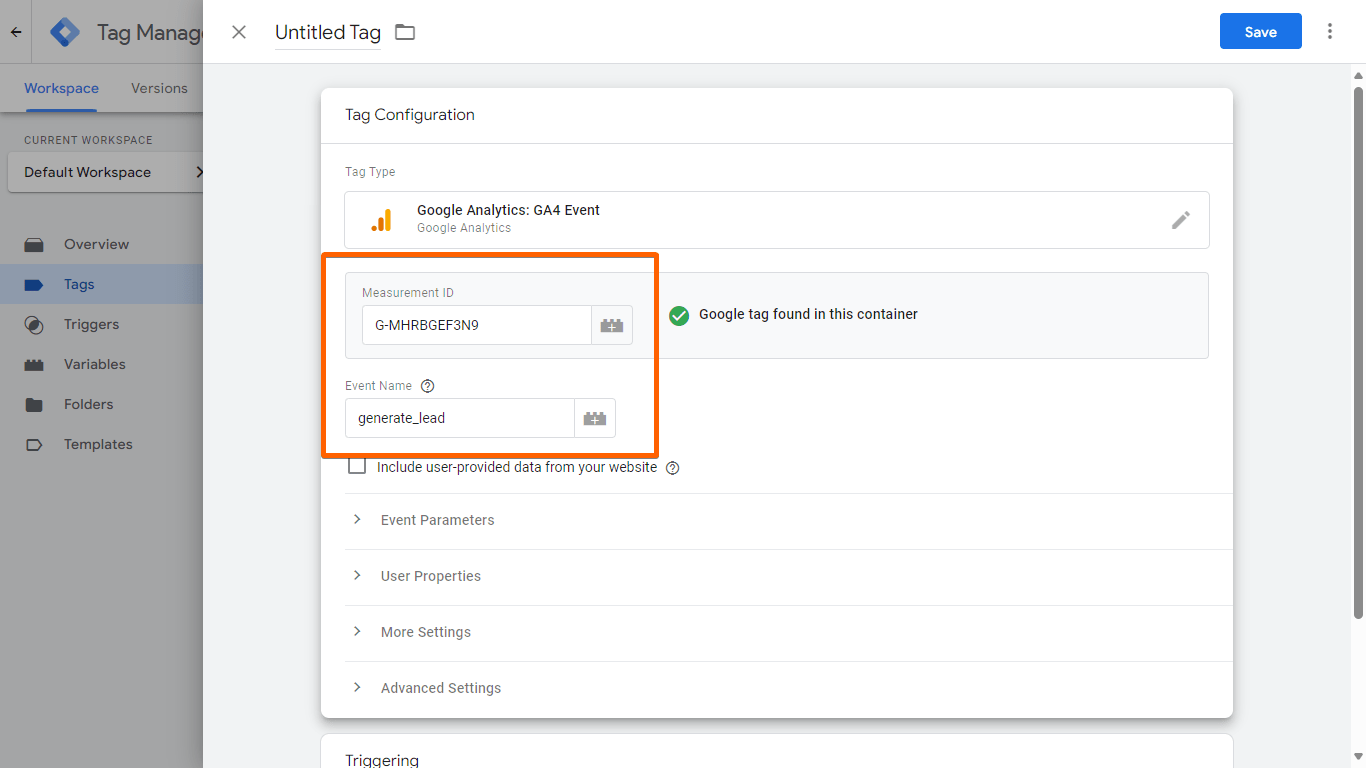
- Scroll down and open Triggering.
- Select your Form Submission trigger.
- Enter your desired tag name at the top, then select Save in the upper-right corner.
Once you’re done, continue by embedding your form and installing GTM on your website.
Adding Your Form and GTM to Your Website
To put it all together, you need to install GTM into your website where your form is embedded.
To embed your form
- In the Form Builder, go to Publish > Embed > Source code.
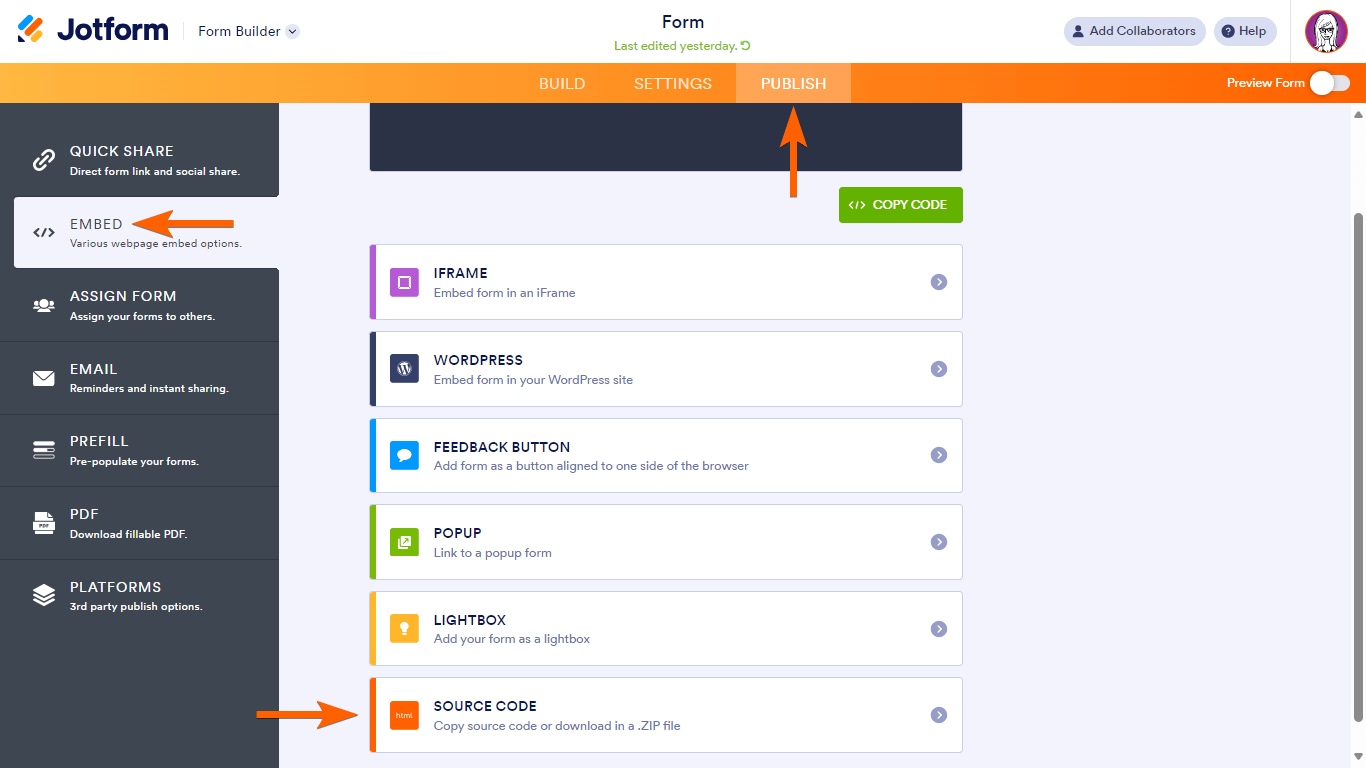
- Copy the provided code and embed it into your website. See How to Get the Full Source Code of Your Form for more information.
To install Google Tag Manager
- In your GTM account, at the top, choose your container to install.
- Add the codes to your website’s head and body tags as mentioned in the dialog.
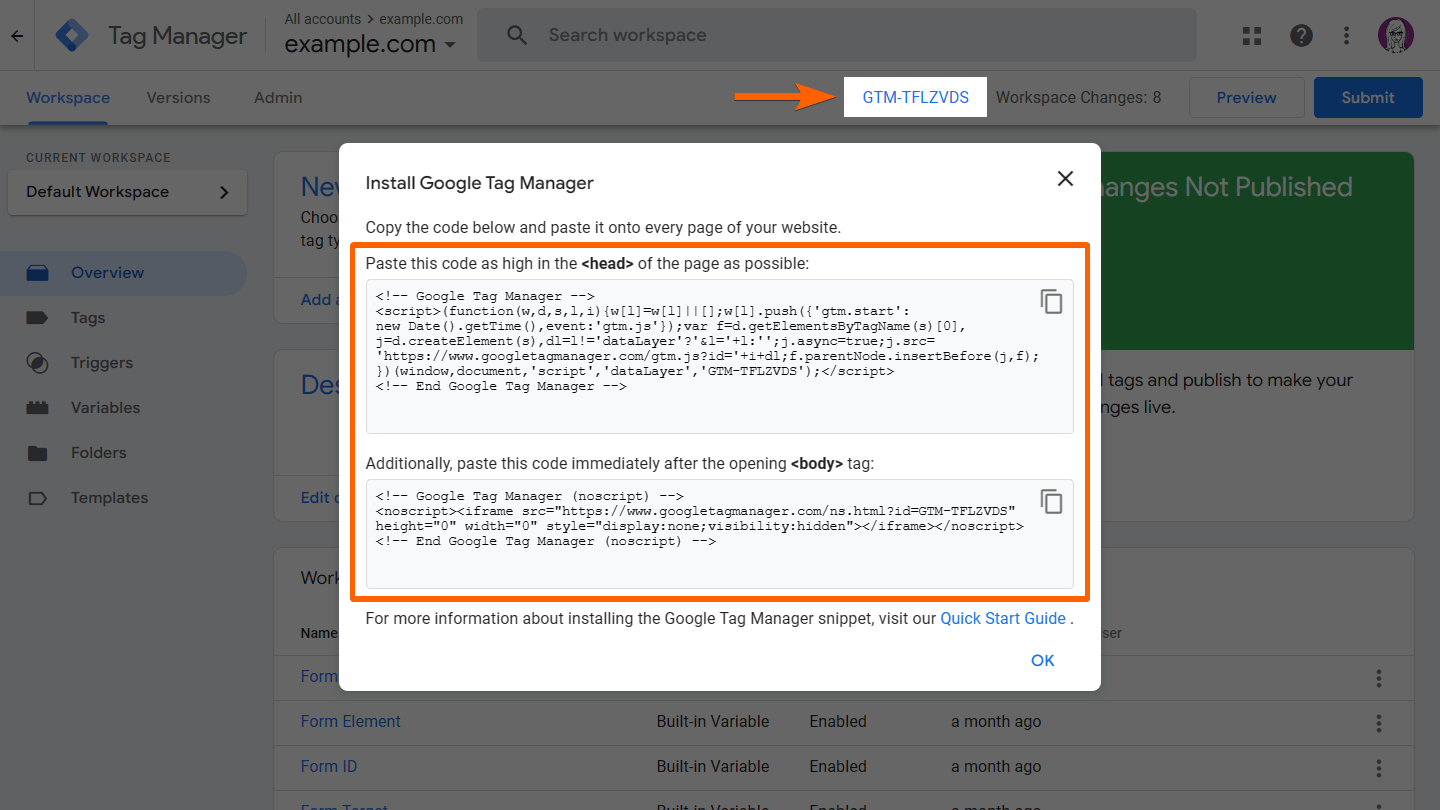
If you only need to monitor your form, you can choose to add the codes only to the pages where your form appears.
Once the form and tag are set, the next step is to check and save your configurations.
Testing Your Setup
To see if your setup works in GTM
- In your GTM account, select Preview in the upper-right corner.

- On the next page, enter the URL where your form and tag are installed, then select Continue.
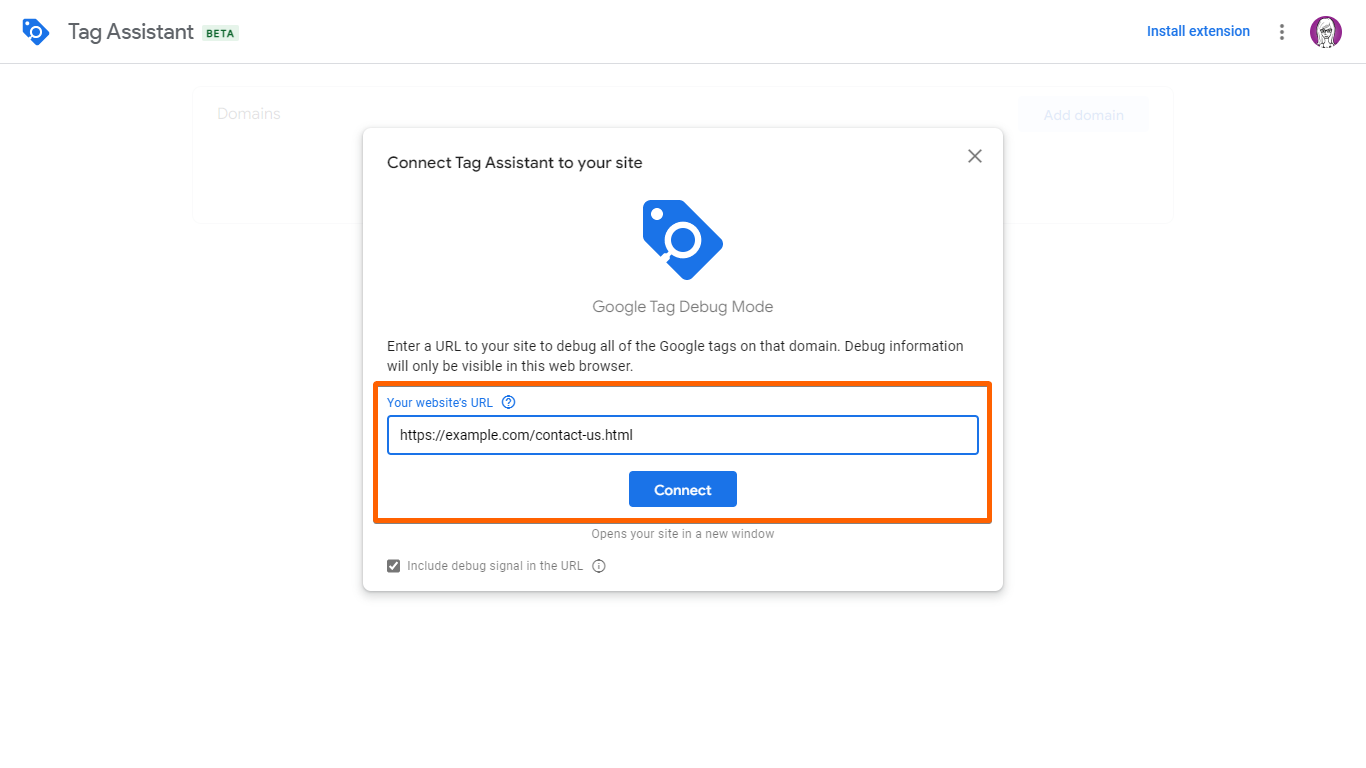
Your form should open in a new tab or window. If Tag Assistant is having trouble connecting to your site, try installing the Tag Assistant Companion browser extension.
- Once Tag Assistant is connected, send a test entry to your form.
- Switch back to Tag Assistant and check the Summary pane on the left.

The Form Submit entry is a good indication that your tag is working.
- Once you’re done, go to your GTM account, select Submit in the upper-right corner, and publish your setup to apply all the changes.

To see if your setup works in GA4
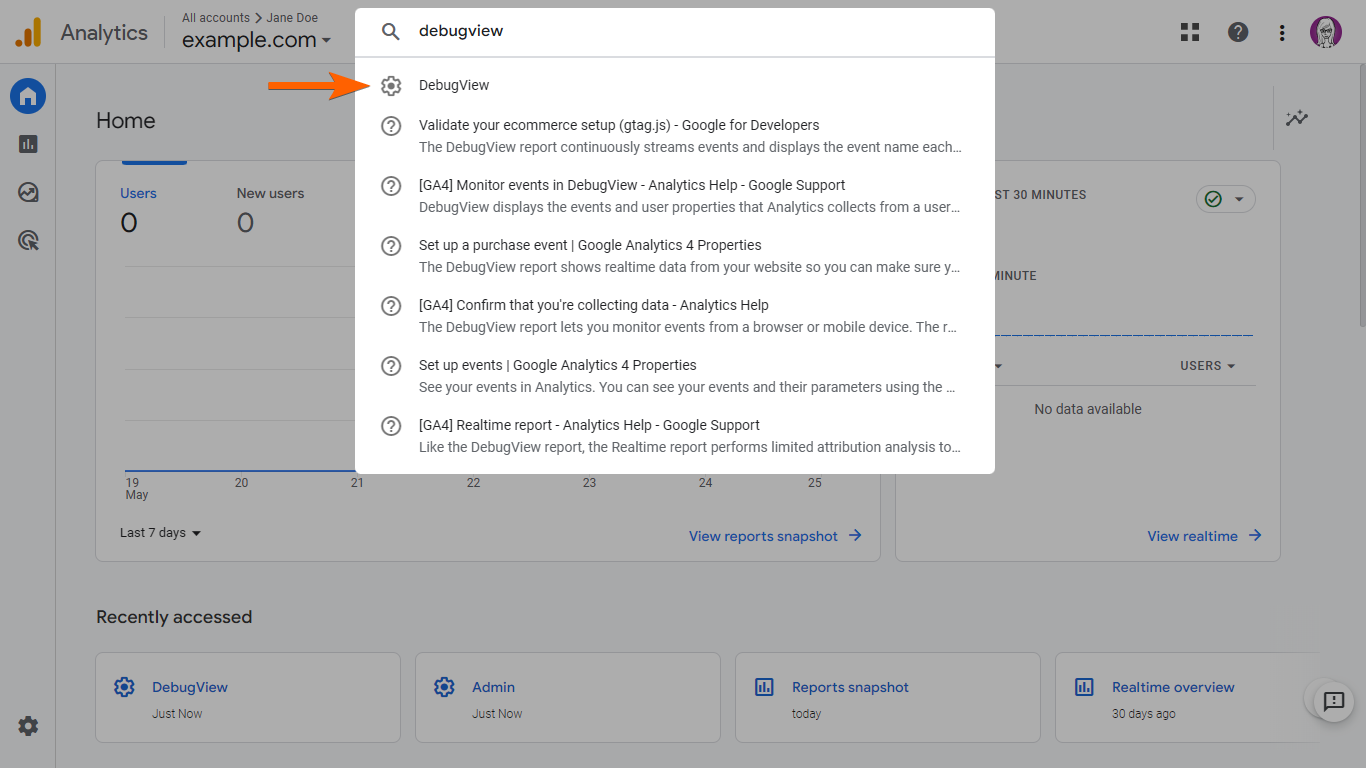
- In your GA4 account, at the top, search and select DebugView.
- Open Tag Assistant in a new tab and connect your site where your form and tag are installed.
- Send a test entry on your form.
- Check the logs in DebugView.
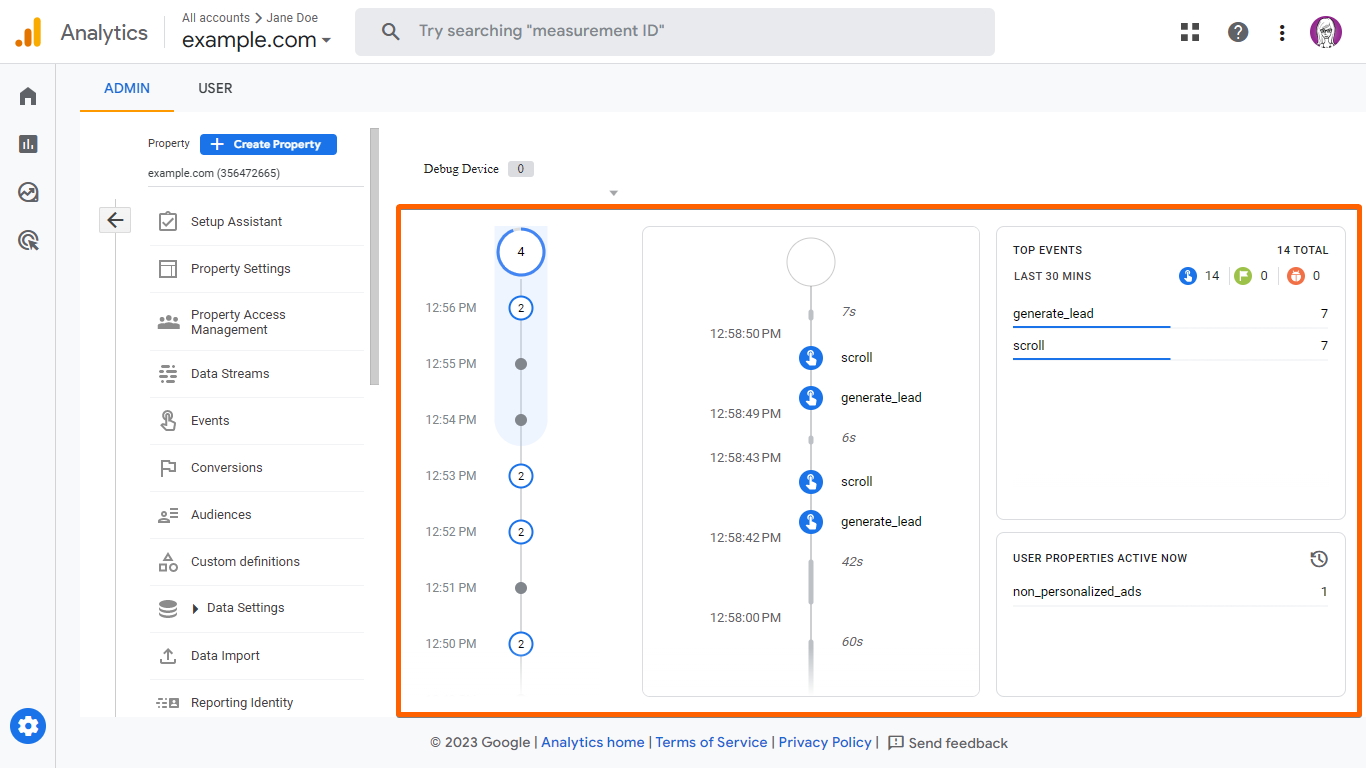
For more information, see how to monitor events in DebugView.

Send Comment:
17 Comments:
March 7, 2025
I tried the guide, but still there's no Form Submit.... could you please check my form too?
January 28, 2025
This all great. But, sadly the embedded form does not send Form Submit events. What can we do?
September 4, 2024
Hi there.
We have a dropdown menu in the Jotform where a selection can be made. We want to track the form submission but only when one concrete selection is made in the dropdown menu. Since the form is embedded and behind the iframe wall, we cannot access it using scripts in Google Tag Manager. I would need to modify the form code to make it send me the change in the dropdown menu. Is such a modification possible? How would I go about it? Can you please advise?
Thanks
August 14, 2024
When I create the trigger, if I choose ALL FORMS rather than providing a specific form ID, will this tag track all the forms on my site? If so, how can I grab the form title as a variable?
May 27, 2024
Hi, I am stuck at the testing part. When I test it, it says connected, but after filling out the form, there is no Form Submit, the tag stays under "Not Fired"
May 25, 2024
I can't see the admin page
February 22, 2024
Heads up! The "Configuration Tag" drop-down menu on the GA4 event tag template isn't there anymore. From now on, every GA4 event tag will need the Measurement ID of the GA4 web data stream receiving the events. It might be a good idea to update this guide, as the current steps won't work in that section.
February 21, 2024
Jotform, GTM functionality for all types of forms needs to be a priority.
December 14, 2023
Will this work if the form is embedded on the website using an iFrame?
December 14, 2023
Doesn't work with Google Analytics 4 (GA4) and the old Google Analytics is no longer available.
In GA4, there is no option "Google Analytics: GA4 Configuration tag" per the instructions on this page.
The closest thing in GA4 is a "Google Tag". However, these instructions don't work with that setup.
The instructions need updating from the step "To set up GA4 Event", number 2 onwards.
August 15, 2023
Trying to set up Google Ads tracking but this doesn't seem to work with Google Ads. Is there another option? Thanks!
June 13, 2023
Does it work only with the source code of the form embedded in the page? It seems that it doesn't work with the form embedded with iframe
March 10, 2023
GA4????
February 1, 2023
Will this also work on GA4? The line says your Universal Tracking ID.
July 6, 2022
Following this setup would allow me to track what steps users abandon the form?
October 18, 2021
I've added the google analytics ID, but it seems like for Google Tag Manager instructions we have to be using a custom Thank You page url for it to work? We are currently using the jotform thank you page.
May 12, 2021
How can we do the above tracking with Google Analytics 4