
Adding an electronic signature in Microsoft Word is possible, but it’s not exactly the smoothest experience. It can be tricky to set up, doesn’t always look professional, and isn’t the most user-friendly option for your recipients.
Creating an electronic signature in Word might seem convenient because it’s a free “solution,” but it’s not built for modern e-sign workflows. Features like tracking, automation, and secure sharing simply aren’t built in.
In this article, I’ve shared how to insert different types of electronic signatures in Word. I’ve also provided an alternative that makes the whole process faster, easier, and more polished for everyone involved.
Need a document signed fast?
Add your document to Jotform Sign and turn it into an e-sign document in minutes. Automatically trigger approval flows, notify your team, and sync finalized PDFs to your cloud storage.


How to insert a signature in Word for Windows
Here are three common ways you can insert an e-signature in Word using Windows.
1. Insert a picture of your handwritten signature
Inserting a picture of a handwritten signature is one way to insert an electronic signature in Word. It’s actually how I used to add signatures to documents back in my early career (about 15 years ago). It’s adequate, but it’s old-school.
Here’s how you do it:
- Sign your name on white paper using a dark pen.
- Scan or photograph it, then save it on your PC as a .png or .jpg file.
- Open your Word document and place your cursor where the signature should go.
- Go to Insert > Pictures > This Device and select your image.
- Click Insert, then (optionally) use the Picture Format tab to crop out any excess background.

Pro Tip
To save time, combine the image with your name, title, or contact info below it. Select everything, then go to Insert > Quick Parts > Save Selection to Quick Part Gallery to create a reusable signature block.
2. Add a built-in signature line
The built-in signature line creates a formal, designated space for someone to sign your document after printing:
- Click where you want the signature line to appear.
- Go to Insert > Signature Line (found in the Text menu).
- Select Microsoft Office Signature Line.
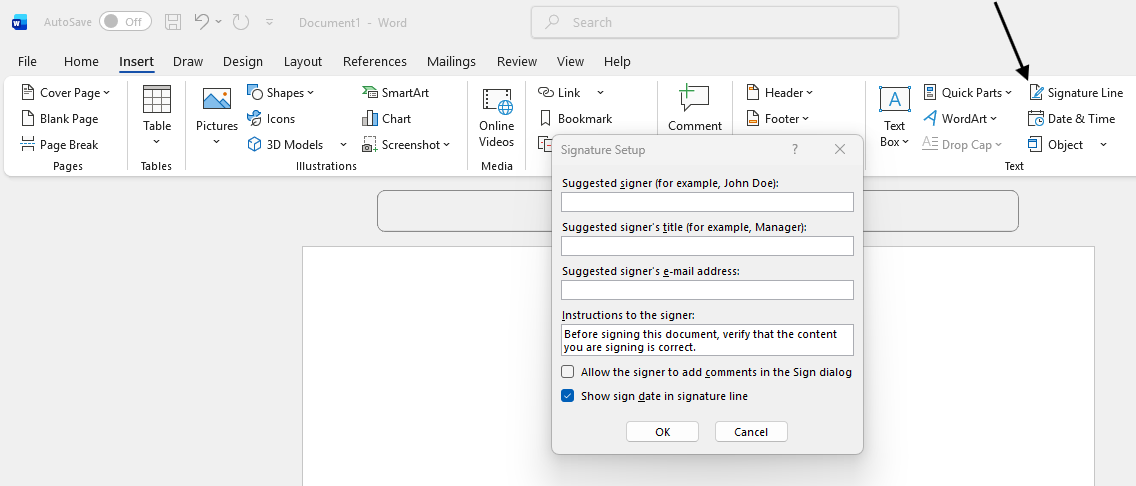
- In the dialog box, fill in the signer’s name, title, and email address if needed.
- Click OK. A signature line with an X placeholder will appear in your document.

Note that once the signature line is created, it can’t be edited — you’ll need to delete it and recreate it if you make a mistake. You also can’t click and sign like an e-signature. The document needs to be printed and signed using a wet signature. Read about electronic vs wet signatures for more information about the differences.
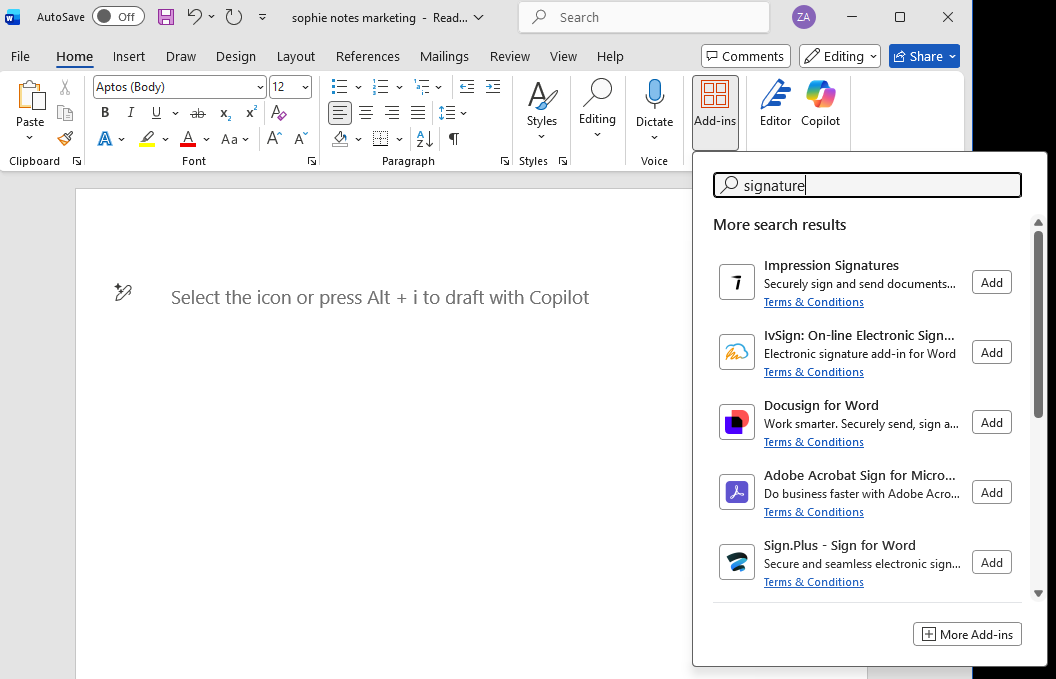
3. Use an add-in
Because Word’s built-in e-signature options are limited for real signing workflows, add-ins that allow you to add a digital signature for Word documents bridge the gap. You can connect Word to dedicated e-signature apps.
Here’s how you do it:
- Open your Word document. Go to the Home tab and click the Add-ins icon (four red squares).
- Search for “signature.”
- Popular options include Dropbox Sign, Sign.Plus, and Docusign. Select one and click Add.
- Follow the add-in’s prompts to log in and send your document for signing.
Pro Tip
Many of the best e-signature apps and add-ins require a separate account and may involve subscription costs. A better free alternative is Jotform Sign.
How to insert a signature in Word for Mac
This next process explores how to add a signature line in Microsoft Word on Mac. It’s similar to the Windows workflow.
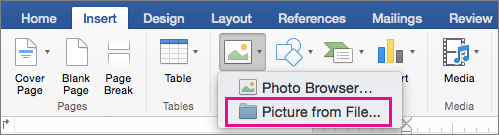
1. Insert a picture of your handwritten signature
This works much the same as on Windows and lets you insert your signature to sign a Word document on a Mac.
- Sign your name on white paper using a dark pen.
- Scan or photograph it, then save it on your Mac as a .png or .jpg file.
- Open your Word document and place your cursor where the signature should go.
- Go to Insert > Pictures > Picture from File. Find your signature image.
- Click Insert, then (optionally) use the Picture Format tab to crop out any excess background.
2. Use an add-in
Just like on Windows, Mac users can add e-signatures for Word through Office add-ins.
- Open your Word document and go to Insert > Get Add-ins.
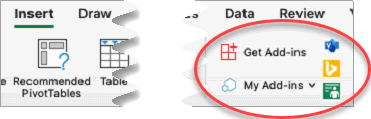
- Search for “signature” in the store.
- Select a compatible add-in, and click Add.
- Follow the add-in prompts to authenticate and send your document for signing.

How to sign Word documents on mobile (iOS and Android)
Word’s mobile app lets you create and e-sign on a phone, but the experience is more limited than on a desktop, especially when it comes to drawing or managing signatures on a small screen.
Signing Word documents on iOS
Here’s the workflow for signing Word documents in iOS:
- Open the Word app on your iPhone or iPad and navigate to the document you want to sign.
- Tap the Edit icon (pencil) to enter editing mode.
- Tap where you want your signature to appear.
- Go to Insert > Pictures and select a saved image of your signature from your photo library.
- Tap the image to resize and reposition it as needed.
- Tap Done to save your changes.
Signing Word documents on Android
- Open the Word app on your Android device and open the document you want to sign.
- Tap the Edit icon to enter editing mode.
- Tap where you want your signature to appear.
- Tap Insert > Pictures and choose a saved signature image from your gallery.
- Tap the image to adjust its size and position.
- Tap Done to save.
Word’s mobile app has real limitations. It doesn’t support advanced signature line features, and drawing on a tiny screen is awkward. If you regularly need to collect signatures from others or manage multiple documents, Jotform Sign Mobile is a purpose-built alternative. Use the free document signing app, available on iOS and Android, to scan physical paper directly into a signable PDF or use in-person signing to collect client signatures on a tablet or phone.
How to automate signatures with Jotform Sign
Word is a great word processor, and it’s fine for collecting e-signatures if you seldom do it. But if you’re regularly sending documents for signature, chasing people for updates, managing multiple signature workflows, or manually filing completed forms, there’s a better way: Consider Jotform Sign vs Word signatures.
Send my document for signature
File type is not allowed.
Maximum file size limit exceeded. (5MB)
Something went wrong.
Jotform Sign handles the entire signing process, so you can focus on the work that actually matters.
Here’s what you get:
- Instant document setup: Upload any Word or PDF document and convert it into a signable e-sign document in minutes.
- Automated approval flows: Set signing orders, trigger automatic reminders, and get notified the moment a document is completed.
- Audit trail on every document: Every signature is timestamped and tracked, giving you a clear record of who signed what and when. Plus, they align with ESIGN Act standards.
- Cloud storage sync: Automatically send finalized, signed PDFs to Google Drive, Dropbox, OneDrive, or wherever your team stores files.
- Team collaboration: Share templates across your team, assign roles, and manage all your documents from one central dashboard.
- Reusable templates: Build a signing template once and reuse it endlessly. This is ideal for contracts, onboarding forms, NDAs, and more.
- Jotform Sign Mobile: Sign on the go. Collect in-person signatures on a single device, scan physical documents directly into signable PDFs, or send documents for remote signing, all from your phone or tablet. Available on iOS and Android.
- Broad format support: Handle Word documents, PDFs, and more with ease.

Ready to get started? Sign up for Jotform Sign and get 10 signed documents every month for free. Simply upgrade anytime as your needs grow.
FAQs about inserting a signature in a Word document
Creating an electronic signature is easier than you might think. You can draw it using a mouse, trackpad, or touchscreen, type your name and apply a font style, or upload a scanned image of your handwritten signature.
Yes. On Windows, you can save a signature block as a Quick Part for future use.
In Word, insert a scanned signature image or use a drawing tool directly on screen.
For a cleaner, fully digital process, use a platform like Jotform Sign. You can sign documents entirely online, whether from a desktop or the Jotform Sign Mobile app, and share the completed file instantly.
AS ALWAYS, CONSULT AN ATTORNEY BEFORE RELYING ON ANY INFORMATION ON THIS PAGE. THE CONTENT ABOVE IS FOR INFORMATIONAL PURPOSES ONLY. JOTFORM IS NOT PROVIDING LEGAL, FINANCIAL OR OTHER ADVICE.


Send Comment:
2 Comments:
January 24, 2023
hyy dear this is very helpful site list you provide me thanks of lot sir
July 2, 2022
Your blog is very good. Thanks for the Forgiving. This blog is very helpful. We also have good articles which I have mentioned below.
digital signature
digital signature certificate