
Steps to lock cells in Google Sheets
- Open your sheet and select the cells you want to lock
- Open the Data menu, and select Protected Sheets and Ranges in the dropdown menu
- In the Protected Sheets and Ranges pane, enter a description for the actions you’re prohibiting
- Click the Set Permissions button
- Click the Restrict who can edit this range option
- Deselect anyone who shouldn’t have permission to edit the cells
Google Sheets is a powerful spreadsheet tool many people use every day. While the program may be similar to Microsoft Excel, it also offers some distinct advantages.
One of those advantages is that you can share your spreadsheets with others. This lets you collaborate with your teams, employees, and supervisors — but it can also lead to some potential issues.
If you’ve put hours of work into developing your spreadsheet, you won’t necessarily want just anyone to edit the cells, either intentionally or accidentally. Taking a few minutes to lock your cells can protect them from being edited or changed, ensuring your document is safe even if you share it with others.
How to lock cells in Google Sheets step by step:
To protect your document, open your sheet and identify the cells that you want to lock. You can lock some of the cells while still allowing collaborators to make changes to others. Start by identifying and selecting the cells that you want to lock.
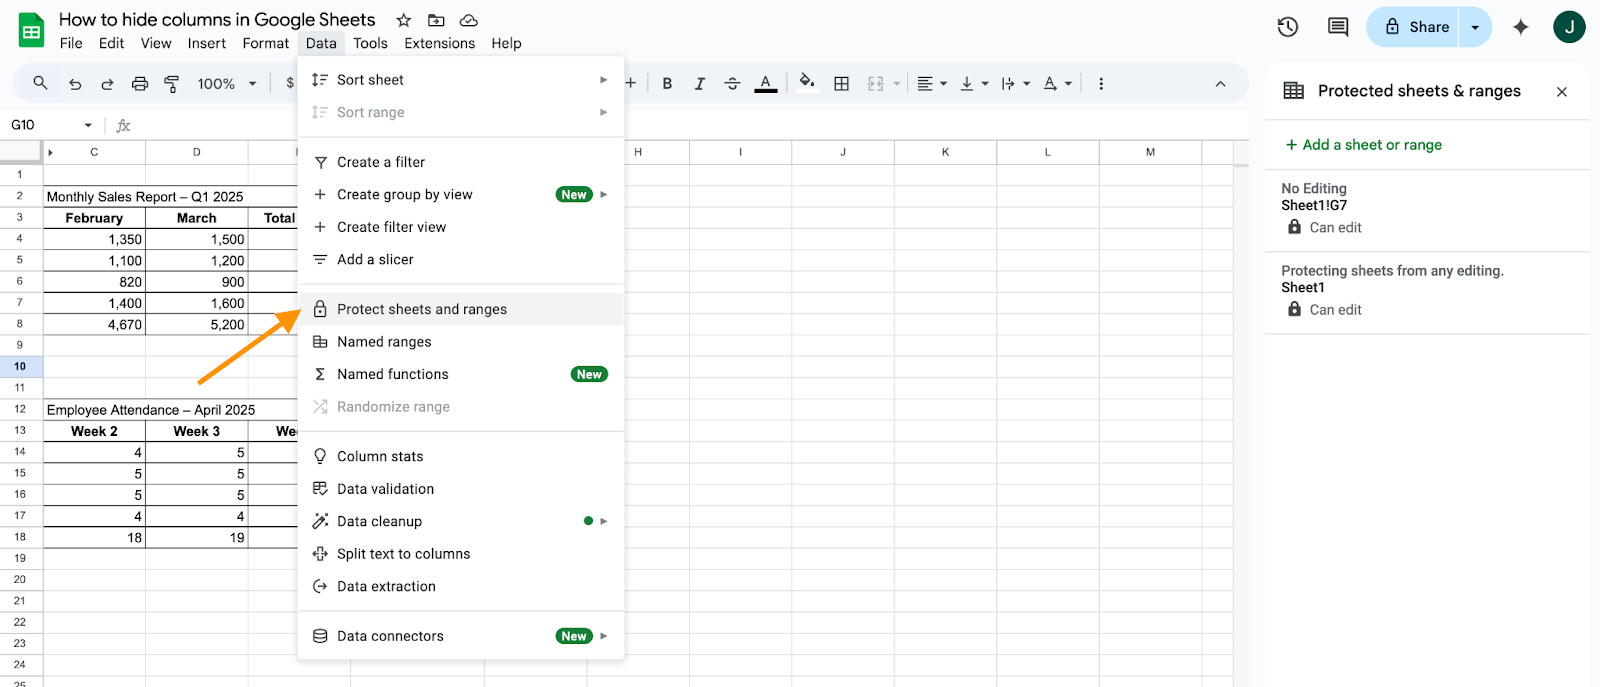
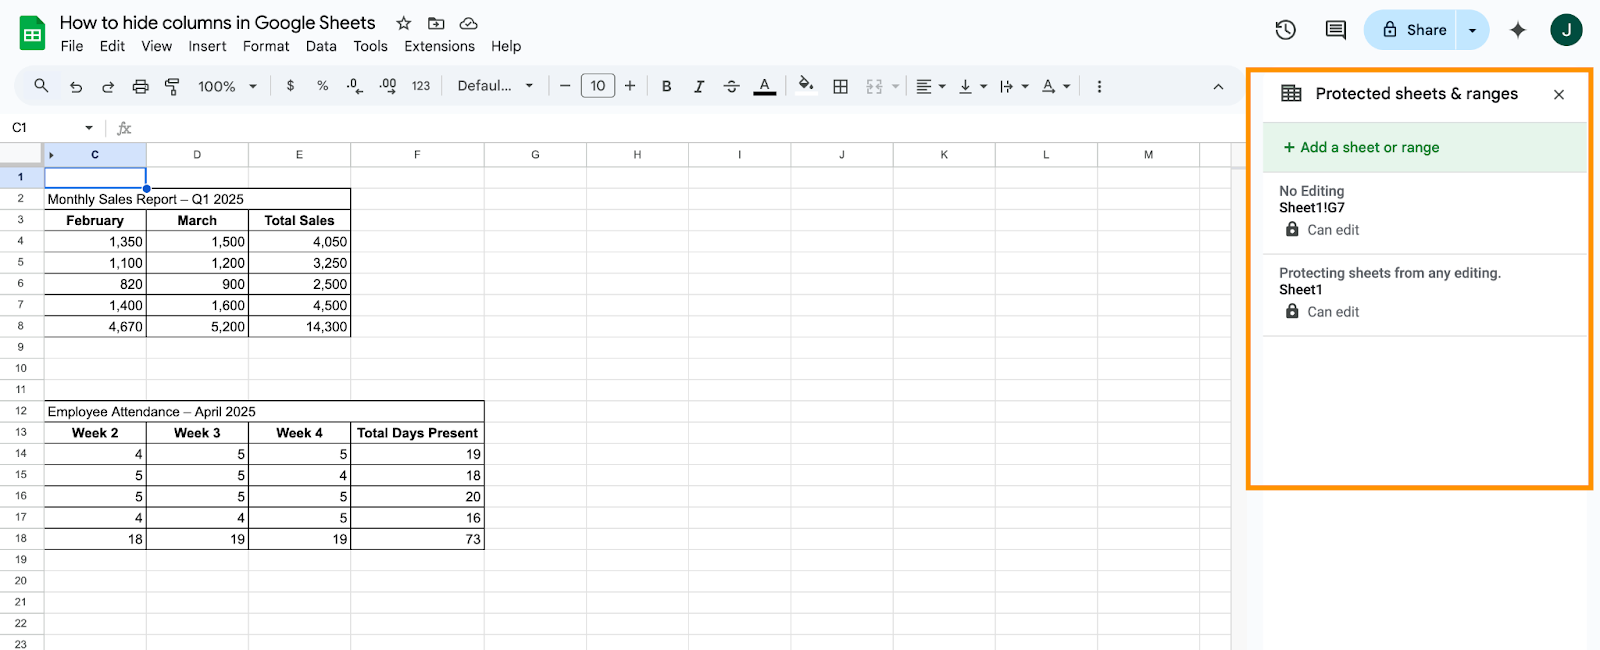
- Open the Data menu at the top of the document, and then select Protected Sheets and Ranges in the dropdown menu. This will open a Protected Sheets and Ranges pane on the right side of your document.

- In the Protected Sheets and Ranges pane, enter a description for the actions you’re prohibiting in the protected cells, like “No changing” or “No editing.”
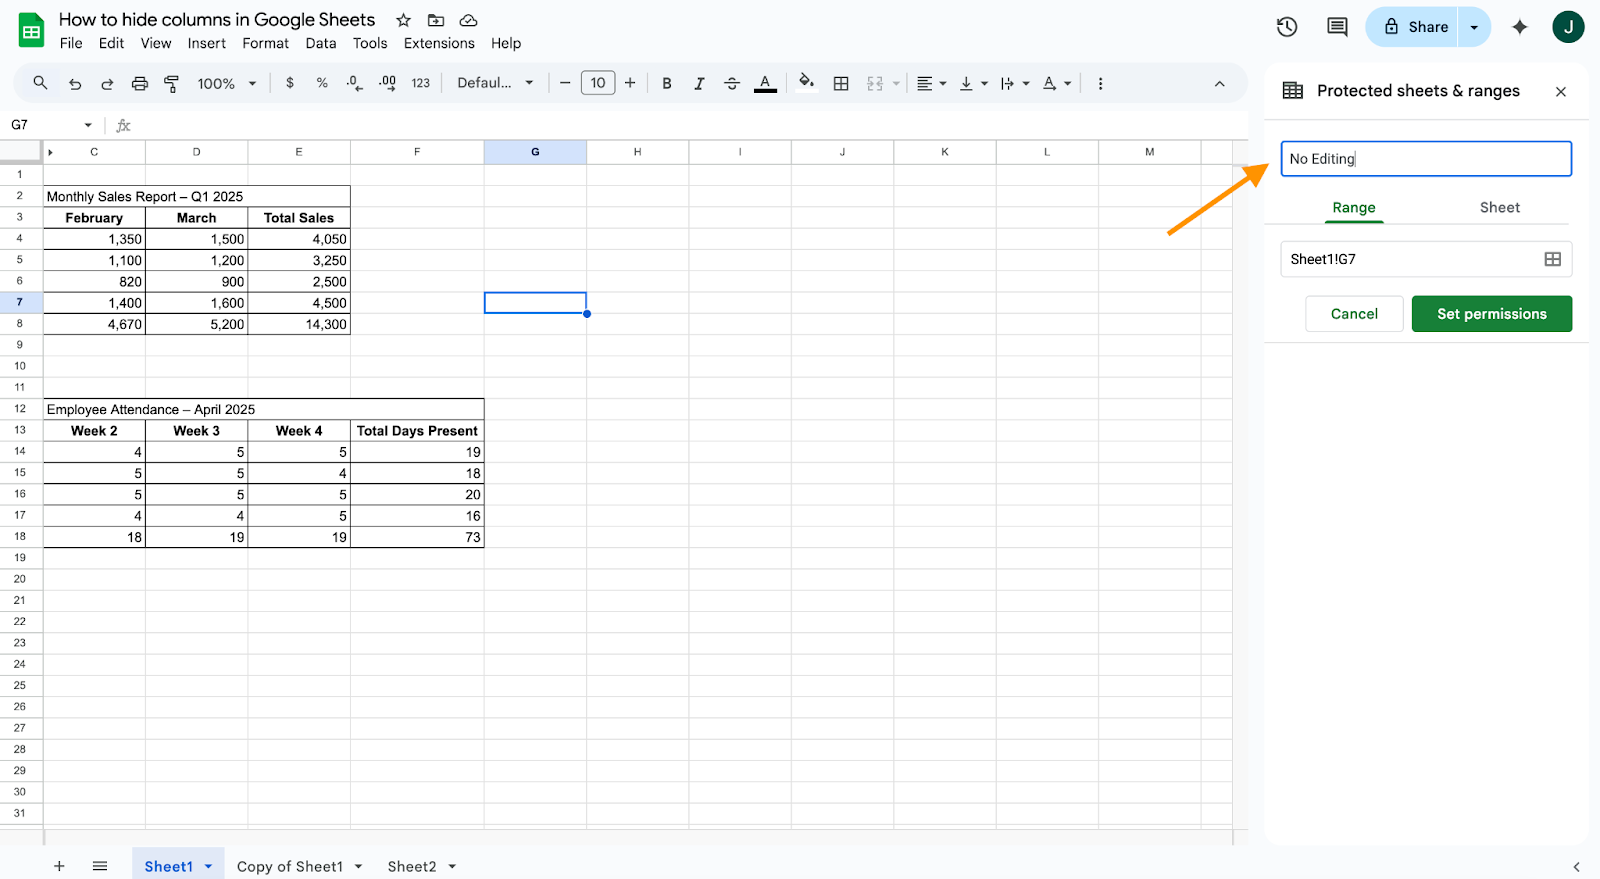
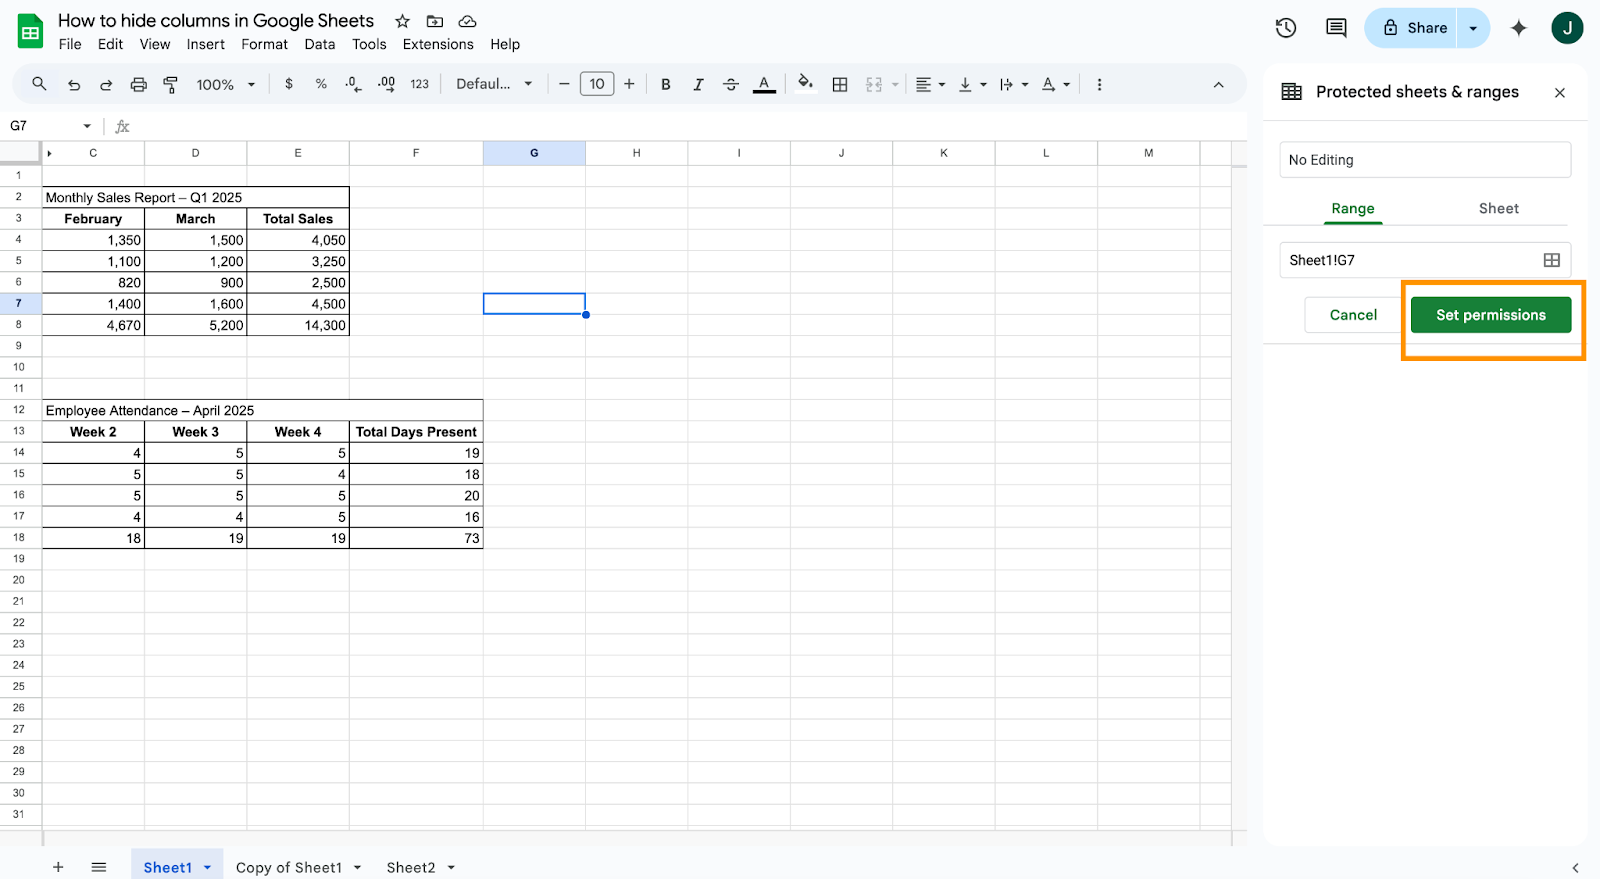
- Click the Set Permissions button to customize the permissions of that highlighted range of cells.
Give editing permissions to select users
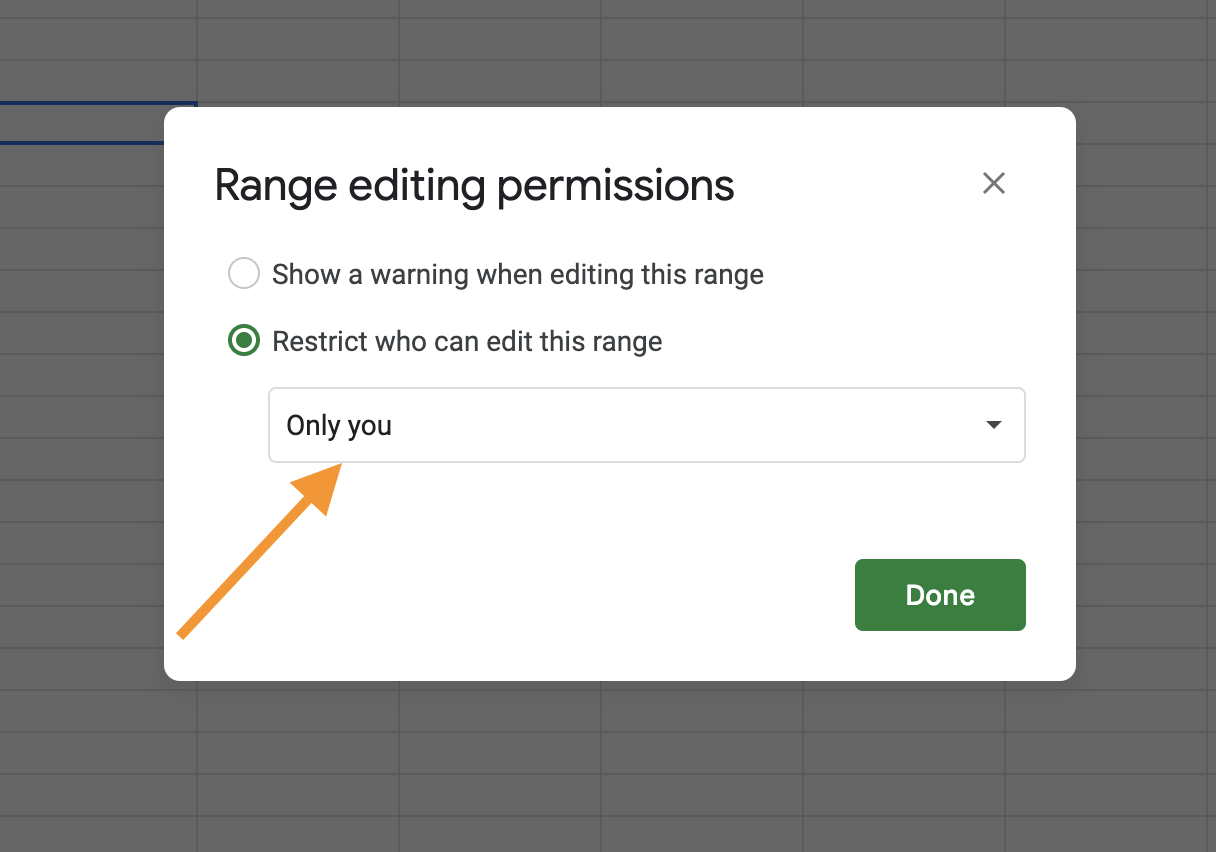
- Decide who should have permission to edit those selected cells. Click Restrict who can edit this range.
- You can choose Only you under the dropdown menu, and no one else will be able to edit those cells.
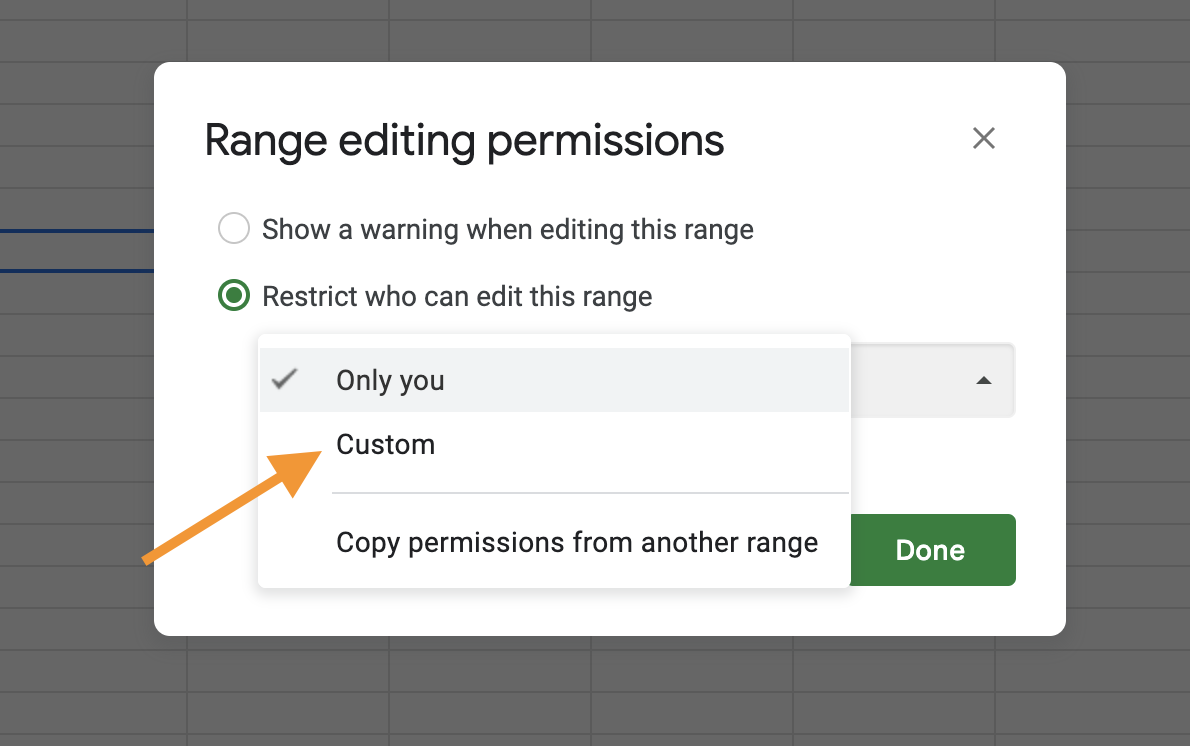
- If you want a select few people to still be able to make changes to those cells, choose Custom from the dropdown menu.
- Finally, click Done.
If anyone without special editing permissions tries to edit those protected cells, they’ll receive a warning message stating that the cell is protected. They will need to contact you to get permission to edit the locked cells.
How to lock an entire sheet in Google Sheets
Protecting certain cells can be useful if you want others to be able to make edits to other portions of a sheet. However, if you want to protect a whole sheet, you can prevent anyone from making changes to any part of it. You can choose to give only yourself editing permissions, or you can give specific people the ability to make edits.
- To start, open the sheet you want to protect.
- Right-click on the sheet tab that you’ll be protecting. This process only applies to one tab at a time, so you’ll need to repeat it for any other tabs you want to protect.
- Click on the Protect sheet option. This will open a Protected Sheets and Ranges pane to the right of the sheet.
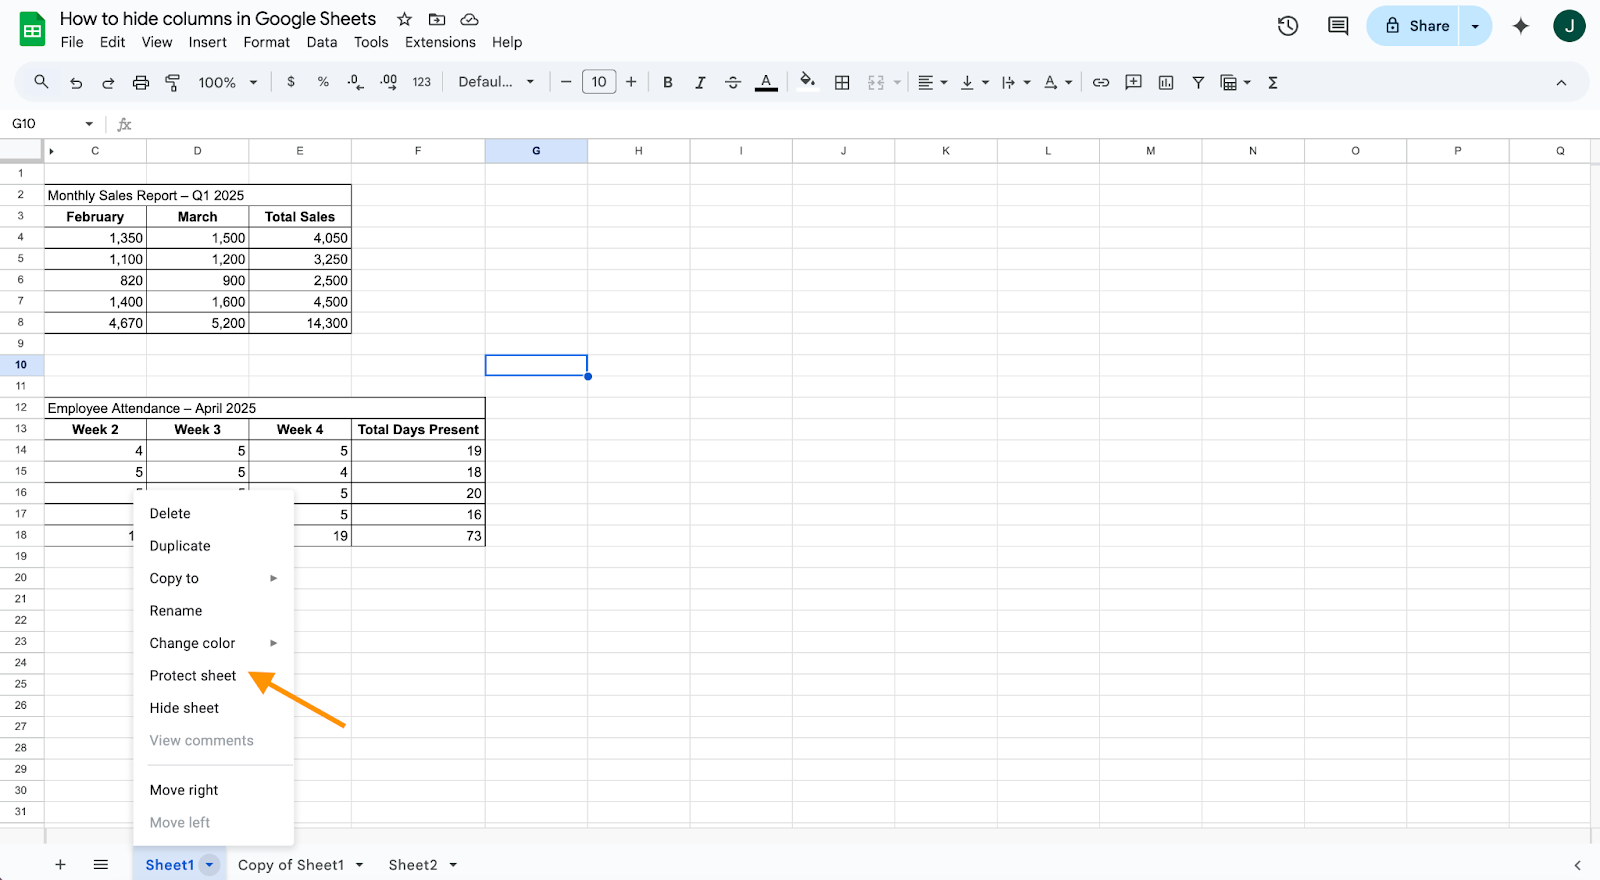
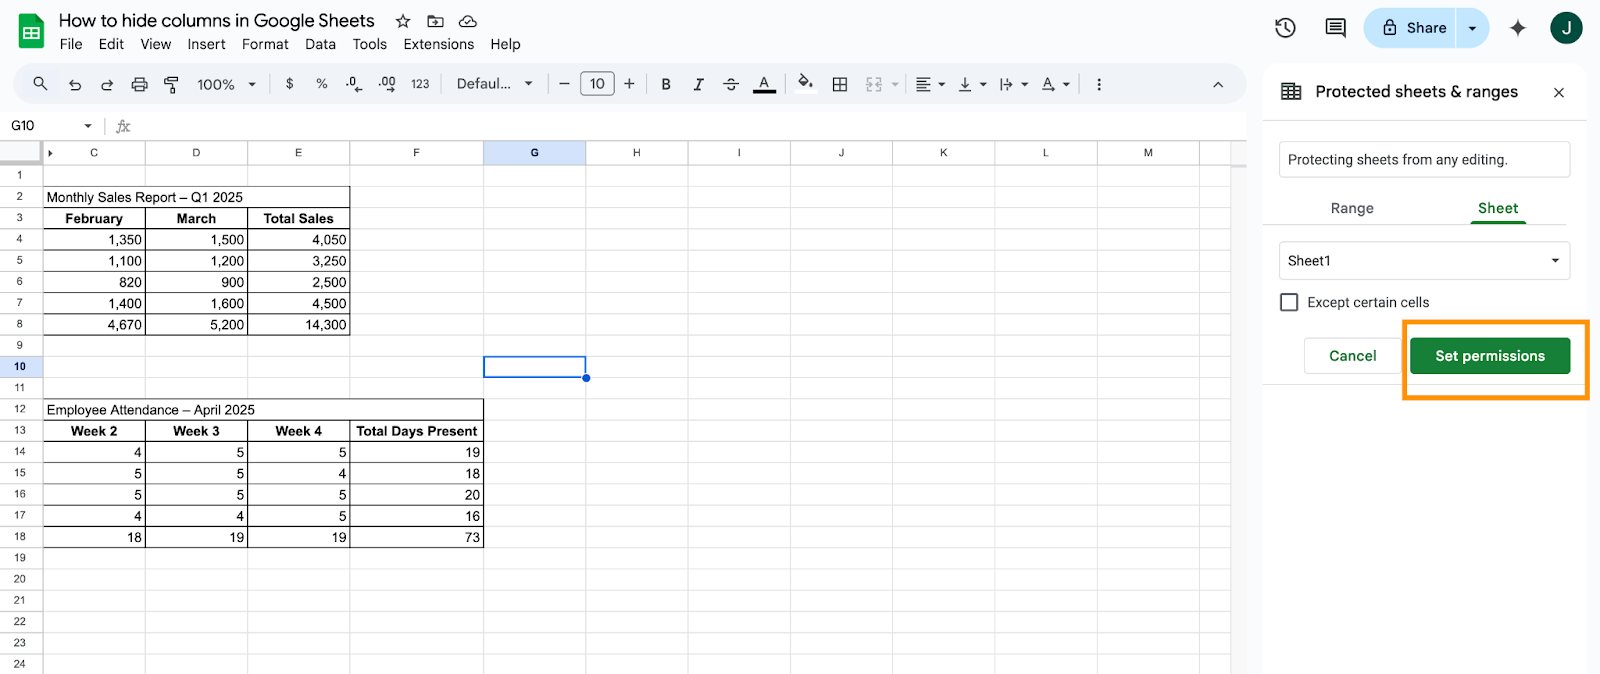
- In the Protected Sheets and Ranges pane, enter a description of what you’re doing, like “Protecting sheets from any editing.”

- Double-check that the sheet name in the second field reflects the name of the sheet you want to protect.
- Click on the Set permissions button.
- Select Restrict who can edit this range.
- In the dropdown, choose Only you if you want to be the only one who can edit the sheet. If you want to give certain people the ability to make edits, then choose the Custom dropdown option. Deselect any collaborators you don’t want to have editing permissions.
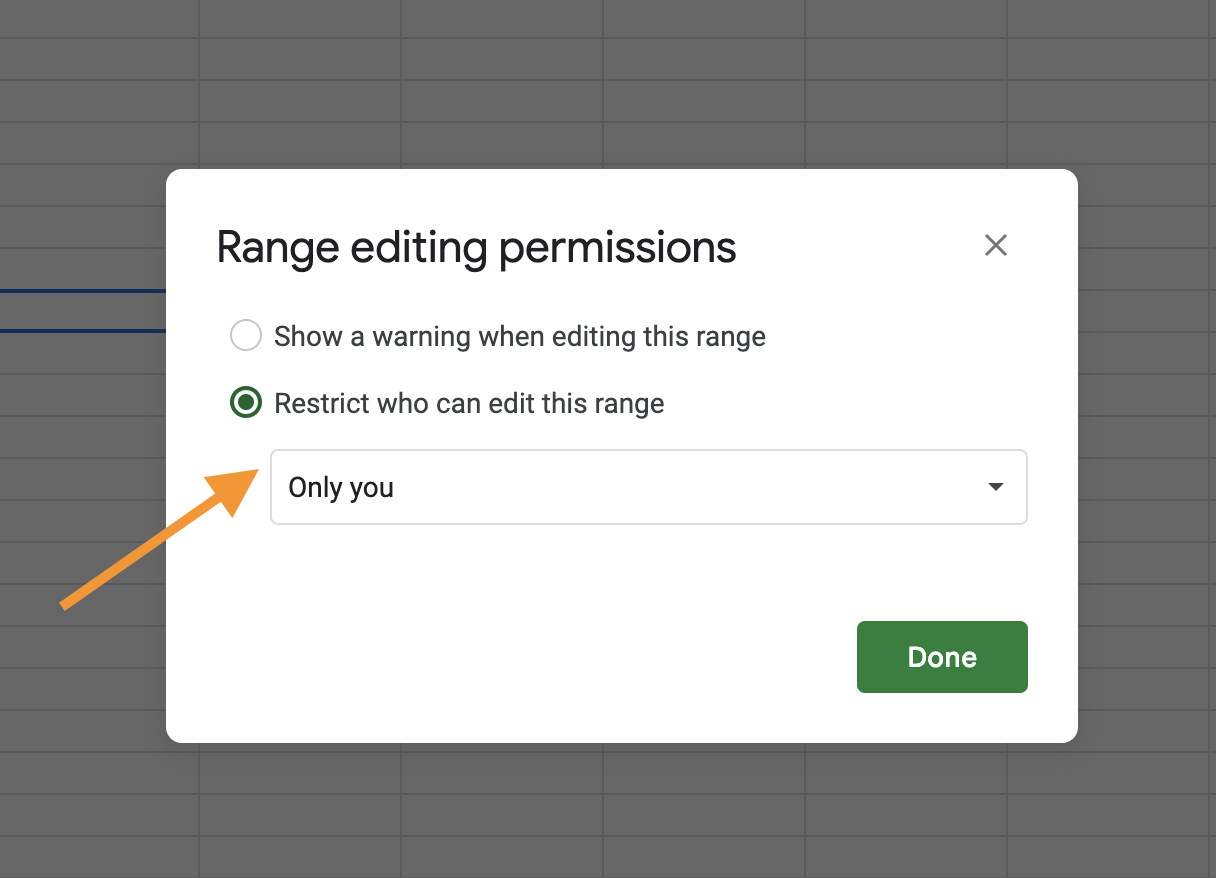
- Click on Done.
How to unlock cells in Google Sheets
Need to make changes to locked content later on? Here’s how you can easily unlock cells:
- Open the Google Sheet that contains the locked cells.
- Click Data in the top menu, then select Protected sheets and ranges.
- In the pane that appears on the right, find the range or sheet you want to unlock.
- Click the trash can icon next to the range or sheet description.
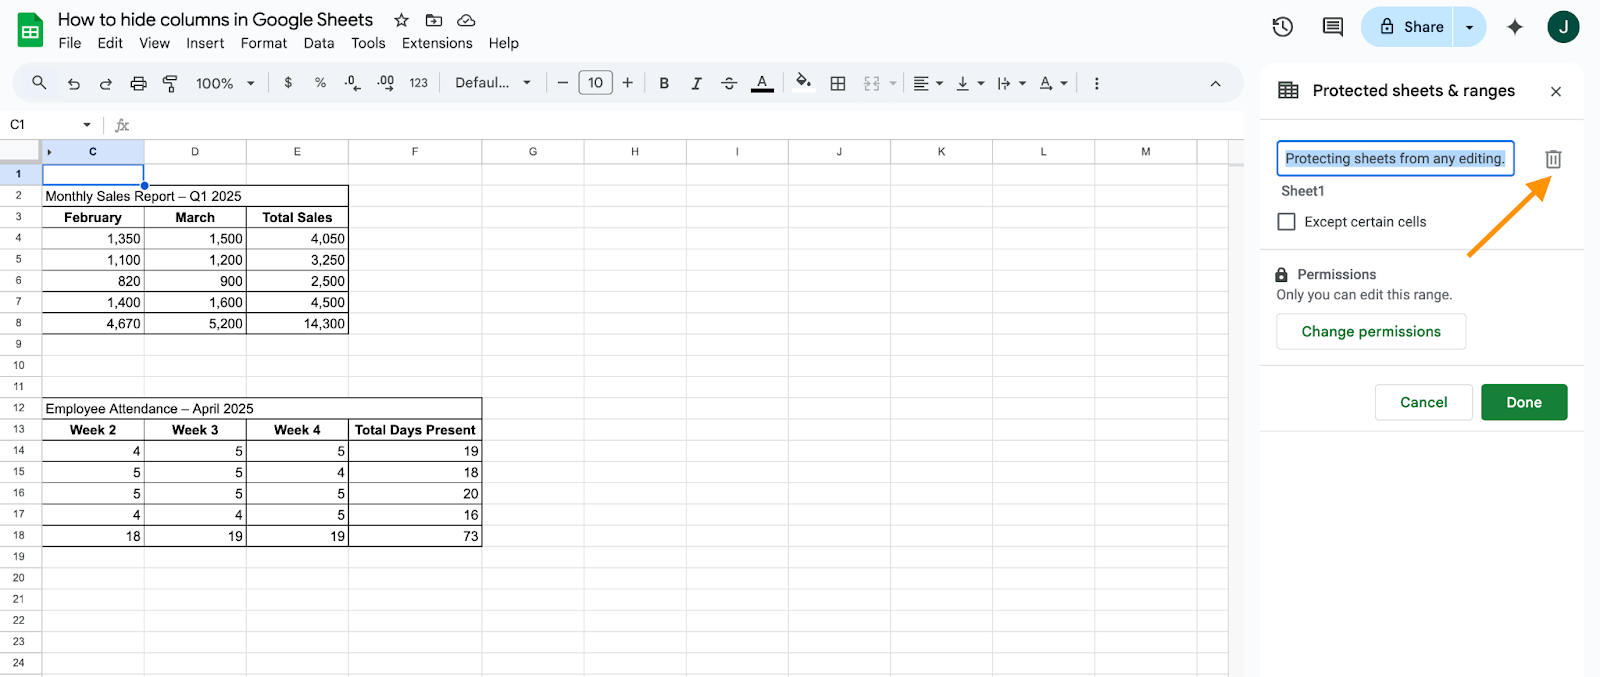
- Confirm that you want to remove the protection.
Once deleted, those cells will no longer be restricted, and anyone with edit access to the document will be able to make changes.
Benefits of locking cells in Google Sheets
Locking cells in Google Sheets offers several benefits, especially when working in collaborative environments:
- Prevent accidental edits: Ensure that complex formulas and critical data aren’t changed unintentionally.
- Protect sensitive data: Limit access to confidential information to only trusted collaborators.
- Maintain version integrity: Keep formatting and structure consistent across users.
- Control permissions flexibly: Choose exactly who can and cannot make changes to specific ranges.
- Improve productivity: Reduce time spent on correcting errors caused by unauthorized edits.
Making the most of Google Sheets
Google Sheets is a powerful tool for any business, and when you know how to use functions like protected ranges and cells, you can make this tool work even better for your business.
If you frequently work in spreadsheets, then it may be time to upgrade your spreadsheet-database software. Options like Jotform Tables can allow for seamless collaboration, and you can import CSV or Excel files directly to help get you up and running quickly. Jotform Tables is also equipped with templates like budget sheets and calendar templates to further save you time.
No matter what programs and software your business uses, spreadsheets are sure to be a key element. When you understand their functionality and features, you’ll get the most out of these tools and make your business more efficient.
Photo by Vojtech Okenka from Pexels


Send Comment:
3 Comments:
February 18, 2023
So close to answering but unfortunately this article isn't about locking a cell. It's about limiting who can edit it. Maybe it's not possible. Might have to use Excel for any spreadsheet where cells need to be locked. Annoying Google. You should probably change the heading of this article too
December 19, 2022
How to auto-lock drop-down cell if the cell value is true
April 28, 2022
There is no "Protected Sheets and Ranges" option under the Data menu.