With Jotform, you can easily connect your forms to HubSpot CRM and keep your customer and business data organized in one place. This integration helps bring information collected through your forms into your CRM, making it easier to manage contacts, companies, deals, tickets, and other records without manually transferring data between platforms.
It’s especially useful for sales teams, marketers, customer support teams, and businesses that rely on accurate customer information to manage relationships and track activity. Whether you’re growing your contact database, managing sales opportunities, handling customer requests, or maintaining company records, this integration helps streamline your workflows and keep your CRM data consistent and up to date.
Connecting Your HubSpot Account
Getting your form ready to integrate with HubSpot CRM only takes a few steps. Here’s how to get started:
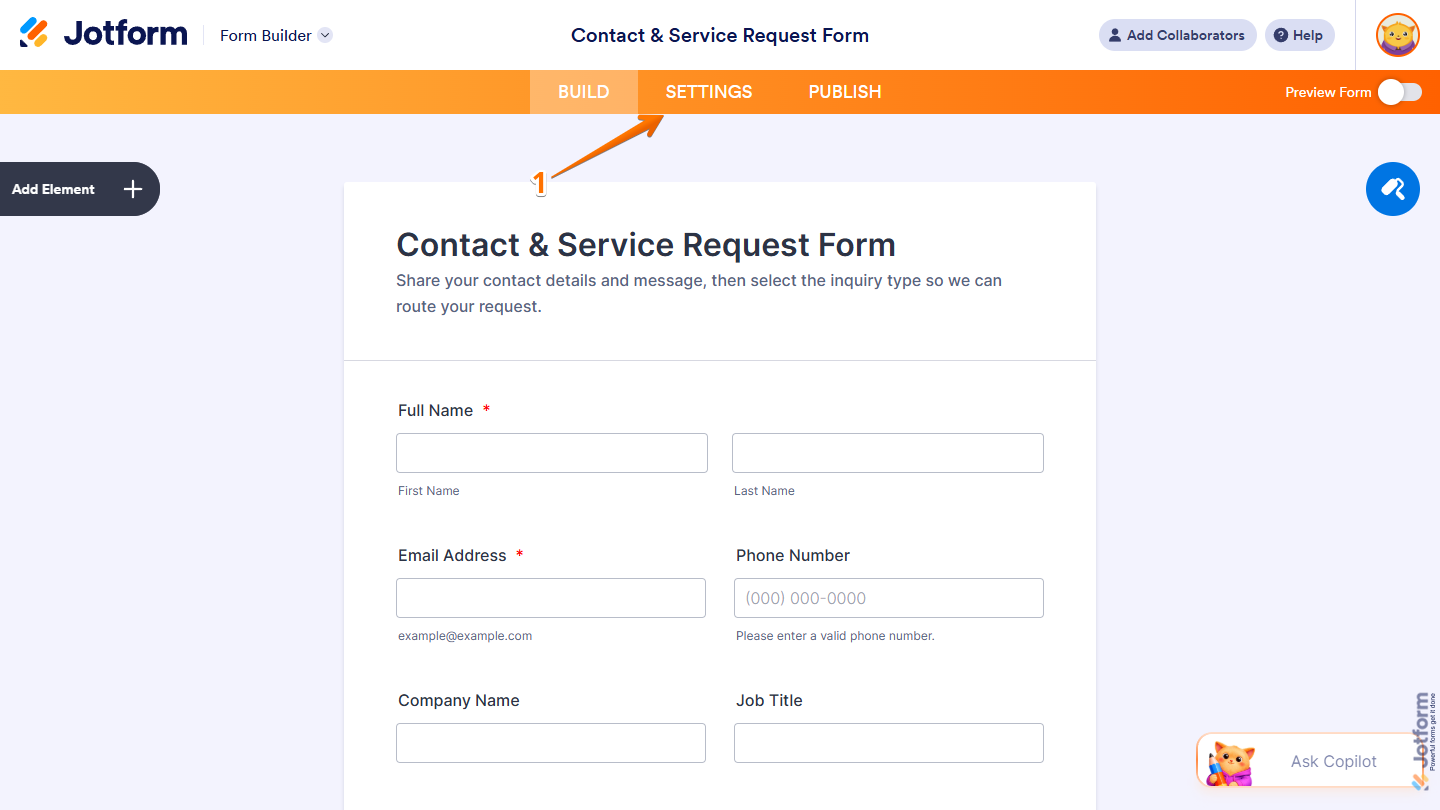
- In Form Builder, in the orange navigation bar at the top of the page, click on Settings.
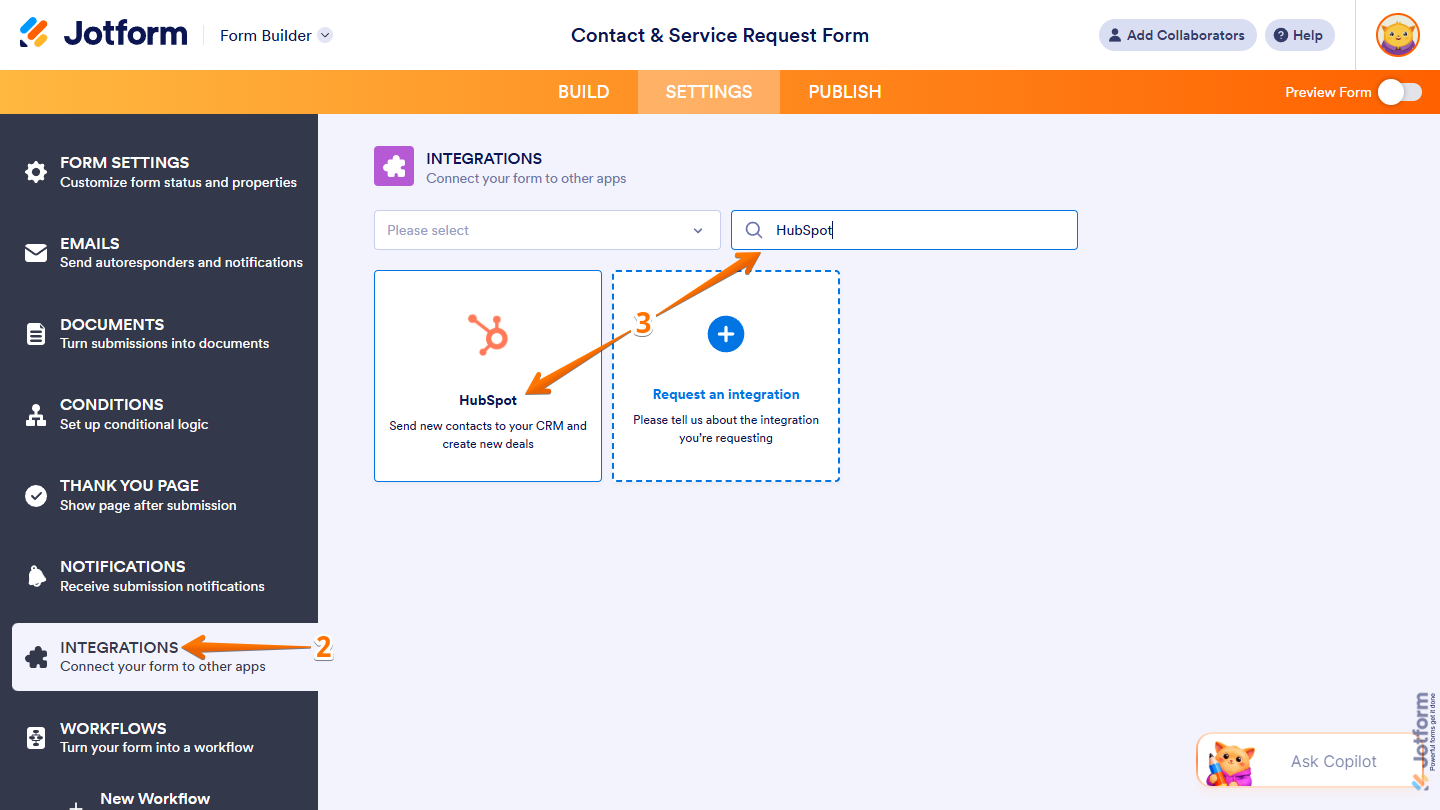
- Then, in the menu on the left side of the page, click on Integrations.
- Now, in the Integrations section on the right, search for HubSpot and click on it.
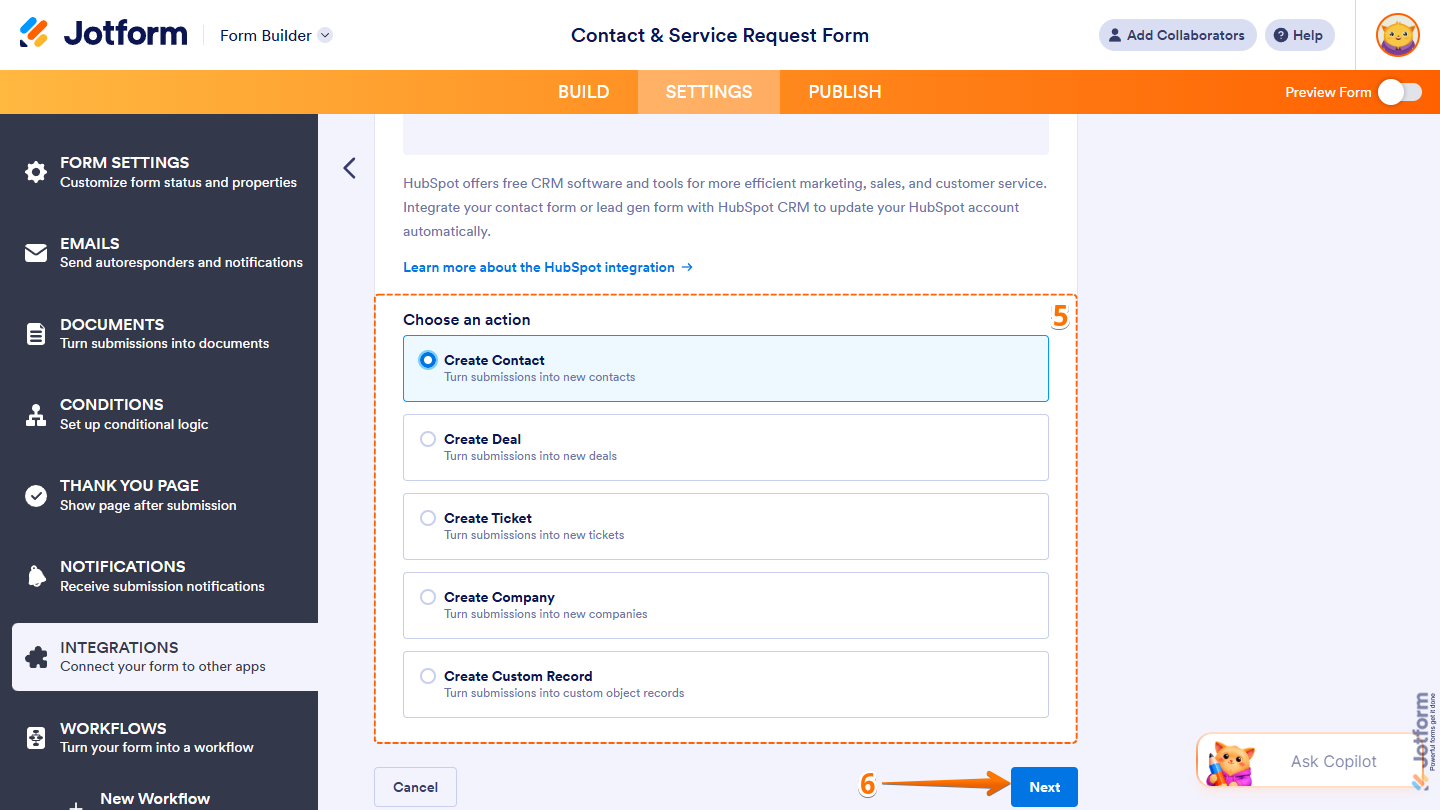
- In the HubSpot section, select one of these actions:
- Create Contact — Create a new contact in HubSpot using your form submission data.
- Create Deal — Create a new deal in HubSpot based on the information collected through your form.
- Create Ticket — Create a new ticket in HubSpot using details submitted through your form.
- Create Company — Create a new company record in HubSpot based on the information gathered from your form.
- Create Custom Record — Create a new custom object record in HubSpot using your form submission data.
- Then, scroll down and click on Next.

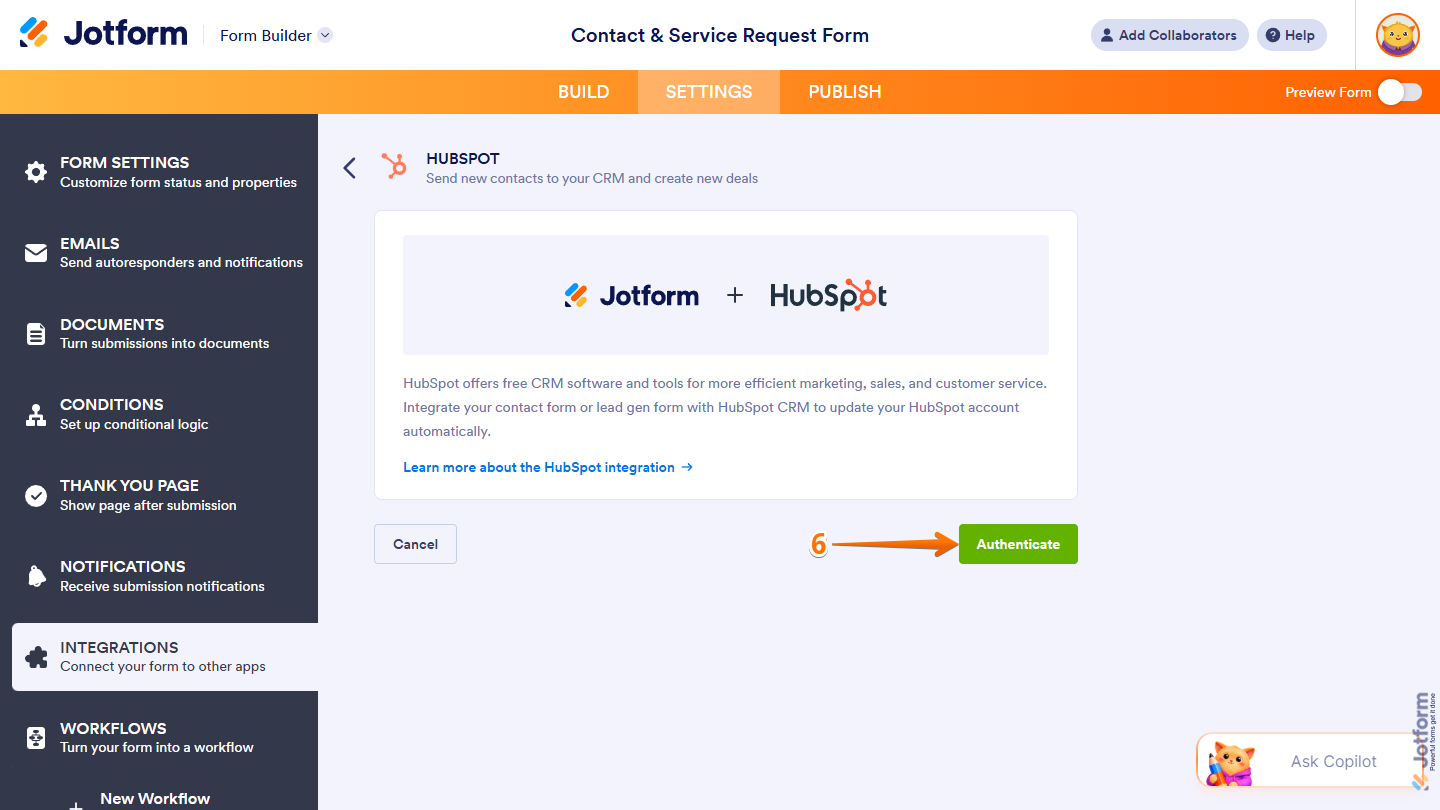
- Now, click on Authenticate.
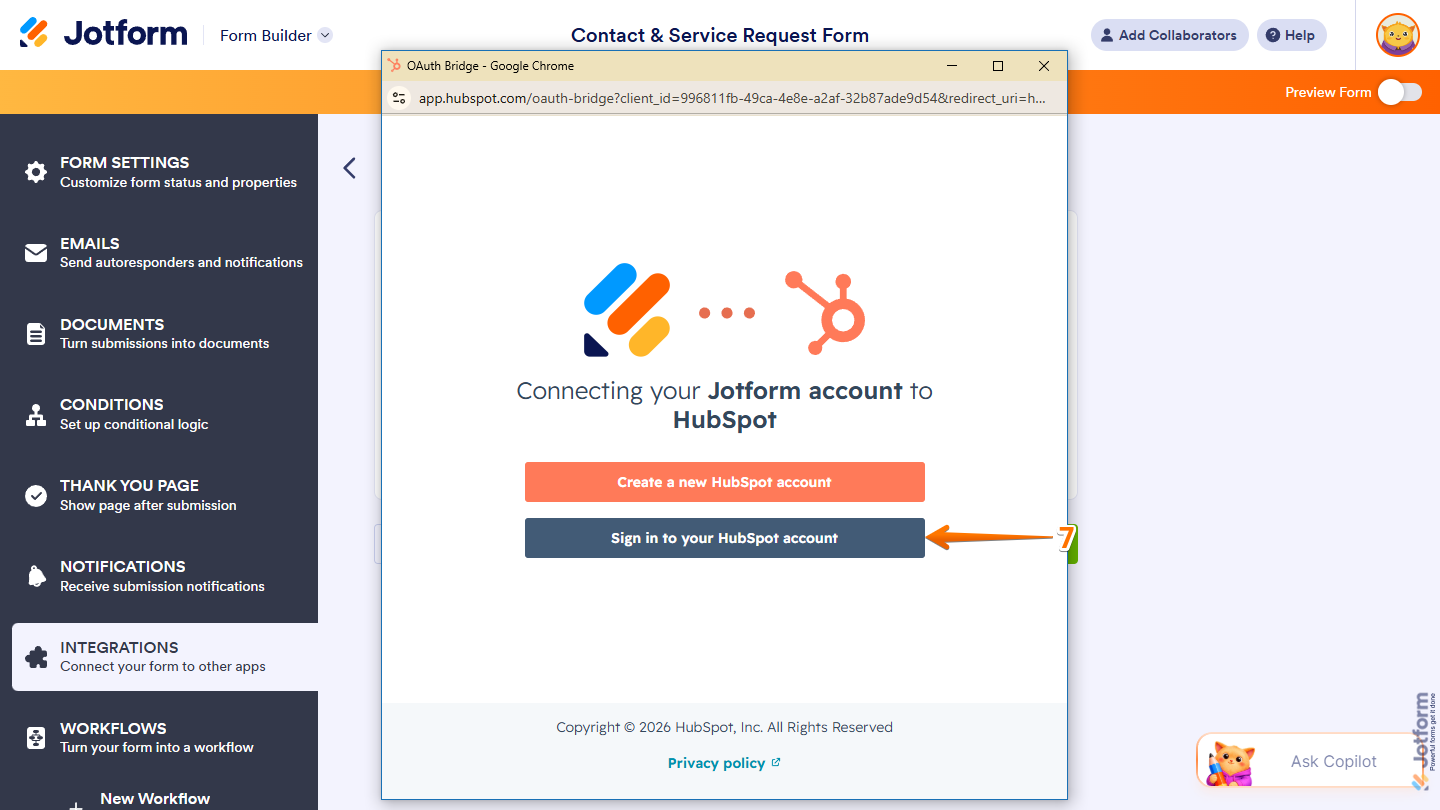
- Then, in the HubSpot OAuth Bridge window that comes up, click on Sign In to Your HubSpot Account.
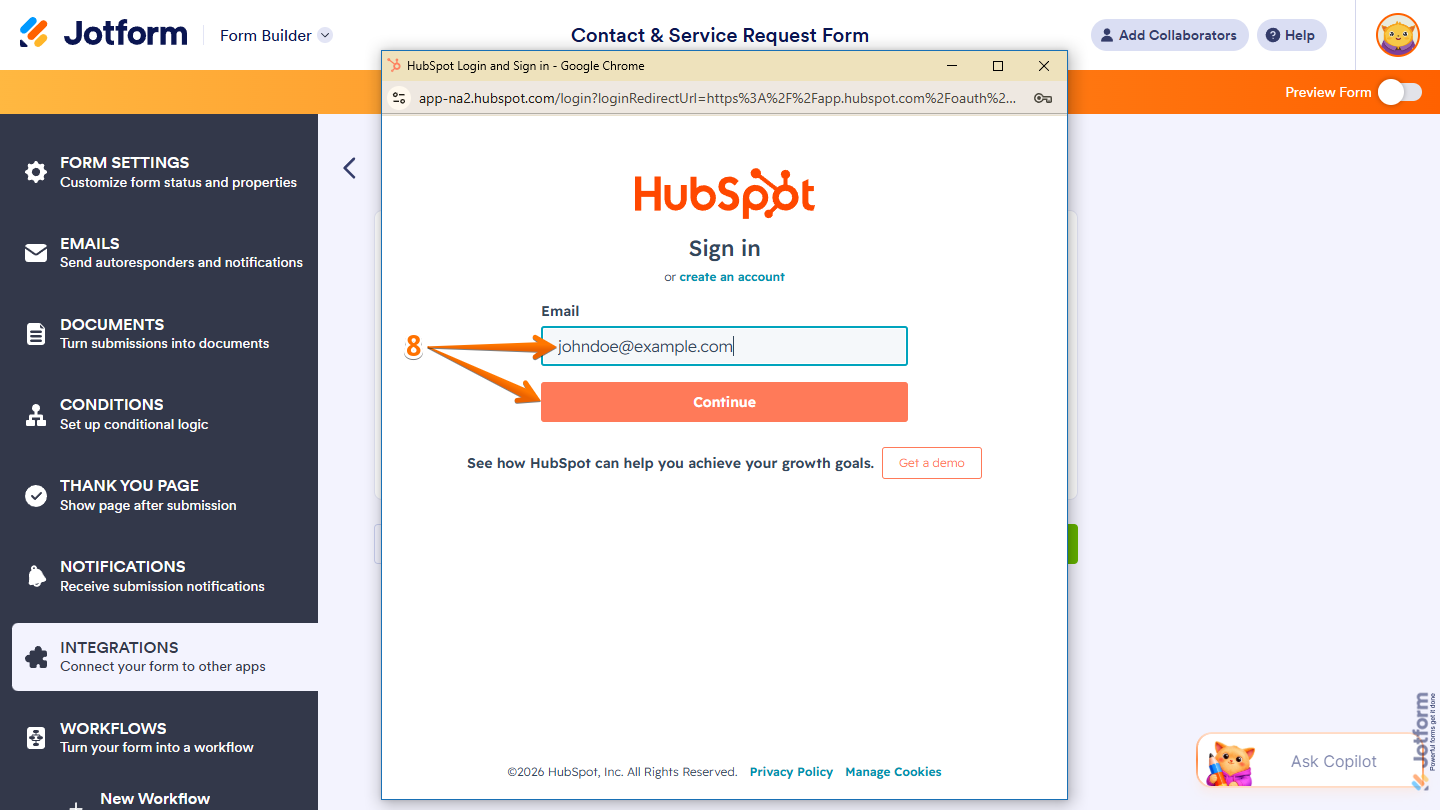
- Next, in the HubSpot Login and Sign In window, log in to your HubSpot account.
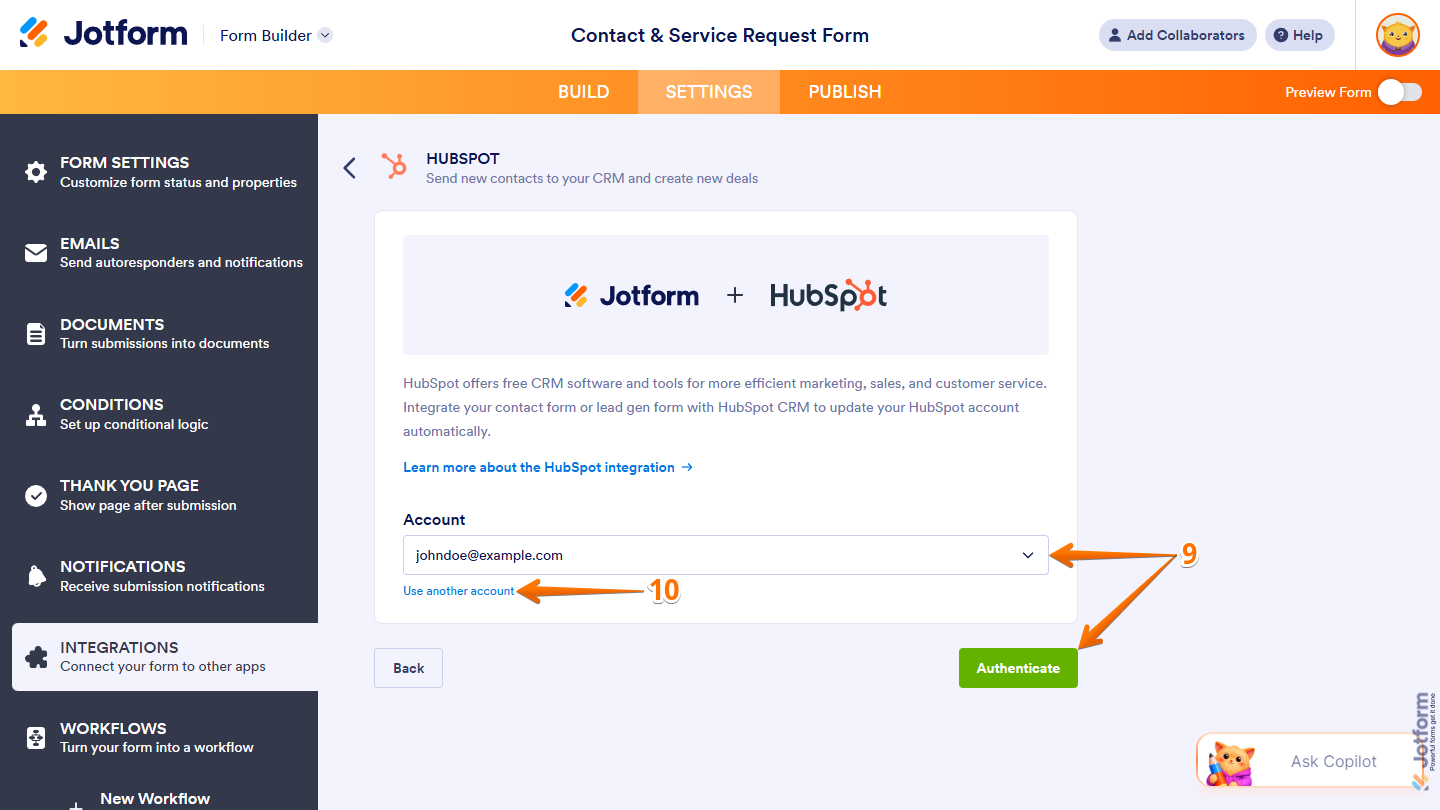
- If you’ve logged in before through one of your other forms, select that HubSpot account from the Account Dropdown menu and then click on Authenticate.
- Or, to use a different one, click on Use Another Account below the dropdown.
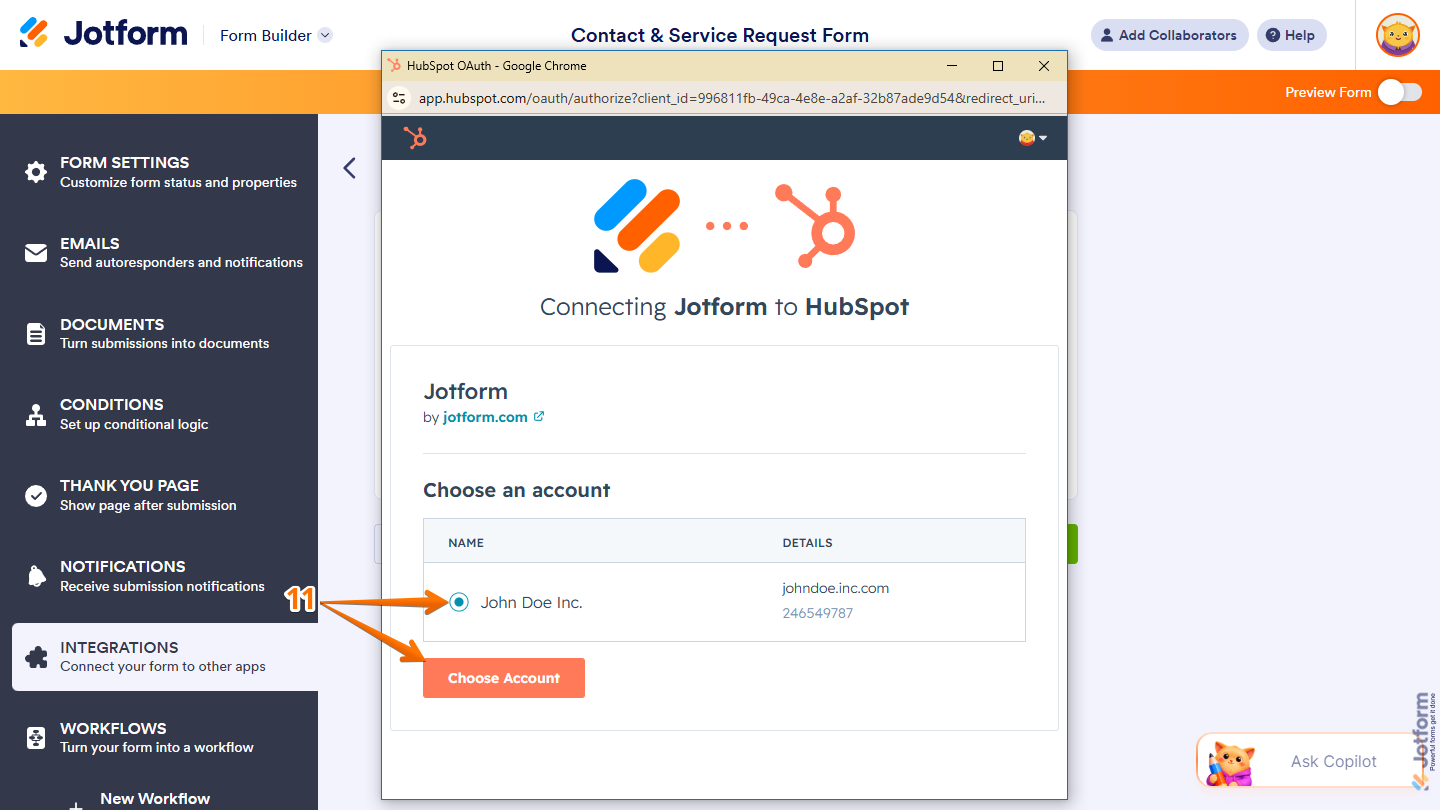
- Now, in the HubSpot OAuth window, select the account you want to use, then click on Choose Account.
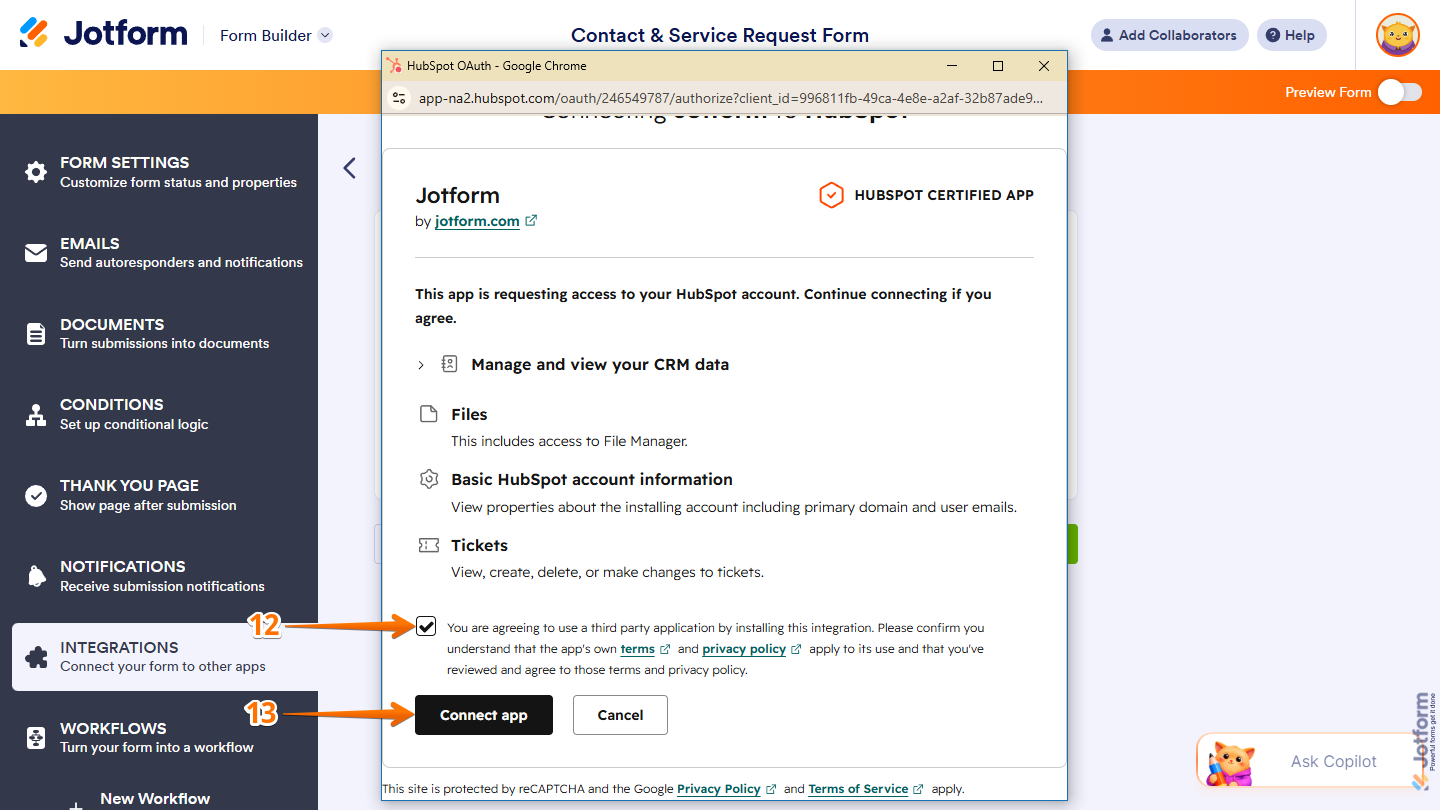
- Then, scroll down to the bottom of the window and put a check in the box confirming that you’ve reviewed and agree to Jotform’s Terms and Privacy Policy.
- Next, click on Connect App.
That’s it. You’ve successfully authenticated your HubSpot account. Now, depending on the action you chose, you can configure settings for:
- Creating Contact Action
- Creating Deal Action
- Creating Ticket Action
- Creating Company Action
- Creating Custom Record Action
Note
You can use the same or different HubSpot accounts for each integration action and each form in your account. This lets you create records in different HubSpot accounts using the same form or in the same HubSpot account from different forms.
Setting Up Integration Actions
Once your HubSpot account is authenticated, you can set up the actions that determine what happens after your form is submitted. Each action lets you automatically create contacts, deals, tickets, companies, or custom records in HubSpot from your form submissions.
Configuring the Create Contact and Create Company Actions
Once you’ve connected your form to your HubSpot account and selected the Create Contact or Create Company action, you can set it up to create records from submissions in just a few steps. Here’s what to do:
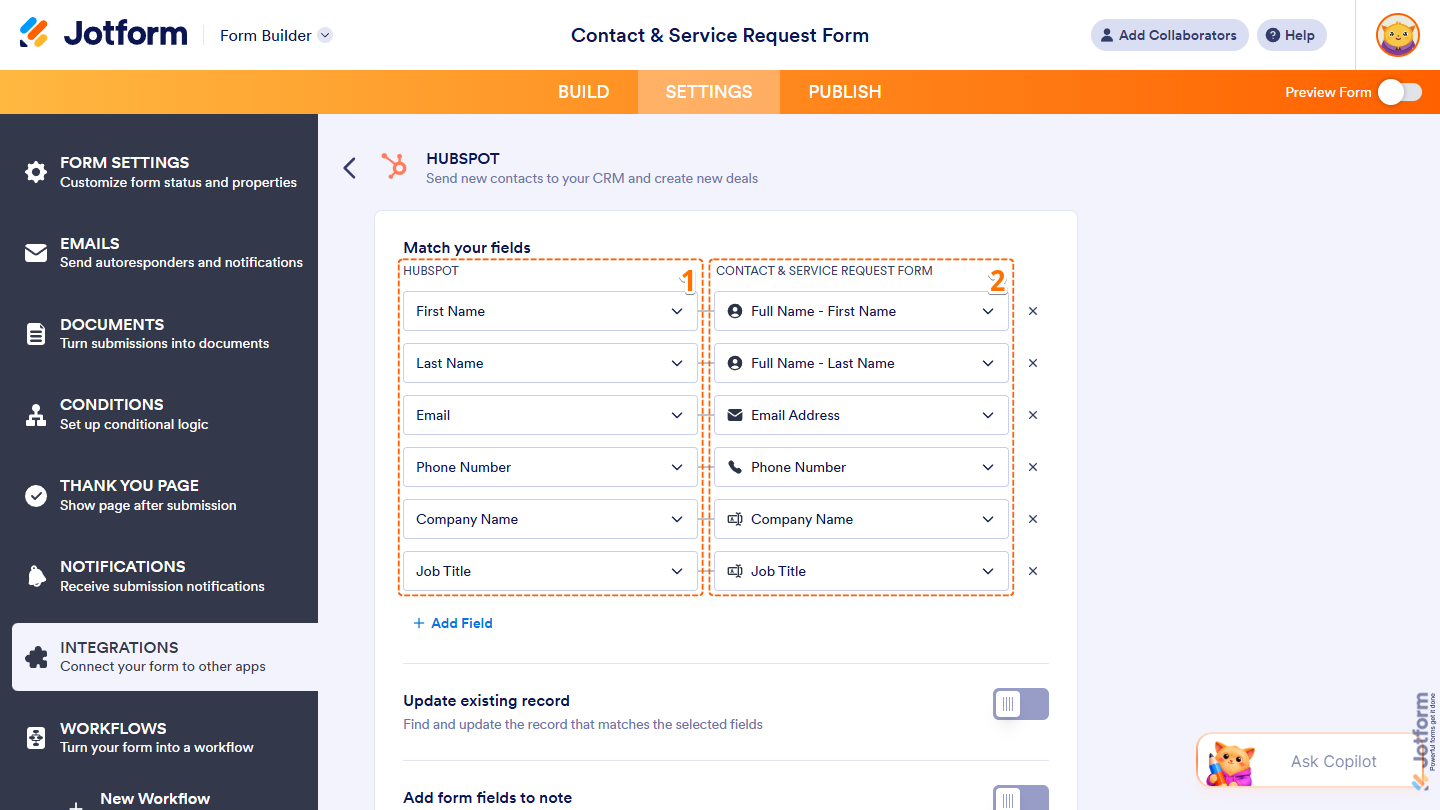
- In the HubSpot section, under Match Your Fields, click on the Dropdown menu under the HubSpot column to select a field from your HubSpot account.
- Then, click on the Dropdown menu under your Form column on the right side of it to select the corresponding Form field.
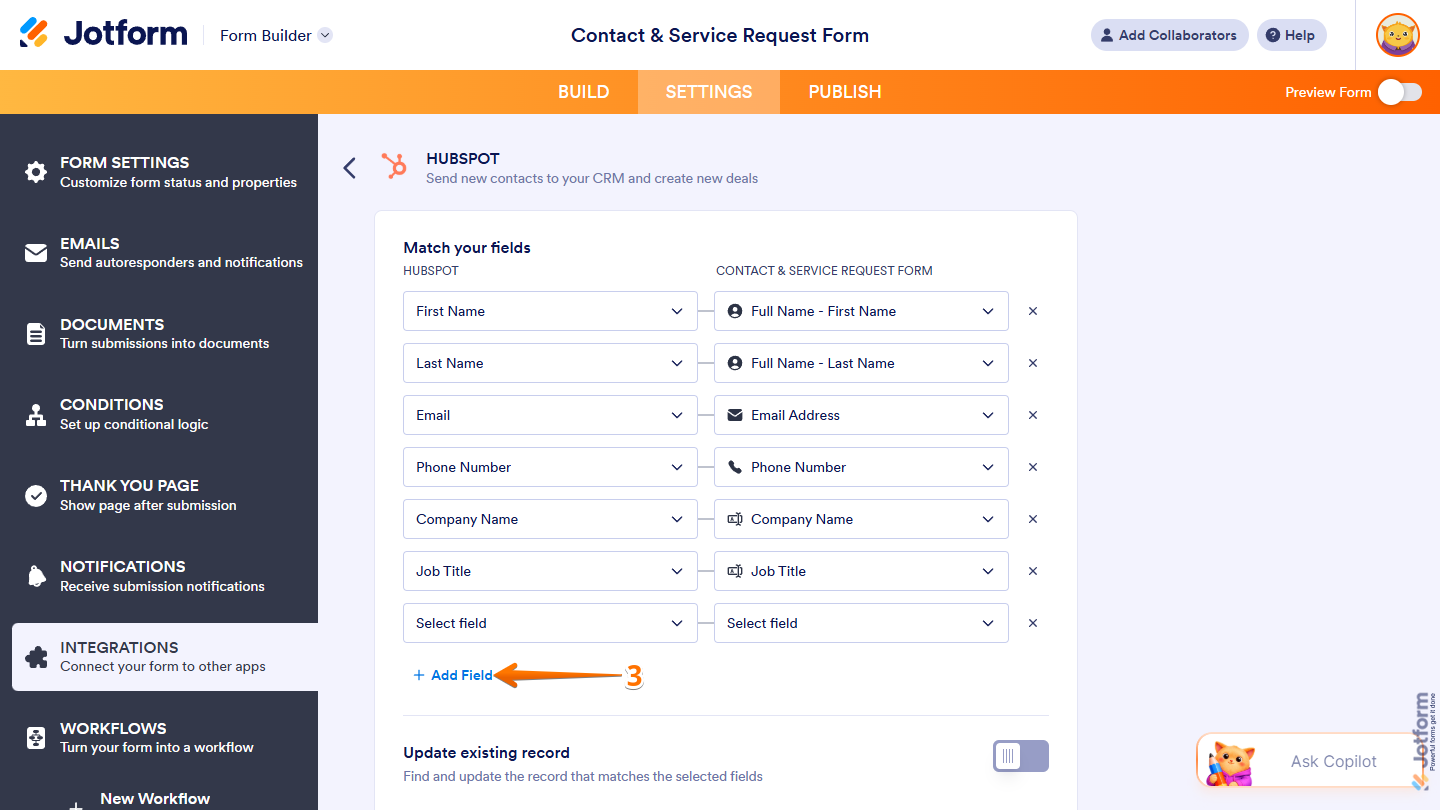
- To map additional fields, click on Add Field at the bottom of the Match Your Fields section.
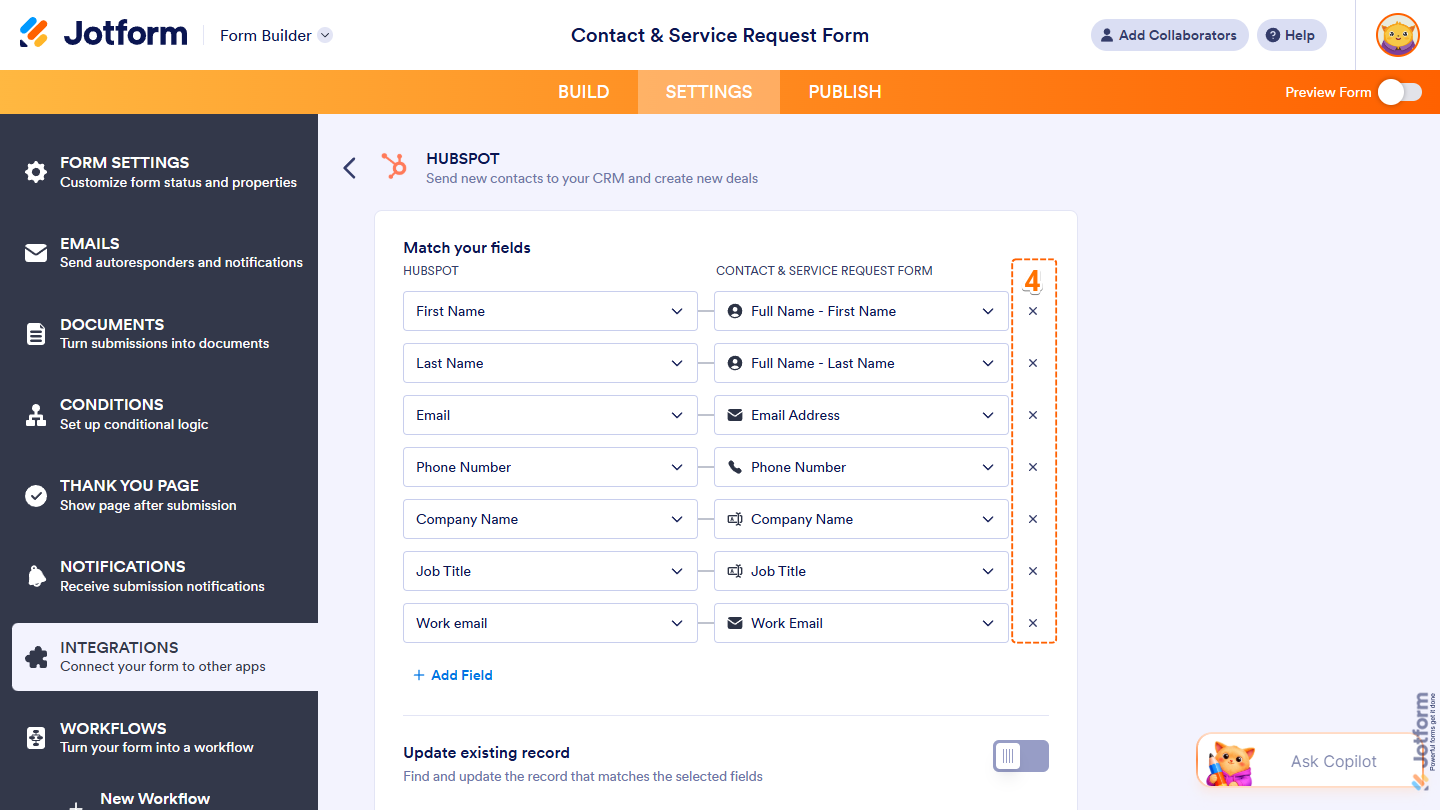
- To remove fields, click on ✕ on the right side of the Dropdown menu under the Form column.
- Now, you’ll see this list of settings you can configure:
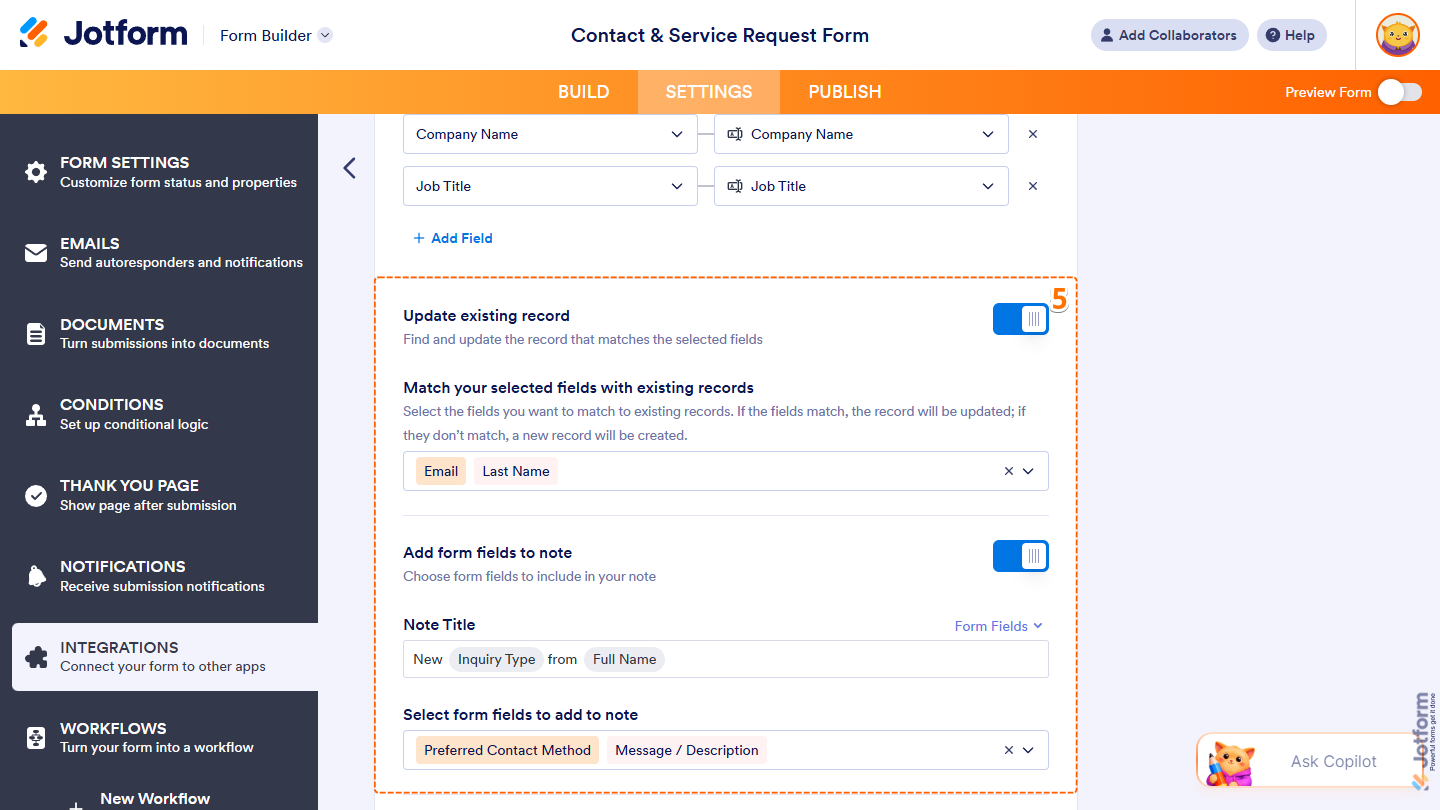
- Update Existing Record — Toggle this on to update an existing record when its data matches the submitted form field values, rather than creating a new one.
- Match Your Selected Fields with Existing Records — Click on the Dropdown menu to select the HubSpot fields that you want to use to match submitted records. You’ll only see this when Update Existing Record is enabled, and at least one HubSpot field is matched under the Match Your Fields section.
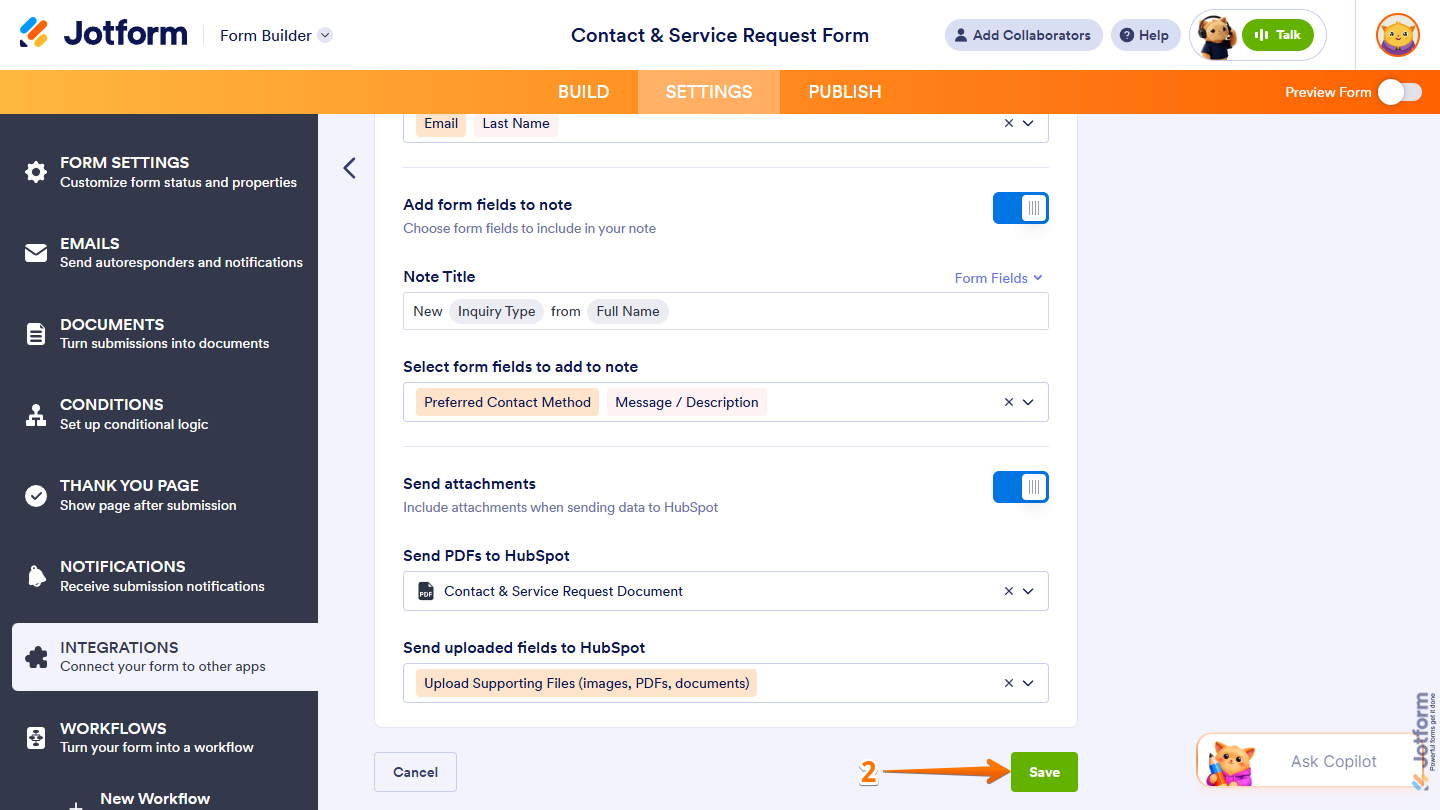
- Add Form Fields to Note — Toggle this on to add form field answers to record notes.
- Note Title — Enter a custom title for your note in the input box. You can also insert dynamic values from supported form fields by selecting them from the Form Fields Dropdown menu on the right. You’ll only see this when Add Form Fields to Note is enabled.
- Select Form Fields to Add to Note — Click on the Dropdown menu to select the form fields you want to include answers from in the record note. You’ll only see this when Add Form Fields to Note is enabled.
- Update Existing Record — Toggle this on to update an existing record when its data matches the submitted form field values, rather than creating a new one.
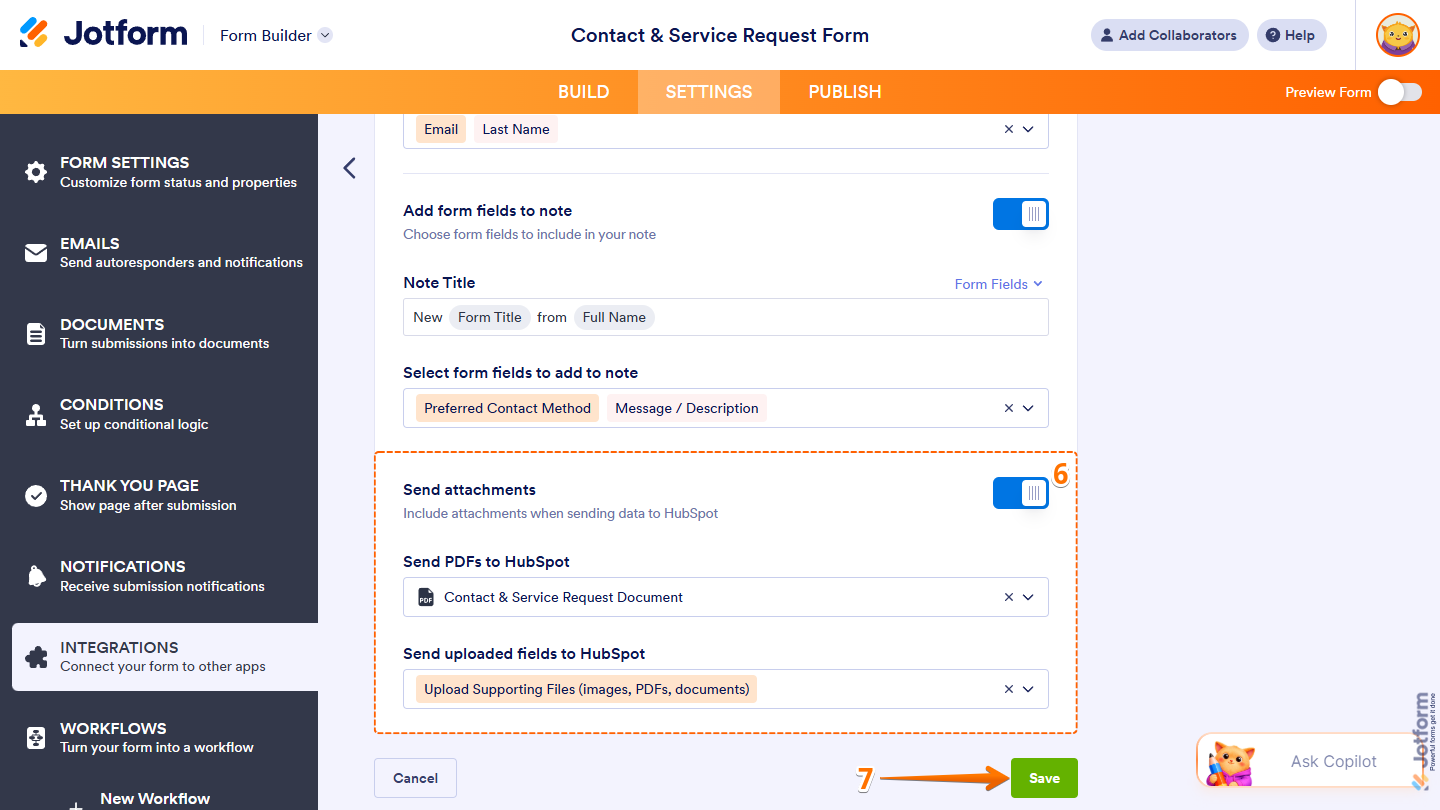
- Then, scroll down and continue configuring these settings:
- Send Attachments — Toggle this on to include attachments in records.
- Send PDFs to HubSpot — Click on the Dropdown menu and select a default or custom PDF document to attach copies of PDF submissions to records.
- Send Uploaded Fields to HubSpot — Click on the Dropdown menu and select one or more File Upload fields to attach uploaded files to records.
- Send Attachments — Toggle this on to include attachments in records.
- Once you’re done, click on Save.
That’s it. You’ve successfully set up your form to create contact or company records in HubSpot.

Configuring the Create Deal and Create Ticket Actions
After you’ve connected your form to your HubSpot account and selected the Create Deal or Create Ticket action, setting it up to create records from submissions is simple. Here’s how to do it:
- In the HubSpot section, you’ll see this list of settings to configure:
- Pipeline — Click on the Dropdown menu to select the pipeline where you want deal or ticket records from form submissions to be added.
- Stage — This is only enabled after you select a pipeline. Click on the Dropdown menu to select the stage where deal or ticket records from form submissions should start in the selected pipeline.
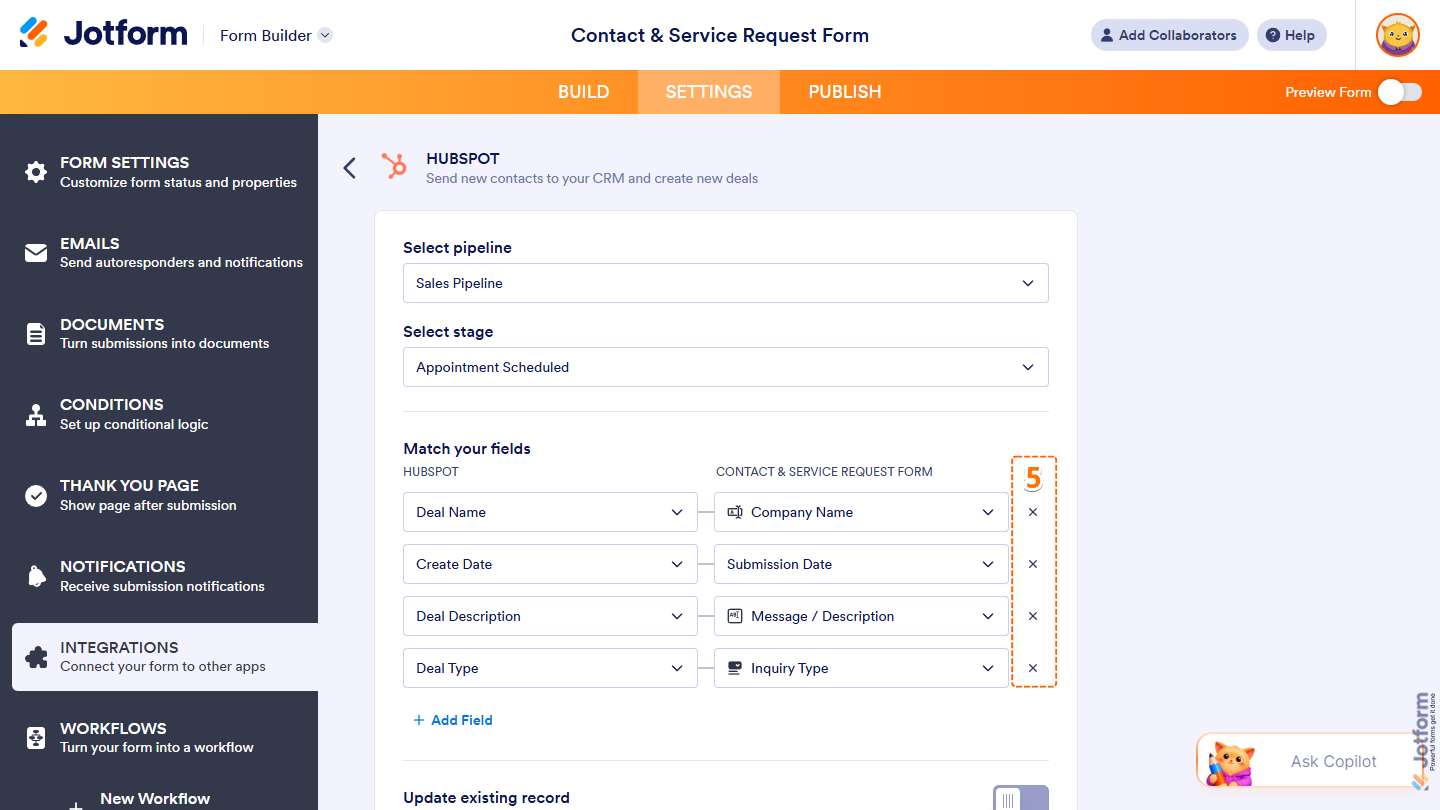
- Now, under Match Your Fields, click on the Dropdown menu under the HubSpot column to select a field from your HubSpot account.
- Then, click on the Dropdown menu under your Form column on the right side of it to select the corresponding Form field.
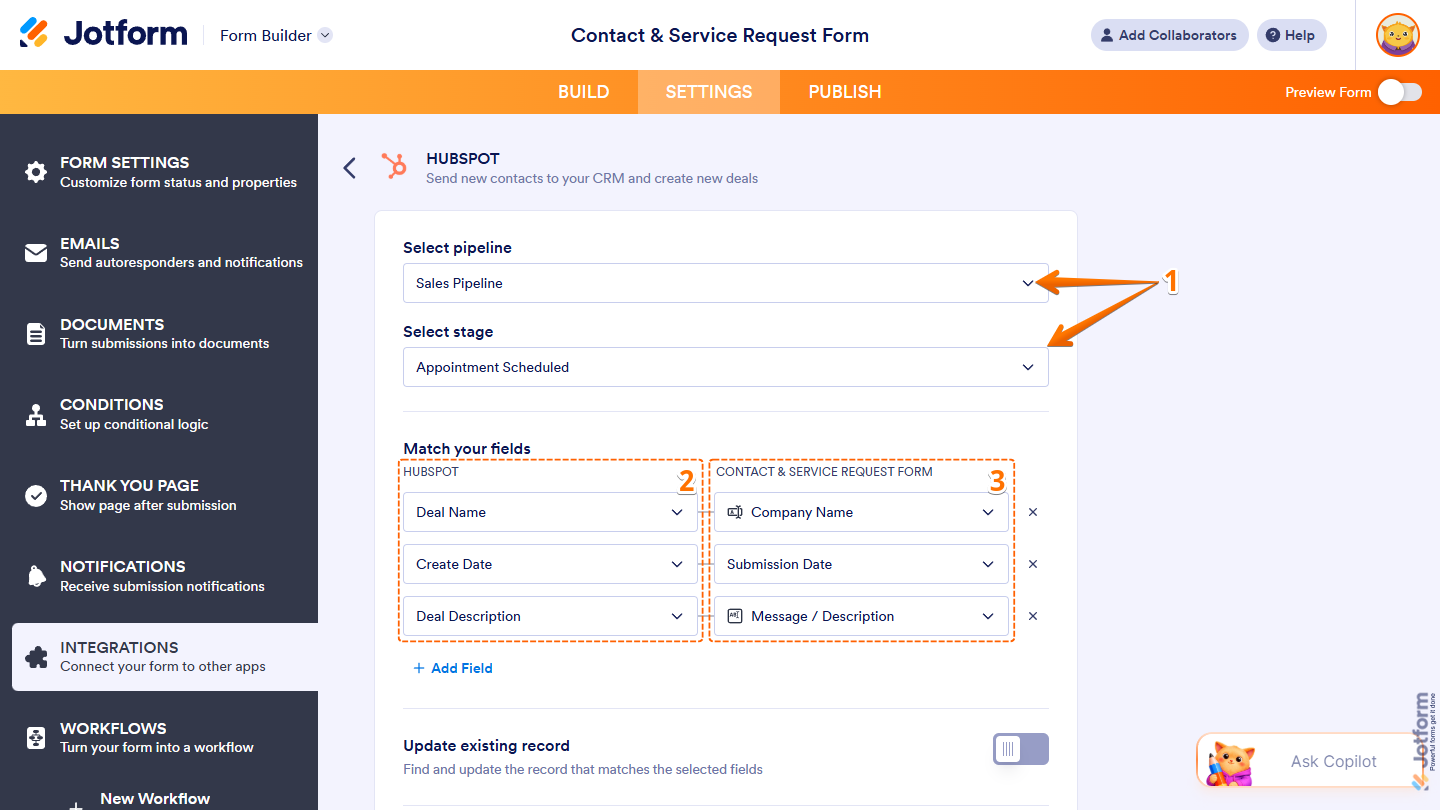
- To map additional fields, click on Add Field at the bottom of the Match Your Fields section.

- To remove fields, click on ✕ on the right side of the Dropdown menu under the Form column.
- Now, scroll down, and you’ll see this list of settings you can configure:
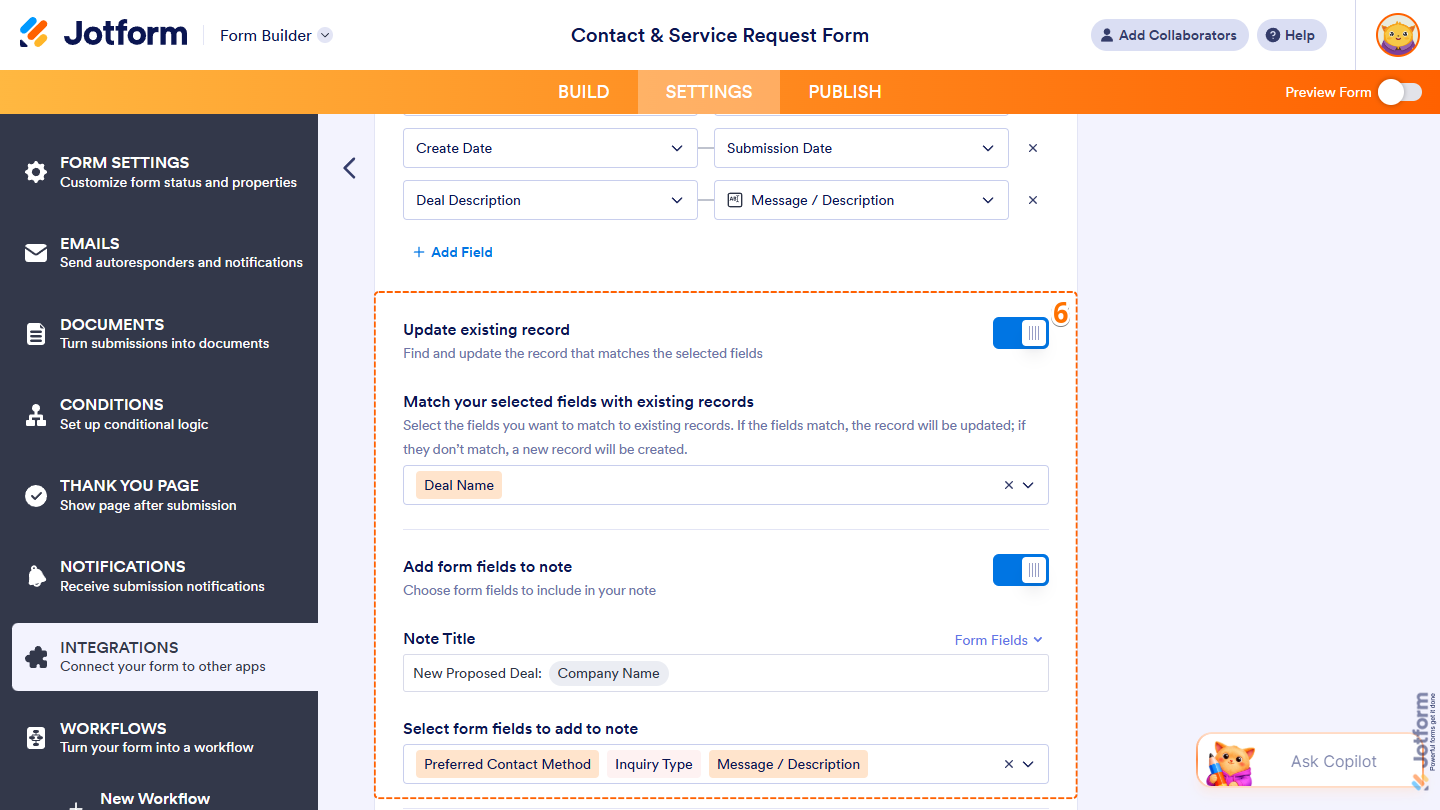
- Update Existing Record — Toggle this on to update an existing record when its data matches the submitted form field values, rather than creating a new one.
- Match Your Selected Fields with Existing Records — Click on the Dropdown menu to select the HubSpot fields that you want to use to match submitted records. You’ll only see this when Update Existing Record is enabled, and at least one HubSpot field is matched under the Match Your Fields section.
- Add Form Fields to Note — Toggle this on to add form field answers to record notes.
- Note Title — Enter a custom title for your note in the input box. You can also insert dynamic values from supported form fields by selecting them from the Form Fields Dropdown menu on the right. You’ll only see this when Add Form Fields to Note is enabled.
- Select Form Fields to Add to Note — Click on the Dropdown menu to select the form fields you want to include answers from in the record note. You’ll only see this when Add Form Fields to Note is enabled.
- Update Existing Record — Toggle this on to update an existing record when its data matches the submitted form field values, rather than creating a new one.
- Then, scroll down again and continue configuring these settings:
- Send Attachments — Toggle this on to include attachments in records.
- Send PDFs to HubSpot — Click on the Dropdown menu and select a default or custom PDF document to attach copies of PDF submissions to records.
- Send Uploaded Fields to HubSpot — Click on the Dropdown menu and select one or more File Upload fields to attach uploaded files to records.
- Send Attachments — Toggle this on to include attachments in records.
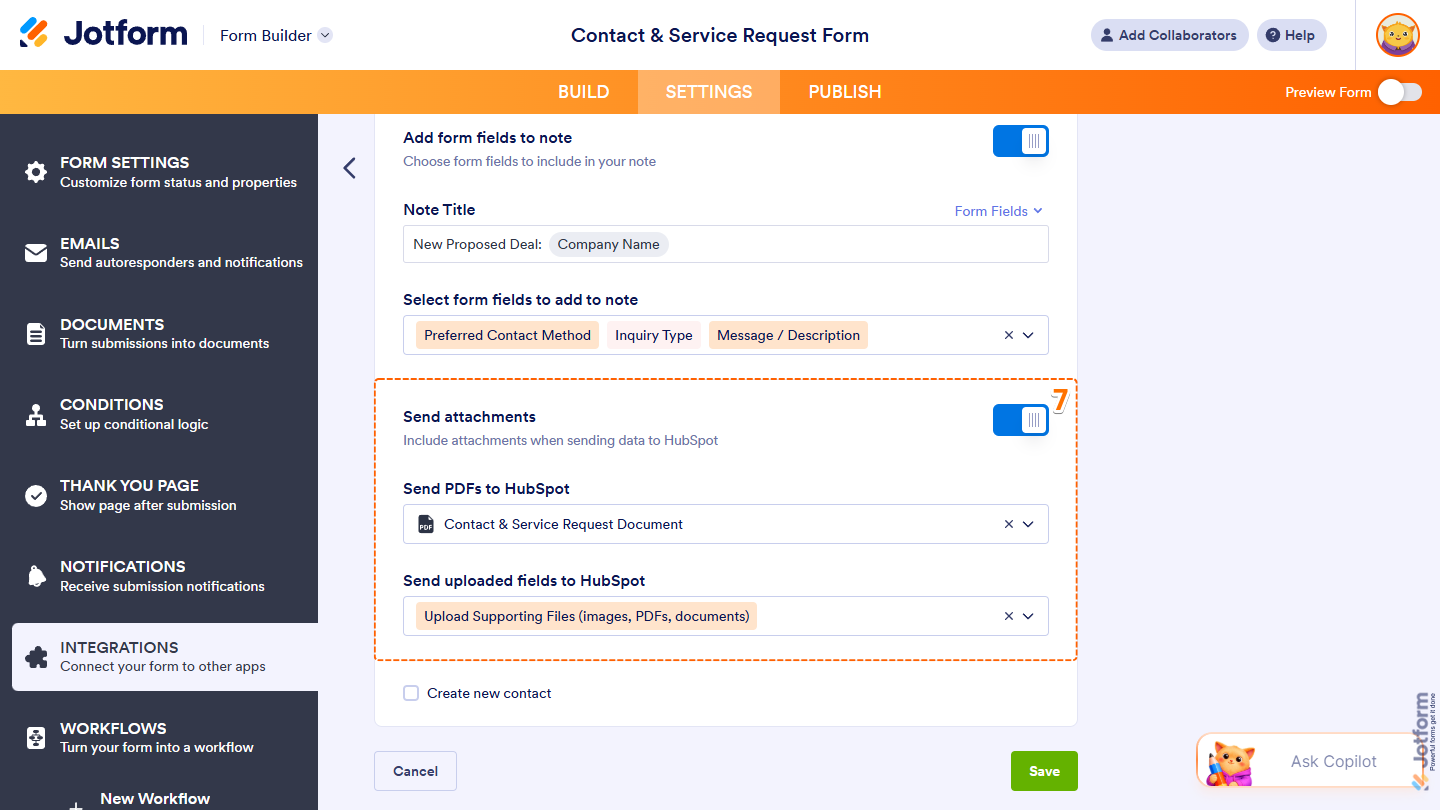
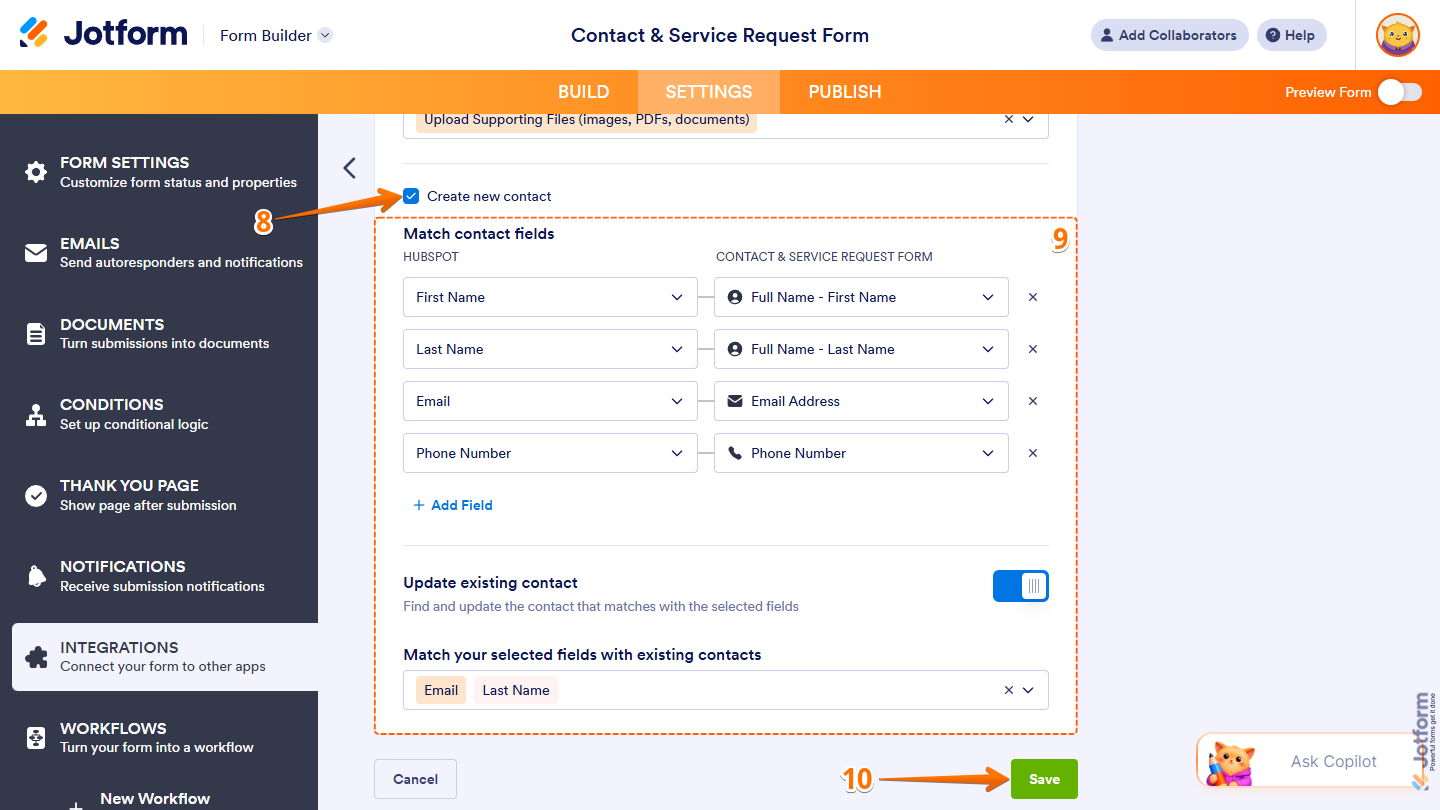
- Next, at the bottom of the section, check the box next to Create New Contact if you also want to add or update a contact record and associate it with the deal or ticket record created from form submissions
- Then, configure these settings:
- Match Contact Fields — Click on the Dropdown menu under the HubSpot column to select a field from your HubSpot account, then click on the Dropdown menu under your Form column on the right side of it to select the corresponding Form field.
- Update Existing Contact — Toggle this on to update an existing contact record when its data matches the submitted form field values, rather than creating a new one.
- Match Your Selected Fields with Existing Contacts — Click on the Dropdown menu to select the HubSpot fields that you want to use to match submitted records. You’ll only see this when Update Existing Record is enabled, and at least one HubSpot field is matched under the Match Contact Fields section.
- Once everything’s set, click on Save.
That’s it. You’ve successfully set up your form to create deal records in HubSpot.

Configuring Create Custom Record Actions
With your form already connected to your HubSpot account and the Create Custom Record action selected, configuring it to create custom object records from submissions is easy. This is how it’s done:
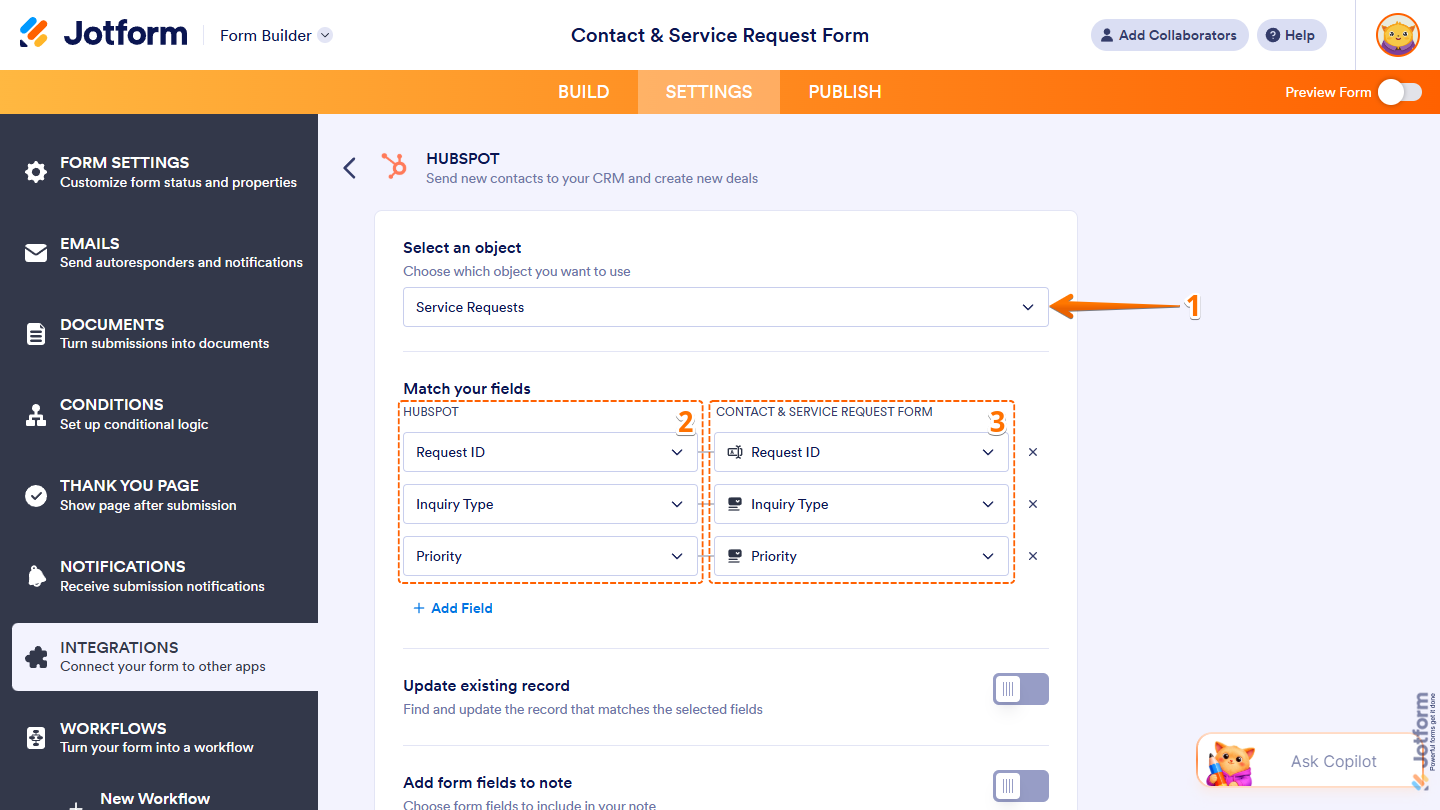
- In the HubSpot section, click on the Select an Object Dropdown menu and select the Custom Object that you want to use.
- Now, under Match Your Fields, click on the Dropdown menu under the HubSpot column to select a field from your HubSpot account.
- Then, click on the Dropdown menu under your Form column on the right side of it to select the corresponding Form field.
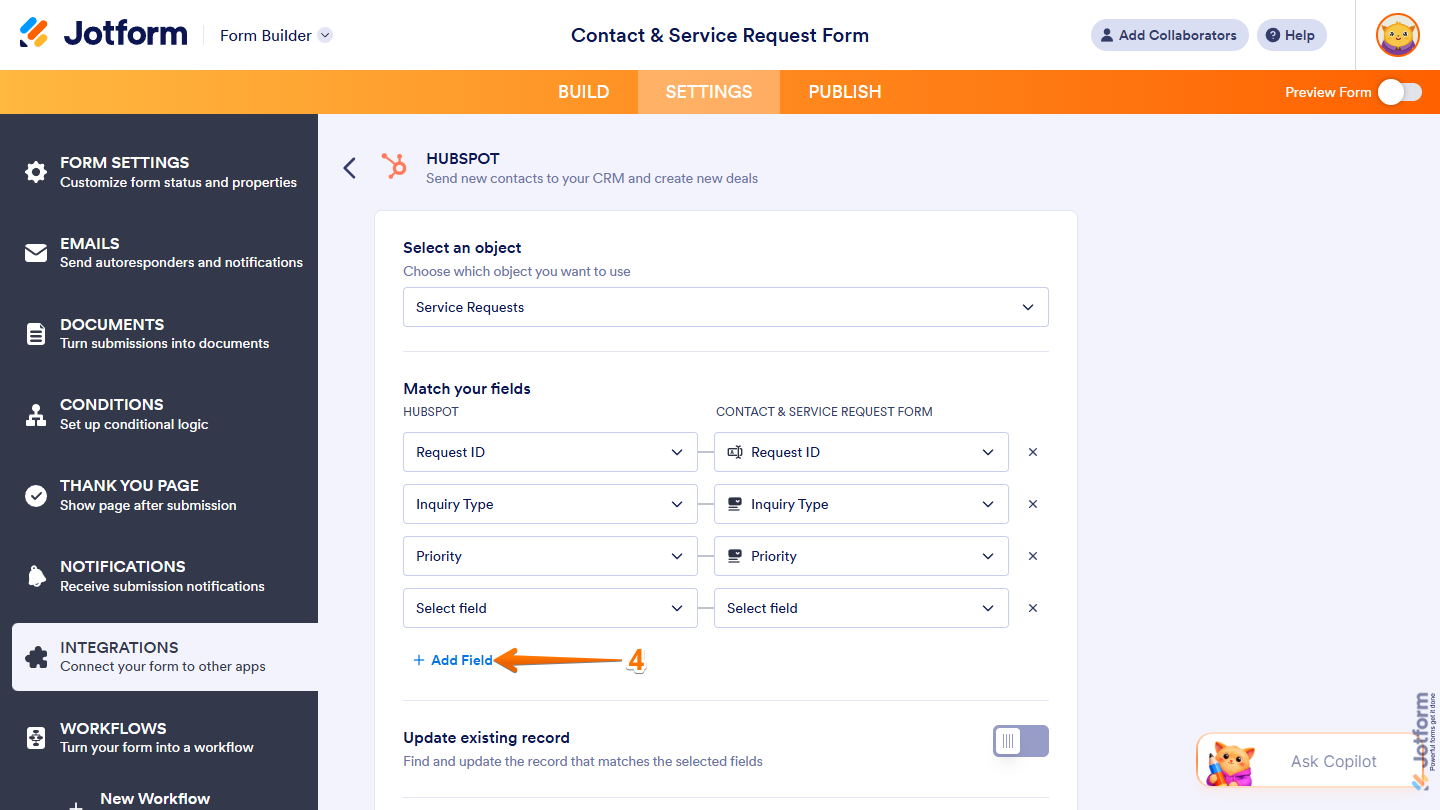
- To map additional fields, click on Add Field at the bottom of the Match Your Fields section.
- To remove fields, click on ✕ on the right side of the Dropdown menu under the Form column.
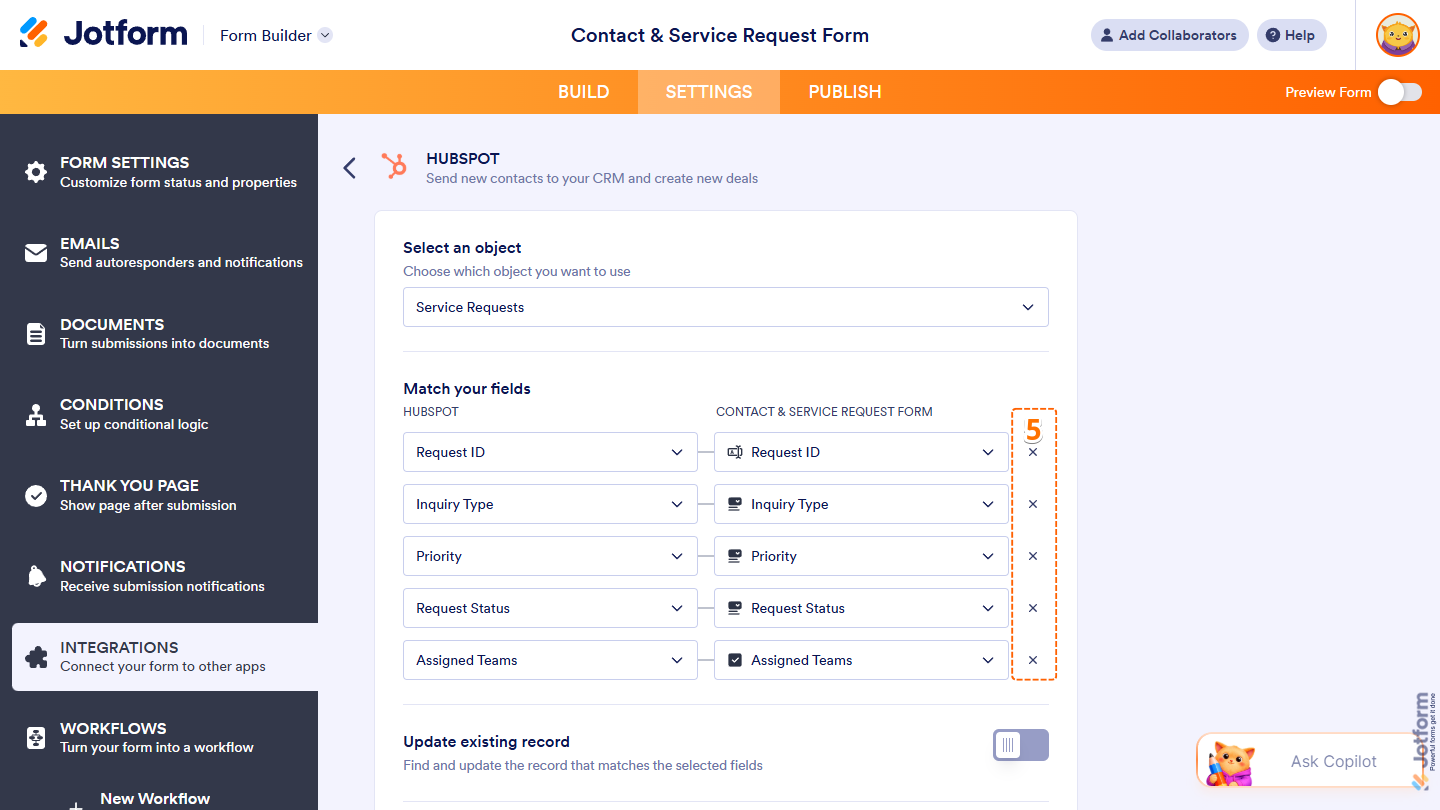
- Next, you’ll see this list of settings you can configure:
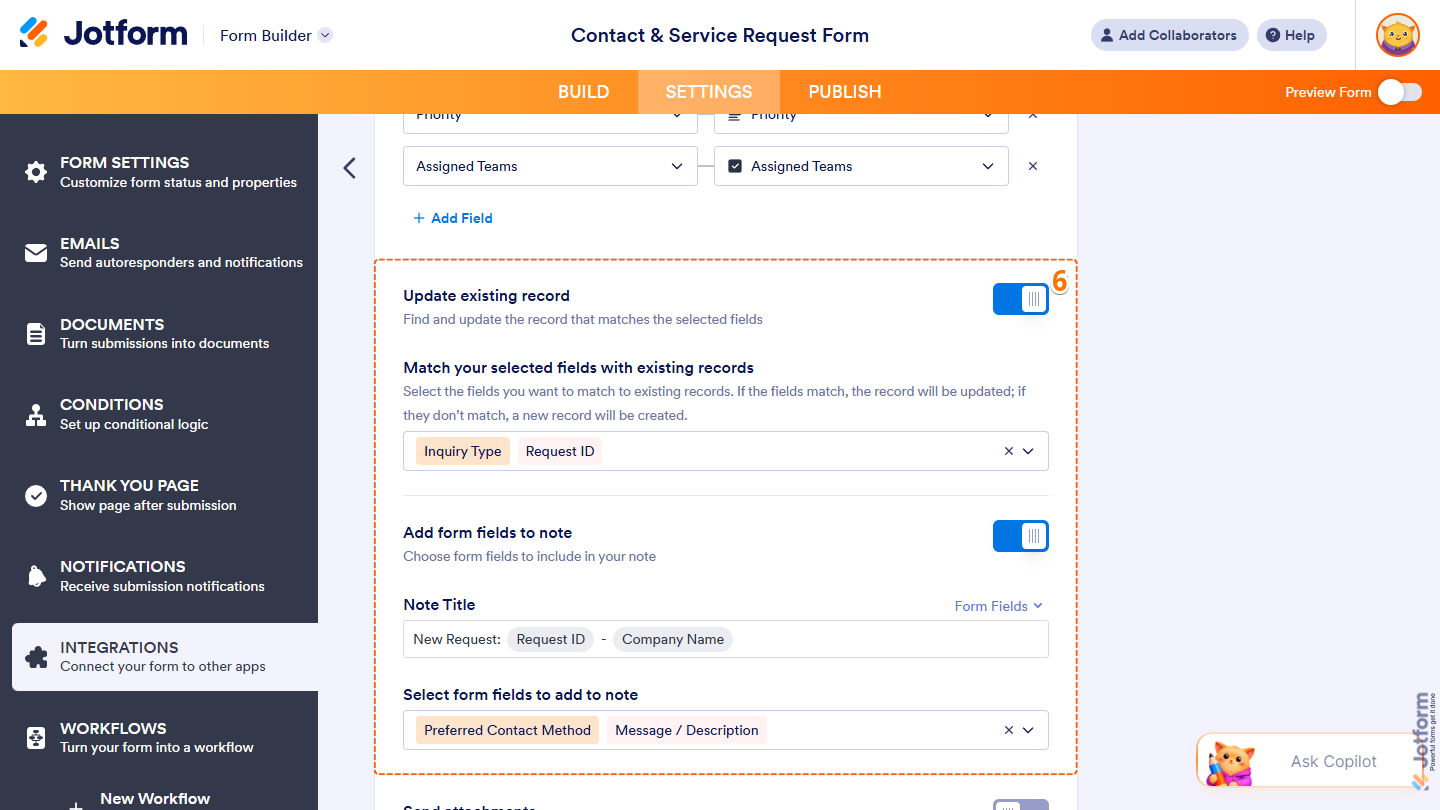
- Update Existing Record — Toggle this on to update an existing record when its data matches the submitted form field values, rather than creating a new one.
- Match Your Selected Fields with Existing Records — Click on the Dropdown menu to select the HubSpot fields that you want to use to match submitted records. You’ll only see this when Update Existing Record is enabled, and at least one HubSpot field is matched under the Match Your Fields section.
- Add Form Fields to Note — Toggle this on to add form field answers to record notes.
- Note Title — Enter a custom title for your note in the input box. You can also insert dynamic values from supported form fields by selecting them from the Form Fields Dropdown menu on the right. You’ll only see this when Add Form Fields to Note is enabled.
- Select Form Fields to Add to Note — Click on the Dropdown menu to select the form fields you want to include answers from in the record note. You’ll only see this when Add Form Fields to Note is enabled.
- Update Existing Record — Toggle this on to update an existing record when its data matches the submitted form field values, rather than creating a new one.
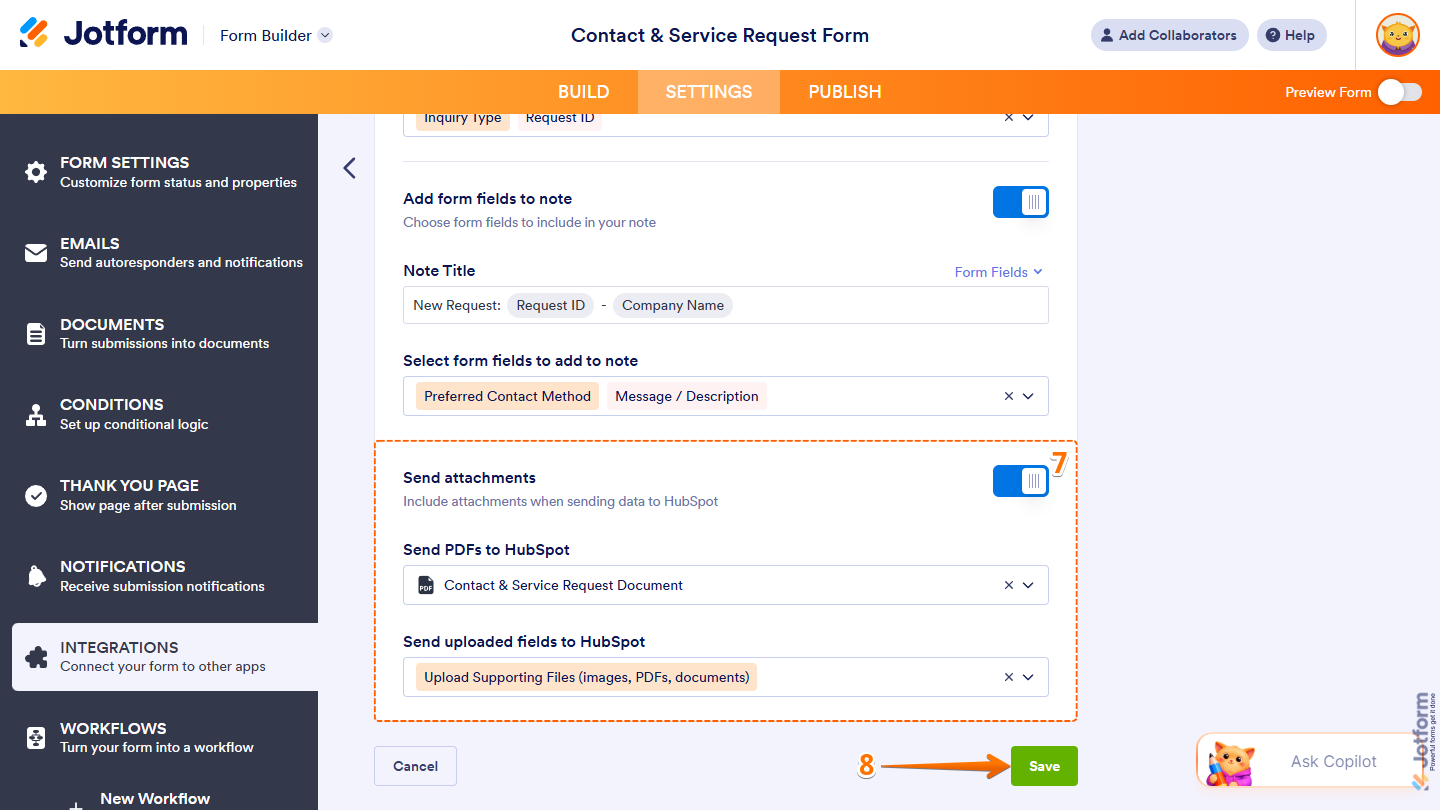
- Then, scroll down and continue configuring these settings:
- Send Attachments — Toggle this on to include attachments in records.
- Send PDFs to HubSpot — Click on the Dropdown menu and select a default or custom PDF document to attach copies of PDF submissions to records.
- Send Uploaded Fields to HubSpot — Click on the Dropdown menu and select one or more File Upload fields to attach uploaded files to records.
- Send Attachments — Toggle this on to include attachments in records.
- When everything looks correct, click on Save.
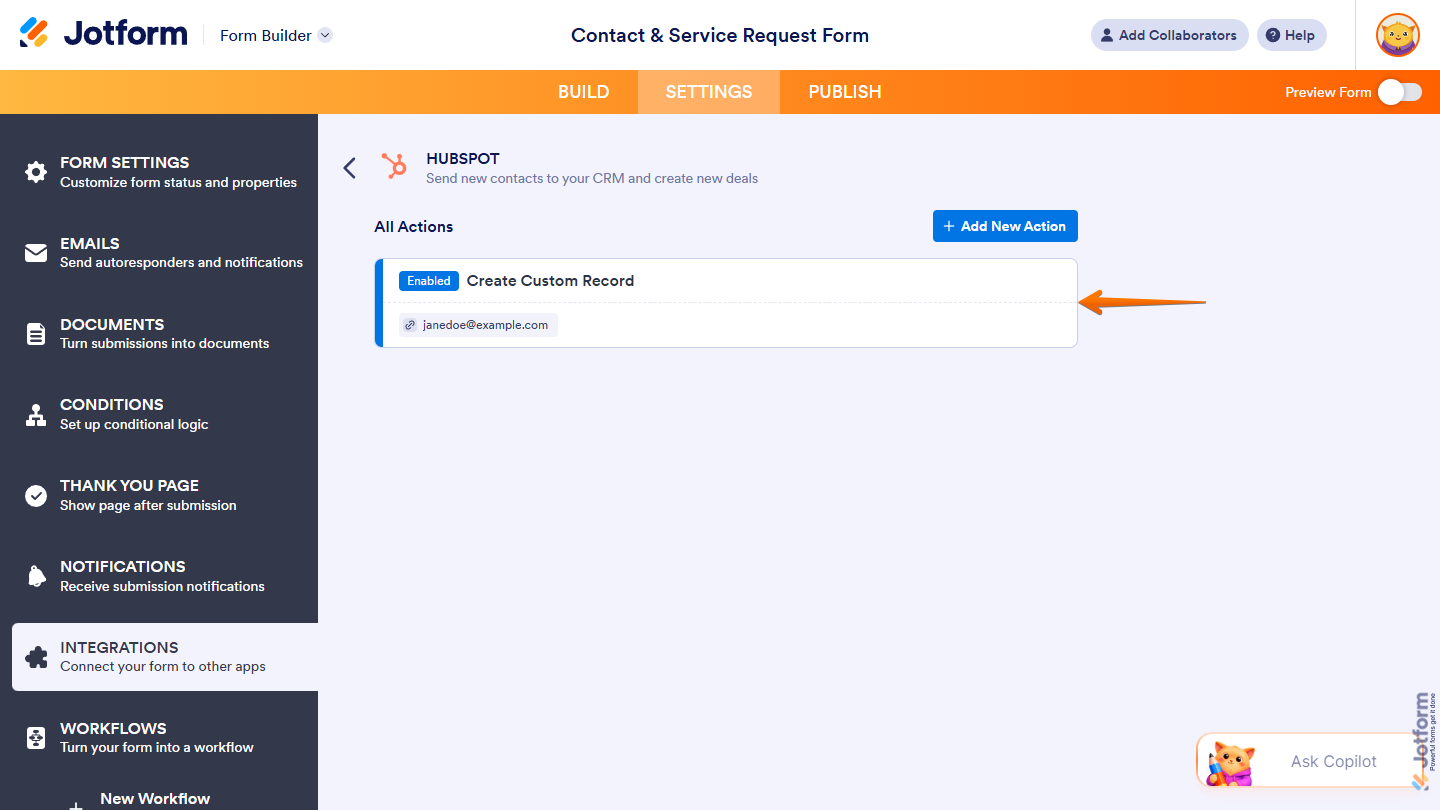
That’s it. You’ve successfully set up your form to create custom object records in HubSpot.
Notes
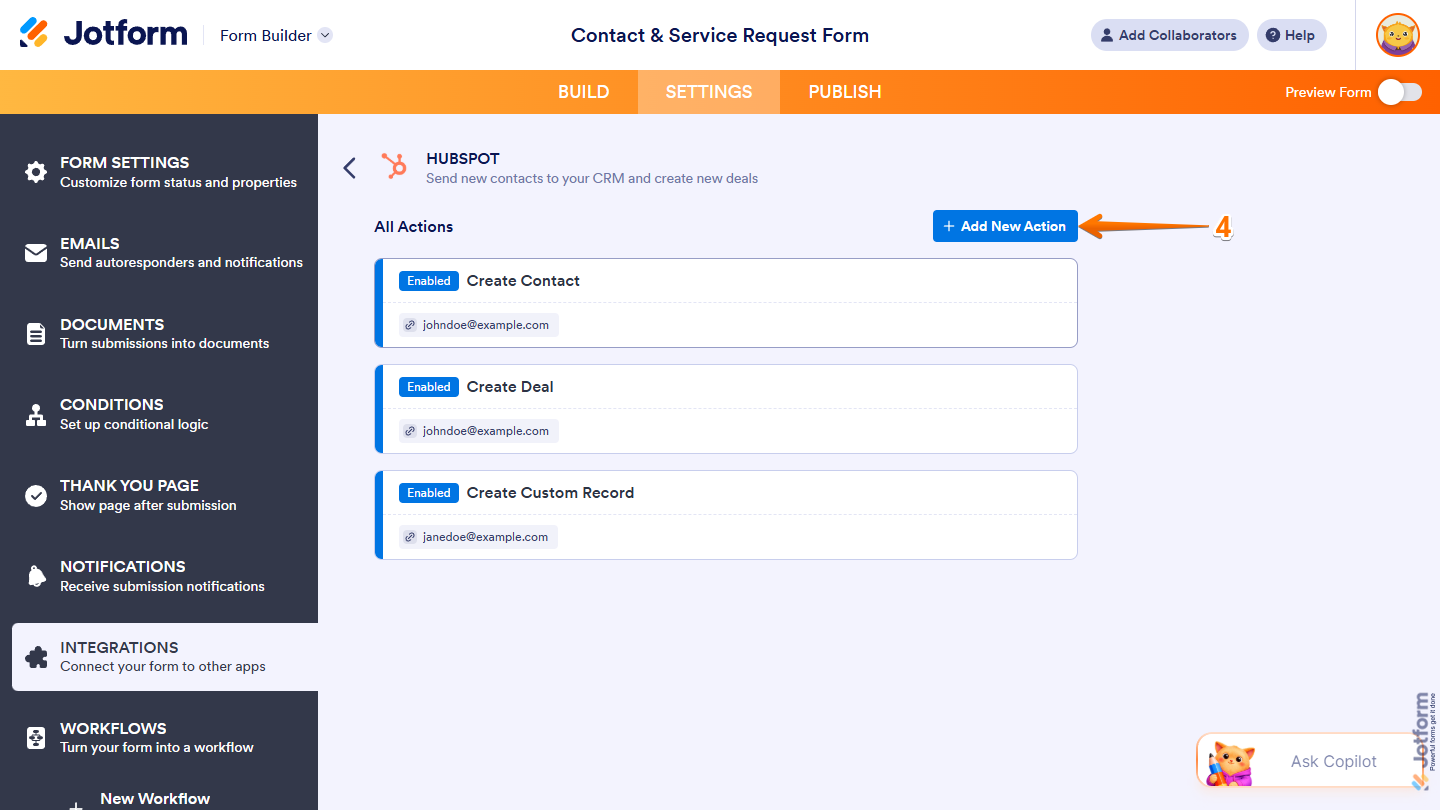
- You can create multiple different or the same actions within the same form. If you want to add another one, click on Add New Action on the top-right side of the All Actions section.
- Make a test submission on your form to test the action you’ve set. Interested in learning how to view the status of your action runs? Check out the Viewing Action Logs section below.
Managing Actions
Once you’ve added your actions, you can manage them anytime to keep things organized and running the way you want. You can edit them, check the logs, rename, enable or disable them, or delete them if you don’t need them anymore.
Editing Actions
You can update an existing HubSpot action to fine-tune how your form submissions are used or adjust the details it sends—here’s how:
- While you’re in the All Actions section, hover your mouse over the action you want to edit, and click on the Edit icon on the right side of it.
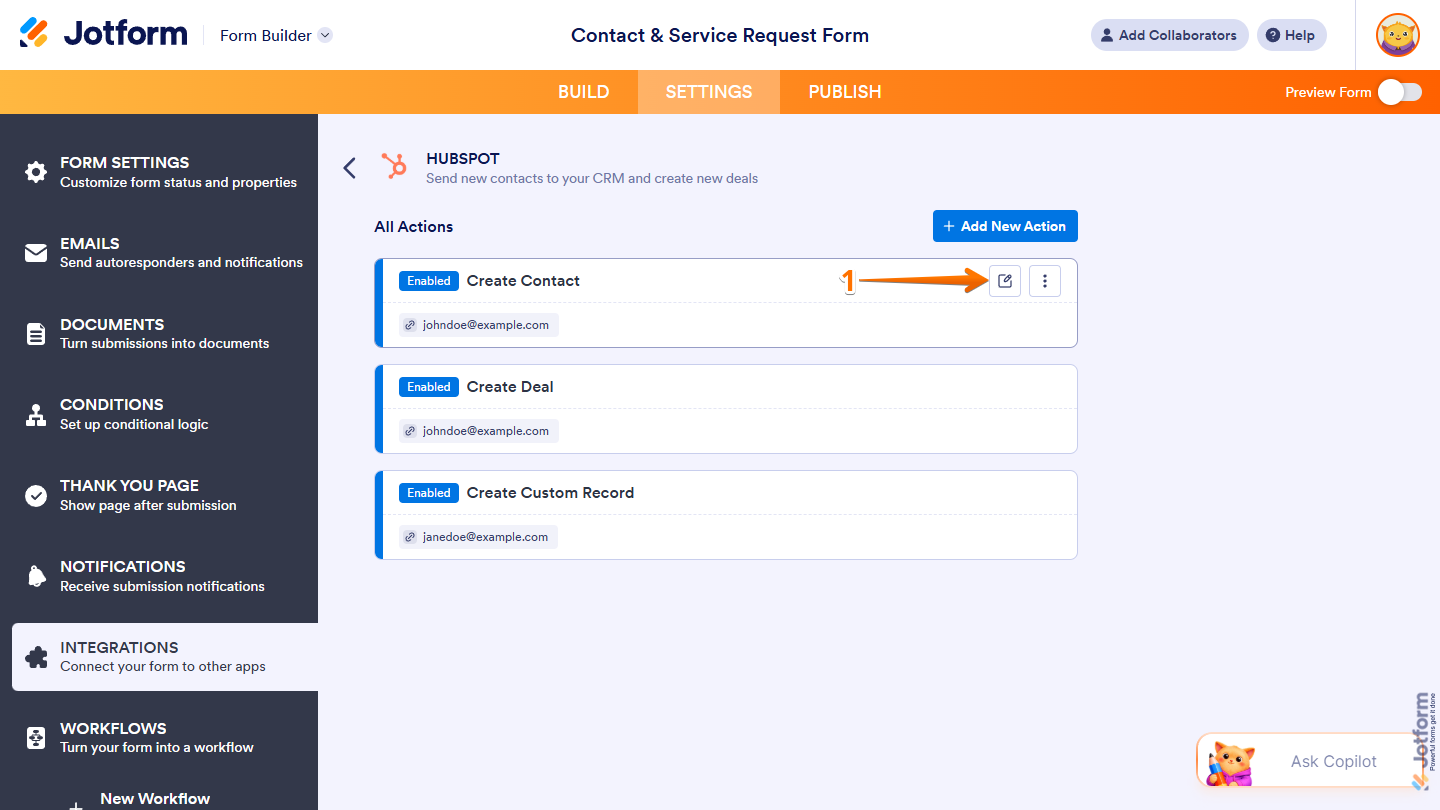
- Now, in the Integration Settings, make your changes, and then click on Save at the bottom.
That’s it. Your changes have been saved, and the action is now updated.
Viewing Action Logs
You can view a HubSpot action’s activity to see how it’s run and whether submissions were processed successfully—here’s what to do:
- While you’re in the All Actions section, hover your mouse over the action you want to view action logs for, and click on the Three Dots icon on the right side of it.
- In the menu that comes up, select See Action Logs.

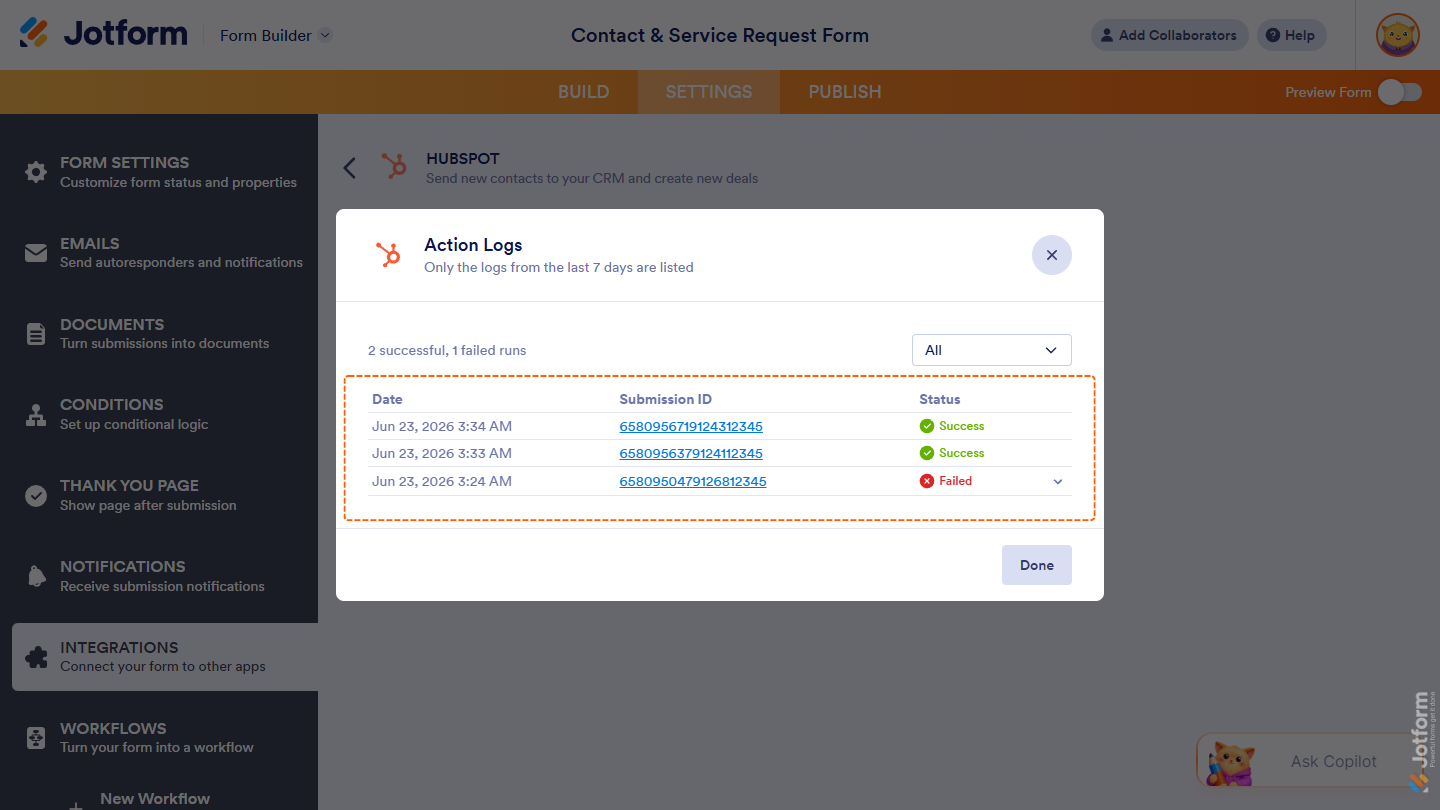
That’s it. This opens the Action Logs window, where you can see successful and failed run logs for the last seven days.
Notes
- Use the dropdown menu on the right side of the Action Logs window to filter logs by All, Successful, or Failed.
- In the Status column, click on the Downward Arrow icon on the right side of Failed to view the error log details.
- In the Submission ID column, click on an ID to open and view the details in another browser tab.
Renaming Actions
You can change the default name of an action to make it easier to identify, reflect workflow changes, and distinguish similar actions in the All Actions section. Here’s how:
- While you’re in the All Actions section, hover your mouse over the action you want to rename, and then click on the Three Dots icon on the right side of it.
- In the menu that comes up, select Rename Action.

- Now, enter a new name for the action and press the Enter key on your keyboard to save your changes.
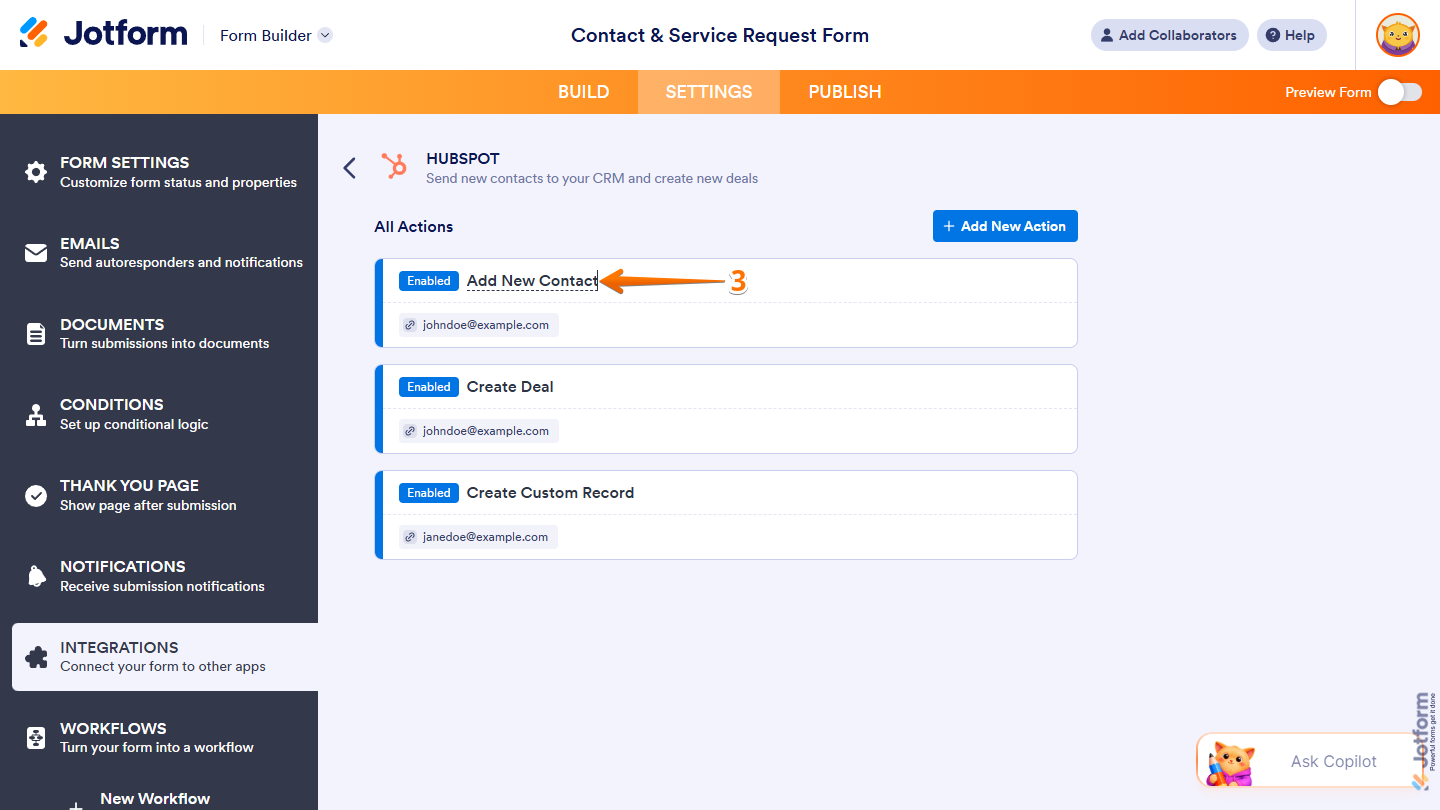
That’s it. Your action has been renamed successfully.
Disabling Actions
You can temporarily stop a HubSpot integration action from running. It’s helpful when you want to pause it without deleting it or affecting other actions in the integration. Here’s what to do:
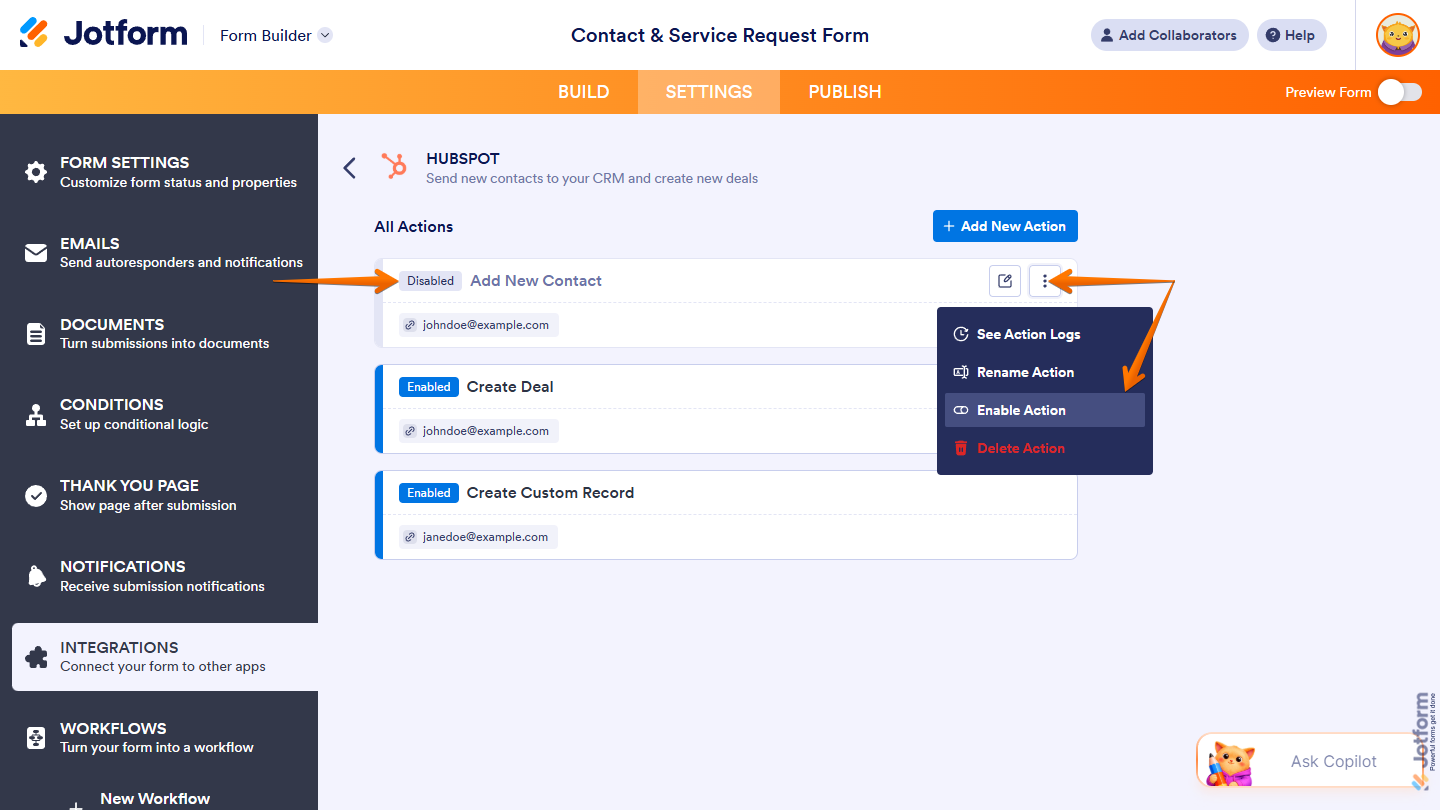
- While you’re in the All Actions section, hover your mouse over the action you want to disable, and then click on the Three Dots icon on the right side of it.
- In the menu that comes up, select Disable Action.

That’s it. The action is now disabled and won’t run until you enable it again. You’ll also see that the indicator on the left side of its name changed from Enabled to Disabled. When you’re ready to enable it, just click on the three-dots icon again and select Enable Action.
Deleting Actions
You can delete a HubSpot integration action to remove it permanently. This helps keep your integration setup clean and organized. Here’s a quick how-to:
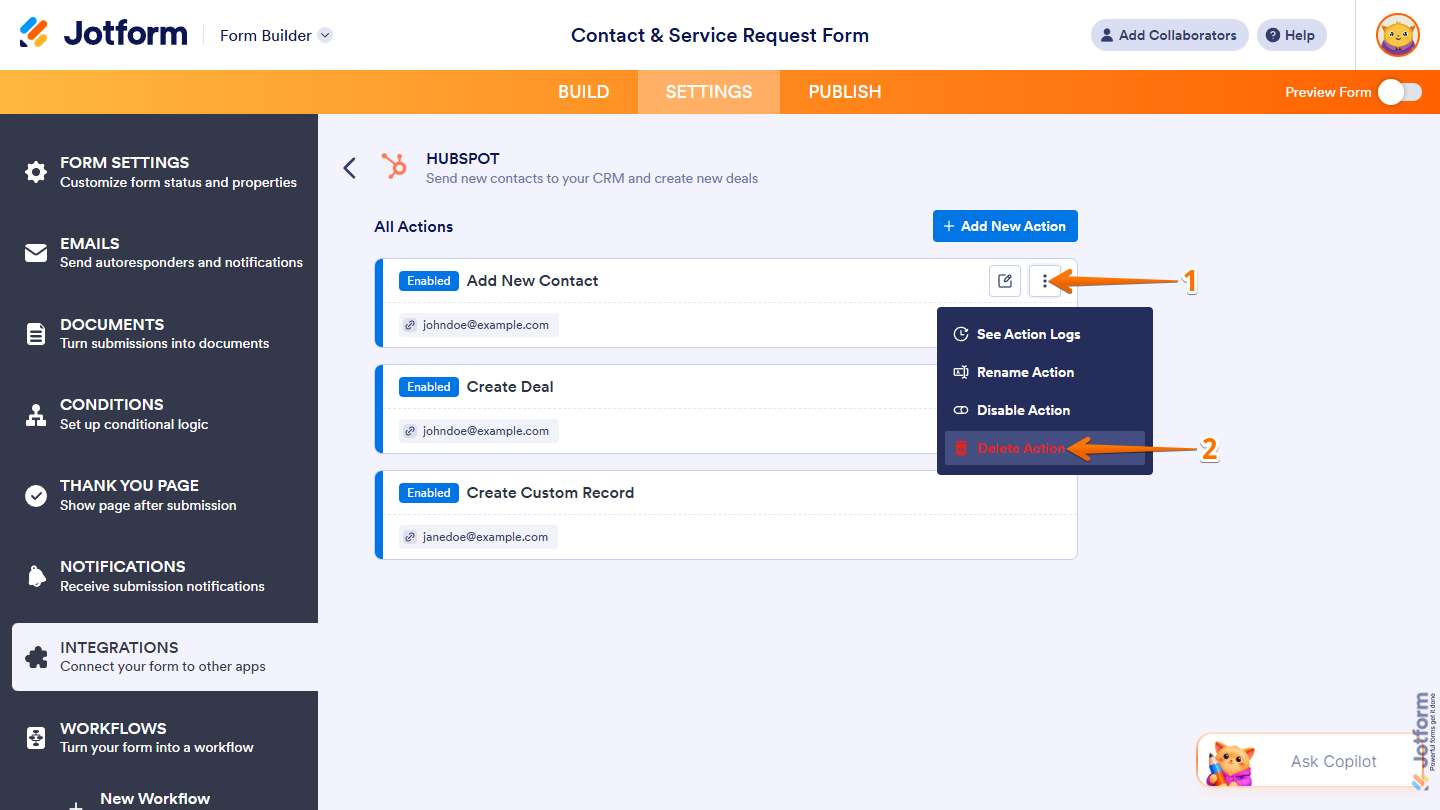
- While you’re in the All Actions section, hover your mouse over the action you want to delete, and then click on the Three Dots icon on the right side of it.
- In the menu that comes up, select Delete Action.
- Then, in the Delete Integration Confirmation window that comes up, click on Yes, Delete.
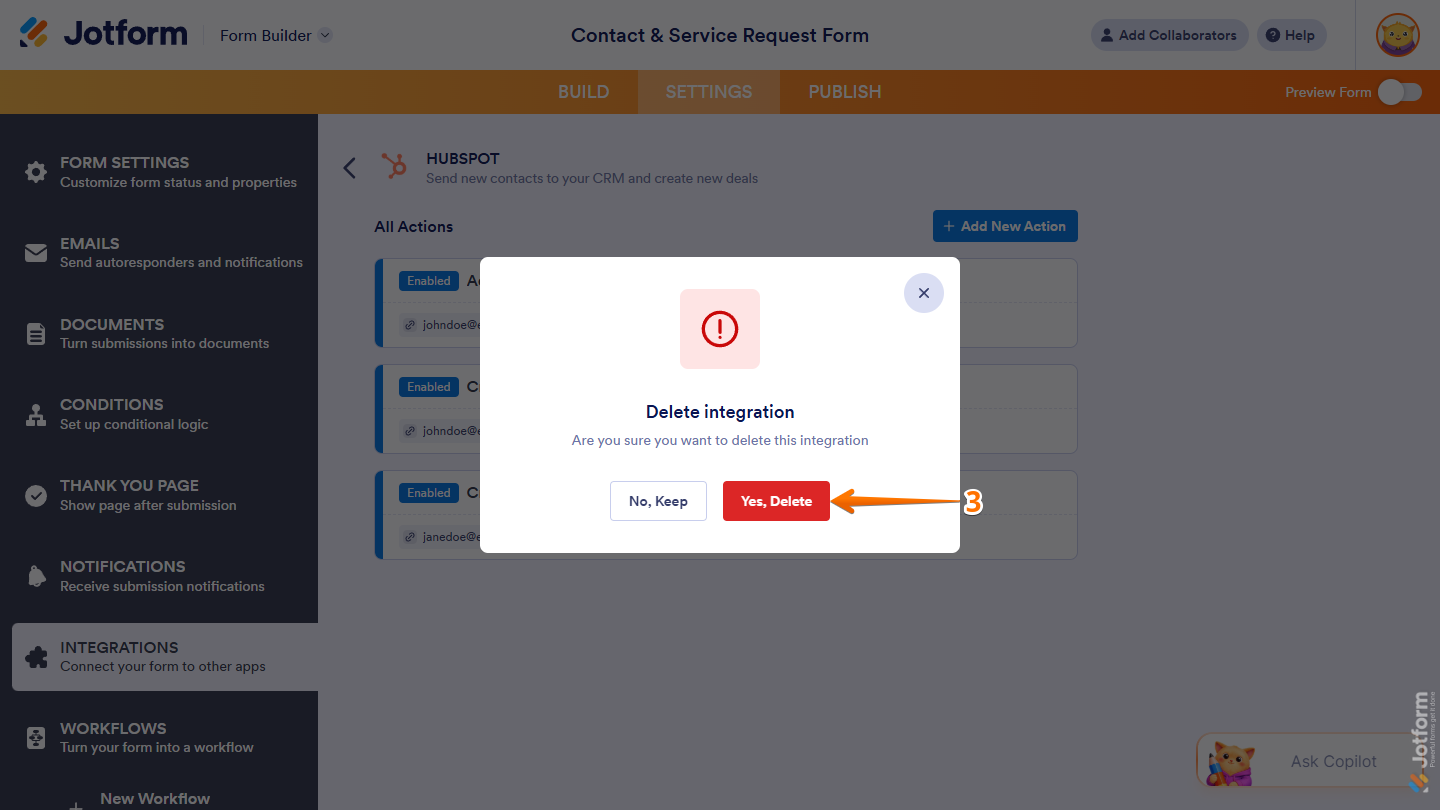
That’s it. The action is removed. If you only want to pause it temporarily, consider disabling it instead.
Disconnecting Your HubSpot Account
Whether you’re no longer using the integration or switching to a different HubSpot account, disconnecting your HubSpot account from your form only takes a few steps. Here’s how:
- In Form Builder, in the orange navigation bar at the top of the page, click on Settings.

- Then, in the menu on the left side of the page, click on Integrations.
- Now, in the Integrations section on the right, search for HubSpot and click on it.

- In the HubSpot section, if your form has integration actions, click on Add New Action on the right side of the All Actions section.
- Then, select an action.
- After that, scroll down and click on Next.
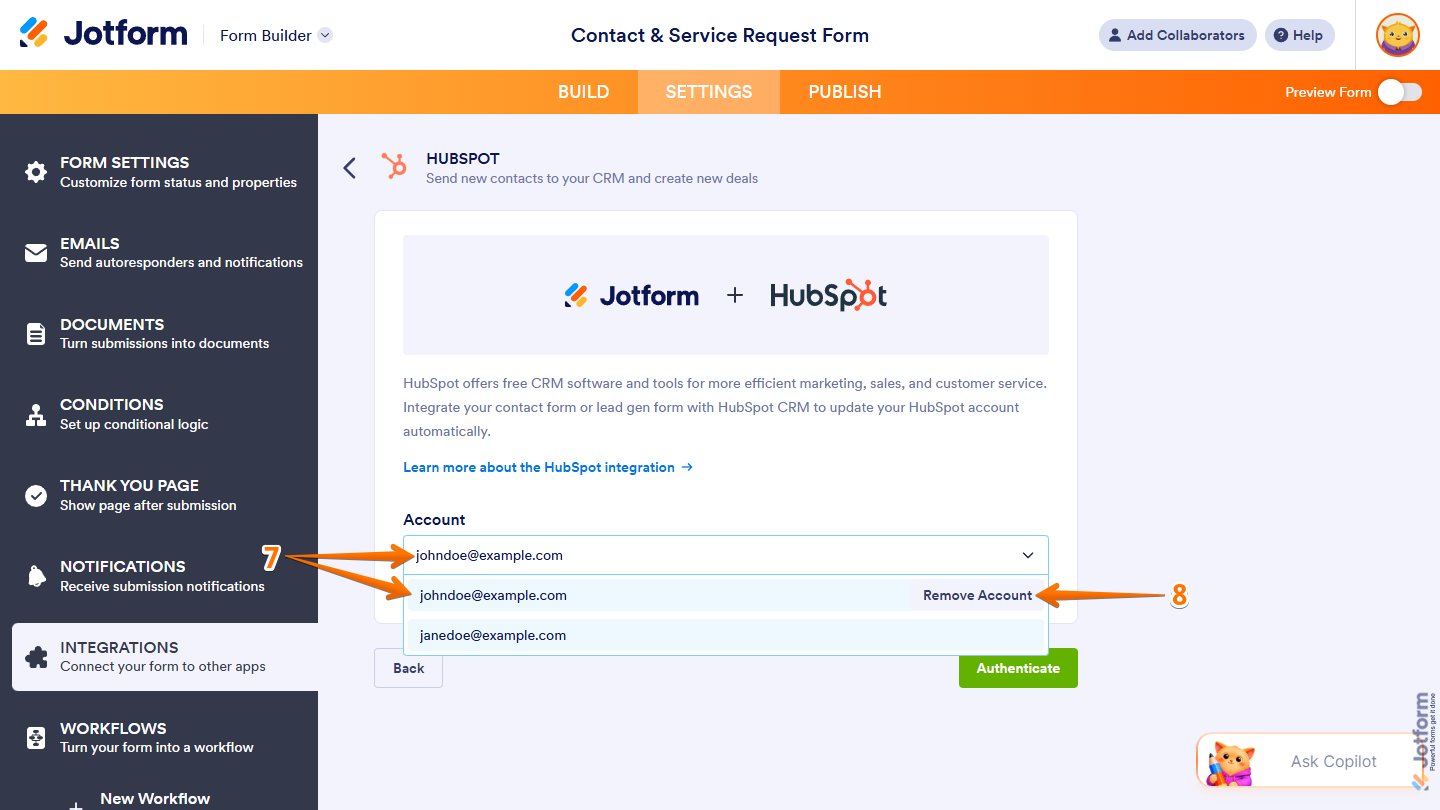
- Now, click on the Account Dropdown menu and hover your mouse over the HubSpot account you want to disconnect your forms from.
- Then, click on Remove Account that appears on the right side of it.
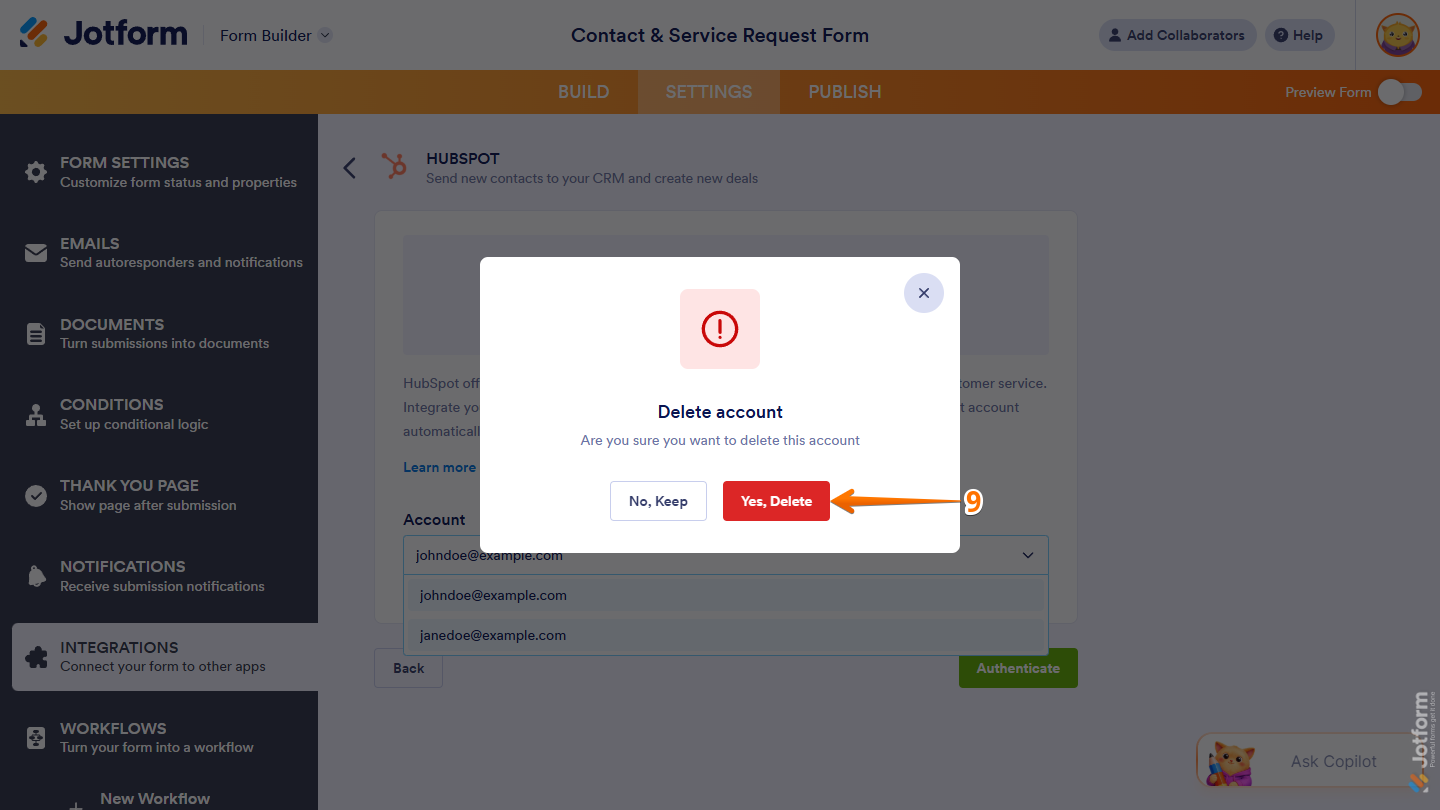
- In the Delete Account Confirmation window, click on Yes, Delete.
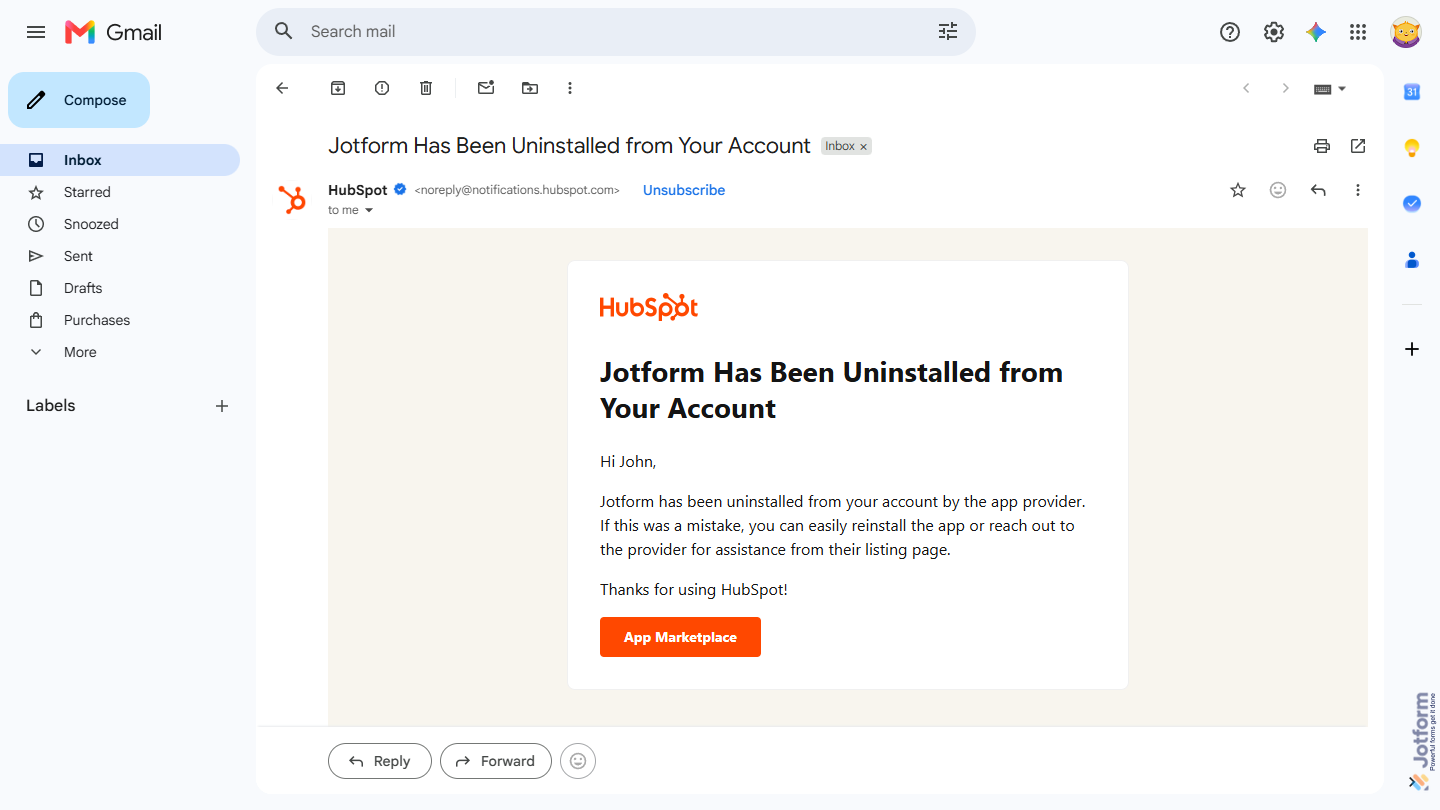
That’s it. The connection between your form and your HubSpot account has been removed. You’ll also receive an email that confirms the connection has been uninstalled from your HubSpot account.
Notes
- You can also uninstall Jotform from the Connected Apps page in HubSpot. Check out this support article from HubSpot on How to Uninstall an App to learn how you can do that.
- Uninstalling the integration won’t delete any existing Jotform data in HubSpot or affect your HubSpot account. However, data will no longer sync between Jotform and HubSpot, and existing records will no longer receive updates from new form submissions.


Send Comment:
13 Comments:
September 30, 2025
This seems to be disconnecting often from our Jotform account. On the Jotform side it looks good, but on the HubSpot side, it shows we have to reconnect. Do you know what would cause this?
February 7, 2025
I've been using Jotform for a while now and this update is very, very welcoming and impressive. One thing that would help me is also being able to add some conditional logic - for example, if response comes from a person that meets/doesn't meet specific criteria, a deal should be/not be created. Congrats anyway, also the UI is very clean!
January 22, 2025
Is it possible to complete the form and have it create a contact without an email? i.e. with name and phone number only...
October 27, 2022
Hi thanks for this video, I don't understand the point of the prefill. Does it help them or us? Does it change my form? Thank you
October 26, 2022
Is there a way to have it create a deal for a 'company' rather than the 'contact'?
June 23, 2022
Is there a way to pull in the source/medium that contact came from before they completed the form?
June 22, 2022
The contact is created as a non-marketing contact. How can I make it so it is a marketing contact?
April 23, 2022
Hi! We integrate our forms with hubspot and it works well. We have a form that will need an approval. Is there a way to log the approval in hubspot to show the form was approved and/or the date the form was approved?
March 21, 2022
How does your signature component integrate with HubSpot? Use case is company needs field for manual customer signature via form that would need to connect/upload into HubSpot. Is this feasible?
February 10, 2022
I'm so disappointed that this only updates currently existing form fields. I REALLY need the integration to create a timeline item with the responses from the form. Most other integration like survey monkey and others already do this. Any ideas for a work around on this? Currently I have to create two forms (one on here and one on hubspot) and create a zap in zapier, but man that's a lot of work for forms I change monthly!
January 10, 2022
It's super easy to set up mapping from Jot Form fields to Hubspot contact records that's for sure.
But it'd be great if you could sync attachments as well. I've seen in a few Jot Form community posts from 2019 that it's in the development roadmap but here we are in 2022 and seemingly still not available.
Any ideas when this functionality might come to fruition?
December 14, 2021
Does this work when using tables of data will each row be considered one contact?
November 12, 2021
If I set up this integration for one form, and then duplicate that form, will the fields in the duplicated form still move over to HubSpot?