
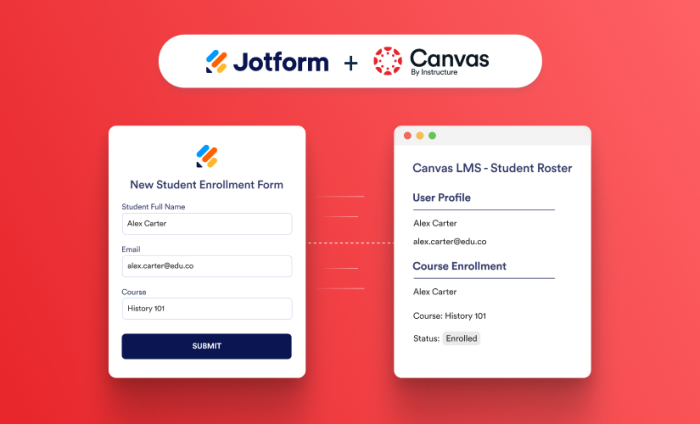
Jotform connects with hundreds of the world’s most popular platforms, helping organizations automate workflows without switching between systems. Now, we’re adding a new integration just for educators.
Canvas by Instructure is the market leader in North American higher education, with 50 percent market share by student enrollment. It also supports more than 11 million students and educators across K–12 schools in the US.
Jotform’s new integration with Canvas automates the administrative work that happens before learning begins.
Every semester, schools process hundreds or even thousands of registrations before classes start. New students submit applications. Employees register for professional development training. Continuing education participants sign up for courses.
Too often, teachers and administrators have to manually create Canvas accounts, enroll learners, and move information between systems. Now, Jotform automates that work. This helps schools scale programs while giving educators more time to focus on what matters most: teaching and learning.
Available integration actions
The integration automates two of the most common administrative tasks that must be done before classes start.
- Create new students: Automatically generate new student accounts in Canvas instantly upon form submission.
Administrators no longer have to submit an IT ticket, wait for approval, and manually create accounts for students in Canvas. The integration securely creates a new Canvas user the moment someone submits a public-facing online registration form. Students get immediate access, while staff spend less time on administrative work.
- Enroll users into a course: Automatically enroll existing Canvas users into specific courses based on their form selections.
If someone with an existing Canvas account registers for a specific course via online form, the integration automatically places them in the right Canvas course, eliminating manual roster updates and giving everyone quicker access to the training or coursework they need.
Pro Tip
We are also announcing Canvas integration for Jotform Enterprise to enhance education workflows for institutions.
Use cases and benefits
Jotform’s Canvas integration helps schools and universities automate the administrative tasks that keep learning on track. Whether supporting students, faculty, or staff, the integration streamlines workflows and reduces manual work across the education experience. Here are a few common ways institutions can put it to use.
| Scenario | How it works | Benefit |
|---|---|---|
|
Onboarding new users |
New students, continuing education participants, or guest learners submit a registration form. The integration automatically creates a Canvas account for them, eliminating the need for manual account setup. |
Faster access to Canvas |
|
Course registration |
Existing Canvas users select a course via an online form. When they submit the form, the integration automatically enrolls them in the appropriate Canvas course. |
Faster access to courses |
|
Faculty and staff training |
Employees register for professional development or compliance training with an online form. Existing Canvas users are enrolled in the appropriate Canvas course automatically. |
Simplified training administration |
|
Certificate and continuing education programs |
Submissions via public registration forms create Canvas accounts for first-time participants and enroll returning users in the courses they select. |
Reduced administrative workload |
|
Managing high-volume registrations |
Whether for orientation, semester enrollment, or a campus-wide training initiative, every form submission automatically creates a new Canvas account or enrolls an existing user in the appropriate course. |
Easier scaling during peak enrollment periods |
How do I set up Jotform’s Canvas integration in the Form Builder?
To integrate Jotform and Canvas, access the Settings in the Form Builder, click on Integrations from the menu on the left, and search for Canvas by Instructure.
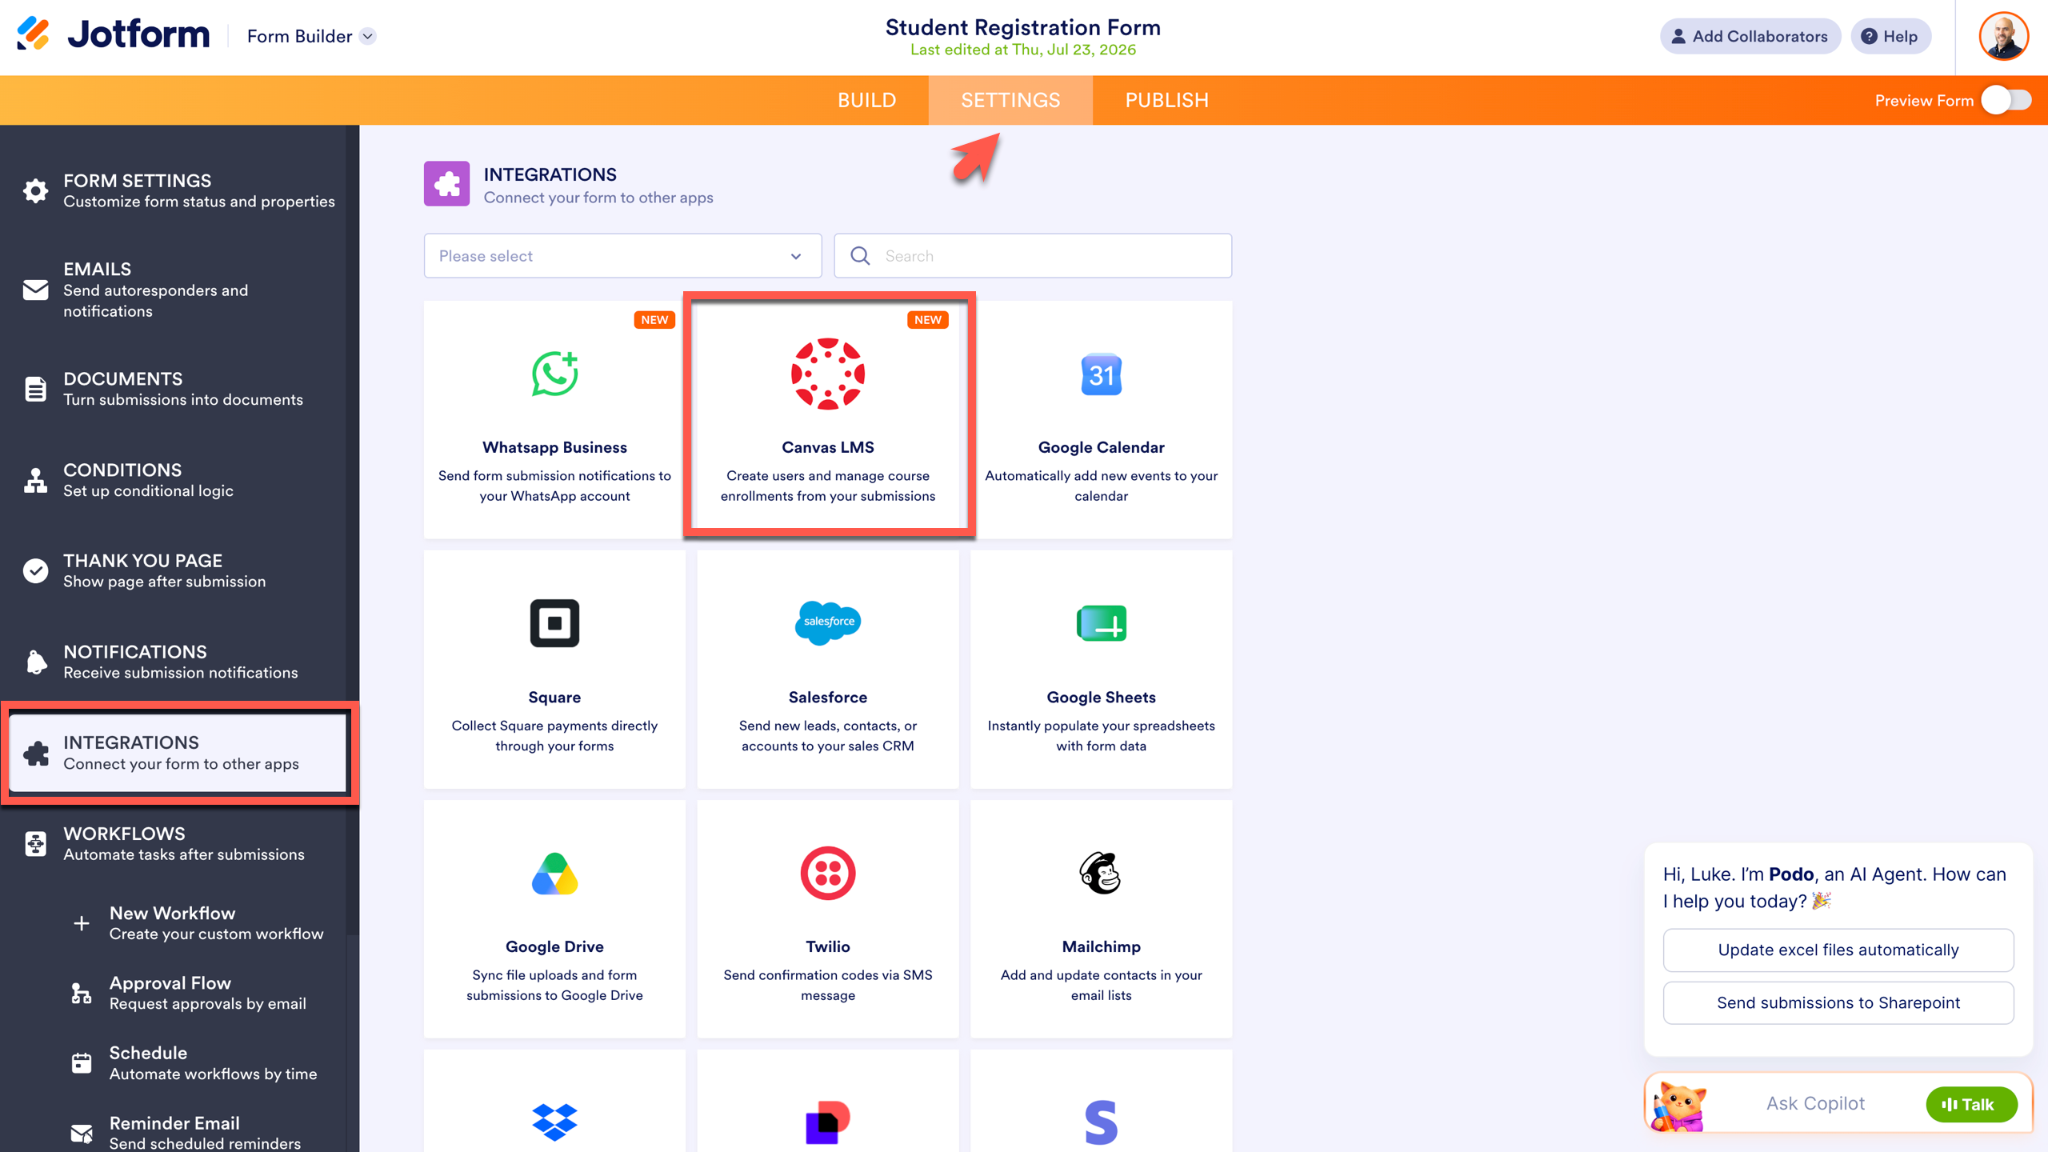
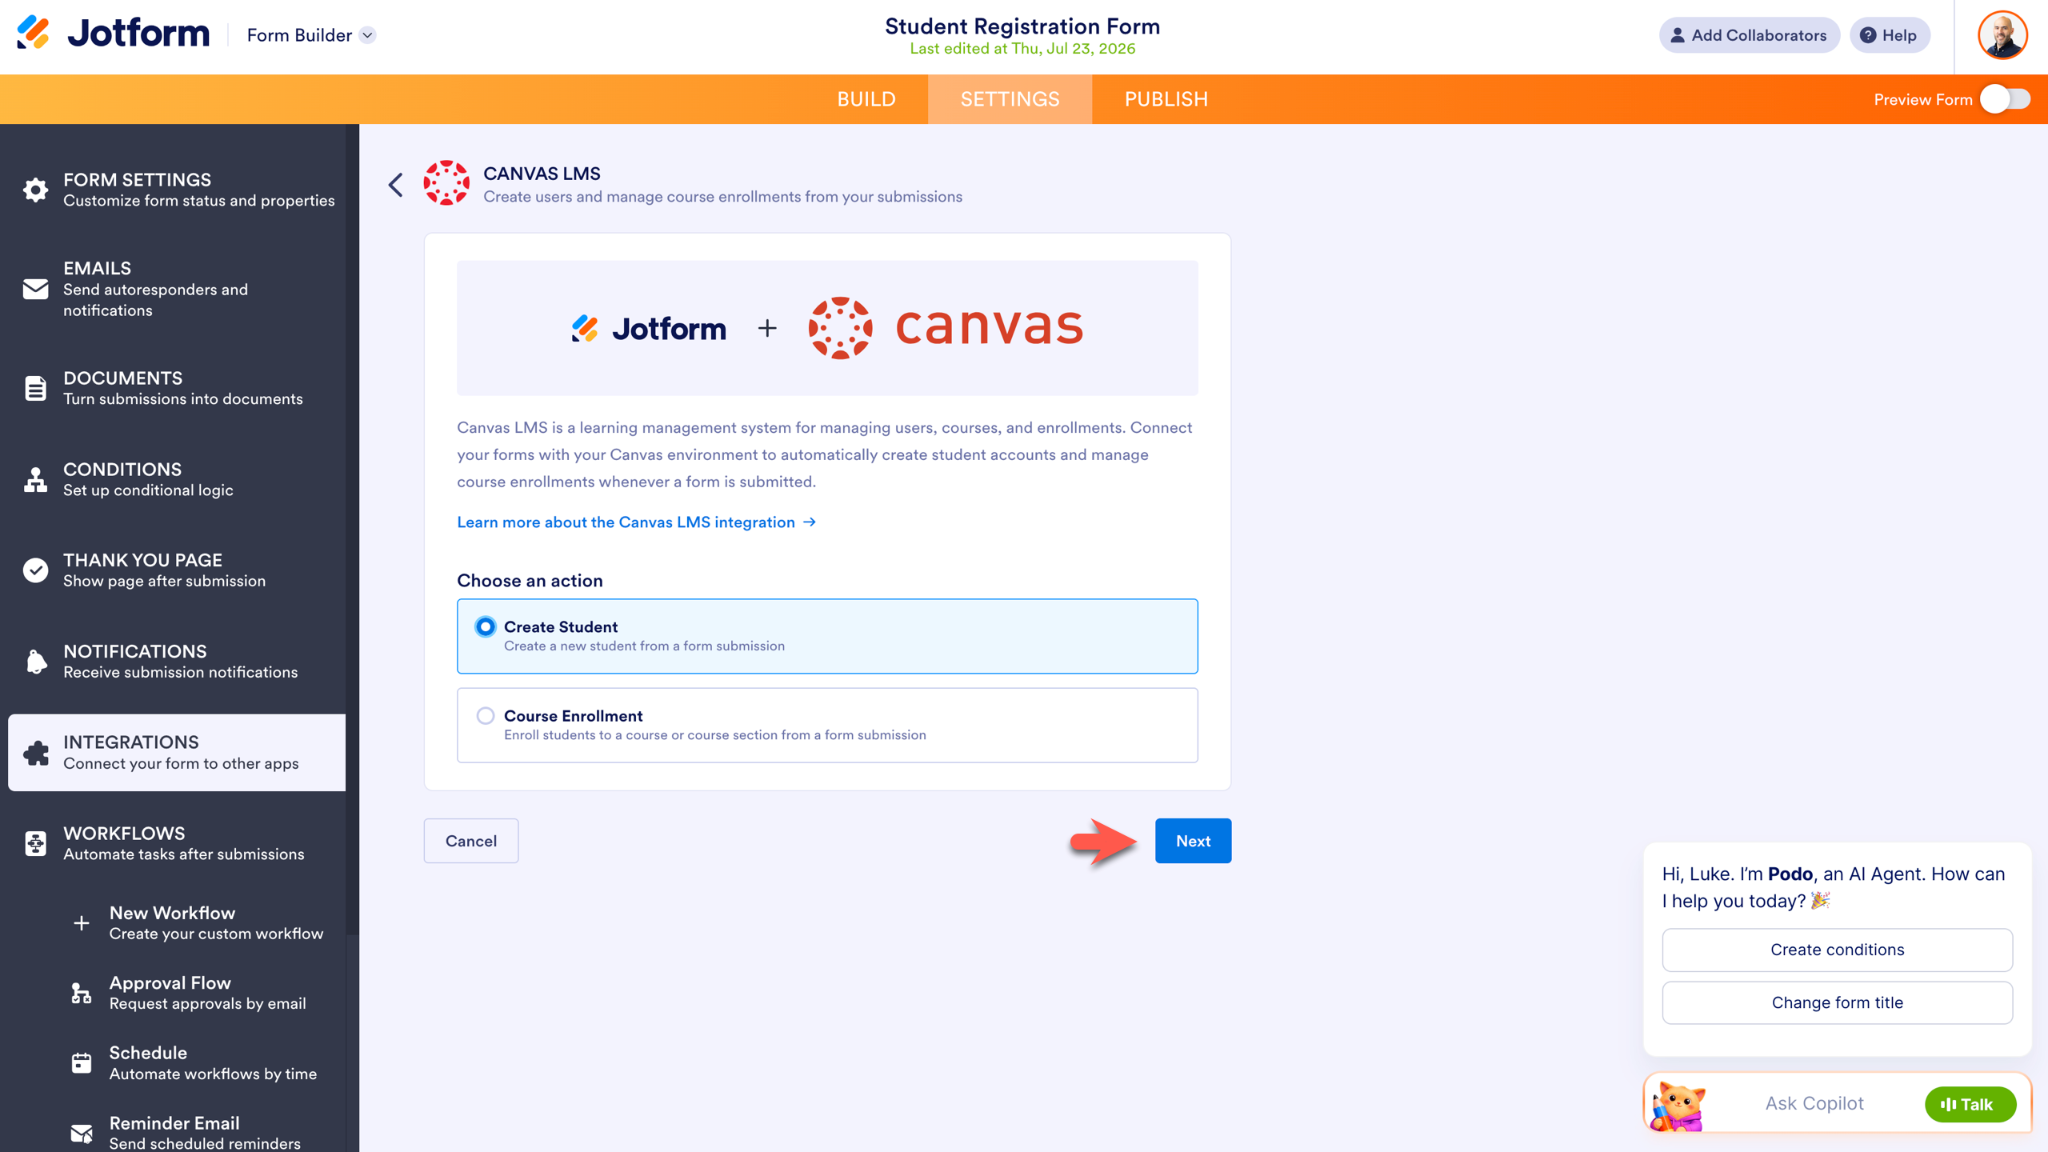
Choose which action the integration will perform: Create Student or Course Enrollment. Click the Next button to continue the setup process.
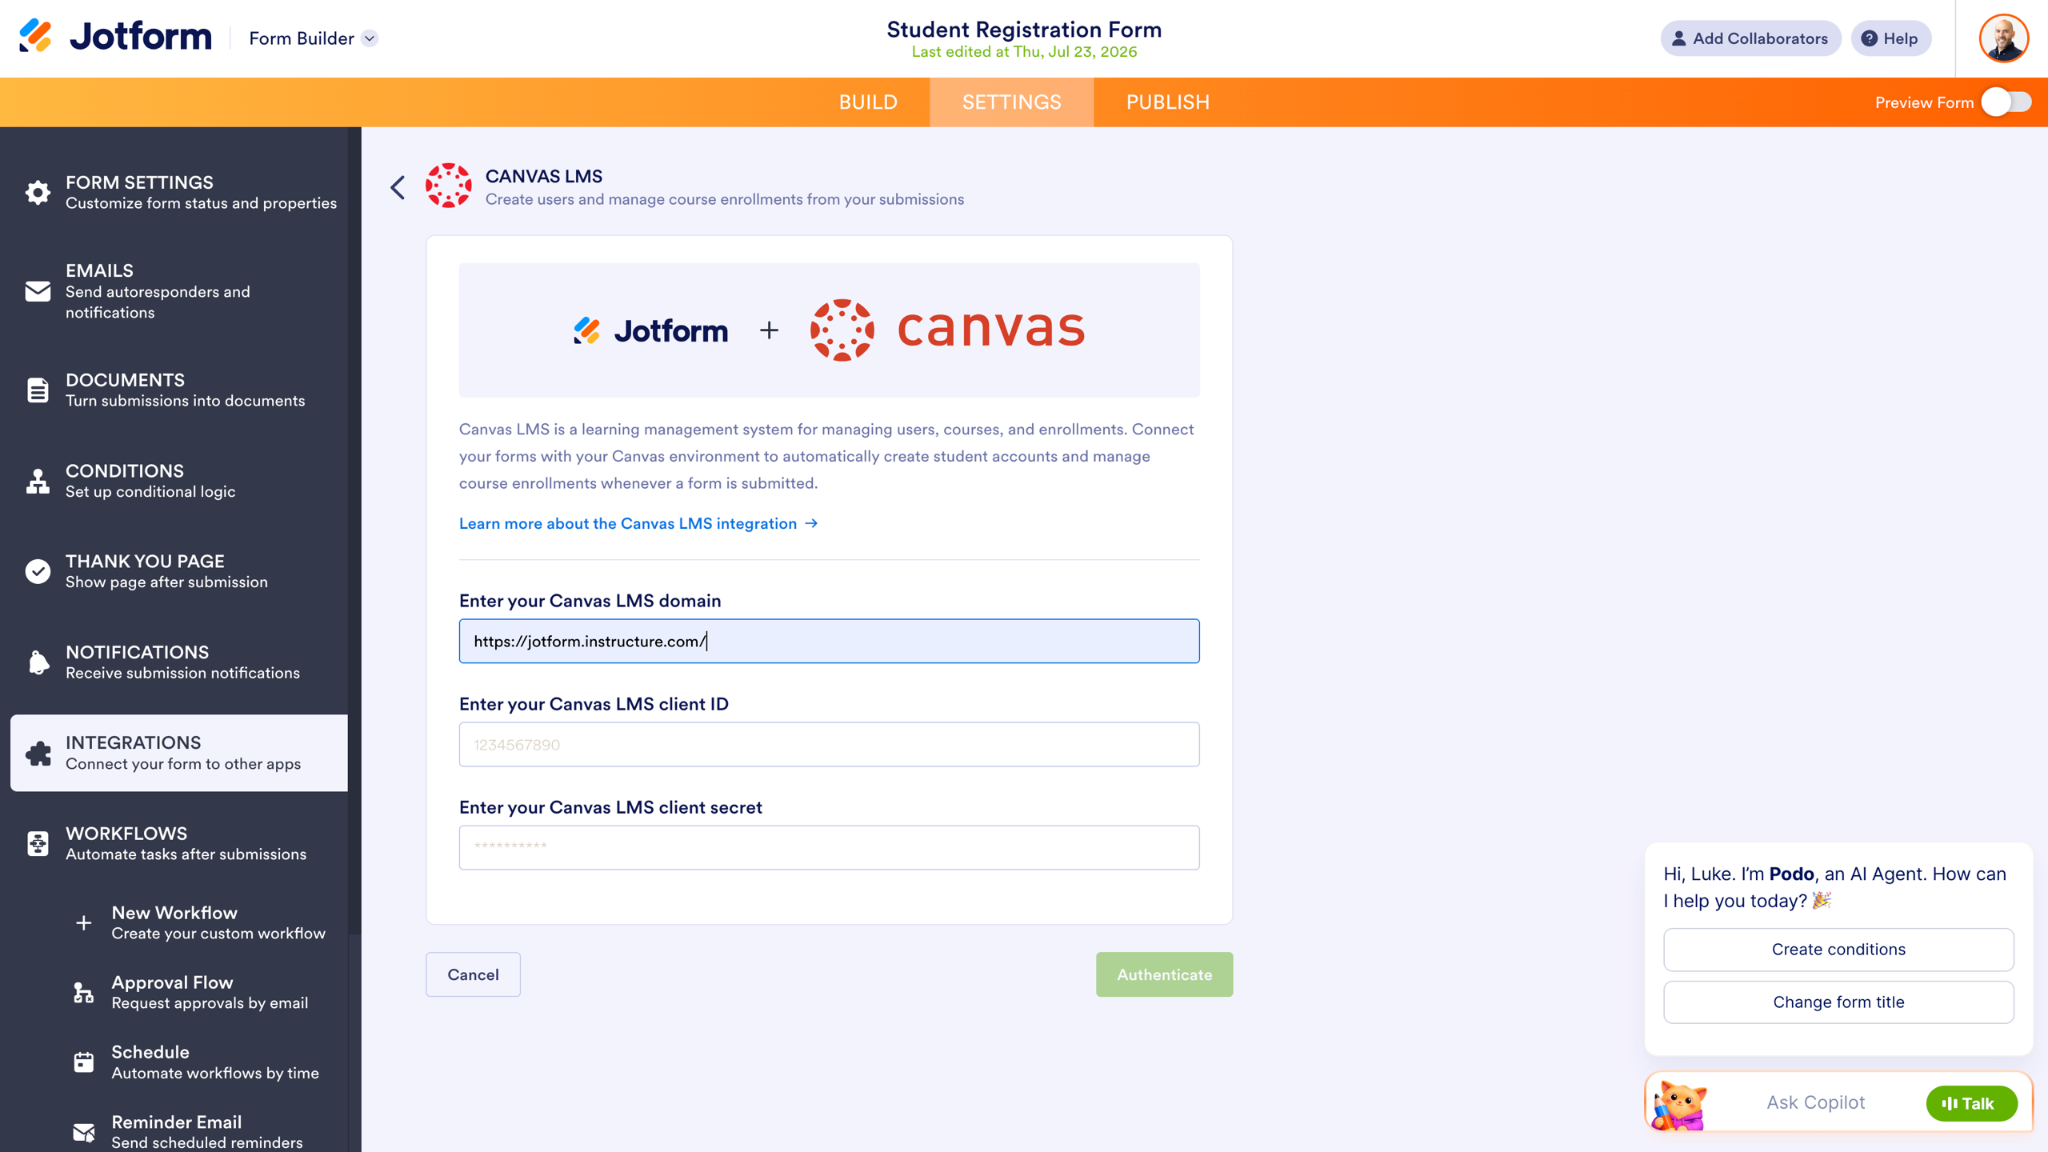
The following screen will ask for specific Canvas account information: your school’s Canvas LMS domain, your Canvas LMS client ID, and your Canvas LMS client secret. Enter your Canvas LMS domain before gathering the remaining information from your Canvas account.
To access the Canvas LMS client secret and Canvas LMS client ID, log into your Canvas instance as an administrator and go to the Admin menu. Select your account, click Developer Key, and then select API Key from the dropdown.
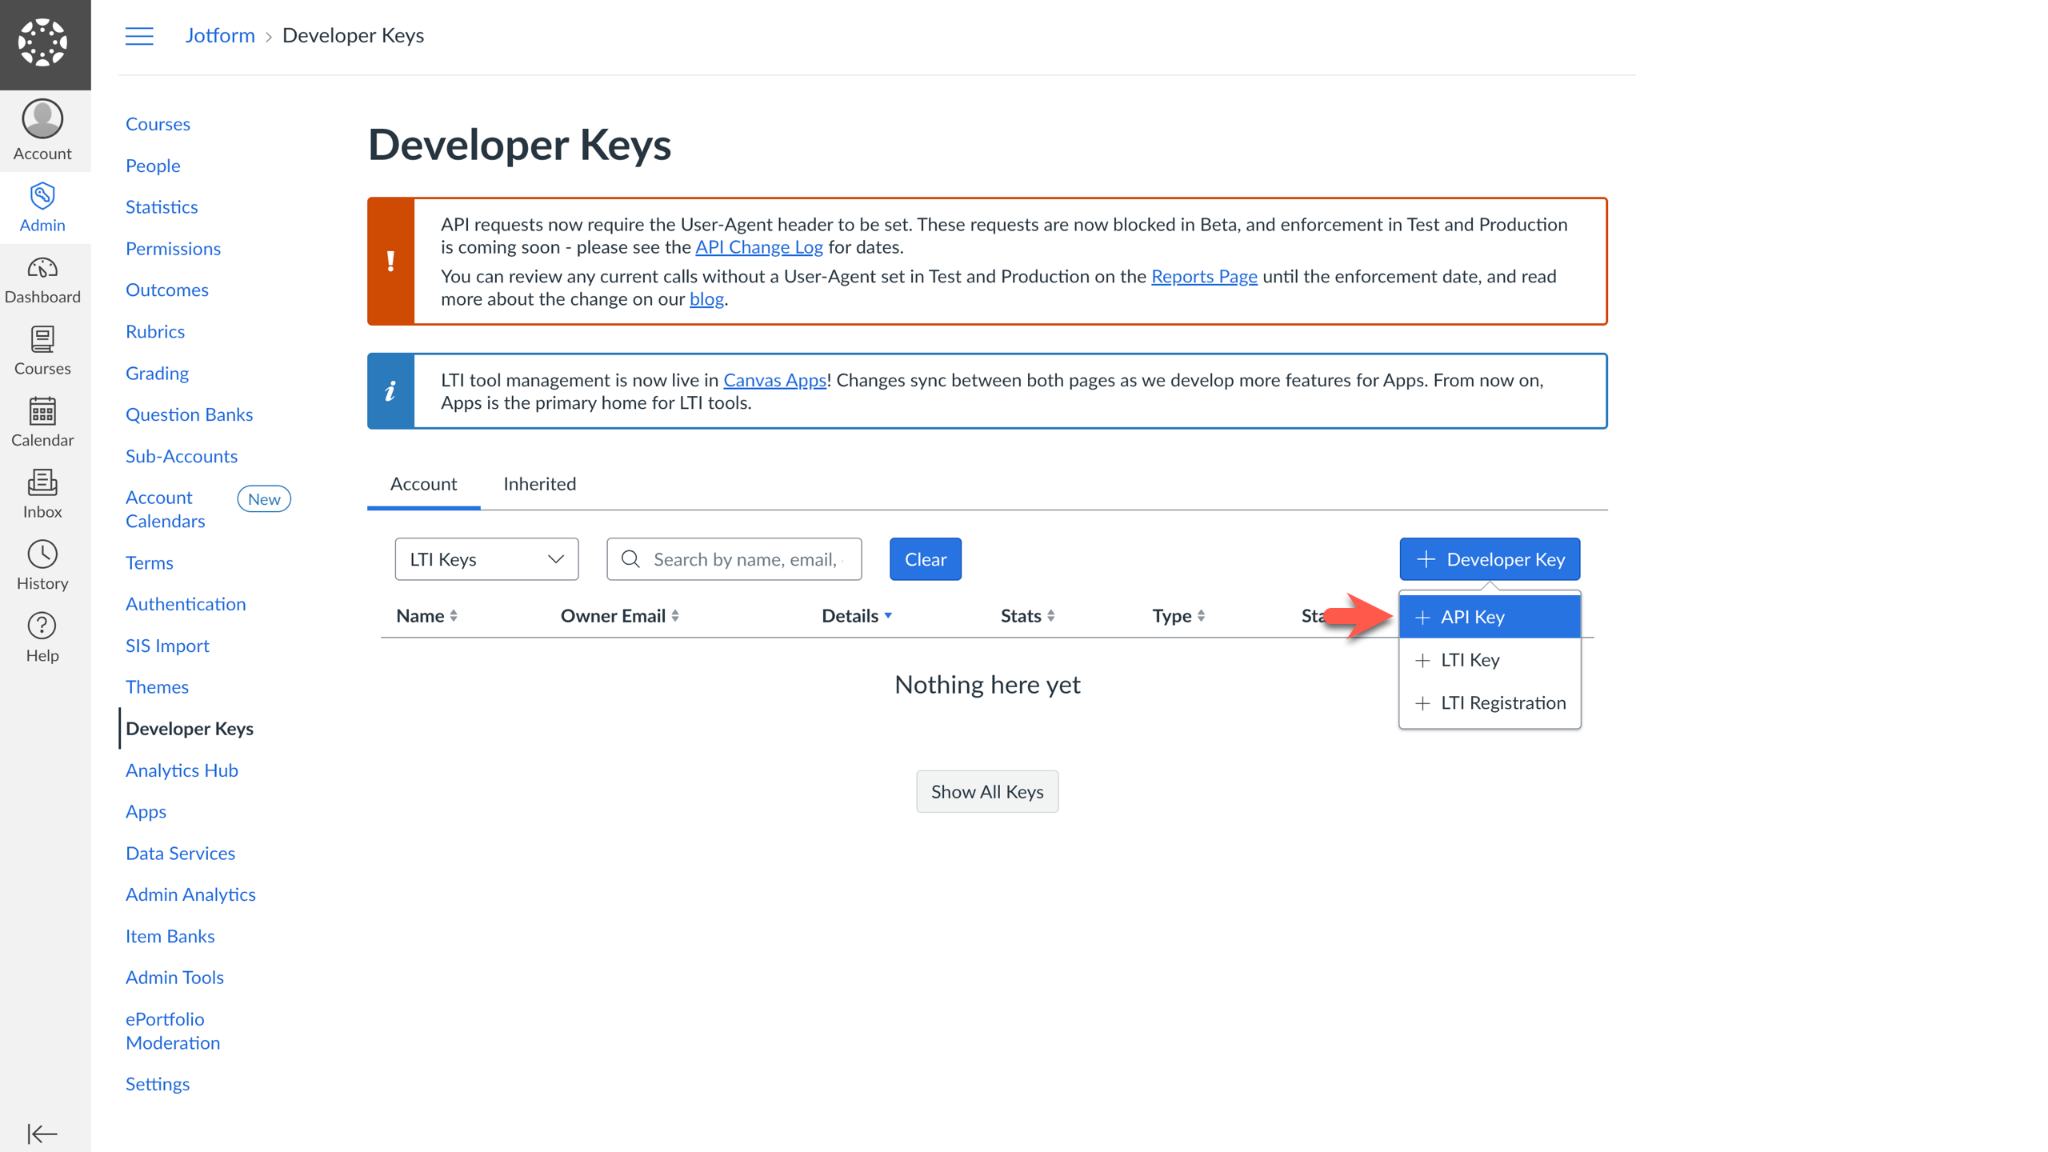
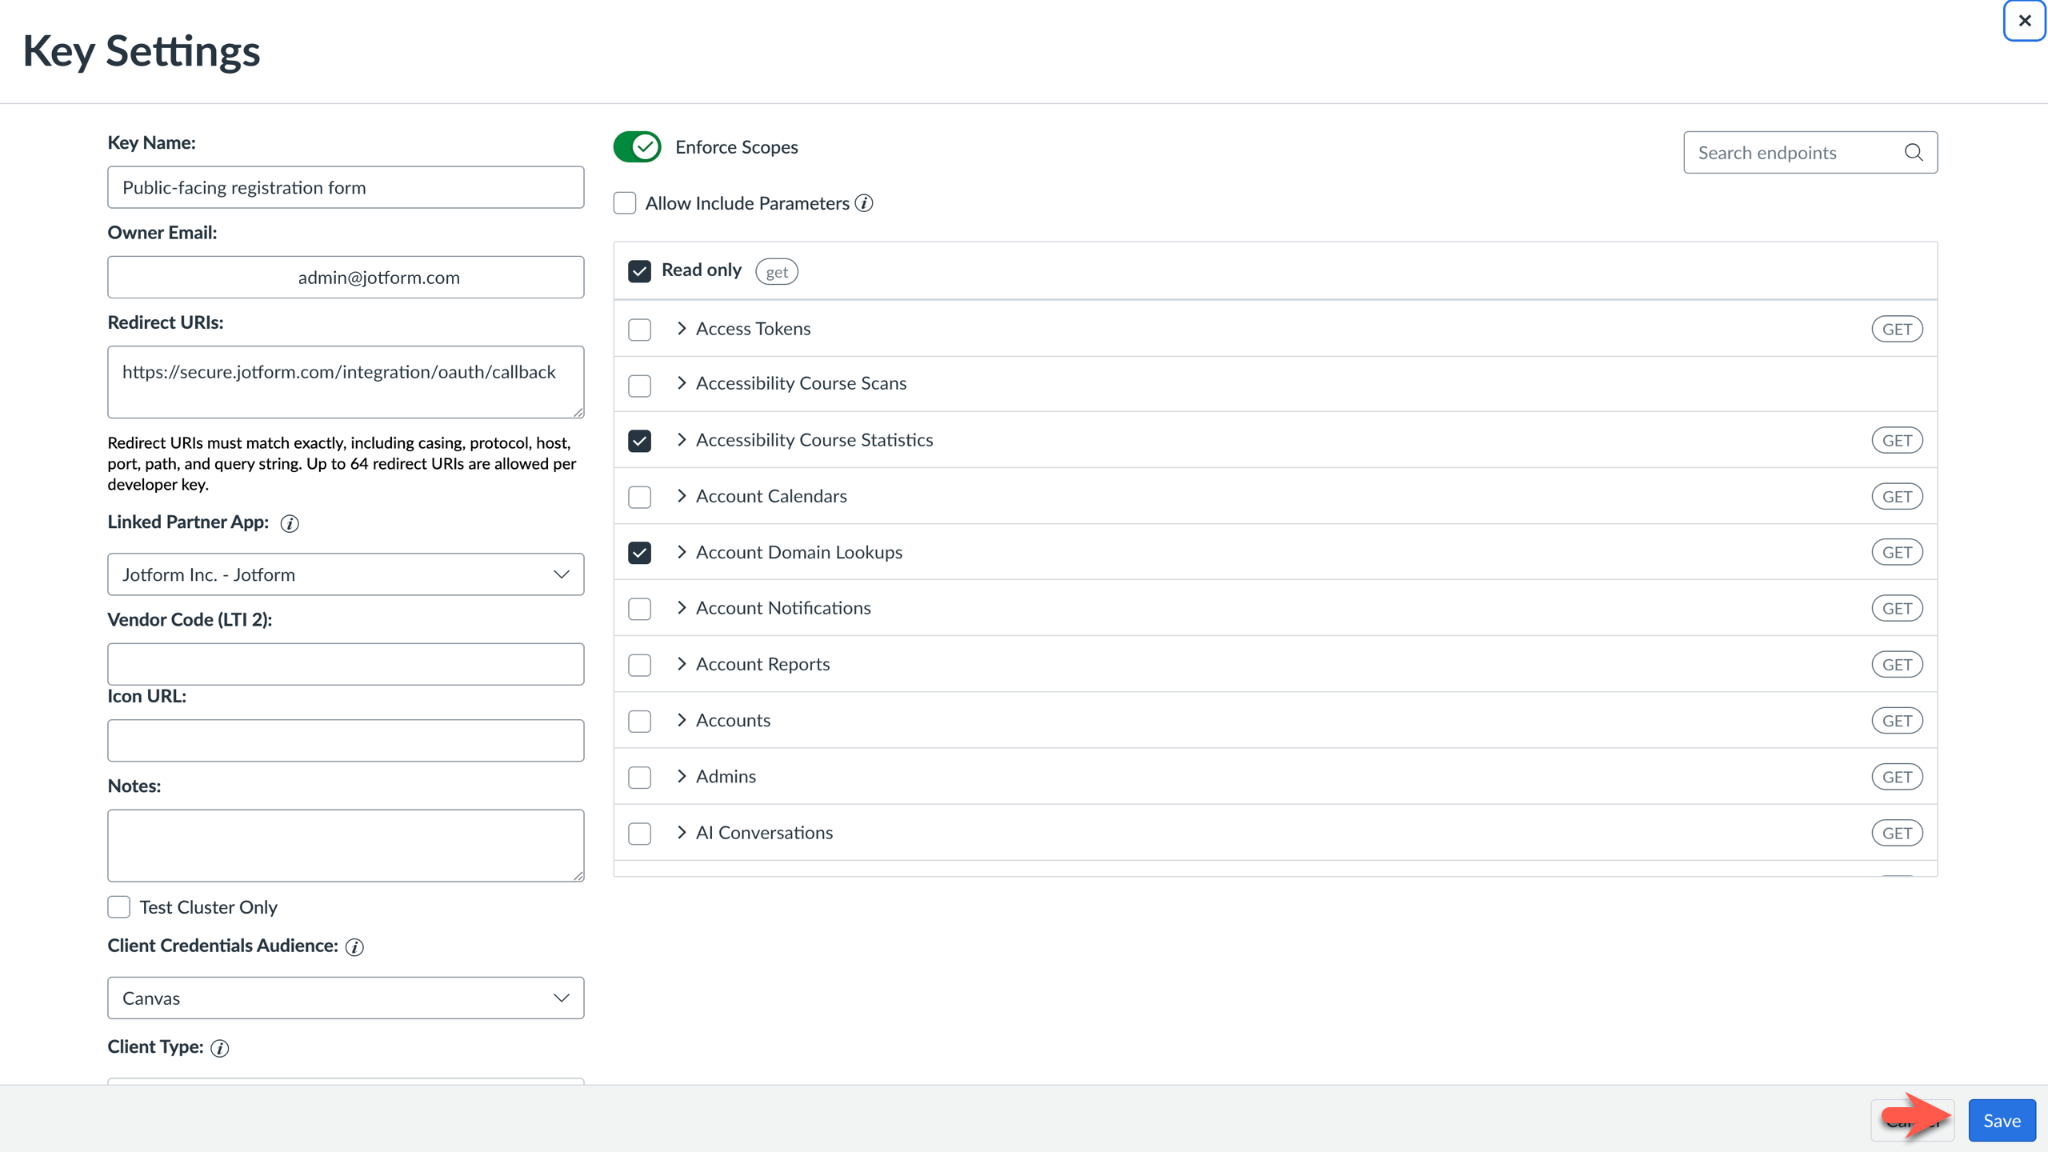
Next, fill out the Key Settings. Give your integration a name that’s easy to remember. In the Redirect URIs section, enter https://secure.jotform.com/integration/oauth/callback. Enter the email address associated with your Canvas account into the Owner Email field.
While filling out your settings for the new Developer Key, you can limit the Scopes related to that key. When your Scopes are set, click Save.
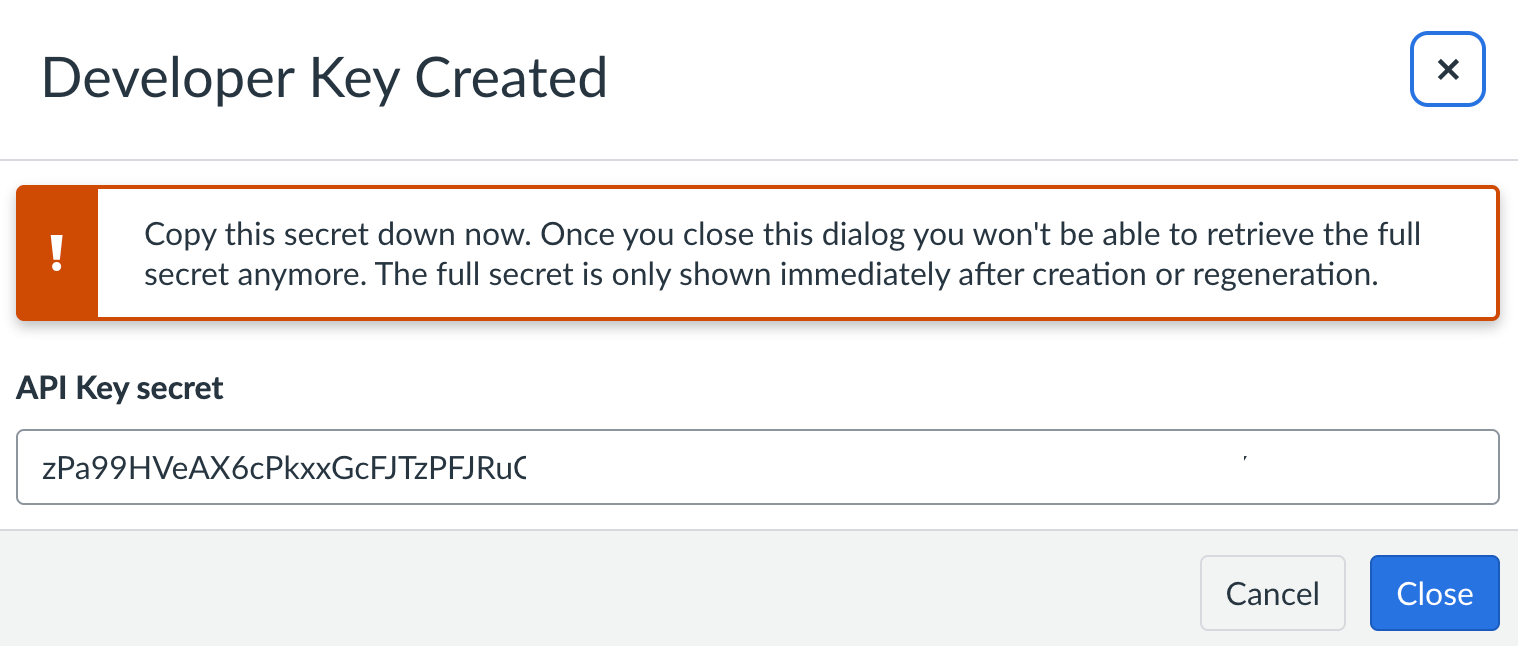
The following screen will state that the developer key has been created and reveal your Canvas LMS client secret. You can copy the client secret and paste it into the Jotform Canvas integration setup page right away or generate a new secret when you retrieve the Canvas LMS client ID during the next step.
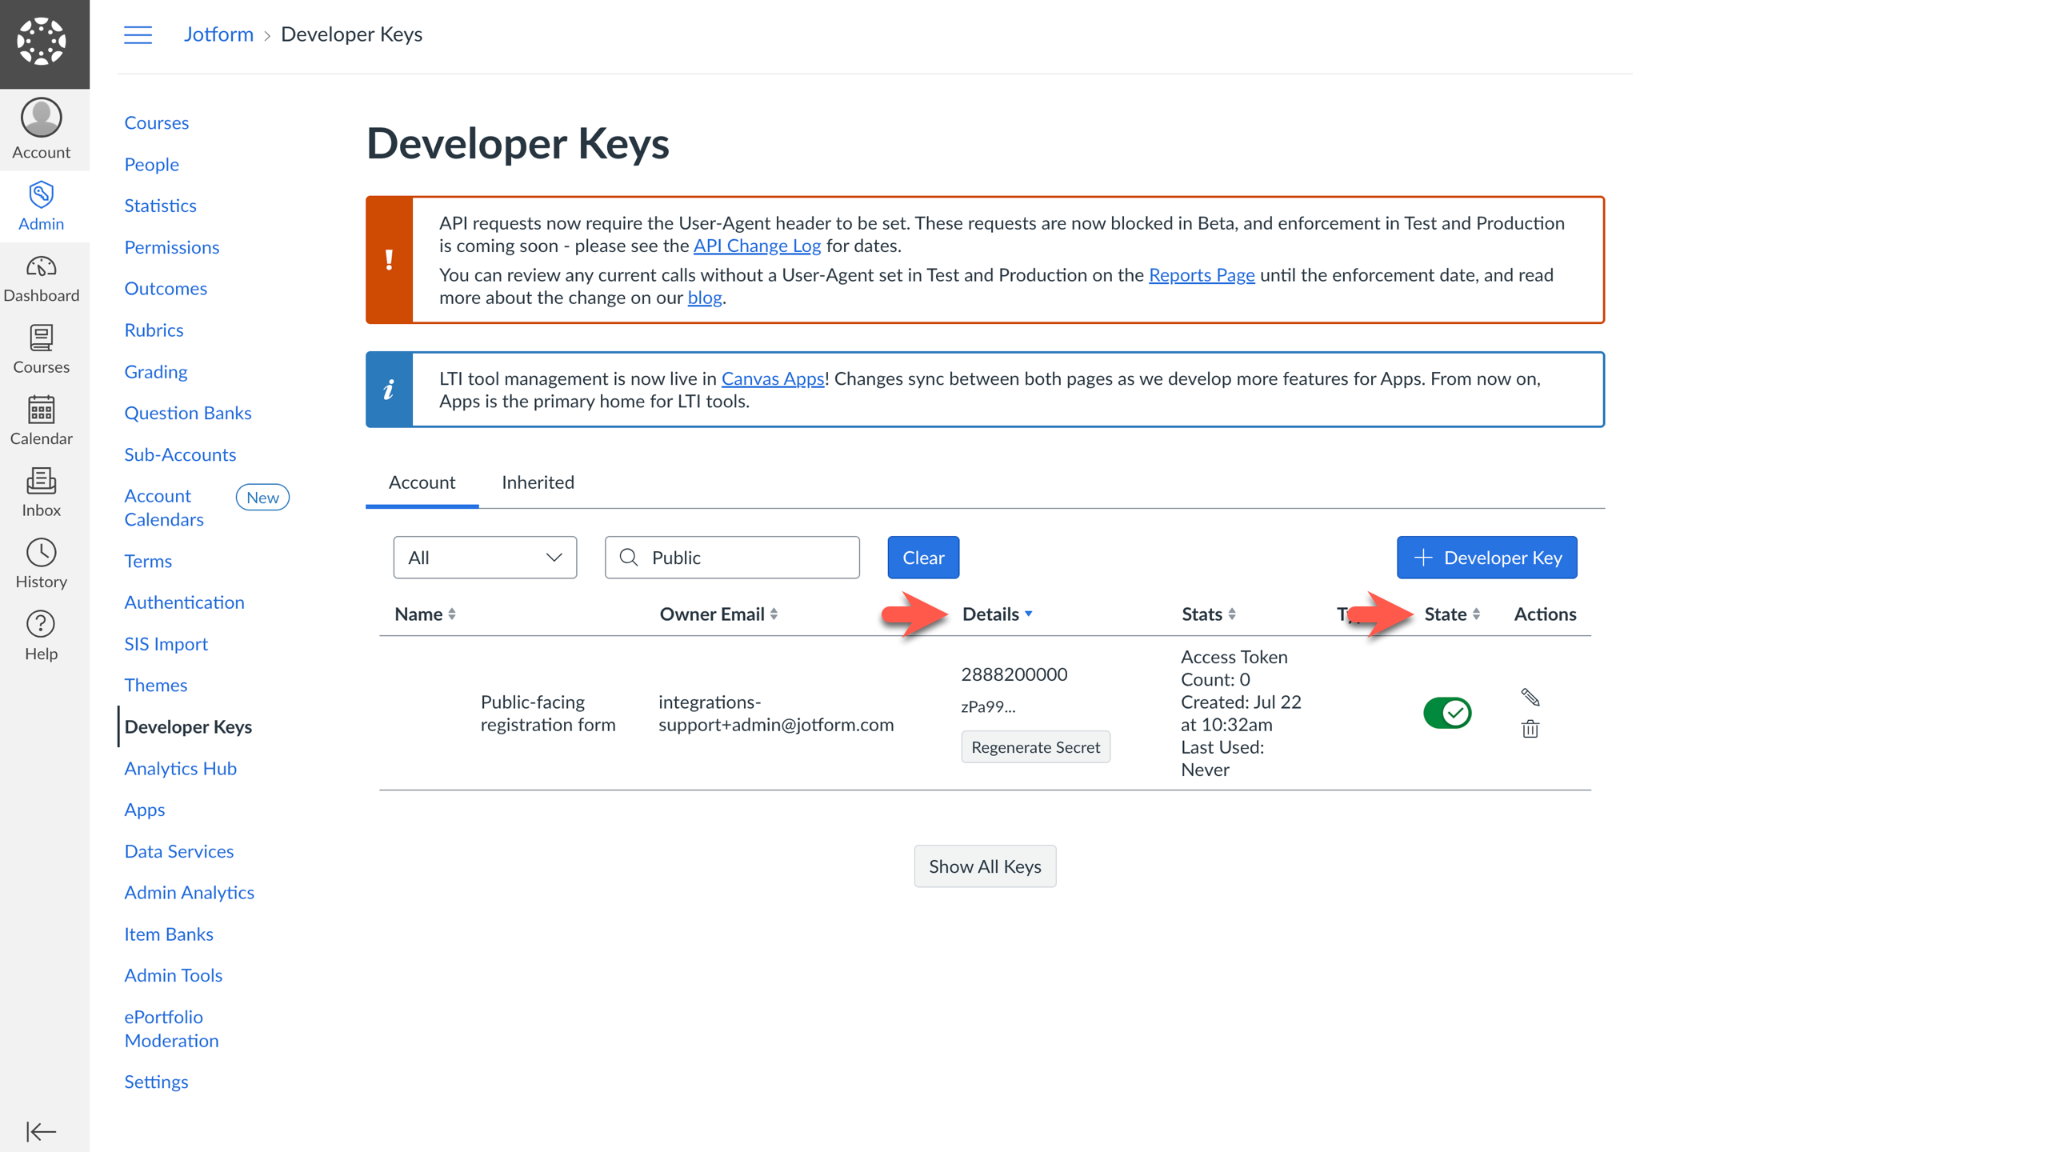
Once you close the popup that says Developer Key Created, you’ll be sent back to the Developer Keys page. The Canvas LMS client ID, the final piece of information needed to set up the integration, is the number listed in the Details column.
If you still need to copy and paste the Canvas LMS client secret, click the Regenerate Secret button before returning to the Jotform integration setup page. The button is below the Canvas LMS client ID in the Details column. Before moving on, slide the State button to the on position.
Paste both credentials into the Jotform integration settings underneath your Canvas LMS domain, and click Authenticate to complete the connection.
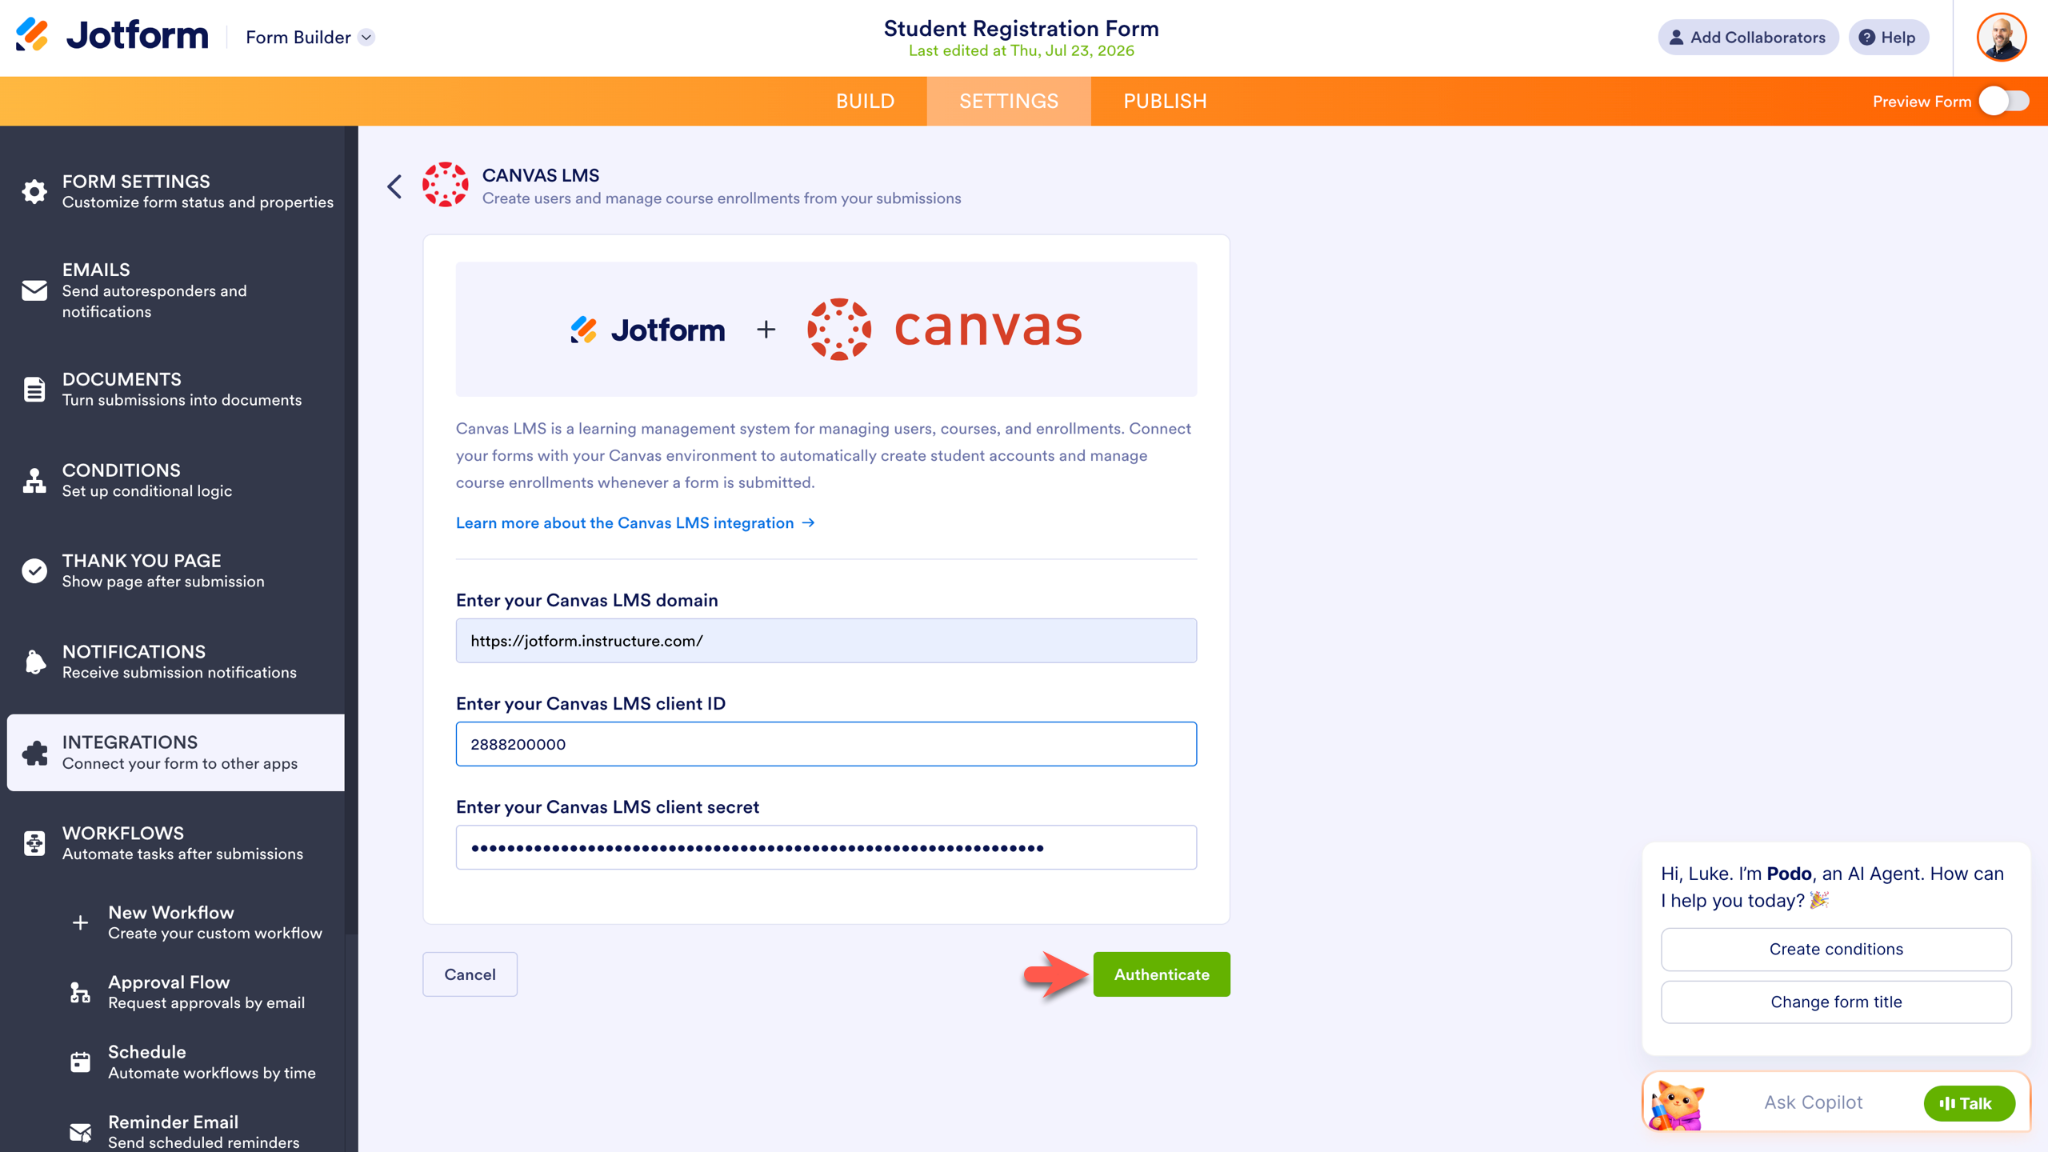
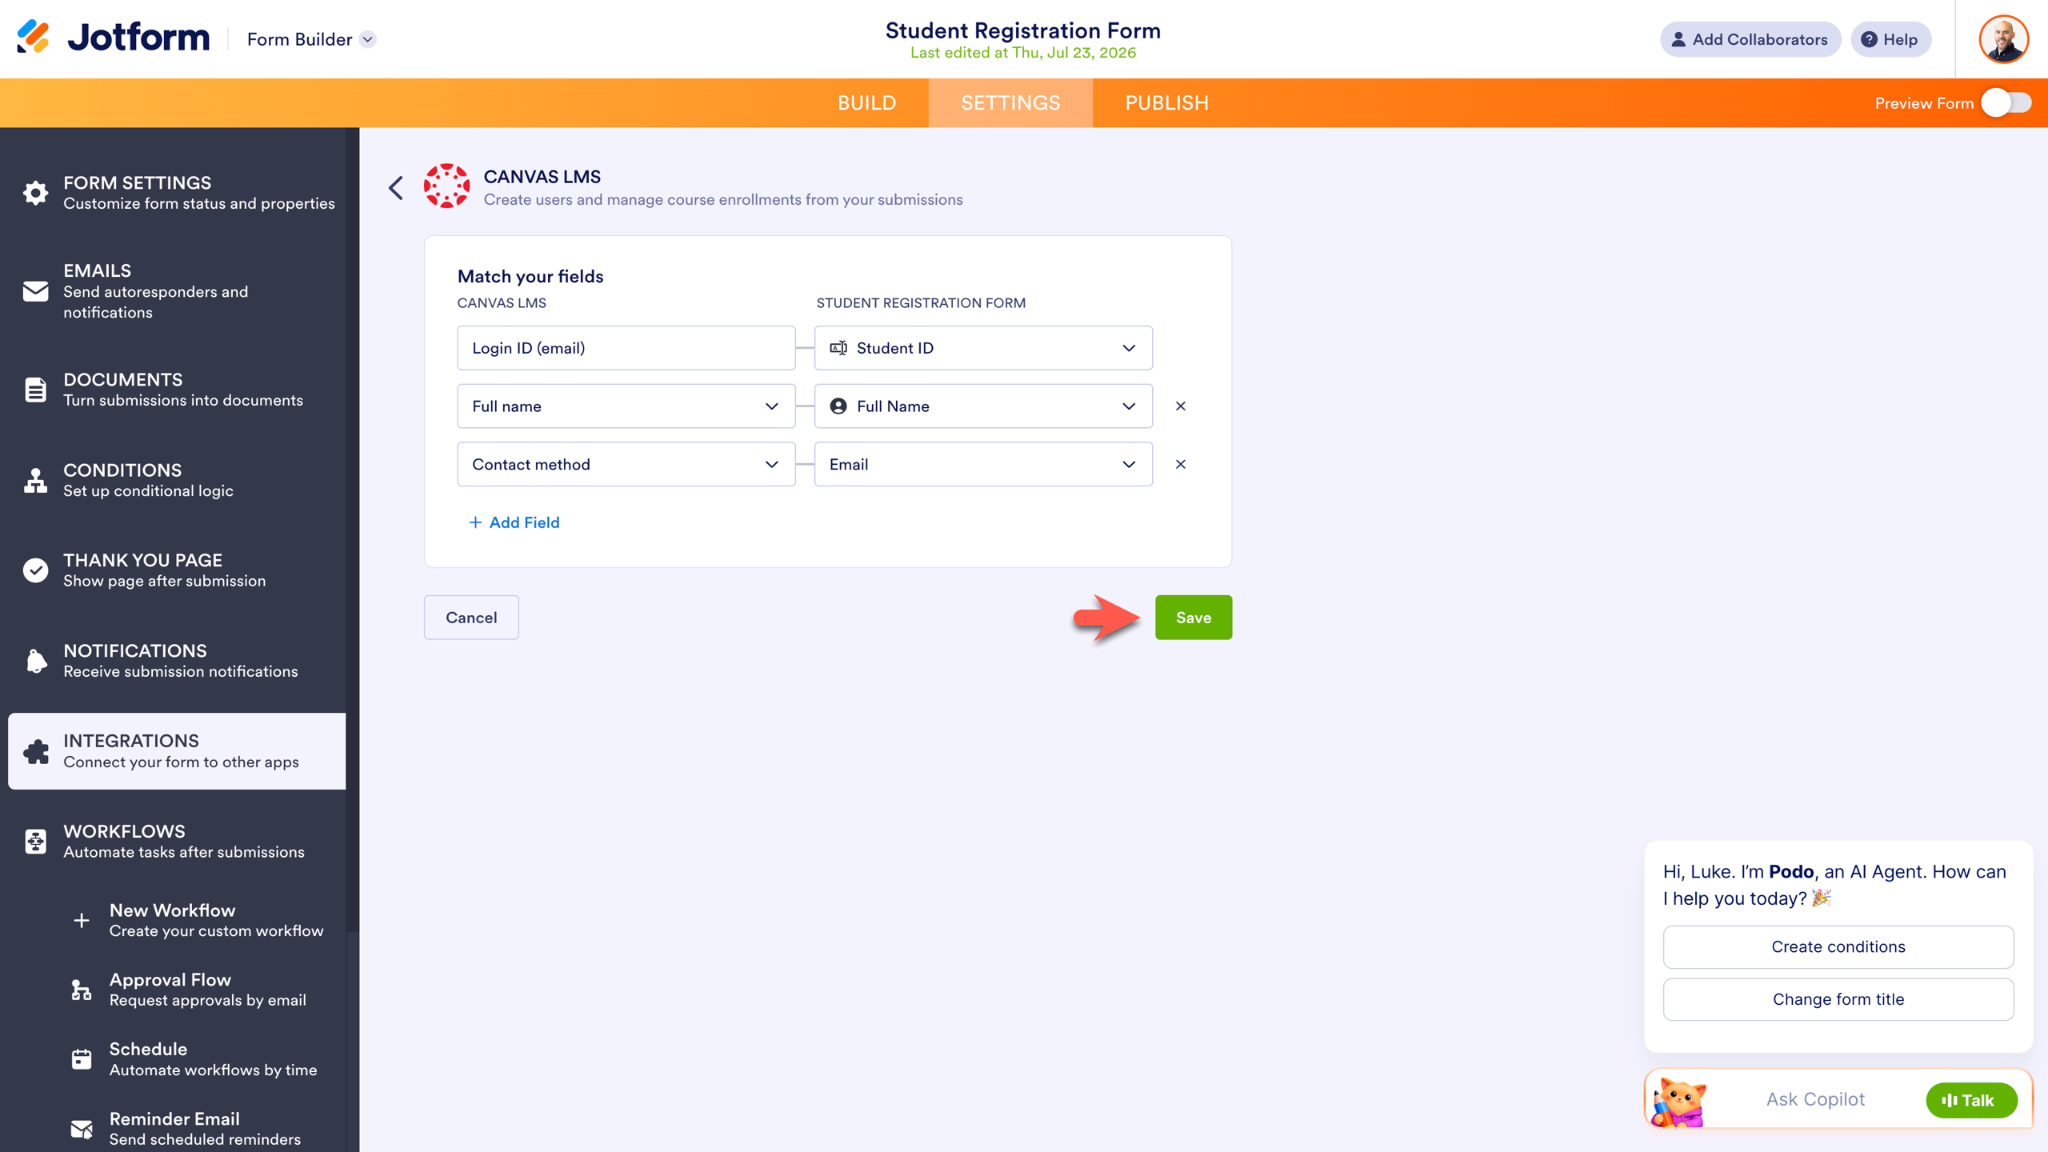
A popup screen from Canvas will prompt you for authorization. After you’ve authorized the integration, you can match your form fields to your Canvas fields in the Jotform Form Builder. Click Save to enable the integration.
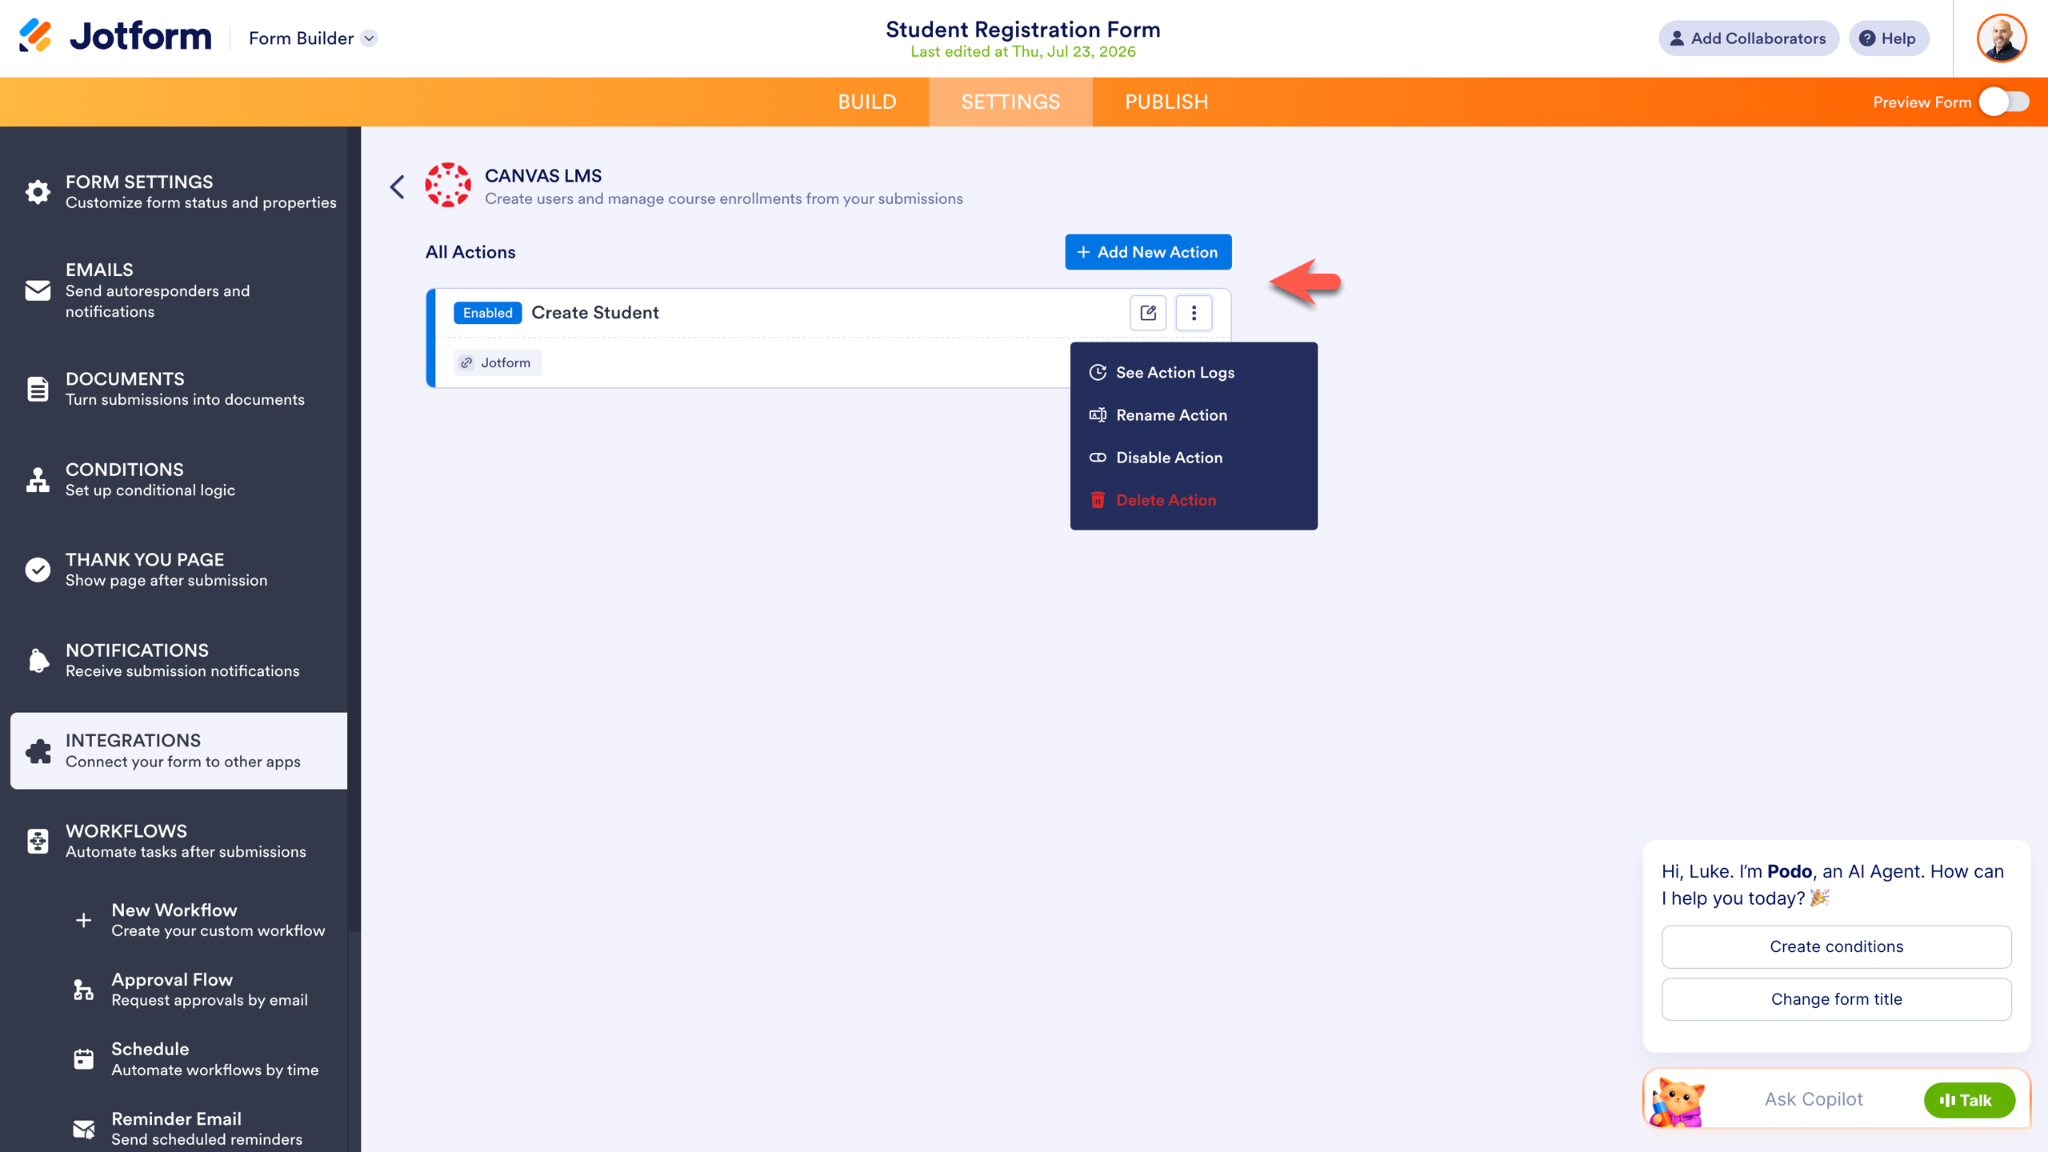
To add another action to your form, click the Add New Action button on the following screen. To edit your integration, click the pencil icon. Further options are accessible via the more options menu (the icon with three vertical dots).
How do I set up Jotform’s Canvas integration in the Workflow Builder?
You can also add the Canvas integration directly to Jotform Workflows. This gives you more control over when each Canvas action happens. You can connect Canvas with approvals, emails, conditional logic, and other workflow elements to build a process that works the way your school does.
Say a manager needs to approve a new student record before it’s created in Canvas. Start by creating an approval Workflow with your enrollment form.
In the Workflow Builder, click Add Element on the left side of the page and select the Integrations tab from the Workflow Elements menu. Click on the Canvas integration to add it to your workflow, or drag and drop it into the workflow.
![[replace with actual description]](https://www.jotform.com/blog/wp-content/uploads/2026/07/image-688.png)
Next, connect Canvas to the step that should trigger the integration. If you added the integration by clicking on it, it will connect automatically to the Approval element in the workflow. If you dragged and dropped the Canvas element, hover over the Approval element, click and hold the blue plus sign that appears around its edge, and drag the flow line to the Canvas element.
![[replace with actual description]](https://www.jotform.com/blog/wp-content/uploads/2026/07/image-687.png)
Once Canvas is in place, click the Complete Settings button on the Canvas Workflow element to configure the integration. Choose the Canvas action you want to use, then follow the prompts to connect your Canvas account and configure the action.
If you haven’t connected Canvas to Jotform yet, you’ll need your school’s Canvas LMS domain, client ID, and client secret. Follow the steps in the previous section to create a Canvas Developer Key and retrieve those credentials.
After you authenticate your Canvas account, match the appropriate Jotform form fields with the corresponding Canvas fields, then save your settings.
![[replace with actual description]](https://www.jotform.com/blog/wp-content/uploads/2026/07/image-689.png)
Now Canvas can become part of a larger education workflow. A school could collect a course registration, route it for approval, then automatically enroll an approved learner in the right Canvas course.
Keep adding and connecting elements to shape what happens before or after the Canvas action. The result is a connected workflow that can manage more of the process, from registration through enrollment, while freeing up administrators from manual work.
From registration to learning
For many education institutions, Canvas is essential. Jotform automatically sends information from the forms learners fill out — whether a program application, event signup, or registration form — to Canvas.
Together, Jotform and Canvas remove friction from the path to learning. Instead of spending time moving information between systems, educators can spend more time supporting students, and learners can start engaging with coursework sooner.








Send Comment: