
When you rely on manual workflows to manage approval requests, your staff wastes their crucial time tracking down spreadsheets and managing emails and phone calls rather than doing important work. By automating your processes, you can eliminate unnecessary manual work and free up your employees to get real work done.
This piece will demonstrate how you can automate a tedious, manual approval process for expense reimbursements with Jotform Workflows.
Let’s get started!
A quick overview of the expense approval process
A mobile-friendly reimbursement claim form lets you easily collect expense details from employees, such as employee name, request date, expense amount, and other relevant information.
The approval workflow automatically routes this information to the finance specialist for their review. If the expense amount is above $1,000, the request will go to the finance manager after the specialist approves it. Once the request has been approved (or denied), the employee will receive an email notifying them of the decision.
Here is the employee reimbursement approval process flow we’re going to build from scratch:
- The employee submits a reimbursement expense claim.
- The finance specialist receives the request, reviews it, and then approves or denies it.
- If the expense amount is higher than $1,000, the finance manager receives the request after the finance specialist, then reviews and approves or denies the claim.
- The employee gets an email notifying them whether their expense reimbursement request has been approved or denied.
Below, you’ll find the steps to build the employee reimbursement approval process step by step from scratch. However, if all you need is a template to get started, you can skip the tutorial and use this template instead.
Building an approval flow
You’ll need a free Jotform account to build this approval flow. If you’re already a Jotform user, you’re ready to go!
Step 1: Add a form
Start by opening Jotform Workflows. First, we’ll add the form employees will use to submit their expense reimbursement requests. You can choose an expense reimbursement form template from Jotform’s template library or design a custom form from scratch. Since the focus of this tutorial is on how to build approval flows rather than forms, we’ll use a form template to get started quickly.
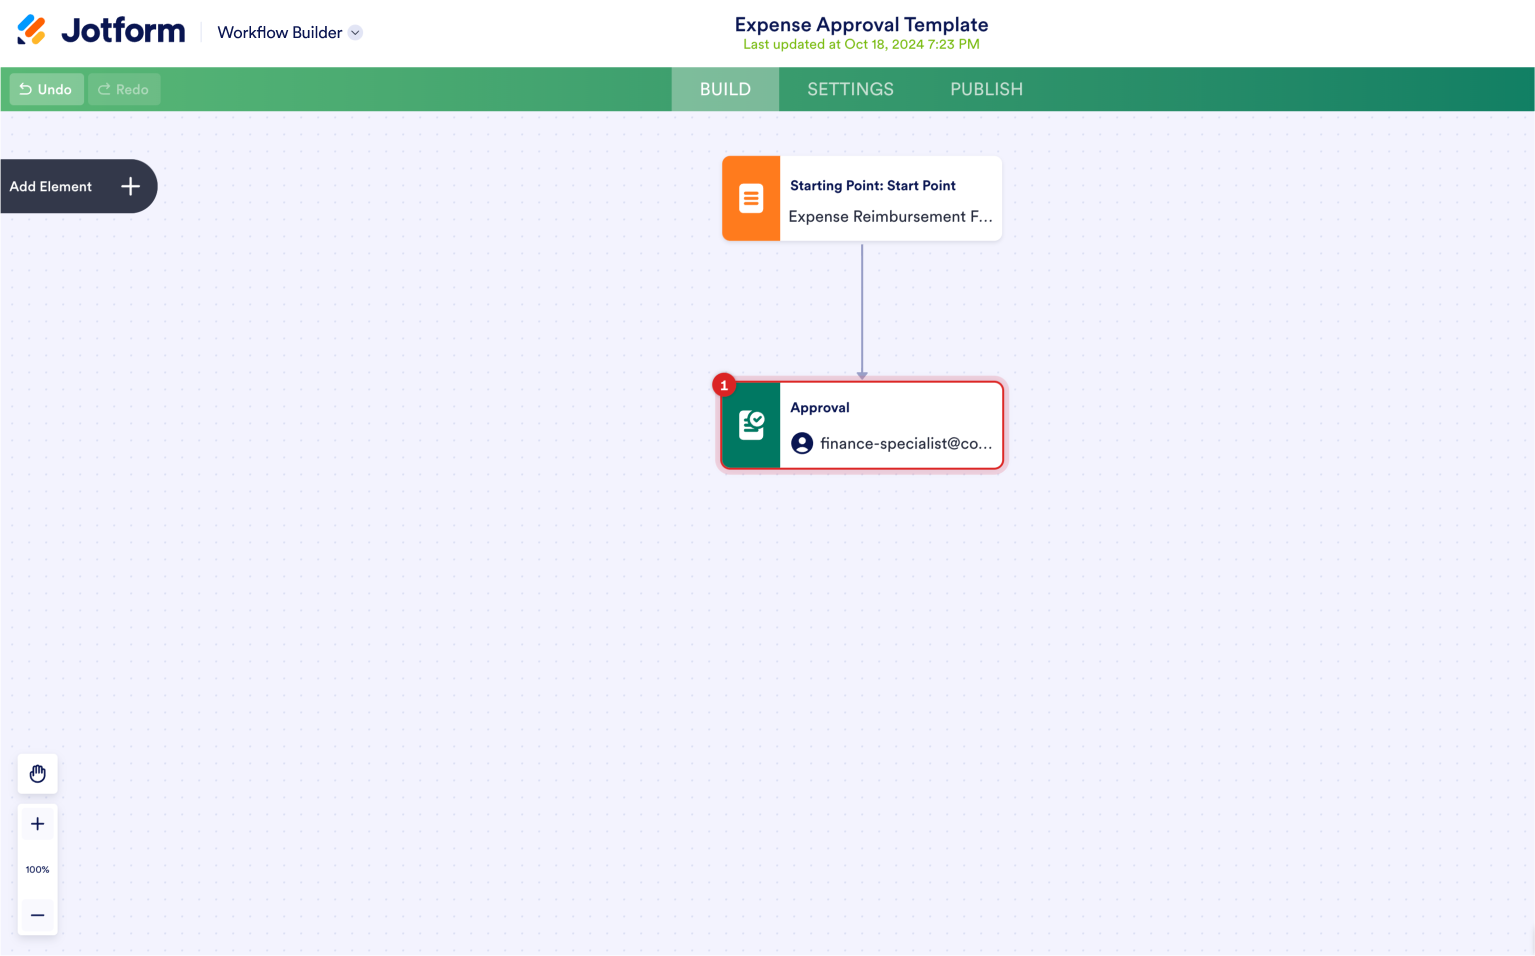
- Open Jotform Workflows.
- Select Start From Scratch.
- Click Add Form.
- Select an existing form, or click Create a new one. If you choose to create a new form, you can click Use Template to search Jotform’s template library for what you need. In this case, we’ll choose the Expense Reimbursement Form template.
- Your chosen form will now appear in the approval flow. The form itself will also open in the Form Builder in a new tab.
Congratulations! Your form has successfully been added to the approval flow. Now it’s time to build the rest of the flow.
Keep in mind that you can access the entire approval flow for this form in the Settings tab of the Form Builder, under Approval Flows.
Step 2: Build the approval flow
Here, we’ll assign submissions to our Expense Reimbursement Form to a finance specialist, who will either approve or deny it.
We’ll then add a condition that will route approved submissions to the finance manager if the amount requested exceeds $1,000. The finance manager can then approve or deny them.
Finally, we’ll set up an autoresponder email to be sent to the employee notifying them whether their request has been approved or denied.
Pro Tip
With Jotform’s Group Approvals, you can streamline the approval process even more by requesting approvals from multiple people at once. You can require a response from an entire group, a majority, or even a specific number of people.
Here are the steps for creating the approval flow:
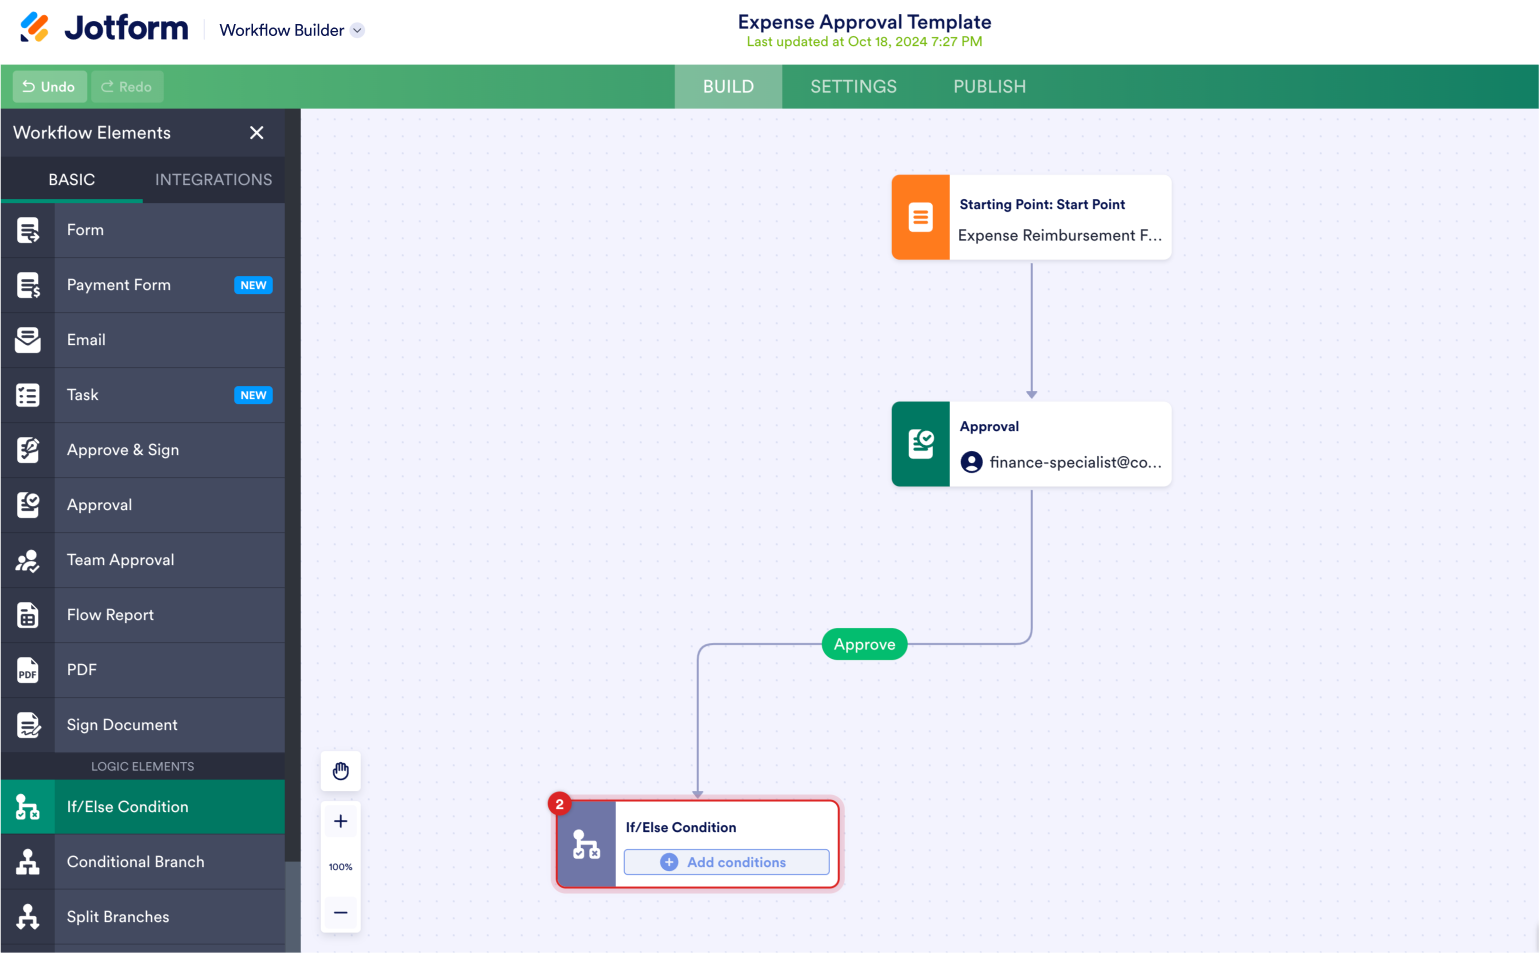
- Drag and drop the Approval element onto the Drag your first element from left placeholder.
- Hover over the Approval box and click the Settings (gear) icon. Enter the approver’s email address (in this case, the finance specialist’s).
- Drag and drop the If-Else Condition element from the left. Click Add conditions. Set the If condition as Total Cost ($), the State as Greater Than, the Target as Value, and the Value as 1000.
- Connect the Approval element to the If-Else Condition element. To do this, hover over the Approval box, then click on the blue dot and drag it to create a line to the If/Else Condition box.
- Drag and drop the Email element into the approval flow. Enter the email subject and content for requests that are denied.
- Connect the Approval element to the Email element, click Select Outcome, then select the Deny outcome. Add the End Flow element and connect the Email element to it.
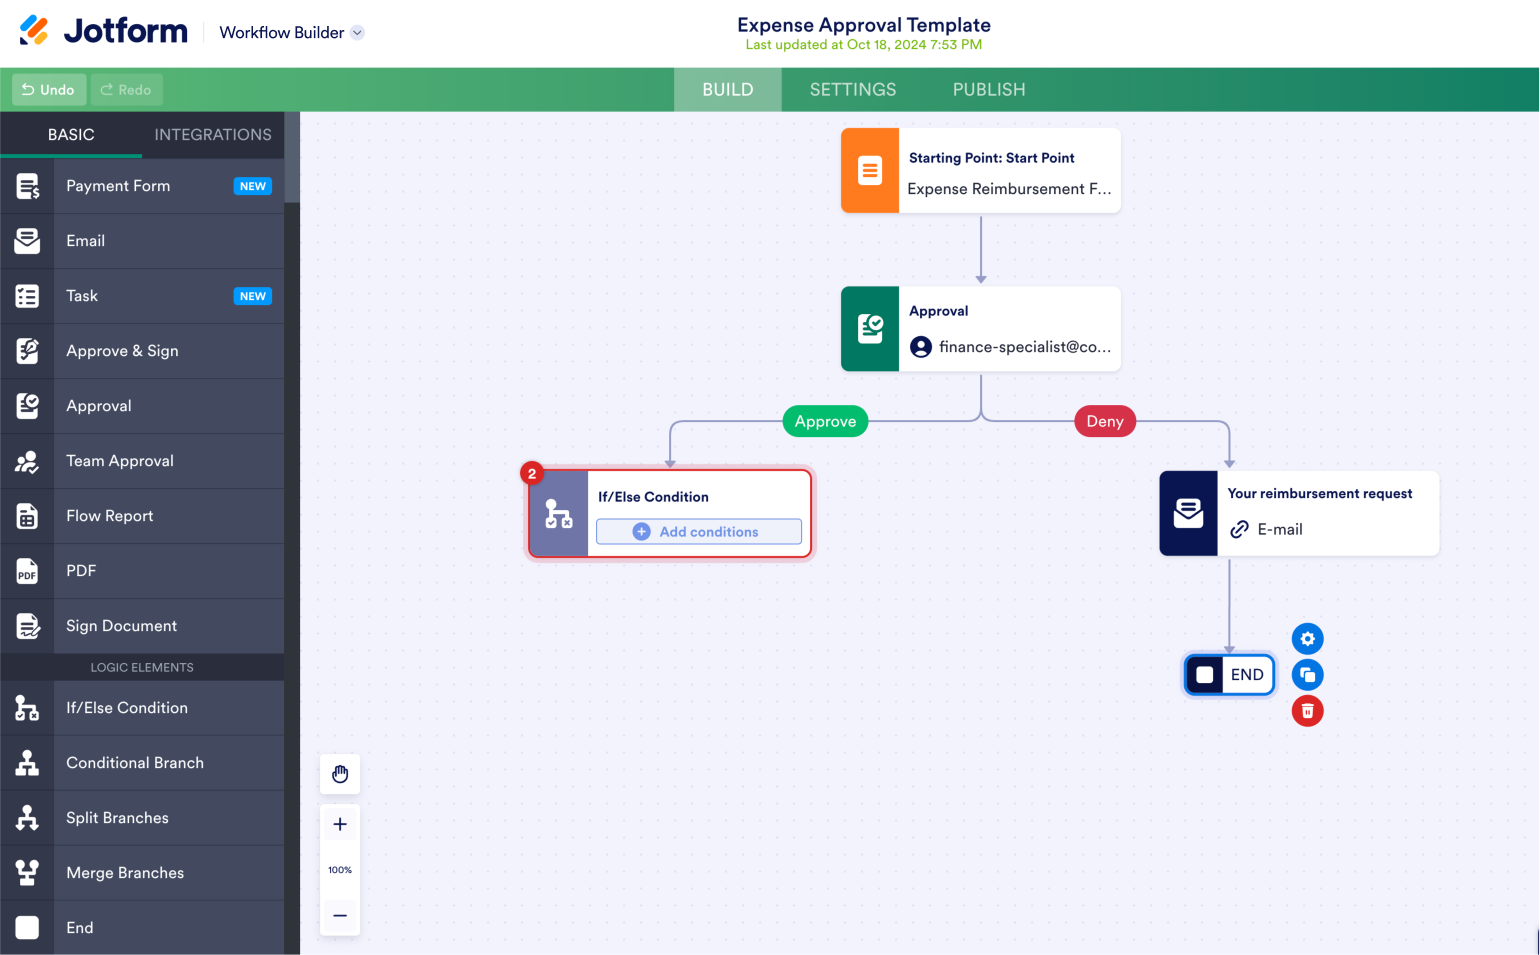
- Now we’ll add a branch for requests that are approved by the finance specialist. If the Value in the If-Else Condition is less than $1,000, then the finance specialist’s approval is enough to send an approval email to the requester. Add the Email element to the flow and enter the email subject and content for an approved request.
- Click the blue dot in the If-Else Condition box and drag it to create a connection with the Email element.
- Click Select Branch to choose whether the condition is true or false. In this case, click FALSE (i.e., the total cost is not greater than $1,000).
- Add an End Flow element and connect the Email element to it.
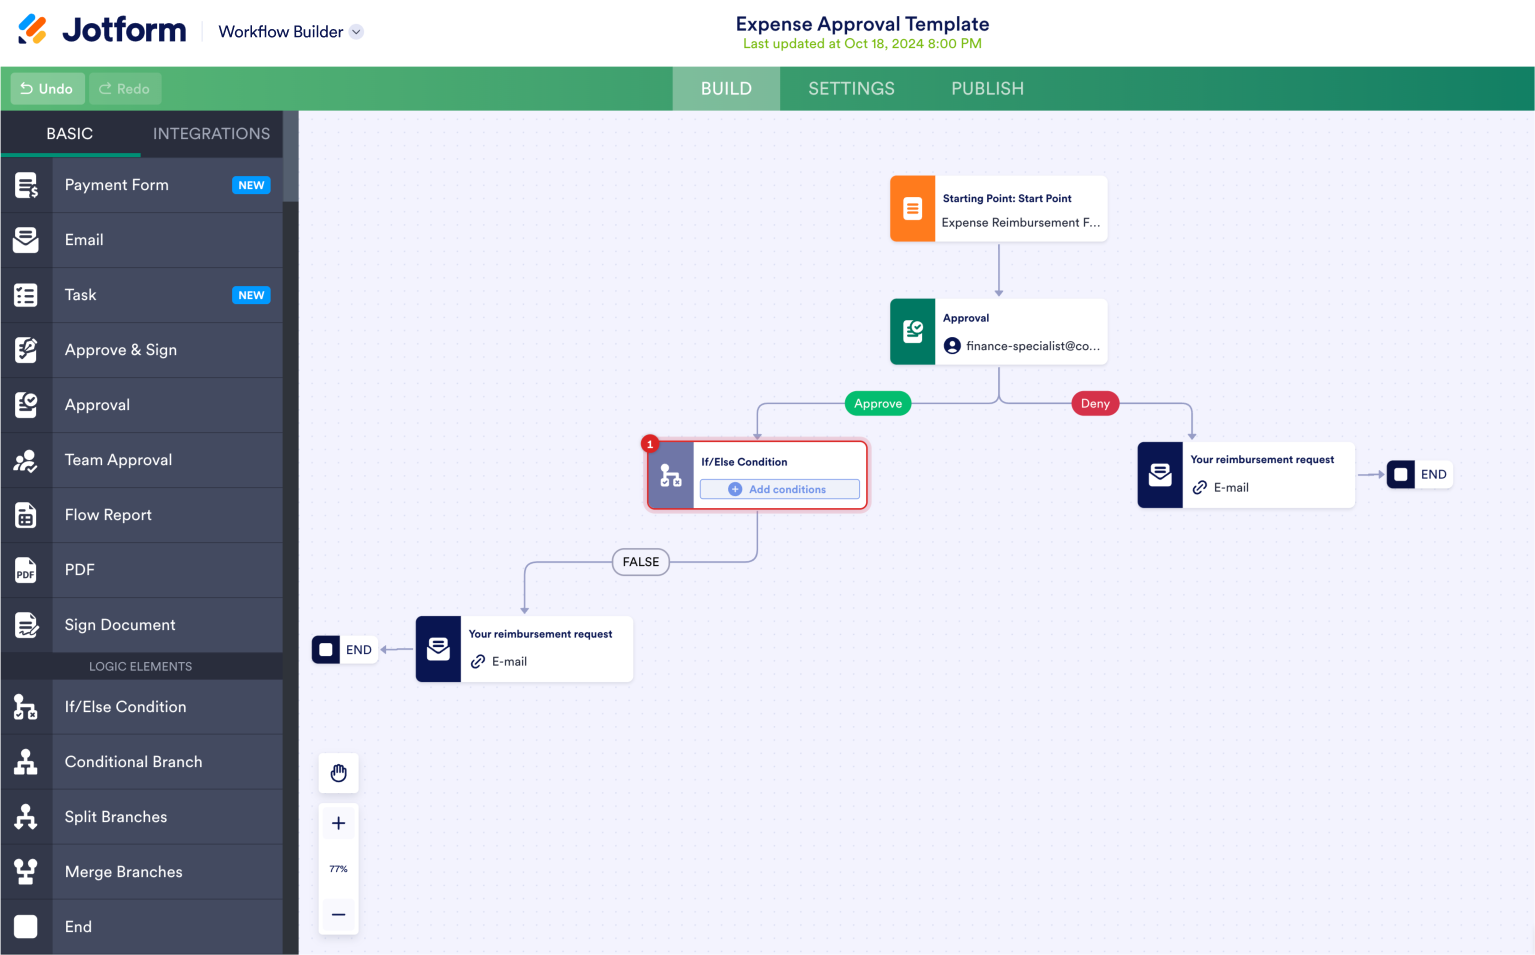
- Next, we’ll add a branch for requests for more than $1,000. Add an Approval element and connect the If-Else Condition box to it. Select TRUE for the branch (i.e., the value is greater than $1,000).
- Click the Settings (gear) icon for the Approval element and enter the approver’s email address (in this case, the finance manager).
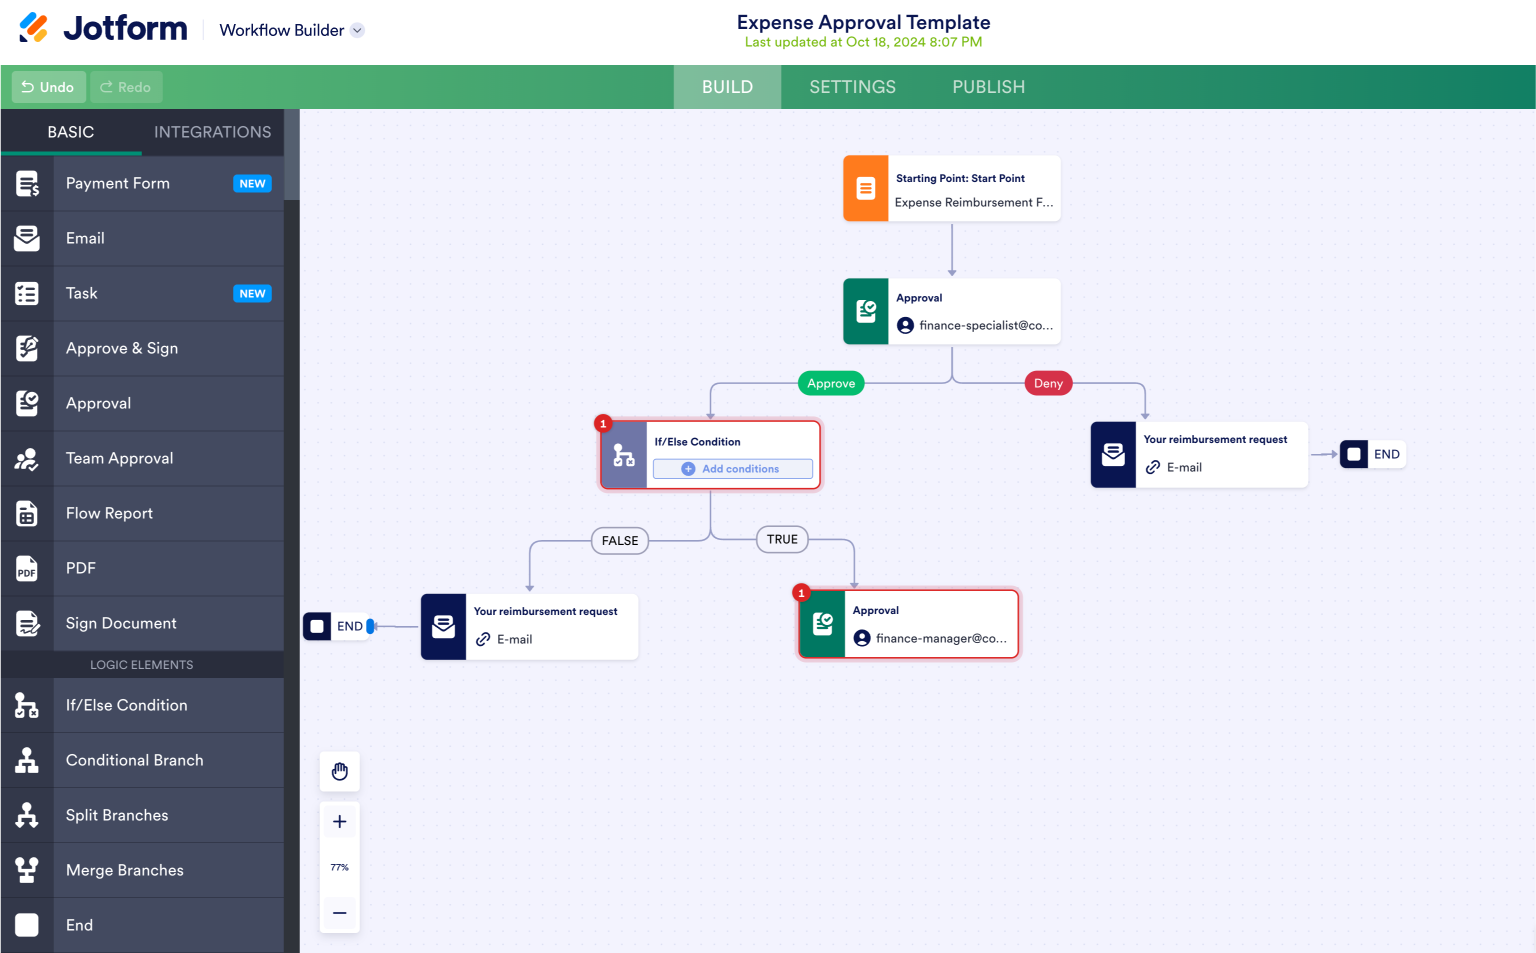
- Now we’ll add autoresponder emails for the outcome of the finance manager’s review. Add two Email elements under the finance manager Approval element. Connect an approval outcome to each Email (either Approve or Deny). The Email element will then send an approval email for the Approve outcome and a denial email for the Deny outcome.
- Connect both Email elements to the End Flow element to finish the approval flow.

Congratulations! Your expense reimbursement approval flow is ready. Now it’s time to publish and test it.
Step 3: Publish and test
In this section, we’ll publish the expense reimbursement approval flow you’ve created and test it.
Publish
Click Publish in the upper navigation of the Approval Builder, and then click the Copy Link button to copy the link to share the approval request.

Alternatively, you could invite people to fill out your form by email directly from the Jotform platform.
Test
Here’s the expense reimbursement approval flow to be tested:
- The employee submits an expense reimbursement claim that’s greater than $1,000.
- The finance specialist receives the request, reviews it, and then approves it.
- The finance manager receives the request (because the expense is higher than $1,000), and then reviews and approves it.
- The employee gets an email notifying them that their expense reimbursement has been approved.
That’s it. Your approval workflow is ready to go!
Check out Jotform Workflows to start building approval flows today!


Send Comment:
2 Comments:
July 10, 2023
If we want to have a multi-layer/level approval process (reason of request, team, amount, etc.), can we have the approval process maintained in a google sheet (ie. API call)? it'll be easier to manage/maintain over the conditional branching in the approval flows.
October 2, 2020
How do you login to workflow if you use google single sign on? I can't get this to connect.