With Jotform’s Cash App Pay integration, you can offer a fast and secure way for your customers to pay, whether they’re using their Cash App balance or a debit/credit card. Cash App, developed by Square, makes it easy for people to send and receive money right from their phones. It’s a simple way to make checkout smoother for users who prefer Cash App.
Adding and Setting Up Cash App Pay
Whether you’re selling products, collecting donations, or offering services, adding and setting up the Cash App Pay integration is quick and easy. Here’s how to do it:
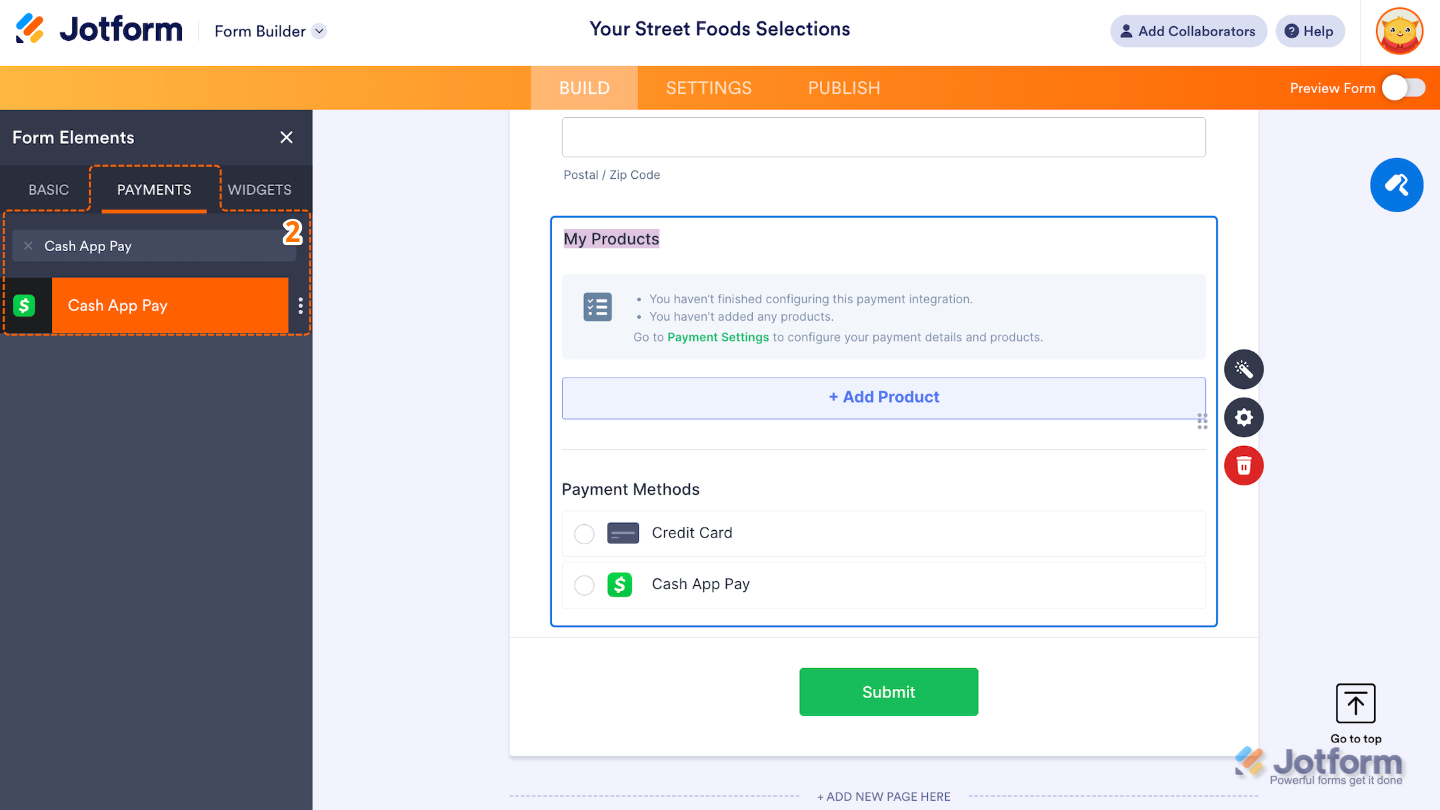
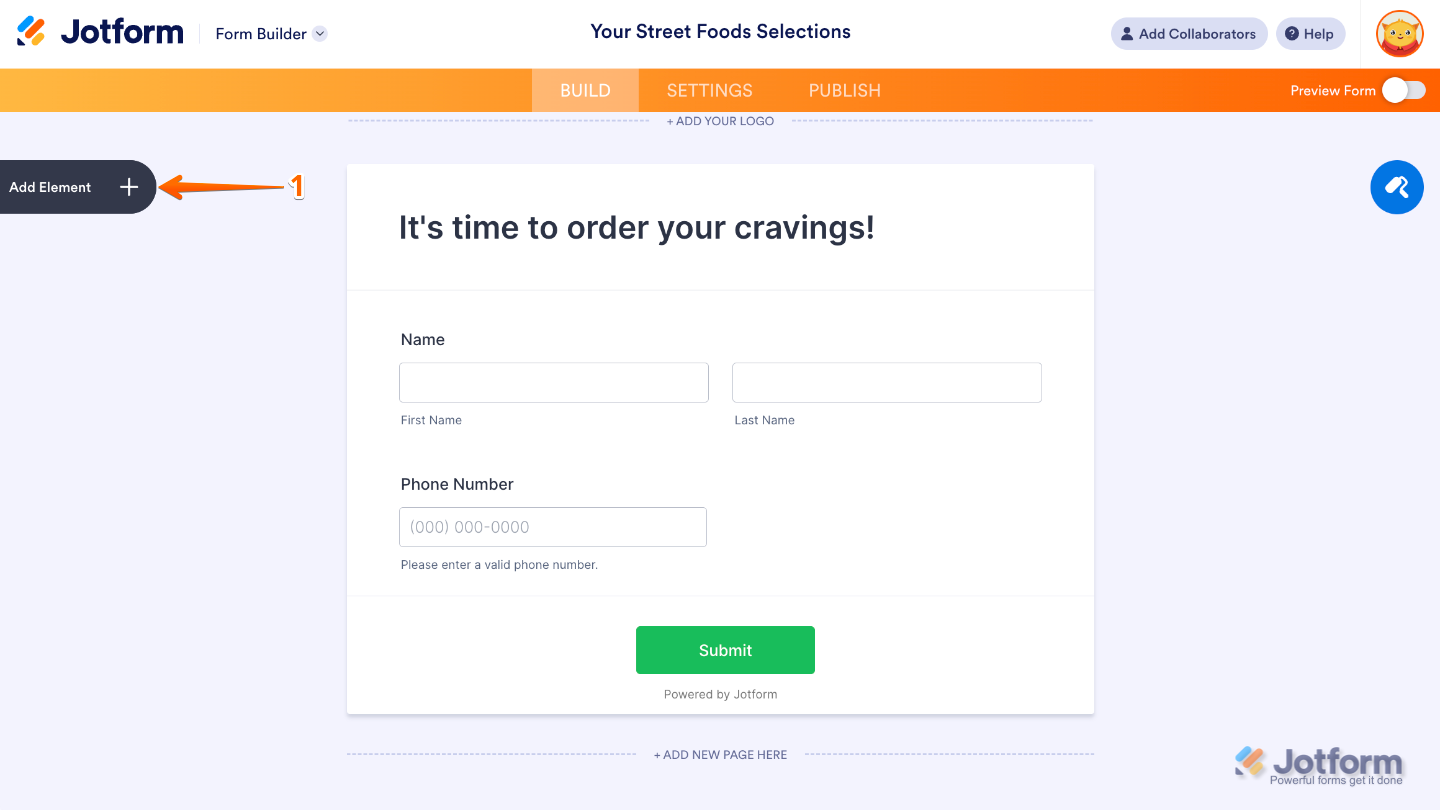
- In Form Builder, click on Add Element on the left side of the page.

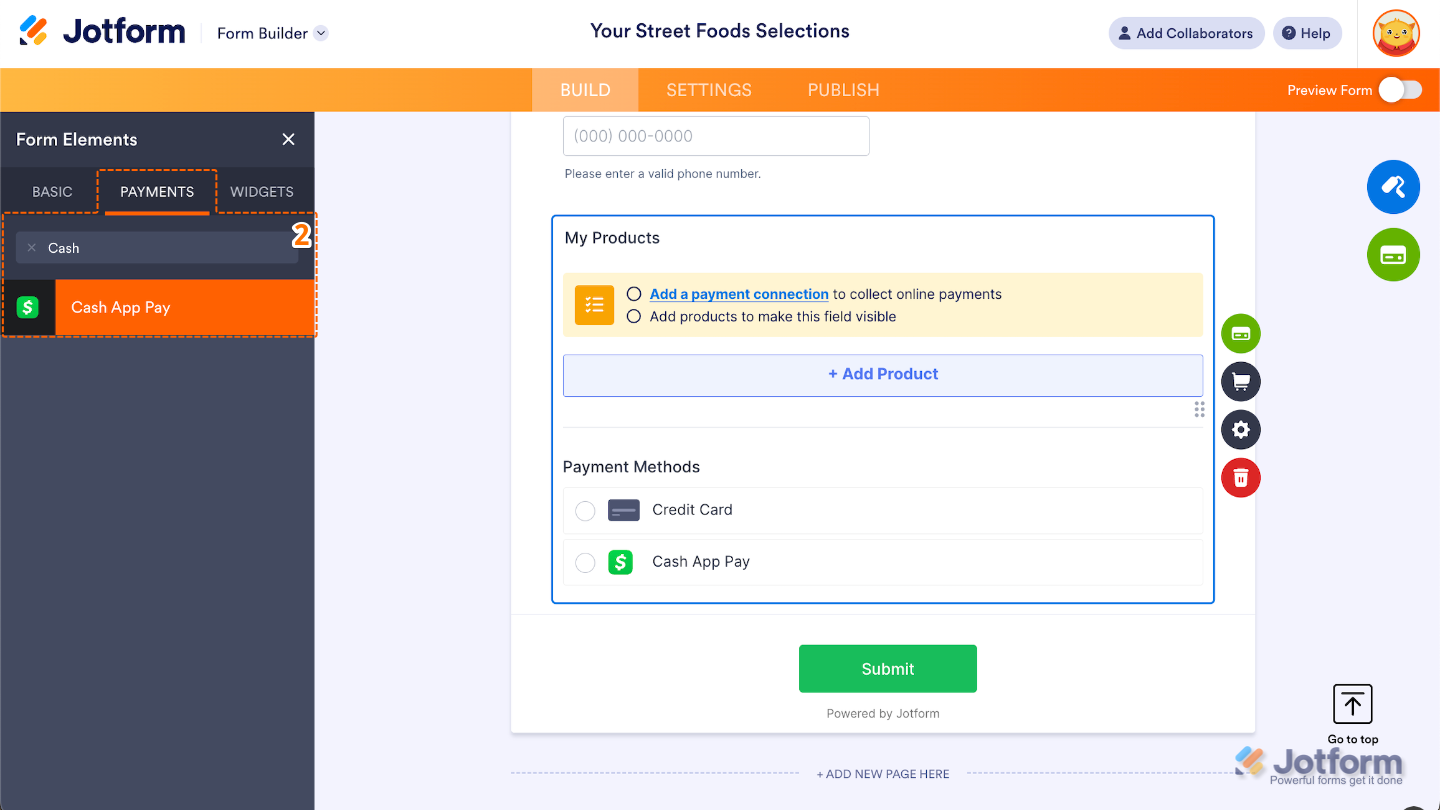
- Now, in the Form Elements menu, under the Payments tab, search for Cash App Pay and then click on it. Or, just drag and drop it to where you want it to be on your form.
- Then, in the Cash App Pay Integration menu that opens on the right side of the page, select a mode from the Mode Dropdown menu:
- Live Mode – Use this to connect to your registered live Cash App Pay account via Square.
- Test Mode – Select this to use your Square Sandbox account for testing transactions.
- Once you’re done, click on Connect via Square.

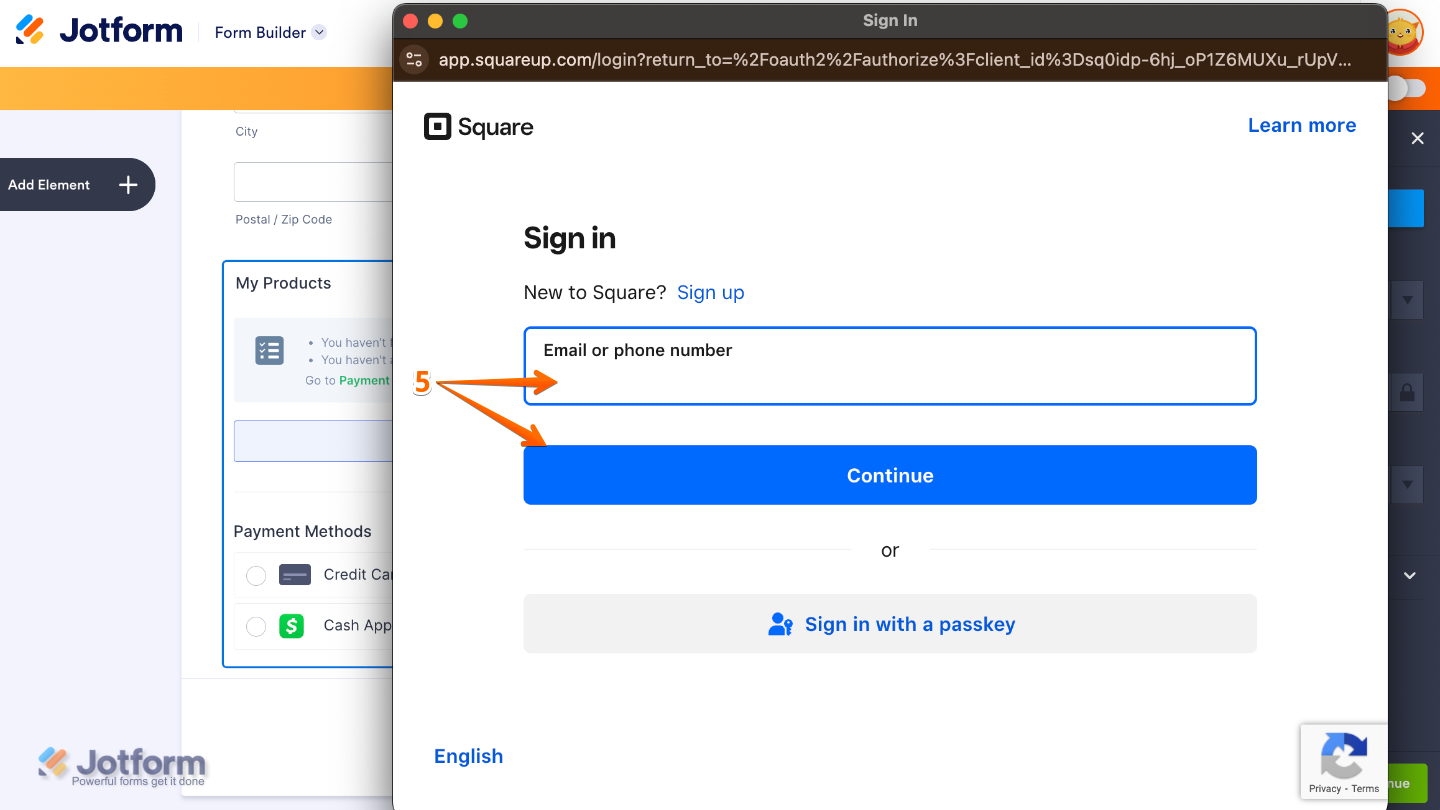
- In the Square Sign In window that pops up, enter your email address and click on Continue to log in to your Square account, and then follow the steps to authenticate it.
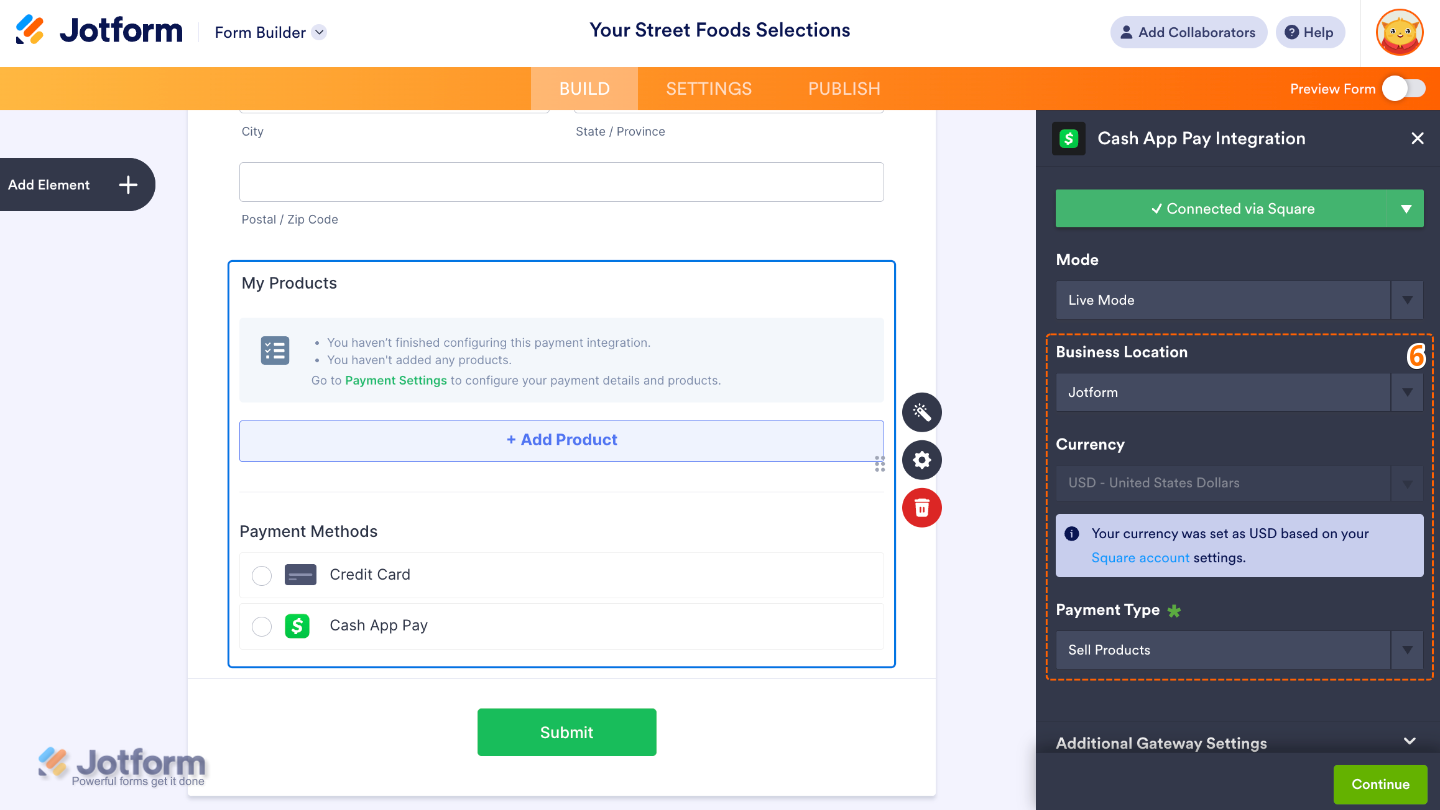
- Once connected, set up these other Square options:
- Business Location — Select the business linked to your Square account that you’d like to use for this integration.
- Payment Type — With Cash App Pay, you can sell products, collect donations, and accept user-defined amounts.
- Currency — Your currency is locked based on your Square account’s currency settings. Changing this has to be done in your Square account.
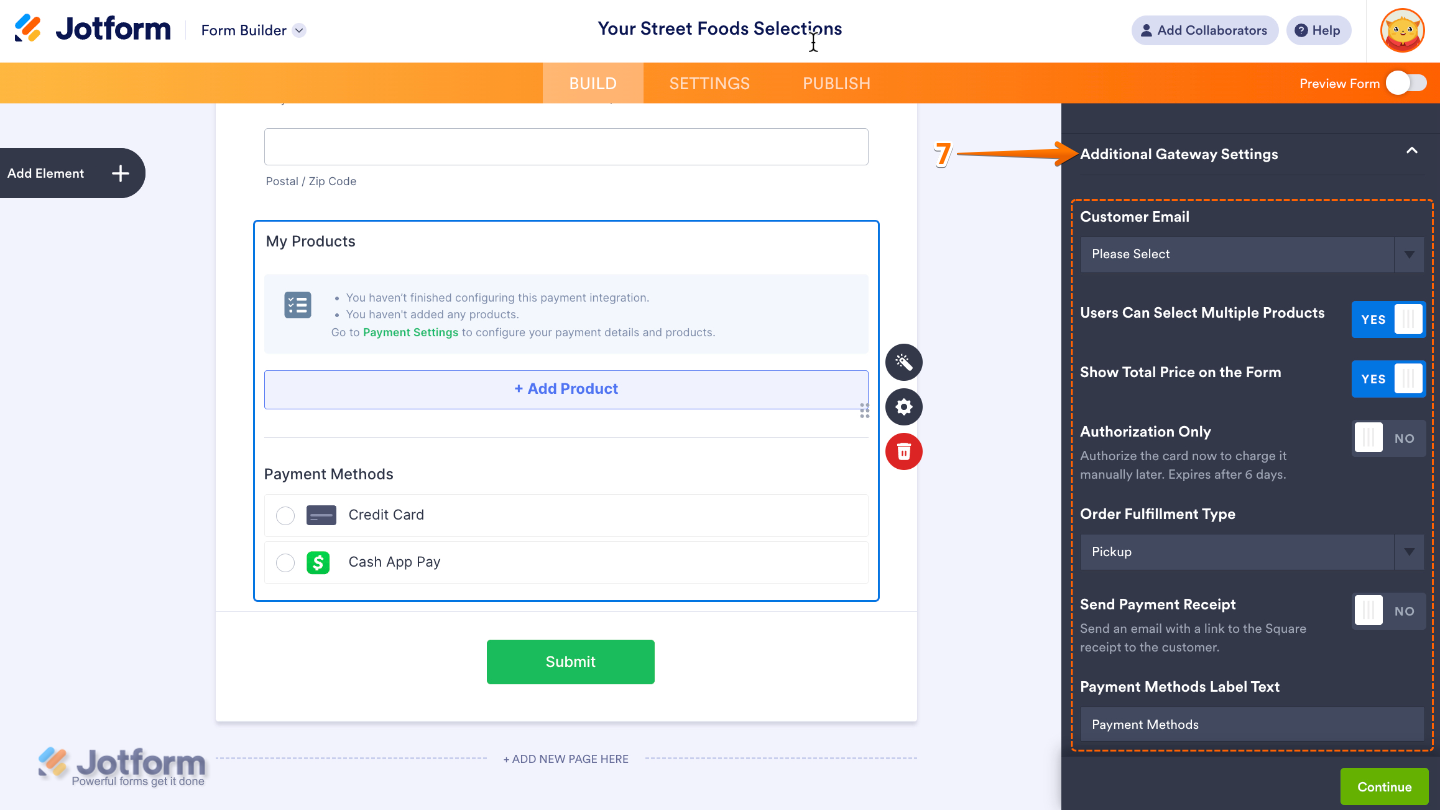
- Next, click on the Additional Gateway Settings to set up these options:
- Customer Email — This maps an email address from your form and sends it to the Square Dashboard, particularly to the customer’s record.
- Users Can Select Multiple Products — This is only available with the Sell Products payment type and is enabled by default. Toggle this Off if you want customers to select only one (1) product per submission.
- Show Total Price on the Form — Toggle this Off if you want to hide the total price of selected products on your form. Just a heads-up—this option is only available when using the Sell Products payment type, and it’s turned on by default.
- Authorization Only — Enable this if you want to preapprove payments before delivering the physical items you’re selling. Explore our guide on How to Enable Payment Authorization to learn more about that.
- Order Fulfillment type — Specify whether the items from your form are for Pickup or Shipment. By default, Pickup is selected for payments made through your Square form.
- Send Payment Receipt — Choose whether to send the Square-generated receipt to your customers.
- Payment Methods Label Text — This lets you update the heading of your Payment Options field to better match your form’s style.
- After that, scroll down and set up these other options:
- Clickable Image Preview — Toggle this Off to prevent customers from enlarging product images. Keep in mind, this feature is only available with the Sell Products payment type, and it’s enabled by default to make things easier.
- Use Decimal
- Decimal Separator — When decimals are shown on your payment field, you can select between a period, which is used in English-speaking countries, or a comma, which is used in many European countries.
- If you’ve selected Sell Products as the Payment Type, click on Continue to add your products. Otherwise, click on Save to complete the integration.

Once done, you’ll be directed to the Payment Settings, where you can set up the following:
- Products — This is where you add and manage the items or services you’re selling on your form. You can include product names, descriptions, prices, images, quantity options, and more. Our guide on Setting Up Your First Order Form walks you through everything.
- Coupons — Here, you can create discount codes for your products. You can set percentage-based or fixed-amount discounts, usage limits, and expiration dates. For a quick how-to, check out our guide on How to Add a Coupon Code to Payment Forms.
- Shipping — This allows you to set up shipping fees based on your needs. You can offer flat-rate shipping, location-based rates, or set shipping costs per product. To learn how it’s done, see our guide on How to Add Shipping Costs to Payment Forms.
- Tax — Add sales tax rules for your products here. You can set tax percentages and apply them to all or specific products depending on your location or business needs. Take a look at our guide on How to Apply Sales Tax to Products on Your Payment Form for more details.
- Invoices — Enable this to automatically generate invoices for each submission. You can customize the layout, add your logo, and send a copy to the customer and yourself. You’ll find more info in our guide on How to Generate an Invoice for Your Payment Form.
That’s it. To explore more ways to get the most out of your payment form, check out our helpful guides in the Jotform User Guide / Payment Form section—you’ll find plenty of tips and features to try out.
Adding and Setting Up Cash App Pay Using a Reusable Payment Connection
Integrating your form with Jotform’s Reusable Payment Connections lets you streamline your Cash App Pay setup. Once connected, you can use the same configuration across other forms or apps—no need to set it up again from scratch. Getting started is simple. Here’s what to do:
- In Form Builder, click on Add Element on the left side of the page.
- Now, in the Form Elements menu, under the Payments tab, search for the Cash App Pay and then click on it. Or, just drag and drop it to where you want it to be on your form.
- Then, in the Payment Properties menu on the right side of the page, click on the Plug icon.
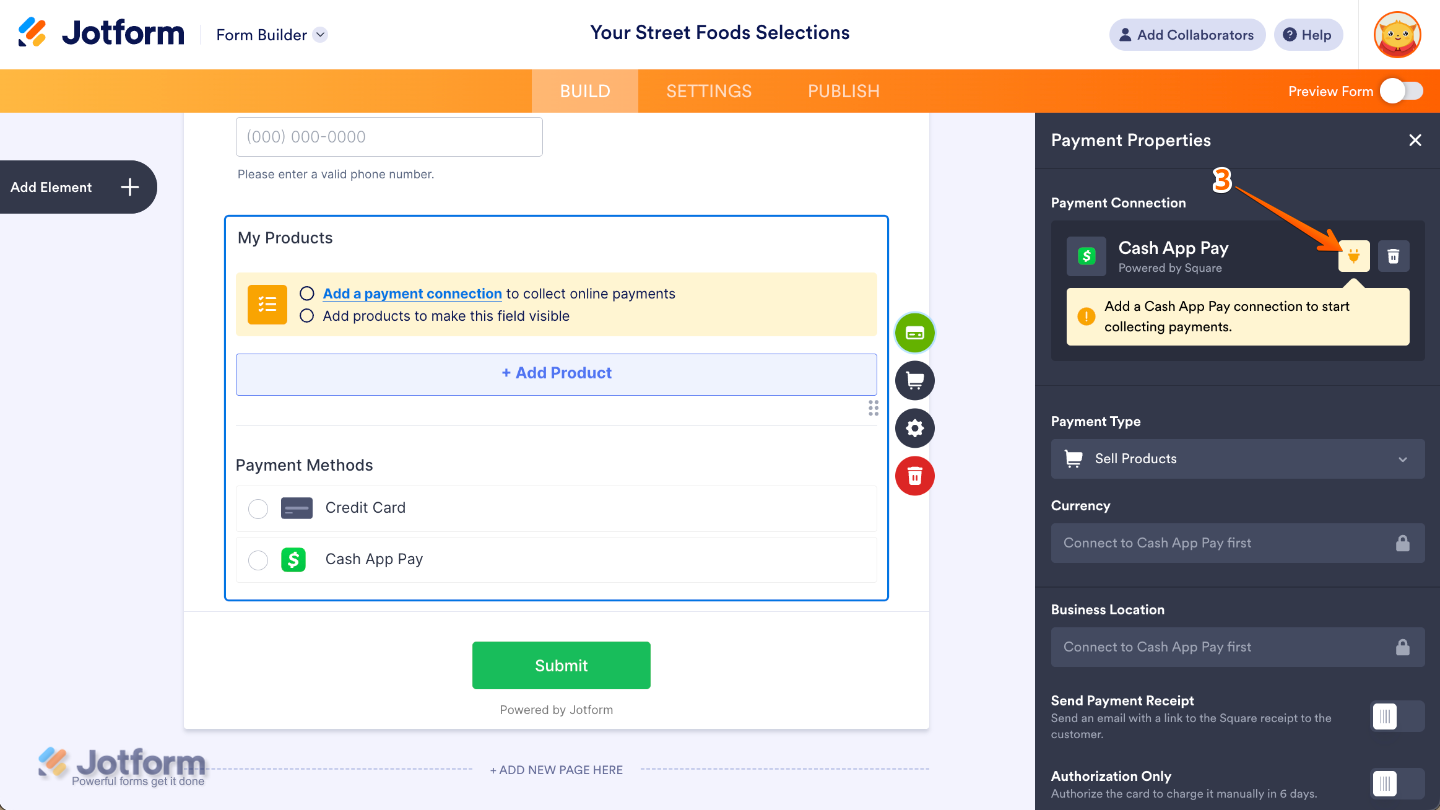
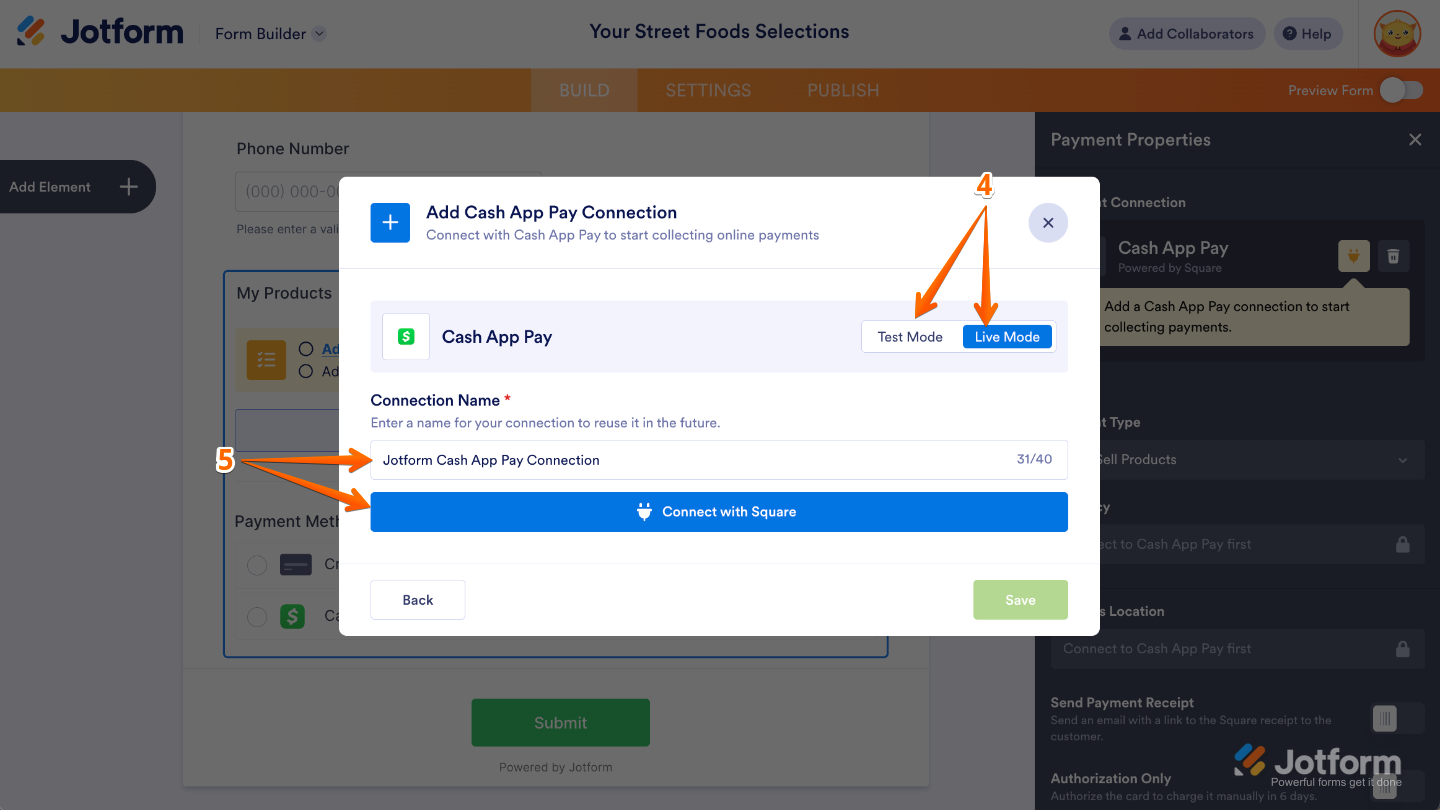
- In the Add Cash App Pay Connection window, click on either Test Mode or Live Mode at the top to select the environment for your payment connection.
- Next, set up the Connection Name and then click on Connect with Square.
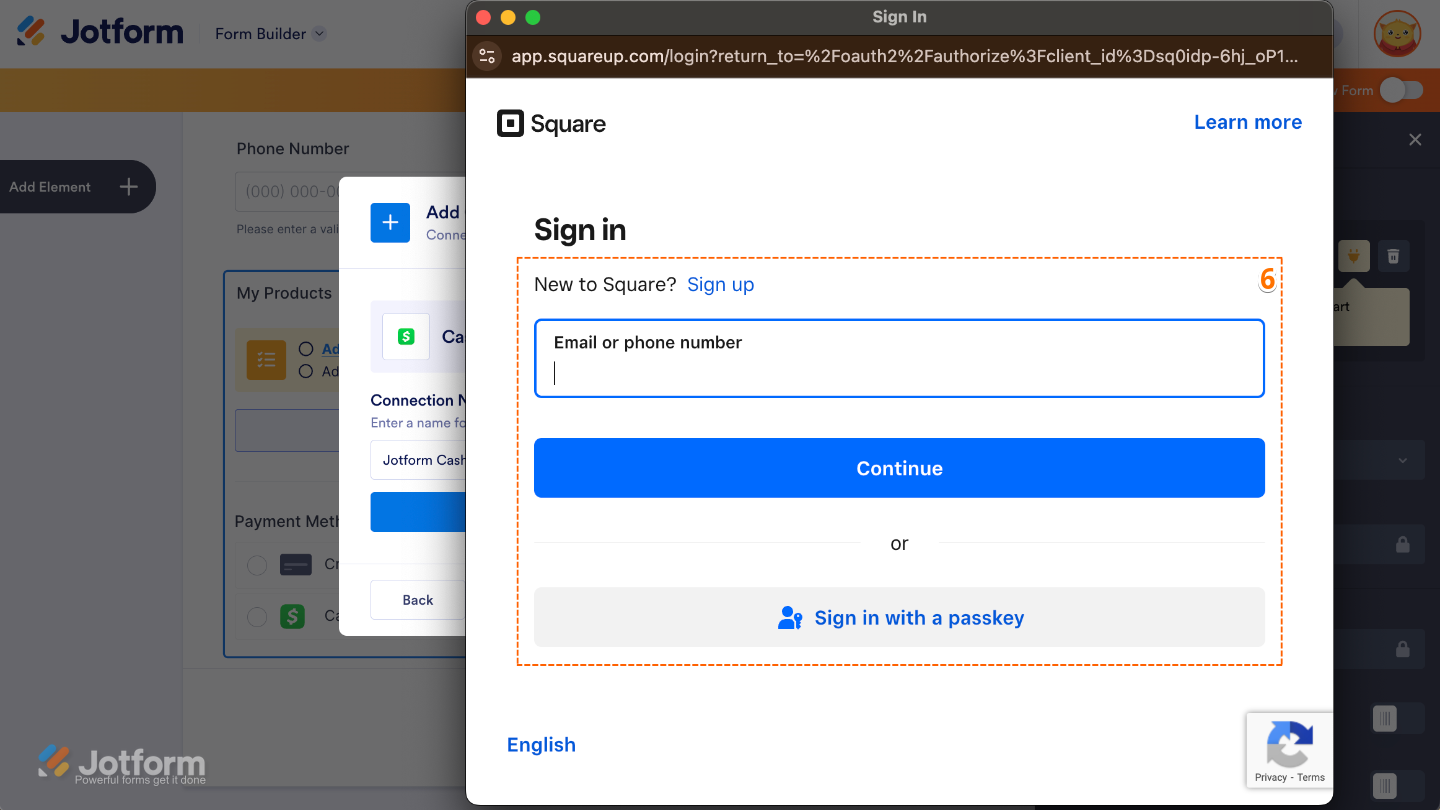
- In the Square Sign In window that pops up, enter your email address to log in to your Square account, and then follow the steps to authenticate it.
- Once connected, click on Save.

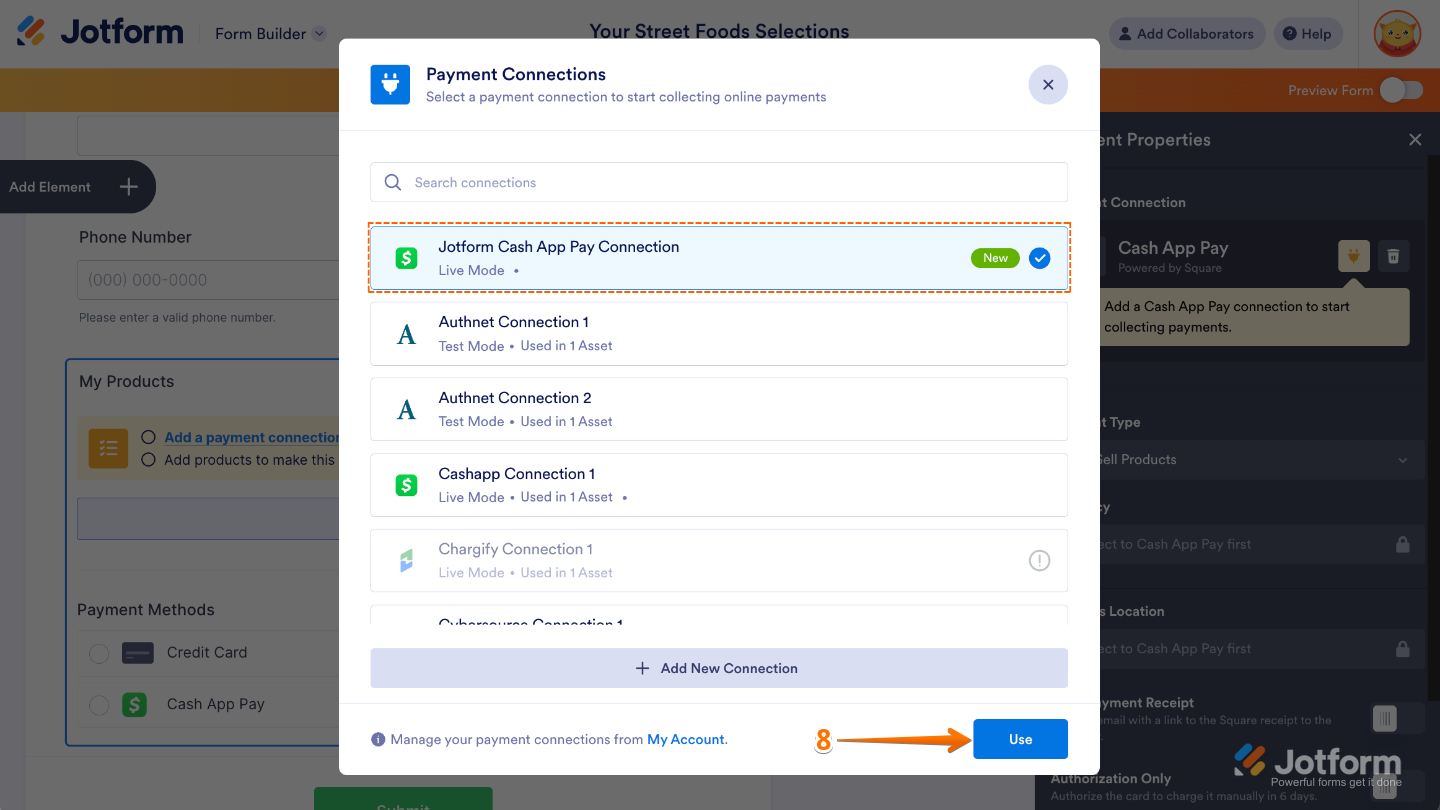
- In the Payment Connections window that pops up, select a connection and then click on Use.
- Now, in the Payment Type Dropdown menu, select what you’d like the payment to be processed for:
- Sell Products — This is selected by default. Use this to sell physical or digital goods at a fixed price, allowing customers to make a one-time purchase.
- User-Defined Amount — This lets customers enter the amount they want to pay. It’s useful for tipping, custom amount pricing, or flexible payments.
- Collect Donations — Select this to accept voluntary contributions. It’s commonly used for fundraising, nonprofit support, or charitable causes.

- The Currency is set to USD by default and locked, so you can go ahead and jump to setting up the Business Location Dropdown menu.

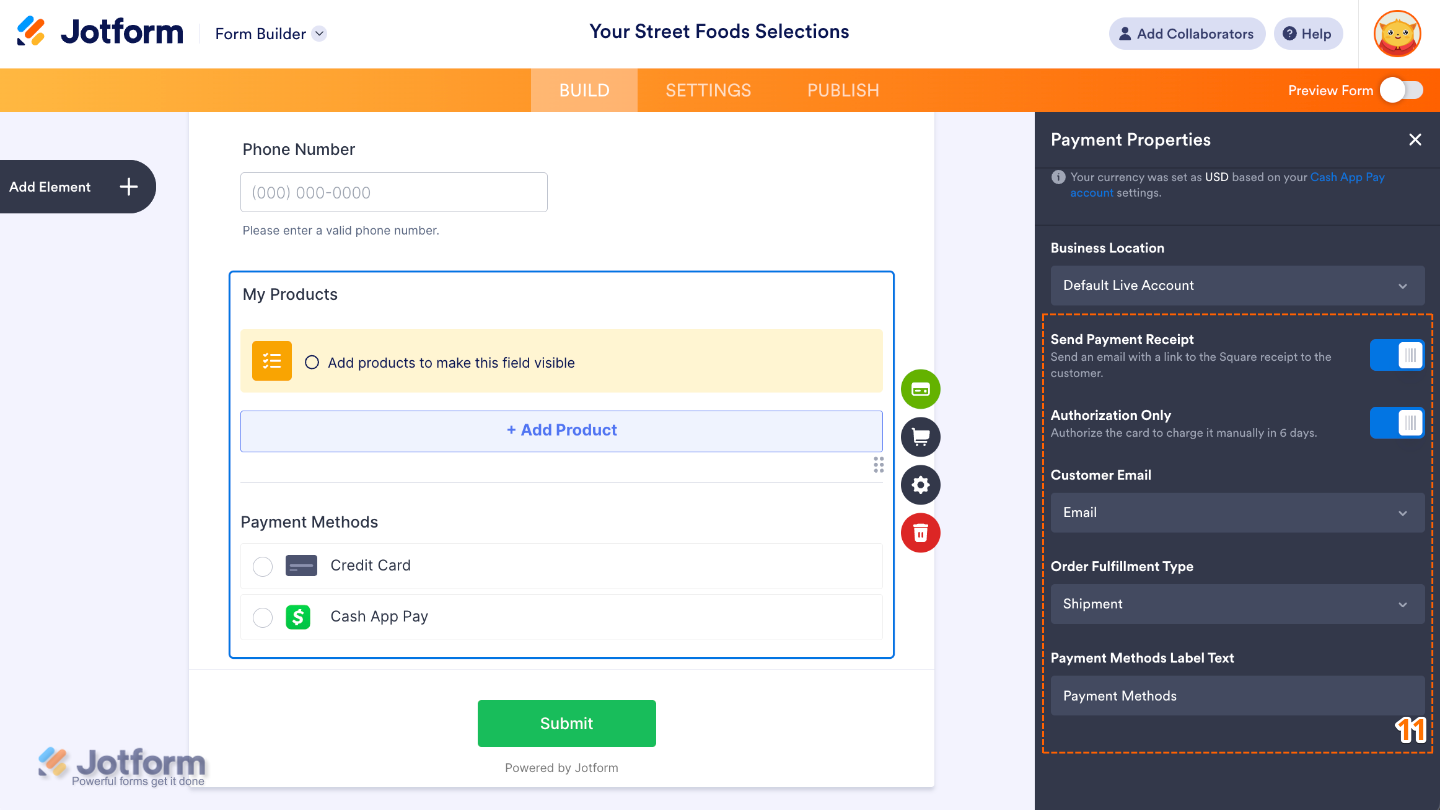
- Scroll down in the menu and then set up these options:
- Send Payment Receipt — Turn this on to send your customers a link to their Square receipt after each successful payment.
- Authorization Only — Use this option if you want to use authorize payments only and manually charge customers later. Visit How to Enable Payment Authorization for more information.
- Customer Email — If you have multiple email elements in the form, select the customer email sent to Square from this dropdown.
- Order Fulfillment Type — You can choose from these two options: Pick Up or Shipment
- Payment Methods Label Text — Set this up to customize the Payment Method text shown on your product field.
That’s it. If you’re looking to dive deeper into Cash App Pay integration features, these guides can help:
- Setting Up Your First Order Form
- How to Add Options to Payment Forms
- How to Add a Coupon Code to Payment Forms
- How to Add Tax to Your Payment Form
- How to Add Shipping Costs to Payment Forms
- How to Generate an Invoice for Your Payment Form
Note
The Cash App Pay via Square integration works only in the US, so you’ll need to have a US-based Square account. Payments are processed in USD only, and while you can connect a non-US Square account, Cash App Pay won’t work unless the account is US-based.
How Cash App Pay Works For Your Customers
To use Cash App’s Scan to Pay flow, your customers should have Cash App (Android | IOS) installed on their mobile devices. Check the Cash App User Guide for more info about it. Here’s a breakdown of the flow:
- Your customer picks a product from your form.
- Then, they simply choose Cash App Pay as their payment method and click on Submit.

- In the Payment Confirmation window, they must click on Cash App Pay.

- Next, they scan the QR code using the Cash App on their phone and confirm the payment when prompted.

- Once done, the form will show the Thank You message for the successful payment.


Send Comment:
3 Comments:
September 27, 2024
Can a Ghanaian create a cash app business account
February 25, 2024
My cash app is lose
January 12, 2023
How much is the transaction fee and any other fees associated with sending invoices through Jotform?