Payment Authorization is one of the features available in Jotform’s payment integrations. It’s a two-step payment solution that lets you authorize and capture a payment later. This feature is helpful if you wish to preapprove payments before delivering the physical items you’re selling.
Payment Authorization is available on the following payment gateways:
Enabling the Payment Authorization
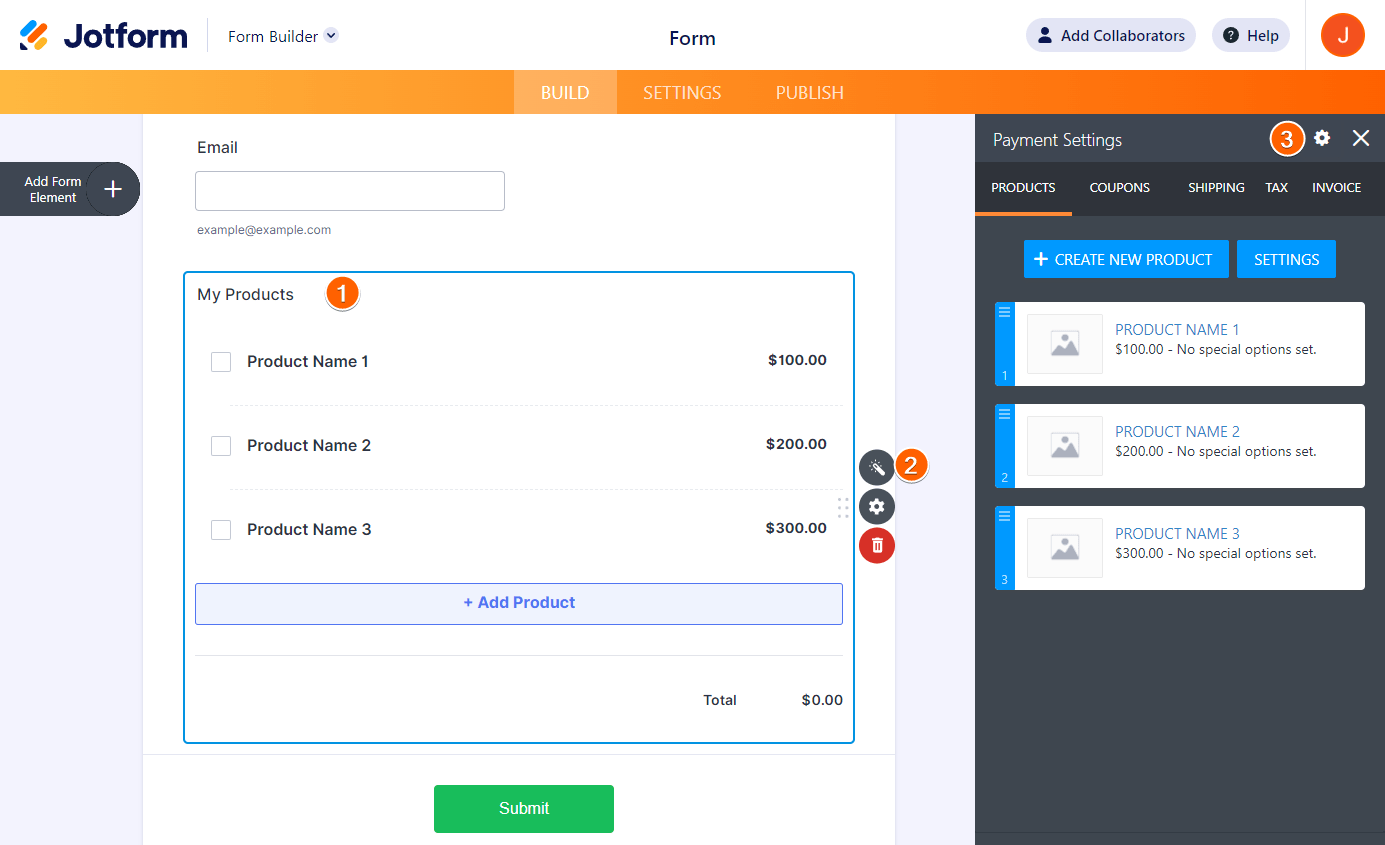
You can find the Payment Authorization through the Additional Gateway Settings. Here are the steps:
- Edit the payment form where you wish to enable the Payment Authorization.
- Click the payment field.
- Open the Payment Settings by clicking the wand icon.
- Click the Settings icon at the top-right side of the Payment Settings window.
- Scroll down and click the Additional Gateway Settings to expand it.
- Look for the Authorization Only and toggle it to Yes.
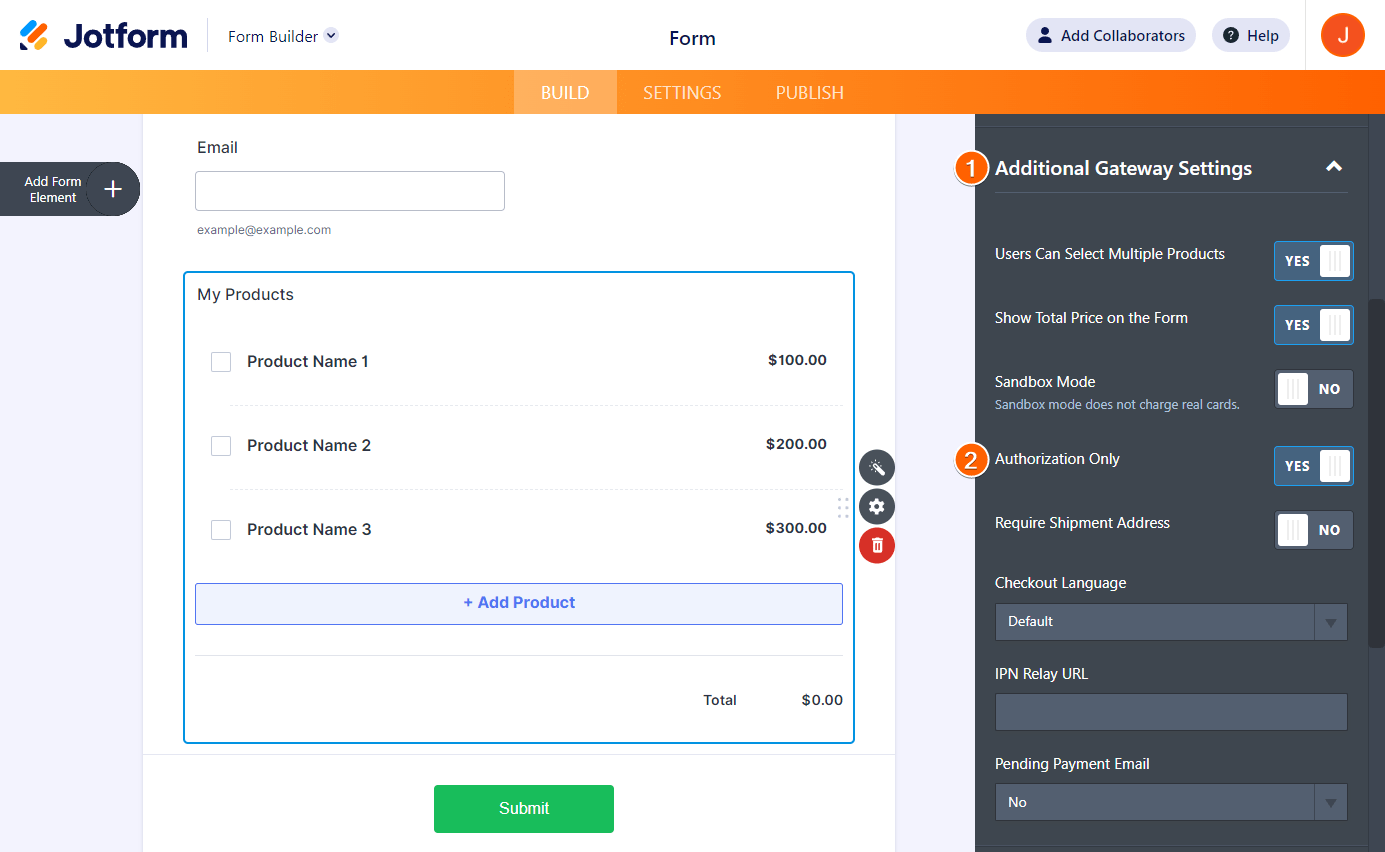
The Authorization Only toggle is the same for Paypal Personal, Paypal Pro, Authorize.Net, Square, Braintree, and eWay.
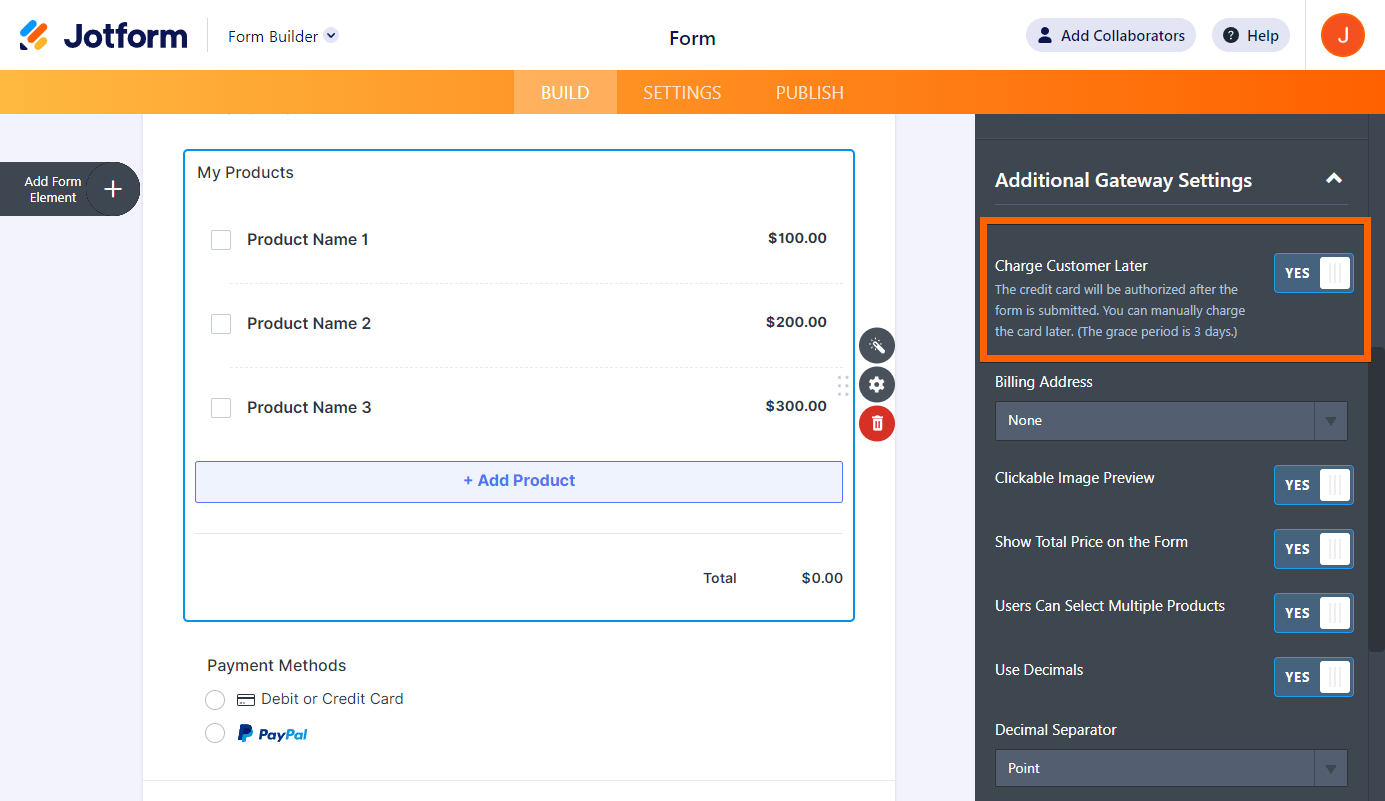
For Paypal Business, you have to toggle Charge Customer Later to Yes.
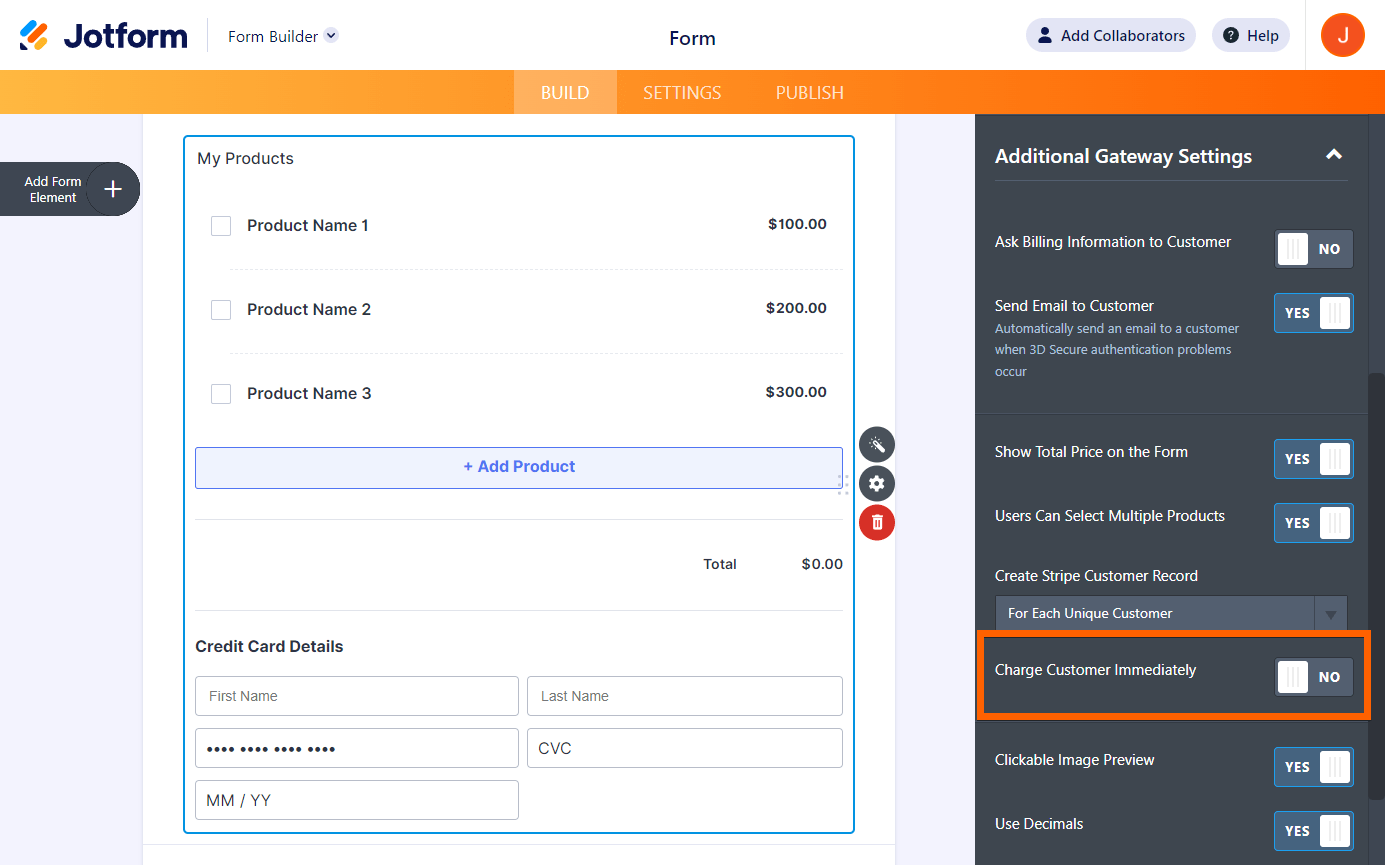
For Stripe, it’s a bit different. You need to set the Charge Customer Immediately to No. That means your customers will never be charged immediately after submitting the form.
Note
If you turn off Charge Customer Immediately, keep the Create Stripe Customer Record setting set to either For Each Submission or For Each Unique Customer. This ensures the Charge Now button in Tables will still function when you use it later.
Capturing or Charging Customers for Authorized Payments
Each payment processor mentioned above has a different flow for capturing authorized payments. Please continue reading below for more information.
Square
For Square, the authorization link to charge customers will expire in six (6) days. Click the Charge Customer Now link through Jotform Tables and the form’s Notification Email.
PayPal Personal and PayPal Pro
For PayPal Personal and PayPal Pro, the link to capture the payment is available through your PayPal account only. PayPal gives you 30 days to capture the payment. Look for the transaction from your PayPal dashboard, click it, and look for the Capture link from the transaction details.
PayPal Business
For PayPal Business, the authorization link will expire in three (3) days. You can capture the payment through your PayPal account, similar to PayPal Personal and PayPal Pro, or capture it by clicking the Charge Customer Now link through Jotform Tables or your form’s Notification Email.
Authorize.Net
For Authorize.Net, you can only capture the payment through your Authorize.Net account. Please visit the following guide to learn more about it.
Stripe
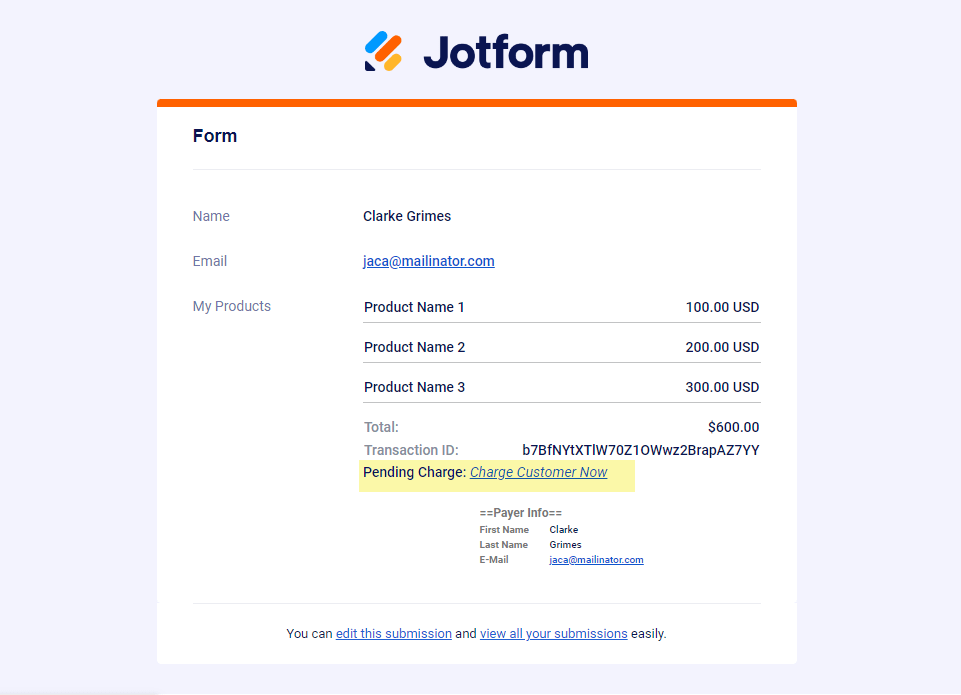
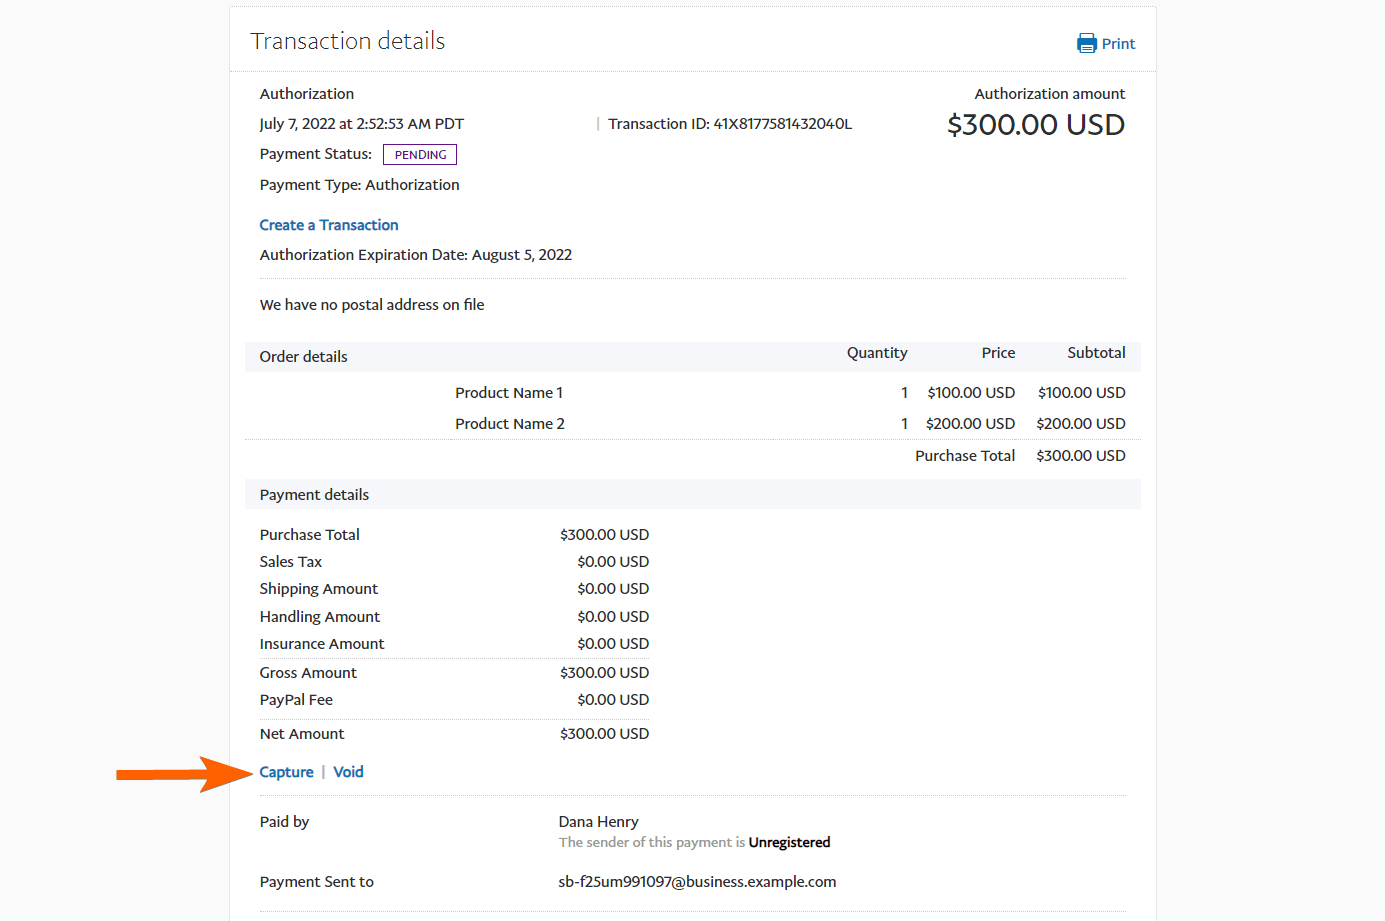
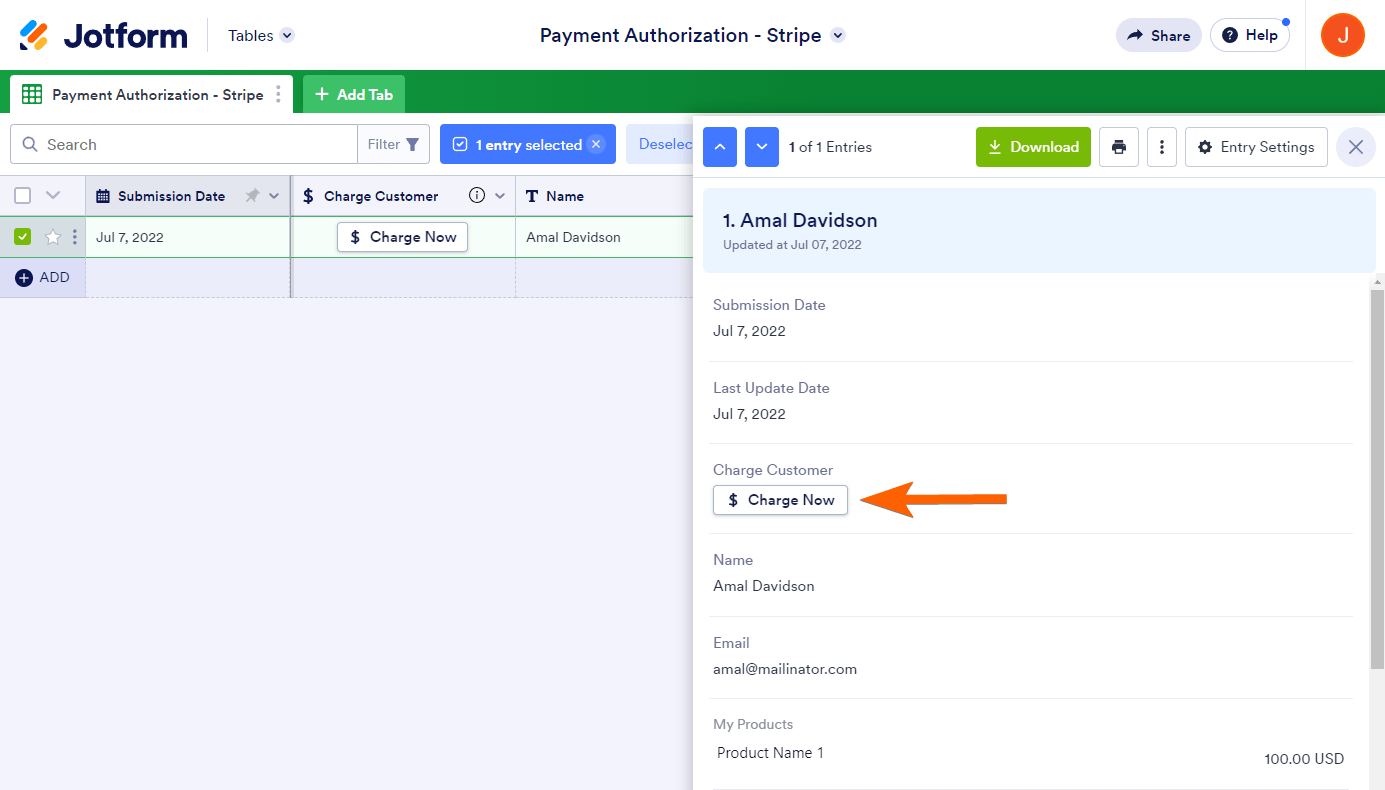
With Stripe, you can capture the payment through the Jotform Tables and your form’s Notification Email. In Jotform Tables, you’ll find the Charge Now button in a separate column or when viewing the submission. Click it and confirm the charge.
You can also charge customers by clicking the Charge Customer Now link through your form’s Notification Email.
One advantage of Stripe is that you can charge your customers later with whatever amount necessary (charge amount different from the authorized amount). You can do this through your Stripe merchant interface.
Note
Stripe’s payment authorization is valid for 7 days. To avoid issues, make sure to charge customers within this timeframe. If the authorization expires, you’ll need to request that your customers resubmit the form to initiate the payment again.
Braintree
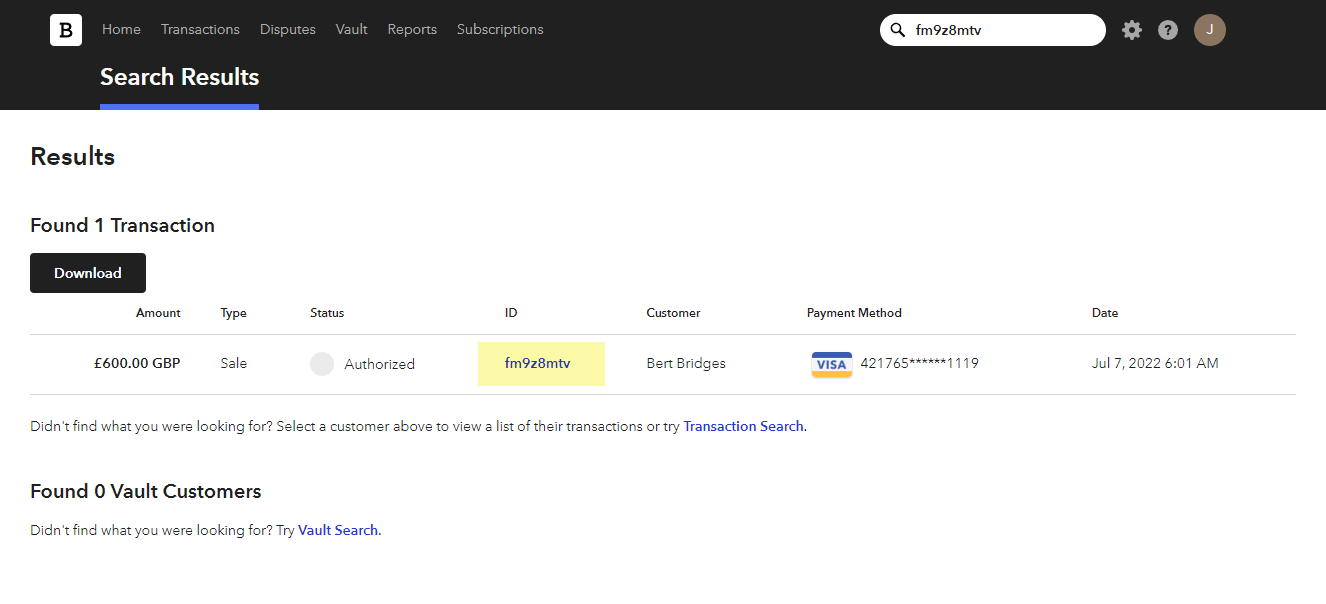
For Braintree, you can only capture the payment through your Braintree account. Copy the Transaction ID from Jotform Tables or through your form’s Notification Email:
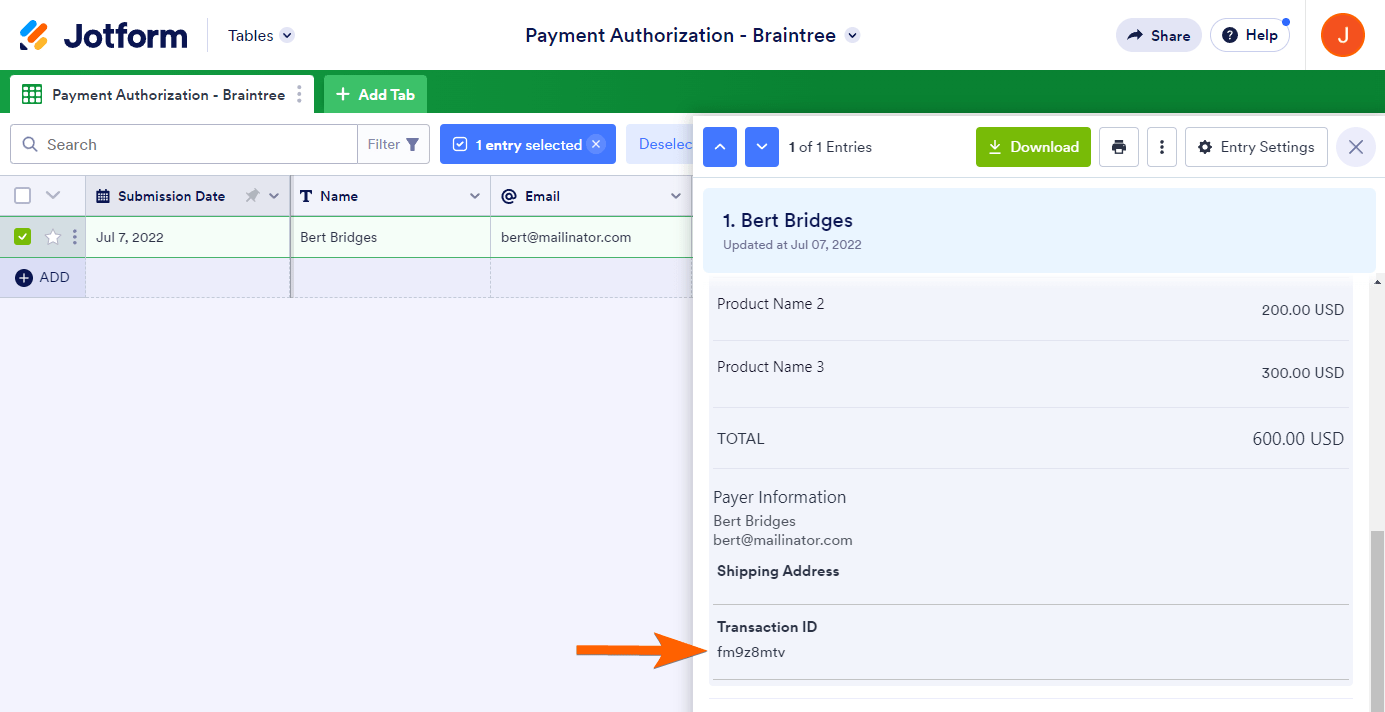
Search for the Transaction ID from your Braintree dashboard, and click the ID link as highlighted in the image below:
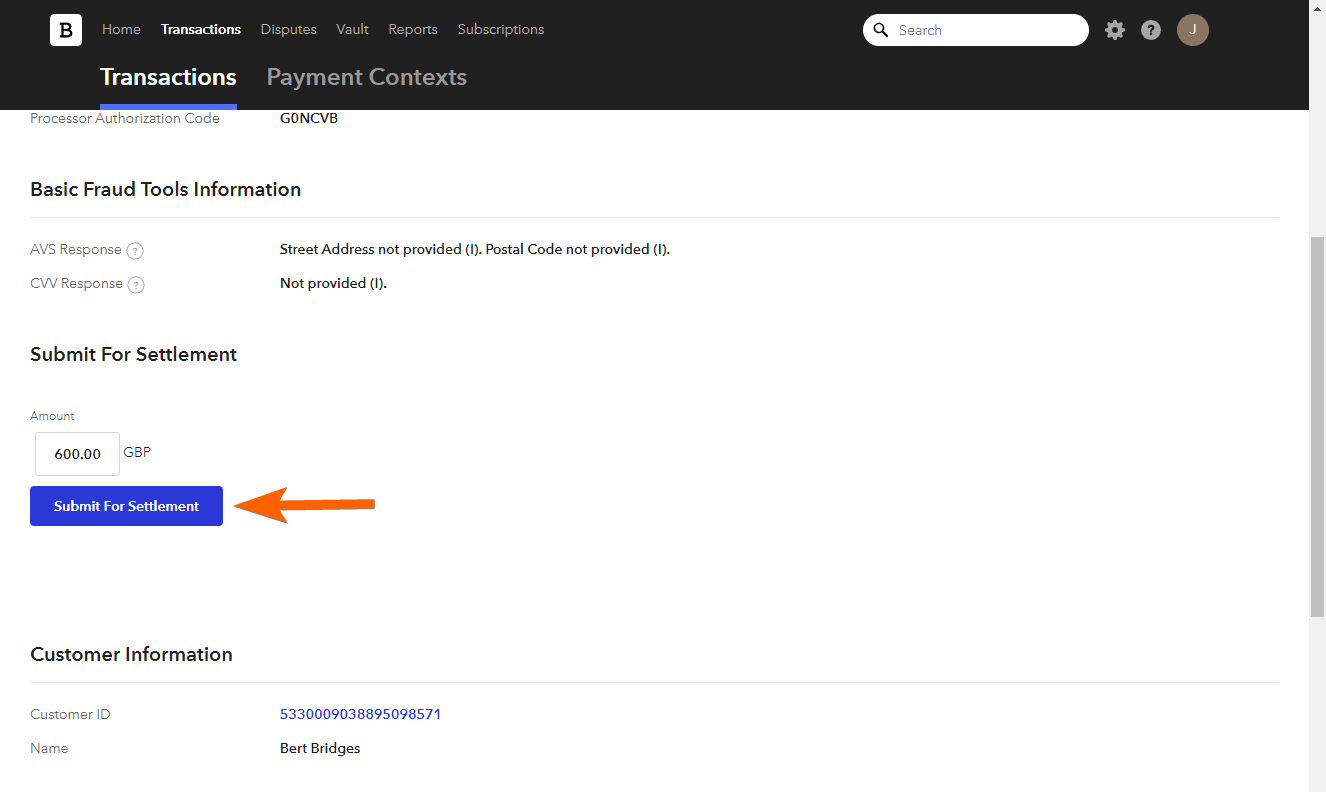
Look for the Submit For Settlement button and click it to charge the customer’s card. You can also charge the customer a partial amount if you want to.
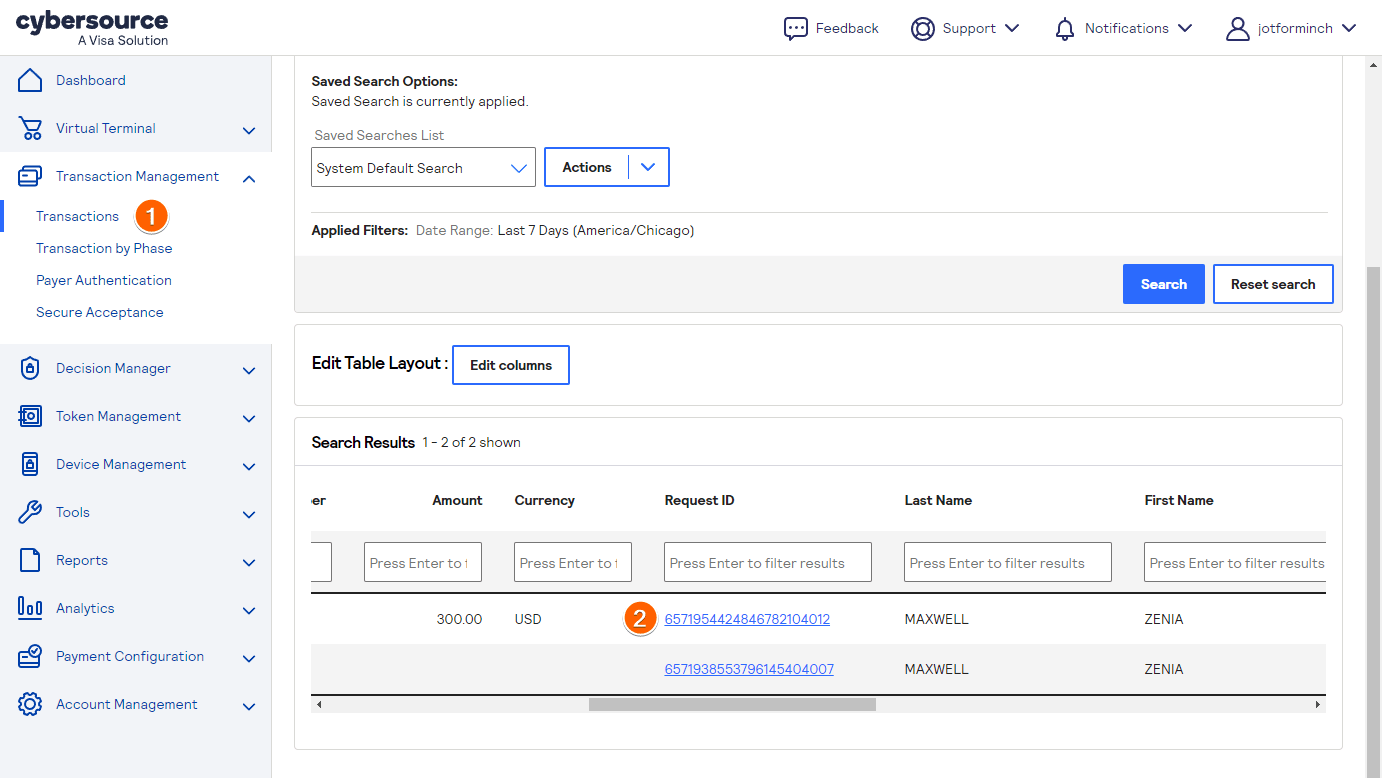
CyberSource
You must access your CyberSource dashboard and go to the Transactions under the Transaction Management section. Under the Search Results section, click the Request ID of the payment from your form.
At the top, click the Settle button.
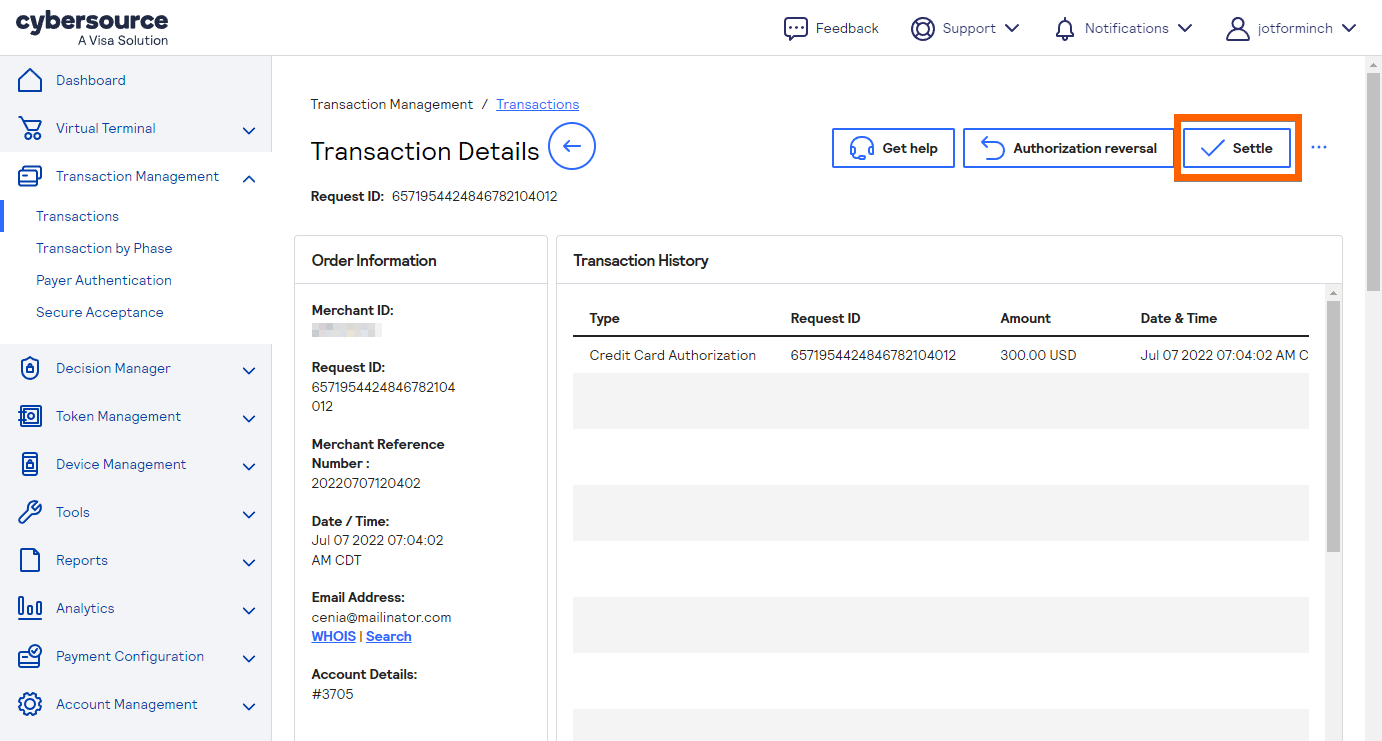
Enter the amount you wish to settle. You can keep the original amount to charge the customer the total amount due. Click the Settle button and confirm.
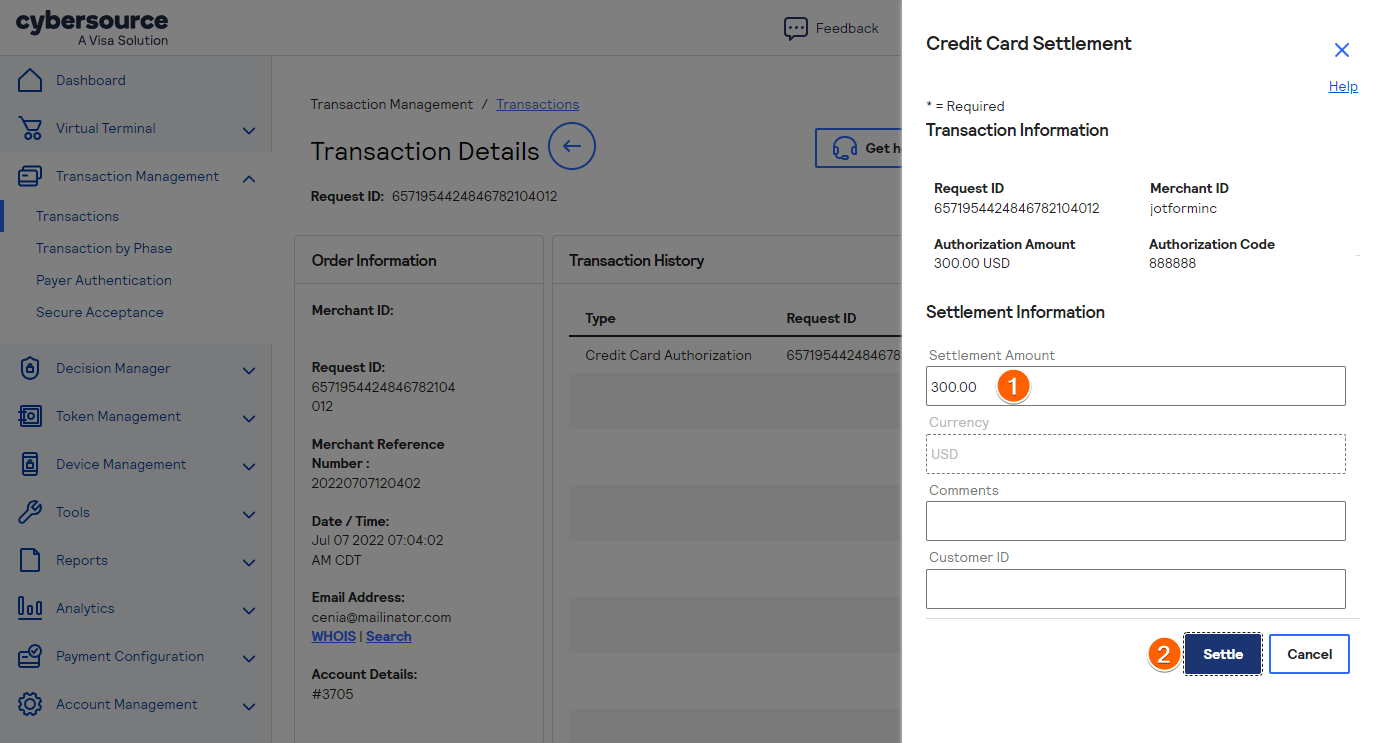
Ultimately, you can send your customer a confirmation email of the charge or print the transaction details.
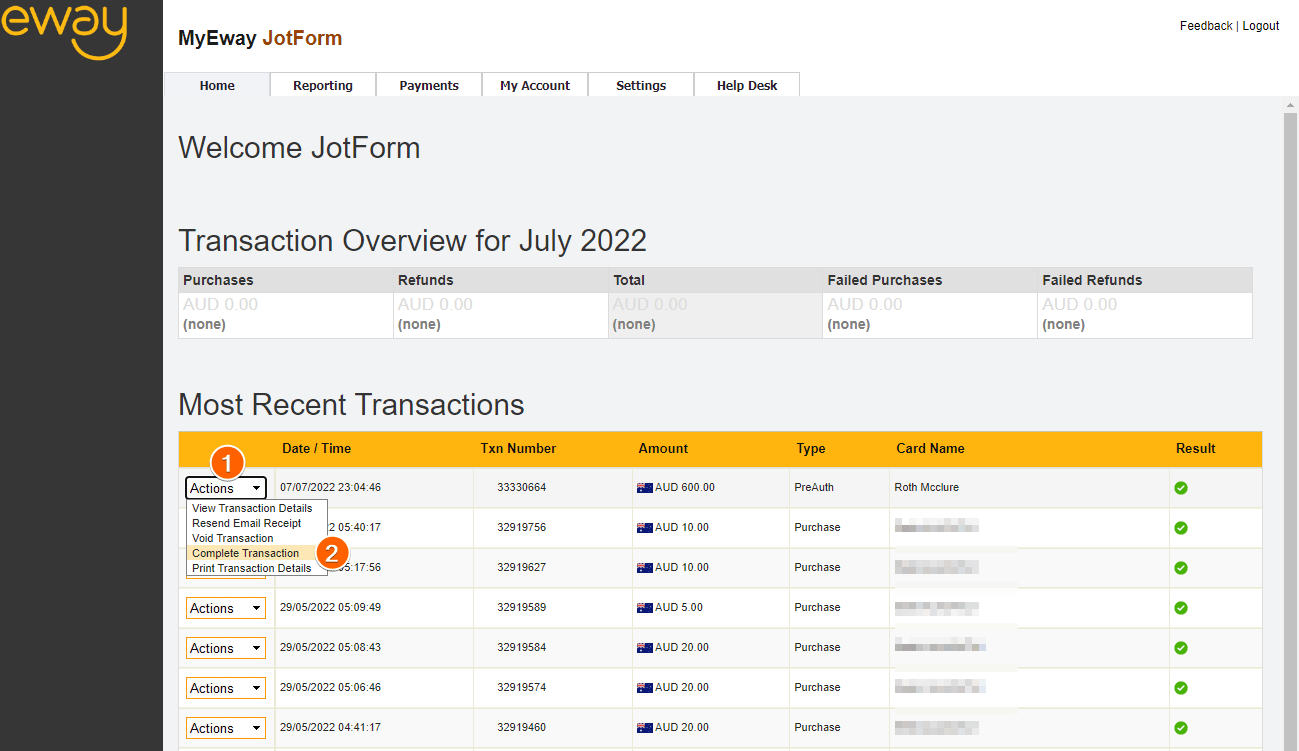
eWay
For eWay, you can charge your customers by clicking the Charge Customer Now link through your form’s Notification Email or the Complete Transaction option from your eWay dashboard.
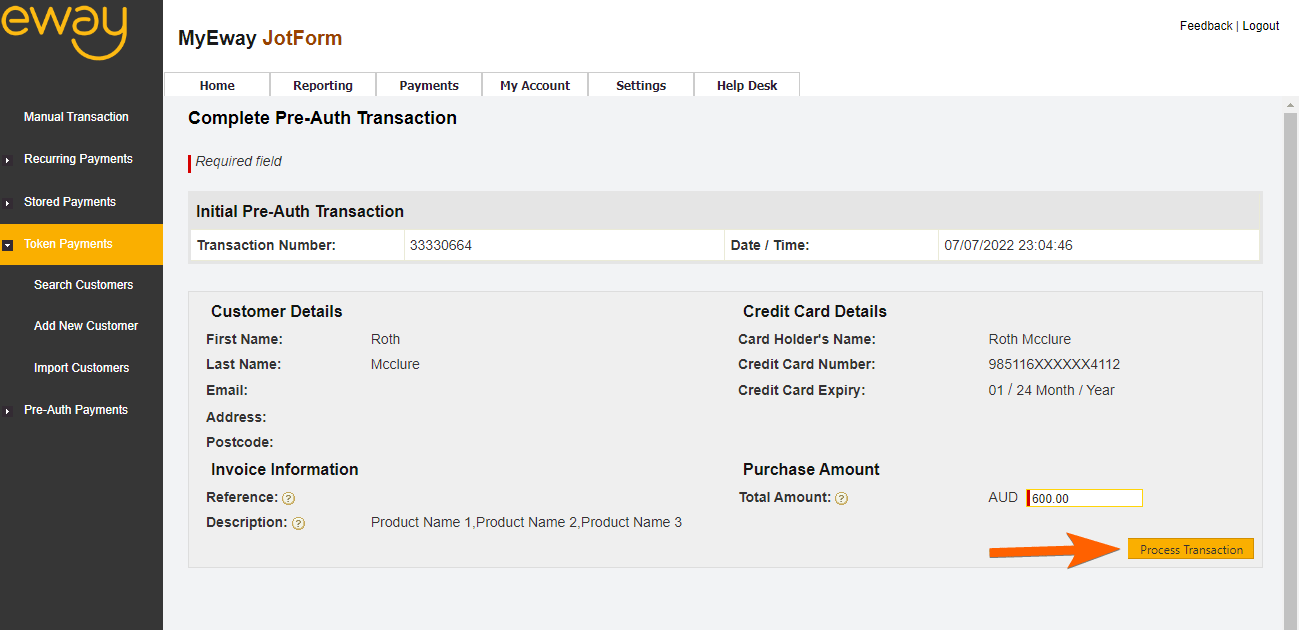
Under the Most Recent Transaction section of your eWay dashboard, look for the PreAuth transaction from your form. On the Actions column, click the Complete Transaction option.
Click the Process Transaction button on the next screen and confirm the prompt to complete the transaction.

Send Comment:
11 Comments:
July 27, 2024
Having to get payment within 6 days with Square was a dealbreaker when I first started using jotform for my business 2 years ago, and still is. I was hoping that might have been updated (fixed?) by now.
December 21, 2023
As a Travel Advisor, we cannot collect client payment...we must collect card info and use it to pay our supplier. What is the work around for this since you will not allow client to provide CC# on the forms?
July 1, 2023
I am a travel agent I need a form to get credit card information to charge the credit card on different vendor sites. I have to be able to read the card information. Is this possible? I use 15 different vendors for booking and I can’t take payment I have to take credit card information and put it into the site used to book the trip.
March 13, 2023
How long do you have to submit the payment using Stripe? Some of my authorizations timed out, but I'm not sure how long that took. Thanks!
February 17, 2023
Using payment authorization and Square, is it possible to add a shipping amount before charging the card?
October 6, 2022
For how many days maximum i can collect the credit card information and charge the customer later ? I am talking about pspal business and Stripe in case of form integration into e website of travel agency.
September 27, 2022
What if we don't have a set product amount? I want to capture card info for future use but the price with vary per person
May 28, 2022
I did the authorization only option but when I did a test to make sure it work it did attempt to run the card, what am I doing wrong?
March 9, 2022
What if I don't use any of the above to accept payments? There is not a widget for the cc merchant we use.
January 12, 2022
What if we want to capture Credit Card information for future, and recurring charges?
August 24, 2021
What about stripe please ? How to Enable Payment Authorization ?