SensePass is a digital payment network that enables merchants to accept any payment method, including credit cards, Venmo, PayPal, Alipay, Klarna, WeChat Pay, Trustly, Coinbase, BitPay, and many more.
With Jotform’s integration with SensePass, you unlock the ability to energize your form with contactless payment functionality. This empowers your customers to effortlessly make payments using their mobile phones simply by tapping their preferred wallet with available funds.
With SensePass integration, you can do the following:
- Sell products
- Sell subscriptions
- Collect donations
- Accept custom payments
Sensepass integration is effortless! Let’s start.
Adding and Setting up SensePass
You can add and set up SensePass integration in your form by following the below steps.
- In the Form Builder, click the Add Form Element button on the left side of the screen.
- Go to the Payments tab.
- Search or find SensePass and click or drag/drop it to add.
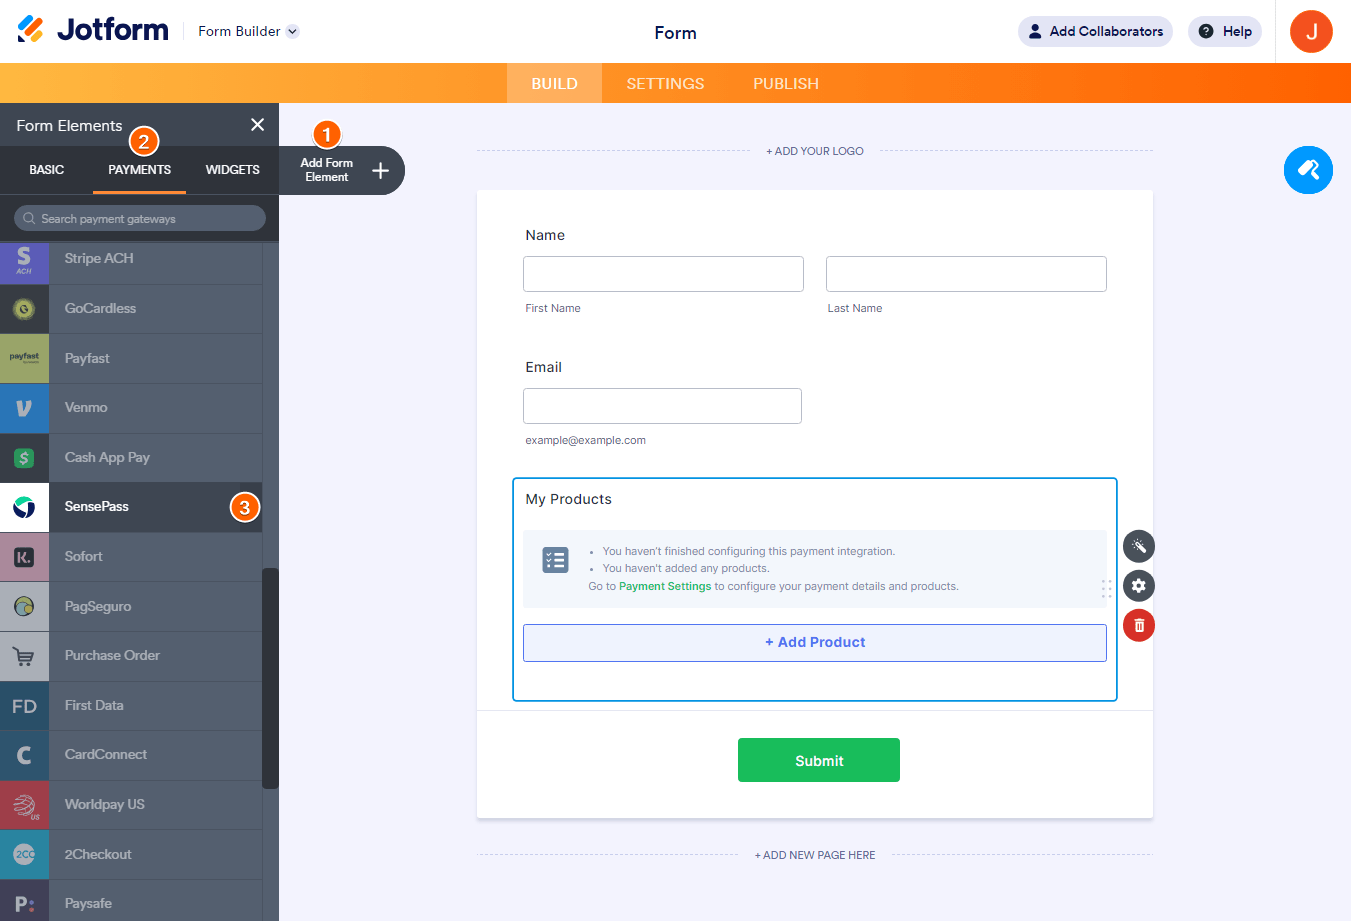
- In the Payment Settings, set up the following:
- API Login ID — You can obtain the key through SensePass’s Developer section. Check out the steps below.
- Enable Direct Payments — This option allows users to complete their payment through the form without being redirected to the SensePass checkout page. Enabling the option will require you to provide a Client ID. Check below for the steps to get the Client ID.
- Currency — SensePass only supports USD, Euro, Israeli New Shekel, and CAD currencies.
- Payment Type — With SensePass, you can Sell Products and Subscriptions, Collect Donations, or Accept Custom Payments.
- Additional Gateway Settings — Under this section, you can toggle some options to ask for additional customer information, enable Sandbox, and more. Scroll below for more information.

Note
When you add SensePass, its Payment Settings will automatically open. You can manually open it by clicking the Wand icon on the SensePass element.
- Finally, click the Continue button at the bottom to add your product or subscription items. If you’ve chosen User Defined Amount or Collect Donation, click the Save button to complete the integration.
See also:
- Setting Up Your First Order Form
- How to Set Up a Recurring Payment Option
- How to Add Options to Payment Forms
- How to Add Coupon Code to Payment Forms
- How to Add Tax to Your Payment Form
- How to Add Shipping Cost to Payment Forms
- How to Generate an Invoice for Your Payment Form
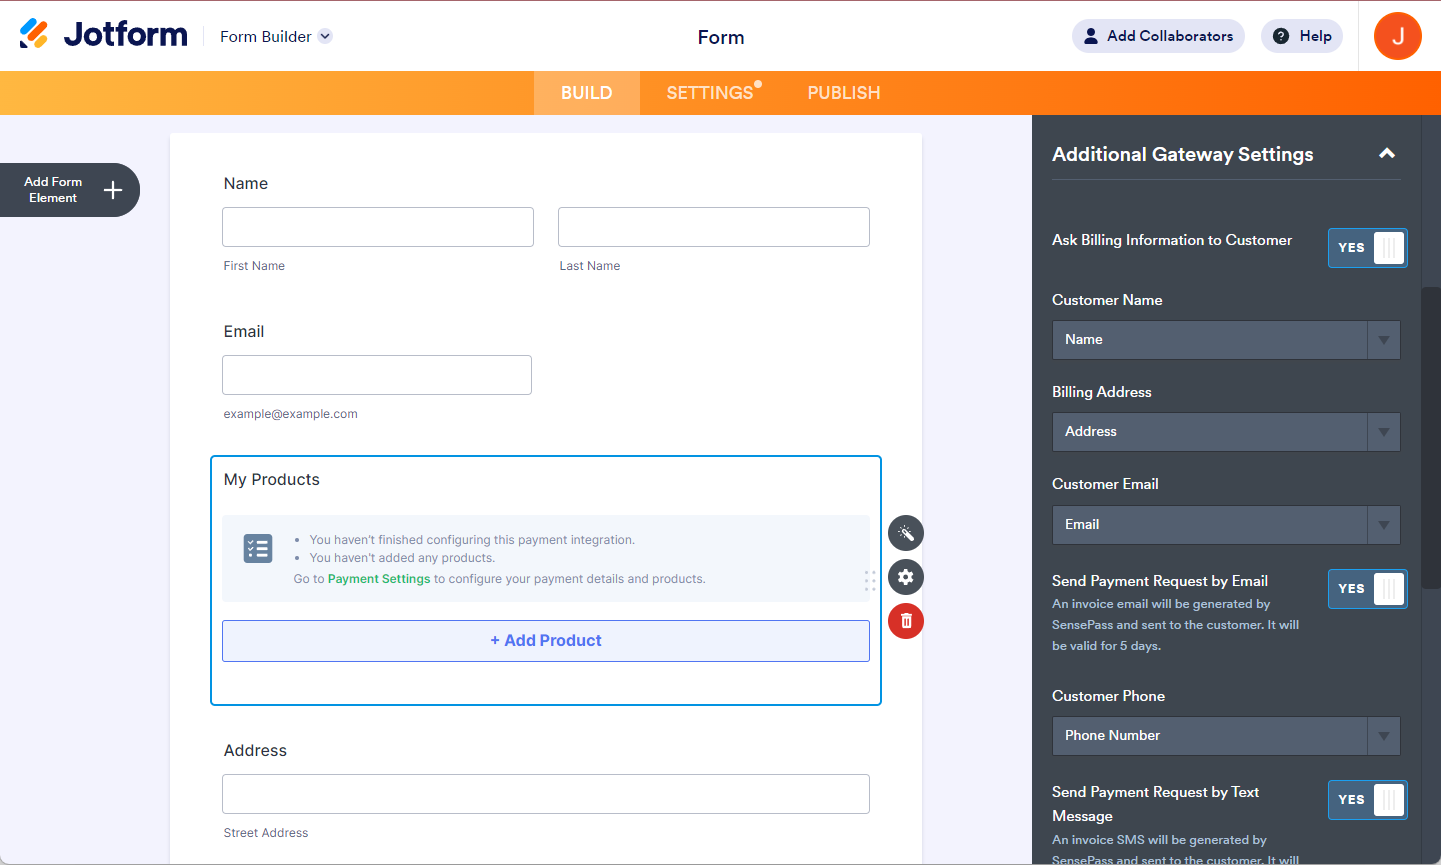
Additional Gateway Settings
Under the Additional Gateway Settings, you’ll find a few options, which include the following unique options for SensePass:
- Ask Billing Information to Customer — When toggled, you can select which fields to send to SensePass for each transaction:
- Customer Name
- Billing Address
- Customer Email – When toggled, you can enable Send Payment Request by Email, a unique feature for SensePass to allow customers to pay later optionally. The link to pay will be valid for 5 days only.
- Customer Phone – The same with Customer Email, enabling this option will allow you to send an invoice via SMS by toggling Send Payment Request by Text Message.
- Sandbox Mode — Enable this if you’re using Sandbox credentials from SensePass to test the integration.
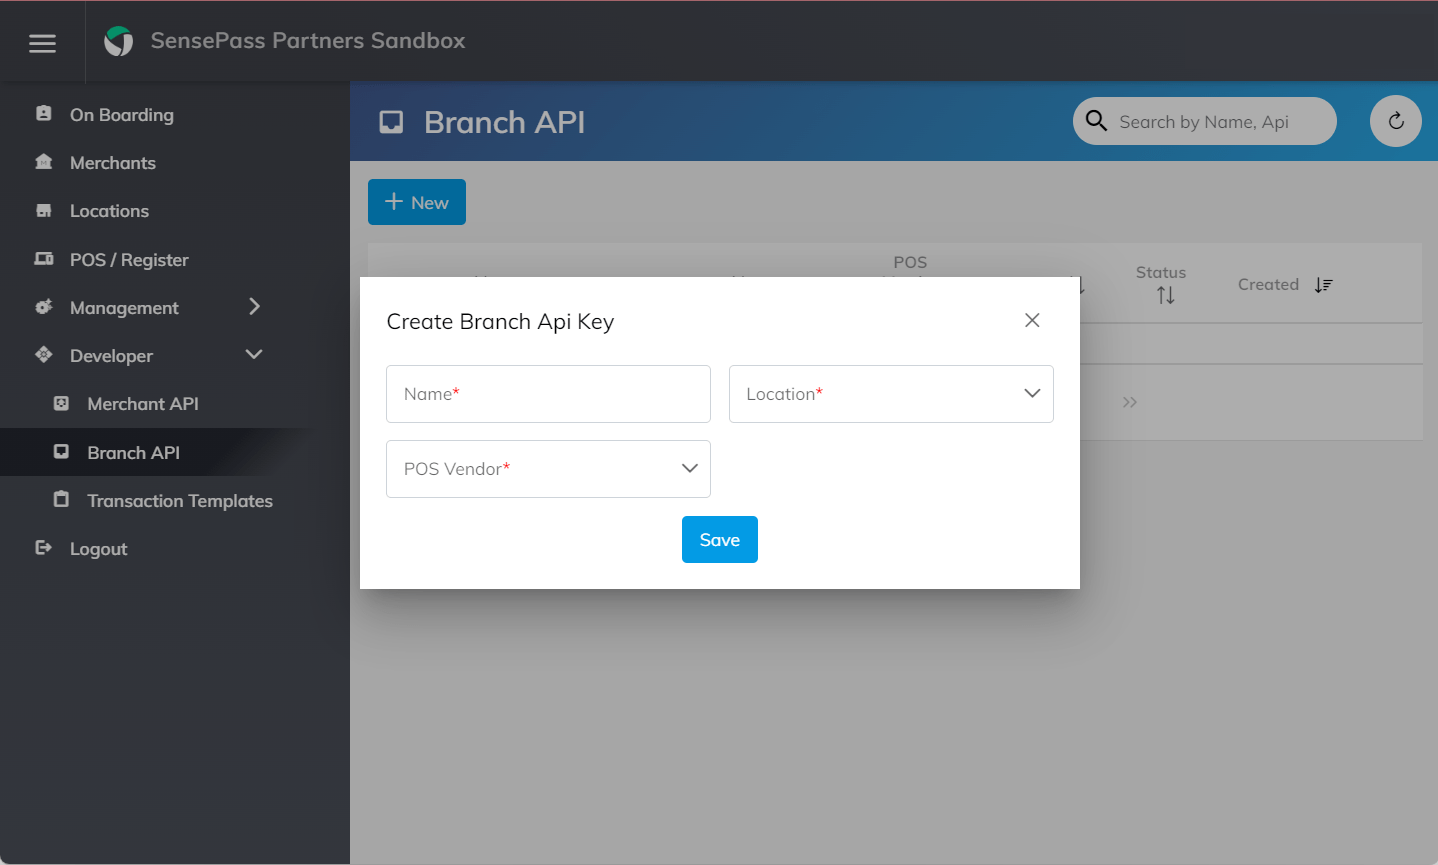
Obtaining SensePass’s API Login ID
Log in to your SendPass Partner’s dashboard, and navigate to the following sections to create/obtain your API Login ID.
- Toggle Developer dropdown.
- Click on the Branch API option.
- Select Merchant and Location from the popup prompt.
- Copy the API key if you’ve already created a Branch API before. That’s the API Login ID for the integration.
If you don’t have a Branch API yet, click the +New button. Enter the Name, and select both the Location and POS Vendor.
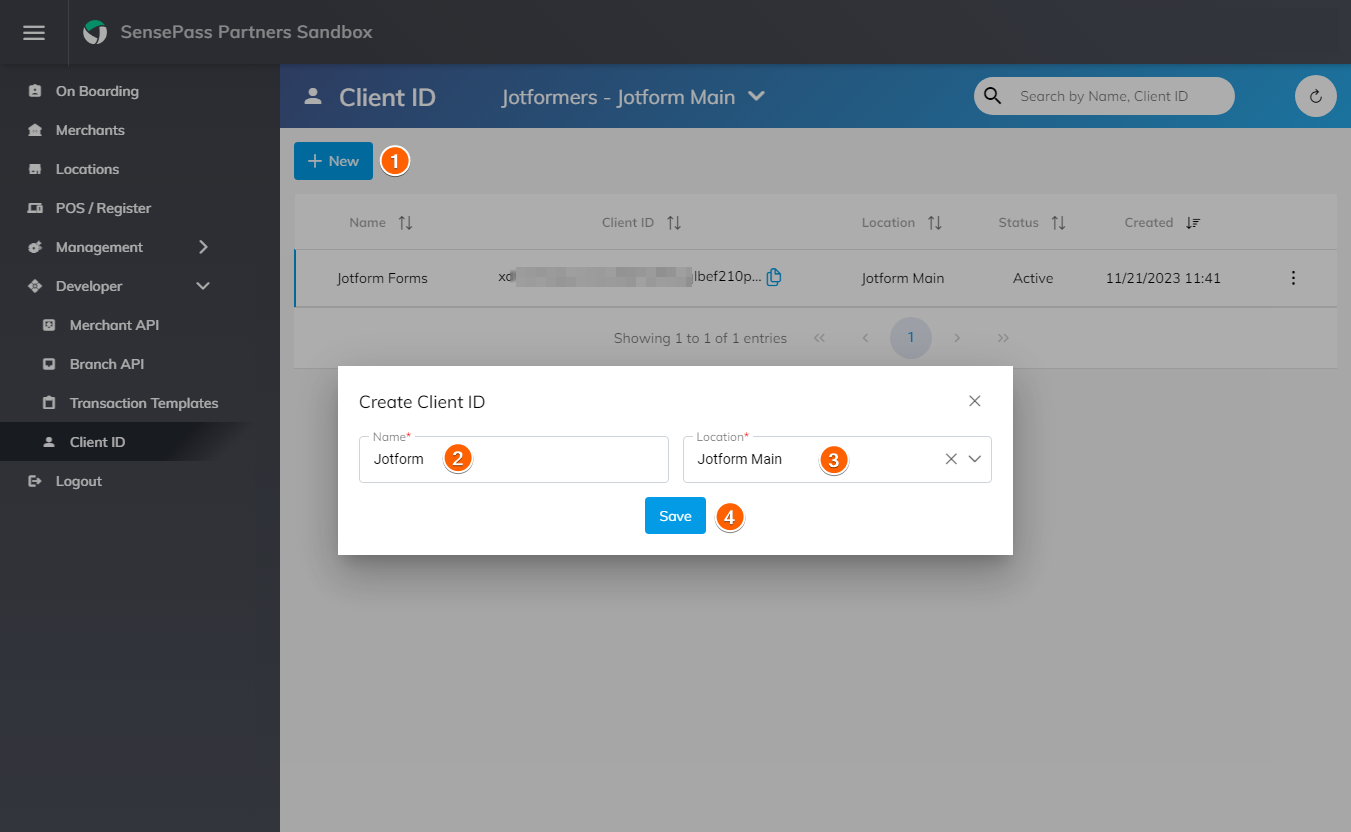
Getting SensePass Client ID
In your SendPass Partner’s dashboard, navigate to the following sections to create/obtain your Client ID.
- Toggle Developer dropdown.
- Click on the Client API option.
- Copy the Client ID.

If you don’t have a Client ID, click the +New button. Enter the Name, select the Location, and click the Save button to create.

Send Comment:
11 Comments:
June 18, 2026
This looks like a pretty useful integration for anyone collecting payments through forms. The setup seems straightforward, especially with the API steps explained clearly. Nice to have more payment options available for customers.
June 17, 2026
AMAZING
December 10, 2025
This guide makes integrating SensePass with Jotform incredibly simple. The explanations about Direct Payments, API Login ID, and additional gateway settings are super clear and beginner-friendly. Resources like this make technical setups much less intimidating — almost like turning everything into letras diferentes that anyone can easily understand.
September 23, 2025
That’s a solid breakdown of how the SensePass integration works in Jotform, and I agree it really lowers the barrier for merchants who want to accept a wide variety of payment methods without adding extra friction for customers. The step-by-step setup looks straightforward, which is always a plus. From a business perspective, it’s also worth remembering that long-term business value often comes from building on top of such integrations in ways competitors can’t easily copy.
August 21, 2025
Wow, this SensePass integration with Jotform looks fantastic! It’s super helpful to see how easy it is to accept payments—from PayPal and Venmo to Apple Pay, crypto, and more—right within the form. I especially love that you can choose between redirecting to a checkout page or enabling direct payments inline, giving full control over the customer experience.
The ability to toggle on features like billing info collection, email or SMS payment links, and sandbox testing makes setup flexible and user-friendly. And knowing only a handful of currencies—USD, EUR, CAD, and ILS—are supported helps manage expectations.
Overall, this is a robust payment solution that streamlines everything from selling products and subscriptions to collecting donations or custom amounts. Great work, Jotform team!
— A happy form-creator.
August 11, 2025
This integration looks really useful! Just wondering could something like this be applied to gaming tournament registrations or tracking player scores through forms? That would really streamline things for small eSports setups.
July 15, 2025
Thank you!
April 7, 2025
This guide is super helpful—makes integrating SensePass with Jotform really easy. Great way to offer more flexible payment options!
October 24, 2024
Thank you
August 30, 2024
necesito informacion quiero adquirir la opcion de pago
June 24, 2024
Thank you for helping people get the information they need. Great stuff as usual. Keep up the great work.