
The last thing you want when you’ve sent out an important document is to have signers wade through pricing fields or terms that don’t apply to them. That’s the beauty of using dynamic fields in your contract: They appear only if applicable, which makes the signing process clearer, faster, and less error-prone.
Docusign supports dynamic fields but handles them differently depending on whether you’re generating a new document or modifying an existing PDF. Either way, you need to know Docusign’s conditional logic rules. In this article, we’ll provide an overview of the two processes for creating an agreement that includes Docusign dynamic fields. We’ll also show you how to incorporate these fields into a PDF.
If you were hoping for a simpler workflow — and a better PDF experience for signers — consider Jotform Sign instead. You can read more about Jotform’s simple conditional logic process at the end of this article.
Pro Tip
Need more of the basics around Docusign? Read our article, What is Docusign and how does it work?
1. Using Microsoft Word placeholders
If you’re writing a new contract, one way to apply conditional logic is to type special codes and field tags directly in your Microsoft Word document. These act as “placeholders” for the variable information.
Docusign reads this special syntax and uses it to create customized agreements that can do any number of things, including populating fields from information already entered. The signer never sees these codes — they only work behind the scenes.
The trick is knowing the correct syntax to use. The tags vary by Docusign product and setup, such as Agreement Preparation, Docusign Gen, or CLM.
It’s important to note that using this method doesn’t generate agreements that change in response to a signer’s actions during signing. It only allows you to build the relevant version of a document, which you can then send out for signature.
For example, if a new agreement is with a party in California, you can use Microsoft placeholders to have Docusign generate a document that includes specific terms, disclosures, or clauses relevant to that state only. How is adding this type of logic to Docusign useful? Well, instead of having to create multiple documents, you can create one and continuously adjust it based on the present requirements.
In the case of a California-specific clause, Docusign offers this example for the syntax you might use:
{{ if StateOfResidence = ‘California’ }}
Clause for Californians.
{{ end if }}
In this case, if you (the sender) put California in the “State of Residence” field, the generated agreement will include the special clause for Californians.
As you might imagine, using Microsoft placeholders isn’t the easiest way to handle dynamic fields. The next option allows you to skip the manual typing and take advantage of an automated solution instead.
2. Using the Docusign Template Assistant
Docusign Template Assistant for Word is a Microsoft Word add-in you can use to create dynamic document templates. It’s available for purchase in the Microsoft Marketplace.
Once you’ve installed it (it requires desktop Microsoft Word, not just the browser version), you can prepare the document in Word and upload it to Docusign. Again, this method won’t result in a document that dynamically changes as a signer is signing — it only allows you to set up a document with the relevant information and generate it accordingly.
Here’s an overview of what the process looks like with the Docusign Template Assistant:
- Create the original document in Word. Include all possible variations in the document, making each alternate version section its own paragraph with a unique heading.
- Open the Docusign Template Assistant.
- Create sender fields. These fields will be used to gather the relevant information each time a new agreement is generated from this template. Include fields for any variations you anticipate being used, like billing frequency, monthly/annual amount, state of residence, etc.
- Add conditional logic rules. Use the Template Assistant’s conditional-content/rule tool to add the rules you want to implement, such as showing or hiding content on certain conditions. The Assistant handles all the syntax for you, so there’s no coding needed on your part.
- Add any dynamic tables if needed. If you’ll have instances where the alternative versions require a different number of options — for example, monthly vs quarterly billing sections that each have their own payment schedules — you’ll need to create dynamic tables that automatically adjust to the data in each case.
- Preview at least two versions. Use the Template Assistant preview feature to check a few versions, verifying that the correct information appears and there are no empty headings, misplaced signature blocks, or other issues.
- Upload the template to Docusign. Once it’s uploaded, you can simply save it as a template for future use. Whenever you start a new agreement from that template, Docusign will automatically prompt you to fill in the sender fields so it can generate an agreement that includes the right information.
Pro Tip
Using Docusign dynamic fields may change the length of a document, and sometimes key fields may change location. To ensure certain fields always match up with their correct text markers — like signature blocks and dates, essential elements of a contract — use the Autoplace feature. It automatically anchors fields with their matching text wherever they appear on newly generated documents.
How to add conditional fields to an uploaded PDF in Docusign
At this point, you might be wondering how to add logic to Docusign if you’re working with an already-uploaded PDF. Yes, it is possible to layer interactive fields on top of a PDF so that the fields change during signing. However, note that the underlying text of the PDF can’t be changed in real time — only the fillable fields can change.
For example, here’s how you could show a delivery address field if the signer indicates that they want the product they’re purchasing to be delivered:
- In your document, add labels for the information required by the signer. In this case, you would add:
Fulfillment Method: _________
Delivery Address: ____________
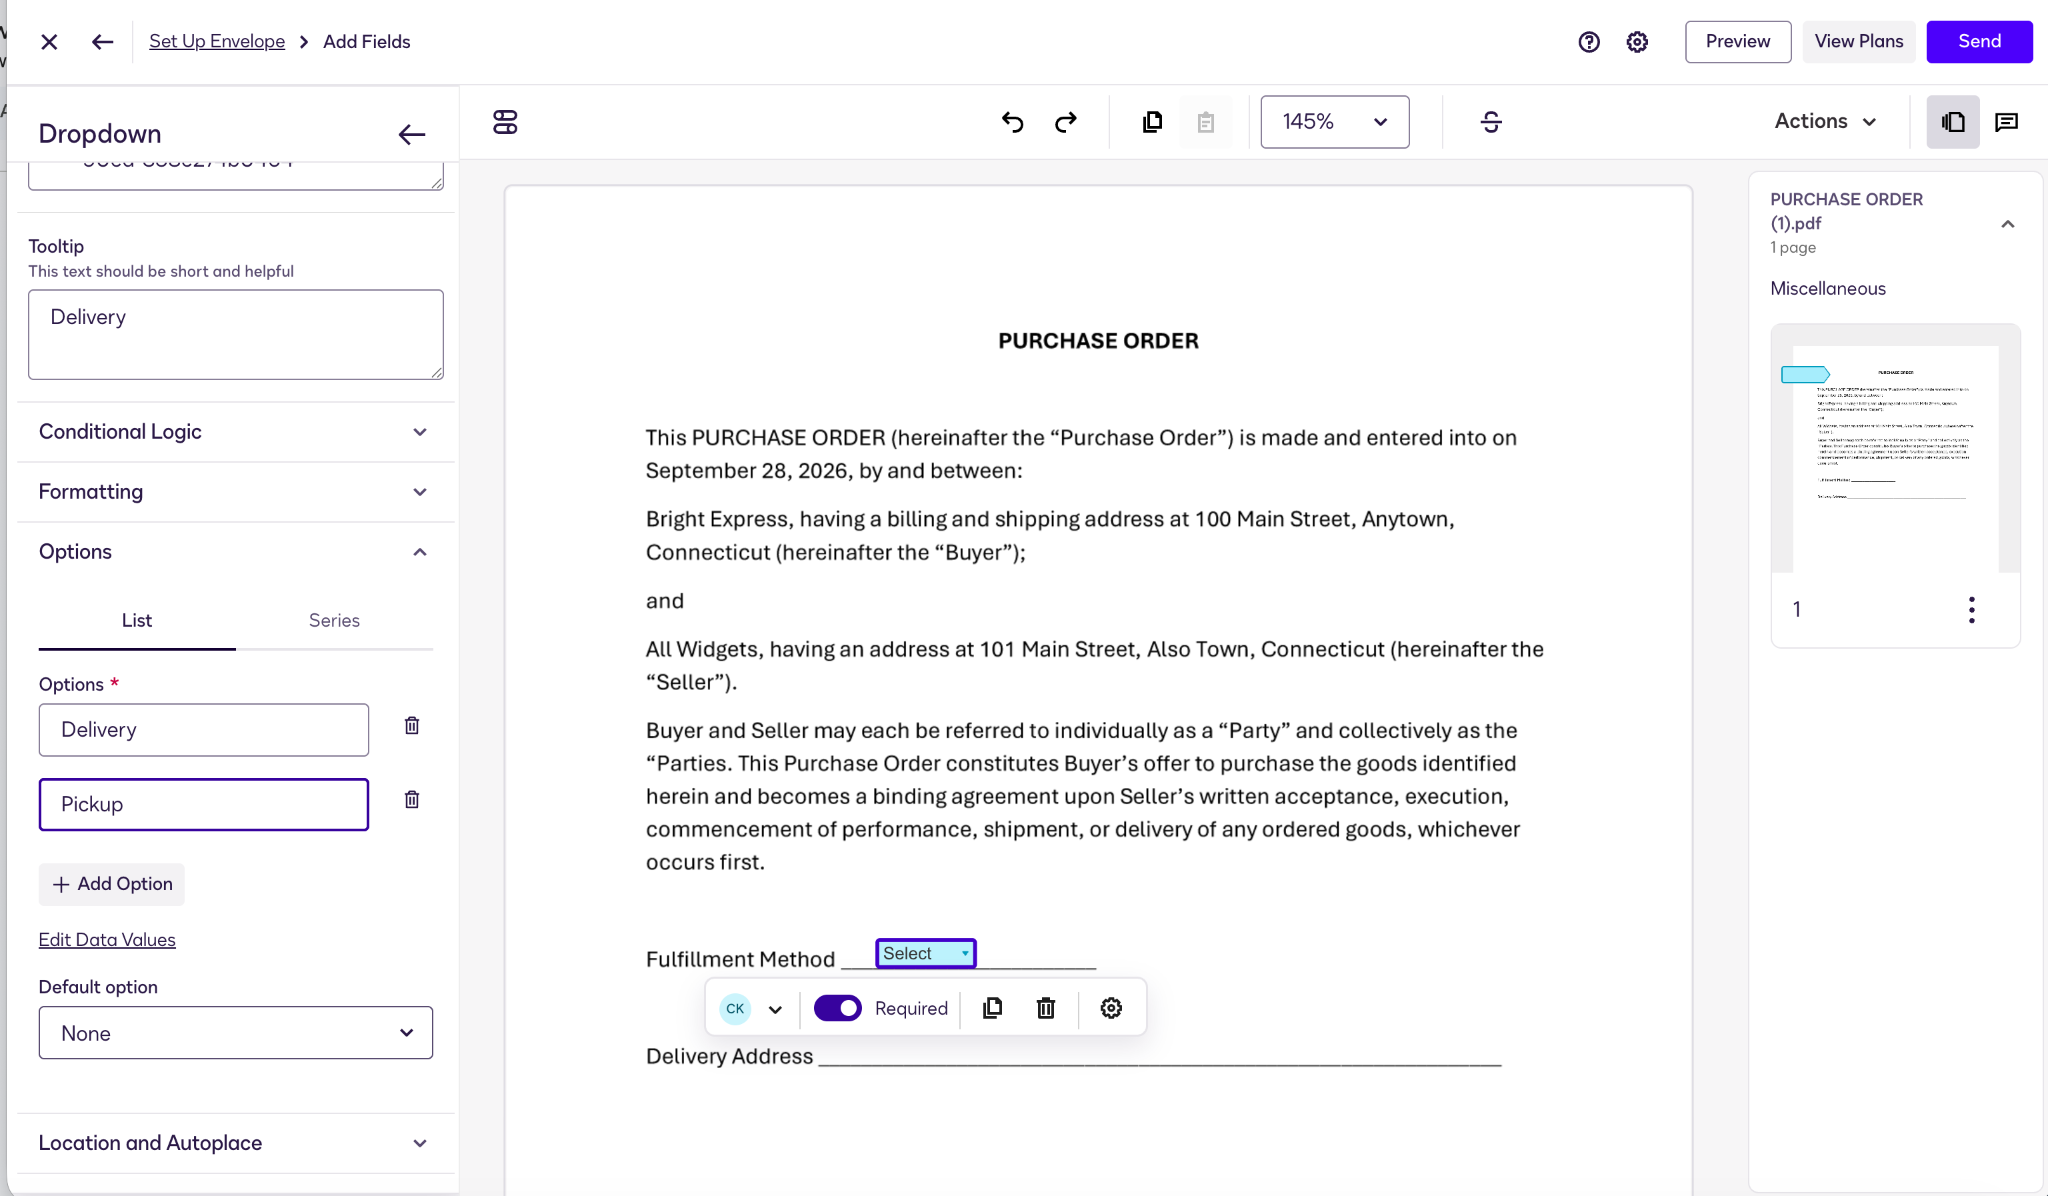
- In Docusign, start a new envelope. Upload the PDF, add recipients, and continue to the Add Fields screen. For the conditional question above, drag a dropdown field onto the space next to “Fulfillment Method” and assign it to the appropriate signer. Add the options “Delivery” and “Pickup.”
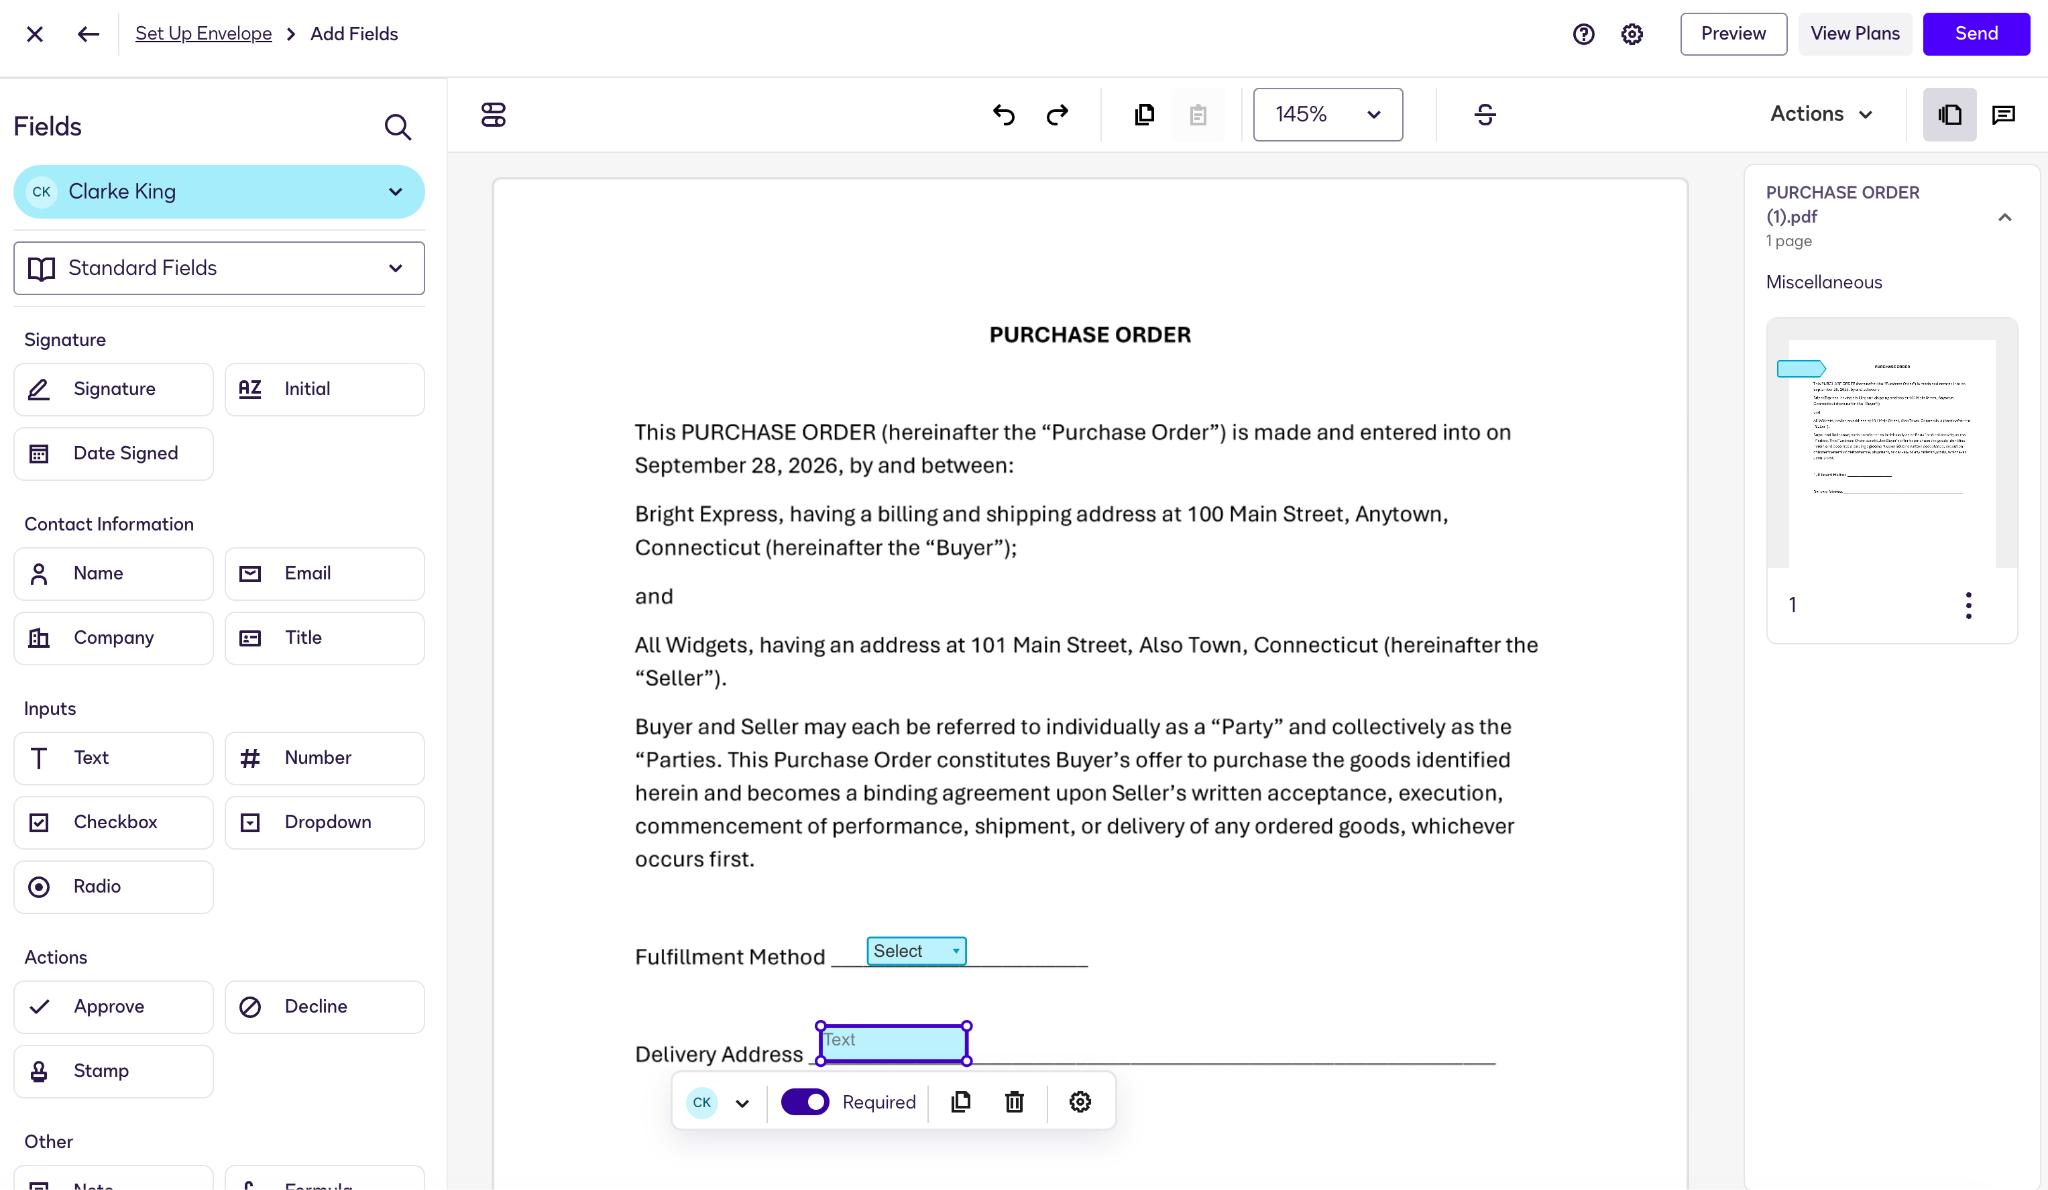
- Drag a text field onto the blank space next to “Delivery Address” and assign it to the same signer as above.
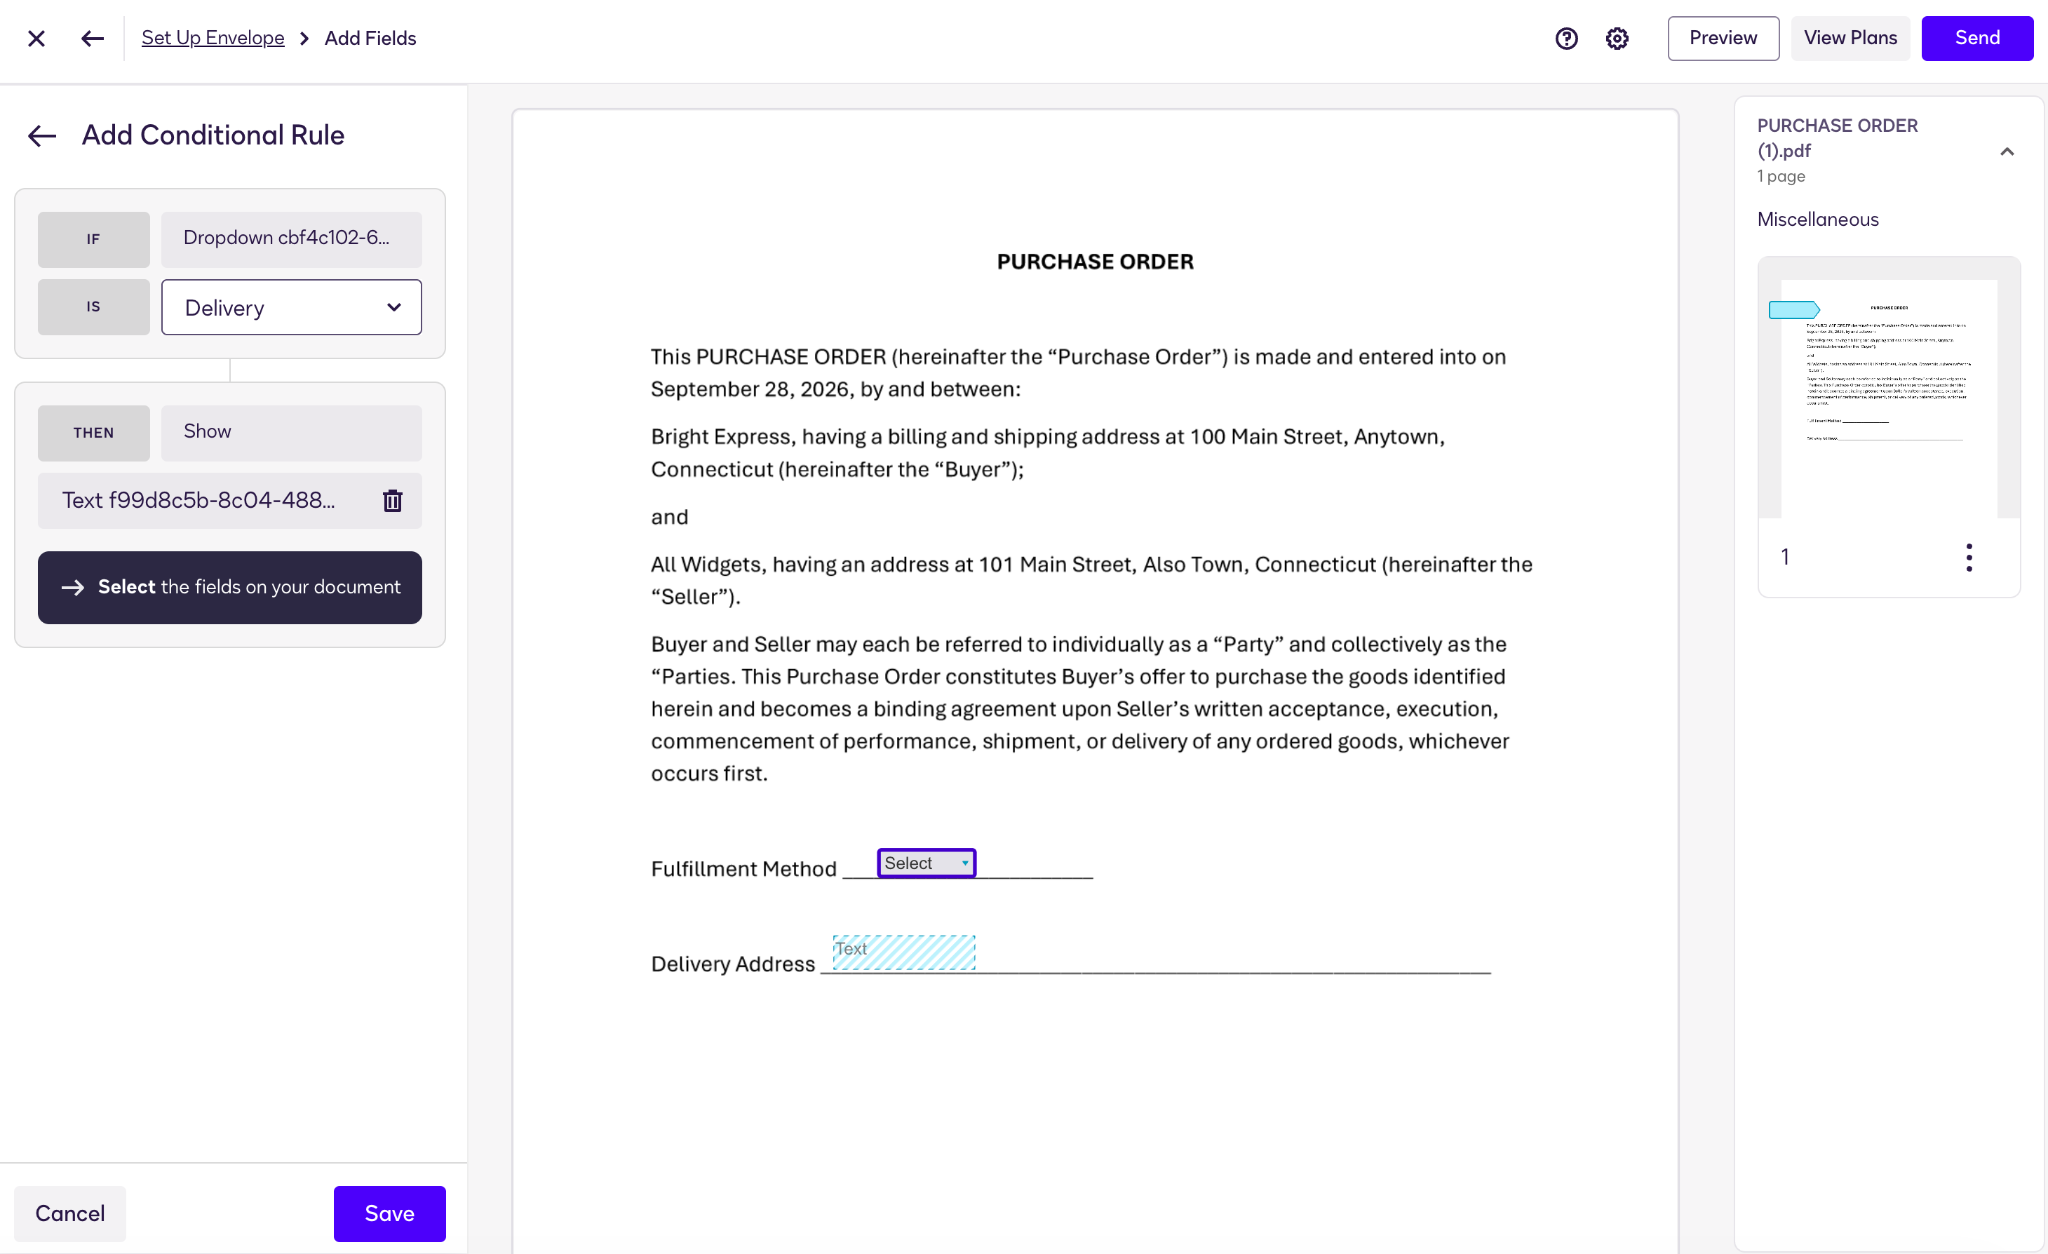
- Create the conditional rule. Click in the Delivery/Pickup trigger field and, in the field properties panel, open Conditional Logic. Select Create Rule and configure it so that if the fulfillment method is “Delivery,” the interactive address field will show.
- Preview the document to ensure it follows the conditional rules correctly.
Remember, because the underlying PDF text can’t be changed, the signer will still see the “Delivery Address” text but there will be no field to fill in if they have selected “Pickup” in the dropdown.
Pro Tip
If it’s possible that an additional signature could be required on a PDF (such as for manager approval), you’ll need to set up conditional routing in Docusign as opposed to using dynamic fields. This feature changes the routing automatically in response to data collected on the original document.
Stop patching PDFs — automate your contracts with Jotform Sign
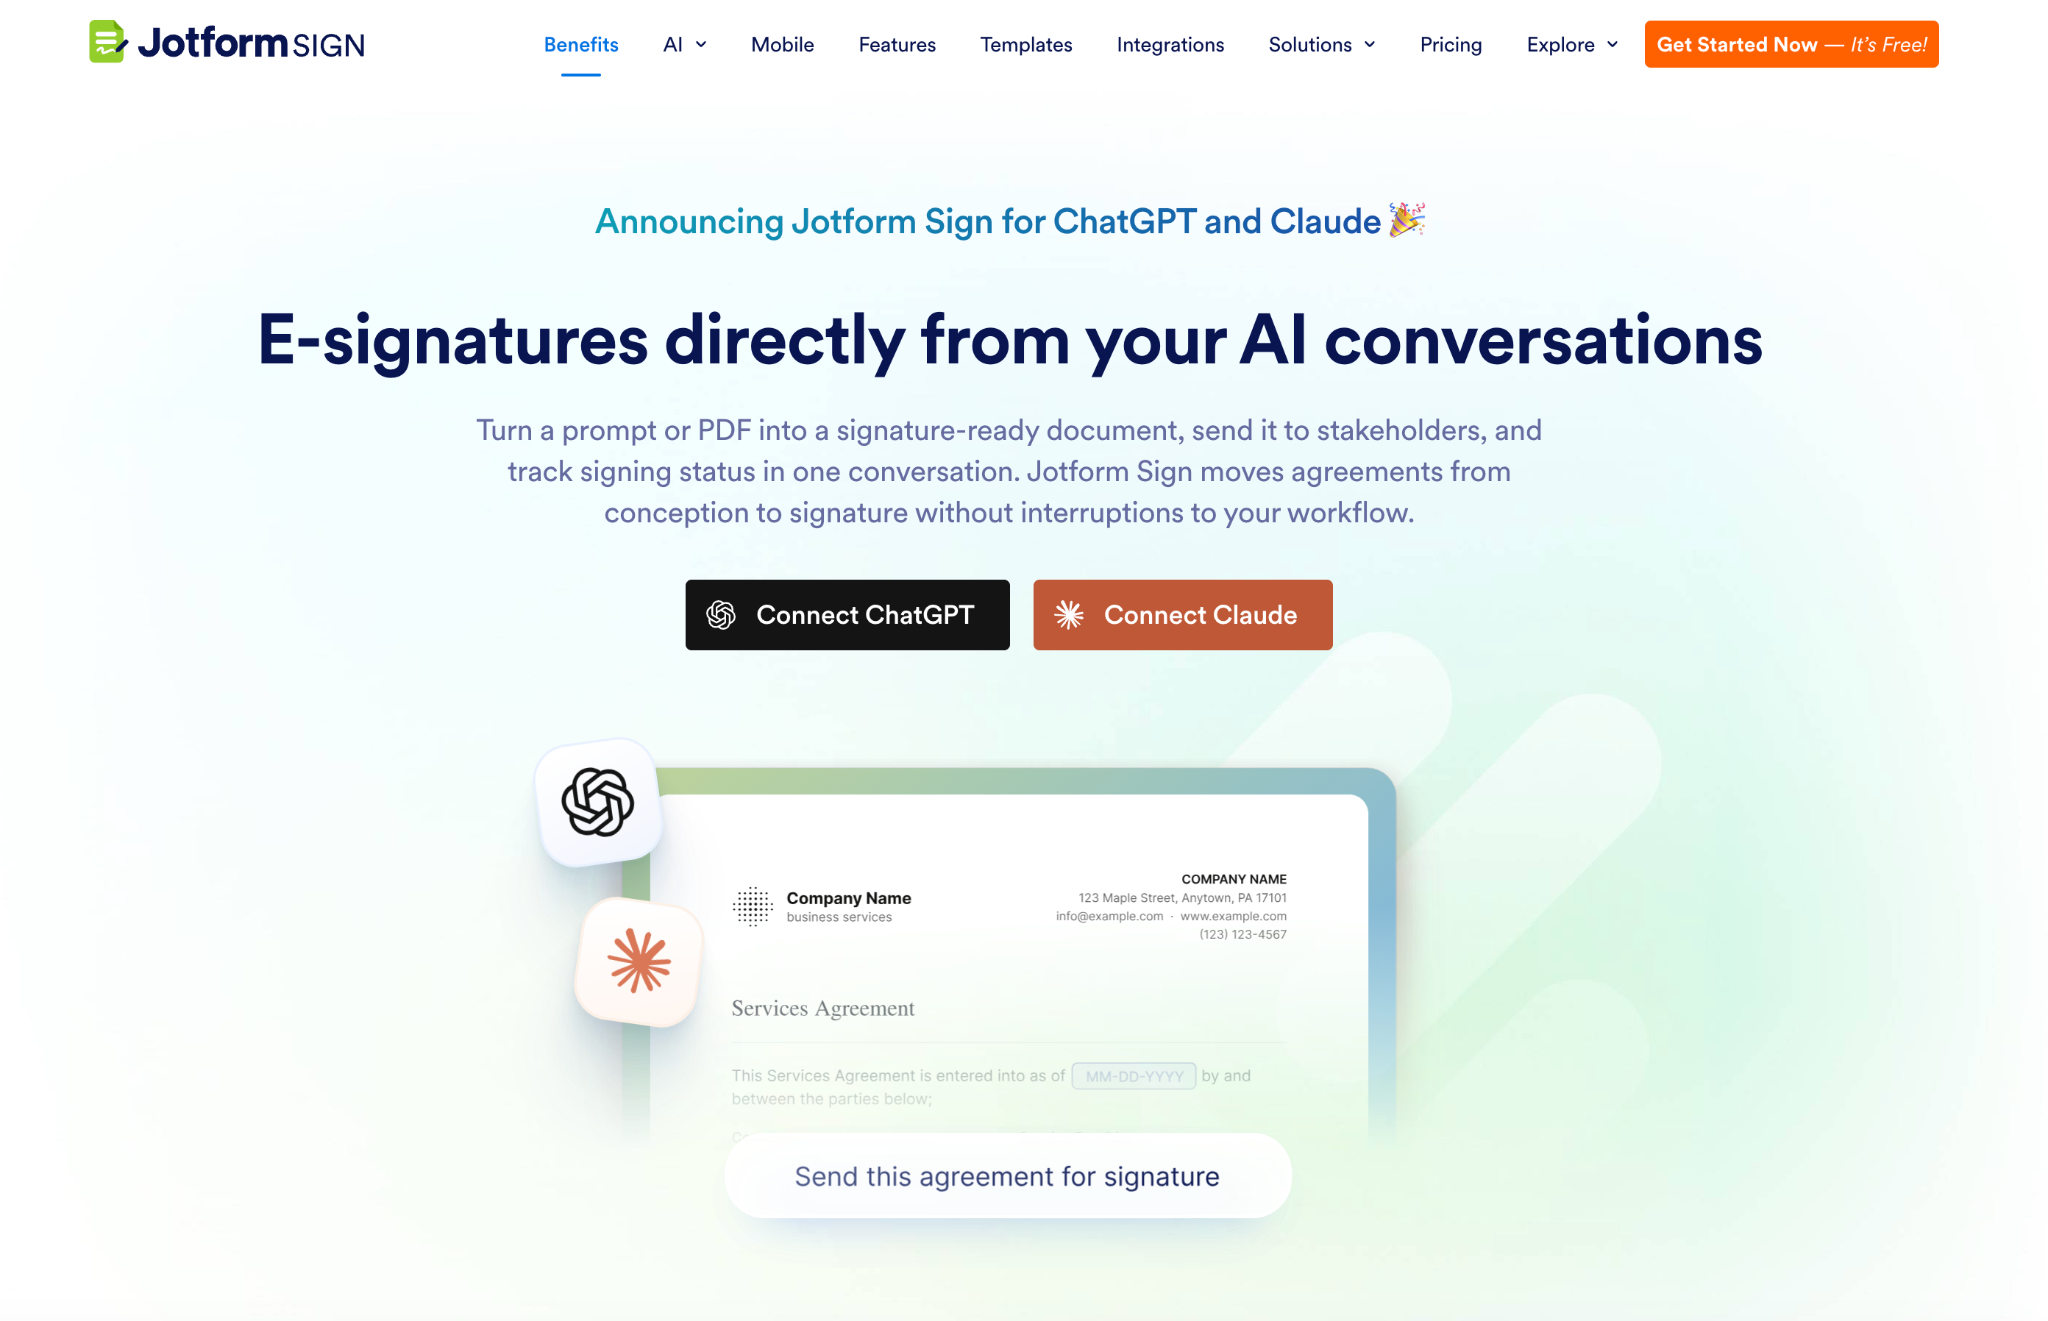
Applying conditional logic after the fact — when you’re already in the PDF stage — isn’t ideal, particularly in the context of contracts. A large part of the appeal of PDFs is that they always retain their original formatting, and they can’t be easily altered. Layering interactive fields onto a PDF that’s about to be signed invites changes and could introduce last-minute questions about the agreement.
As you can tell from the above instruction sets, Docusign doesn’t make it easy to create agreements from dynamic data. A better alternative is to use Jotform Sign. Rather than patching up already-generated PDFs with incoming data, Jotform offers a seamless workflow that allows you to collect the signer data you need before creation and turn it into a perfectly clean, signature-ready PDF.
Here’s why Jotform Sign’s approach — front-end forms and backend signatures — makes for a better experience:
- Data capture and contract generation are handled separately: You collect any variable agreement information in a Jotform smart form that uses conditional logic to perform calculations or validate answers as needed. Then, Jotform Sign automatically maps those results into your existing agreement, generating a polished PDF that’s ready to sign. There’s no patching up PDFs, and the workflow is simple and automatic.
- It offers signers a flawless mobile experience: Rather than asking signers to pinch, scroll, and zoom inside a PDF to find the interactive fields on their mobile devices, Jotform lets them use a straightforward dynamic web interface (Jotform Sign Mobile). They can quickly and easily add their information and then receive a finished PDF that covers all the bases.
When it comes to contracts, Jotform has even more to offer. This online contract maker has hundreds of free contract templates covering nearly every use case and an AI contract generator to help you create professional contracts in minutes. You can also take advantage of Jotform’s contract management software to speed up the signing process and keep it on track. Automatic email notifications, due date reminders, shared workspaces, and approval flows help you stay on top of agreements at every stage.



Intrigued? Keep reading to see how easy the process is with Jotform.
How to automate dynamic contracts with Jotform Sign
In this example, we’ll create a delivery contract.
- Create a regular online form in Jotform Form Builder that contains all the questions for variable items in your agreement.
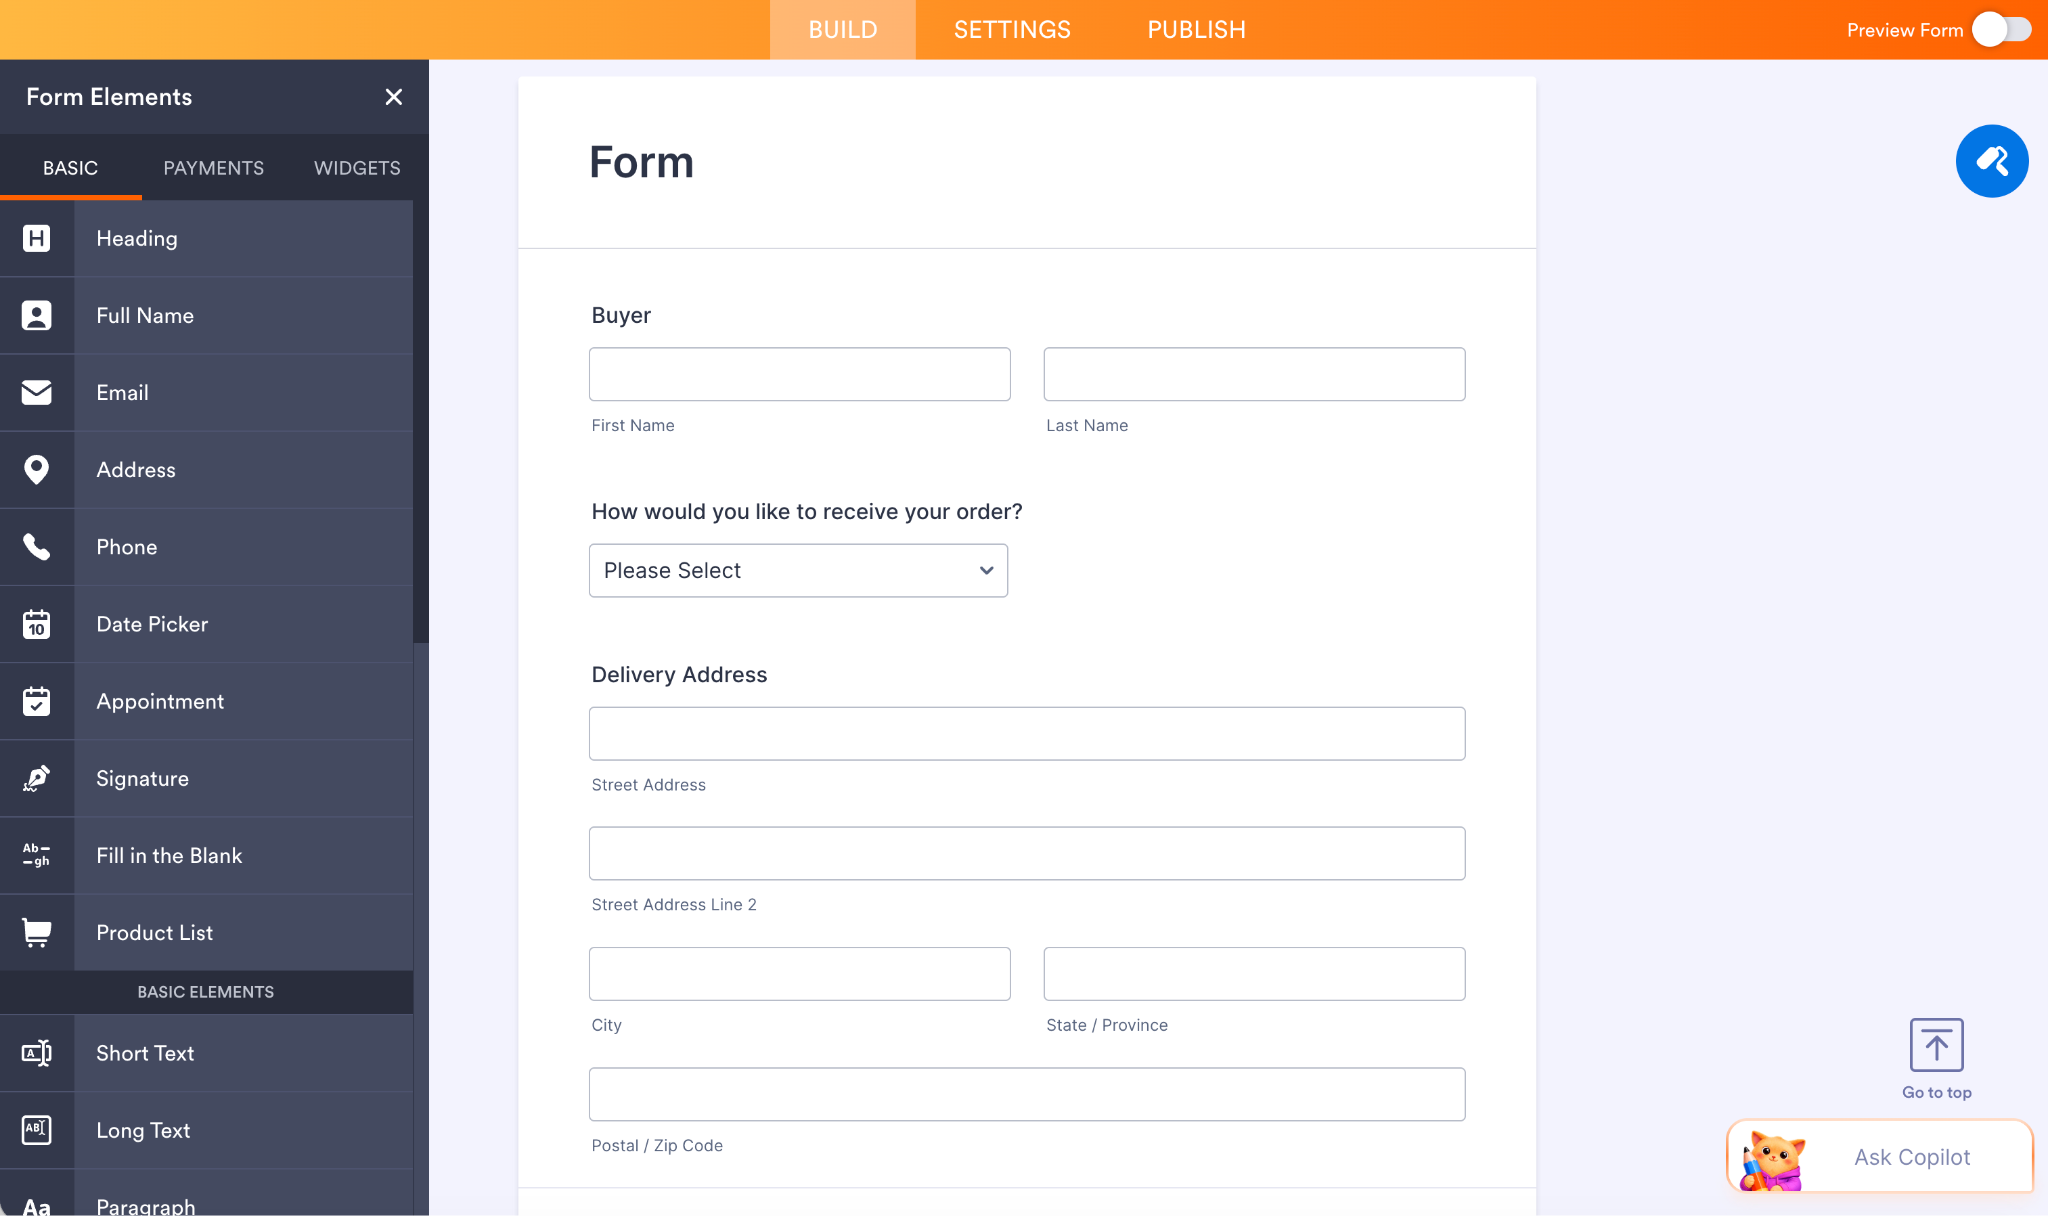
- The next step depends on your specific needs:
- If you want the agreement to reflect a total dollar amount based on purchase quantity, go to the Widgets tab in the left menu and add the Form Calculation Widget.
- If you want the agreement to hide or show certain fields depending on a user’s responses (as in this case), go to the Settings tab at the top and click Conditions on the left. Choose Show/Hide Field to hide the Delivery Address field unless Delivery is selected as the fulfillment method. Configure the rules as needed.
There are also other conditional logic types you can use in your form.
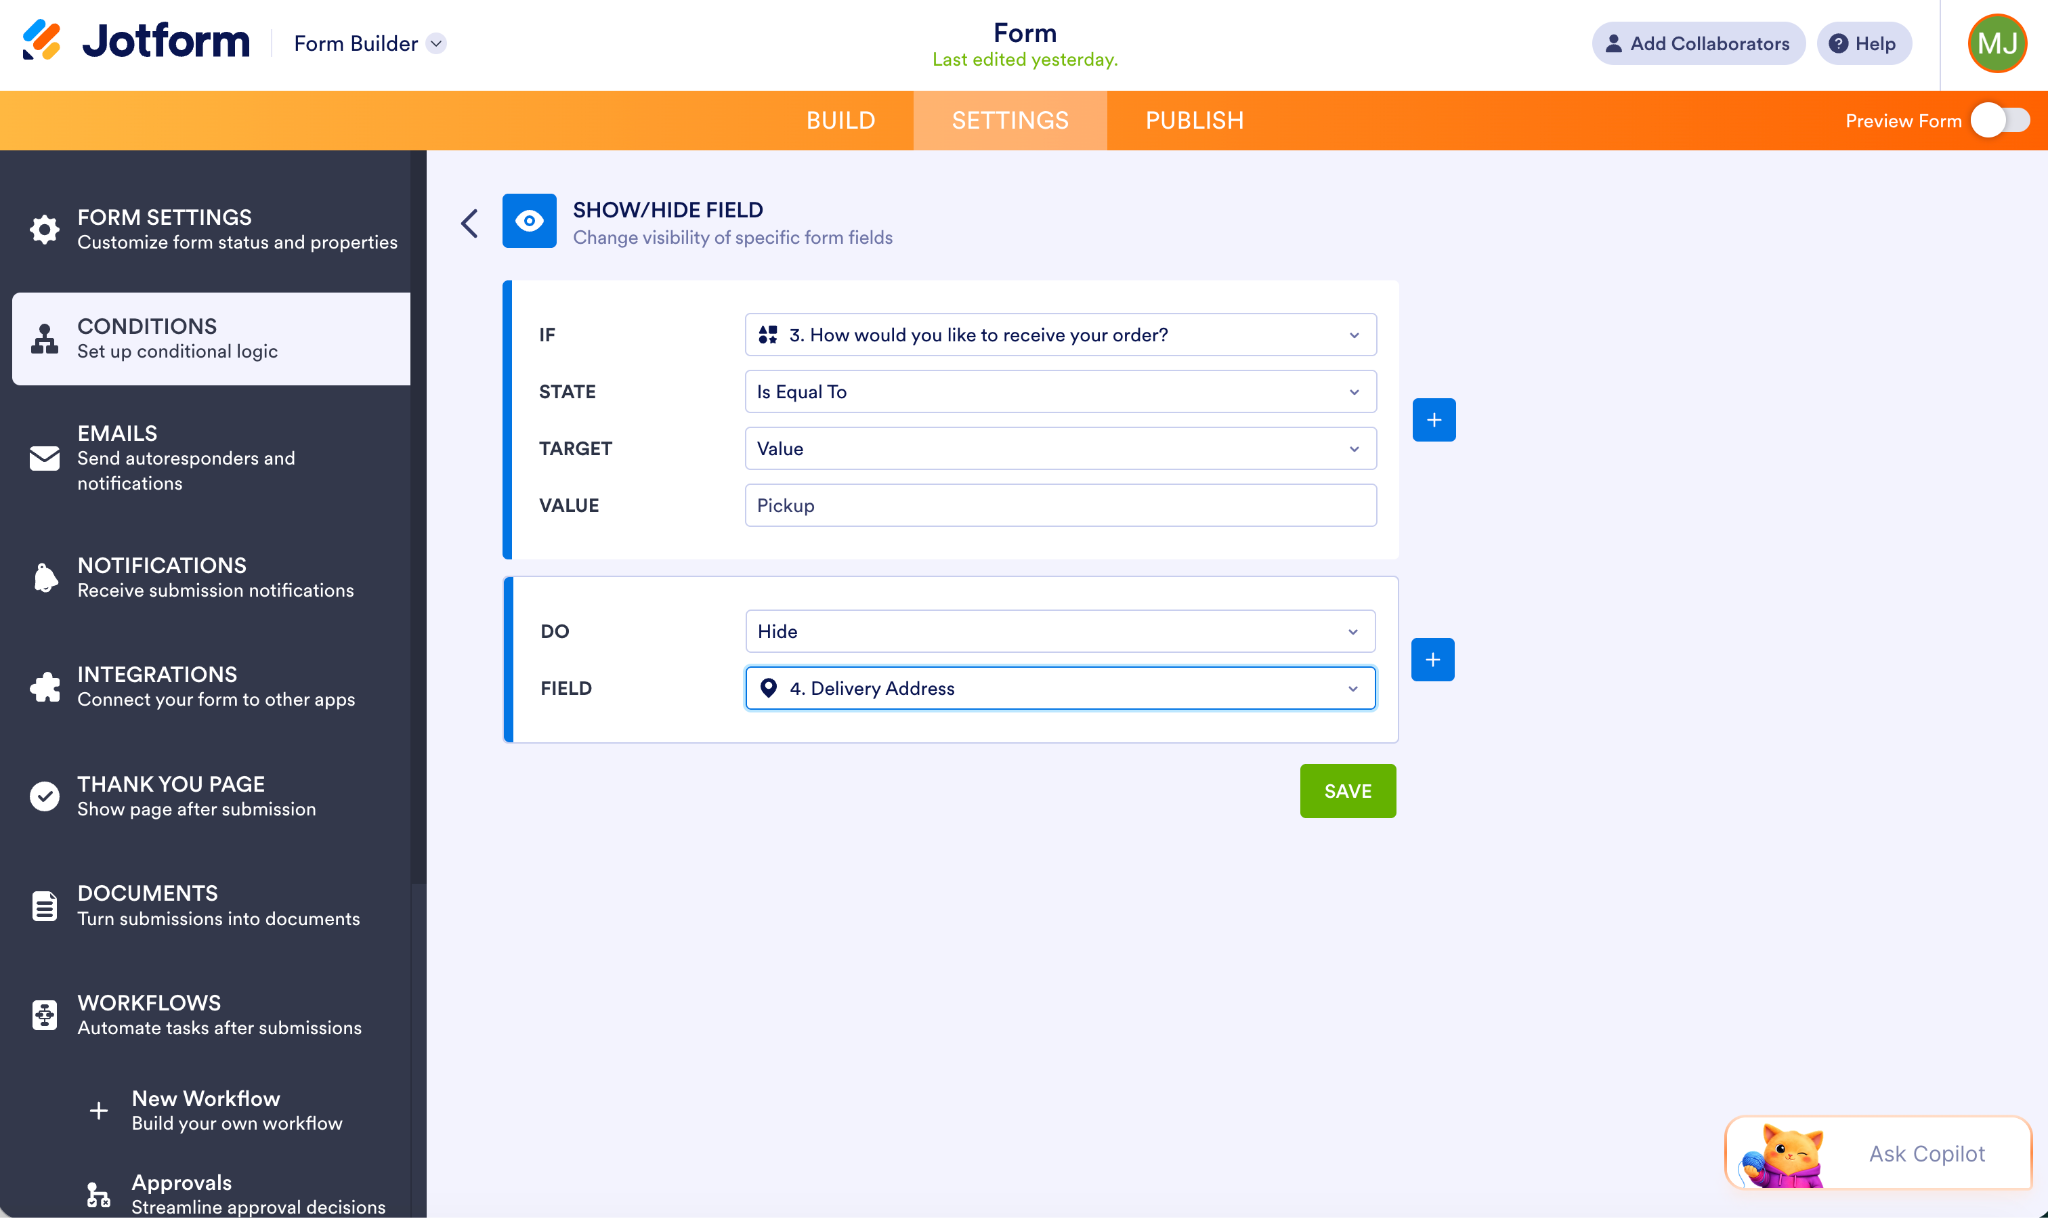
- Click Preview Form at the top right to make sure the rules are working correctly.
- Enable Jotform Sign for the form in the form’s Settings. Set up your Jotform Sign automation so that the person you’re sending it to receives the document to sign (for example, by using an Email field or assigning it directly).
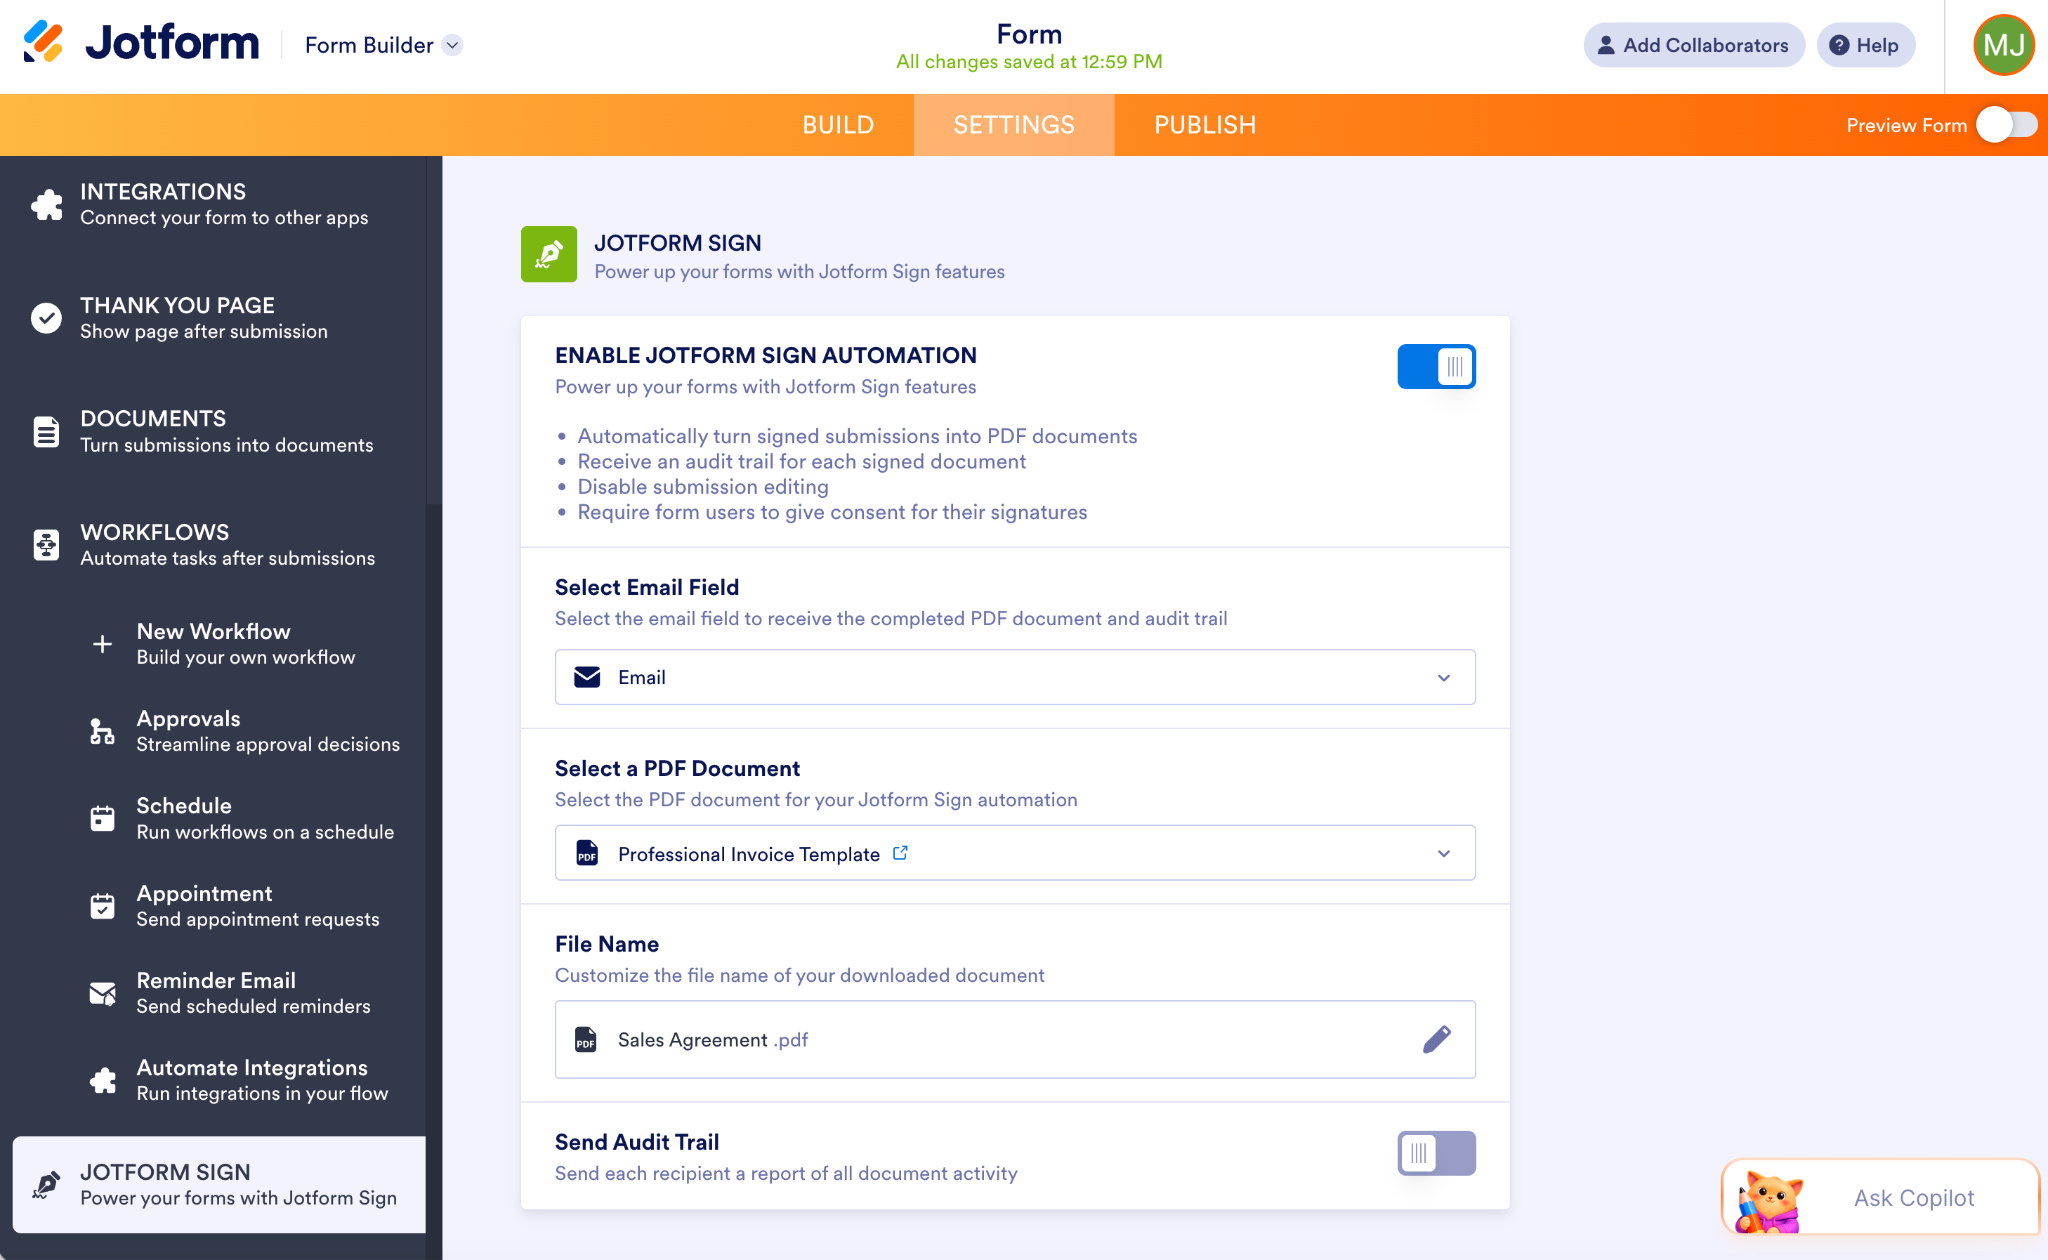
- Send the form link or Sign request to that specific person. When they answer the questions, the form will adjust as instructed and then proceed to the signing step.
Jotform Sign stands out as one of the simplest Docusign alternatives available, and it consistently receives high marks on G2 from thousands of users. You can compare the features of Jotform Sign vs Docusign here.
It’s free to get started, so there’s nothing standing between you and your first agreement. Check out the vast library of Jotform Sign templates and give Jotform Sign a try today.
FAQs about Docusign dynamic fields
Yes, you can calculate values based on input from other number or data fields in Docusign. It has a built-in tool called Formula Fields that handles the calculations automatically.
There could be any number of reasons why your conditional fields aren’t working. It could be that the rule is attached to the wrong trigger field, the relevant fields are assigned to two different people, or the logic you’re using is conflicting. It’s also possible that your desired action requires a different feature, like conditional routing.
This article is for operations managers and HR professionals trying to build complex contracts (where certain clauses or fields only apply to specific people) who are frustrated by rigid PDF limitations.
AS ALWAYS, CONSULT AN ATTORNEY BEFORE RELYING ON ANY INFORMATION ON THIS PAGE. THE CONTENT ABOVE IS FOR INFORMATIONAL PURPOSES ONLY. JOTFORM IS NOT PROVIDING LEGAL, FINANCIAL OR OTHER ADVICE.









































Send Comment: