-
BenflipsAsked on July 12, 2016 at 8:56 PM
Hi. I've just installed this widget, instead of just the Google line by itself (whatever that other widget was called).
Can you change Street Number to appear above street name.
Can you shorten the field width for street name/city/state/country
Can you potentially have these appear in a more horizontal fashion rather then vertical - etiher all fields on one line, or perhaps, if this is not so easy, Street # / Street name / City on one line and then State, Postcode, Country on a second lien?
-
Kevin Support Team LeadReplied on July 13, 2016 at 12:45 AM
Would not be possible to display all the fields in the same line and this is because of the responsiveness of the form, it will not be properly displayed on mobile devices.
But would be possible to display them in the second way you requested, please inject this code in the widget:
tr {
position: absolute;
}
tr:nth-child(1) {
margin-left: 218px;
}
tr:nth-child(2) {
margin-left:0px;
}
tr:nth-child(3) {
margin-left:438px;
}
tr:nth-child(4) {
margin-top: 44px;
margin-left: 0px;
}
tr:nth-child(5) {
margin-left: 217px;
margin-top: 45px;
}
tr:nth-child(6) {
margin-left: 438px;
margin-top: 45px;
}
This code needs to be injected in the widget as well, it will help you to change the width of the needed fields:
#route,
#locality,
#administrative_area_level_1,
#country{
width:100px !important;
}
IDs are different, but here are each ID with the correspondent field:
#route = street name
#locality = city
#administrative_area_level_1 = state
#country = country
In my case I set the same width to all the fields, but you can do it individually.
To inject the code in the widget first click on the widget and click on the wizard icon:

Then click on the CSS tab and paste the given code there:
As you will affect the default layout for the widget, you also need to customize the widget width and height, to do it, please inject this code to the form:
iframe#customFieldFrame_397{
width: 686px !important;
height: 180px !important;
}
This guide will help you to inject the code to your form: How-to-Inject-Custom-CSS-Codes
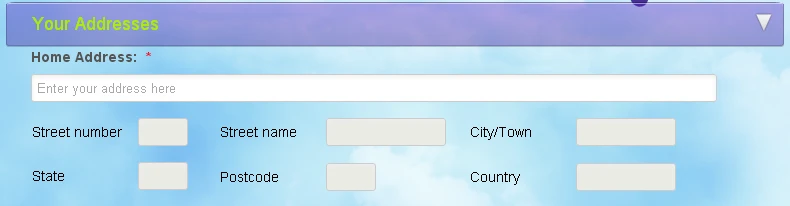
This is how the widget will be displayed once you inject the given code:
As you can see there will be some fields with a different width value, so if you can set the same width to all the fields, you can do it by injecting this code instead of the one given above:
Instead of using this:
#route,
#locality,
#administrative_area_level_1,
#country{
width:100px !important;
}
You would need to use this:
input[type="text"]{
width: 180px !important;
}
This needs to be injected to the widget, following the steps given above.
-
BenflipsReplied on July 13, 2016 at 2:47 AMThat looks great, thank you.
I haven't done the last bit.
Can you specifically show me how to alter this so that the state field is
the same width as the street number, and then the street name is made a bit
wider, with both it, and postcode underneath it aligned closer to the (now
reduced-size state field)
*Regards,*
*Dr. Ben Phillips*
Chiropractor
B.App.Sc.(Comp.Med.)(Chiro) M.Clin.Chiro.(RMIT)
... -
BorisReplied on July 13, 2016 at 7:07 AM
Please note that the above provided custom CSS code are not compatible with mobile devices, so your form may not be easily submitted over a mobile device.
> how to alter this so that the state field is the same width as the street number,
It sounds like you would like to decrease the width of "State" to be the same width as "Street Number". To do this, we would add this bit of custom CSS inot your widget:
#administrative_area_level_1 { max-width: 50px; }
> and then the street name is made a bit wider, with both it, and postcode underneath it aligned closer to the (now reduced-size state field)
To do this, we would need to slightly change the entire CSS codes my colleague initially provided, so that the full custom CSS you would be using in the Autocompleted Address widget is this instead:
@media only screen and (min-width: 686px) {
tr { position: absolute; }
tr:nth-child(1) {
margin-left: 188px;
}
tr:nth-child(2) {
margin-left: 0px;
}
tr:nth-child(3) {
margin-left: 438px;
}
tr:nth-child(4) {
margin-top: 44px;
margin-left: 0px;
}
tr:nth-child(5) {
margin-left: 188px;
margin-top: 45px;
}
tr:nth-child(6) {
margin-left: 438px;
margin-top: 45px;
}
#route {
width: 120px !important;
}
#locality,
#administrative_area_level_1,
#country {
width: 100px !important;
}
#administrative_area_level_1 { max-width: 50px; }
}Changes from original code have been marked in red, and the code is made so it will apply only on screens wider than 686 pixels - as the code would make it look bad on smaller devices anyway.
In addition to changing the CSS code within the widget, I would also recommend slightly changing the CSS code that is injected on the form itself. The CSS code that is currently on the form itself is this:
iframe#customFieldFrame_397{
width: 686px !important;
height: 180px !important;
}We would need to change it into this instead:
@media only screen and (min-width: 686px) {
iframe#customFieldFrame_397{
width: 686px !important;
height: 180px !important;
}
}You can change that CSS code by following this guide:
https://www.jotform.com/help/117-How-to-Inject-Custom-CSS-Codes
Please try it out and let us know should you need any further assistance. Cheers
-
BenflipsReplied on July 13, 2016 at 9:53 PM
I made the first changes you suggested to the widget's CSS - that looked great, thank you.
Then I made the changes to the form as suggested to make these changes ignored on smaller screens - but it appears that this invalidates ALL of the custom changes from the previous code, not just the 'horizontal' spacing...
As a result, when I review it in builder, the original appearance of the widget has reverted completely to its default state.
I understand that the changes first suggested are not responsive on smaller screens, hence the workaround.
However when this more responsive 'vertical' structure is reinstated (on smaller screens) can I still have some of the general changes to this widget apply - such that the street number is the first field instead of street name, and where the street name, city, state and country input field widths are smaller (probably HALF of the current width).
(I'm not sure if this address 'structure' which is the common format here in Australia applies worldwide (ie...street number as first field)...but if it does, it would be a good change to make to the backend of the widget itself...just a suggestion for your widget team.)
-
Kevin Support Team LeadReplied on July 13, 2016 at 11:27 PM
I have checked your form and it currently shows as default, I can see that you have injected the code given by my colleague and the code I gave is still there as well.
As I used the this "!important" on the given code, it should generate some conflict, I would also recommend you to check the comments in the code they look like this " /* comment */ " since this may generate conflict as well.
Please ensure that all comments are like the example above, otherwise may be that there is a comment not properly closed and this may generate a conflict.
I would also suggest you to start again, remove all the code given here and then add only the once provided by my colleague on his reply which is enhanced.
I after doing this, it still does not work, please let us know, we will be glad to help.
-
BenflipsReplied on July 14, 2016 at 1:45 AMI'm pretty certain I did this.
I copied all of the new code suggested to the widget - and as I say, by
doing that, it looked exactly as I wanted it to.
Then I added the other suggested code from your colleague to the form, and
that is when the display reverted to the original format.
I assumed this is because the builder screen is a the smaller width such
that your colleague's exception code to maintain responsiveness on mobile
and other smaller screens kicked in, but if I am wrong, and I have made
errors with the code, please let me know.
... -
BorisReplied on July 14, 2016 at 4:15 AM
You can use this link to view your form directly, so you'll see exactly how it looks when your users open the form:
https://form.jotform.com/43420990799871
Yes, you are correct. The reason that the fields are back in their default alignment in the Form Builder is that Form Builder has a limited horizontal space available for displaying the form, which is just below the 686 pixels of width we were using in the custom CSS.
When testing out changes, it is best to take a look through the form's direct link, rather than how it appears in the Form Builder. This is how your form appears when accessed over its direct link in a desktop browser:
In order to re-position the fields even on smaller screens, we can add the following custom CSS into your widget, underneath the previously added custom CSS already present in the widget:
@media only screen and (max-width: 685px) {
tr { position: absolute; }
tr:nth-child(1) {
margin-top: 45px;
}
tr:nth-child(2) {
margin-top: 0px;
}
tr:nth-child(3) {
margin-top: 90px;
}
tr:nth-child(4) {
margin-top: 135px;
}
tr:nth-child(5) {
margin-top: 180px;
}
tr:nth-child(6) {
margin-top: 225px;
}
#administrative_area_level_1 { max-width: 50px; }}We would also need to add the following custom CSS into your form itself, in addition to the existing CSS on the form:
@media only screen and (max-width: 685px) {
iframe#customFieldFrame_397 {
width: 100% !important;
min-height: 330px;
}}It would make your form appear like this when viewed on smaller screens:
That would be it, code-wise, but I've noticed something that my colleague implied above. There seems to be a tiny error in your current custom CSS on the form - the very last "closing" curly bracket is missing.
Your form's custom CSS currently ends in this:
#cid_349 .form-matrix-row-headers, #cid_349 .form-matrix-column-headers {
width: 300px;For any "opening" left curly bracket, there should be a "closing" right curly bracket, so please add one so that your form's CSS ends as this instead:
#cid_349 .form-matrix-row-headers, #cid_349 .form-matrix-column-headers {
width: 300px;
}That should leave you all set, with all the custom CSS happily applied. Please try it out, and let us know should you need any further assistance getting your form just right. :) Cheers
- Templates
- Integrations
- Products
- PRODUCTS
- Form Builder
- Jotform Enterprise
- Jotform Apps
- Store Builder
- Jotform Tables
- Jotform Inbox
- Jotform Mobile App
- Jotform Approvals
- Report Builder
- Smart PDF Forms
- PDF Editor
- Jotform Sign
- Jotform for Salesforce Discover Now
- Support
- GET HELP
- Contact Support
- Help Center
- FAQ
- Dedicated Support
Get a dedicated support team with Jotform Enterprise.
Contact Sales - Professional ServicesExplore