


Jotform Approvals is a powerful tool that creates approval workflows — for free! Businesses across the world in many different industries use these workflows to approve or deny requests.
Jotform Approvals provides a canvas where you can simply drag and drop elements, add conditions, send emails based on a specific result, and create a visualization of the whole approval process.
With Jotform Approvals, you can minimize the time spent on every approval, reduce costs, eliminate paperwork, and make the approval process easier and more efficient.
Below is a quick list of all the questions answered here so you can quickly jump to the questions that matter to you:
- How Do You Create an Approval Workflow?
- How Do You Add and Connect Elements to Each Other?
- How Do You Set up an Approval Element?
- How Do You Create Multistep Approvals?
- How Do You Create Parallel Approvals?
- How Do You Set up a Send Email Element?
- How Do You Set up an IF-Else Condition Element?
- How Do You Set up a Conditional Branch Element?
- How Do You Set up a Merge Branches Element?
- What Are Errors and Warnings?
- How Do You Edit Your Approval Workflow?
- How Do You Disable an Approval Workflow?
- How Do You Share or Publish Your Approval Workflow?
- How Do You Track the Approval Process?
- How to Track the Approval Process via Jotform Tables?
- How Do Approvers Complete Their Tasks?
How Do You Create an Approval Workflow?
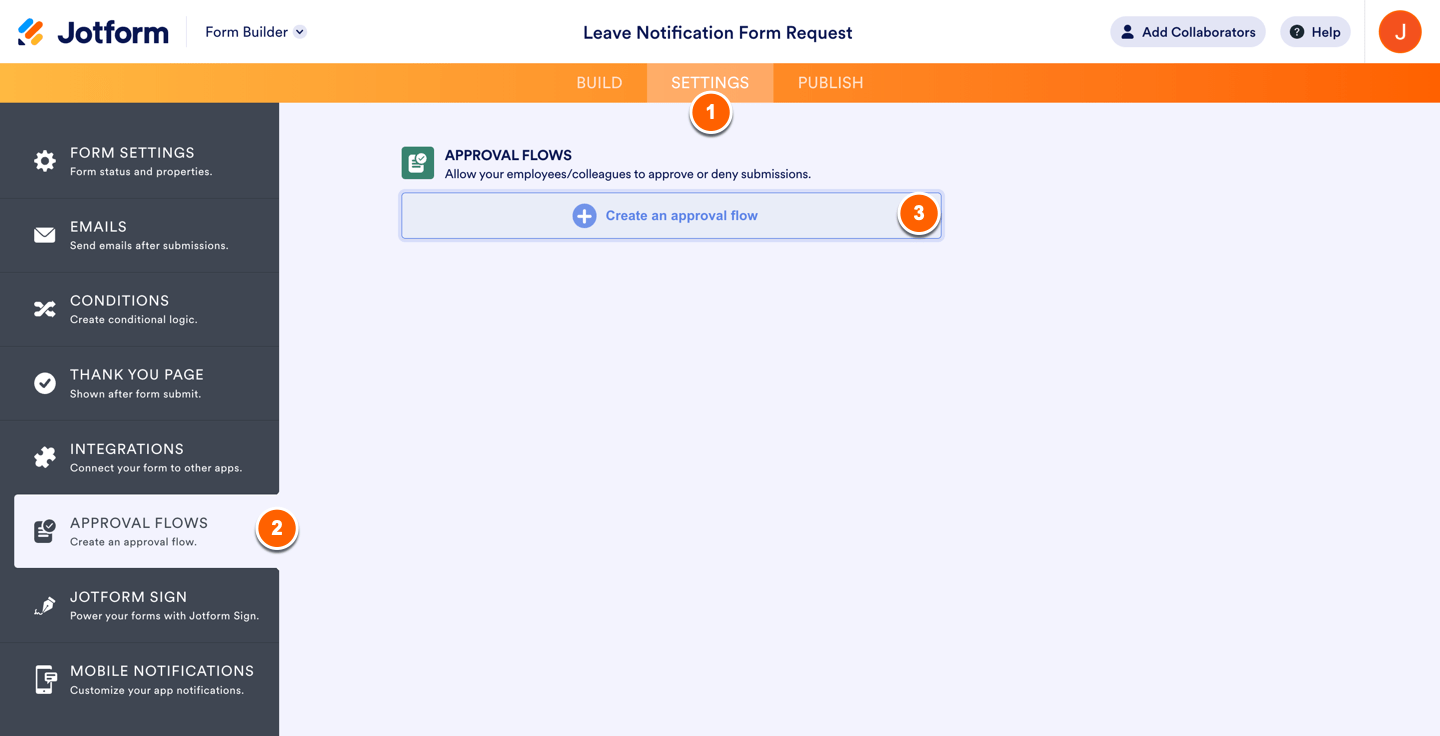
Every approval flow starts with a form, so the first step is to create your form. Next, add all the fields required for your flow. Once you’ve created your form:
- Go to the Settings tab in the Form Builder.
- Select the Approval Flows tab from the menu on the left.
- After that, click on the Create an approval flow button. You’ll be redirected to the approval flow builder.
Please visit the following user guide for the full directions on how to create your approval workflow: How to Create an Approval Flow in Jotform.
How Do You Add and Connect Elements to Each Other?
Adding and connecting elements is very straightforward. You have the following options to add and connect elements:
- Drag and drop a new element in between existing elements.
- Draw a link to create a placeholder, then drag and drop the element there.
- Drag and drop an element outside of the connected elements and manually connect it.
Please visit the following guide for the detailed steps: How to Set up an Approval Element in Jotform Approvals.
How Do You Set up an Approval Element?
The approval element is main element of the whole approval flow. This is where the deciding factor of the approval flow comes in. In the approval element, you define the outcomes. By default, Approve and Deny are the default options. You can add more if you wish and even set up multistep and parallel approvals.

Please visit the following user guide for further directions: How to Set up an Approval Element in Jotform Approvals.
How Do You Create Multistep Approvals?
The multistep approval is helpful if multiple people need to approve/deny a request.
Let’s say your HR department reviews the request first. If they approve the request, it’s sent to the supervisor for final approval. Once the supervisor makes their decision, the approval flow ends. On the other hand, if the department denies the request, the approval flow will end without going to the supervisor. Here’s an example of how to create a flow for a multistep approval:
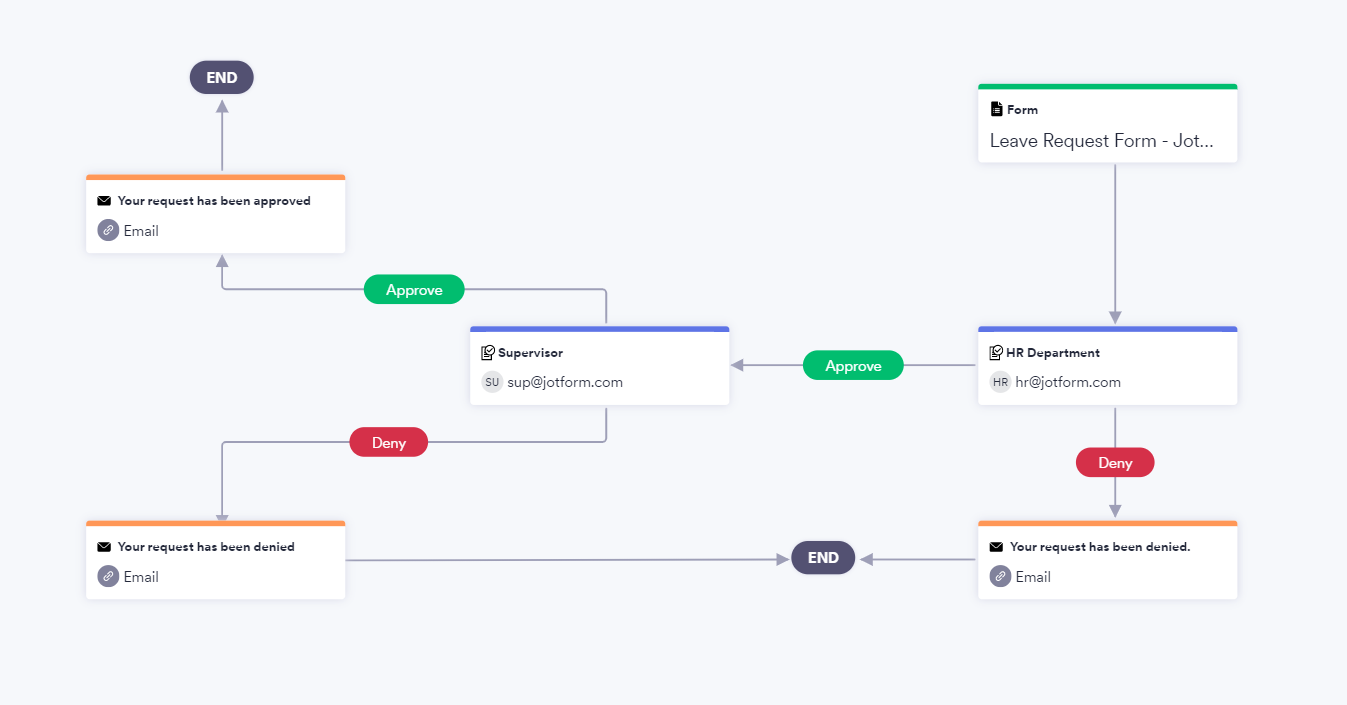
On the right side, you can see the basic approval. On the left side is the multistep approval. You should always end each flow with the End Flow element.
Please refer to the following user guide for more information: How to Create Multistep Approvals in Jotform Approvals.
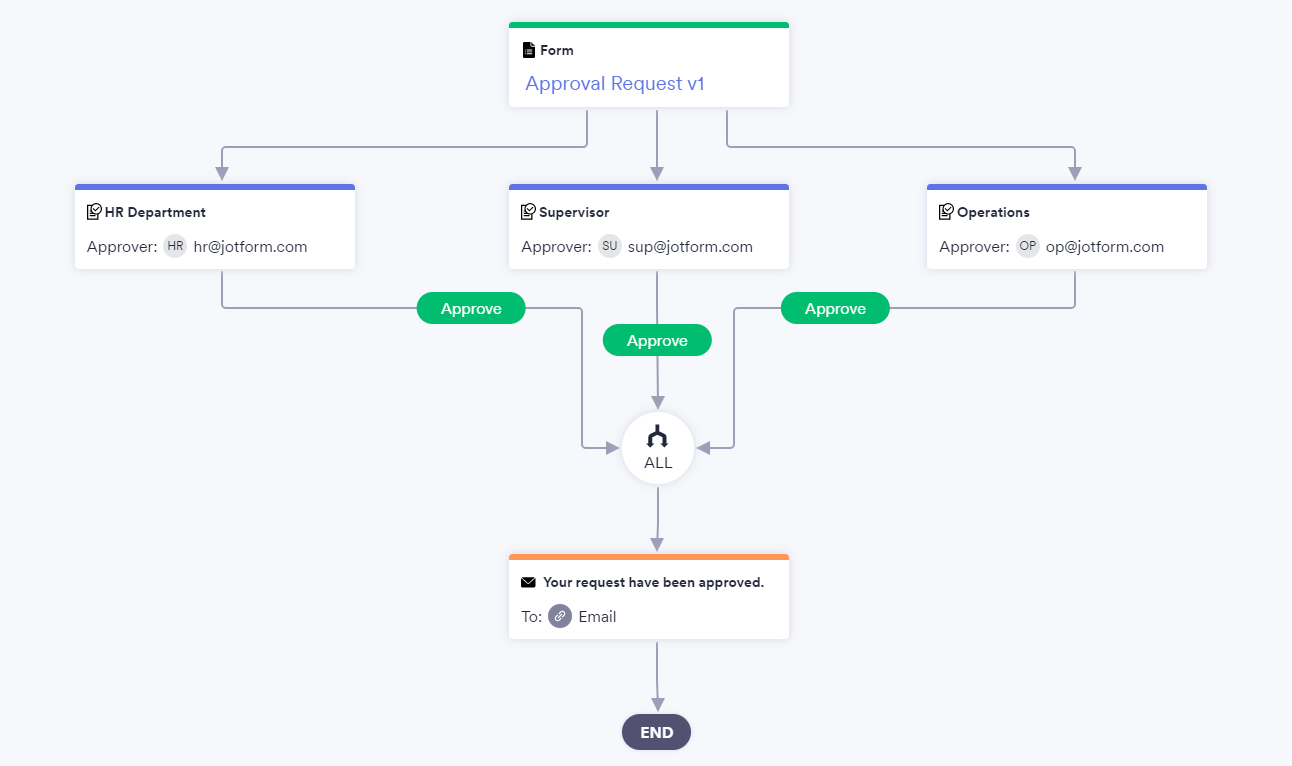
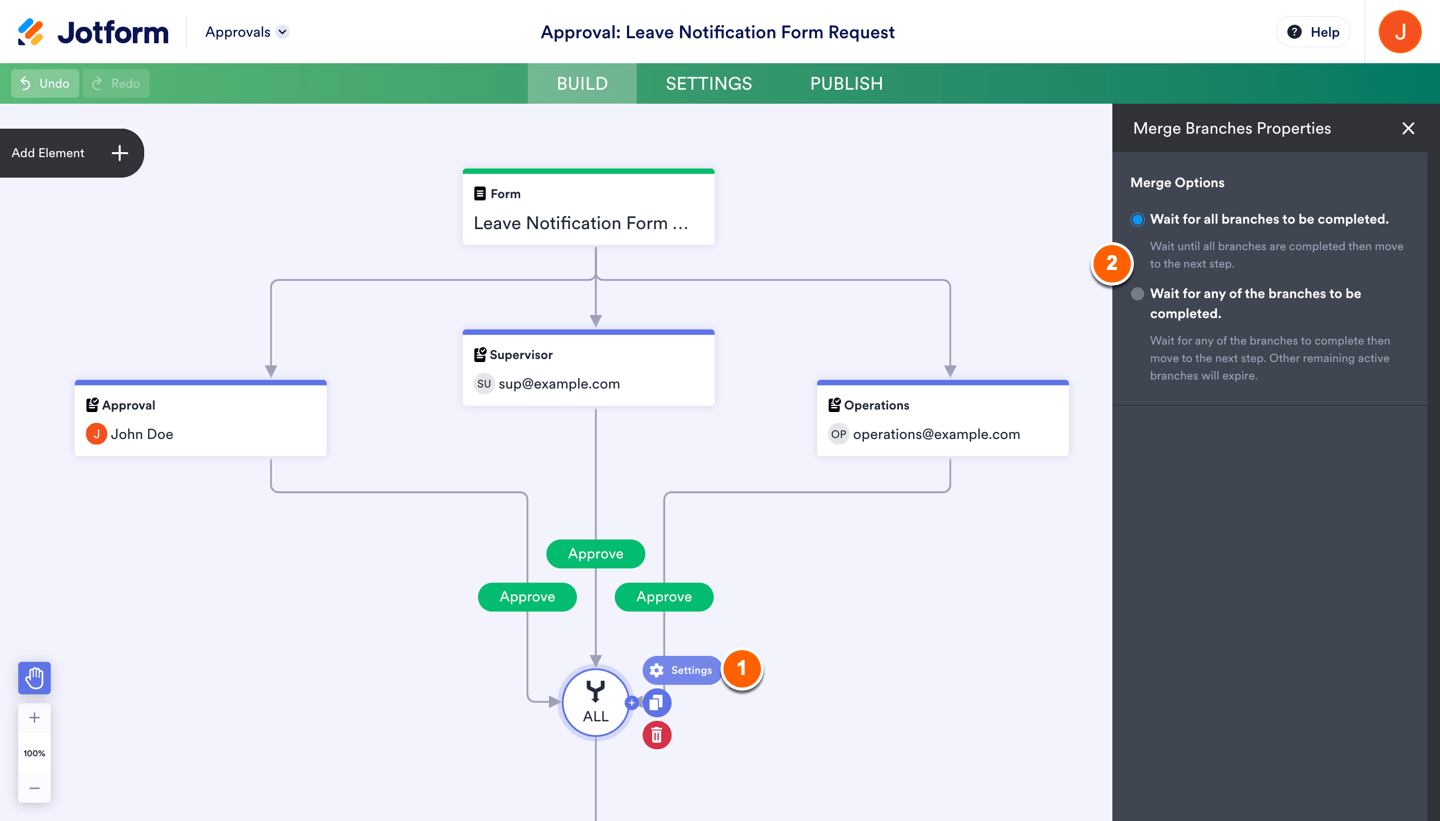
How Do You Create Parallel Approvals?
Parallel approvals send the approval request to multiple people and let one or all of them decide on the request. You can set up parallel approvals by adding multiple Approval elements in parallel format and then using the Merge Branches element.
Here’s a basic example of a parallel approval:
- Click on the Settings icon of the Merge Branches element.
- In the Merge Branches element, you can choose one of two options:
- Wait for all branches to be completed.
- Wait for any of the branches to be completed.

If you choose the first option, all approvers need to approve the request before the flow moves to the next step. In the example above, there is a setup with an email to go out upon approval and ended the flow there.
If you choose the second option, only one approver needs to approve the request to move the flow to the next step.
How Do You Set up a Send Email Element?
The Send Email element, while optional, is recommended for your approval flow. It allows you to notify the requester when their request has been approved or denied, or notify people that aren’t part of the approval process but would like to be in the loop.

There are three tabs in the Send Email element’s settings: Email, Recipients, and Advanced.
Please visit the following user guide for more details about the Send Email element: How to Set up a Send Email Element in Jotform Approvals.
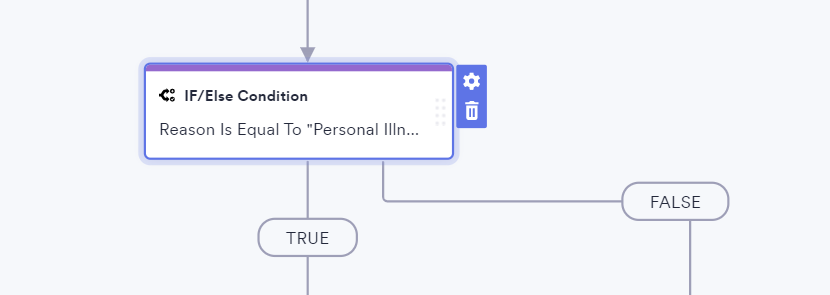
How Do You Set up an If-Else Condition Element?
The If-Else Condition element allows you to change the flow of the approval process based on conditions. For example, you can process approvals only when a specific option is selected from a multiple-selection field or send different approvals based on the input or selection in a specific field.
Please visit the following user guide for more details and examples about using the If-Else Condition element: How to Set up an If-Else Condition Element with Jotform Approvals.
How Do You Set up a Conditional Branch Element?
The Conditional Branch element allows you to create conditions and use them to build your approval flow. It enables you to direct your flow to perform different actions according to the condition that’s met. You can use this element instead of the If-Else Condition element.

Please visit the following user guide for more details and examples of how you can use the Conditional Branch element: How to Set up a Conditional Branch Element with Jotform Approvals.
How Do You Set up a Merge Branches Element?
The Merge Branches element allows you to bring separate approval elements together and create one path. One example of this is parallel approvals.
From the Elements menu, click or drag and drop the Merge Branches element to your workflow canvas:
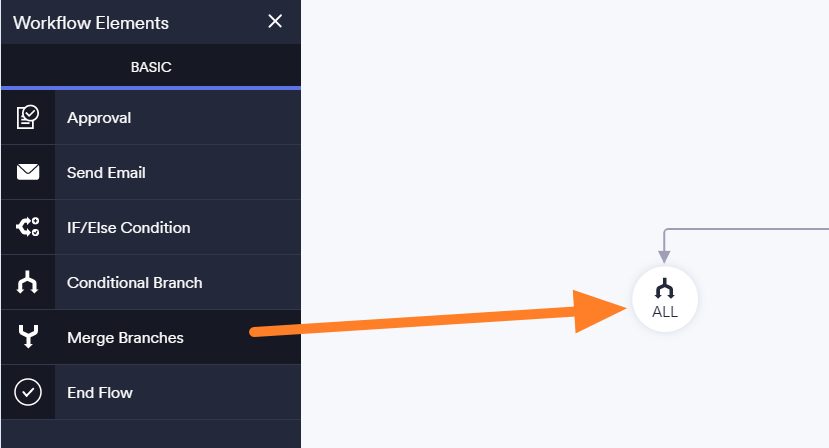
Once you added the Merge Branches element, you will need to set up this element:
- Click on the Settings icon of the Merge Branches element.
- In the Merge Branches element, you can choose one of two options:
- Wait for all branches to be completed – if you choose this option, all approvers must approve or deny the request before the flow can move to the next step.
- Wait for any of the branches to be completed – if you choose this option, just one of the approvers needs to approve or deny the request before the flow can move to the next step.
What Are Errors and Warnings?
If required items aren’t configured for an element, a red circle with an exclamation mark will appear on the top-left side of the element. That indicates an error. Click on the exclamation mark on the element or at the top right corner of the Approval Builder.
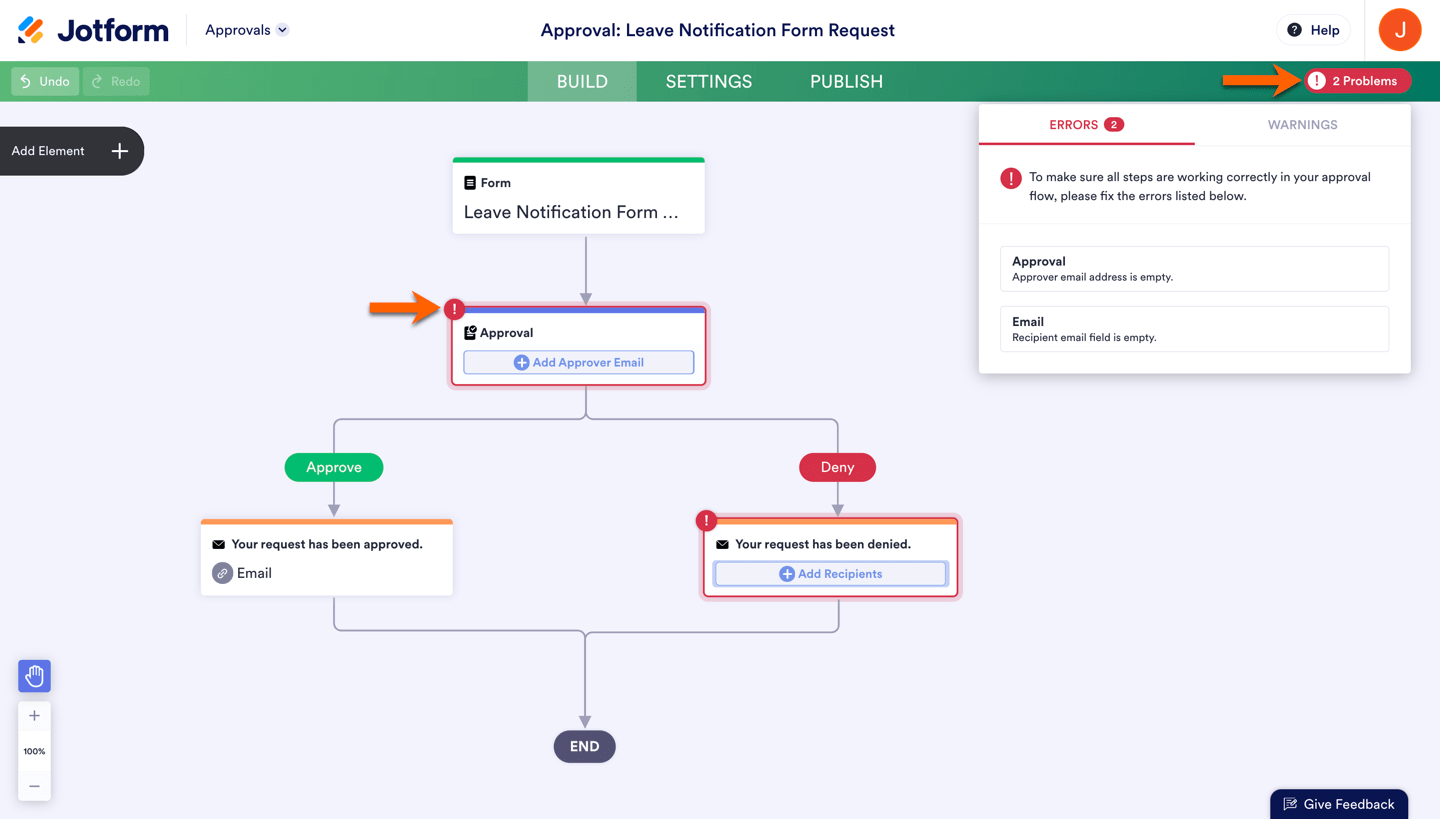
On the screenshot above, the Approval element is missing the approver’s email address. And the Send Email element is missing the recipient’s email.
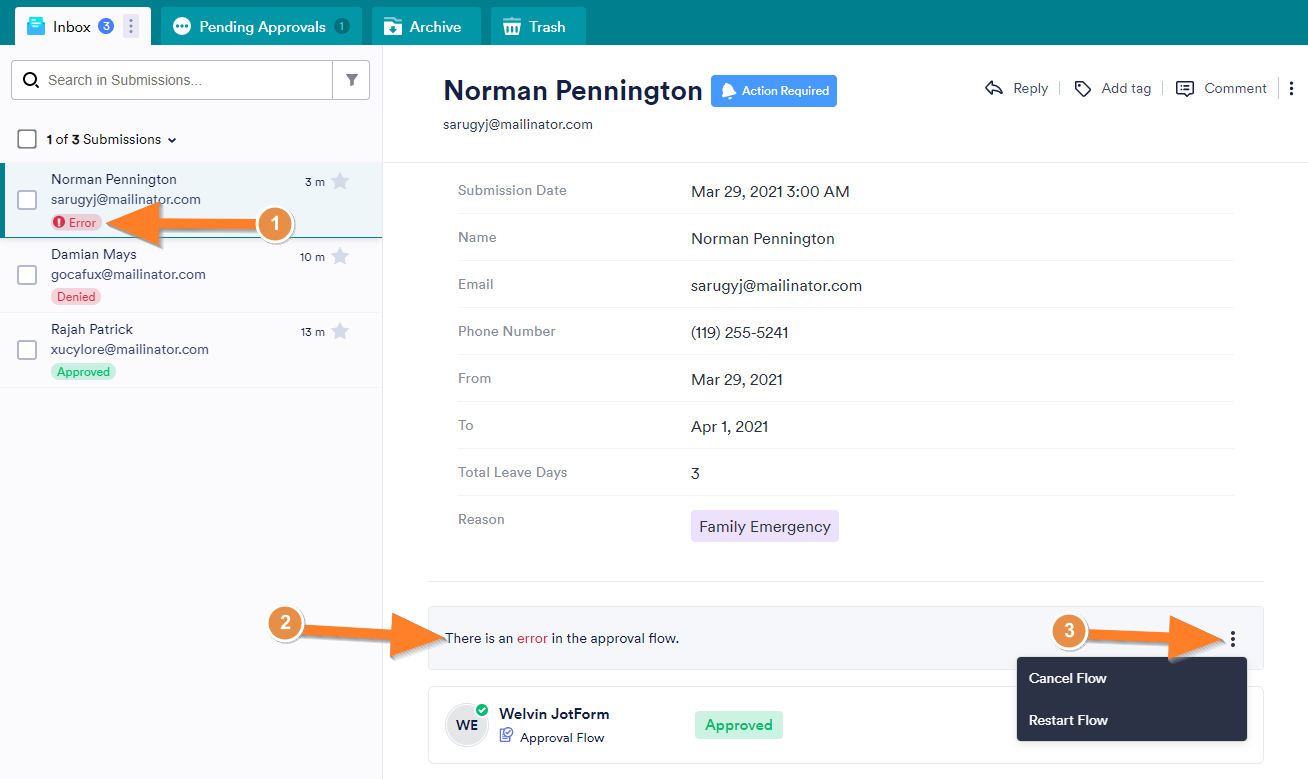
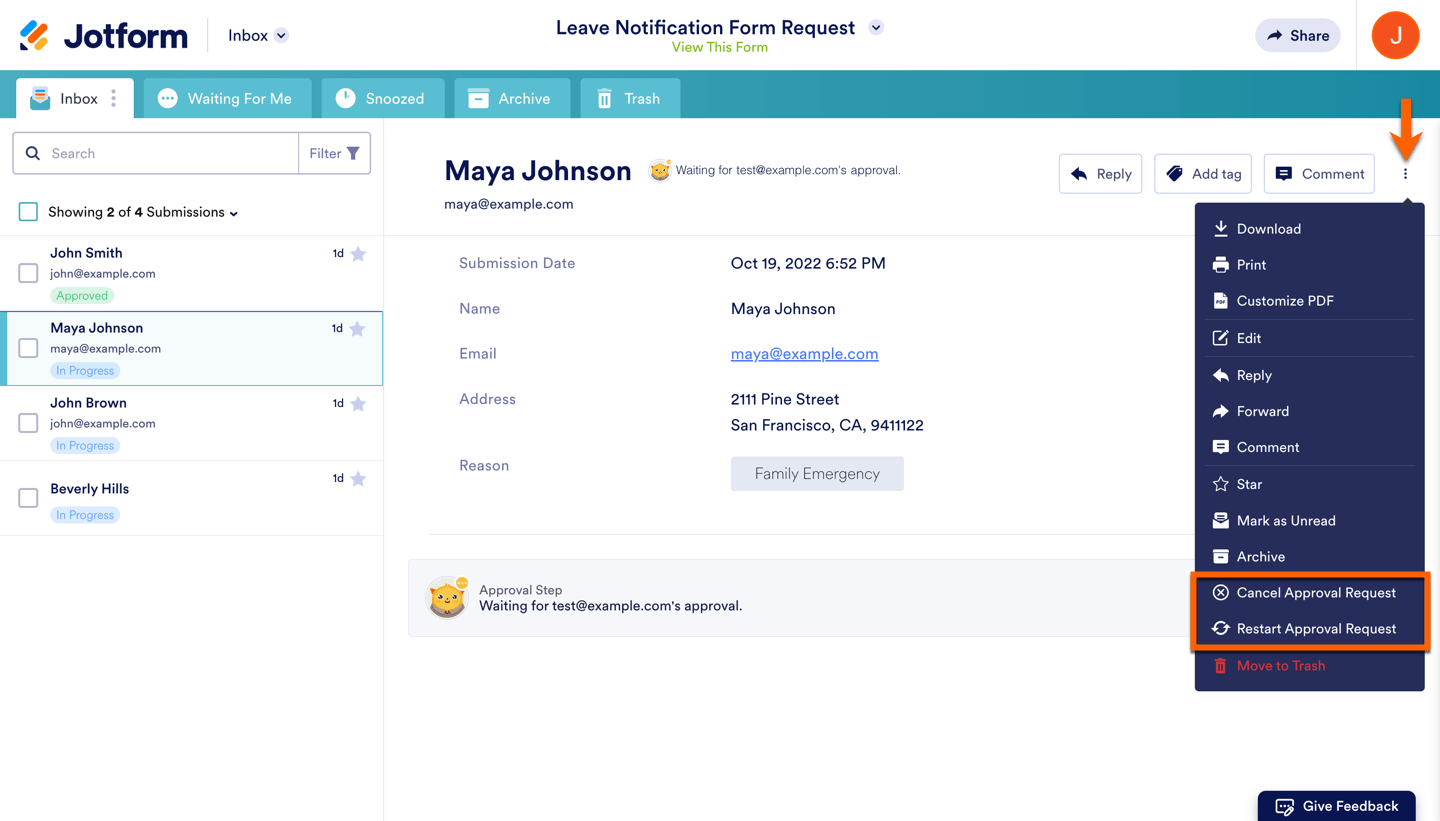
If you’ve already published the form and are receiving approval requests, edits to the approval flow will trigger a warning, especially if you have pending approvals or approvals that are in progress.

You’ll also see the error on the Inbox page regarding the changes in your approval flow. You have the option to either Cancel or Restart the flow.
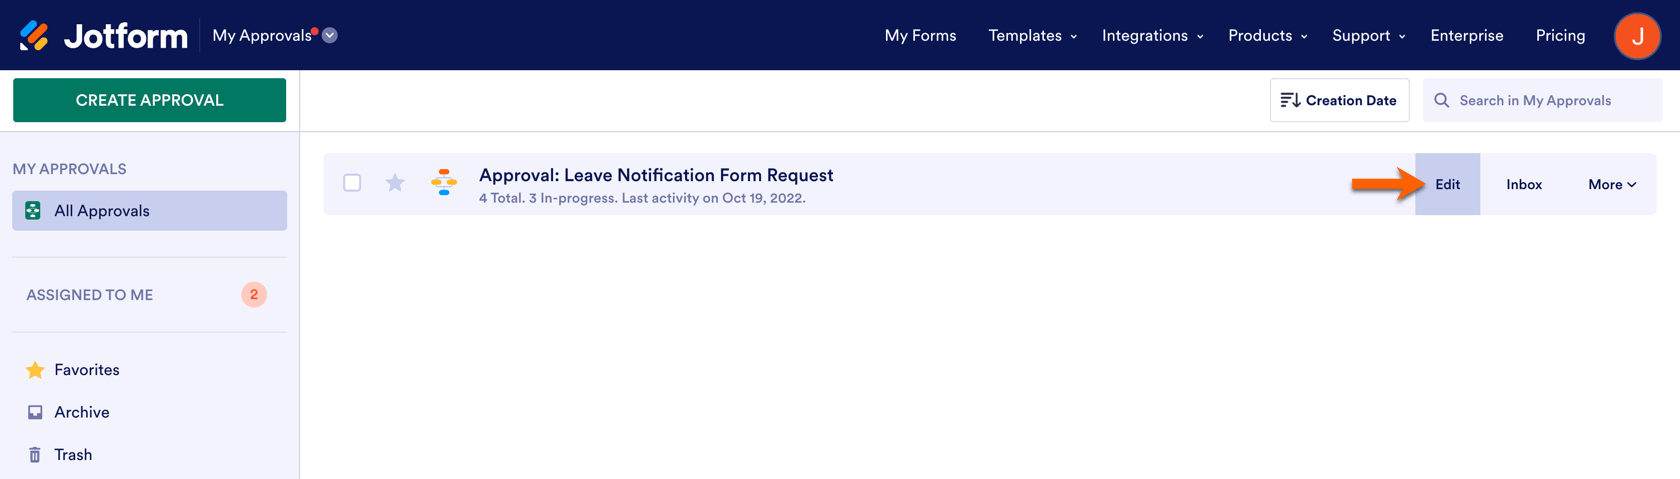
How Do You Edit Your Approval Workflow?
You have two options to edit your approval workflow. The most accessible is through the Form Builder:
- Go to the Settings tab of your Form Builder.
- Select the Approval Flows tab from the left menu.
- Hover your mouse over the approval flow and click on the Pencil icon.

Alternatively, you can go to the My Approvals page, hover your mouse over the approval, and click Edit.
How Do You Disable an Approval Workflow?
If you temporarily don’t need the approval workflow, you can easily disable one. After that, the approval workflow will be paused and you can enable it whenever you need. To disable your approval workflow:
- In the Form Builder, click on the Settings tab.
- Select the Approval Flows tab.
- Next, hover your mouse over the approval flow and click on the gear icon.
- After that, click on the Disable option.
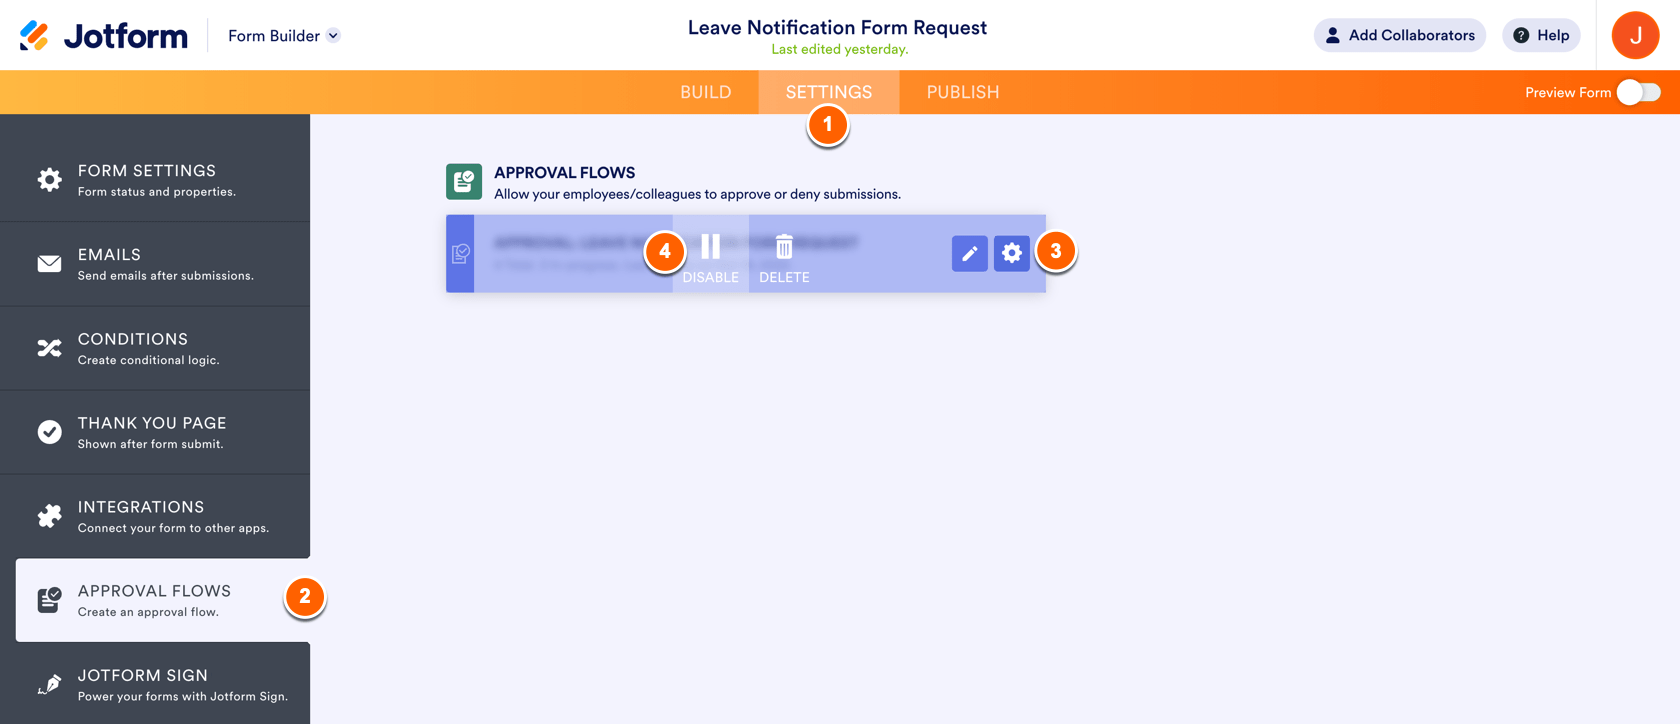
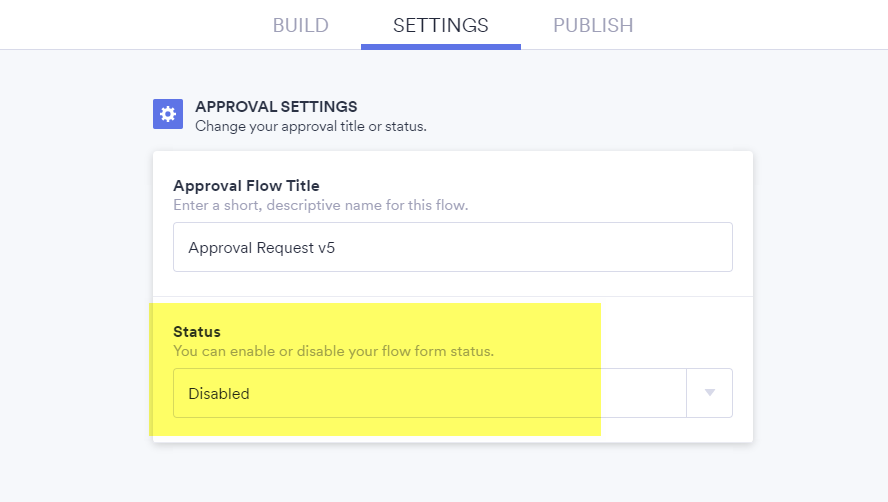
Alternatively, in the approval builder, go to the Settings tab. Choose Disabled in the Status dropdown.
How Do You Share or Publish Your Approval Workflow?
You can publish your approval workflow by sharing the link to the form. The Publish tab in Jotform Approvals includes, all the same, publish options as for forms.
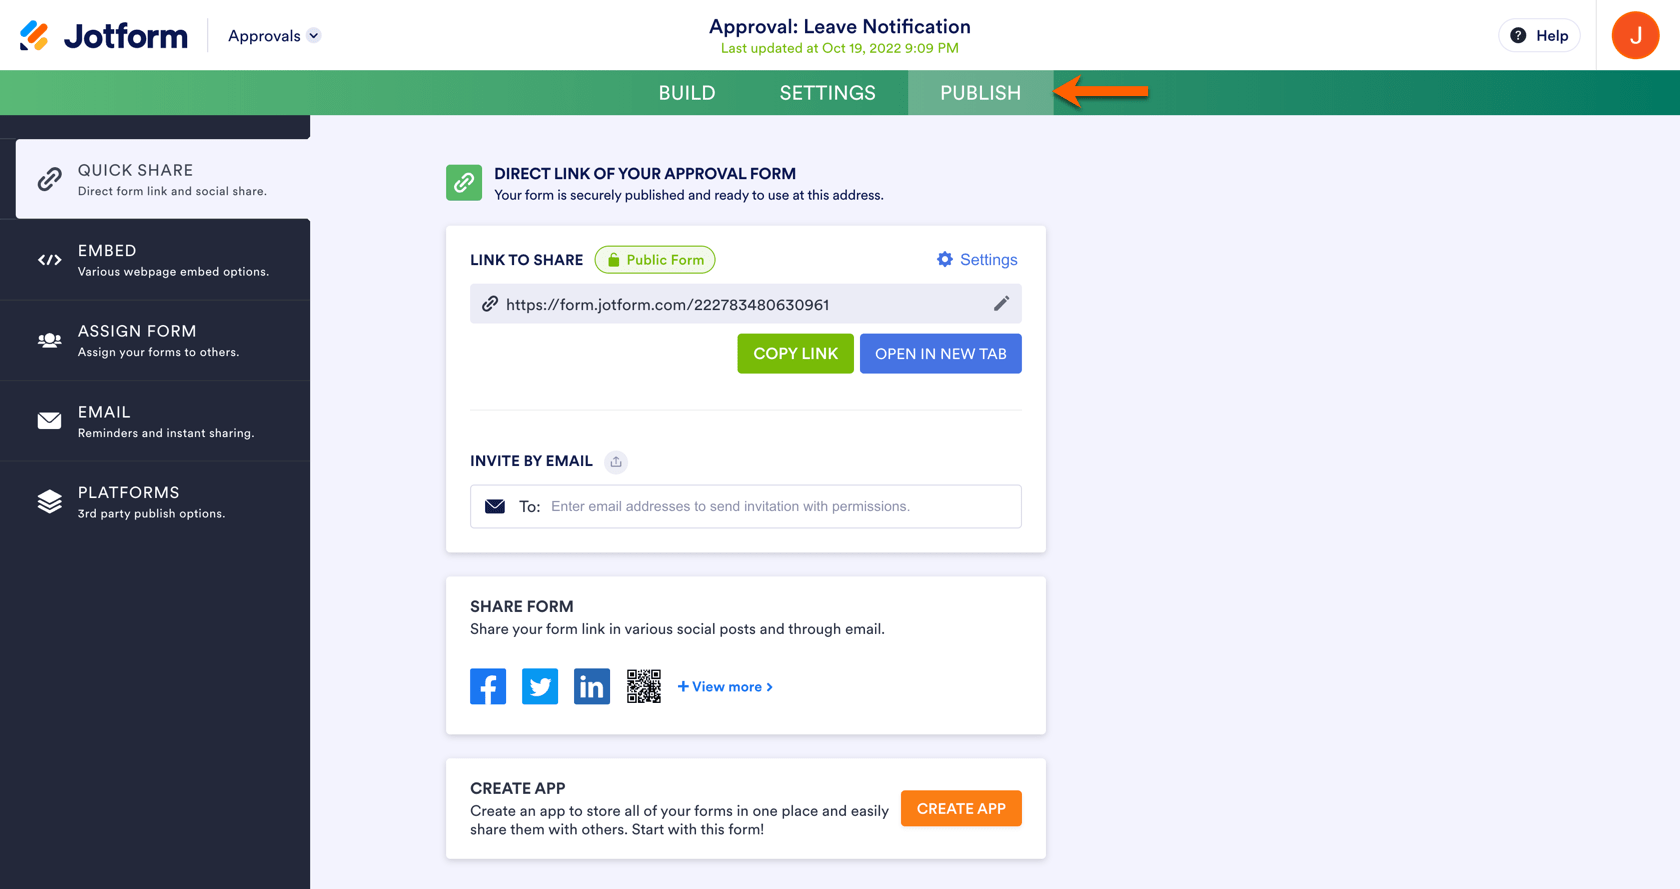
There are also additional options to share your form in the Publish tab. To learn more about all of them, please check this guide: How Do You Share or Publish Your Approval Workflow?
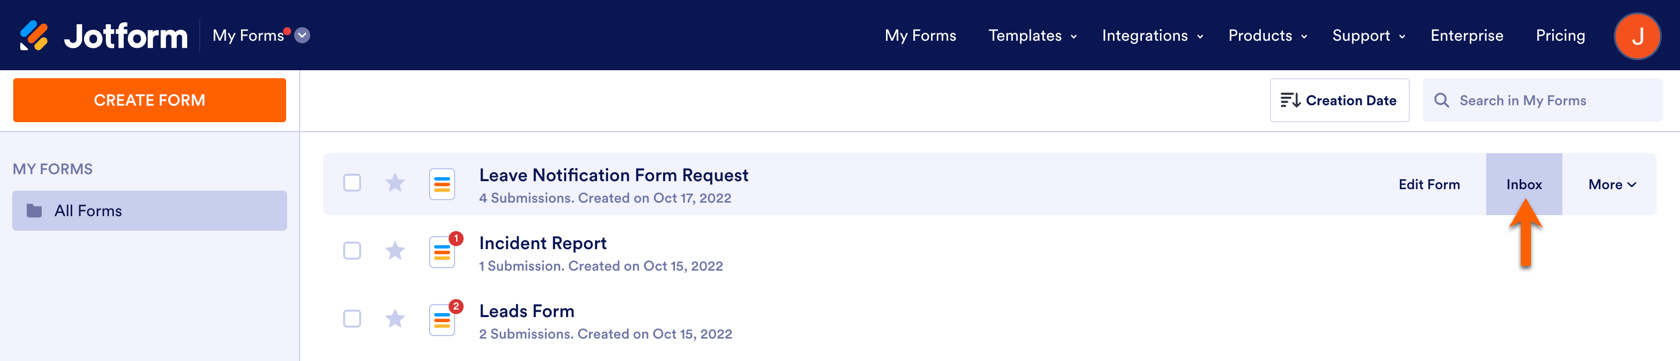
How Do You Track the Approval Process?
Approval Process Tracking via Inbox
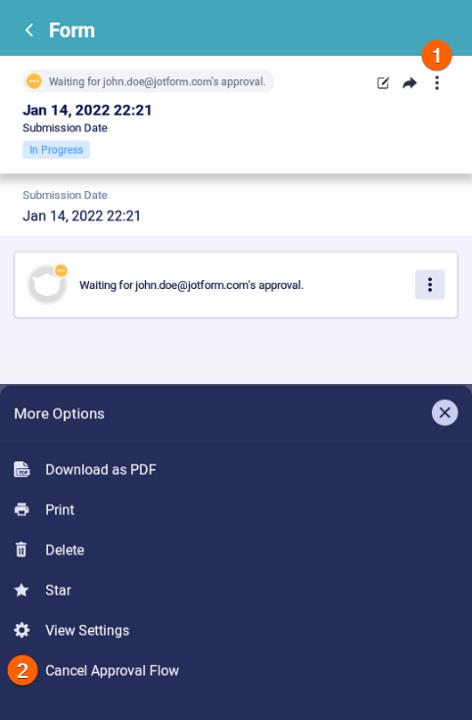
As a form owner, you can track all approval processes via Jotform Inbox.
By clicking on the three dots icon (⋮), you can Take Over and approve or deny the request on behalf of the approver or Reassign the approval step to another person.
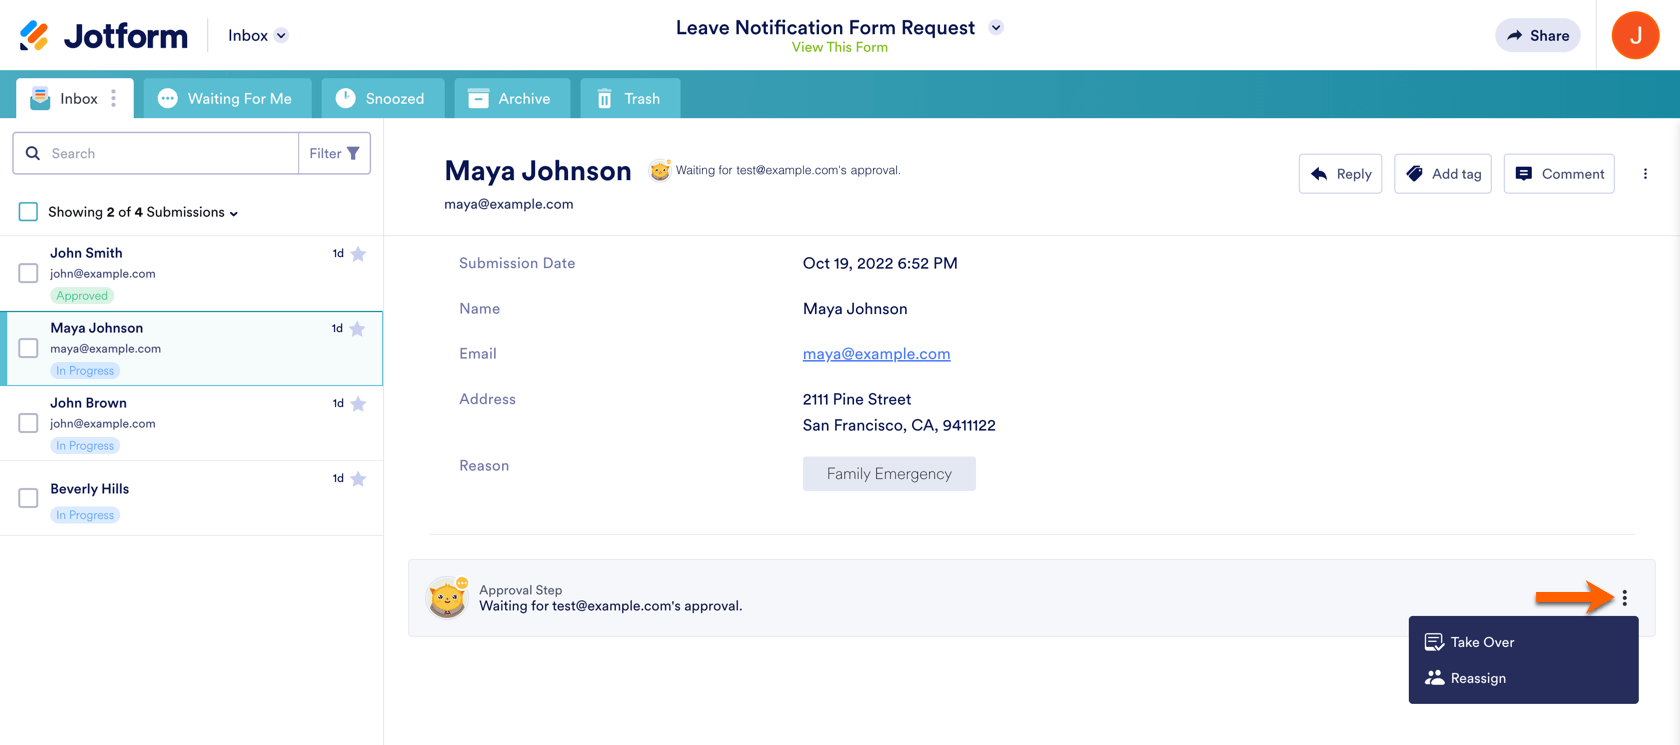
Also, it’s possible to Cancel or Restart the flow by clicking on the three dots icon (⋮) and selecting the Cancel Approval Flow option.
Approval Process Tracking via Mobile App
Another convenient way is to track all approval processes via Jotform Mobile App.
To check your approvals, you need to view the form’s Submissions.
You’ll see all approvals you have and their data such as the progress status of every approval.
By clicking on the three dots icon (⋮) after viewing an entry, you can Take Over and approve or deny the request on behalf of the approver or Reassign the approval step to another person.
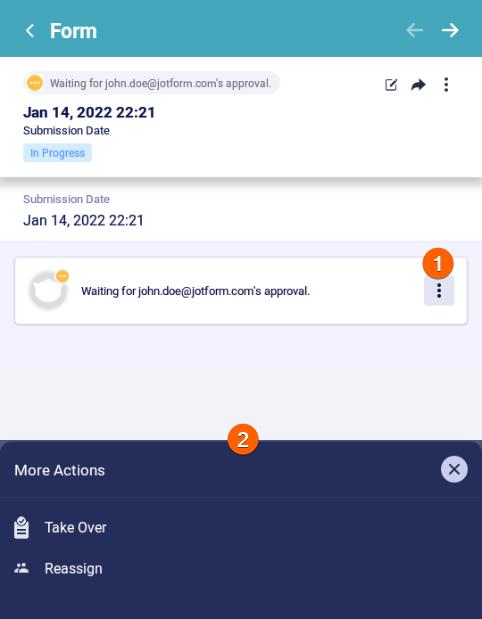
Also, you can cancel the approval flow for a certain submission, just click on the three dots icon (⋮) on the top of your screen to see the Cancel Approval Flow option.
How to Track the Approval Process via Jotform Tables
You can track all of your approval processes along with all of your submission data via Jotform Tables.
Once you’ve created a workflow, the Status column will be automatically added to your submissions table. This column won’t be visible on the form itself, just in Jotform Tables.
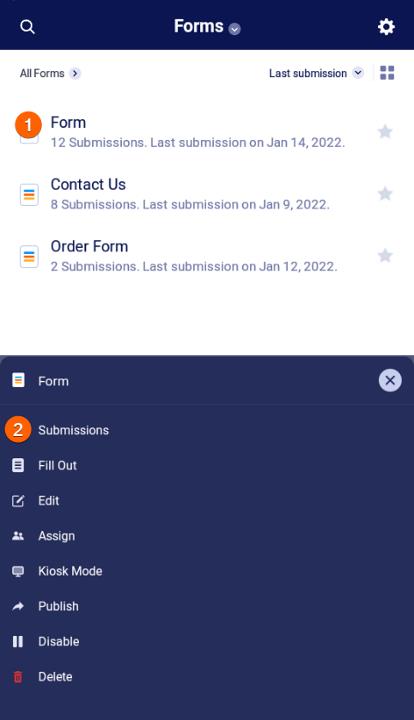
To access your form’s submission table:
- Go to the My Forms page and select the form with the submissions you want to view.
- Click the Submissions button in the top toolbar.

You’ll be redirected to Jotform Tables, where the submissions are listed. There, you can track your submissions in the Approval Status column.
The form owner and people with access to the submissions table can see the status of submissions (such as Approved, Denied, or In Progress).

Learn more about managing your approval workflow here: How Do You Track the Approval Process in Jotform Tables.
How Do Approvers Complete Their Tasks?
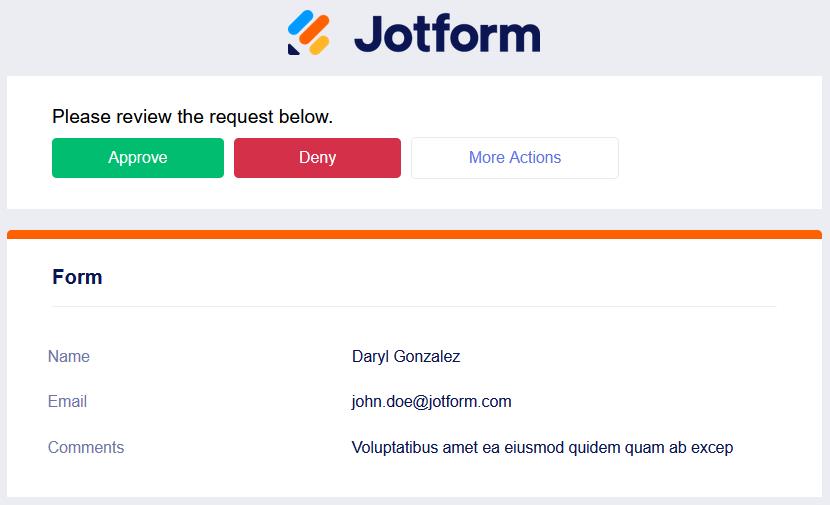
Please visit the following guide for more details: How Do Approvers Complete Their Tasks.
Send Comment:
1 Comments:
More than a year ago
Pueden los aprobadores no tener cuenta en jotform?