Jotform’s Autoresponder Emails help you automatically send pre-written emails to people after they submit your form. Whether you’re confirming registrations, acknowledging requests, sending order details, sharing files, or following up with customers, autoresponder emails make it easier to provide timely information, personalize your messages, and reduce the need for manual follow-ups.
Creating Autoresponder Emails with Email Copilot
Whether you’re building a new form or updating an existing one, you can use Email Copilot to quickly create Autoresponder Emails with AI-generated content based on your prompt and form fields. Here’s how:
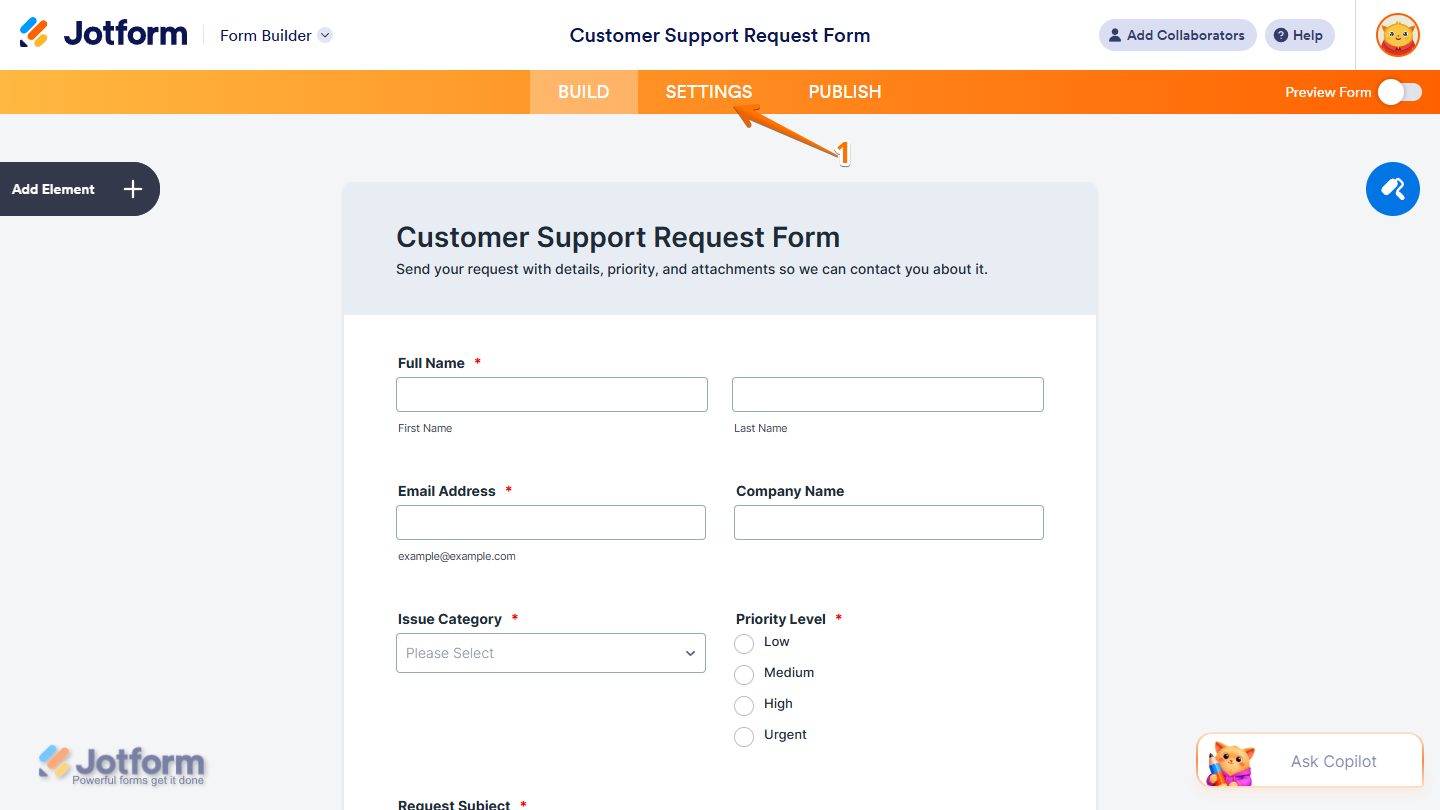
- In Form Builder, in the orange navigation bar at the top of the page, click on Settings.
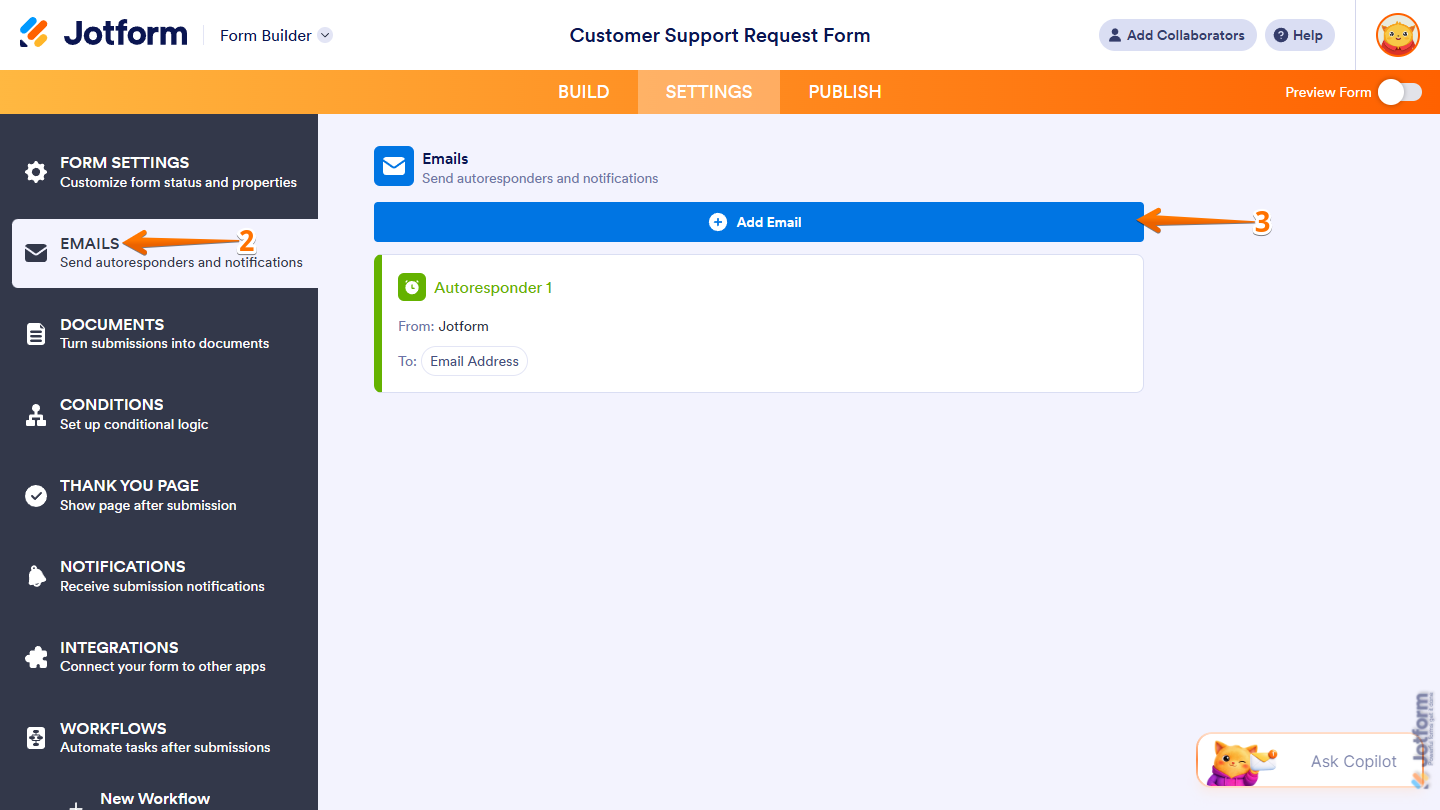
- Now, in the menu on the left side of the page, click on Emails.
- If your form has an existing Notification Email or Autoresponder Email, click on Add Email in the Emails section on the right.
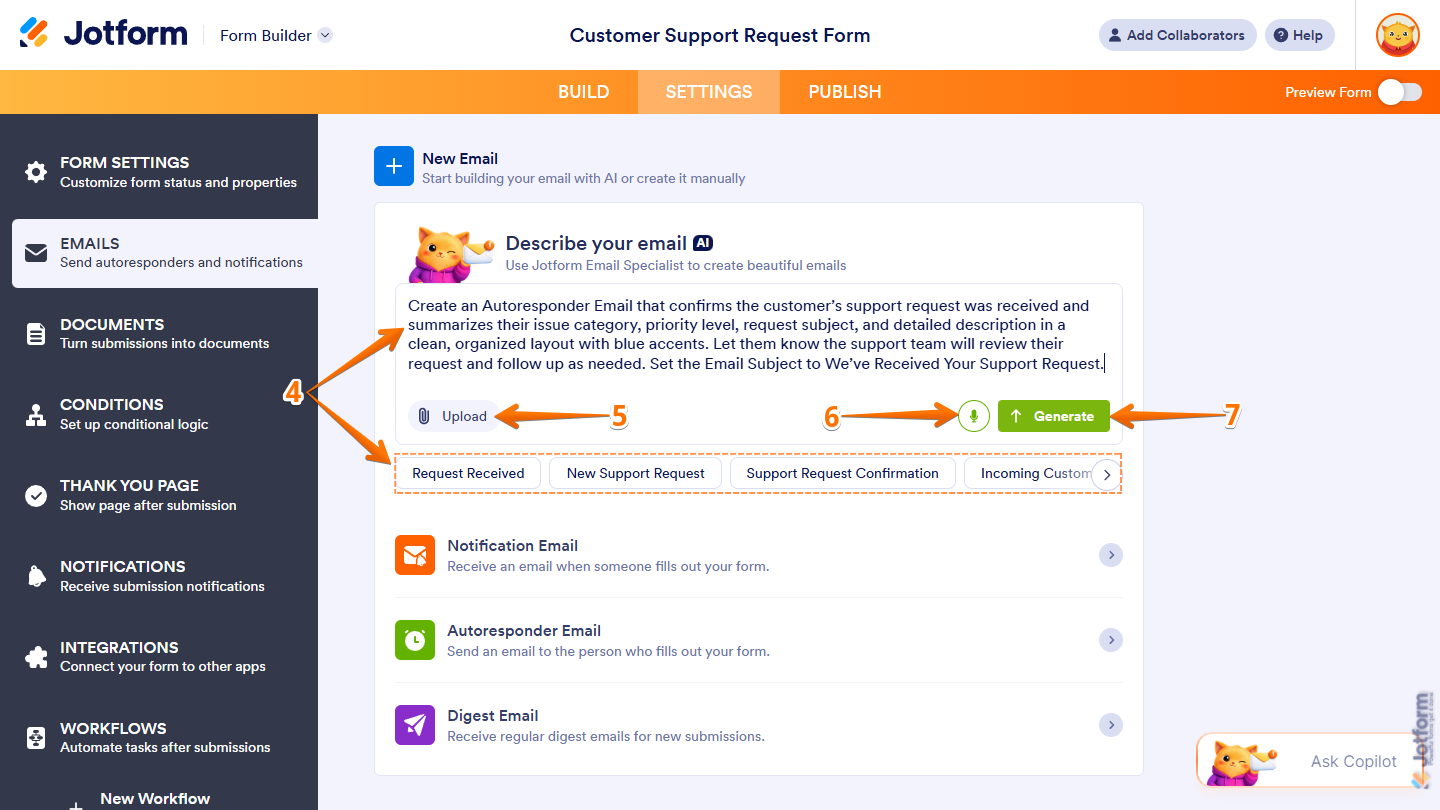
- Then, in the Describe Your Email Prompt box of the New Email section, describe the content, style, format, and other details you want for your Autoresponder Email, or click on one of the buttons below it to use a predefined prompt.
Here are some example prompts:
- Create an Autoresponder Email that thanks customers for their order and includes their submitted order details in a clean, organized layout with blue accents. Set the Email Subject to Order Confirmation.
- Create an Autoresponder Email that confirms the registrant’s registration and includes their submitted registration details in a clear, structured layout with green accents. Set the Email Subject to Registration Confirmation.
- Create an Autoresponder Email that confirms the applicant’s application was received and includes their submitted application details in a simple, modern layout with purple accents and visual dividers. Set the Email Subject to Application Received.
- To use an image as additional context for your prompt or include it in the autoresponder email, click on Upload in the bottom-left corner of the Prompt box, and then select one from your device.
- If you’d rather use voice for your prompts, click on the Microphone icon on the right side of the Prompt box, and then allow permission for your browser to access your device’s microphone.
Pro Tip
For better results, include the email’s purpose and tone in your prompt. You can also provide details about your website and visual style or upload your logo to help Email Copilot create an email that fits your brand.
- Once you’re done, click on Generate.
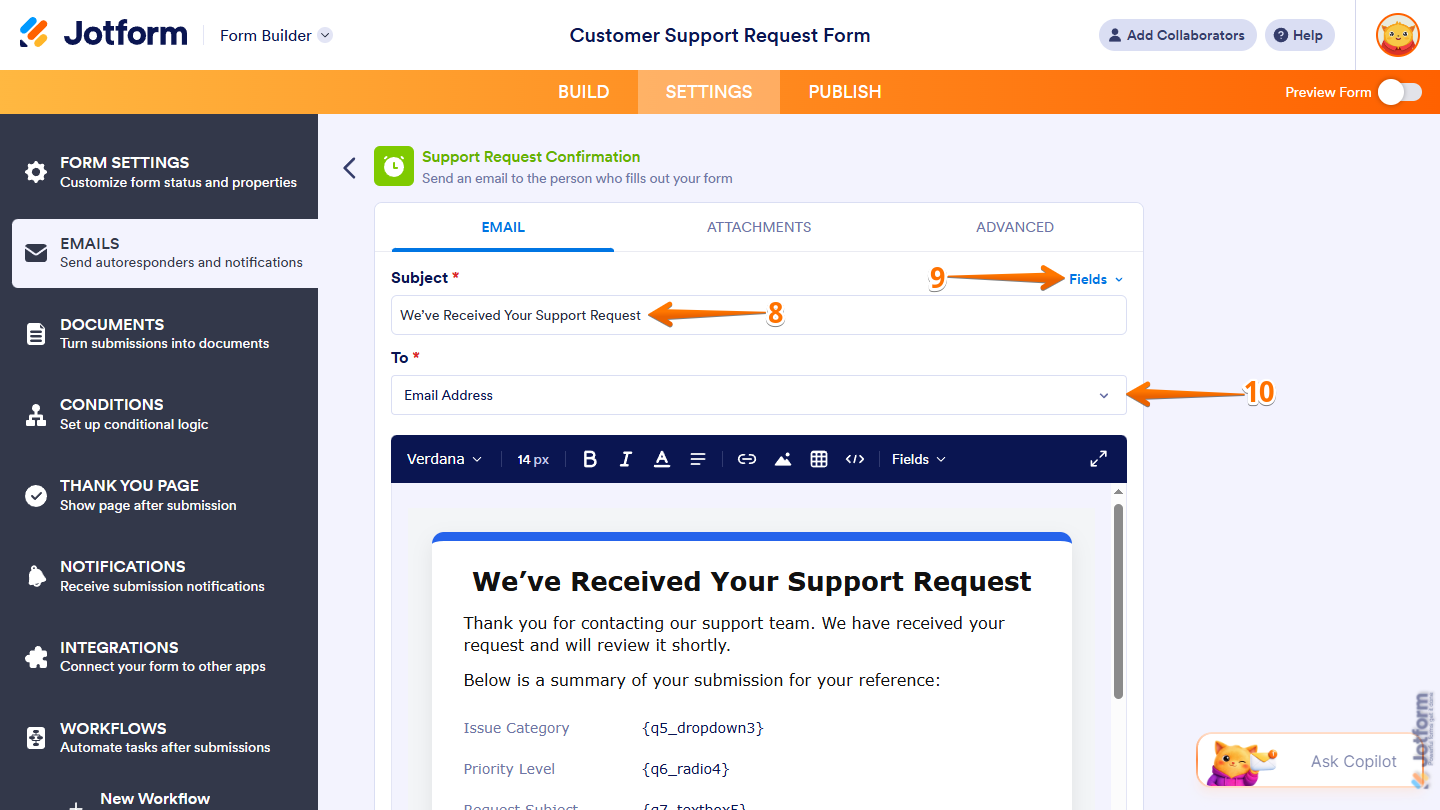
- Now, under the Email tab of the generated Autoresponder Email, in the Subject field, enter the subject line you want for the autoresponder emails.
- To include a field value in the subject line, click on Fields on the right, and then select a supported field.
- Next, under To, click on the Downward Arrow icon on the right, and in the Dropdown menu, select the Email field to use for the recipient.
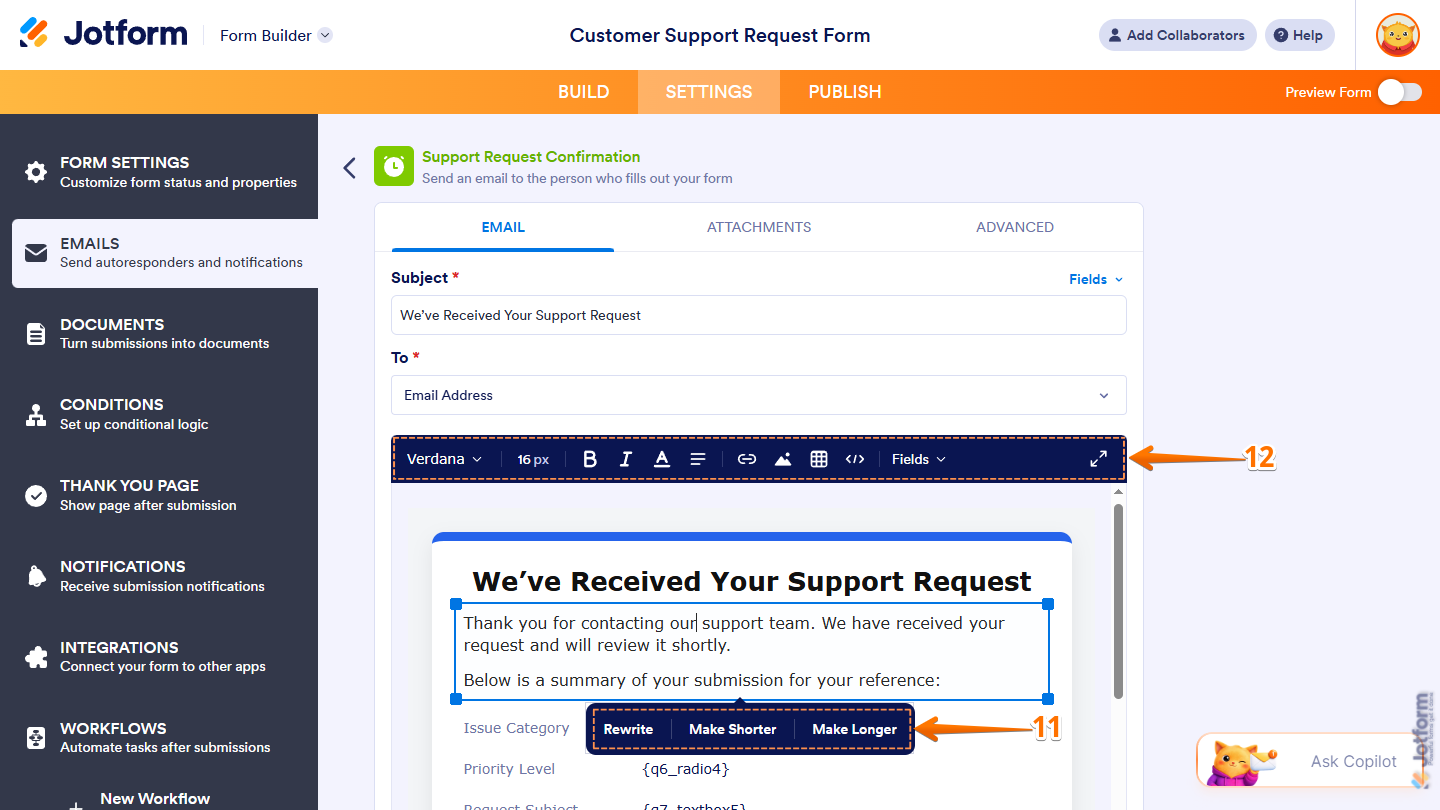
- In the email editor, click on the heading, sentence, or paragraph you want to change, then in the menu that appears below it, select one of these options:
- Rewrite — This generates a new version of the selected text while keeping its meaning.
- Make Shorter — This generates a shorter version of the selected text.
- Make Longer — This generates a longer version of the selected text with more detail.
- To manually customize the email content, use the tools at the top of the editor to format and align text, add links, images, or tables, insert form field values, or edit the HTML source.
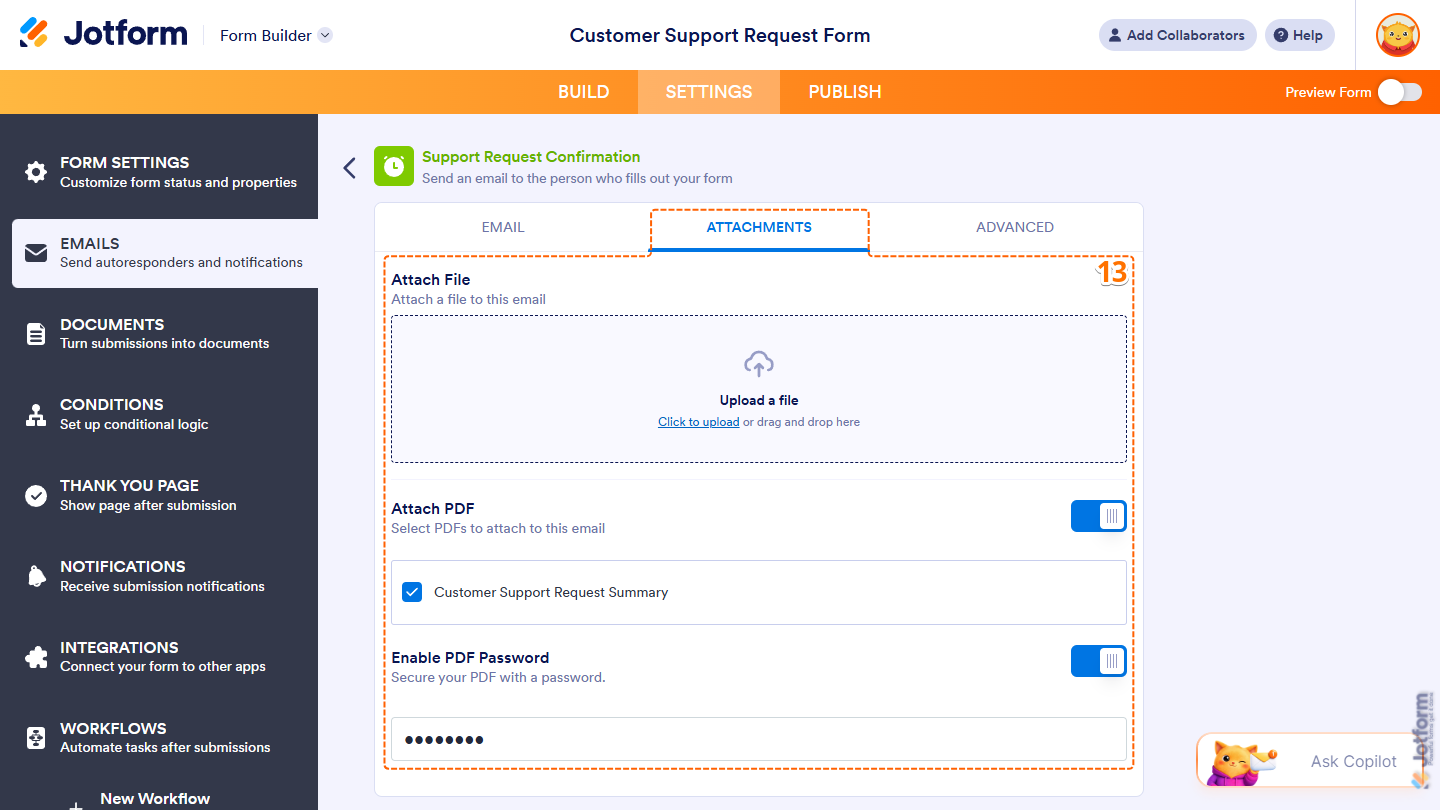
- Now, under the Attachments tab, configure these settings:
- Attach File — Drag and drop a file into the Upload area, or click on Upload a File, and then select a file from your device to attach to the autoresponder emails.
- Attach PDF — Toggle this on, then below it, tick the box next to a PDF Document option to attach that PDF version of the submission to the autoresponder emails, or tick the box next to Select All to attach every available version.
- Enable PDF Password — When Attach PDF is enabled, toggle this on and then below it, enter the password you want to set for the attached PDFs.
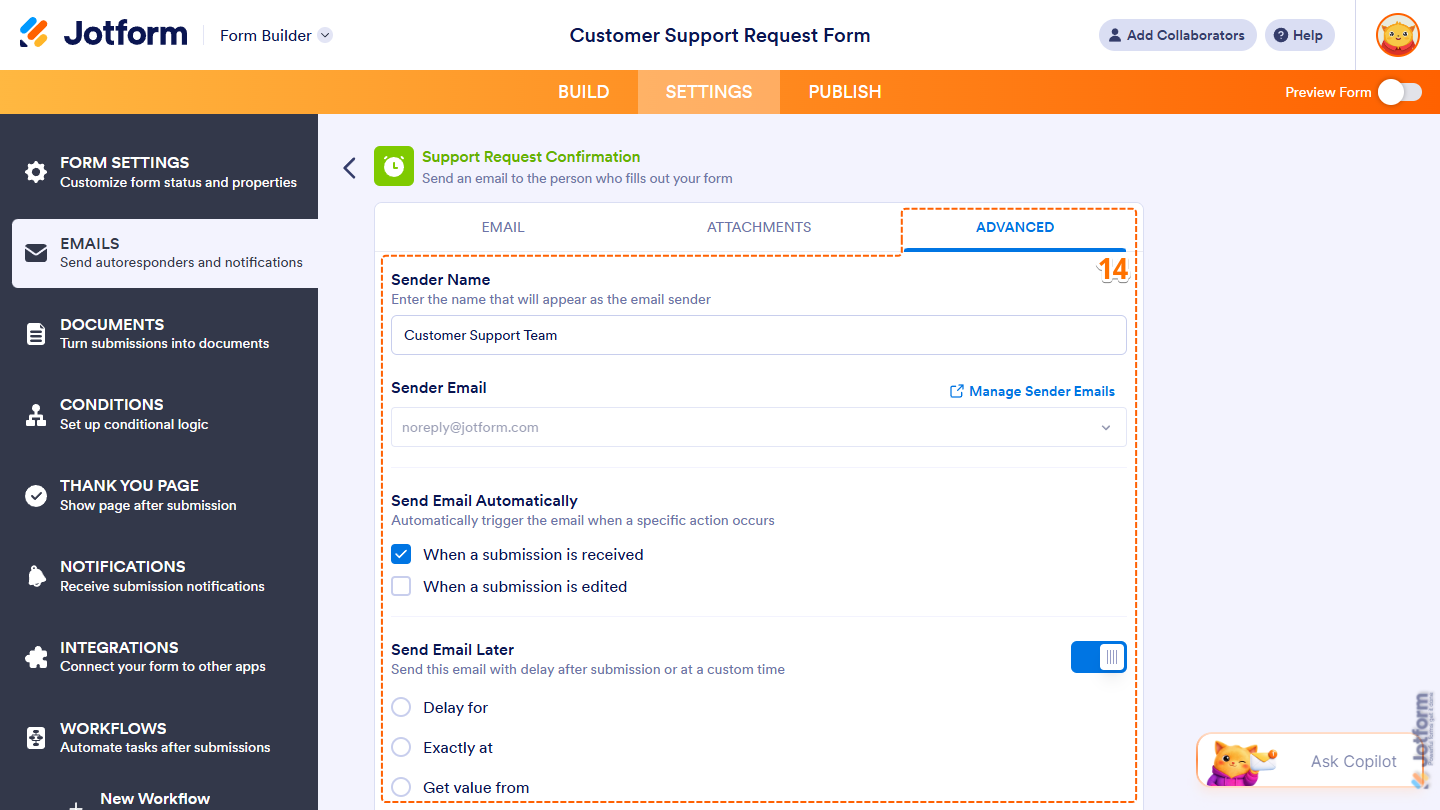
- Then, under the Advanced tab, set up these settings:
- Sender Name — Enter the name you want to appear as the sender of the autoresponder emails.
- Sender Email — Keep the default sender email selected, or click on the Downward Arrow icon and, in the Dropdown menu, select a custom sender email you’ve already set up for your account. You can also click on Manage Sender Emails on the right to open your Account Settings in a new browser tab to set one up. Check out our guide on How to Set Up a Custom Sender Email with SMTP to learn more.
- Send Email Automatically — Tick or untick the box next to When a Submission Is Received or When a Submission Is Edited to set whether autoresponder emails are sent for that event.
- Send Email Later — Toggle this on and below it, select whether you want the autoresponder emails sent after a delay, at a specific date and time, or based on a Date field value. Take a look at our guide on How to Send Emails Later Using Autoresponder Email for more details.
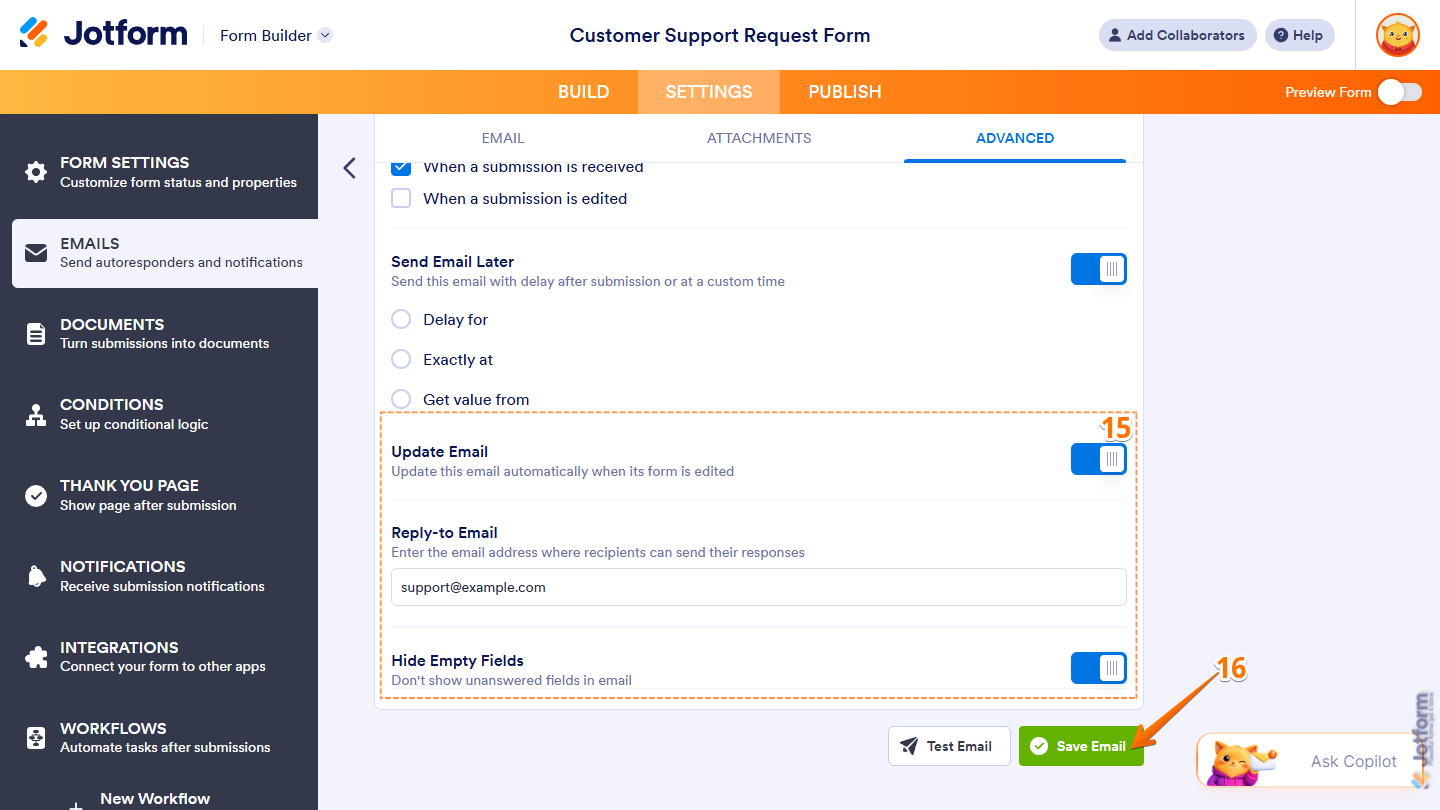
- Next, scroll down and continue with these settings:
- Update Email — Toggle this off to prevent the email content from updating automatically when you edit the form.
- Reply-To Email — Enter the default reply-to email address for the autoresponder emails.
- Hide Empty Fields — Toggle this off to include unanswered form fields in the autoresponder emails.
- Once everything’s set, click on Save Email.
That’s it! You’ve successfully created and configured your Autoresponder Email with AI-generated content based on your prompt and form fields.
Creating Autoresponder Emails Manually
Whether you’re building a new form or updating an existing one, you can manually create Autoresponder Emails and configure their recipients, content, and settings. Here’s what to do:
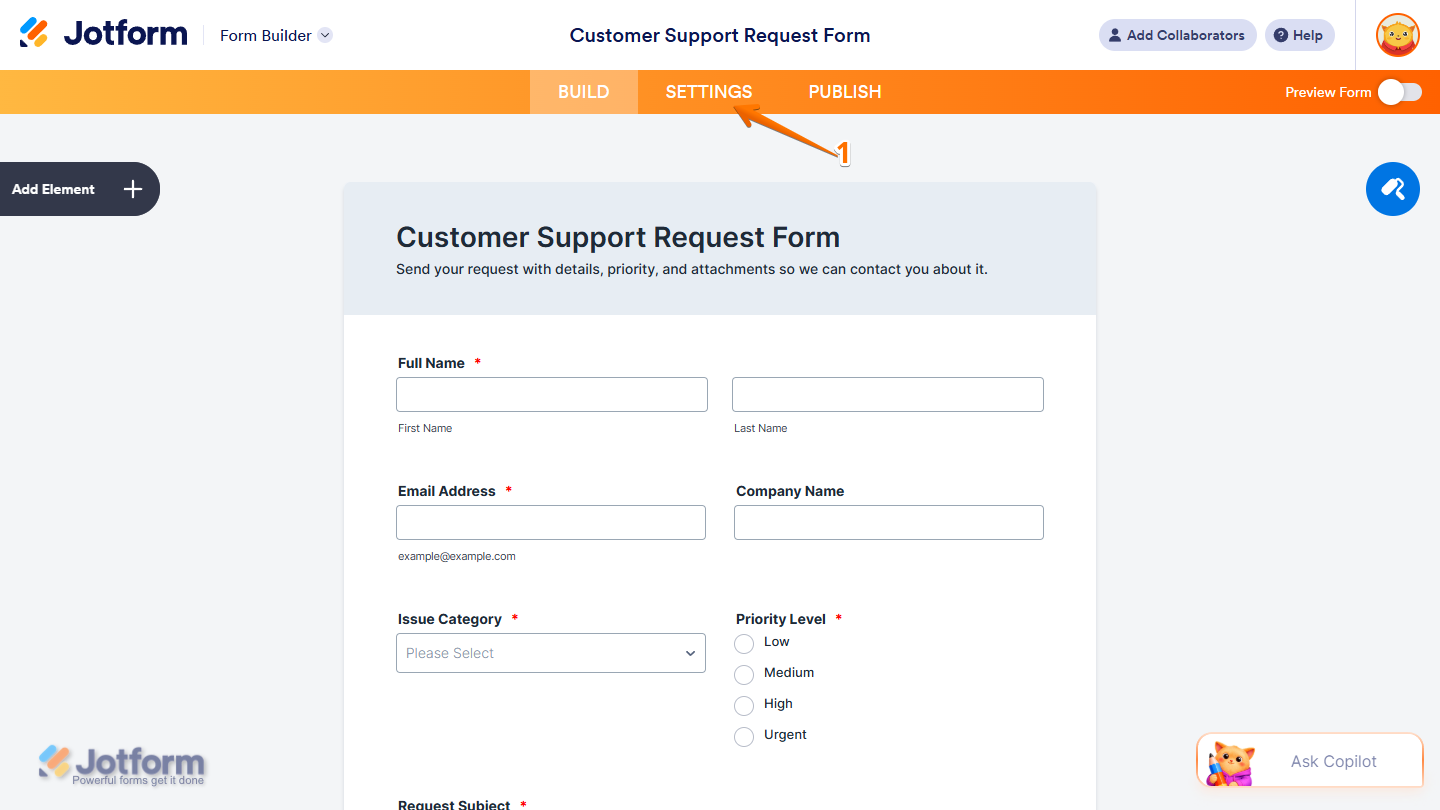
- In Form Builder, in the orange navigation bar at the top of the page, click on Settings.
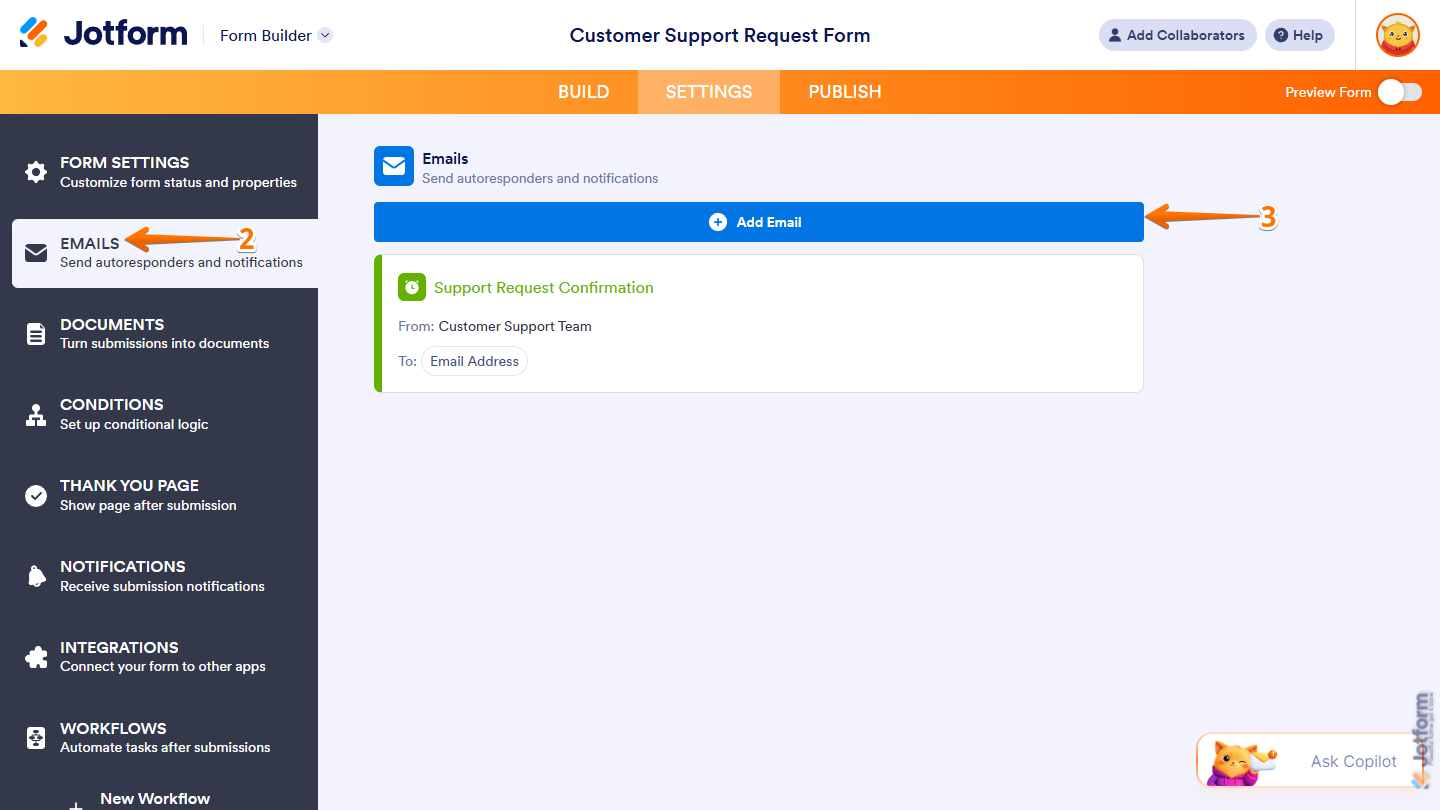
- Now, in the menu on the left side of the page, click on Emails.
- If your form has an existing Notification Email or Autoresponder Email, click on Add Email in the Emails section on the right.
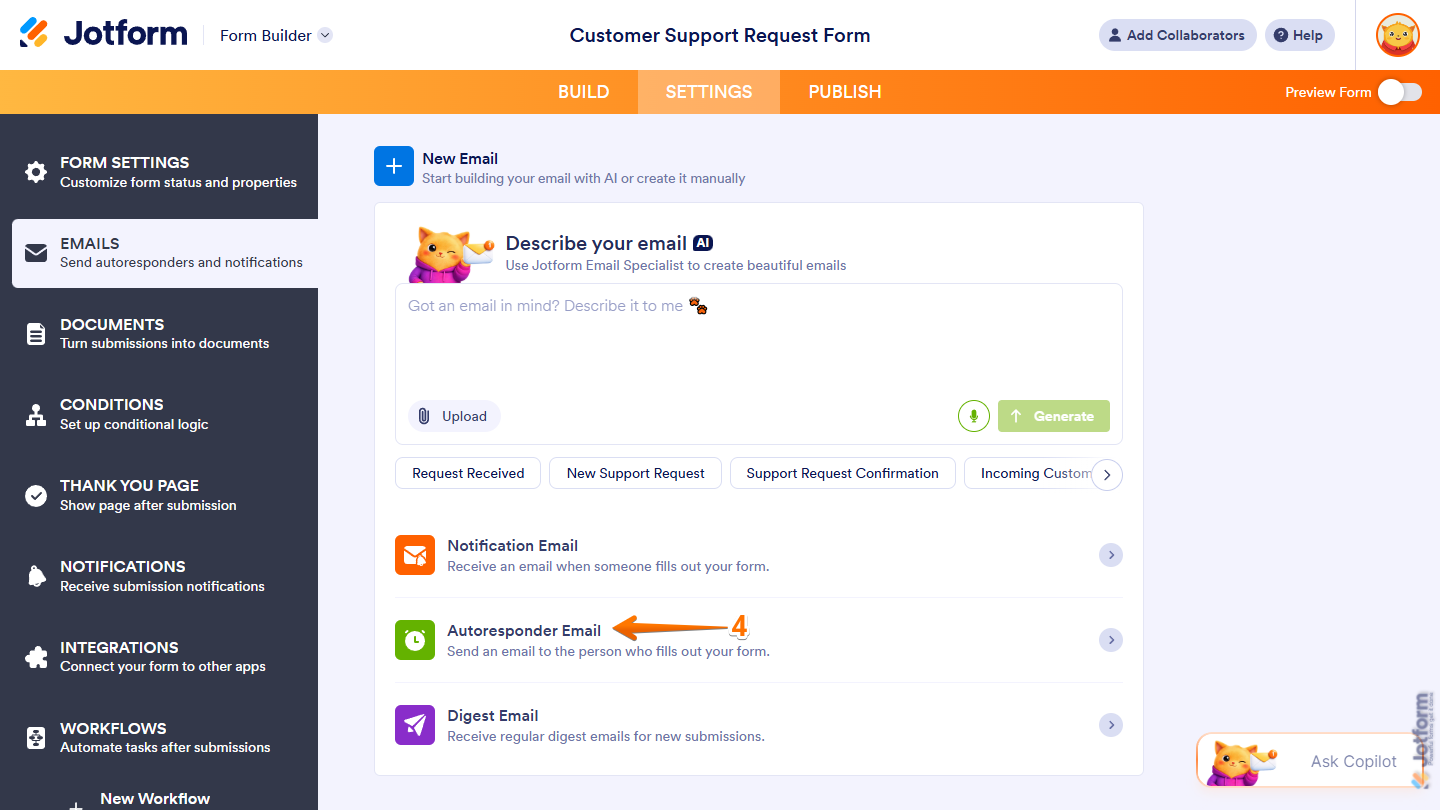
- Then, in the New Email section, click on Autoresponder Email.
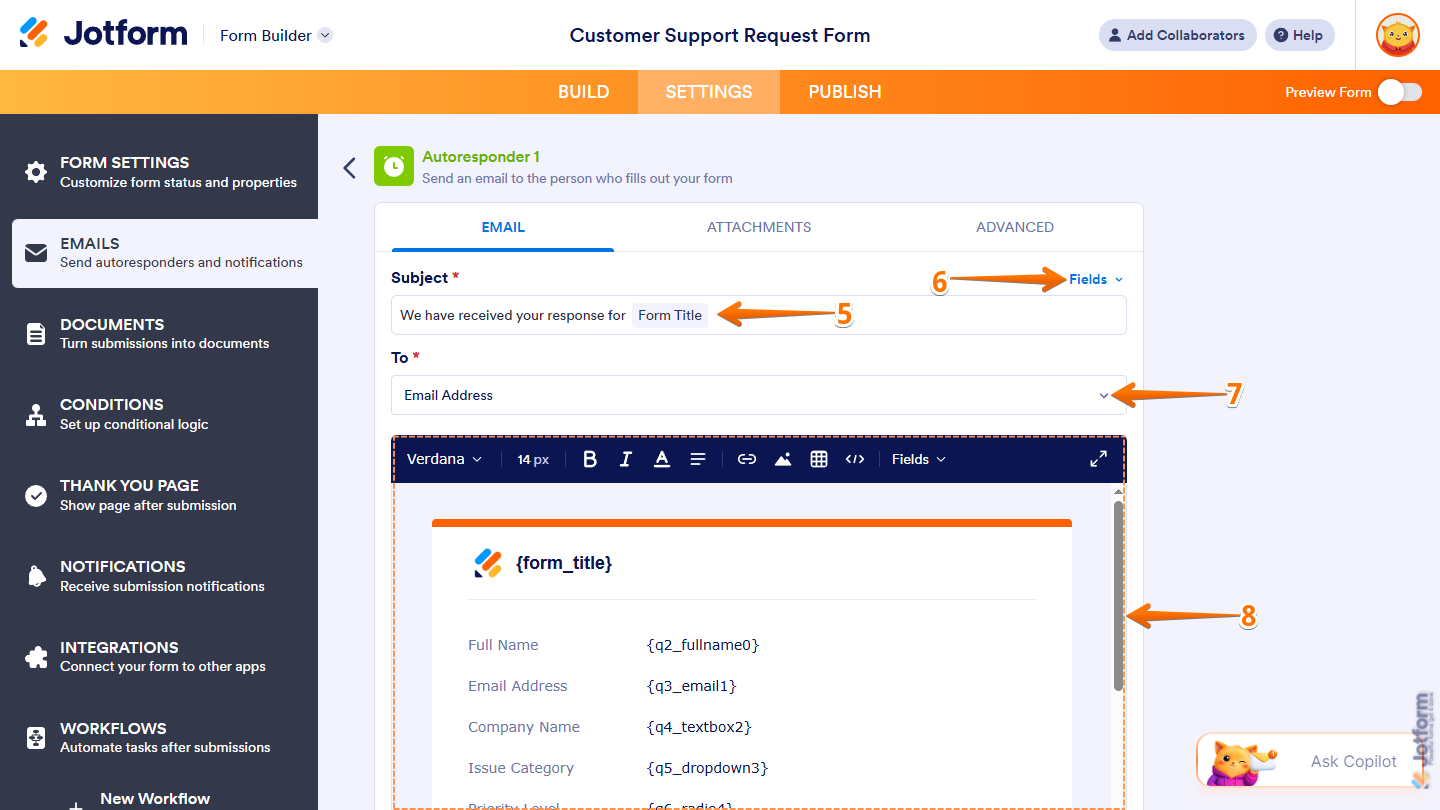
- Now, under the Email tab of the new Autoresponder Email, in the Subject field, enter the subject line you want for the autoresponder emails.
- To include a field value in the subject line, click on Fields on the right, and then select a supported field.
- Next, under To, click on the Downward Arrow icon on the right, and in the Dropdown menu, select the Email field to use for the recipient.
- In the email editor, customize the content of the autoresponder emails. You can use the tools at the top to format and align text, add links, images, or tables, insert form field values, or edit the HTML source.
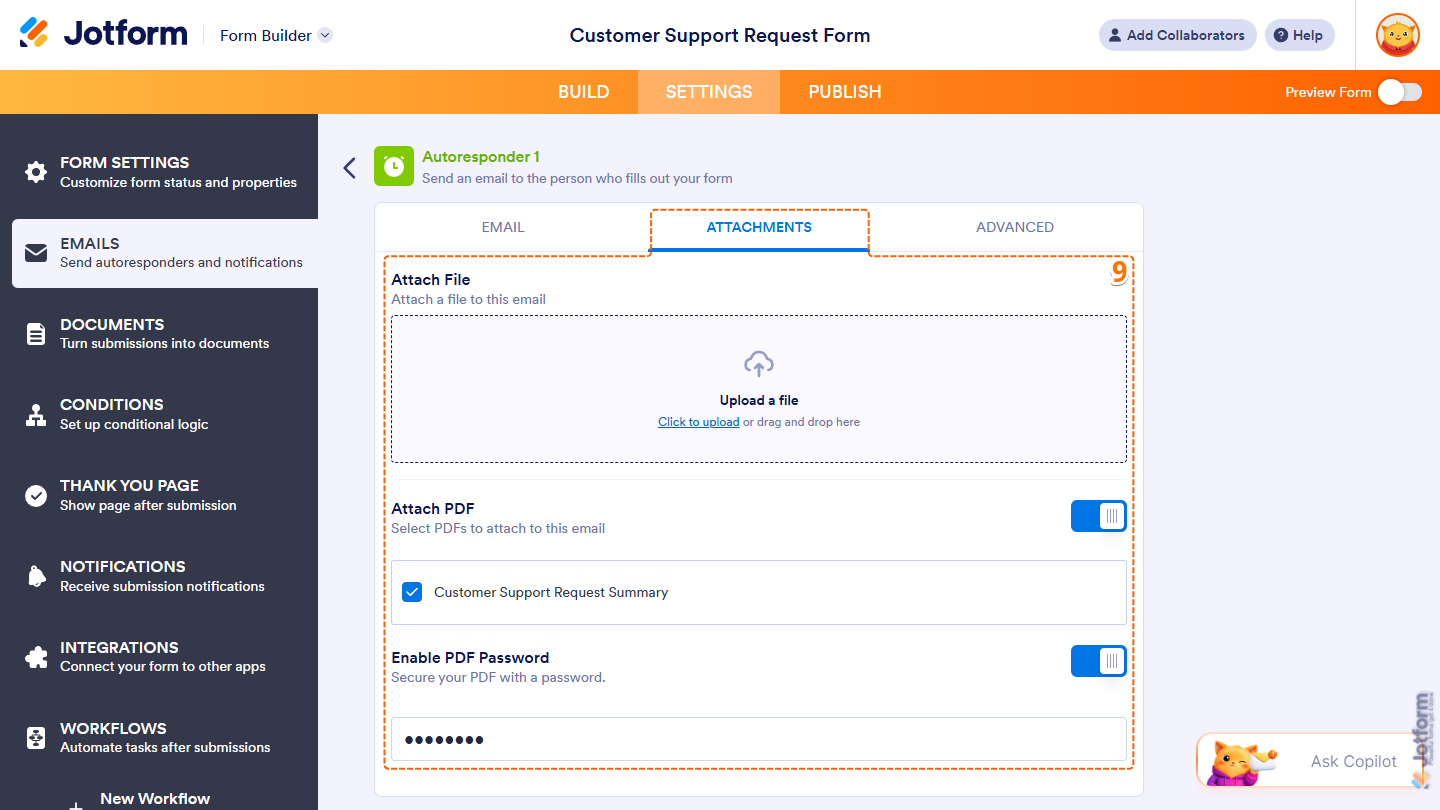
- Now, under the Attachments tab, configure these settings:
- Attach File — Drag and drop a file into the Upload area, or click on Upload a File, and then select a file from your device to attach to the autoresponder emails.
- Attach PDF — Toggle this on, then below it, tick the box next to a PDF Document option to attach that PDF version of the submission to the autoresponder emails, or tick the box next to Select All to attach every available version.
- Enable PDF Password — When Attach PDF is enabled, toggle this on and then below it, enter the password you want to set for the attached PDFs.
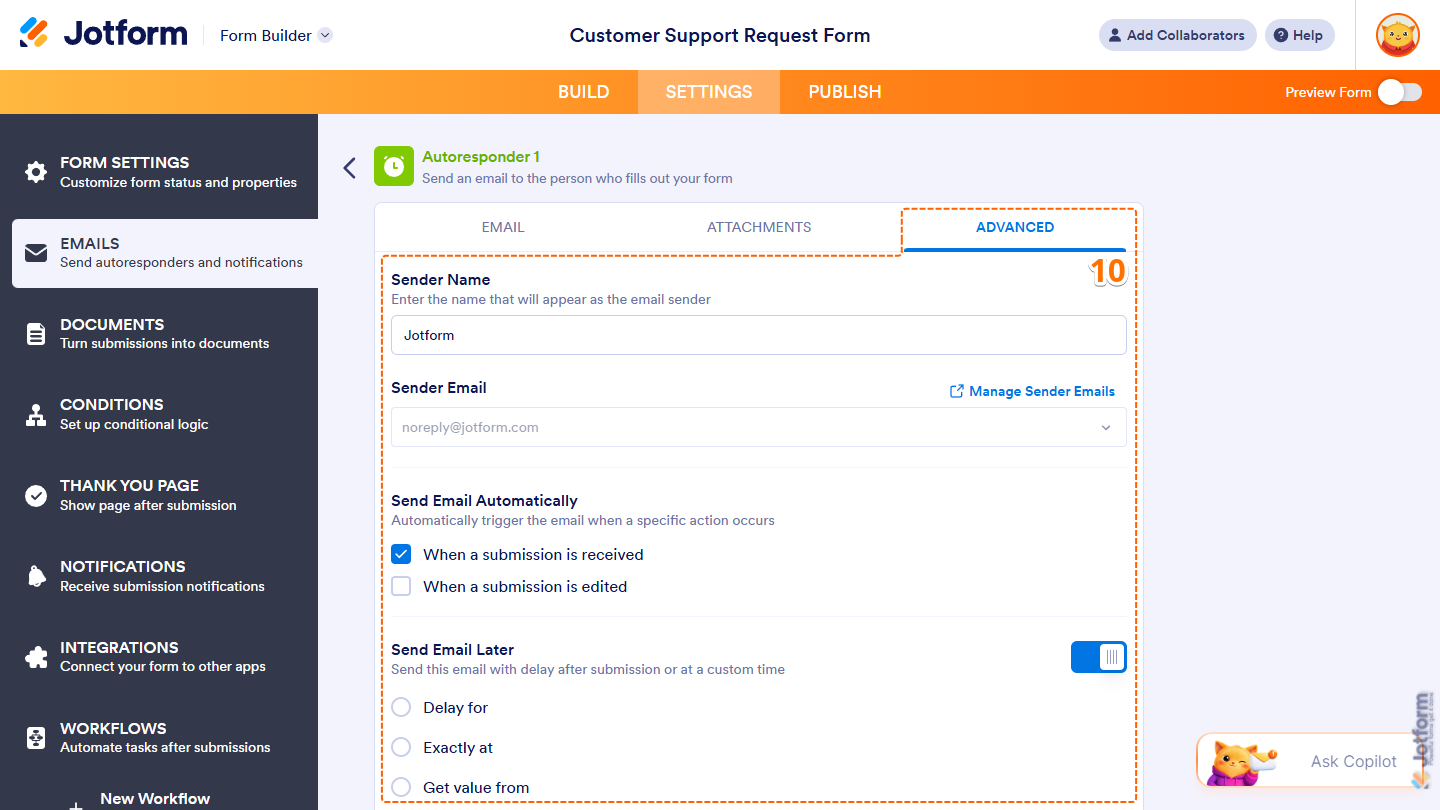
- Then, under the Advanced tab, set up these settings:
- Sender Name — Enter the name you want to appear as the sender of the autoresponder emails.
- Sender Email — Keep the default sender email selected, or click on the Downward Arrow icon and, in the Dropdown menu, select a custom sender email you’ve already set up for your account. You can also click on Manage Sender Emails on the right to open your Account Settings in a new browser tab to set one up. Check out our guide on How to Set Up a Custom Sender Email with SMTP to learn more.
- Send Email Automatically — Tick or untick the box next to When a Submission Is Received or When a Submission Is Edited to set whether autoresponder emails are sent for that event.
- Send Email Later — Toggle this on and below it, select whether you want the autoresponder emails sent after a delay, at a specific date and time, or based on a Date field value. Take a look at our guide on How to Send Emails Later Using Autoresponder Email for more details.
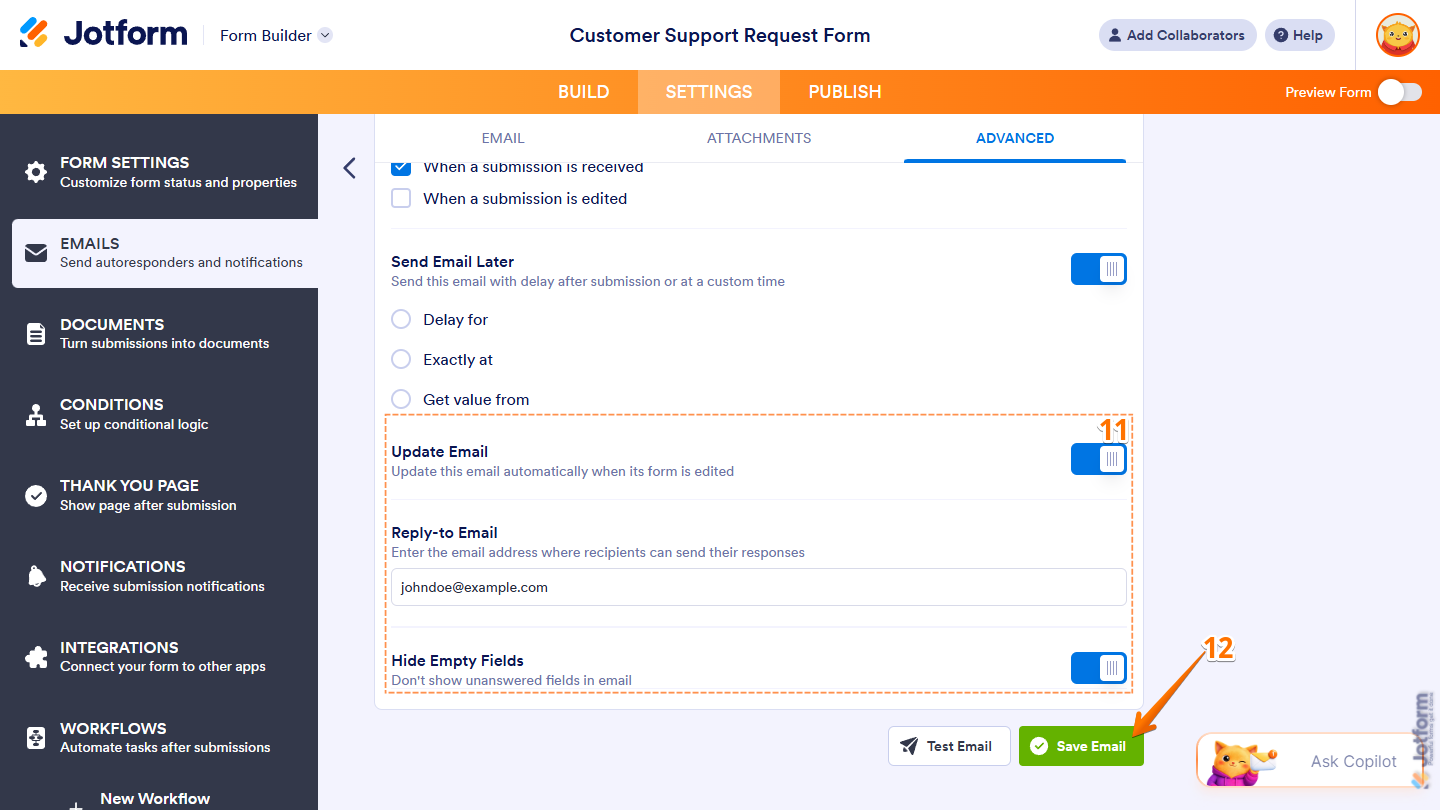
- Next, scroll down and continue with these settings:
- Update Email — Toggle this off to prevent the email content from updating automatically when you edit the form.
- Reply-To Email — Enter the default reply-to email address for the autoresponder emails.
- Hide Empty Fields — Toggle this off to include unanswered form fields in the autoresponder emails.
- Once everything’s set, click on Save Email.
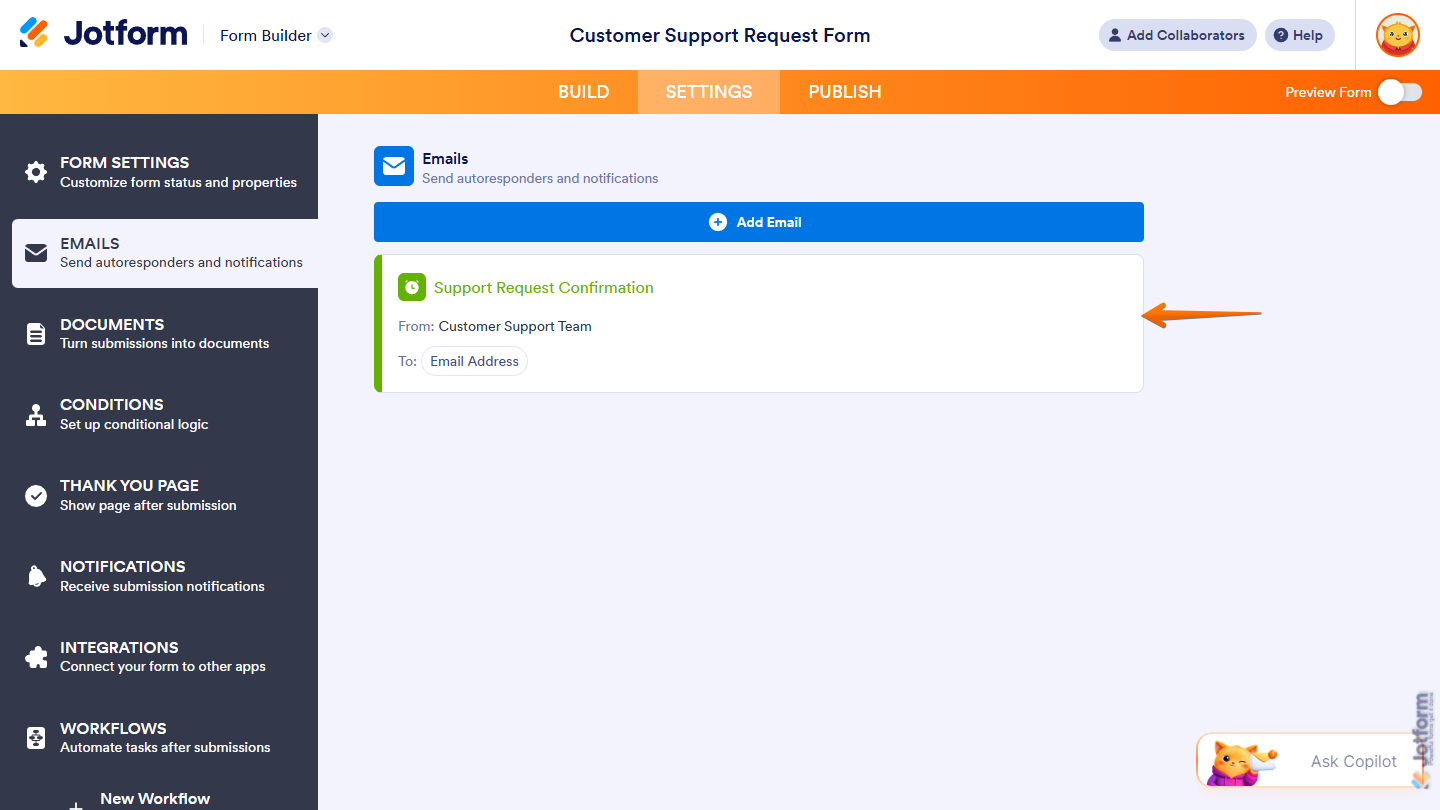
That’s it! You’ve successfully created and configured your Autoresponder Email, including its recipient, content, and settings.
Notes
- When you use the Test Email button, an email with your Autoresponder Email’s current content is sent to the email address associated with your account.
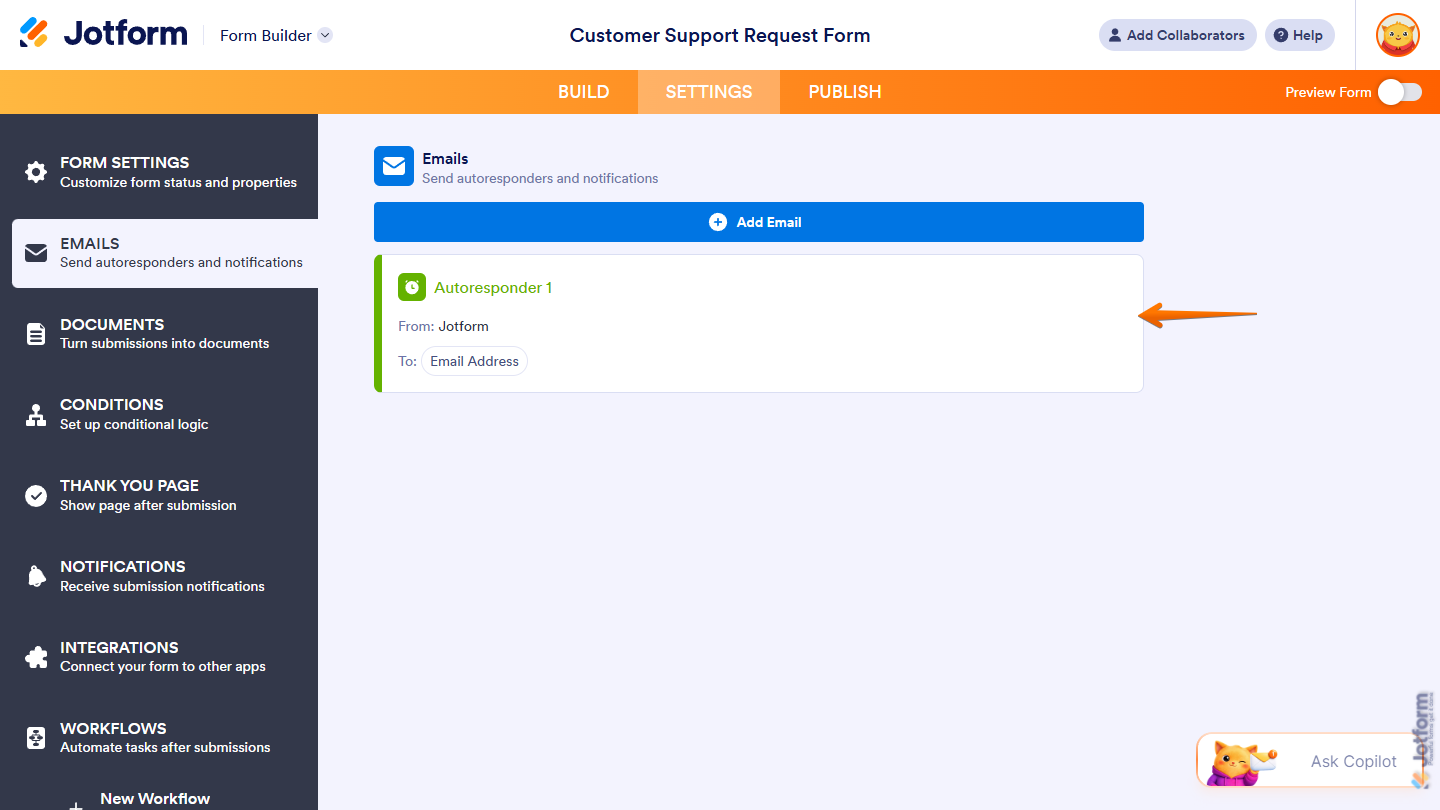
- An Autoresponder Email is automatically created when your form has an Email field. You can edit its recipient, content, and settings at any time. Check out our guide on How to Edit Notification and Autoresponder Emails to learn more.


Send Comment:
168 Comments:
March 8, 2026
I want to put a text paragraph and a QR code in the email sent by Autoresponder. I can only add fields in the form. How do I ad something that is not in the form.
October 3, 2025
I am trying to set up an autoresponder email that is supposed to be scheduled to be sent out on an exact day and time. When we tested this the mail was not sent to the list of submissions. And in the Advanced settings there is a blue text box saying: This email can only be sent manually from the Exhibitor SIGN UP: FUN EXPO Liseberg 2025 Table.
What must we do to make this work and not have to send out the mail manually?
July 17, 2025
I have set up an autoresponder email after my form received around 50 submissions. Do these automated emails get sent to people that have previously filled out the form, too?
July 9, 2025
I have questions on how to change the settings so I do not automatically get the Form Submission notification for when a form is signed. Currently my notification set up to notify me when a form is completed and the Subject and Email content has important information by design. I also have the Autoresponder email so that the form filler gets notified and emailed upon completion that is important for the form filler. However, I always receive an additional email that notifies me that the form was signed and this filles my inbox and is redundant because I already received the first email. How do I stop this from happening?
March 5, 2025
Good Morning,
I am trying to set up Autoresponder so that form-fillers receive a copy of what they submitted. In Settings, I clicked on Emails and then clicked Add Email. I clicked AutoResponder Email and clicked on Recipients at the top. The dropdown menu under Recipient Email (Please Select) does not include the option titled Email. It lists only the field titles I created. This is a free account. Is this the reason the Email option is not showing up for me? Thanks.
March 2, 2025
Hi there, I am looking to set an a set of email responses, which I require to attach to weighted conditions. Ive set the logic though do not seem to be able to set a condition for direct to an email? The form i'm building is here, are you able to provide any insights please? I have checked YT, yet unable to locate the information I need. Any guidance gratefully received, Joel
August 14, 2024
HOW MANY AUTORESPONDERS CAN I SET ONCE WE GO FOR THE PAID VERSION
July 22, 2024
can I send multiple pdf's. It shows I can only send one??
July 21, 2024
The autoresponder emails are not being sent/received for my Planning Assessment form. How do I correct this? I am receiving notification that they have filled and submitted the form.
July 15, 2024
how do i send an invoice to the person filling out the form when they submit a form
May 27, 2024
This guide seems to show that all form fields are displayed in the autoresponder email, however I've just created an autoresponder email and that is not the case. It only shows the message 'Your submission has been received. Thanks for filling out {form_title}.' I did a test email and it shows the same. How do we make the autoresponder show all form fields so that the submitter knows what information they have submitted?
May 16, 2024
I have tried to set up notify email to me when somone signed up but I just tested it and still won't work. What happened?
October 12, 2023
Is it possible to setup an auto-email template?
October 7, 2023
Im using a ticket form- how can I get Jotform to send the ticket via email after submission?
September 2, 2023
How do I create a response based on their quiz results? I just created a Dieter Personality quiz form and i want to be able to send a response with their result based on their score...... how would i do that?
March 7, 2023
I have set a form with many fields, so want to hide empty fields in the emails - however even with it set to hide them, they are showing in the emails sent out. Why would this be?
January 11, 2023
How can you send the filled out form as a pdf? As in, all the questions and their answers are on one pdf and sent in an email? Thank you
November 13, 2022
should there be a email address field on the form for the 'save and submit later' functionality to work?
October 28, 2022
On the email test sent from the auto responder, at the end, there are two options for editing the form:
You can edit this submission and view all your submissions easily.
How can I choose only the option: edit this submission
Thanks
August 16, 2022
Autoresponder emails only uses form fields. In my case I use jotform for sending out contract and I want to be able to send them the whole contract (including the fields they filled out and the terms of services defined in the contract, and have the ability to either attach a pdf copy of it or have them download the copy themselves. is there any way to do that?
May 25, 2022
Is there a way to track and see how our autoresponder emails performed? Basic open and click through rates is what I'm looking for.
Thank you
March 28, 2022
The data requested on the Autoresponder and the notification email are the same, however, they print different information in the fields. what have I done wrong.
March 24, 2022
This is great. If I have a form reply I wish to send to my list upon receipt of their Jotform is this possible?
March 22, 2022
I've noticed when I setup an email using the "Input Table Properties" element the form will not send that email. Why? I am using a form entitled "Cash App Input Form"
Benjamin Strickland
bsstrick197@gmail.com
March 4, 2022
We did some test submissions of our registration form, and our club is receiving the notification emails when the form is filled out and submitted, but not everyone that filled out the form receives the autoresponder email. Seems that anyone that has their email with Bellsouth.net does not get the autoresponder.