
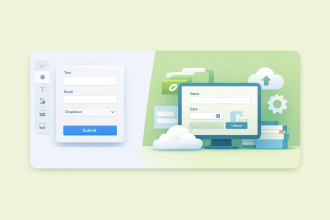
At Jotform, the Form Builder needs no introduction. But to unlock the full potential of its automation features, you have to get to know the Form Builder and all it’s capable of.
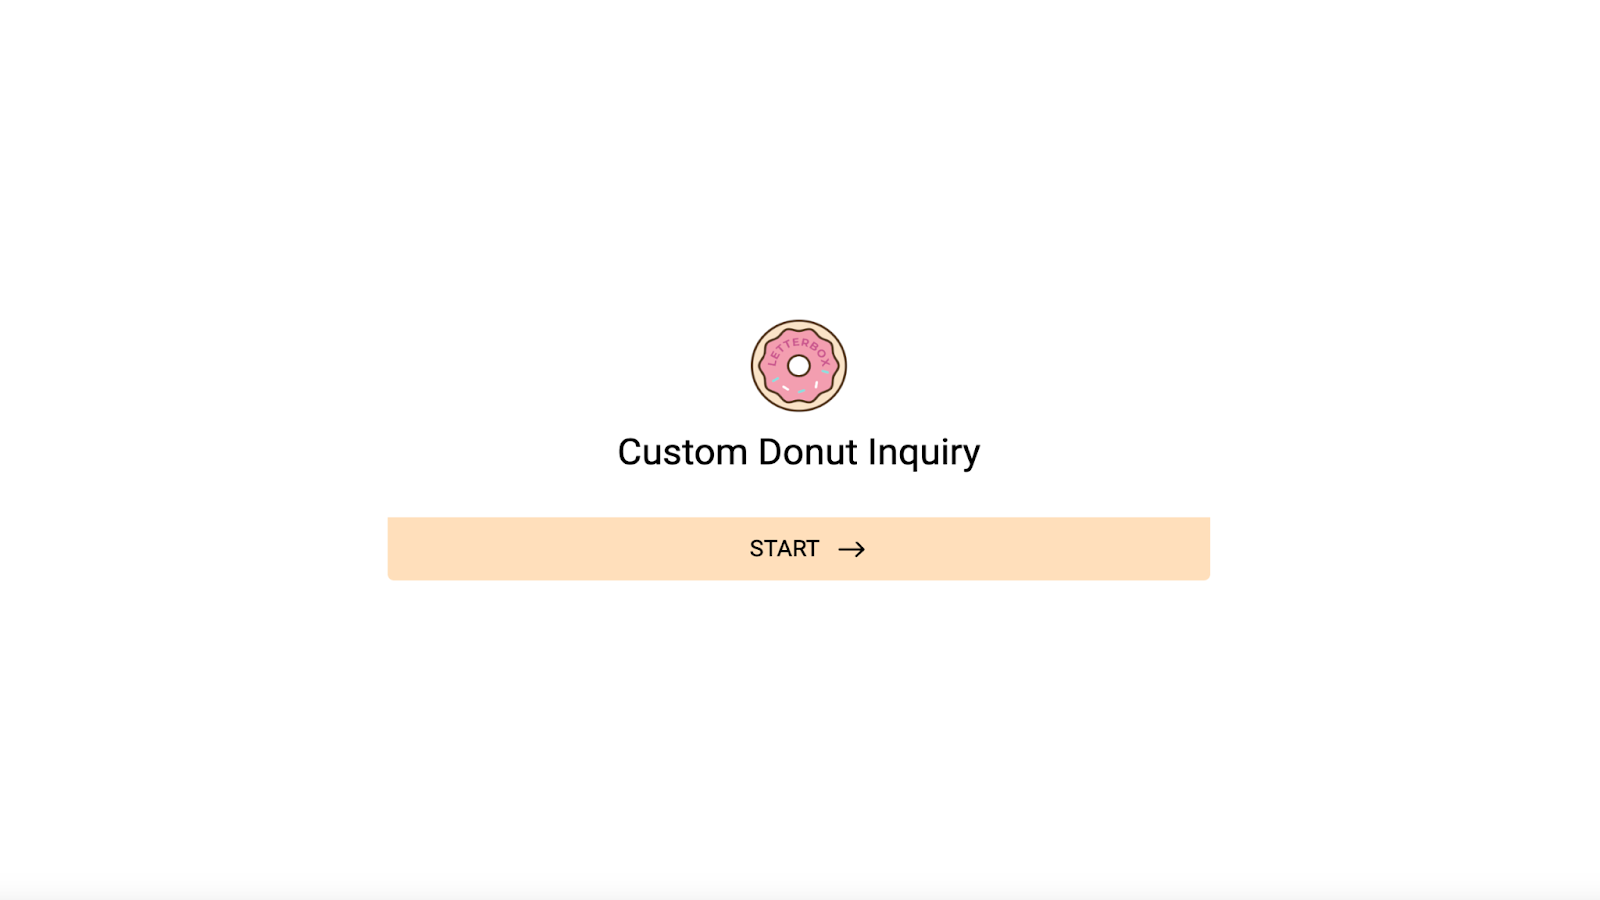
For example, at Toronto’s Letterbox Doughnuts, advanced Form Builder features helped a side hustle go mainstream.
“As we started to pick up momentum, Jotform was fortunately in place. I think the business would have started to fall apart at the seams without it,” says owner Jonathan Oliver. According to him, Jotform’s conditional logic and integrations with Slack and Airtable provided a path for rapid growth. Without them, Letterbox Doughnuts “just wouldn’t have been in business, or [we] wouldn’t have been able to do what we do.”
We’re confident that advanced Form Builder features can help other users have similar breakthroughs. Below, you’ll find more on Letterbox Doughnuts, Form Builder features and updates, Jotform user data, and more. Plus, we’ll hear from the people who make it all possible — Jotform’s developers and designers.
Enhance your form-building process with the power of AI. Explore Jotform’s AI Form Generator.
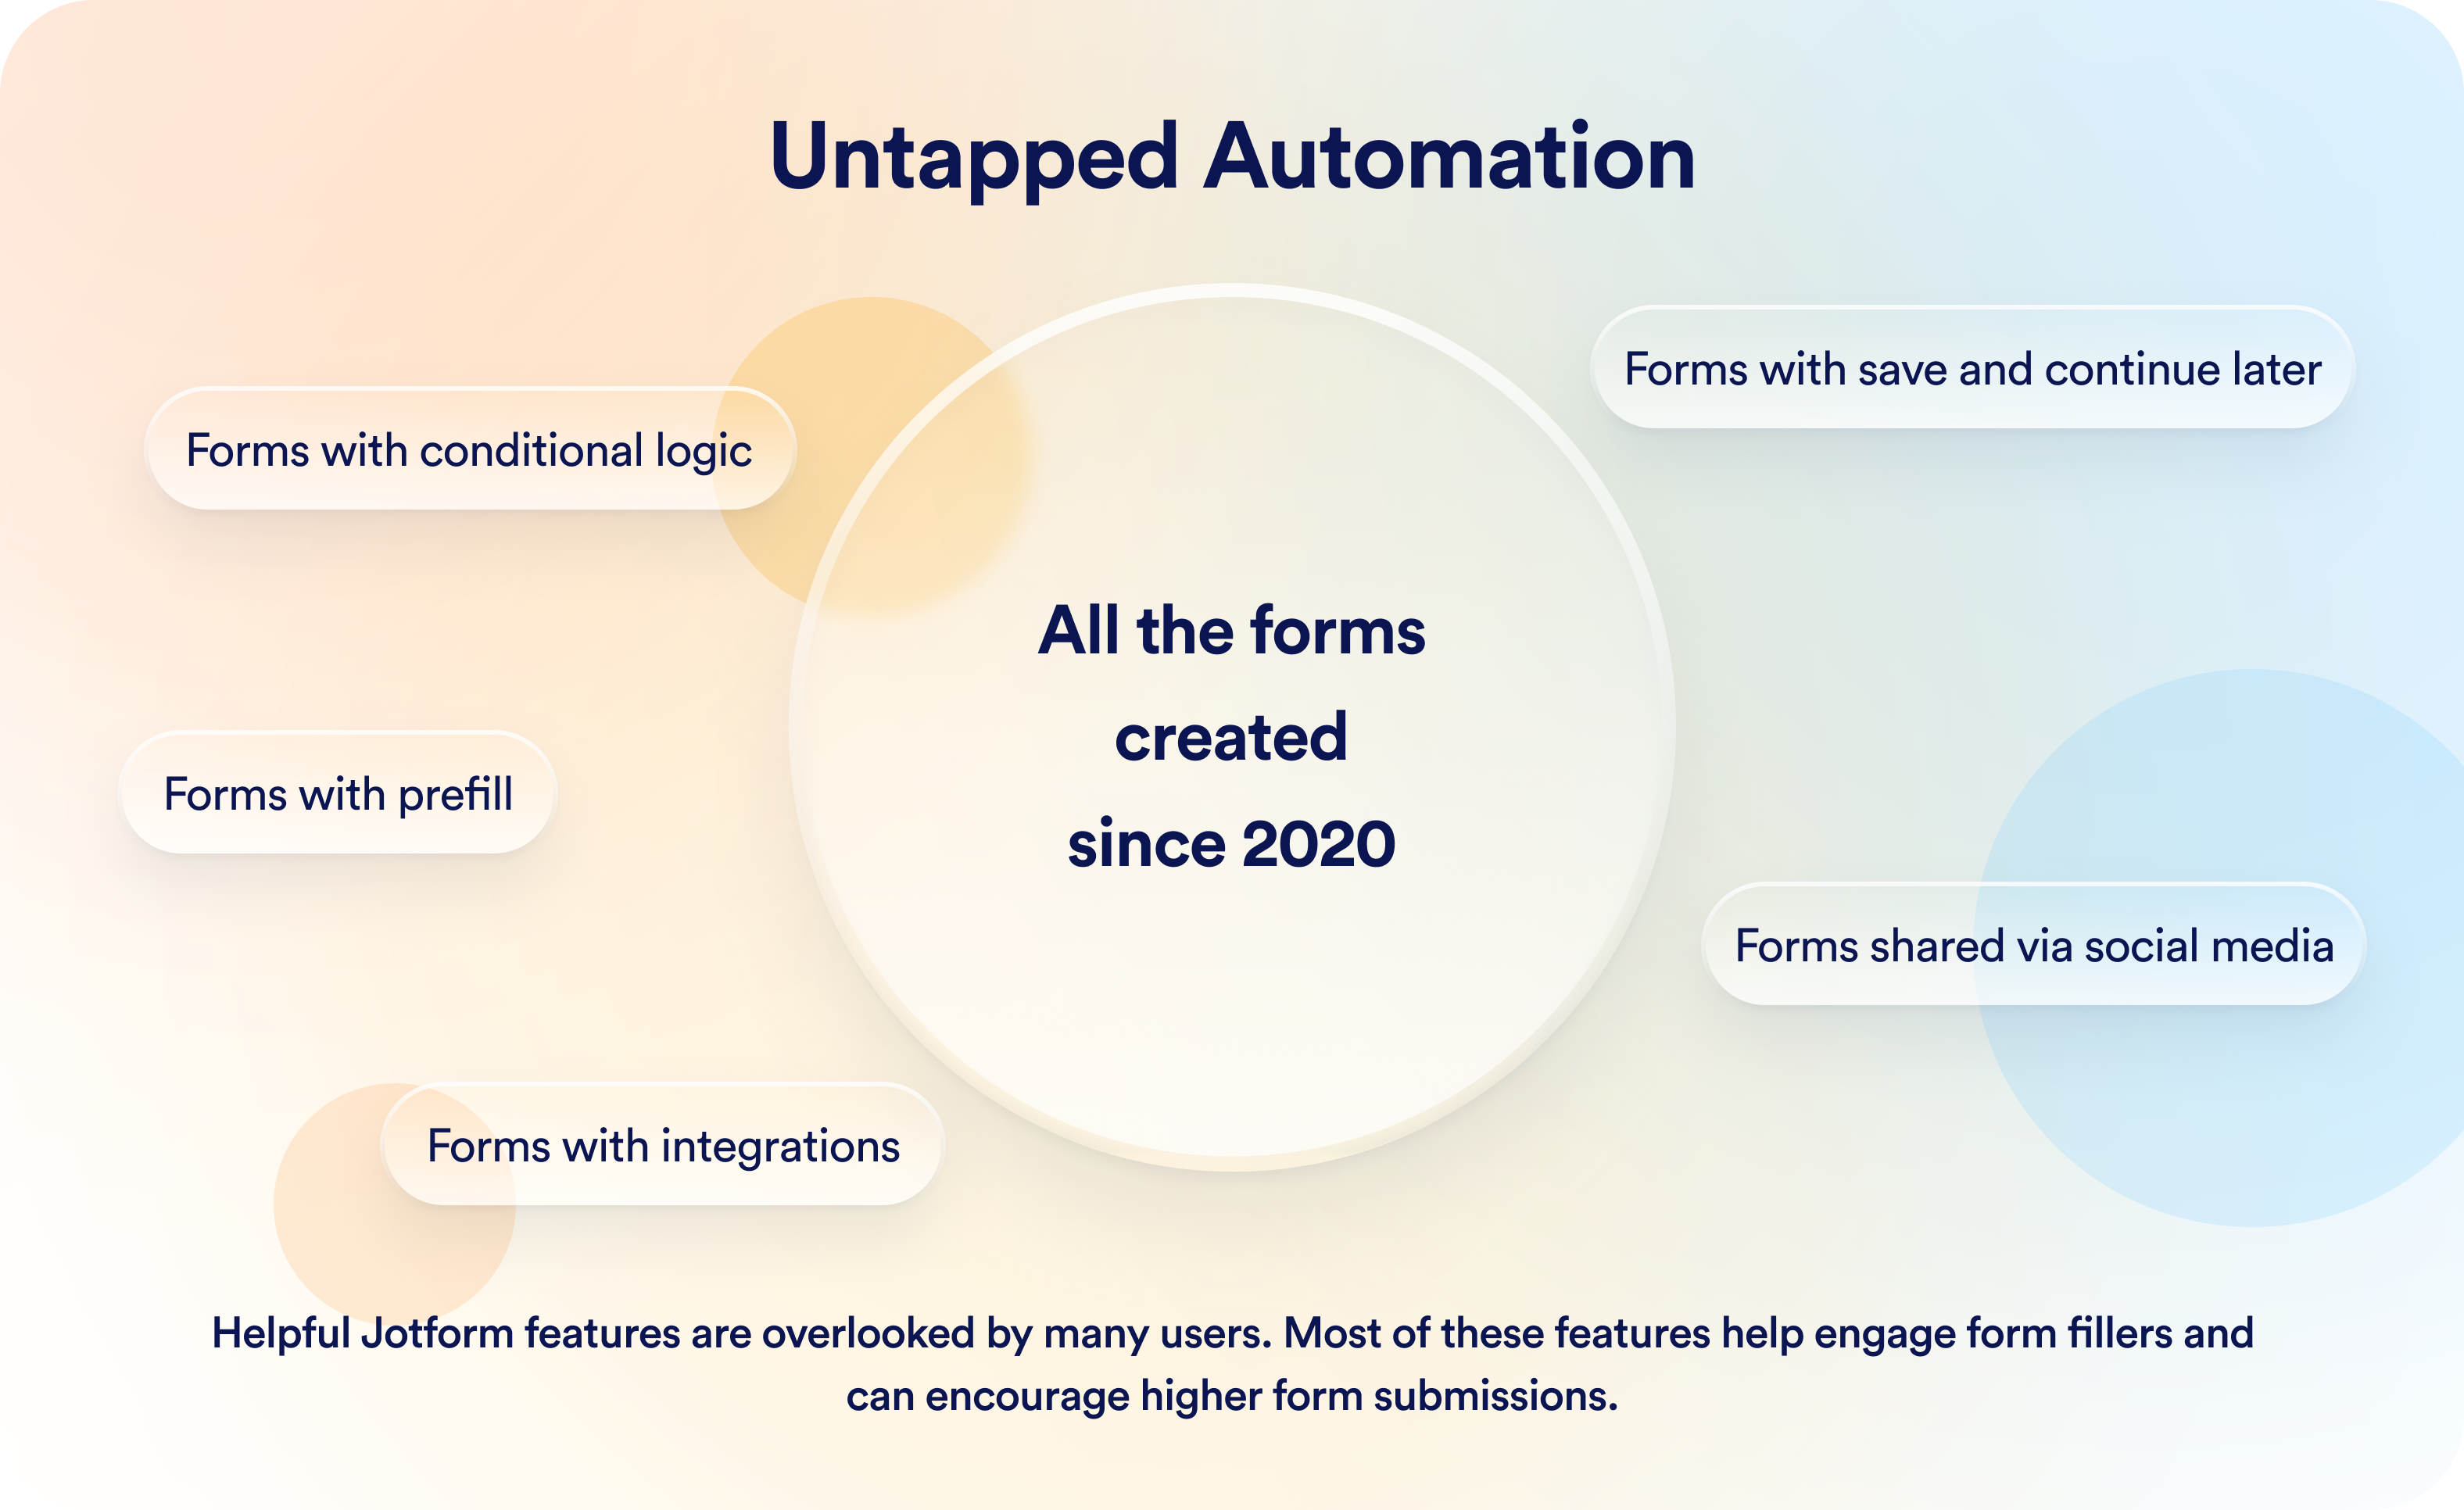
Jotform user data: Room for productivity growth
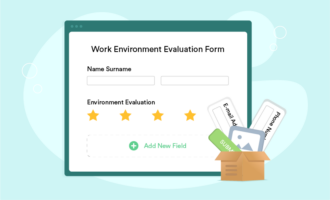
Since the beginning of the decade, Jotform users have created tens of millions of unique forms. But according to our data, just a fraction of users take advantage of easy-to-add advanced features such as conditional logic, integrations, prefill, and more.
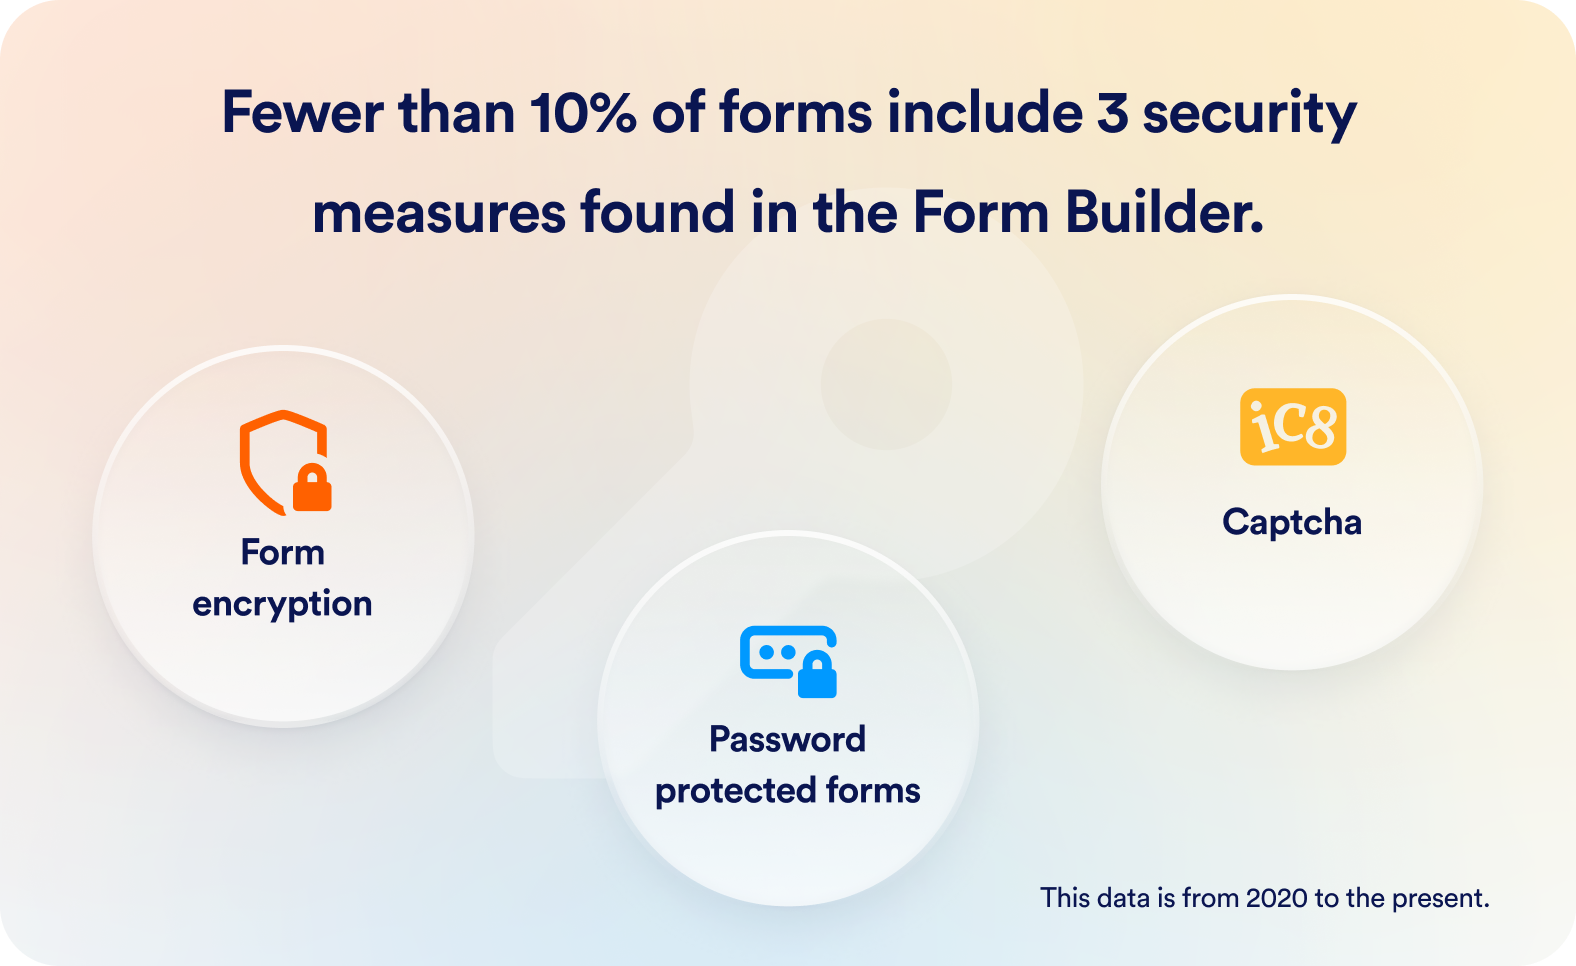
In another example, fewer than 10 percent of forms include any of the following three security features: Captcha, password protected forms, and form encryption.
Any form created with the Form Builder can pay dividends. But the data suggests that many users can get more from the Form Builder, especially considering how easy it is to add advanced features to a form.
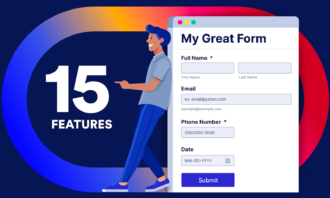
Form Builder highlights
There are a lot of tools available within the Form Builder, so we’ve compiled a selection of need-to-know features, complete with tutorials and resources that will help you use them right away.
If you have a question that isn’t covered in this section, Jotform still has you covered, with Jotform Academy, Jotform’s User Guides, and more.
Conditional logic
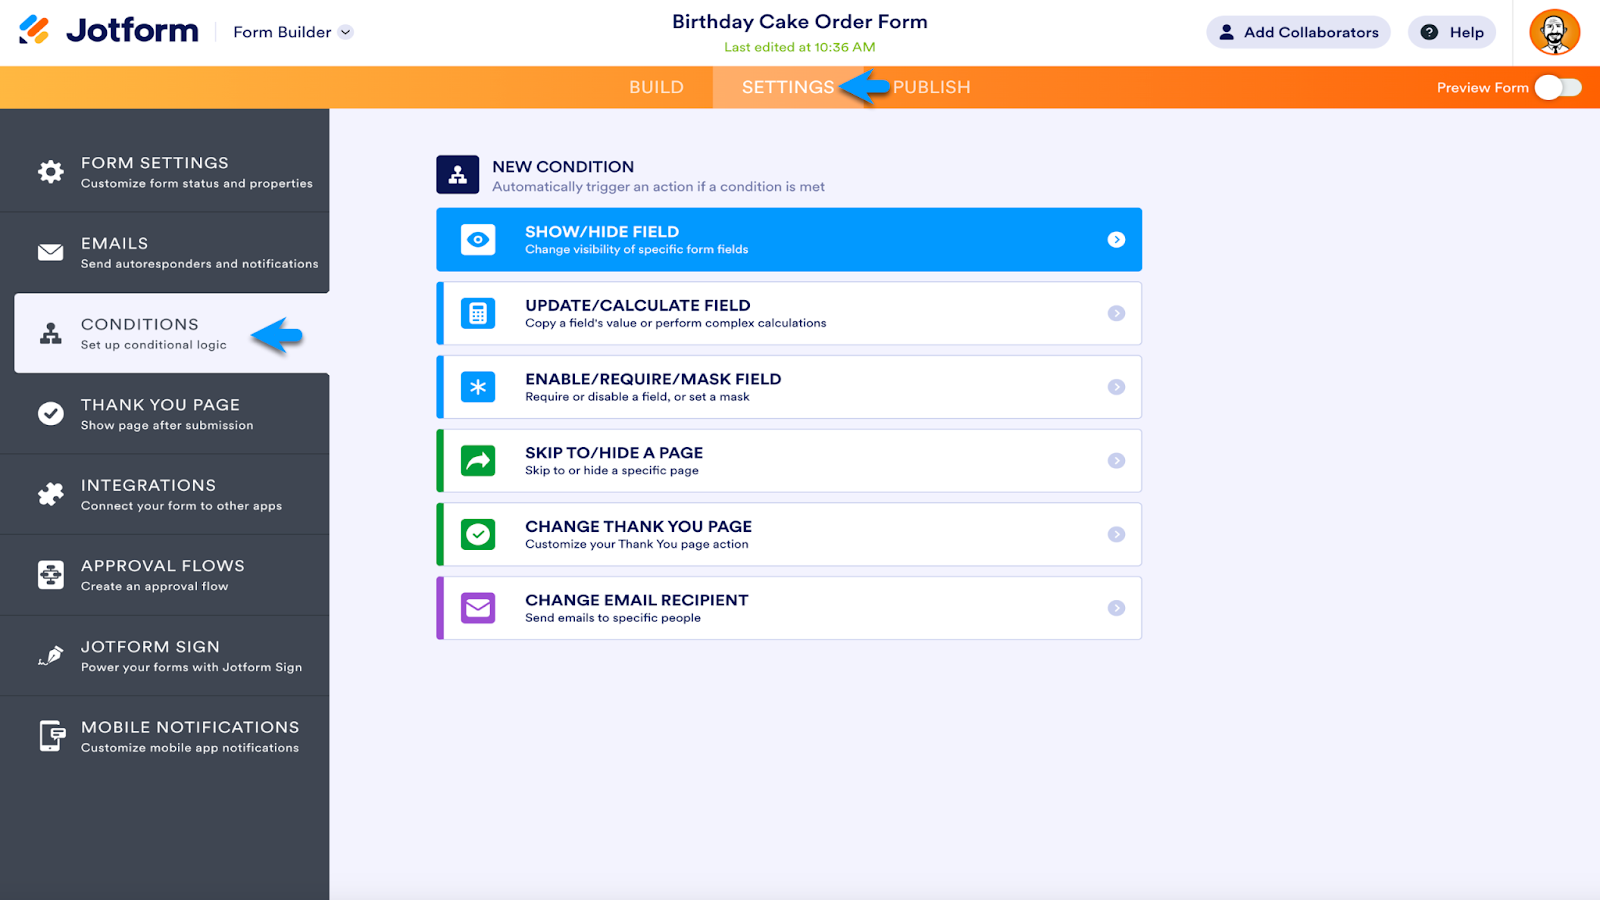
Jotform’s conditional logic may seem complex, but adding it to a form is a straightforward process.
Within the Form Builder, go to the Settings section. Then select Conditions from the menu on the left. You’ll find six different ways to automatically trigger an action if a condition is met, starting with Show/Hide Field at the top of the list.
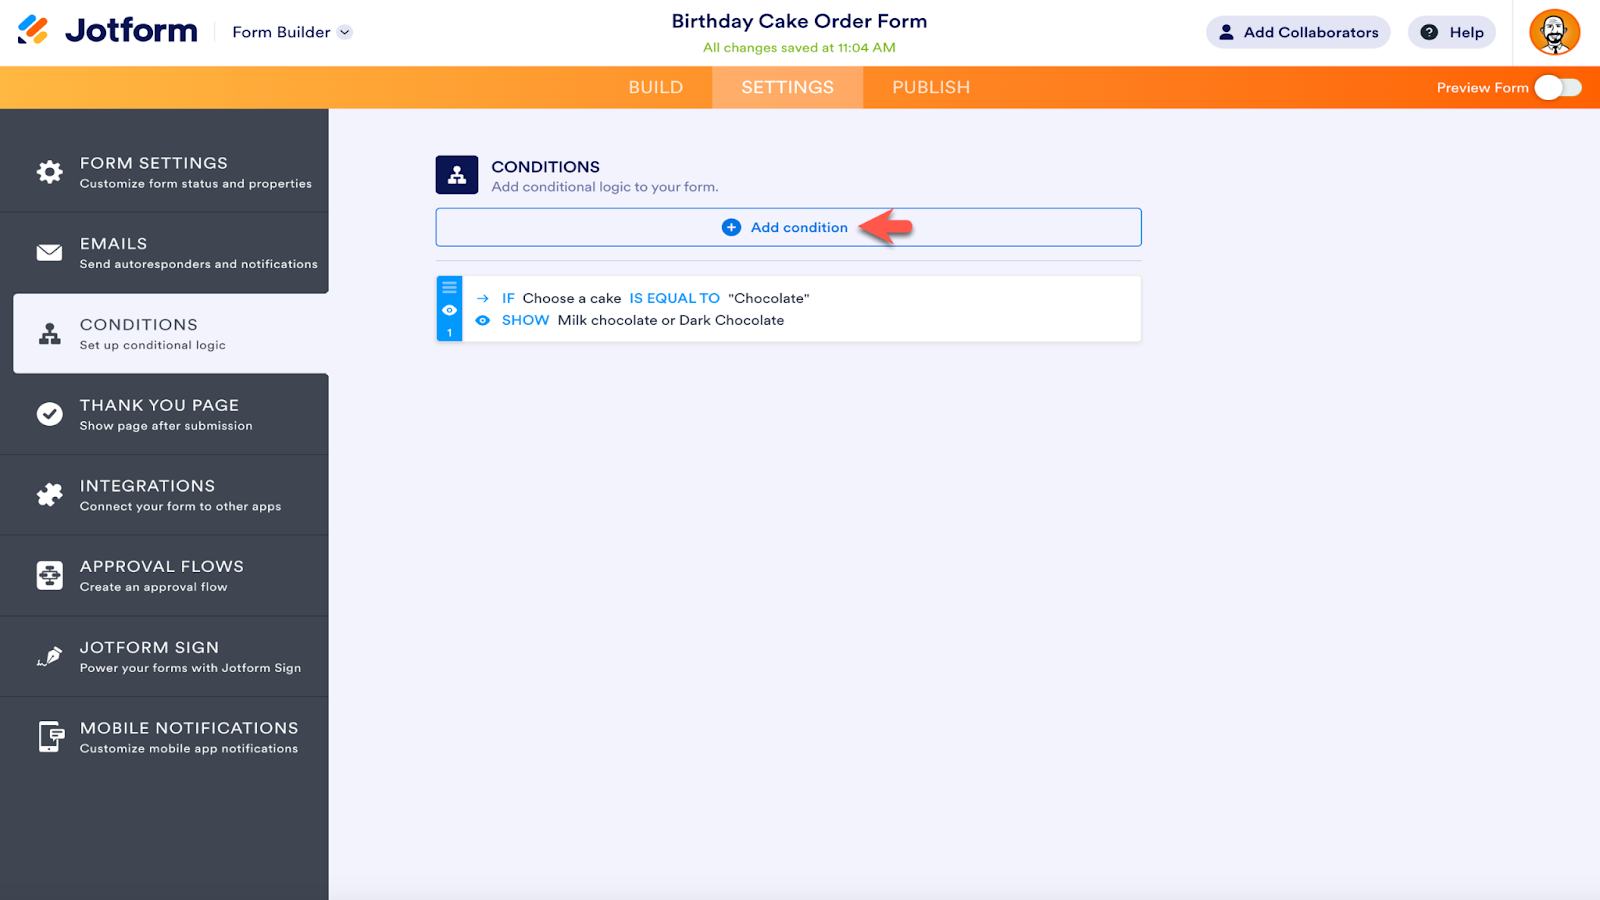
Click the Show/Hide Field option to access its settings. The example below is for a cake order form. If a form filler chooses “Chocolate” from the “Choose a cake” option on the form, an element will appear, asking whether the customer wants milk chocolate or dark chocolate.
Since customers who want a yellow cake won’t need to answer this question, it will remain hidden. To add more Show/Hide Field options, click the plus sign icon to the right of the conditions. Select Save when finished.

After the condition is set, the Conditions menu in the Form Builder will provide a summary. To access the full conditions menu again, click Add condition.
Additional conditional logic options include automatic mathematical calculations, skipping to a different page on your form, overriding default email alerts, and more.
- Update/Calculate Field: Copy a field’s value or perform complex calculations.
- Enable/Require/Mask Field: Require or disable a field, or mask a field (to ensure submissions are entered in your desired format).
- Skip to/Hide a Page: Skip to or hide a specific page.
- Change Thank You Page: Display a custom message or redirect to a different page after submission.
- Change Email Recipient: Override your default email alerts and send emails to specific people.
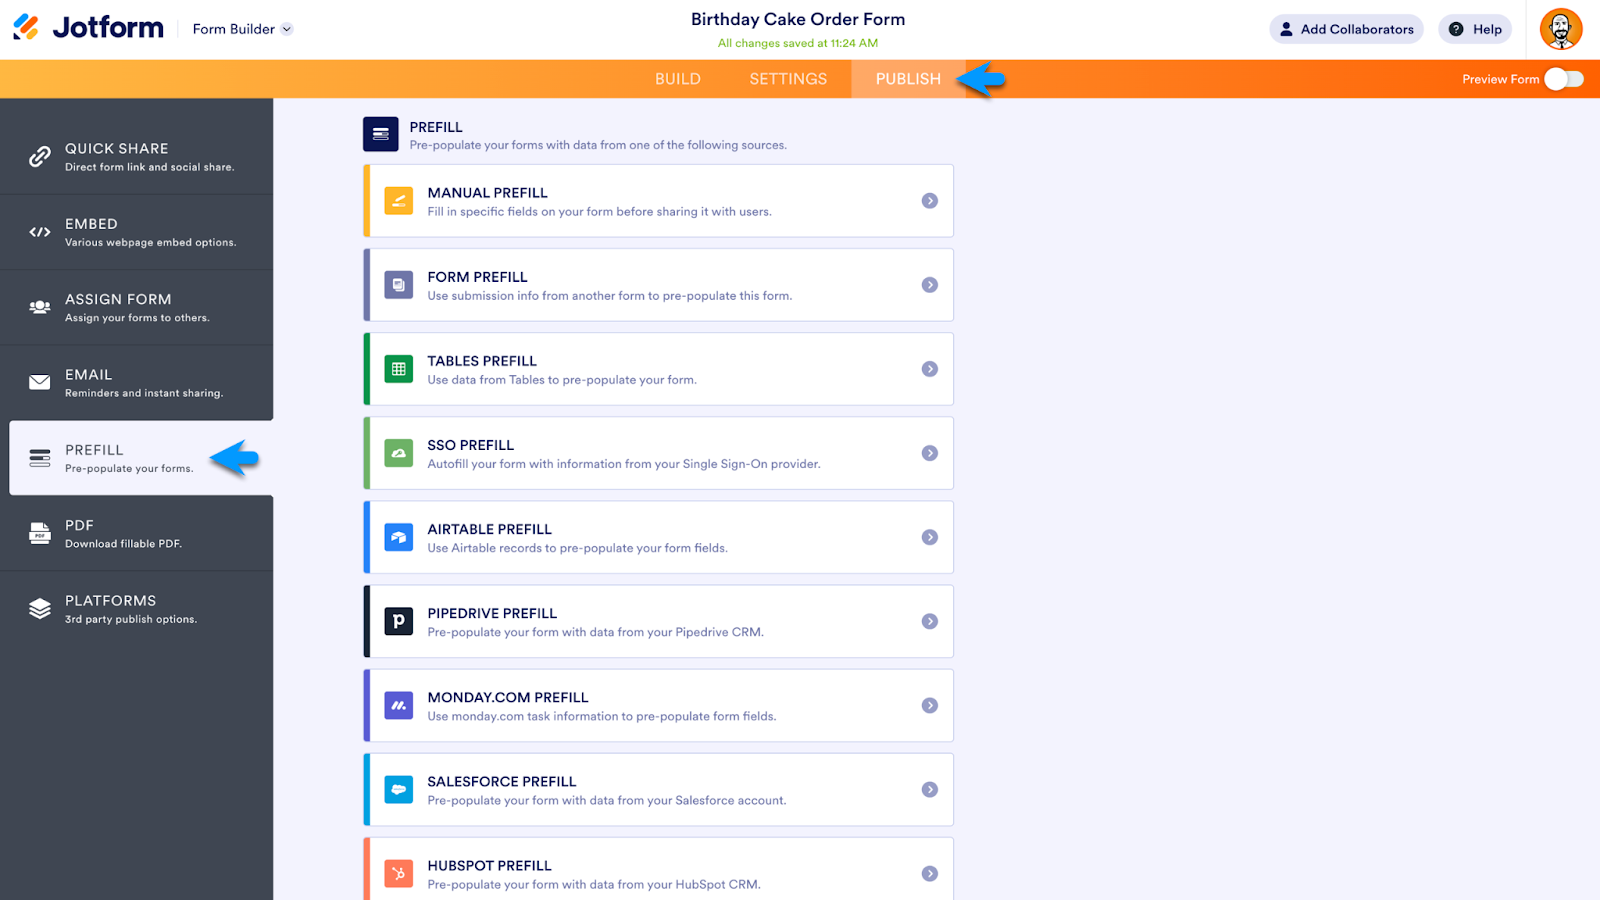
Prefill
Jotform Prefill can lead to higher conversion rates for your forms — by as much as 200 percent. It’s a simple formula: Using data to prefill parts of your form reduces the time needed to fill out the form, leading to positive outcomes for all.
You can use data acquired from other forms or Jotform Tables, or pre-populate your form with data from third-party apps such as Salesforce.
To access Jotform Prefill, go to the Publish section of the Form Builder. There’s a robust list of Prefill options, from Manual Prefill to Airtable, Pipedrive, monday.com, Salesforce, and HubSpot.
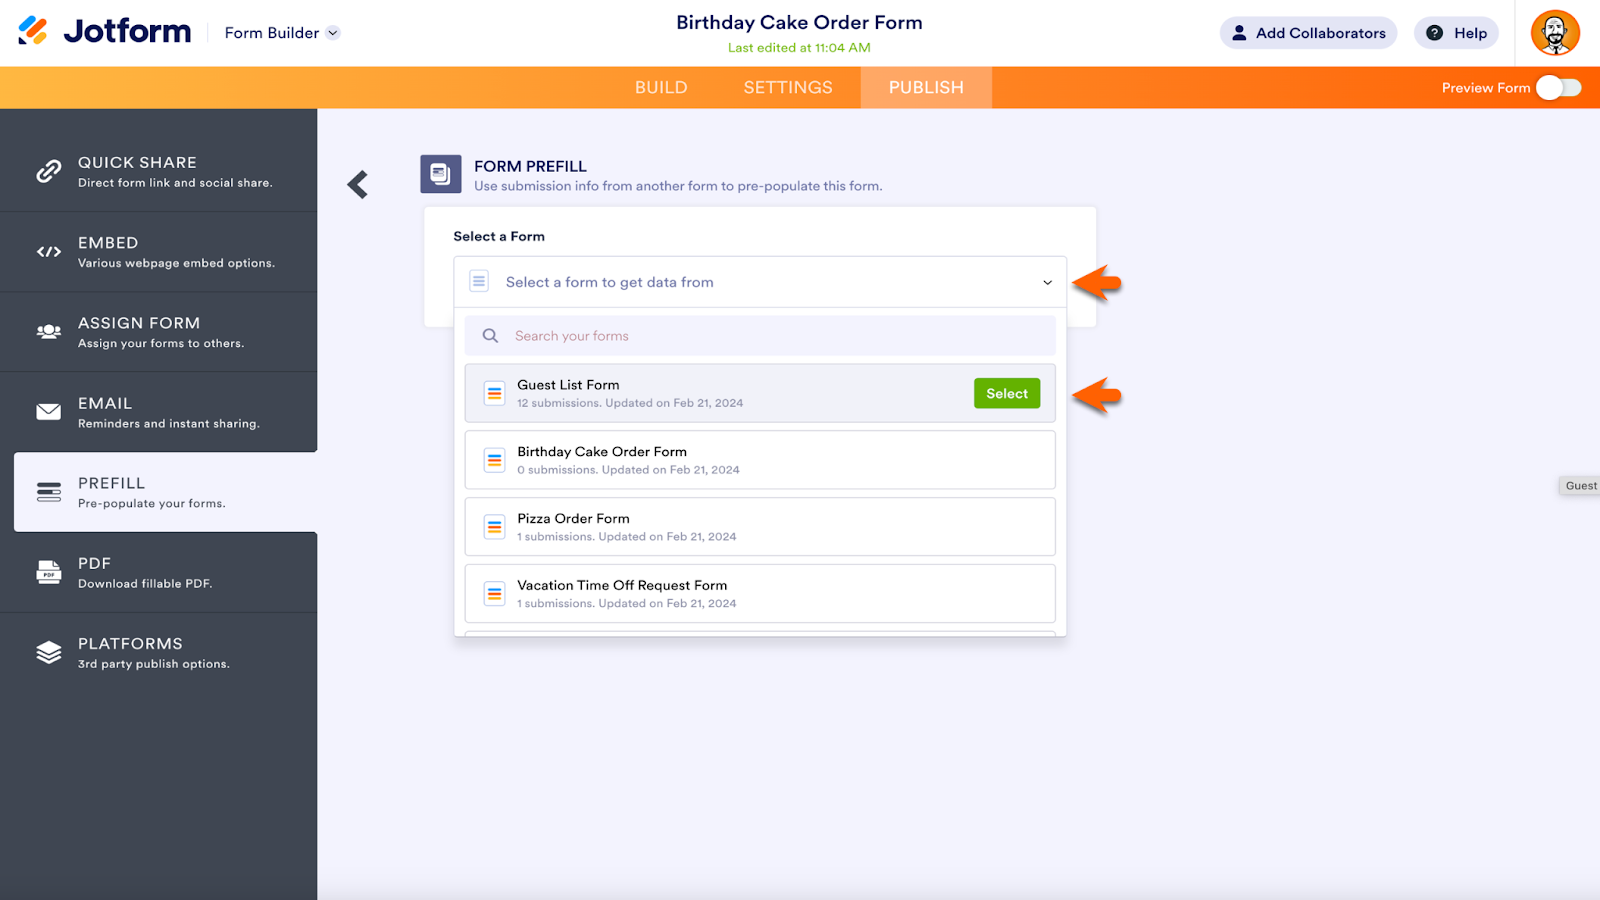
To prefill a form with data from a different form, select the Form Prefill option and then select a form from the dropdown menu by scrolling through the list or using the search functionality. Click the Select button when you’ve found the right form.
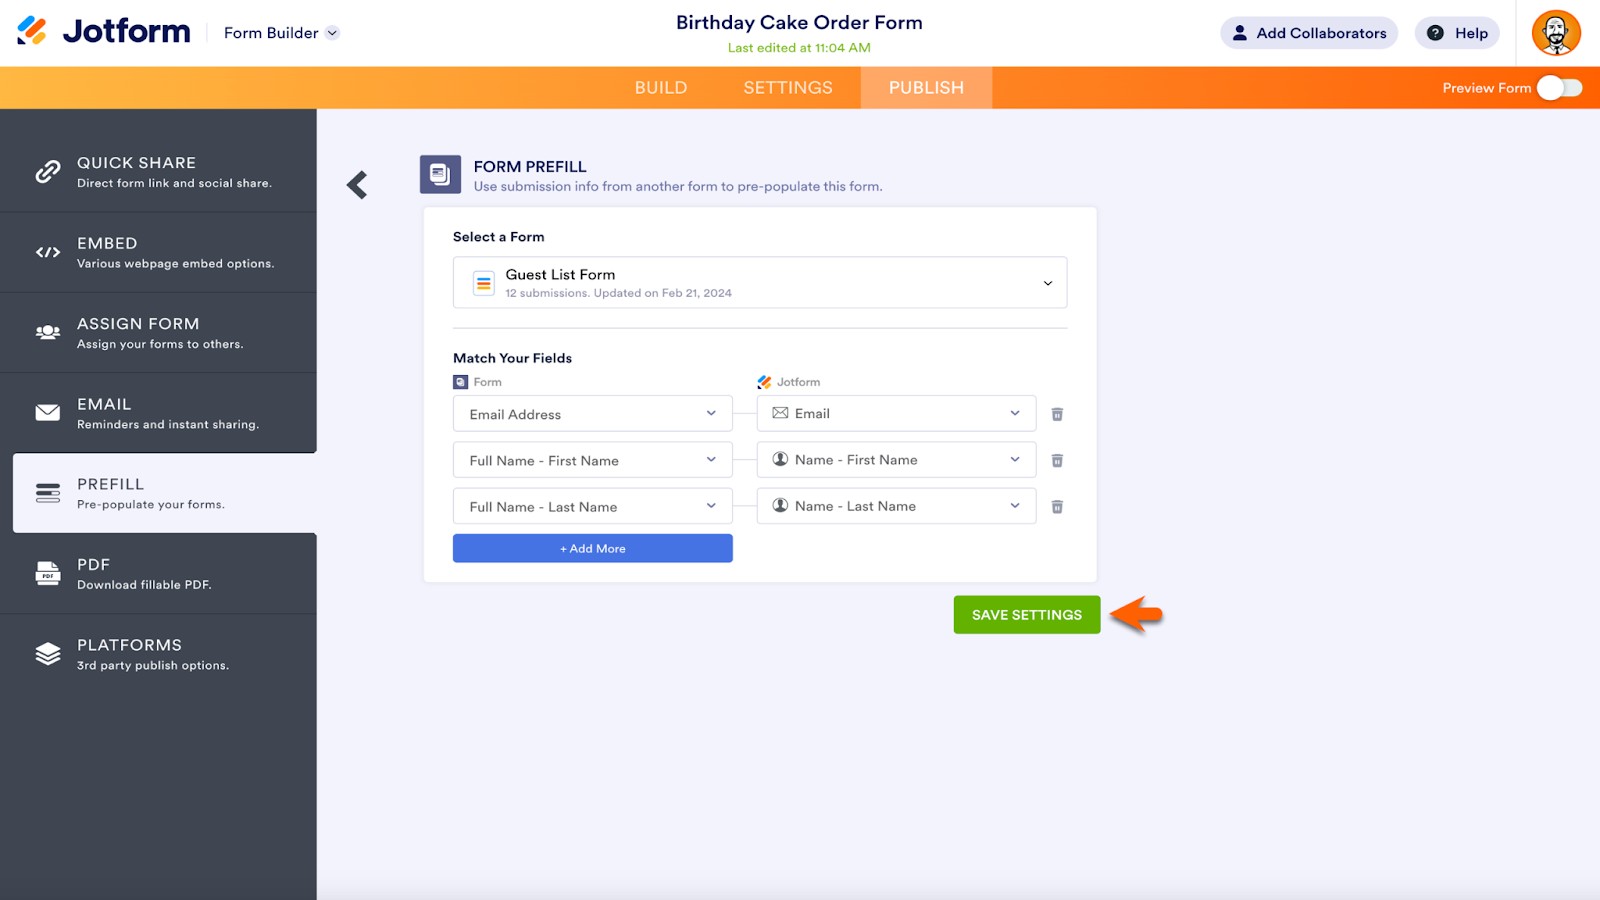
Next up, match the fields you’d like to prefill. The columns on the left represent incoming data. The columns on the right represent the form fields that will be prefilled. Delete connecting rows with the trash icon on the right. If there are additional fields you’d like to connect, click the Add More button. Click the Save Settings button when finished.
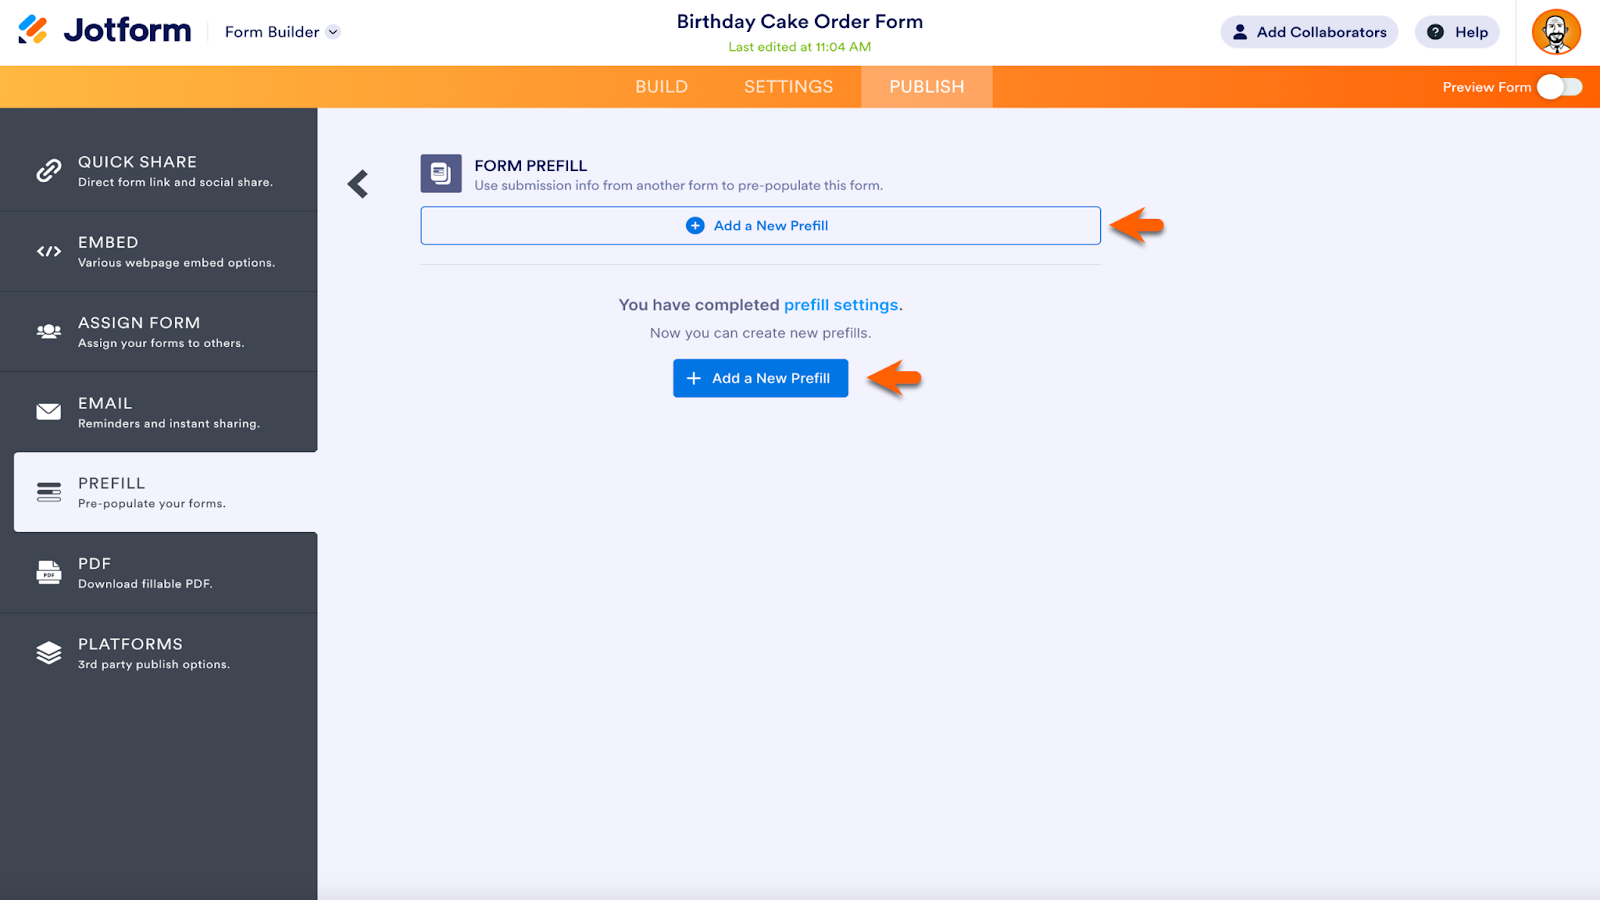
Once the settings are saved, click one of the Add a New Prefill buttons. This will display the input from the corresponding Jotform Table.
Select individual submissions in the table or select them all by checking the boxes on the left. When finished, click the Create button.

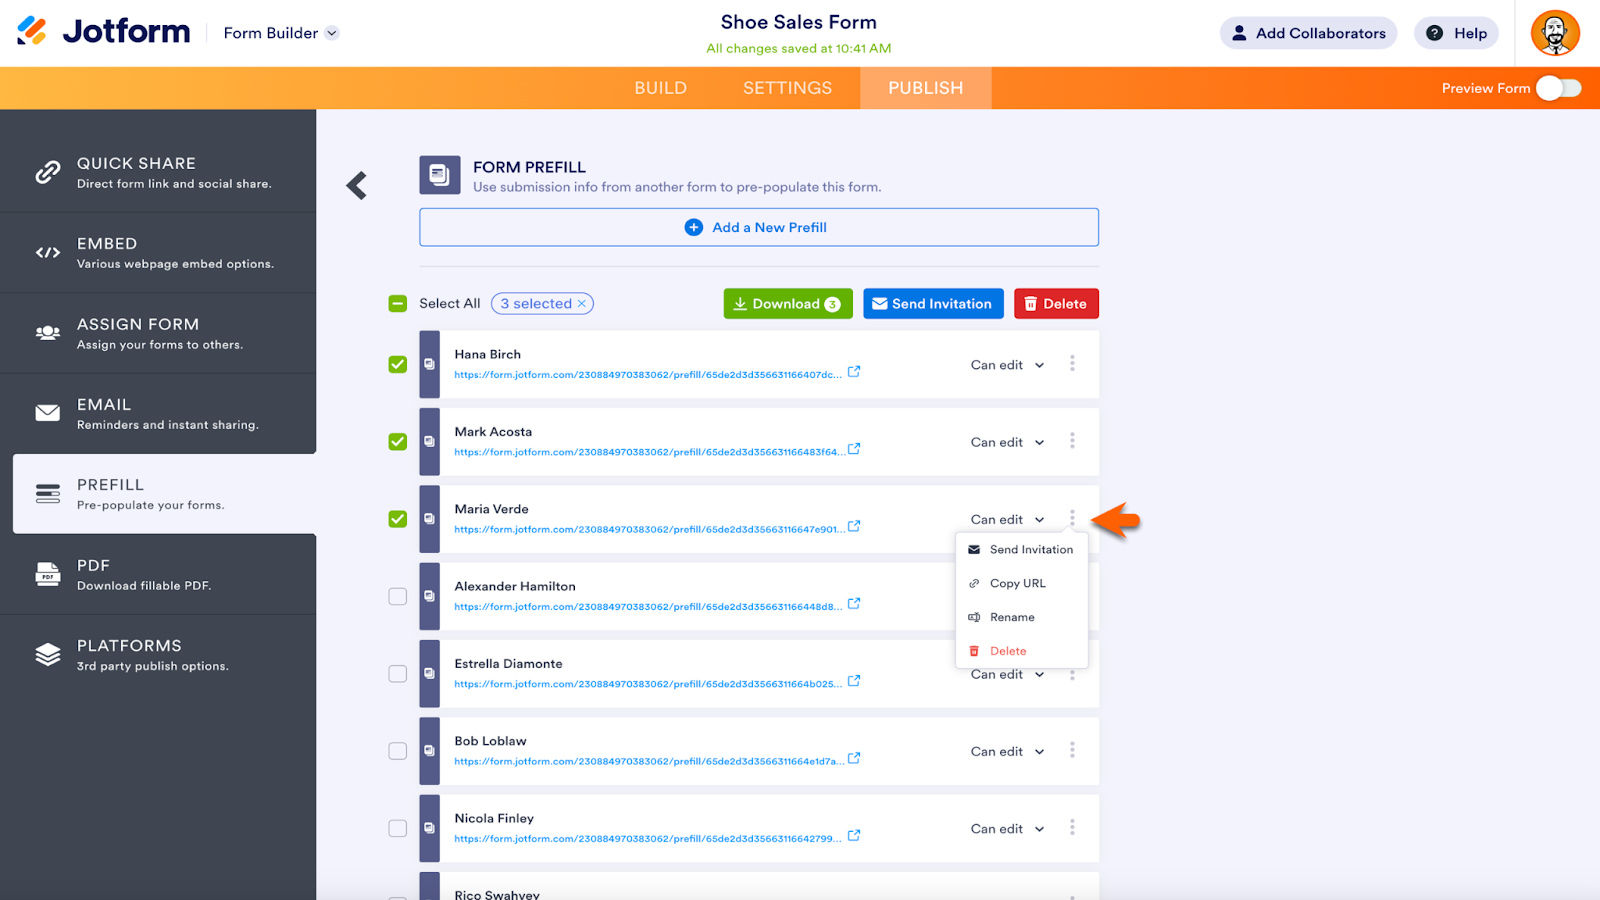
A prefilled form URL will be created for each entry. Click the Select All box or check the box for individual URLs to reveal more options. Download the URLs, send an invitation via email, delete the URLs, or indicate whether the prefilled forms are editable or read only.
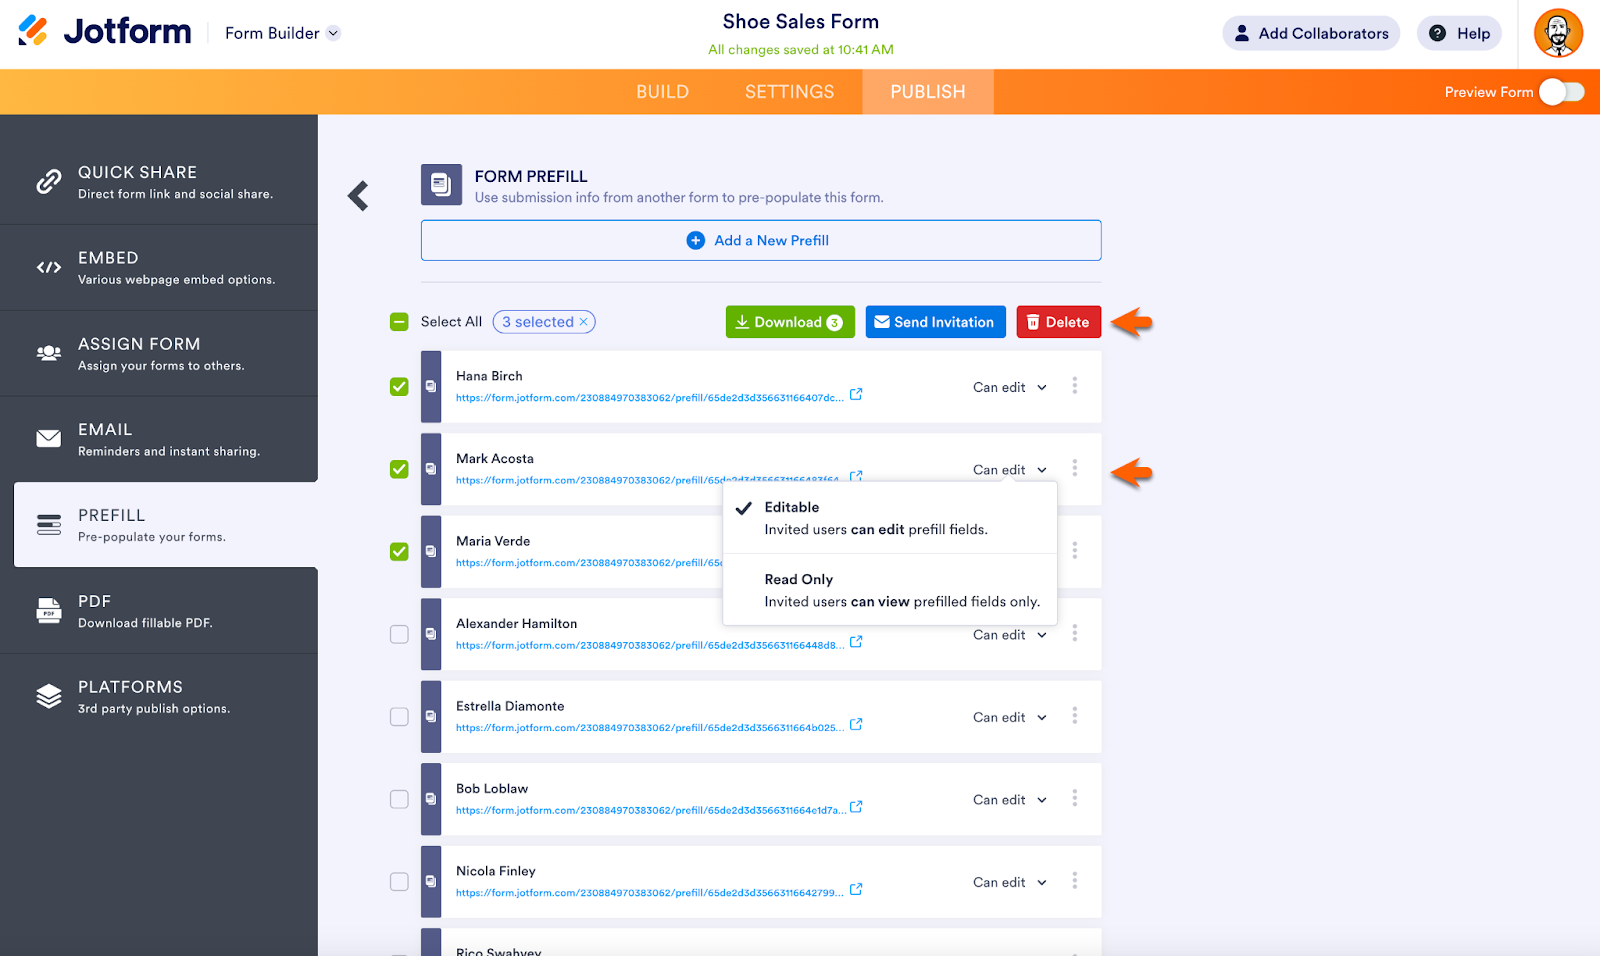
Open the menu to the right of each entry to send an invitation, copy the URL, rename the prefilled URL, or delete it.
Did you know?
Jotform Prefill 2.0 added new ways to prefill your form. Provide a prefilled link on your Thank You page, assign prefilled forms with Jotform Workflows, and more!
Save and continue later
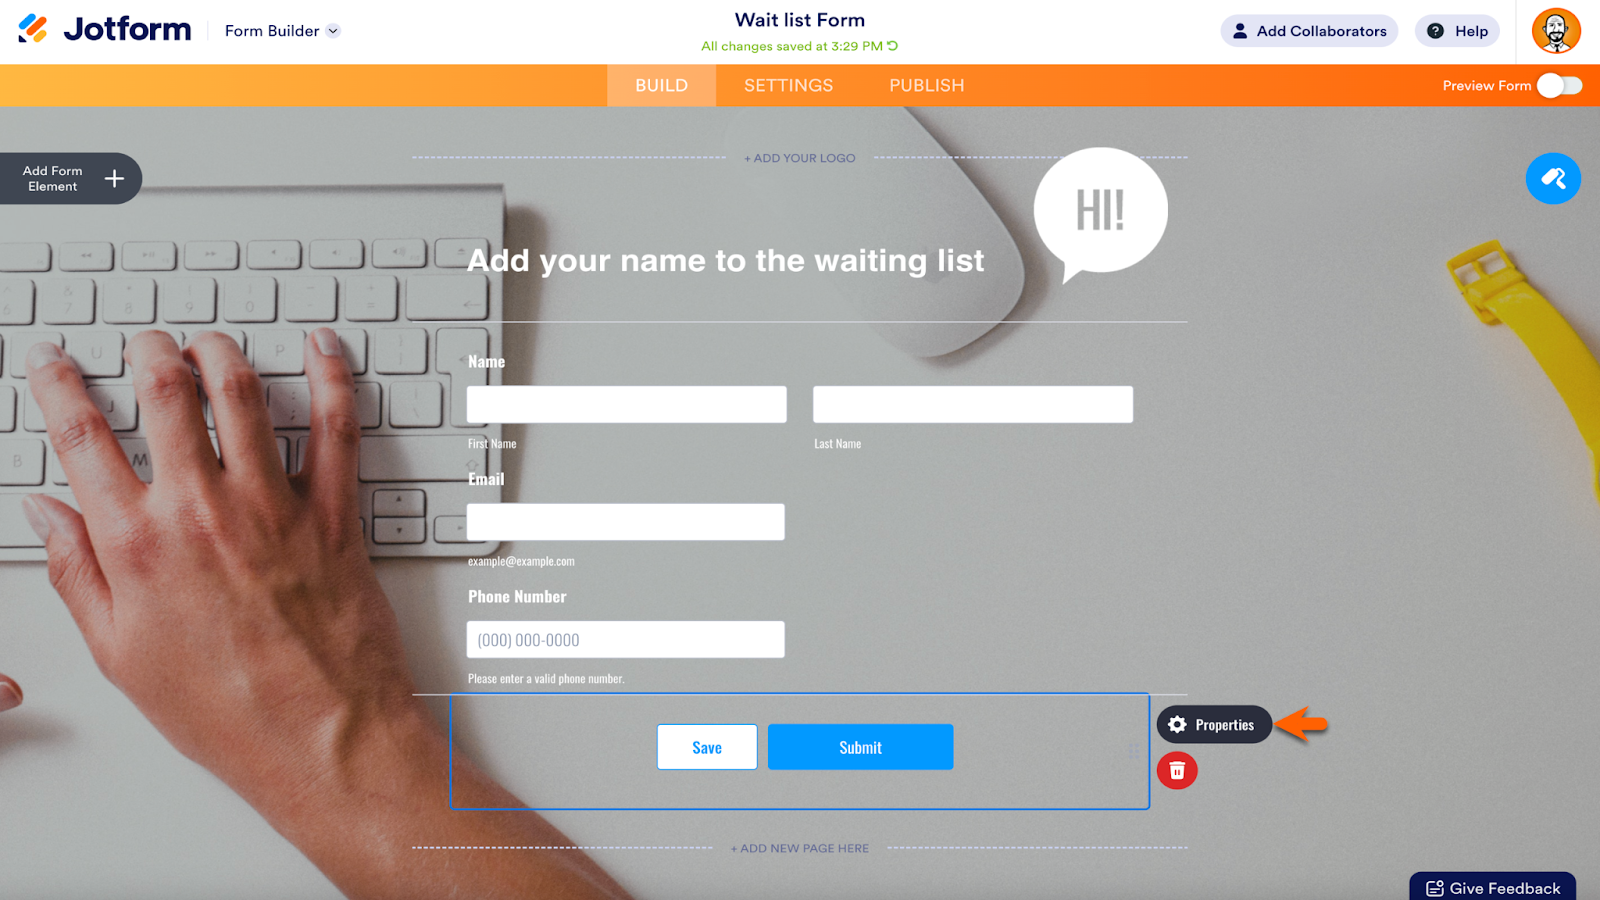
For forms that take a bit longer to fill out, it can be helpful to allow responders to save their progress and continue later. The Save and Continue Later feature can turn incomplete forms into finished submissions.
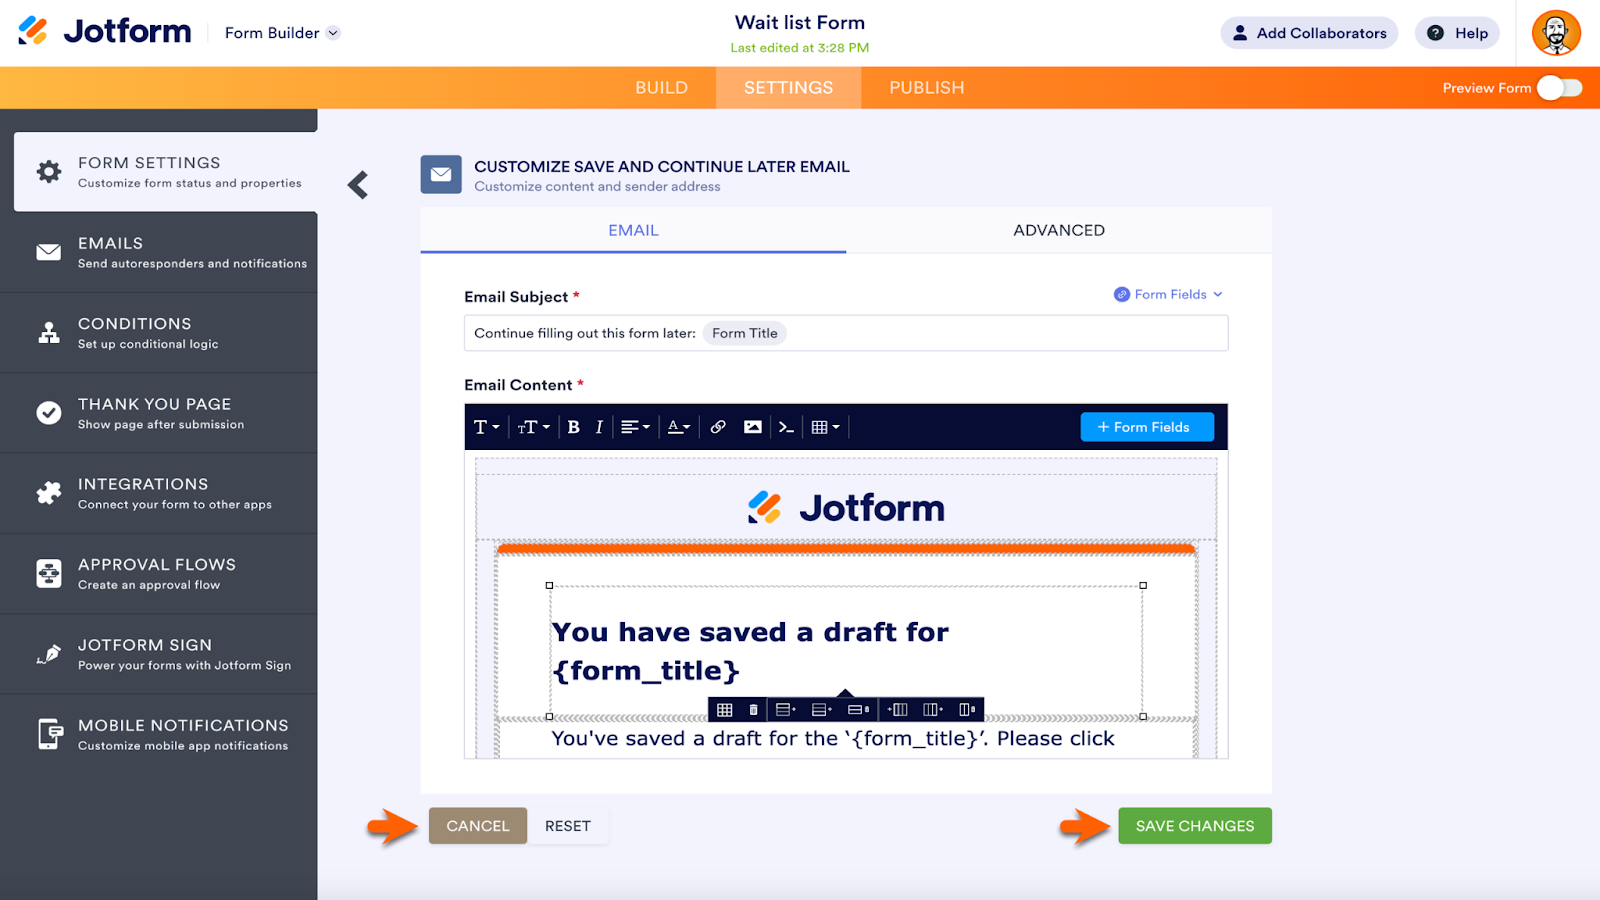
To activate this feature in the Jotform Form Builder, open the Submit button Properties.
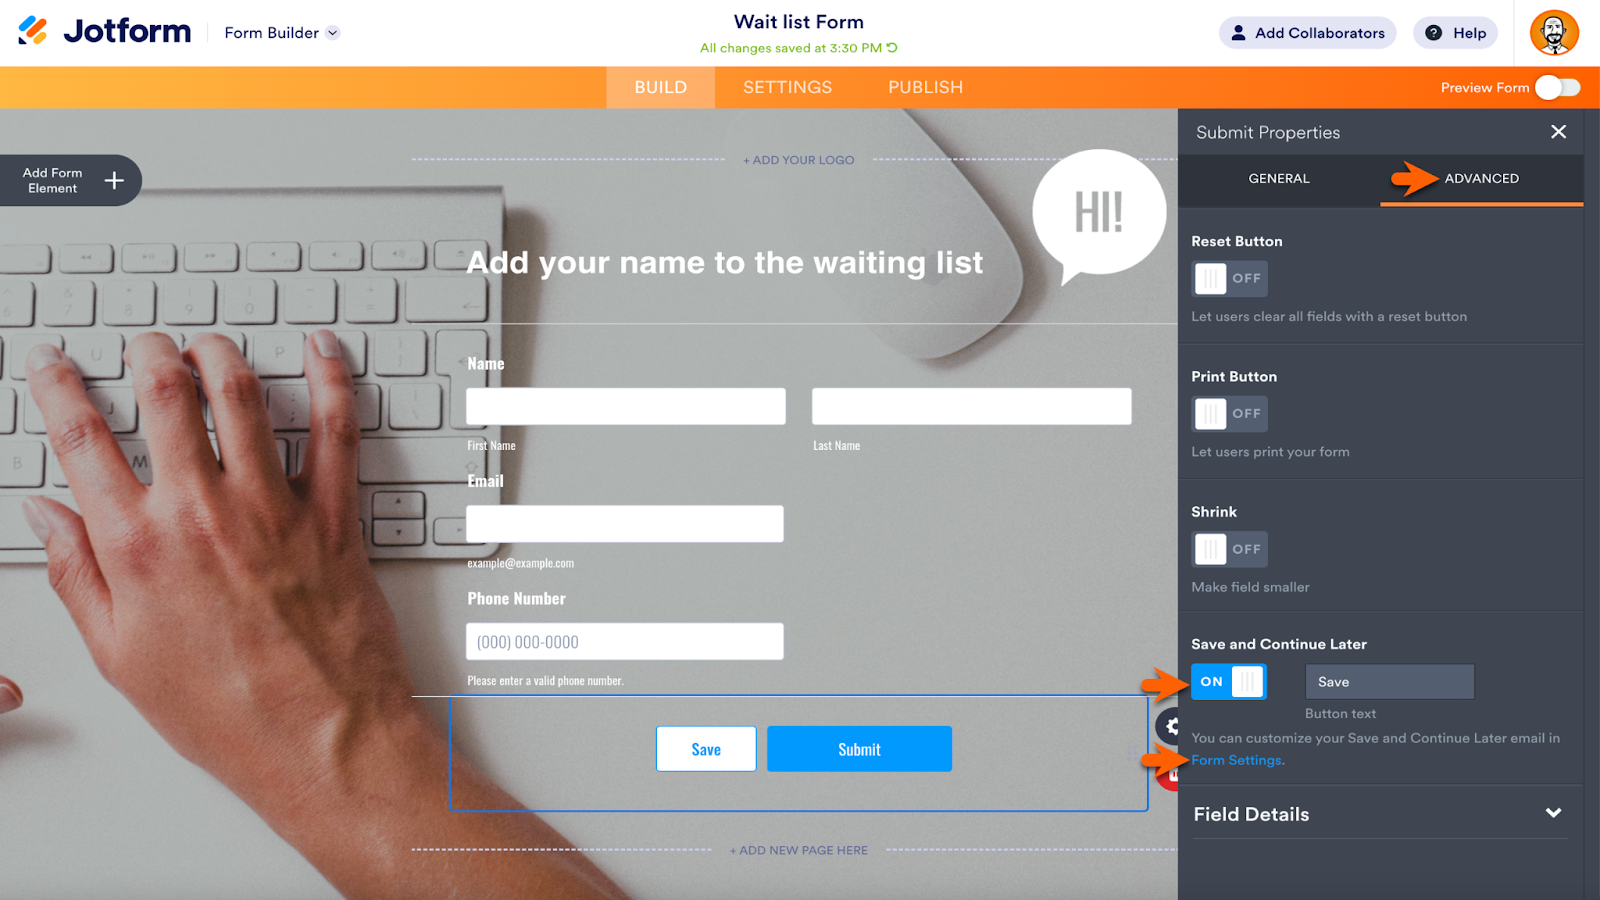
Next, go to the Advanced section of the Properties menu. Click the toggle for Save and Continue Later to the On position. To the right of the button, enter the text that will appear on the Save button. Click the Form Settings link near the bottom of the screen to customize automatic reminder emails for those who have started to fill out your form but haven’t finished.
Within the Form Settings, click the Show More Options button to expand the Settings menu. Scroll down until you see the Save and Continue Later section. Enable or disable the feature in the dropdown menu. Click the link below the menu to customize your Save and Continue Later email.

Customize the email subject line and create a unique message with a text editor that allows you to change fonts and more. Additionally, add an image, a table, or a link. Used the Advanced section to indicate which email address will be listed as the sender. Reset any of your changes with the Reset button, or cancel changes with the Cancel button. When finished, select Save Changes.
Distribute forms via social media and more
Jotform form distribution features deliver your form to its target audience, whether it’s meant for the entire world to see or catered to one specific person.
To share your form, go to the Publish section of the Form Builder. The Quick Share page opens by default. At the top of the page, find the Copy Link button for fast sharing. Alternatively, you can enter email addresses or upload a CSV file to share via the Invite by Email section.
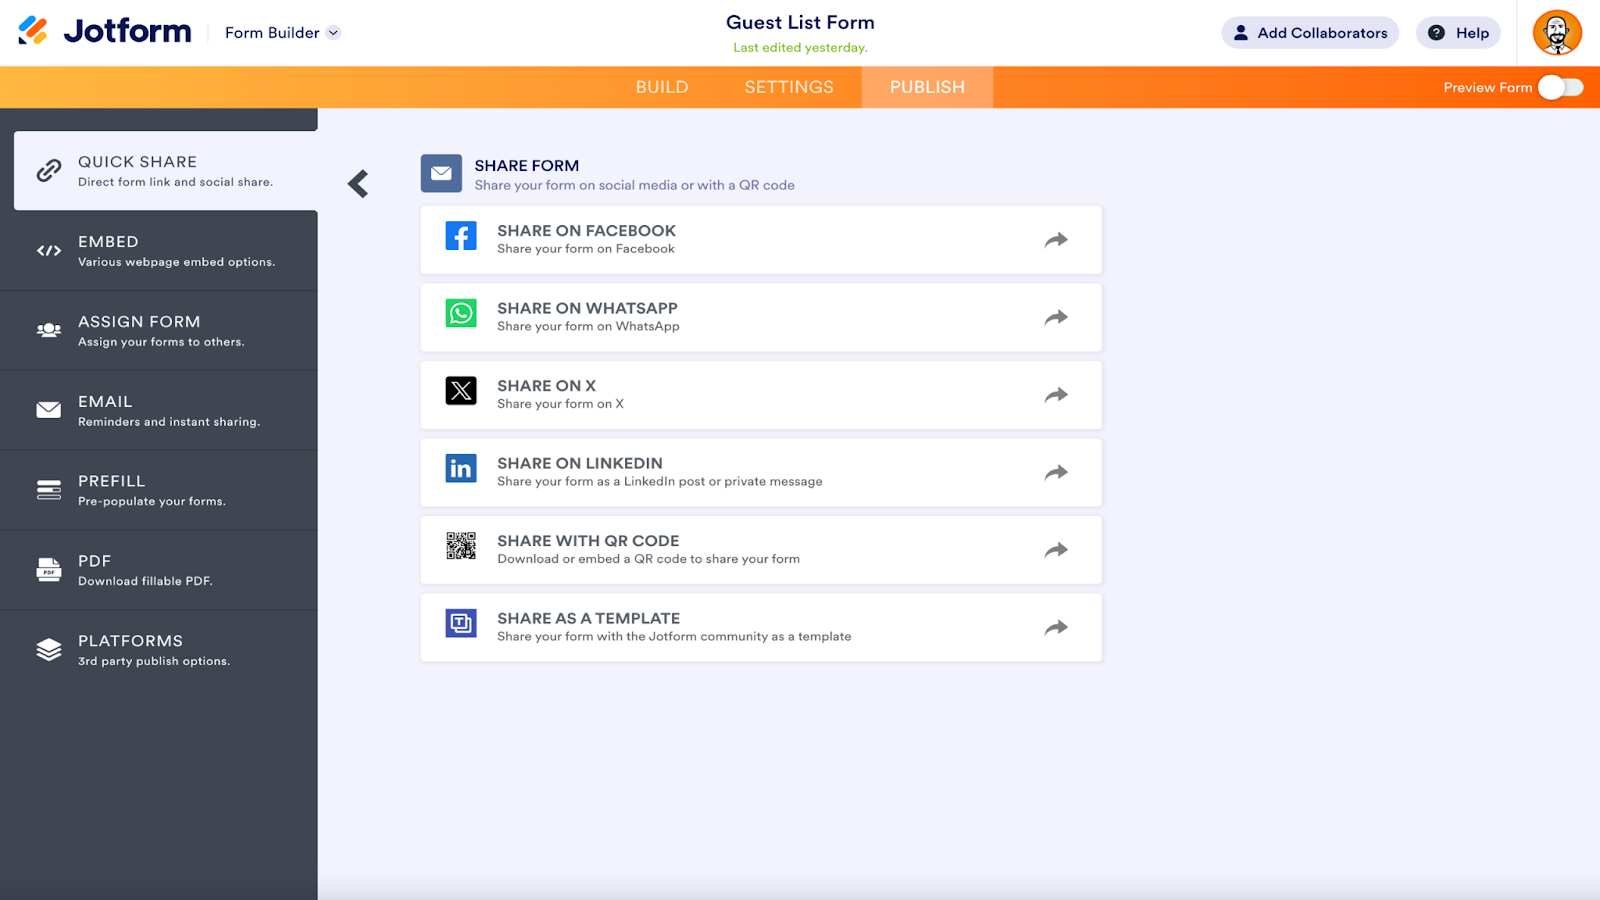
The Share Form section provides links to share your form via social media or a unique QR code. Click View More to open the full list of social media share options.
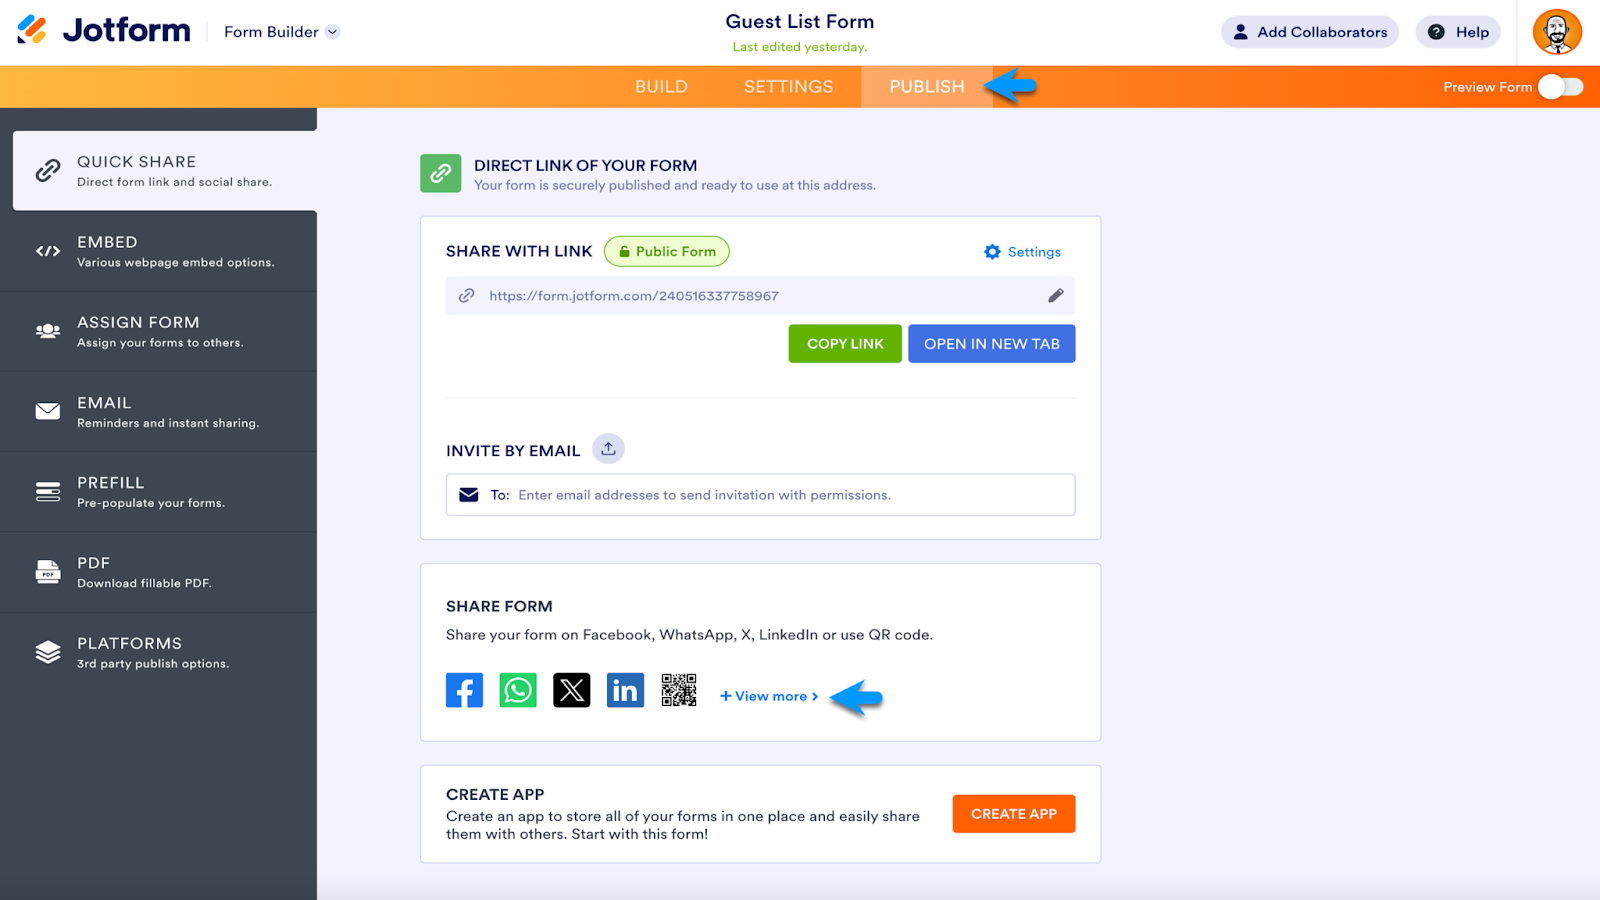
With just one click, open your Facebook, LinkedIn, WhatsApp, or X (formerly, Twitter) account with an automatic share link for your form. Additionally, share your form with the Jotform community as a form template, or click the QR code option to download your QR code, share it with a link, or access an embed code to place your QR code on your website.
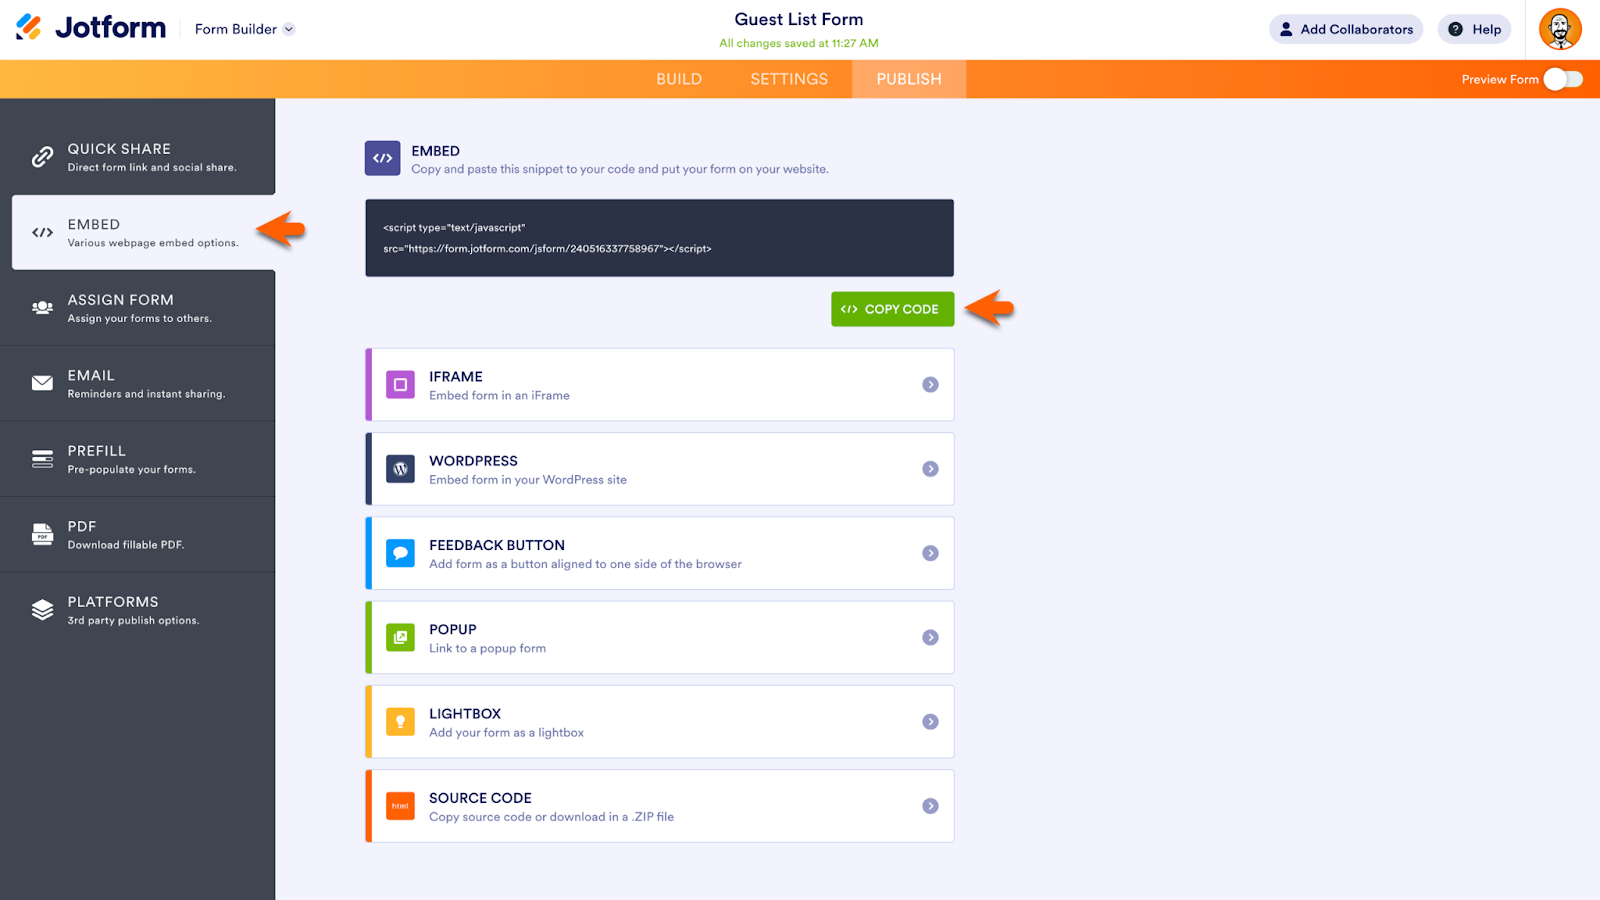
To embed your entire form into your website, access the Embed options within the Publish section of the Form Builder. The embed code for your form appears at the top of the screen. There are other embed options available, including code made specifically for WordPress.
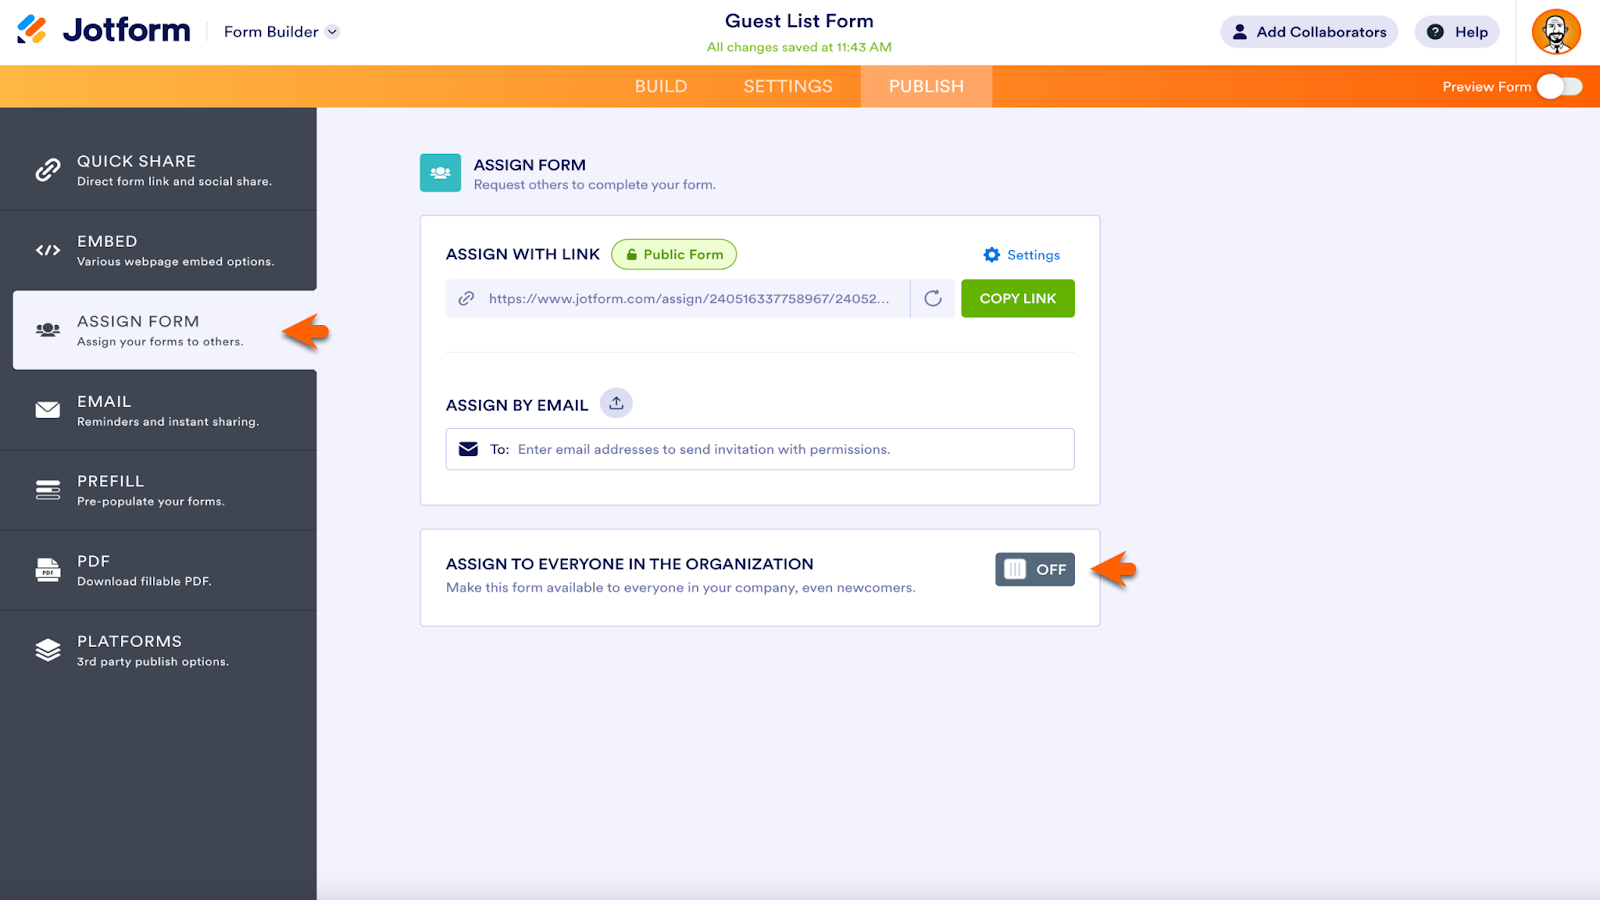
To assign your form to a colleague or client, go to the Assign Form tab. Use the Copy Link button to quickly assign your form via link, or enter one or more email addresses into the Assign by Email section.
Jotform Enterprise users can use the Assign Forms feature to assign the form to everyone in their organization with one click via a button at the bottom of the page.
Jotform integrations
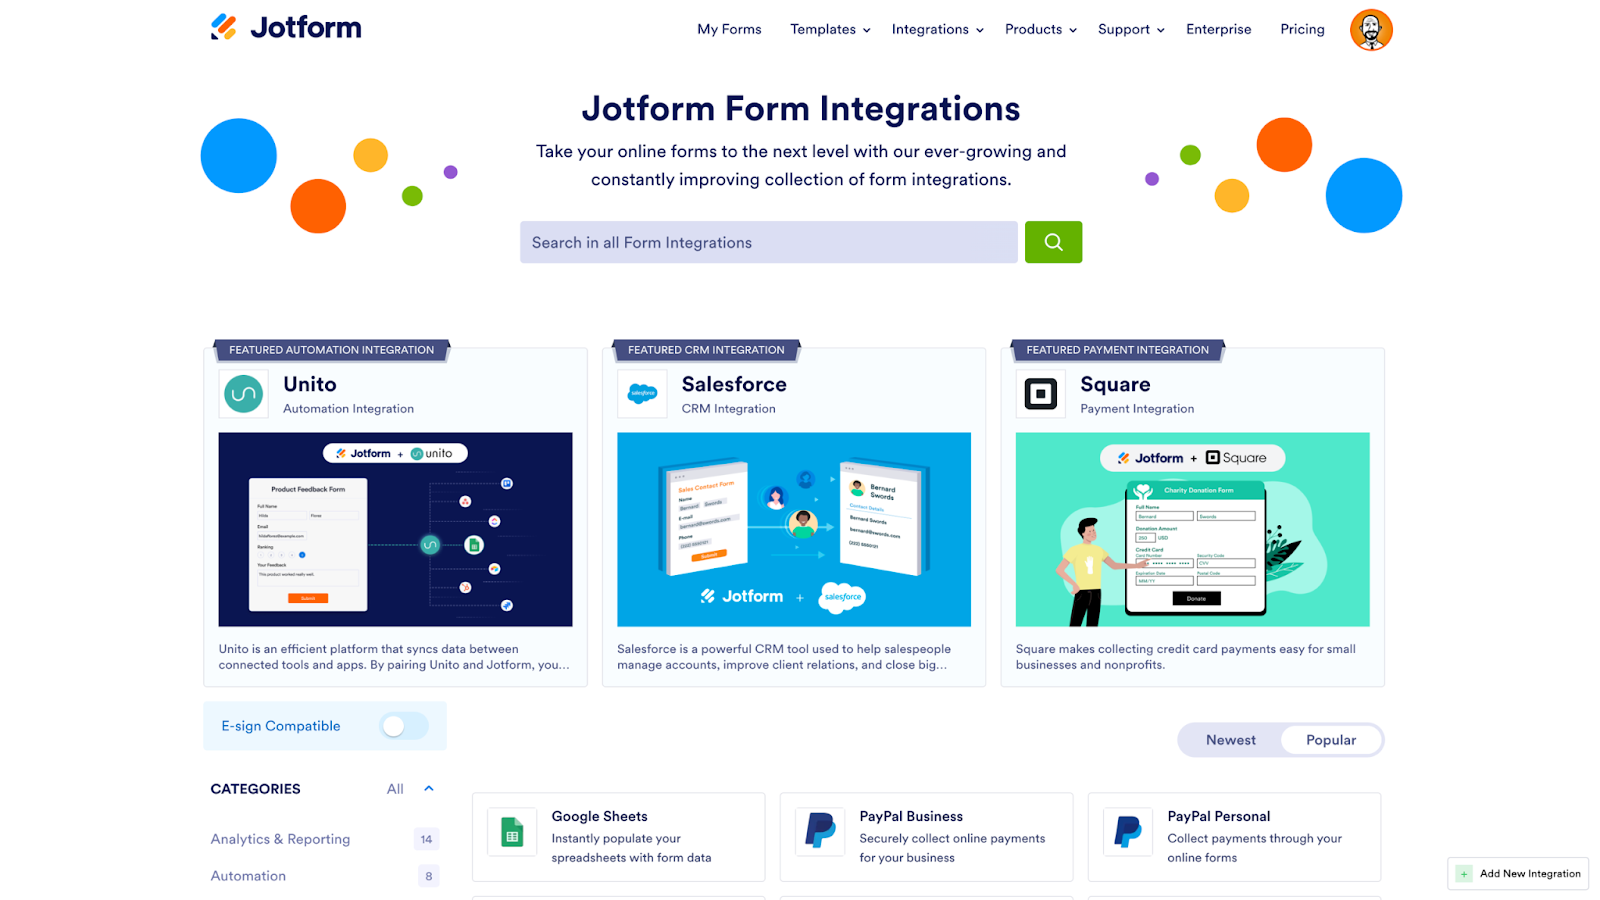
Jotform’s integrations connect Jotform with hundreds of other automation tools, some of which you likely already use. Manage your Jotform submission data with CRM tools like Salesforce, send Jotform data to your preferred cloud storage service, conduct email marketing campaigns more effectively with a variety of email software, accept payment directly through your form, and more.
Jotform’s entire library of integrations is easy to find. Use the Integrations dropdown menu in the top banner on the Jotform website.
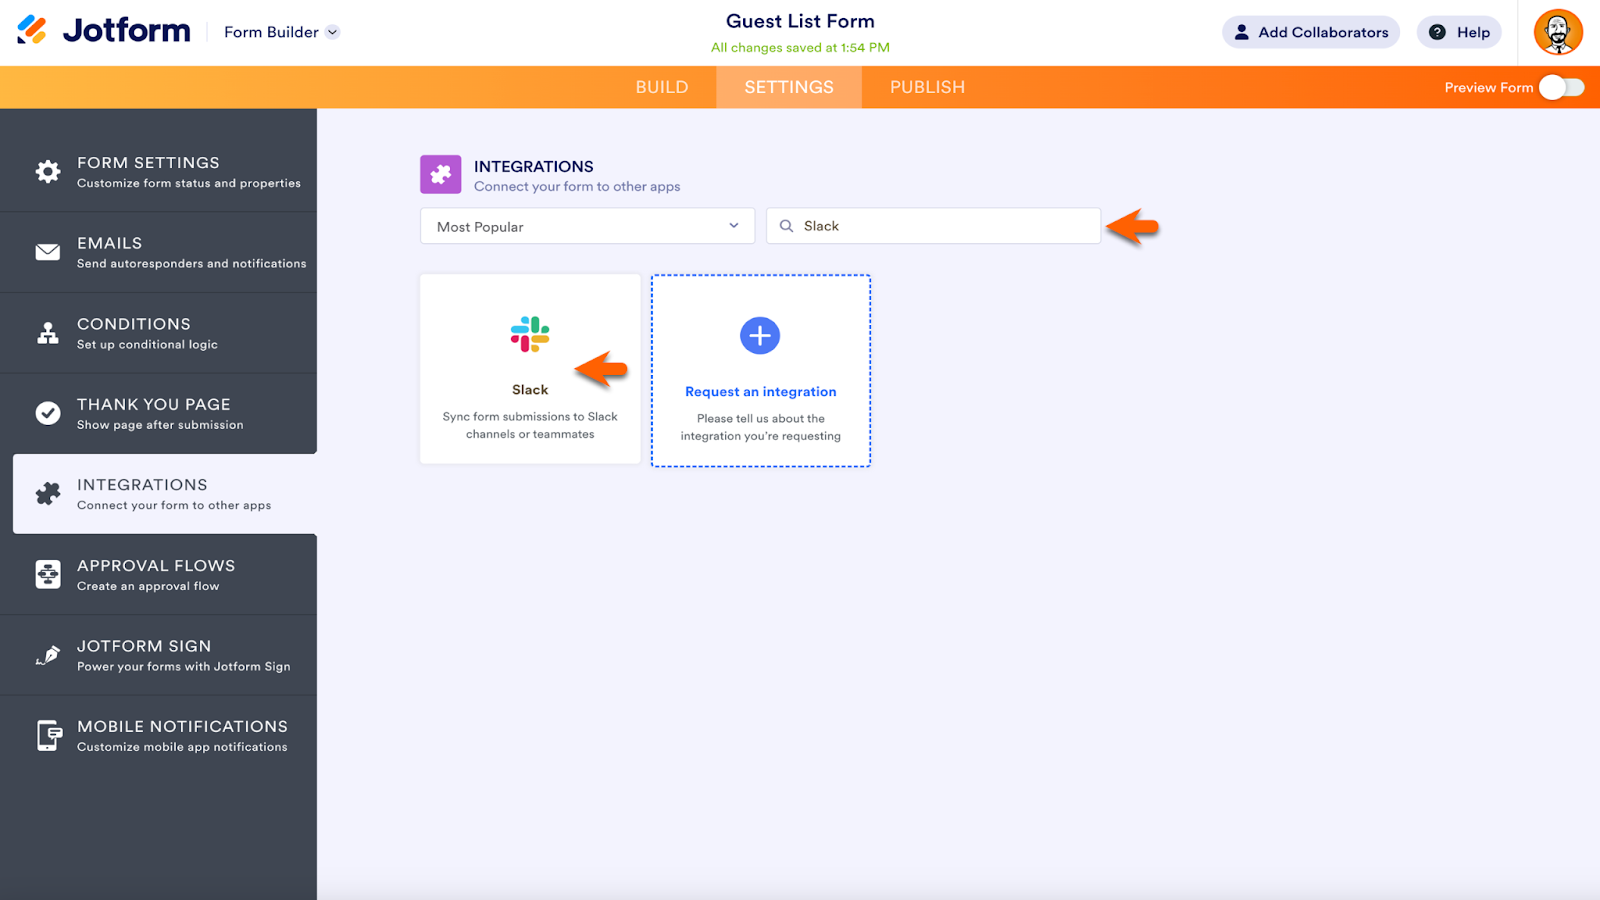
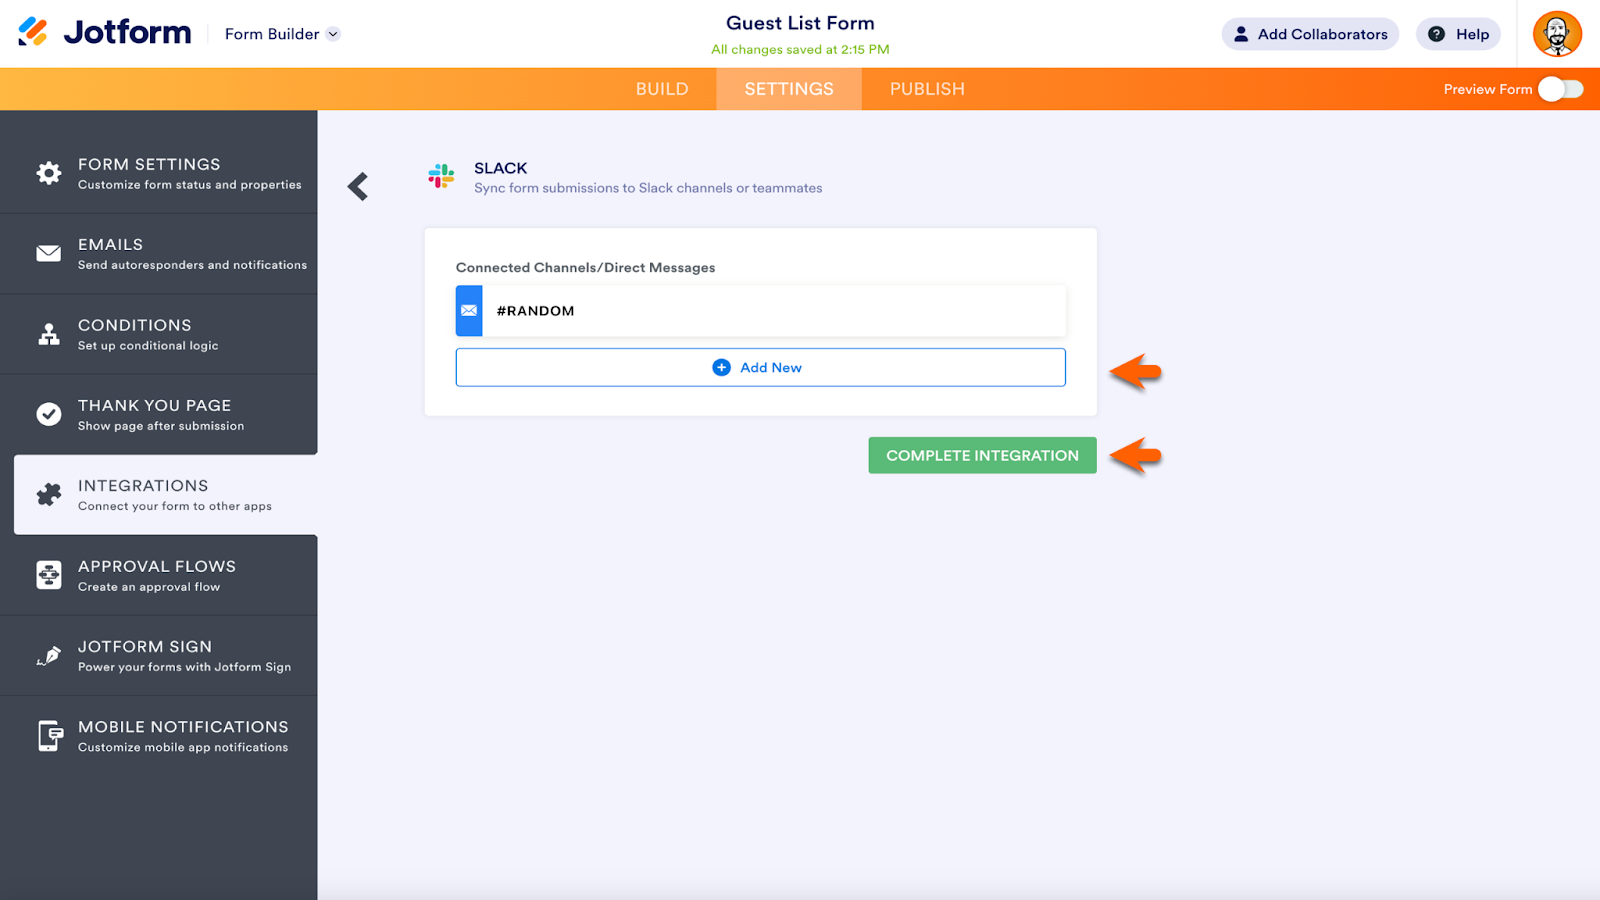
Each integration takes just a few steps to add. For example, to send submission data to your preferred Slack channel or via Slack direct message, go to the Integrations tab, found in the Form Builder Settings.

Use the search at the top of the Integrations page to find Jotform’s Slack integration. Click on the integration’s tile to proceed to the next step.
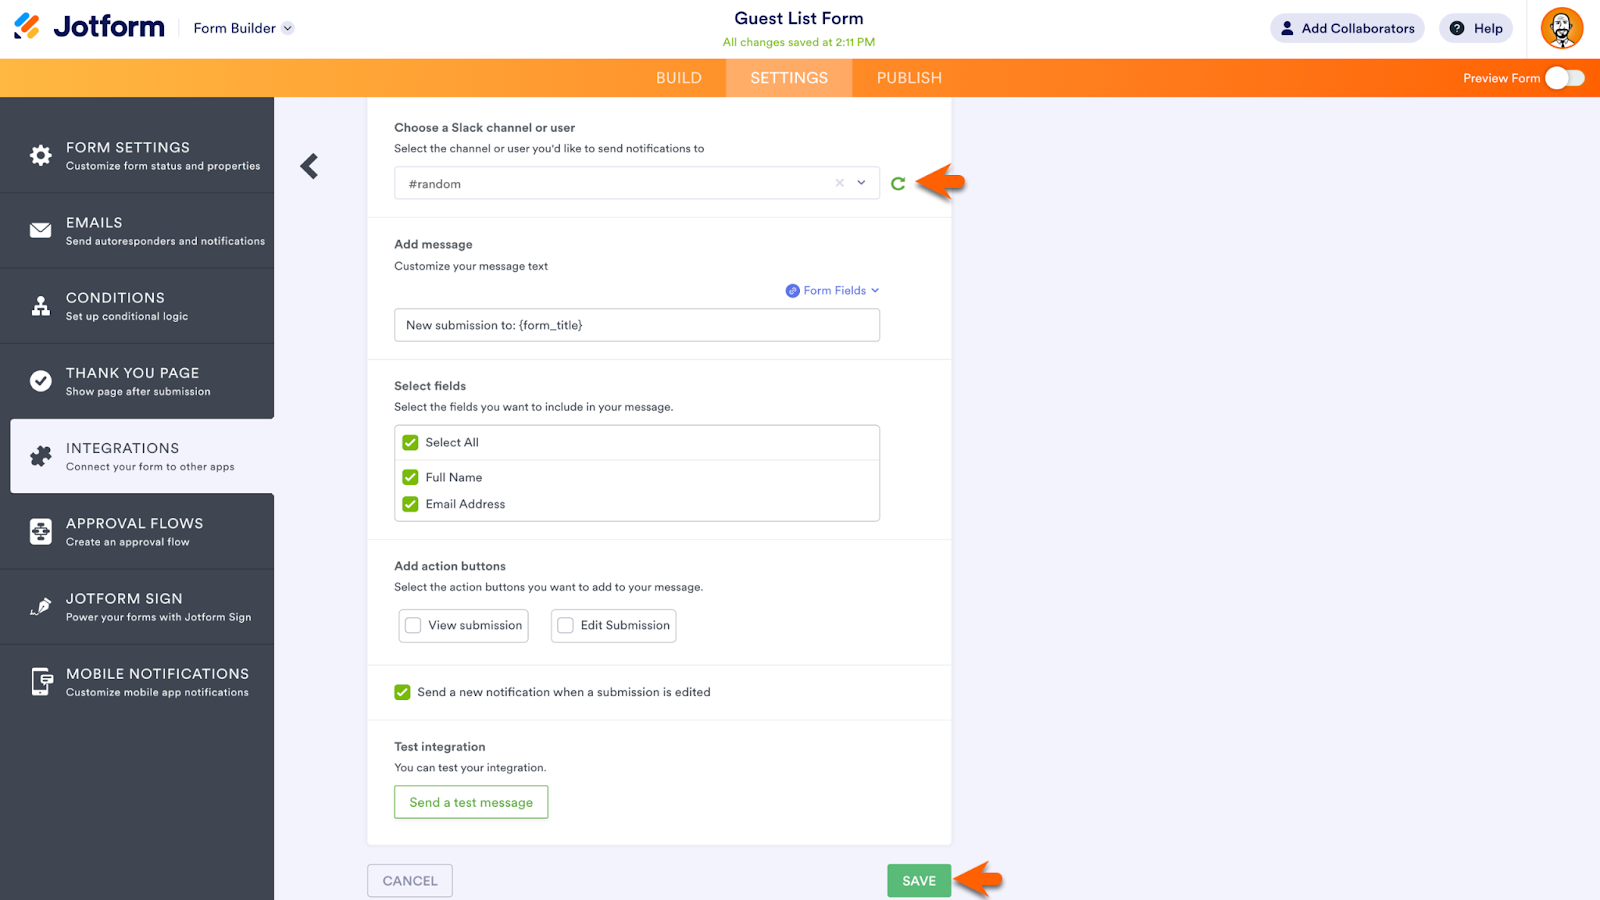
After authenticating your Slack account and providing Jotform access, choose which Slack channel or colleague you’d like to send submission data to. Once selected, the menu expands to include additional options. Send a custom message along with the submission data, send email notifications, add action buttons to the Slack message (these provide links to view or edit the submission), and more.
When you’re all set, click the Save button.
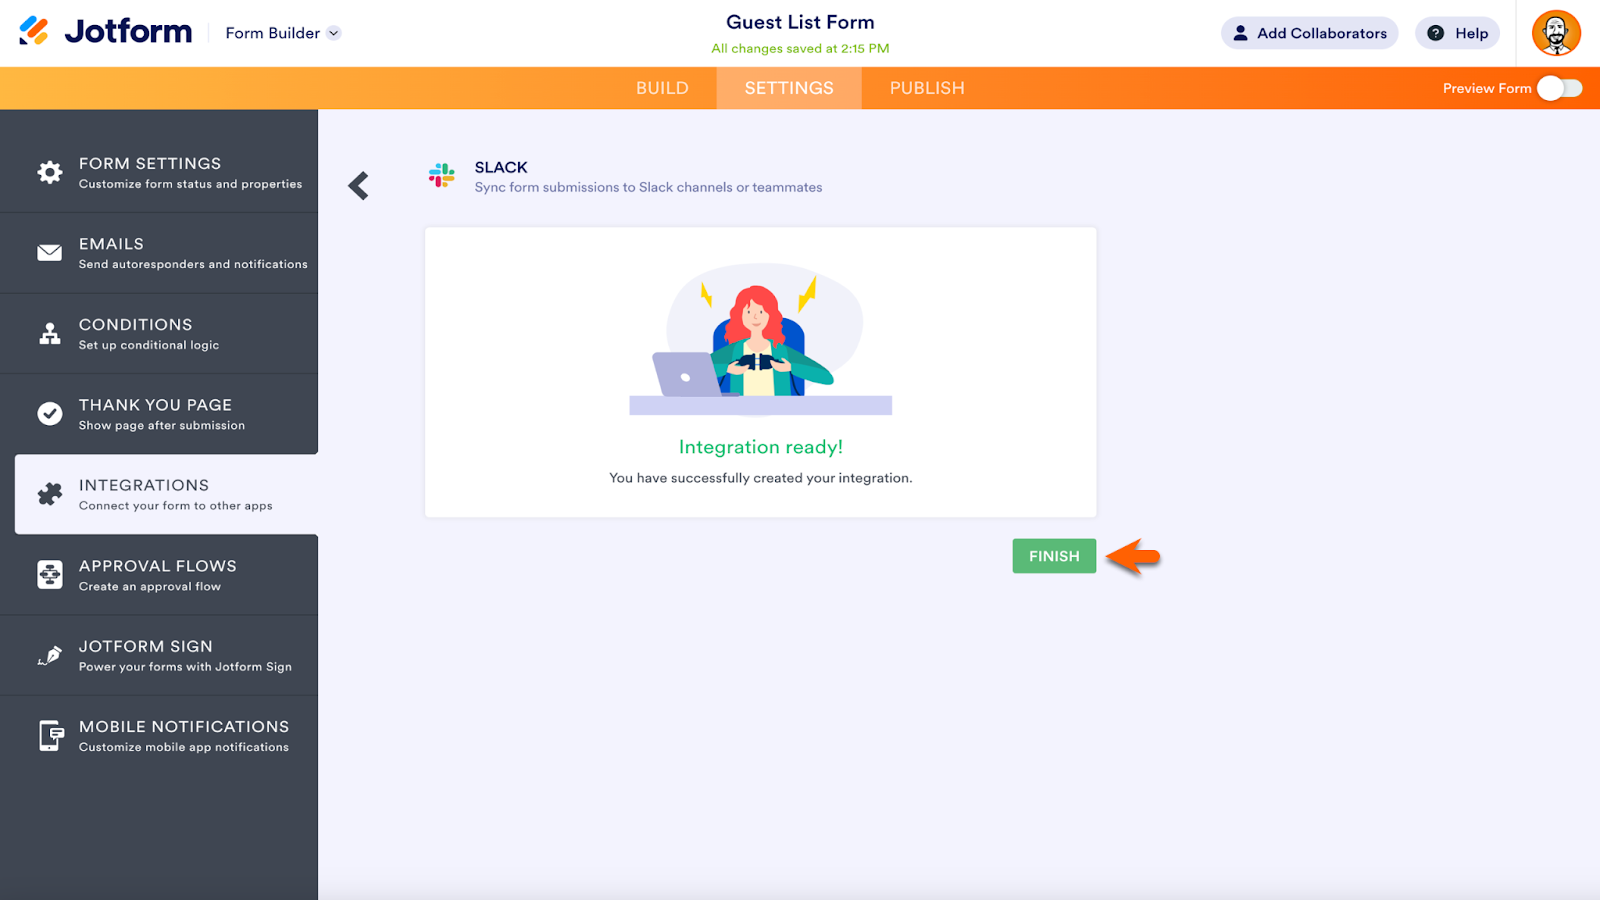
On the screen that follows, either add another connection to a Slack channel or direct message, or use the Complete Integration button to go to the next step.
On the next screen, click the Finalize button, and the Slack integration is ready to go.
Jotform payment integrations
For those collecting payment with their form, Jotform offers more than 30 payment processor integrations and doesn’t charge additional fees. Like other forms, these payment forms can be embedded into your website.
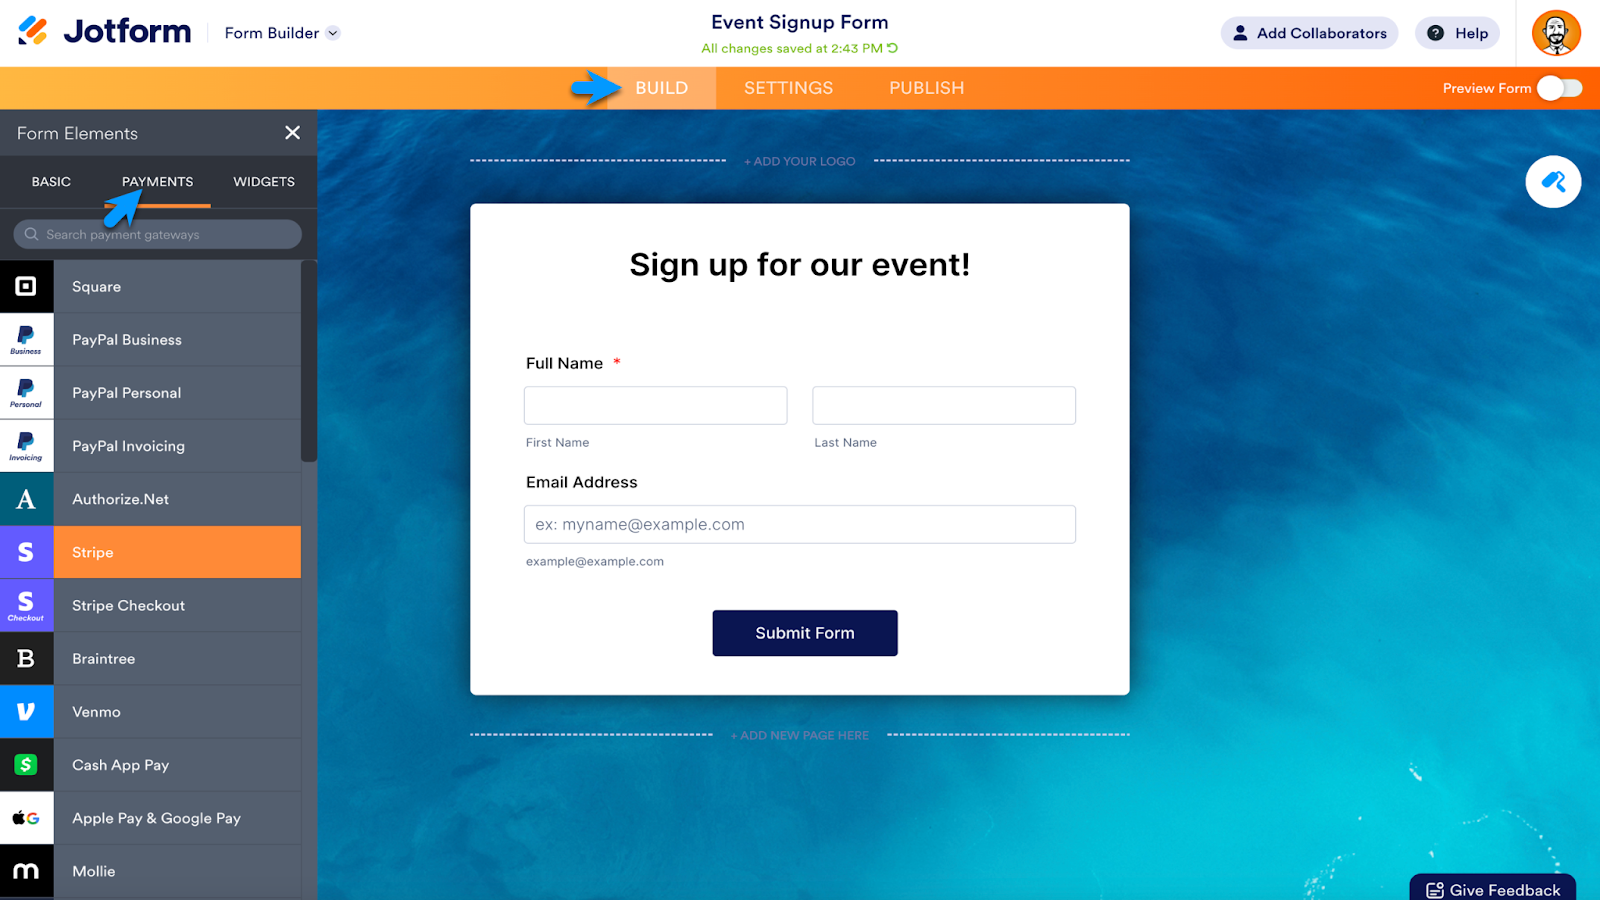
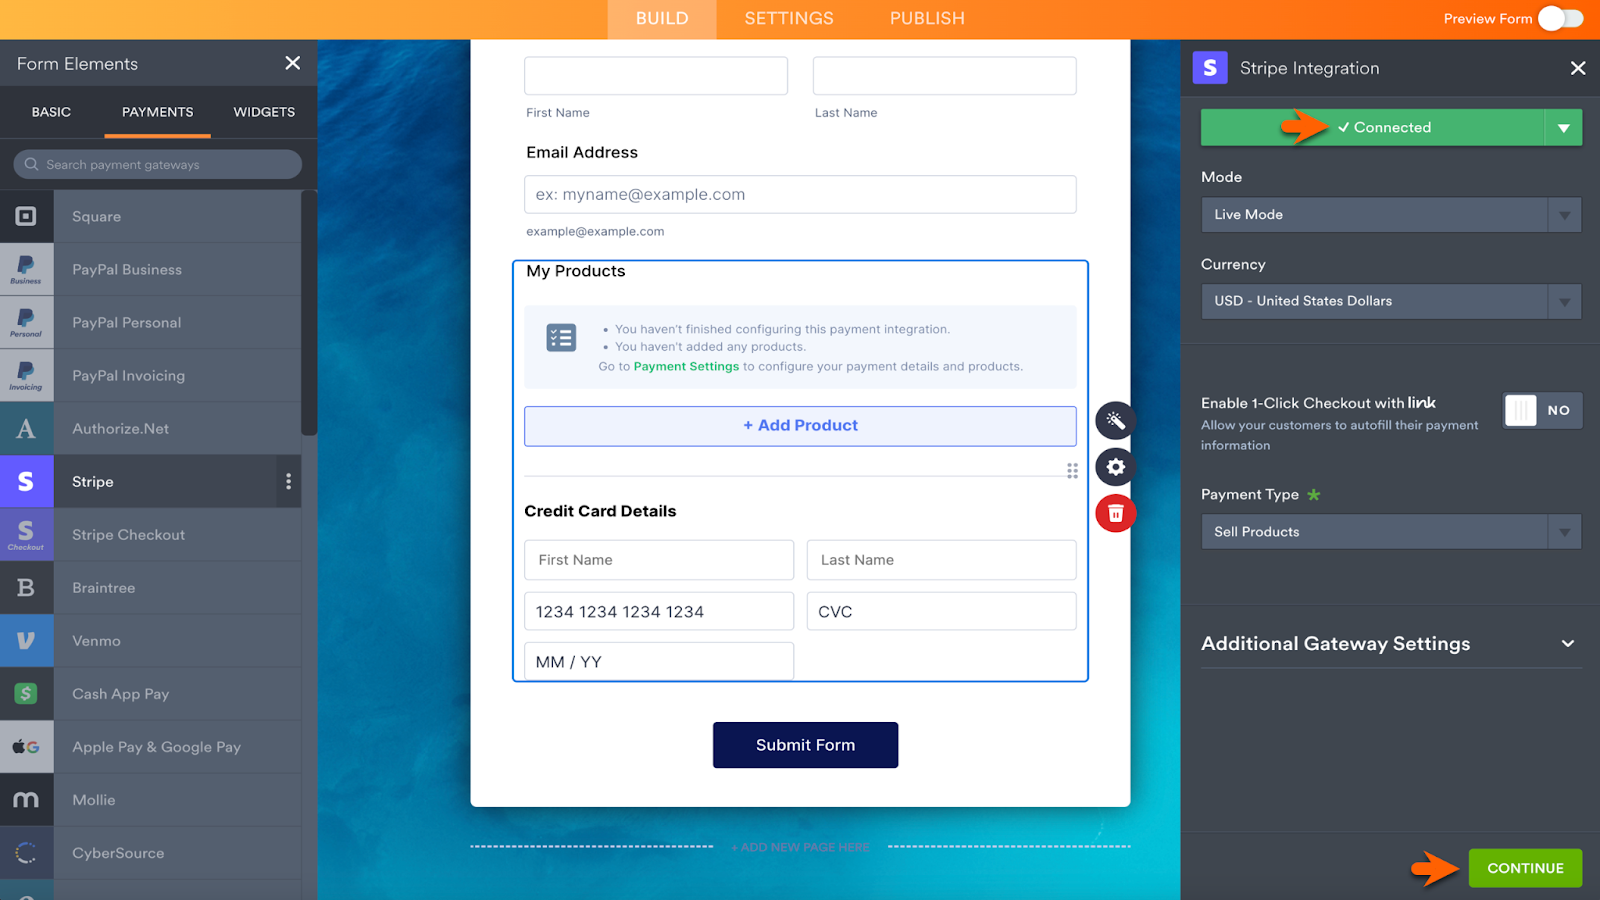
Add a payment integration from the Integrations section of the Form Builder, or find your preferred payment integration within the Form Elements. The Payments section is next to the Basic elements. Click your preferred payment integration or drag and drop it onto your form.
Click the Connect button in the menu that automatically opens on the right side of the screen.
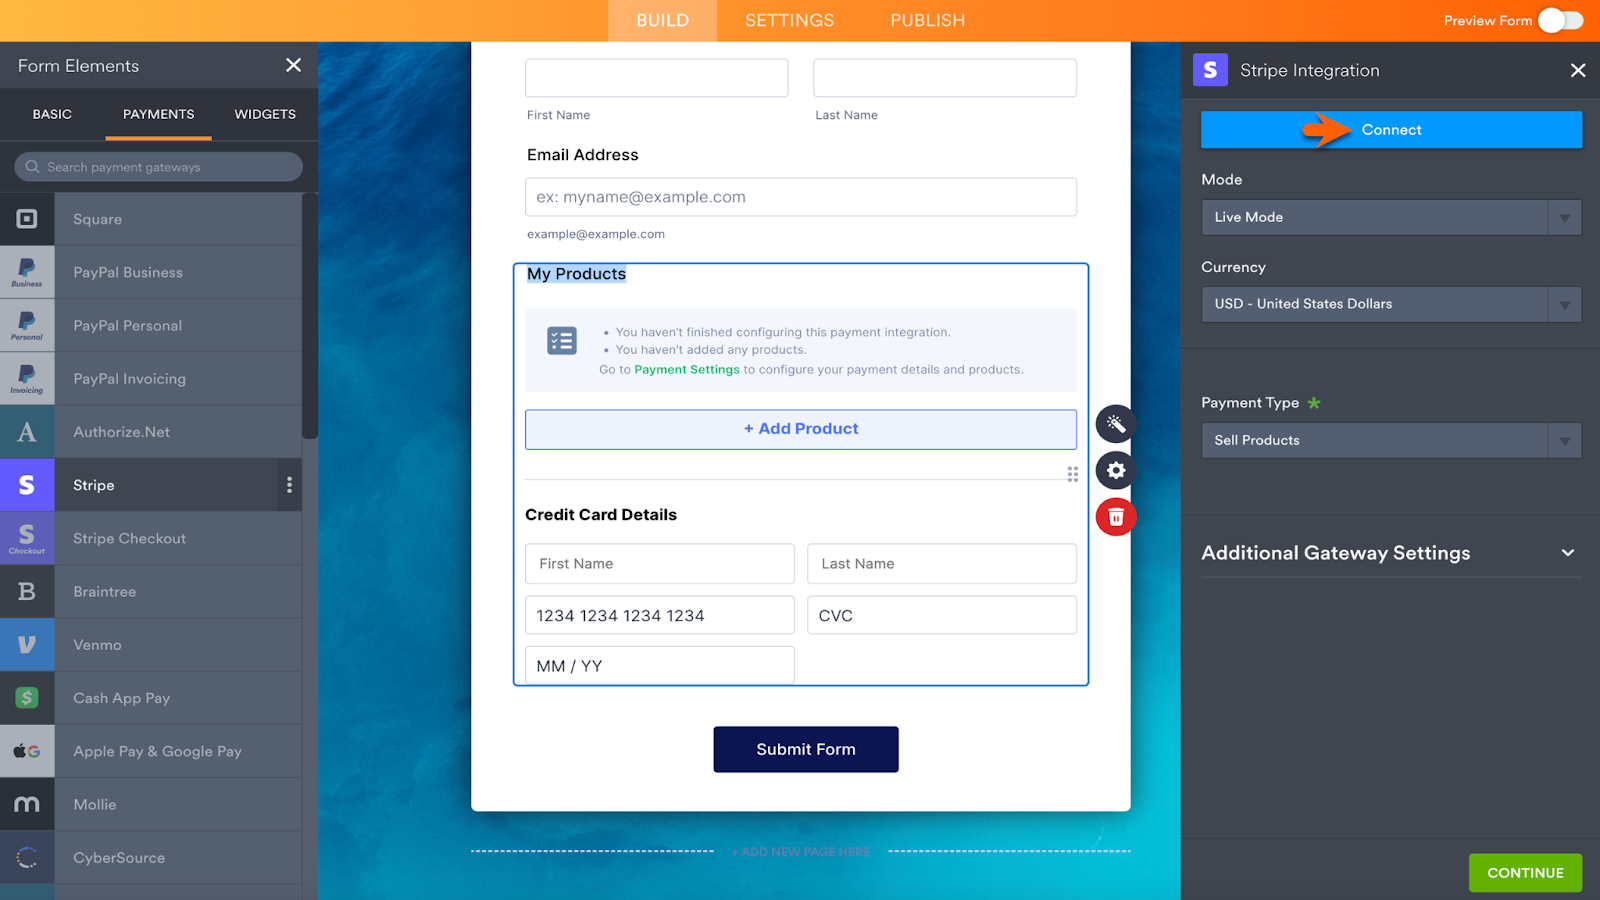
Follow the prompts to authenticate your payment processor account and allow Jotform to access it. When finished, the integration will show as connected. Click the Continue button at the bottom of the screen to complete installation.
Form Security: Encryption, password protected forms, and Captcha
Jotform provides a high level of security by default. All account information is automatically encrypted in transfer and at rest. Additionally, Jotform is PCI DSS Level 1 certified (the highest level of security for sites that take credit card payments), uses a 256-bit SSL connection for transferring form data (the industry standard), and more.
There are three easy tools within the Form Builder that can boost form security based on your needs, whether you’re registering guests for a private event, protecting particularly sensitive data, or safeguarding against spam. They are the Captcha form element, password protected forms, and form encryption.
Add Captcha to your form
A CAPTCHA requests that users complete simple challenges to help protect your forms against unwanted submissions from spammers and spambots.
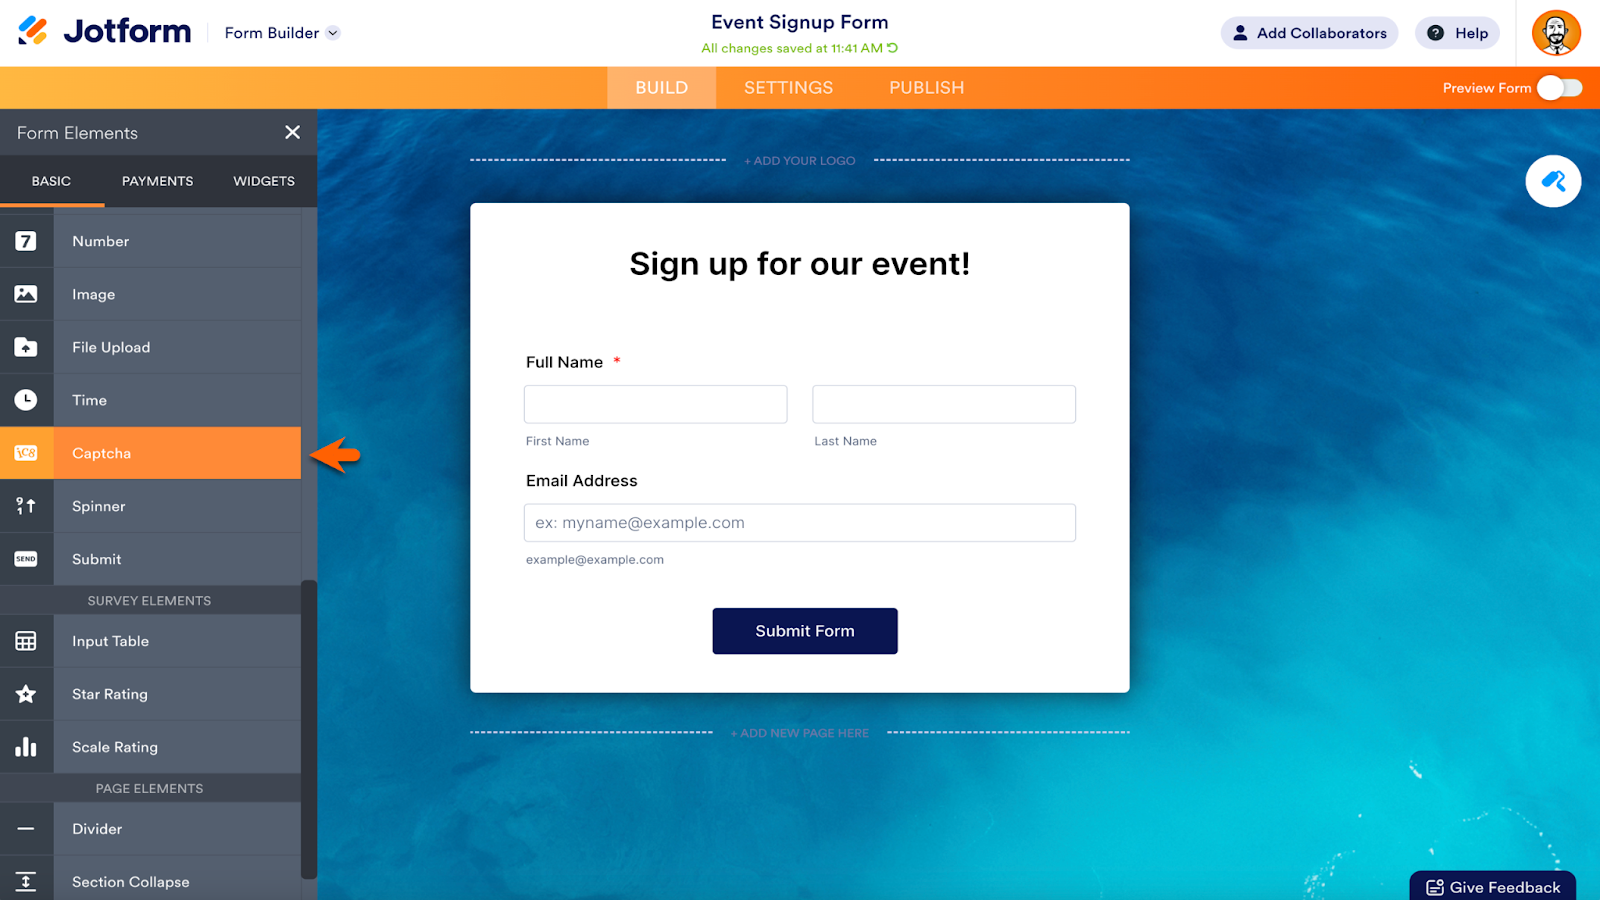
Jotform’s Captcha form element provides this safeguard. It’s located in the list of Basic form elements within the Form Builder. Click the element or drag it onto your form to add it.
Below is a preview of the form after the Captcha has been added.
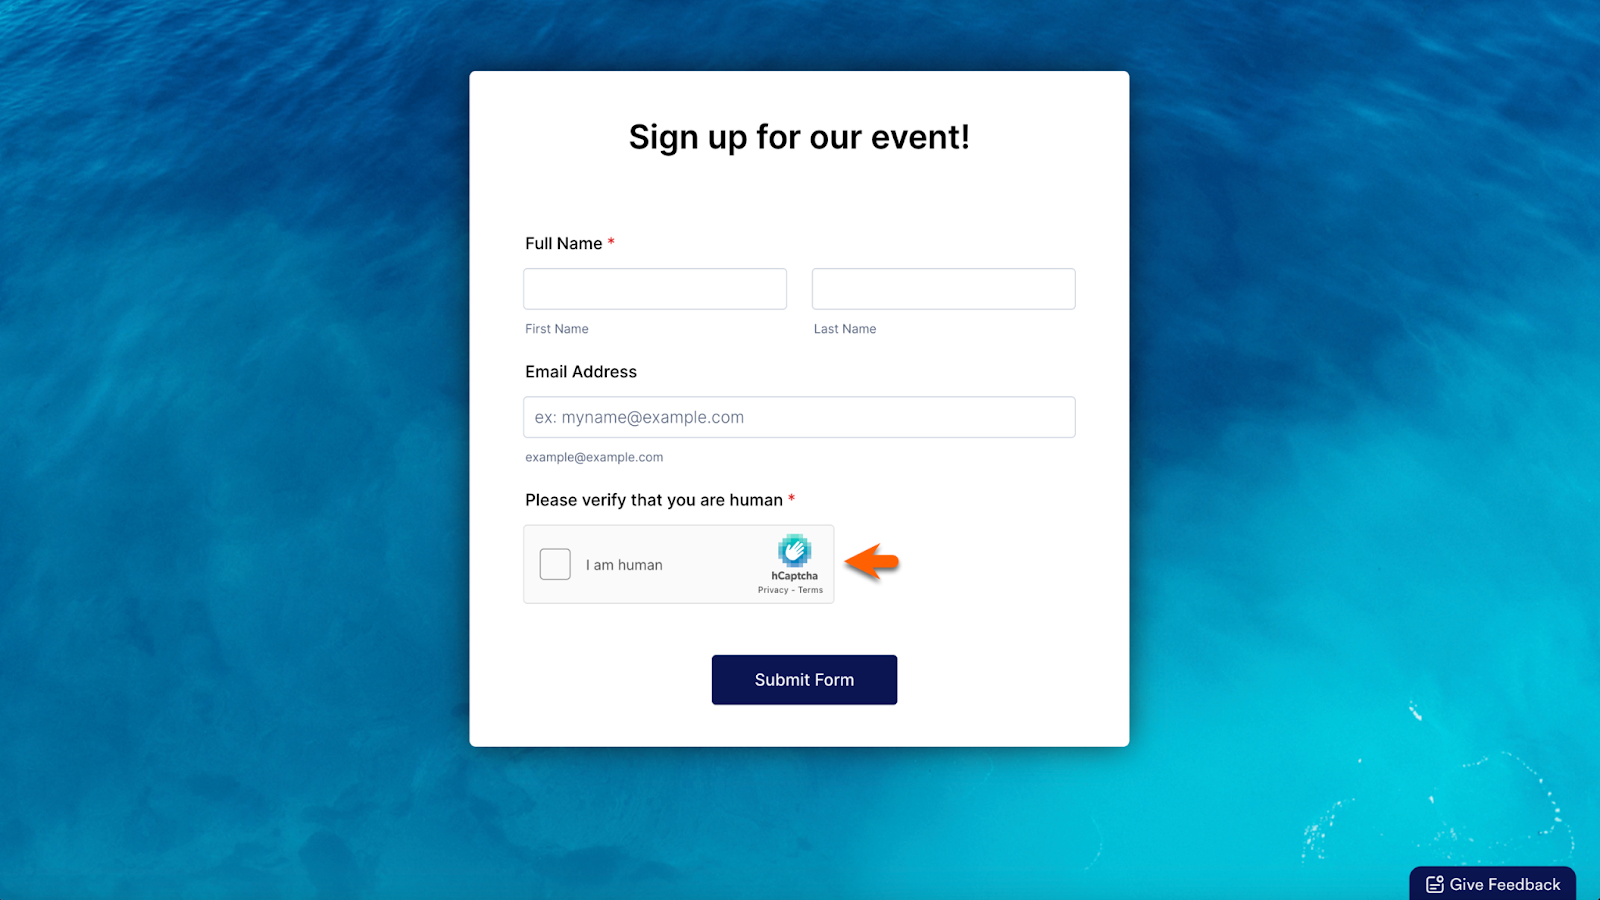
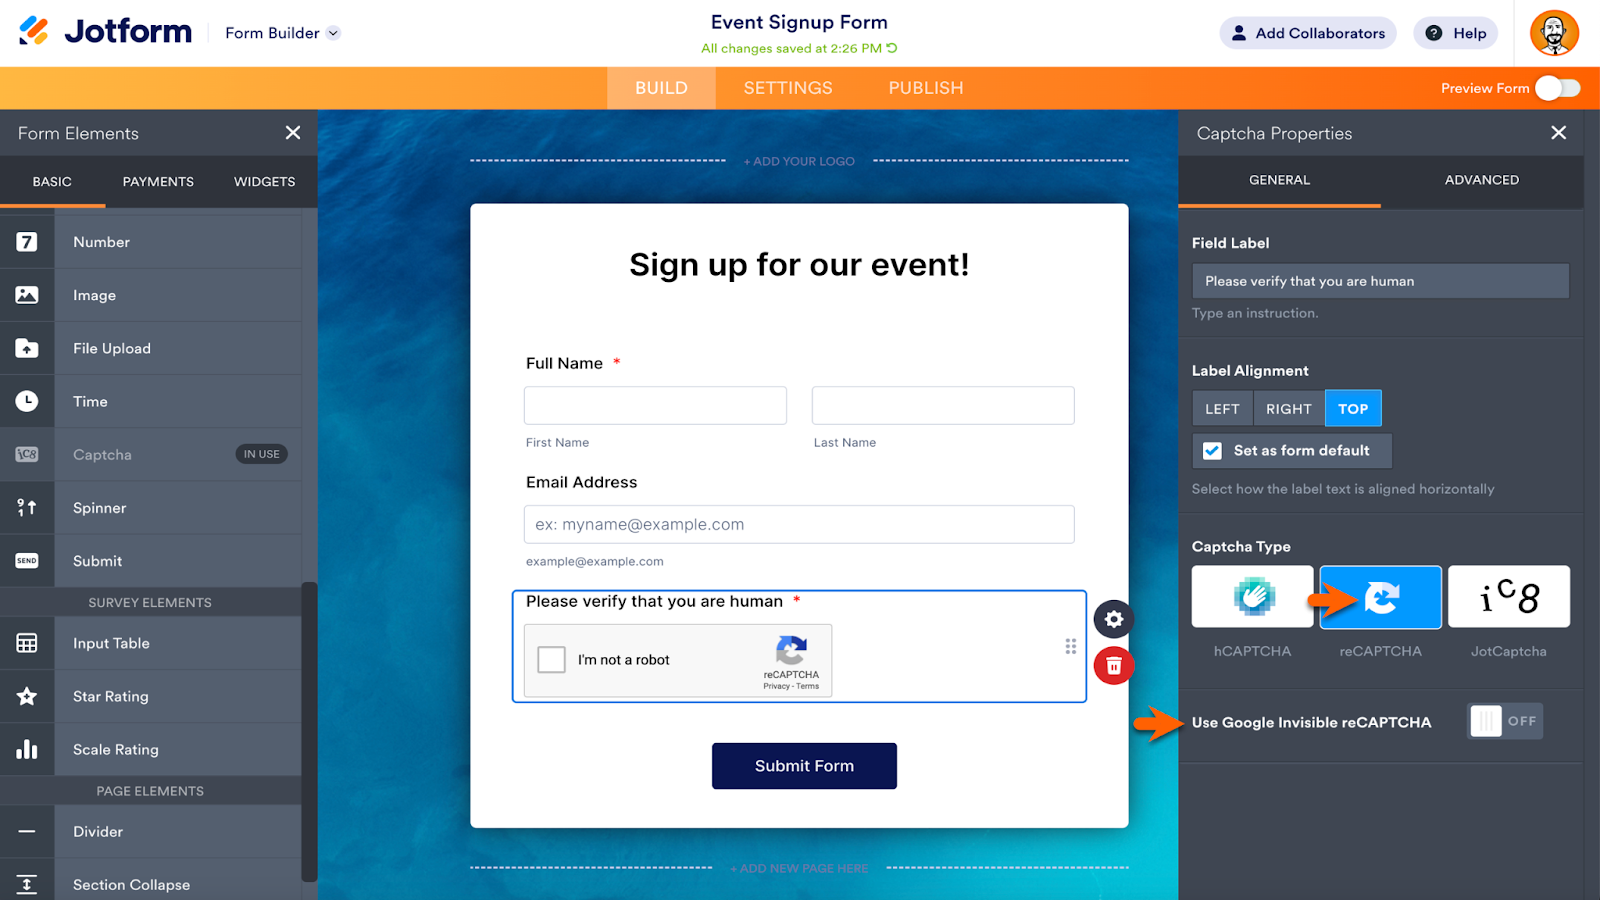
Use the Captcha element’s Properties menu to toggle between three different types: hCAPTCHA (Jotform’s default Captcha), reCAPTCHA, and JotCaptcha (Jotform’s CAPTCHA alternative that asks users to enter text from a provided image).
To use Google’s invisible reCAPTCHA, choose reCAPTCHA from the Properties menu, and then activate Google Invisible reCATCHA with the on/off toggle button.
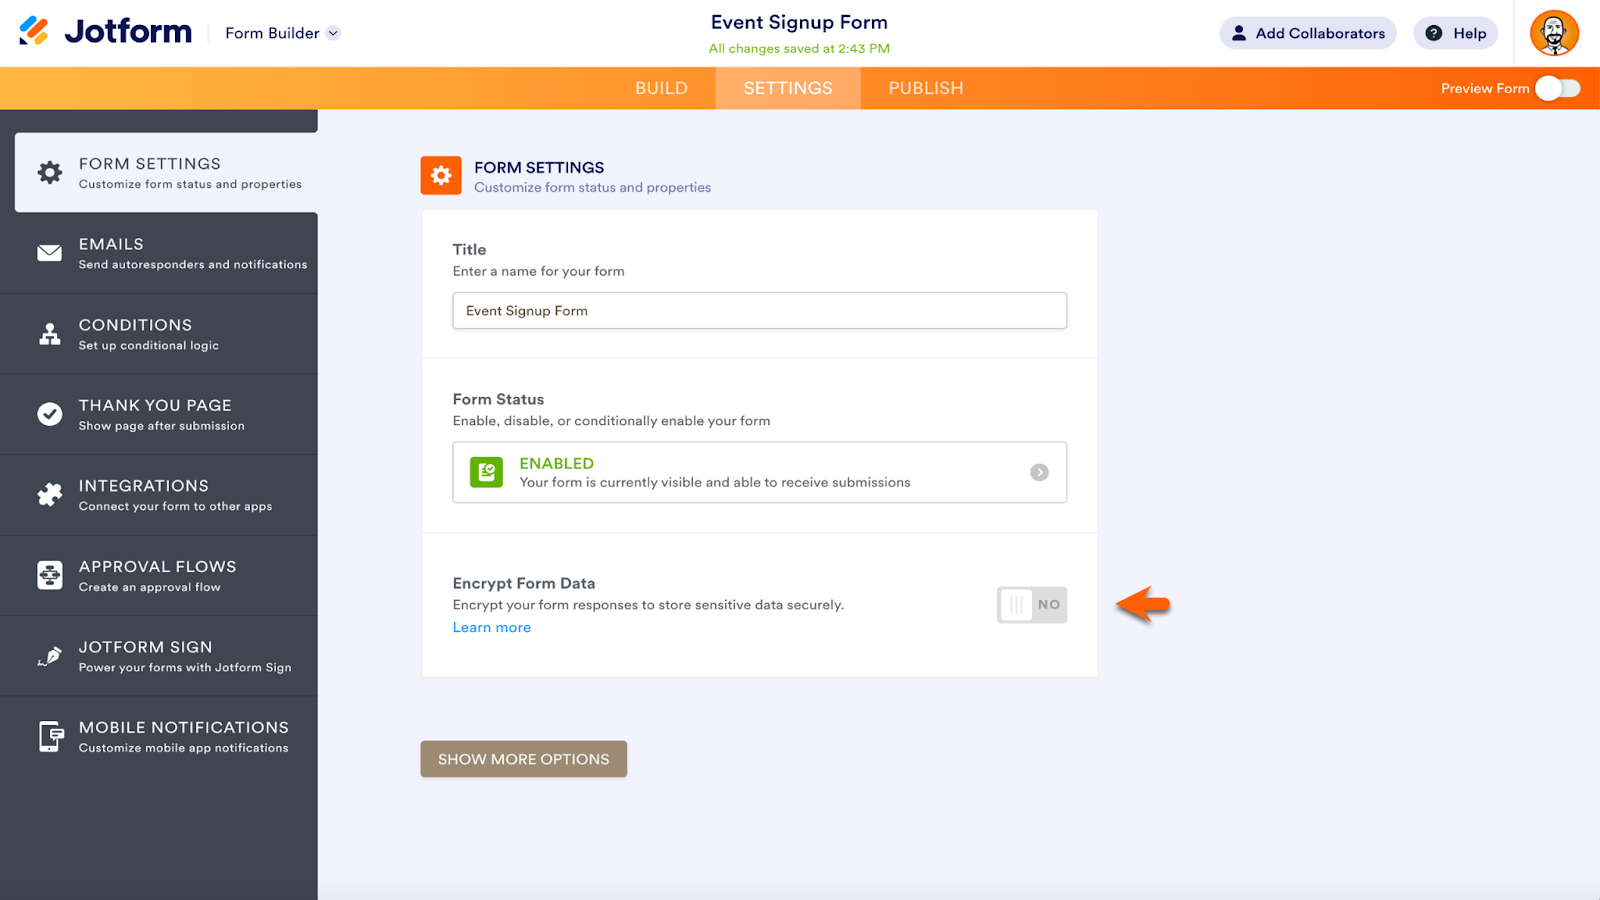
Encrypt form data
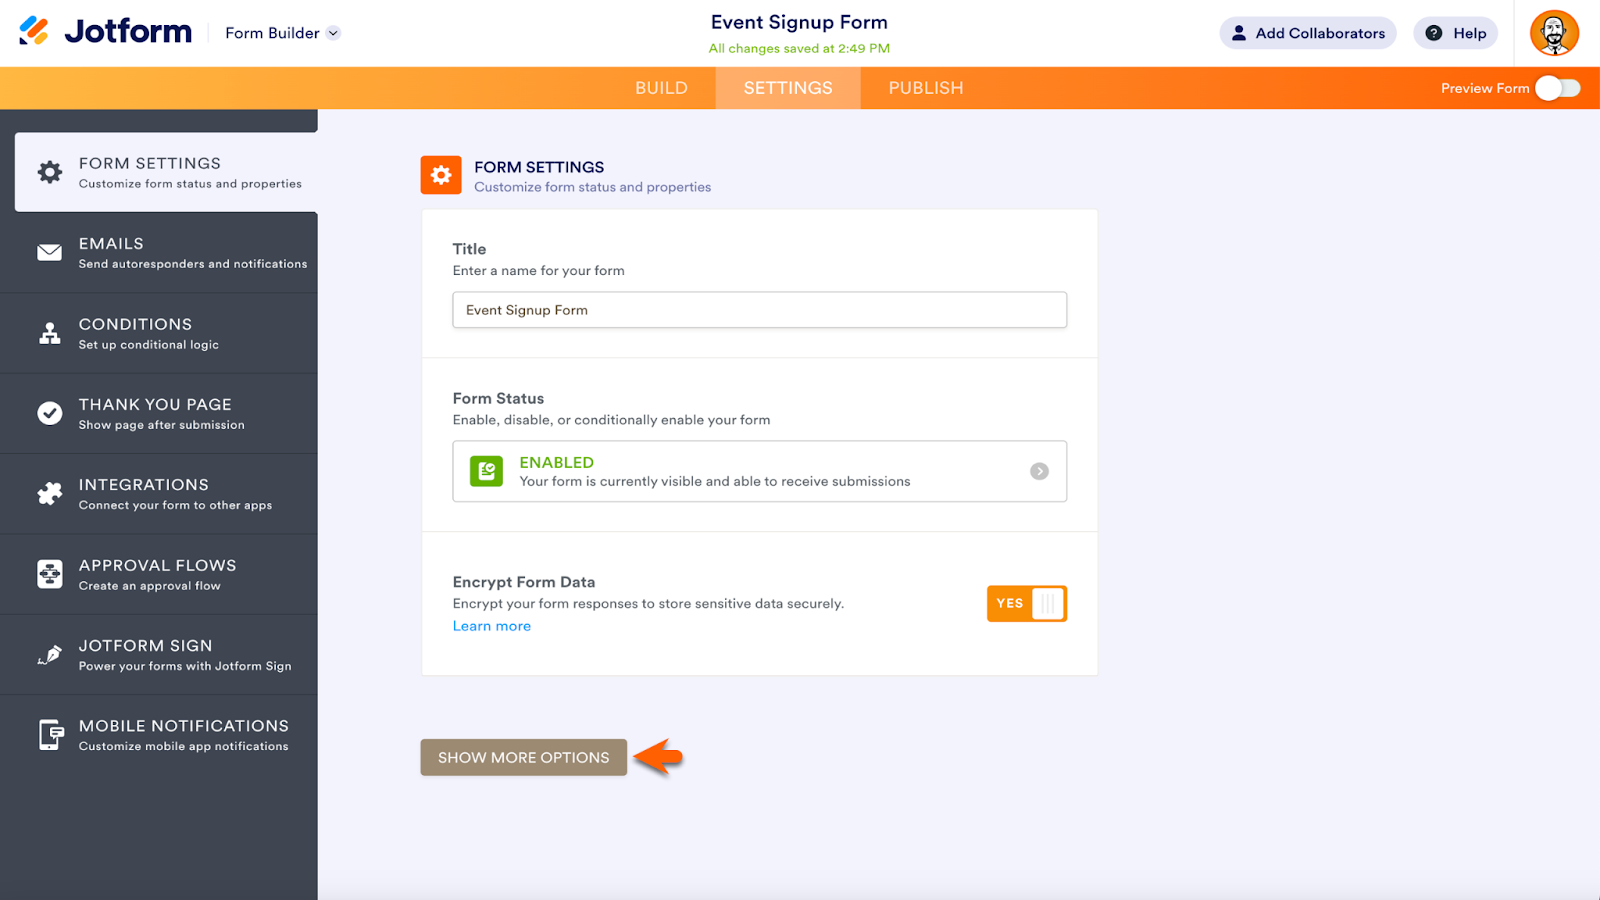
To add an extra layer of encryption to your form data, go to the Settings within the Form Builder. Locate the Encrypted Forms feature. Toggle on the Encrypt Form Data button to get started.
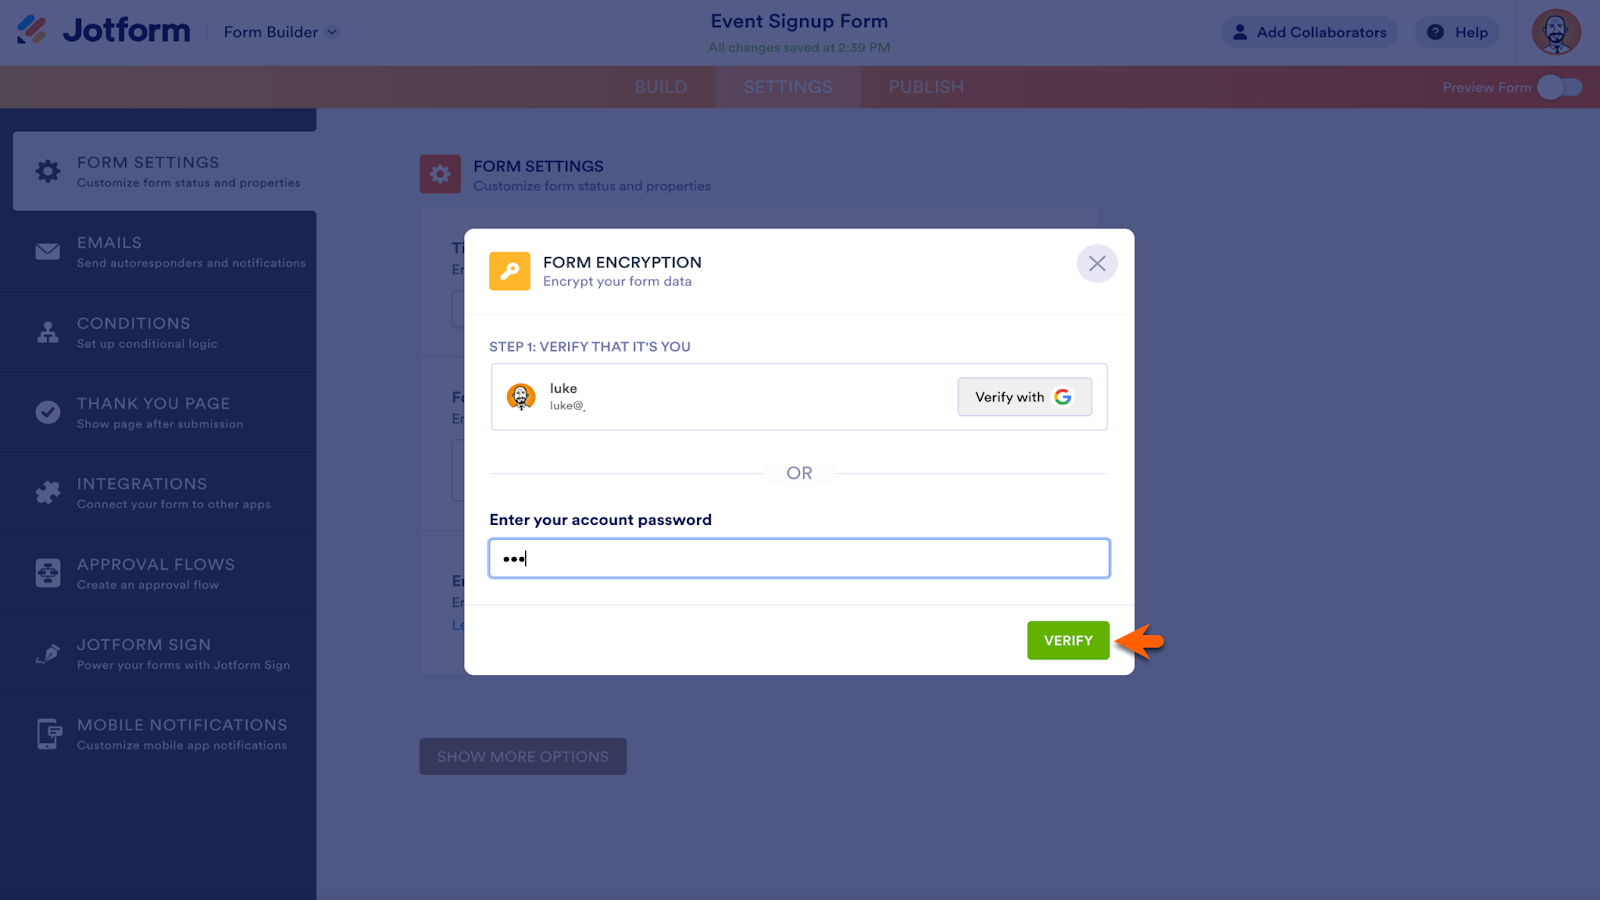
Next, verify your Jotform account with Google or your password. Click Verify to continue.
Pro Tip
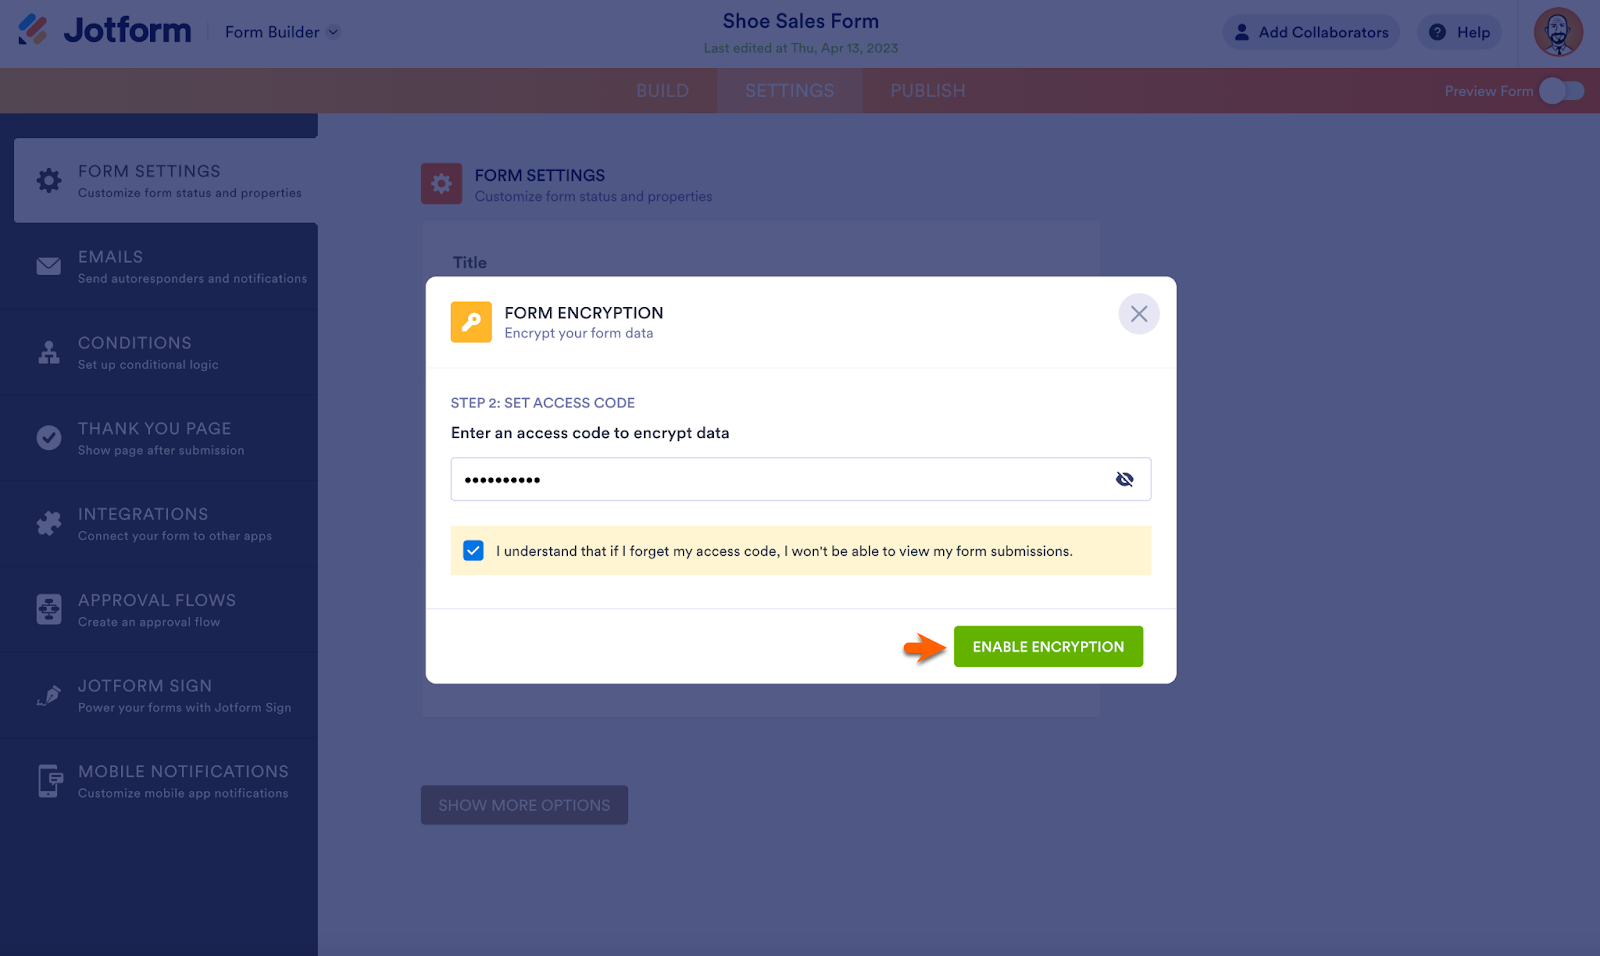
Some form features aren’t available with form encryption. When adding form encryption, the Form Builder will alert you if there’s a conflict, and you can choose whether to proceed.
On the following screen, create an access code in the space provided. Check the box that explains your access code will be needed to view form submissions. When ready, click Enable Encryption.
Password protected forms
If you want to require form submitters to use a password to access your form, go to the Settings within the Form Builder. Click the Show More Options button to reveal the Password Protected Forms feature.
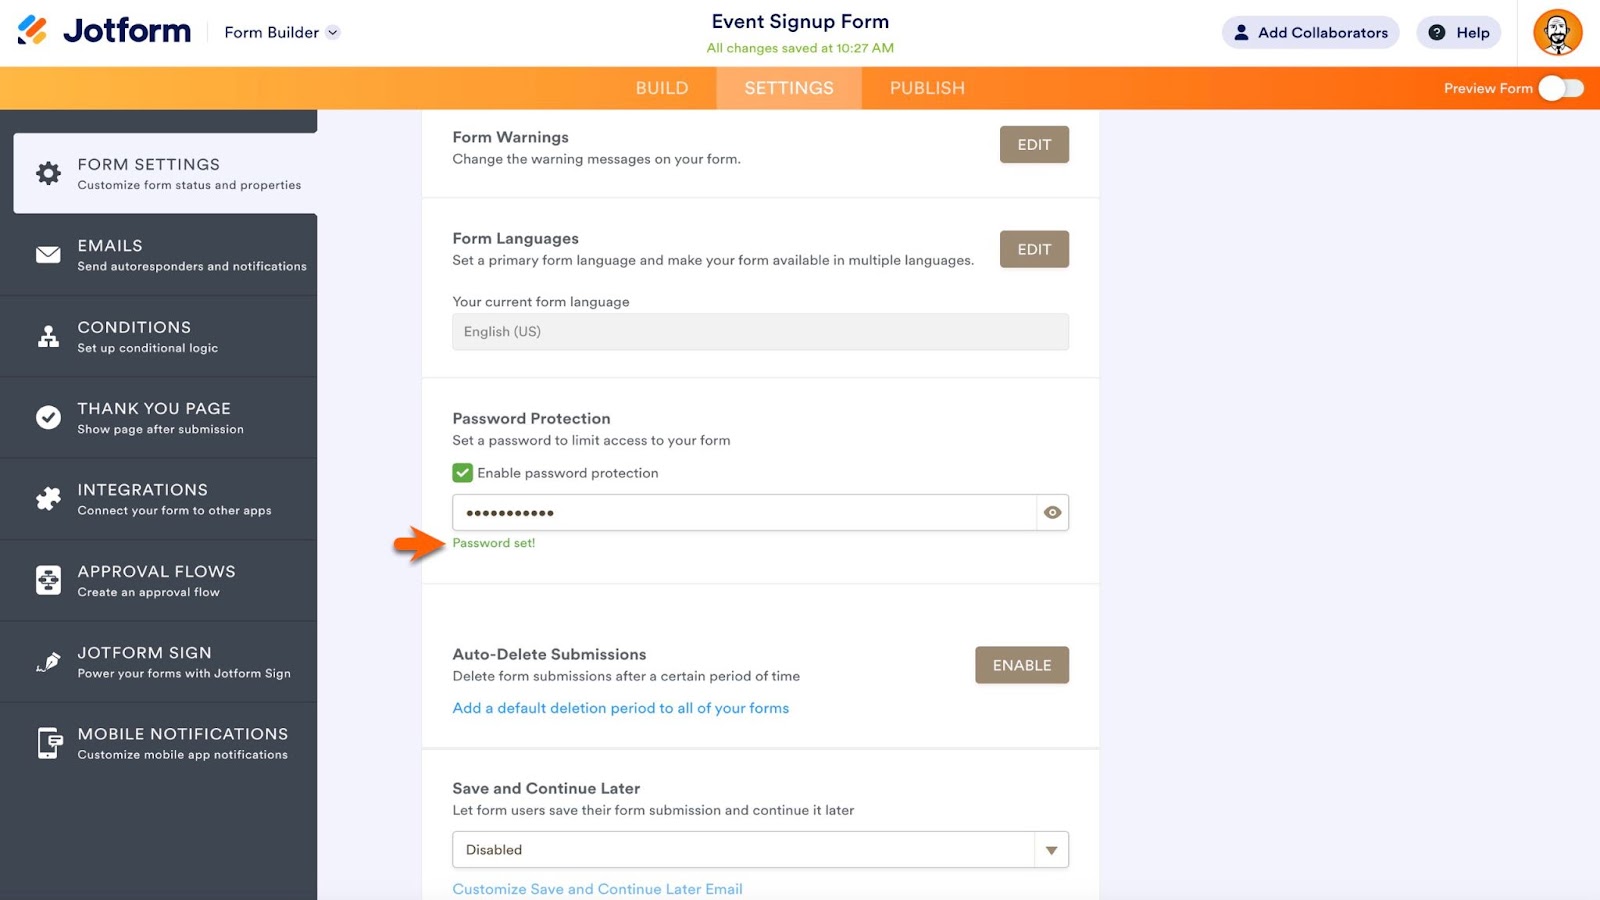
Check the box next to Enable password protection.
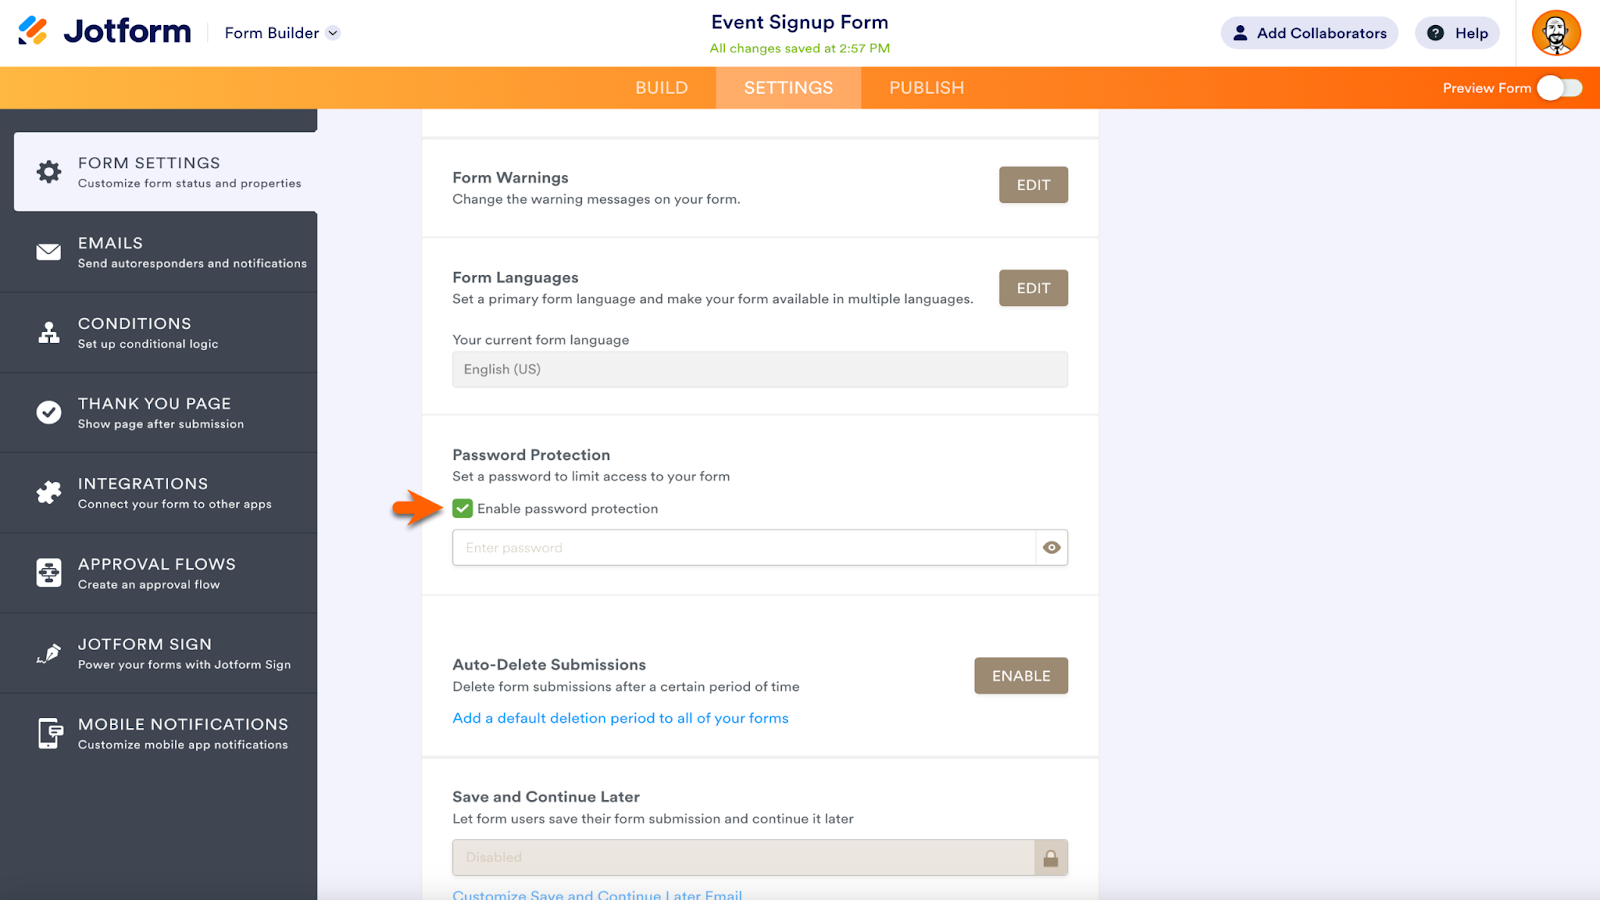
Next, create a unique password, and you’re all set.
Form Builder updates
Jotform product teams consistently look for ways to improve all of Jotform’s products, and that includes the Form Builder.
Take a look at some of the recent updates to Jotform’s No. 1 automation tool and take note: Half of these updates were requested by Jotform users.
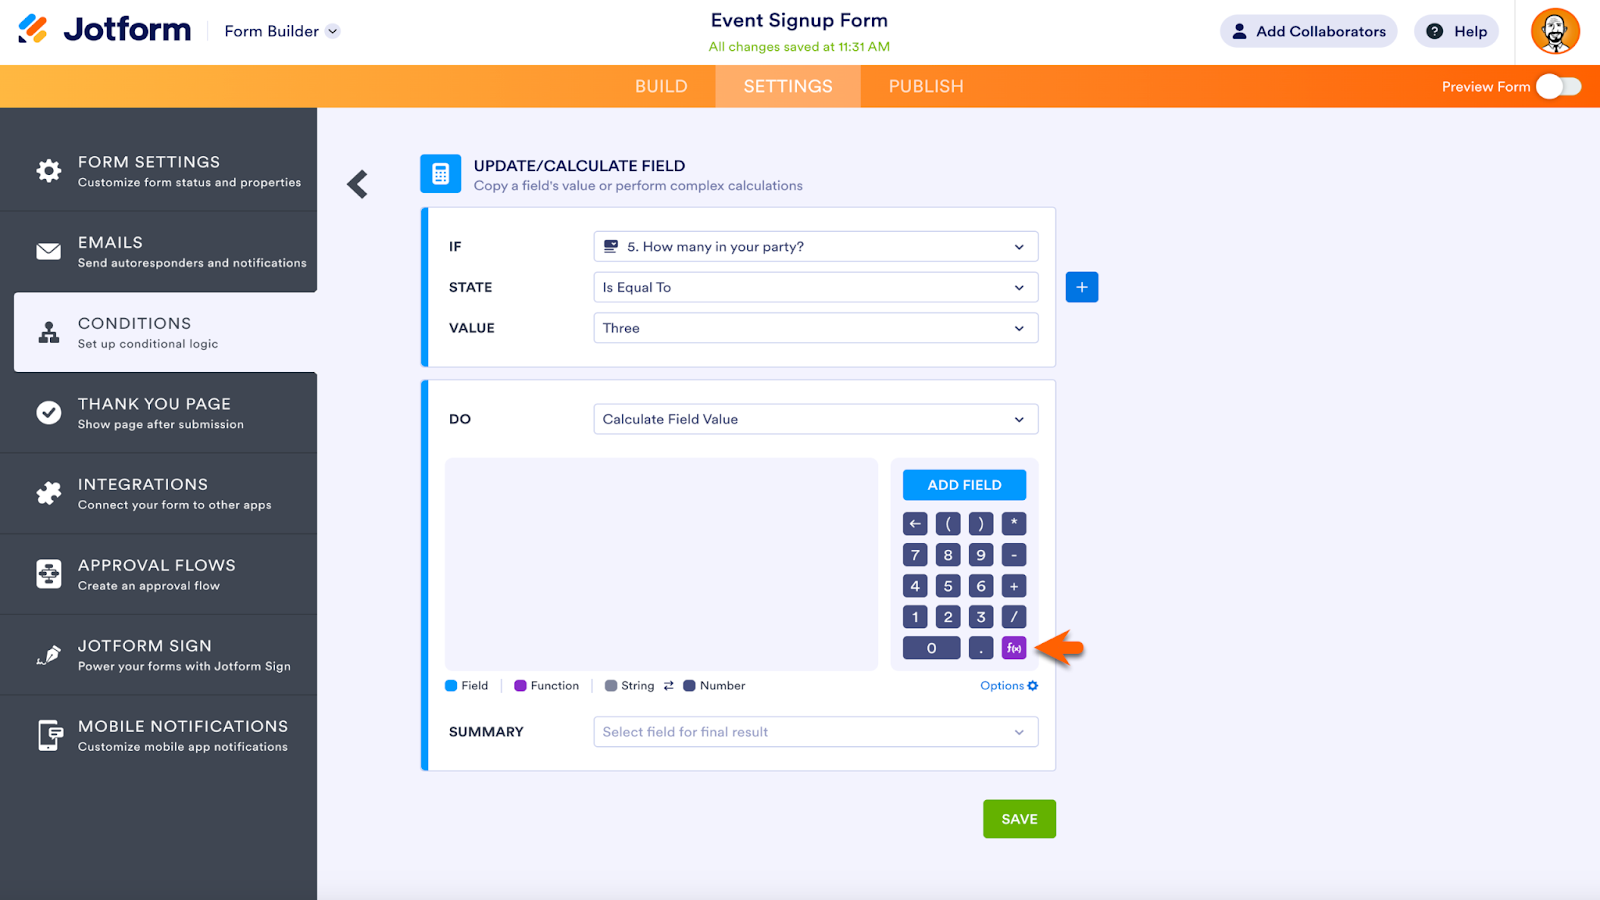
Conditions settings
Setting conditions on your form is even more intuitive after Jotform’s latest update. Icons have been added to each conditional command, and advanced math equations have a new dedicated button designed for seamless access.
In the If field, the question, “How many in your party” includes an icon of a dropdown menu to show what type of question it is.

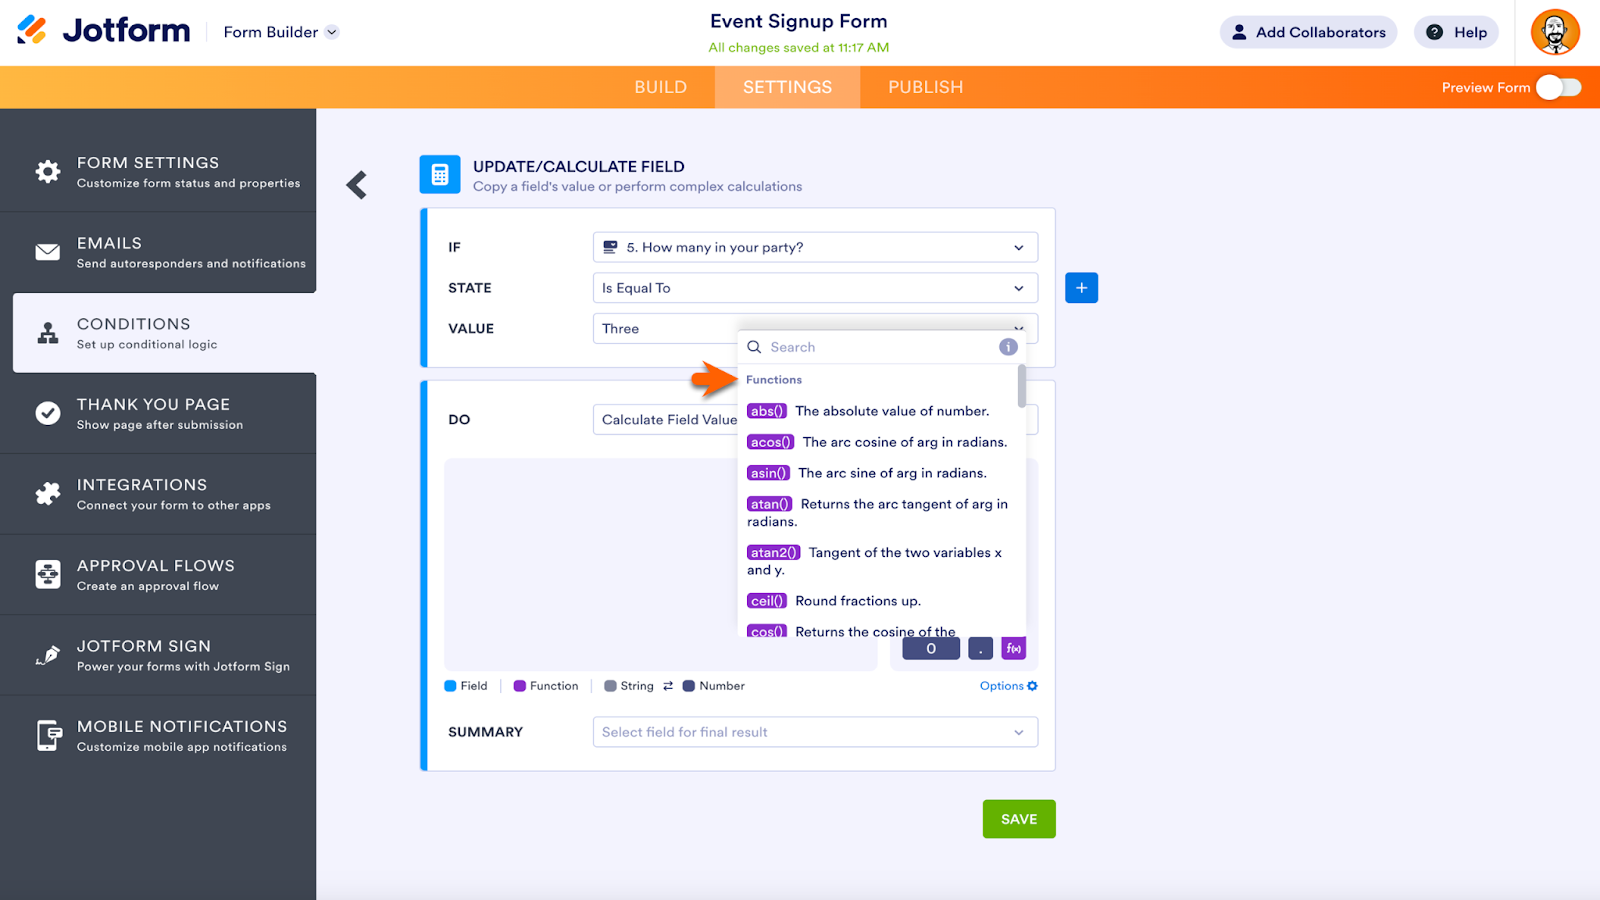
A new function key, in a vibrant purple color, is clear on the calculator, making it easier to set up mathematical conditions.
The list of functions that appear after clicking the function key have a more polished look than before, complete with matching purple icons.
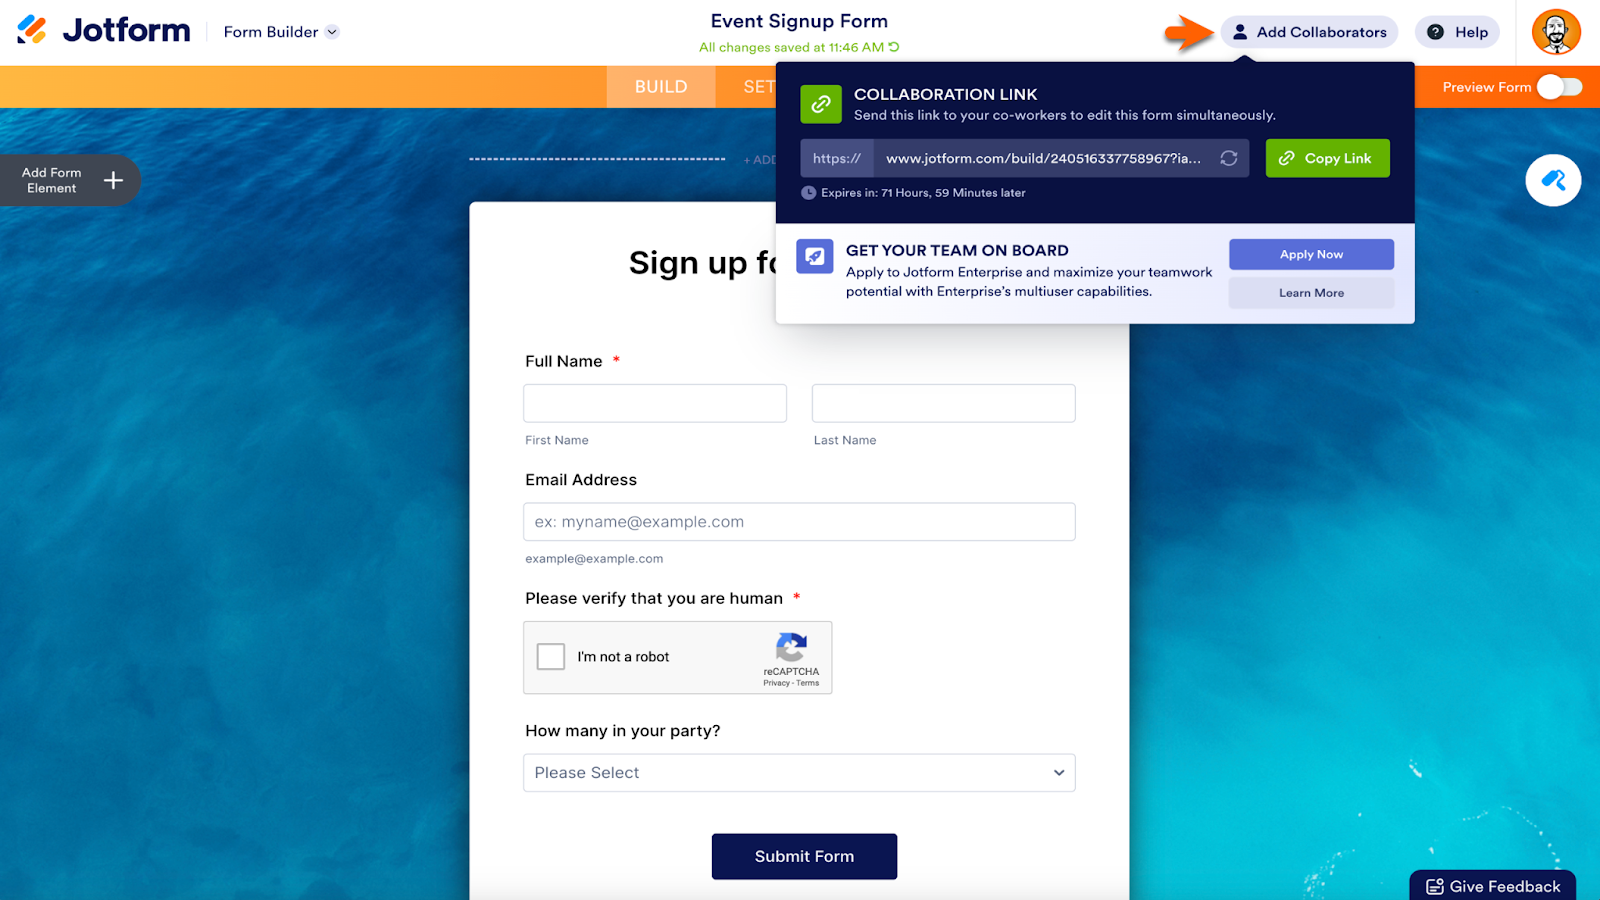
Collaboration link
Jotform has clarified the process of adding collaborators to your form. The Add Collaborators button is now at the top of the Form Builder. The new design of the popup, which includes a clock icon and a countdown underneath the link, makes it clear when the collaboration link will expire.
For Jotform Enterprise users, collaboration links never expire. Contact the Jotform Enterprise sales team to find out more.
Did you know?
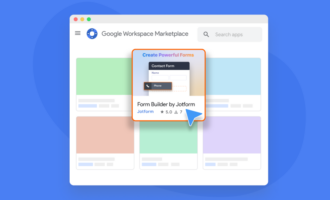
You can add the Form Builder to Google Workspace via the Google Workspace Marketplace!
The Google Workspace Marketplace is an online store with free and paid web applications built for Google Workspace. Jotform’s free app provides an easy way to open the Form Builder while using Google Workspace.
Simply search for and select Form Builder by Jotform in the marketplace, click the Install button, and log into your Jotform account.
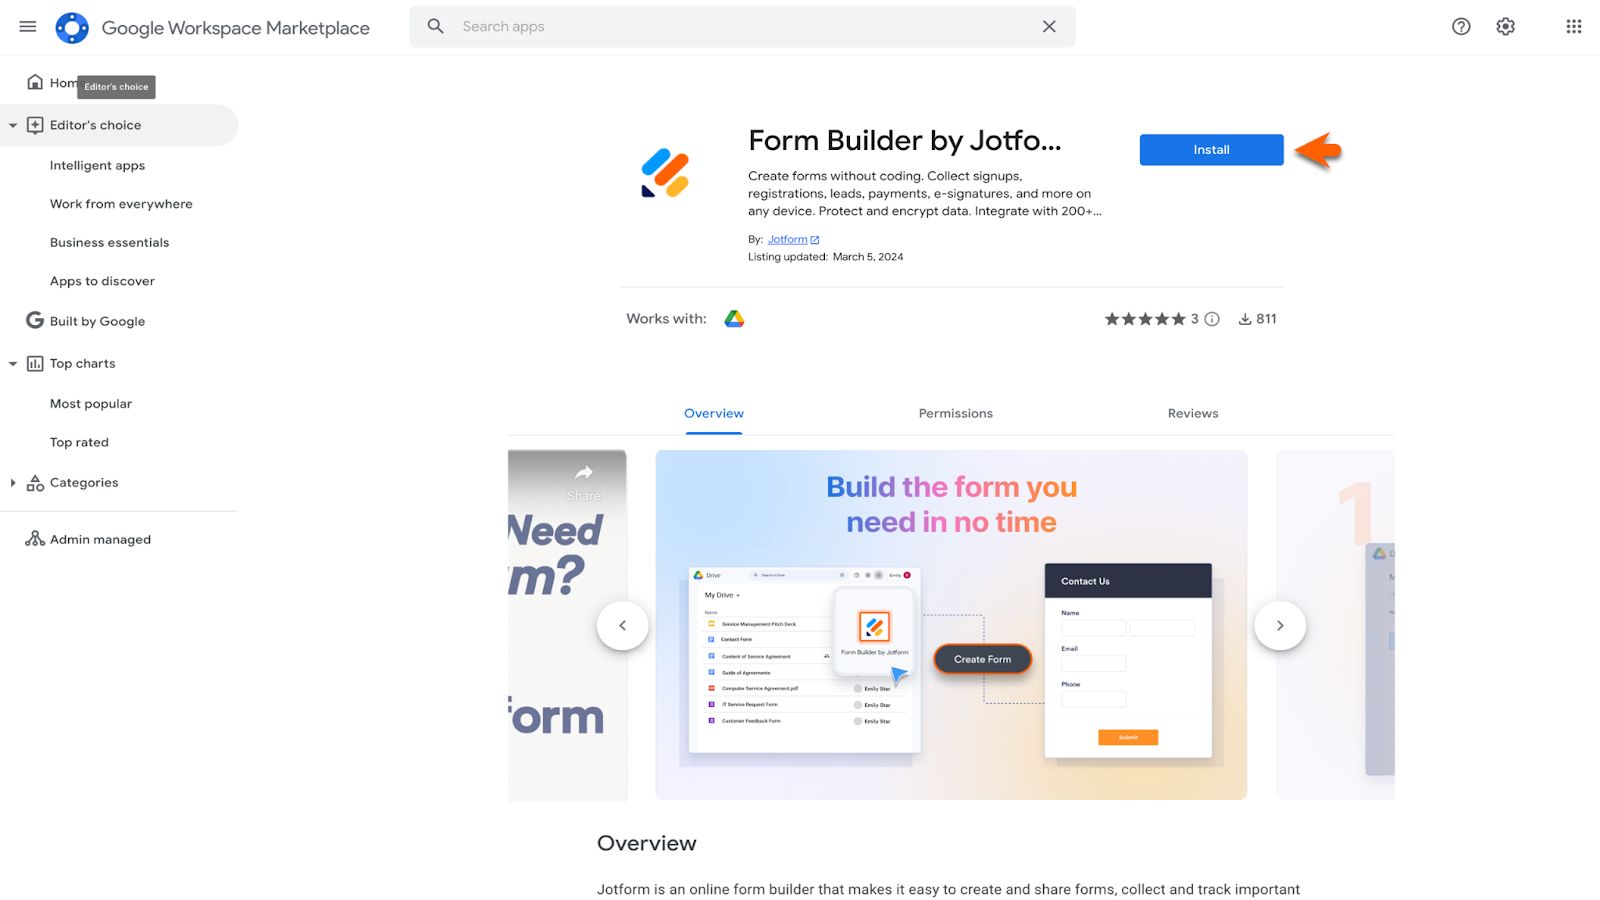
When setup is complete, you’ll be able to quickly open the Jotform Form Builder from your list of Google Workspace apps and build the form you need in no time.
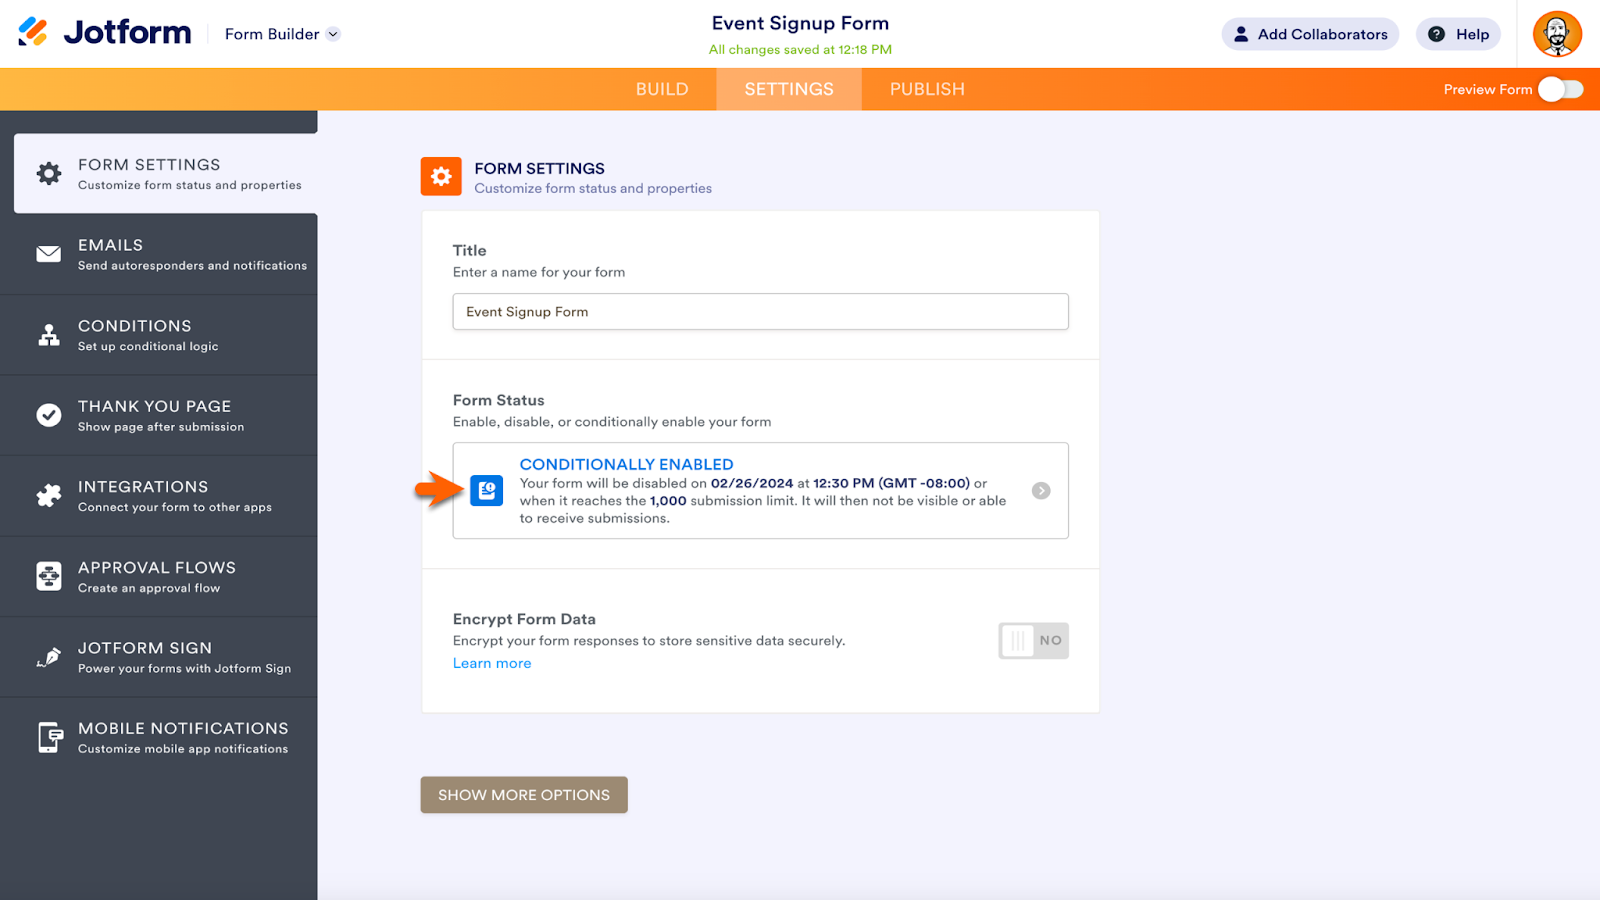
Form status setting
One of the most basic options in the Form Builder settings is the status of your form. After a number of Jotform users requested that the status of their forms be clearer, Jotform designers updated the look of this setting.
There are five status settings, including Enabled and Disabled. When Enabled, the status is easily viewable in green and reads “Enabled.” Click the form status to change it to Disabled and more.
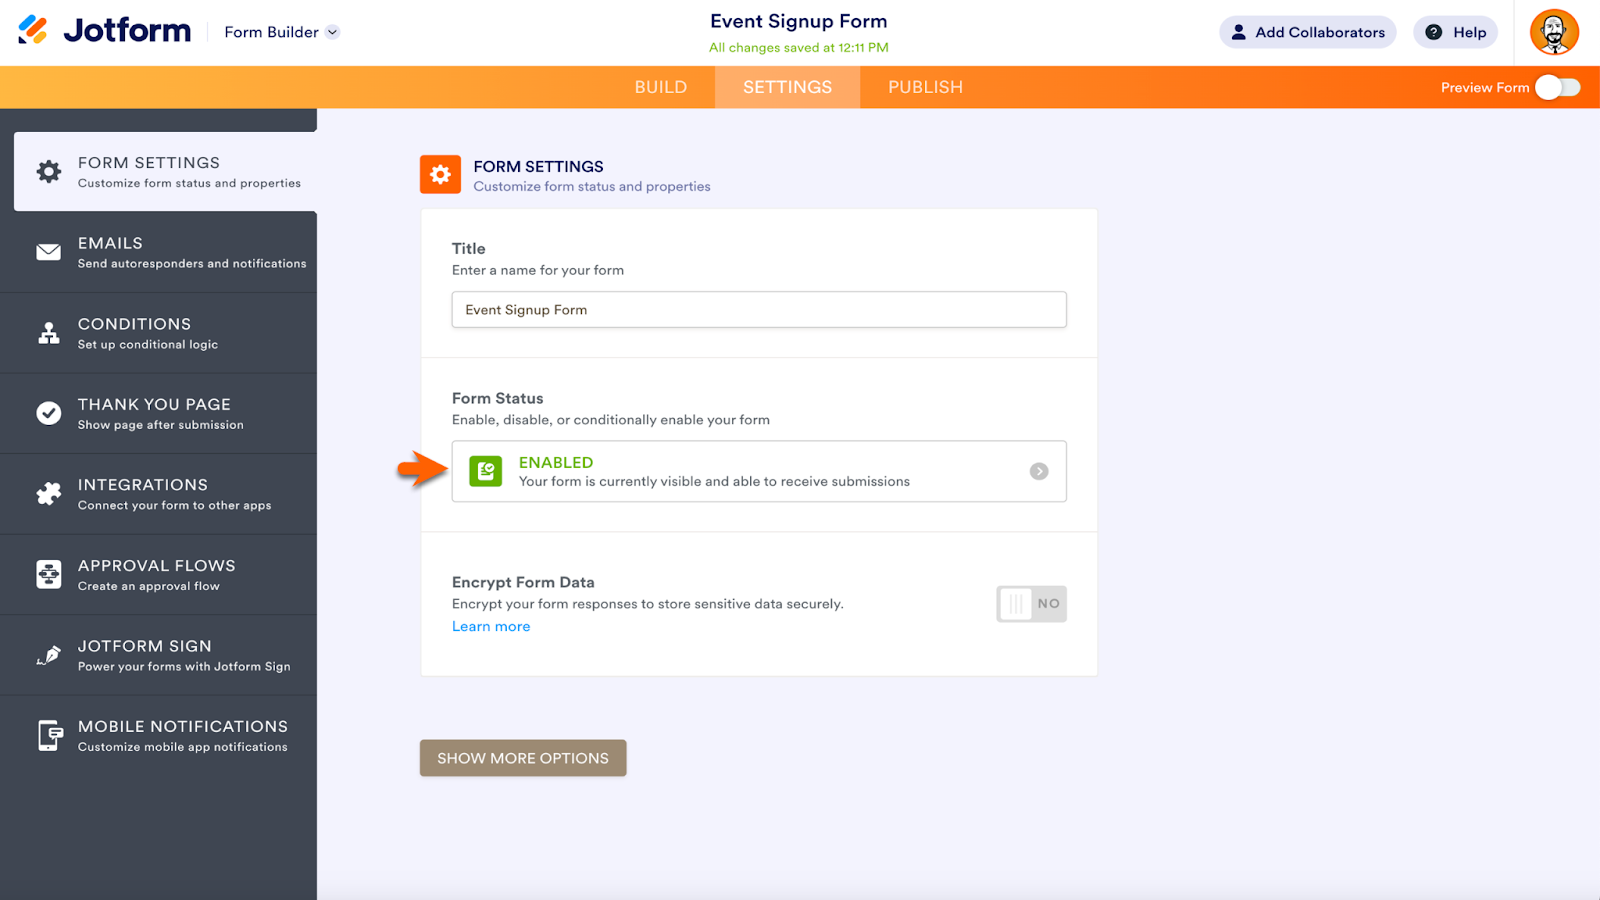
Further options include Disable on specific date, Disable at submission limit, and Disable on specific date or at submission limit. When one of the disabled options is activated, the font color changes from green to blue.
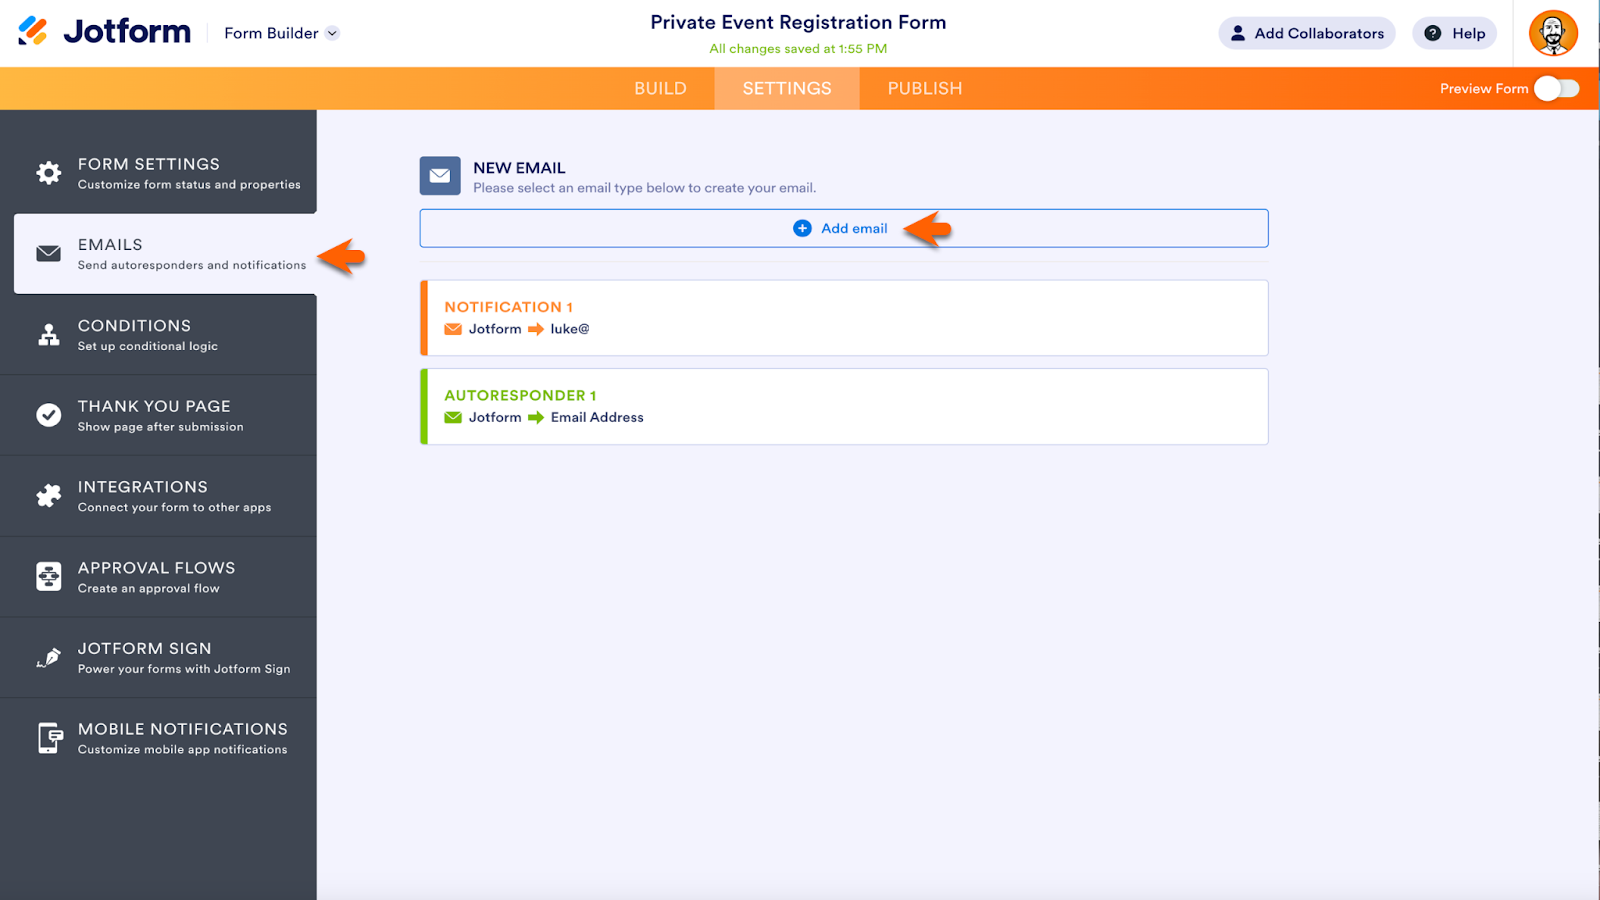
Digest Emails
Jotform’s Digest Emails, which gather insights from multiple forms in a single email, debuted in 2023. At the request of Jotform users, this feature is now available within the Form Builder.
Go to the Email tab of the Form Builder Settings. To create a digest email, click the Add email button.
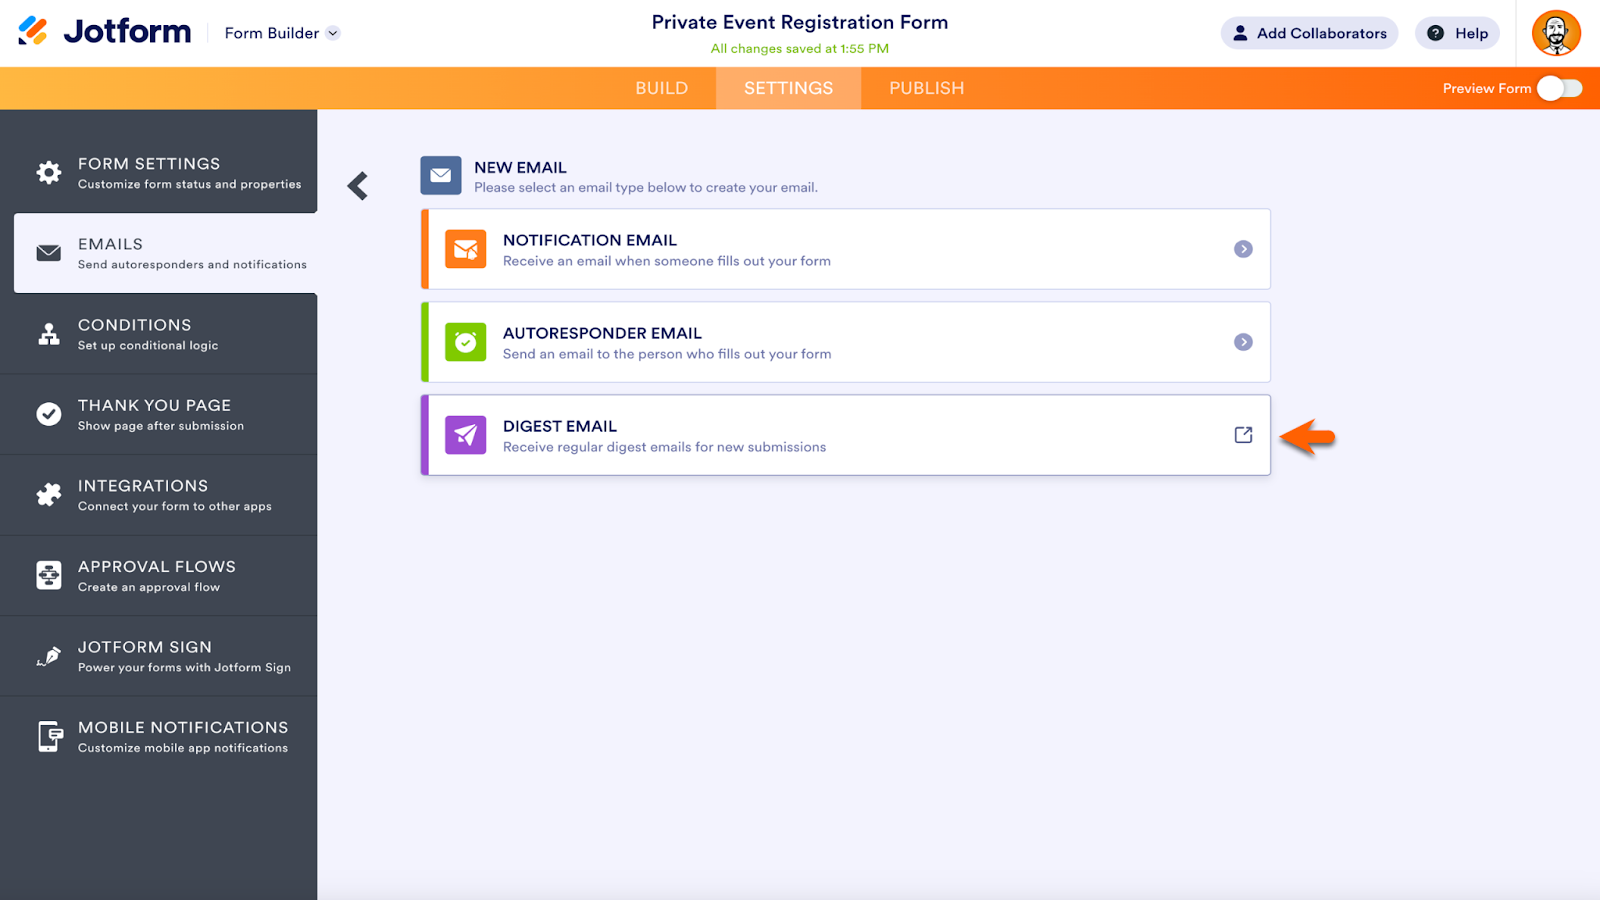
On the following page, click on the Digest Email option.
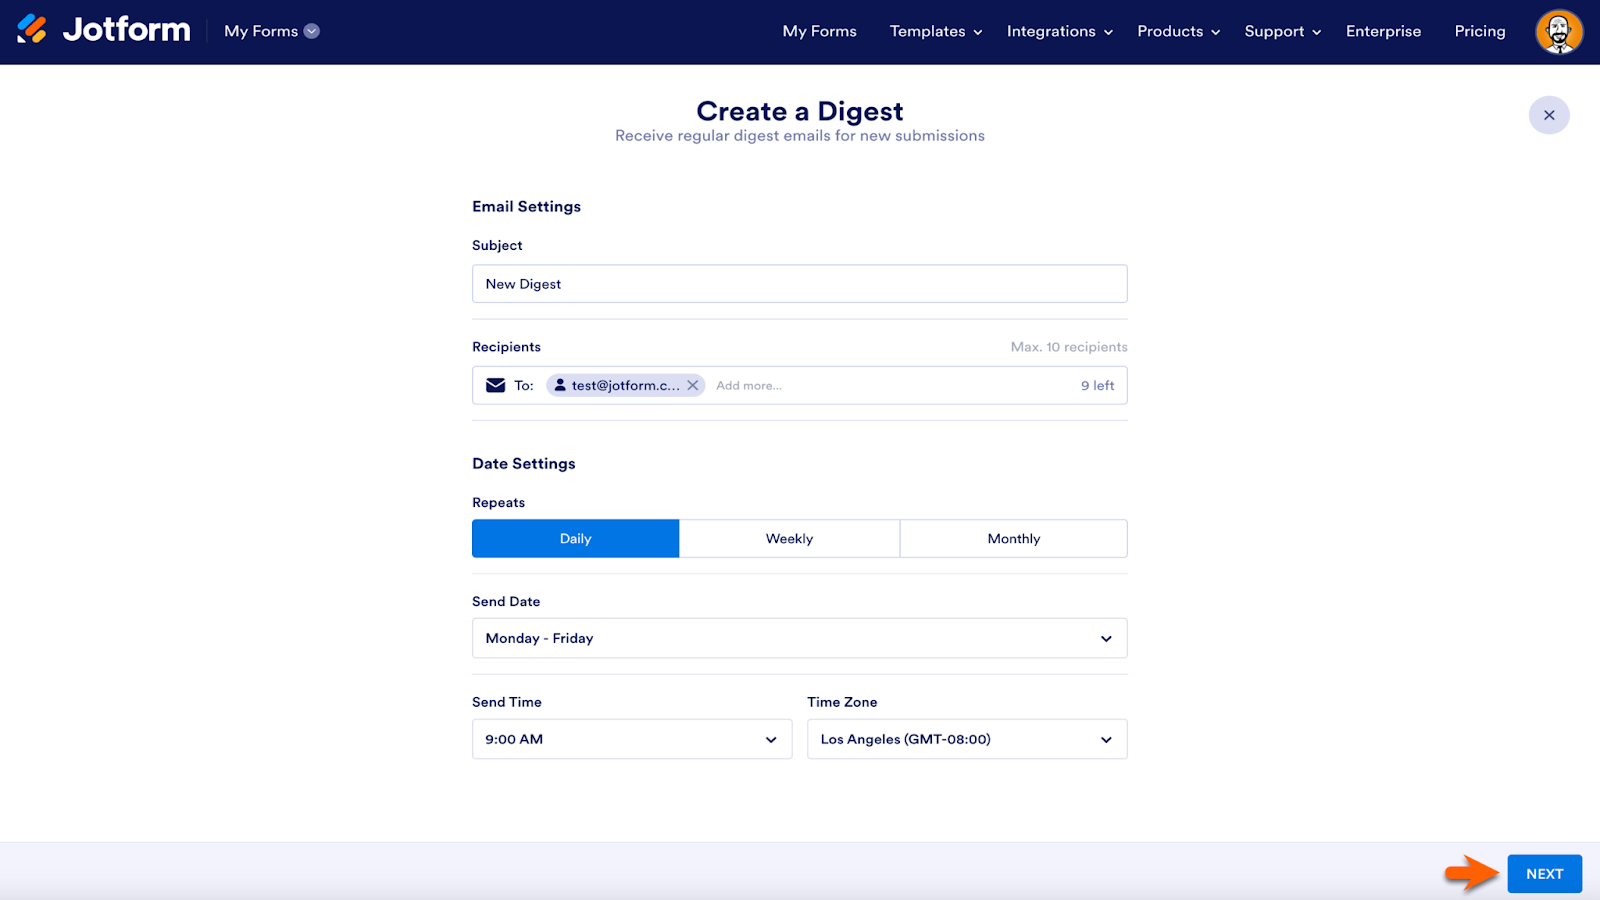
The Form Builder will open the Digest Email settings in a new tab in your browser. Choose who you’d like to receive the digest, how often it’s produced, and what time it’s sent. Click the Next button to customize the look of the email.
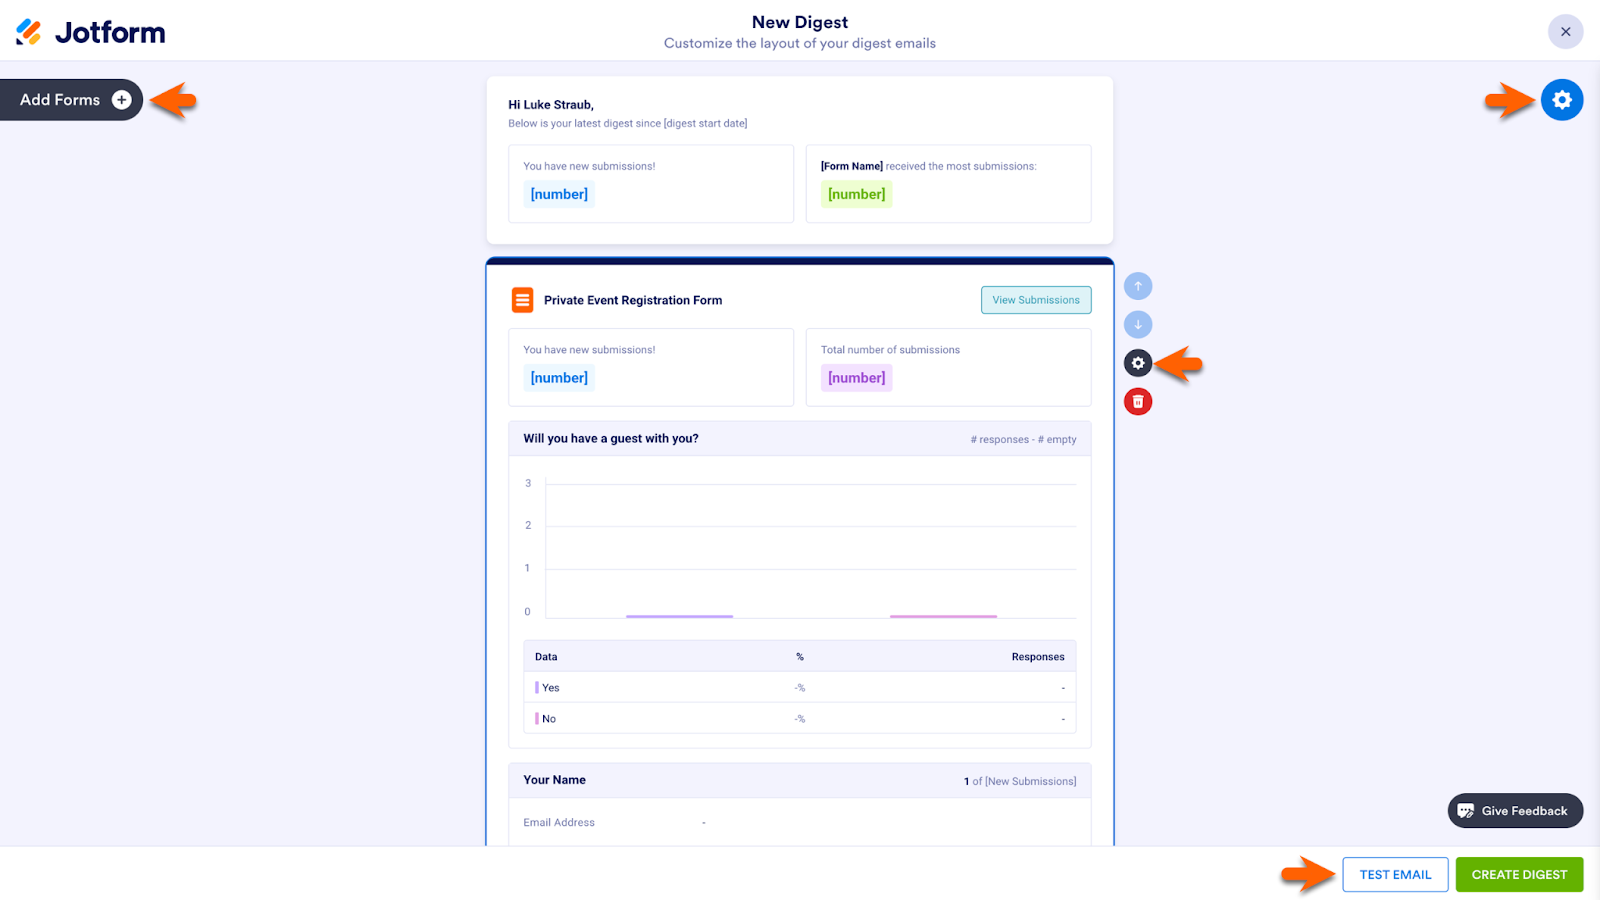
When you click on an element within the body of the email, a gear icon appears next to it. Click on the icon to customize the look of your digest email. You can include more forms in your email with the Add Forms button.
Click the blue gear icon in the upper right corner of the page to reopen the settings from the previous page. When finished, preview your email with the Test Email button or use the Create Digest button to complete the setup.
Letterbox Doughnuts: Form Builder features foster growth
How about we take a look at some advanced features in action?
Letterbox Doughnuts started out as a pandemic-era side hustle catering to friends and family who wanted to celebrate special occasions during that trying time. Word quickly spread about their tasty, letter-shaped treats, and demand grew exponentially. Owners Jonathan and Priom Oliver were prepared with advanced Form Builder features that helped grow their business.

Conditional logic streamlines complex ordering
The Letterbox Doughnuts form is for special orders and uses conditional logic to sort a bevy of customer options. With Jotform conditional logic, forms fields are dynamic and change based on responses to previous questions on the form.
“Conditional logic is a big piece for us,” Oliver says. “If [there’s] something as basic as a specific date somebody wants, such as their wedding date, but we are fully booked on that day, it would be a pain to go through that whole order process and then say, ‘Sorry, we can’t do it.’
“Then there’s what types of doughnuts you want. If you want ring doughnuts, there are questions only applicable to ring doughnuts, or filled doughnuts, and so on.”

Letterbox Doughnuts uses another form service for other order forms, but the added functionality of the Jotform Form Builder plays a key role for organizing large events.
“Jotform is really, really good at capturing intricate details for large events and weddings, and we use the other order form as a more basic happy birthday type of form,” Oliver says. “Jotform allows us to separate those two parts of the business.”
Letterbox Doughnuts’s special order form is well past the five digit submission mark. That’s a ton of data that represents impressive company growth. Jotform’s integrations make that data easy to organize.
Integrations with Slack and Airtable streamline workflow
There are more than 100 integrations available within the Form Builder. These connect your form to other valuable software programs. There are CRM integrations, payment integrations, storage integrations, and more. They are easy to add; plus, they save time and boost productivity.
Slack and Airtable integrations expedite the Letterbox Doughnuts production workflow. The company uses Jotform’s Slack integration to keep its employees updated on incoming orders. It also uses Jotform’s Airtable integration to automatically transfer form submissions to its backend database.
“The integrations are a big piece for us,” says Oliver. “The form is integrated so that after a form is completed, we’ll get a Slack notification. We’ll get a Jotform email notification as well. But the Slack notification is a nice pop to mind because Slack is always open.
“The customer gets the Jotform email notification as well, and the submission is integrated into Airtable, which is our backend ordering system.”

From conditional logic to integrations with Slack and Airtable, Jotform’s Form Builder was vital to the rapid growth of Letterbox Doughnuts. And since Jon and Priom got married 10 months after starting a business together, Jotform may have aided that outcome as well. 😉
“We just wouldn’t have been in business or wouldn’t have been able to do what we do,” Oliver says. “The amount of time we spent on 10 or 15 orders with Jotform was the amount of time we were spending on two or three orders.
“Without Jotform, we would have stayed a cute little side hustle business.”
Jotform designers and developers take the lead from Jotform users
You are part of the Form Builder story and what comes next in its development.
Don’t believe it? Read on.
The Marvel Team
Mercan Alper leads Jotform’s Marvel Team of designers and developers. Within the last year, the Marvel Team embraced a new challenge. They are now the team in charge of all things Form Builder, from updates to maintenance and more.
“As a designer, I always wanted to be part of this side of Jotform,” Alper says. “The Form Builder is the core of Jotform. It’s a great product; it’s been working for nearly 20 years.”

According to senior product manager Kaan Cömert, every Jotform product team has a stake in the Form Builder, because every form created with the Form Builder is connected to advanced Jotform automation, such as Jotform Tables, Workflows, Report Builder, and much more.
Constant product feedback and evolution
Jotform’s suite of products is vast, as Alper learned quickly when she first joined the company. “When I first started at Jotform, I suggested features, and my colleagues kept telling me, ‘We already have that,’ ” she says.
To maintain its automation products, Jotform has a culture of constant improvement. Since the company’s inception, development has been driven by user feedback.
“In the early days, when Jotform had fewer than 10 employees, we would spend all Friday afternoon watching usability tests,” says Jotform founder and CEO Aytekin Tank. “We’d have popcorn and watch users try our product and our new features.”
He explains that if an issue arose, the team set a goal to fix it by the following Friday. To this day at Jotform, the tradition continues and is known as Demo Day, when product teams present their weekly progress to colleagues.
We are always working to continually improve our products. One of the greatest things about Jotform is that our users respond so quickly with feedback. It’s really great to learn from them.
Mercan Alper
Provide your feedback on the Form Builder and more
Ever used Jotform and needed some expert advice? Perhaps you have an idea for a new feature. Or maybe you’d just like to tell us how much Jotform automation has made your life easier.
If you ever need to contact Jotform, it’s easy to reach Jotform support, which accepts messages around the clock.
“Every user has unique needs,” says Alper. “During design reviews, if more than two users want to have a new feature, we need to think about it. We may develop it or not, but we need to think about it because it’s so important. At Jotform, we don’t say, ‘Well it’s only two users.’ We always consider it because it can be insightful for us.”
Jotform Form Builder: Our core product
The Form Builder and its array of features is connected to every Jotform automation tool — so much so that even Jotform’s CEO works to maintain it as Jotform evolves.
“Everyone works on the Form Builder. If you check the log you can see everyone’s name there. You can see Aytekin’s name there too,” Alper says.
Adds Cömert: “The Pegasus Team, who is responsible for the PDF Editor, is making changes to that product. So they need to come and talk with us. Because at the end of the day, these changes apply to the Form Builder and we need to work together.
“The Form Builder is the core product. We need to collaborate with everyone.”
The Form Builder is rewarding on its own, but the more users dive into its advanced features, the more likely it is they’ll find additional benefits. That can lead to using other Jotform products such as the PDF Editor and more.
A tool for everyone
“As a designer, I use lots of tools. Everyone has their own way to use those tools,” Alper says. “It’s the same with Jotform.
“You can do things in lots of different ways. And you can create lots of different workflows.”
While Alper is talking about Jotform as a whole, the same can be said about the Form Builder. A form that only takes a few seconds to create can pay big dividends. For those who go further with their forms, the rewards can be even greater.
Try a Form Builder feature you haven’t used before. Whether it’s a new Thank You page, conditional logic, widgets or integrations, or anything else new to you, we want you to get the most out of Jotform’s automation capabilities, starting with our core product, the Form Builder.
Conclusion
Jotform has had its share of big product releases over the last few years. From Jotform Mobile Forms and Jotform Apps to Jotform Sign and more, Jotform’s product teams consistently add automation capabilities that make each form even more powerful.
Product releases are just the beginning, however. Each automation is refined over time, often aided by input from Jotform users. That’s the case with the Form Builder as well, even though it’s been a no-code staple for nearly two decades.
As Jotform products have grown in number and capability, we’ve turned our attention toward customer education. Jotform for Beginners, Jotform Enterprise for Beginners, and Jotform Academy all have the same purpose: to ensure our users can reach their full potential with Jotform automation.
What will you create next with Jotform? We can’t wait to find out. In the meantime, we’re here with helpful tips, detailed instructions, inspiration, learning resources, and a listening ear so we can all grow together in the years and decades to come.


Send Comment:
1 Comment:
March 28, 2024
I apply fland but its block why?