
A/B testing is a great way to improve the response rates of your forms. It can really affect your bottom line if you have lead generation or event registration forms.
Jotform is the quickest way to create web forms, and it turns out you can easily A/B test these forms without breaking a sweat. In this tutorial, we will see how to A/B test a form in minutes.
- A website that you or your webmaster can modify and add tracking codes
- A web page that your control form will be embedded to
- Another web page that your experimental form will be embedded to
- A conversion page which will be used to track the results from each form
- An A/B website test tool (For our example: google website optimizer)
What is needed?
Let’s proceed.
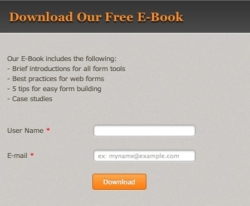
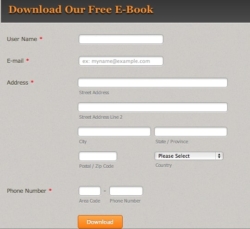
1. Create the original form which will be the control form. For our example, I created a basic lead generation form which asks for user name and e-mail to download a free e-book with a list of the e-book content.
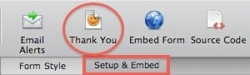
2. Get/copy the link from your conversion page and go to setup and embed. Select thank you.
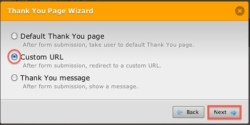
3. Select custom URL and click next. Paste your URL from the conversion page.
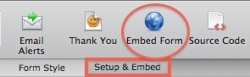
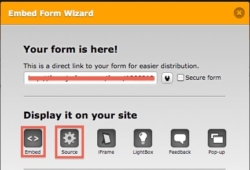
Embed your control form to the page you arranged for. Go to setup & embed and select Embed Form.
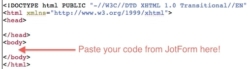
You may select embed or source code which suits for you but do not forget to copy your Jotform code between the tags. This is why we need a page we can modify the source code which has the proper HTML tags (). Do not use the direct link URL for your forms.
NOTE: Don’t forget to save your forms after each change!
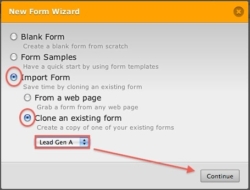
Now that we are done with the first form, we can easily copy our control form and change it to the experimental form. To clone an existing form go to my forms and select new form. From the wizard select import form and select clone an existing form. Click continue.
Now let’s make changes on the cloned form. You may change anything from design to content but for our example, I am going to add address and phone number but erase the information of the e-book content. Also, the thank you page remains the same as the control form, so you do not have to do the same steps again except embedding your experimental form to another page than the control form.
Tests Ideas to Perform
- Long vs Short (forms with or without many questions)
- Same page vs multi page (forms with single pages vs. with page breaks version)
- Design of the web form (fonts, colors, label placements)
- Speed of the form load (a form that loads instantly and a form that takes 10 seconds to load)
- Speed of the form submissions (a form that submits in 1 second and a form that submits in 10 seconds using javascript in the form page)
This covers the preparation of our forms and our URL’s for the Google website optimizer. I used google website optimizer because it is free. However, if you use other tracking tools the procedures may change a little bit. I assume that you are following me here so I’ll keep continuing.

1. Sign up to google website optimizer. If you have a Gmail account you just enter your Gmail user name and password to sign in.
2. Click create experiment to get started.
3. Select the A/B experiment.
4. A/B experiment checklist will come across but we already did all of them already so select the check box on the bottom left corner and click create.
5. Enter your experiment name.
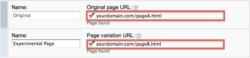
6. Identify the pages you want to test. On this part, we have to go back to our forms and get the page URL’s for each page and copy it.
Paste the control form at the Original page URL and test form to the Page variation URL
7. Identify your conversion page. This will be the URL from our custom thank you URL which we send our users to our conversion page.

NOTE: The URL’s above are only as a sample. Your form URLs will be different.
After this step, the installation and validation of the javascript tags page comes up. Here, you can either leave it to your webmaster to copy the javascript tags or do it by yourself. I chose to do it by myself.

From here you have to follow Google’s steps and paste the codes given to you after the tag to track your forms.
NOTE: Don’t forget to save your pages after pasting the tracking code.
When each page is validated you are good to go. You can start A/B testing your forms.
That’s pretty much all. Do your own A/B test today and share your experiences with us. (Tip: You can use our A/B test calculator to see your test results.)


Send Comment:
1 Comment:
November 2, 2011
nice