
Jotform Tables offers more than your typical spreadsheet.
But what does more mean?
One answer is team productivity. Spreadsheets are notoriously tough for teams to manage. Data can easily be lost as multiple people make changes, and it’s often difficult to track what’s been altered. In fact, roughly nine in 10 spreadsheets contain errors.
With Jotform Tables, efficient collaboration and accurate data are baked in. It’s easy to share your data with teammates and just as easy to limit access for specific collaborators. Tracking changes — and reverting your table back to previous iterations — couldn’t be simpler. Plus, Jotform developers consistently look for ways to boost team productivity even further. The result? Three new Tables features to do just that.
Read on to find out what’s new — and learn about essential features that make Jotform Tables a great team productivity tool.
3 new team productivity features for Jotform Tables
New collaboration features for Jotform Tables increase your ability to control the data teammates can view or edit; provide greater flexibility when adding new data columns to a Table; and bring the Jotform Sign Audit Trail feature directly to your Tables.
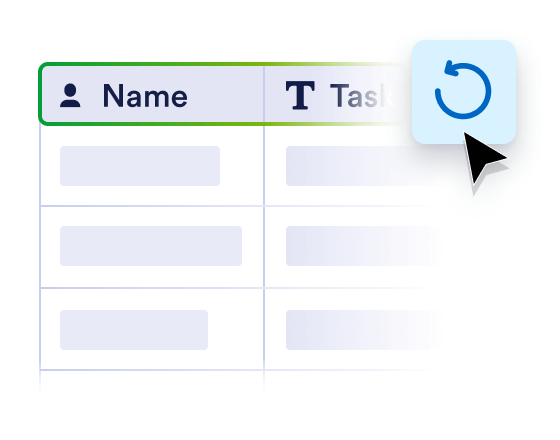
Reset Columns
The Reset Columns feature reconnects your table to its form and enables the addition of custom columns that boost collaboration.
Reset Columns
- Reset and restore the connection between table and form.
- Keep submission columns and custom columns separate.
- Retain custom columns after reset.
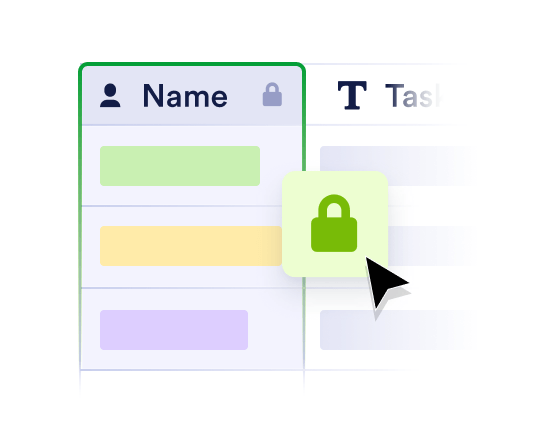
The Lock Column &
Lock Filter
The Lock Column and Lock Filter features lock data in place so it can’t be edited by collaborators with edit access.
The Lock Column &
Lock Filter
- Collaborate with fewer data entry errors.
- Keep filtered data viewable as long as needed.
- Lock select columns or an entire table.
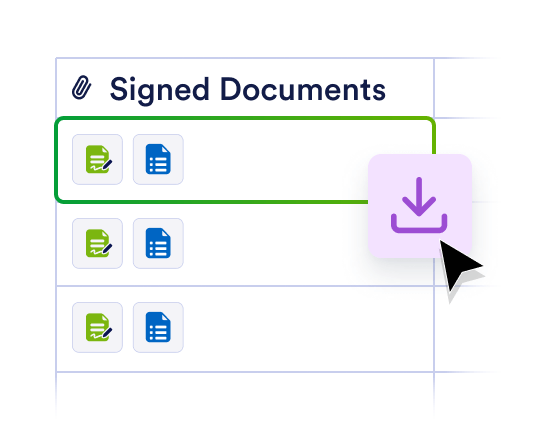
Jotform Sign doc download
Download Jotform Sign documents in Jotform Tables, either with or without an Audit Trail, so your team can collaborate in one workspace.
Jotform Sign doc download
- Download Sign docs as PDFs with or without Audit Trail.
- Download Sign data as a CSV or Excel file from Tables.
Let’s take a look at how to add these three new features to any one of your Jotform Tables, starting with the Reset Columns option.
Reset Columns
All of Jotform’s products are connected. One prime example is Jotform’s core product — its forms — and Jotform Tables.
After all, every single form submission is automatically stored in a corresponding table. By default, each form element becomes a column header in Tables. In the past, when users added custom columns, this eliminated the synchronization between form elements and column headers in the table.
No more!
The updated Reset Columns feature still reverts column names to their original configuration, but it retains the link between table and form, and safeguards the functionality of any custom columns you’ve created.
Your custom columns won’t be deleted by the Reset Columns feature
The Reset Columns feature reorganizes your table columns to align with the connected form and moves all of your custom columns (those not connected to the associated form) to the right side of the table. This keeps custom columns separate from columns connected to your form.
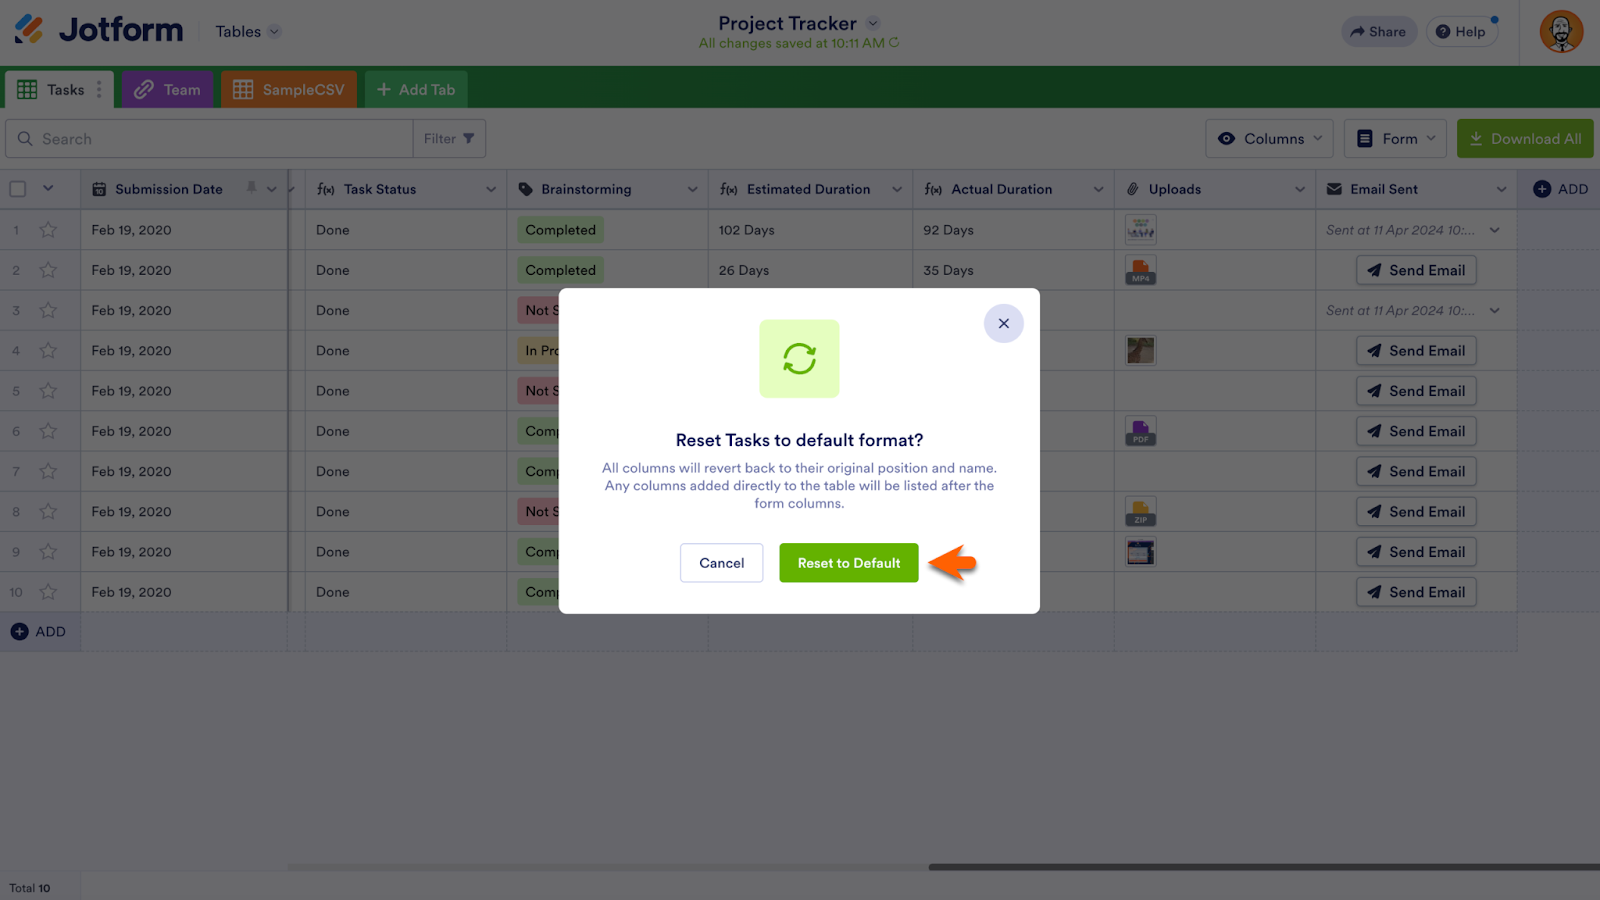
To reset your columns, open the tab menu, designated by a vertical ellipsis, on the active tab. Select the Reset columns to default option.
On the following screen, click Reset to Default. Now all of your columns will revert to their original position, the connection between form and table will be retained, and any columns you add in the future will be listed after columns that come from your form.
Lock Column and Lock Filter
Providing teammates with full edit access to your table can help move along projects. But there are times when certain data needs to be left untouched. The same can be said for filtered information that must remain viewable.
For those scenarios, Tables has you covered with the Lock Column and Lock Filter features. Together, these functions make it easy to view specific data without having to worry about it changing as teammates work in the same space.
To lock a column of data so it can’t be edited by collaborators, open the dropdown menu on the selected column and select the Lock data in column option.
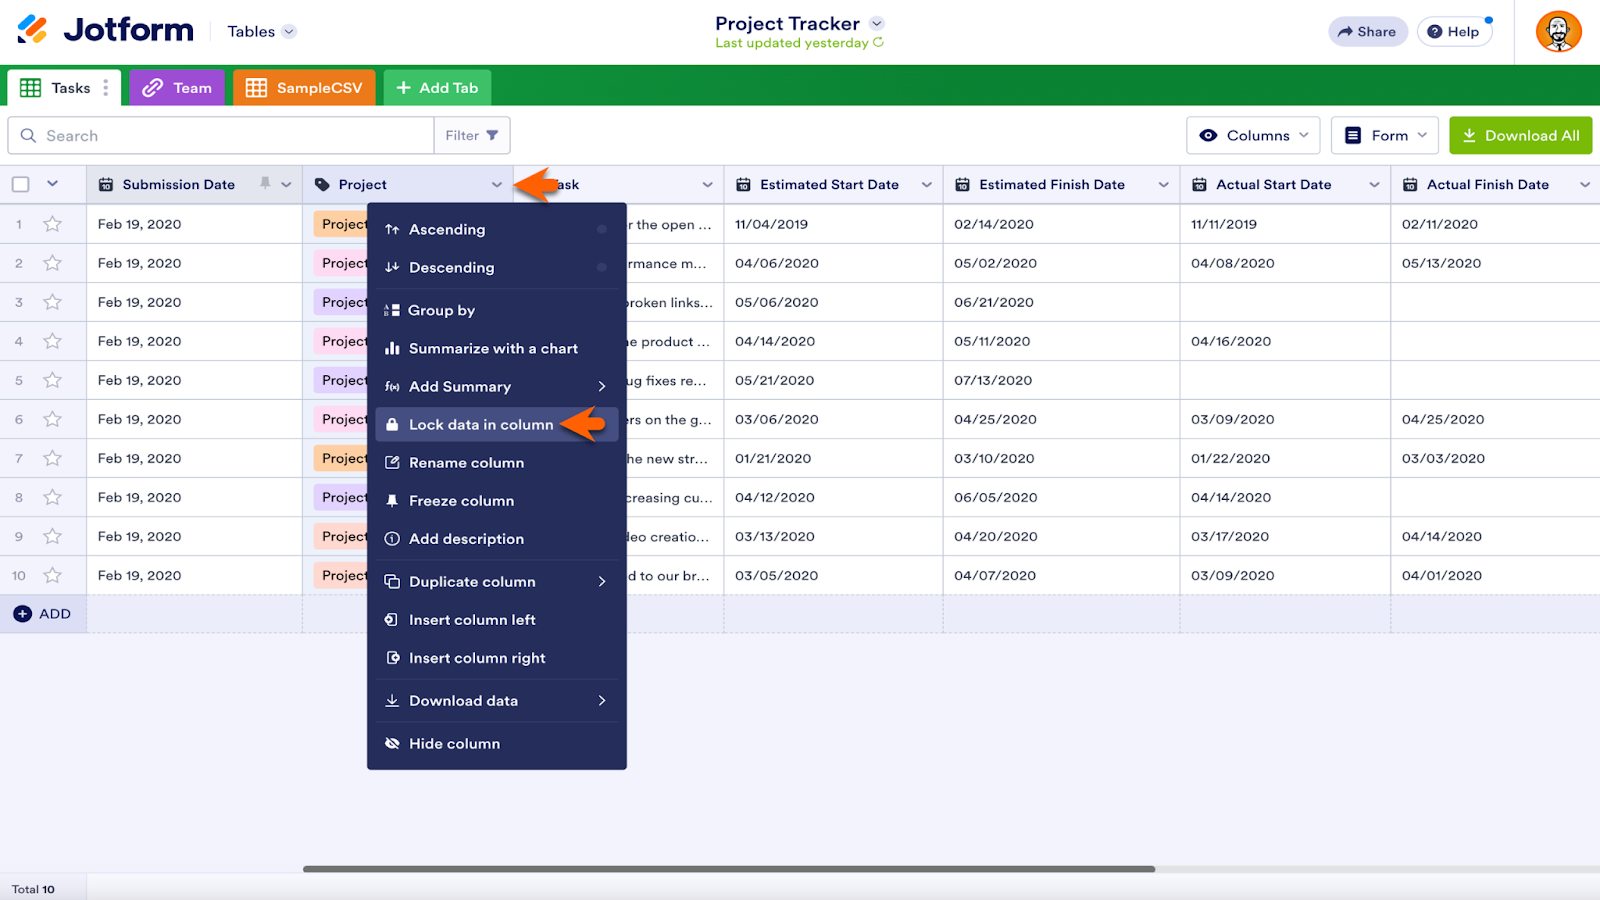
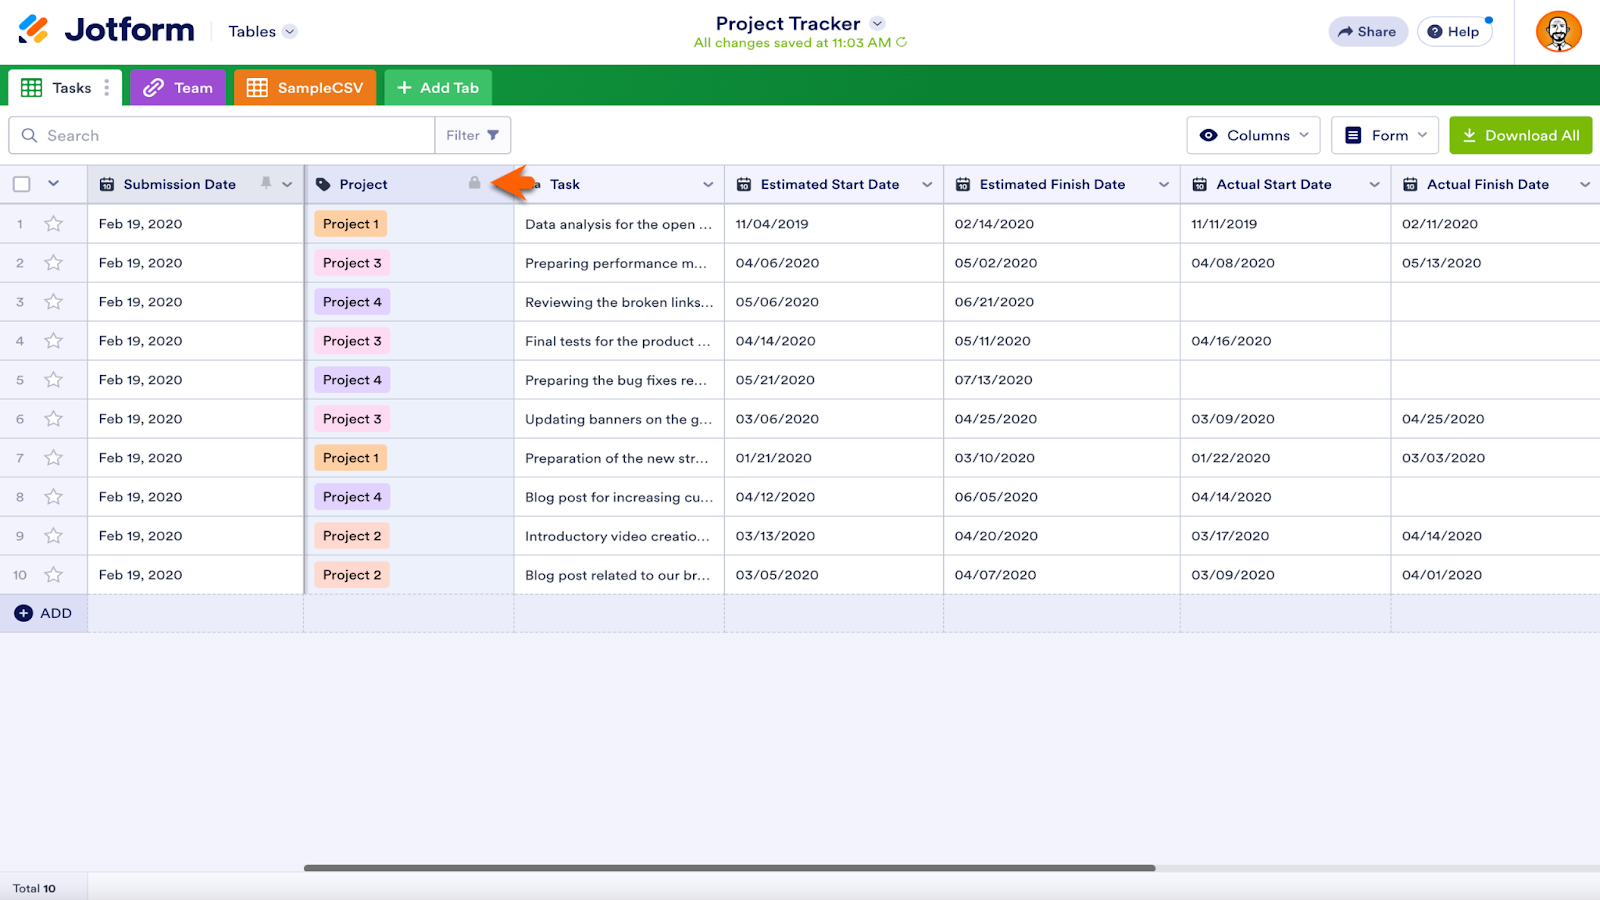
After this option is selected, a padlock icon will appear at the top of the column, signaling to others that the data can’t be edited. In the example below, the project names are locked so projects won’t become mislabeled and cause confusion.
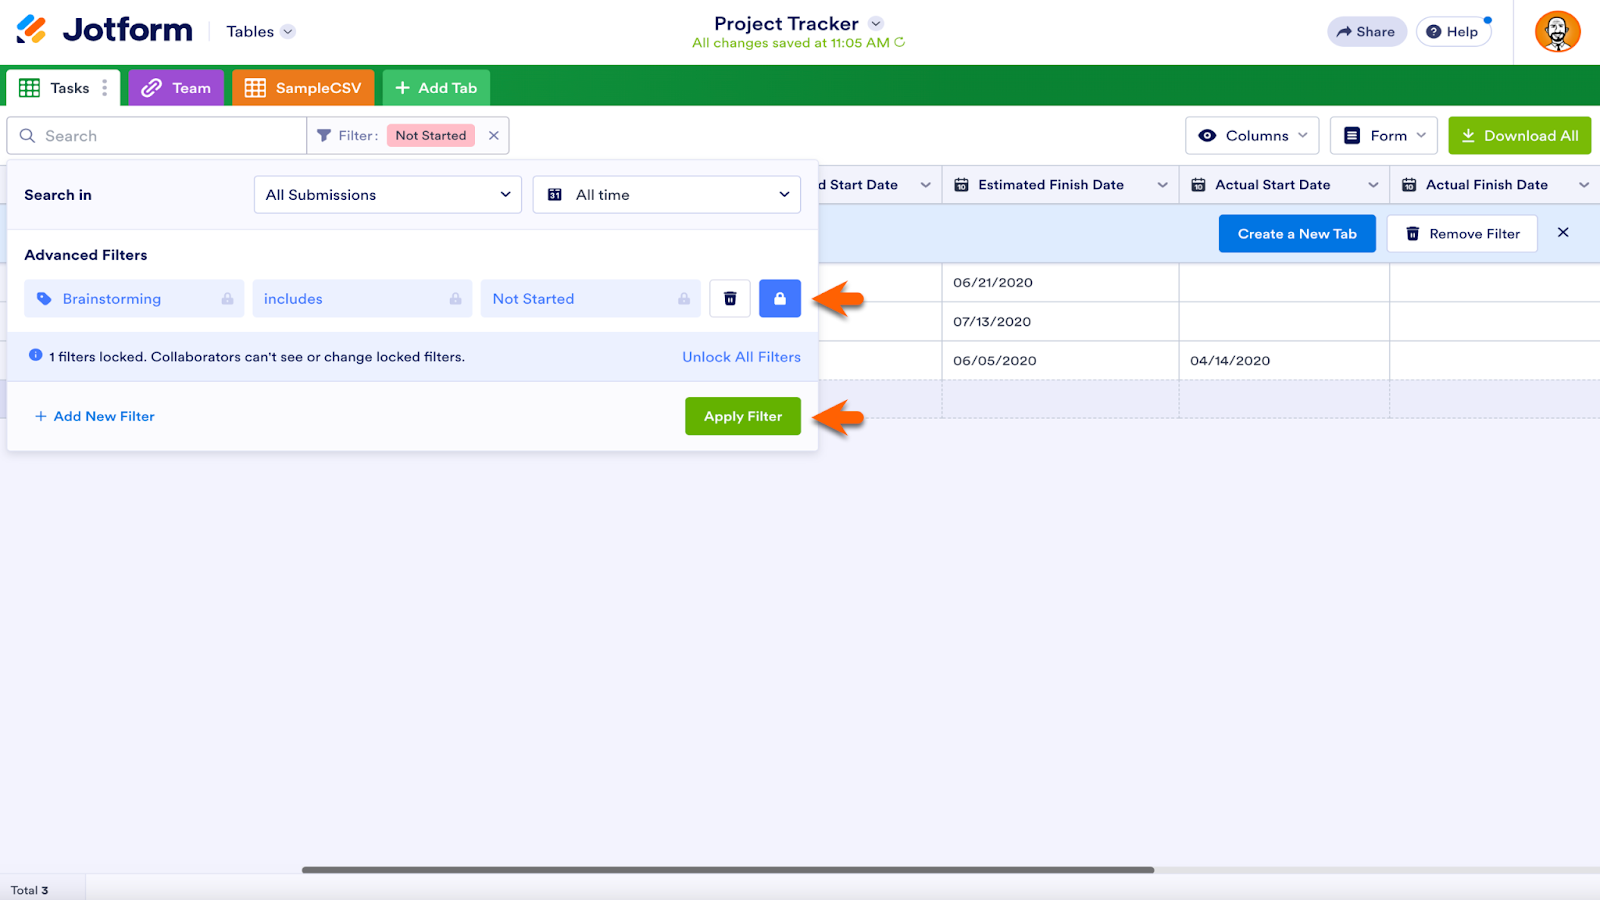
The filter function within Tables will get you precisely the data you need in seconds. Sometimes, you need that filtered data to remain untouched by collaborators. Conversely, the data you find via filter might not be as useful to collaborators as it is to you. It might be helpful if the filter was invisible to your collaborators.
To lock your filter in place on your screen and make it invisible to collaborators, click on the padlock icon in the Filter menu and then the Apply Filter button.
Pro Tip

Download a Jotform Sign document with or without an Audit Trail
Jotform Sign automatically produces an Audit Trail for signed documents. That functionality is now accessible via Jotform Tables, helping you and your team save time.
Just as each online form has its own table that automatically stores and organizes submissions, so do documents created with Jotform Sign. Tables containing Jotform Sign documents are listed on your My Tables page, along with tables created for online forms.
Pro Tip
You can add Jotform Sign capability to your forms via the Form Builder. Choose the Signature form element and then activate Jotform Sign automation in the element’s settings. The options to download either with or without an Audit Trail will be available in that form’s associated table.
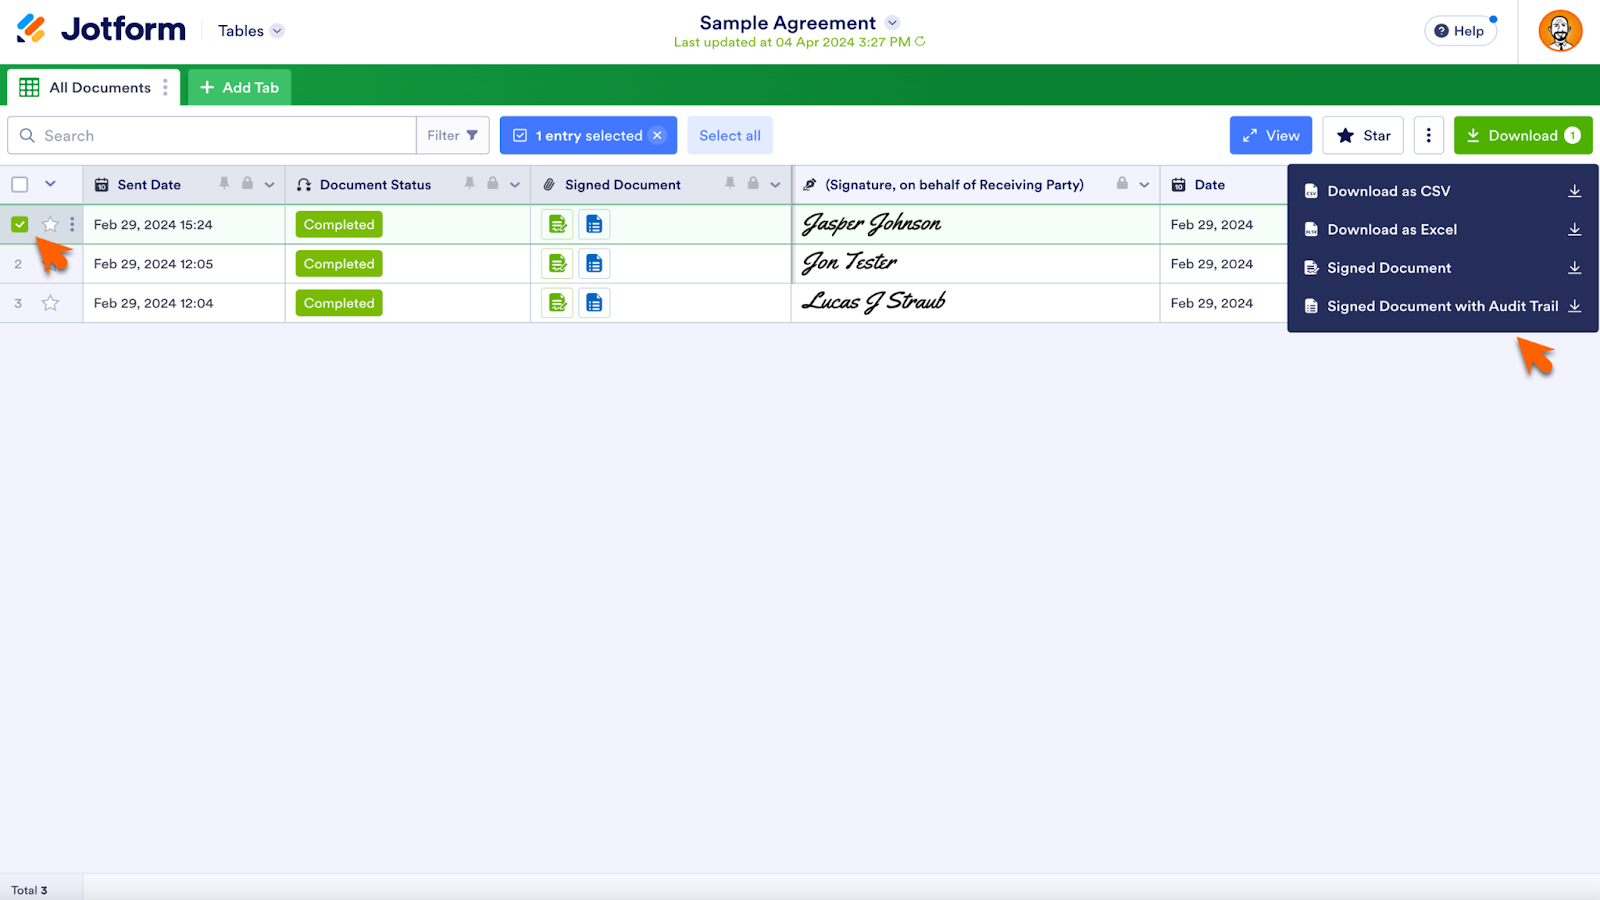
To download a PDF of your signed document, with or without an Audit Trail, while working in Tables, click on the green and blue icons in the Signed Document column. The green icon is a PDF of the Jotform Sign document without an Audit Trail; the blue icon is a PDF of the document with an Audit Trail.
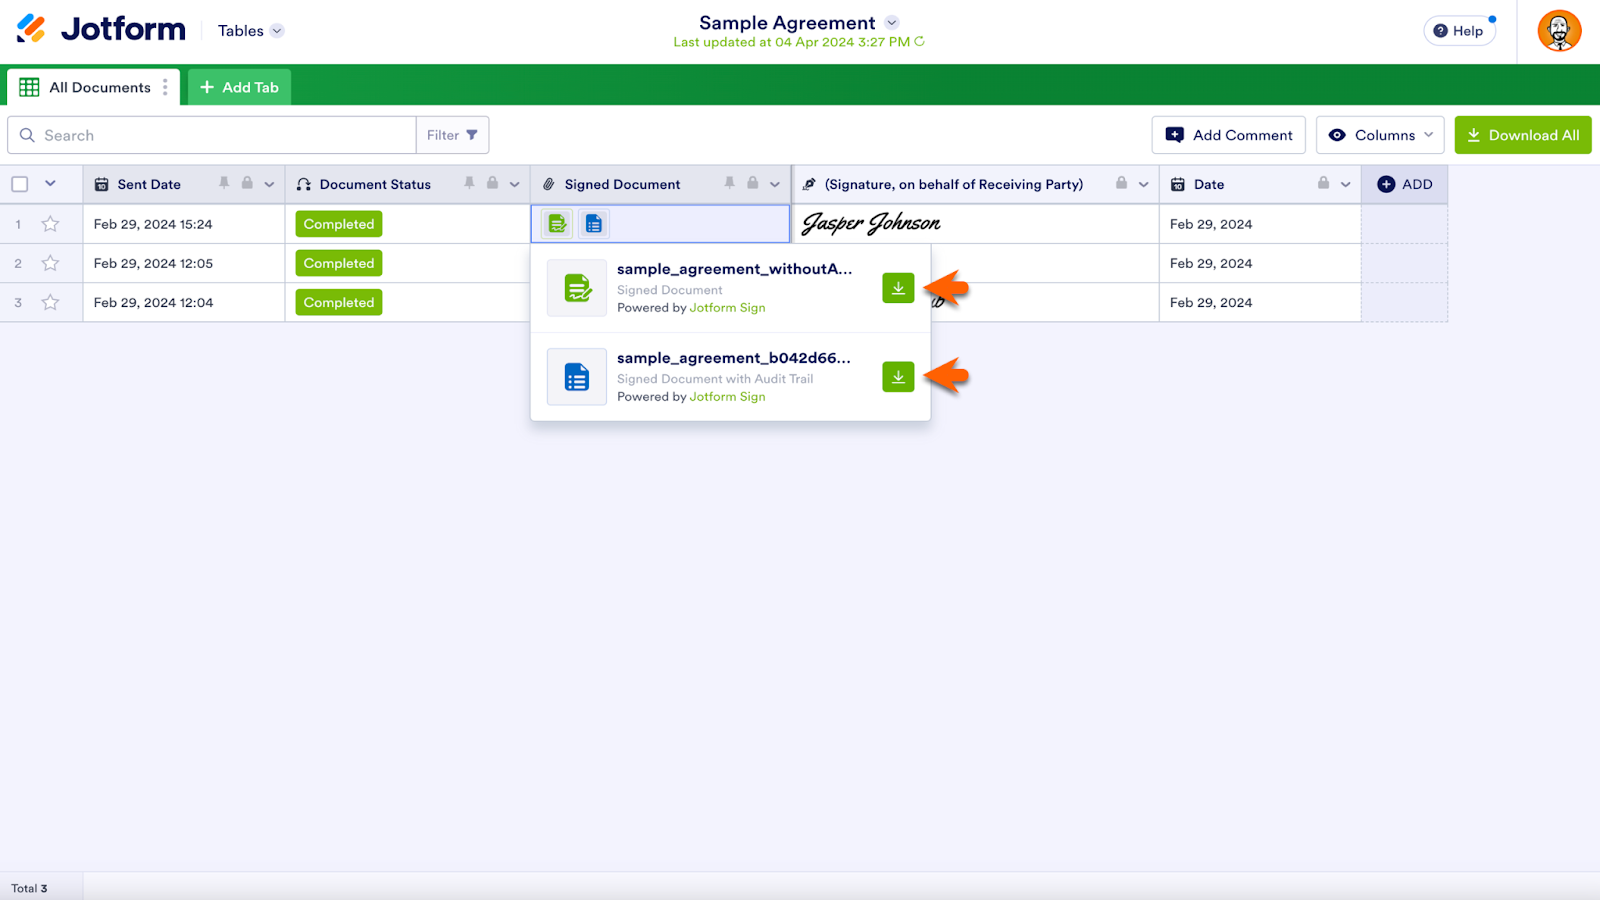
Both download options are also available via the Download button. Select the document you want to download by marking the checkbox on the left of the table. Then click Download to view the options.
Did you know?
You can turn your existing PDFs into e-sign documents in a single click with Jotform Sign. If you don’t have the right document already, more than 700 Jotform Sign templates can get you started in minutes.
Essential collaboration features for Jotform Tables
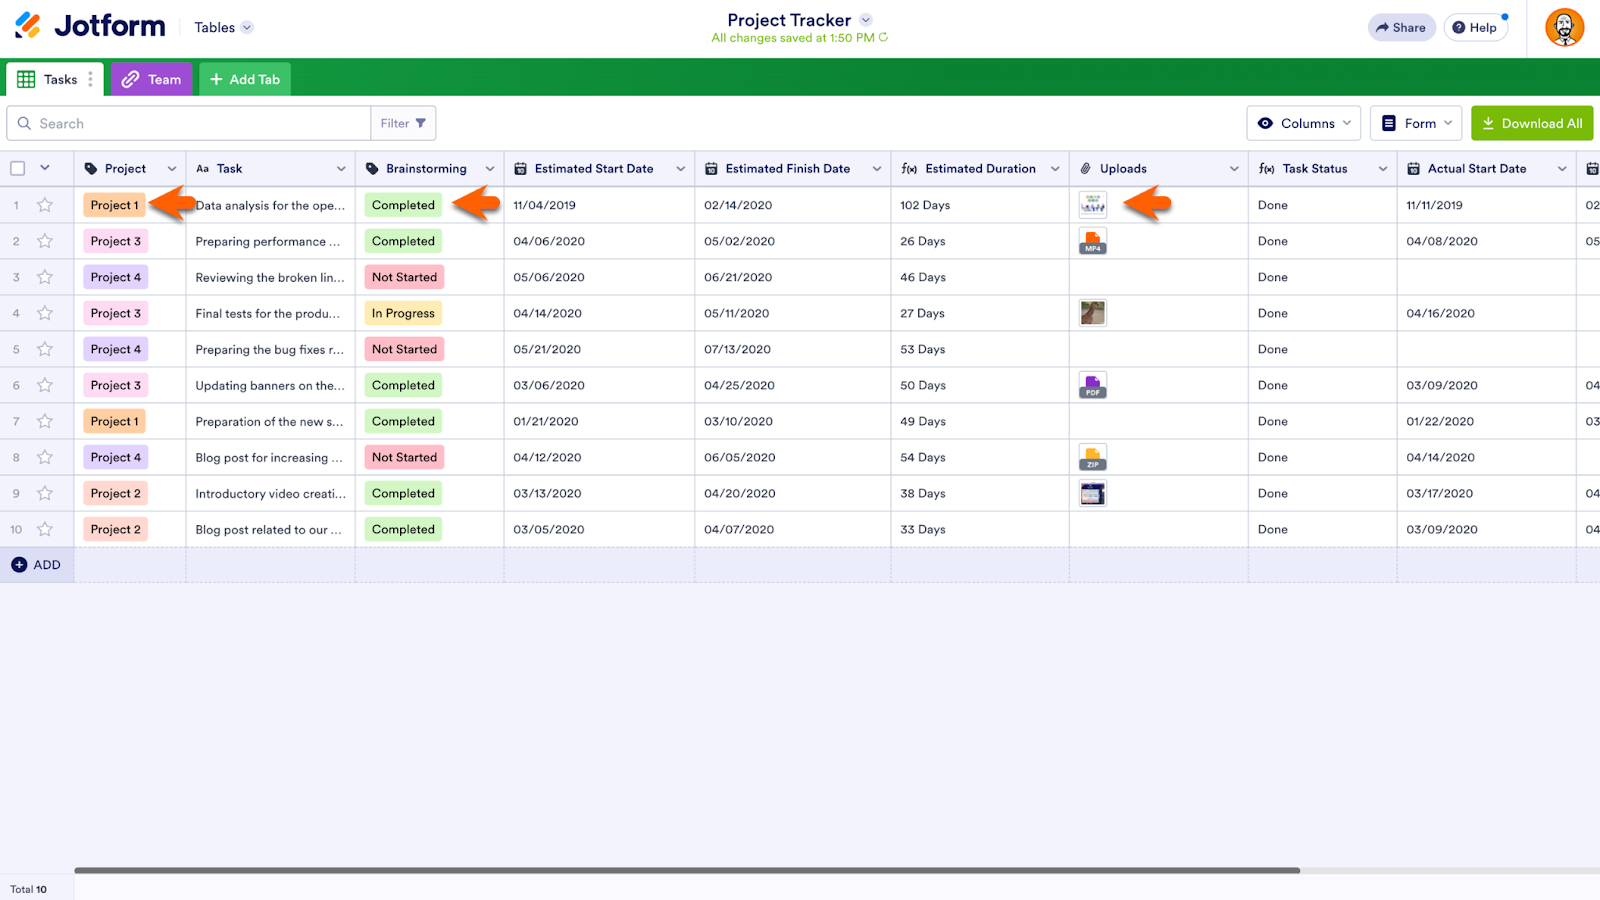
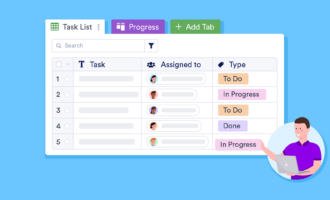
When you work with Jotform Tables, data is clearly labeled, a stark difference from monotonous spreadsheets. Plus, there are many options for managing your data and acting on it, from sending emails with a single click to including checkboxes, star ratings, file uploads, and more. These features provide clarity regarding how your data is displayed, helping you and your team get the most from it.
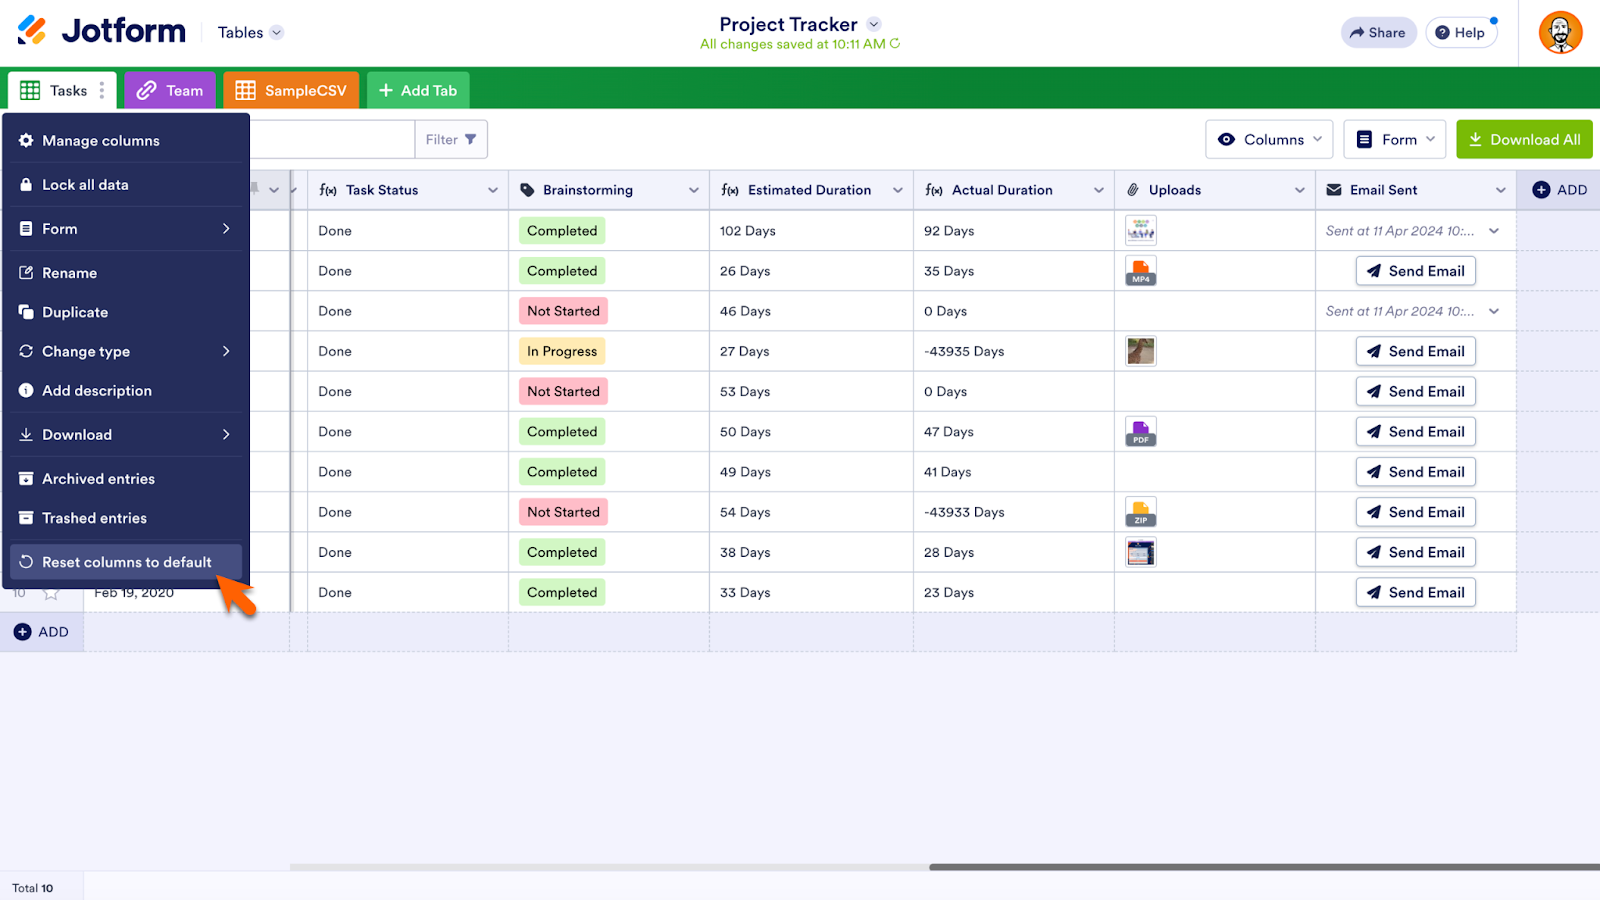
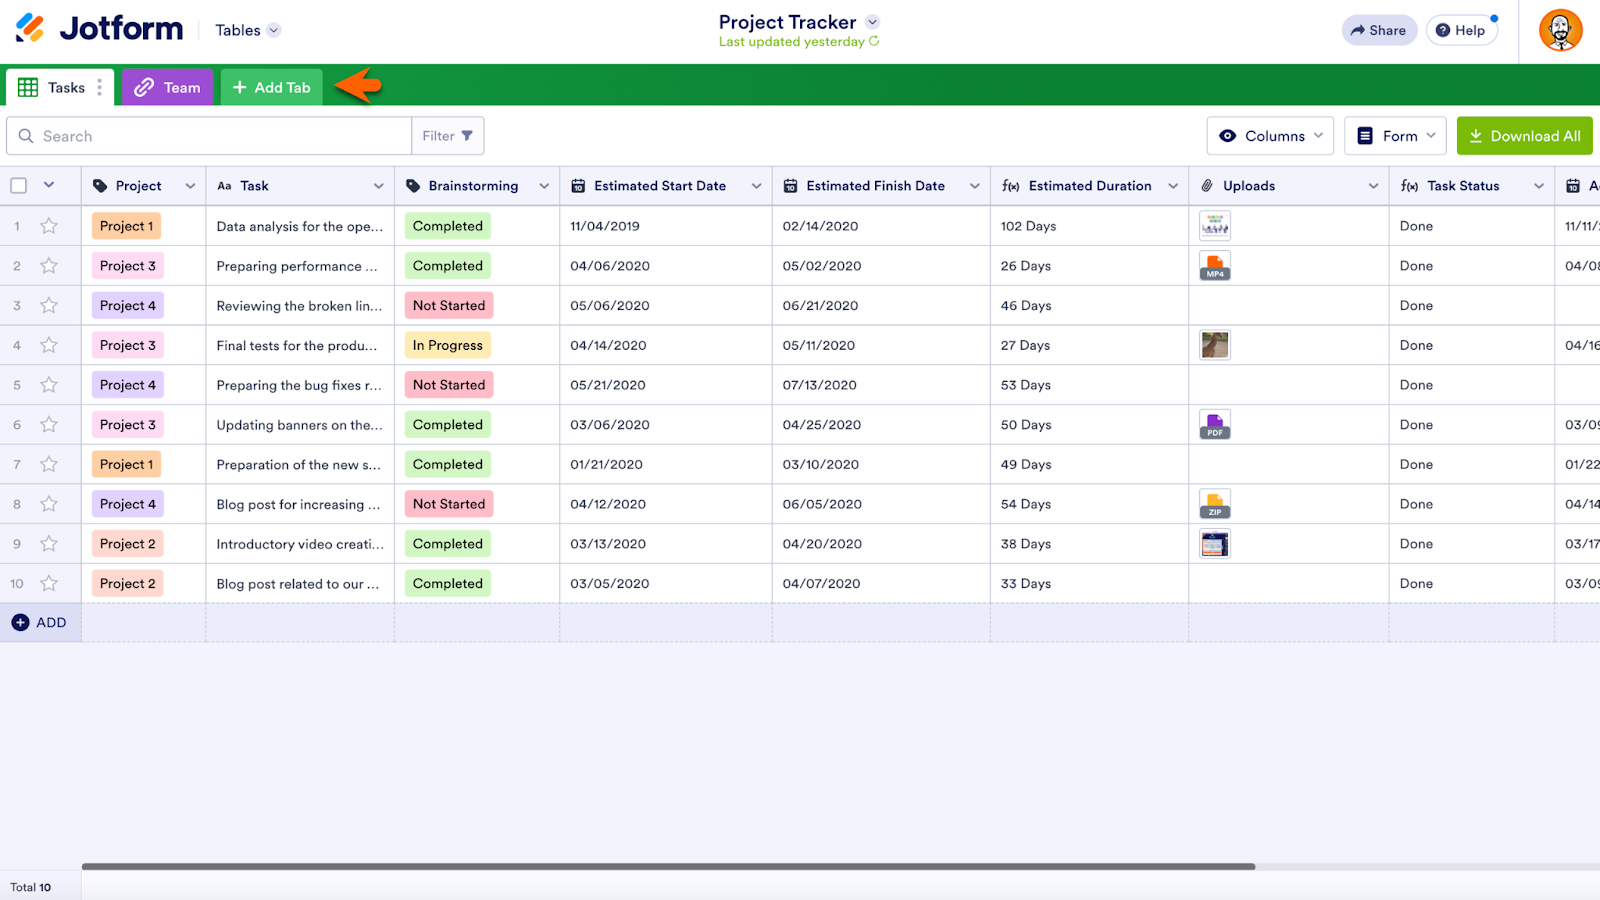
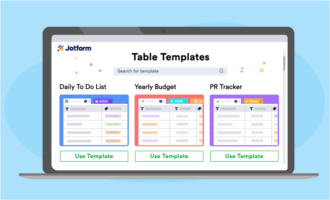
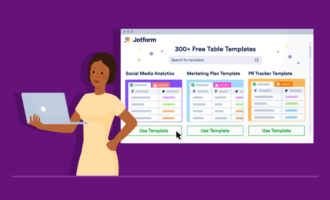
For example, take a look at this sample Project Tracker, one of more than 300 customizable Jotform Tables templates. Color-coded labels provide vital information at a glance. An Uploads column contains multiple types of files, including PDFs, GIFs, and ZIPs. Other columns contain formulas (designated by the f(x) symbol) for automatic calculations.
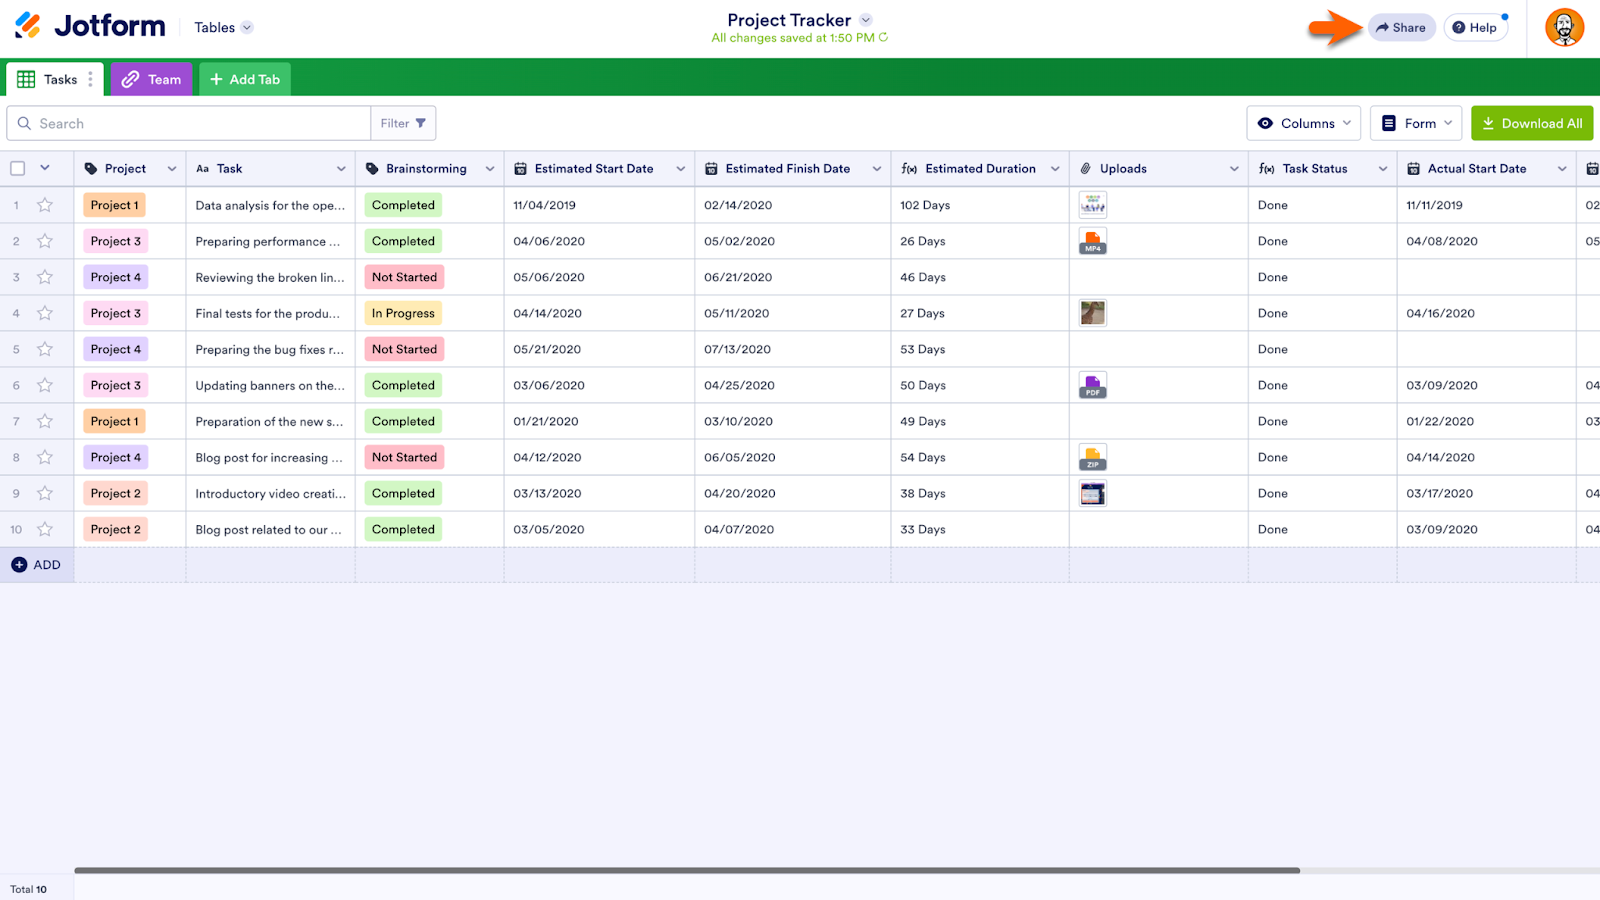
Share options for your table
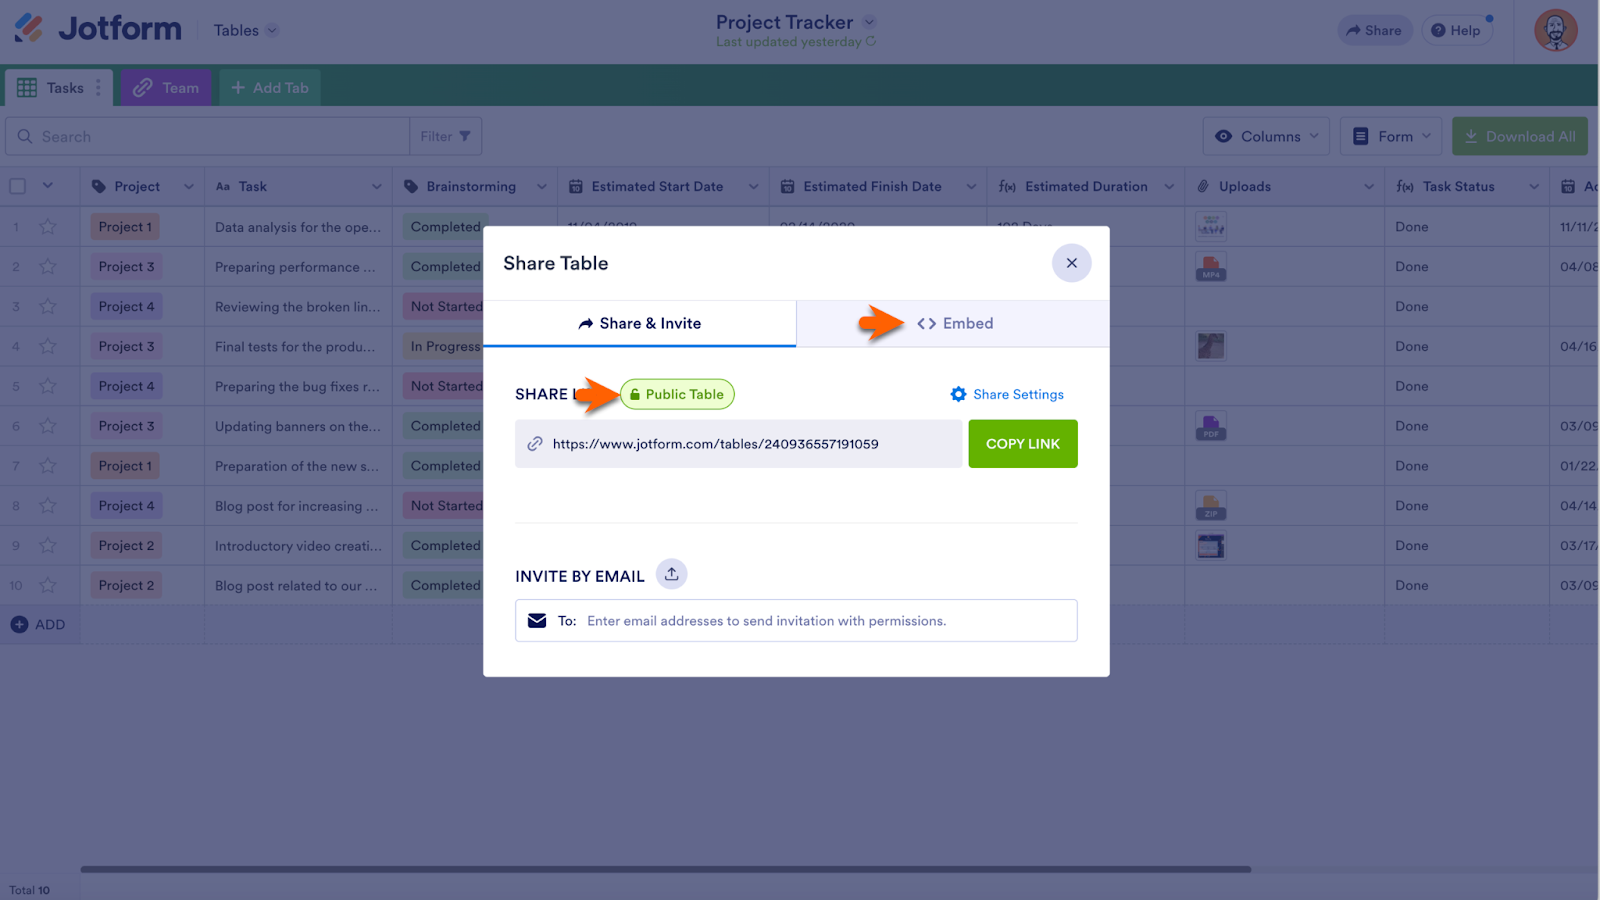
To initiate collaboration with Jotform Tables, click on the Share button at the top right of the screen. It will open to reveal a host of options that provide different levels of access to your table.
The Share Table popup contains two essential ways to share your table. First is the Invitation Link option. Click Create Link to automatically generate a link for your table. Below that is the Invite by Email option. Enter one or more email addresses to send invitations to collaborators.
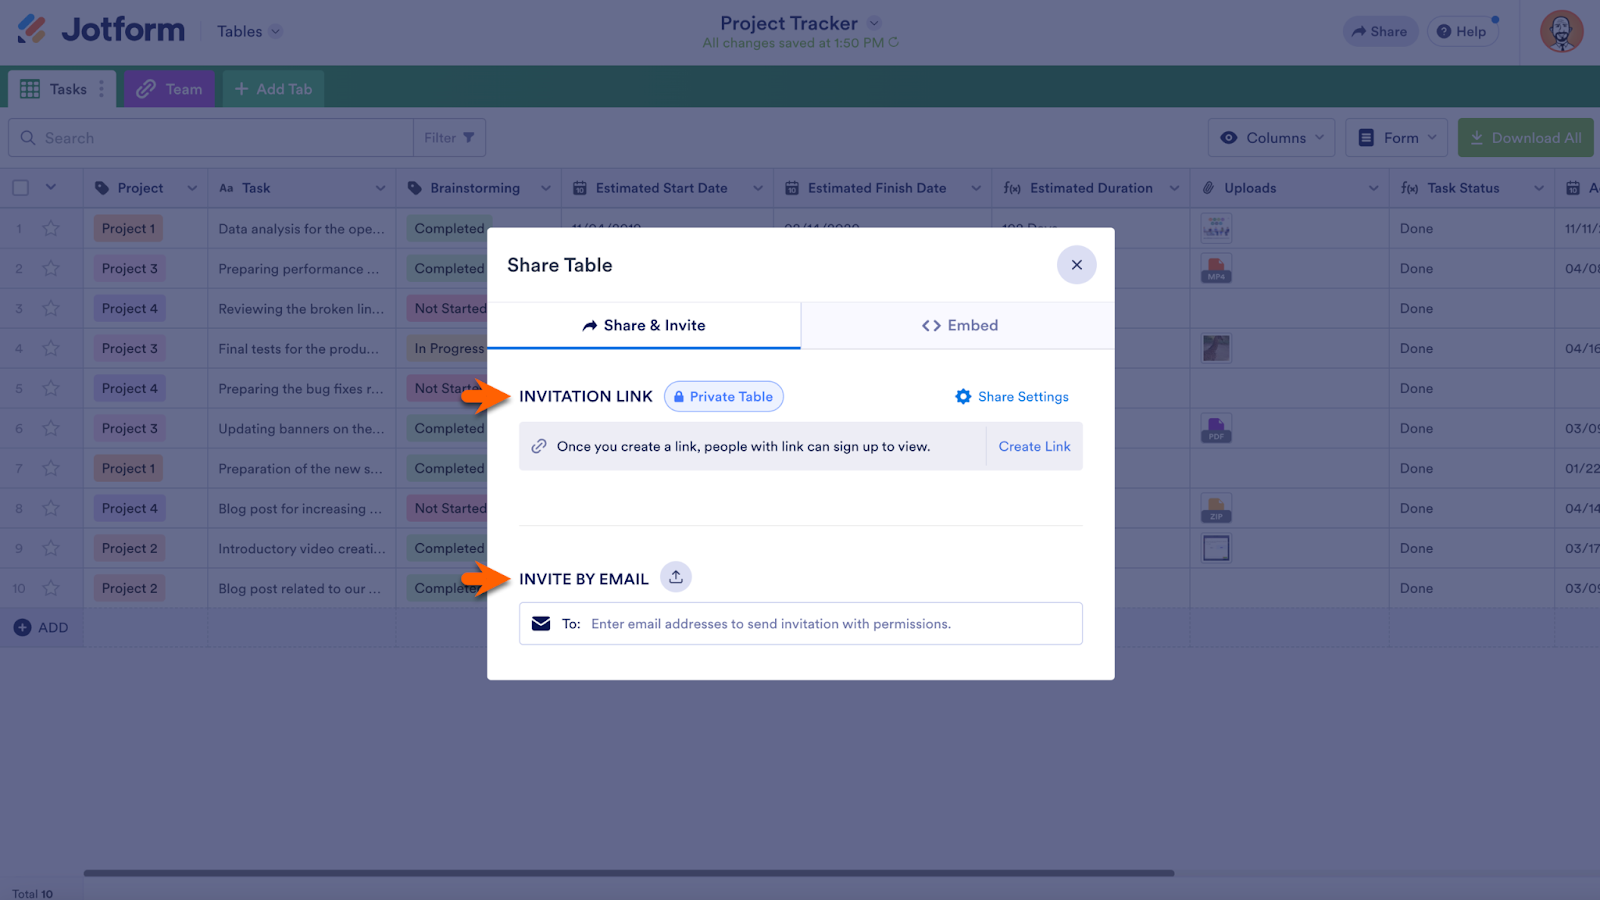
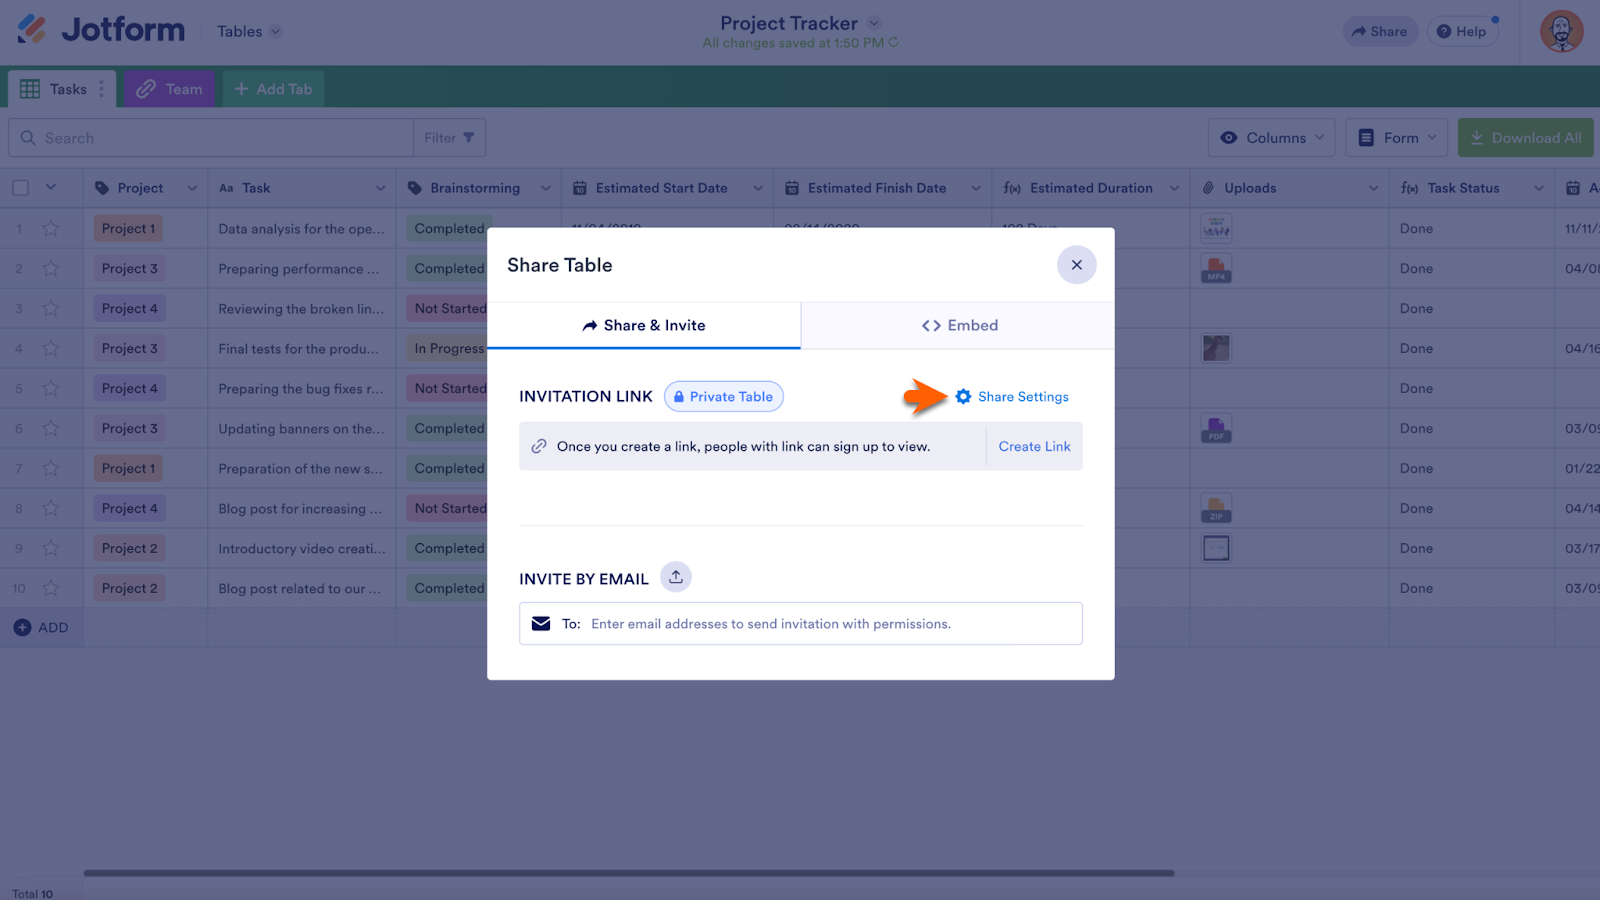
There are three different levels of access you can assign via an invitation link: Read Only, Commenter, and Collaborator. By default, invitees are granted Read Only access. To allow them to comment on or even edit your table, open the Share Settings, located on the Share Table popup.
The Share Settings link opens the Invitation Link Default Role section. Choose from Read Only, Commenter, and Collaborator access. It’s your choice whether collaborators can view data, view data and add comments, or view and edit data.
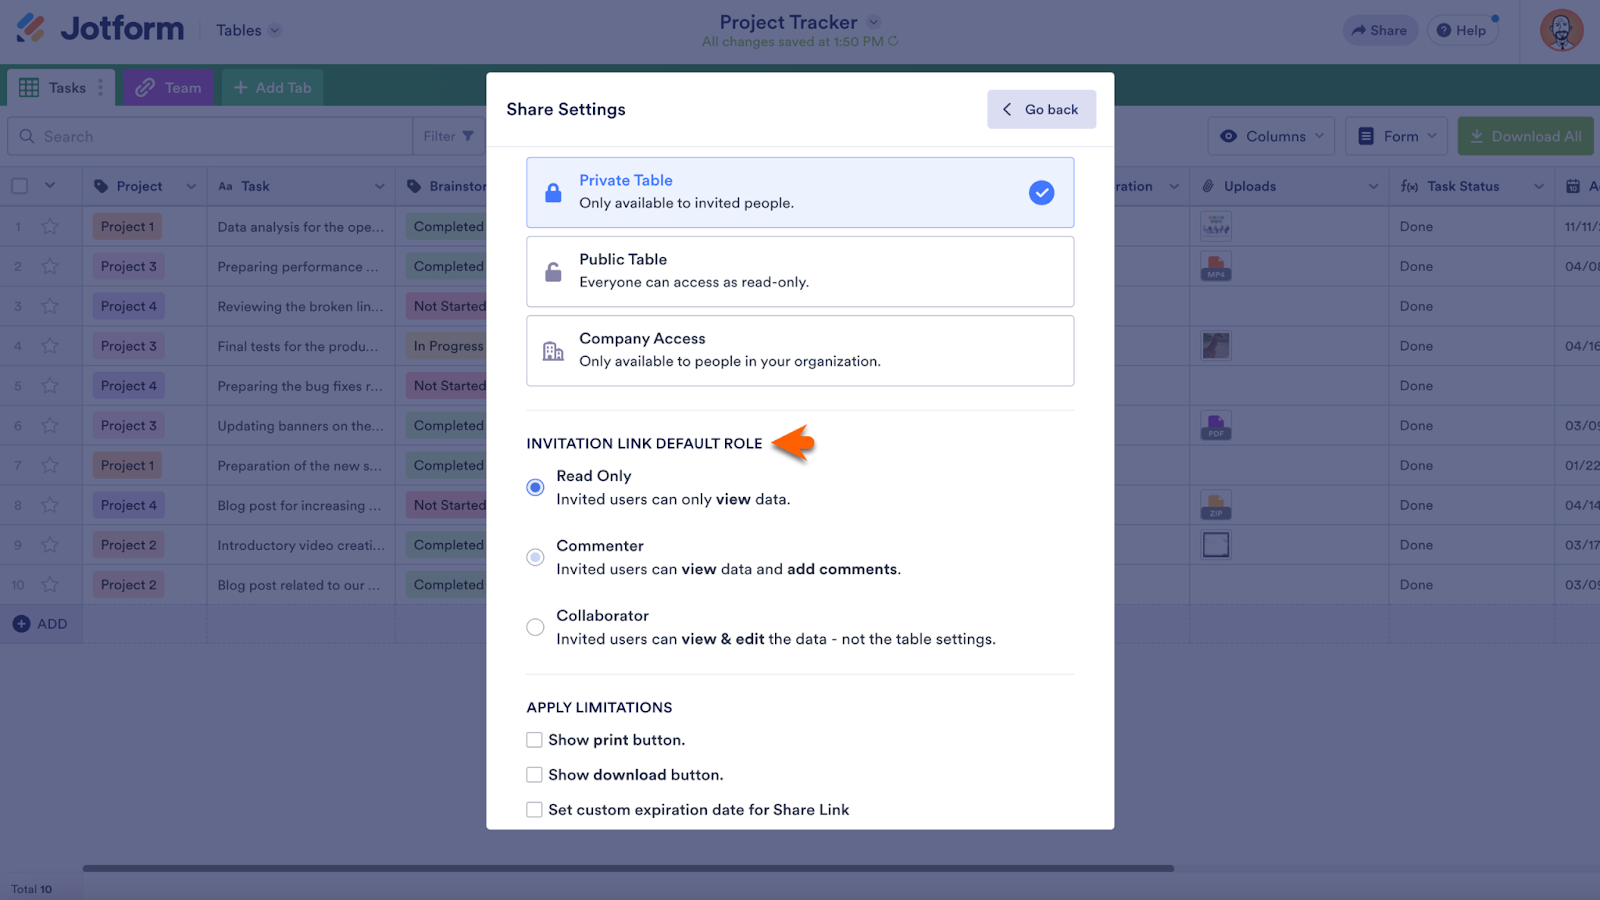
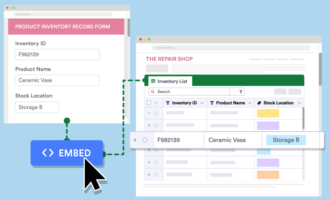
The Public Table privacy setting is ideal for embedding your table into a website, dashboard, or kiosk to display data in real time, as access is Read Only by default.
With the Company Access setting, you can either require an organization email domain for collaborators or require collaborators to use single sign-on. (Note that single sign-on is only available with Jotform Enterprise.) Invitation link default roles for Company Access are identical to the roles for Private Access: Read Only, Commenter, and Collaborator.
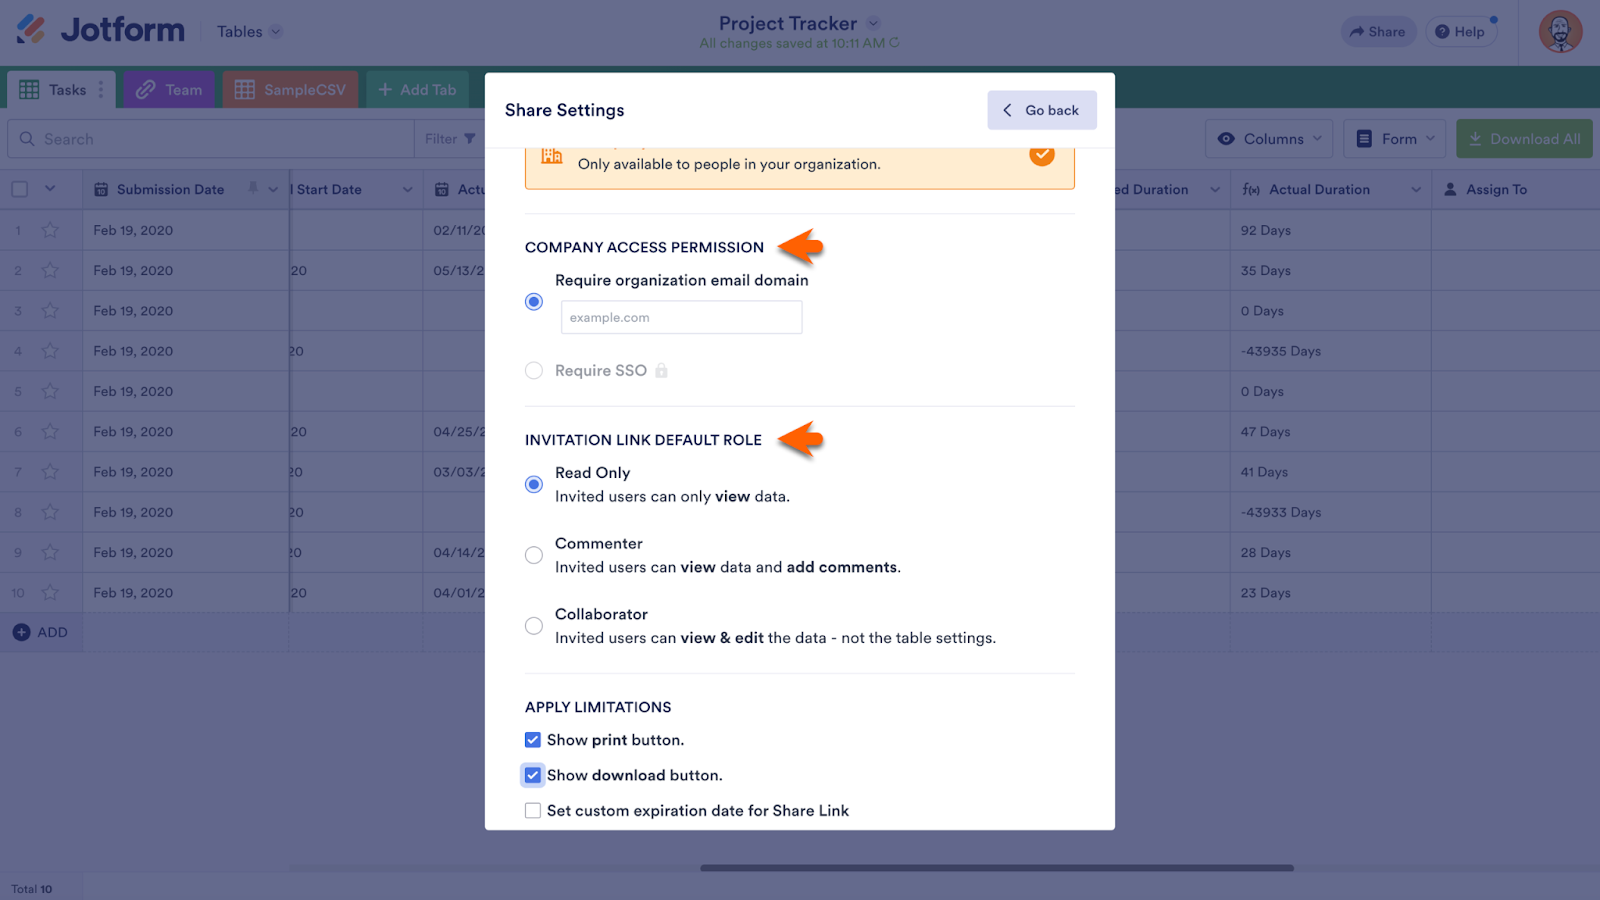
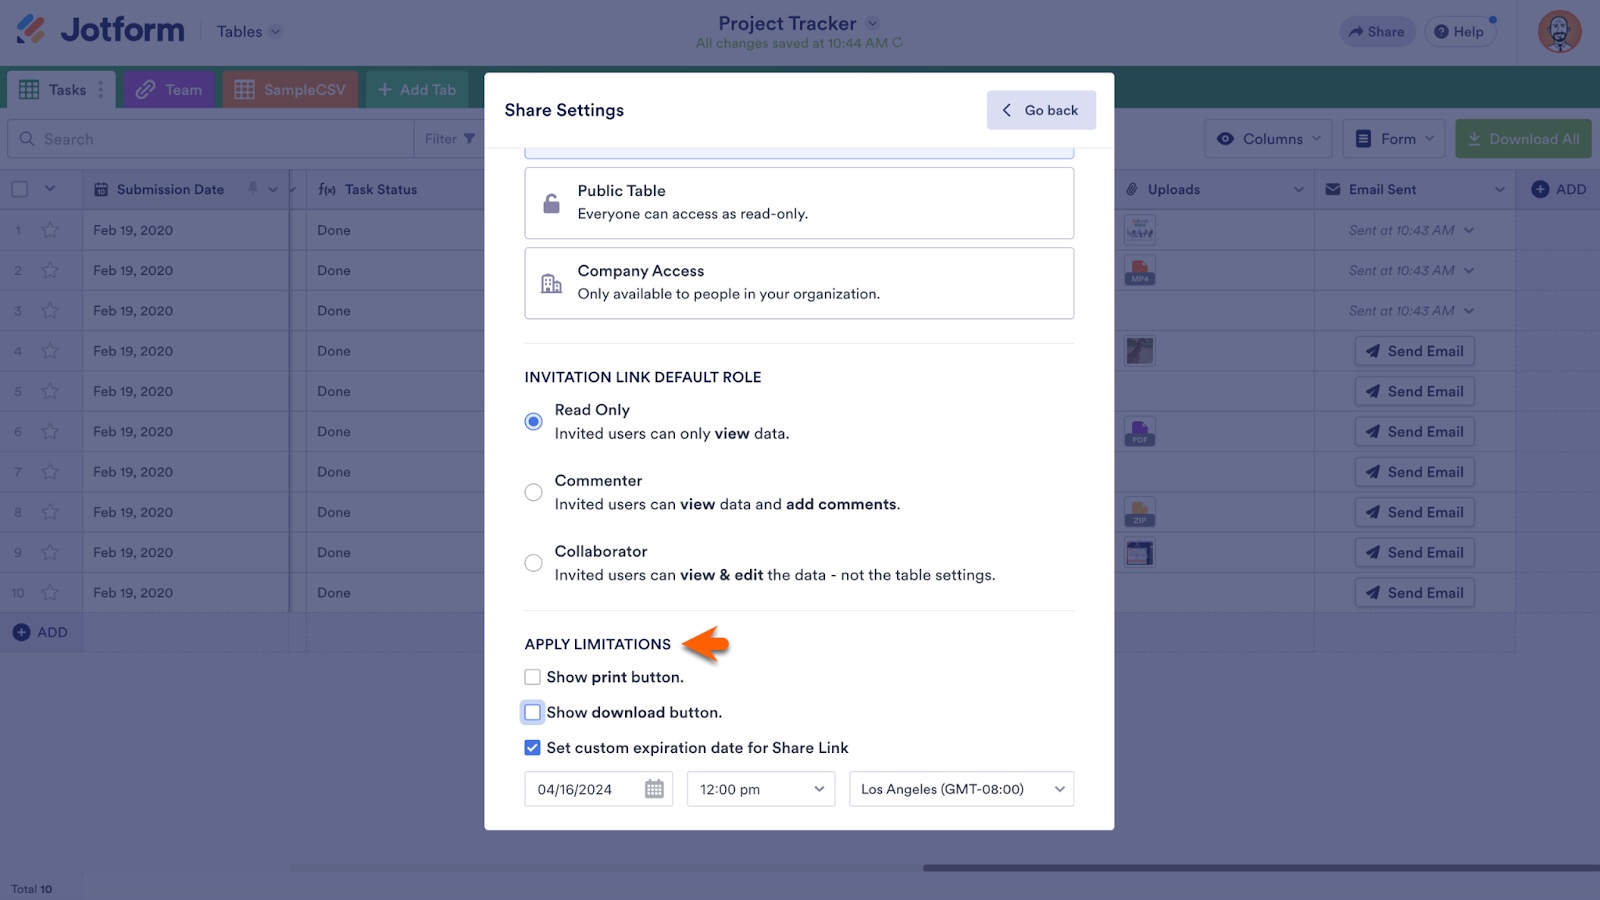
At the bottom of the Privacy Settings is the Apply Limitations section. This helps you control what your collaborators can see. You can show collaborators a print or download button, or opt to hide them. Check the last box in this section to set a custom expiration date for your Share Link.
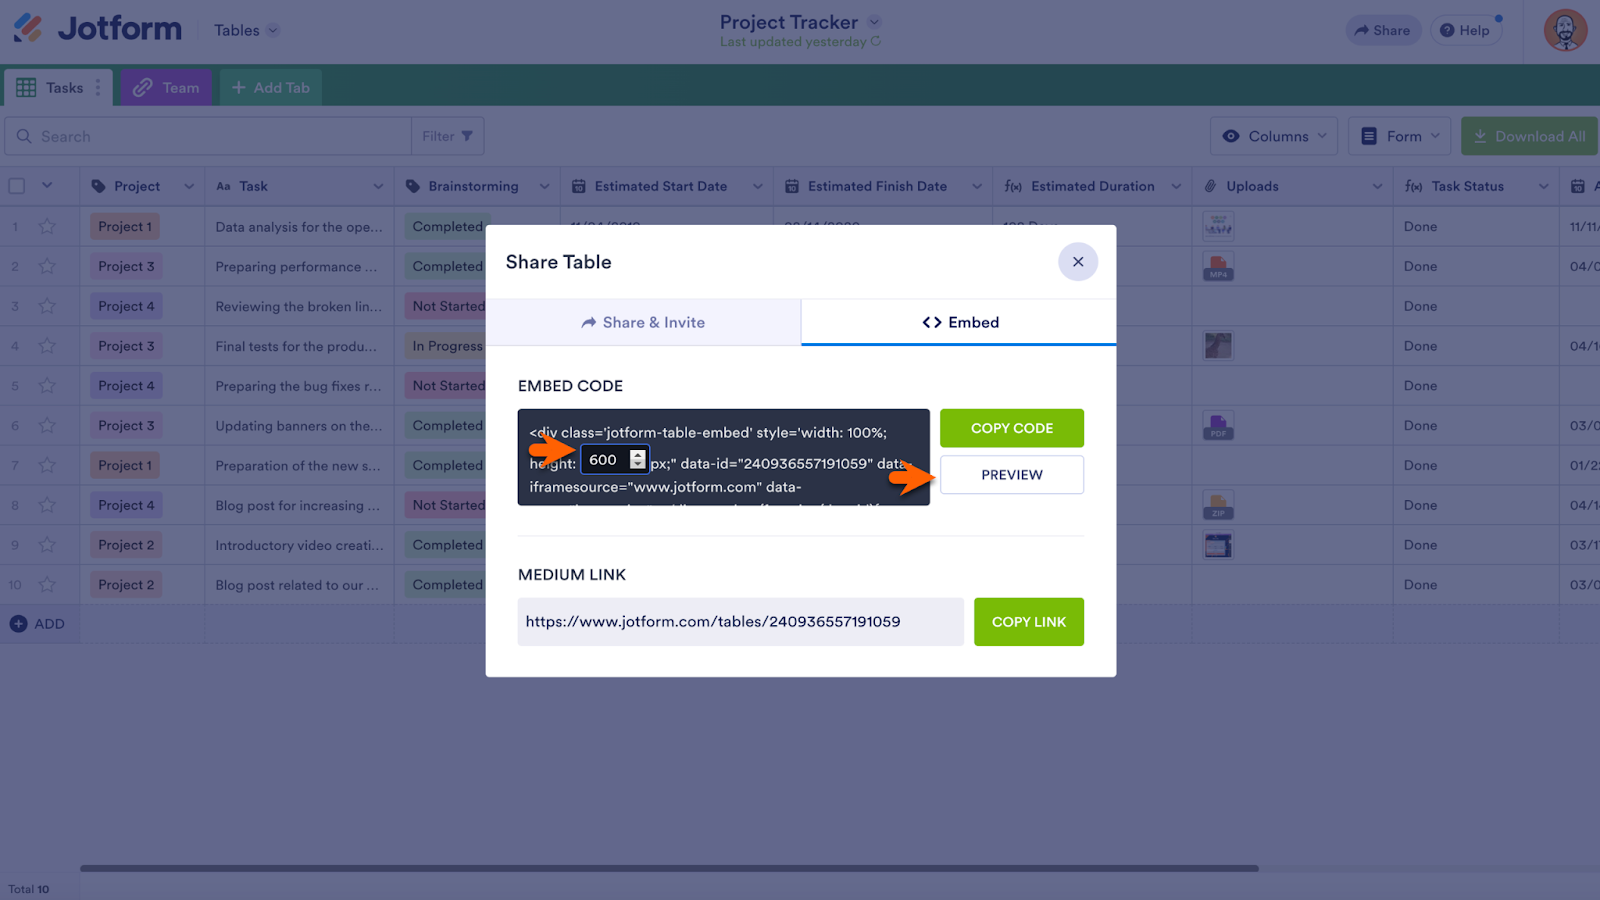
Next to the Share & Invite tab is the Embed tab. To use this feature, set your Privacy Settings to Public Table.
Click Copy Code to copy and paste the embed code into a website. Click Copy Link to copy and paste your table into Medium. Within the general embed code, there’s a height adjuster for your embedded Table. A Preview button is available so you can get a glimpse of your table and see whether the height is appropriate.
Did you know?
Jotform’s online forms have top-level security, and so does Jotform Tables. Whether collecting data through online forms, storing it in Jotform Tables, or both, Jotform keeps your data protected with a 256-bit SSL connection, the industry standard. Plus, Jotform offers GDPR compliance, CCPA compliance, form encryption, password protected forms, and more, including two-factor authentication at login.
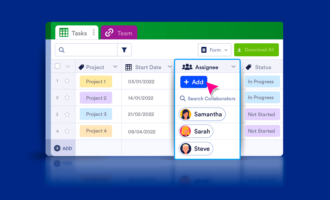
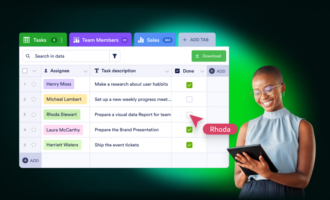
Assign column entries to collaborators
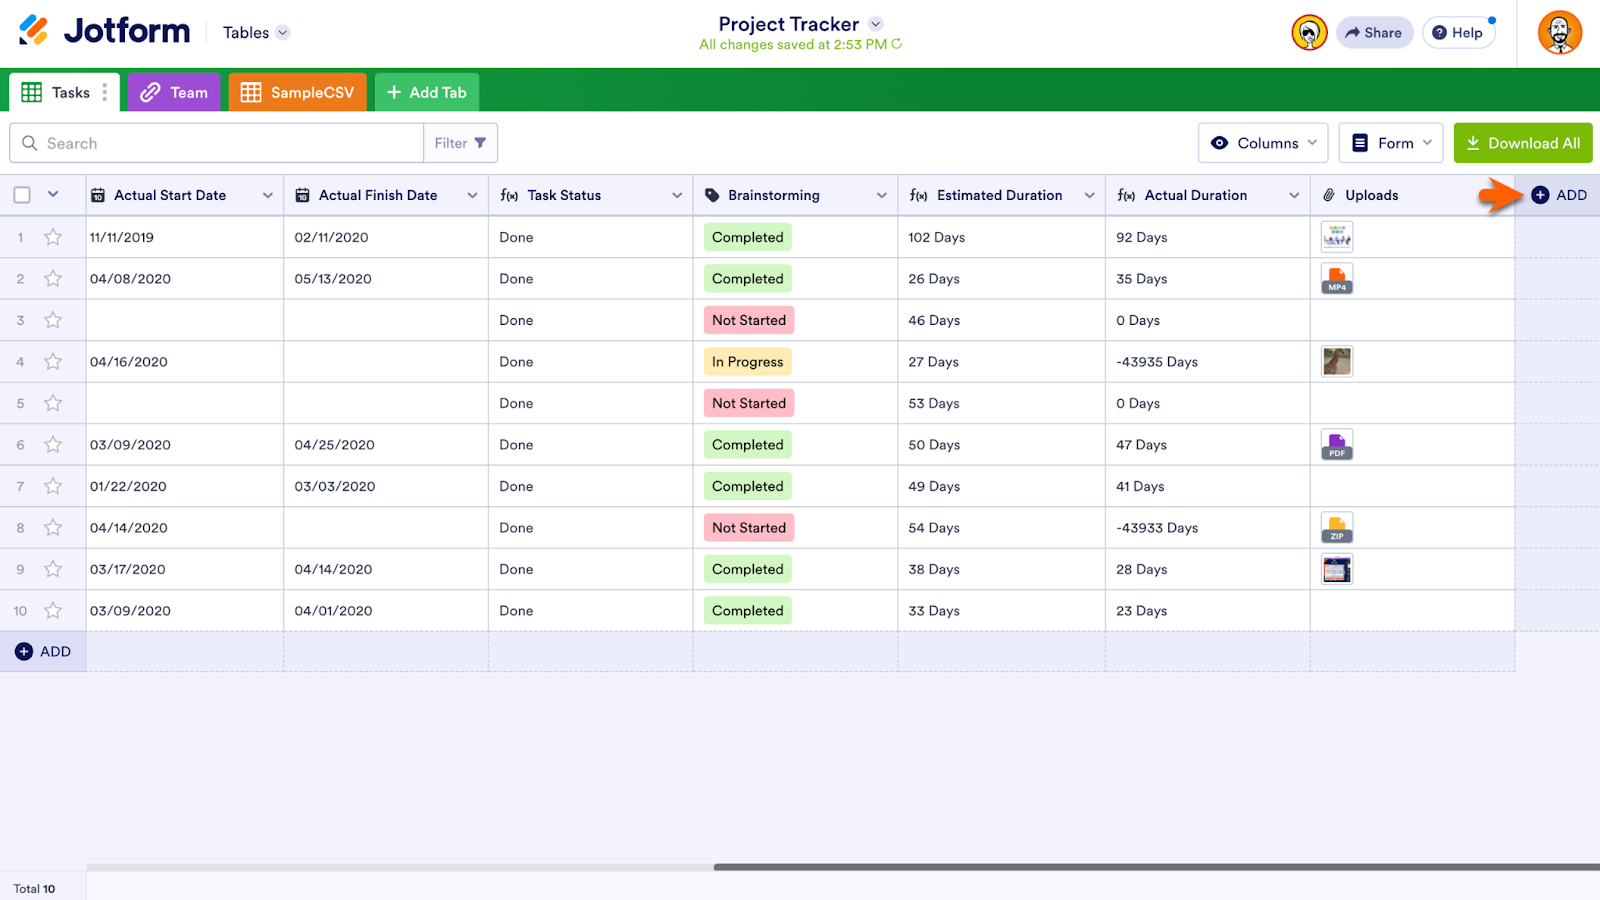
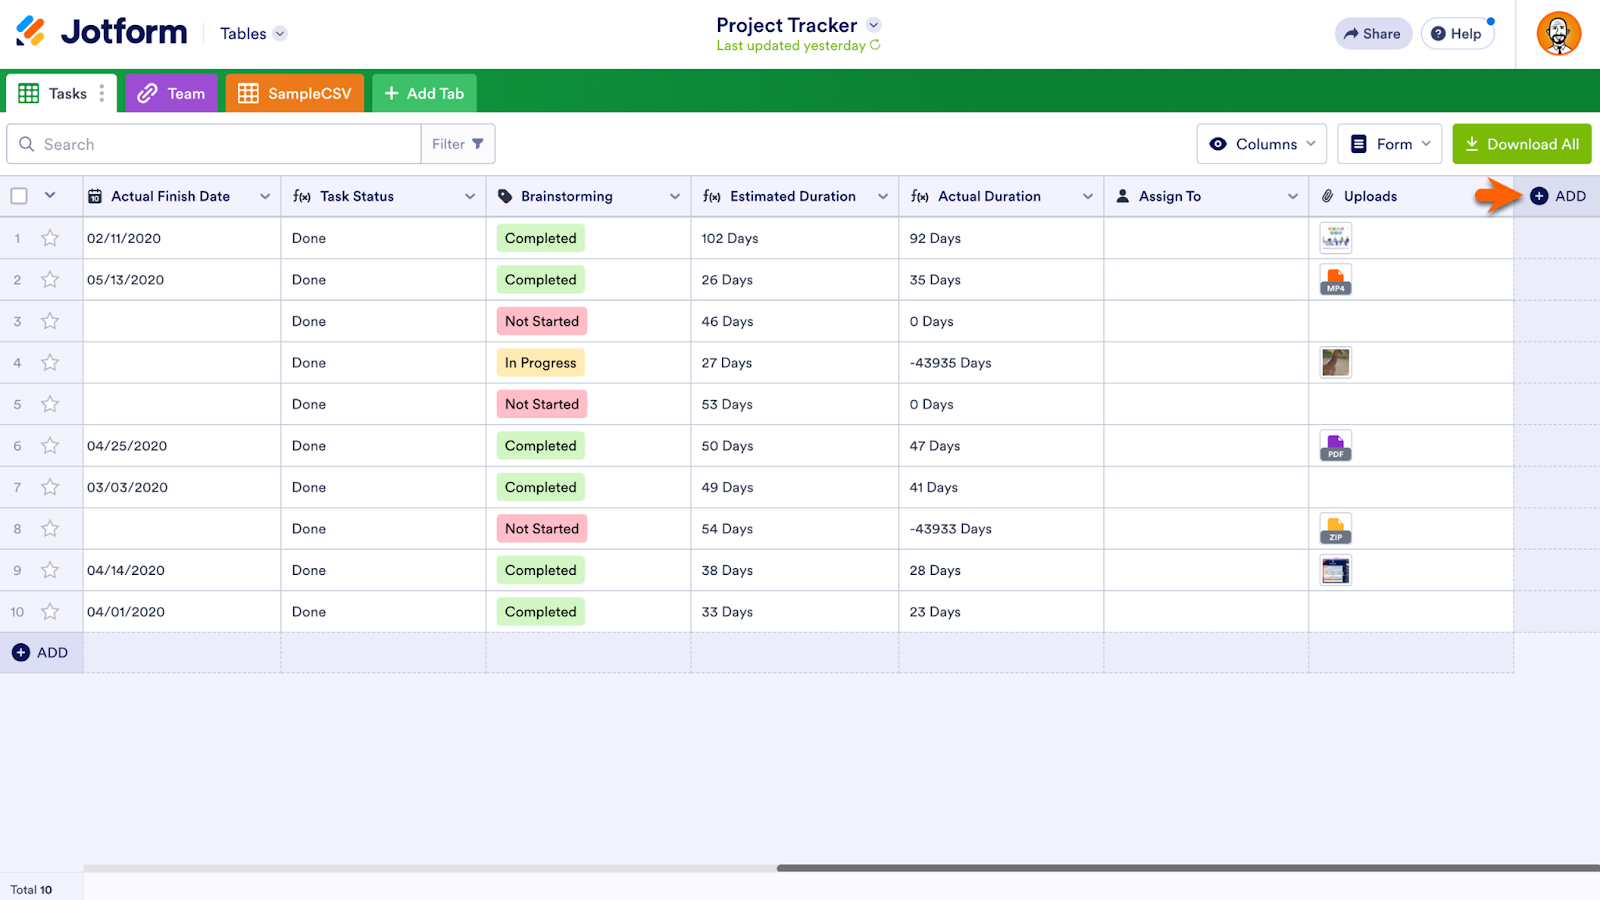
Another essential Tables option is adding a column. There are a variety of versatile column options that can help you collaborate more smoothly. It’s even possible to assign projects or data to collaborators by using the Assignee feature. To get started, click the Add button on the right of your table to add a column.
Pro Tip
Table columns are initially set by the table’s corresponding form.
Next, select Assignee from the Basic section of the menu. Click Next to continue.
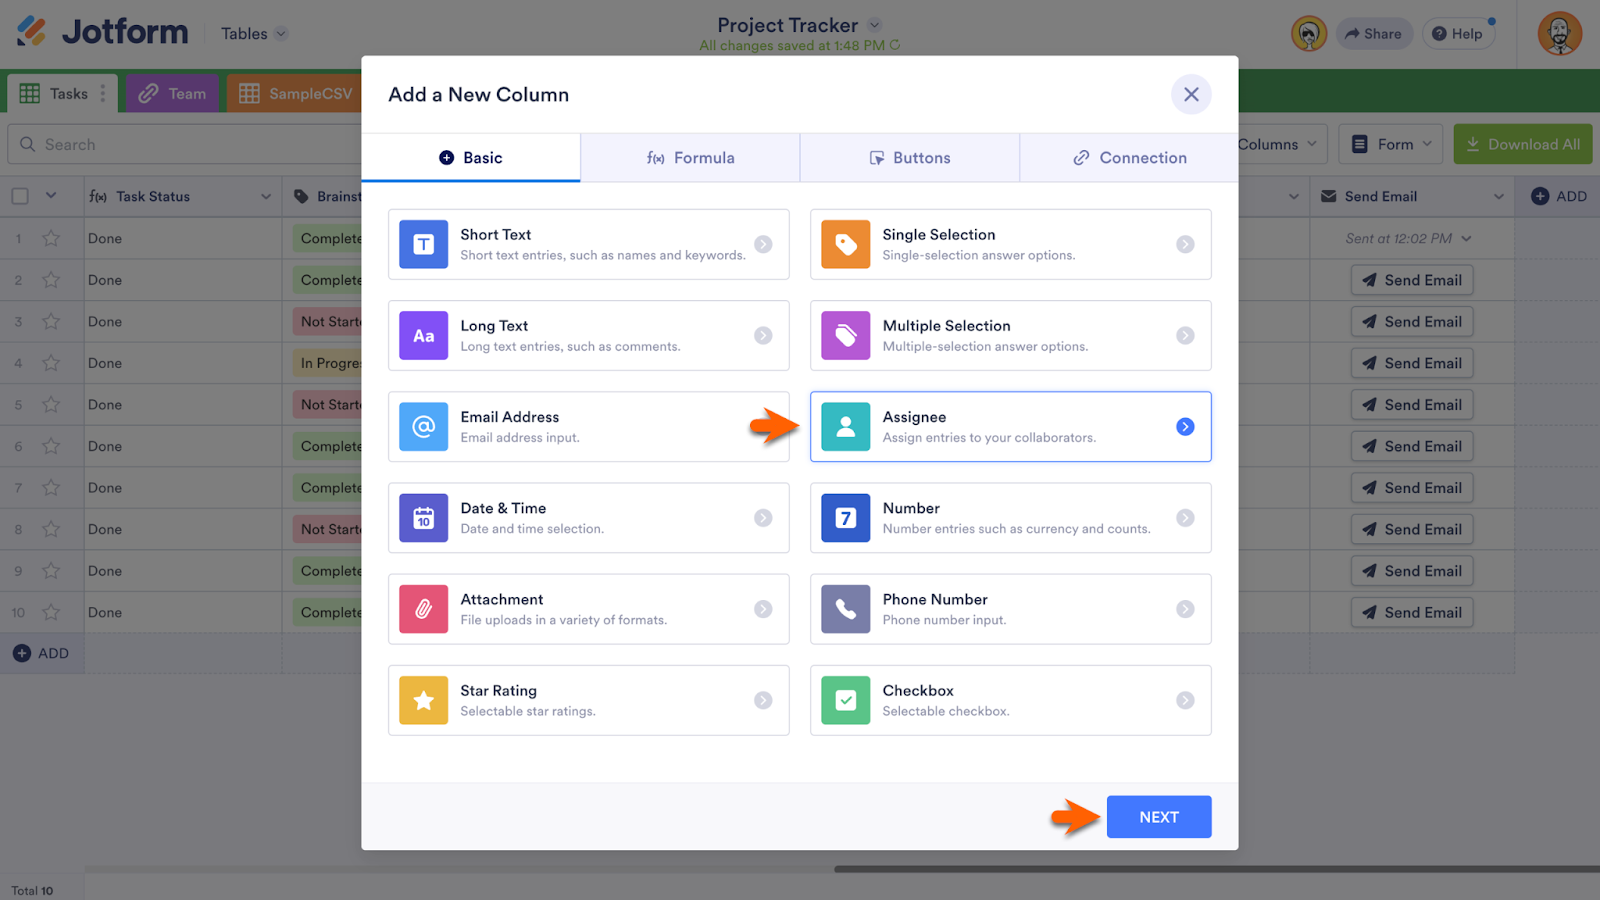
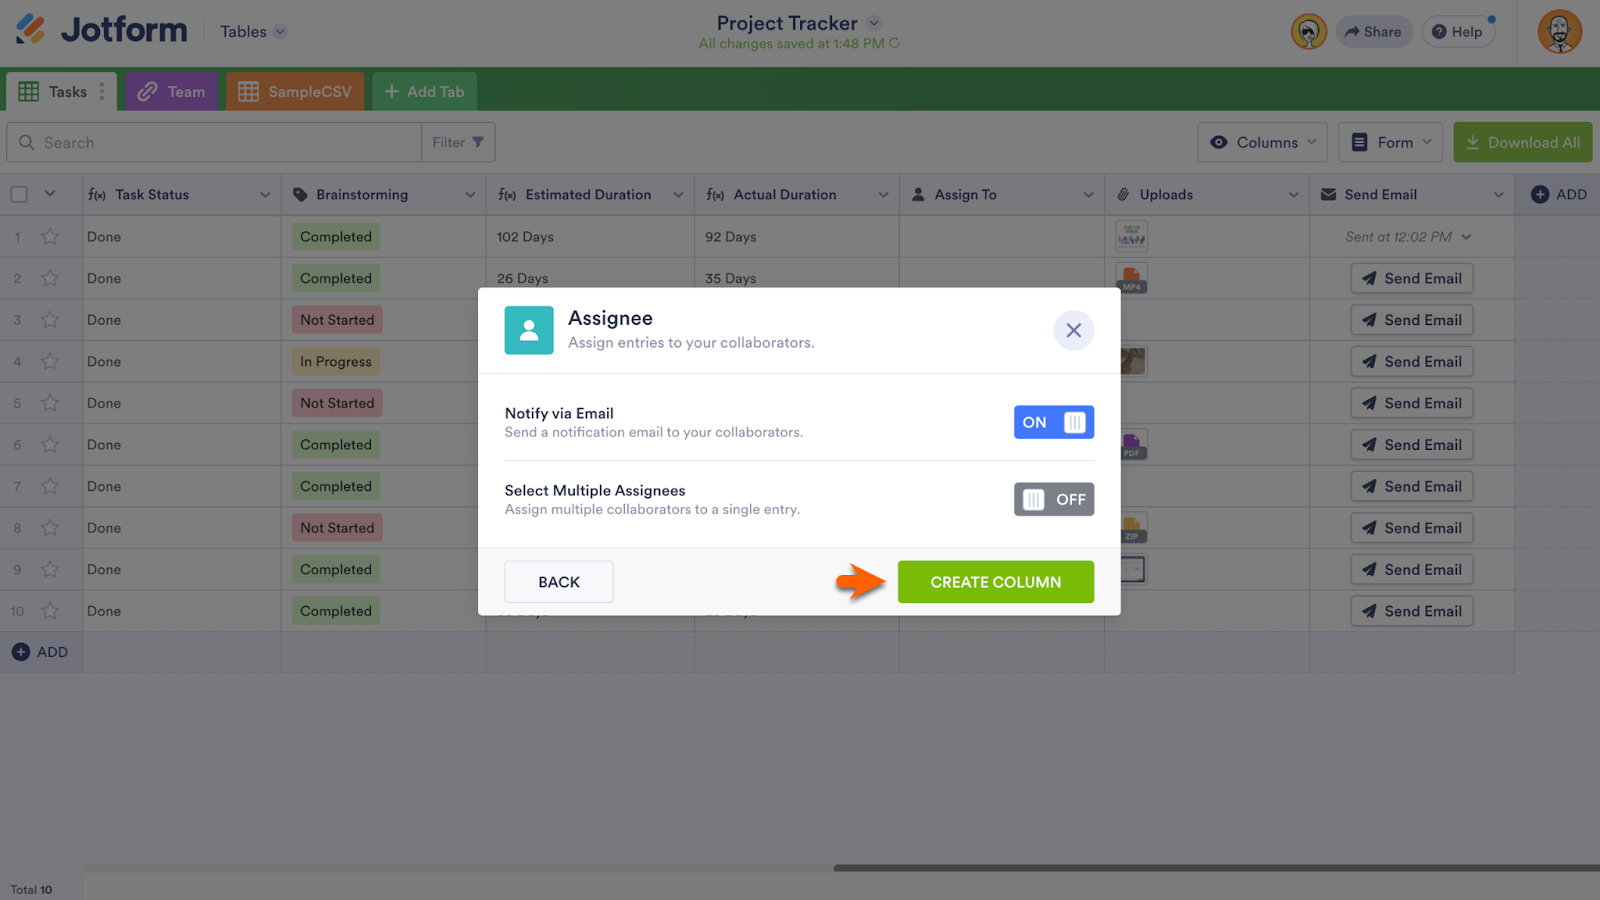
Name your new column and then choose from a couple of options on the following screen. Options include notifying assignees via email and allowing multiple assignees. By default, Notify via Email is active. When finished, click Create Column.
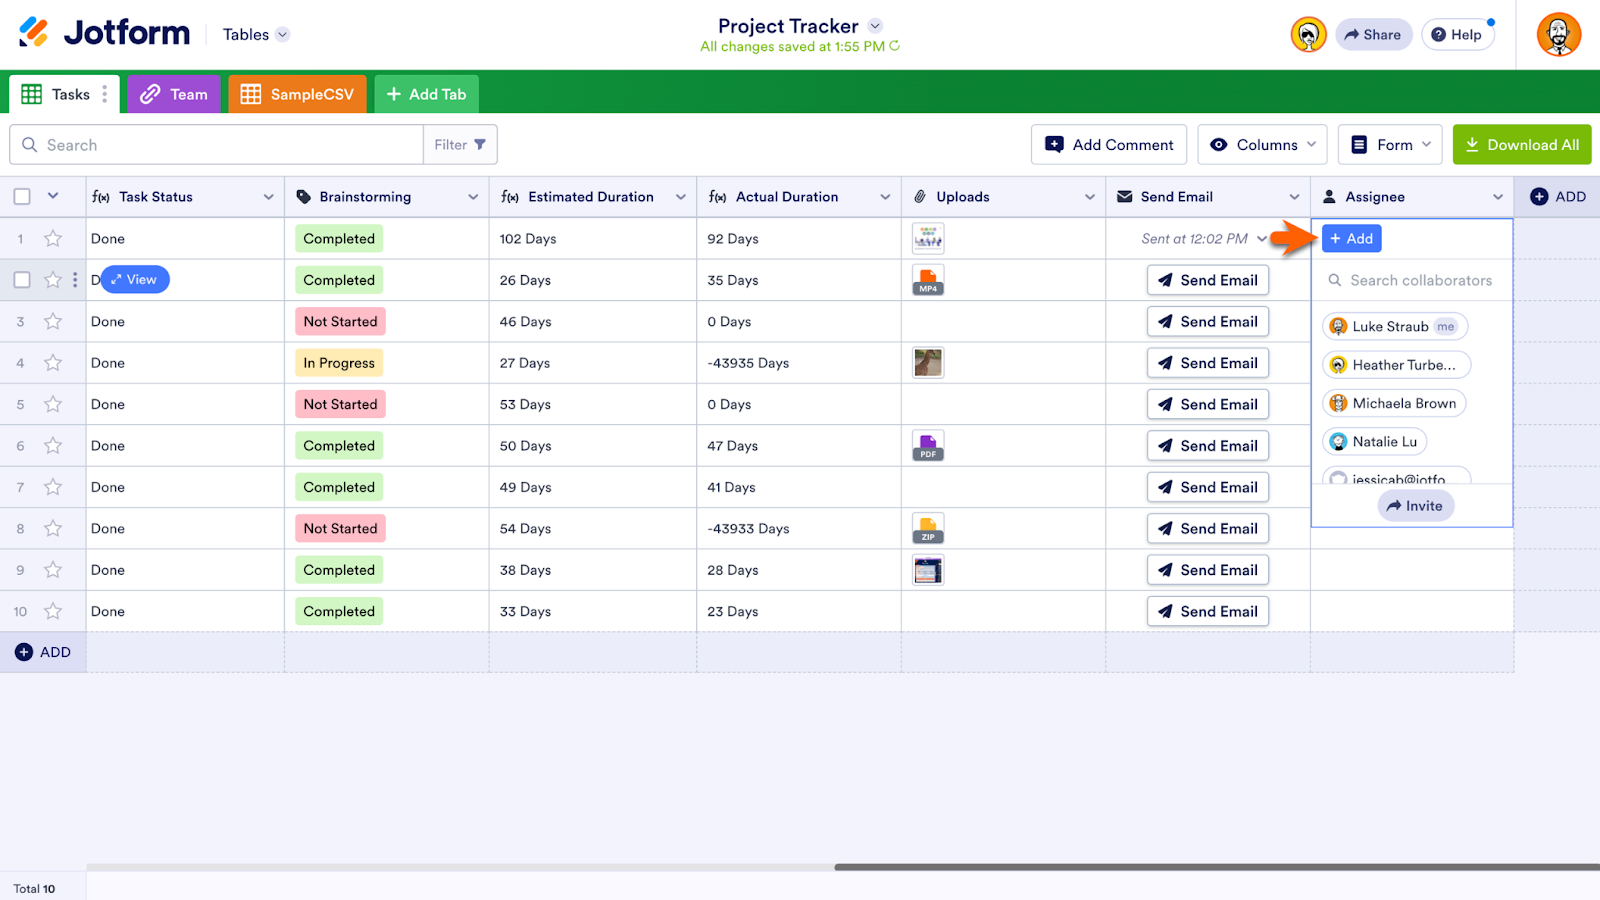
Click a data entry point in your new column to reveal an Add button. Click on your preferred collaborator, or use the search function or Invite button to invite additional collaborators.
Import Excel or CSV data to Tables
Jotform Tables stores your submission data automatically, as every single form you create comes with its own table. But Tables isn’t limited to submission data. In fact, it’s easy to import Excel or CSV files into a new or existing table.
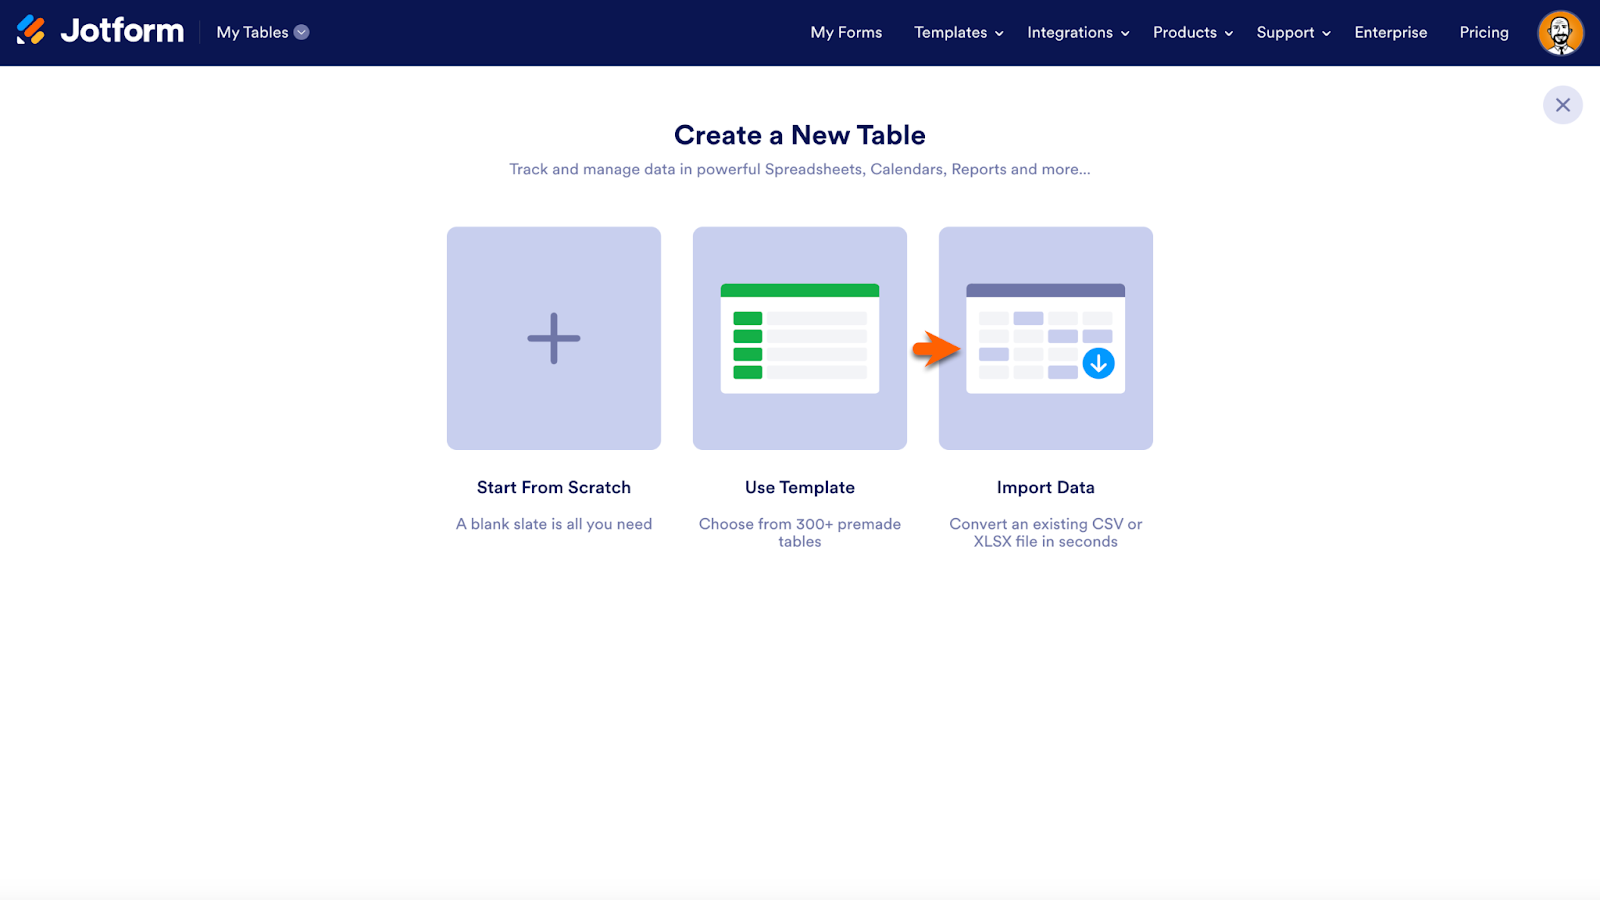
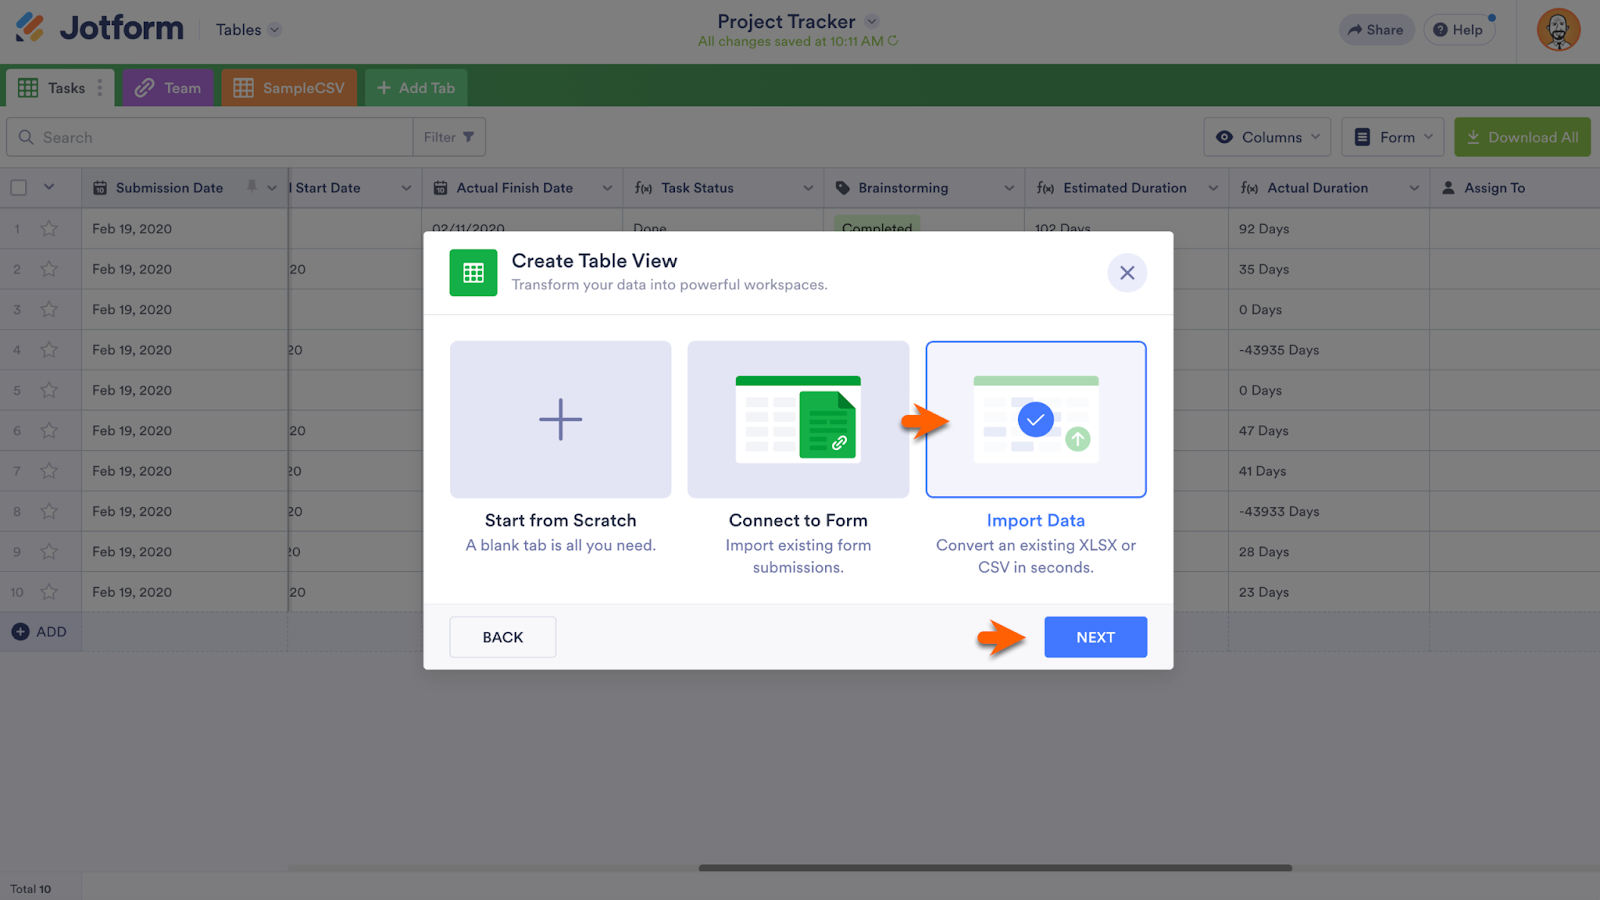
To import data into a new table, first click Create Table from the My Tables page.

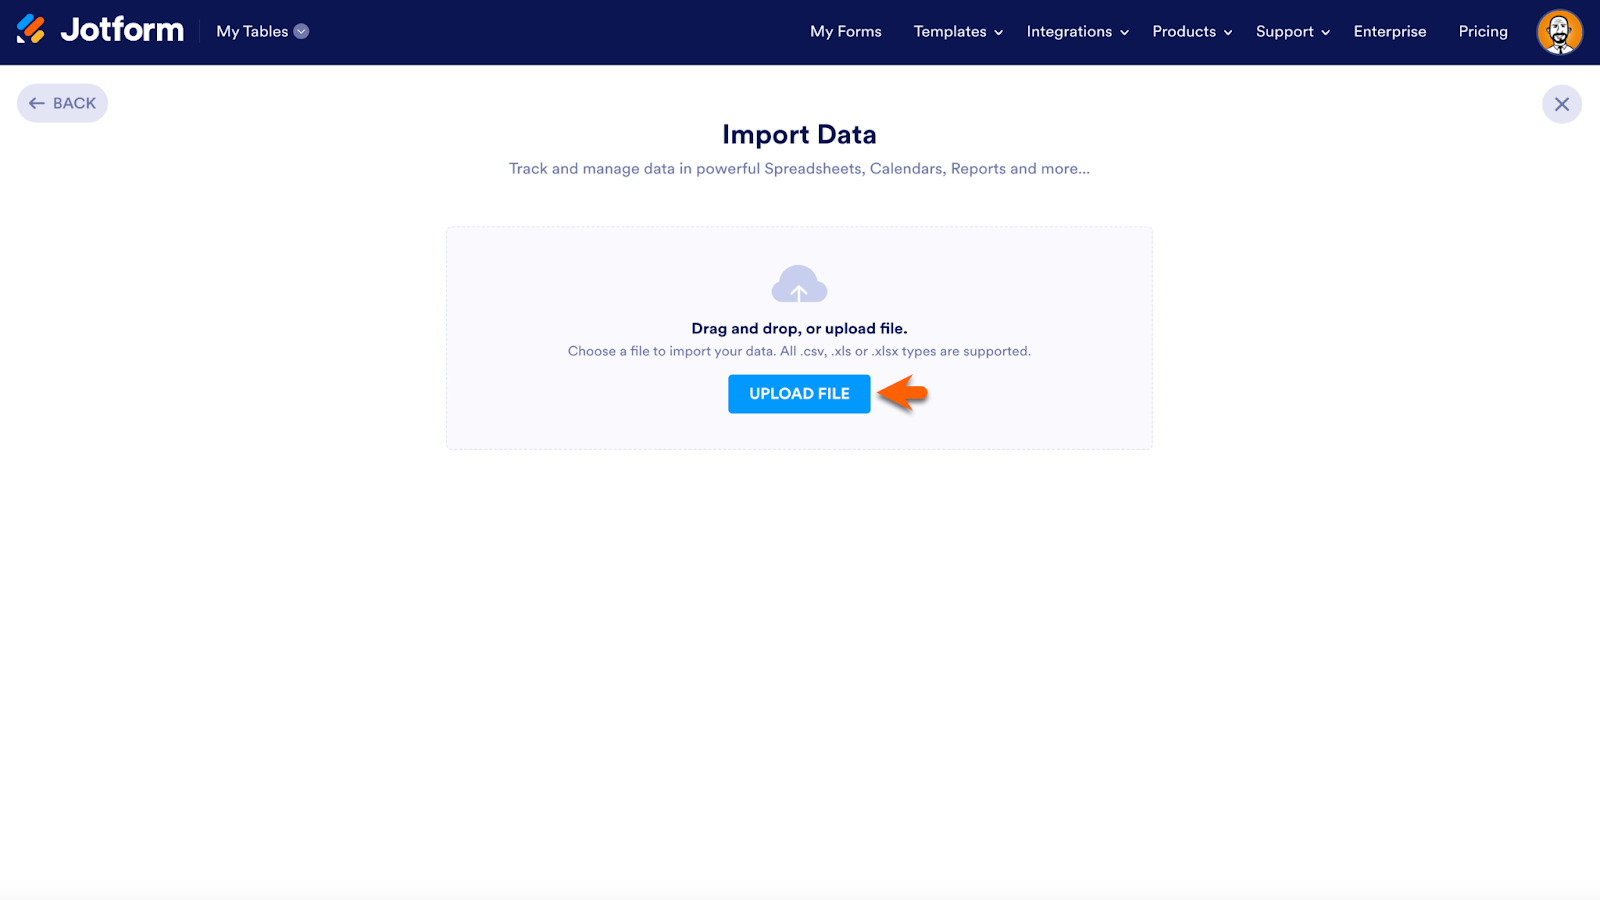
On the following screen, click the Import Data option.
Next, click Upload File. All CSV, XLS, and XLSX files are supported by Jotform Tables.
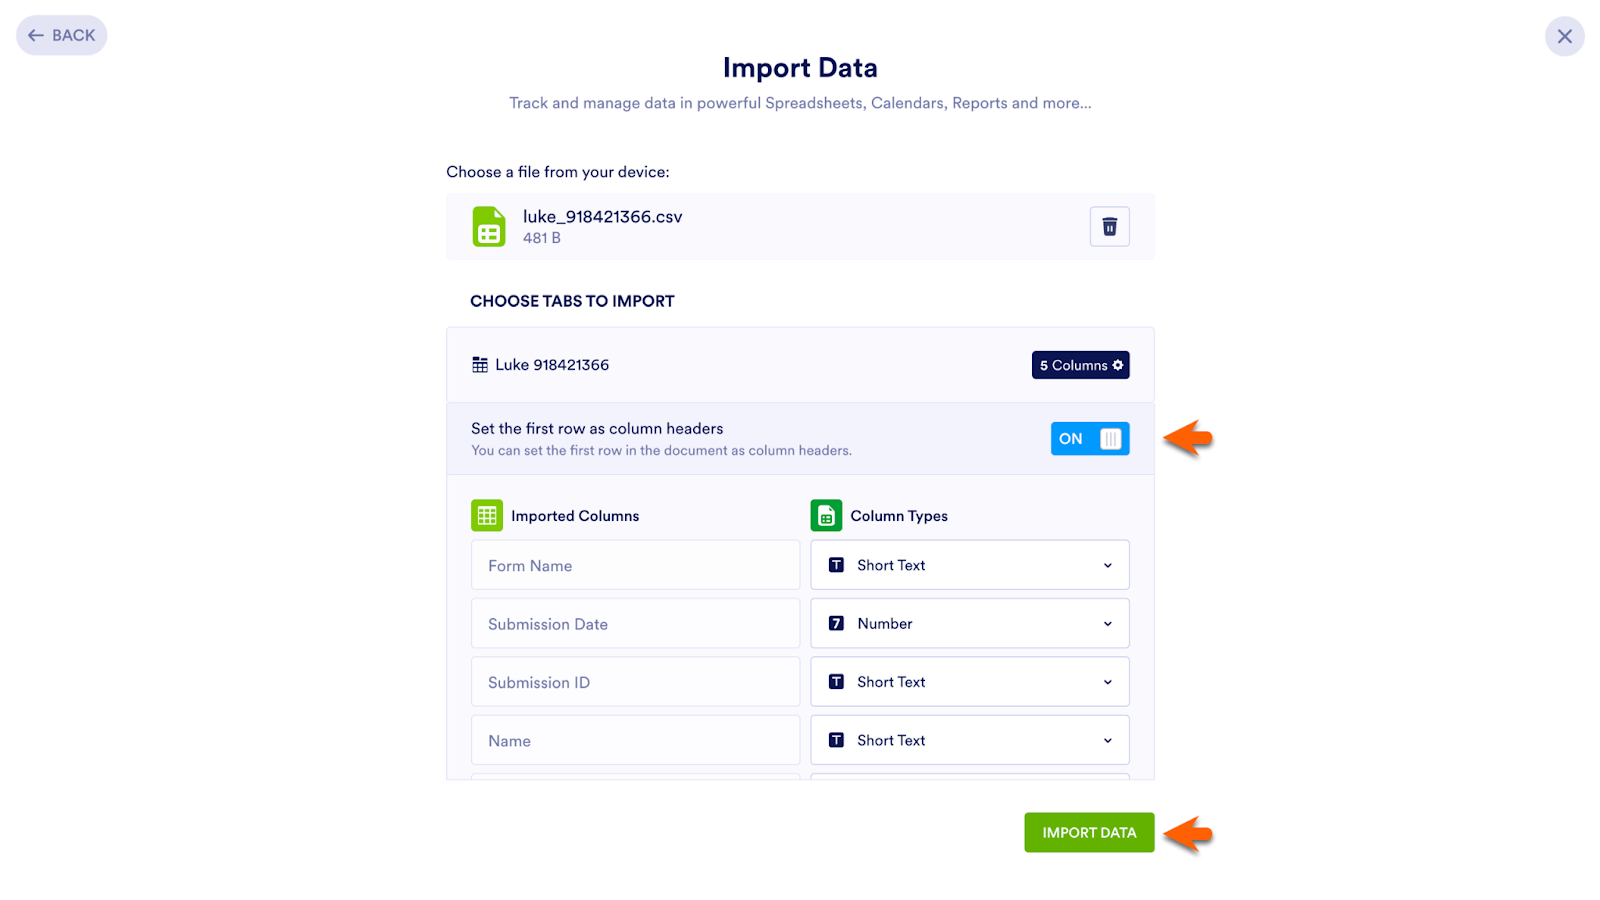
After selecting a file, configure how your data will appear in your table. Choose whether the first row of your imported file will be column headers or not, and select the column type for each type of data. When finished, click Import Data.
Pro Tip
All submission data is automatically stored in a Jotform table, but you can create a table that isn’t connected to a form and isn’t based on imported data. To create such a table, go to your My Tables page, choose Create Table, and then select the Start from Scratch option.
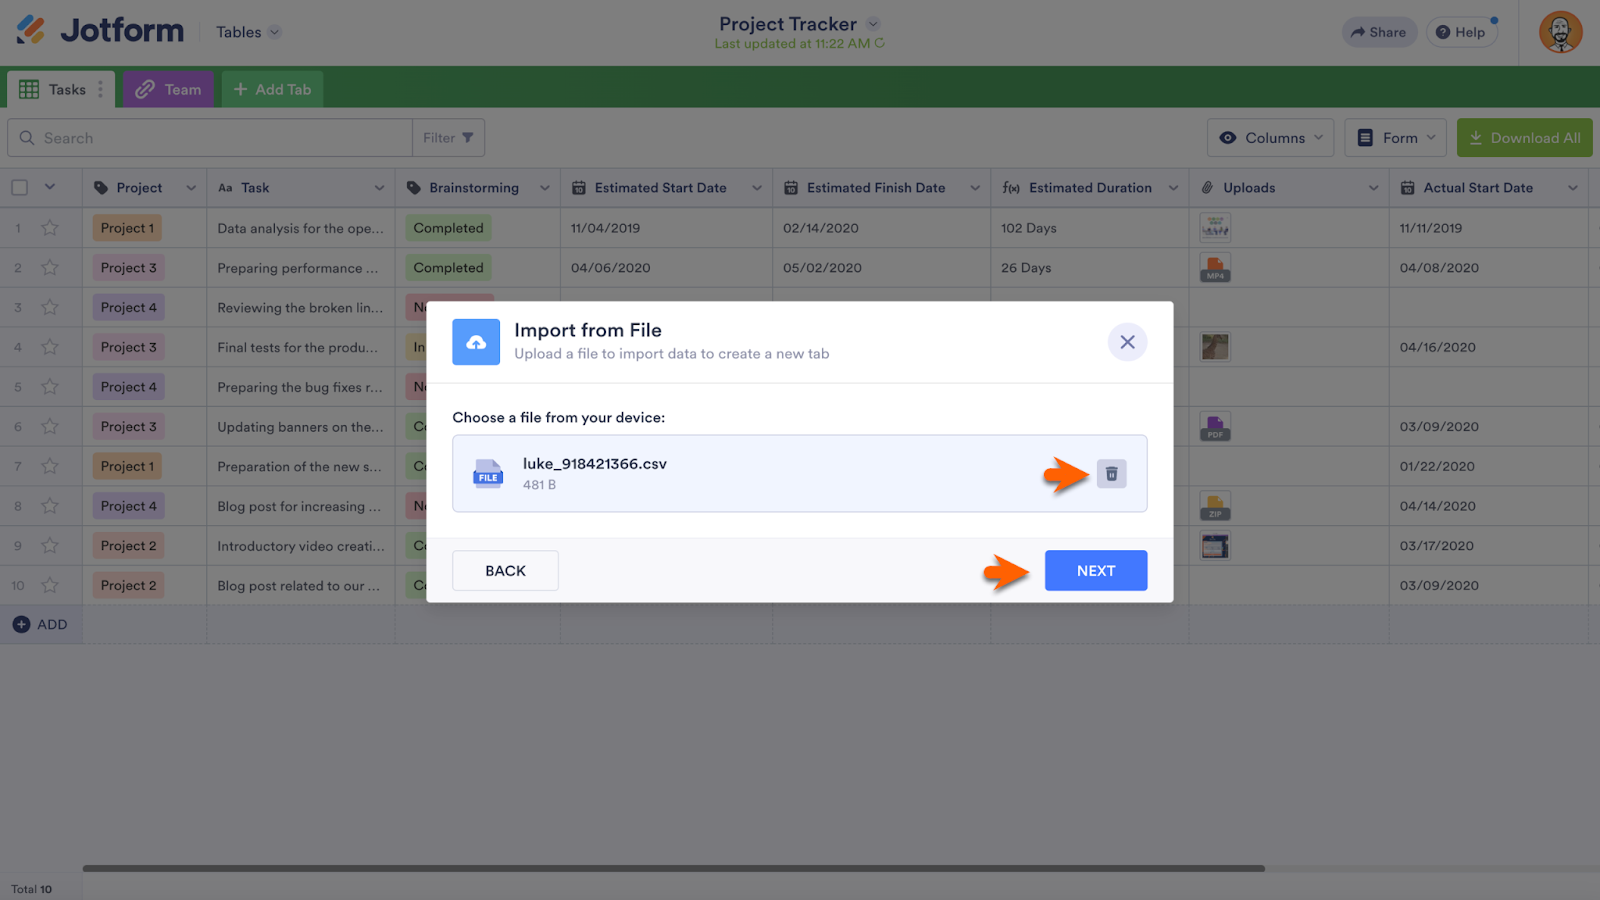
To import data into an existing table, click the Add Tab button.
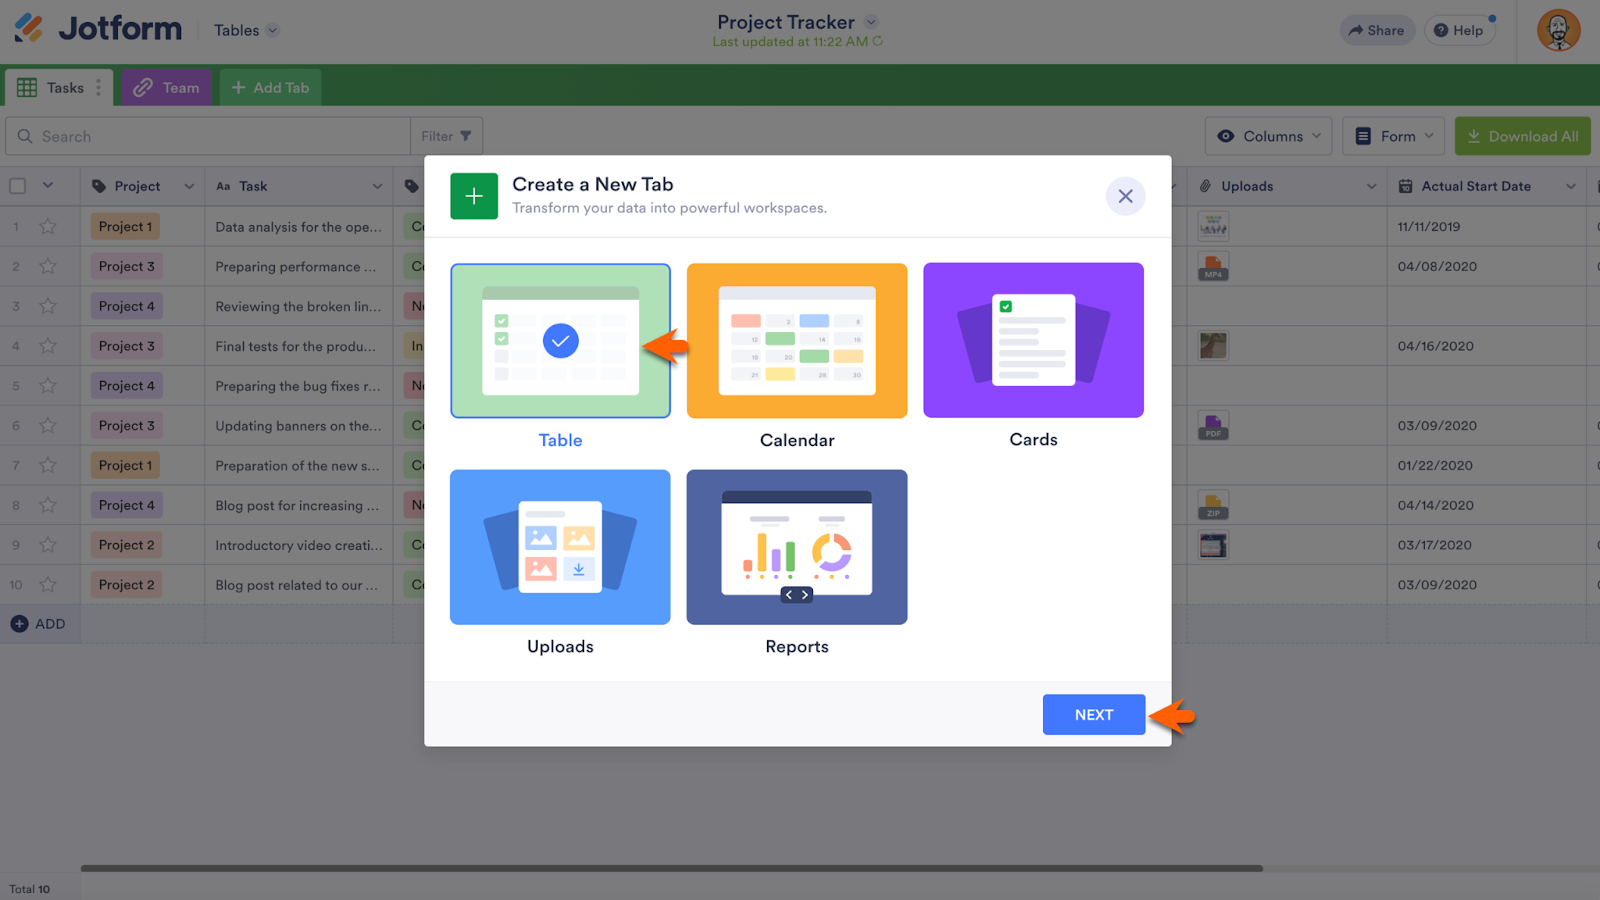
Choose Table from the provided options and then click the Next button. The rest of the process for uploading data is similar to the process for uploading into a new Table.
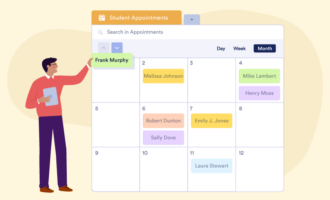
Add a new tab to your table to see your data differently
Different Jotform users like to view their data in different ways. For an alternate view of your data, add a new tab to your table.
View data by submission date with Calendar view; look at each row of submission data on a card with Cards view; view uploads with Uploads view; and automatically generate a visual report with Reports view.
On the following screen, select Import Data and then click Next. This will prompt a file upload screen. Just as before, select a CSV, XLS, or XLSX file to upload.
Confirm your file choice or click the trash can icon to select another file to upload.
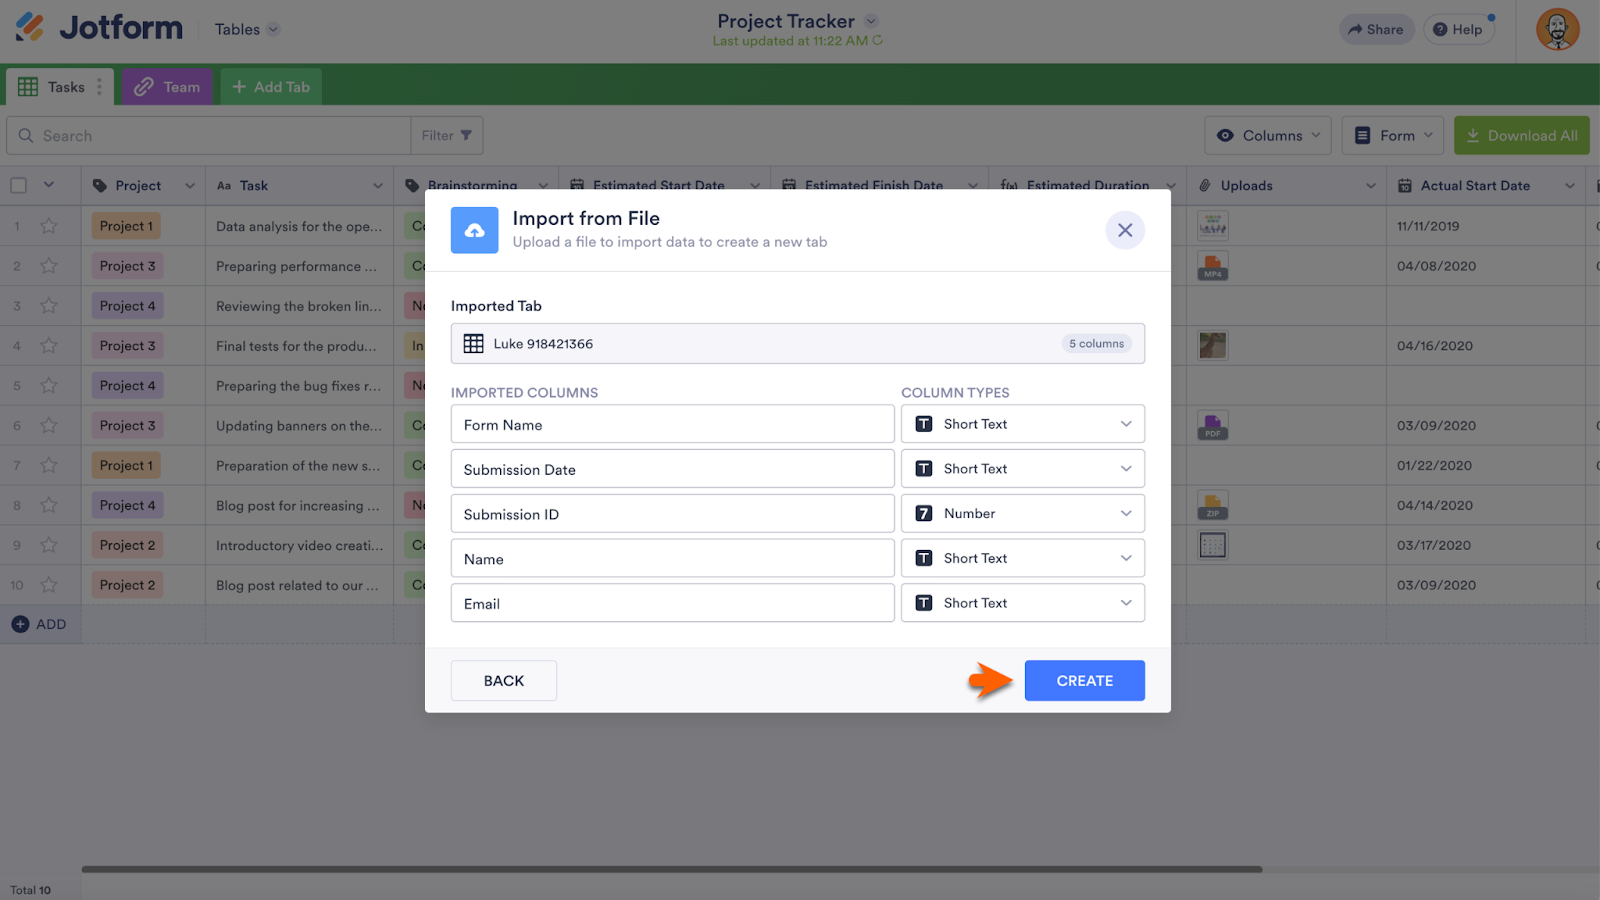
Select the proper column types on the following screen and click Create to finalize the upload.
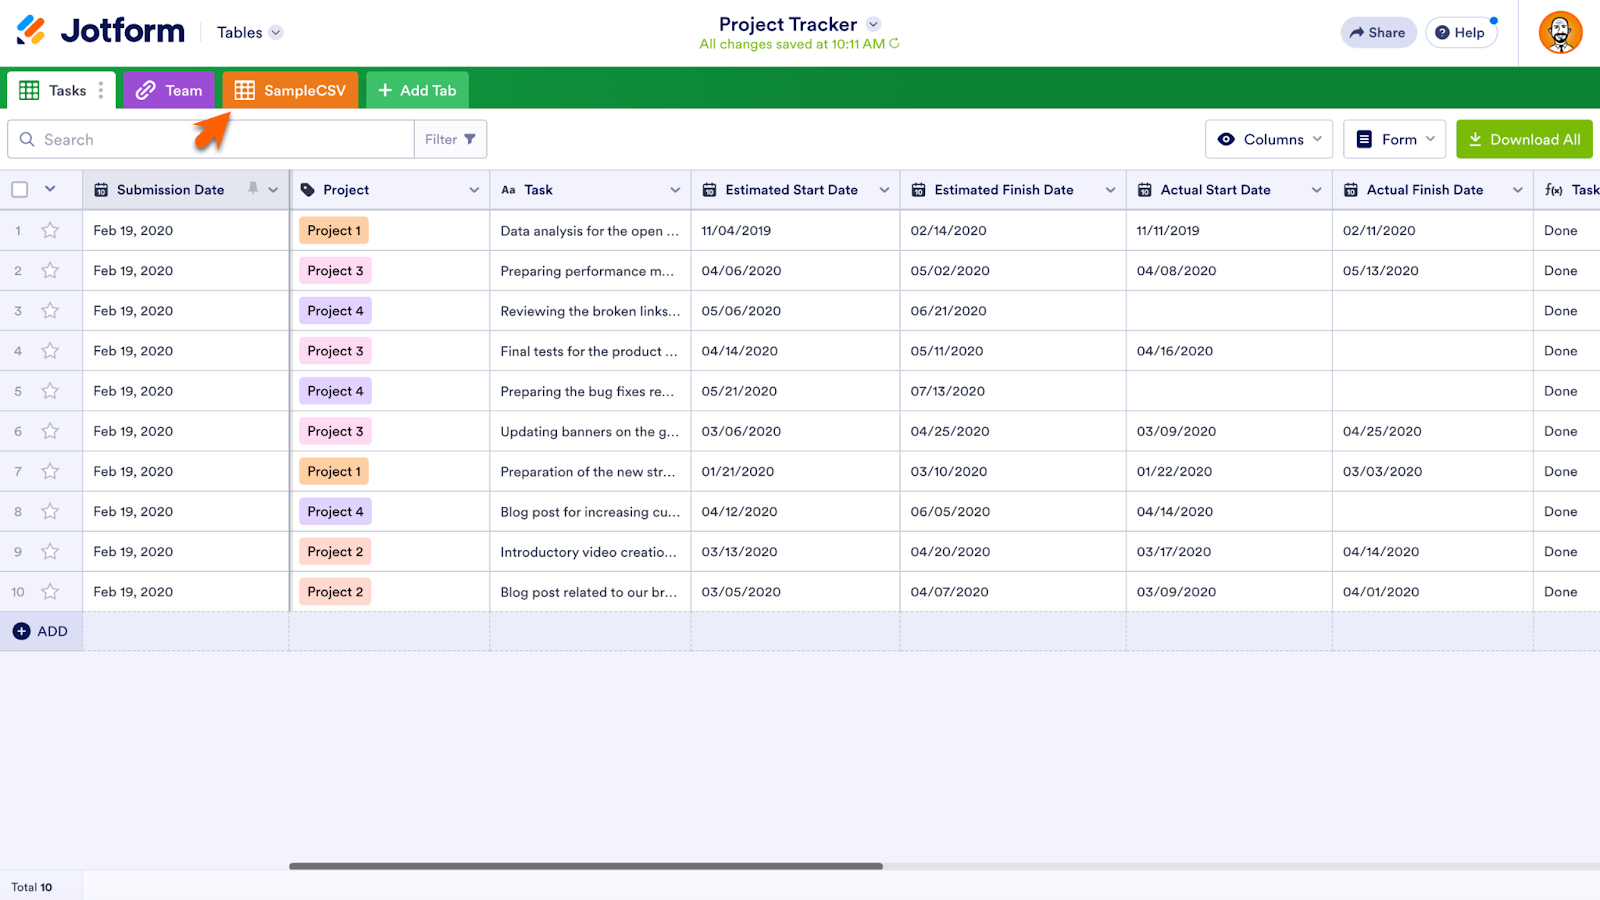
Go back to your table, and your file will be available via the tab at the top of screen.
Download table data as an Excel, CSV, or PDF file
Conversely, it’s easy to download table data as an Excel, CSV, or even a PDF file. Downloading attachments in your table is also an option. To get started, click the Download All button on the top right portion of the screen. This will show your available download options. For PDFs and attachments, downloads are sent to your registered email.
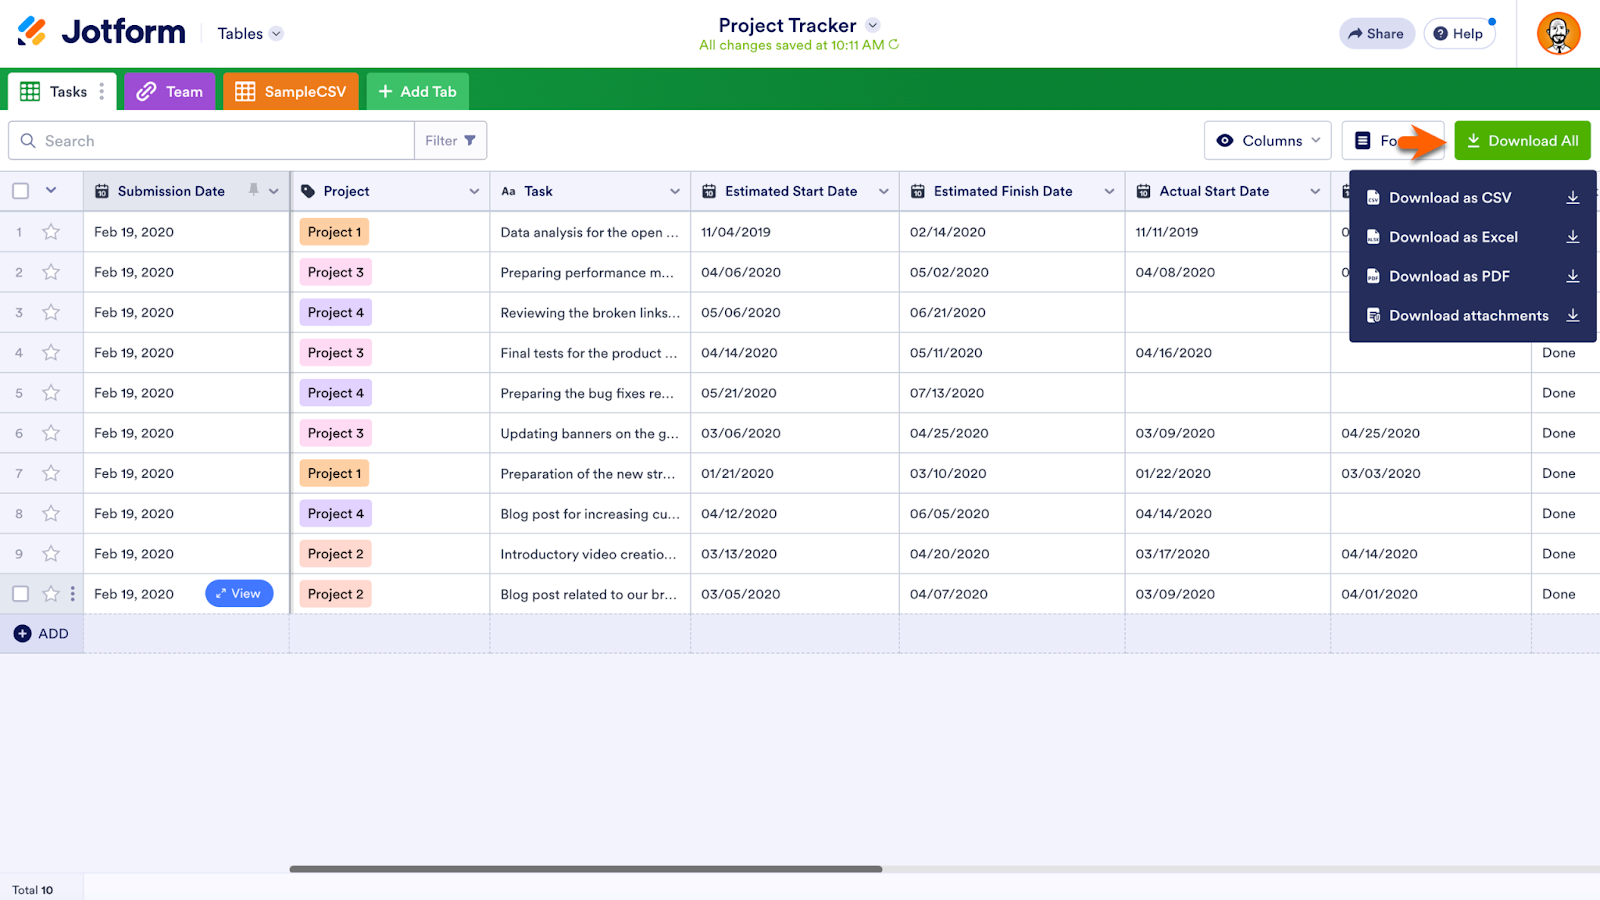
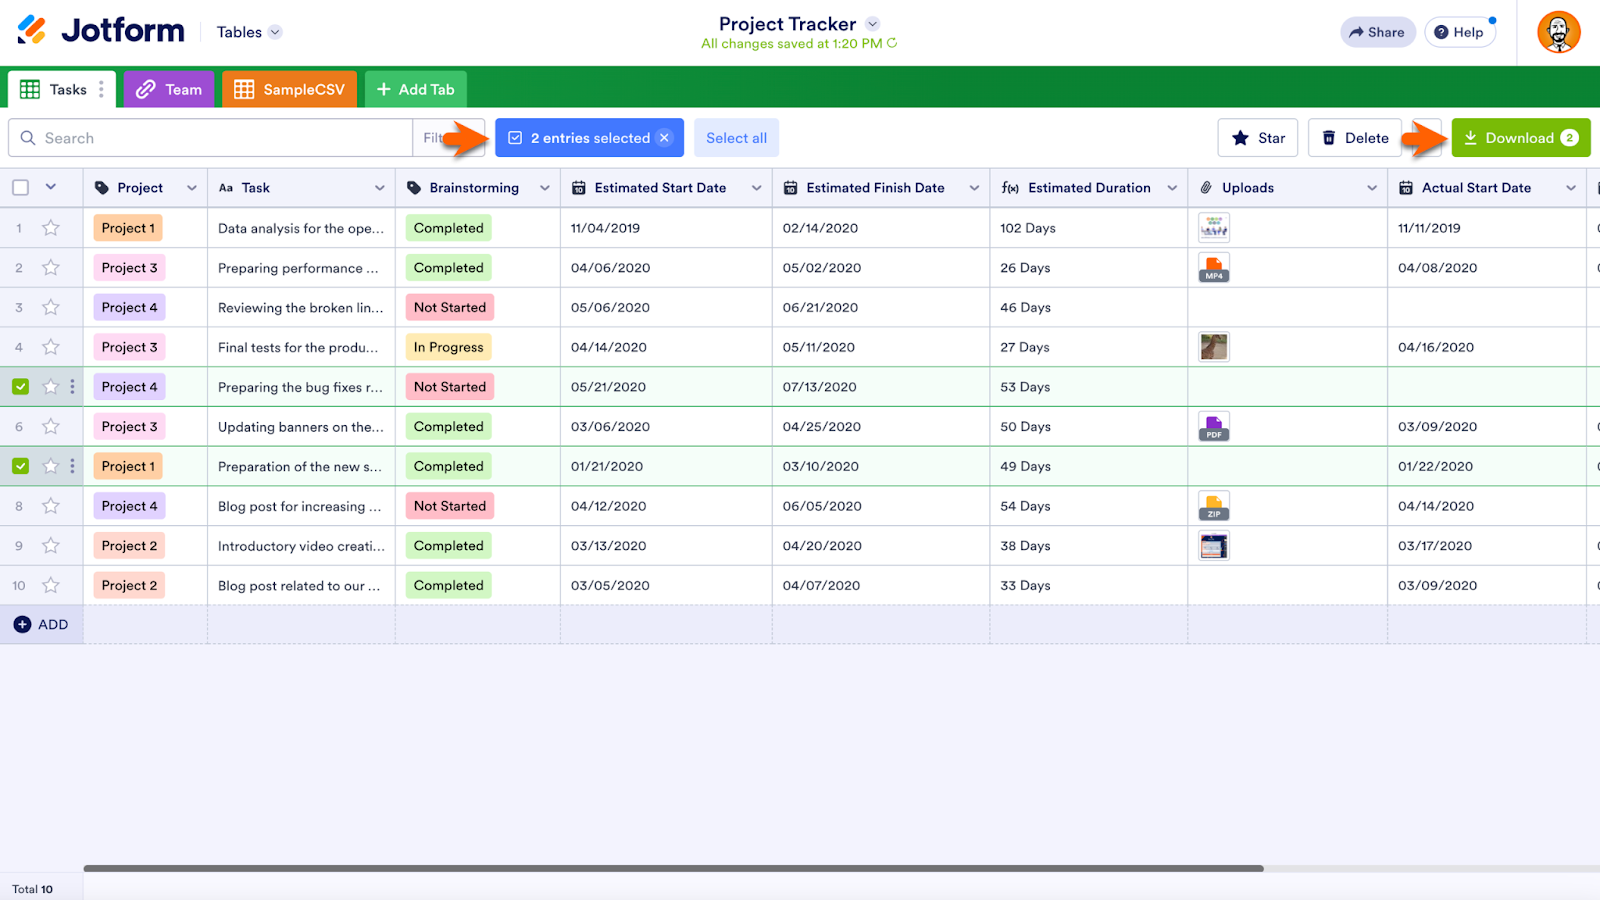
To download specific entries in your table, use the checkboxes on the far left of the table and click Download to reveal the same options: Excel, CSV, PDF, and attachments.
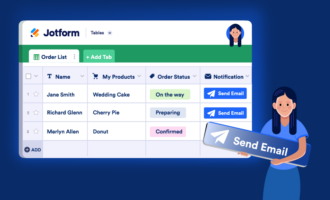
Action Buttons: Send Email and more with one click
Jotform Tables Action Buttons add efficient one-click functionality to your database. Instantly send files and data to your favorite apps, prefilled forms to contacts, notification and autoresponder emails, and more.
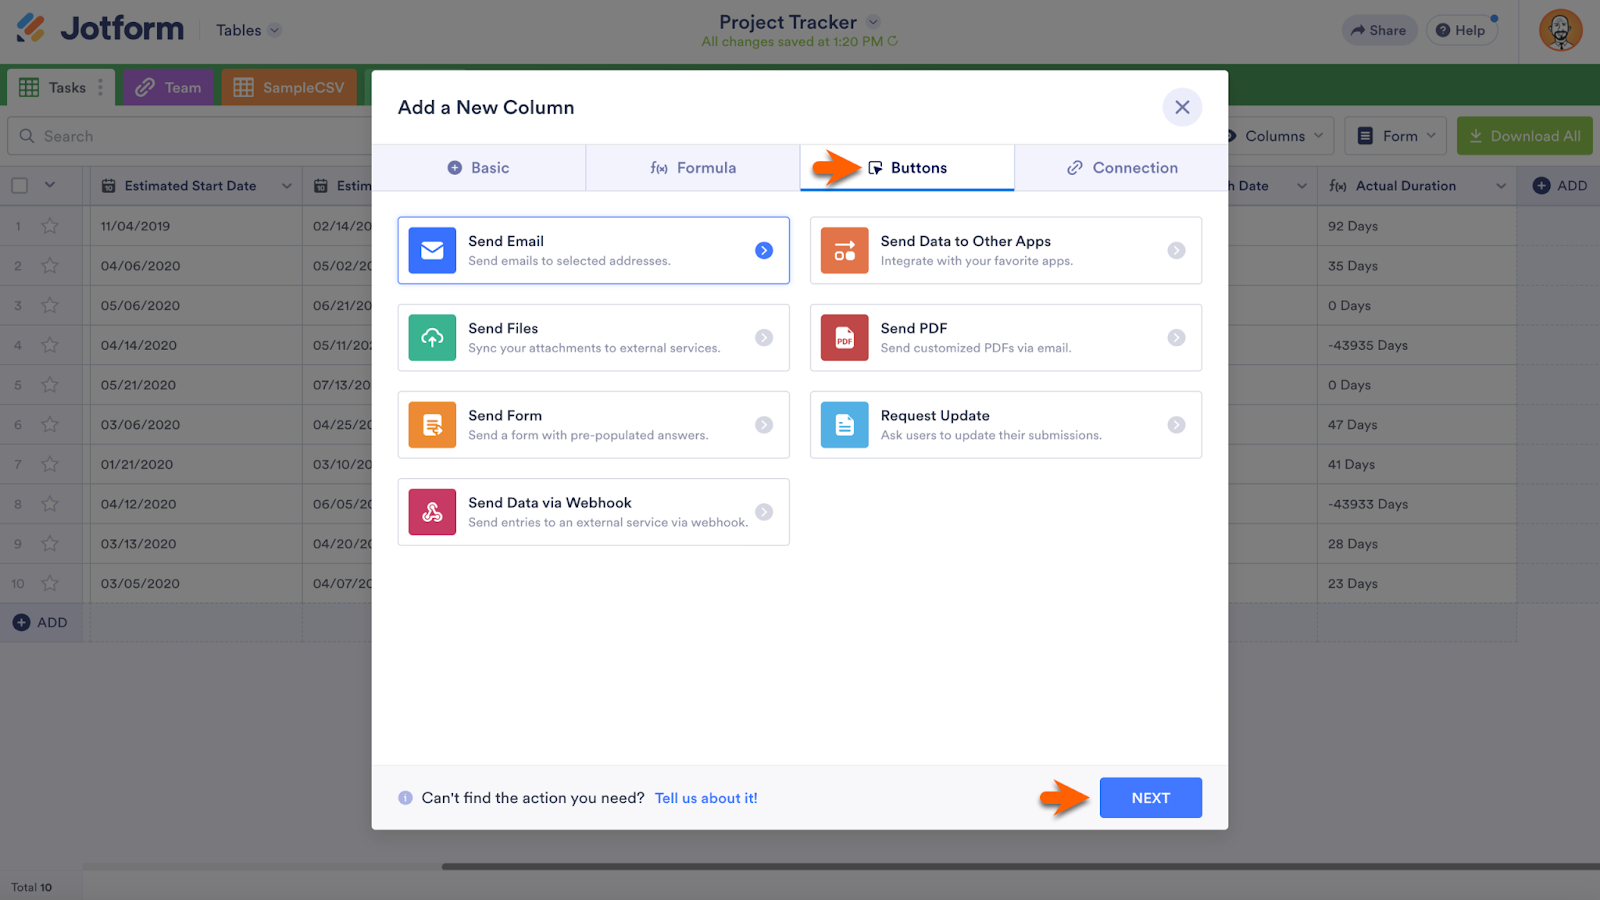
To add an Action Button to a table, first add a column using the Add button to the right of the table’s existing columns.
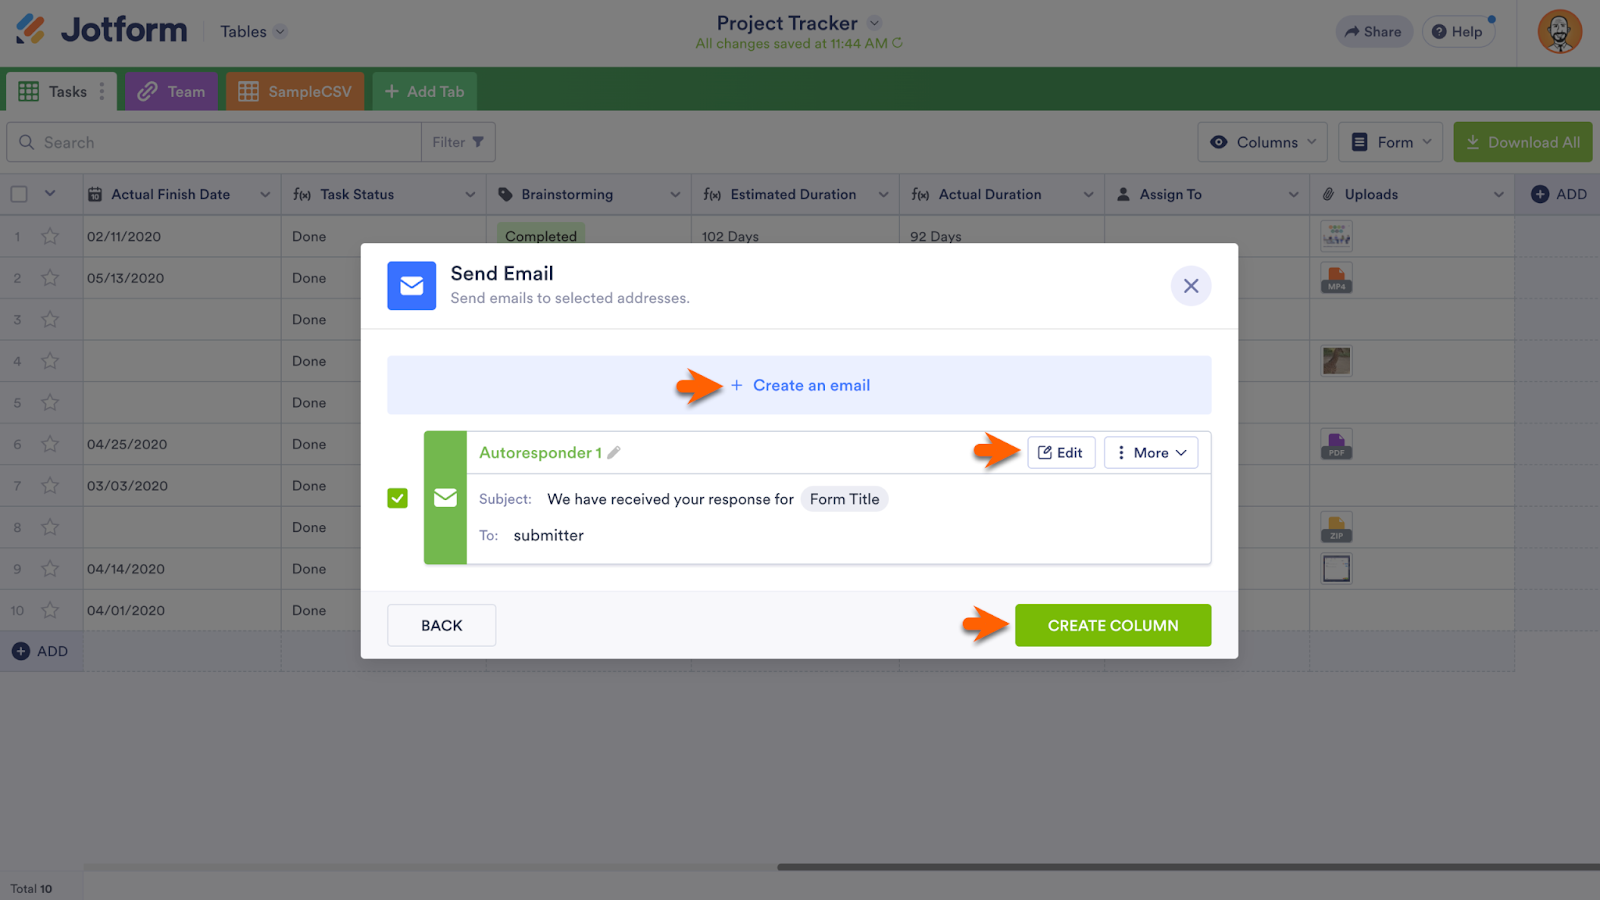
Send Email Action Button
Go to the Buttons tab on the following screen and pick from the menu of available Action Buttons. In the example below, Send Email has been selected. Click Next to name your column before going to the following step.
Add an autoresponder or notification email with the Create an Email button at the top of the following popup menu. Use the Edit button to customize the email. The More button will duplicate, rename, or delete the email. When you’re all set, click Create Column.
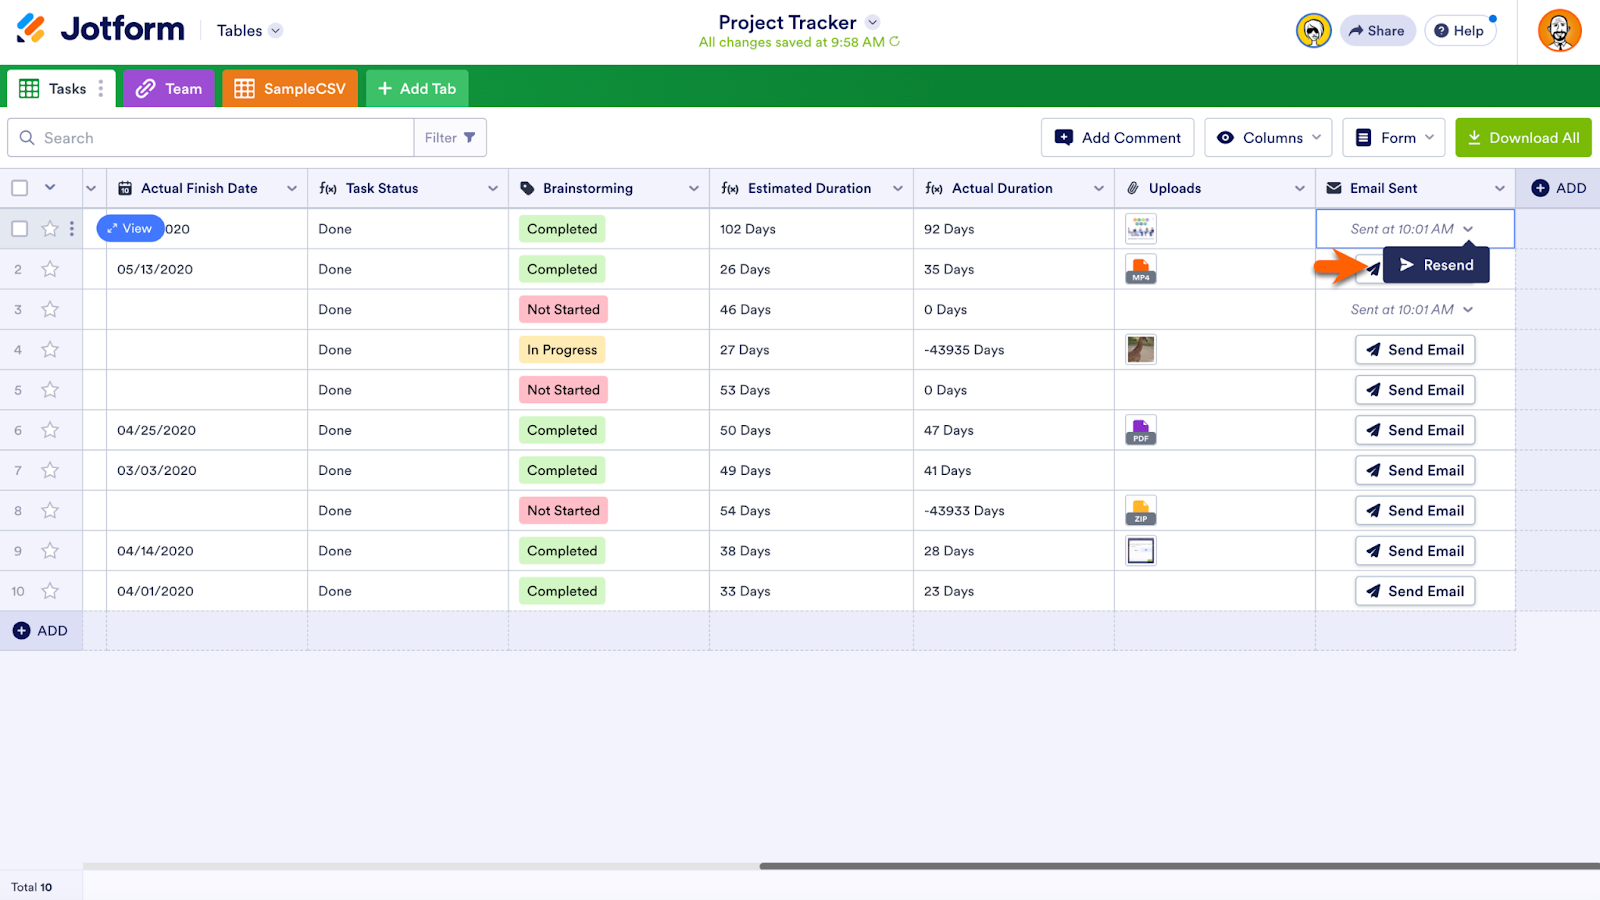
Now each cell in the column contains an Action Button that will send your email in one click. Once the Action Button has been used to send an email, the cell will display the time it was sent. To resend the email, open the dropdown menu for the sent email and then click the Resend button that appears.
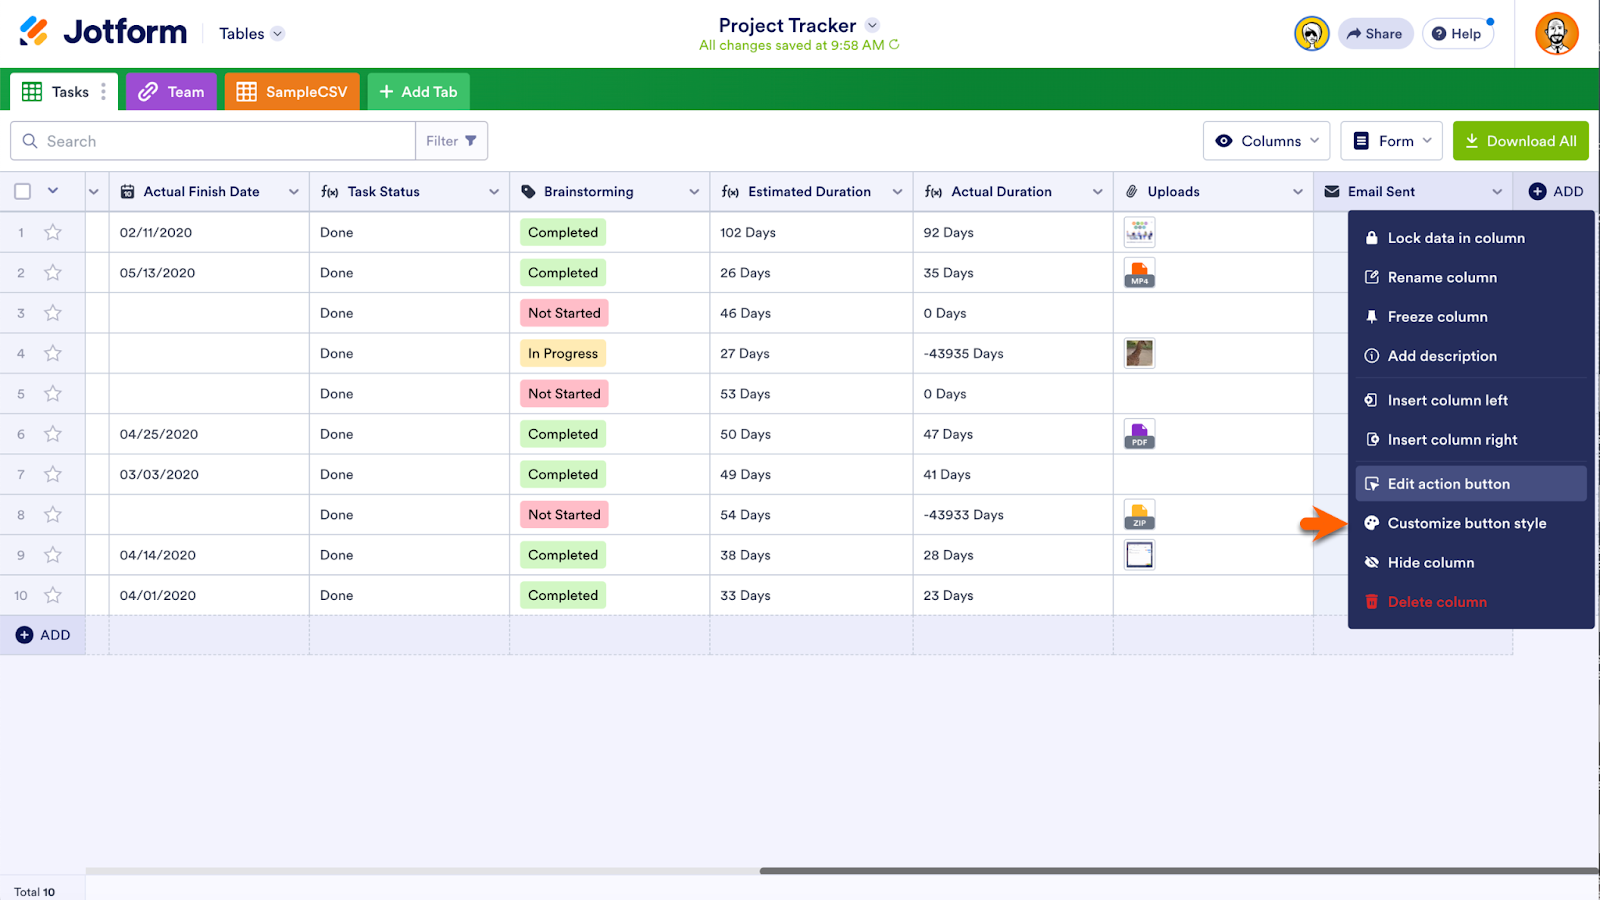
To edit your Action Button or customize the button style, open the dropdown menu at the top of the column.
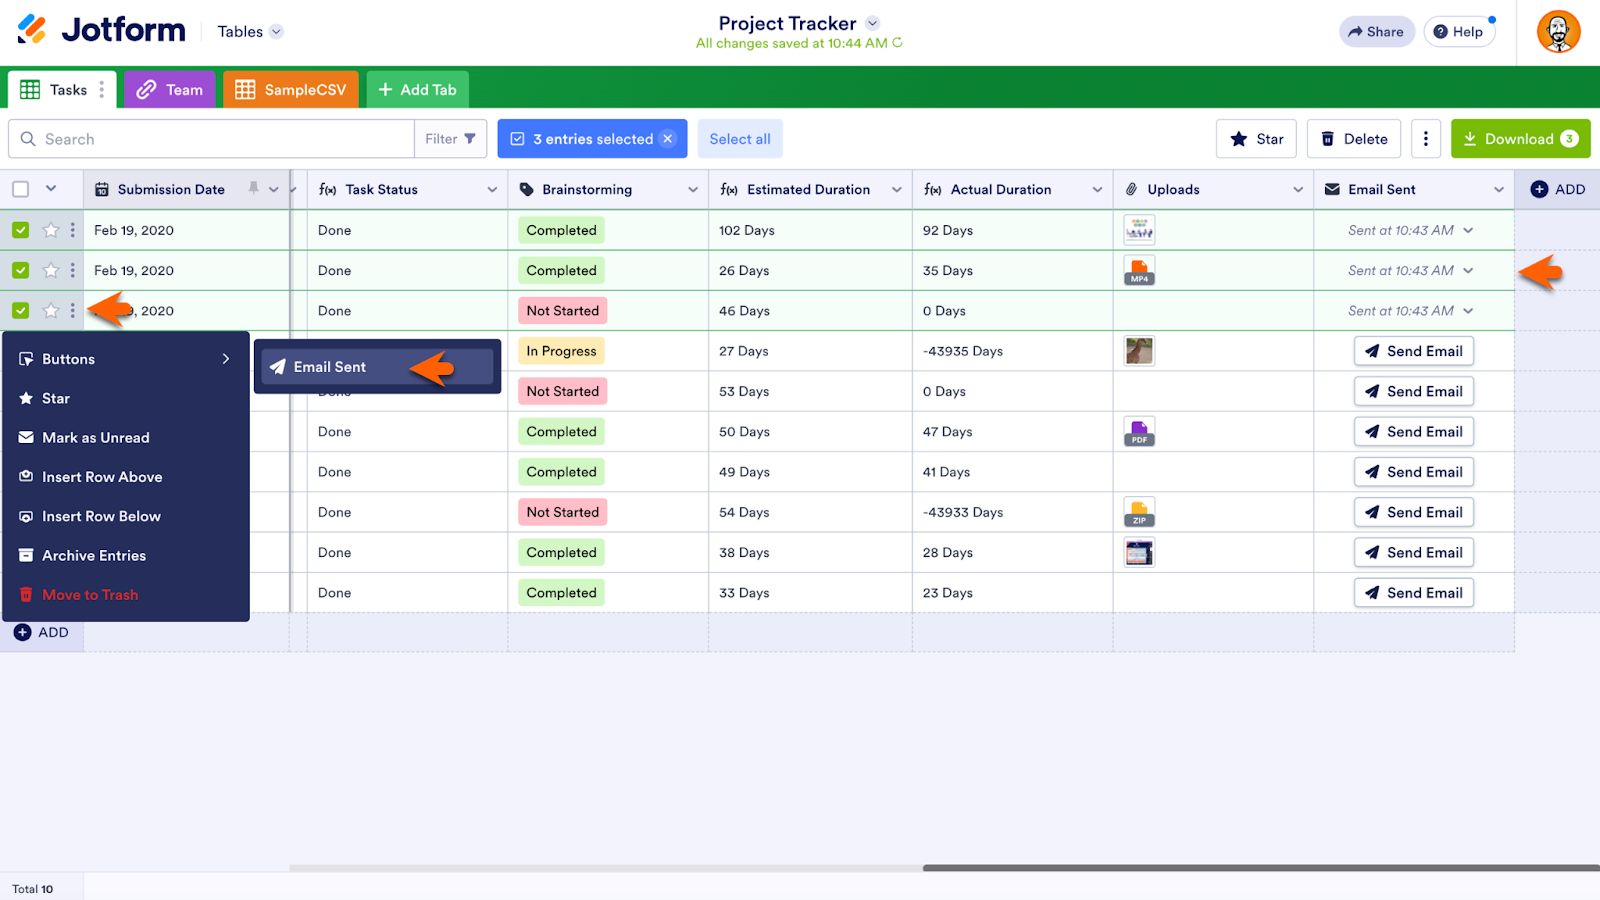
To activate multiple Action Buttons at once, use the checkboxes on the left of the table to select rows of data. Click the vertical ellipsis next to one of the checkboxes to open the context menu. Click on Buttons, and then select the action you’d like to perform. The Action Buttons will be activated simultaneously.
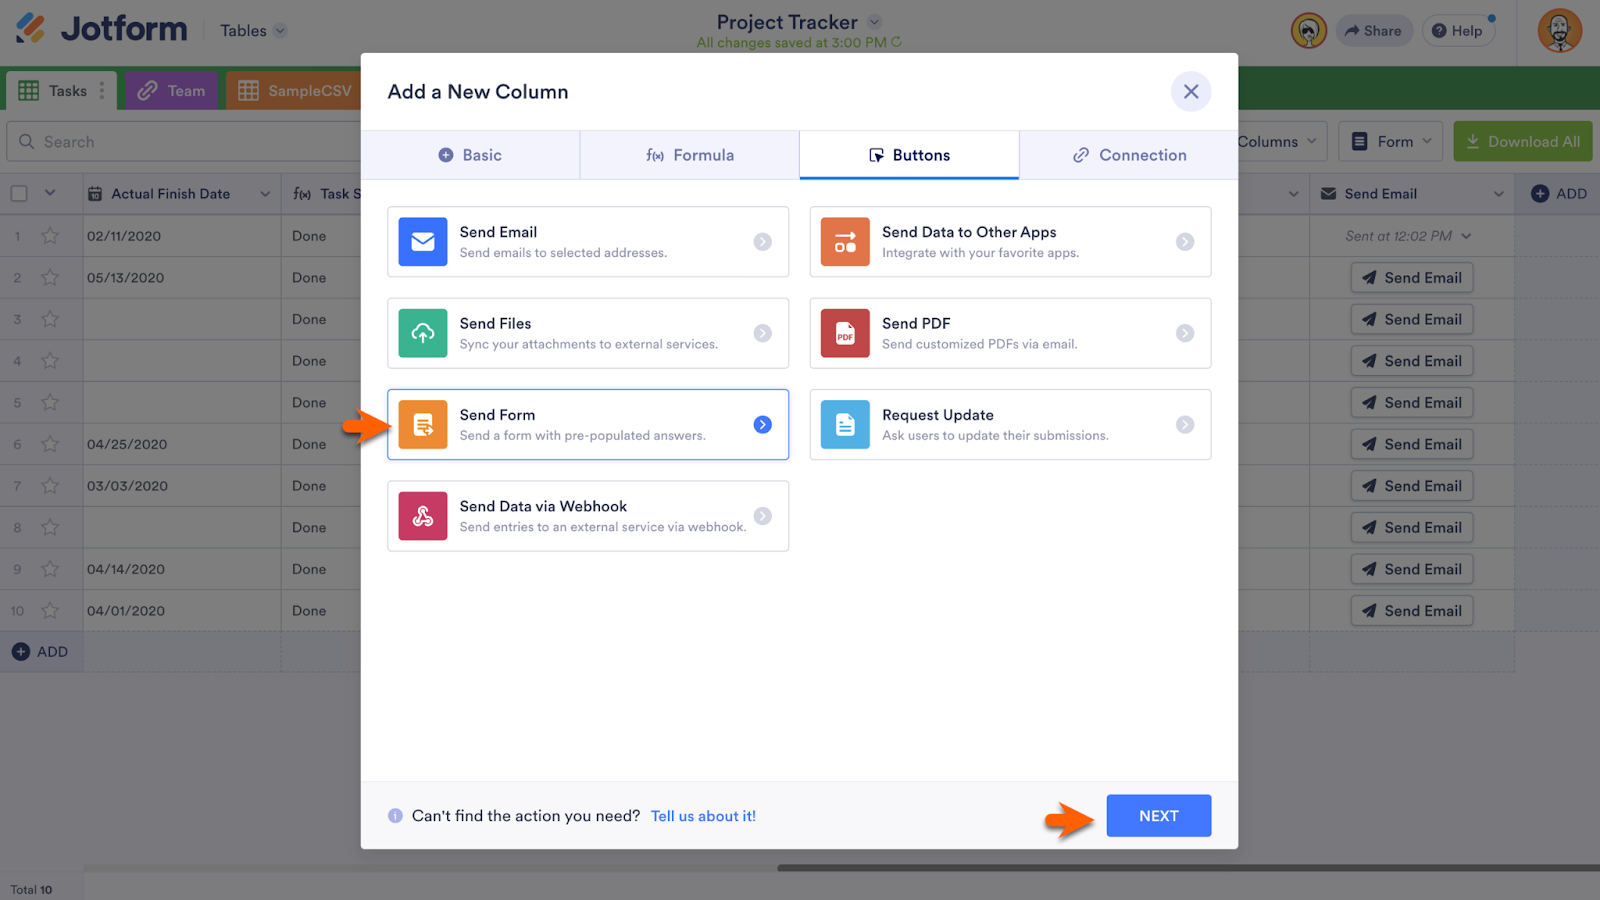
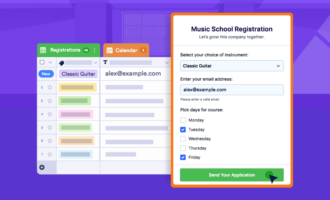
Send Forms with Prefill Action Button
Put data stored in your table to good use by sending prefilled forms with just one click. It’s easy to do with the Send Form Action Button.
First, use the Add button on the right side of your table to add a column. Go to the Buttons tab and select Send Form. Click Next to name your column and proceed to the following step.
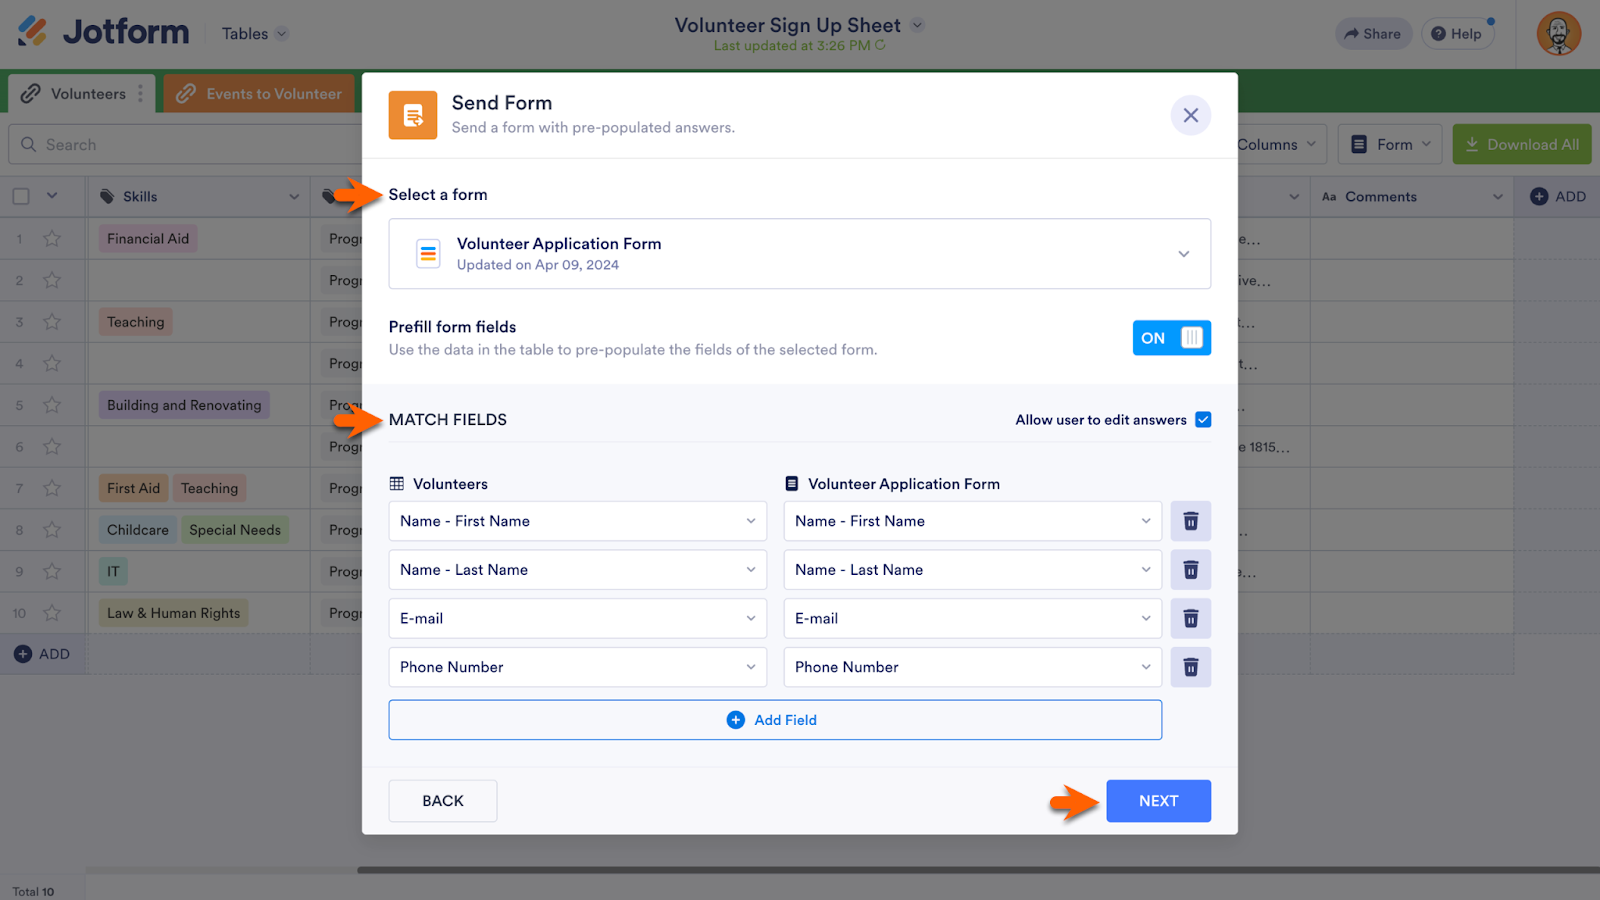
On the screen that follows, select which of your online forms you’d like to send. The Prefill form fields button is switched on automatically. Match the fields that are to be prefilled, and click the Next button.
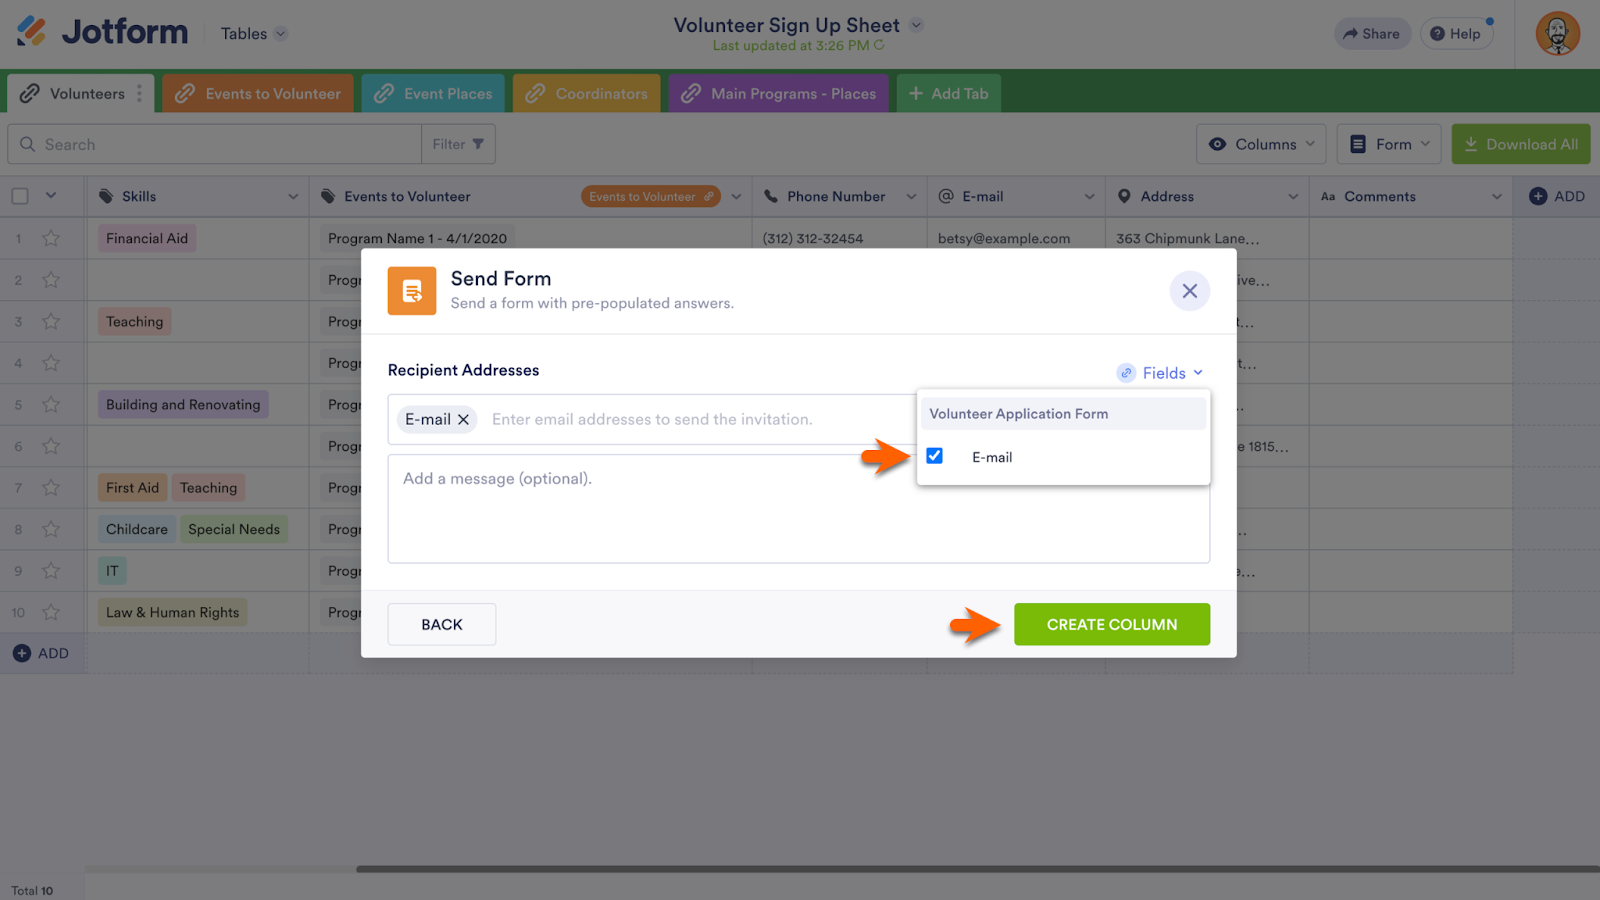
Finally, select how you’d like to send the form. This example form/table combination has email entries for each submission, so the email option shows as available in the Fields dropdown menu. The Send Form button will send the form via email addresses listed on each row of your table. You can also manually add up to three email addresses. Add an optional message if desired and then click Create Column.
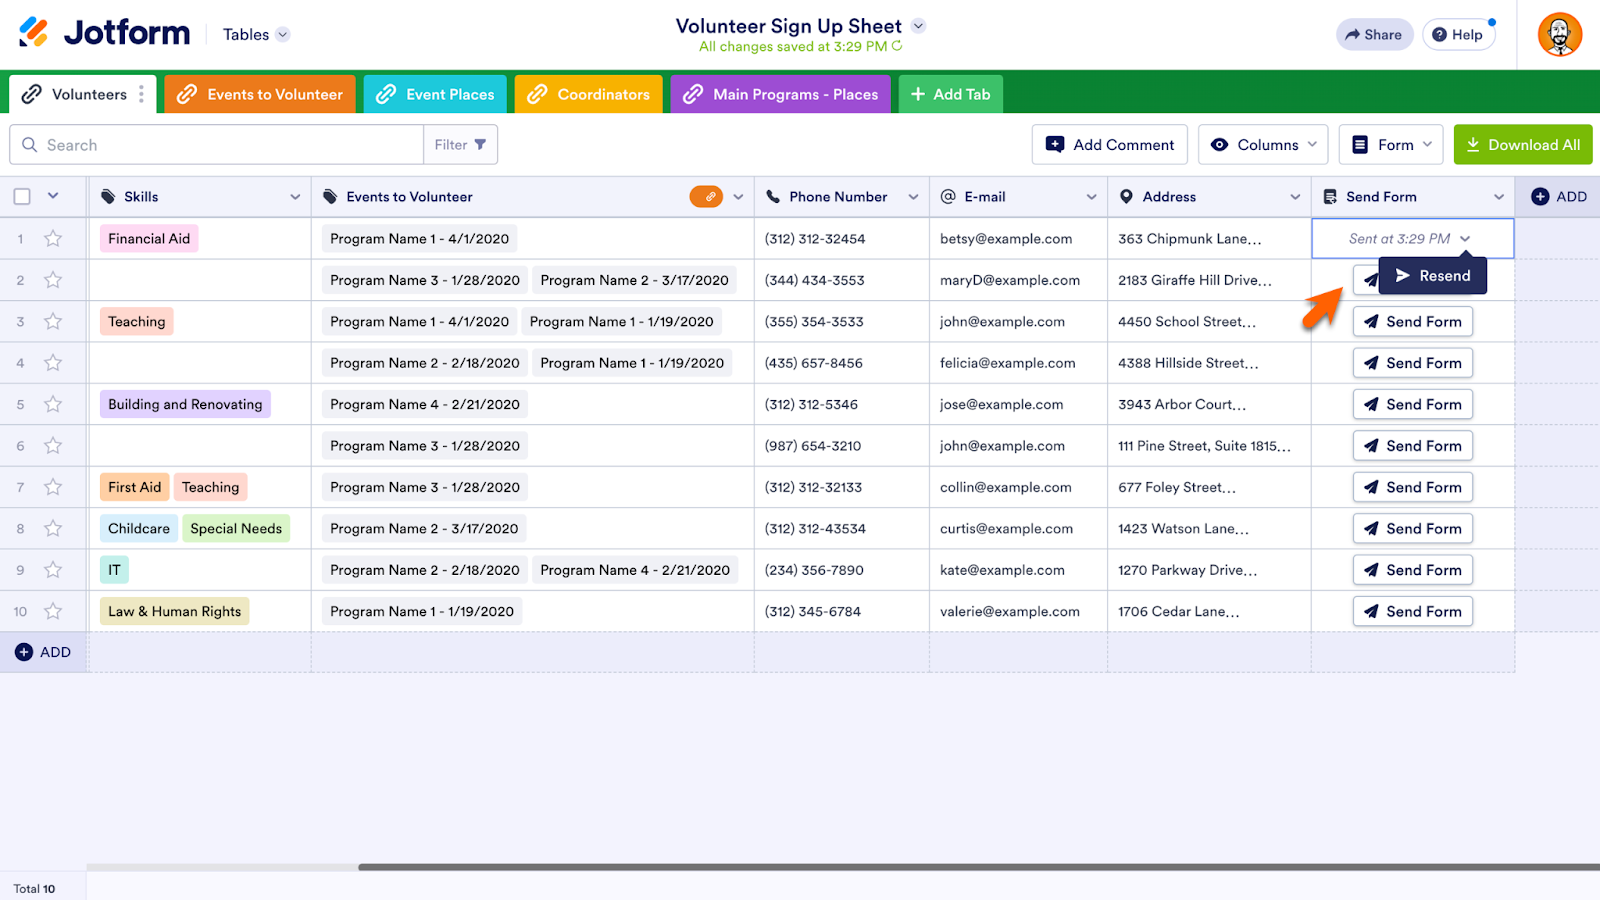
The Send Form Action Button is now operational. Just like the Send Email Action Button, a time stamp appears after you click the button. Open the dropdown menu next to the time stamp to use the Resend button. Open the dropdown menu at the top of the column to edit the Action Button or customize its appearance.
Conclusion
Jotform is excited to see how our three new features for Jotform Tables can improve your data management and team collaboration. But we also know that established and essential Jotform features play a big role in streamlining workflows and getting more done.
In fact, as Jotform has launched more products in recent years, there are many features we think more users should know about. That’s why Jotform has produced an array of new customer education material. Jotform for Beginners, Vol. 1 and Vol. 2; Jotform Enterprise for Beginners; Jotform Academy; and the latest, The Ultimate Guide to Online Forms, all help you build powerful workflows.
We’ve put team collaboration with Jotform Tables in the spotlight because Jotform knows it’s easier to get more done with a cohesive team — and possessing a tool built for teamwork, like Jotform Tables, can set your organization apart.
Want to add to the conversation? We’d love to see your comment below. If you have a story to share about how you use Tables to boost team productivity, please fill out this short form and tell us all about it.


Send Comment:
1 Comment:
April 26, 2024
This is a fantastic overview.
Thanks for a well communicated overview. My inbox zero discipline tried to delete this 3 times but the email kept saying, "Read me, you will use this".
Internally I keep directing our team toward Jotform... the capabilities mount.