The very first iPhone was released in June 2007 and eventually sold more than 6 million units, changing the smartphone landscape forever. But it wasn’t until the App Store launched a year later that the potential of what you could do on your smartphone really came into focus.
Productivity software isn’t the same as the most revolutionary cultural innovation this century, but the lesson remains: Great products can be considerably more useful with product add-ons that unlock their power.
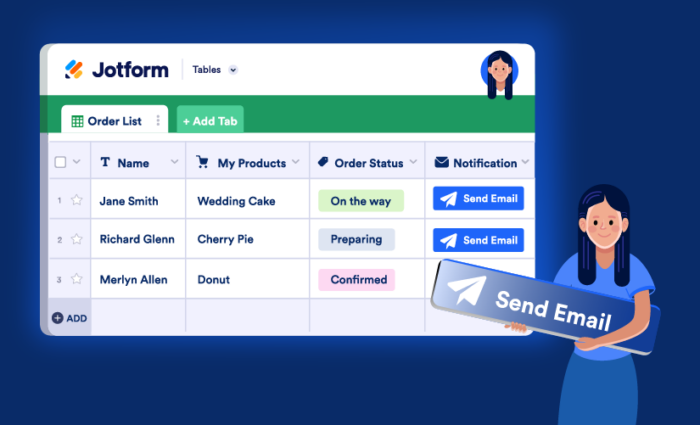
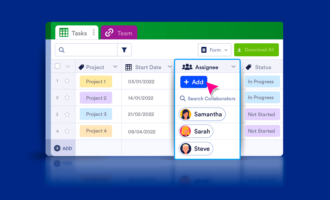
We’re betting that our new Action Buttons will have the same kind of turbocharging effect on your Jotform Tables workflow, enabling you to complete all of your tasks from one workspace.
No more shuttling back and forth between products or third-party apps to perform functions involving the same set of data. Now you can correct submission errors; request updates from submitters; send your data to other parties, apps, or integrations; create PDFs; and more, all from the comfort of Jotform Tables.
We’re making an efficient platform even more powerful for the work you do everyday. With the touch of an Action Button, you can
- Send emails directly to submitters
- Ask submitters to update their original form submissions
- Funnel your data directly to your cloud storage, CRM, or project management tools for seamless execution
- Send PDF documents and share updates directly from your Jotform Tables workspace
- Ask previous submitters to submit new or alternate forms
- Do more with Jotform Tables — whether you’re collecting data via form submissions or using your tables as a data management tool


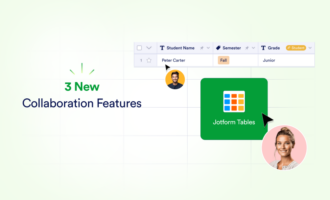
How Action Buttons will turbocharge Jotform Tables
Since its 2020 debut, Jotform Tables has helped you save time and streamline tasks by collecting your form submission data in one place, doubling as a spreadsheet and a team collaboration and project management workspace.
And yet, there was a workflow disconnect.
You still had to open other Jotform or third-party products to complete your work. For example, after processing data in Jotform Tables, you had to send that data to a third-party service manually. Or if you needed to send out PDF documents or certificates post-submission, you had to download them from a table and email them separately.
Similarly, to trigger emails and form integrations for a second time, you had to open the original form in edit mode and make the necessary modifications to it.
Now, with Action Buttons like Send Email, Send Data to Other Apps, Send Form, Request Update, and more, you’ll be able to take action directly from Tables whenever you need to without having to access your original form.
Walkthrough of Action Button features
There are several types of Action Buttons available in Jotform Tables. Let’s dive into how you can set up these buttons and make your life (and your team’s lives) easier.
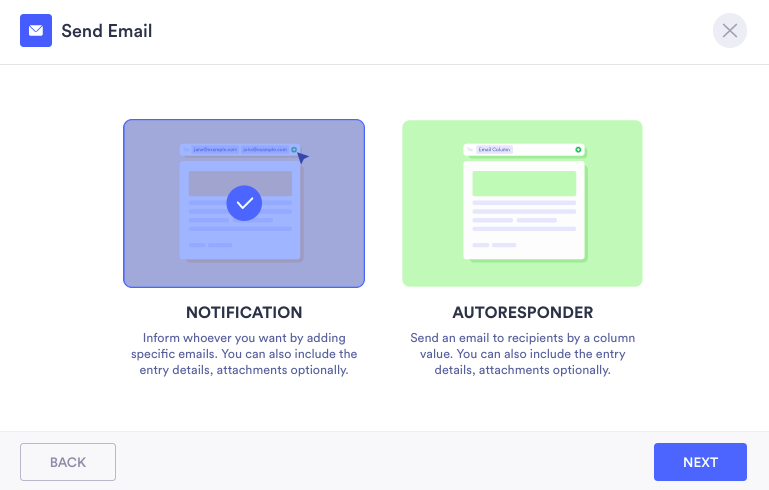
Send Email button
If you’ve spent time collecting data via forms, chances are you’ve had to send an email to your users after receiving their submissions.
Now you can send custom emails to your users via an Action Button. You can also create form notification/autoresponder emails for colleagues within your table, such as an order or application update, payment confirmation, or tracking number.
To set up the Send Email button, access your table in Jotform Tables.
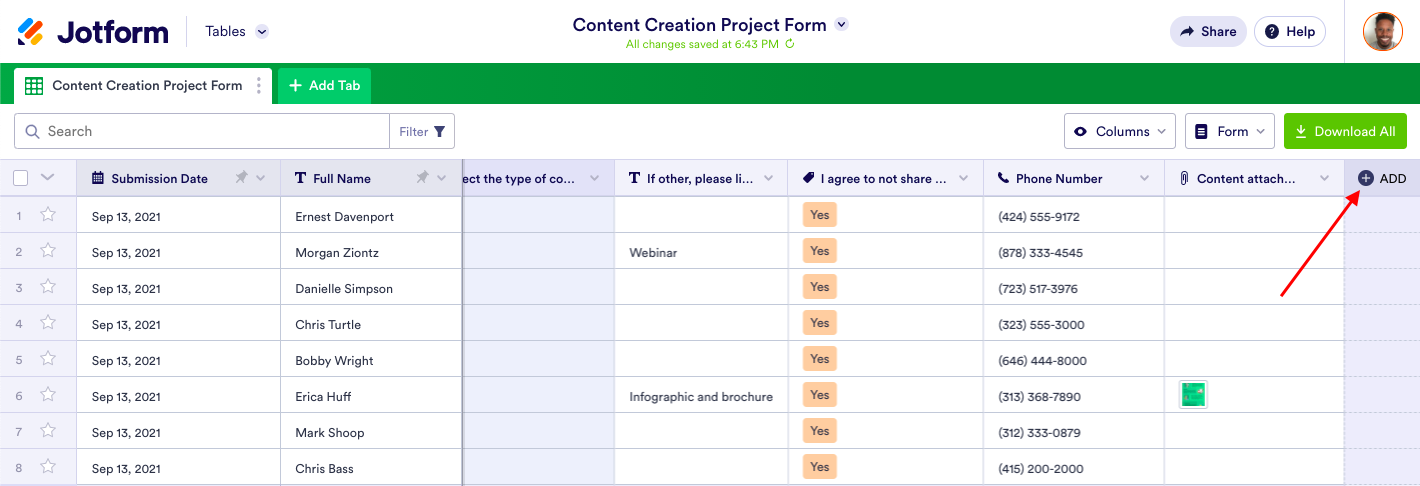
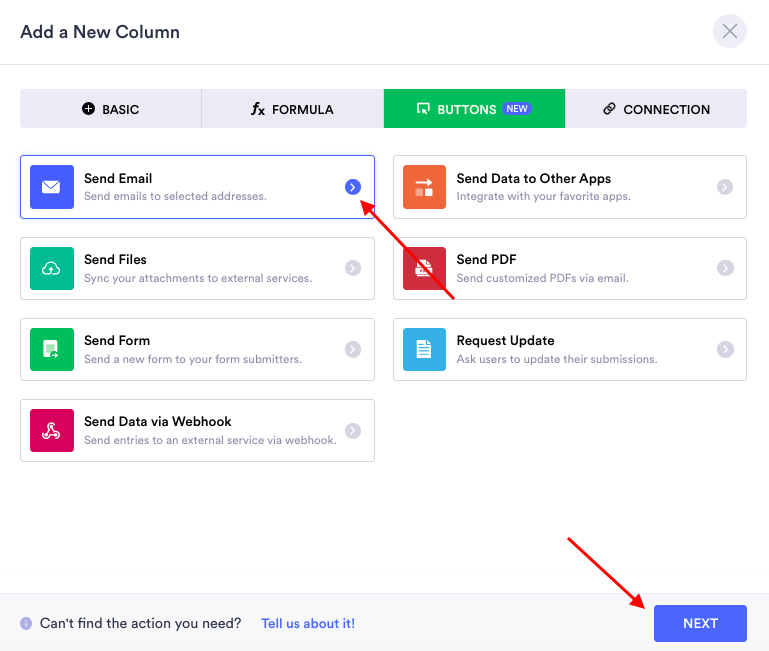
Add a new column. Select Send Email from the available Action Button options and click Next; then name your column.

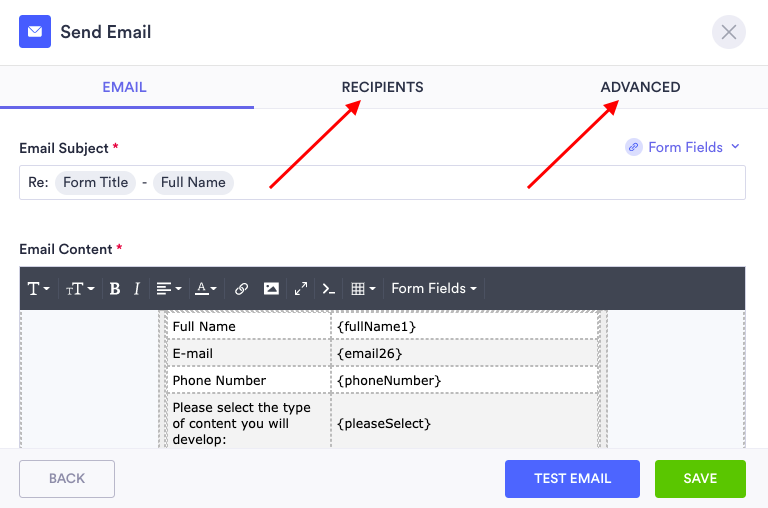
At this point, you’ll have the opportunity to create and edit notification emails for internal peers or third-party collaborators, electing to send full entry details, just some, or none. You can also send and customize autoresponder emails that will go to any of your form recipients. And you can do all of this from your table.
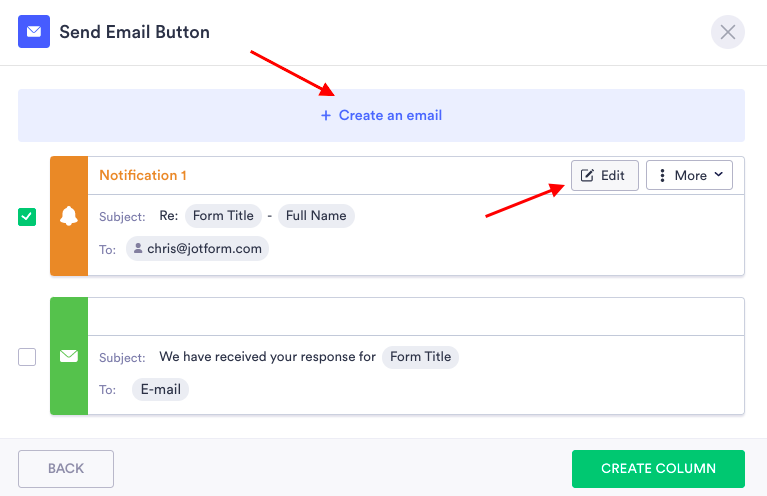
All the functionality you’re used to having in the Settings/Email section of the Form Builder is here for you through Action Buttons.
You’ll be able to customize all aspects of your emails, including your list of recipients and advanced actions like sending upon form submission/edit, attaching PDFs, and enabling form changes in the email content.
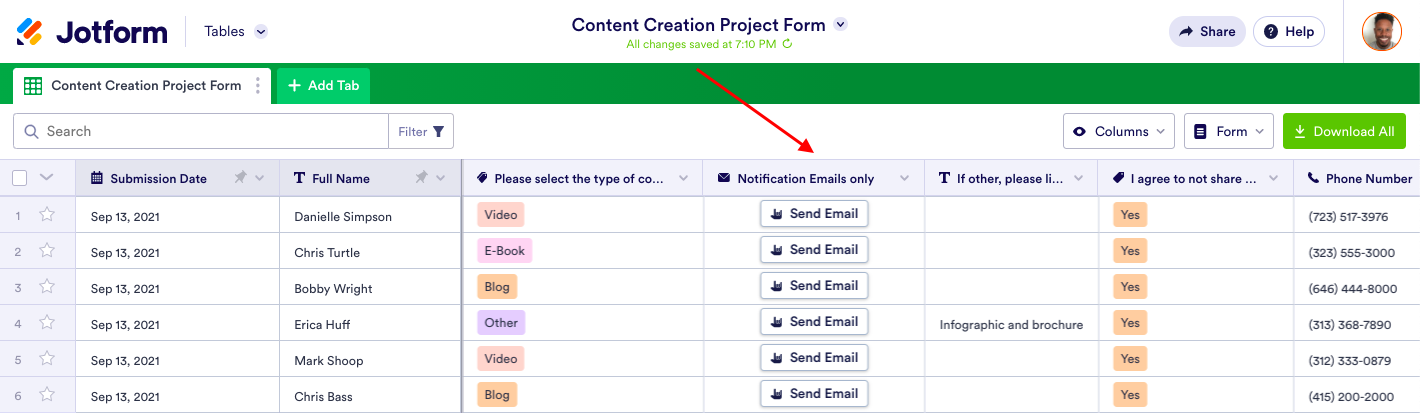
Once you’ve saved your email preferences, the new Action Button column will appear in your table.
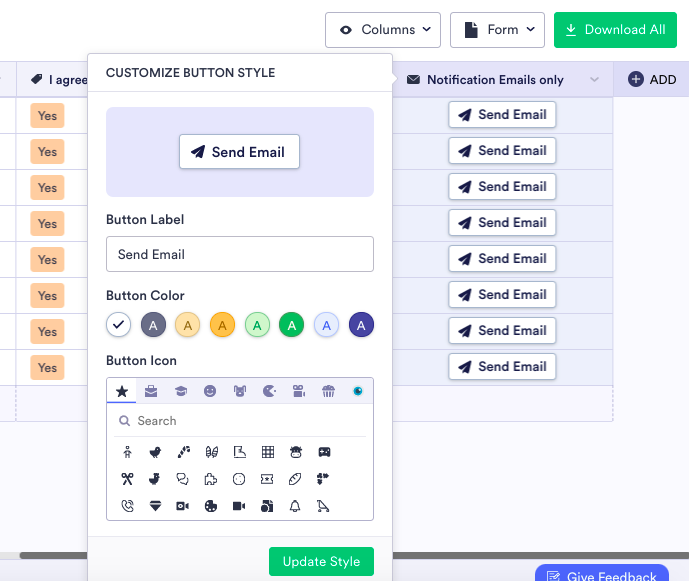
To help you be as productive as possible, you’ll have the option of customizing your Action Buttons. You can do this by clicking on the dropdown at the top of the column and selecting the Customize button style option.
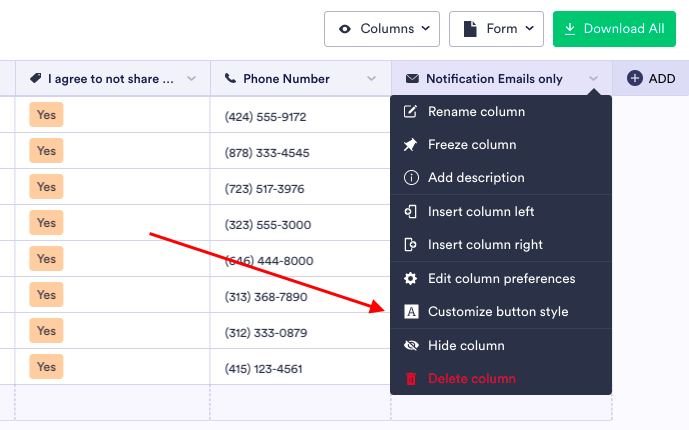
Whether you’re an educator, HR professional, or e-commerce marketer, you work better when you can customize your work environment to fit your style and requirements. By customizing your action button name and color, and even selecting an icon for it, you’ll feel more comfortable and inject a little fun into your day-to-day tasks.
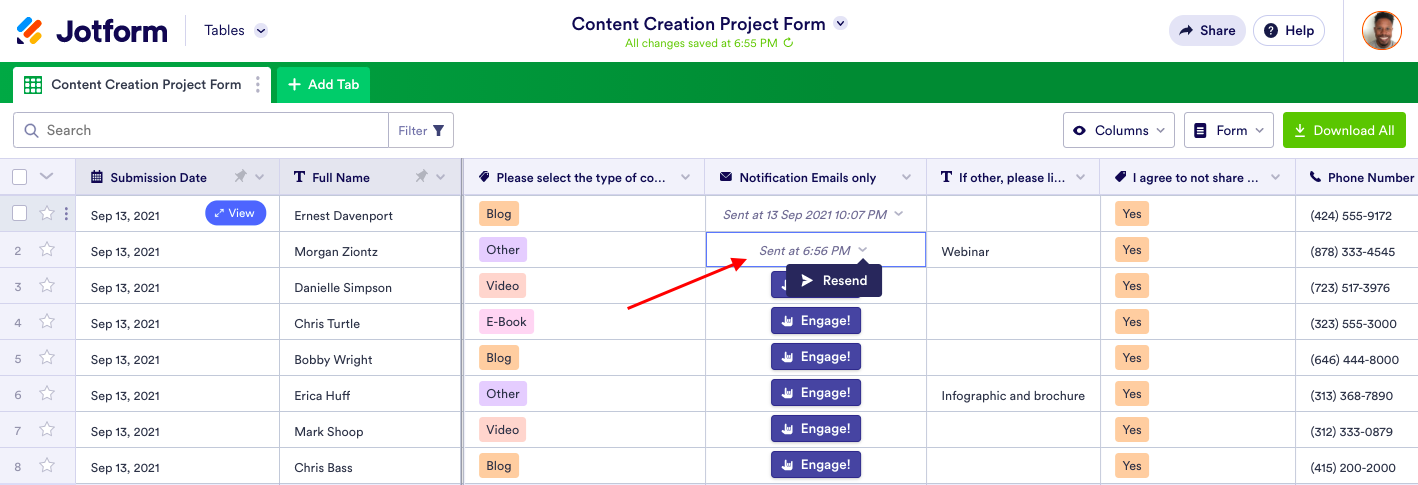
Once you click the Action Button, your results and the timestamp will be displayed. If needed, you can also resend an email by clicking in the cell’s dropdown.
Did you know?
You can use Action Buttons for each individual submission/entry or for all by selecting multiple entries and triggering their buttons at once from the row context menu (vertical ellipsis).
Whenever you click a button, the most recent action date will be displayed. But you can always reuse the buttons or resend your updated data.
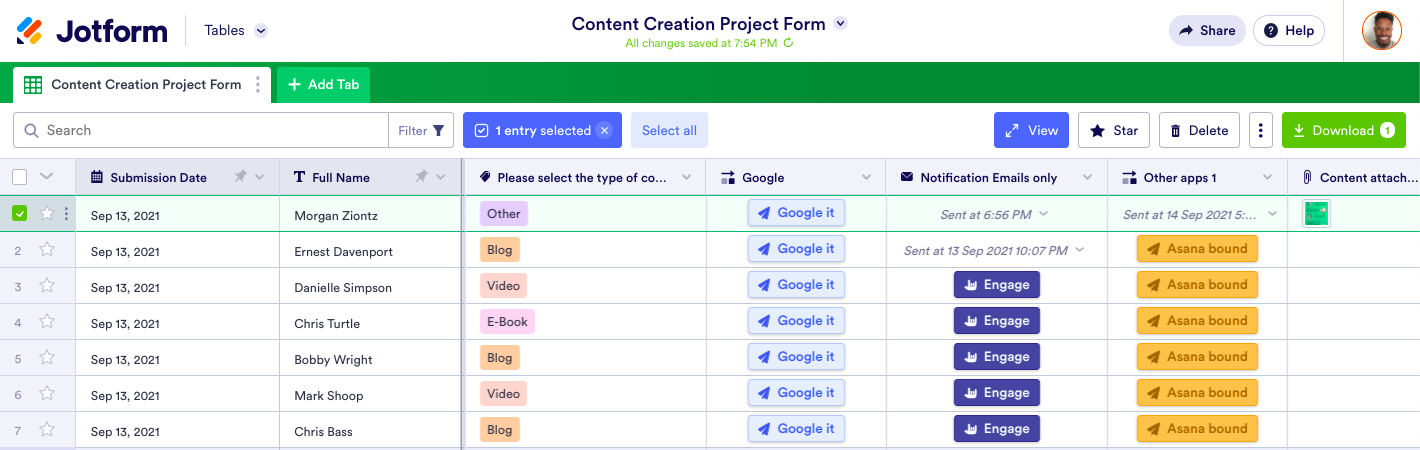
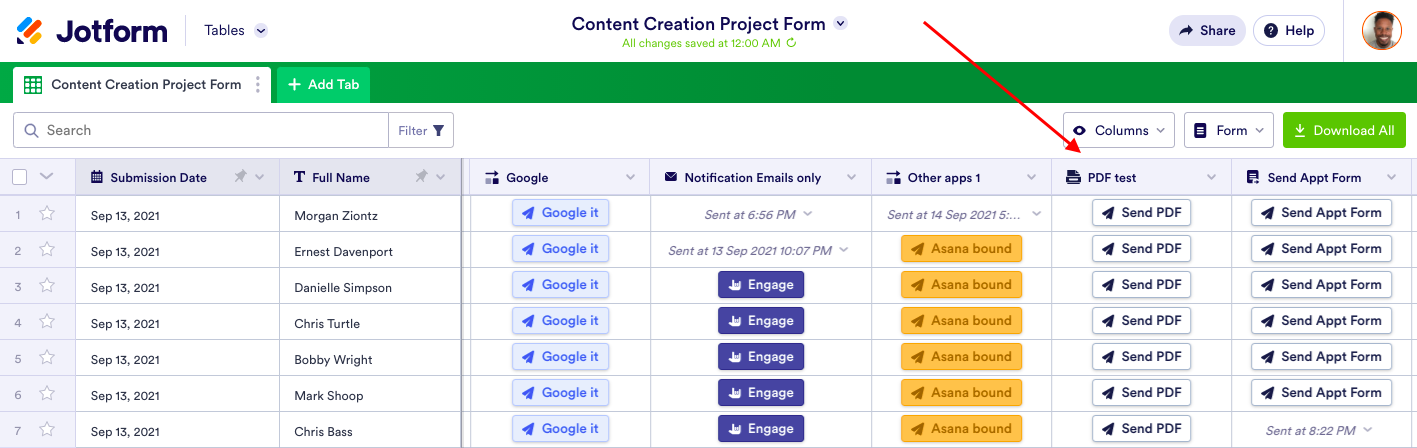
Send Data to Other Apps button
Sending information directly from your table to your project management, CRM, and third-party email apps provides added flexibility to your workflow.
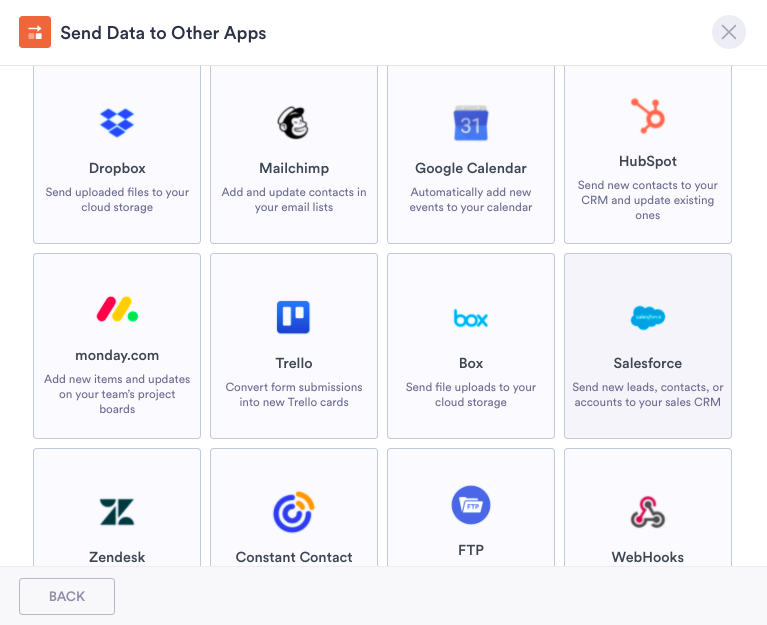
You can process, add to, and edit your data in Jotform Tables and — based on the integrations connected to your form — create new tasks in Asana, add contact details to Constant Contact and Salesforce, or update a board in Trello, as just a few examples.
Select Send Data to Other Apps from the available Action Button options and click Next.

Enter your column name (as in the example below), and you’ll see the option to select the apps where you want to send your data. The default screen will show the integrations currently built into your form.
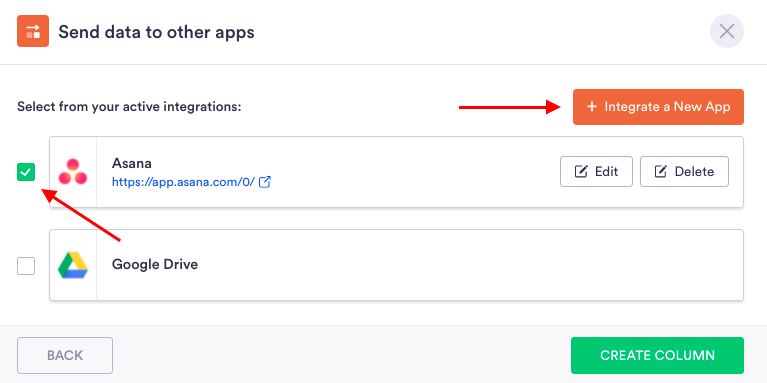
If you decide you want to change the kind of task or project you’re working on in the third-party apps already connected to your form, you can edit your field mapping and data preferences directly in your table.

To integrate a new app, click the orange Integrate a New App button and follow the authentication steps as you normally would in the Form Builder, easy peasy.
Finally, click the green Create Column button when you’re finished, and you’ll see your new Action Button column appear in your table. When I click the customized Asana bound button for one of my contacts, it shows up in the relevant Asana board and project.

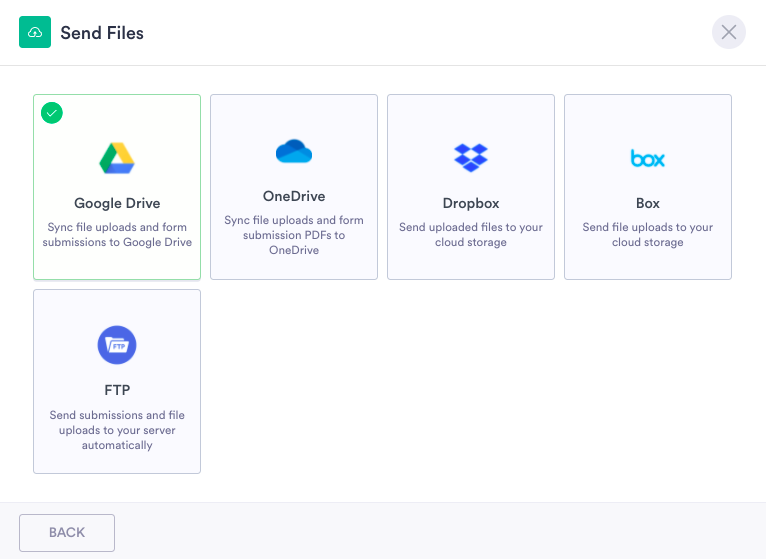
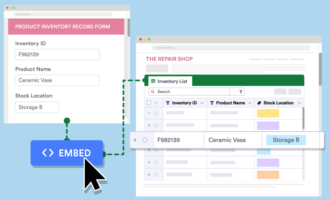
Send Files button
Integrations with cloud storage services are one of the most in-demand features Jotform offers. The Send Files button sends your data to your cloud integrations in one click. Whether it’s a form submission or an attachment to a submission, you’ll be able to send any data uploaded through your form to Google Drive, Dropbox, Box, One Drive, or an FTP server.
Just add a new column as in the above examples, and select the Send Files option. It will show your default storage integration, or you can integrate a new app. You can also edit the preferences of your cloud integrations. (Note that Google Drive currently doesn’t have an edit option.)
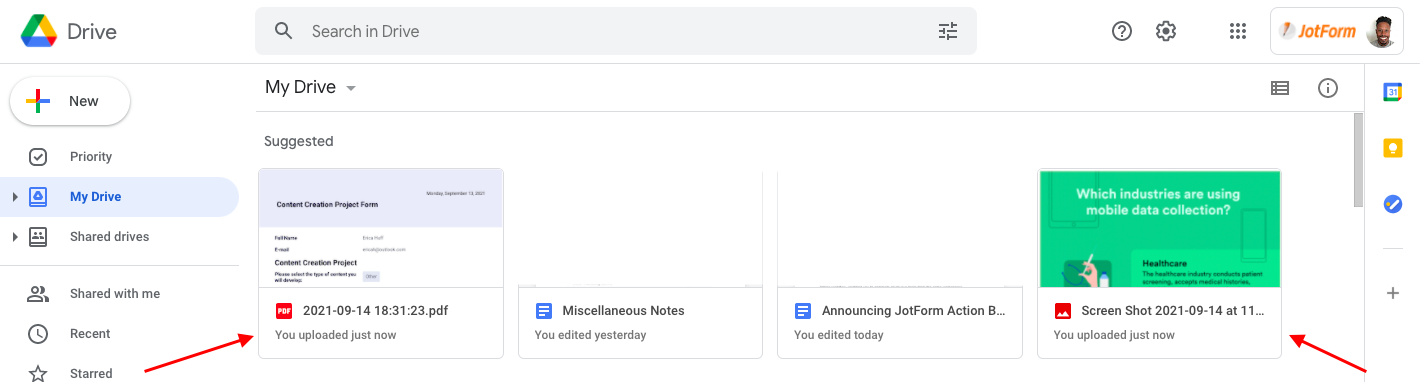
In this example, when I clicked my customized Google it button, a PDF of the user’s complete form submission, along with the attached infographic, was added to my Google Drive.
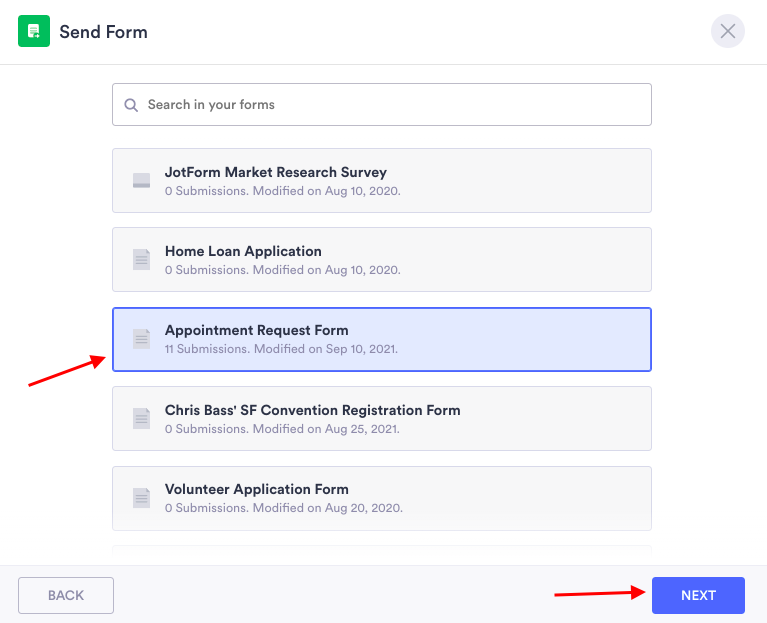
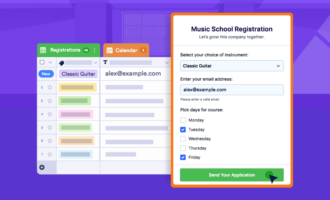
Send Form button
If you’ve ever needed to send an alternate form to your users based on the data/answers in their first form, the Send Form button is for you.
Previously, sending a second form involved adding a link (and perhaps certain conditions) to the Thank You page or autoresponder email of your first form. Now, event organizers sending follow-up feedback forms, teachers sending quizzes, or HR business partners sending relevant employment forms can share a second form with a specific user directly from their table.
To start, select the Send Form option, name your column, and click Next. You’ll see a list of available forms to send.
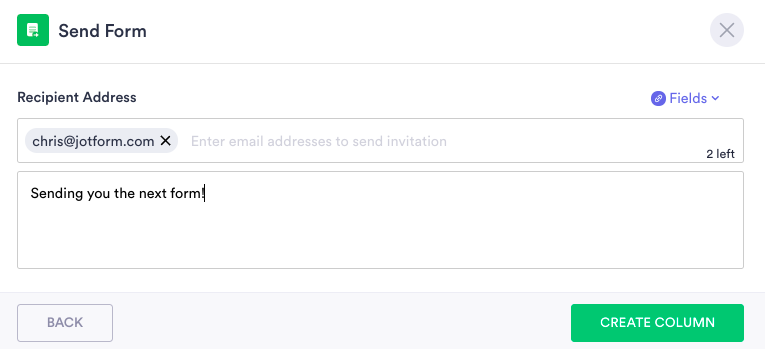
From there you can include Email or other field identifiers from the Form Fields dropdown (such as Short Text and Input Table), or just type in the email of the recipient. Once the column is created, however, you can send the form to anyone in your table.
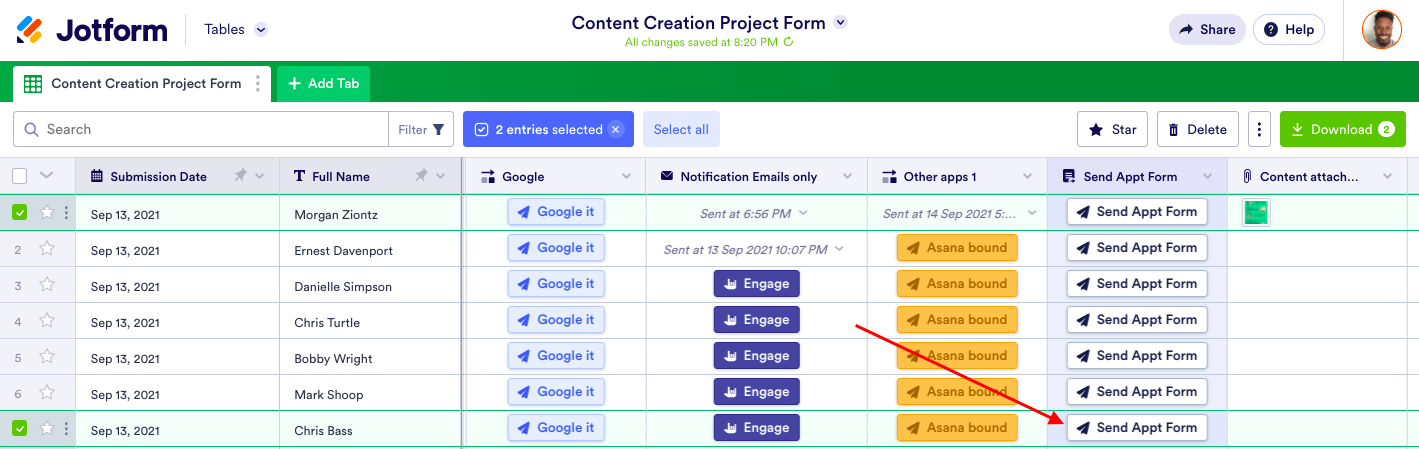
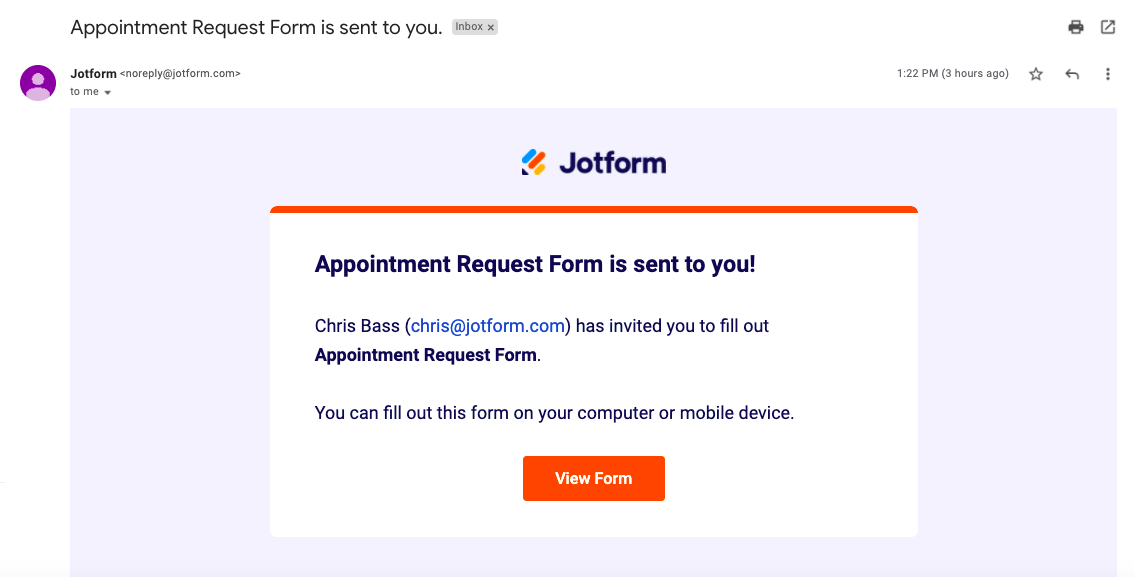
When you click the button in your new column (labeled Send Appt Form here), the form you’re sending will arrive in the recipient’s email inbox.
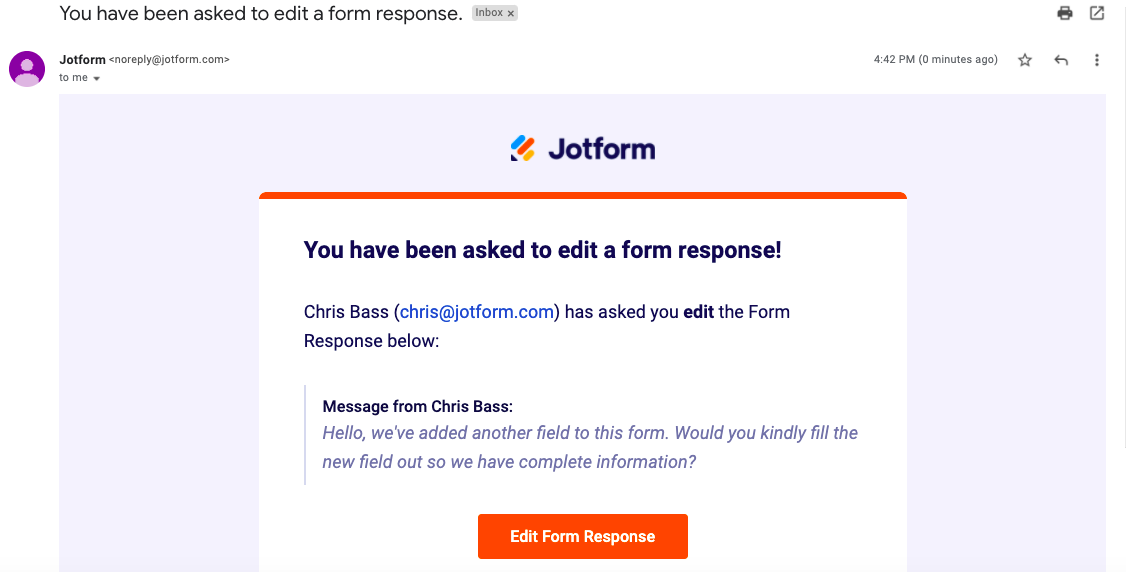
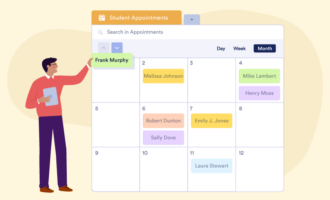
Request Update button
The Request Update button gives you a convenient way to send an individual user or a group of users a link to update their current form submission whenever you need, for whatever reason.
You can also use this button to request more information in scenarios where a new field is added to the form after submissions start rolling in.
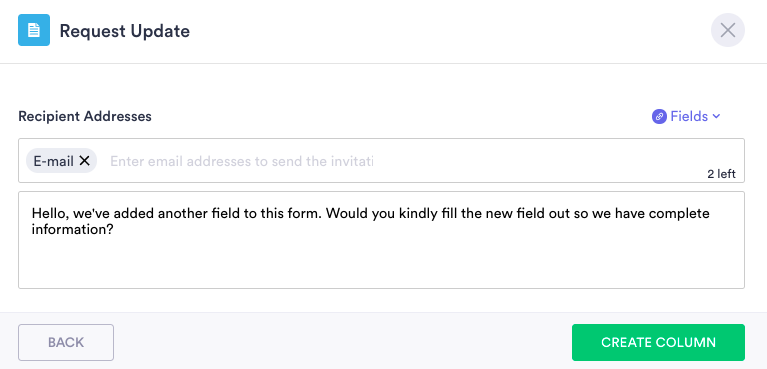
As in the Send Form example above, the email arrives in your recipient’s inbox so they can update and resend the form easily.
Send PDF button
Sending the PDF documents that you’ve created with (or migrated into) Jotform’s PDF Editor has never been more secure, convenient, and easy.
Doing this from the comfort of your table is a no-brainer. Sending contracts, badges for events, or follow-up invoices is a snap with the Send PDF Action Button.
Once you’ve named your column, you’ll have the option to select the current form as a default option or select a different PDF document.
Clicking the new tab icon on the right will open Jotform’s PDF Editor, where you can make edits to the current form as a PDF, create a new PDF from scratch, or use a template to create a new PDF. You can also create a password for an added layer of security when you send the PDF via email.
*Note: If you do use a password, be sure to include it in the message field so your submitter is aware when they receive the emailed PDF.
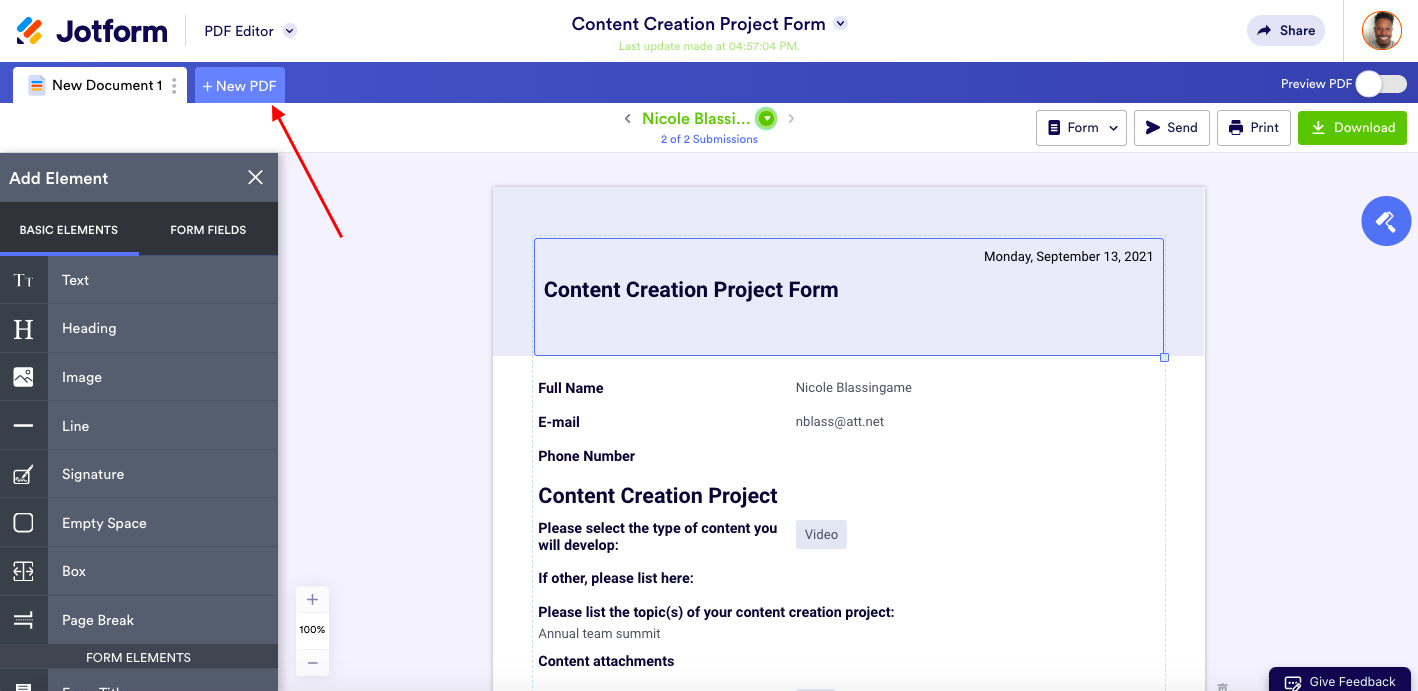
The PDFs you’ve crafted/selected will then go out to your selected users at the click of a button.
Send Data via Webhook button
You advanced users out there will be happy to know you can write rules to send your data from Jotform Tables to your internal or proprietary database. This is a neat way to build an Action Button that fits your particular data needs by employing internal servers, APIs, or SQL databases.
For those interested in learning more, refer to our guide on How to Set Up a Webhook with Jotform.
Conclusion
No matter how you use Jotform, our Action Buttons will allow you to move your complete workflow to Jotform Tables.
Those who depend on Jotform Tables to collect form data for editing and processing can use Action Buttons to handle communication with end users, third-party apps, and internal collaborators.
Those who use tables and spreadsheets primarily for project management can import data into Jotform Tables and use Action Buttons to process relevant tasks based on their workflow.
Now, the power and functionality of our Form Builder has come to Jotform Tables, enabling you to take action with the click of a button. What could be easier than that?
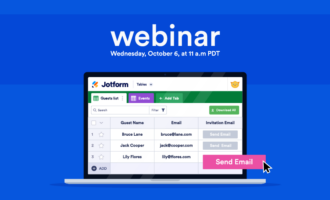
If you’re interested in learning more about Action Buttons, Jotform will be having a webinar about them on October 6. Register for it today!
You can also refer to our user guide: How to send an email with form data in Jotform Tables


Send Comment:
6 Comments:
September 27, 2021
I'm excited to use this. When will this be added? I'm not seeing it in my environment yet. Thanks!
September 22, 2021
This is great!! I don't see the "Request Update" button. Will this be added soon?
September 22, 2021
I am definitely looking forward to trying this. Can you please create an instructional video since they are easier some times rather than the screen shots. Please and thanks
September 22, 2021
Wow, exactly the feature I've been waiting for
September 21, 2021
I like to talk to a salesperson. I am interested in this new feature. I want to see if can be used with software that loads CSV files onto distribution lists. What I want to do is have your new JOT FORM feature send the 365Emailing Software a copy of the registration data record in a certain format into my 365Emailing Software and then into Microsoft Office 365. Office 365 enables users to email 50 million emails per month for $75 and if your new feature can capture and send the new registration into 365Emailing software it would then be able to add the new data records onto the MSFT LIST
September 21, 2021
Amazing!