Form Approvals Google Forms tutorial
- Install Form Approvals in Google Forms
- Prepare your Google Form for approvals
- Add recipients and assign their roles
- Set the approval order and routing conditions
- Customize notifications and workflow settings
- Activate and test the approval workflow
- Track and manage approval requests
While Google Forms is a popular and reliable online form builder, it lacks the ability to natively run approval workflows and tracking. But approval workflows are necessary for streamlining modern operations — which is why many Google Forms users turn to third-party tools for help.
Form Approvals is considered one of the best Google Forms add-ons for approval workflows. It adds recipient routing, approval roles, conditions, email notifications, signatures, document generation, and request tracking to basic Google Forms in just a few steps.
In this guide, we’ve broken down how to create a Google Forms approval workflow using Form Approvals (and highlighted a native approval alternative to simplify the process even further). Here’s how to configure and test your first approval workflow.


1. Install Form Approvals in Google Forms
Before you can start using Form Approvals, you’ll need to integrate this add-on into your Google Forms environment.
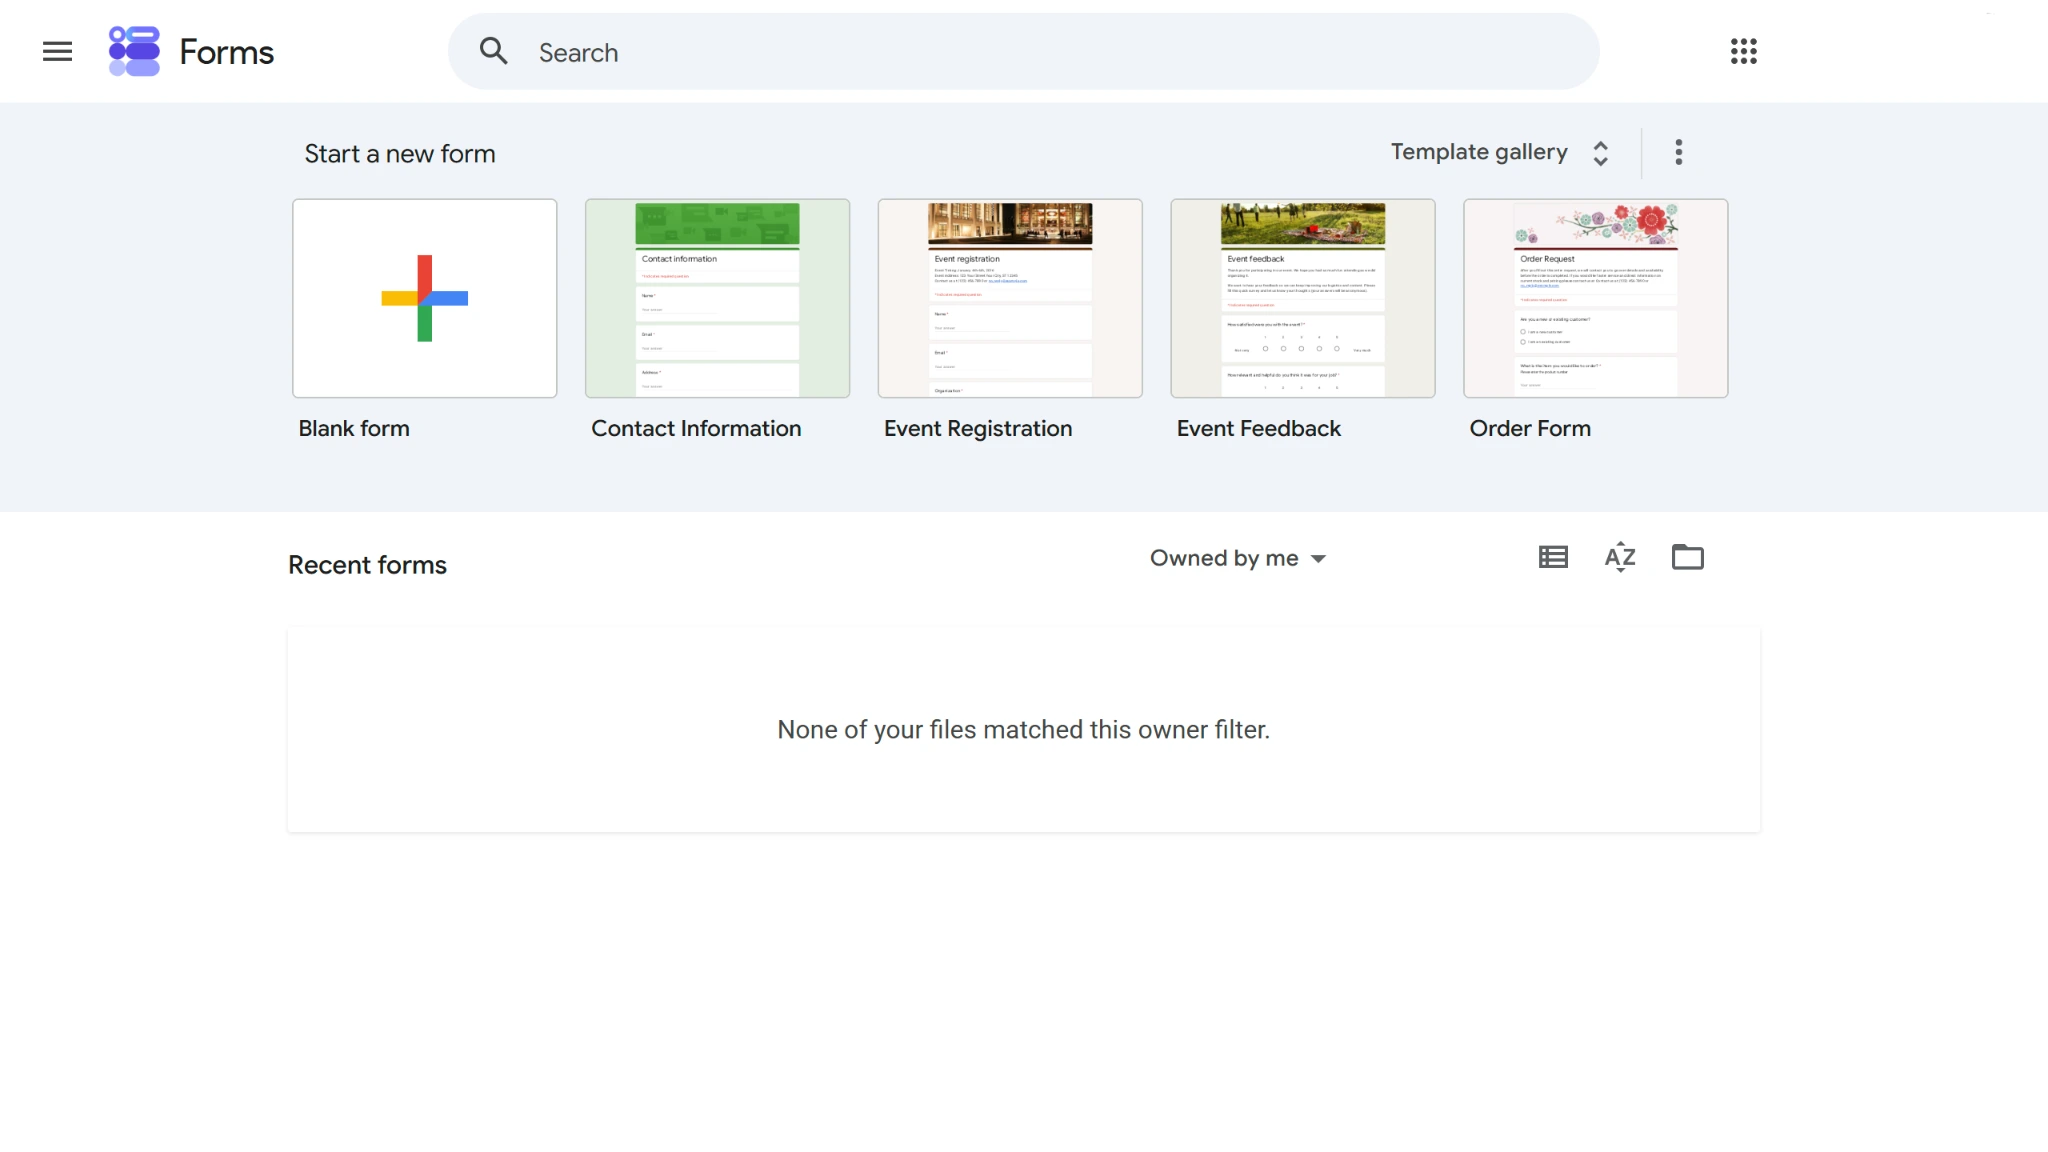
- Open Google Forms and click Blank form to start a new form.
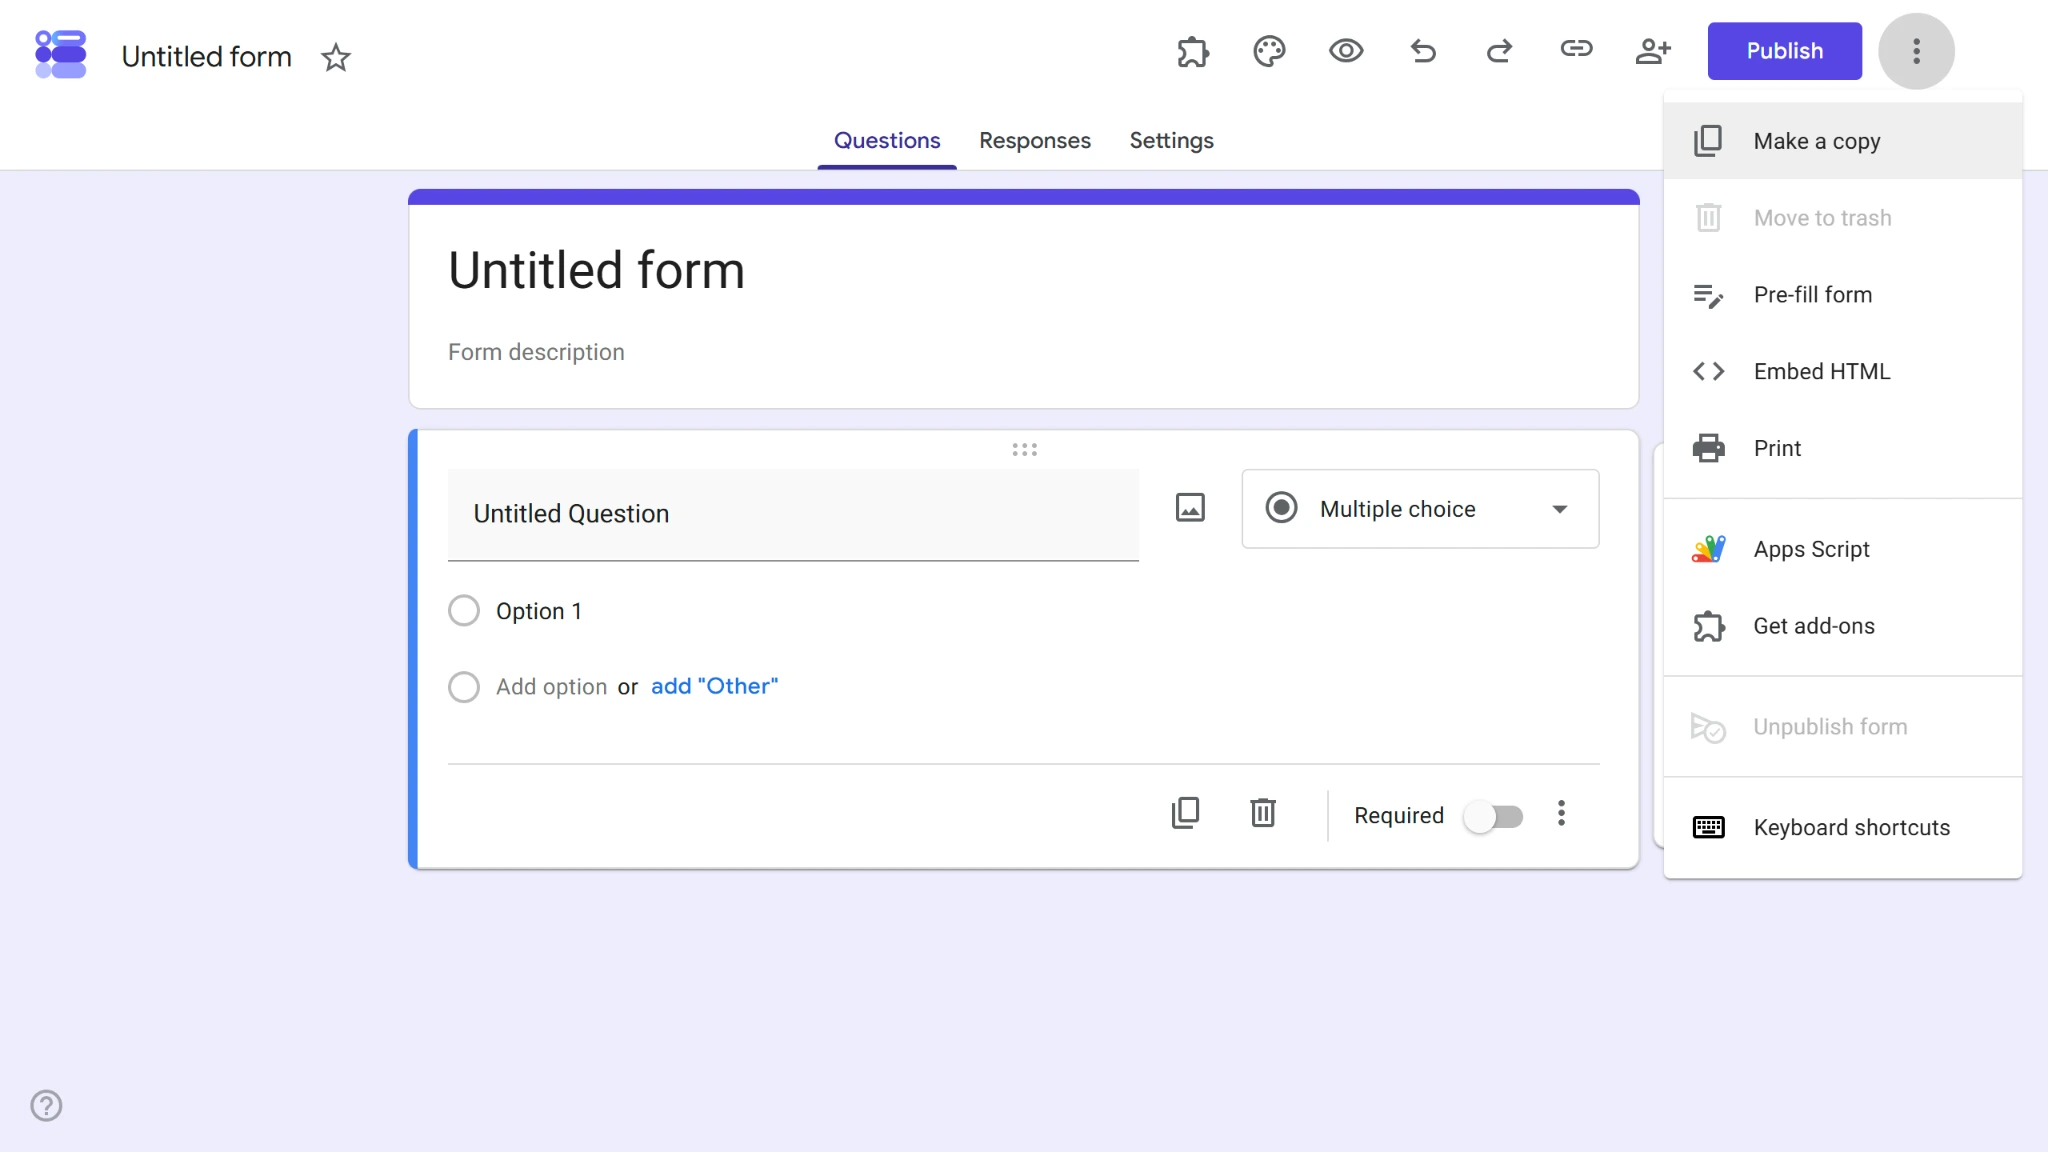
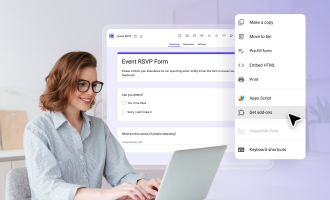
- In your new form, click the three dots in the top-right corner and click the Get add-ons option from the dropdown menu.
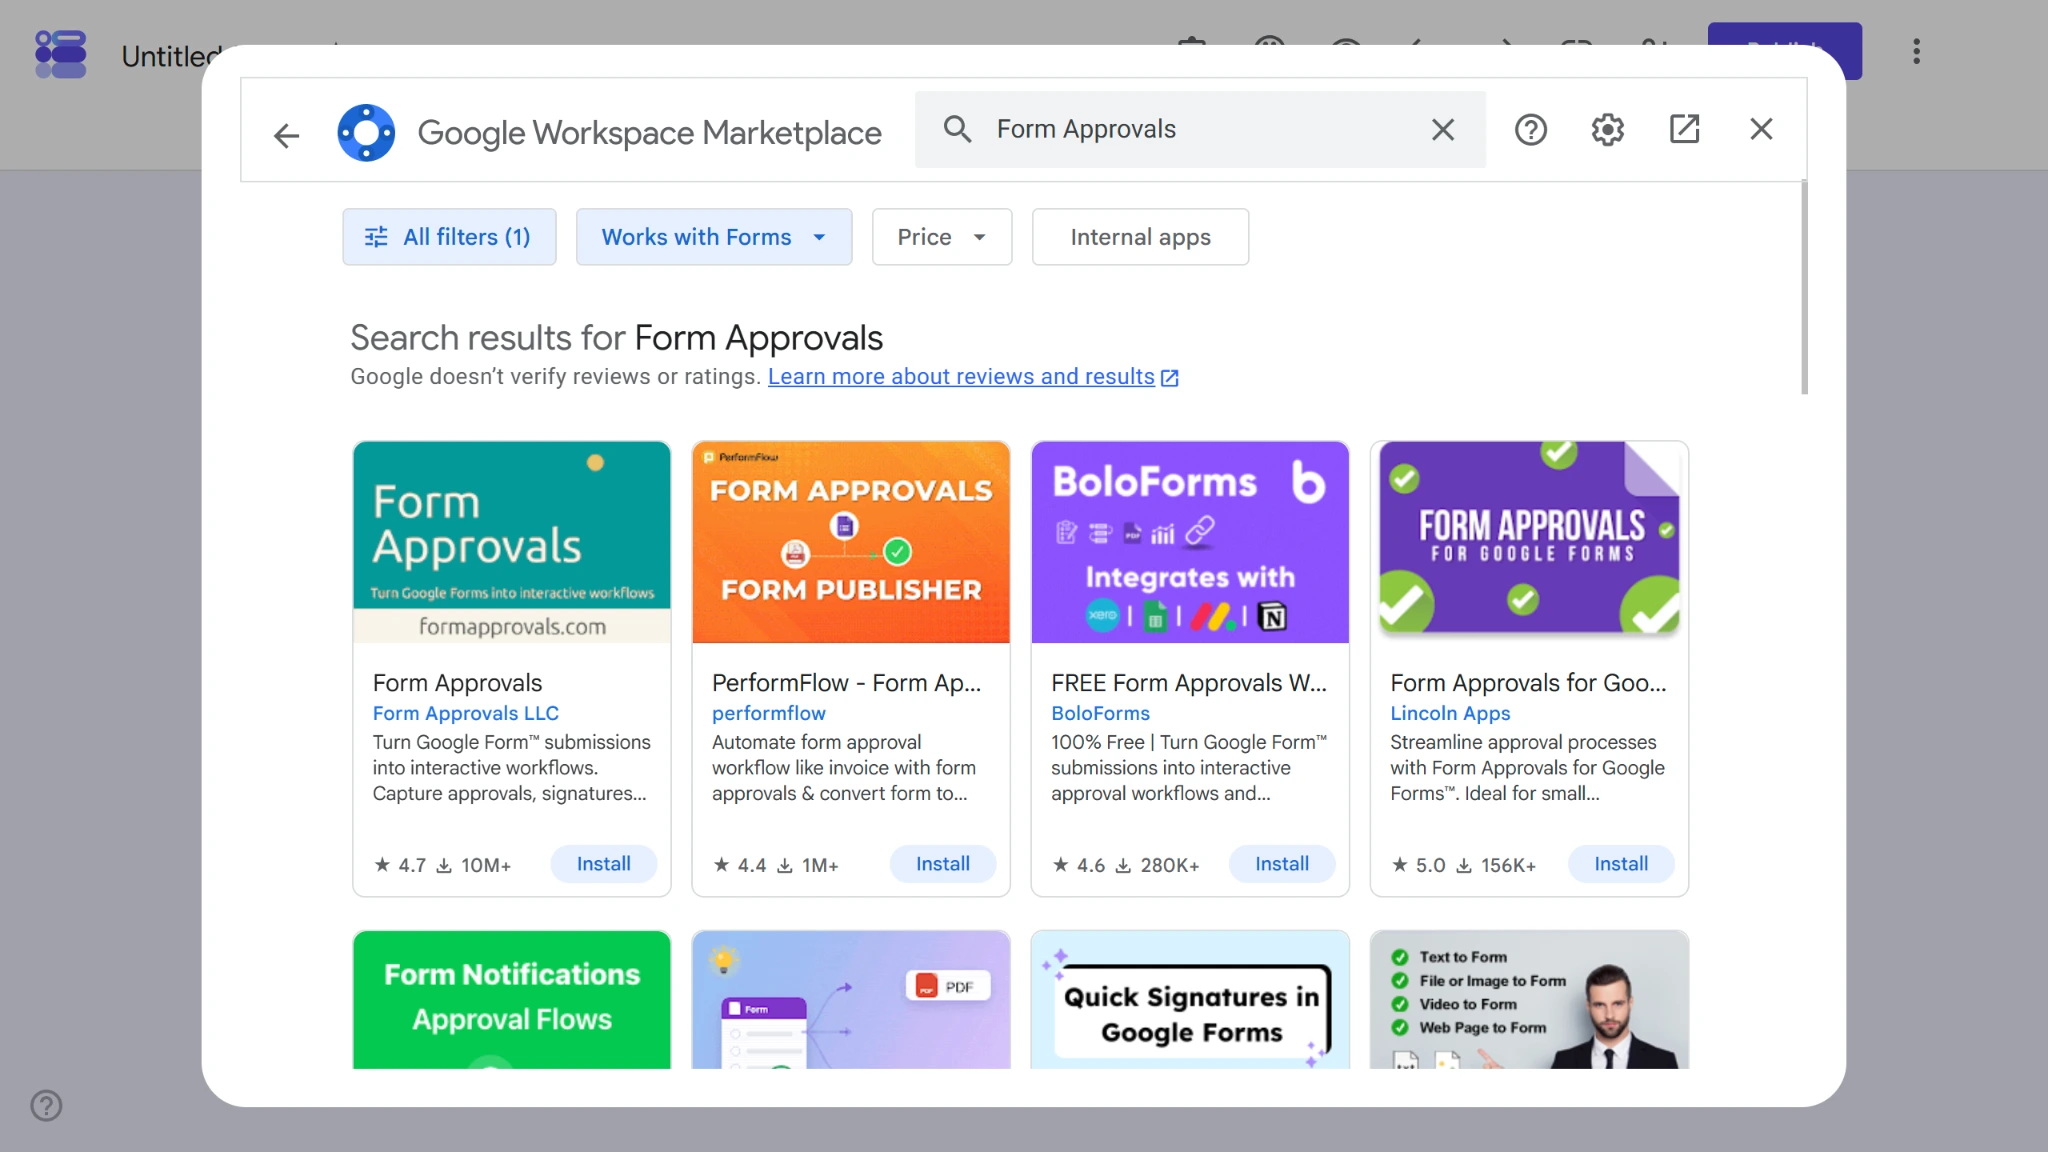
- Search for Form Approvals in the top search bar and then click Install under the Form Approvals add-on.
- When you install Form Approvals, you’ll need to grant it permission to access certain data in your Google Workspace to run effectively. Review permissions and approve to finish the installation process.
2. Prepare your Google Form for approvals
Once you have Form Approvals installed, you’ll need to format your Google Form to match the approval process. This means adding the relevant questions and fields required for requestors to submit requests and approvers to receive and review them.
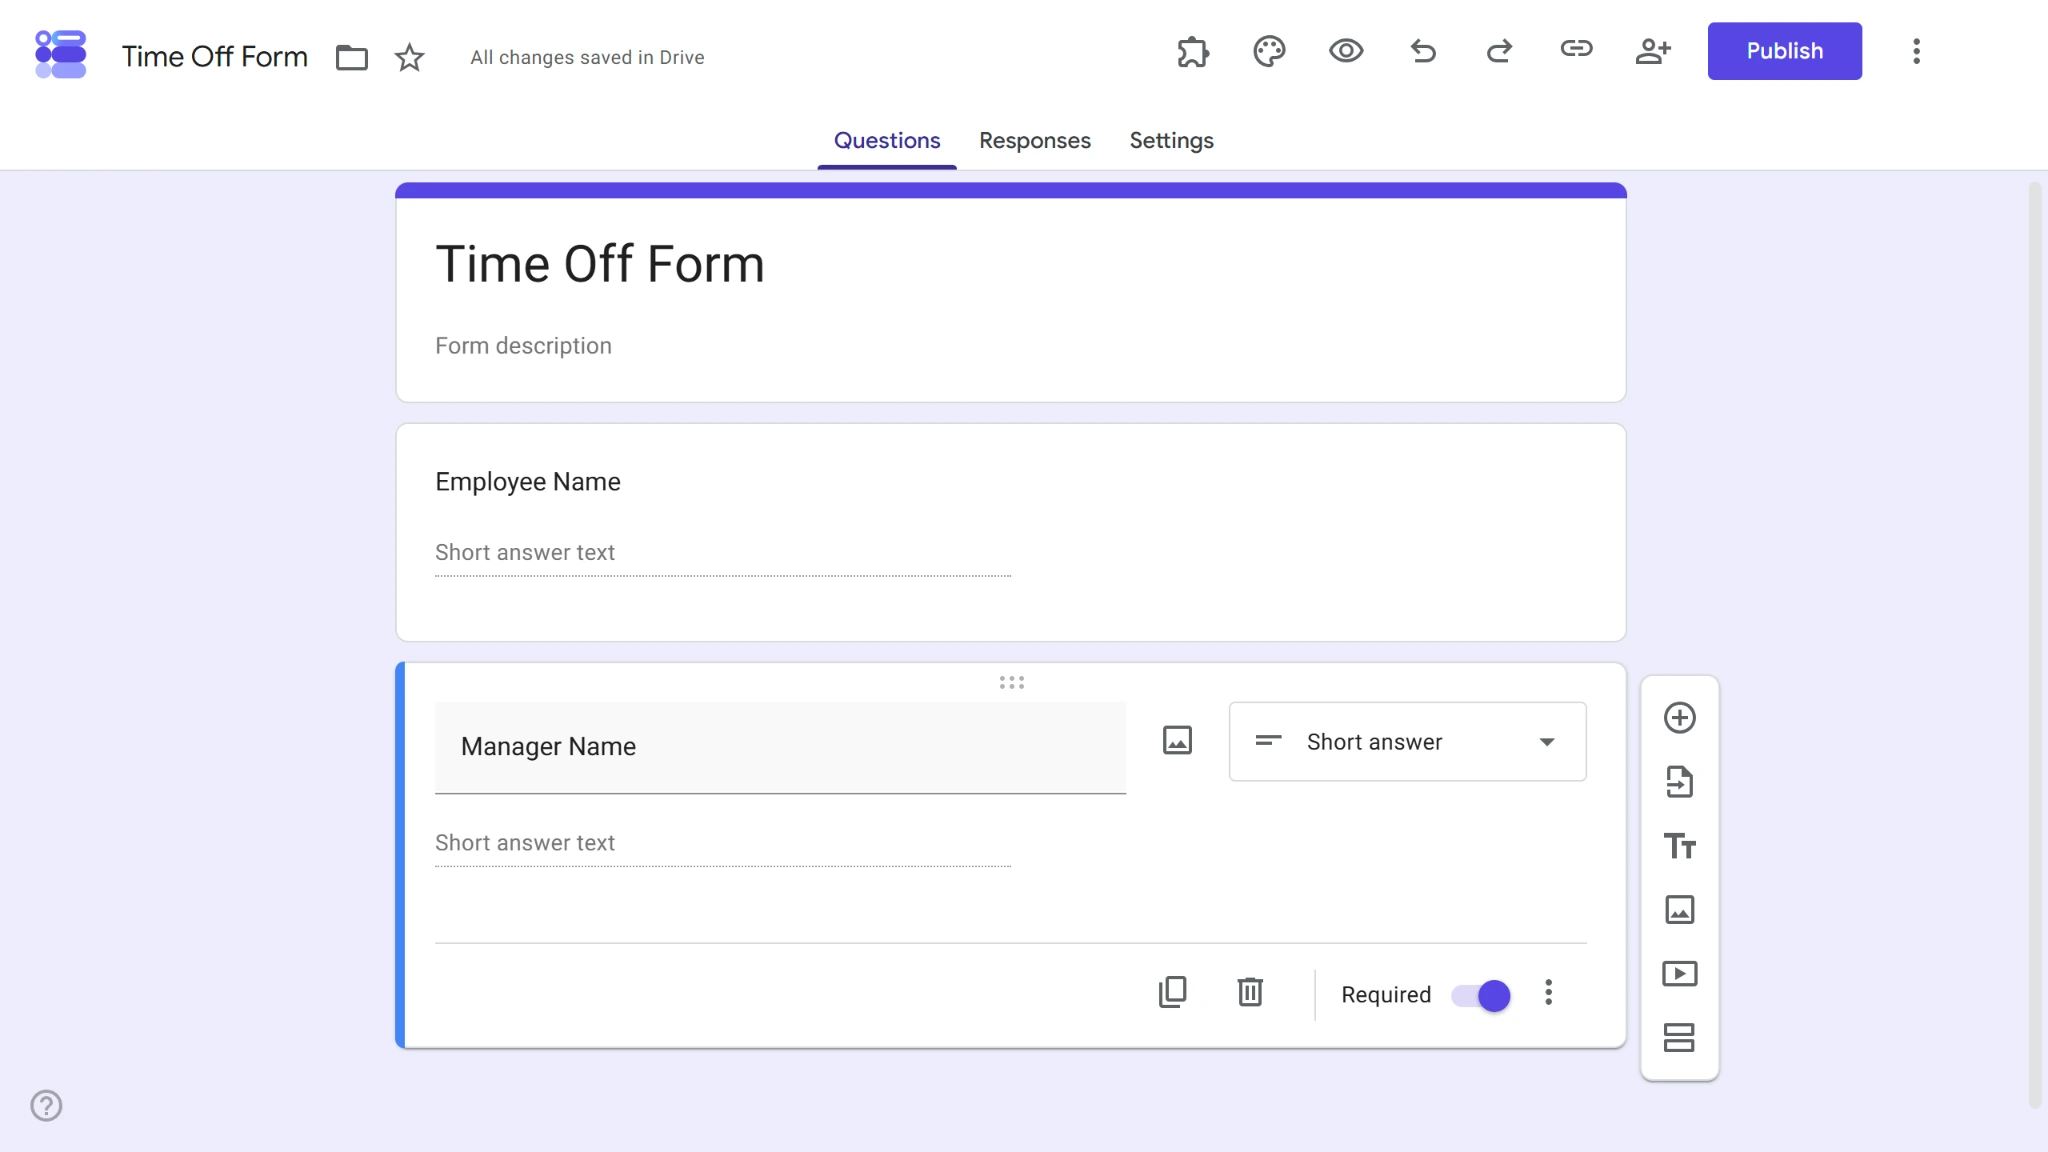
- Title your form and add relevant questions based on the form’s purpose. Make sure to add a field that will include the approver’s email address.
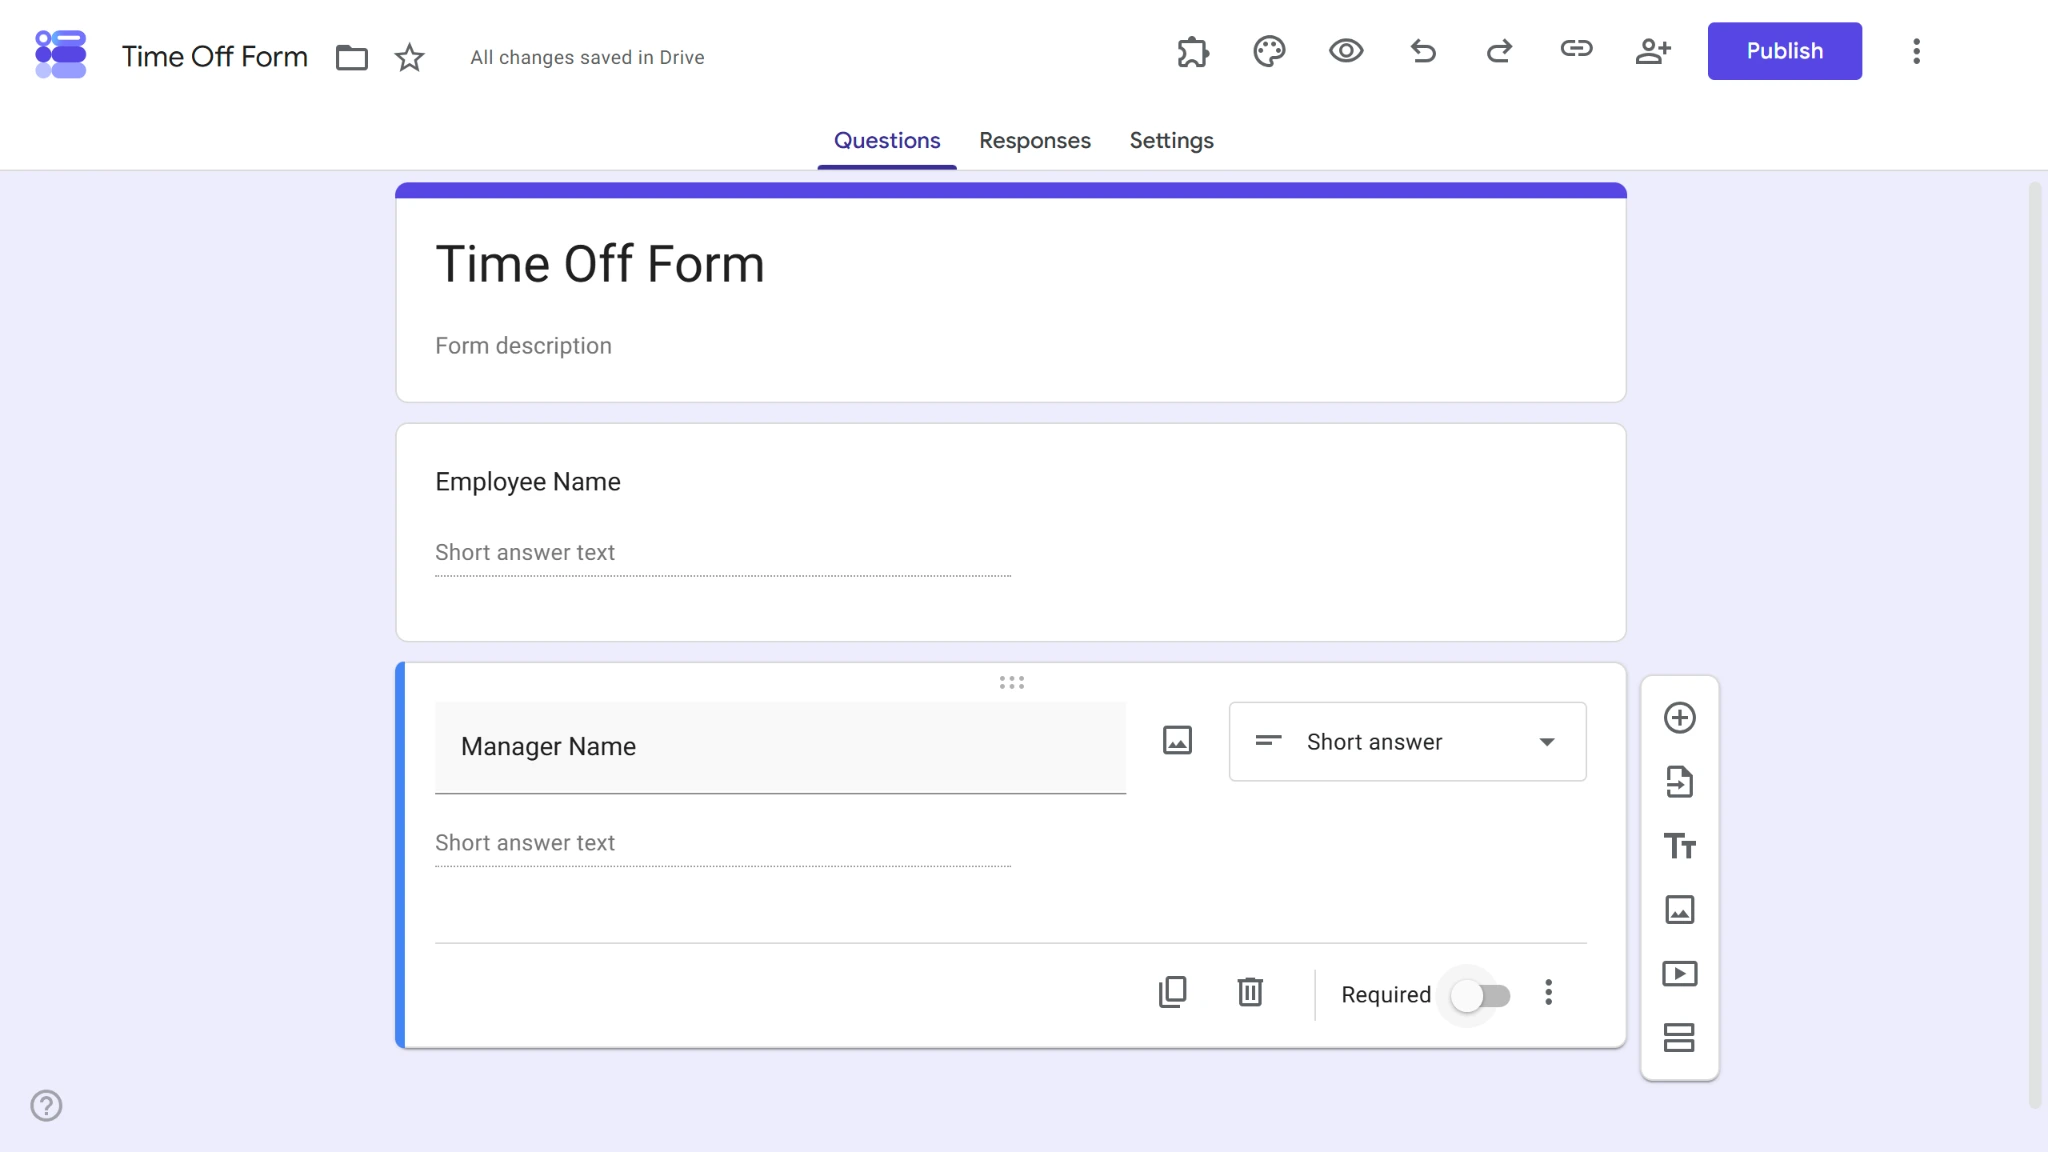
- Toggle on the Required option for your approval email address field.
Pro Tip
Looking for a quicker way to build out your Google Forms? Integrate the AI Form Builder add-on into your Google Workspace to generate Google Form questions from a prompt or import content from Google Docs, Sheets, Slides, Drive files, and other Google Forms.
3. Add recipients and assign their roles
In the Form Approvals add-on, there are two ways you can add recipients to your approval workflows: dynamically and statically. Static recipients are specific email addresses added to your approval workflows. Dynamic recipients are linked to a specific field in your Google Form, meaning they change depending on what is entered in that field.
We cover how to set up each below.
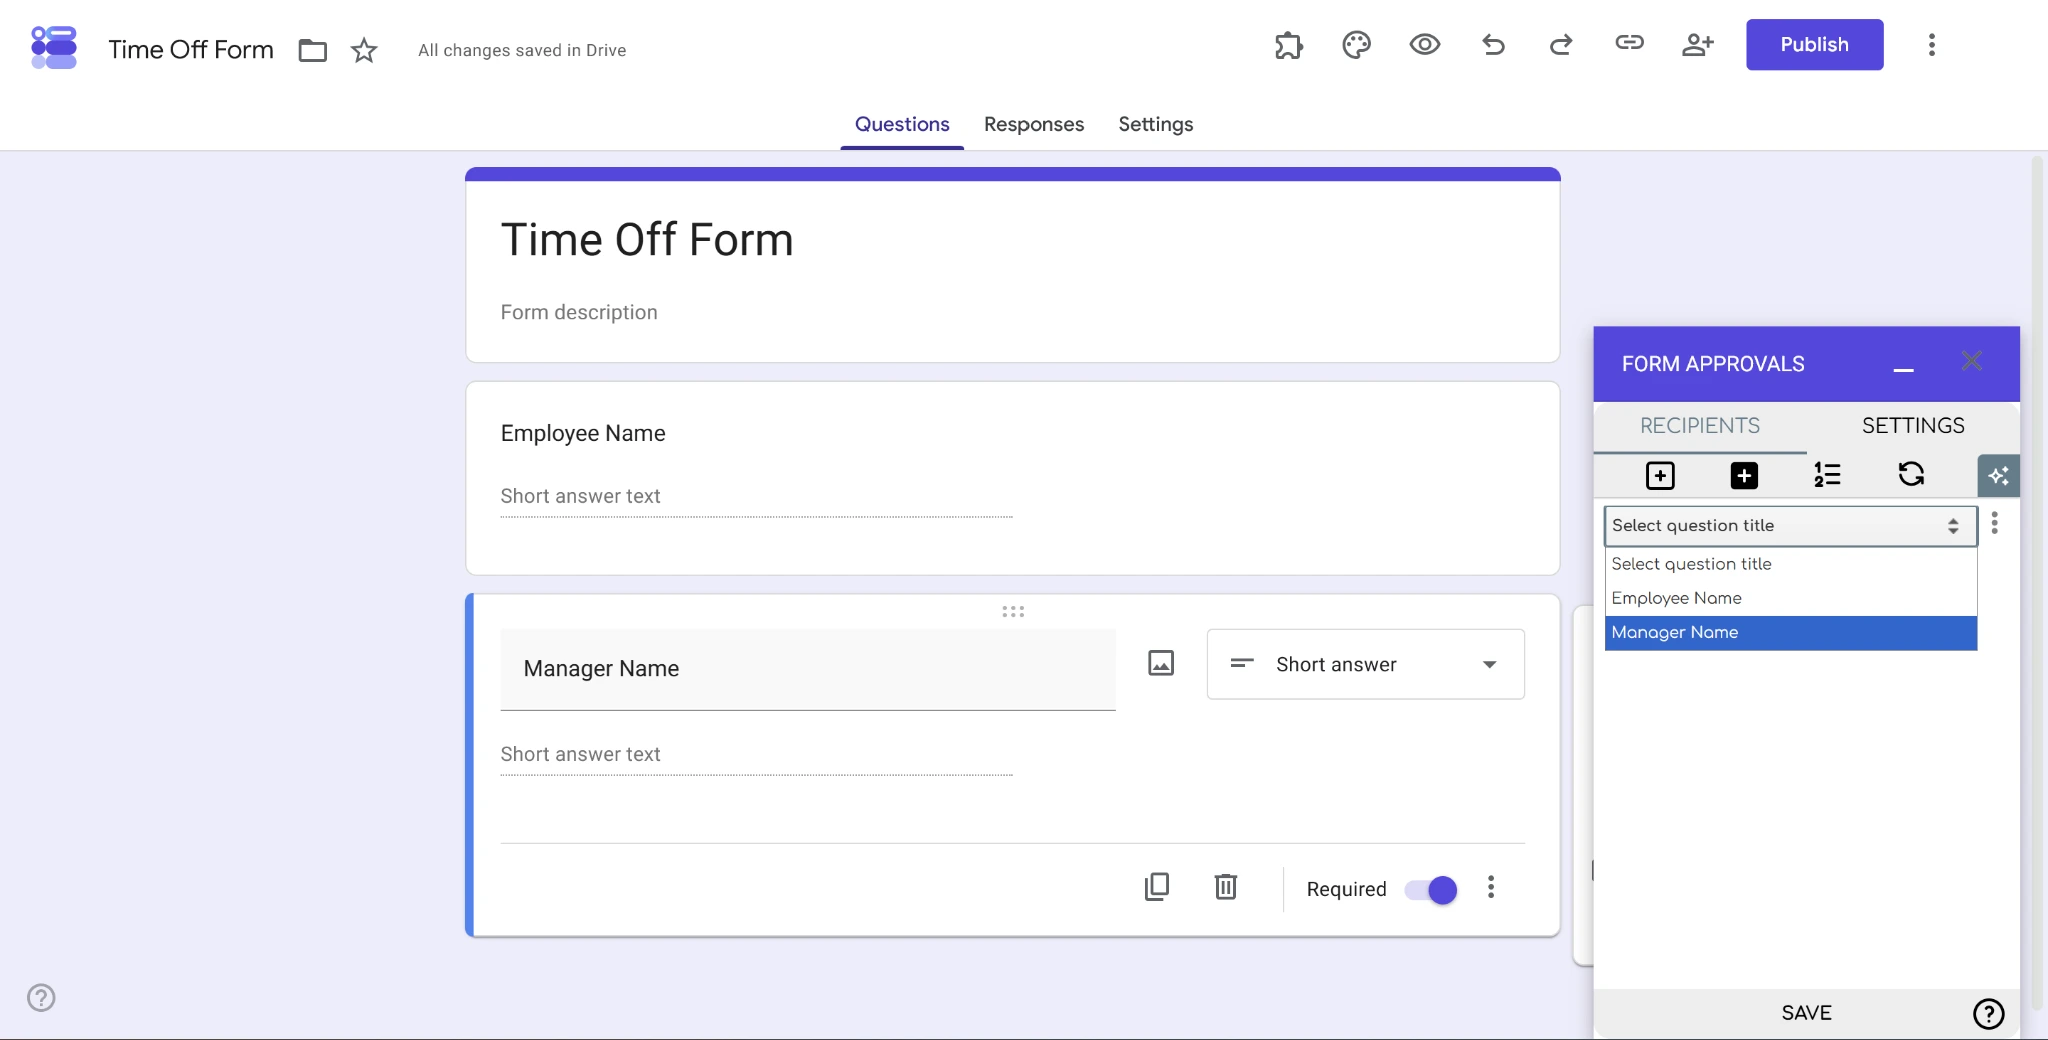
Dynamic
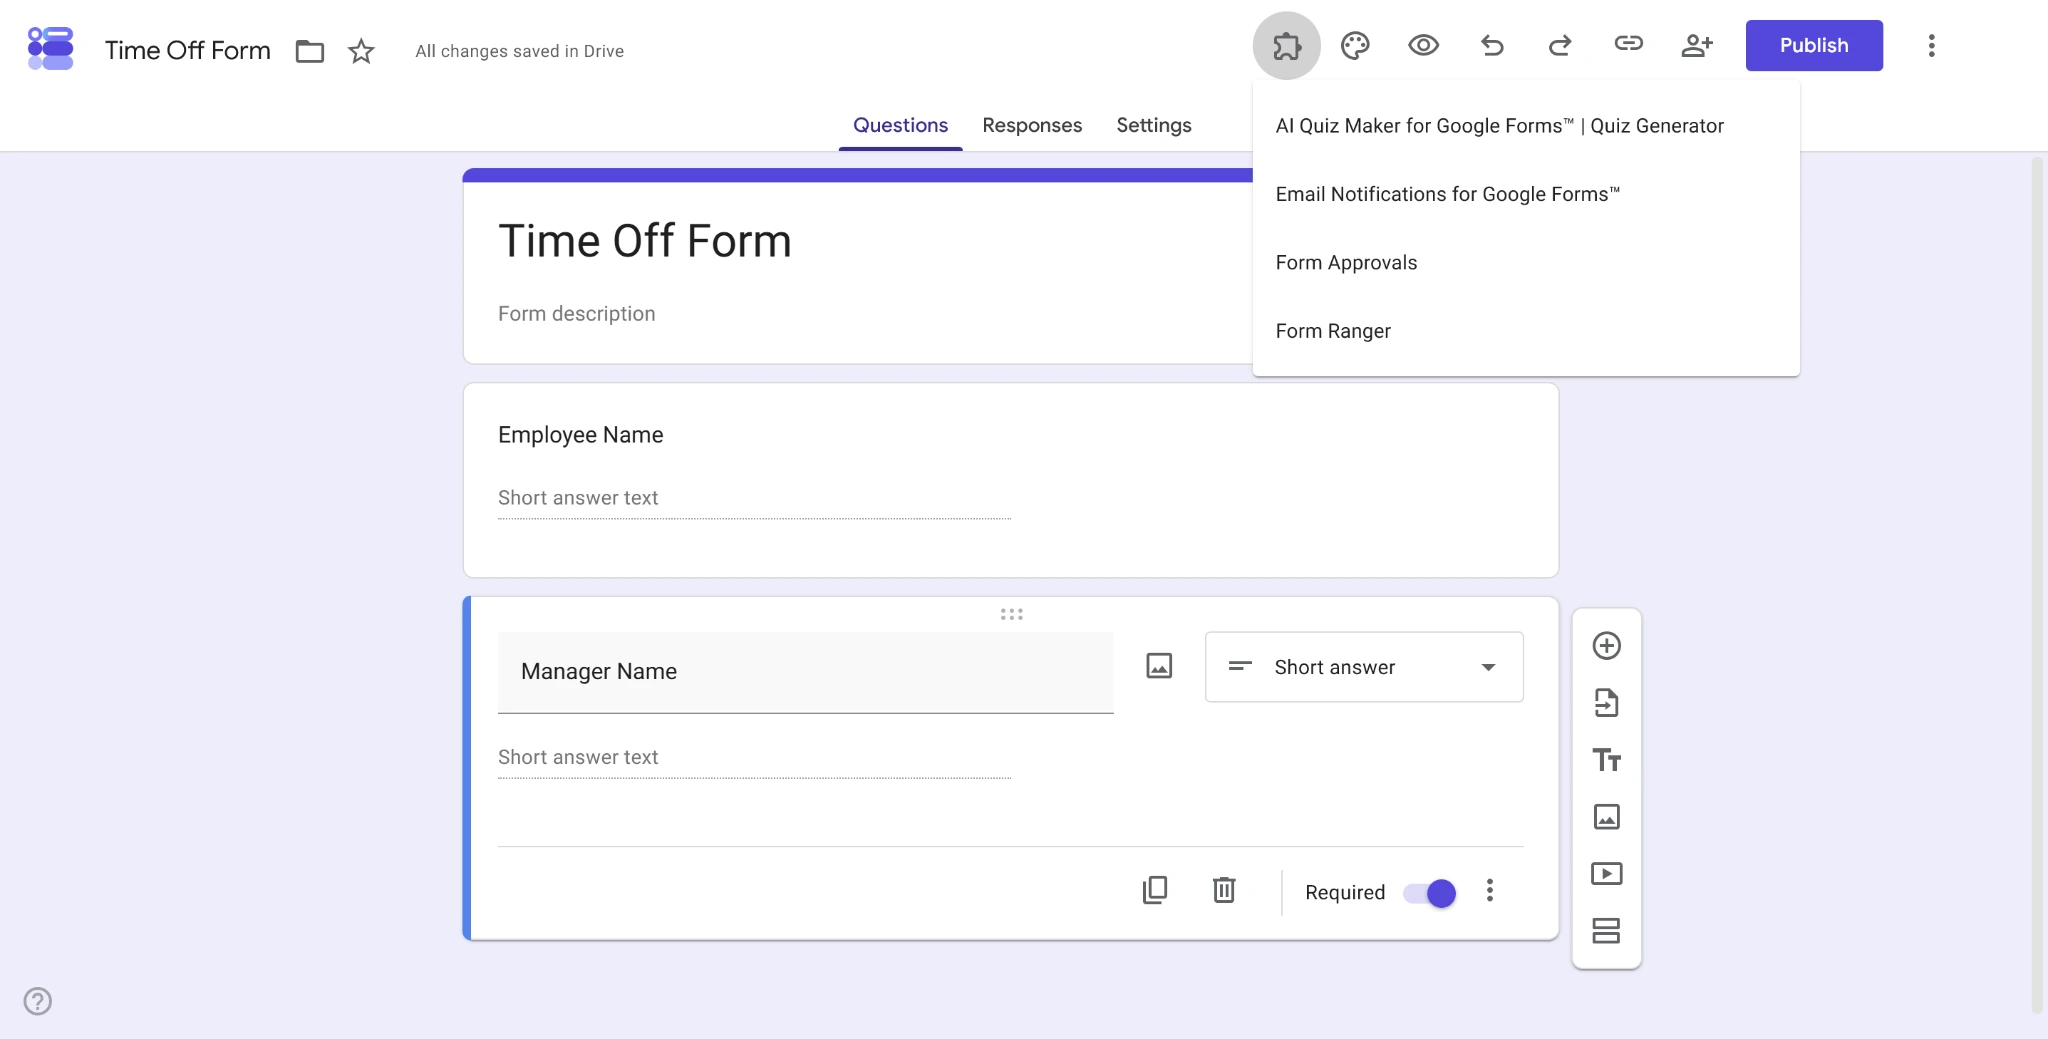
- Click the puzzle piece “Add-ons” button at the top of your form and select Form Approvals from the dropdown menu.
- Select the Add Dynamic Recipient button.
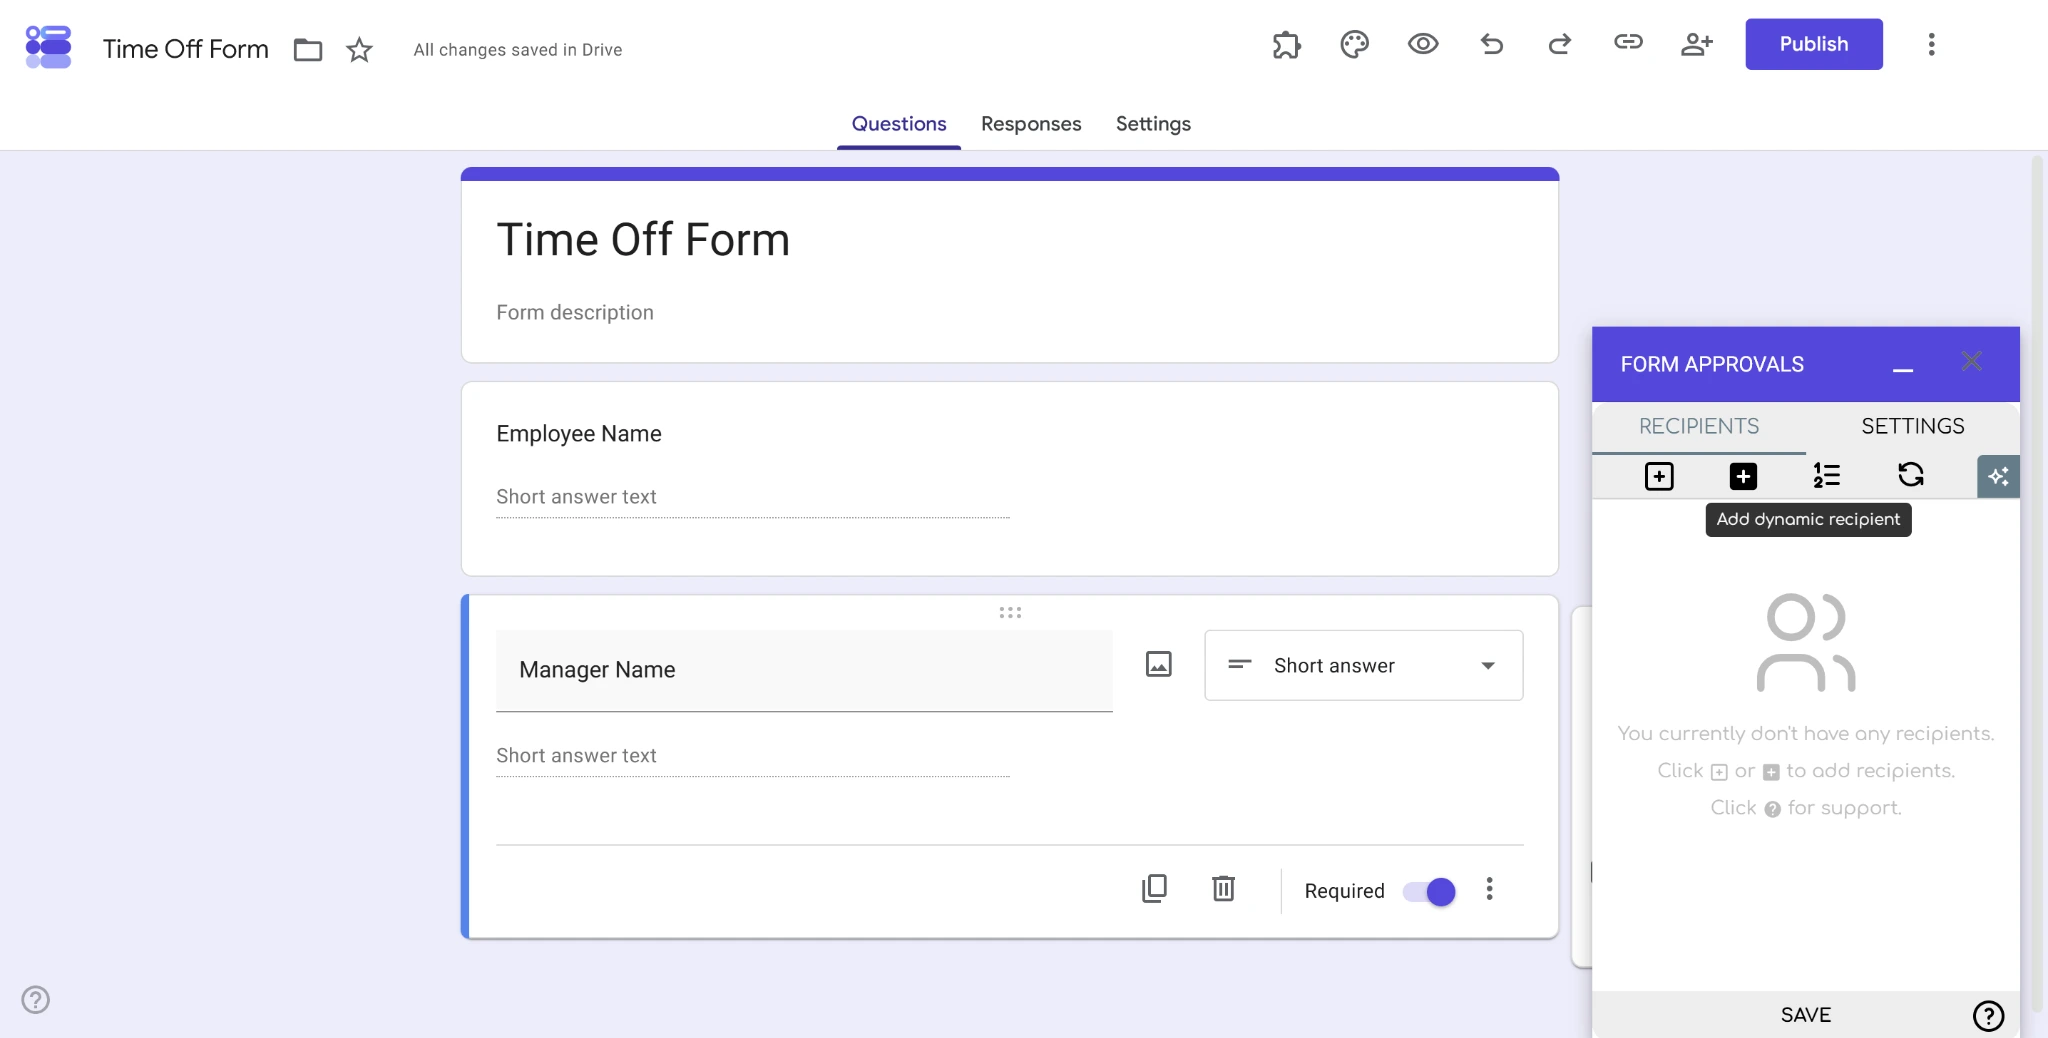
- Choose which field you want to set as your dynamic recipient and click Save.
Static
- Click the puzzle piece “Add-ons” button at the top of your form and select Form Approvals from the dropdown menu.
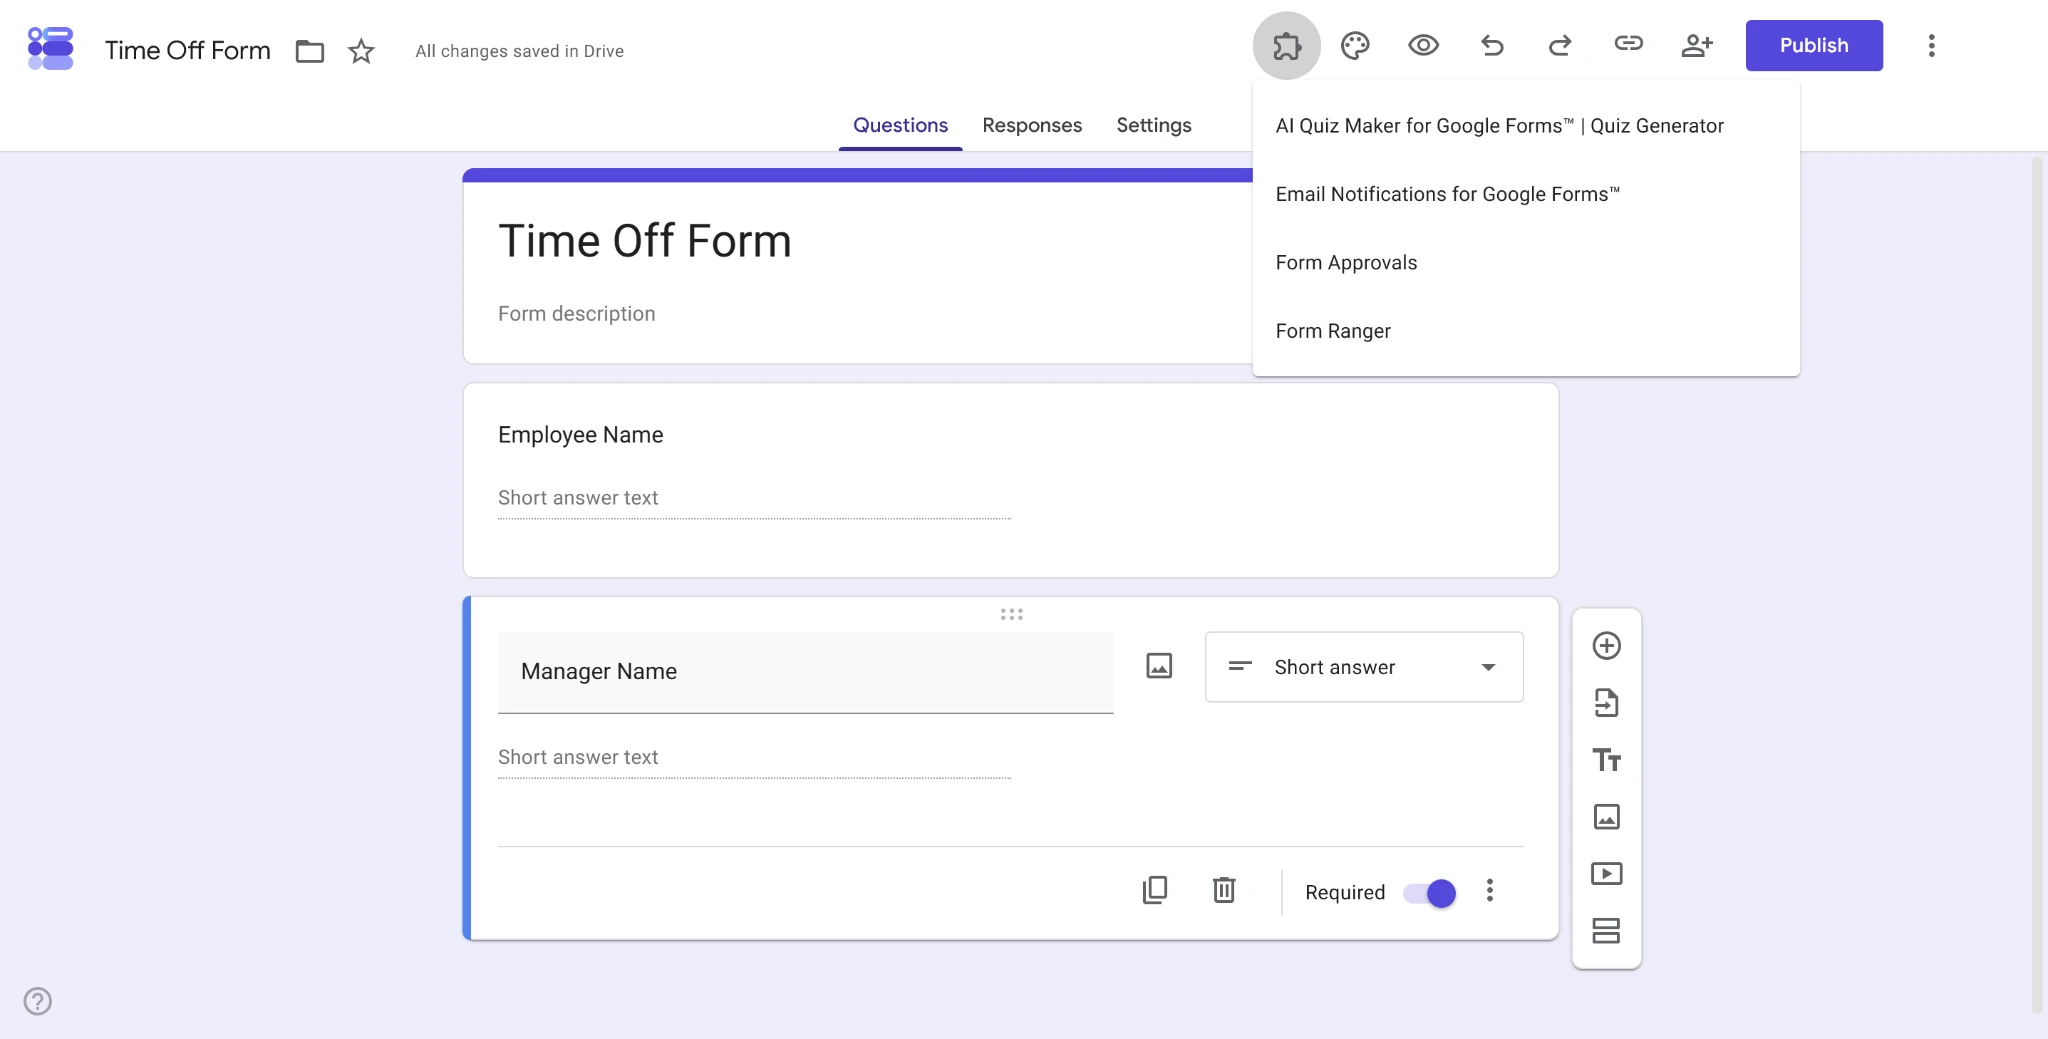
- Select the Add Static Recipient button.
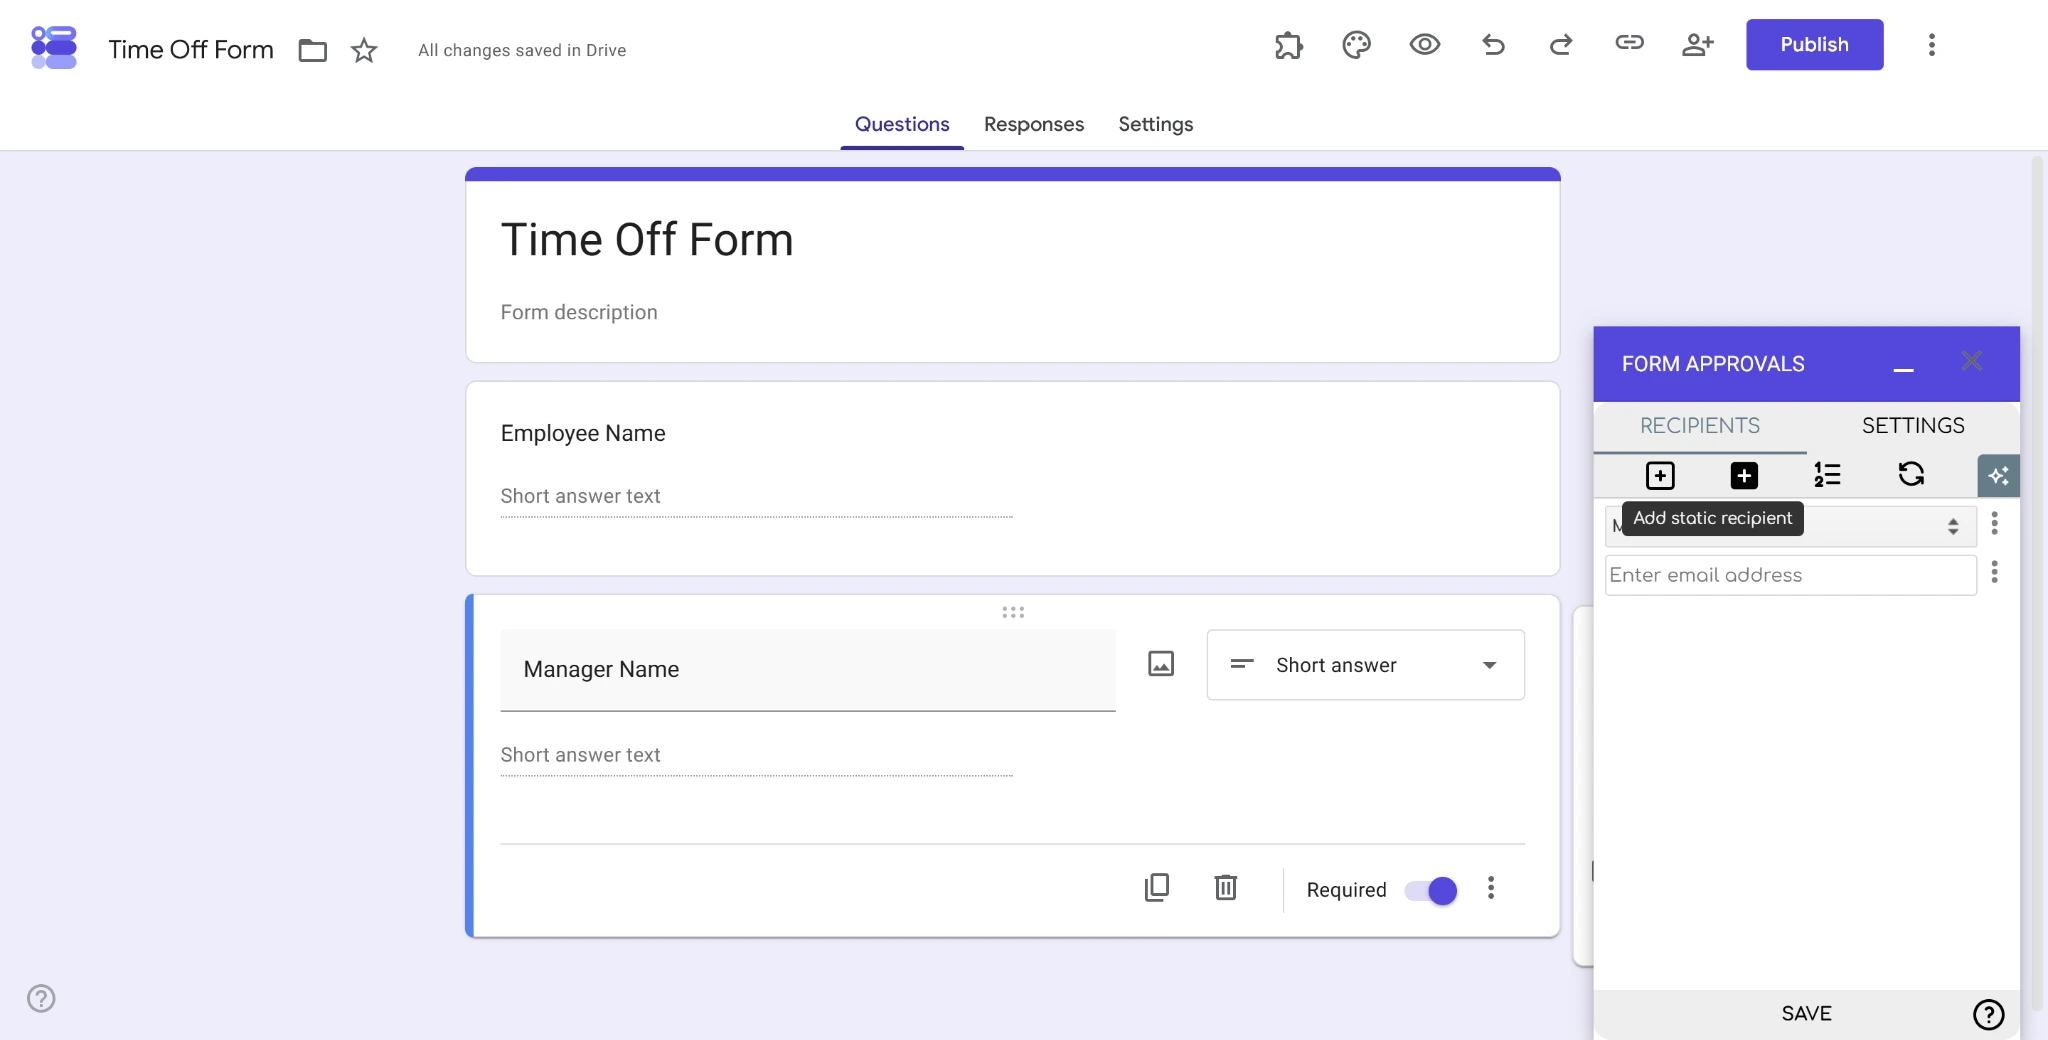
- Type in the email of your recipient and click Save to add.
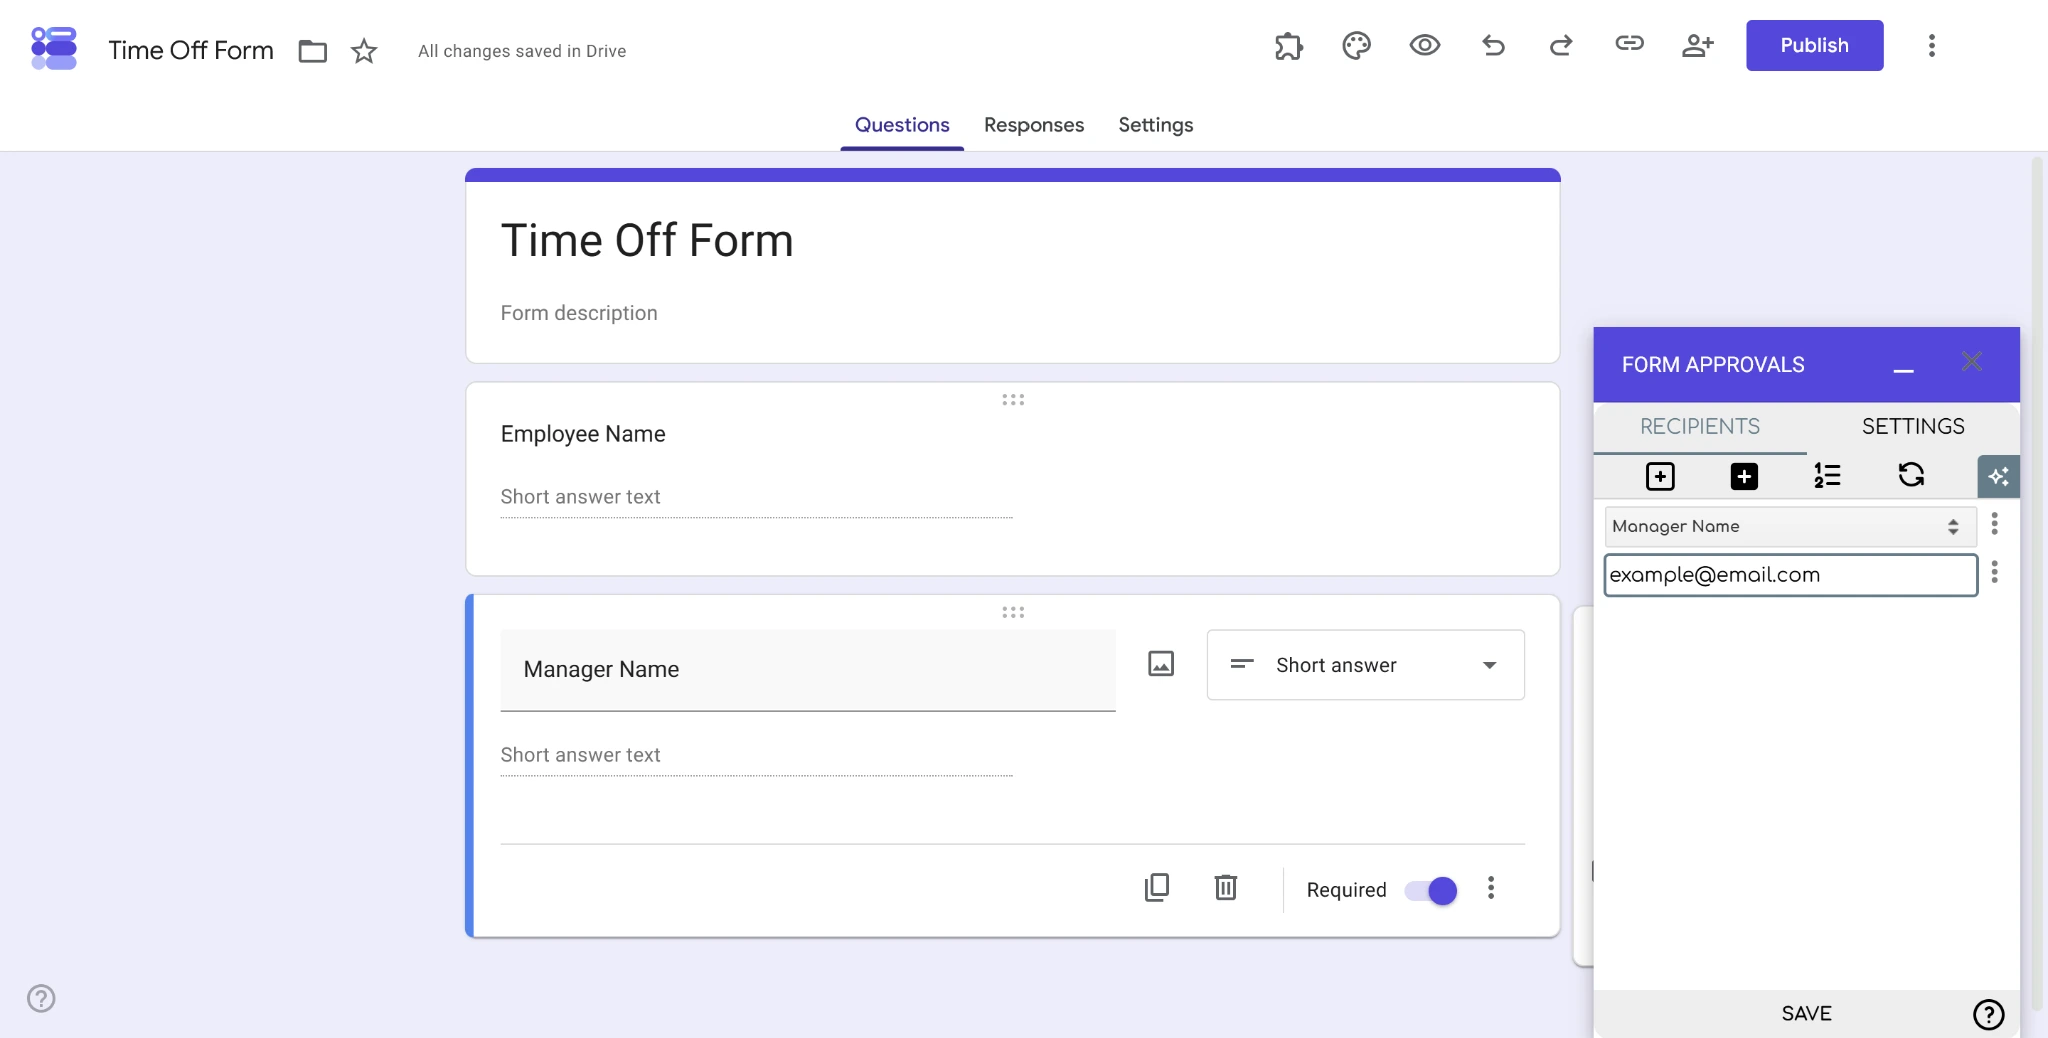
You can add as many recipients as you need. You can also add group recipients, but this process is only required when you need a member of a certain group to respond.
Keep in mind that you’ll have to manage the order and logic behind who receives your forms in your Google Forms approval workflow. This will become more complicated the more recipients you add.
4. Set the approval order and routing conditions
After you’ve added all your intended recipients, you’ll need to determine the order for your approval workflow — as well as any additional Google Forms conditional approval workflows that may impact this order.
- Click on the Set receiving order button in the Form Approvals add-on.
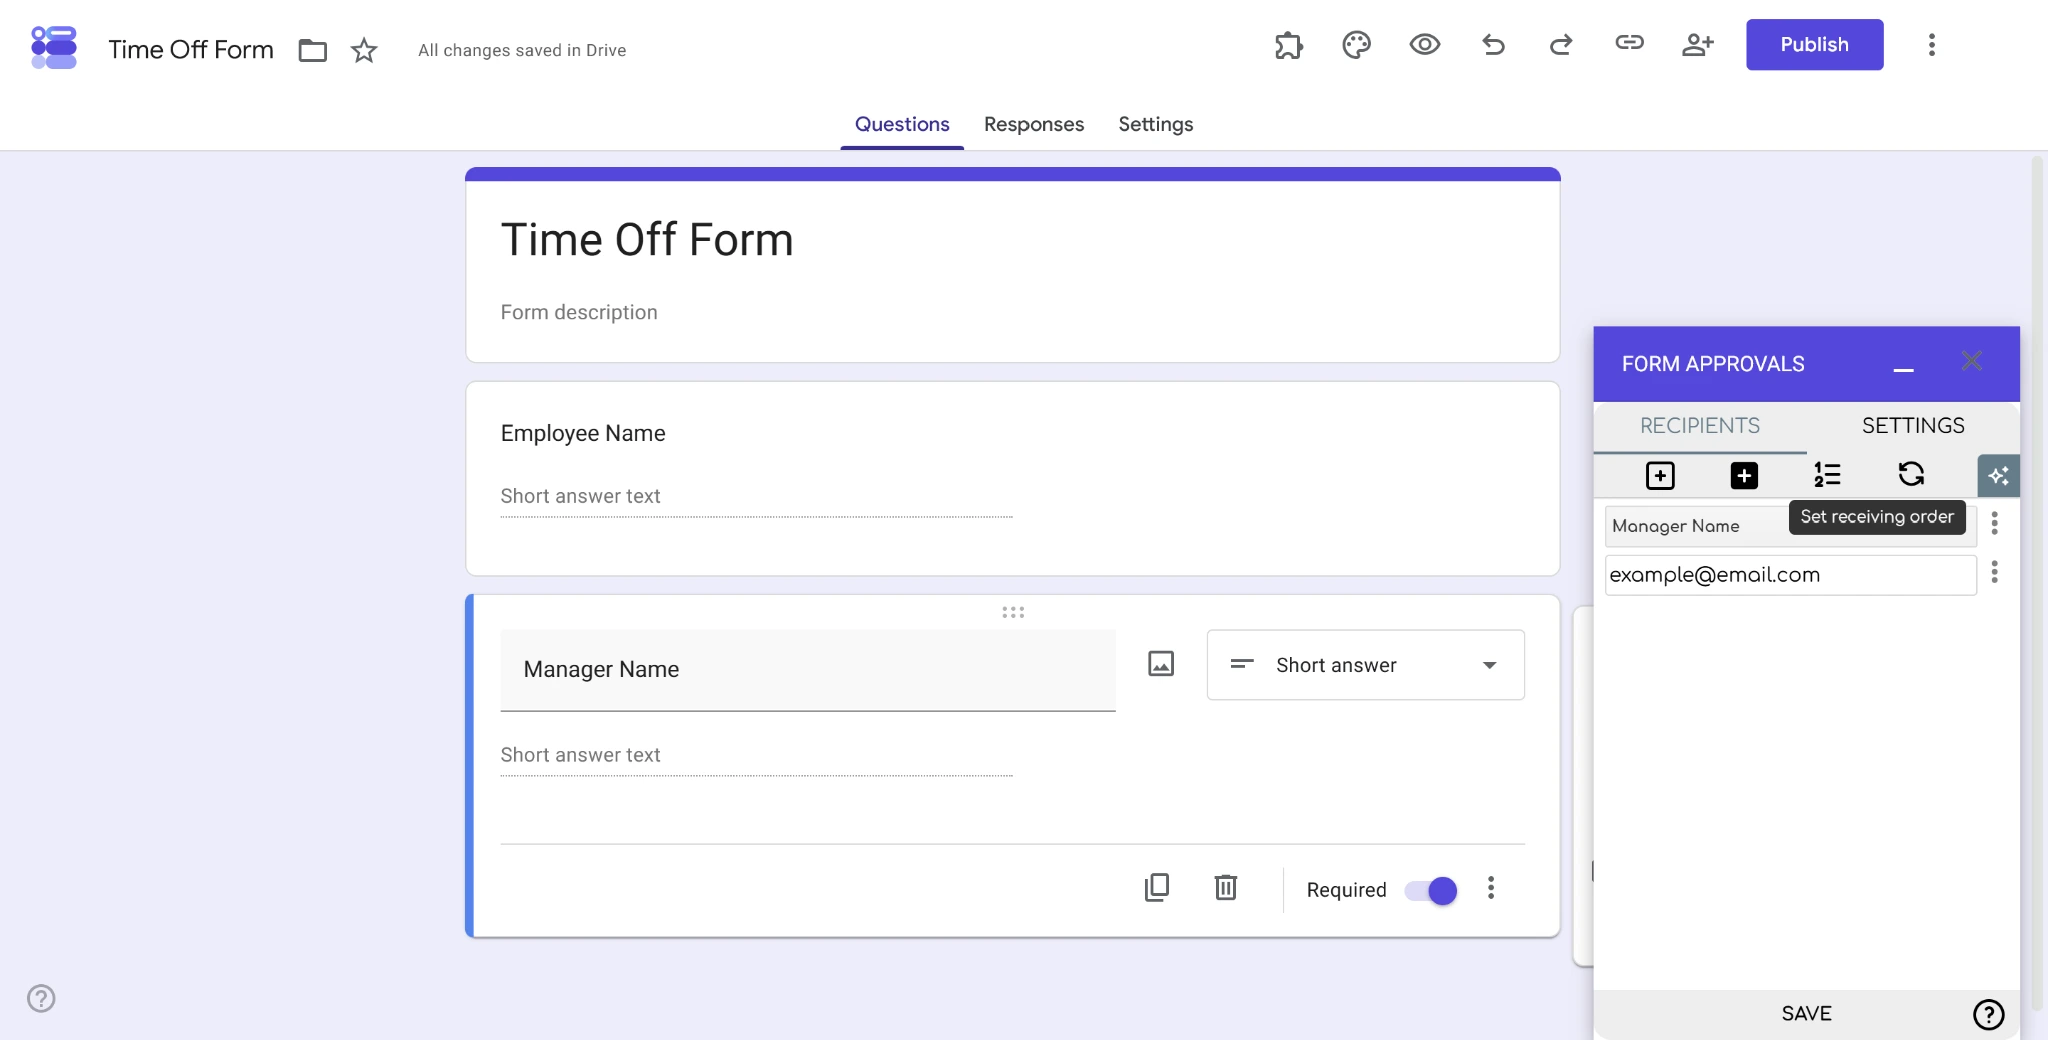
- Adjust the order by changing the numbers on the left-hand side of each dynamic or static recipient. This will determine the order in which your form must be approved, so consider factors like company hierarchy and roles.
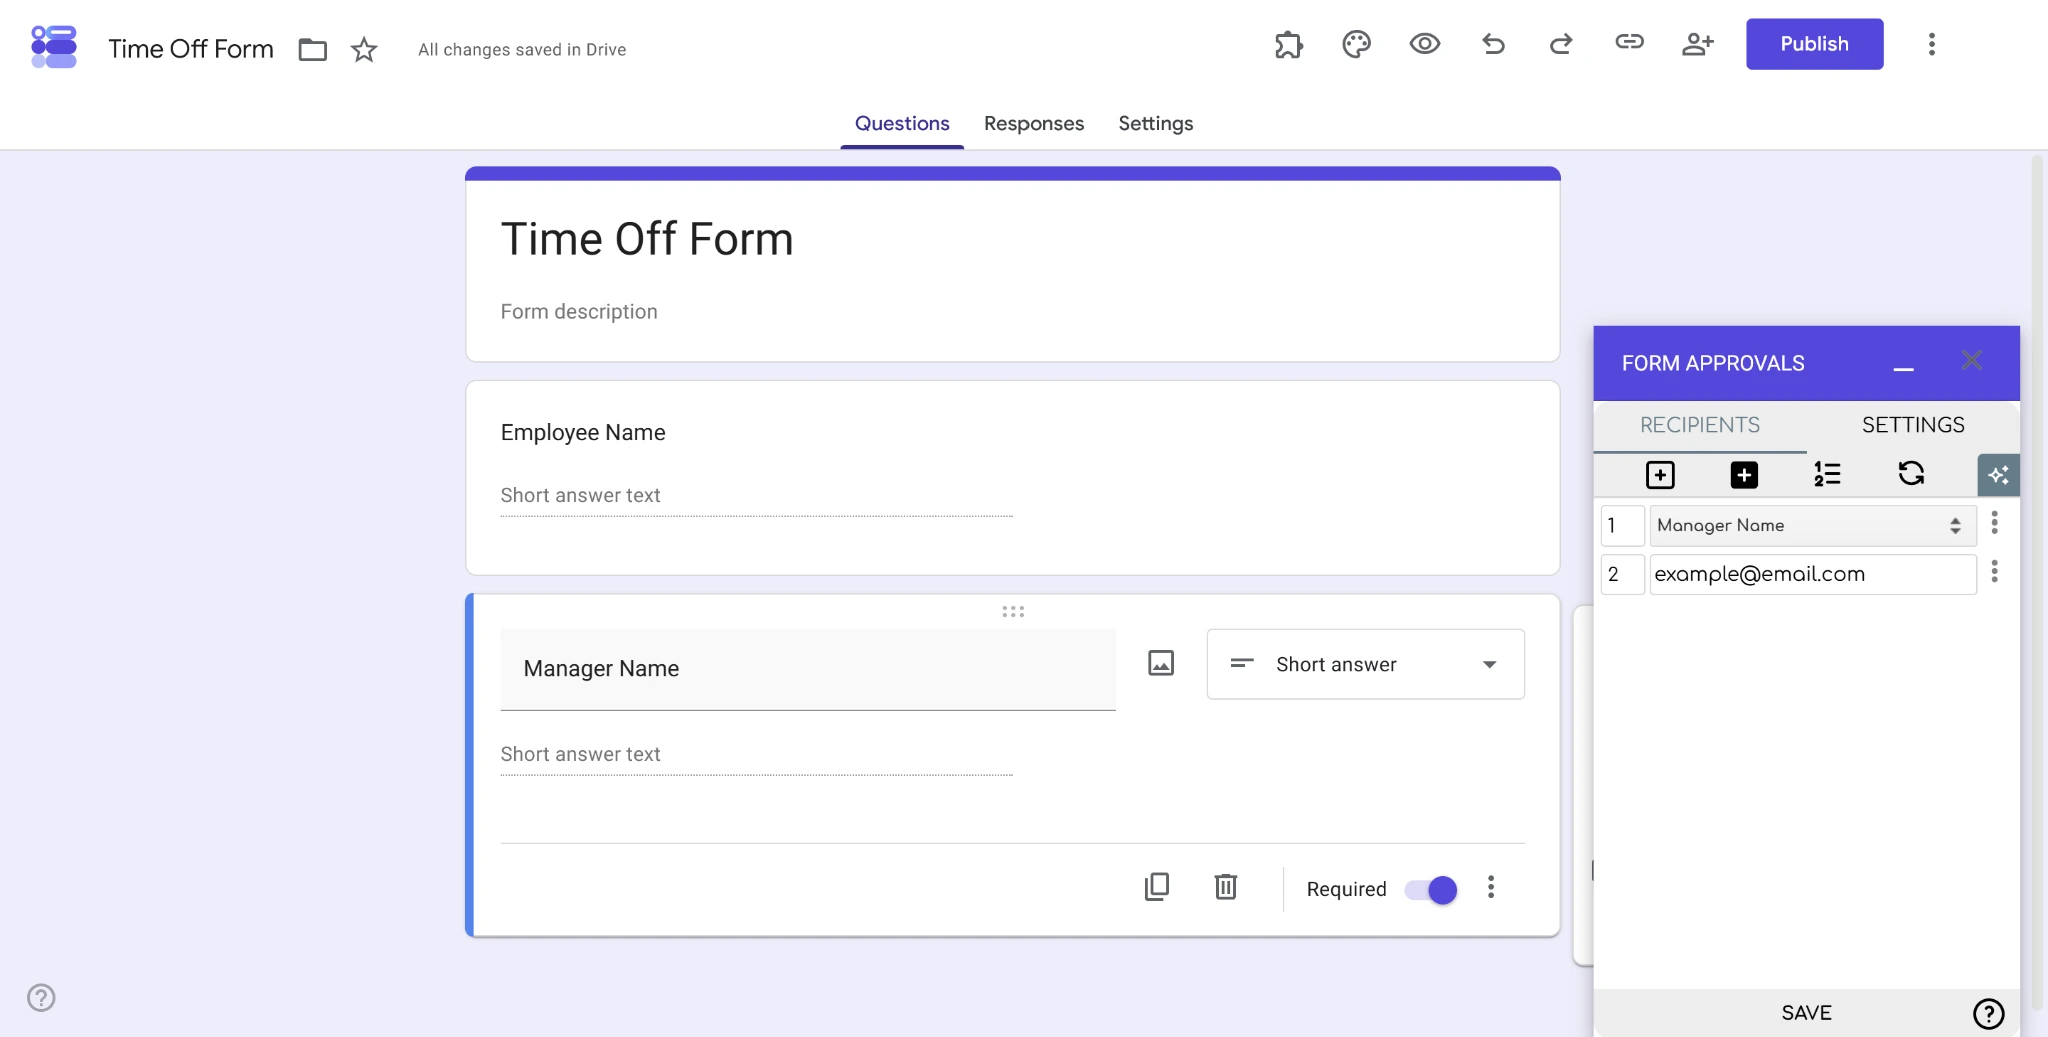
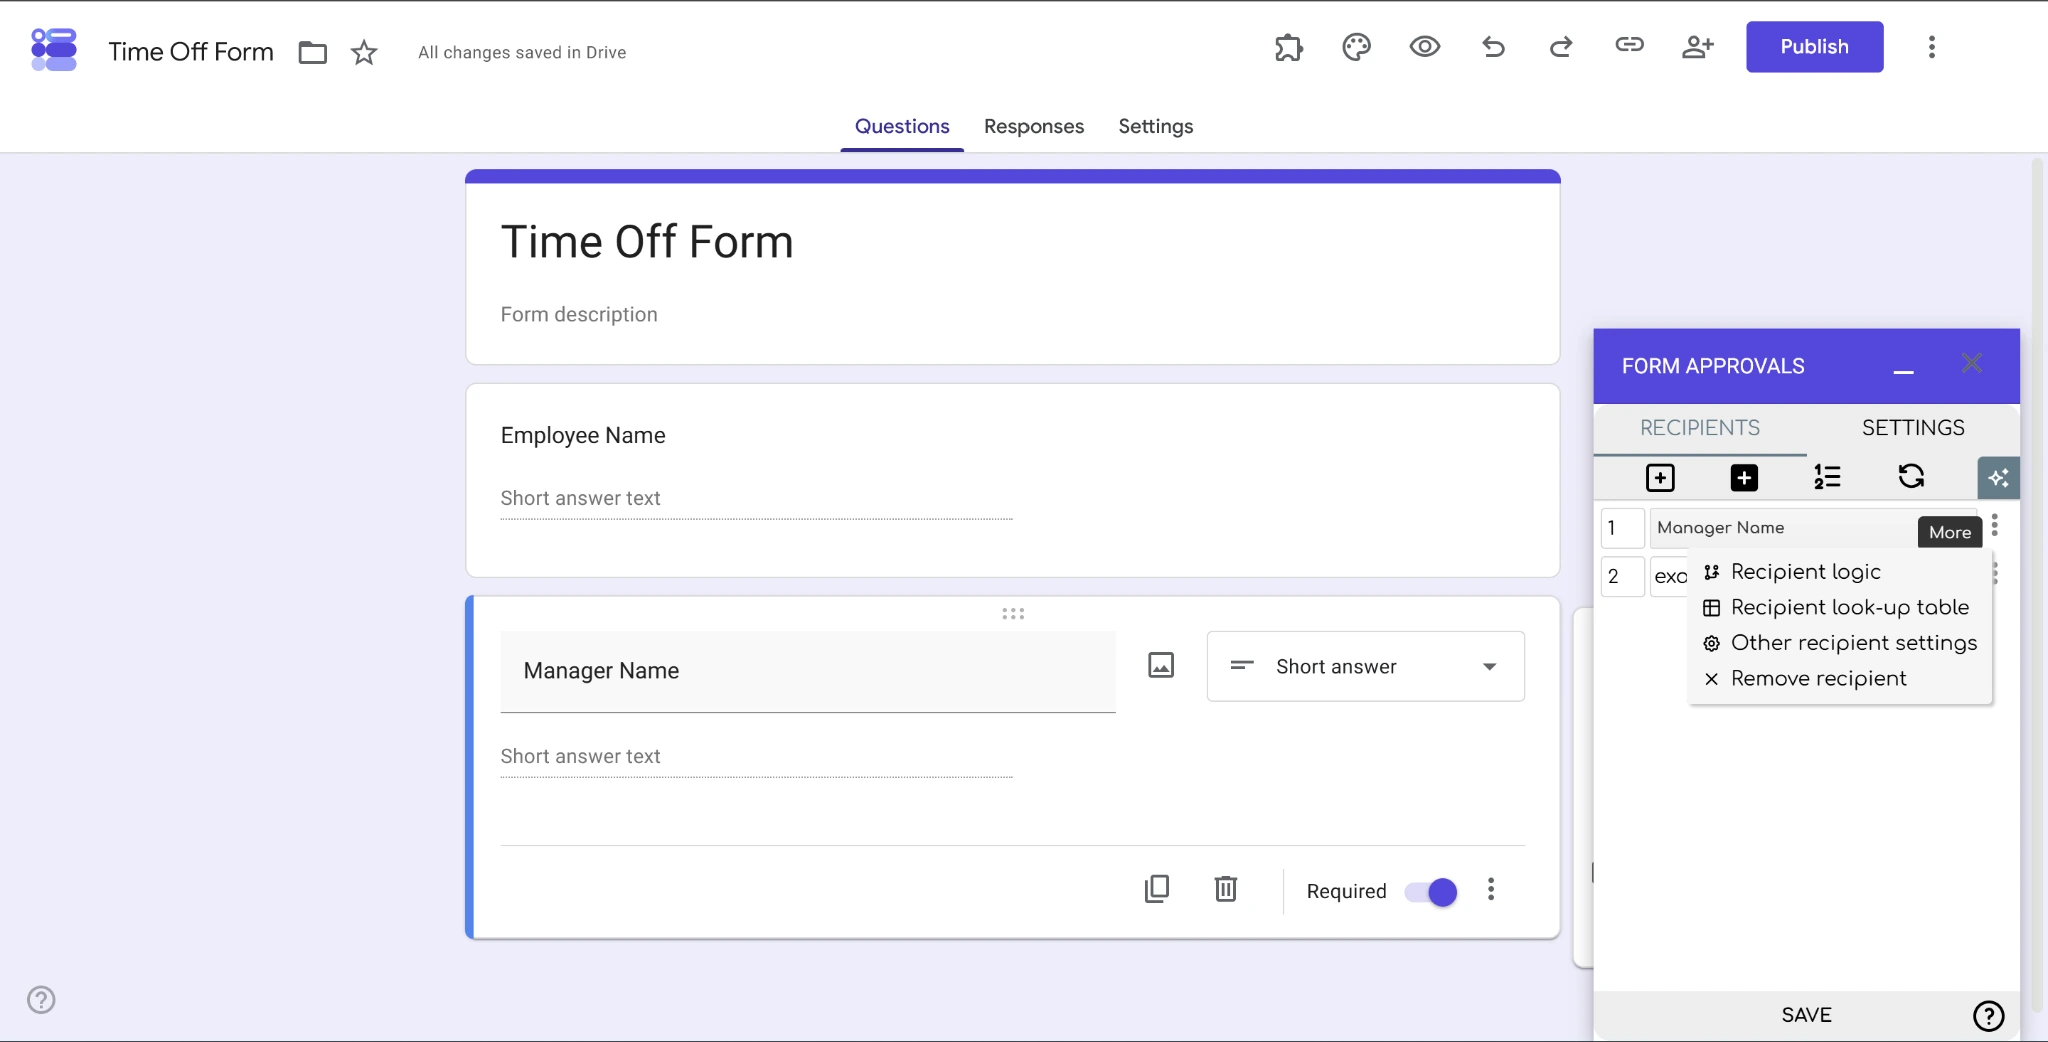
- Once your order is set, click the three-dot “More” button on the right and select Recipient logic.
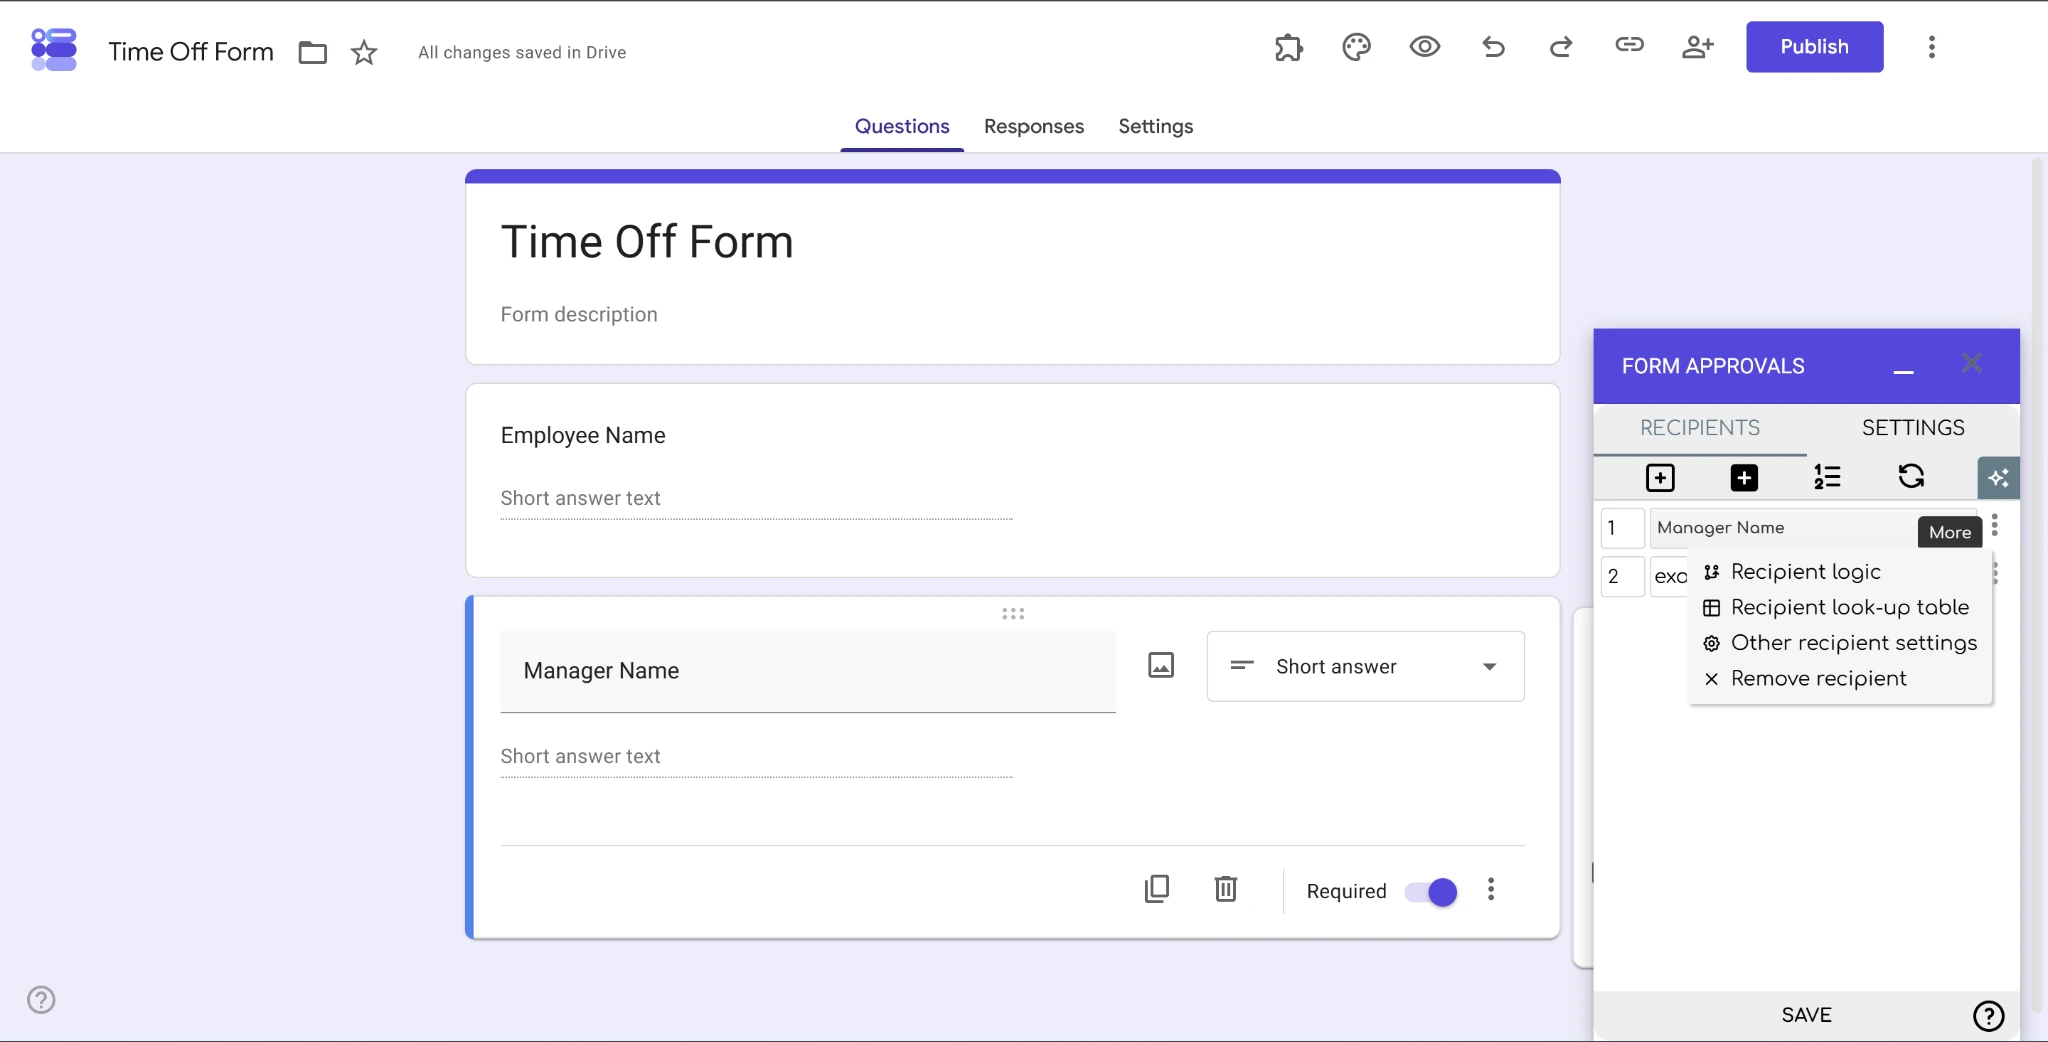
- Set the recipient logic to send specific forms to certain recipients depending on the input from specific fields. For example, you can set Google Forms approval routing logic around a specific employee’s name so that their forms are sent to their direct manager.
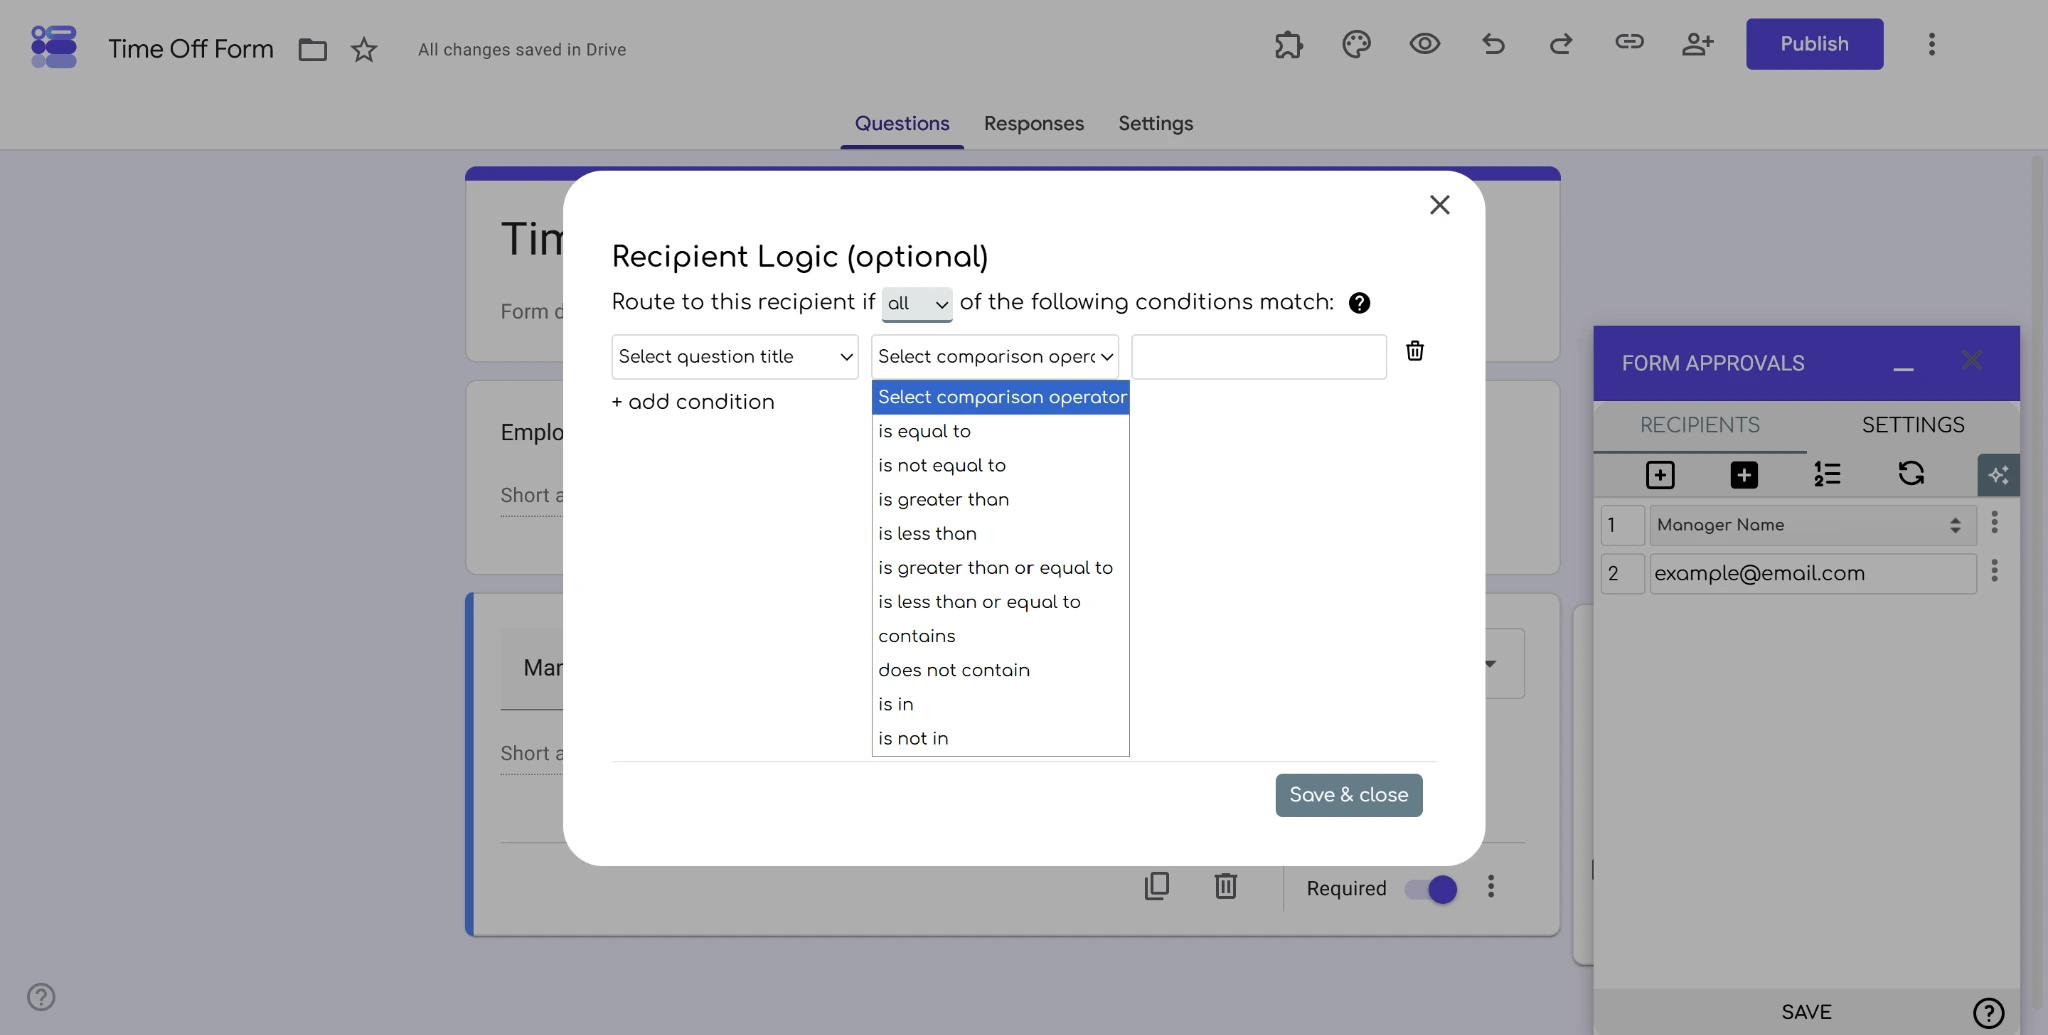
You may not need to use recipient logic or ordering for simple workflows. But these advanced settings can help execute multilevel approvals in Google Forms for complex organizations that have a wide range of stakeholders.
5. Customize notifications and workflow settings
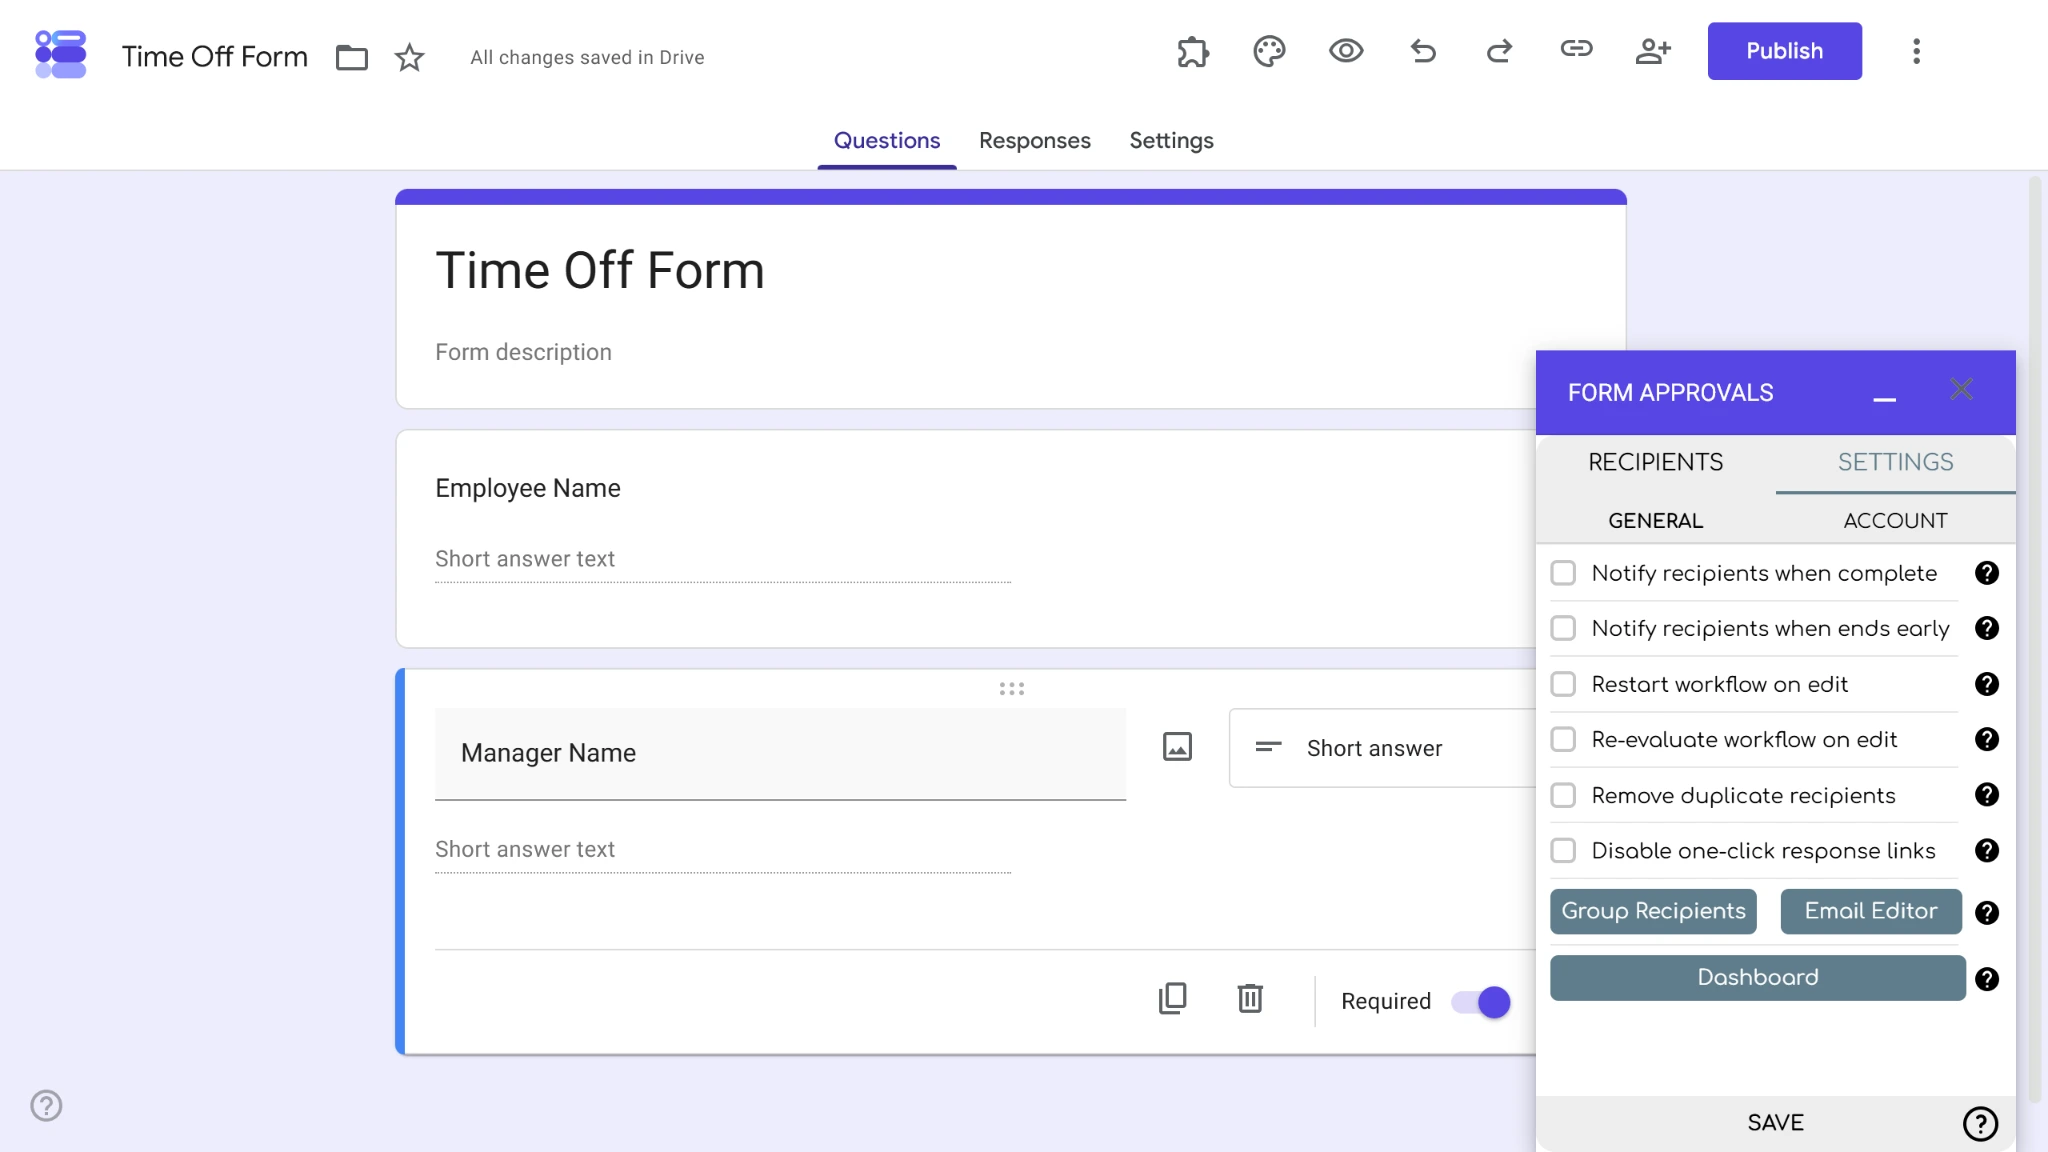
To update the settings of your Form Approvals workflows, click into the Settings tab at the top of the add-on. From there, you can turn settings on and off, including
- Notify recipients when complete
- Notify recipients when ends early
- Restart workflow on edit
- Re-evaluate workflow on edit
- Remove duplicate recipients
- Disable one-click response links
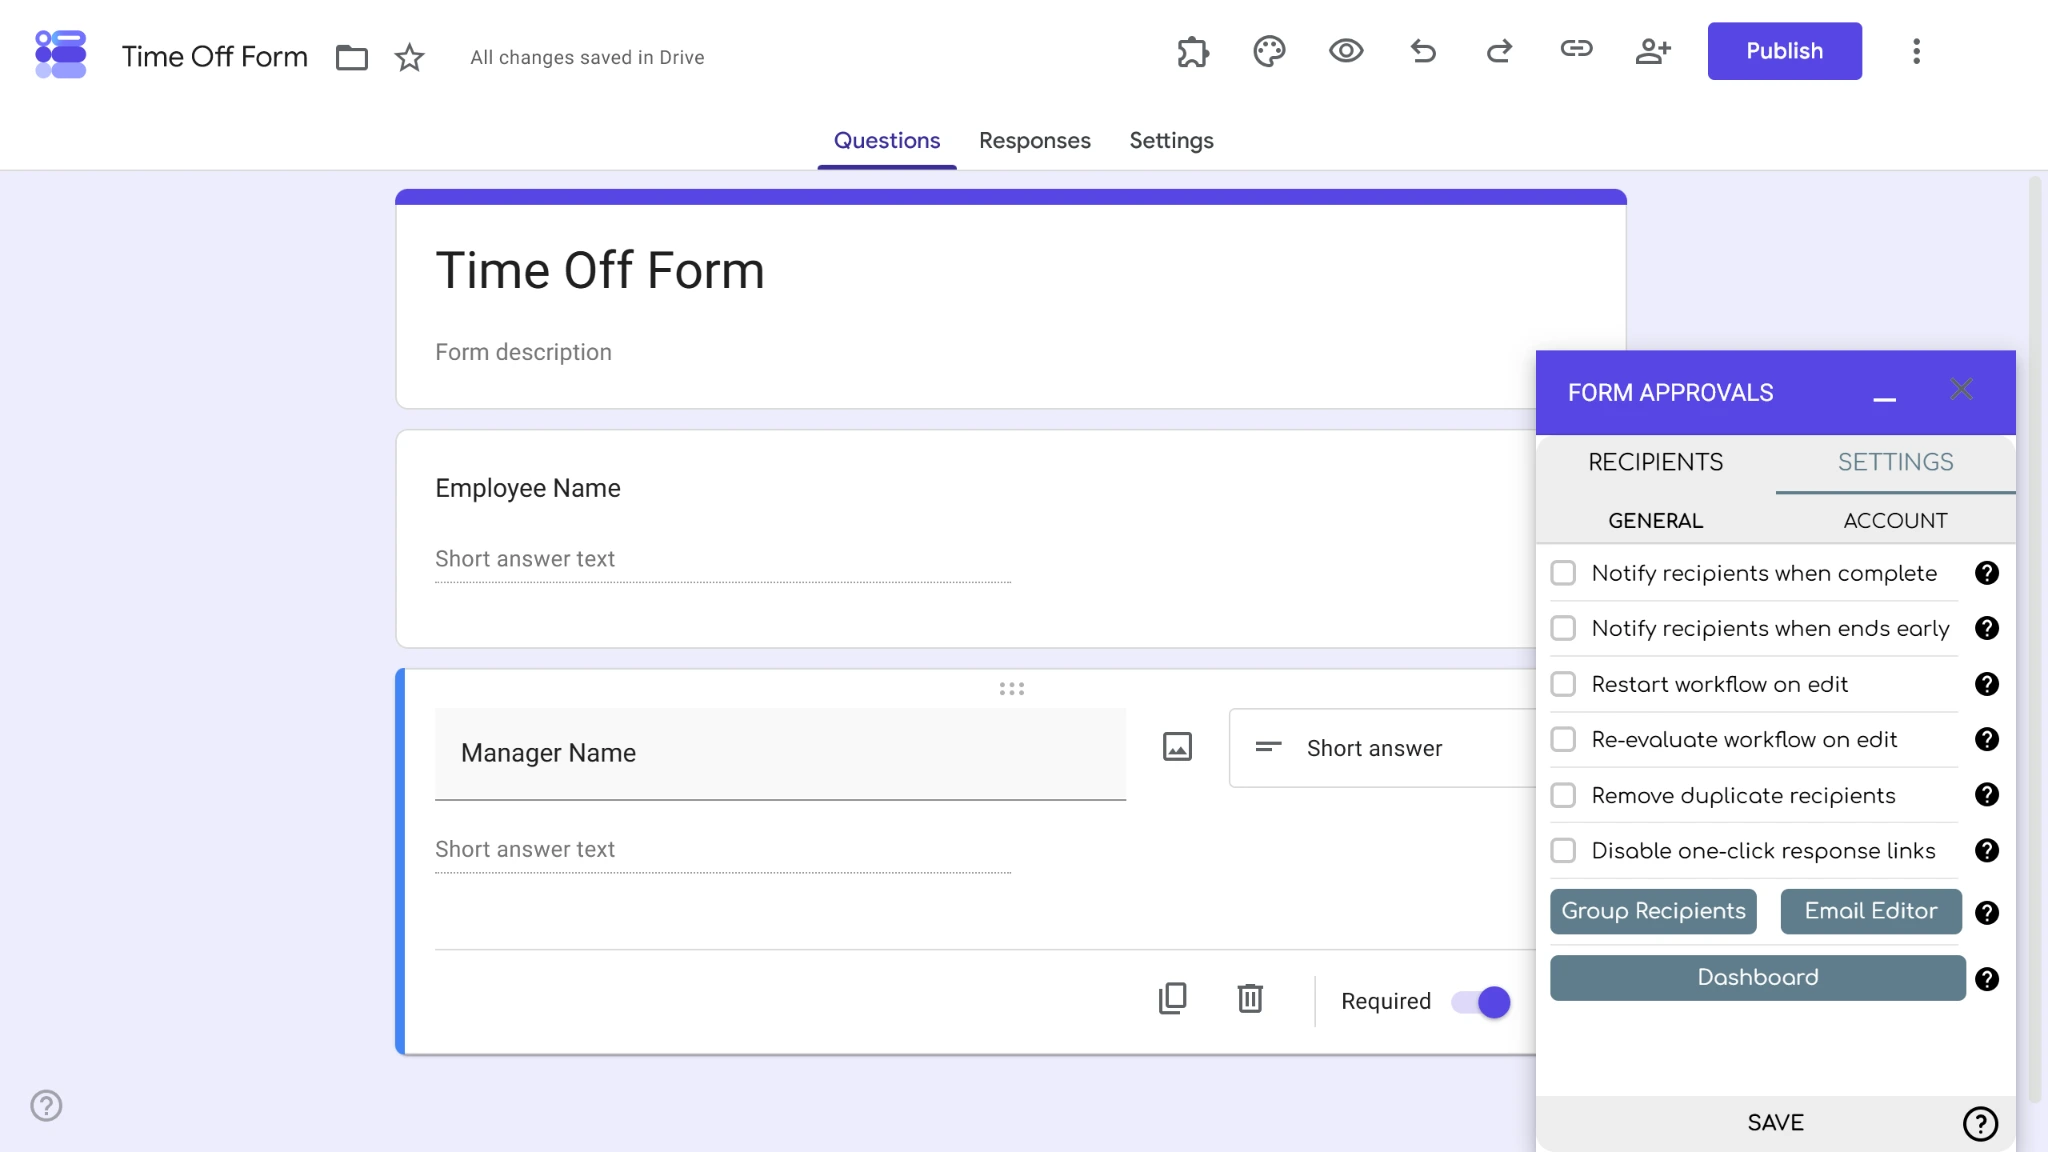
These settings can be changed at any time to improve your approvals setup.
Adding signatures or generated documents
During your Form Approvals review, you may need sign-off or review of certain documents from team members to authorize the approval of your Google Forms. Here’s how you can add these tasks to your workflow:
Signature
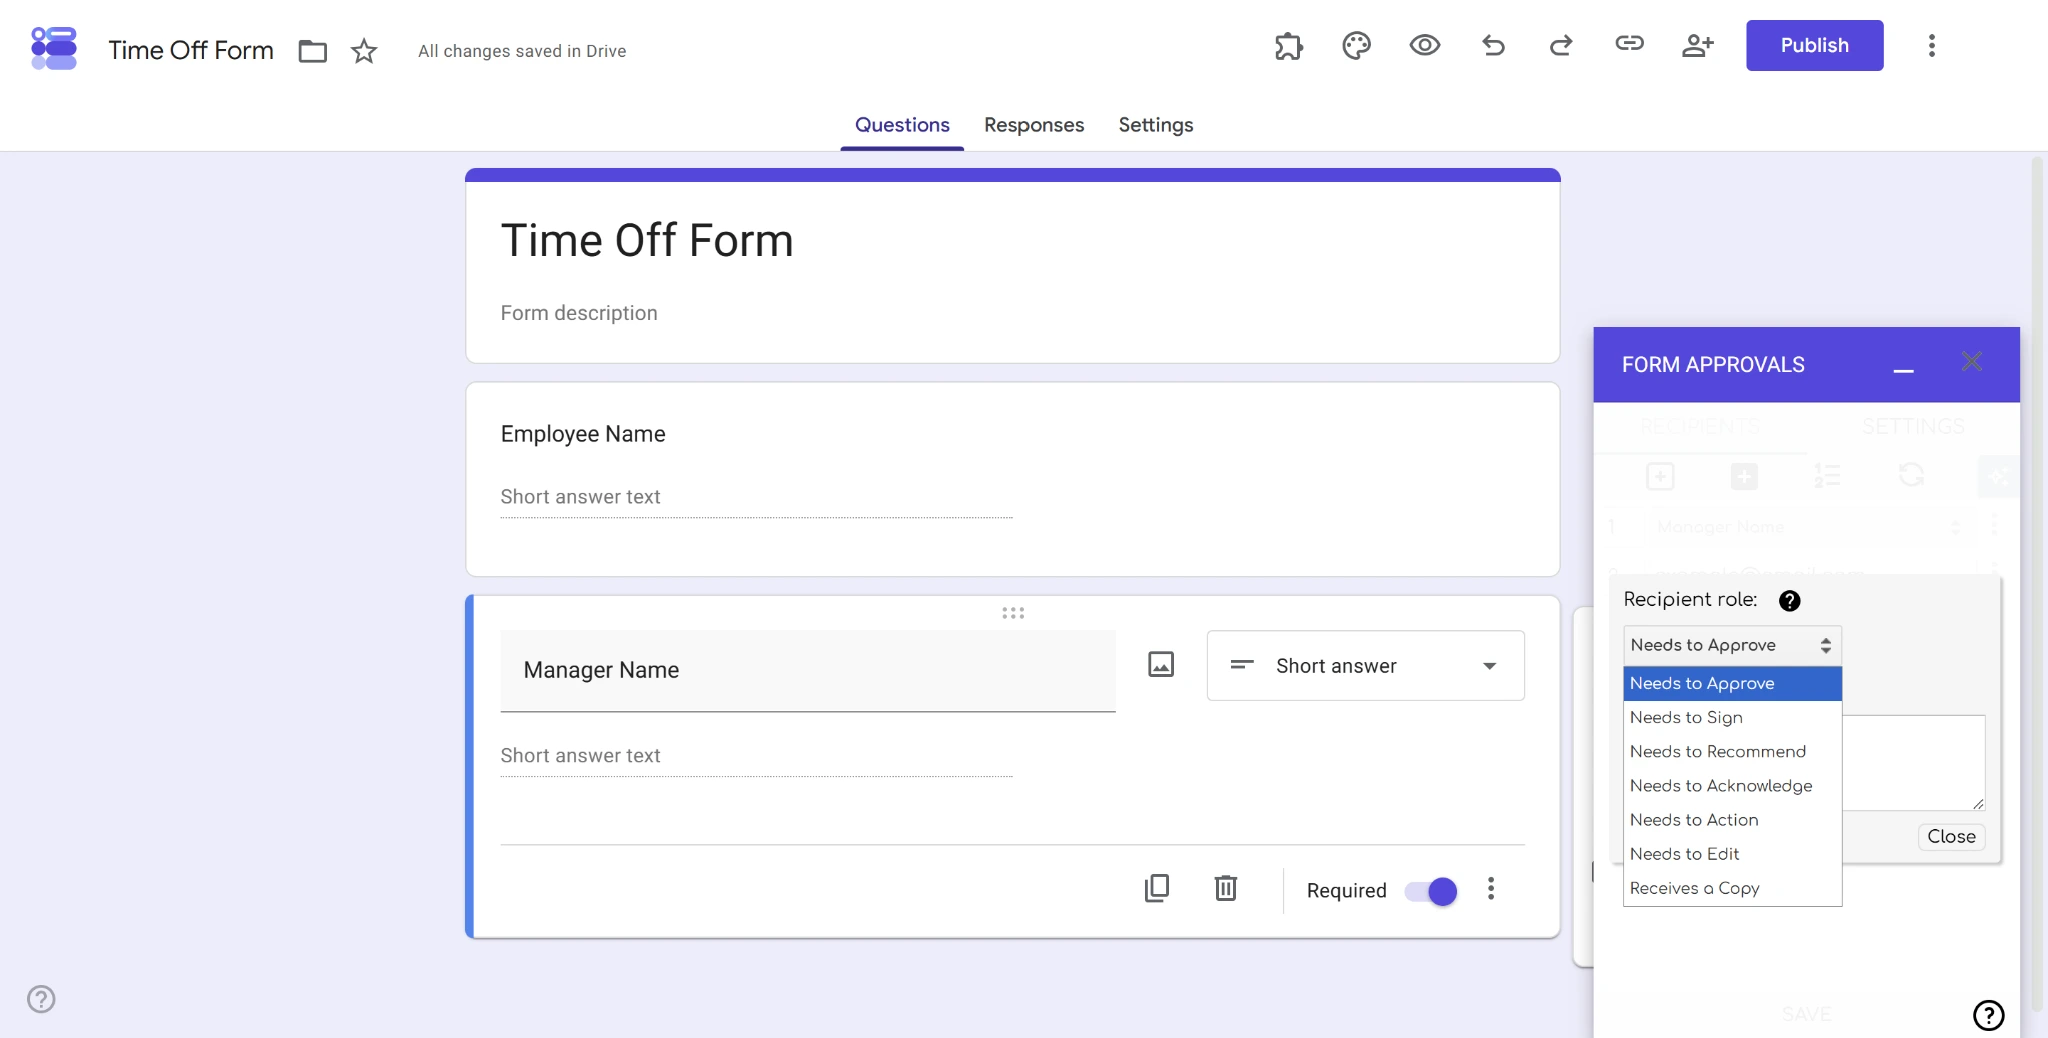
- Click the three-dot “More” button on your recipients list next to the recipient who needs to sign. Then click Other recipient settings.
- Choose Needs to Sign from the Recipient role dropdown menu and click Close.
File
- Go to the Settings menu of Form Approvals and click the Email Editor button.
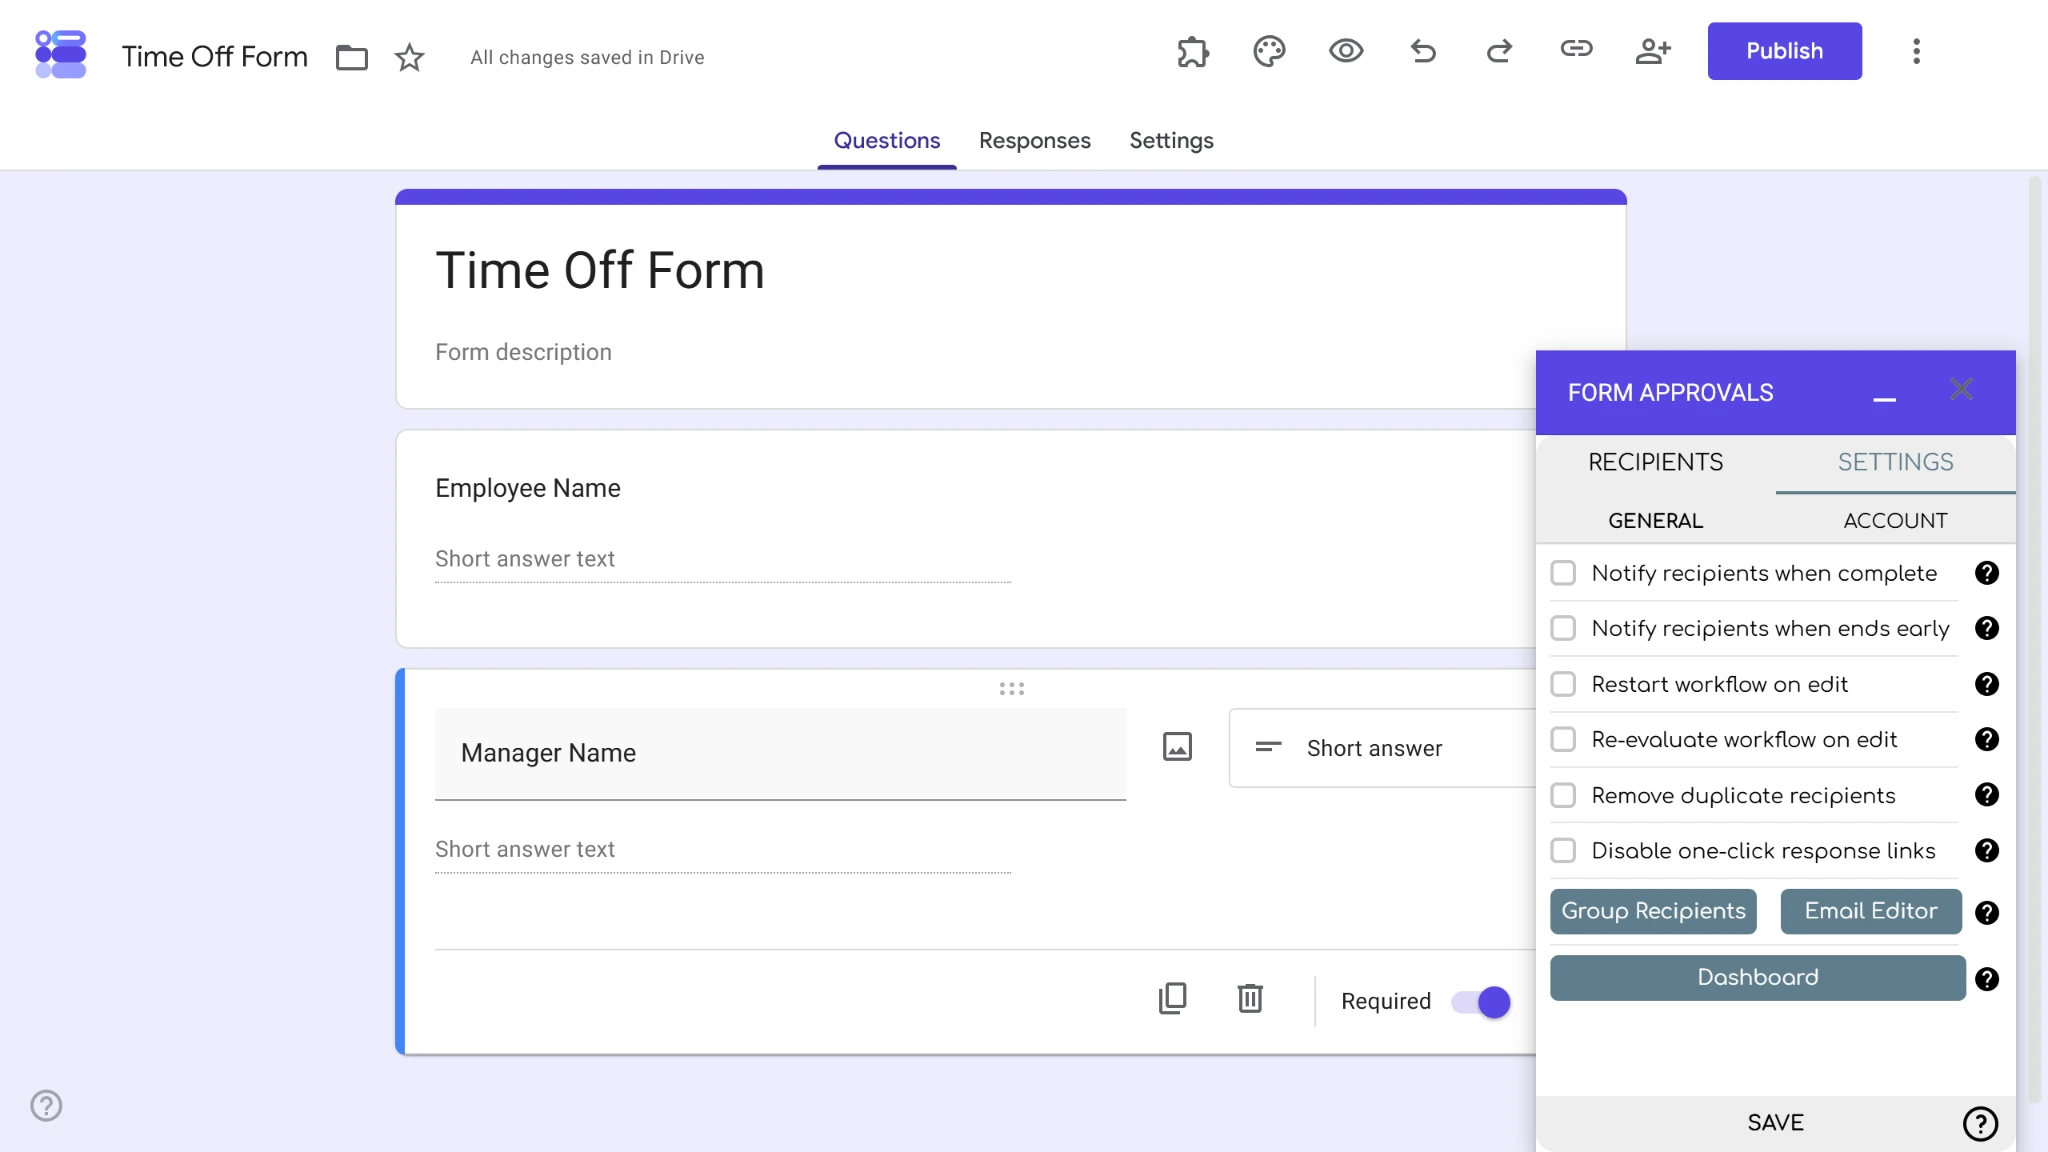
- Click the Other button on the left side of the Email Editor.
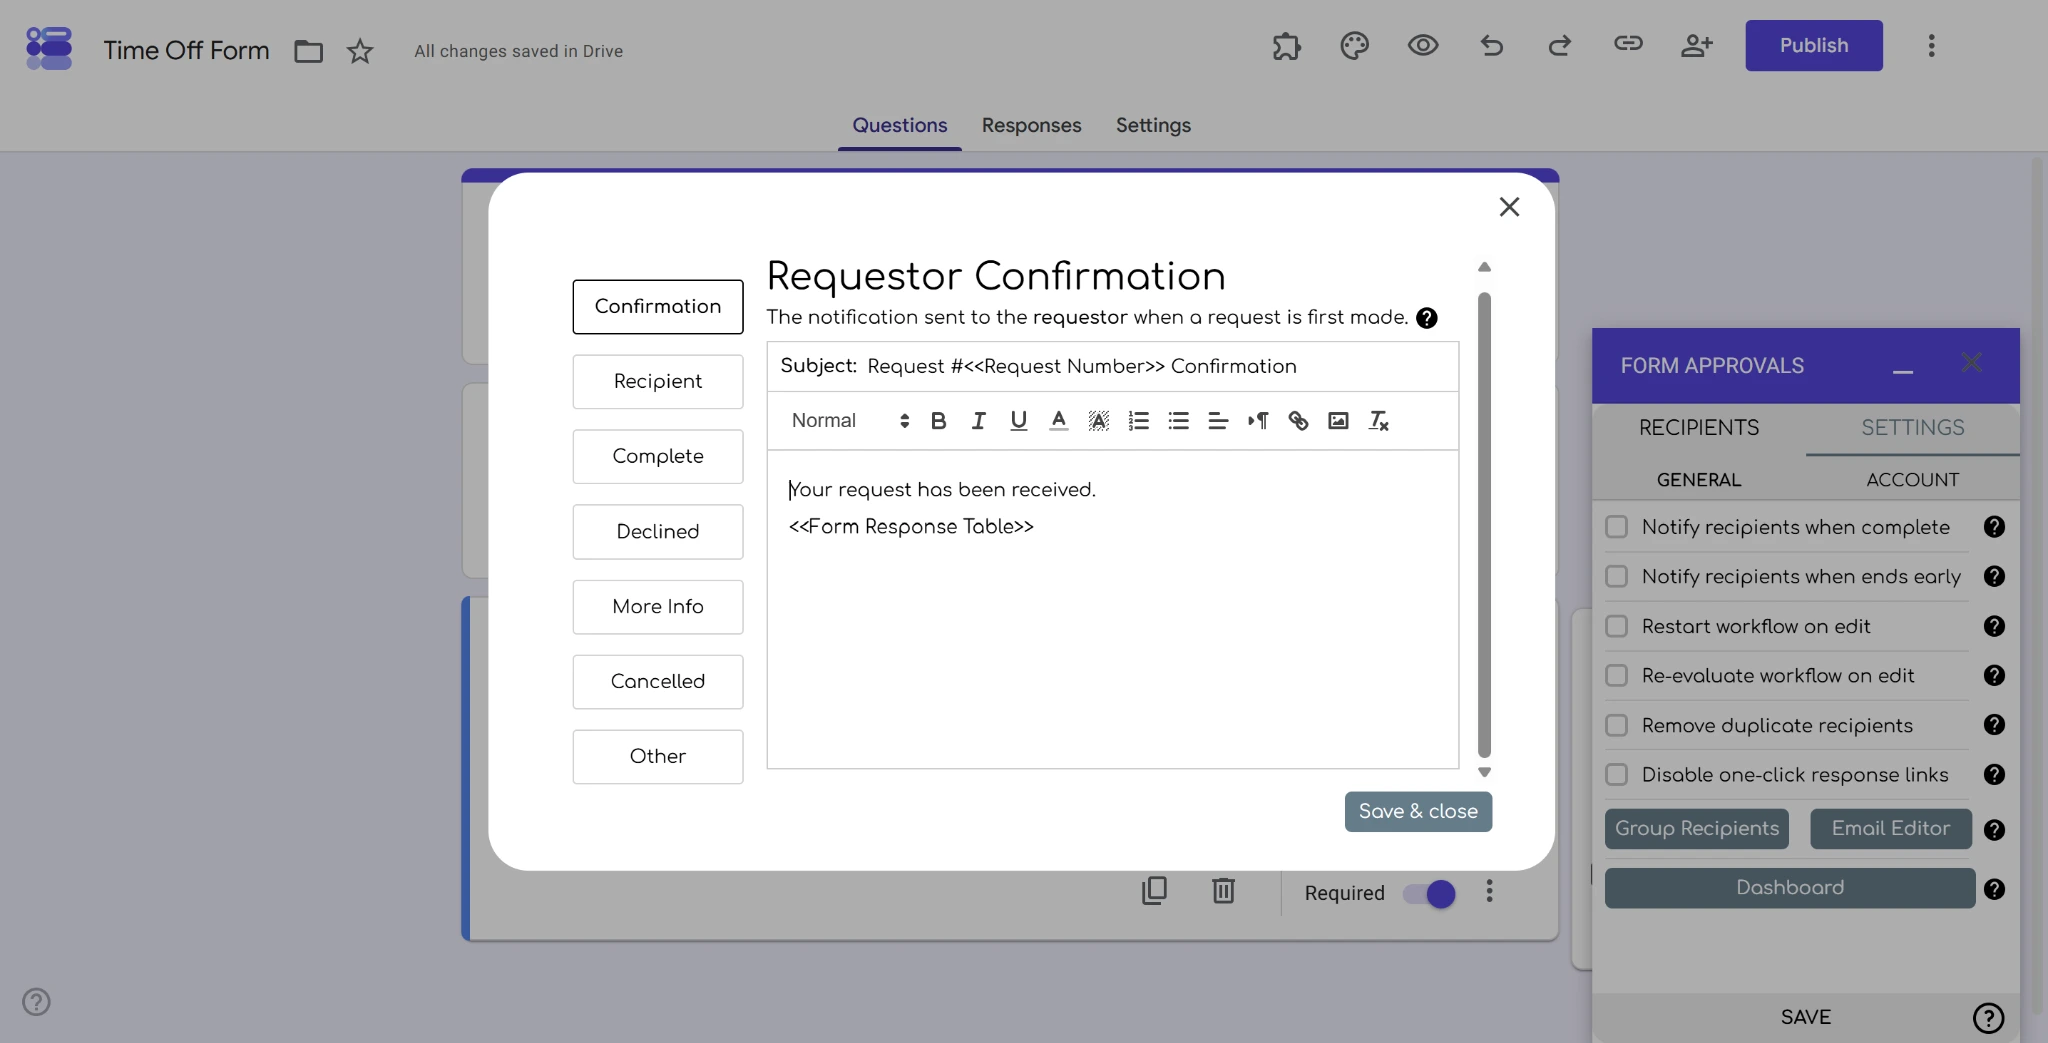
- Under “Attach files to notifications,” click + add attachment.
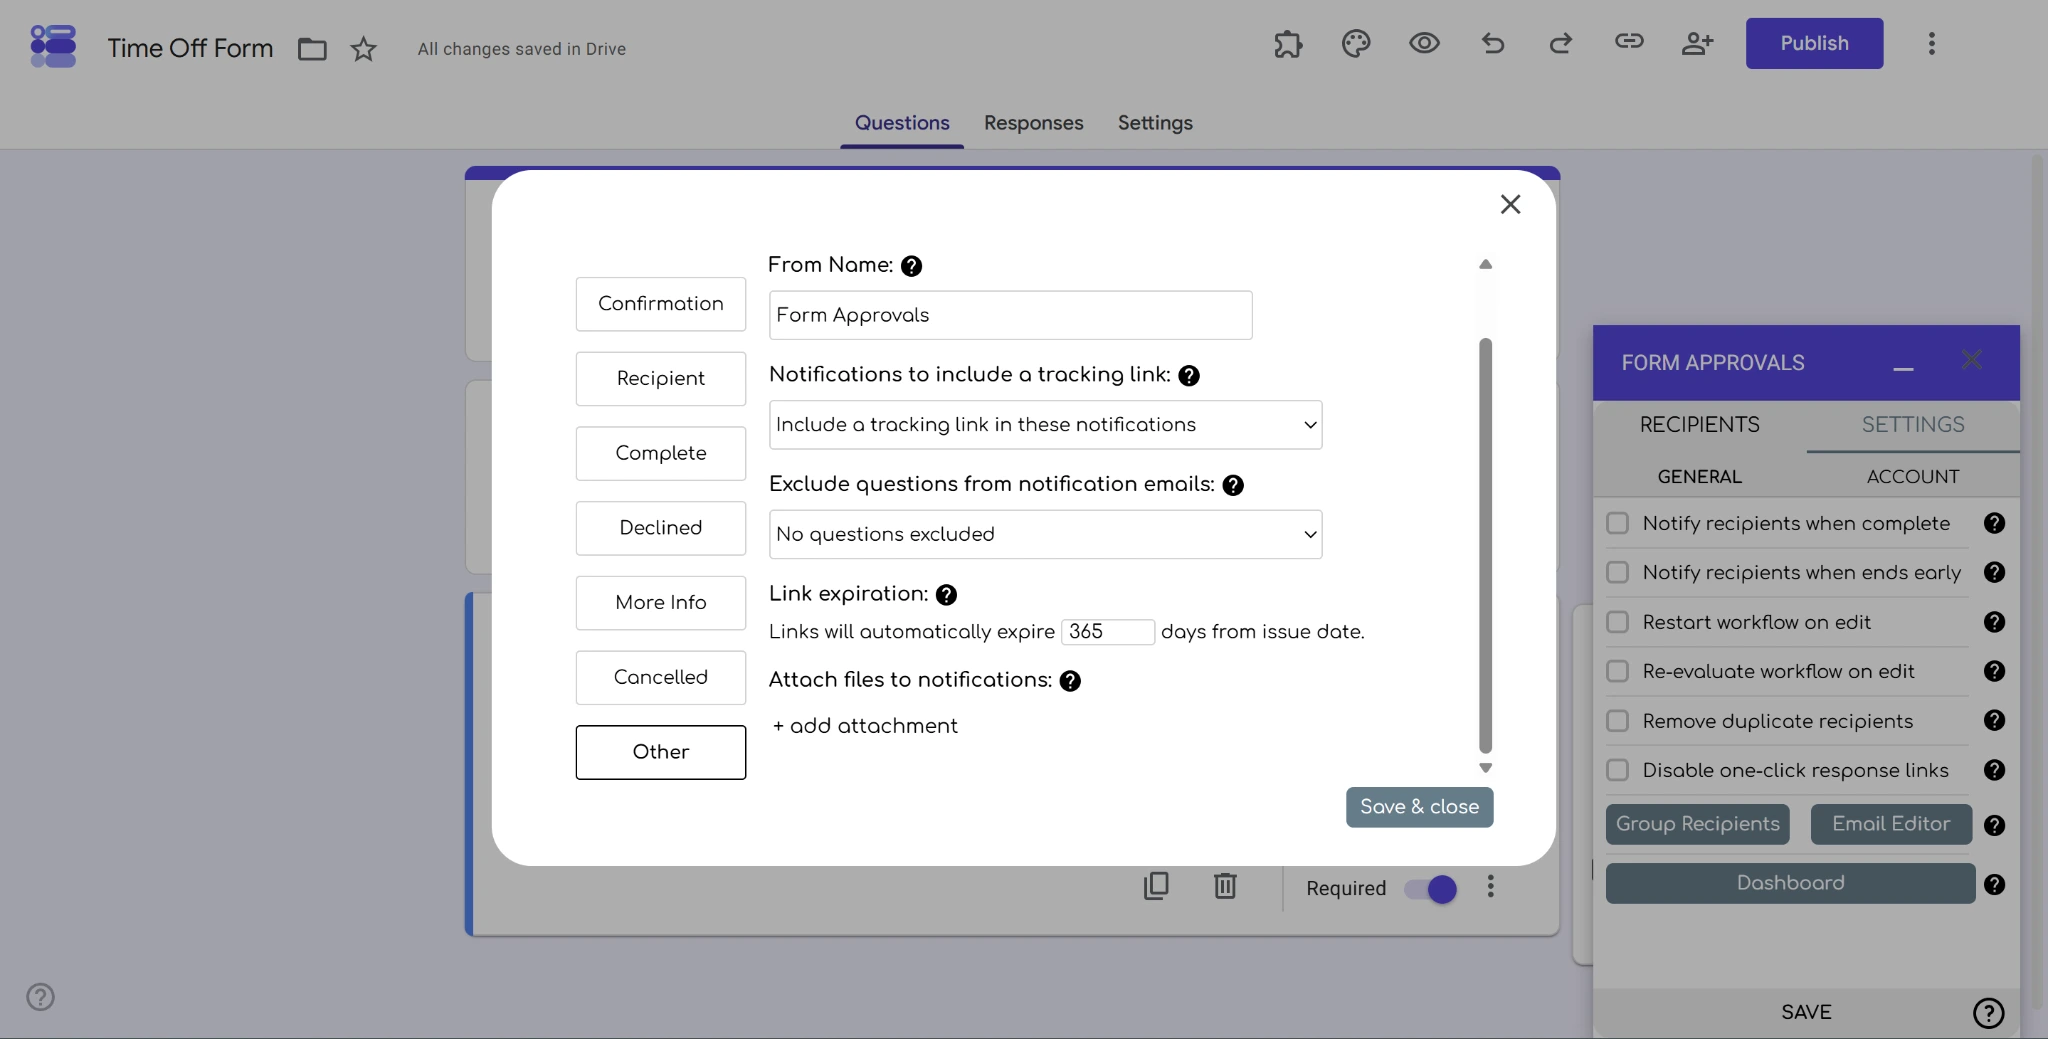
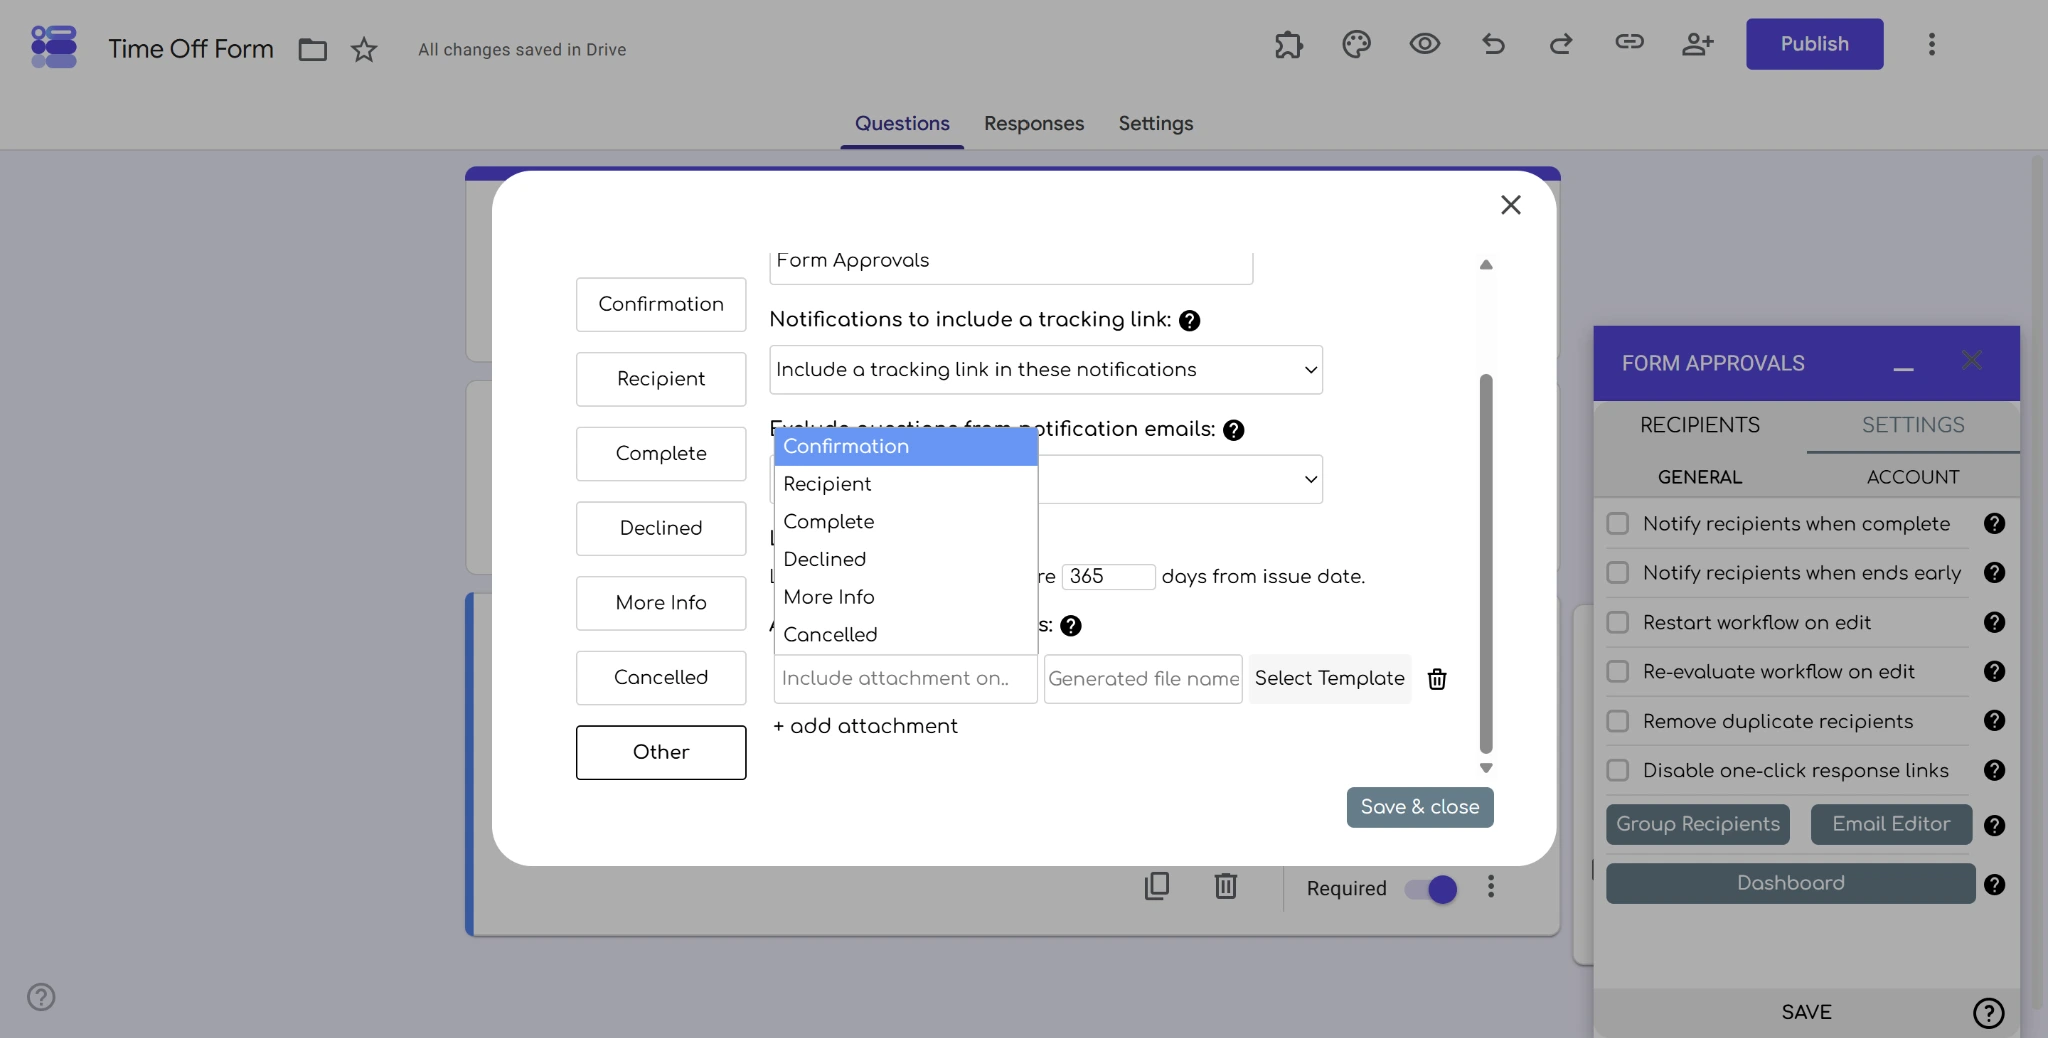
- Select which email notification you want to attach your file to, then click Select Template to choose a file to attach. Click Save & close when you’re finished.
6. Activate and test the approval workflow
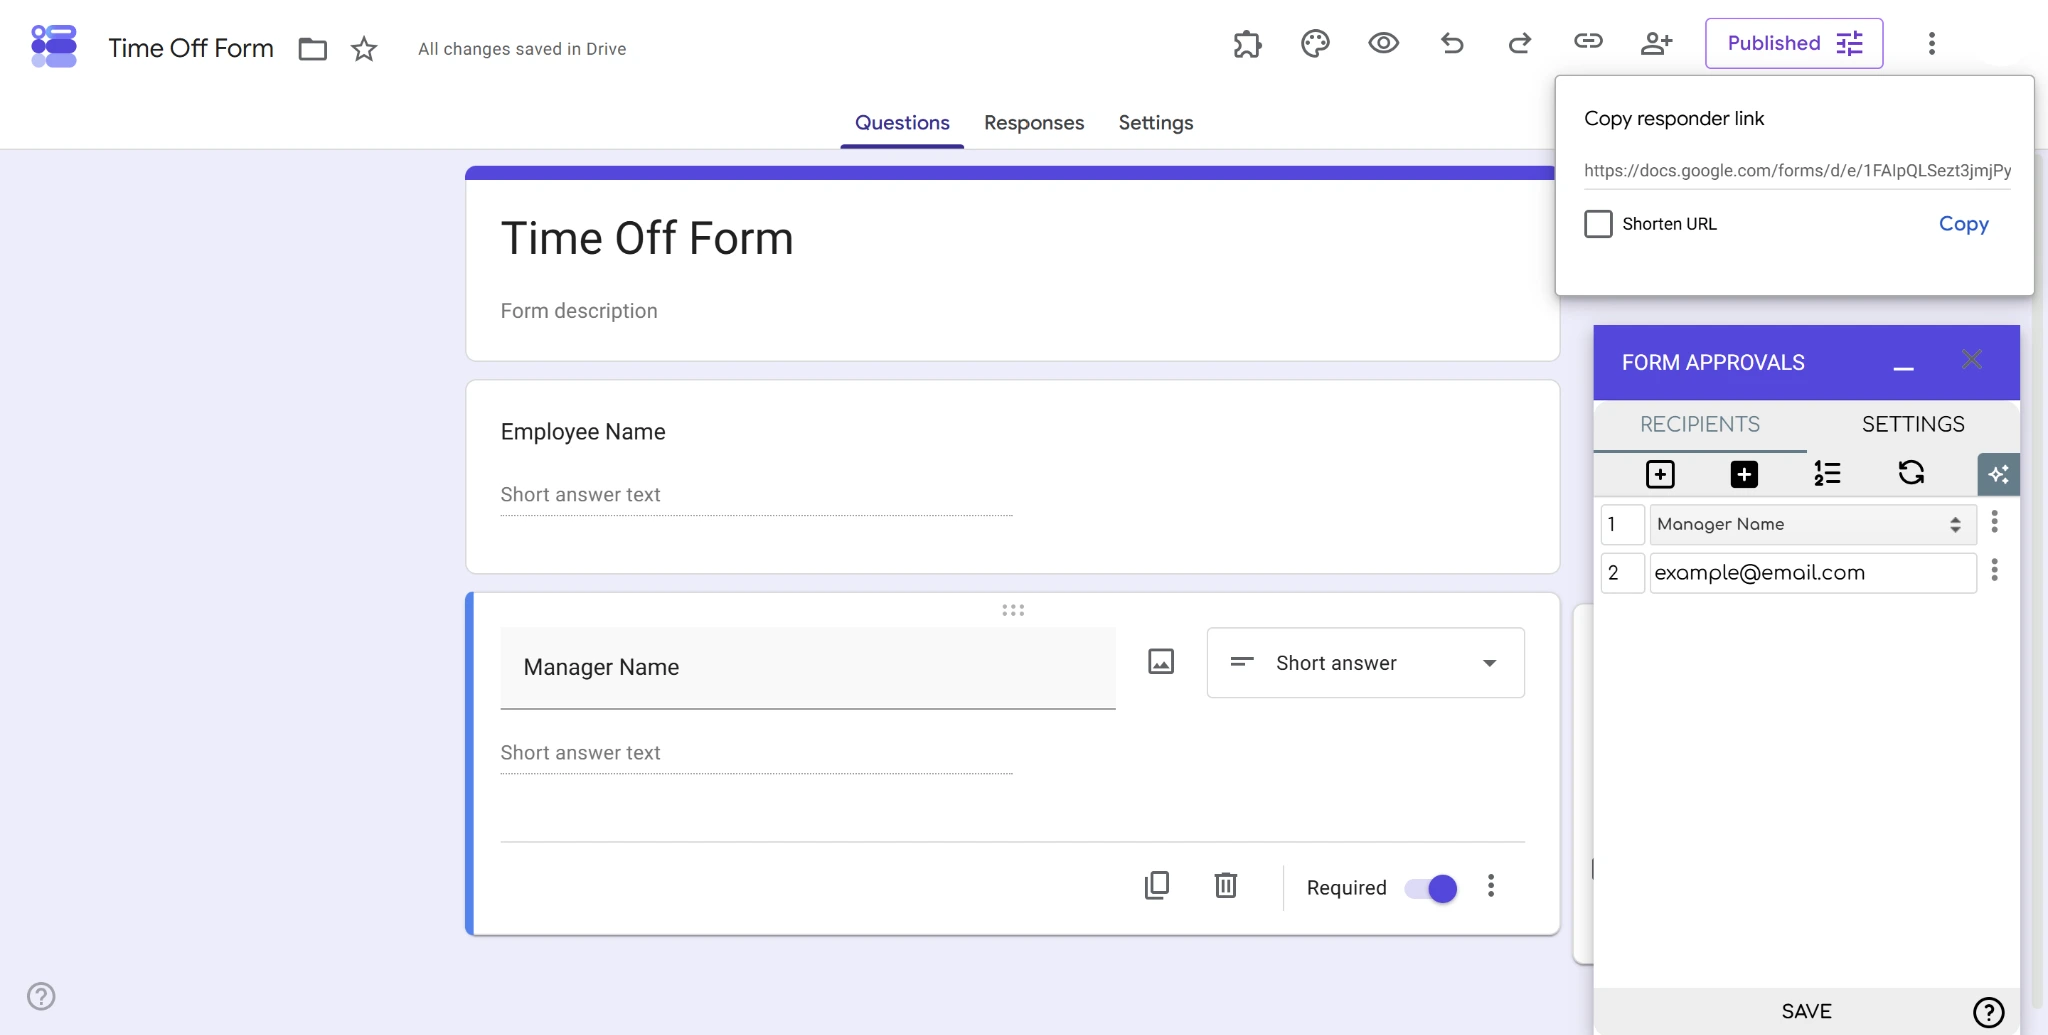
Once you’re finished, save your changes. Now it’s time to test your approval workflow to see if it works. Publish your form and copy the responder link. Then fill out your form and check whether your workflow sends a notification to the correct recipient.
If your workflow doesn’t send emails as intended, check that your recipient email addresses are entered correctly and that the right fields are connected as dynamic recipients.
7. Track and manage approval requests
As your approval requests come in, you can manage them all within the Form Approvals dashboard.
- Open the Settings menu for Form Approvals, then click on the Dashboard button at the bottom.
- Go to the My Forms tab on your dashboard to view individual forms and their related data.
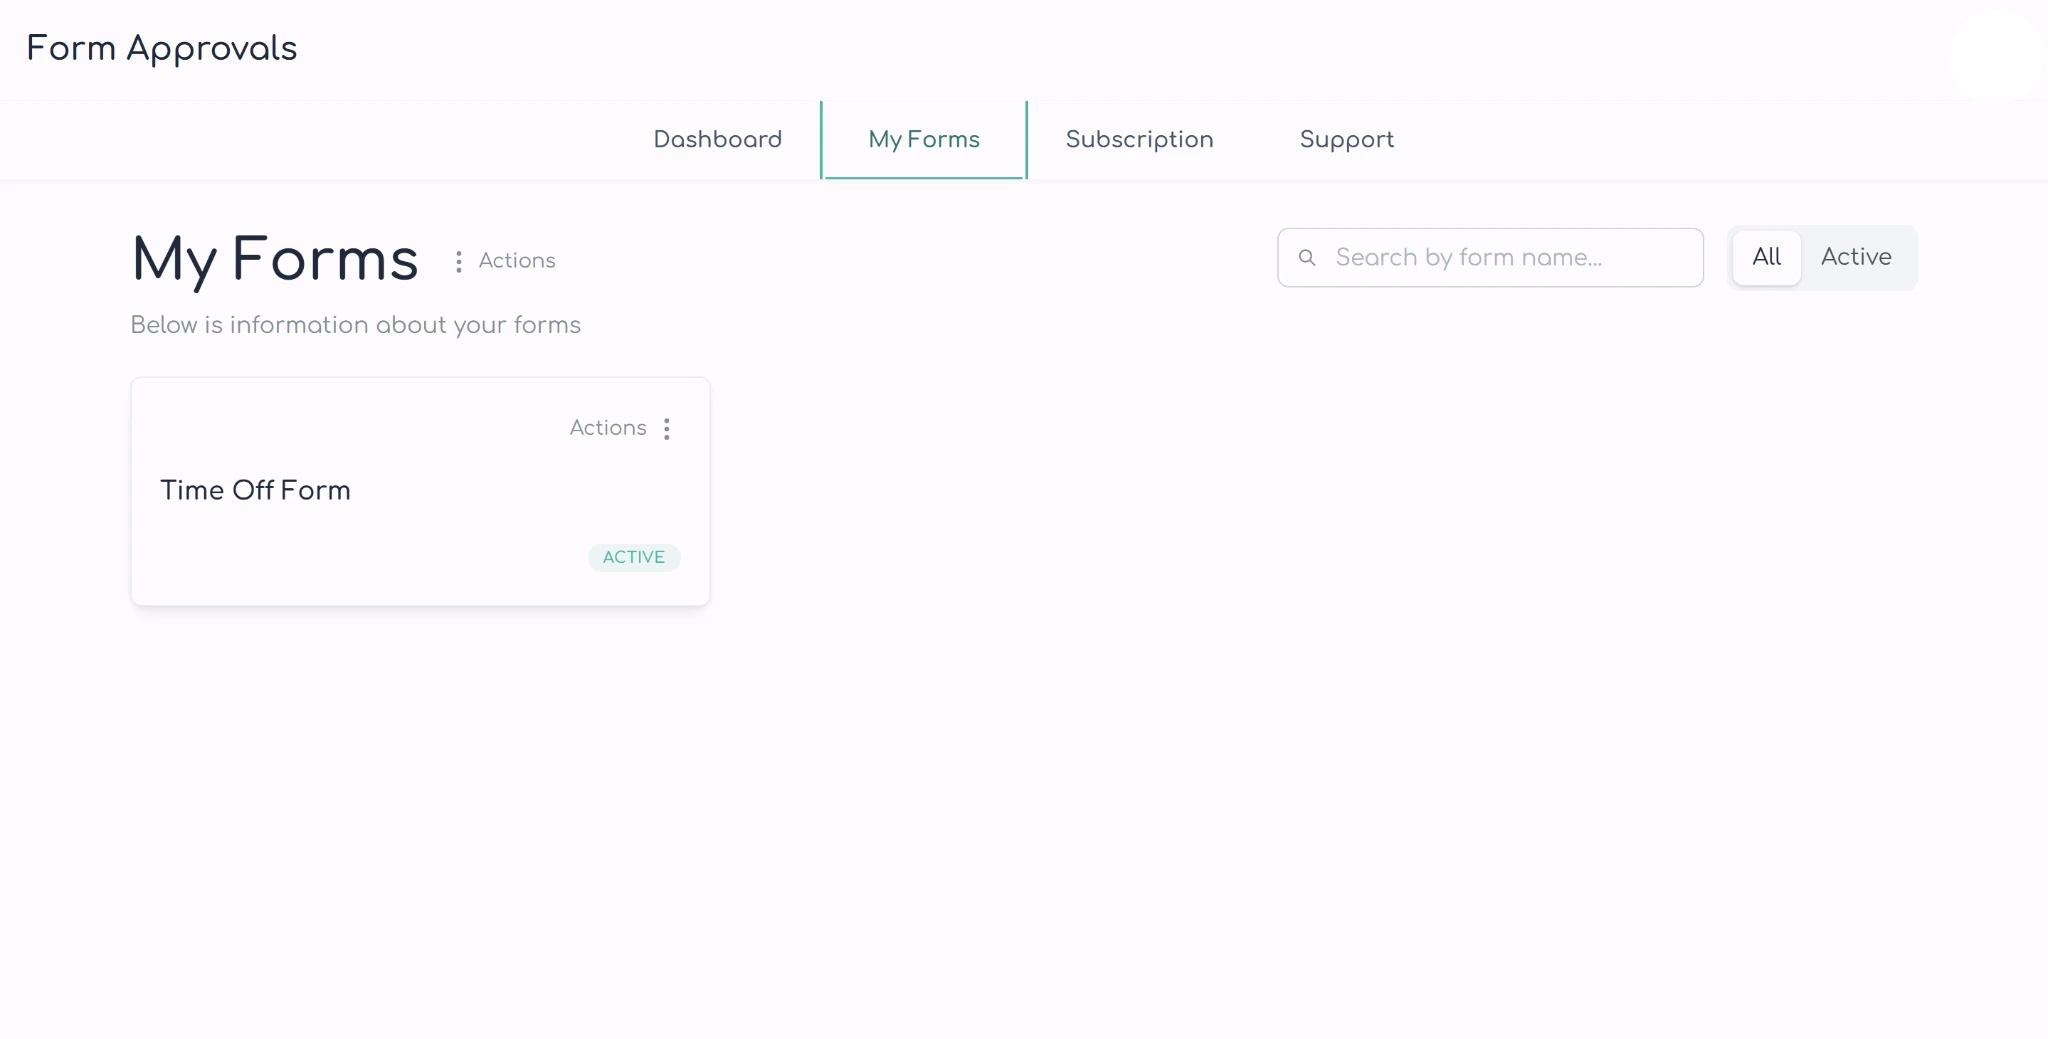
From this dashboard, you can view the overall status of your forms — as well as your total usage of this add-on.
Form Approvals tips and limitations
While Form Approvals may be an easy solution for how to add approvals to Google Forms, this tool is only as effective as how you use it. Follow the tips below to avoid common pitfalls when implementing Form Approvals, and you’ll drastically improve your workflows.
- Use a single Google account during setup: Form Approvals needs access to your account to pull data and store files. Limiting your setup to a single account will avoid confusion over form access and reduce security concerns.
- Use an organizational administrator account: An administrator account grants access to multiple users, so you can consolidate your files under a single email without reducing availability.
- Test every approval path: Don’t trust that your approval workflows will work automatically. Testing your paths will ensure there are no broken chains that can become administrative headaches down the road.
- Validate dynamic recipient emails: Since you won’t have control over which emails are entered into a dynamic recipient field, make sure you validate the legitimacy of these recipients so that your forms go to the right people.
- Protect the connected Google Sheet: Edits to your connected Google Sheet can lead to misunderstandings about approval status. Limit the entities who can access this sheet and employ strict version control to maintain data integrity.
- Check plan limits and Team-only features: Although Form Approvals may offer a free version, it’s limited to 20 monthly form submissions. Limitations like these may make this option a poor fit for users with high monthly workflow needs.
The Form Approvals add-on can be a capable workaround for Google Forms, but its setup is also overly complicated and difficult to manage. For truly effective workflow management for online forms, consider trying a native alternative instead.
Don’t bolt approval workflows onto Google Forms. Use Jotform instead.
You shouldn’t have to manage a Google Form, Form Approvals add-on, linked Google Sheet, workflow administrator account, and separate workflow settings just to use approval workflows on your online forms. With Jotform Workflows, you can centralize your approval workflow into a single native solution.
Jotform Workflows offers a full suite of advanced, user-friendly features, including
- A visual drag-and-drop workflow builder
- Sequential, parallel, individual, and group approvals
- Conditional routing, tasks, reminders, and due dates
- E-signature collection with Jotform Sign
- Jotform payment requests
- PDF generation and real-time workflow tracking
- 200-plus workflow templates, including specific approval workflow templates
- More than 30 workflow-friendly integrations
You can also customize your approval rules to match your organizational needs. Rules can be based on one response, a majority, a set number, or everyone in the group. Jotform also has industry-specific templates made for HR, finance, IT, procurement, education, and more.
If you’re a Google Forms user worried about starting from scratch, Jotform has you covered there, too. You can migrate Google Forms to Jotform in seconds by following three quick steps. Once imported, you can connect your forms to visual workflows, add approval stages and conditions, assign tasks, request signatures or payments, and track the process from your Jotform account — all for free.
You can try working around Google Forms’ limitations with Form Approvals, but coordinating approvals doesn’t have to be complicated. Make the switch to Jotform Workflows and start running unlimited native workflows that will streamline your approval process.
This article is for school administrators, HR teams, finance departments, operations managers, nonprofit staff, IT administrators, and small business owners who use Google Forms to collect requests and want to route each submission through an automated approval process.











































































Send Comment: