
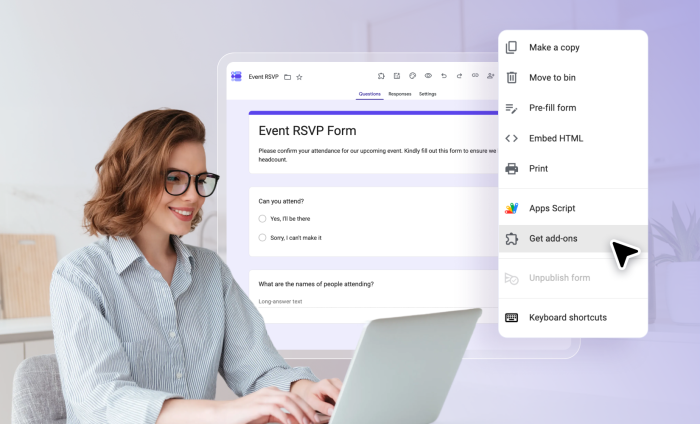
Quick steps:
- Open your form in Google Forms.
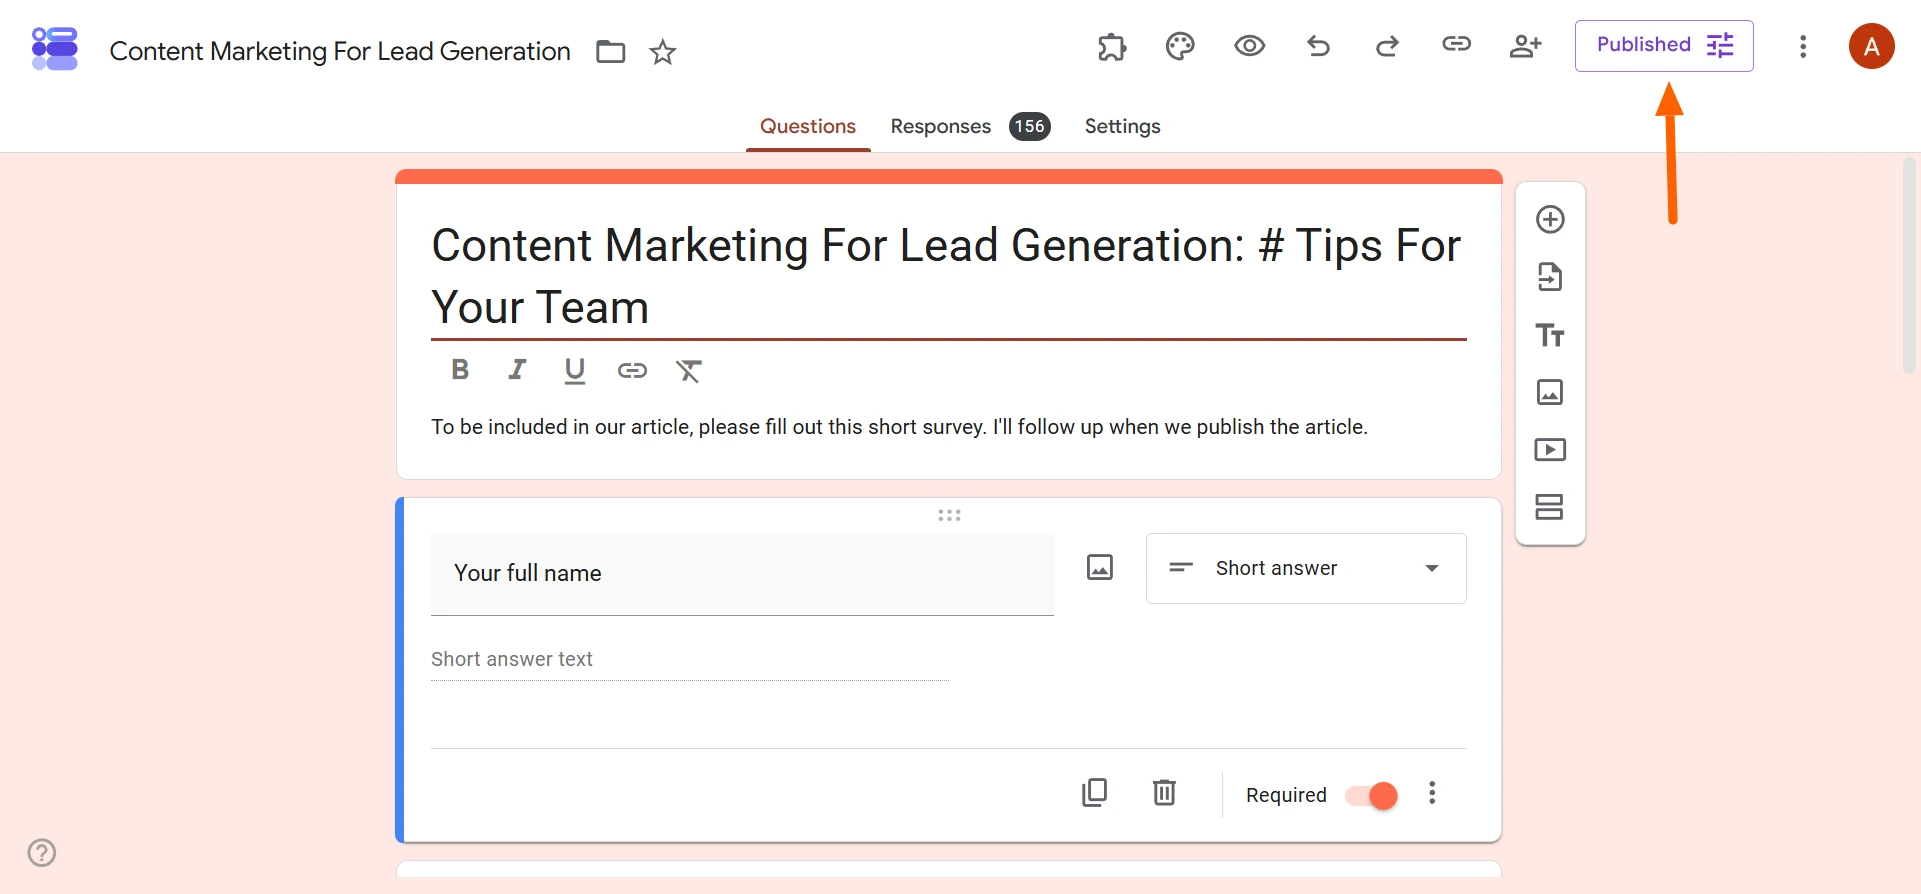
- Click Published in the top right corner.
- Toggle off Accepting Responses.
- Click Save.
Most forms have an expiration date. Maybe the application deadline has passed, you’ve hit your information quota, or event registration is full. At that point, leaving the form open can create work for you. The best option is to close your Google Form quickly so it no longer accepts responses. Wondering how?
In this article, we show you how to close a Google Form in multiple ways, from a manual one-click toggle to an automated, scheduled close. And for those who are looking for more advanced form options for closing online forms, we introduce you to another form builder that will meet your needs: Jotform.
Pro Tip
Wish you had the option to close either on a specific date or when a response limit is reached, whichever comes first? Google Forms can’t do it, but Jotform can. Jotform’s built-in auto-disable and response-limit feature is available in all of its 20,000-plus free form templates.
How to close a Google Form manually
Even if you know how to use Google Forms, figuring out how to close a form can be confusing because it’s not an intuitive process. The function is also not easy to find.
Follow these steps to manually stop your Google Form from accepting responses. Be aware that this method takes effect instantly, and that it can be used only on a form you have published.
- Open the Google Form you want to close.
- Click Published at the top right.
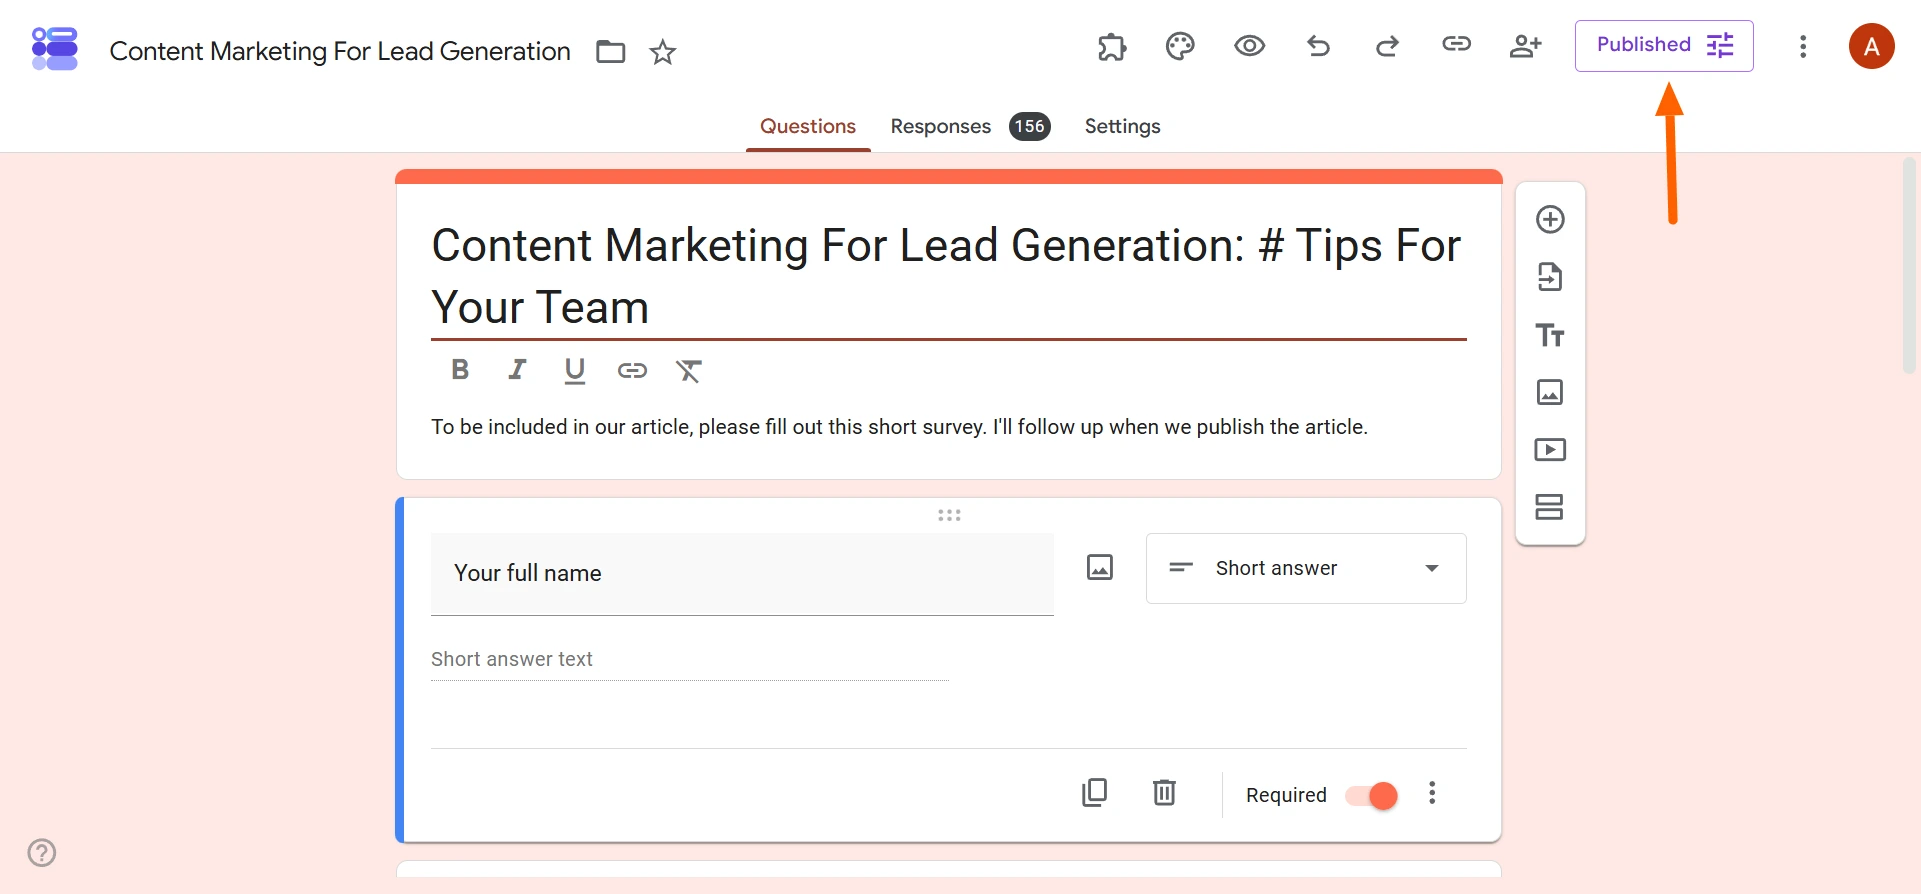
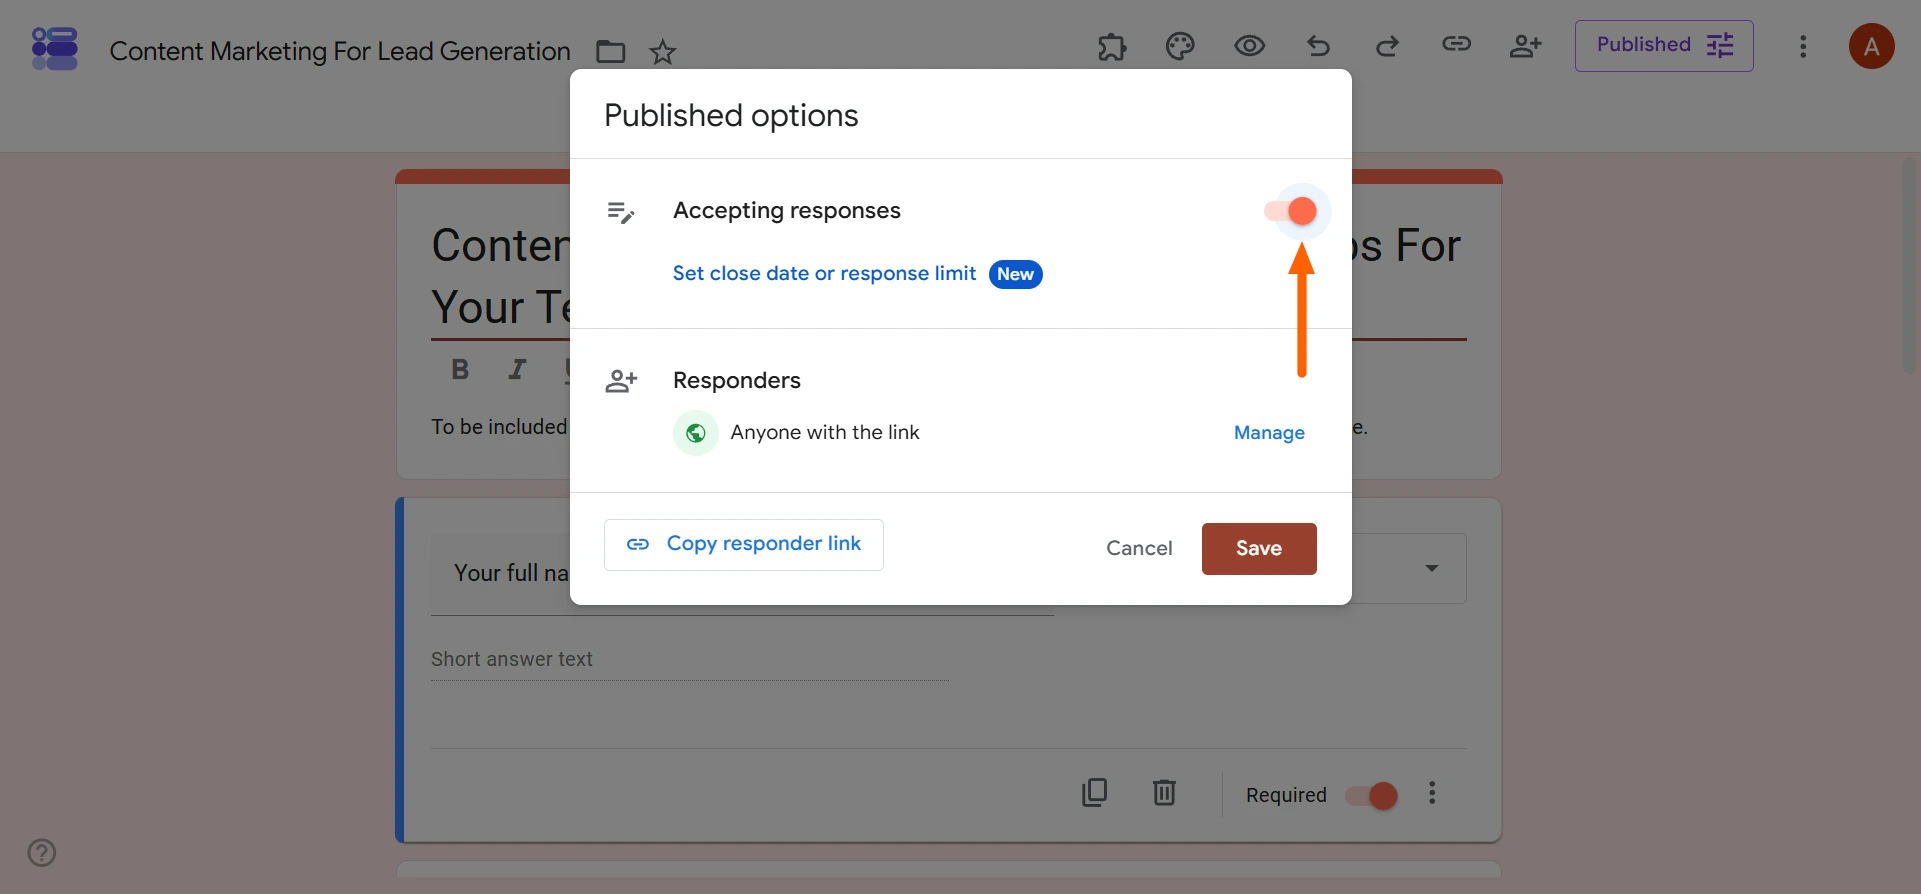
- Toggle off the Accepting Responses button.
- Click Save.
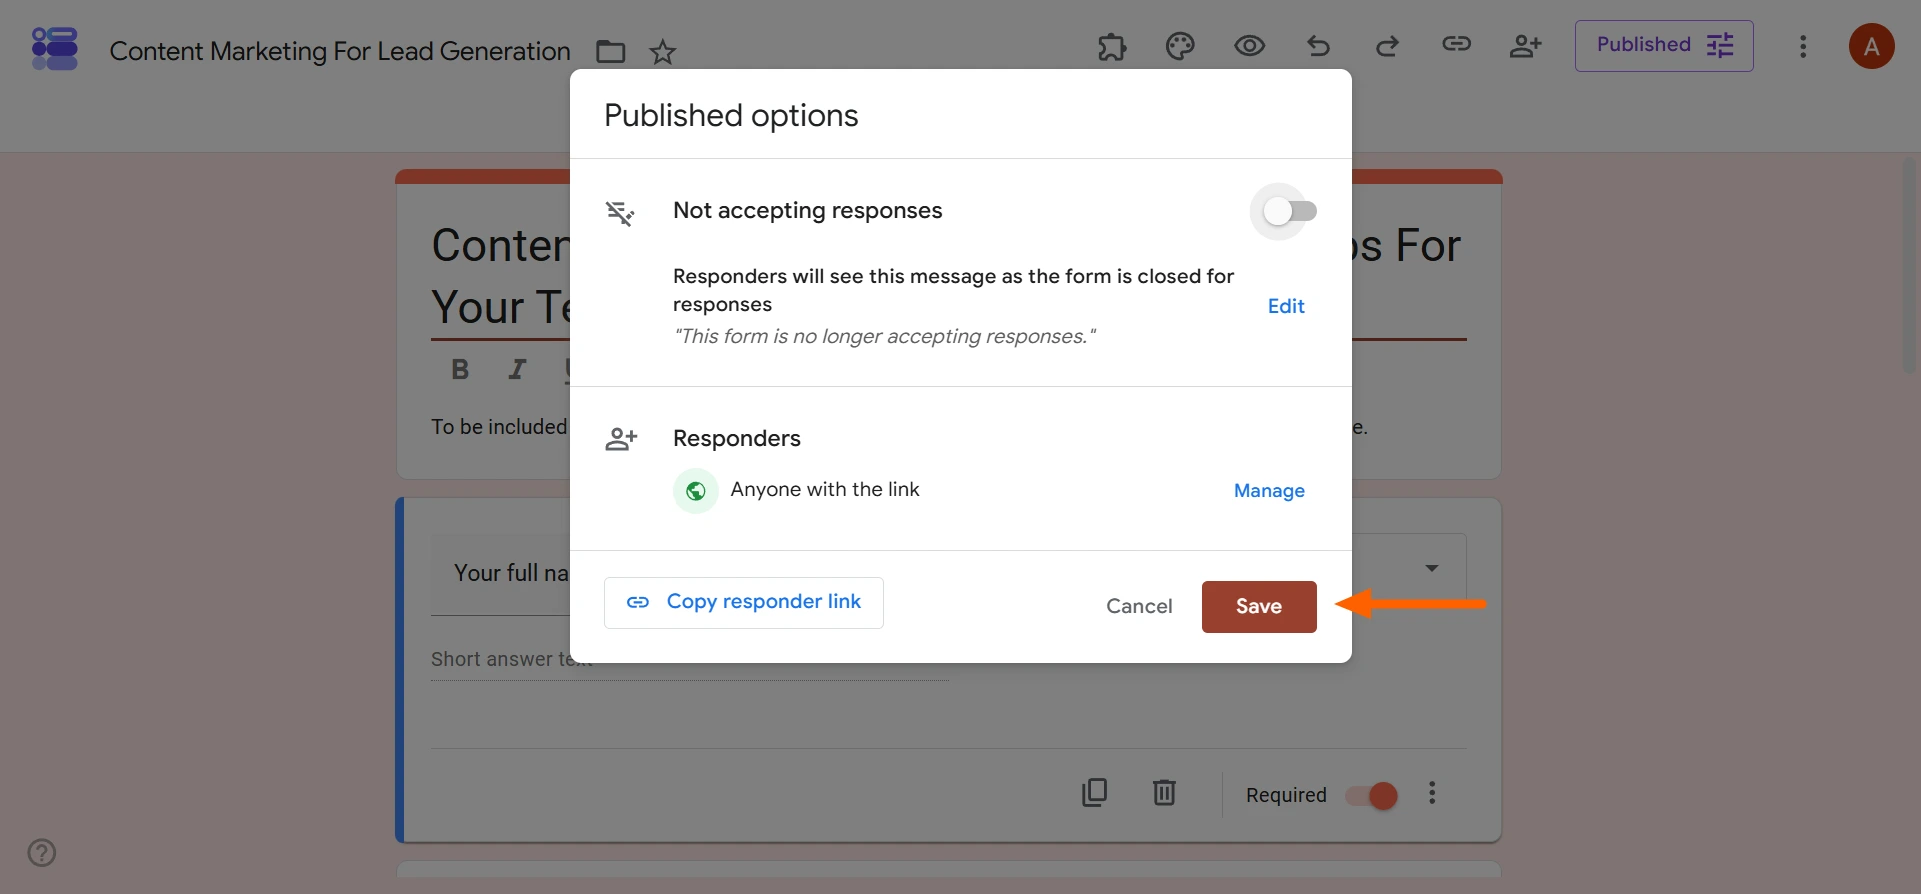
After you follow these steps, your Google Form will no longer accept responses.
If you ever need to manually reopen the Google Form, follow the step-by-step instructions provided later in this article.
Pro Tip
The downside of choosing to close a form manually is that you might forget to do it. After all, it’s not the only task on your to-do list.As a result, you may end up with more responses than you wanted. Check out our guides that show you how to delete responses and edit responses in Google Forms. You’ll learn how to maintain and manage your incoming data more effectively.
How to close a Google Form automatically
If you have a strict deadline or response quota, it’s best to set up an automated form closure instead of doing it manually.
Google Forms recently added this capability. (Previously, users had to rely on third-party add-ons to get the job done.) You can now set your form to close automatically upon reaching a Google Form response limit or a specific date and time.
However, you can choose just one of those conditions as the trigger. If you want the ability to close your form when either one of those conditions is met, you will need to use a third-party add-on (or choose a more advanced form builder).
Set a response limit to auto-close the form
If you need a specific number of responses to your form, this is the setting to use. For example, if you’re conducting market research for a new product or service and want to hear from 100 prospects and customers about their needs, you’d follow these steps:
- Open the relevant Google Form.
- Click Published.
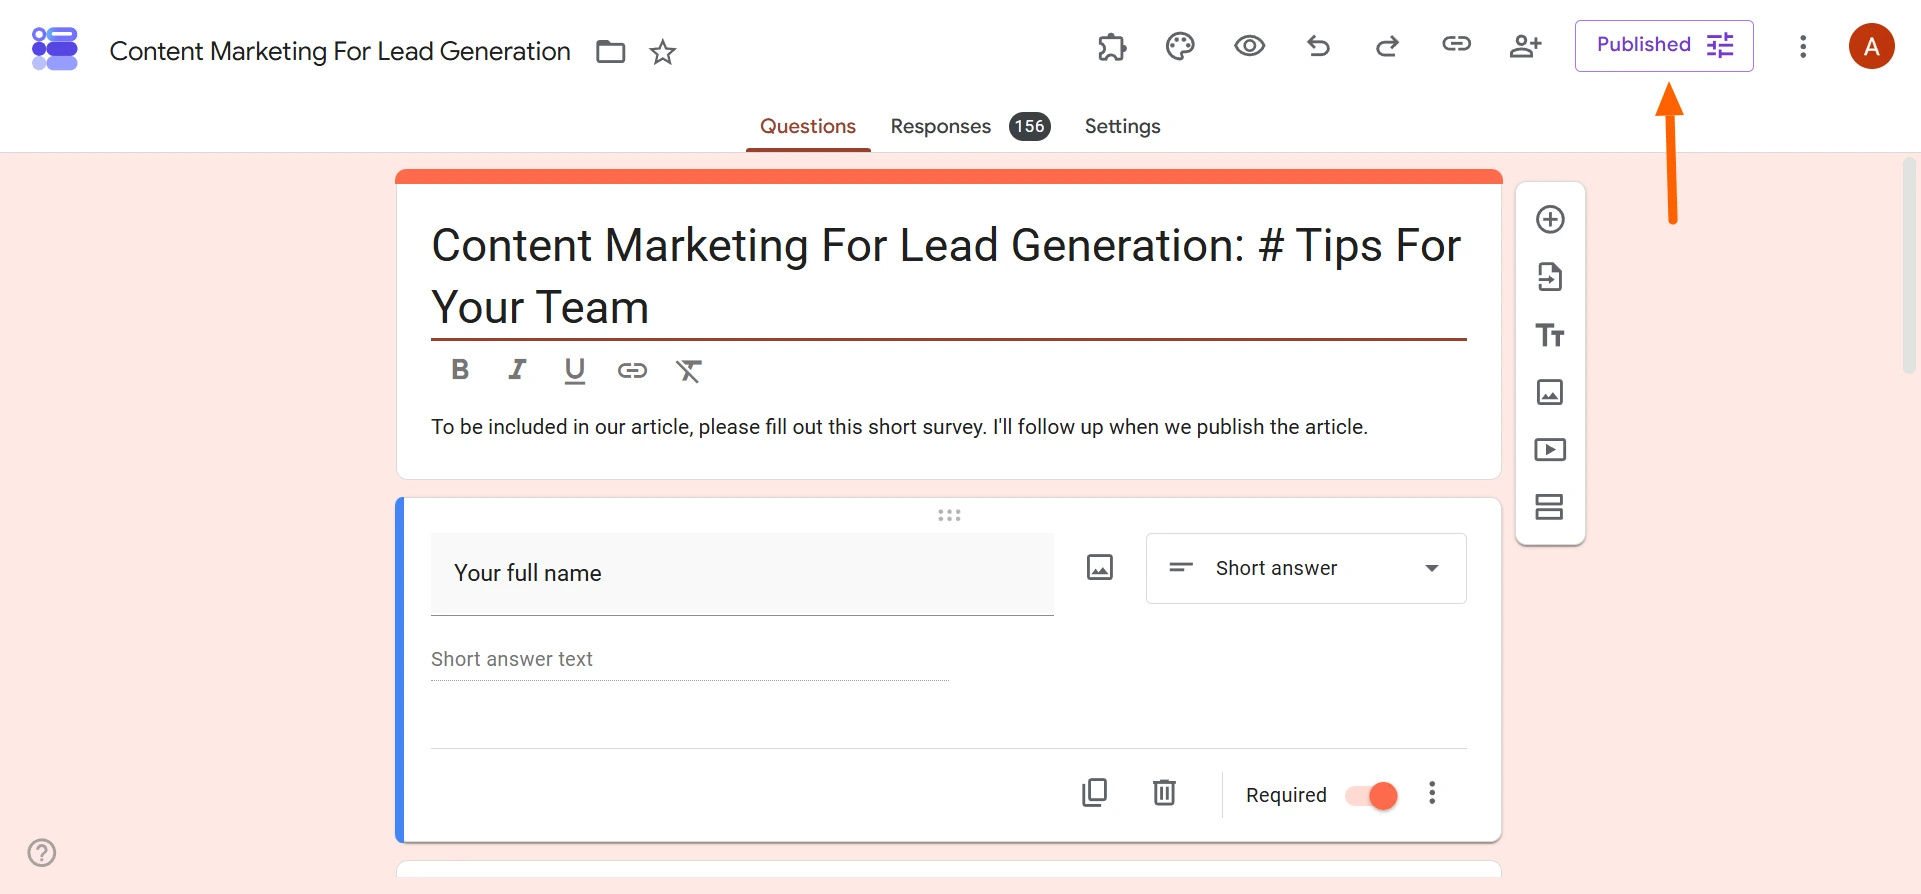
- Click Set Close Date or Response Limit.
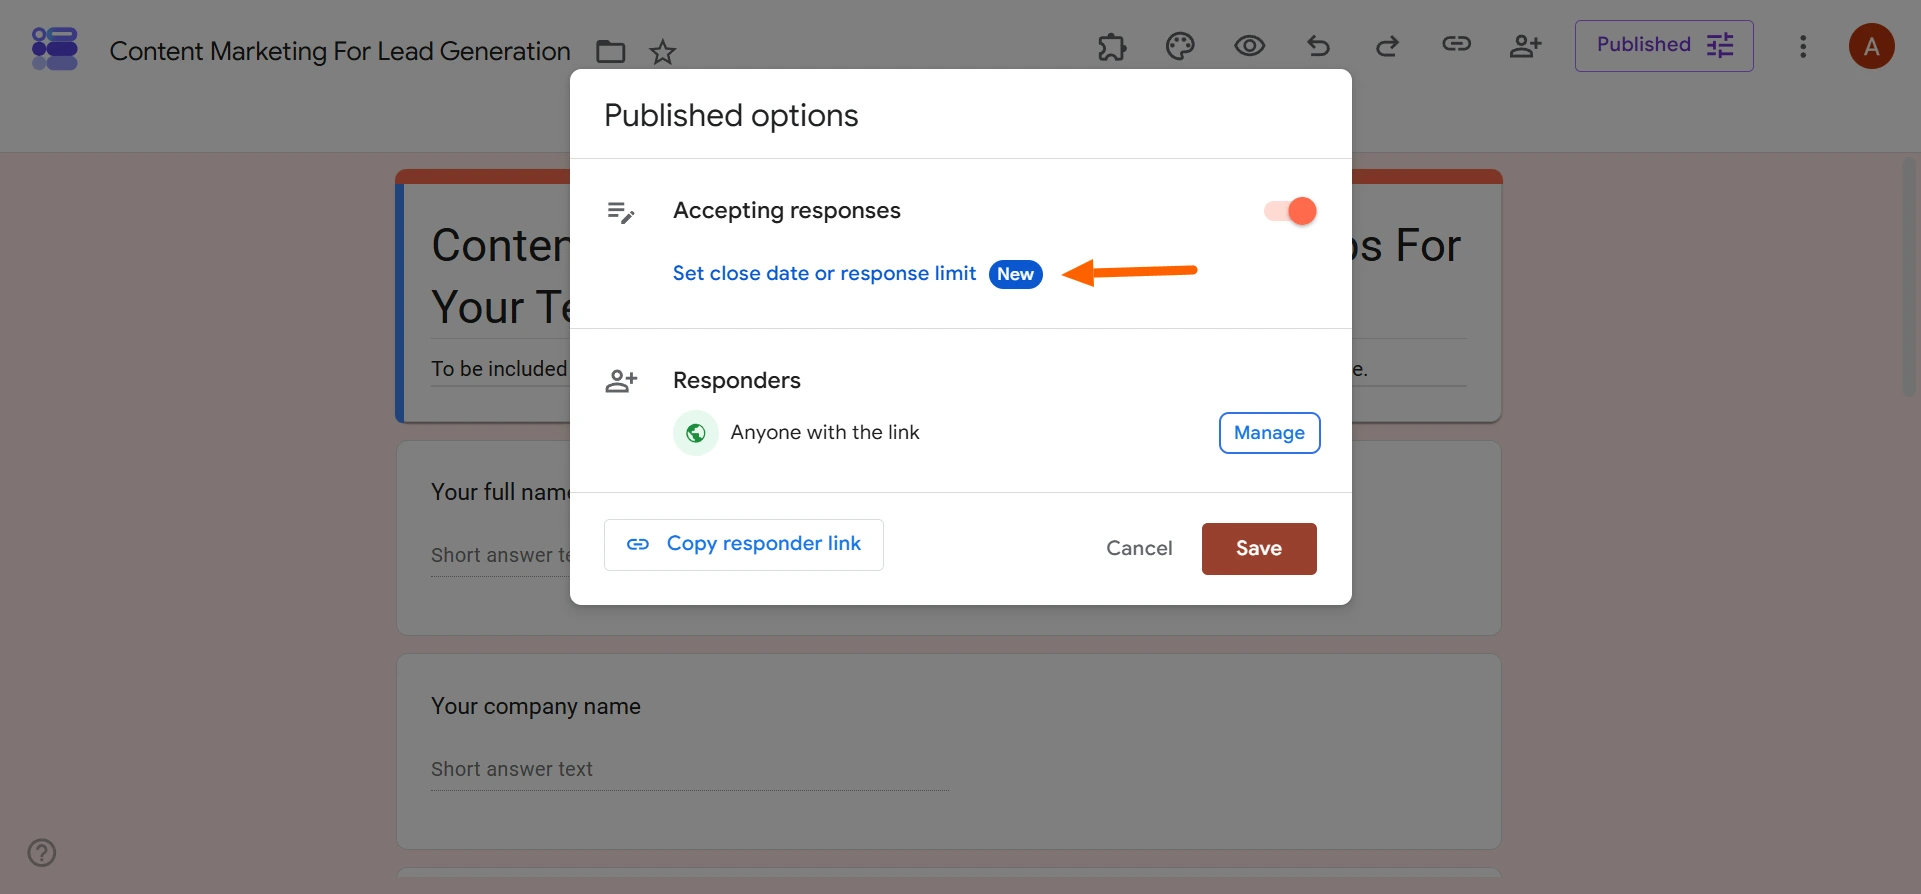
- Select After a Number of Responses. Type in the number of responses you want to accept before the form automatically closes.
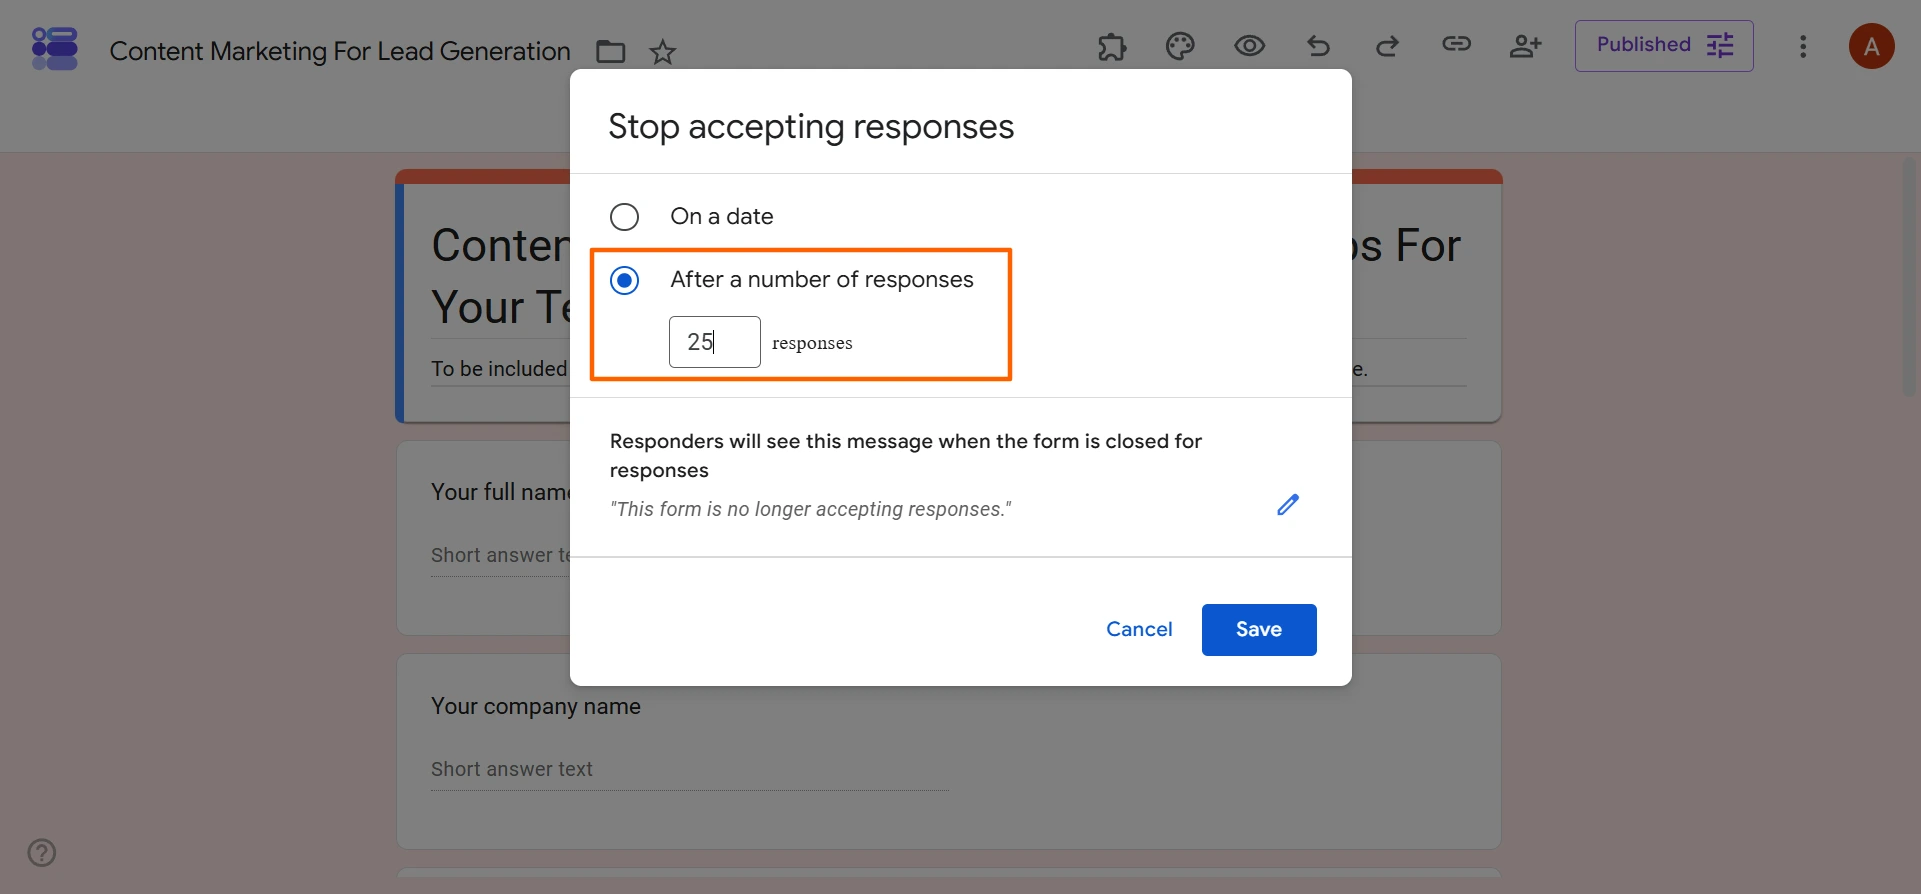
- Click Save.
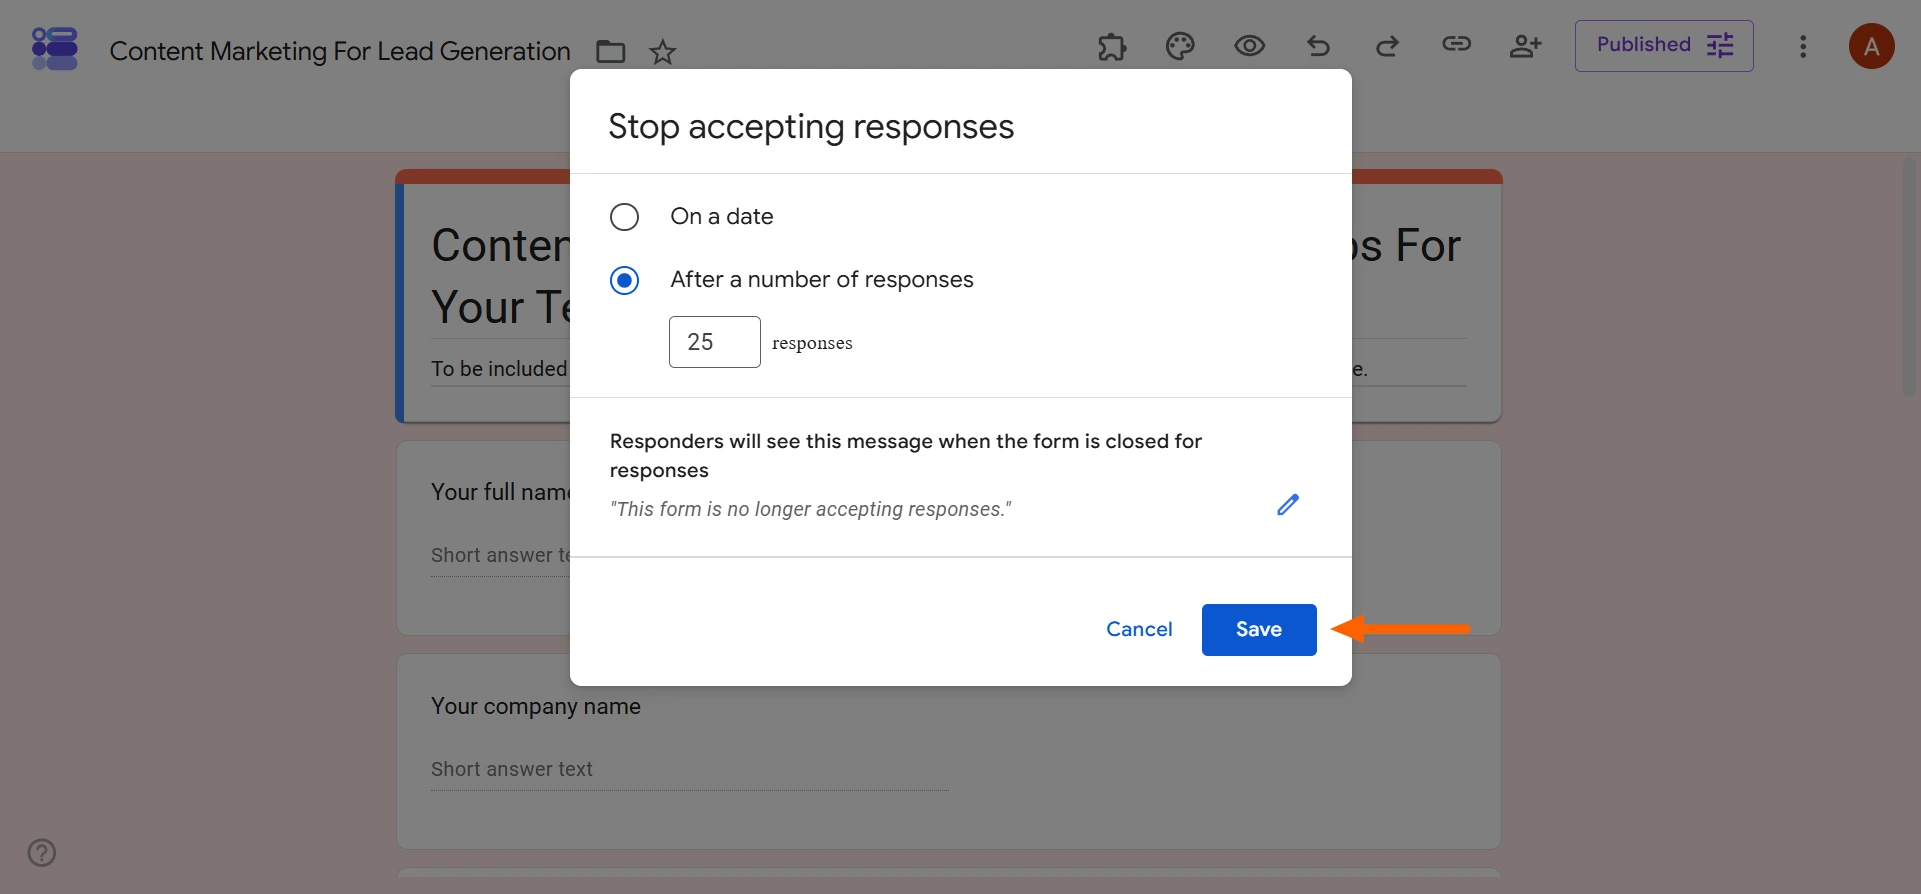
Now, once the Google Forms response limit has been reached, the form will automatically stop accepting responses.
Pro Tip
If you have already started accepting responses on your form, the response limit you set must be greater than the number of responses you have already collected. Google Forms will not let you set a response limit that is lower than the number of responses you have already collected. For example, if you’ve already received 50 responses, the response limit you set must be greater than 50.
Schedule your Google Form to close automatically on a set date and time
The date and time setting is effective when you are tied to a specific deadline. For example, if you have an open position at your organization and are accepting applications until the end of the month, the date and time feature would work best.
- Open the relevant Google Form.
- Click Published.
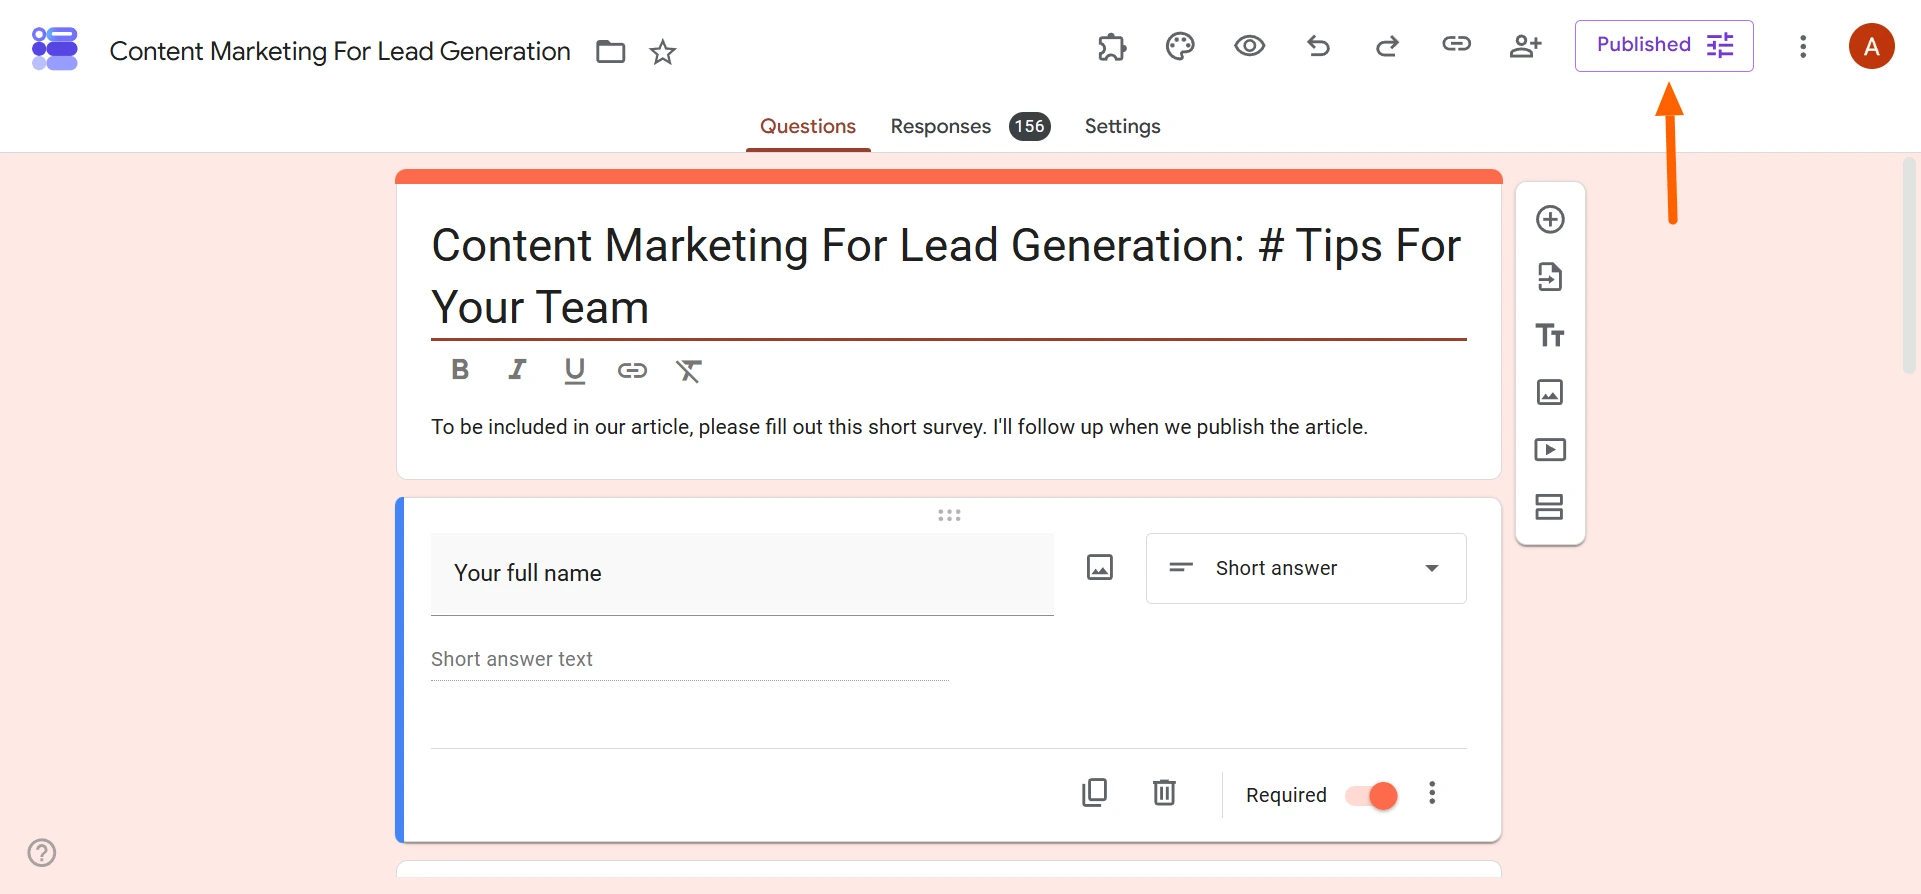
- Click Set Close Date or Response Limit.
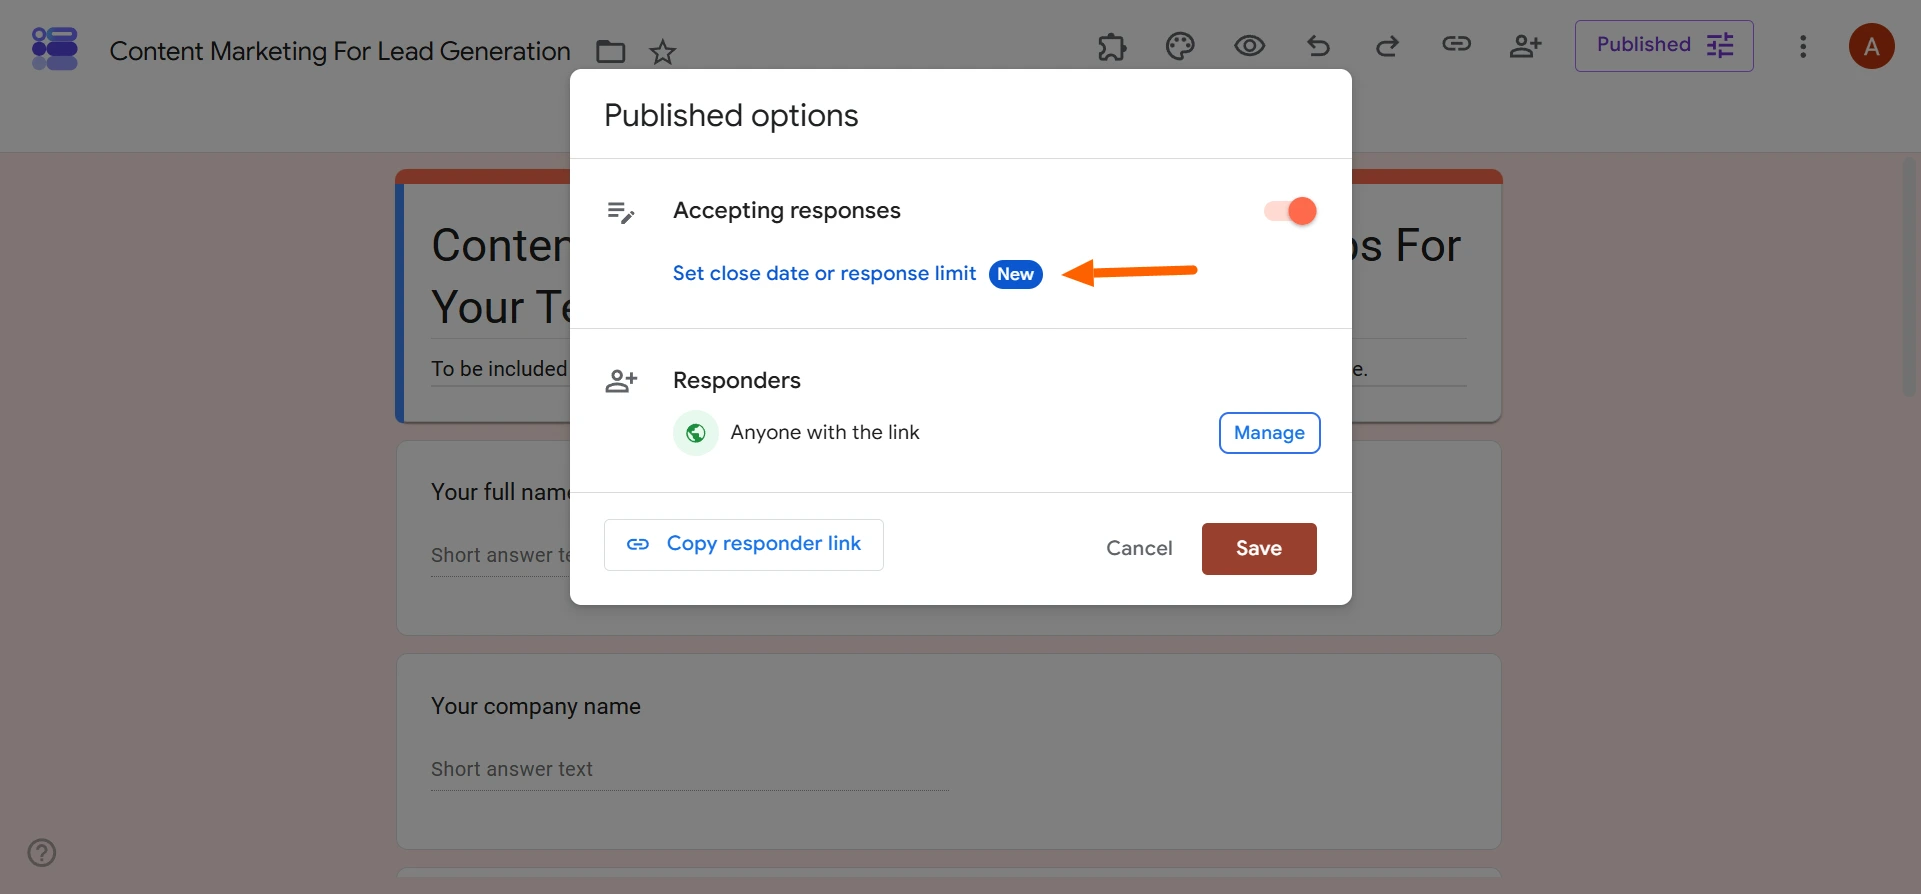
- On a Date will be pre-selected. Click Choose Date and Time.
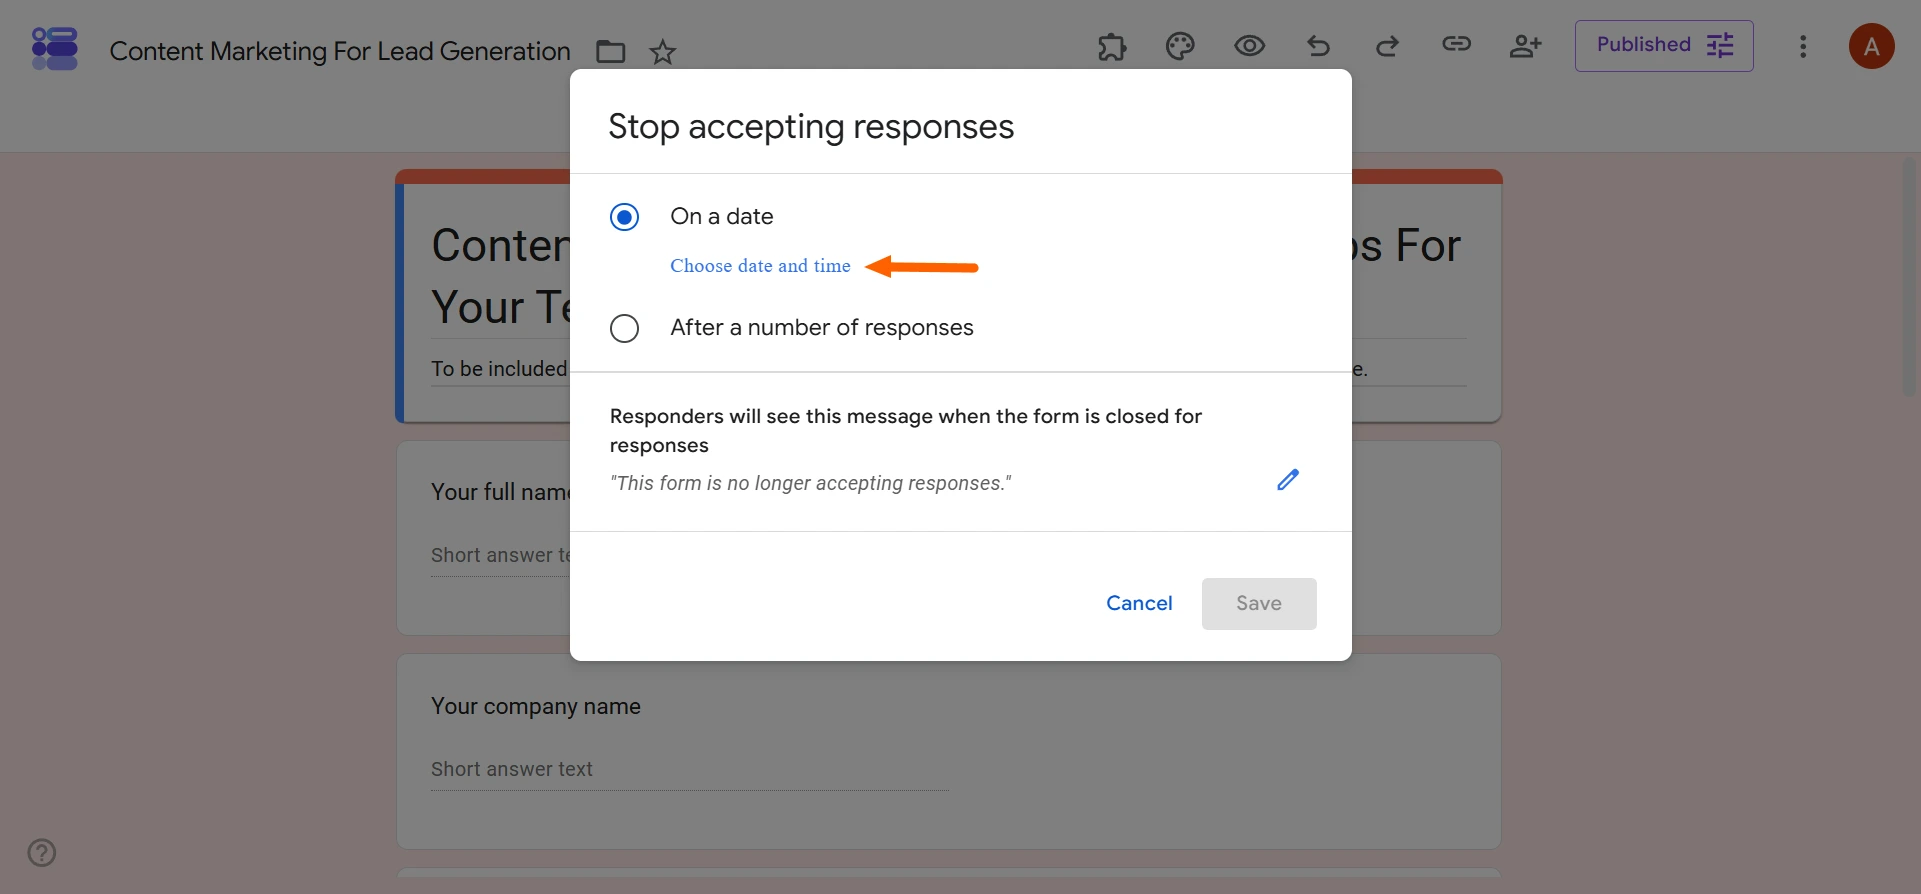
- Select the date and time on which you want the form to automatically close. Click OK.
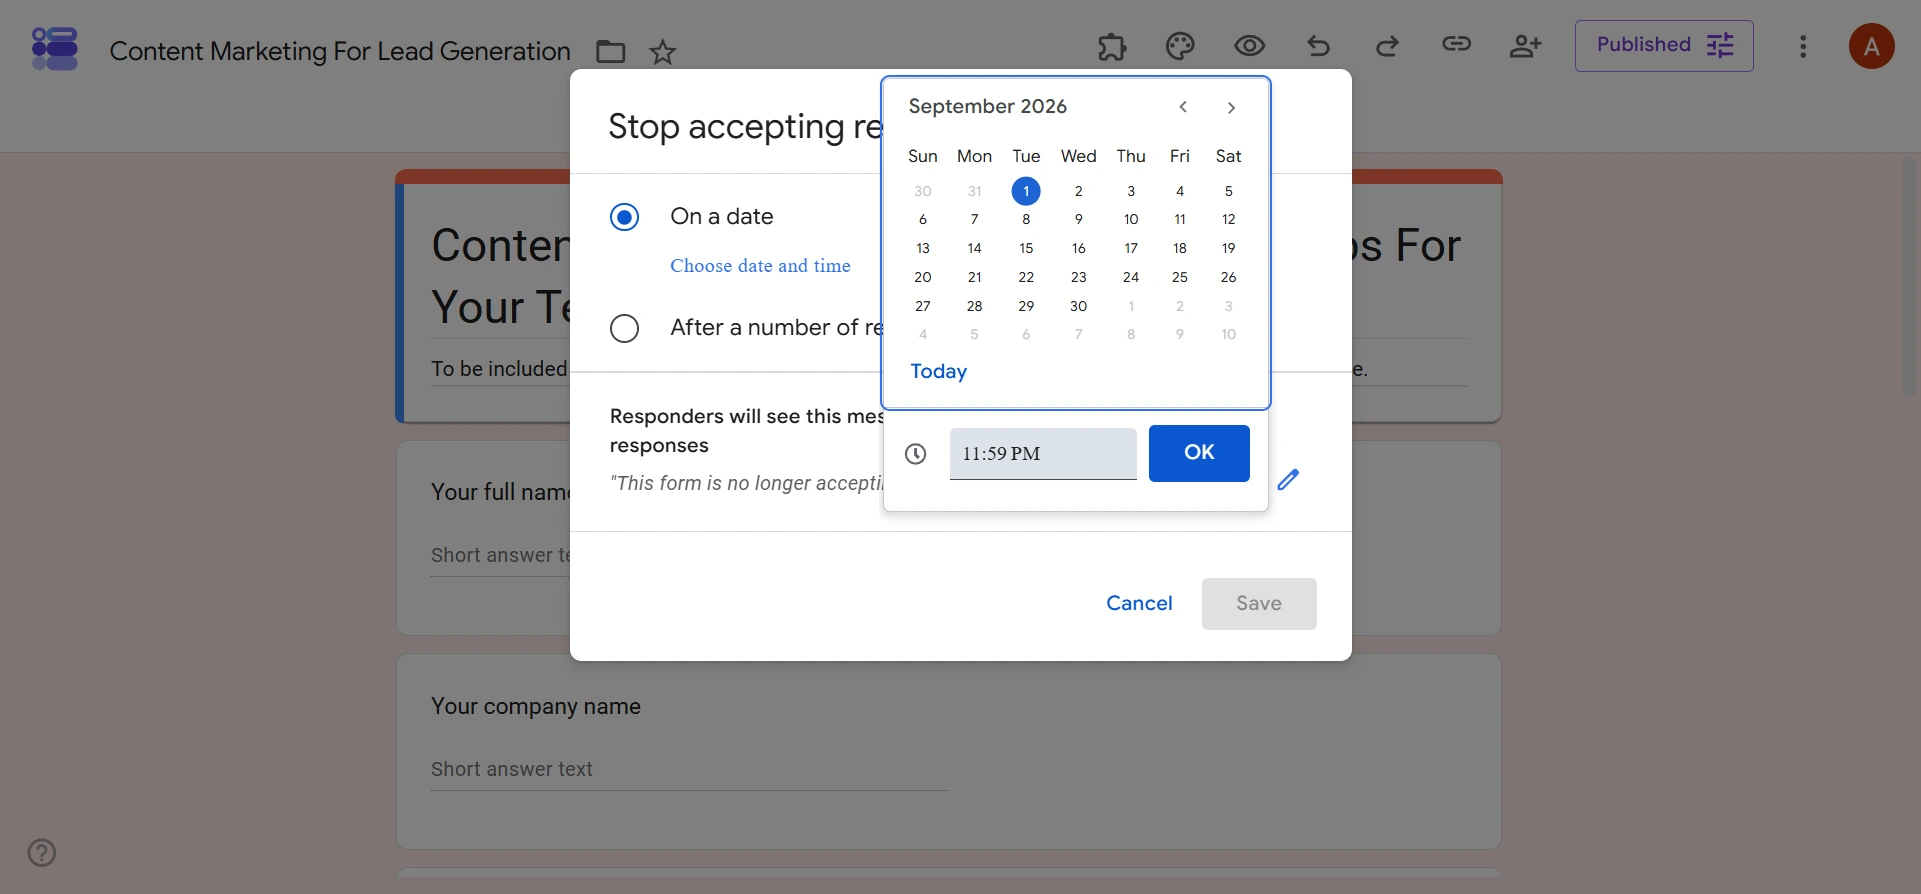
- Click Save.
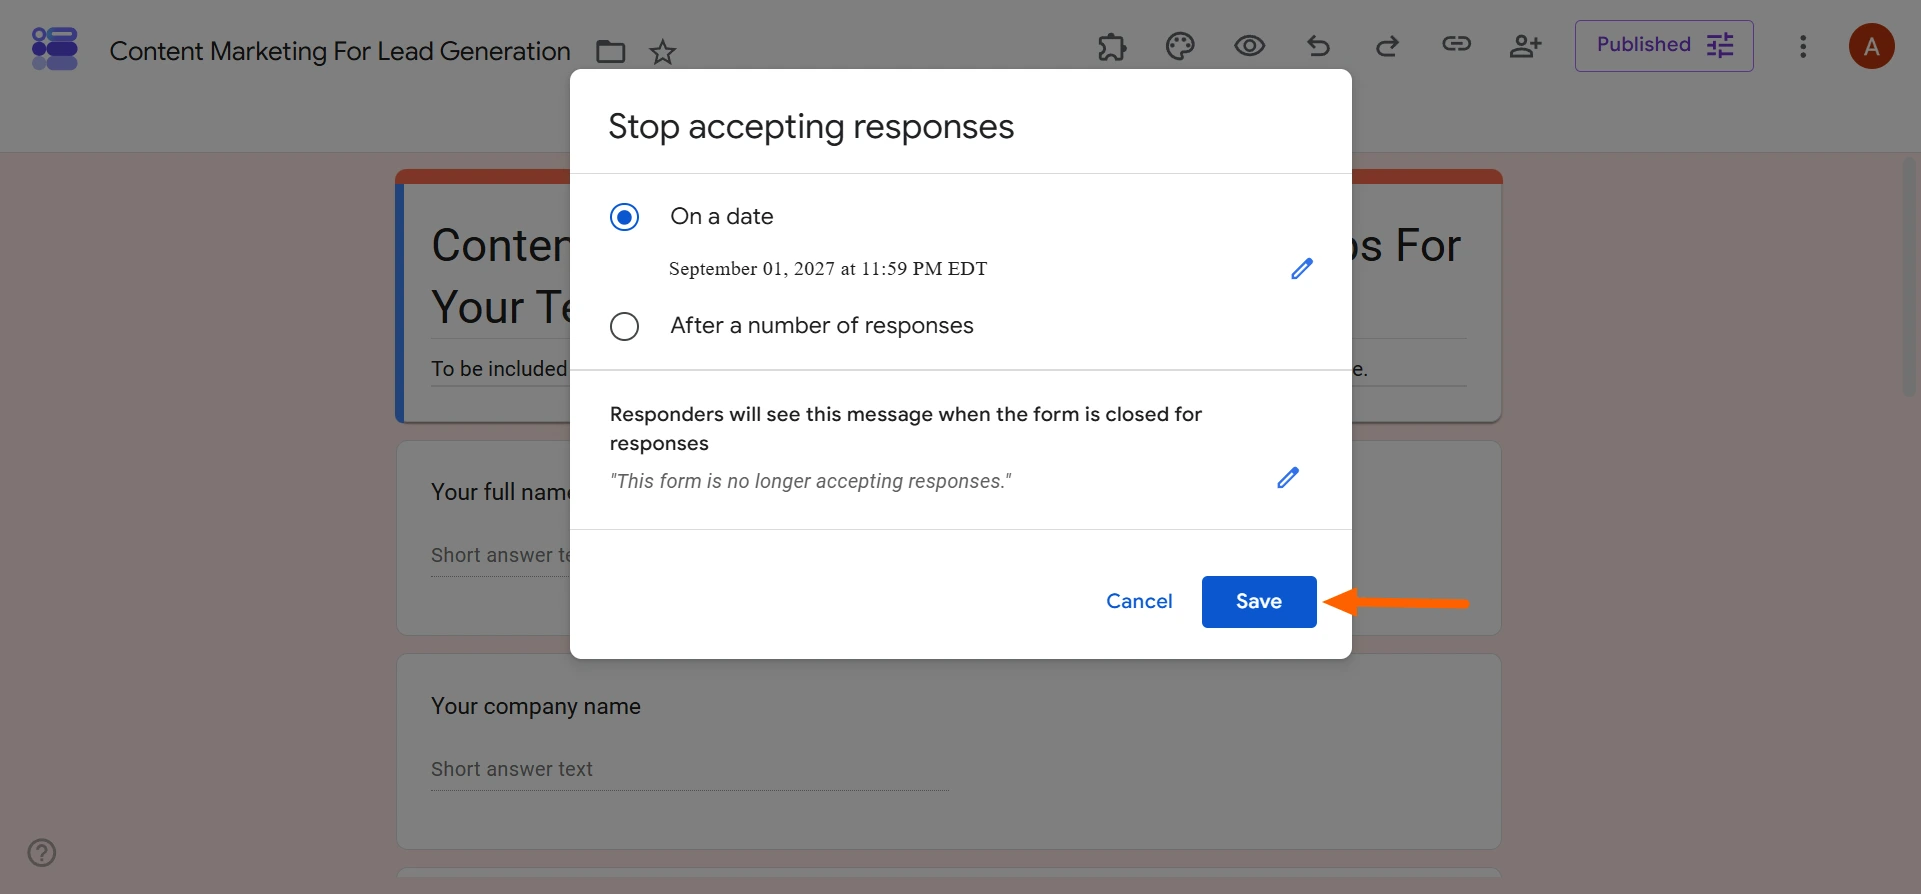
You have now successfully scheduled your Google Form to close. On the date and time you have selected, this form will automatically stop accepting responses.
Pro Tip
The Google Forms automatic close date and time feature uses your local time zone. If your audience is in a different time zone, you’ll need to convert the desired closing time accordingly when configuring the setting.
For example, if you’re in Eastern time and want your form to close at 12 p.m. Pacific time, you would set the closing time to 3 p.m. Eastern time (which will be 12 p.m. Pacific time).
How to change the message respondents see after you close the Google Form
Once your Google Form has closed automatically, the form link will still be active and you may get additional visitors. They won’t be able to fill out the form, but they will see a message.
The Google Forms default message is “This form is no longer accepting responses.” If you would like to change the default message, follow these instructions. (Note that this feature doesn’t work if you manually close the form; it works only for automatic closures.)
- Open the Google Form for which you want to change the form-closed message.
- Click Published.
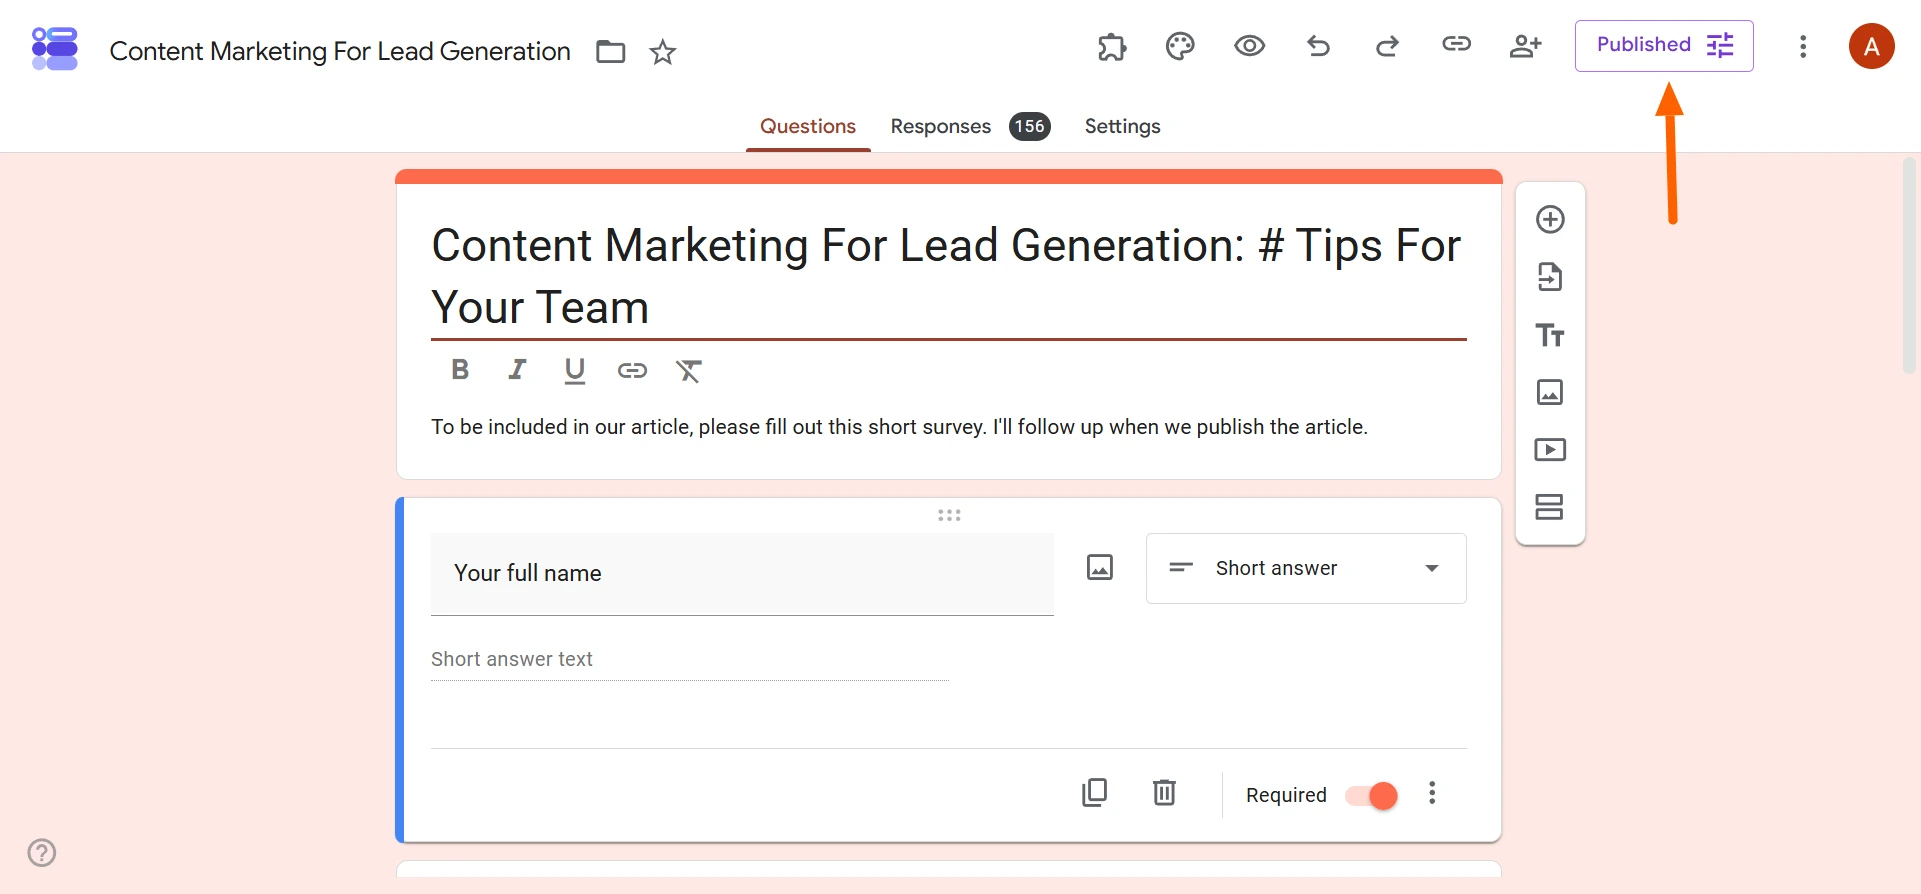
- Click Set Close Date or Response Limit.
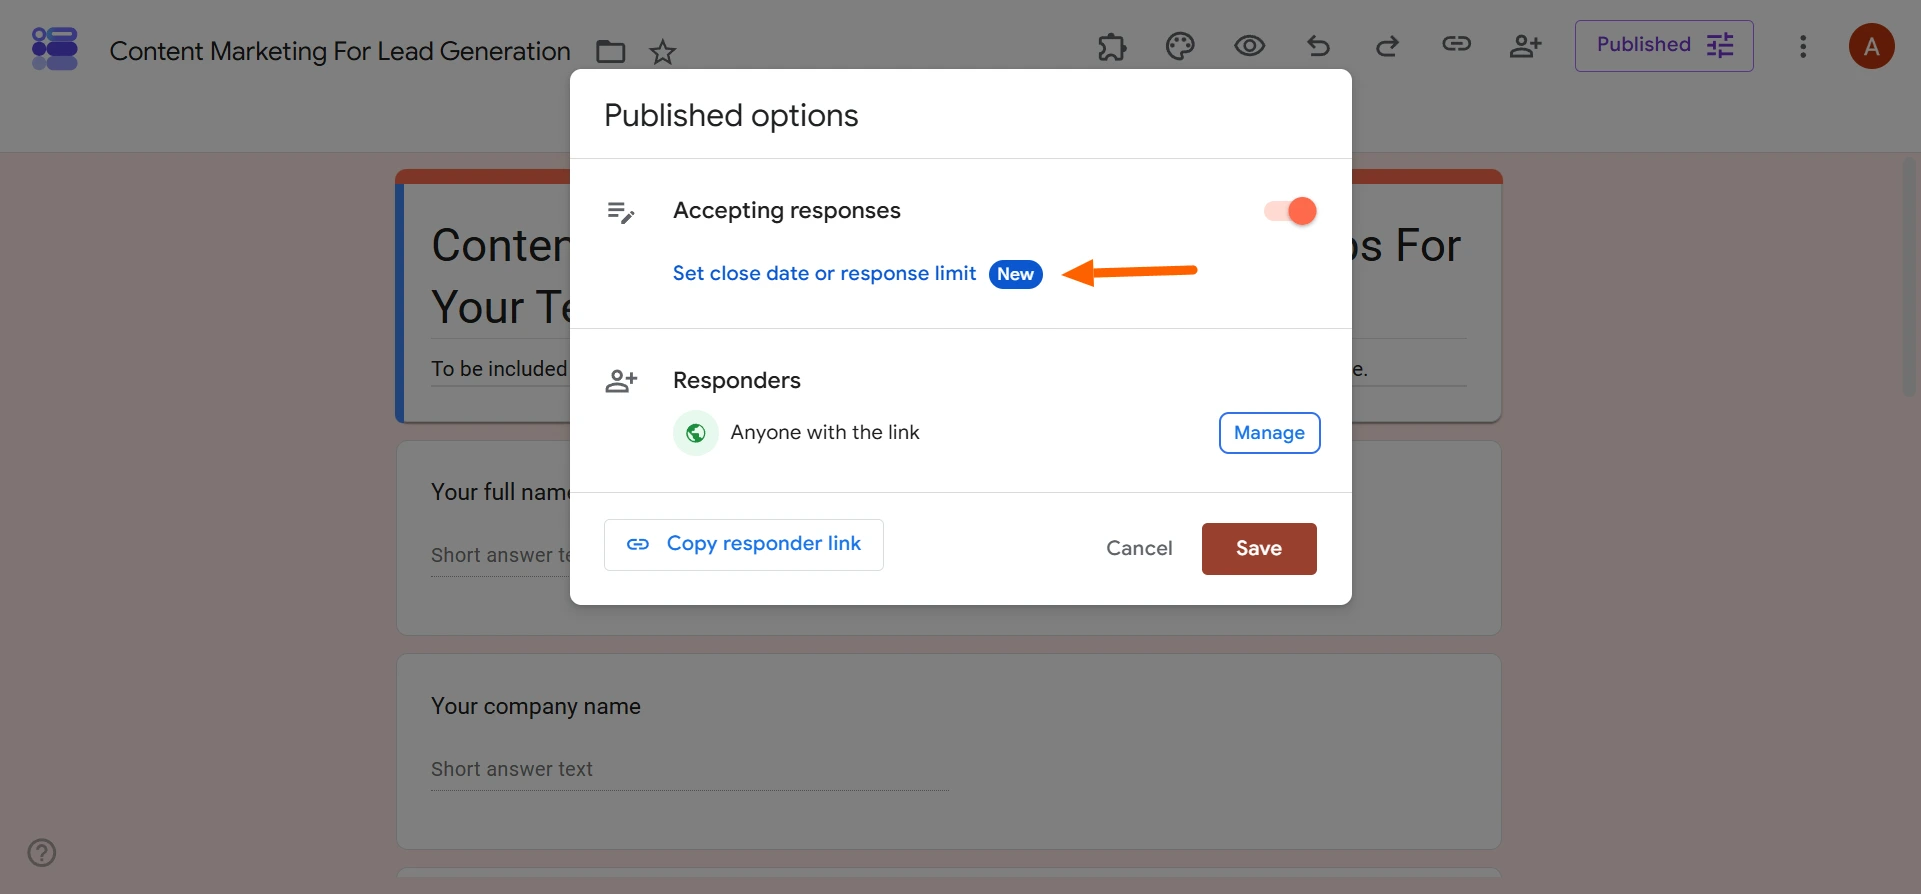
- Click the edit (pencil) icon next to Responders Will See This Message When the Form Is Closed for Responses.
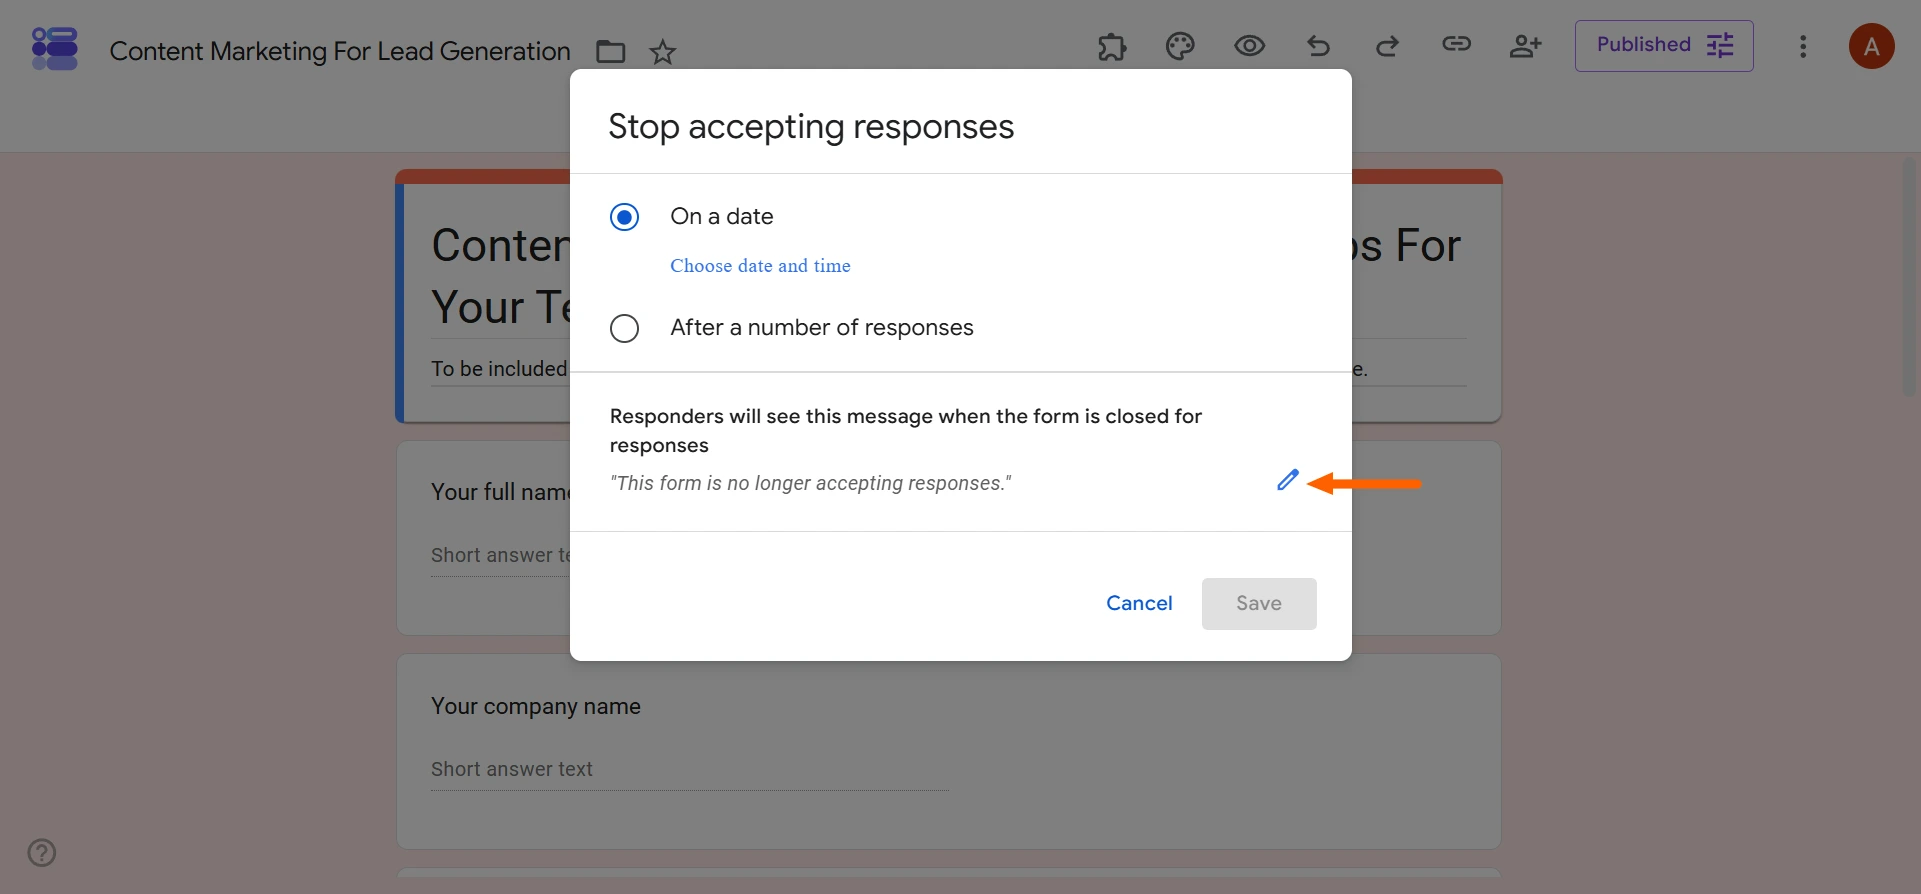
- Type in the message users will see if they access the form after it has closed.
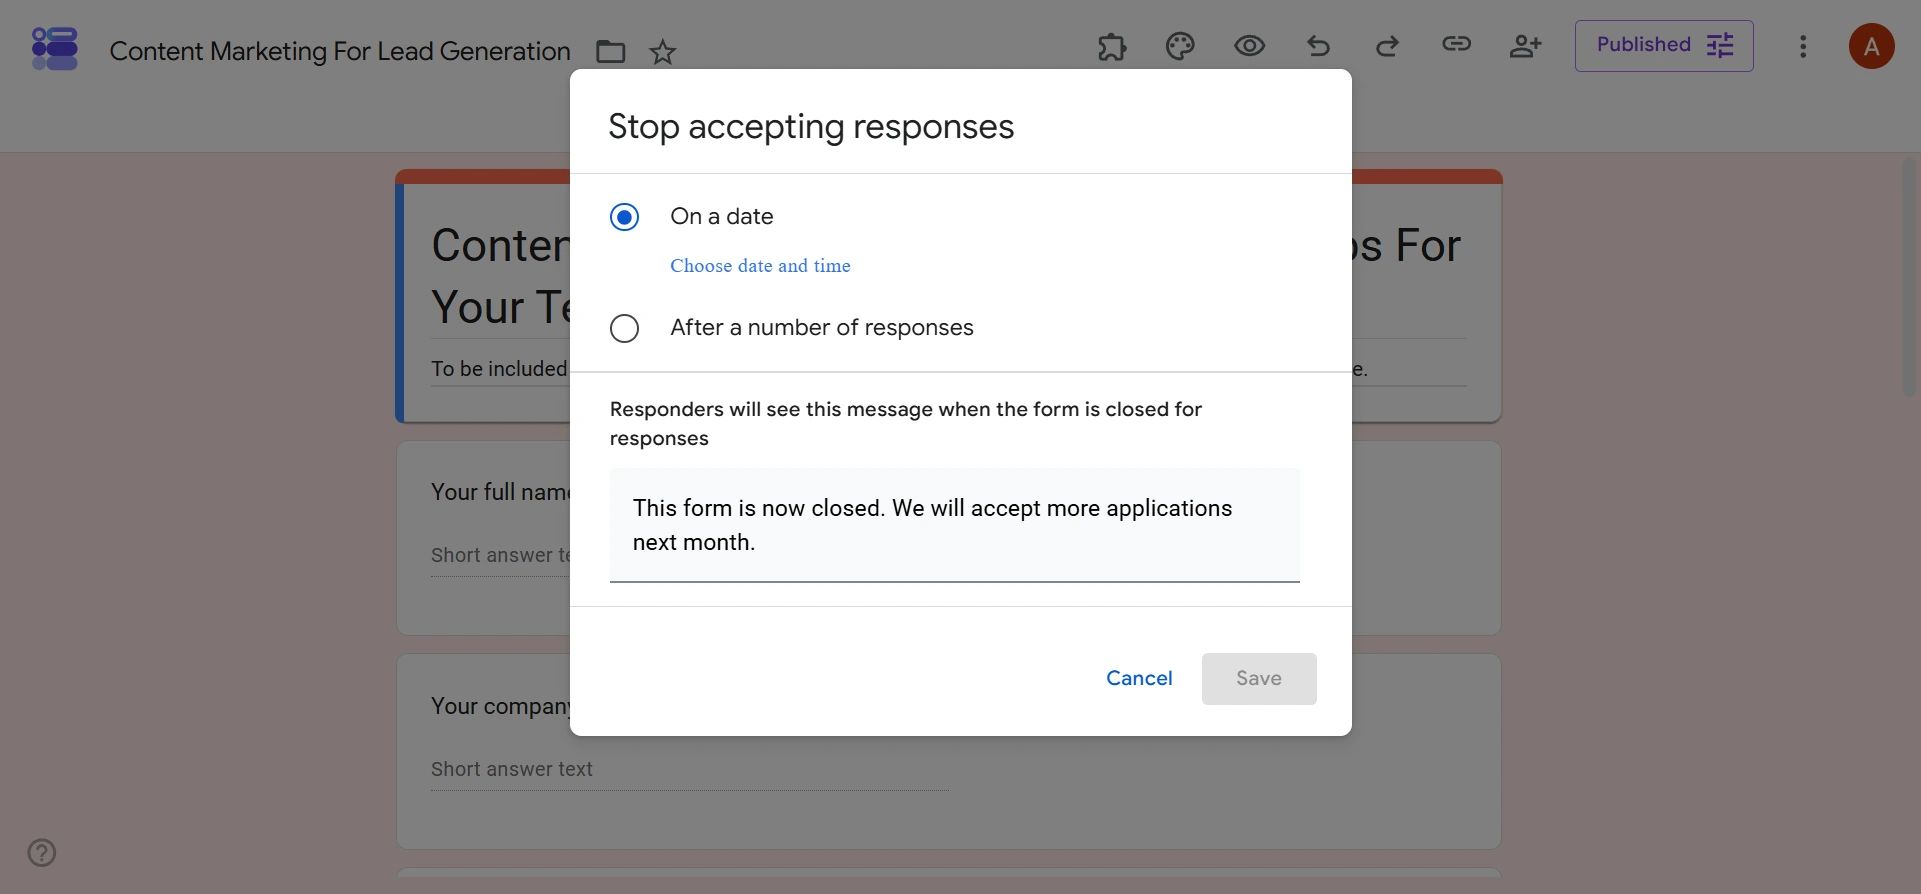
- Select how you want to automatically close the form: via date or response limit. Set the criteria for automatic closure, and click Save.
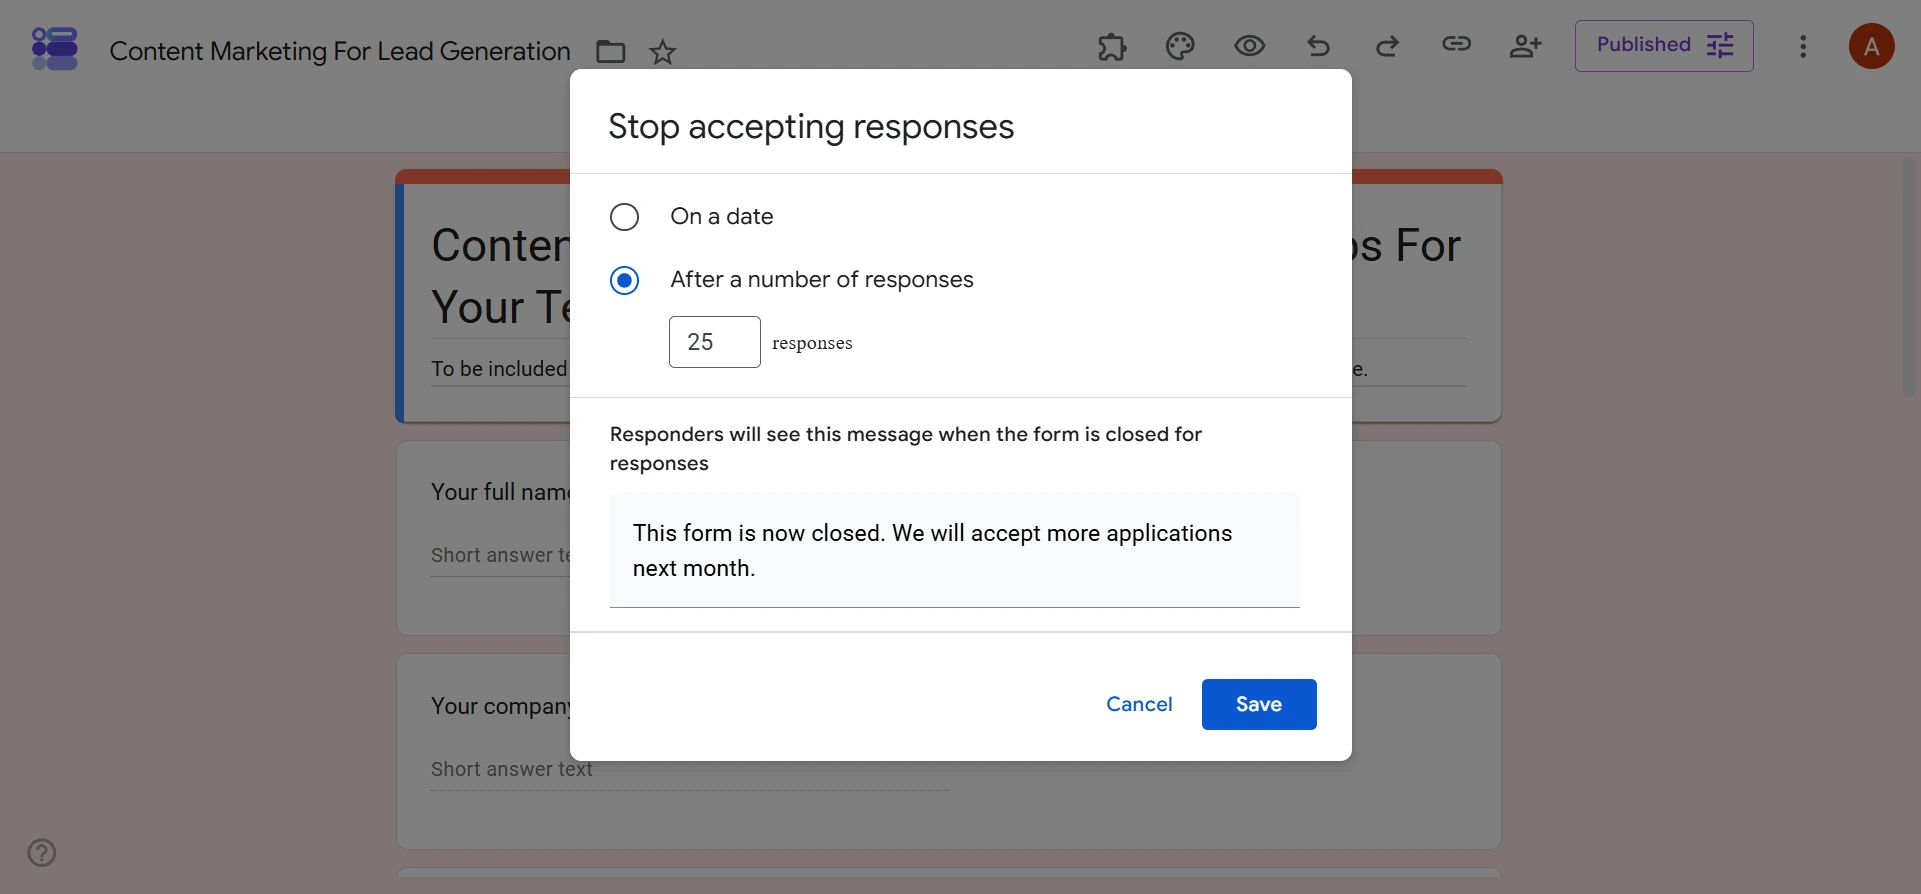
Once your form has automatically closed, Google Forms will display your custom message to respondents if they try to access the form link.
Pro Tip
The form-closed message can do more than tell users the form is no longer accepting responses. Use the message to pass on additional, helpful information for your audience. For example, “Check back next month, when we will be accepting more submissions.”
How to reopen a Google Form after closing it
Once you have closed a Google Form, either manually or automatically, you can reopen it to continue accepting responses on the same form. There are two different ways of doing so, depending on the method you used to close the form.
Reopen a manually closed form
If you manually closed your form, opening it again is easy. Follow these instructions:
- Open the relevant Google Form.
- Click Published.
- Toggle the Accepting Responses button to on.
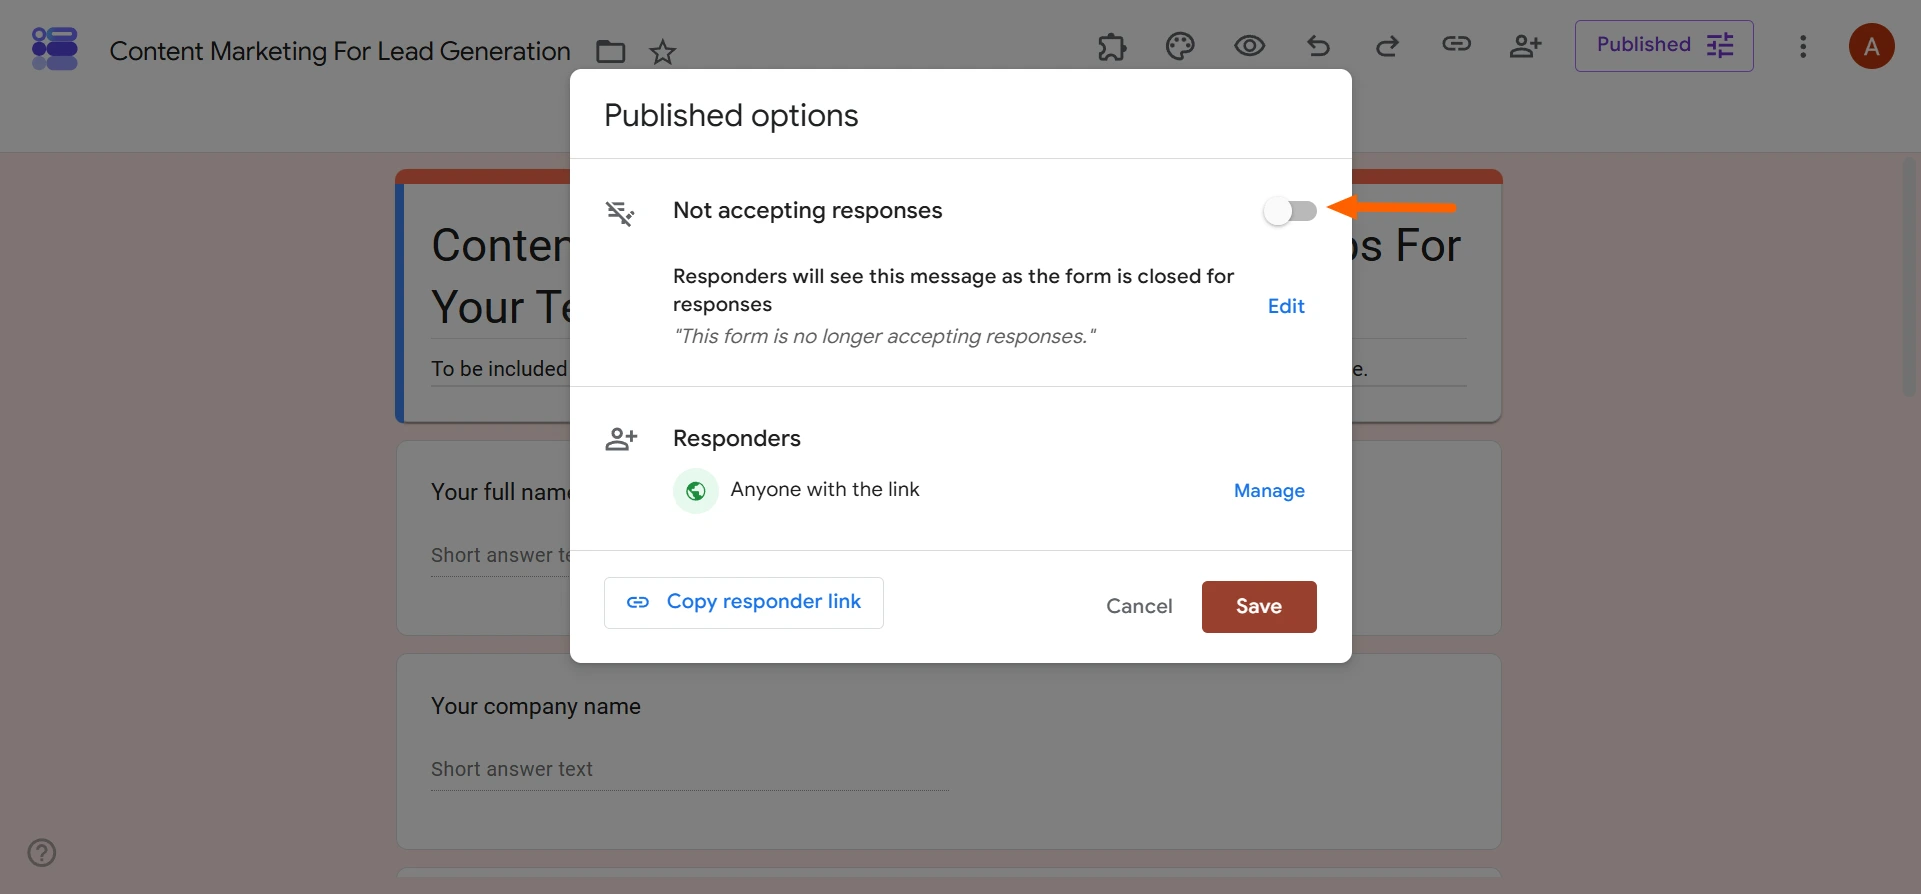
- Click Save.
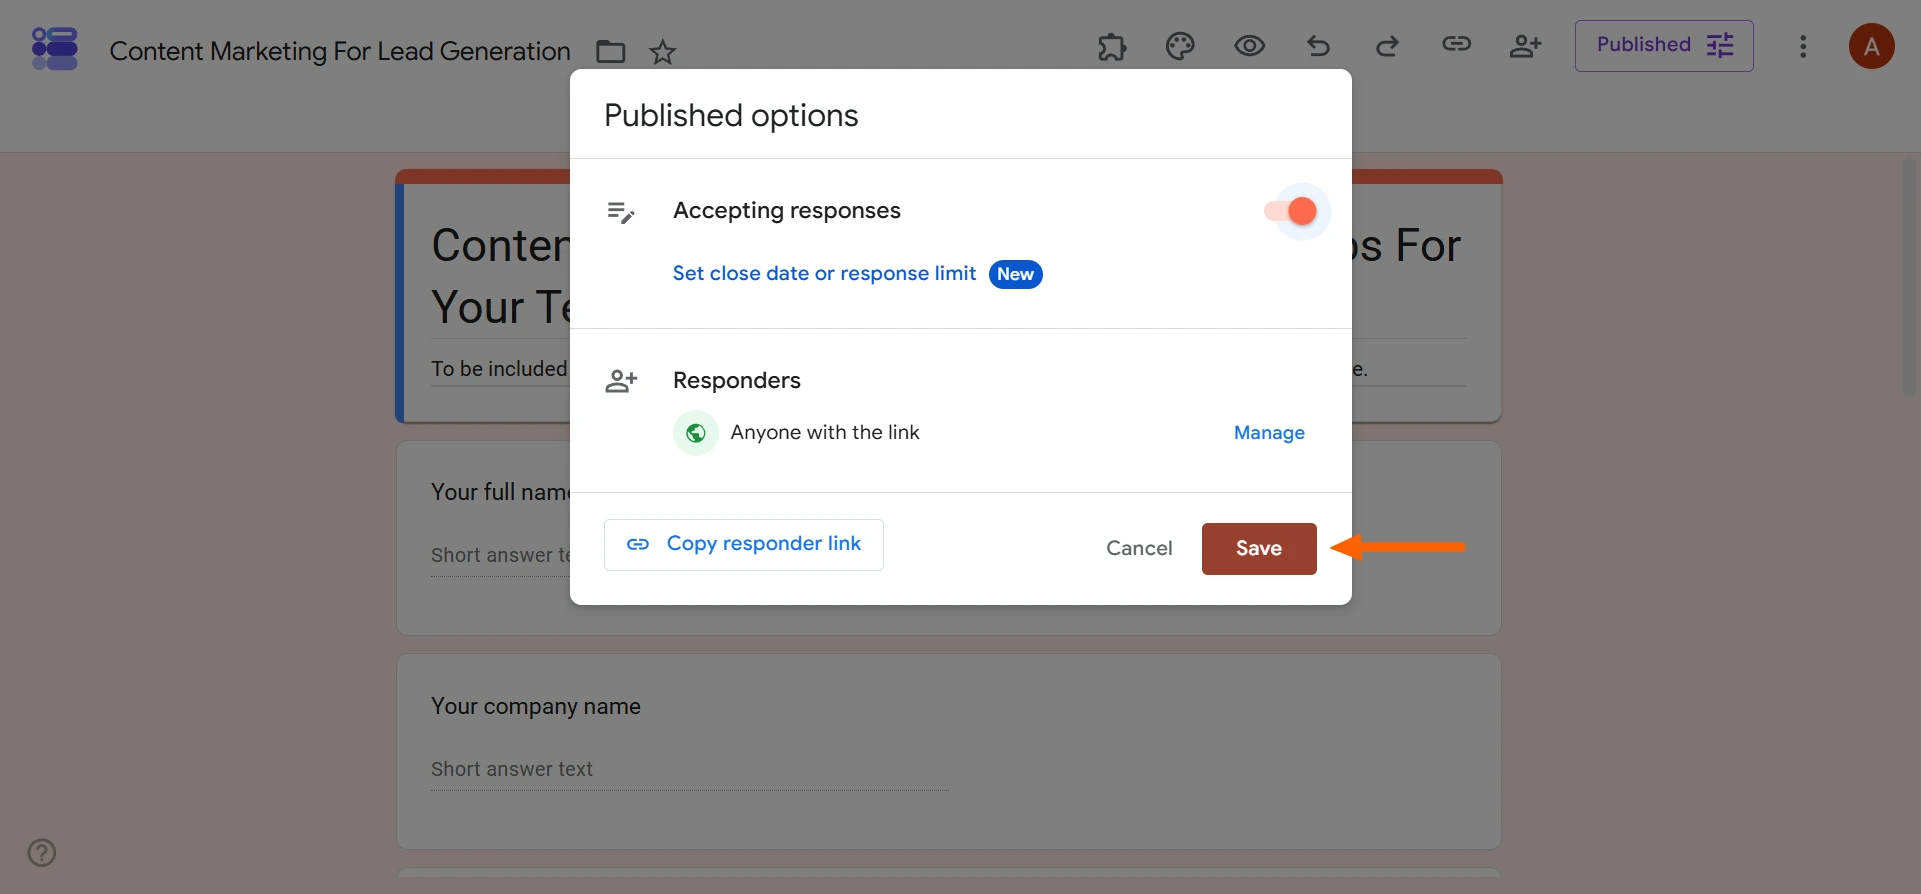
Your Google Form will now once again accept responses.
Remove an automatic-closing rule
Removing an automatic-closing rule, whether it’s for a response limit or for a specific date and time, is slightly trickier. Follow these steps:
- Open the relevant Google Form.
- Click Published.
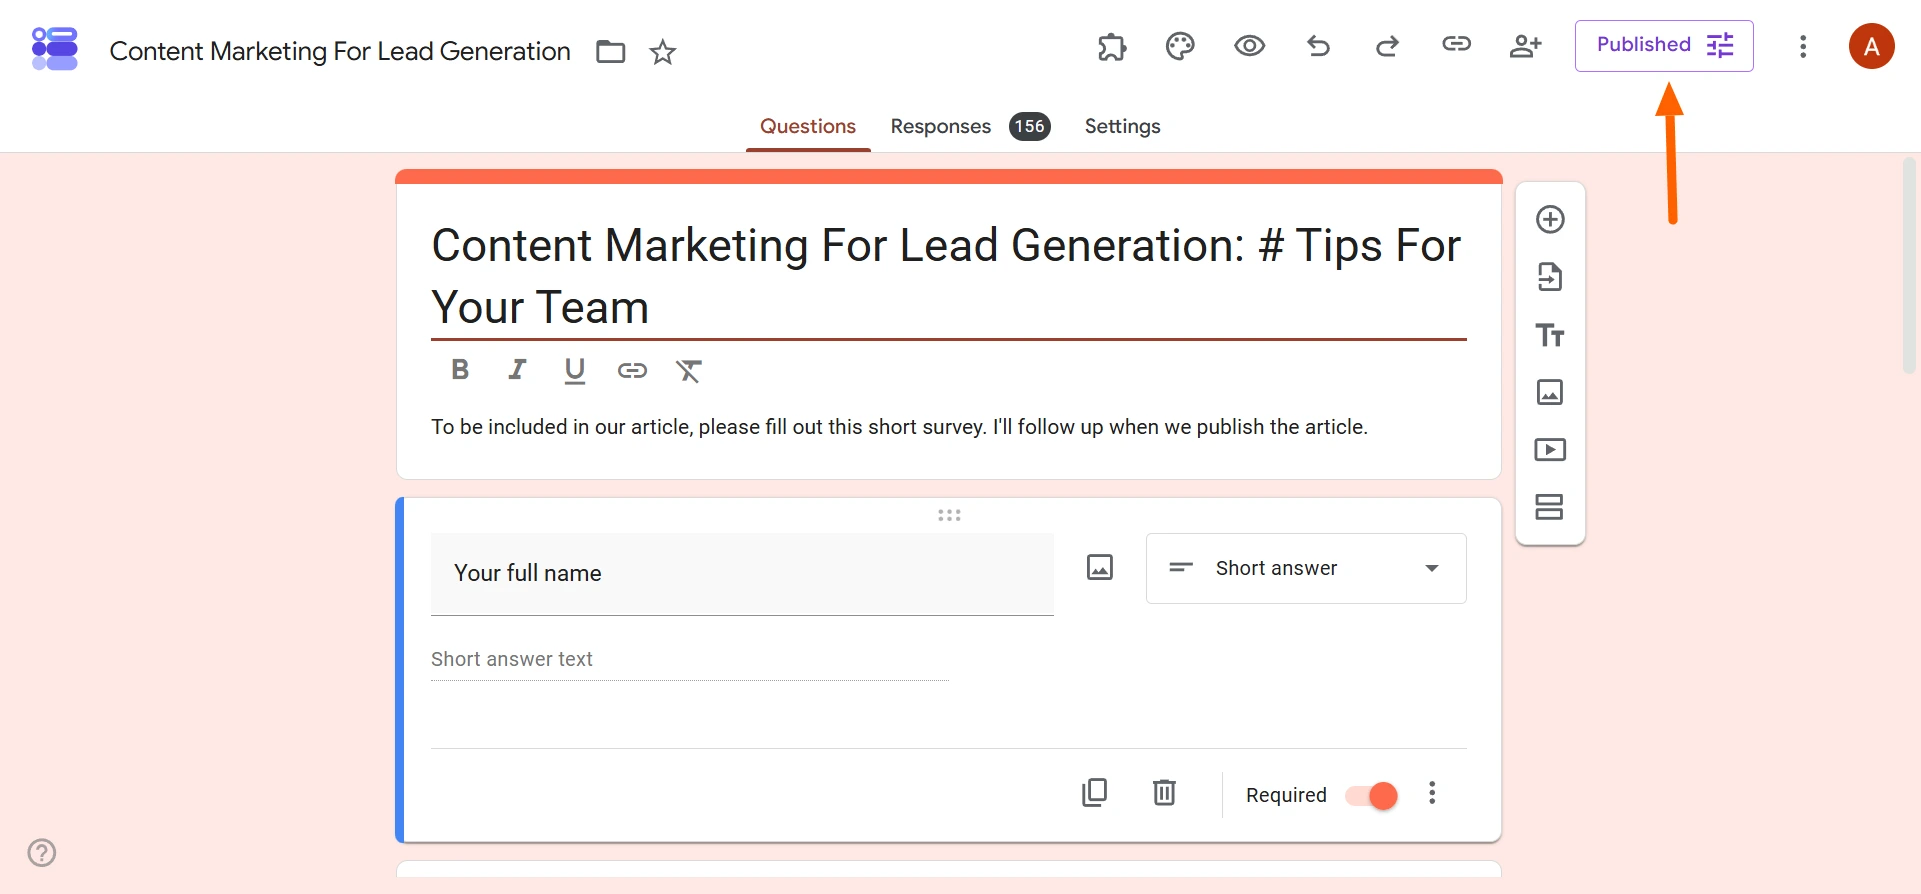
- Click Manage.
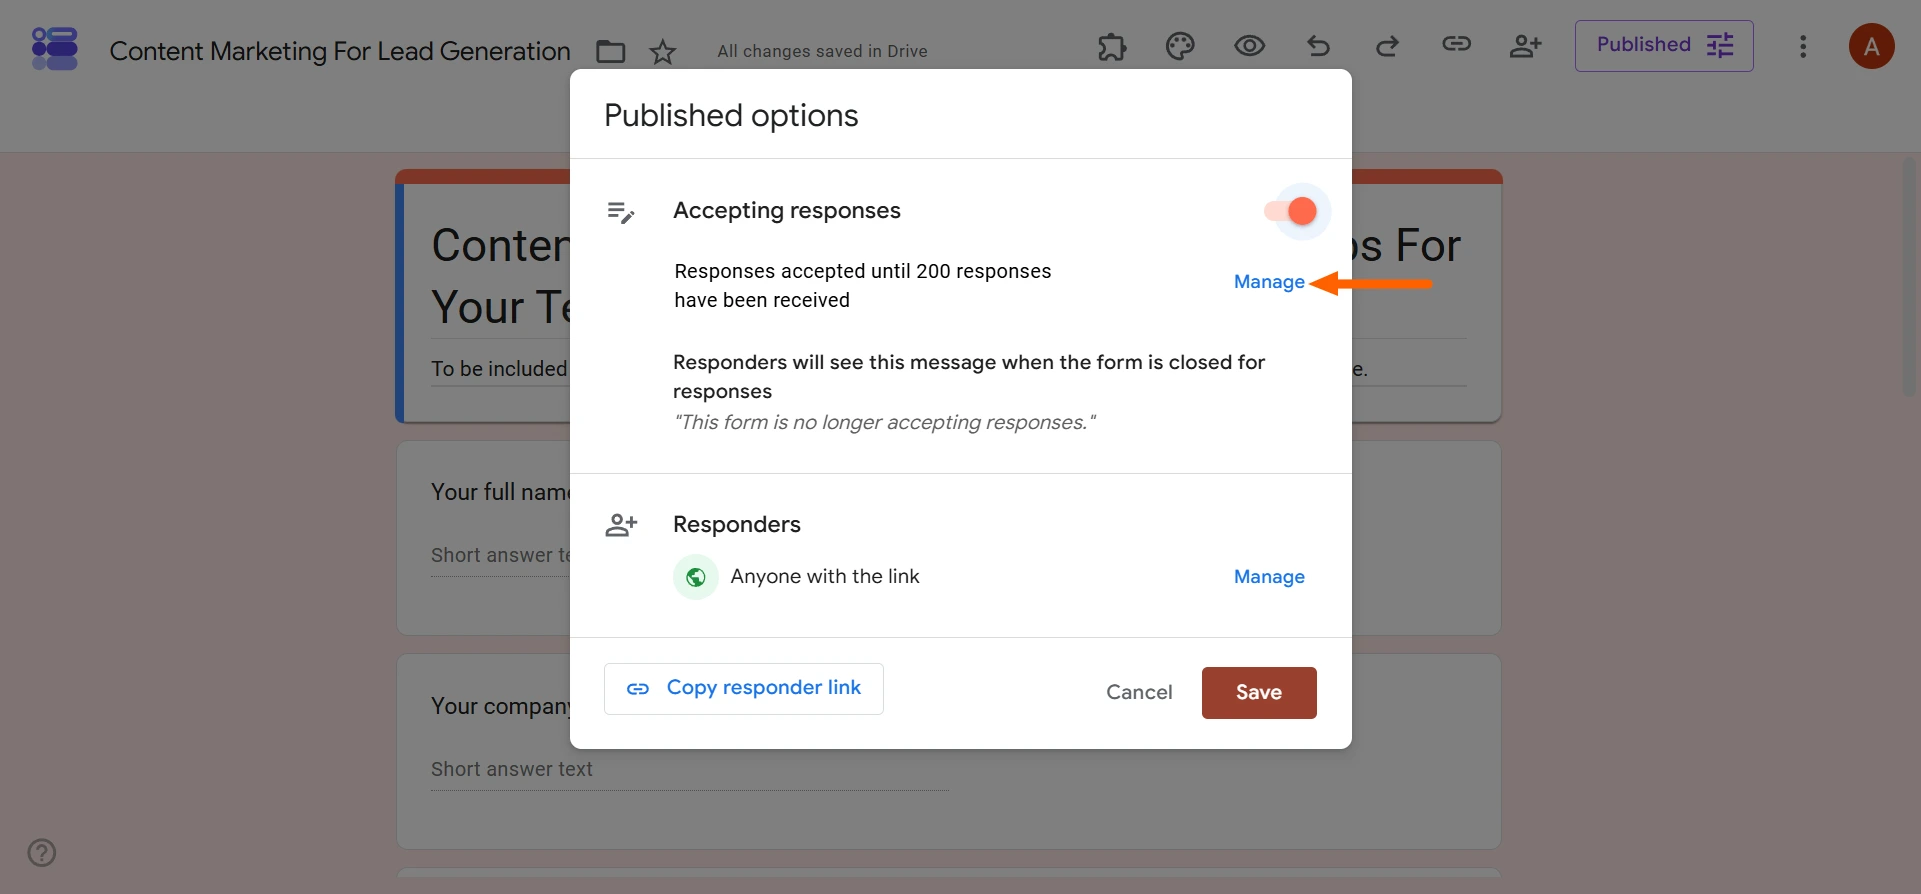
- Click Remove Expiration.
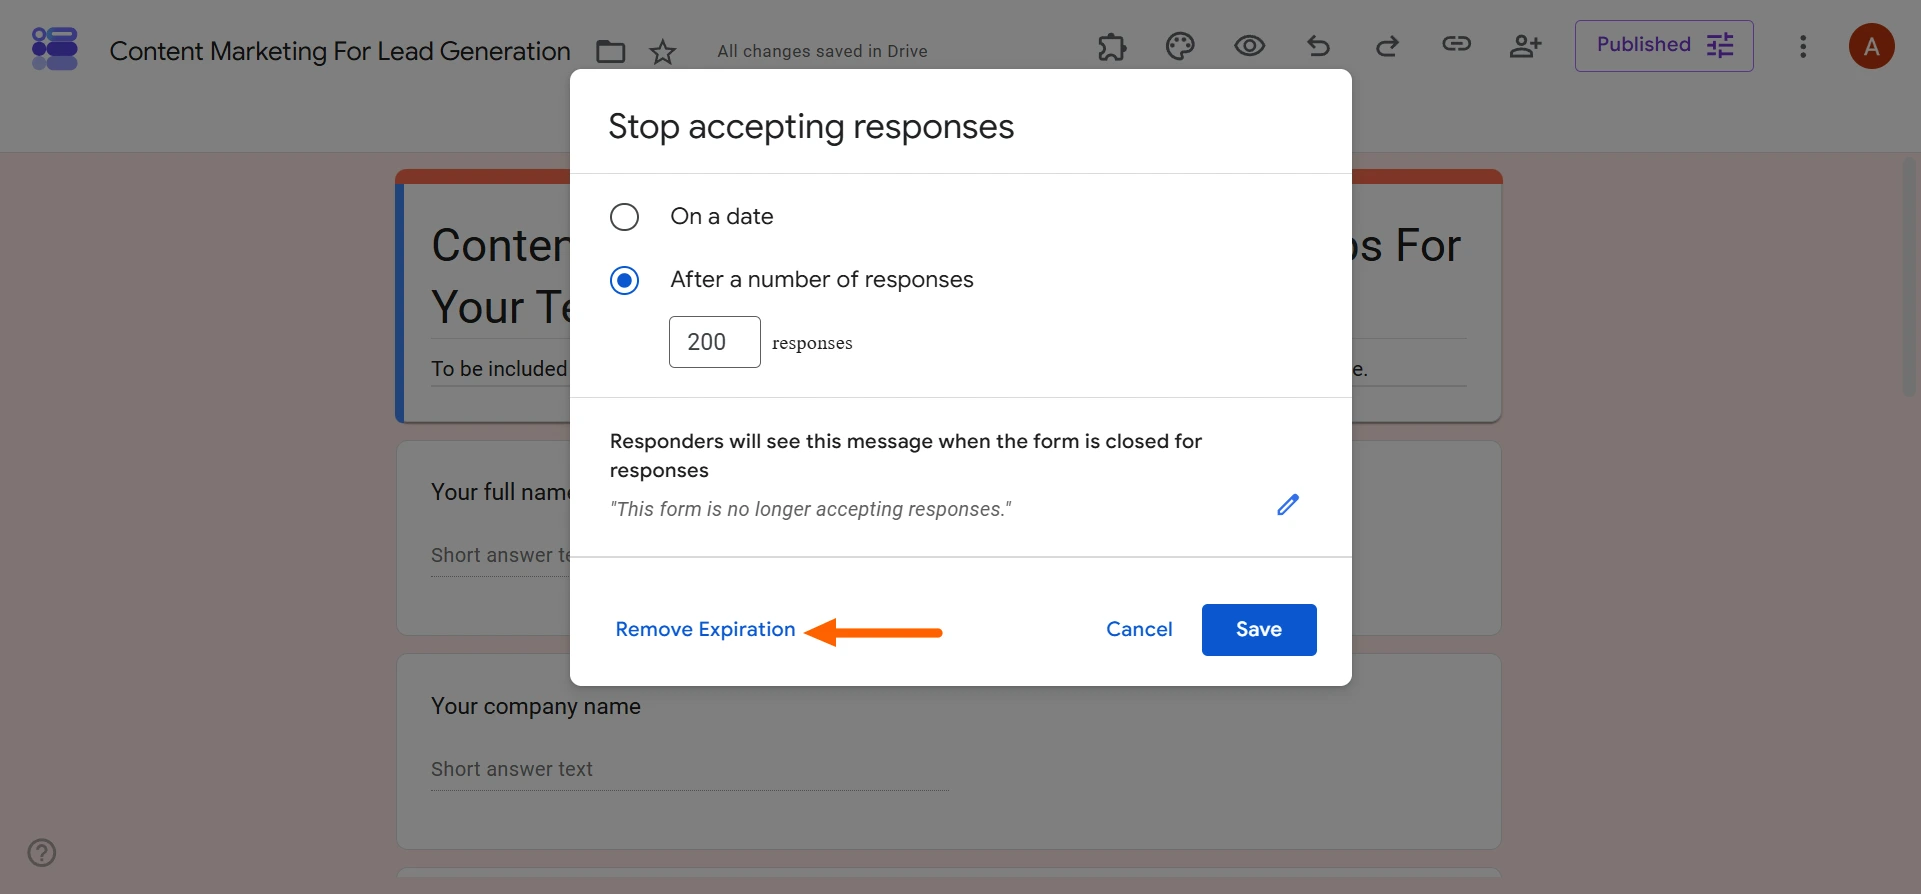
- Click OK.
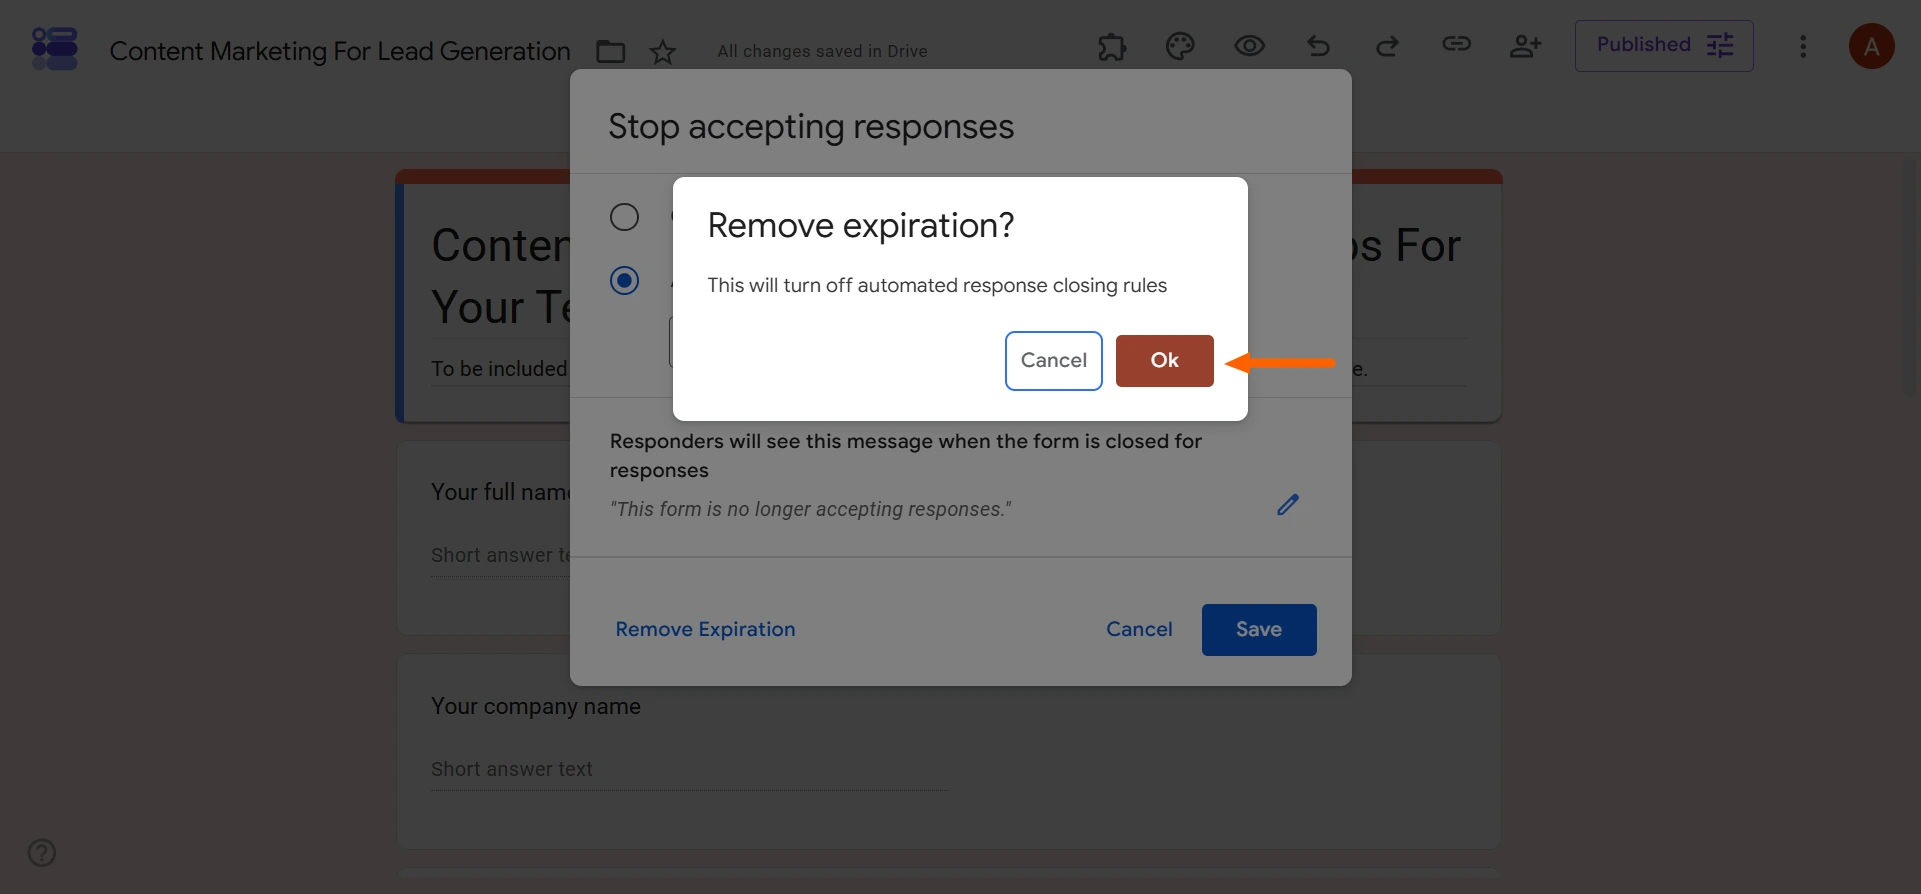
- Click Save.
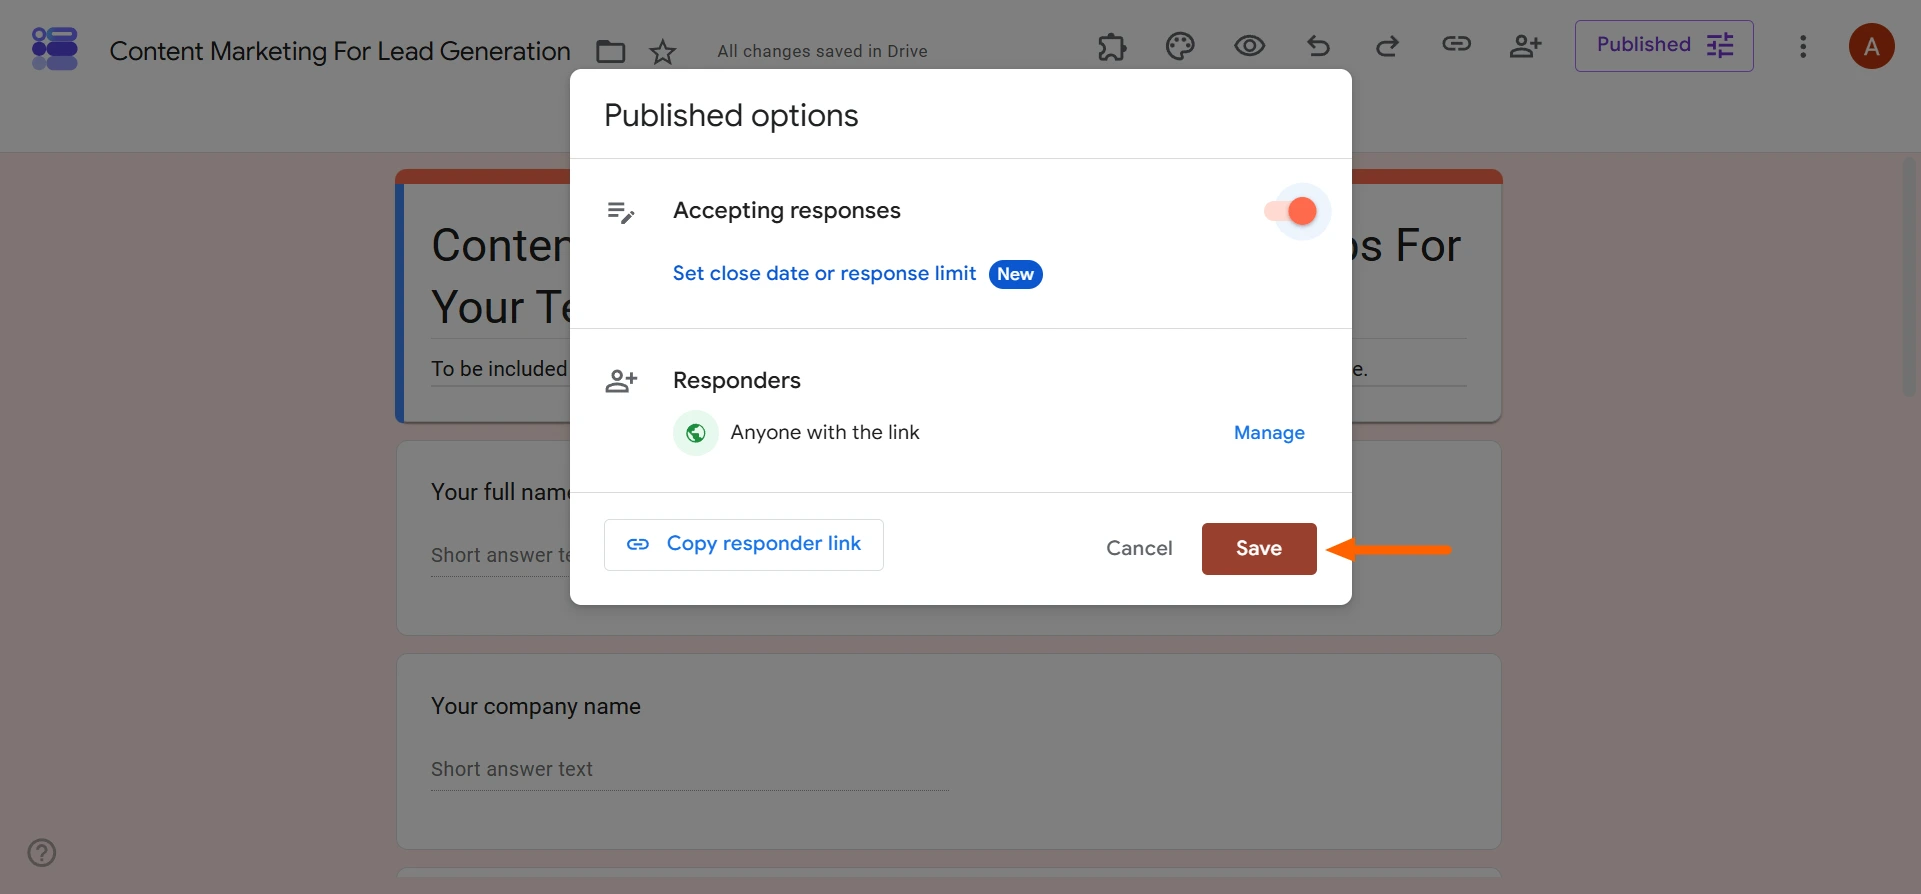
The form you automatically closed will no longer have the closing rules in place and will accept responses once again.
Close forms the way you want with Jotform
Google Forms lets you close your forms after a form limit is reached or on a specific date and time. But what if you want more flexibility? If you want to set your forms to close automatically either when a specific form limit is reached or on a specific date, whichever comes first, you need a more sophisticated form builder.
This is where Jotform comes in.


This leading form builder not only enables you to close your form manually, at a specific date and time and after a set number of responses, but also lets you close the form once you have reached either a specific response limit or date and time. This built-in functionality (no add-ons required) allows for more flexibility when closing your form.
Take a look at the form-closing features of each, side by side:
 Jotform |  Google Forms | |
|---|---|---|
| Close form immediately | ||
| Close form at a specific date and time | ||
| Close form after a set number of responses | ||
| Close form when either the date or response limit is reached | Not without an add-on |
How to close a Jotform form manually
When you need to close your form as quickly as possible, you can do it with Jotform two different ways. Both are faster than the method for Google Forms, and you can reverse them at any time. Here’s how to manually close a Jotform form:
My Forms
- On the My Forms page, select the form you’d like to close or open.
- Click the More dropdown menu.
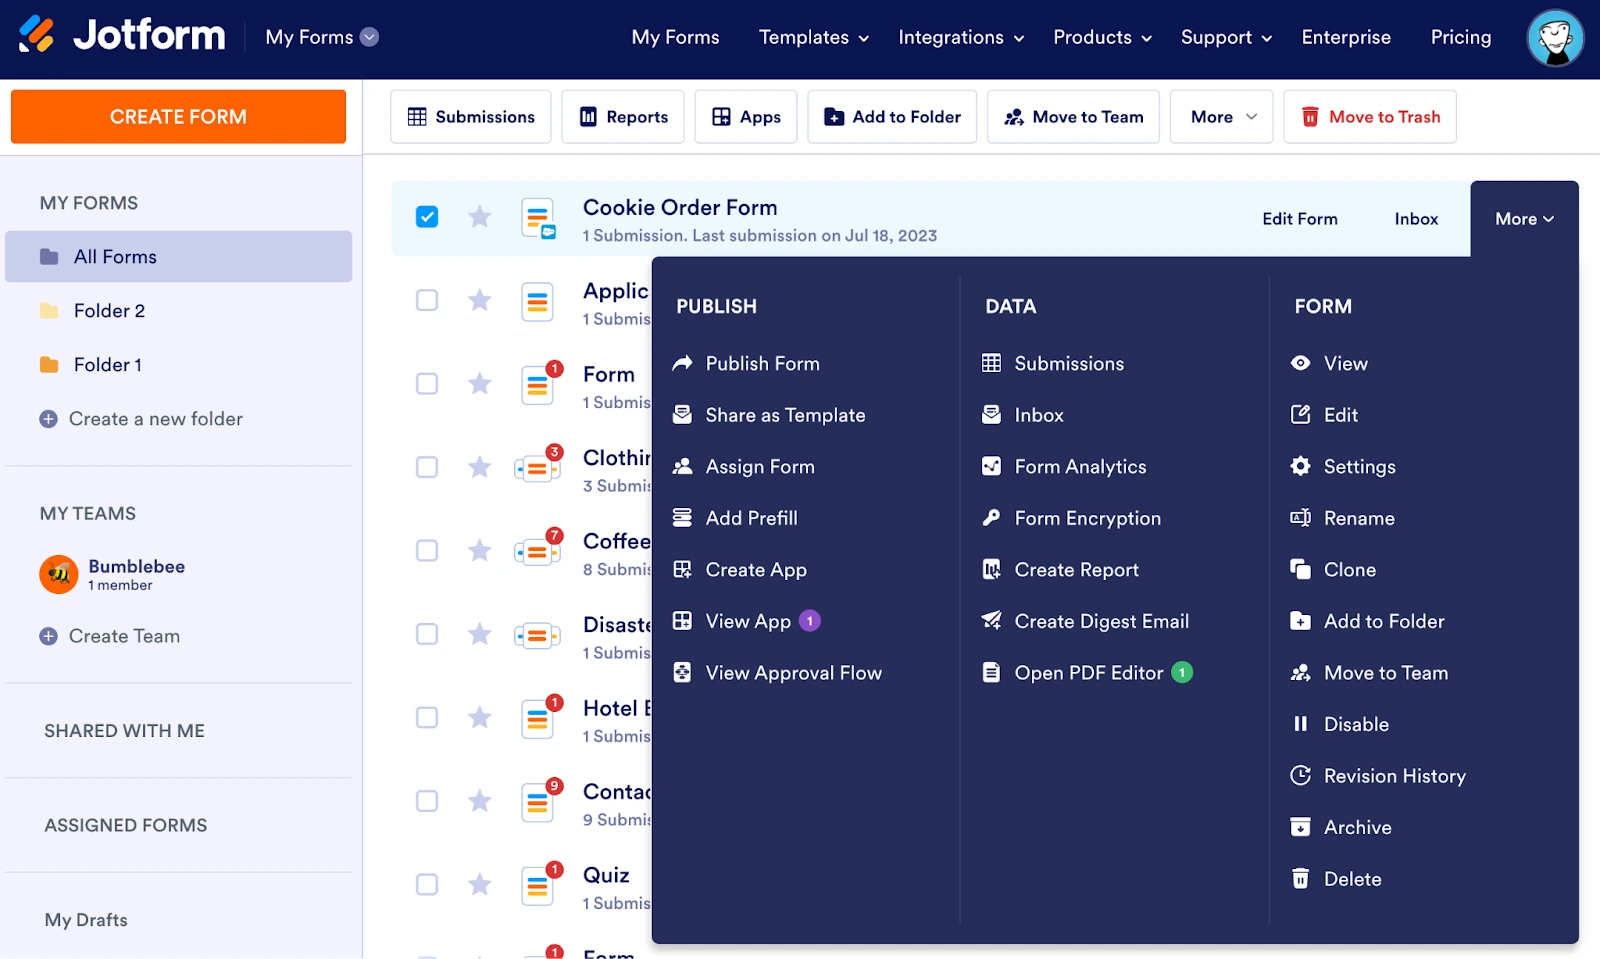
- Click either Disable or Enable to close or open that form.
Form Settings
- In the Form Builder, click the Settings tab at the top.
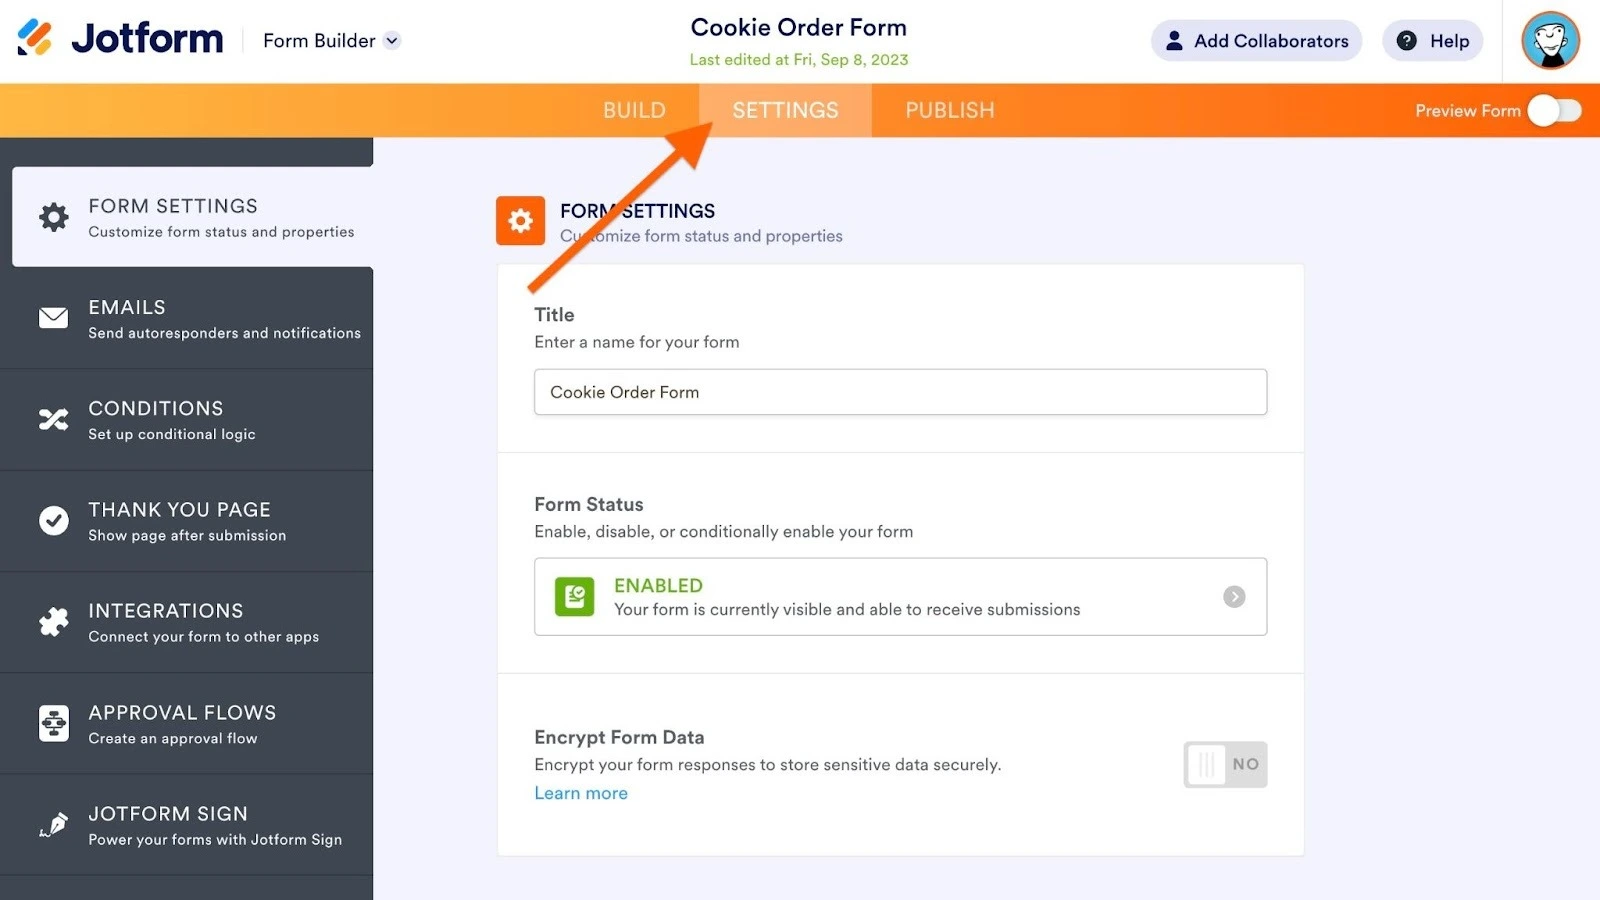
- Set the Form Status to Disabled to close the form or Enabled to open it.
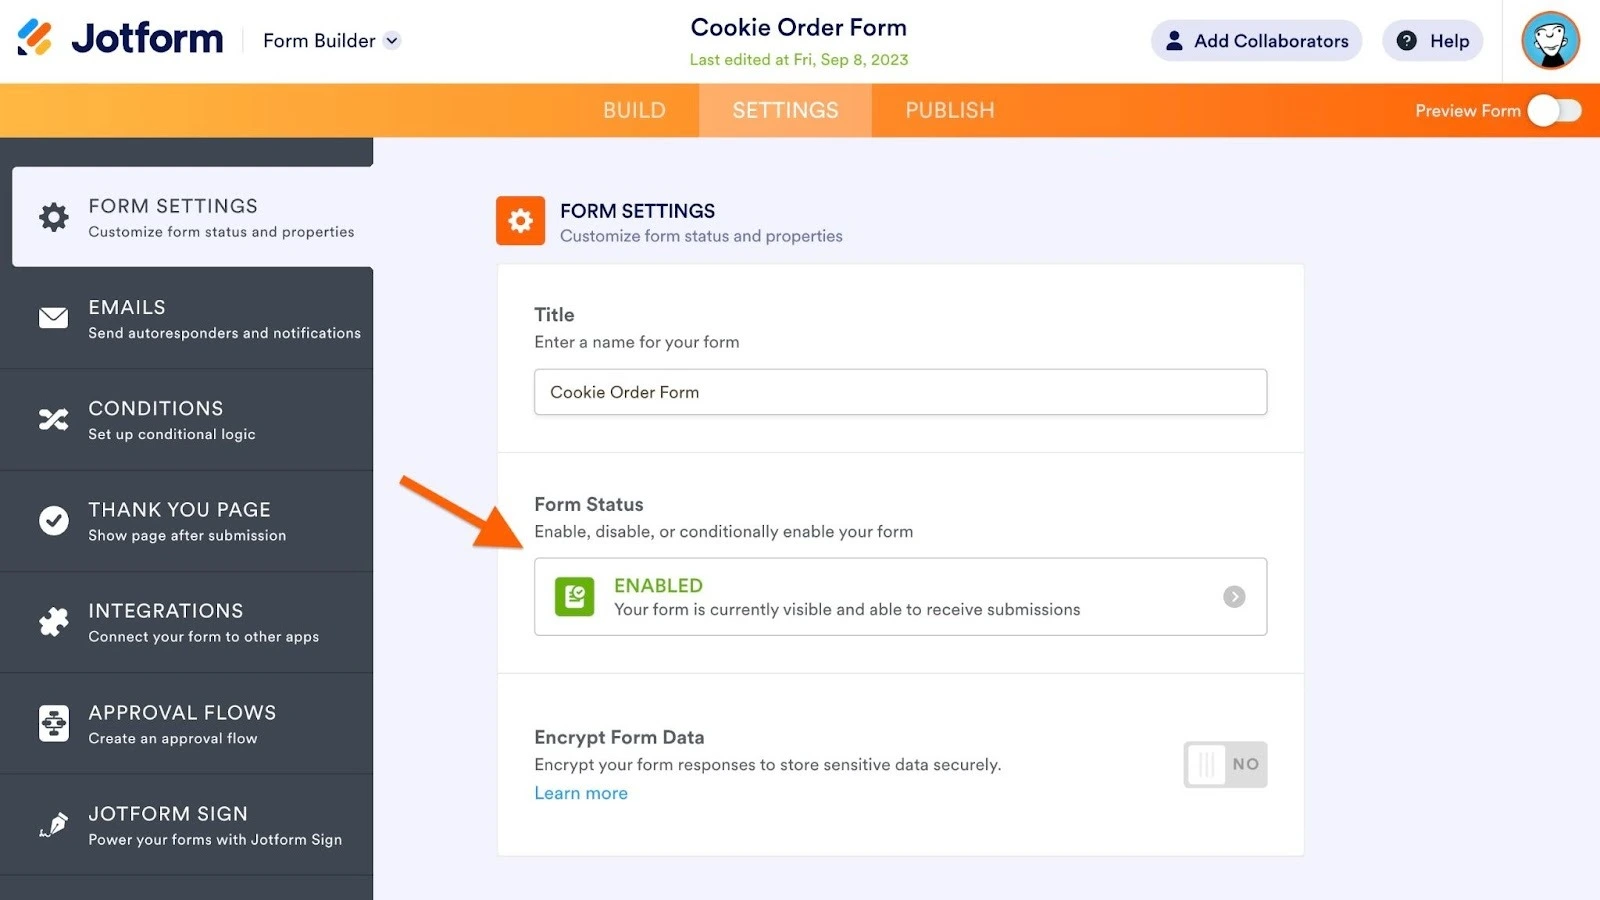
Each of these methods is quick, easy, and reversible, so you don’t have to worry about being able to use your form again.
How to close a Jotform form automatically
With Jotform, you can automatically close or disable any forms according to one or more criteria. You can set them to close based on the number of submissions you’ve received, the date, or even both simultaneously. (This contrasts with Google Forms, which doesn’t allow you to set both a submission limit and a time limit).
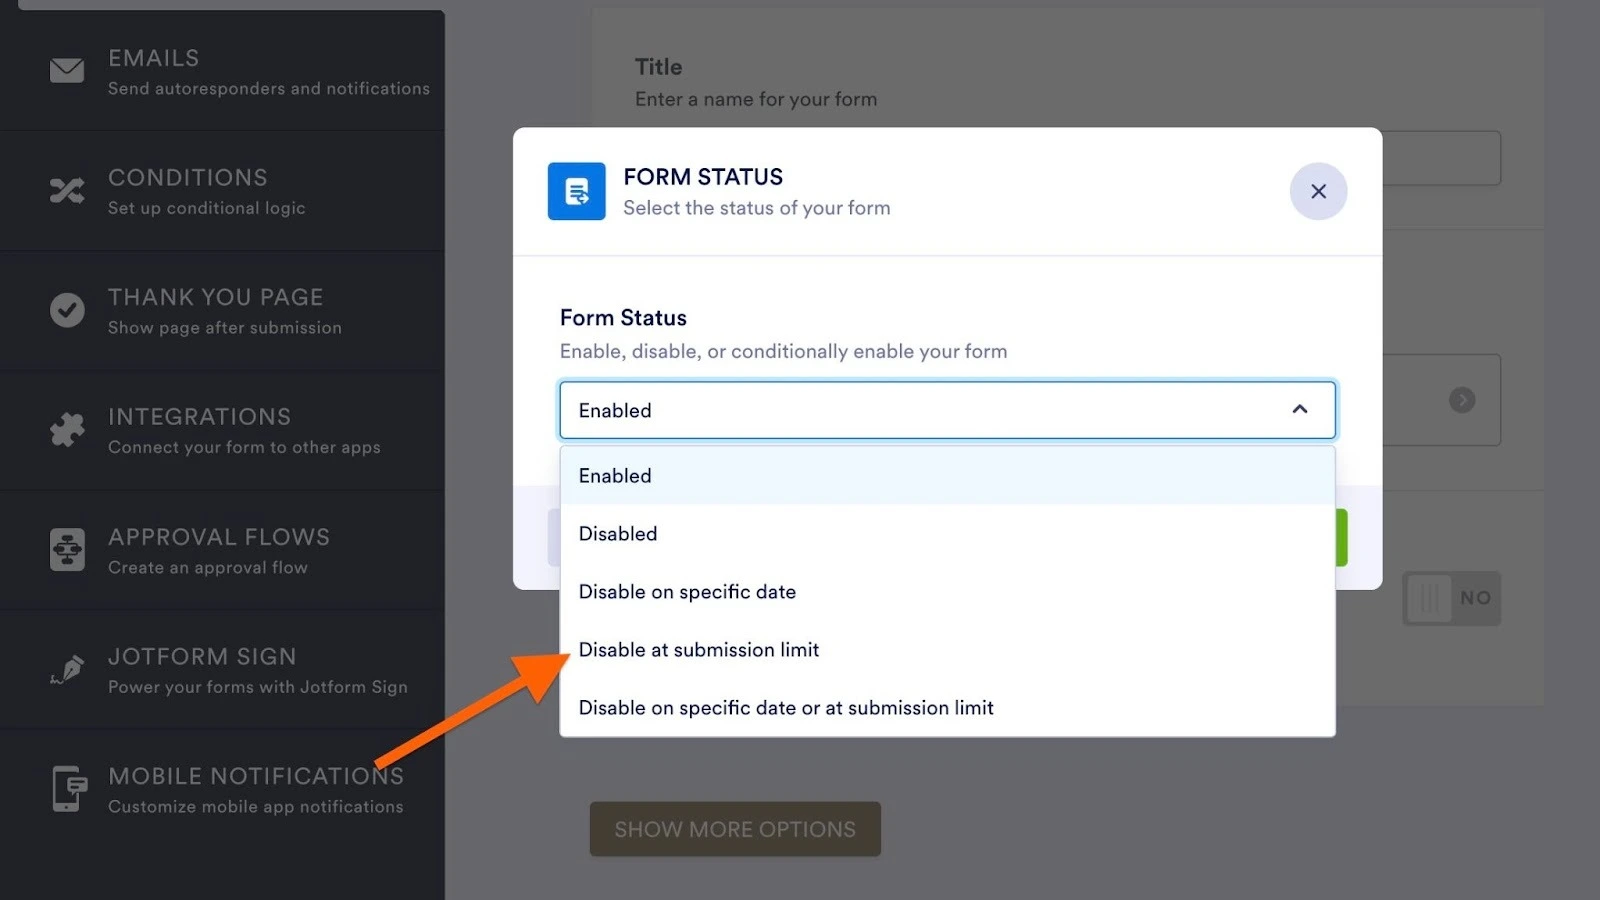
Let’s take a look at the different ways you can close your Jotform form automatically. You can access each of these options through the Form Status option in the Form Builder’s Settings tab.
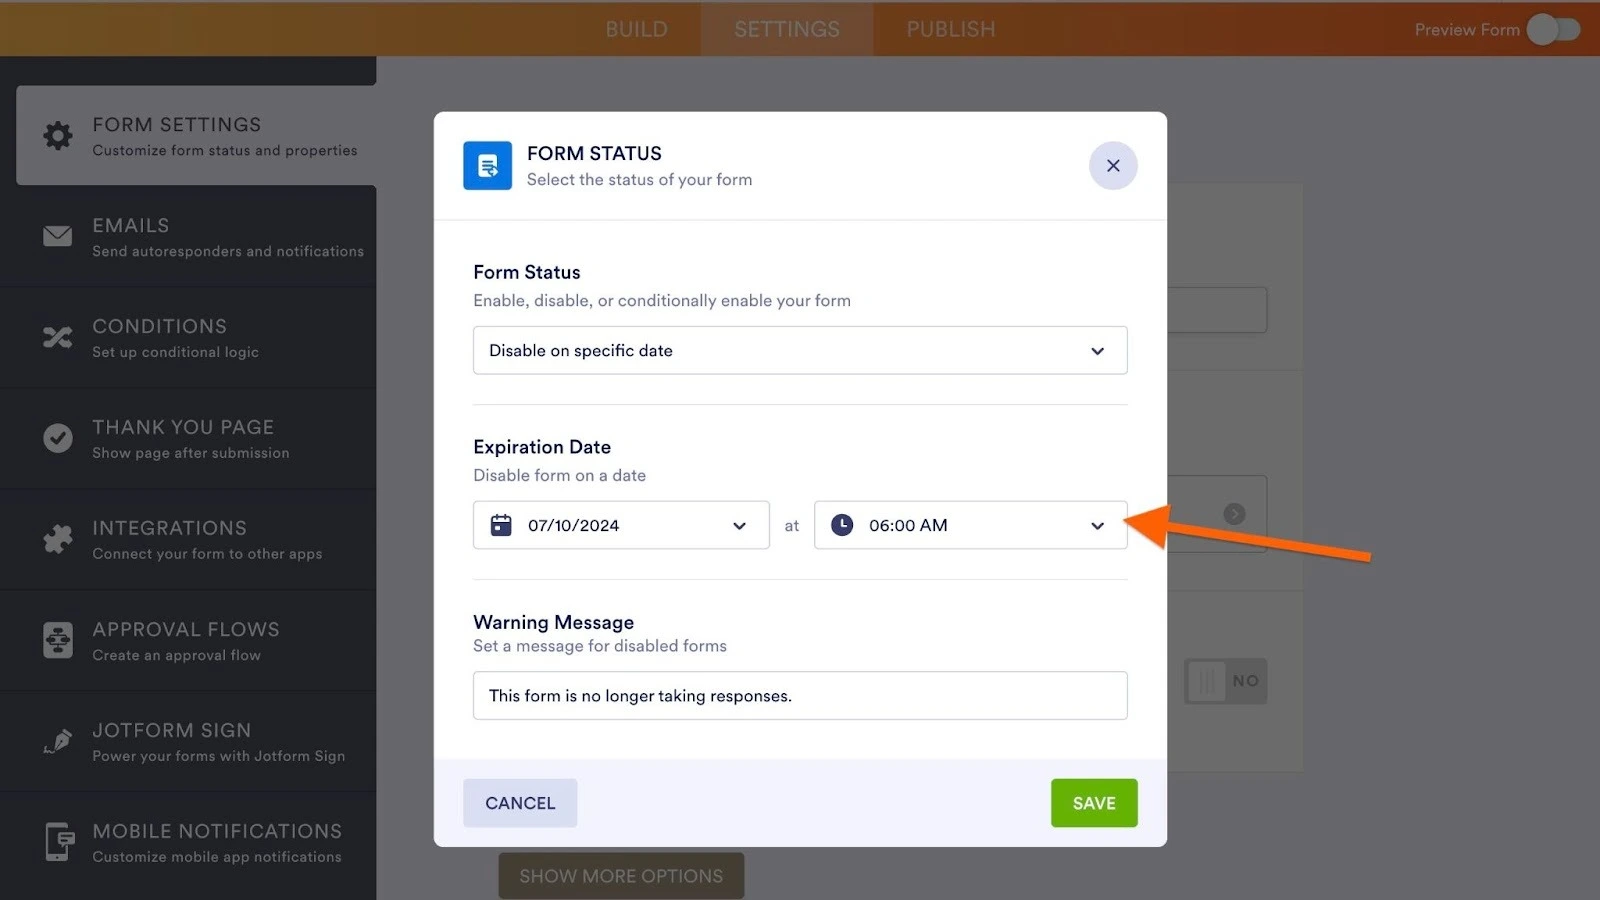
Close on a specific date
This is how to close your Jotform on a specific date and time. It’s important to note that these settings are in Eastern Standard Time (EST) and are on a 24-hour clock, so there are no a.m. or p.m. options. You also have to set expiration times at least five hours before they will happen.
- In Form Settings, select Disable on Specific Date.
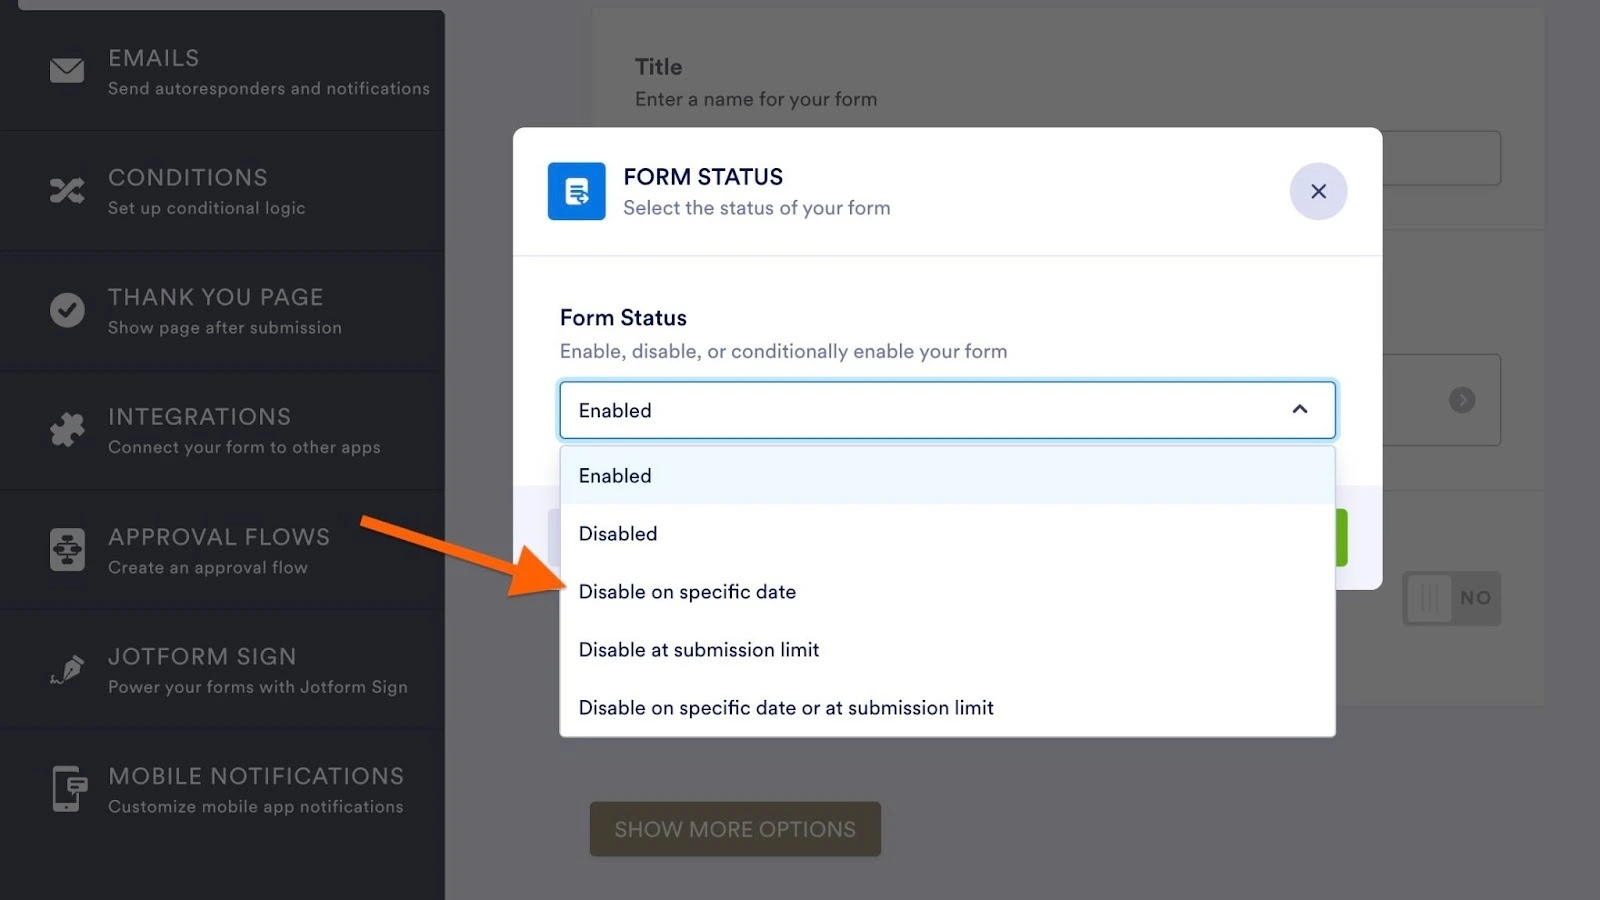
- Set your expiration date using the calendar widget.
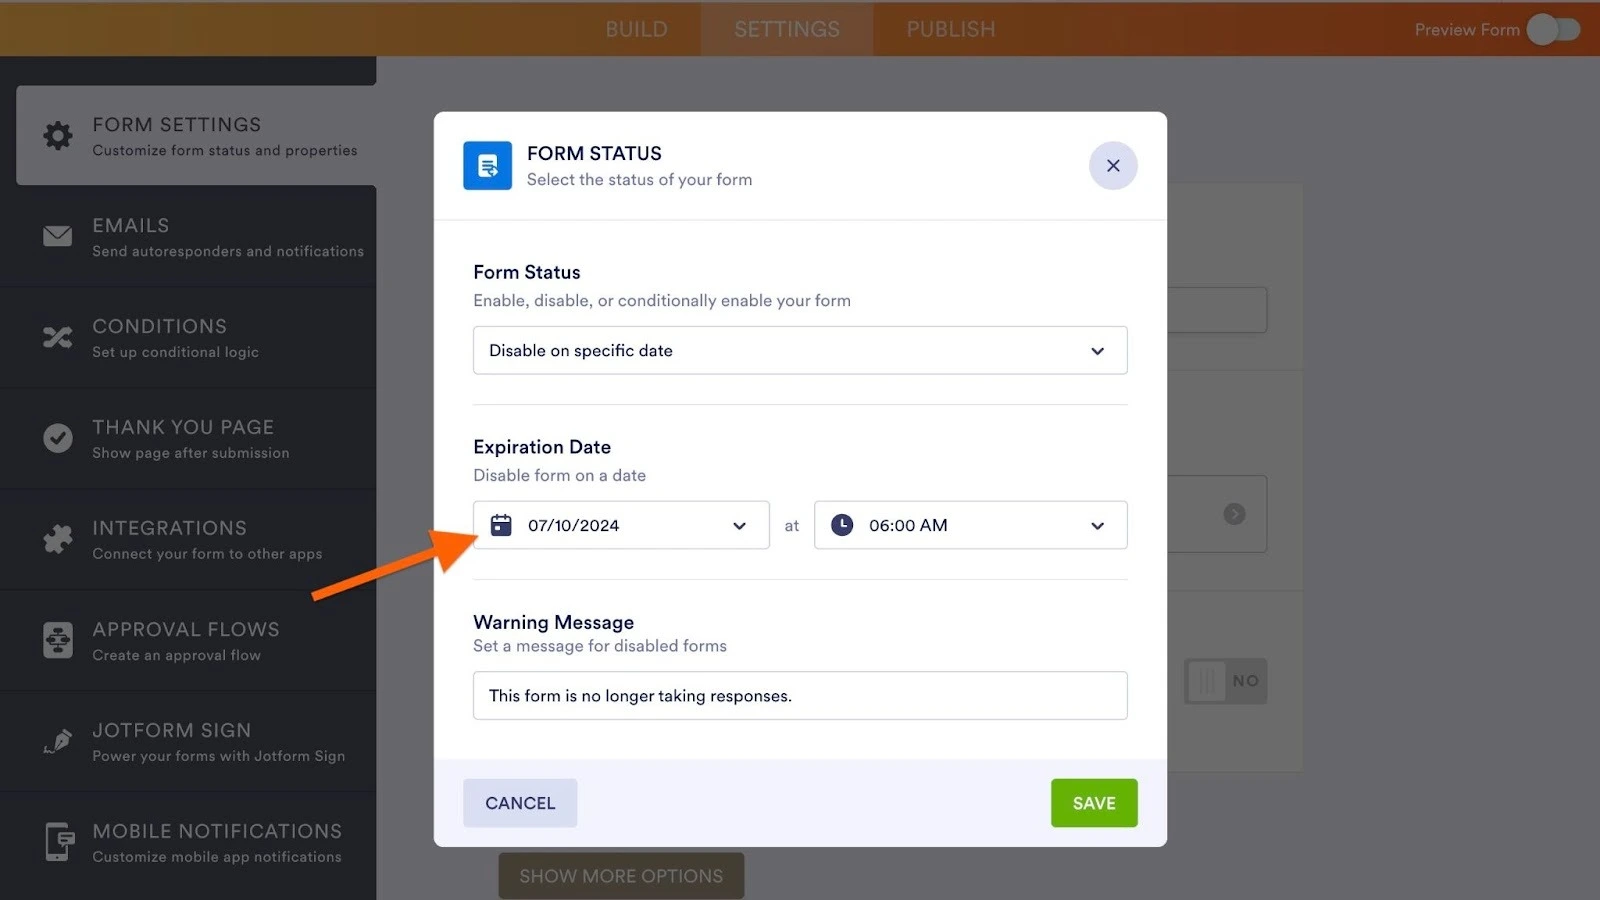
- Enter the expiration time in the box to the right.
Close by a submission limit
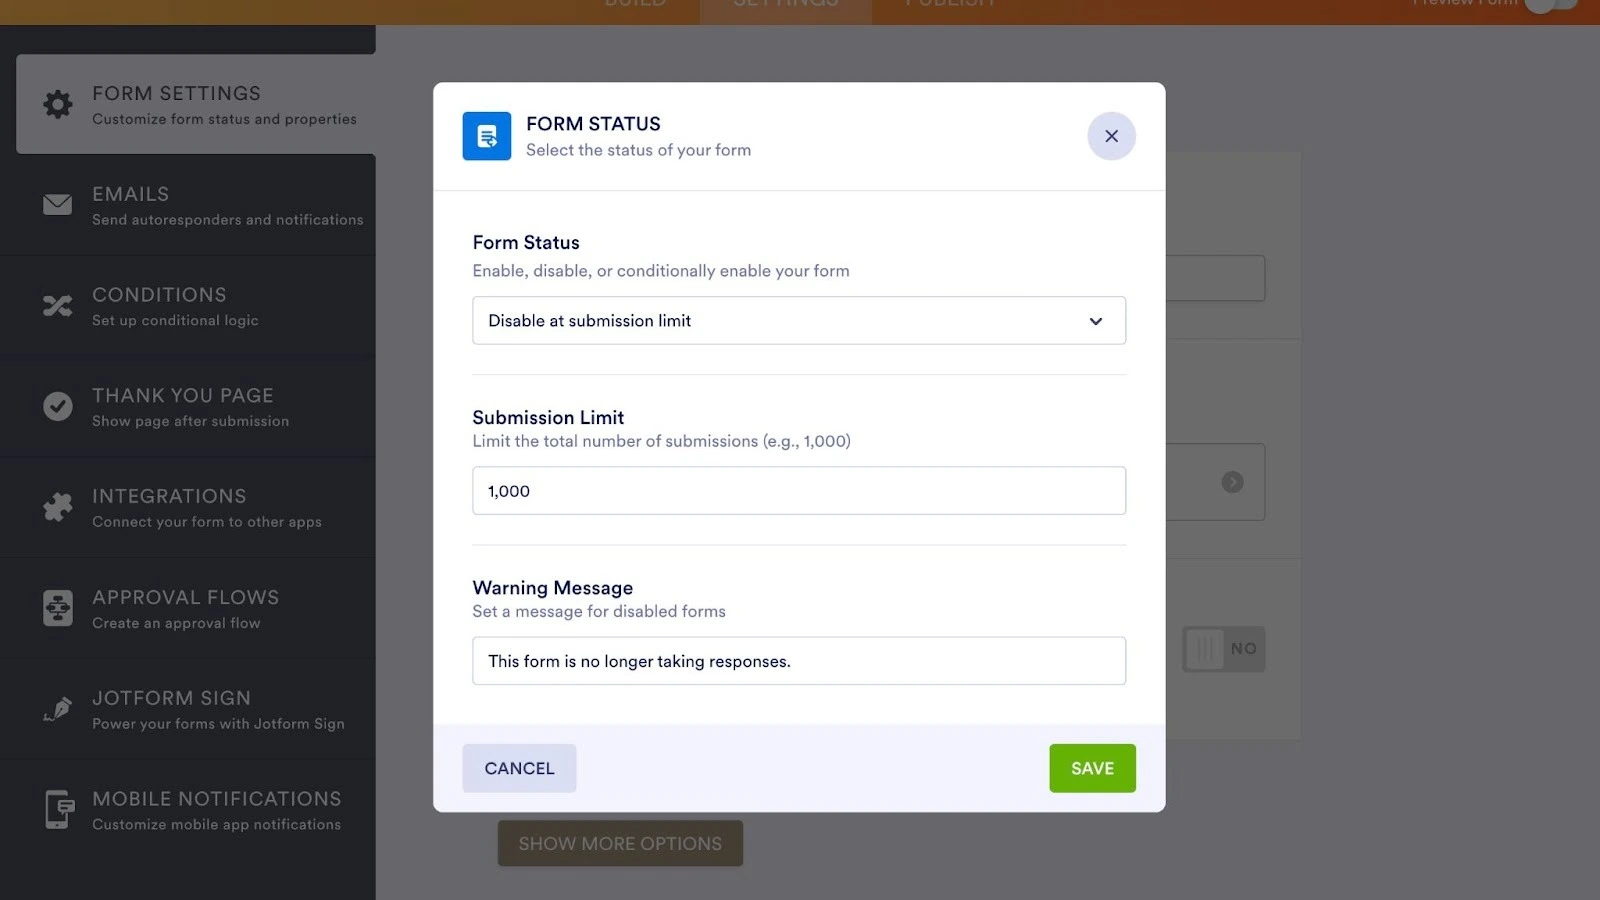
Jotform can also set submission limits for your forms. Be sure to enter the exact number of submissions you want. Once a form reaches its limit, it will disable automatically, so you won’t have to awkwardly contact anyone who submits the form after the limit has been reached.
Here’s how to set it up:
- In Form Settings, select Disable on Submission Limit.
- Enter your exact submission limit in the corresponding text box and click Save.
Close a form on a specific date or submission limit
Forms sometimes require multiple closing factors. For example, a product that has an order deadline and a limited number available will require a form that can close based on both number of submissions and date. Luckily, Jotform can do what Google Forms can’t.
Here’s how to automatically close a form by date and submission number:
- Select Disable on Date and Submission Limit in Form Settings.
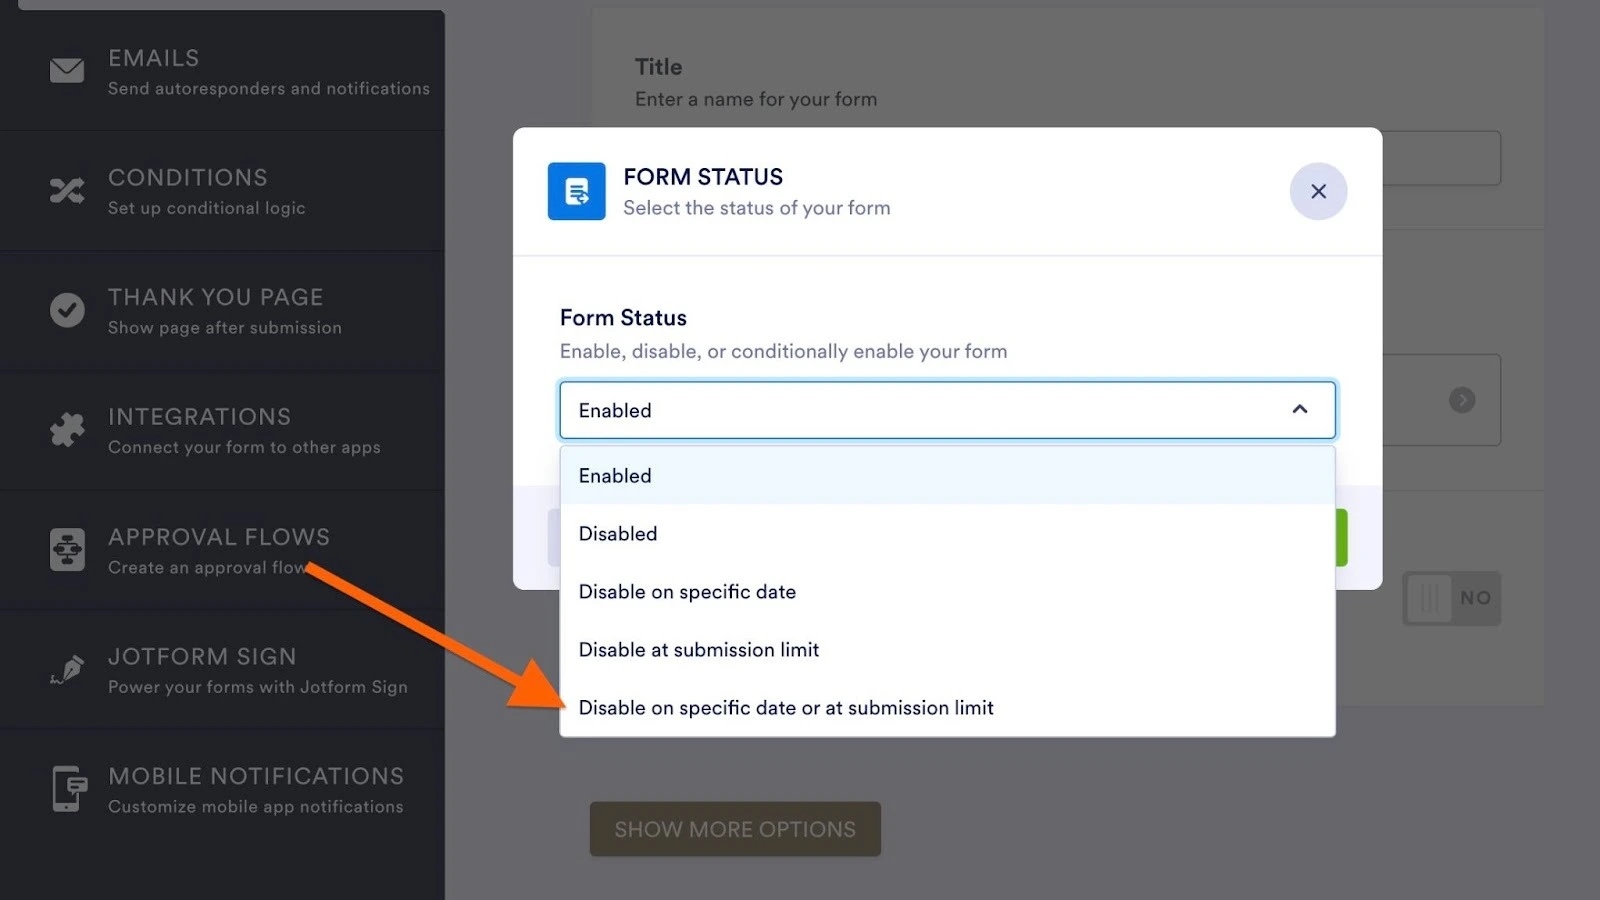
- Set your expiration date in the calendar widget.
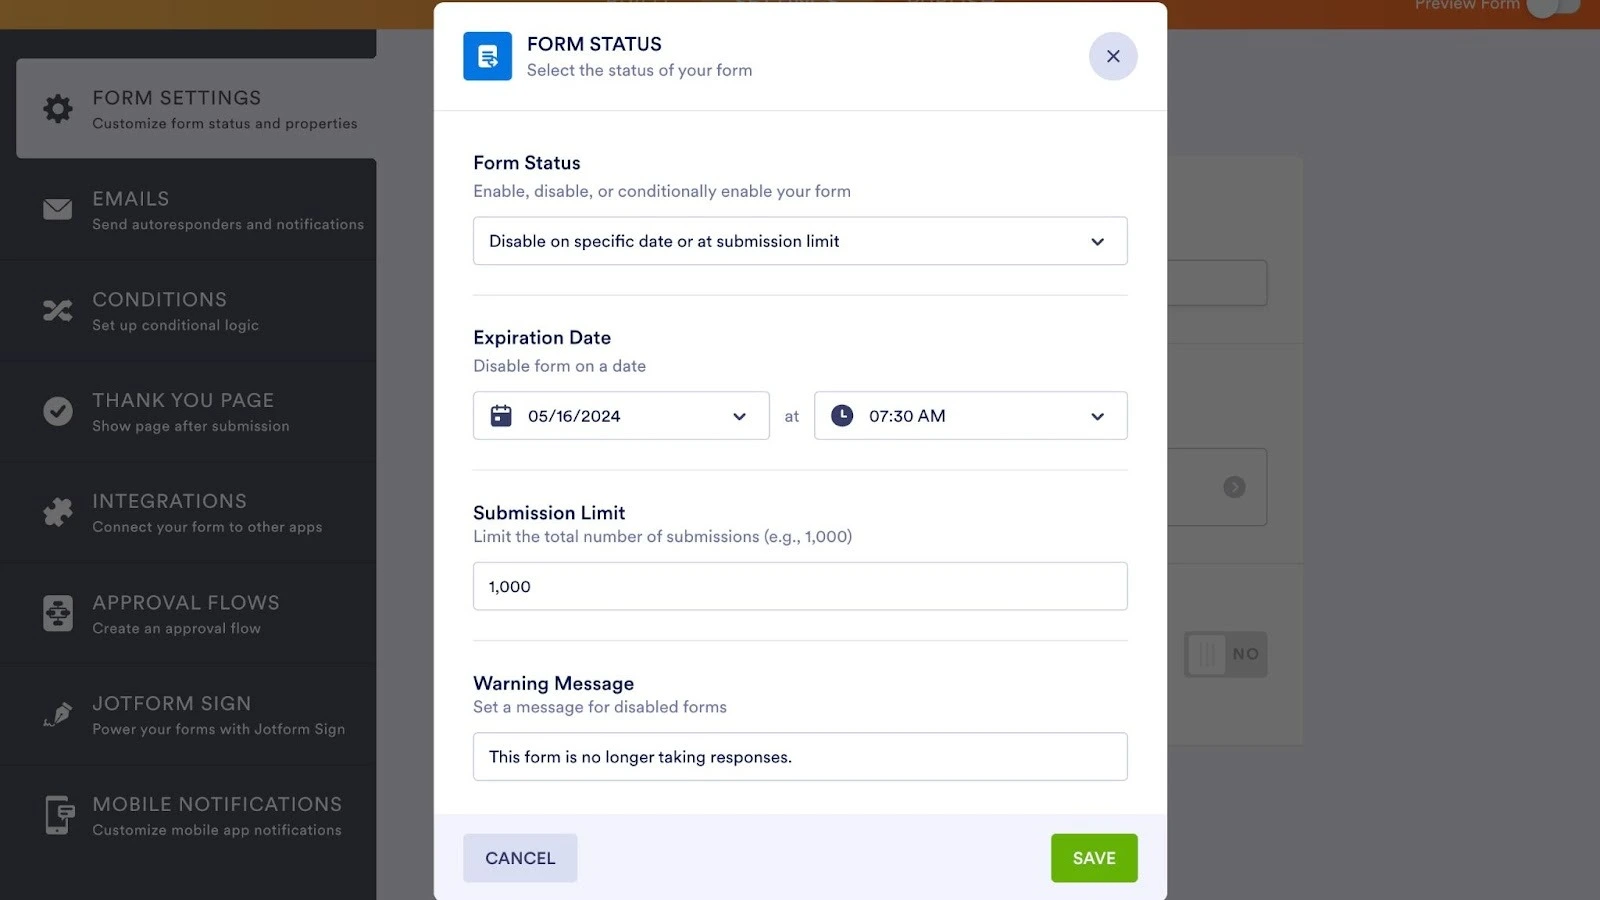
- Select expiration time in the box to the right.
- Enter your exact Submission Limit in the corresponding text box.
When your form hits either of these two limits, it will close automatically. Need it to open again? You can reopen an automatically closed form by setting it to Enabled in Form Settings, or by changing the date and form submission limit. You can adjust one or both of the limits.
If you change the submission limit, you’ll want to add your original limit to however many more responses you need. For example, if your original limit was 250 and you want to add 100 submissions, you would enter 350 as the new submission limit.
8 reasons to switch to Jotform today
If you’re looking for a basic form builder for simple form workflows, then Google Forms does the trick. However, if you need a form builder that offers flexibility and sophisticated features, look no further than Jotform.
Here are some reasons why users consistently choose Jotform over Google Forms:
- No required login to fill out forms or upload files: Jotform makes it easy and friction-free for users to access your forms and upload files. While Google Forms allows responses without a sign-in, users do have to sign in if they want to upload a file to your form. This slows things down for your respondents and can affect your form completion rates.
- Easy ways for respondents to view their own submissions: Jotform lets form fillers access and review their responses anytime, without any special settings. In Google Forms, you have to specifically configure the form to show responses to form fillers.
- Multiple options for collecting payments: You can accept one-time or recurring payments using native form fields in Jotform because it has 40-plus payment processor integrations with leading tools including Stripe, Square, and PayPal. Google Forms doesn’t accept payments natively; you have to use an add-on.
- Advanced tools for e-signature collection: Instead of using a third-party tool for electronic signatures, as with Google Forms, you can collect e-signatures natively with Jotform Sign. The tool is free and works seamlessly on any device.
- Workflow automation based on form responses: You can put form responses to work (or analyze them further) using Jotform’s workflow automation tools. Jotform supports approval, notification, and follow-up workflows to keep things moving. Google Forms doesn’t have native workflow automation capabilities.
- Advanced form logic for highly relevant forms: Jotform offers sophisticated conditional logic, answer piping, multi-language support, and offline forms so users have a smooth form-filling experience. Google Forms offers only basic conditional logic.
- Mobile-optimized forms for any device: With Jotform, you don’t need extra configuration to make forms mobile-friendly. Every form you create with Jotform looks great and works perfectly on any device, every time.
- Fillable PDF forms in seconds: Unlike with Google Forms, you can convert any existing PDF into a smart, fillable, submittable PDF web form with Jotform. This functionality is ideal for applications, official documents, and more.
And that’s not all. Jotform makes it easy to build forms while saving time. You can use the Jotform AI Form Builder or choose from thousands of form templates, including file upload form templates. Plus, you can easily expand the functionality of any Jotform form using the hundreds of available form widgets, such as for payments, signatures, inventory, and more. Even though Jotform comes with highly sophisticated features, it’s intuitive and easy to use, with no learning curve.
If you’ve already built your form in Google Forms but want to try Jotform’s advanced features, you don’t need to rebuild your form in Jotform. Simply migrate your Google Forms to Jotform with our migration tool. We do all the heavy lifting for you, bringing over your form questions and structure.
With just a few clicks, you can start exploring all that Jotform has to offer. Give Jotform a try today and see how easy it is to build, open, and close your forms.
FAQs about closing a Google Form
Yes, there are two ways to schedule a Google Form to close automatically. You can set a Google Form time limit so that it closes on a specific date and time. You can also schedule the form to close automatically once it has received a specific number of responses. Find both options once you click Published.
Yes, it is possible to limit the number of Google Form responses. Click Published, then click Set Close Date or Response Limit. Select After a Number of Responses and type in the number of responses you want to collect. Click Save.
After a form is closed, the form link will remain active. However, users won’t be able to see the form or submit responses. Instead, they will see a message that lets them know the form is closed. Google Forms lets form owners customize this message.
Yes, it’s possible to reopen a Google Form after closing it. The method will depend on whether you closed the form manually or through an automatic rule. Click Published; If you closed the form manually, you can reopen it by reversing the toggle. If you closed the form automatically, click Manage, then Remove Expiration, and OK. Then click Save.
This article is for teachers, event organizers, HR teams, and anyone running a Google Form with a deadline or response cap who needs to stop new submissions cleanly.




















































































Send Comment:
1 Comment:
January 10, 2024
I have used Email Notifications for Google Forms for quite some time to both set open dates for forms and set a maximum response number. I am creating my forms for February and that extension does not show those options now. Has Google changed that extension? formLimiter does not allow me to add both and that's what I need. Are you aware of another Google extension I can use? Thanks!