
One of Google Forms’ drawbacks is its lack of built-in support for multilingual forms. There’s no built-in workflow for it. It’s a shame because many organizations rely on the form builder for international customer surveys, event registrations across different countries, feedback forms for multilingual workforces, or school communications sent to families who speak different languages.
Luckily, there are a few workarounds that get the job done — and I’ve included each method in this article. You can either use a third-party add-on, manually duplicate or combine languages within your questions, or run a Google Sheets script.
Speaking honestly, though, there are drawbacks with these workflows — they’re complex or make data analysis or form management more challenging than it needs to be. That’s why I’ve included another solution in this article: Jotform. It auto-translates forms into 130 languages in just a few clicks and without you having to write a single line of code.
But before we get into that, I’m walking through all three options to translate a Google Form so that you feel fully supported. Once you’ve read the article, you can choose the approach that works best for you.


1. Using an add-on
Using a Google Workspace Marketplace add-on like Pretty Forms Designer is the easiest way to create Google Forms in multiple languages. It extends the form builder with additional functionality, including multilingual support.
Here’s how to install the add-on and how to translate a Google Form using it.
- Open Google Forms and create or open the form you want to make multilingual.
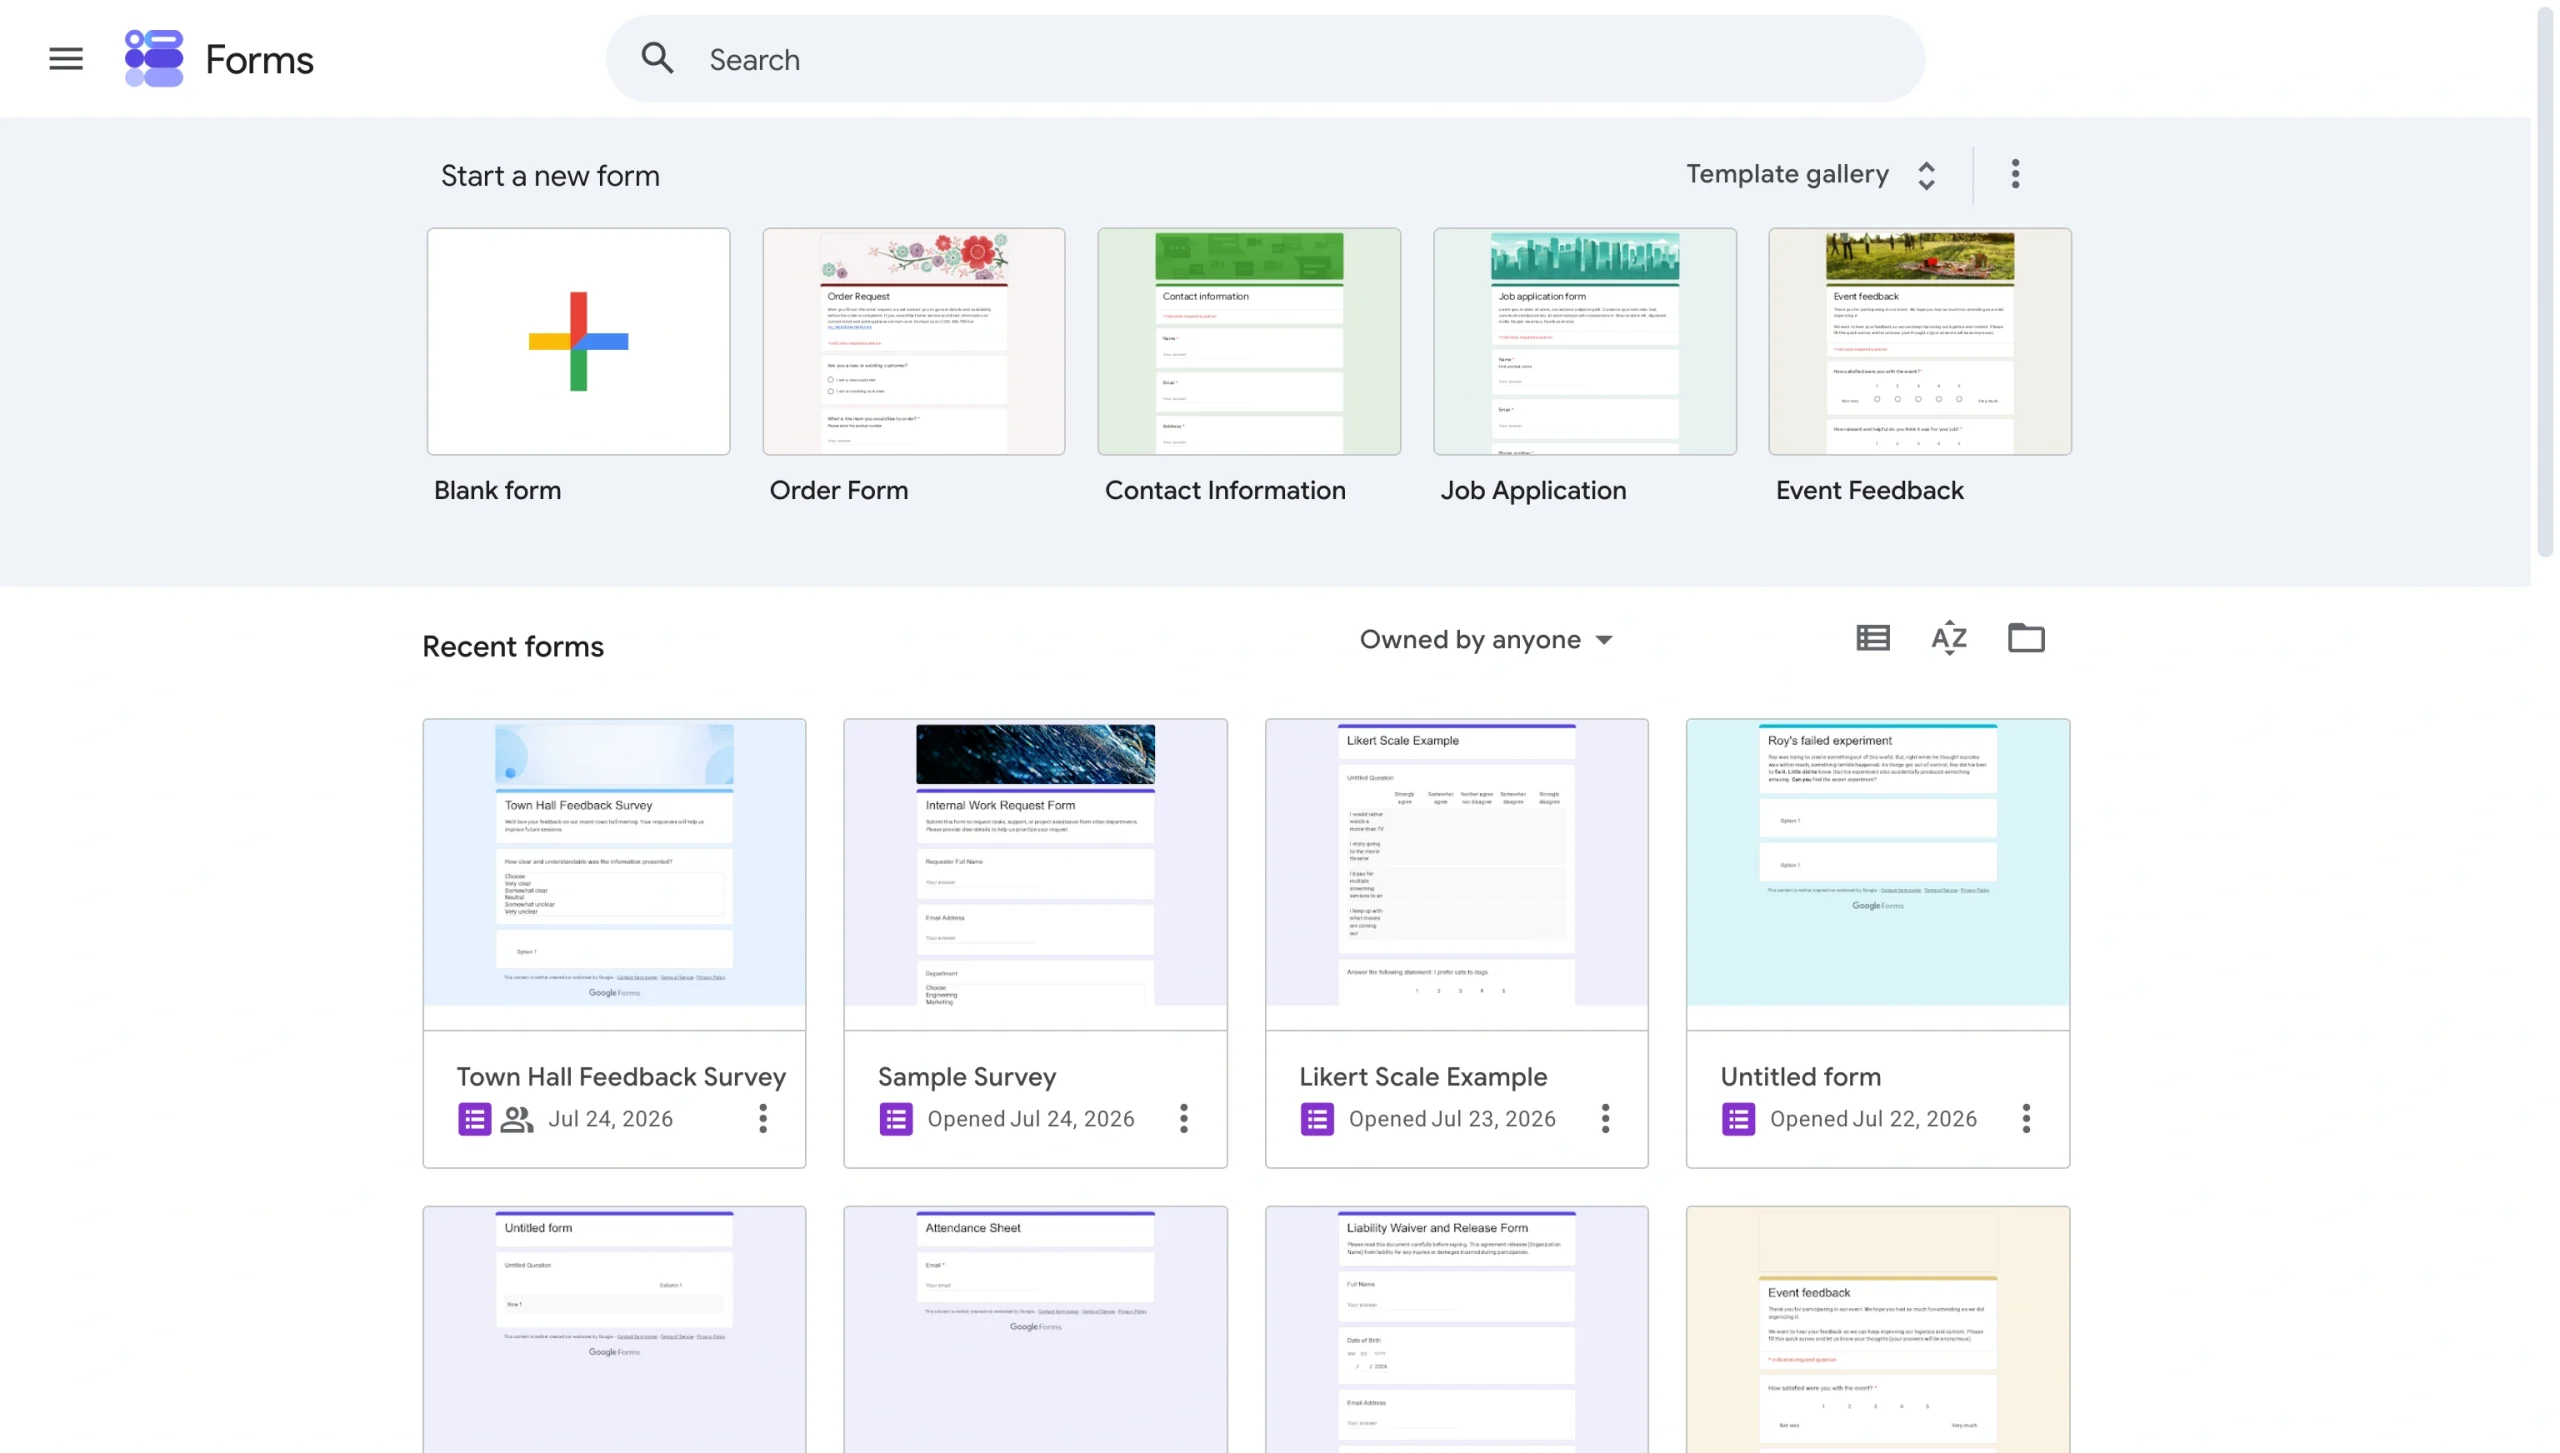
- Click the three-dot menu (⋮) in the top-right corner of the form editor and select Get add-ons.
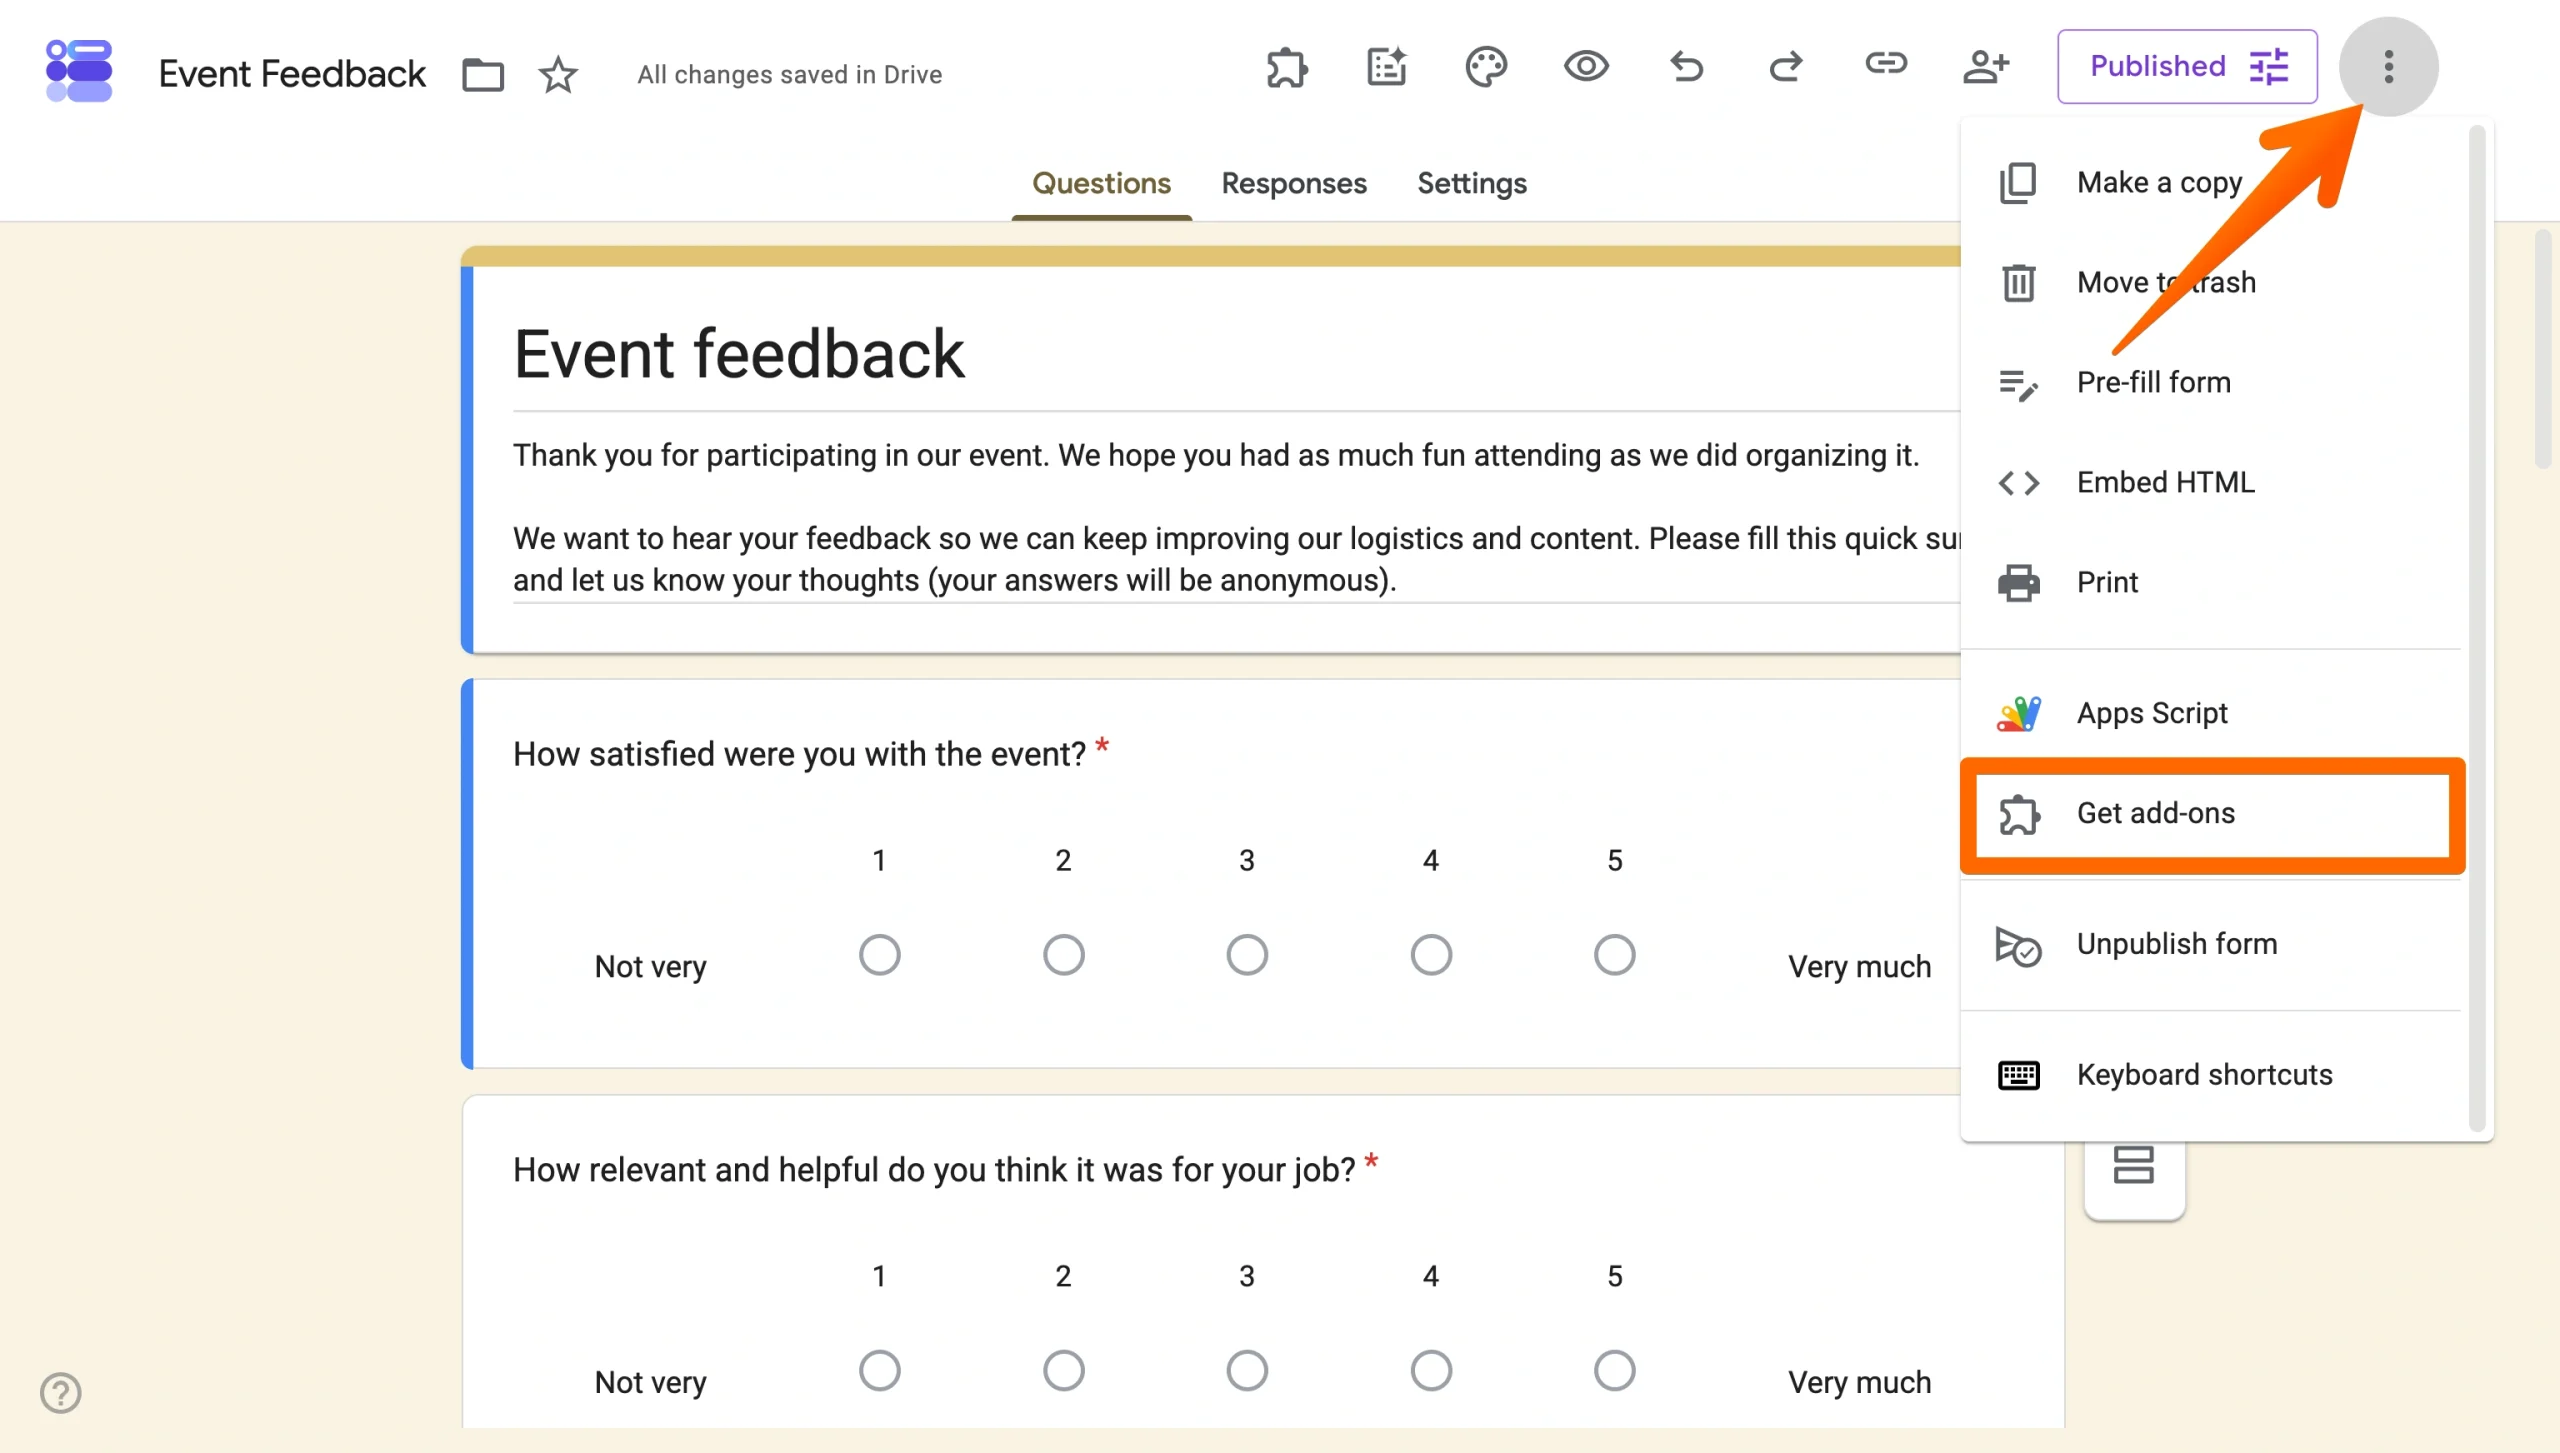
- In the Google Workspace Marketplace, search for Pretty Forms Designer and click on it.
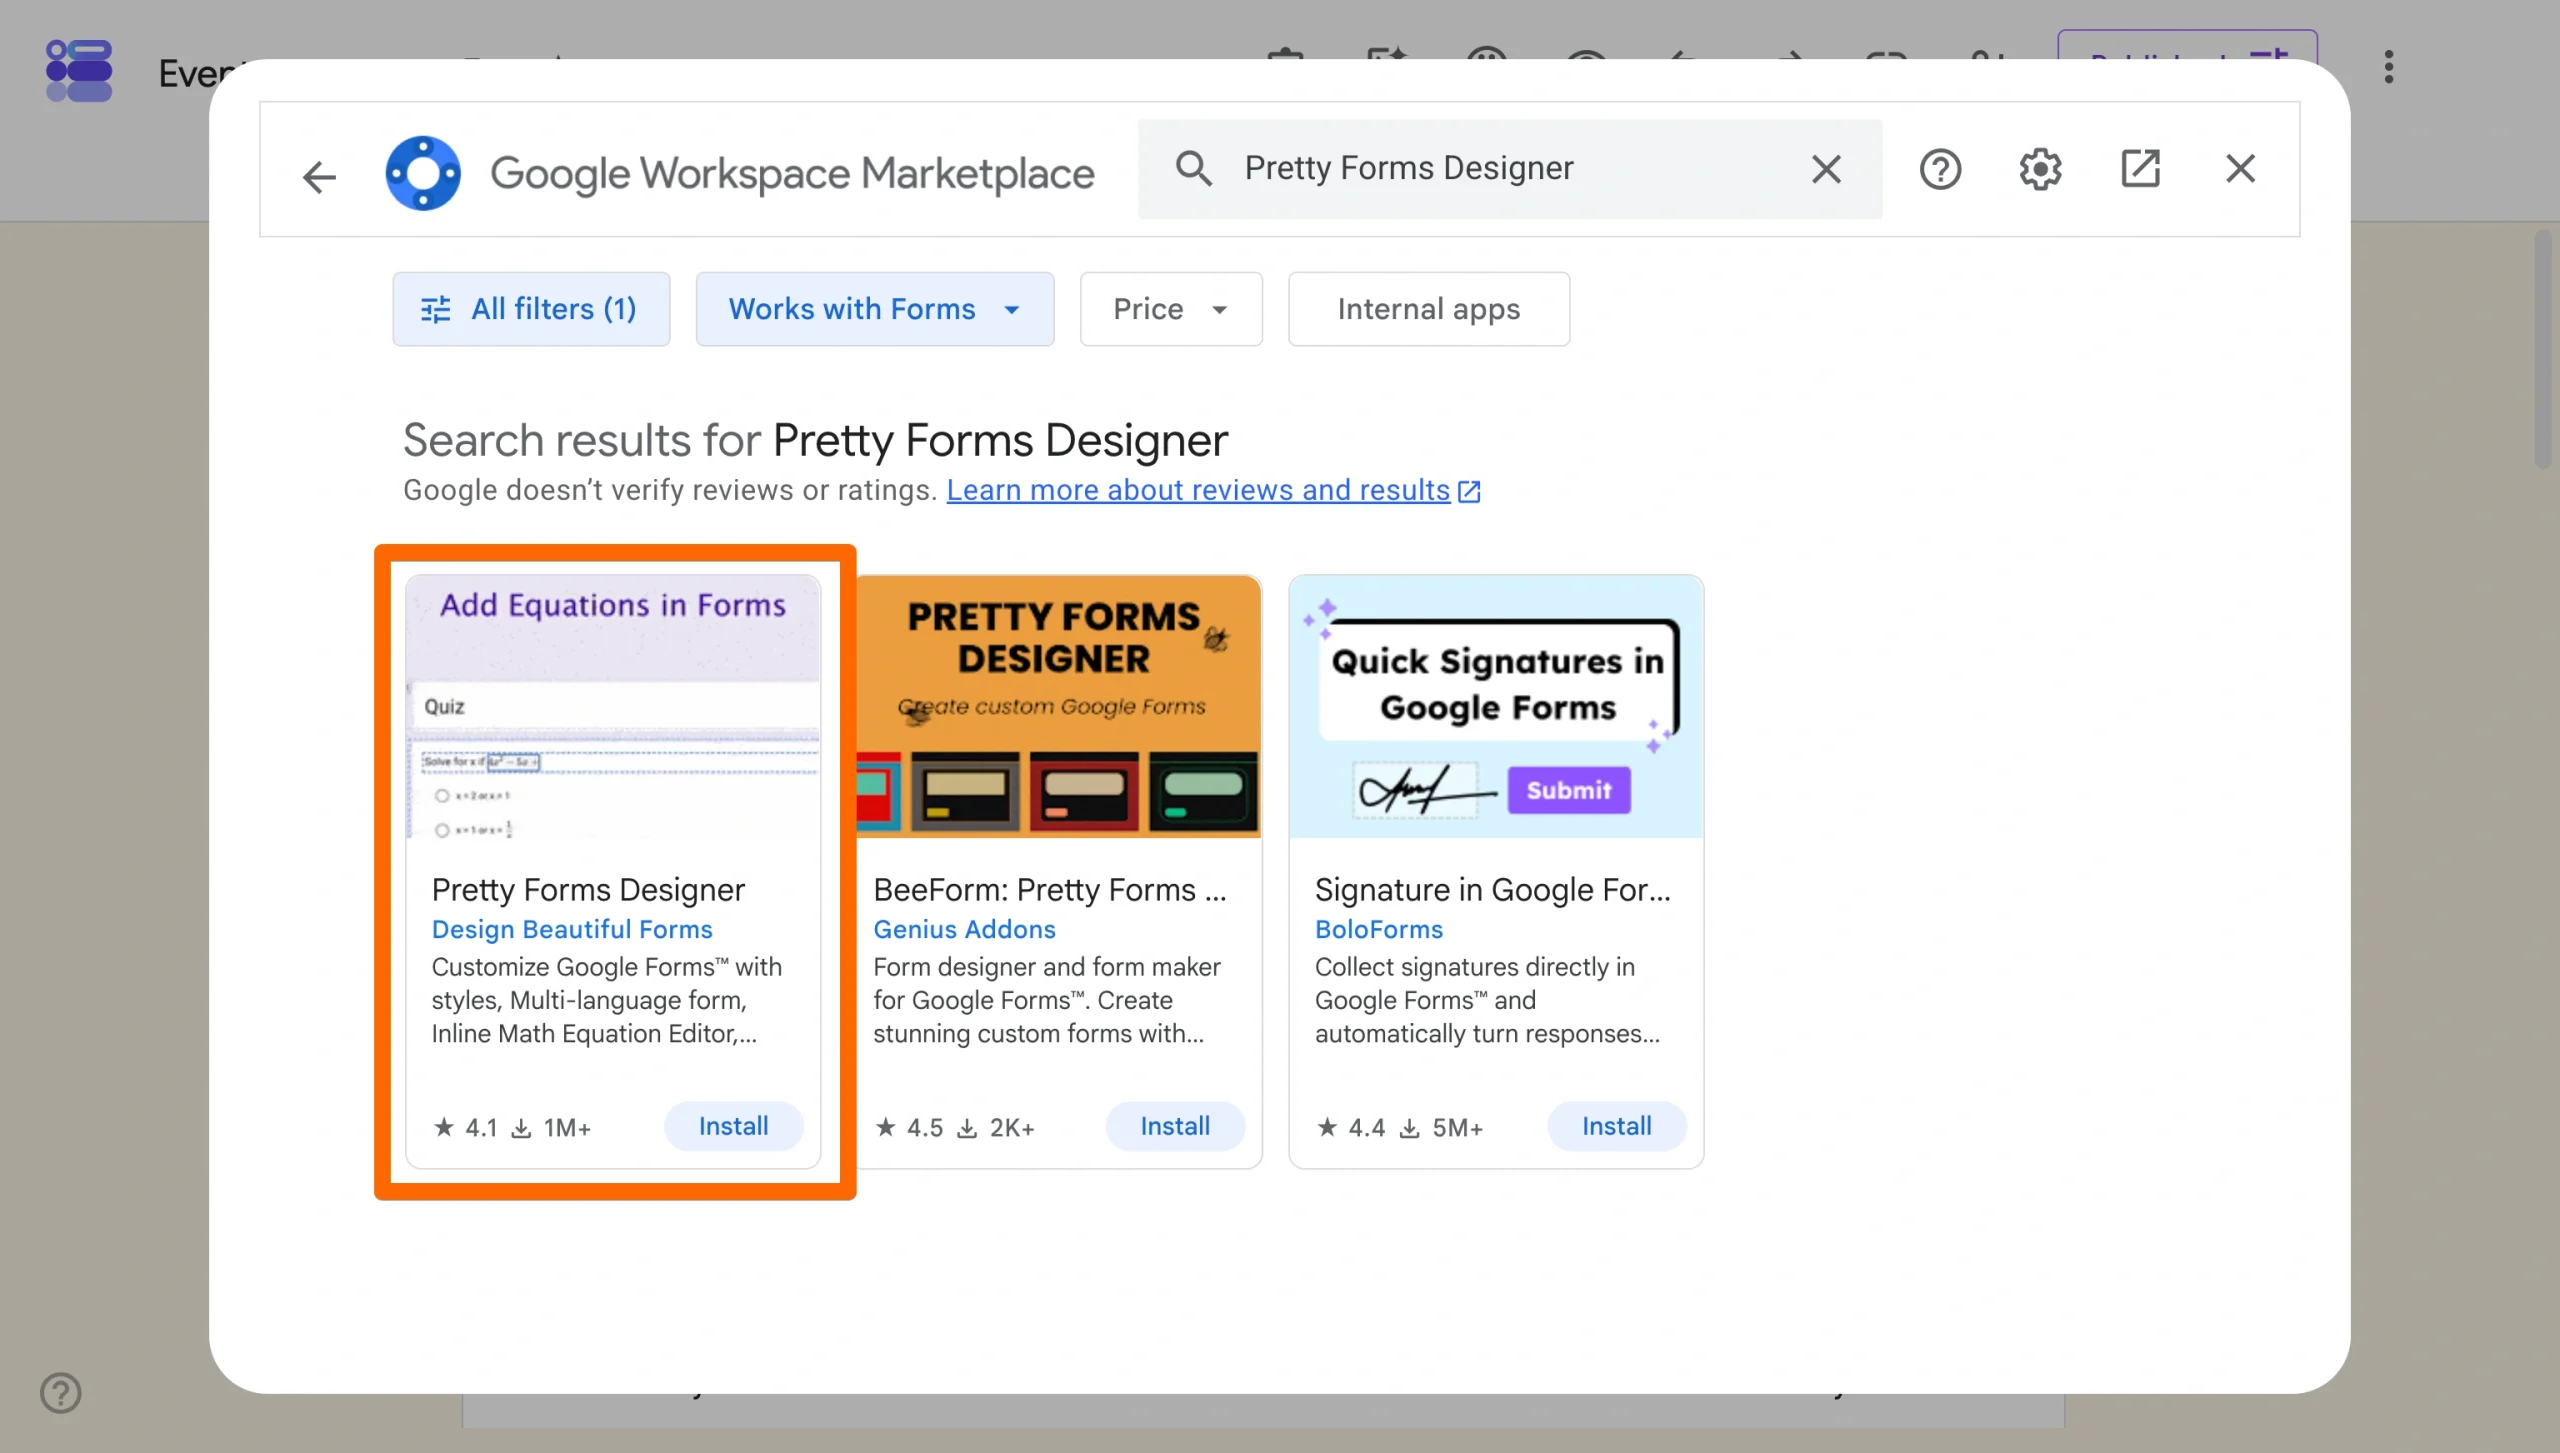
- Click Install and follow the prompts to grant the necessary permissions.
- Once installed, return to your form, open the add-on via the puzzle piece icon, and launch Pretty Forms Designer.
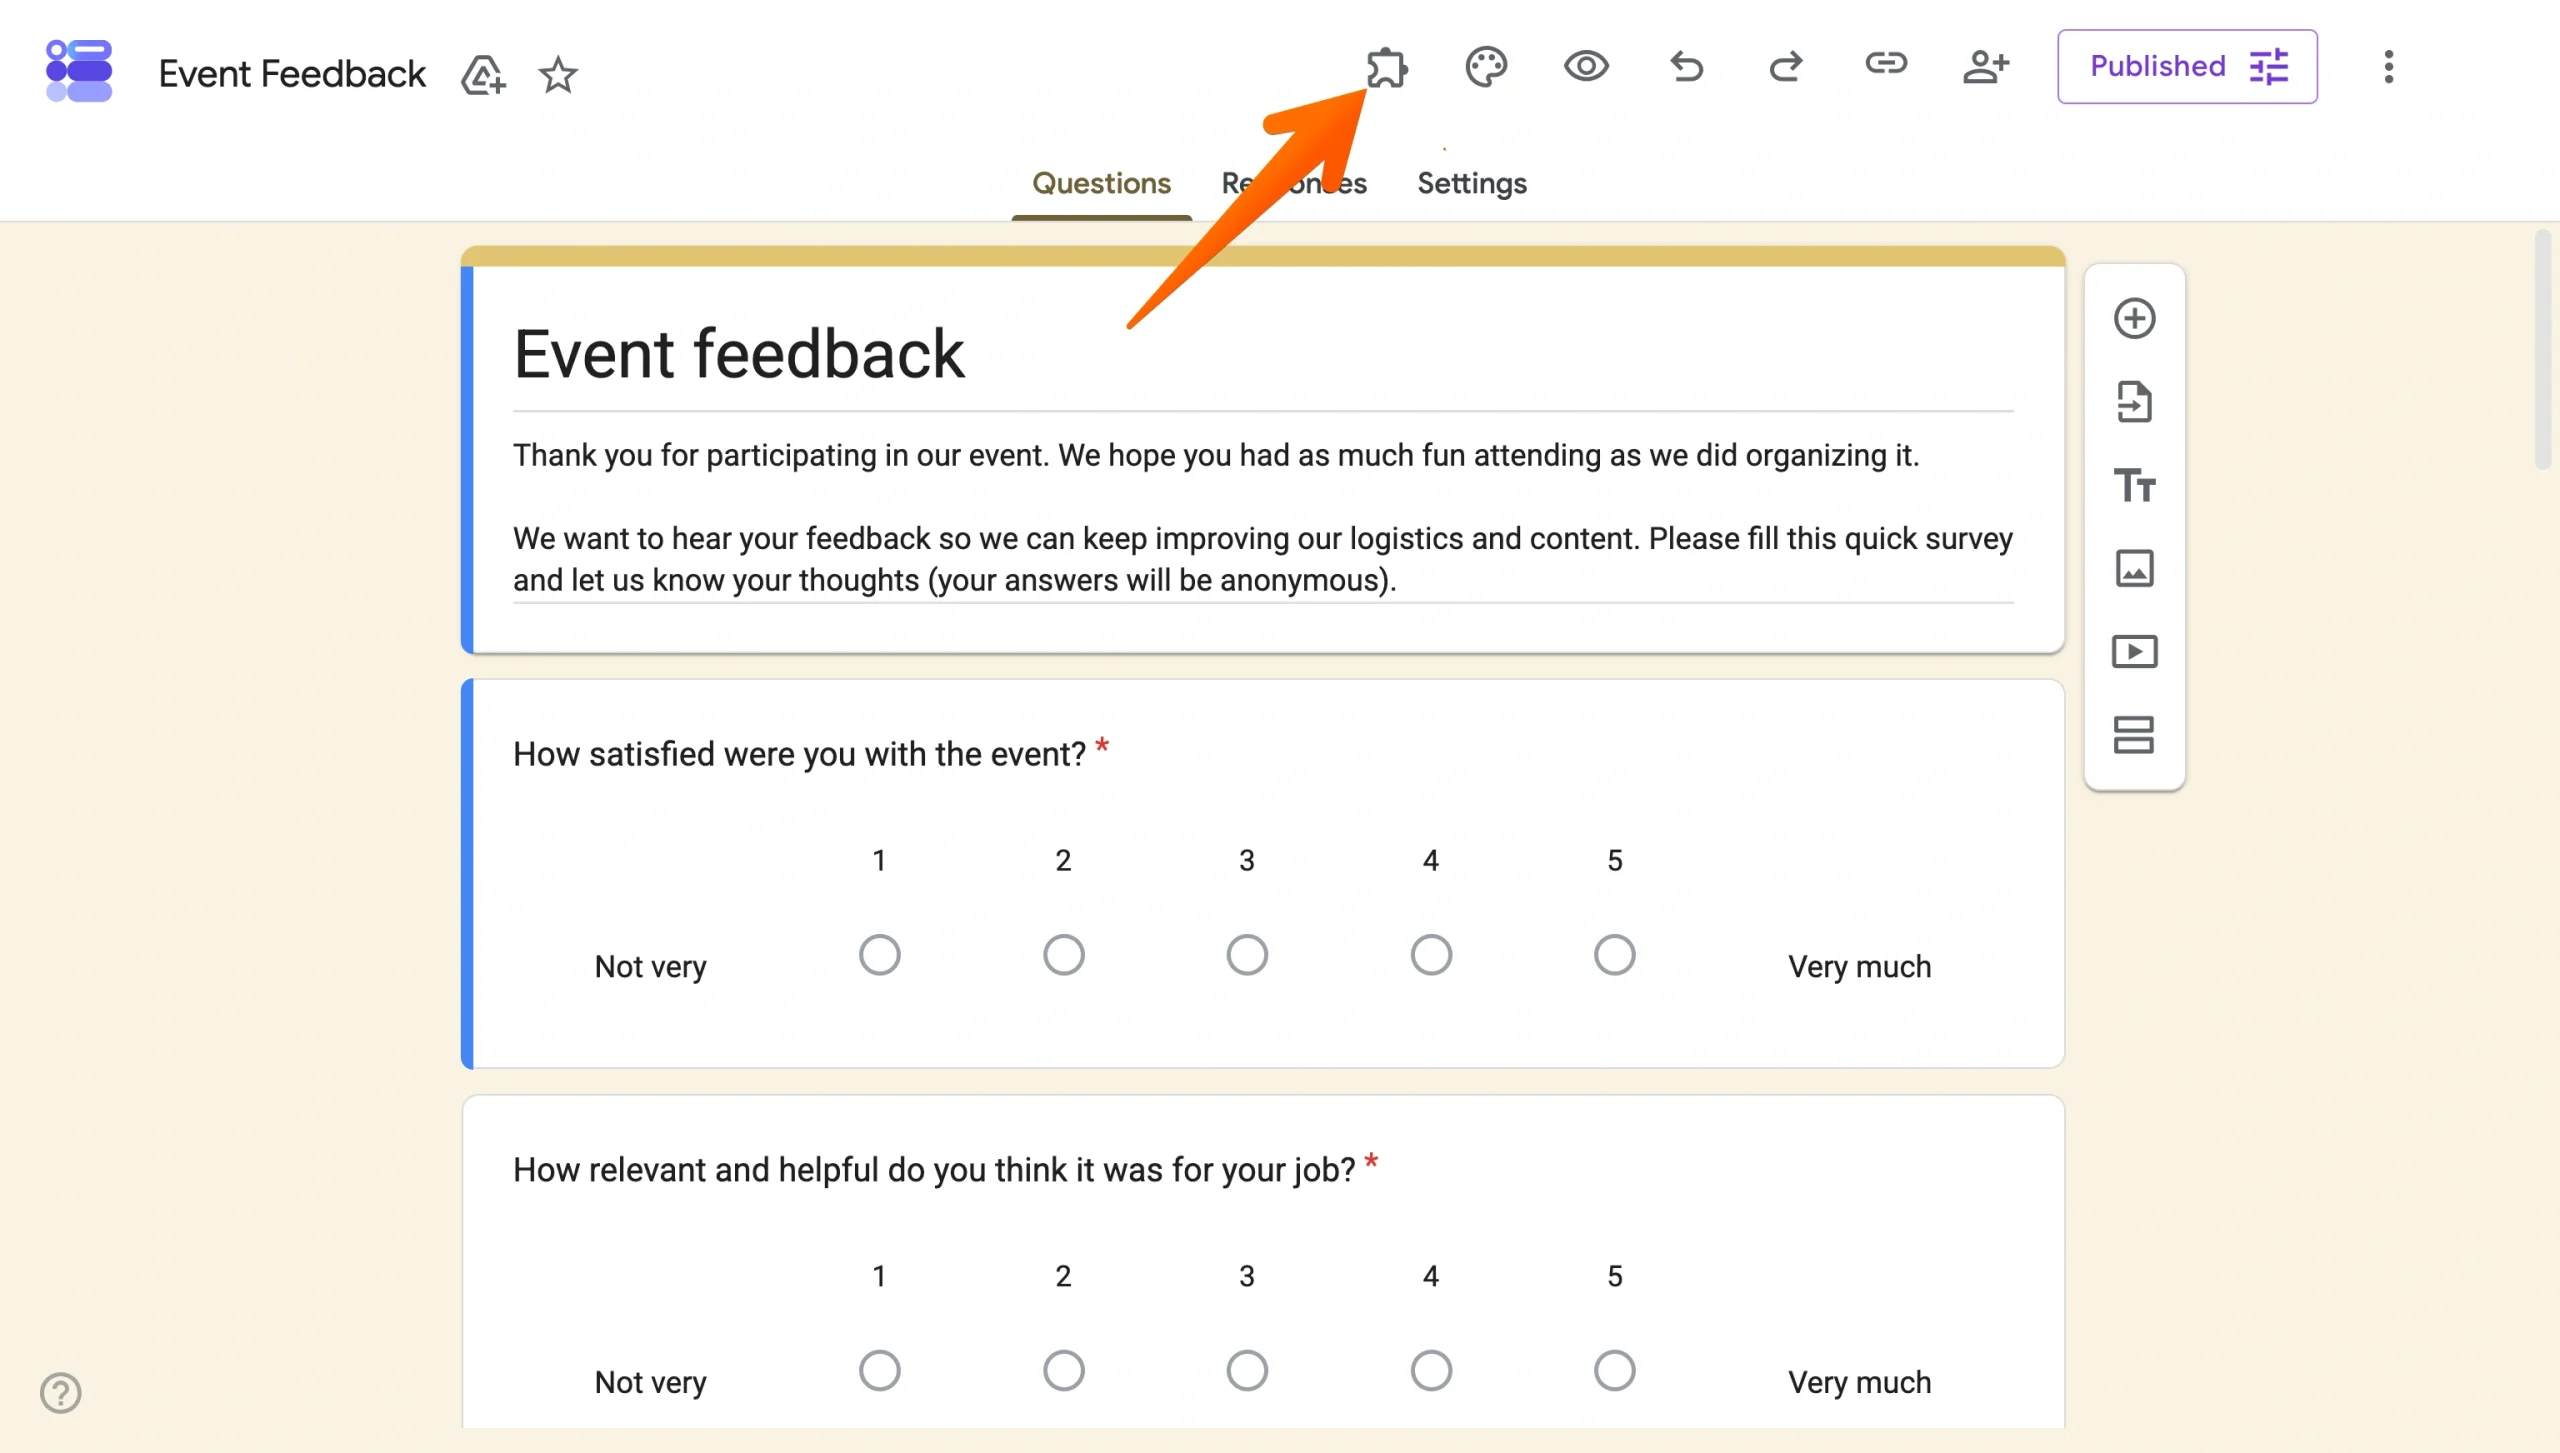
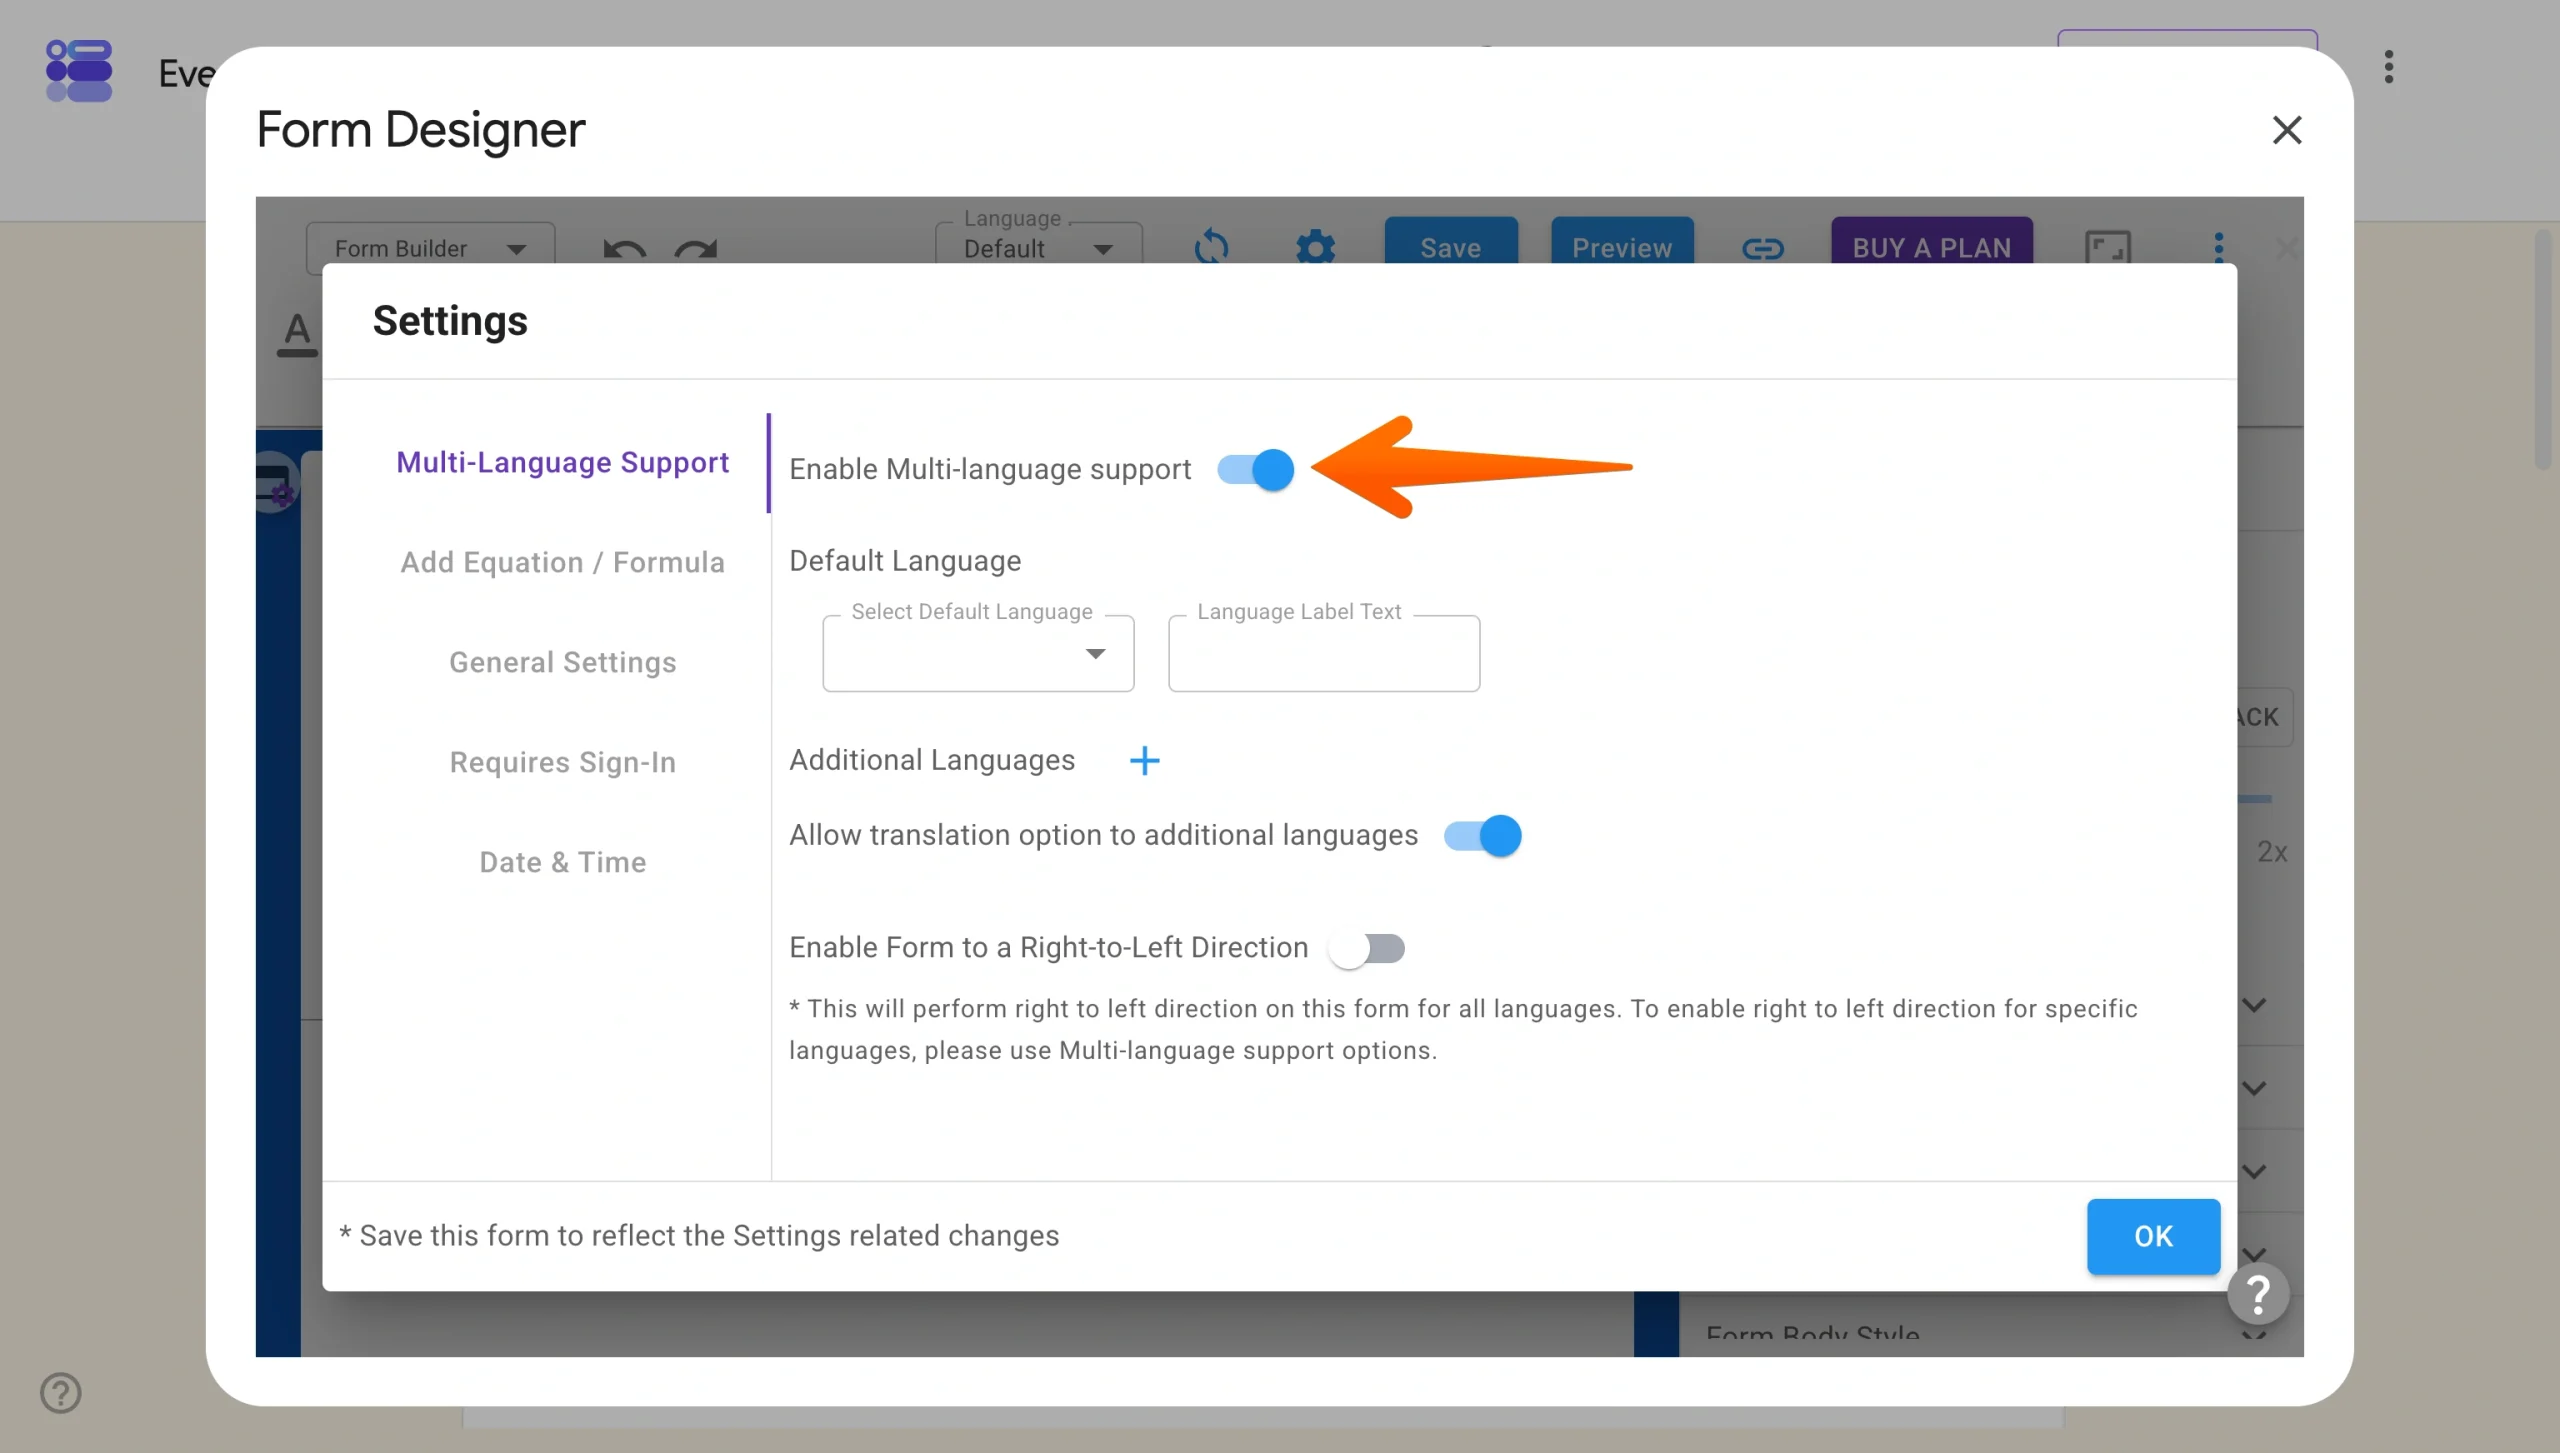
- Staying in the menu, select Open Form Designer. Then, within the add-on, navigate to settings and toggle on Enable Multi-Language Support. You can add one language for free, but you’ll need to upgrade for more.
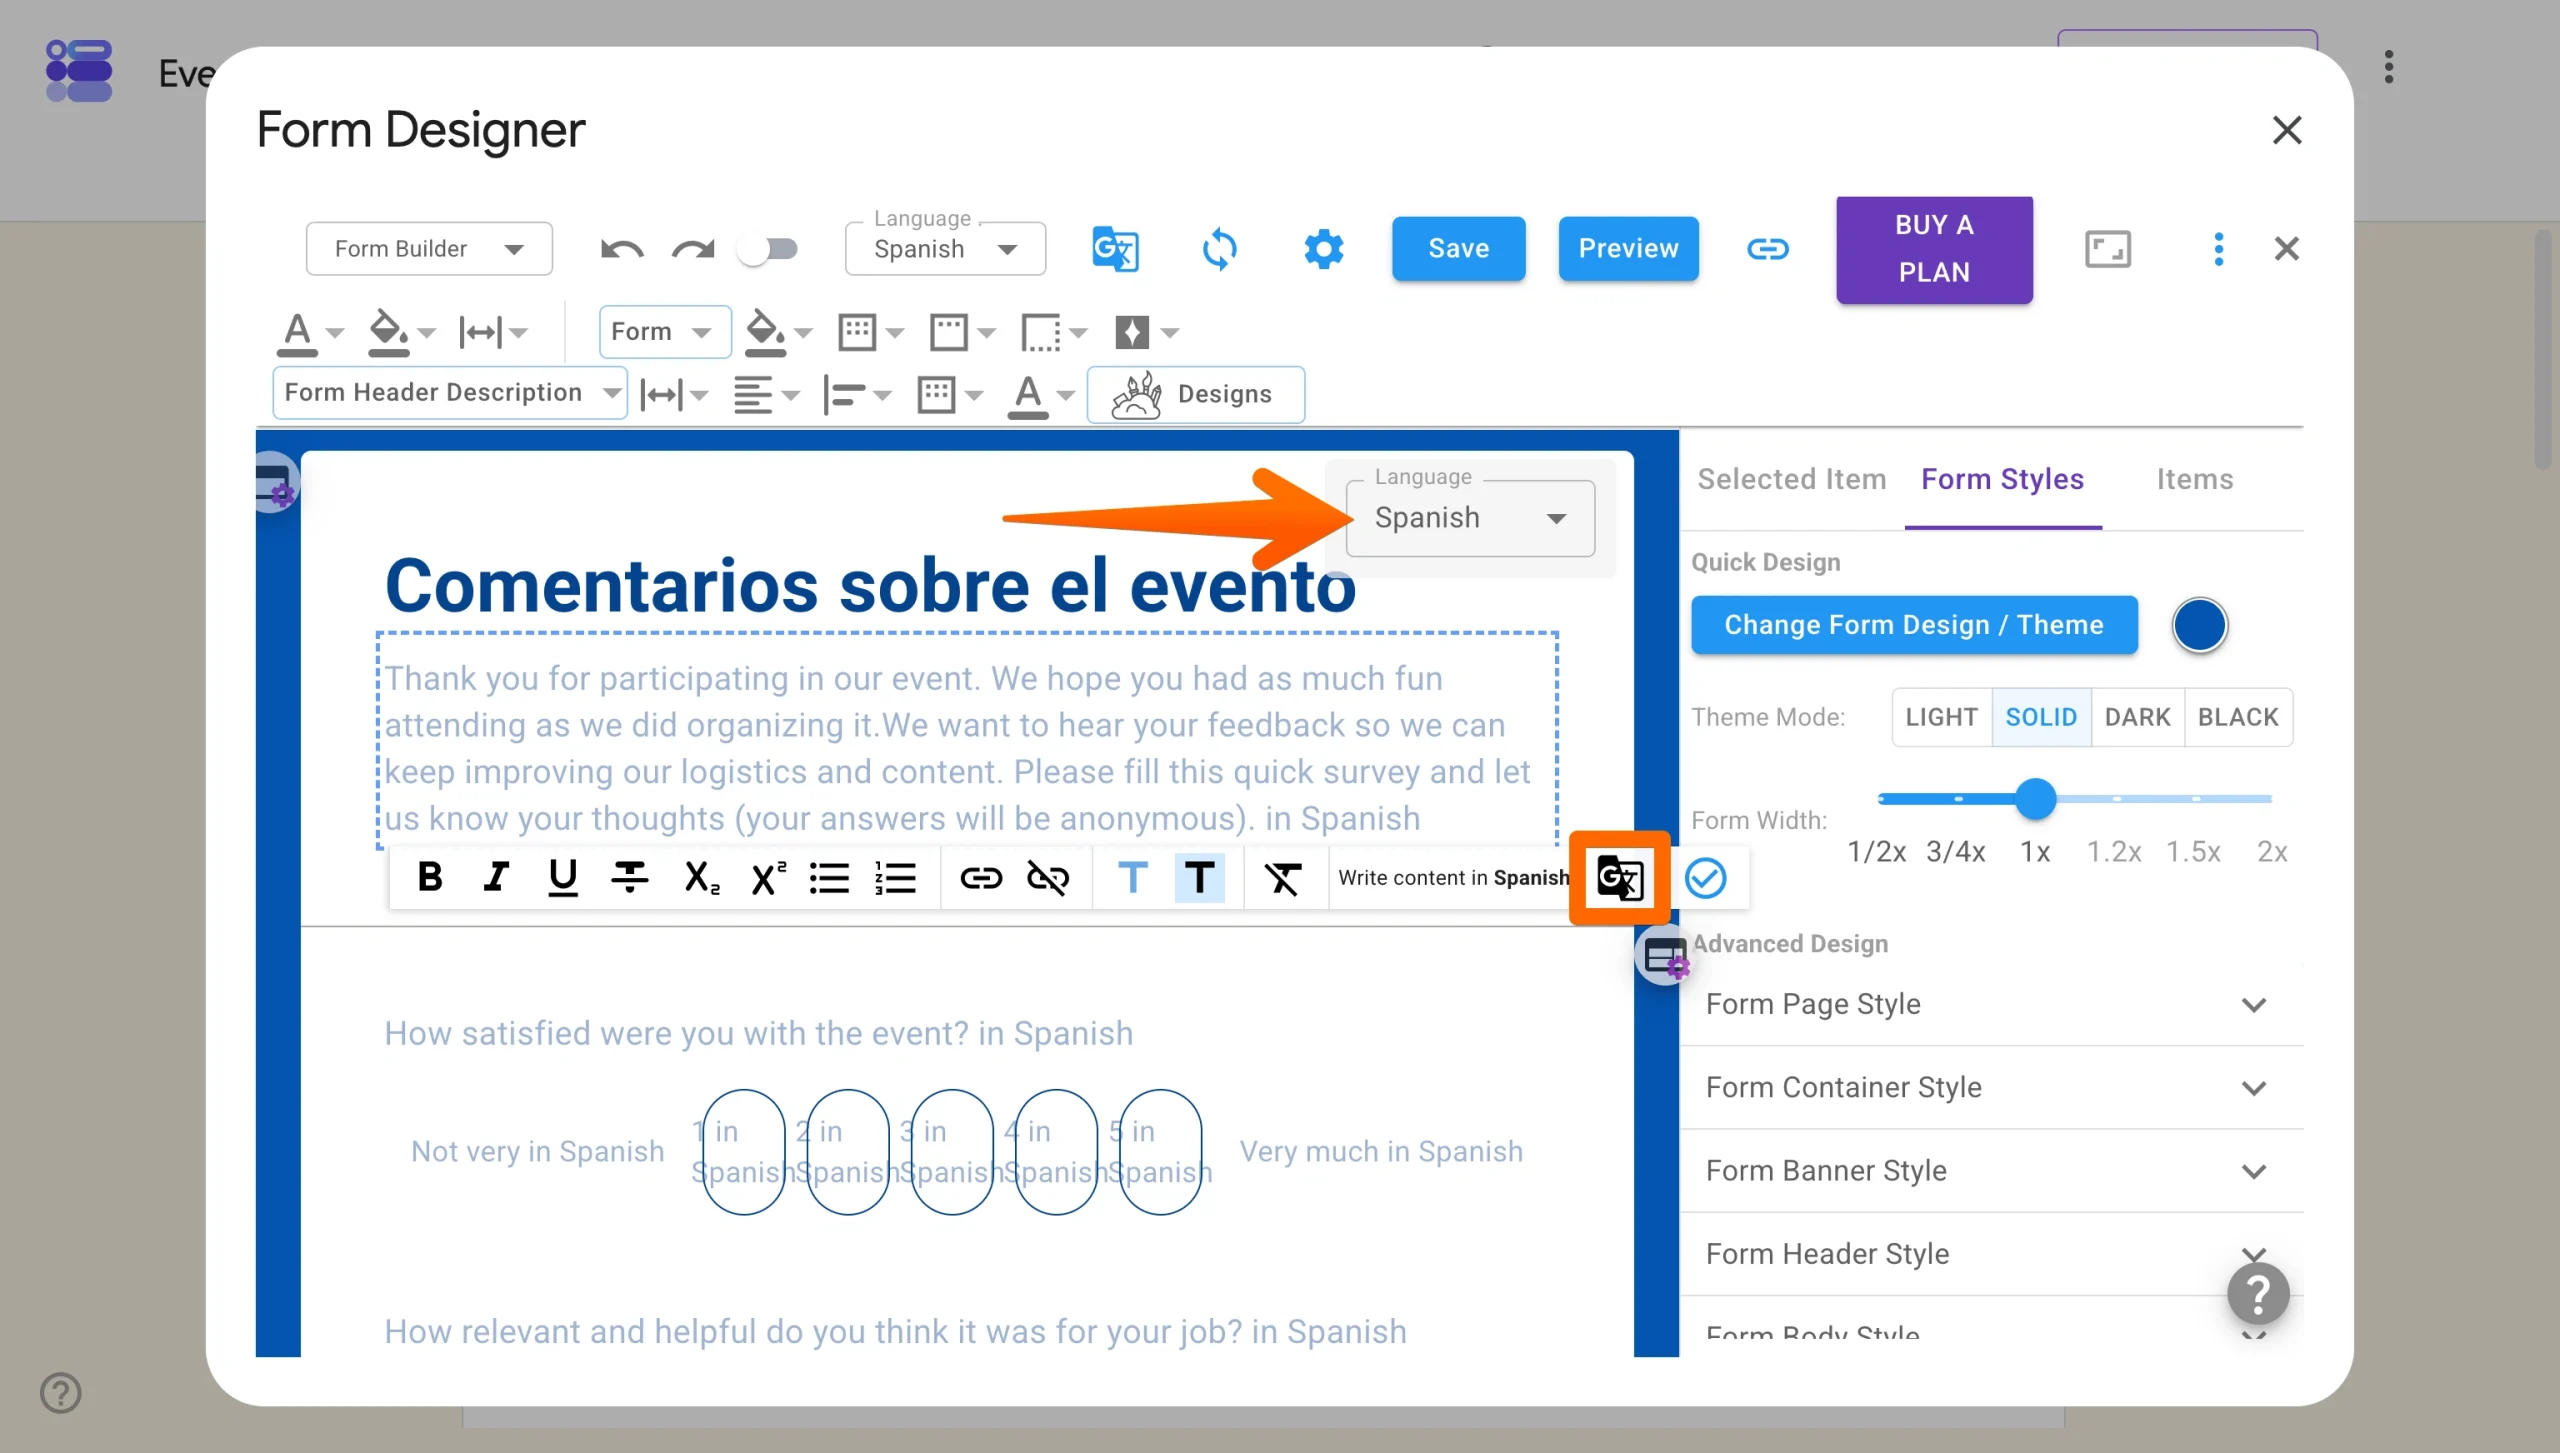
- Set up your form. Click the dropdown menu and select the language you want to translate the form into. Then, use the Google Translate tool and automatically translate the Google Form text.
- Save your settings. The add-on will apply the language options to your form so that respondents can view it in their preferred language.
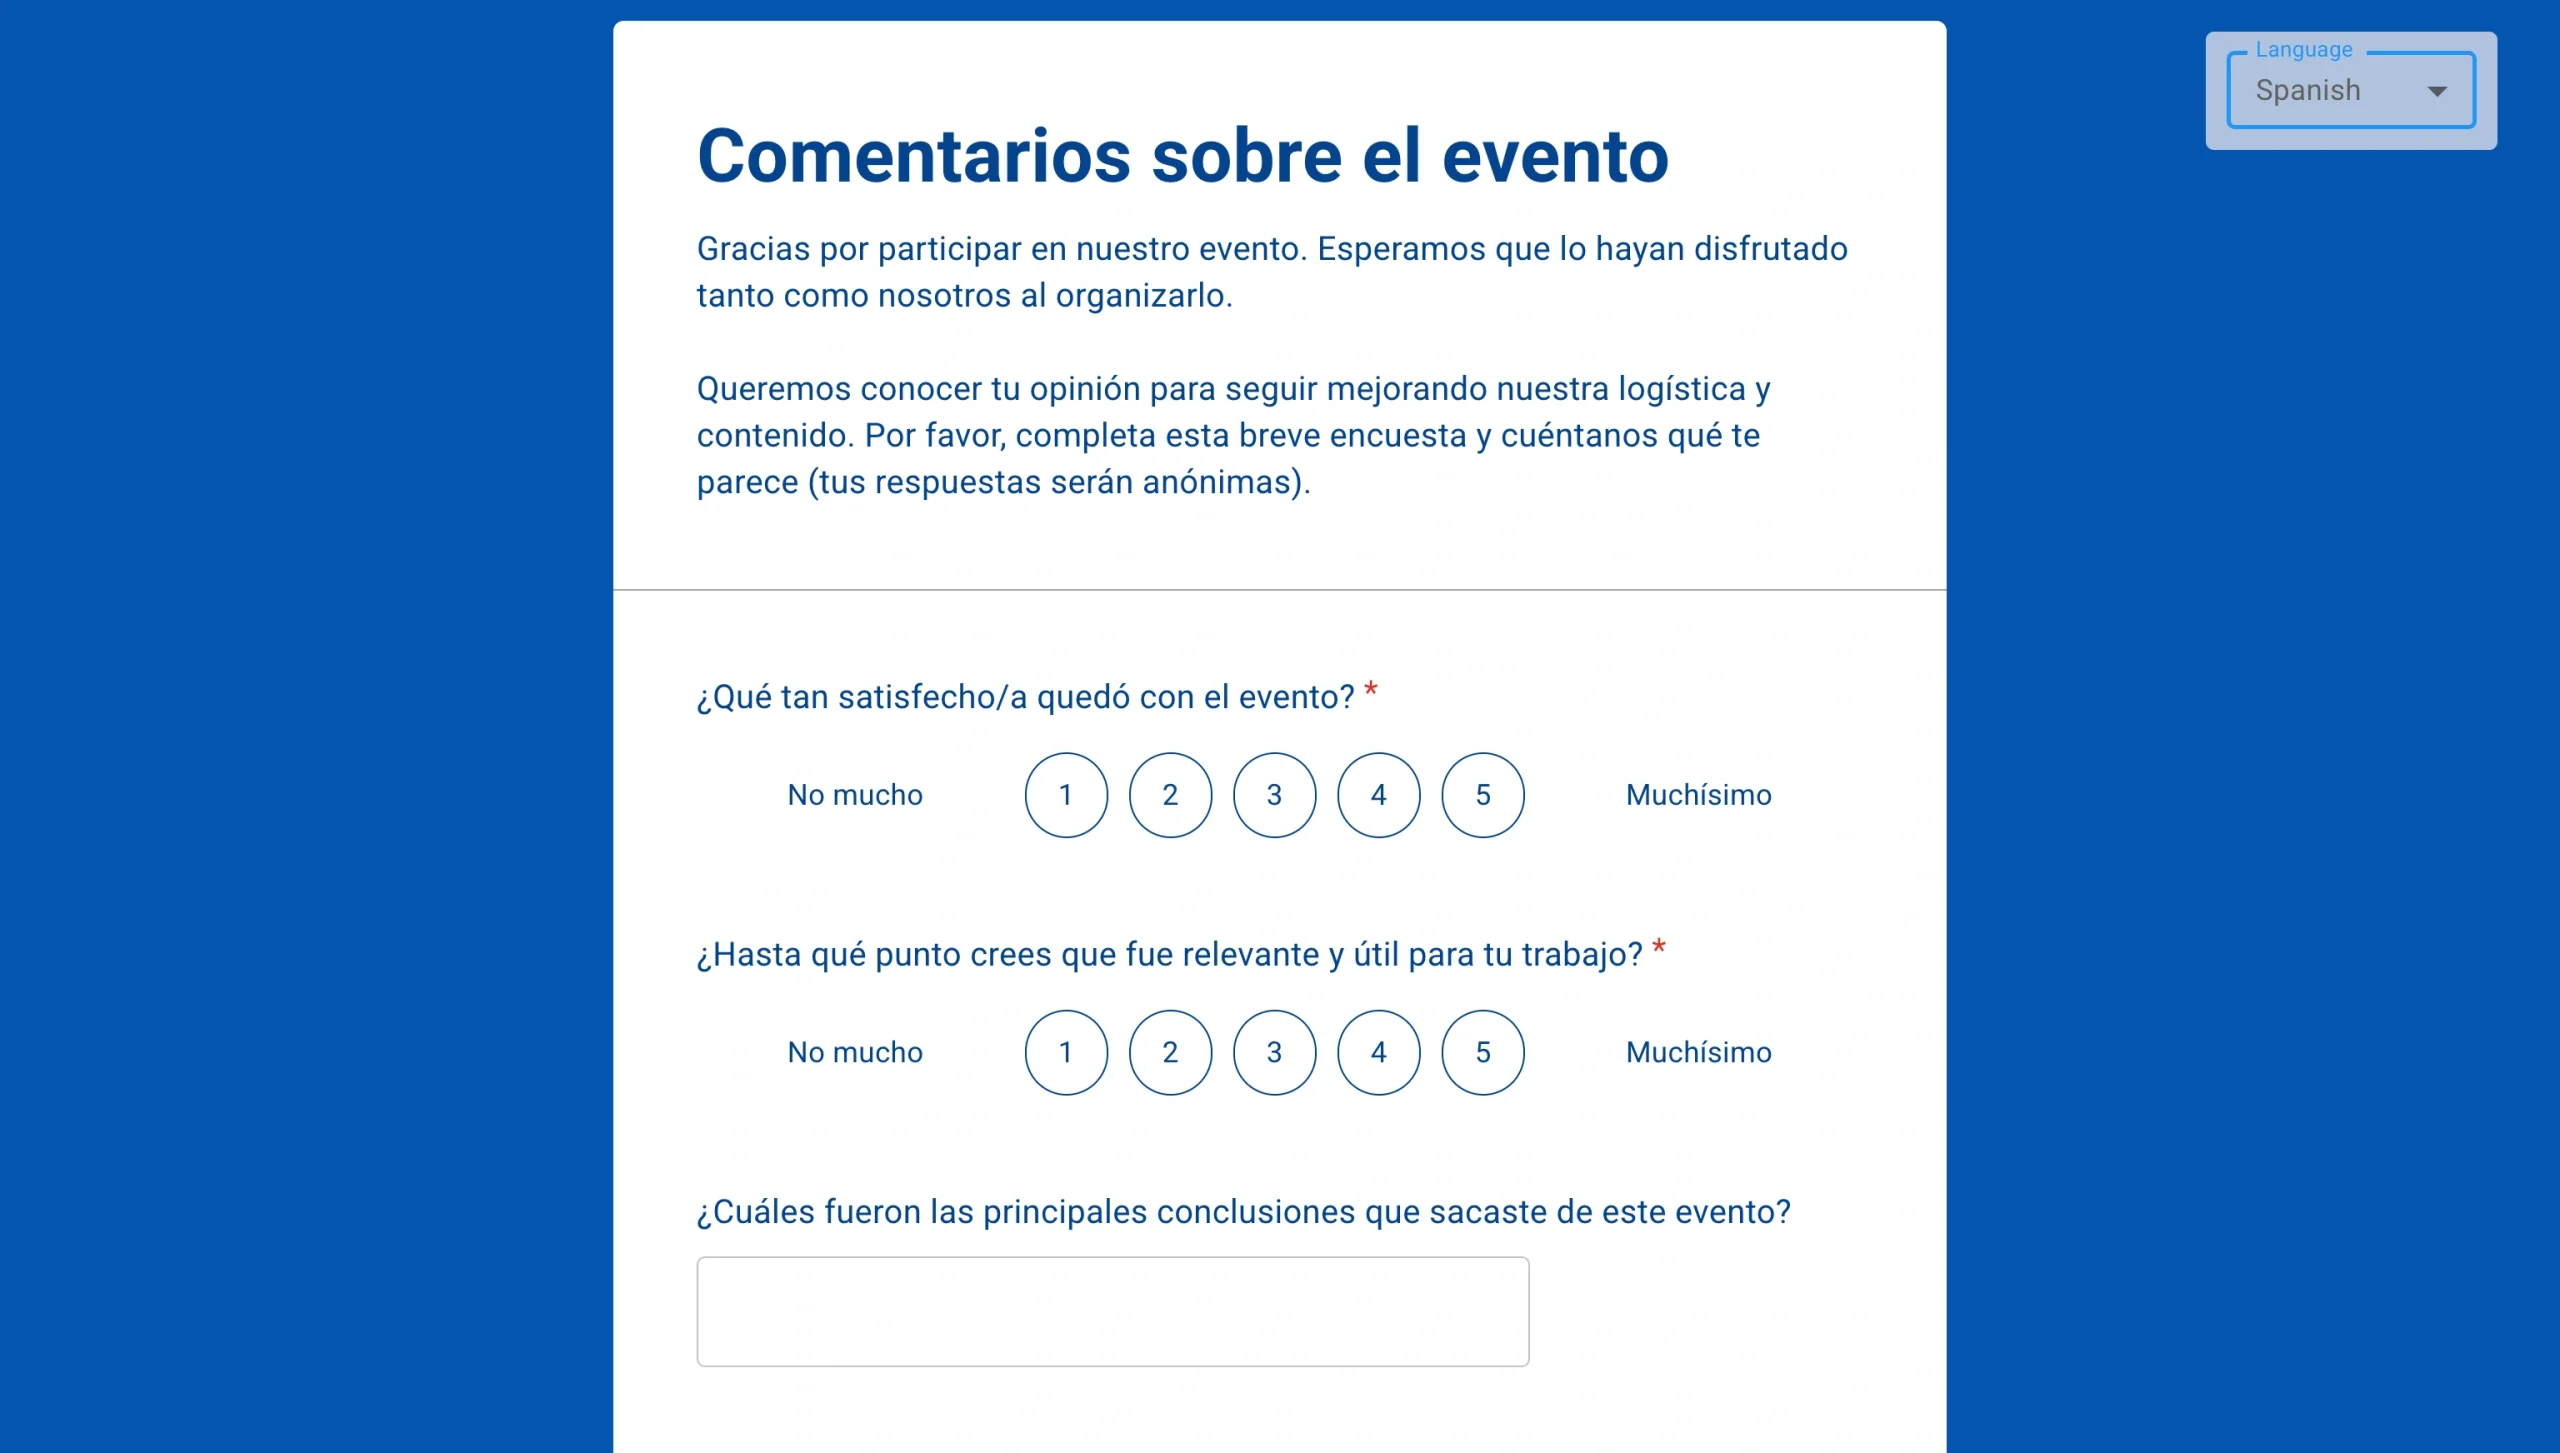
The shared multi-language Google Form looks like this:
Pro Tip
If you want to skip add-ons entirely, you can use a built-in solution like Jotform’s multilingual forms feature to translate your form into over 130 languages in just a few clicks. Skip to see the simplest form translation workflow.
2. Manually creating a multilingual form
You can manually translate the contents of a Google Form. This approach gives you full control, but it takes considerably more time, so it’s best suited to situations where you’re working with just two or three languages and have a relatively short form.
There are three ways to go about it:
- Create multiple forms for each language.
- Use Google Forms’ built-in “Go to section based on answer” logic to route respondents to a language-specific version of your form.
- Include both languages directly within each question and answer field.
Create multiple forms for each language
- Pros: Easy to create and gives you full control of translations
- Cons: Creates multiple forms, which makes managing responses difficult
A simple option is to duplicate your form for each language you need, then translate each copy manually. So if you need English, Spanish, and French versions, you’d end up with three separate forms, each fully written in its respective language.
It’s simple and requires no logic or add-ons, but managing multiple forms and consolidating responses afterward adds some admin overhead.
Use “Go to section based on answer”
- Pros: Creates only one form that you can share with audiences using different languages
- Cons: Time-consuming to set up, and one export of responses will include the different languages
This method uses survey logic to present respondents with a language selector at the start of your form, then route them to a section written entirely in their chosen language. It keeps things clean for the respondent, though it means duplicating every question across multiple sections.
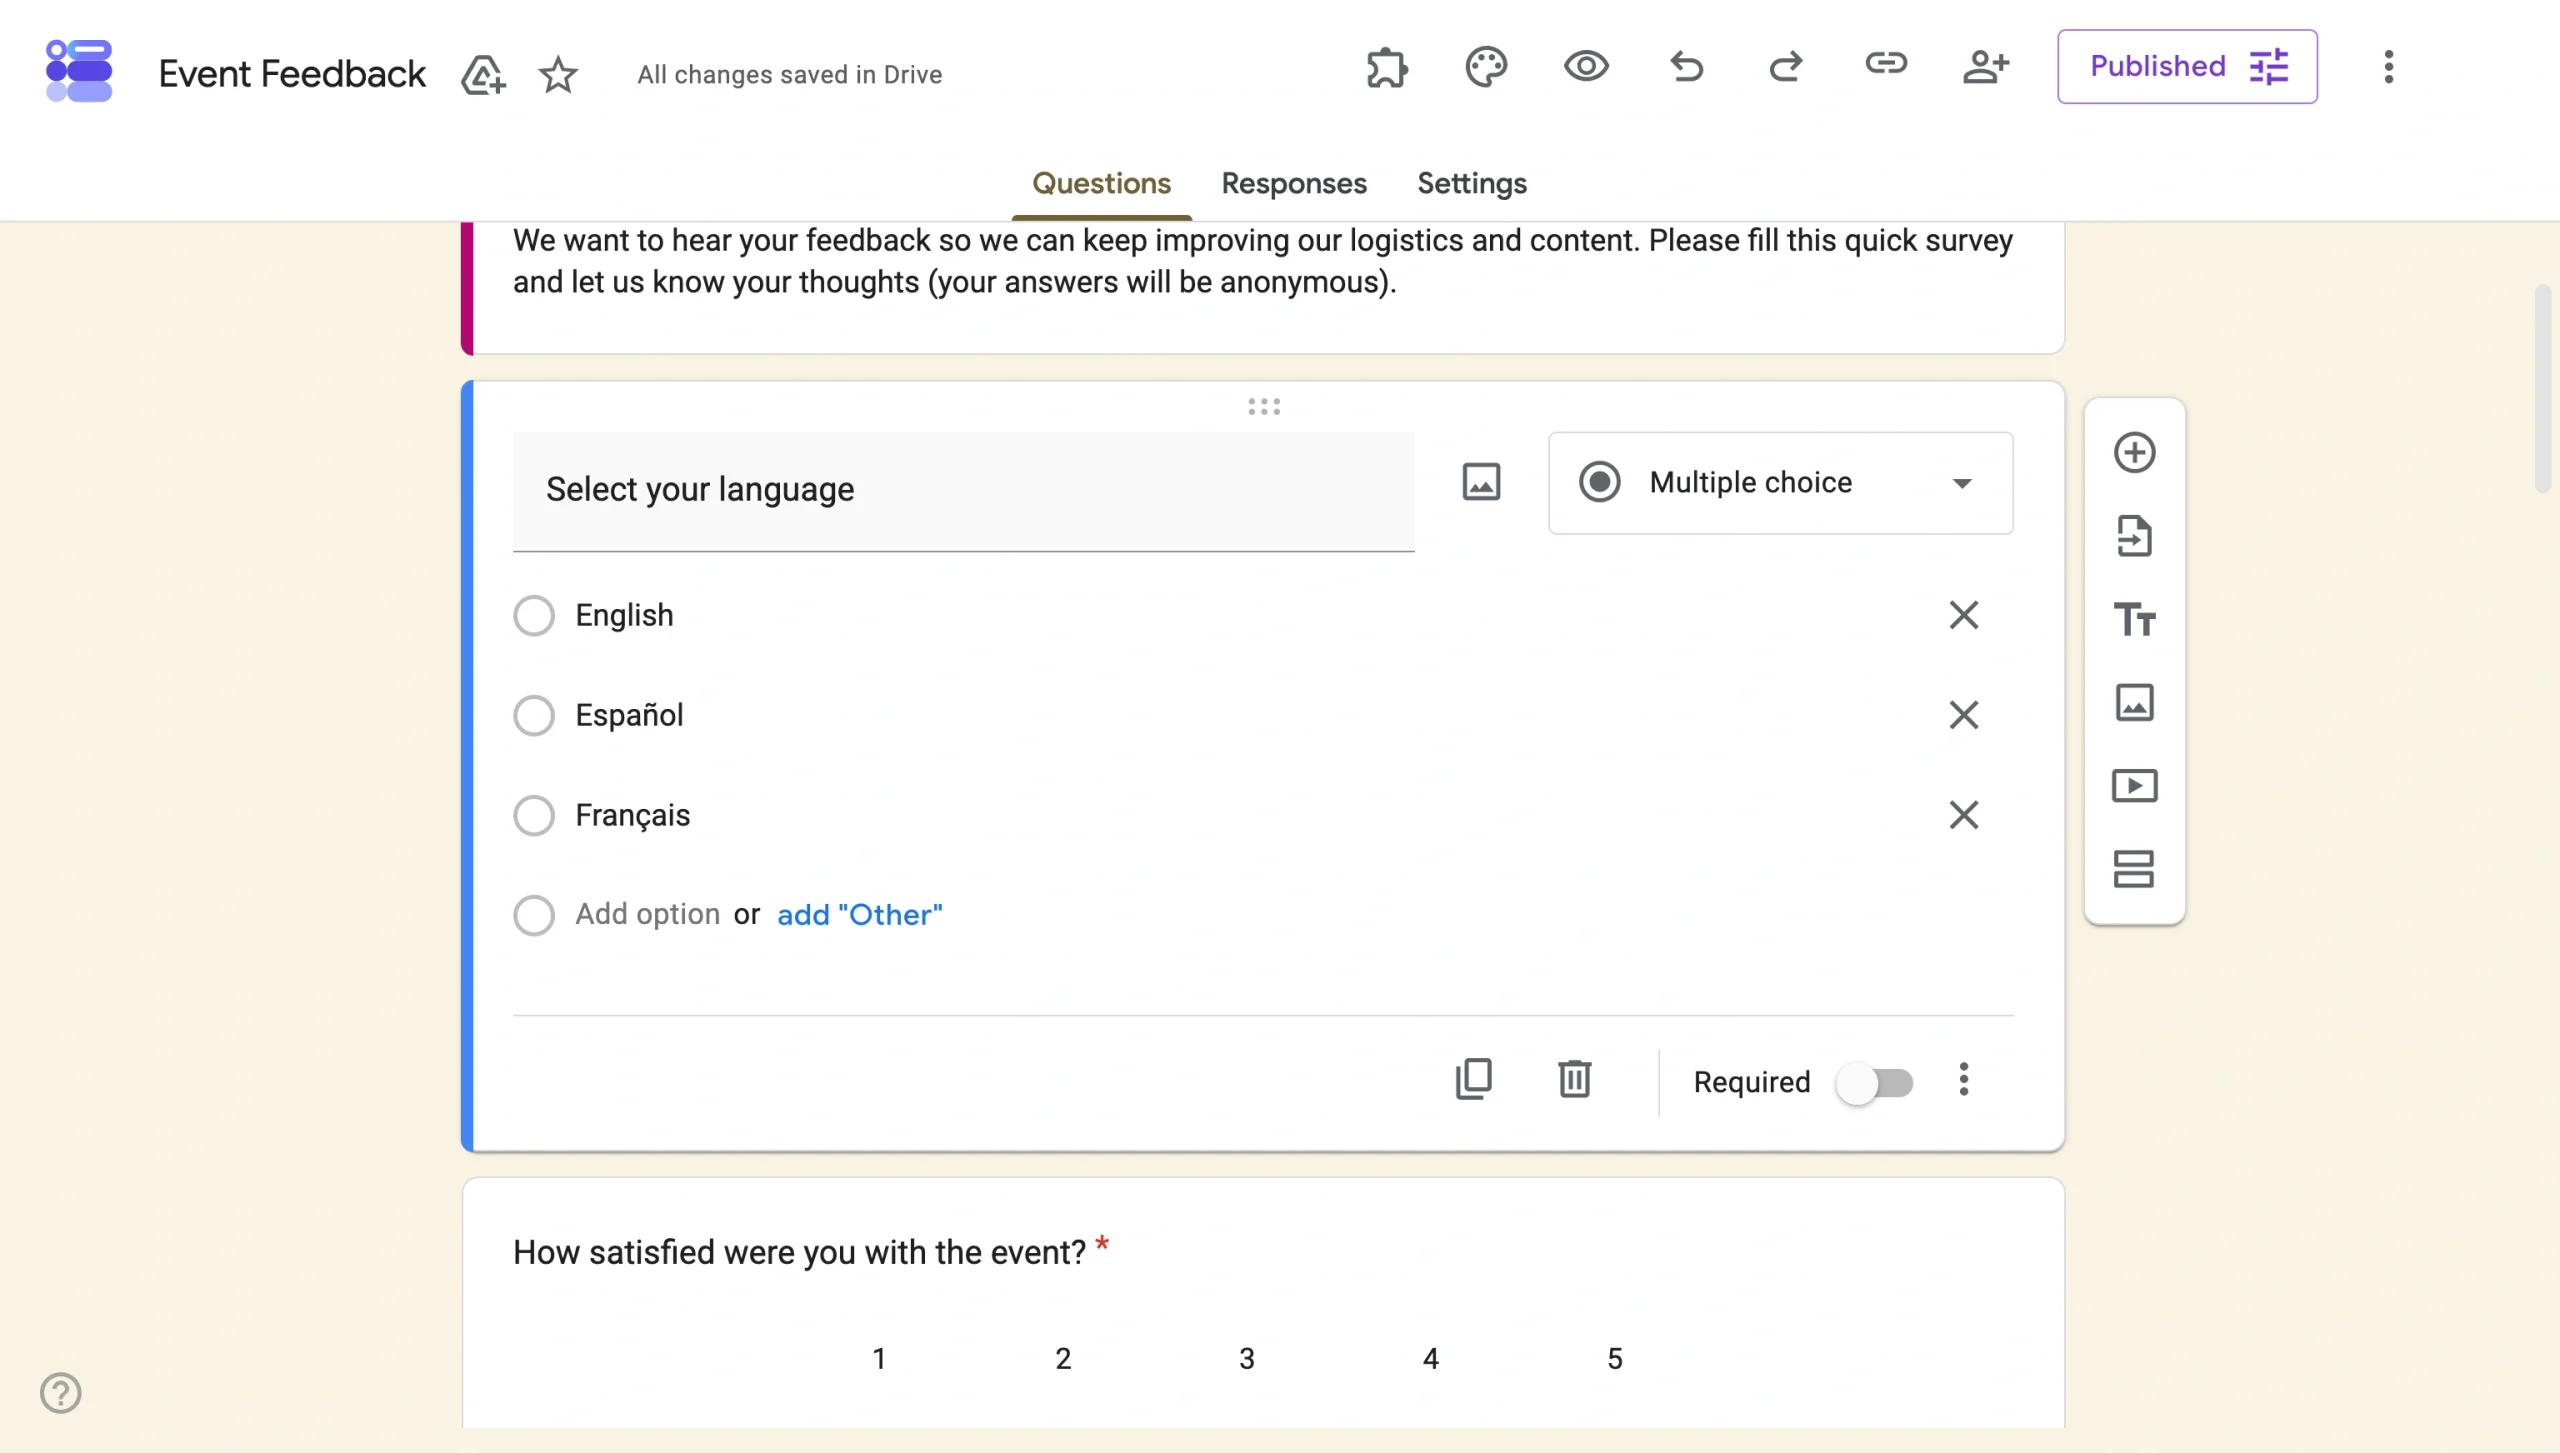
- Open your form and add a Multiple choice question at the top asking respondents to select their preferred language (e.g., English, Español, or Français).
- Create a new section for each language by clicking Add section at the bottom of the form editor.
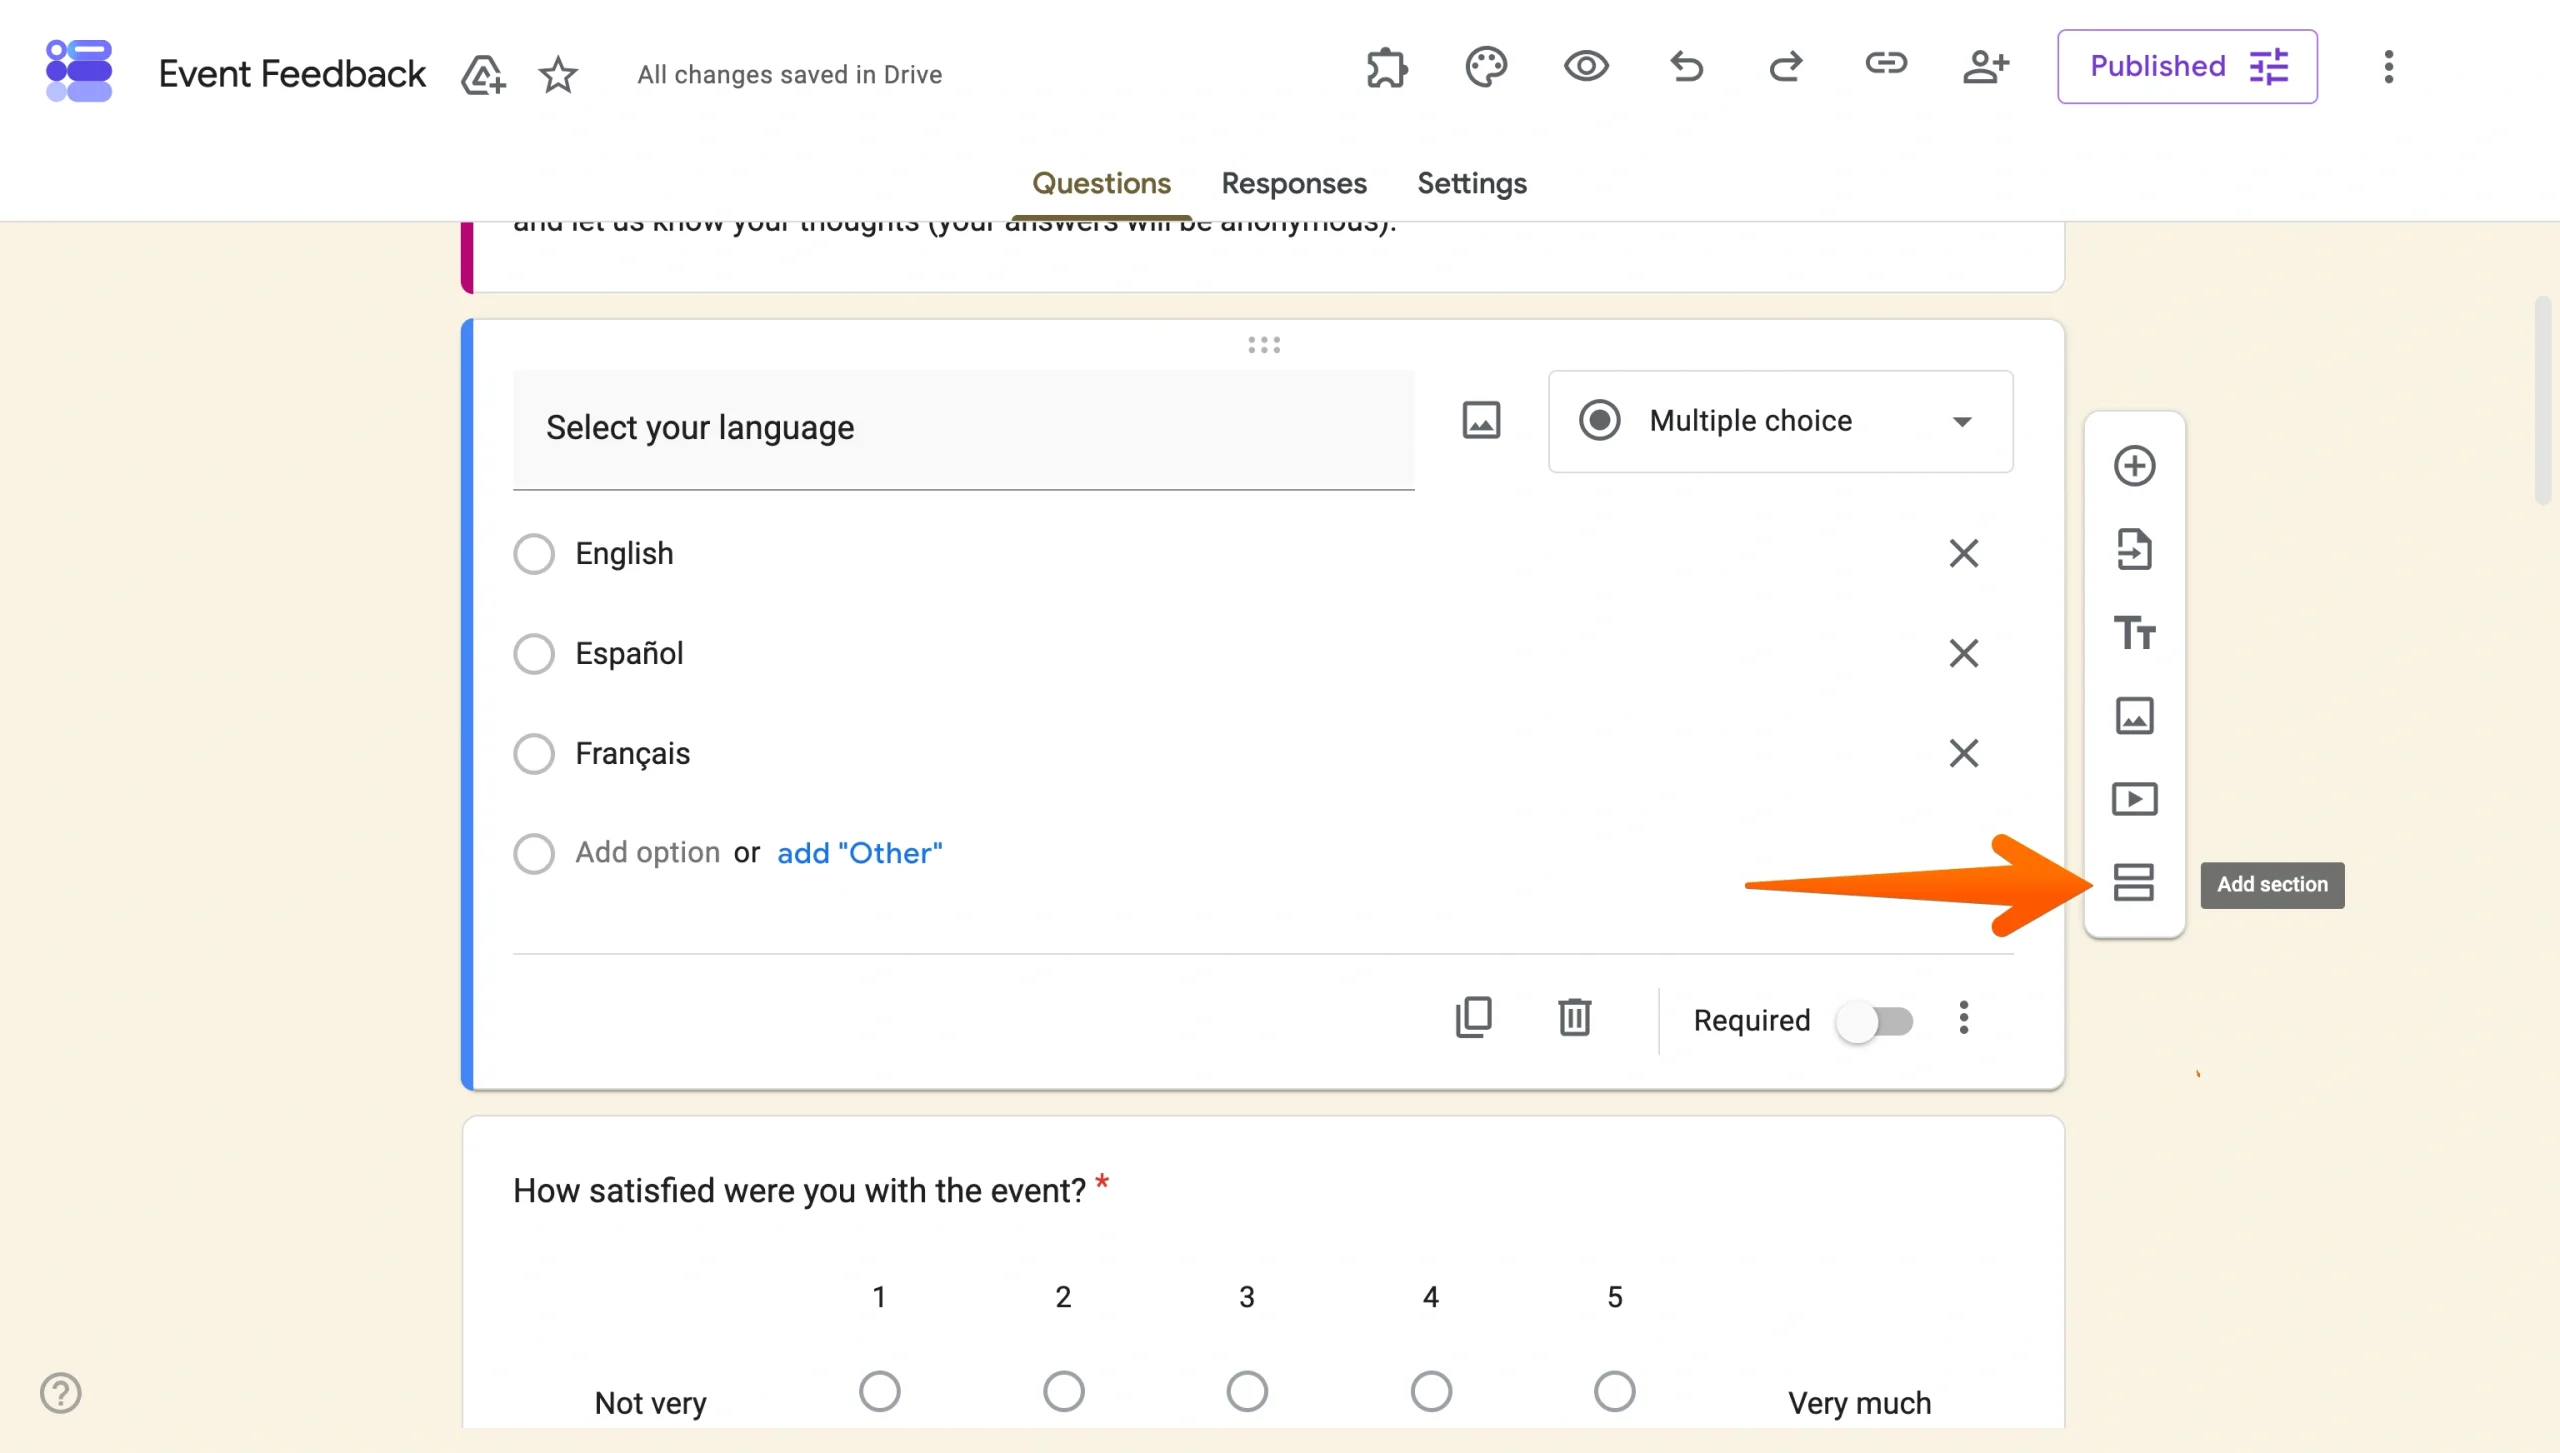
- Go back to the question and click the three-dot menu on that question and select Go to section based on answer.
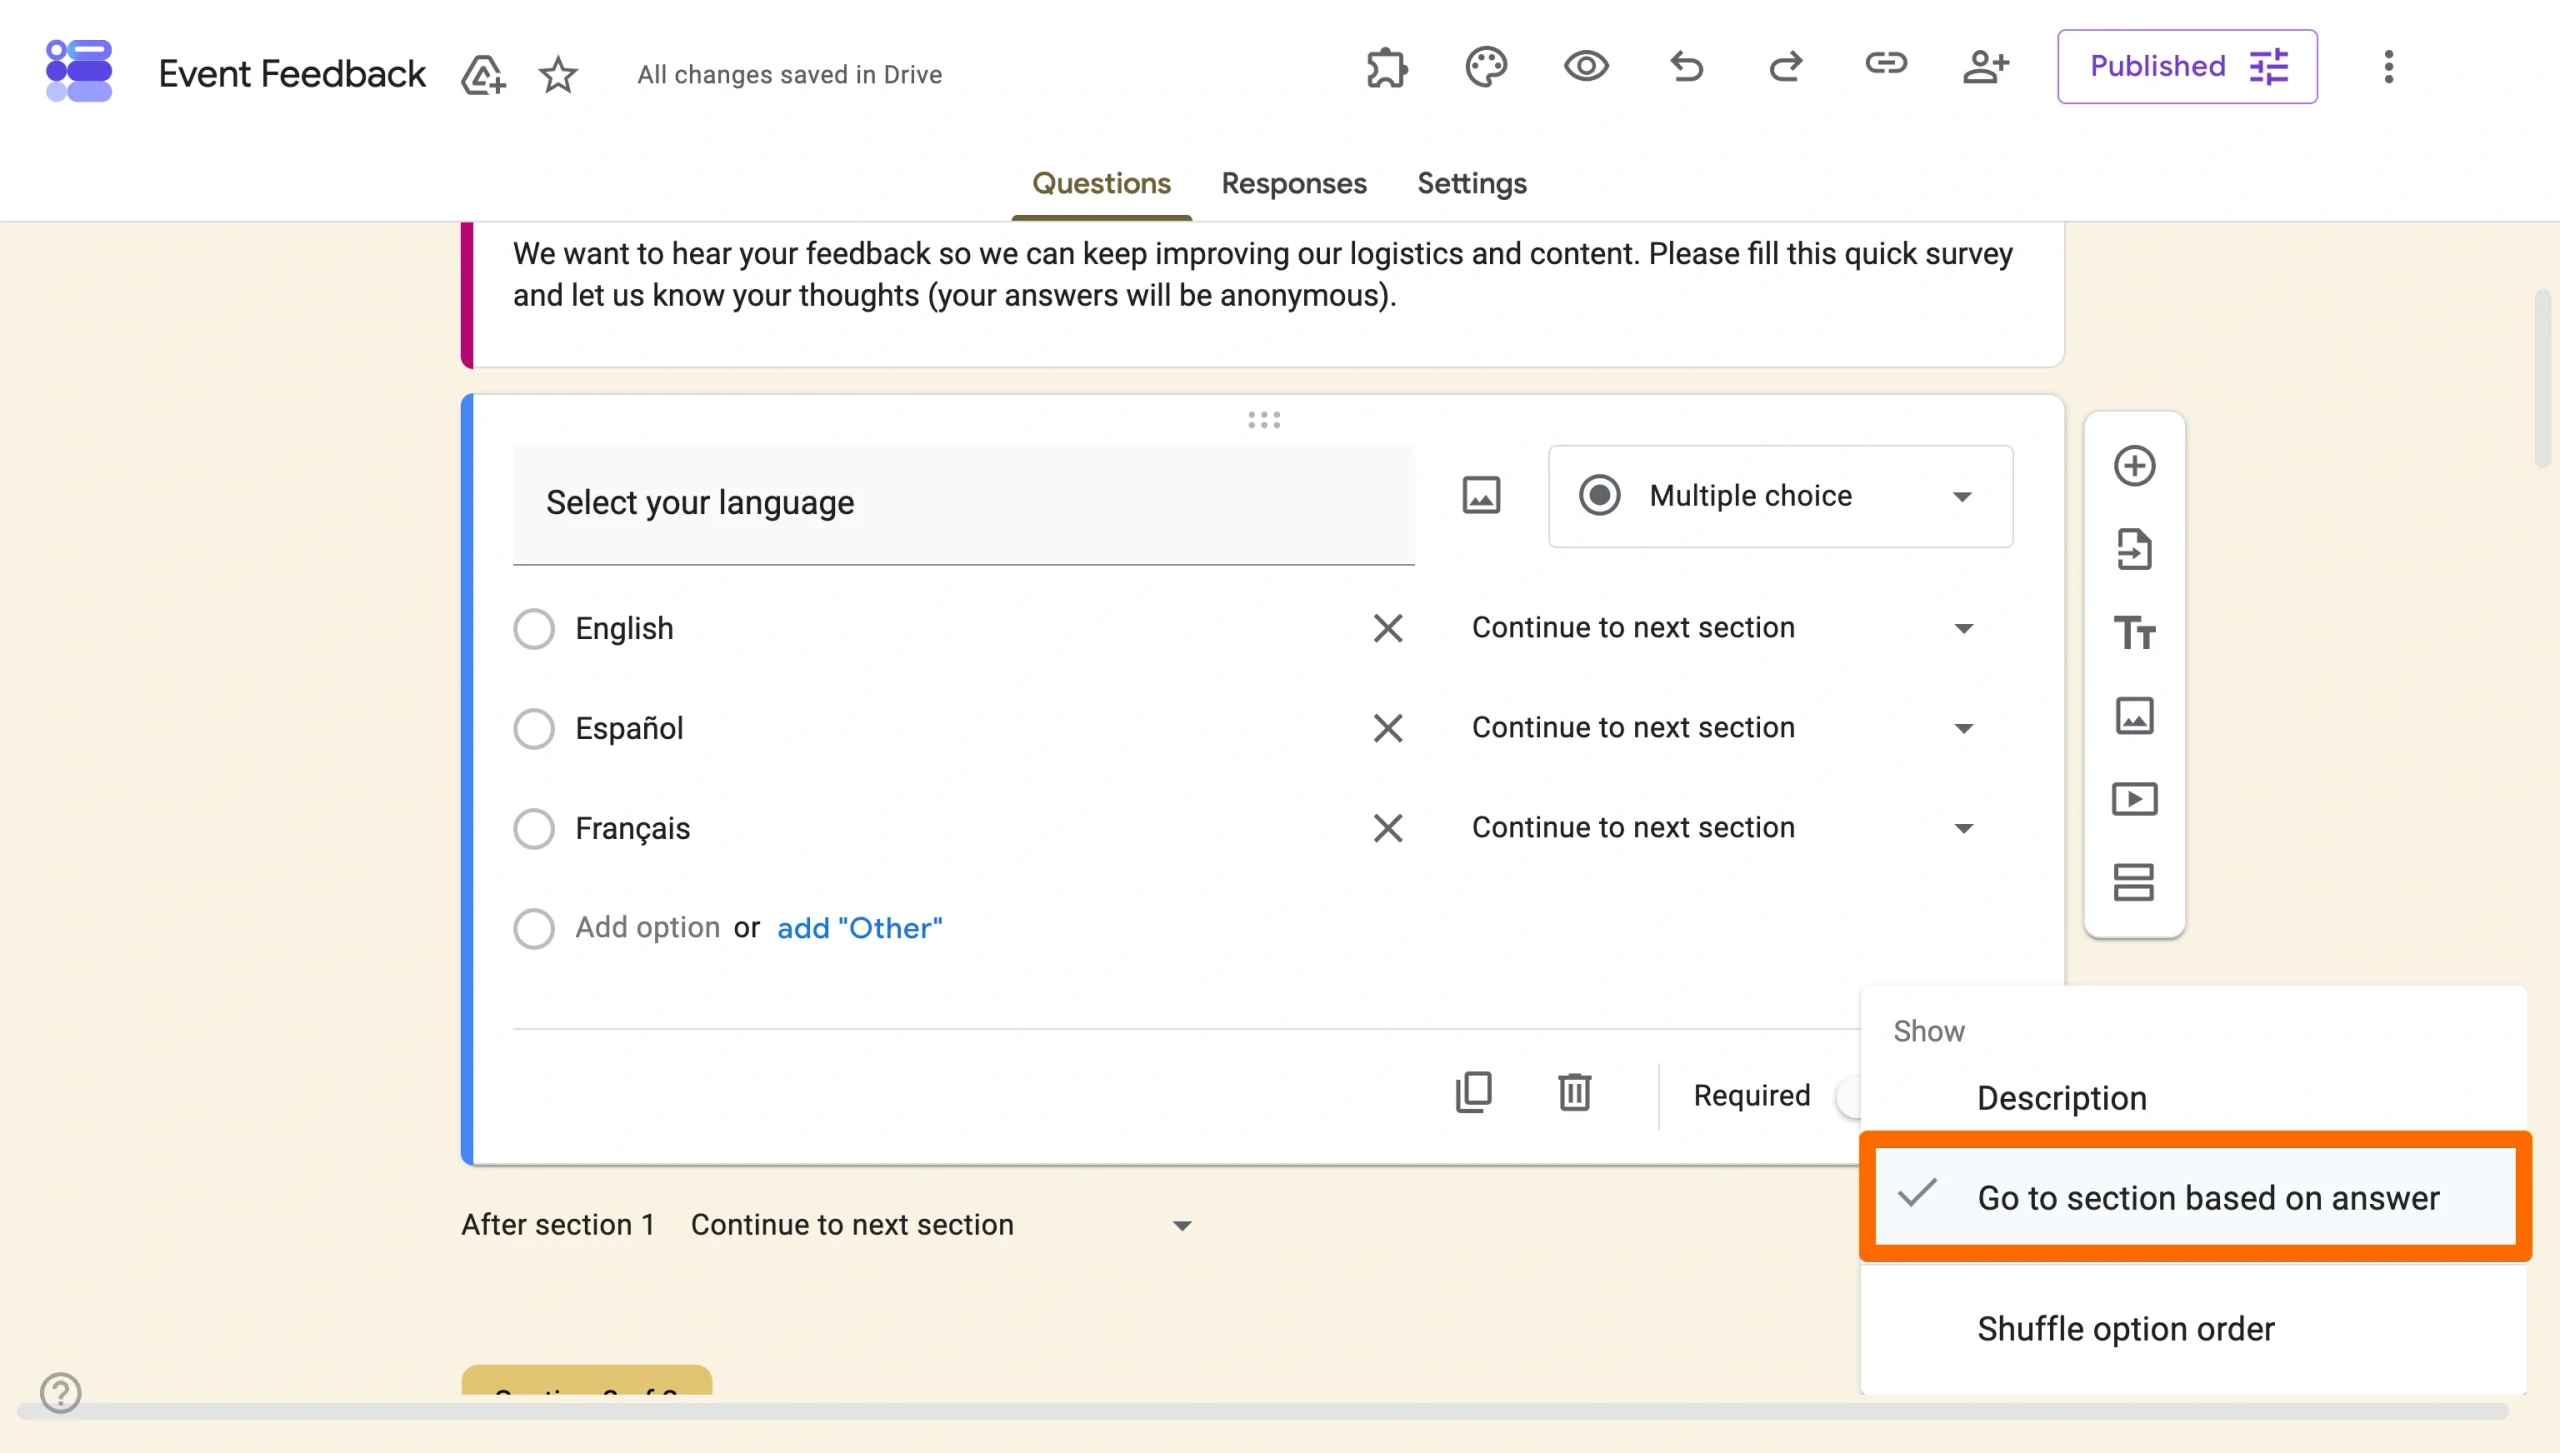
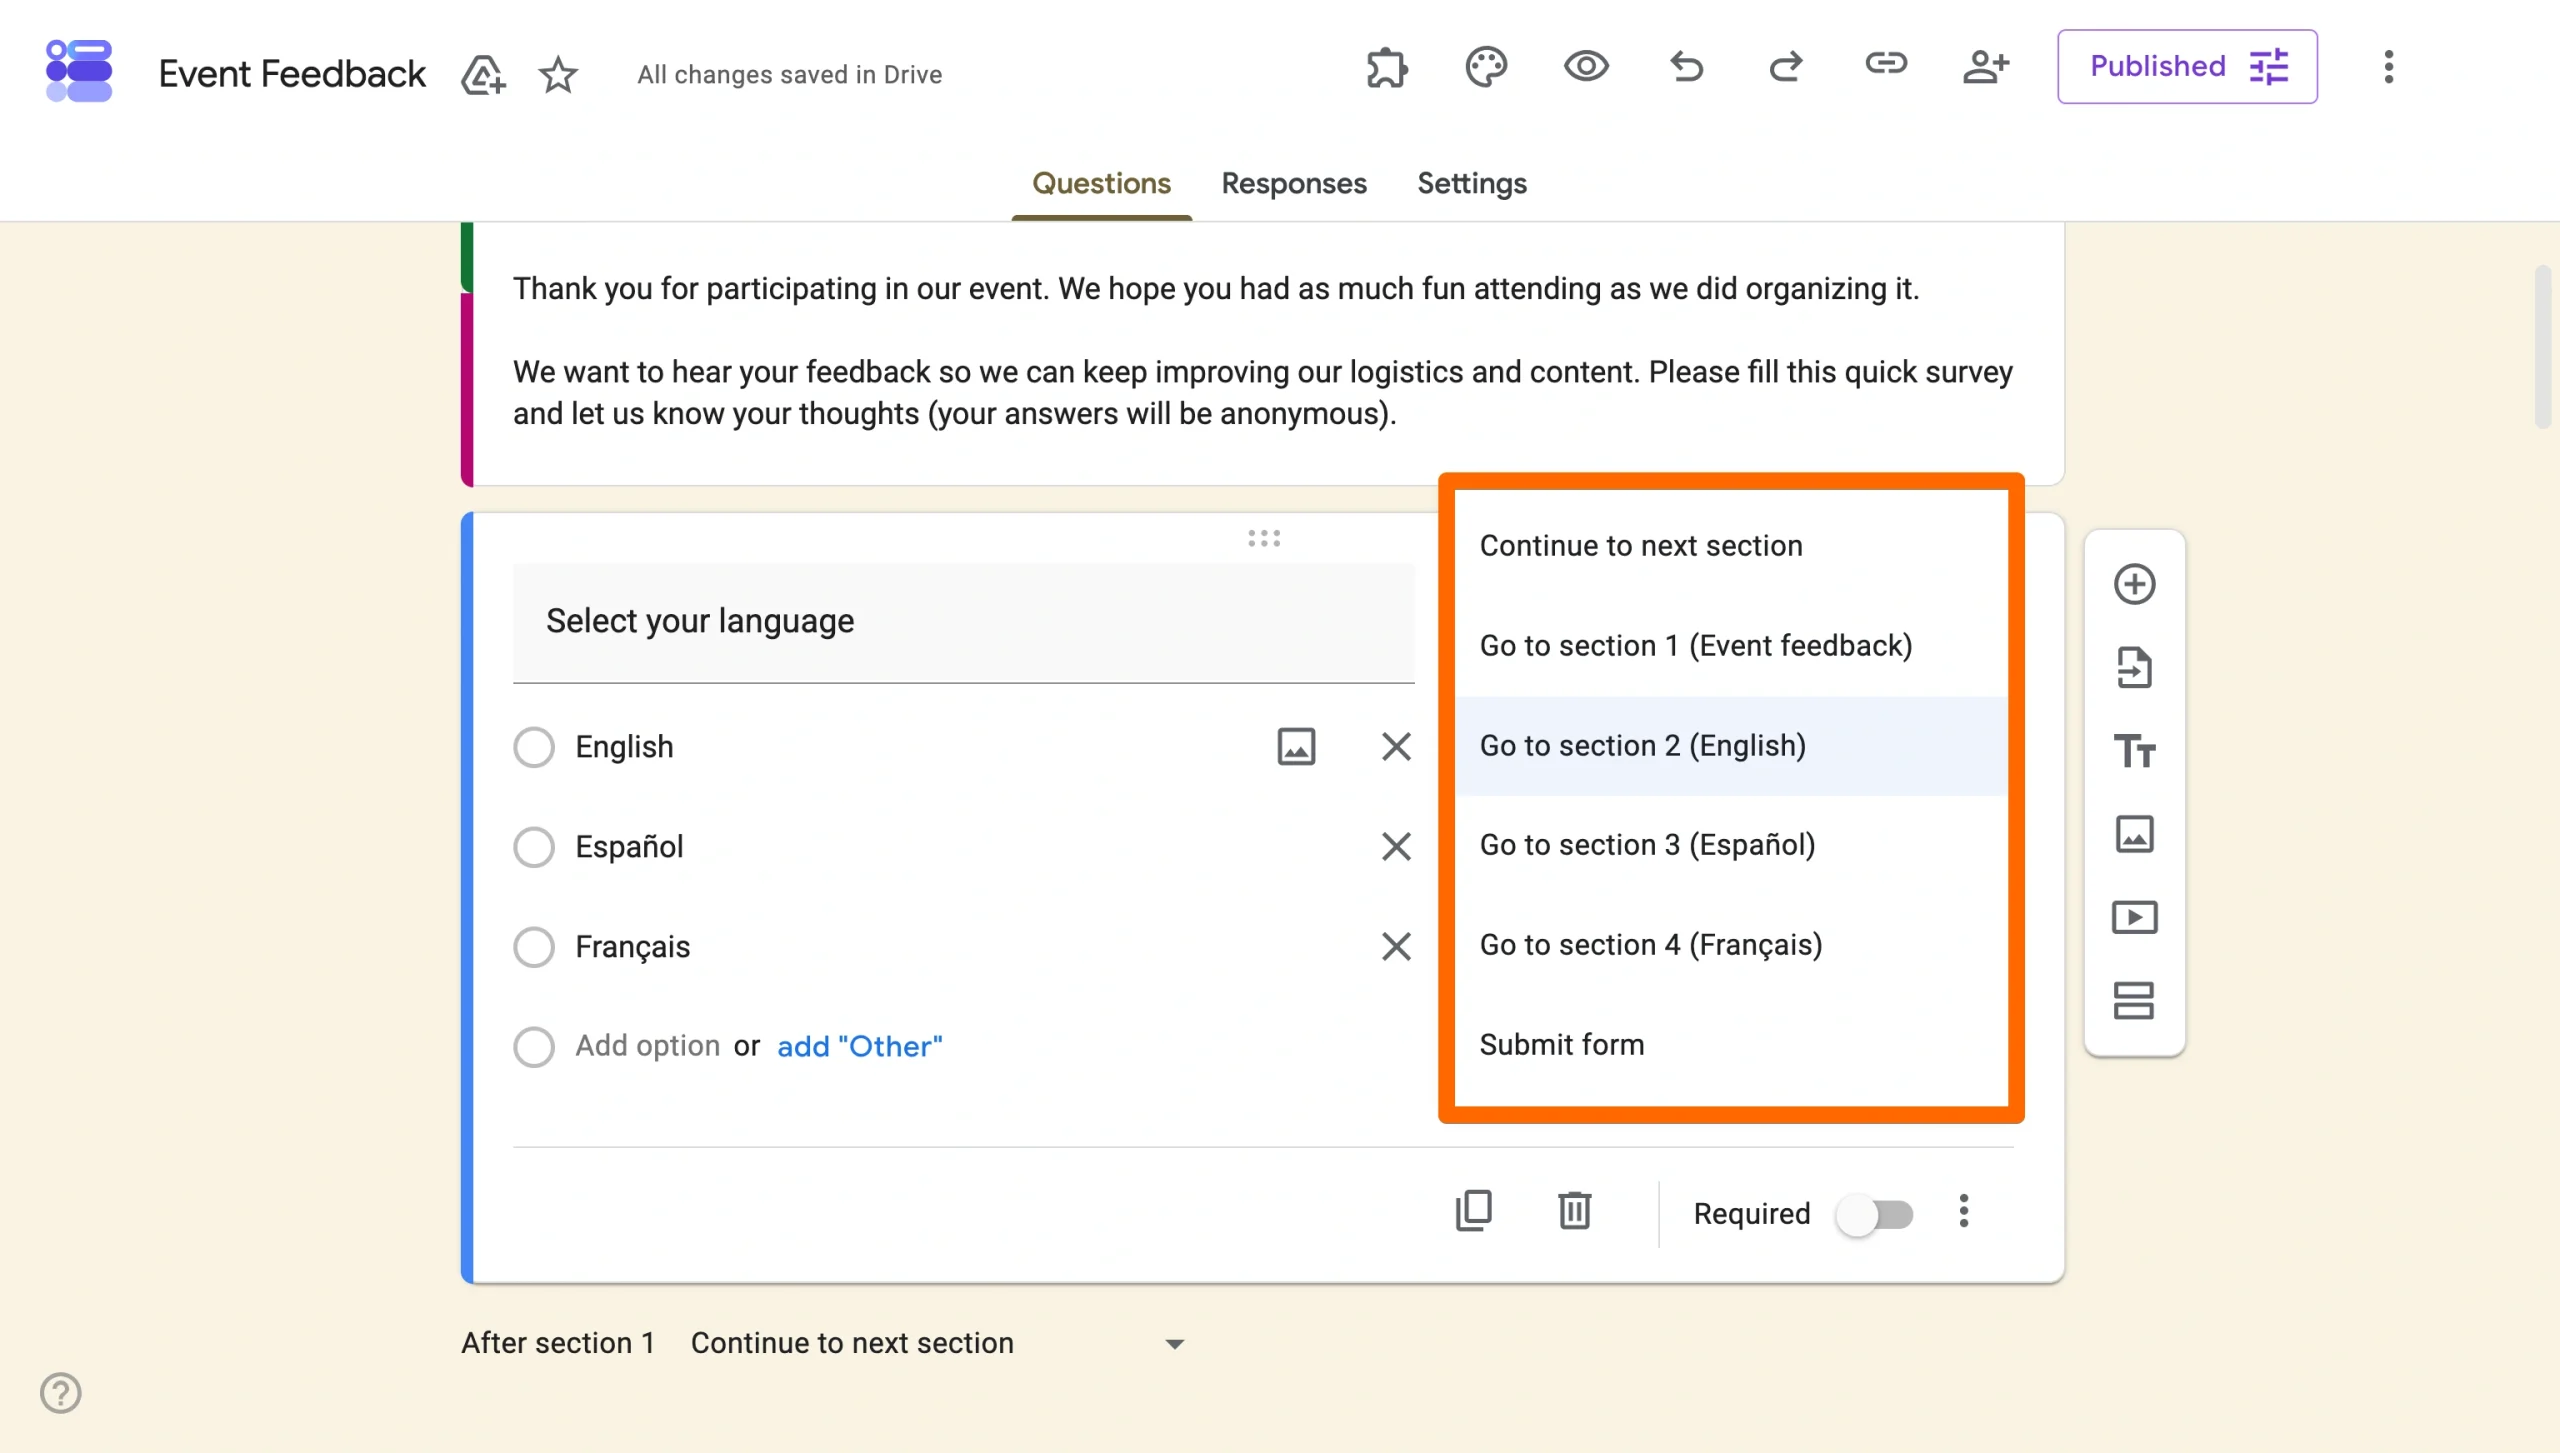
- Assign each answer option to its corresponding language section using the dropdown that appears next to each choice.
- Populate each section with your form questions, written fully in the relevant language.
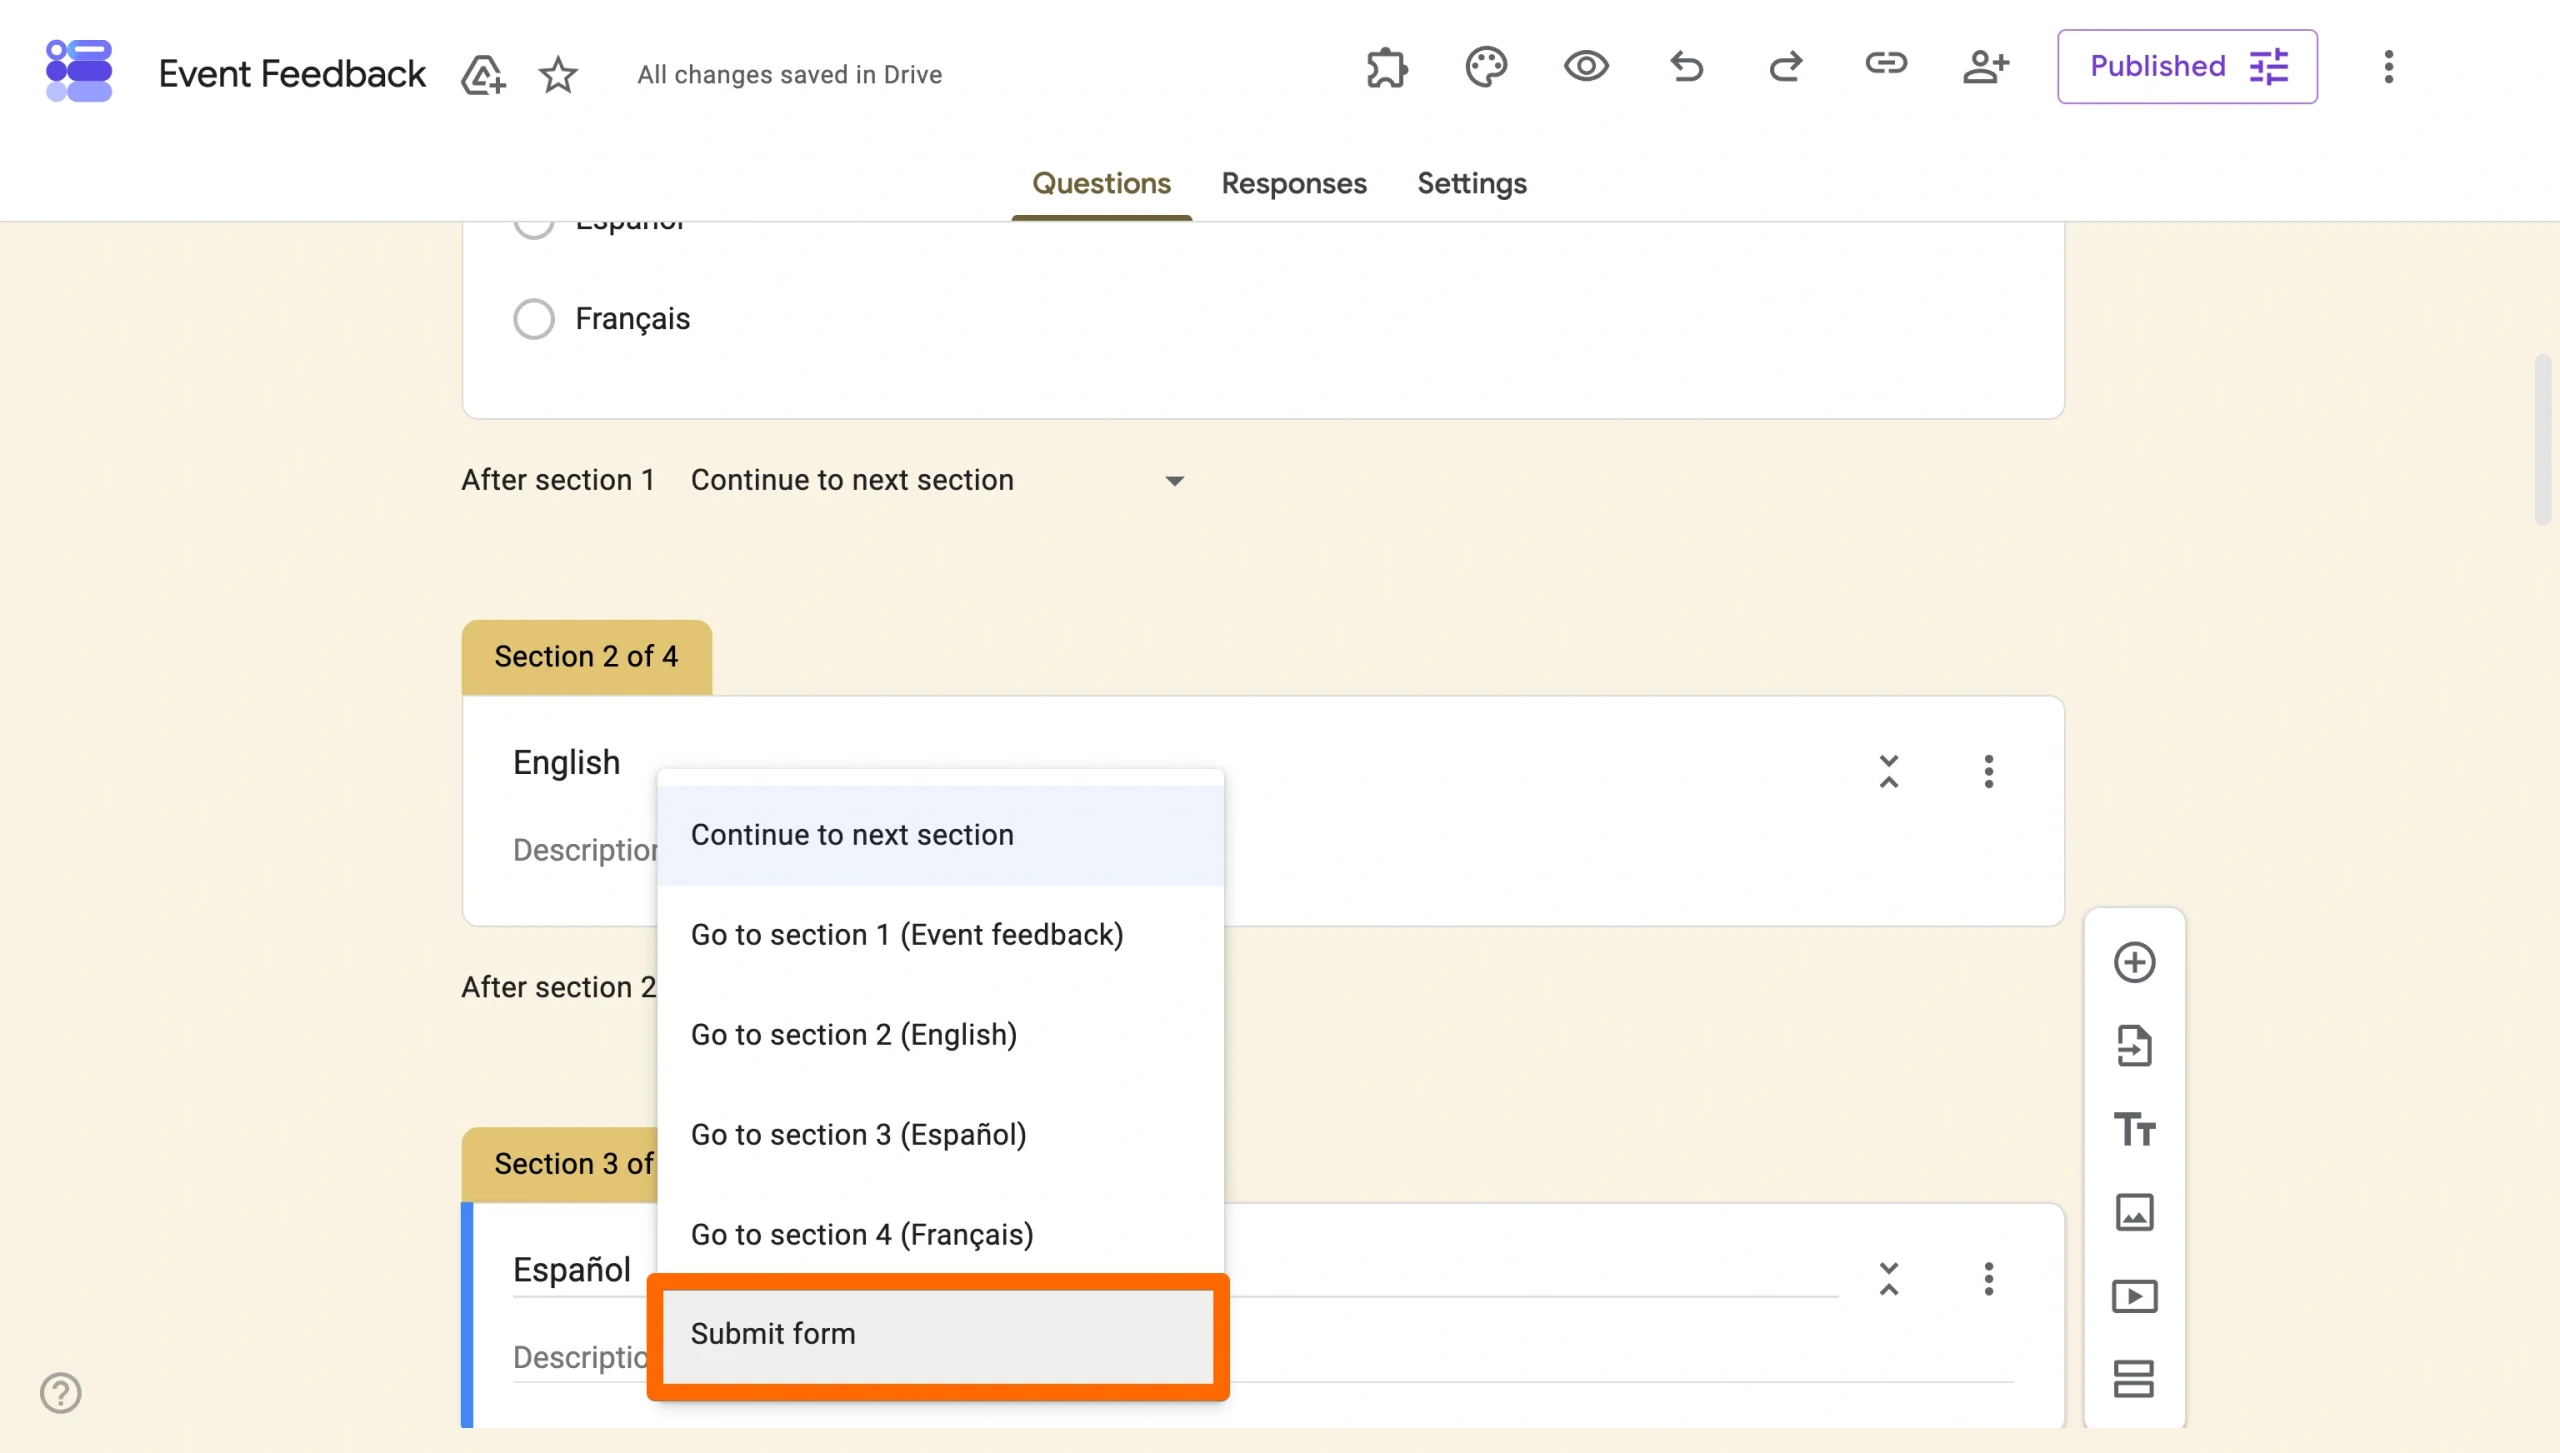
- Make sure that each section is set to “Submit form” at the end so respondents don’t loop back to another language section. You do this at the bottom of the section — click the down arrow and select Submit form.
Add translations to each question
- Pros: Creates only one form that you can share to audiences speaking one language
- Cons: Doesn’t feel as customized for the user
Rather than routing respondents to separate sections, you include both languages directly within each question-and-answer field. It works well for short forms with two languages, where keeping everything on one page is practical.
For example, a name field might read: What is your name? / ¿Cómo te llamas?
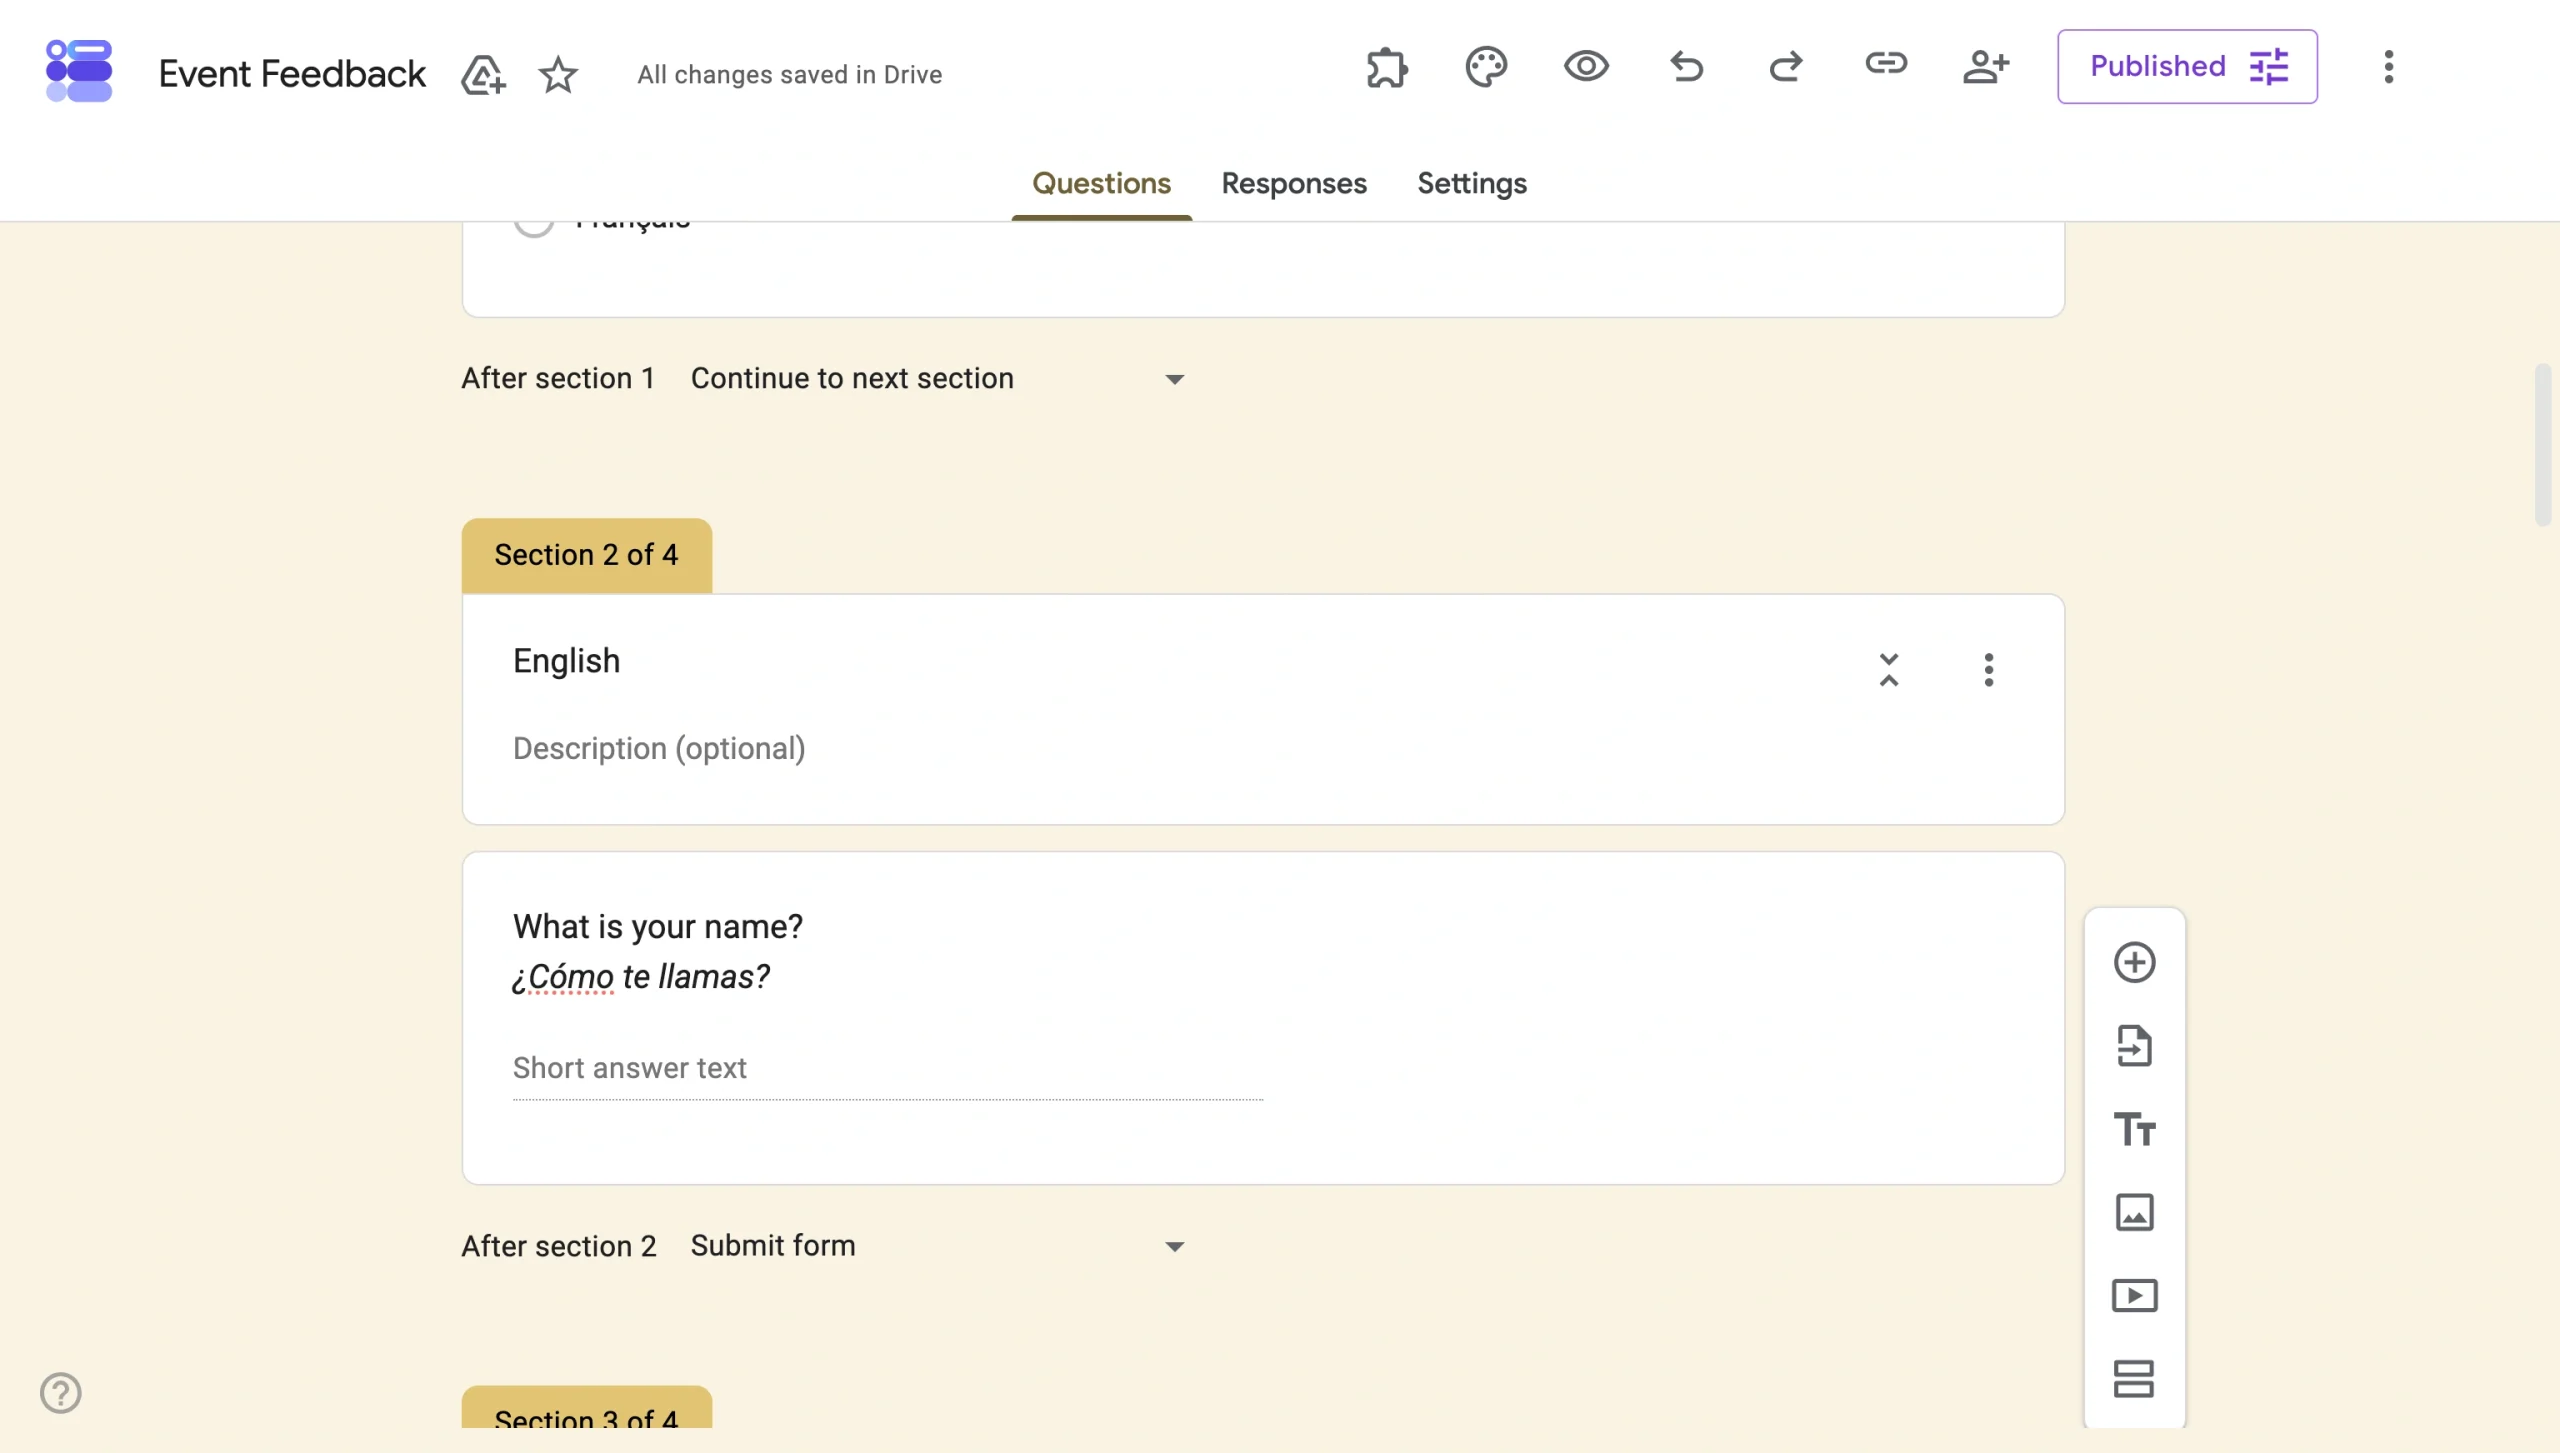
If you create multiple-choice questions in the form, then the answer options follow the same dual-language format throughout.
This method requires no logic setup, but the form can feel cluttered as you add more languages or questions. For anything beyond a simple form, the previous section-based approach or the add-on will serve you better.
3. Using Google Sheets script
- Pros: Allows management of form questions and answers in one central database
- Cons: Highly complex and is best suited to those with coding knowledge
For those comfortable with a little code, using a Google Sheets script is another way to create Google Forms in multiple languages. It’s the most advanced option of the three. Rather than manually building each form, you write a script that generates translated versions of your form automatically, pulling language data from a Google Sheet.
Did you know?
Jotform takes the coding complexity out of the equation. With a few clicks, you can automatically translate every form into over 130 languages. The next section provides a step-by-step guide to this simple solution.
Here’s how to use the script:
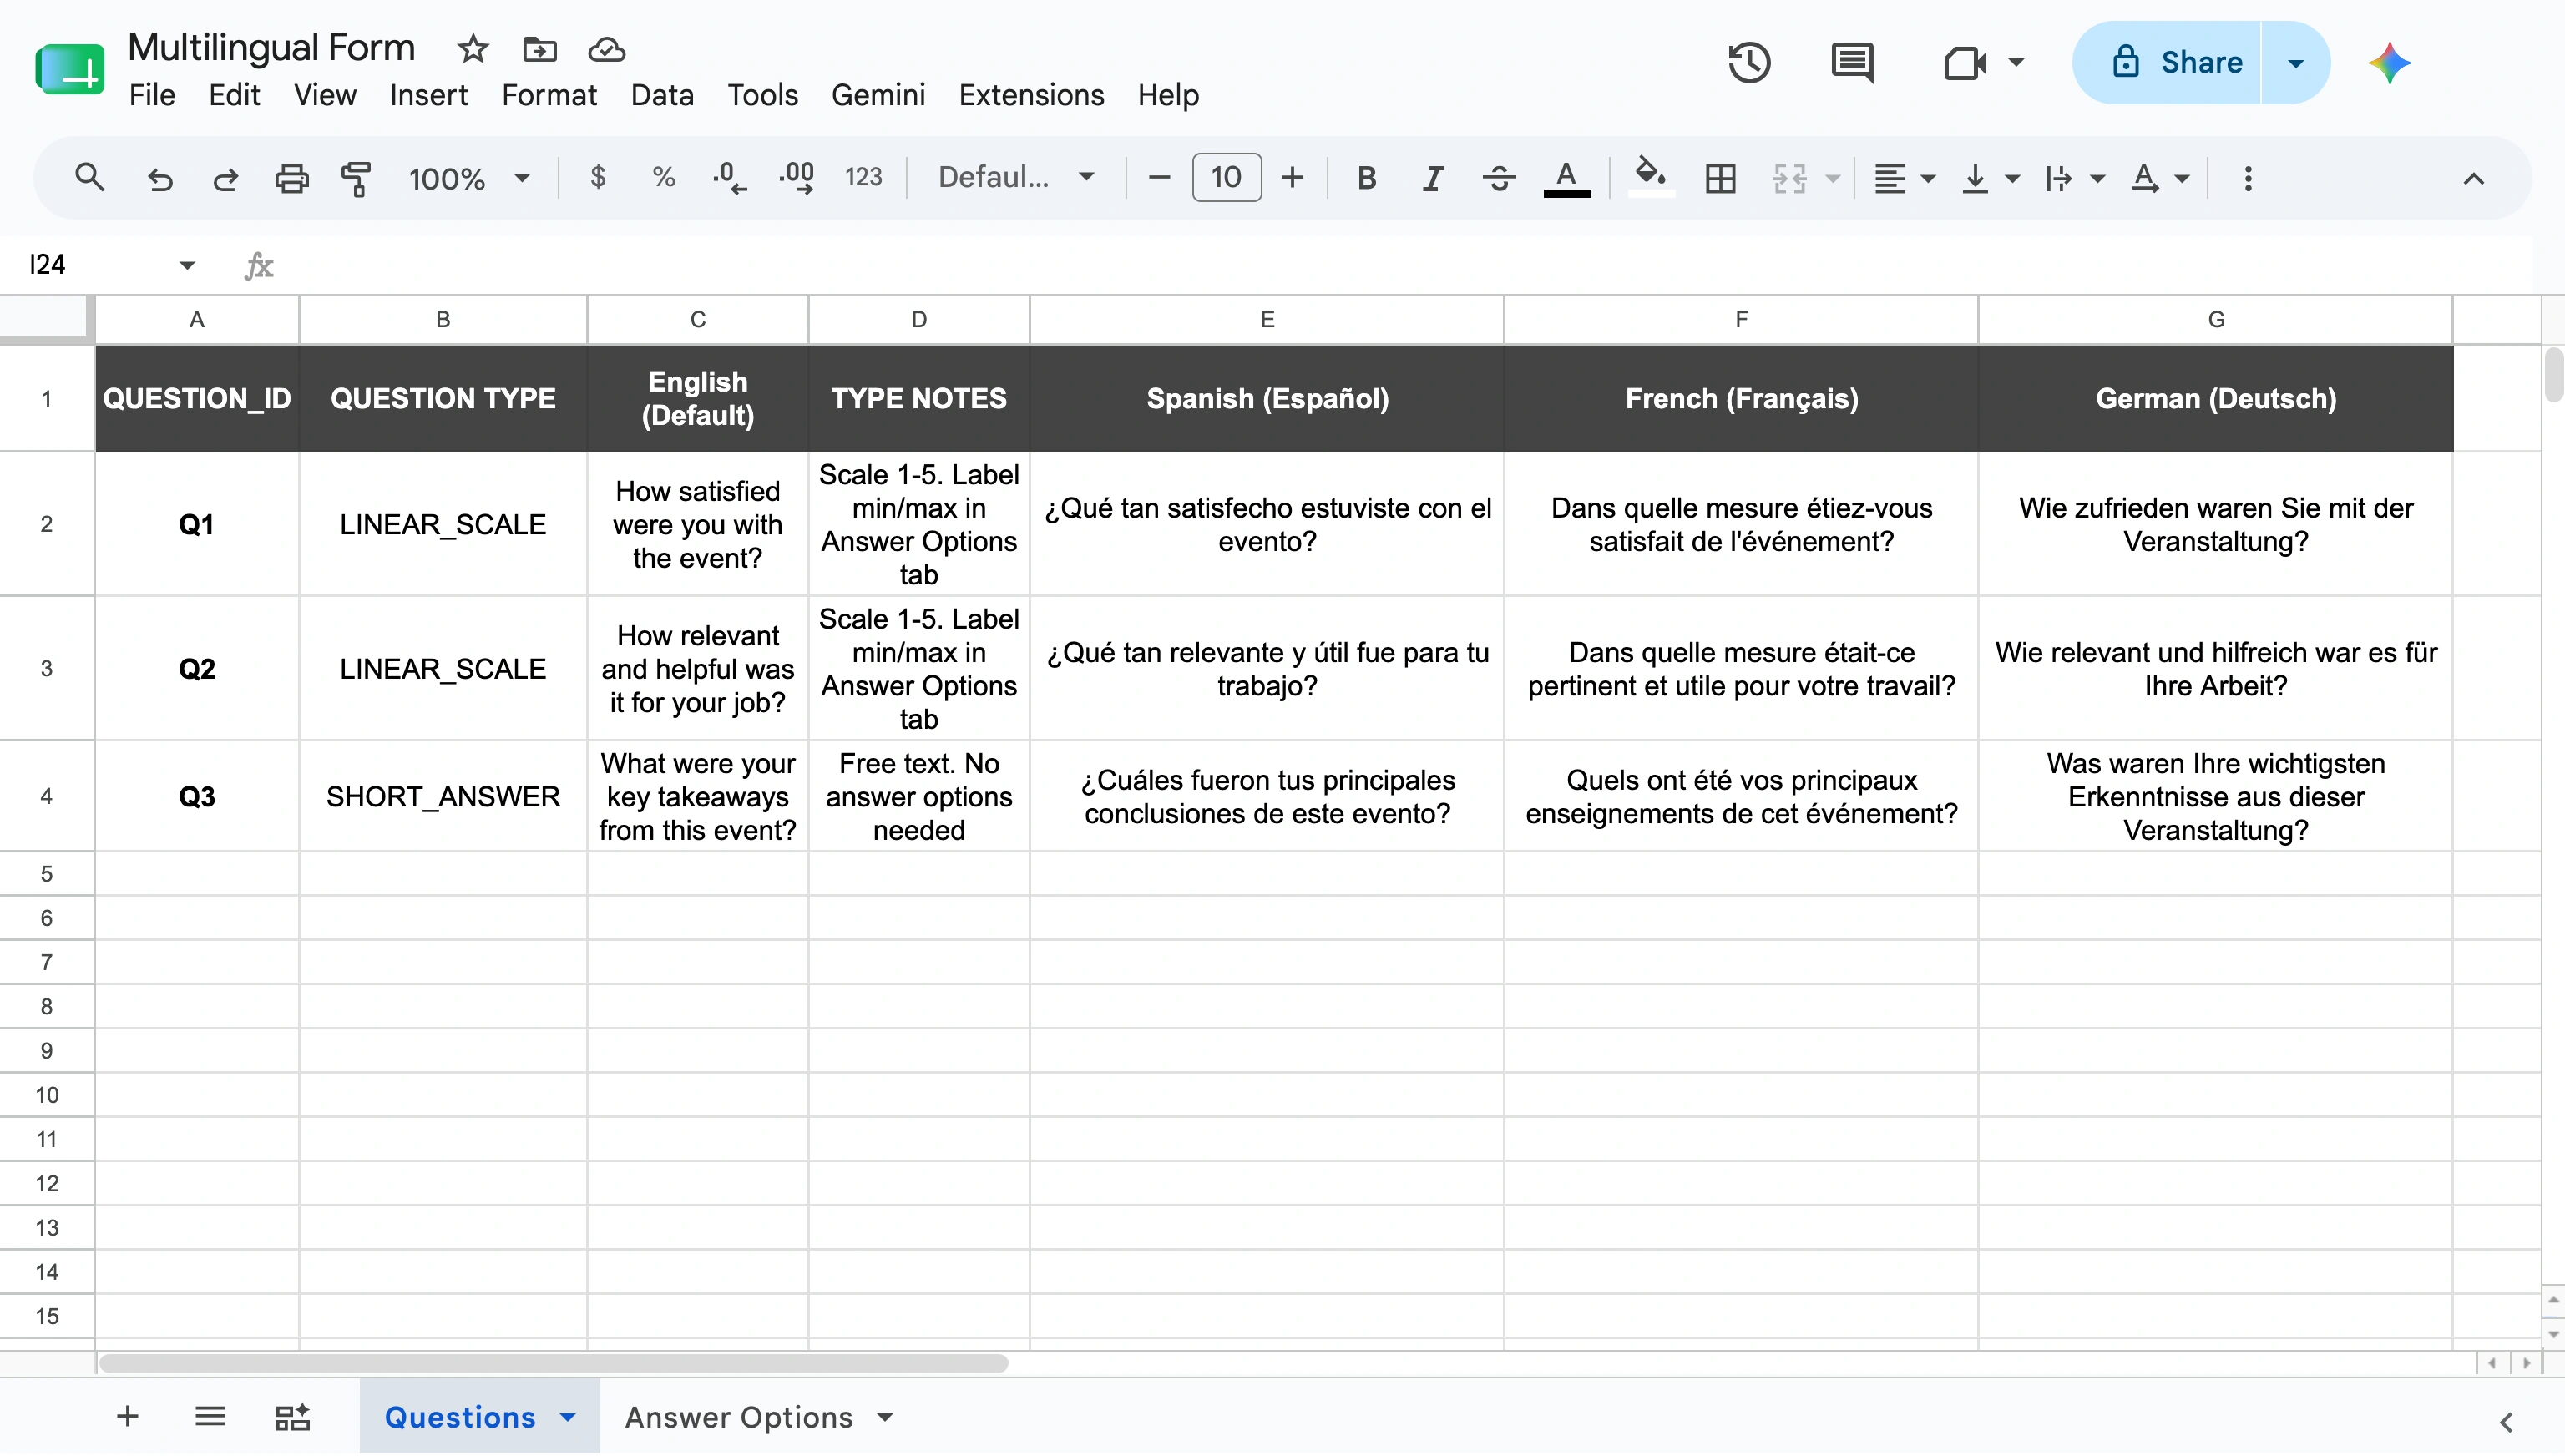
- Create a spreadsheet and fill in two worksheets: a “Questions” tab and an “Answer Options” tab.
In the Questions tab, each row needs:
- A question ID (e.g., Q1, Q2)
- A question type (e.g., LINEAR_SCALE or SHORT_ANSWER)
- Your English question text, and the translated versions in each language column
- Switch to the Answer Options tab. You must assign the relevant question ID to questions and answers.
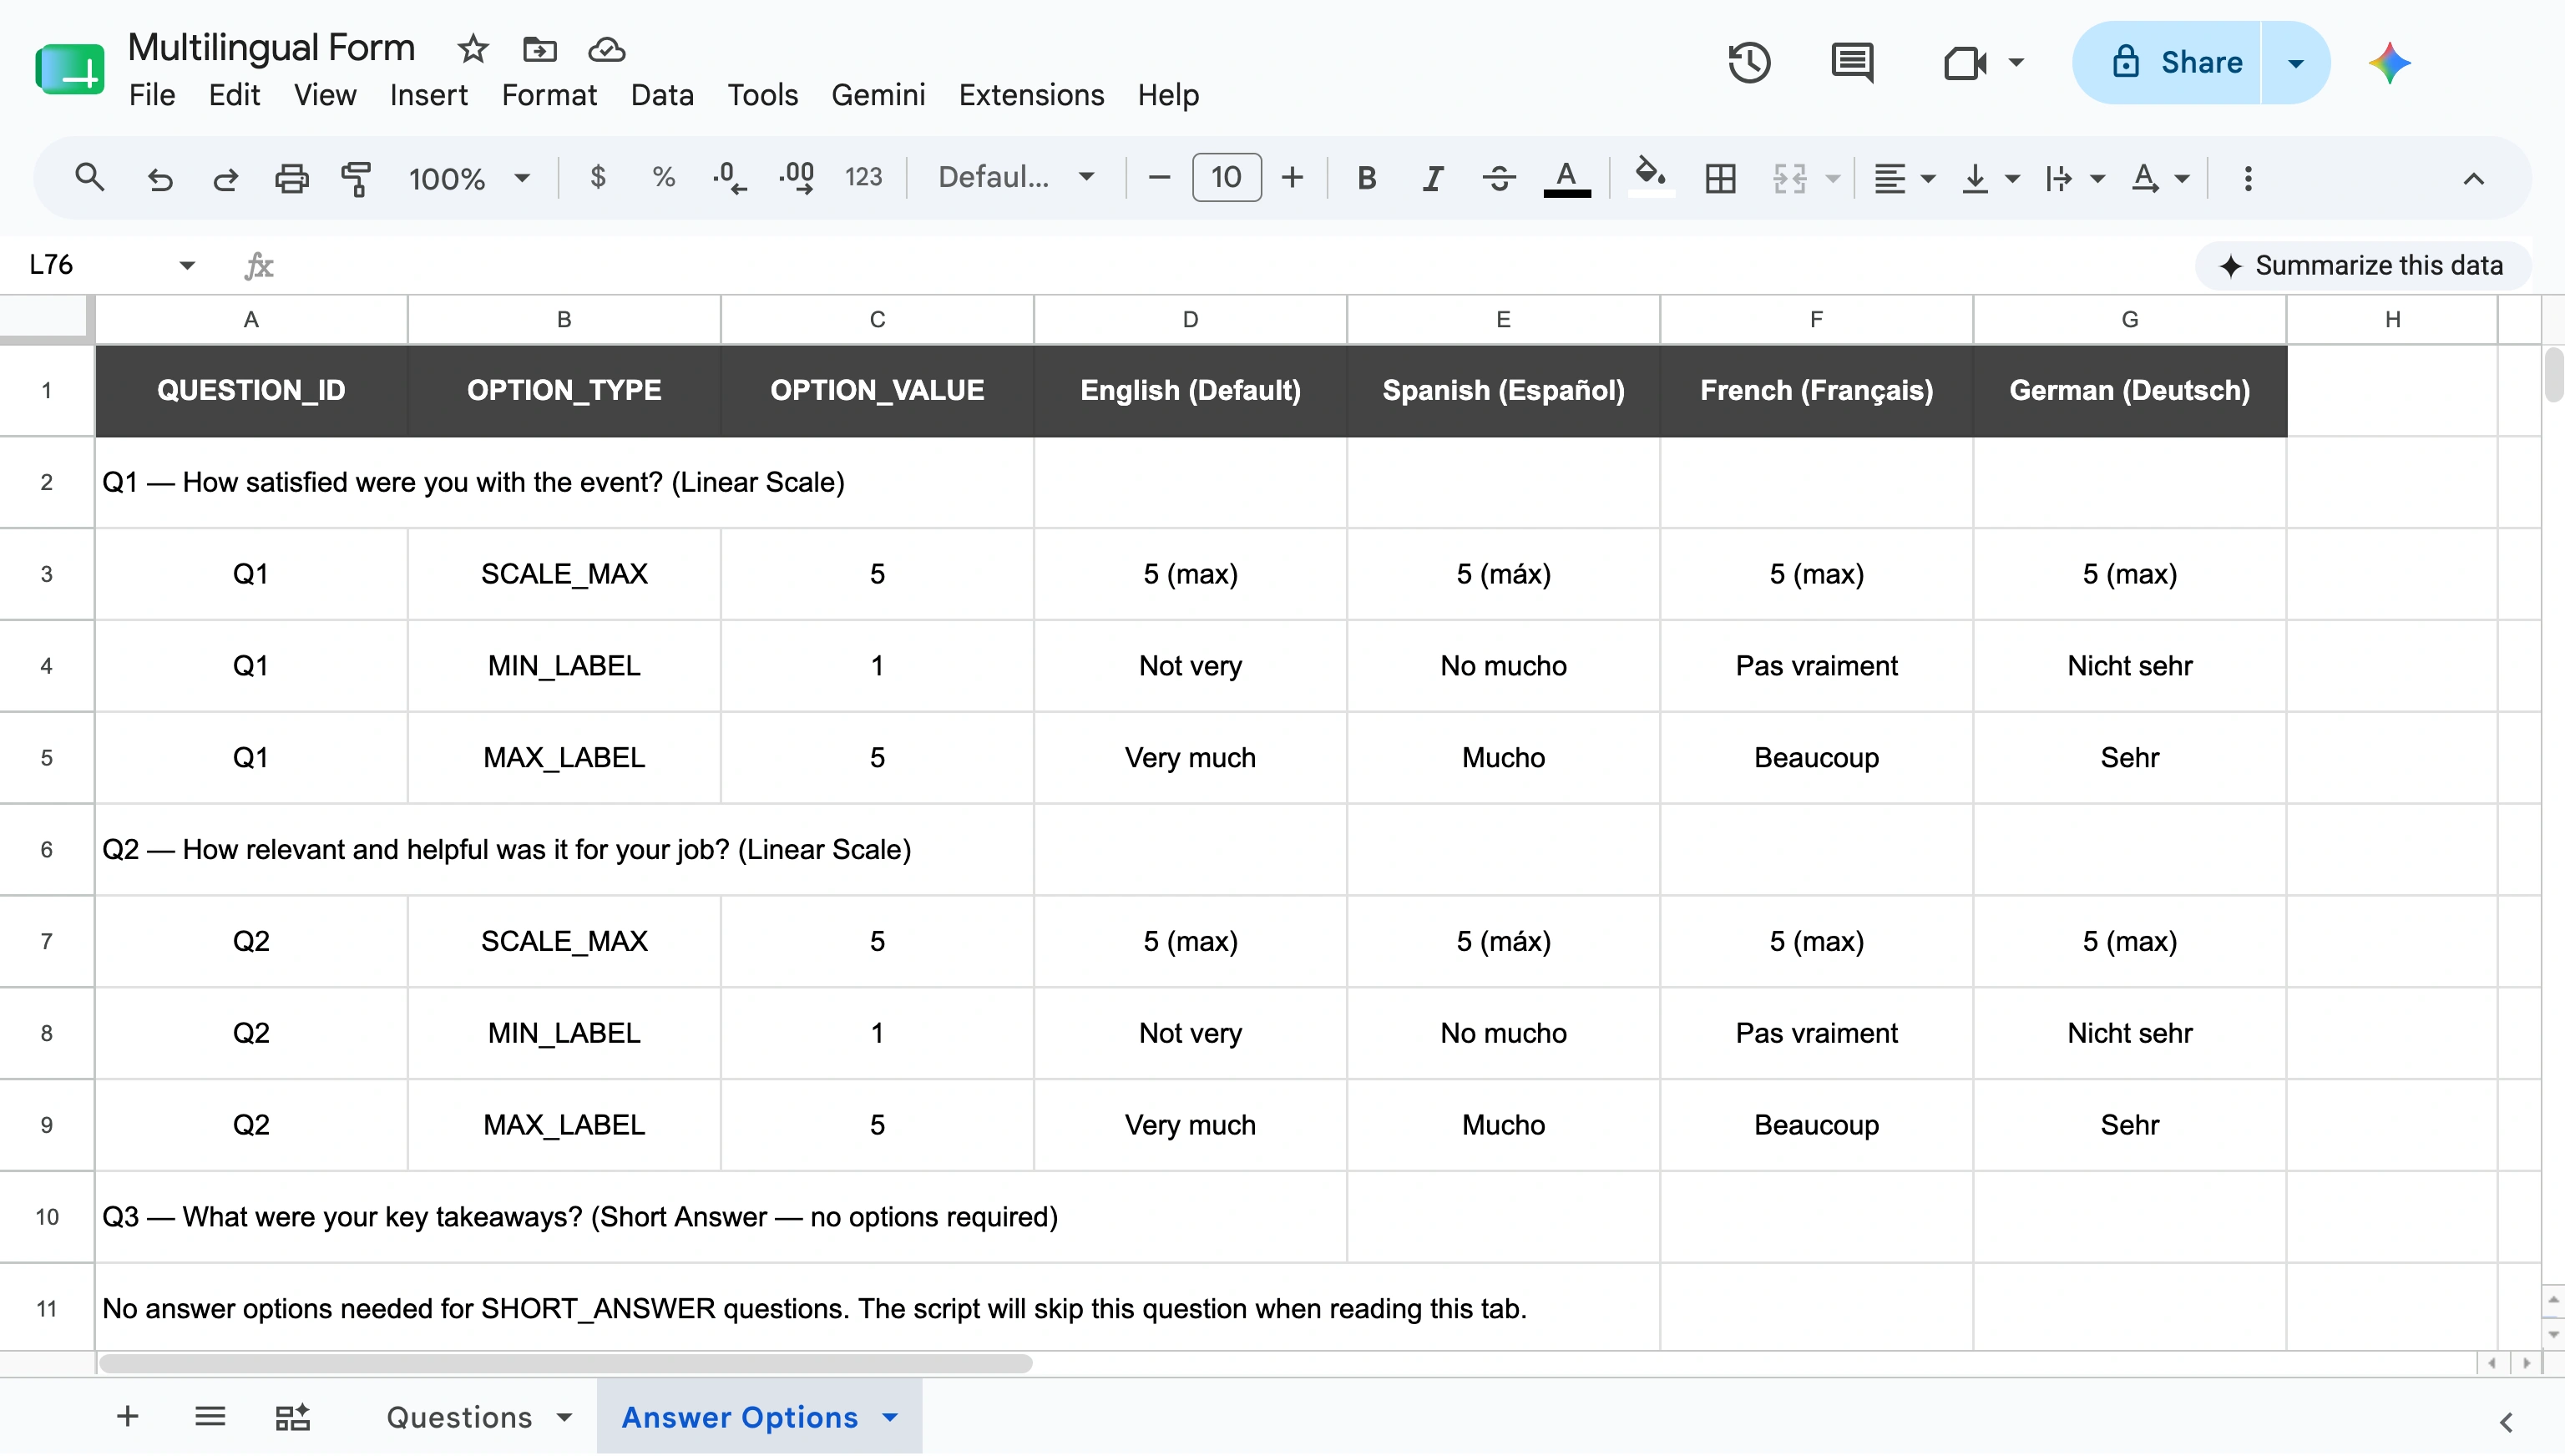
In the example above, you can see linear scale questions and rows for SCALE_MAX, MIN_LABEL, and MAX_LABEL. Fill in the translated labels for each language column.
SHORT_ANSWER questions don’t need any entries here as a user can type whatever answer they want.
Here’s a table so you know how to handle each question type:
| Question type | Answer Options tab required? | Rows needed | Notes |
|---|---|---|---|
|
LINEAR_SCALE |
Yes |
SCALE_MAX, MIN_LABEL, MAX_LABEL |
SCALE_MAX sets the top of the scale (e.g., 5). MIN_LABEL and MAX_LABEL are the translated endpoint labels (e.g., “Not very” and “Very much”) |
|
SHORT_ANSWER |
No |
None |
Free text field — just translate the question in the Questions tab |
|
MULTIPLE_CHOICE |
Yes |
One row per answer option |
Add each choice as a separate row, translated across language columns |
|
CHECKBOX |
Yes |
One row per answer option |
Same as multiple choice — one row per selectable option |
|
DROPDOWN |
Yes |
One row per answer option |
Same structure as multiple choice and checkbox |
|
PARAGRAPH |
No |
None |
Long-form free text — same as short answer, just translate the question |
- In Google Sheets, click Extensions in the top menu and select Apps Script to open the script editor.
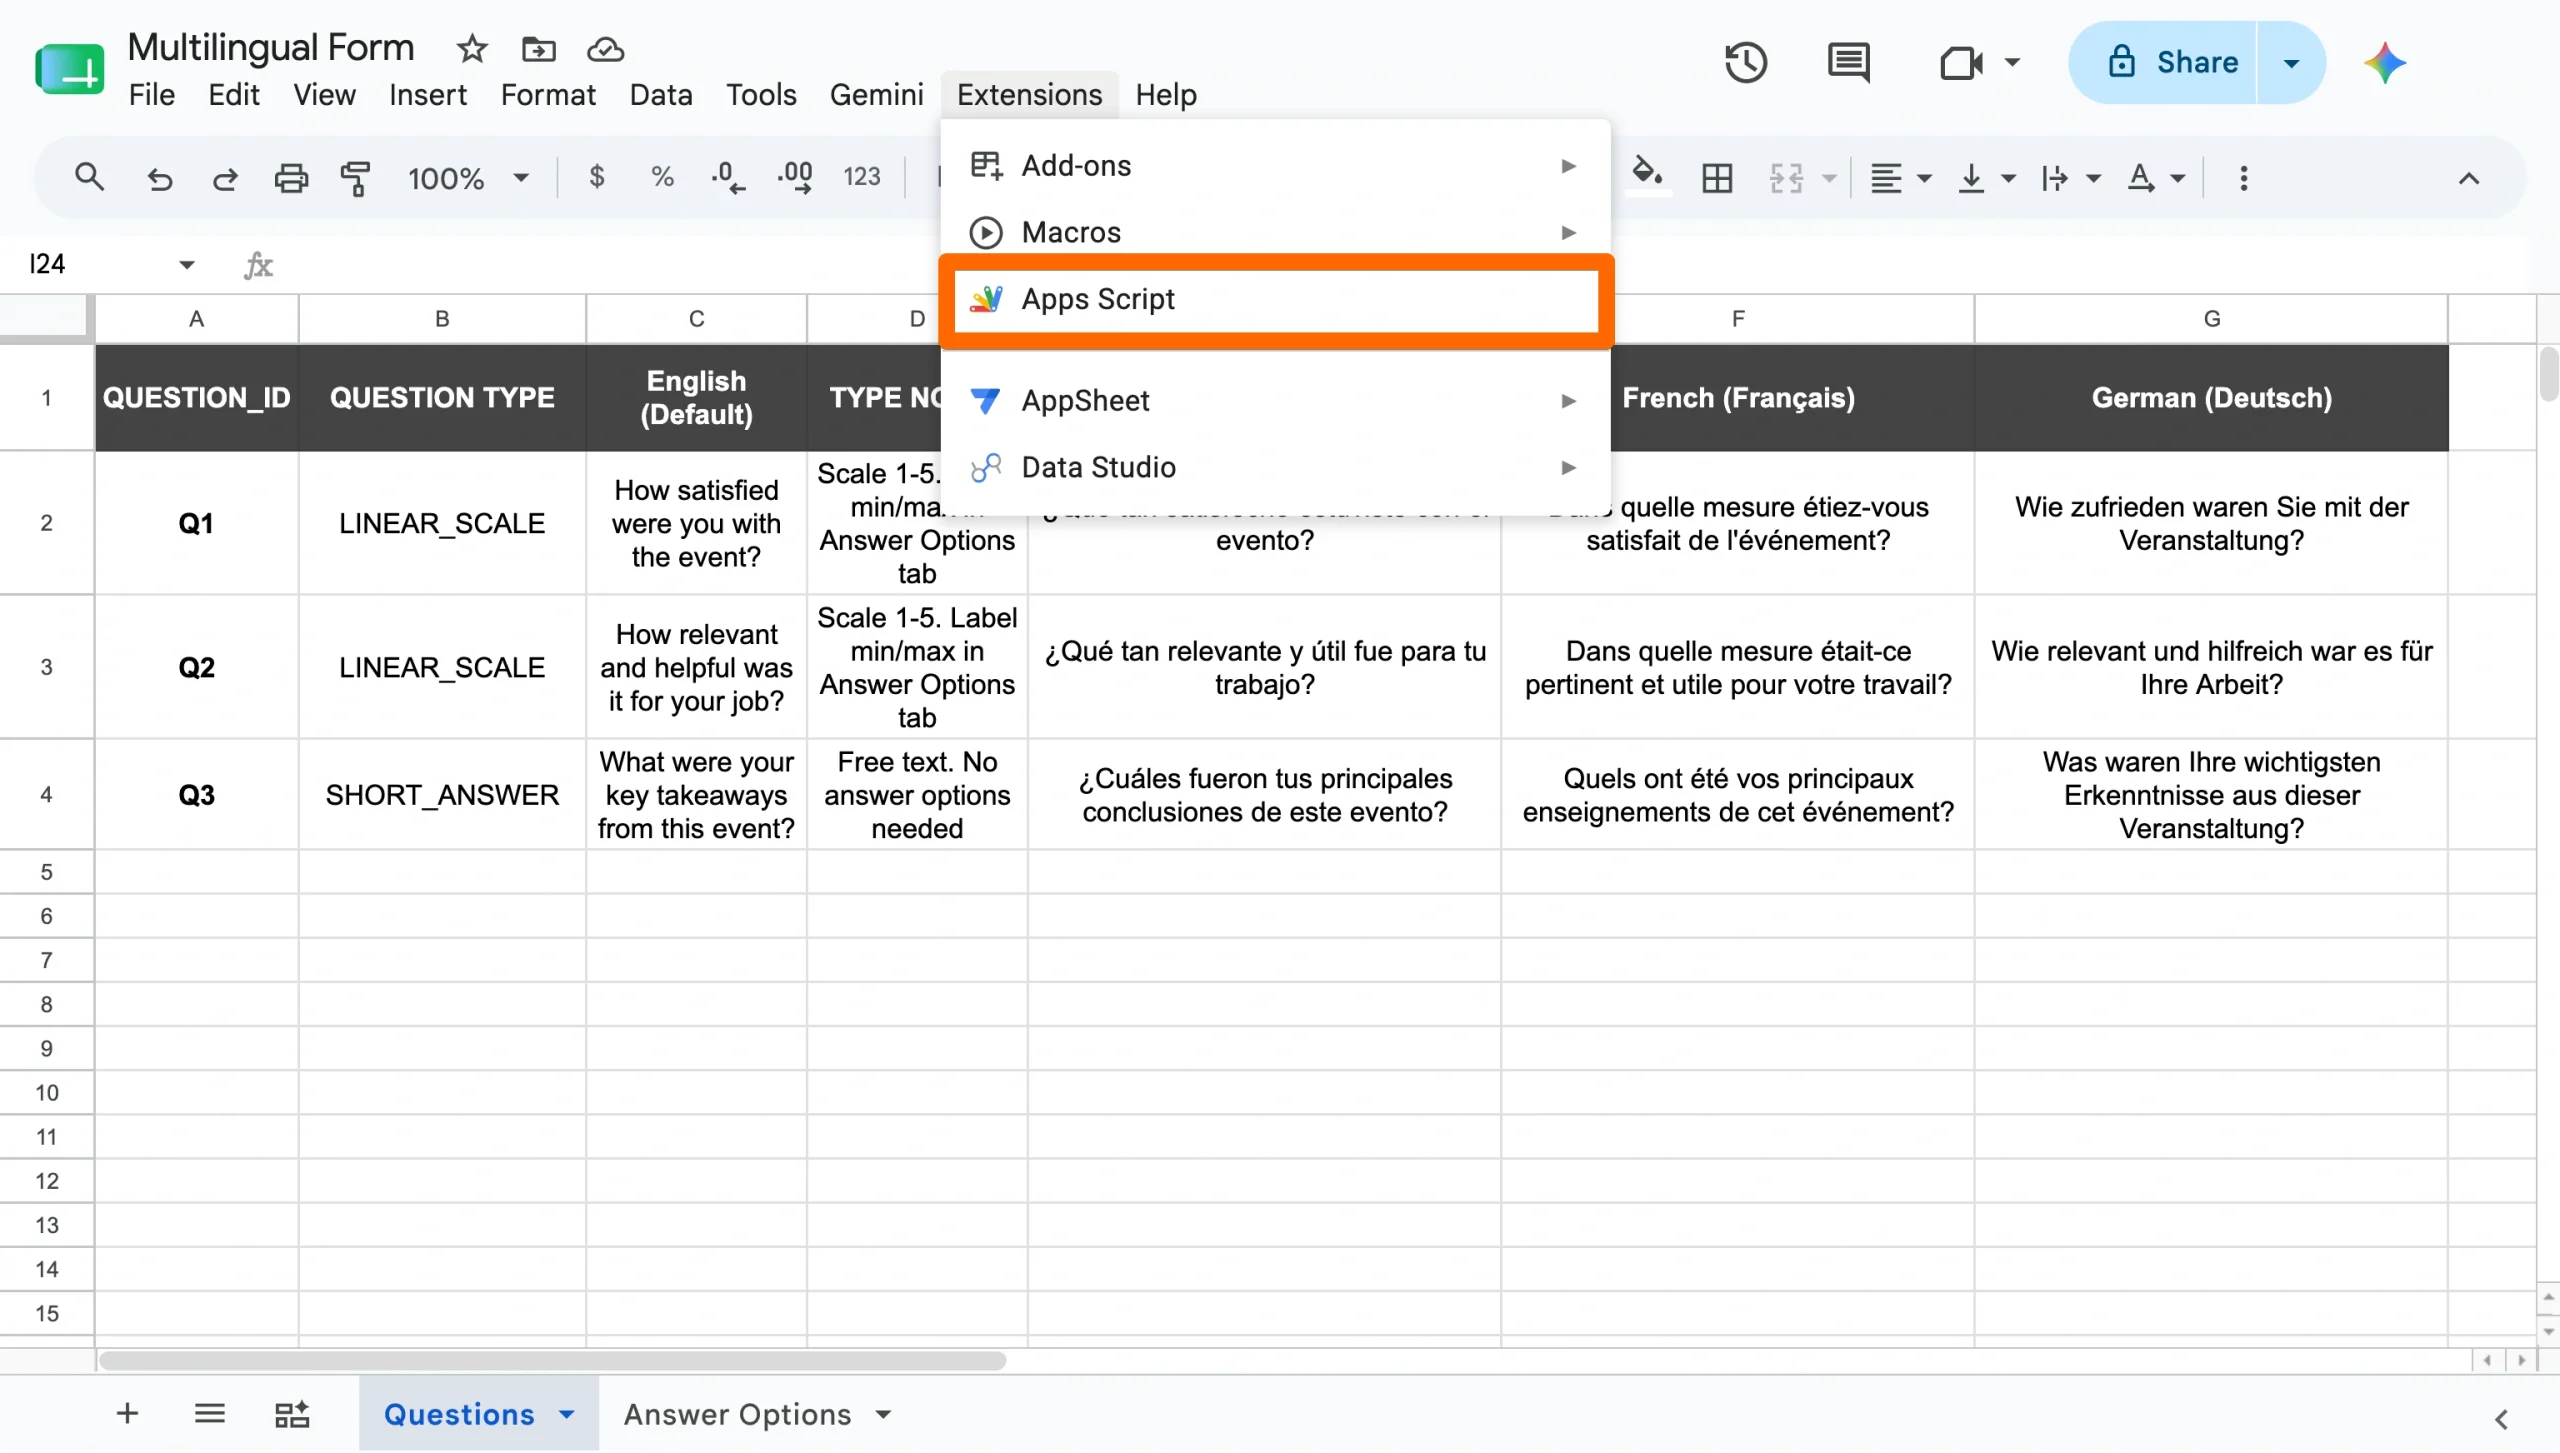
Expand this option, copy the full script below, and paste it into the Apps Script editor.
/**
 * Multilingual Google Form Generator
 * -----------------------------------
 * Reads question and answer option data from a linked Google Sheet
 * and generates one fully translated Google Form per language.
 *
 * SETUP:
 *  1. Paste this script into Extensions > Apps Script inside your Google Sheet.
 *  2. Update SPREADSHEET_ID below with your Sheet's ID (found in its URL).
 *  3. Update LANGUAGES to match the language columns in your sheet.
 *  4. Click Run > generateMultilingualForms and authorize when prompted.
 */

// ─── CONFIG ────────────────────────────────────────────────────────────────

const SPREADSHEET_ID = "YOUR_SPREADSHEET_ID_HERE"; // ← replace this

const LANGUAGES = [
  { name: "Spanish",  column: 5 },  // Column E in Questions tab
  { name: "French",   column: 6 },  // Column F in Questions tab
  { name: "German",   column: 7 },  // Column G in Questions tab
];

// Tab names — update if you rename them
const QUESTIONS_SHEET  = "Questions";
const OPTIONS_SHEET    = "Answer Options";

// Row where data starts (row 1 = title, row 2 = instructions, row 3 = headers)
const DATA_START_ROW = 4;

// ─── MAIN FUNCTION ─────────────────────────────────────────────────────────

function generateMultilingualForms() {
  const ss        = SpreadsheetApp.openById(SPREADSHEET_ID);
  const qSheet    = ss.getSheetByName(QUESTIONS_SHEET);
  const optSheet  = ss.getSheetByName(OPTIONS_SHEET);

  const questions = getQuestions(qSheet);
  const options   = getAnswerOptions(optSheet);

  LANGUAGES.forEach(lang => {
    createFormForLanguage(lang, questions, options);
  });

  Logger.log("✅ Done! Check your Google Drive for the generated forms.");
}

// ─── READ QUESTIONS TAB ────────────────────────────────────────────────────

function getQuestions(sheet) {
  const lastRow  = sheet.getLastRow();
  const data     = sheet.getRange(DATA_START_ROW, 1, lastRow - DATA_START_ROW + 1, 7).getValues();

  return data
    .filter(row => row[0] !== "")  // skip blank rows
    .map(row => ({
      id:      row[0],  // Col A: QUESTION_ID
      type:    row[1],  // Col B: QUESTION_TYPE
      en:      row[2],  // Col C: English
      // Col D is TYPE NOTES — used by humans, not the script
      es:      row[4],  // Col E: Spanish
      fr:      row[5],  // Col F: French
      de:      row[6],  // Col G: German
    }));
}

// ─── READ ANSWER OPTIONS TAB ───────────────────────────────────────────────

/**
 * Returns an object keyed by QUESTION_ID.
 * Each entry contains: scaleMax, minLabel (translated), maxLabel (translated)
 *
 * Example:
 * {
 *   Q1: { scaleMax: 5, labels: { Spanish: { min: "No mucho", max: "Mucho" }, ... } },
 *   Q2: { ... }
 * }
 */
function getAnswerOptions(sheet) {
  const lastRow = sheet.getLastRow();
  const data    = sheet.getRange(DATA_START_ROW, 1, lastRow - DATA_START_ROW + 1, 7).getValues();

  const options = {};

  data.forEach(row => {
    const qId        = row[0];  // Col A: QUESTION_ID
    const optionType = row[1];  // Col B: OPTION_TYPE
    const value      = row[2];  // Col C: OPTION_VALUE

    // Skip section label rows (merged cells come back as empty in col B)
    if (!qId || !optionType) return;

    if (!options[qId]) {
      options[qId] = { scaleMax: 5, labels: {} };
      LANGUAGES.forEach(lang => {
        options[qId].labels[lang.name] = { min: "", max: "" };
      });
    }

    if (optionType === "SCALE_MAX") {
      options[qId].scaleMax = parseInt(value, 10);
    }

    if (optionType === "MIN_LABEL" || optionType === "MAX_LABEL") {
      LANGUAGES.forEach((lang, i) => {
        const translatedLabel = row[4 + i]; // Cols E, F, G
        if (optionType === "MIN_LABEL") {
          options[qId].labels[lang.name].min = translatedLabel;
        } else {
          options[qId].labels[lang.name].max = translatedLabel;
        }
      });
    }
  });

  return options;
}

// ─── CREATE ONE FORM PER LANGUAGE ─────────────────────────────────────────

function createFormForLanguage(lang, questions, options) {
  const form = FormApp.create(`Event Feedback Form — ${lang.name}`);
  form.setDescription(`Please complete this form in ${lang.name}.`);

  questions.forEach(q => {
    // Pick the right translation column based on language name
    const translatedText = getTranslation(q, lang.name);

    switch (q.type) {

      case "LINEAR_SCALE": {
        const item     = form.addScaleItem();
        const qOptions = options[q.id] || {};
        const labels   = (qOptions.labels || {})[lang.name] || {};

        item.setTitle(translatedText)
            .setBounds(1, qOptions.scaleMax || 5)
            .setLabels(labels.min || "", labels.max || "")
            .setRequired(true);
        break;
      }

      case "SHORT_ANSWER": {
        form.addTextItem()
            .setTitle(translatedText)
            .setRequired(false);
        break;
      }

      // Extend here for MULTIPLE_CHOICE, CHECKBOX, DROPDOWN etc.
      default:
        Logger.log(`⚠️ Unknown question type "${q.type}" for ${q.id} — skipped.`);
    }
  });

  Logger.log(`✅ Created form: ${form.getEditUrl()}`);
}

// ─── HELPER: GET TRANSLATION FOR A QUESTION ───────────────────────────────

function getTranslation(question, languageName) {
  switch (languageName) {
    case "Spanish": return question.es;
    case "French":  return question.fr;
    case "German":  return question.de;
    default:        return question.en; // fallback to English
  }
}- At the top of the script, update the SPREADSHEET_ID value with your own Sheet’s ID.
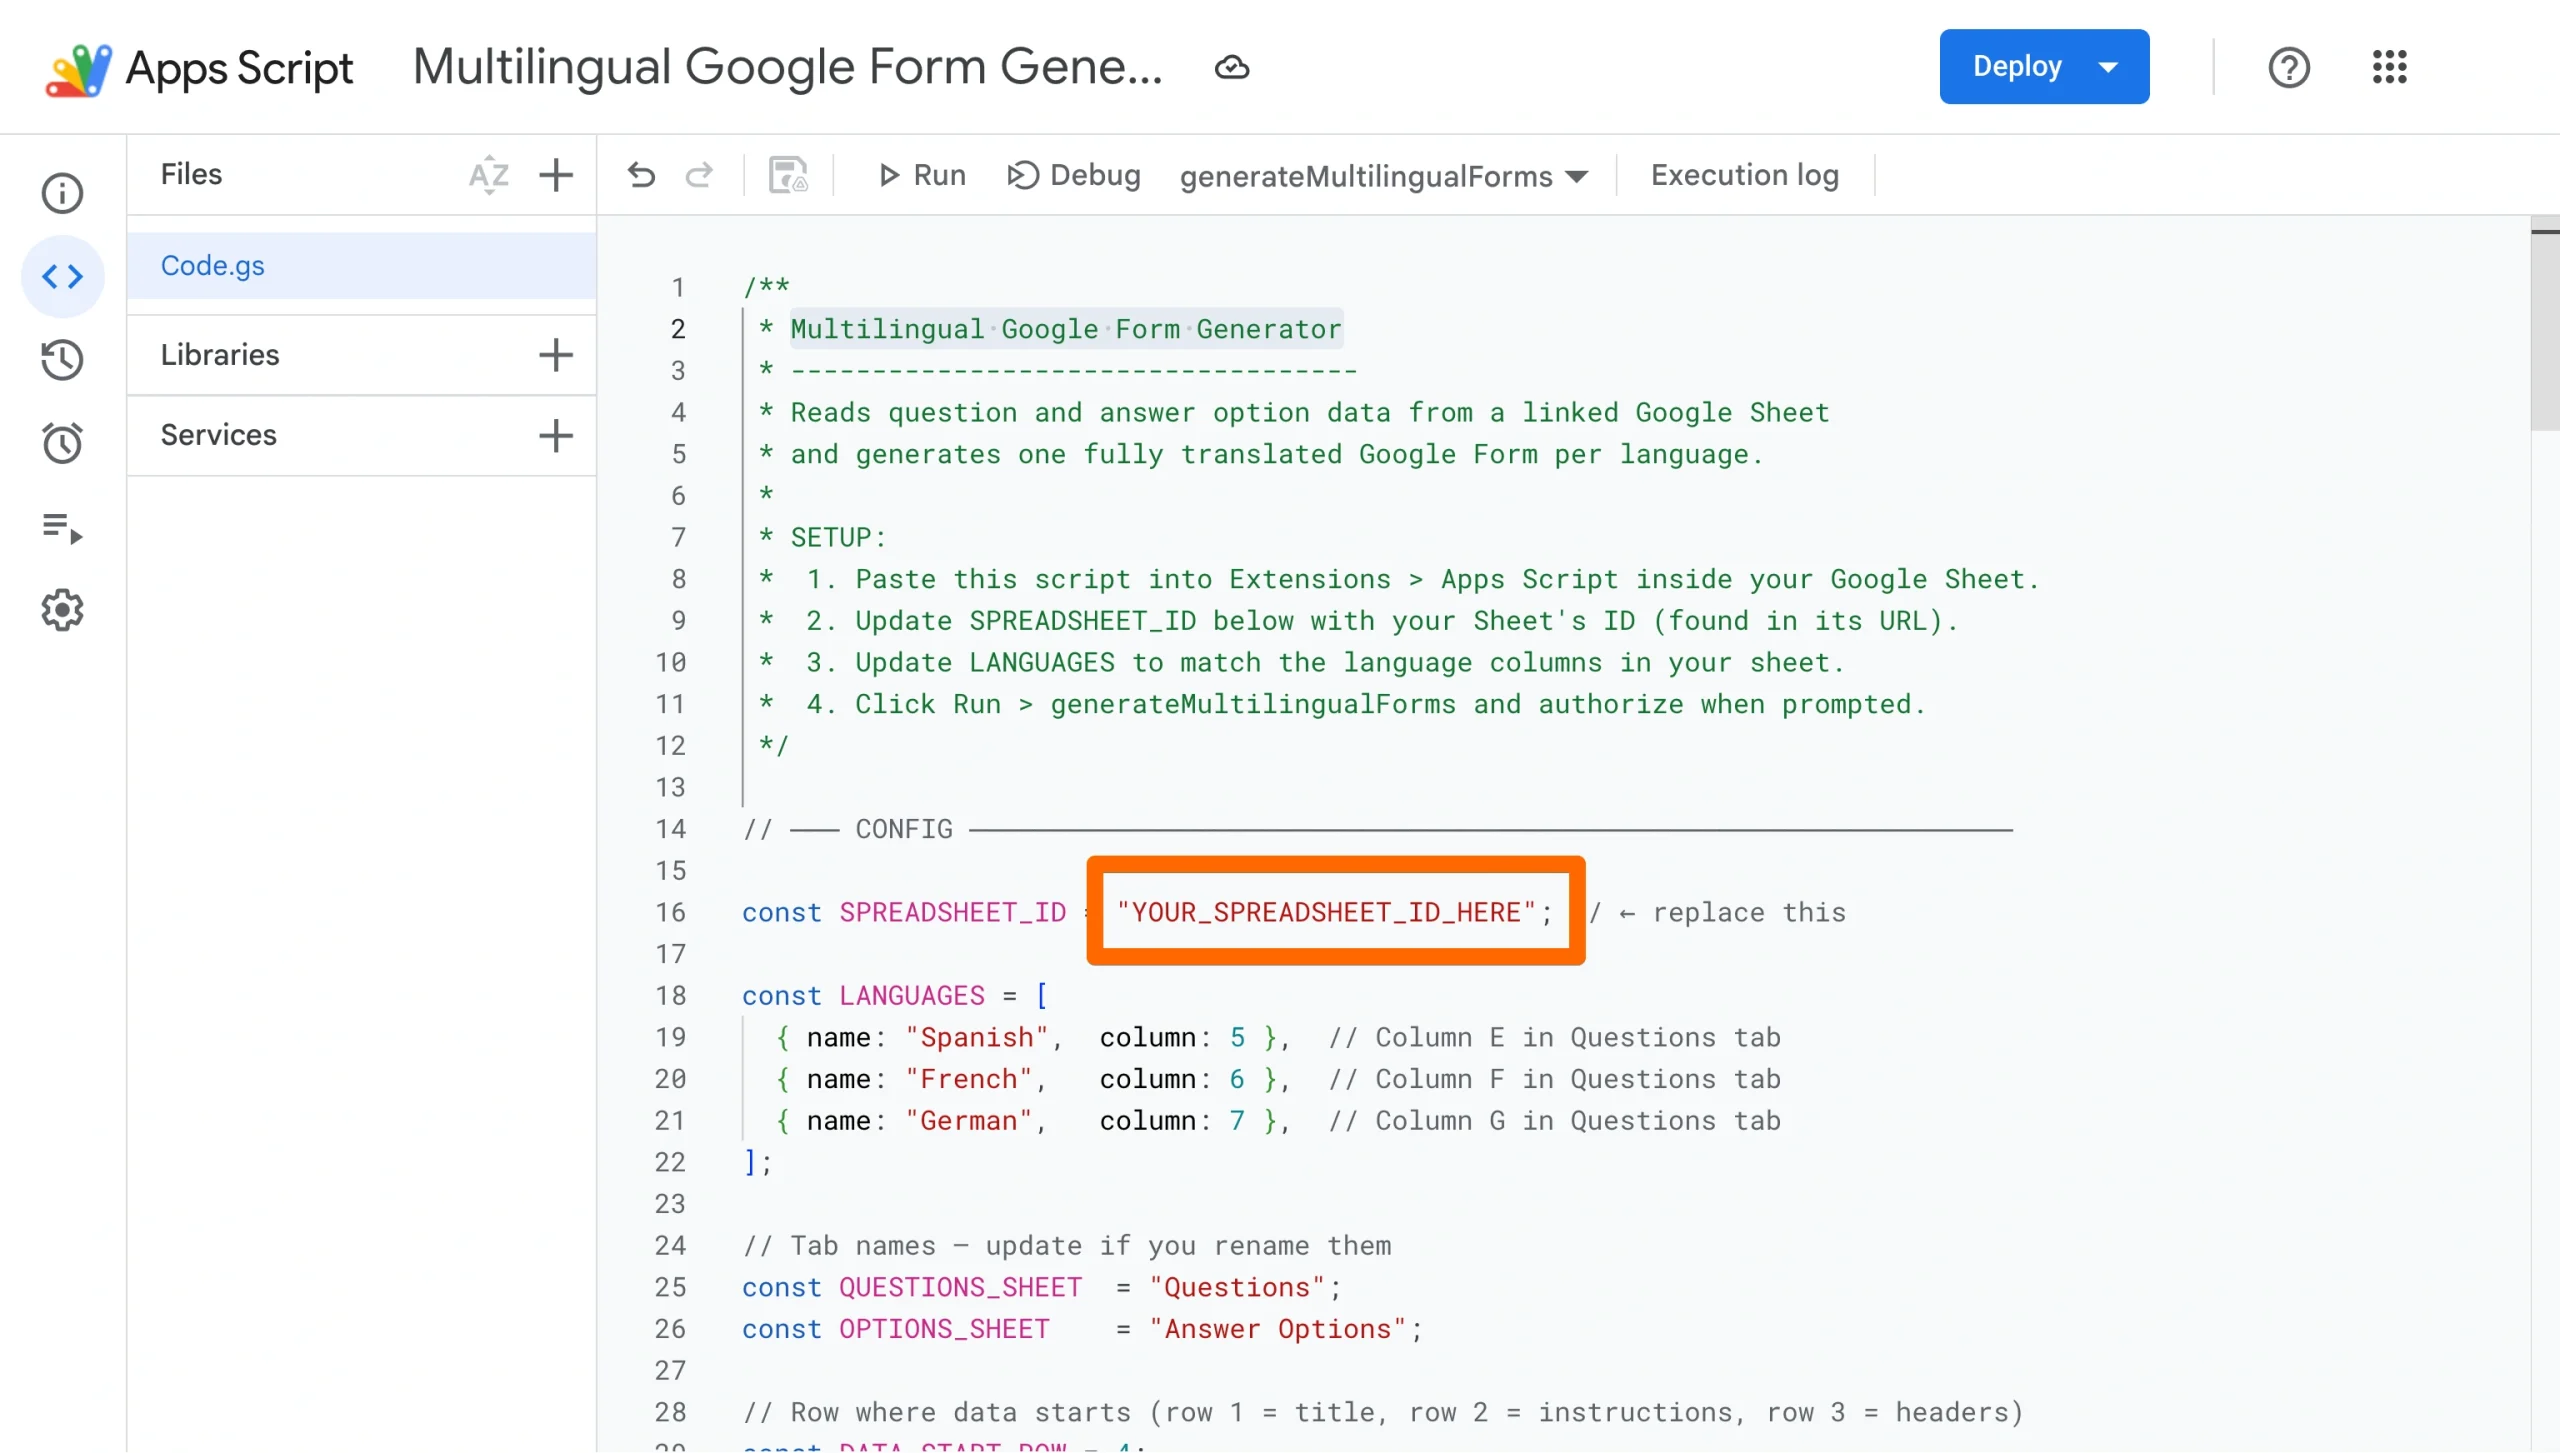
You’ll find this in the URL of your spreadsheet. It’s the long string of characters between /d/ and /edit.

- Click Save, then click Run. When prompted, grant the permissions the script needs to access Google Forms and Google Drive.
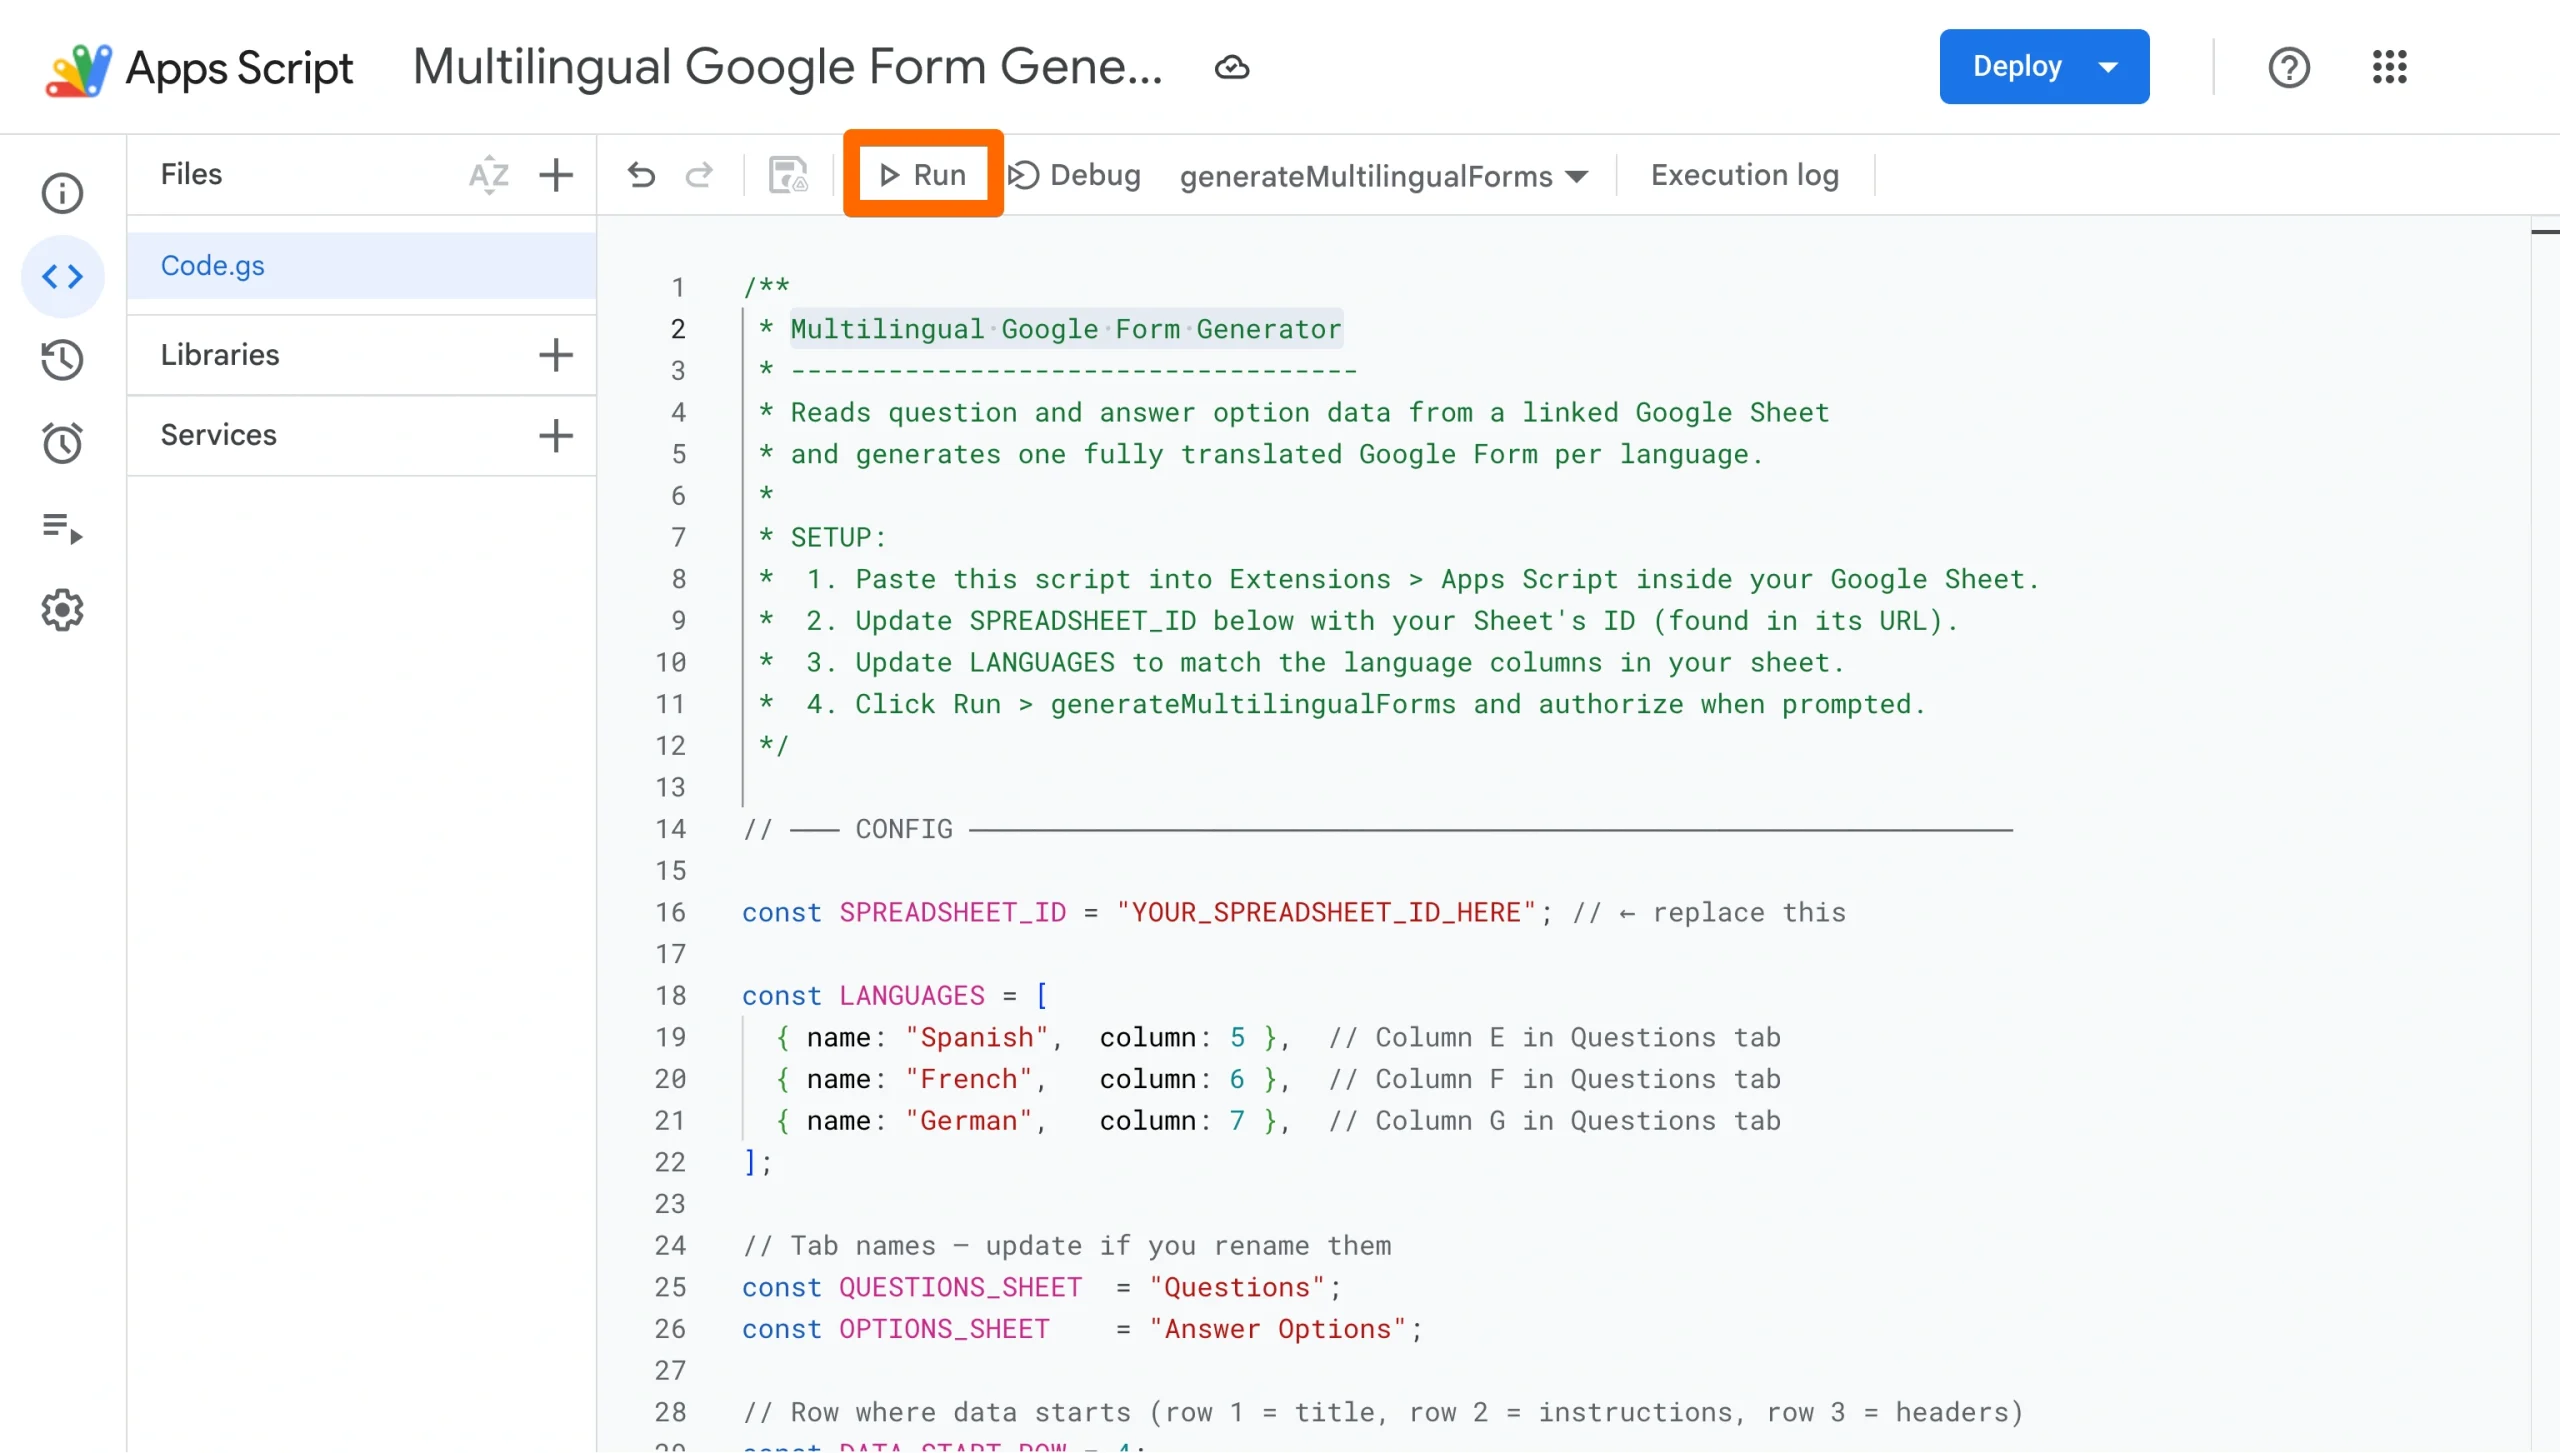
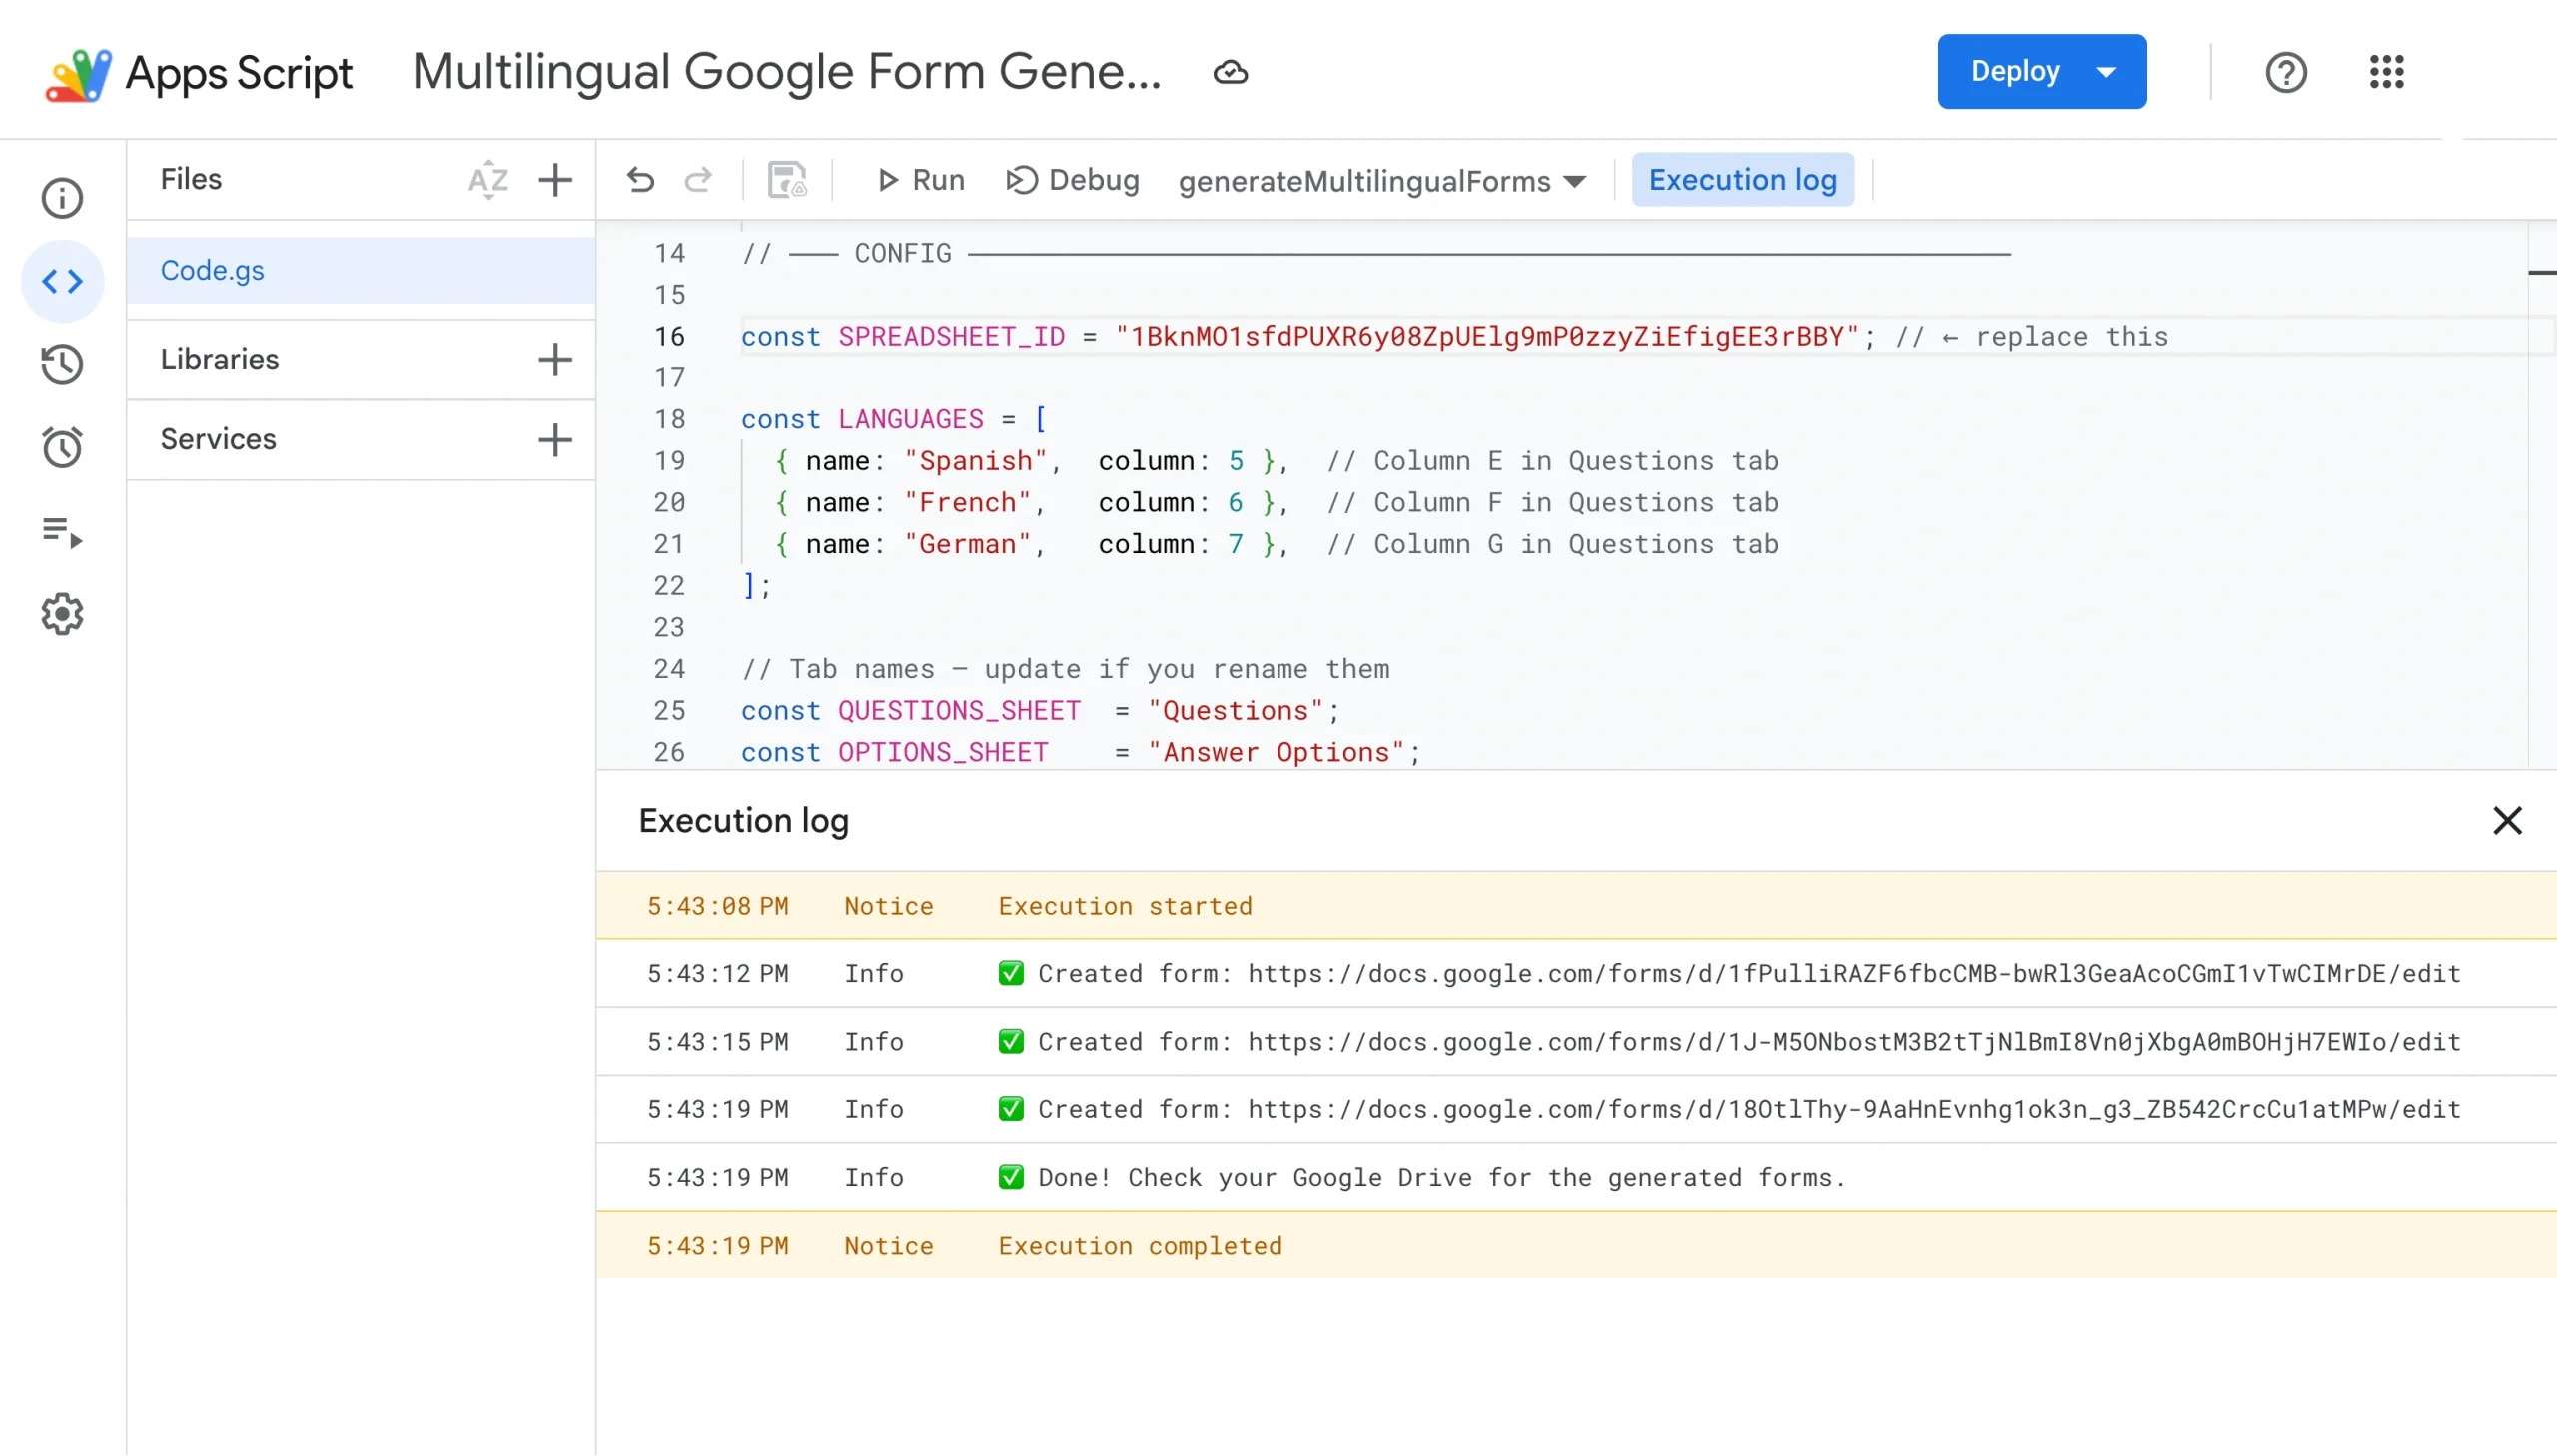
- As soon as the script starts running, an execution log will run at the bottom of the page. Wait until it confirms completion.
- Open Google Forms. You’ll find one newly generated form for each language, fully built with your translated questions and scale labels, ready to review and share.
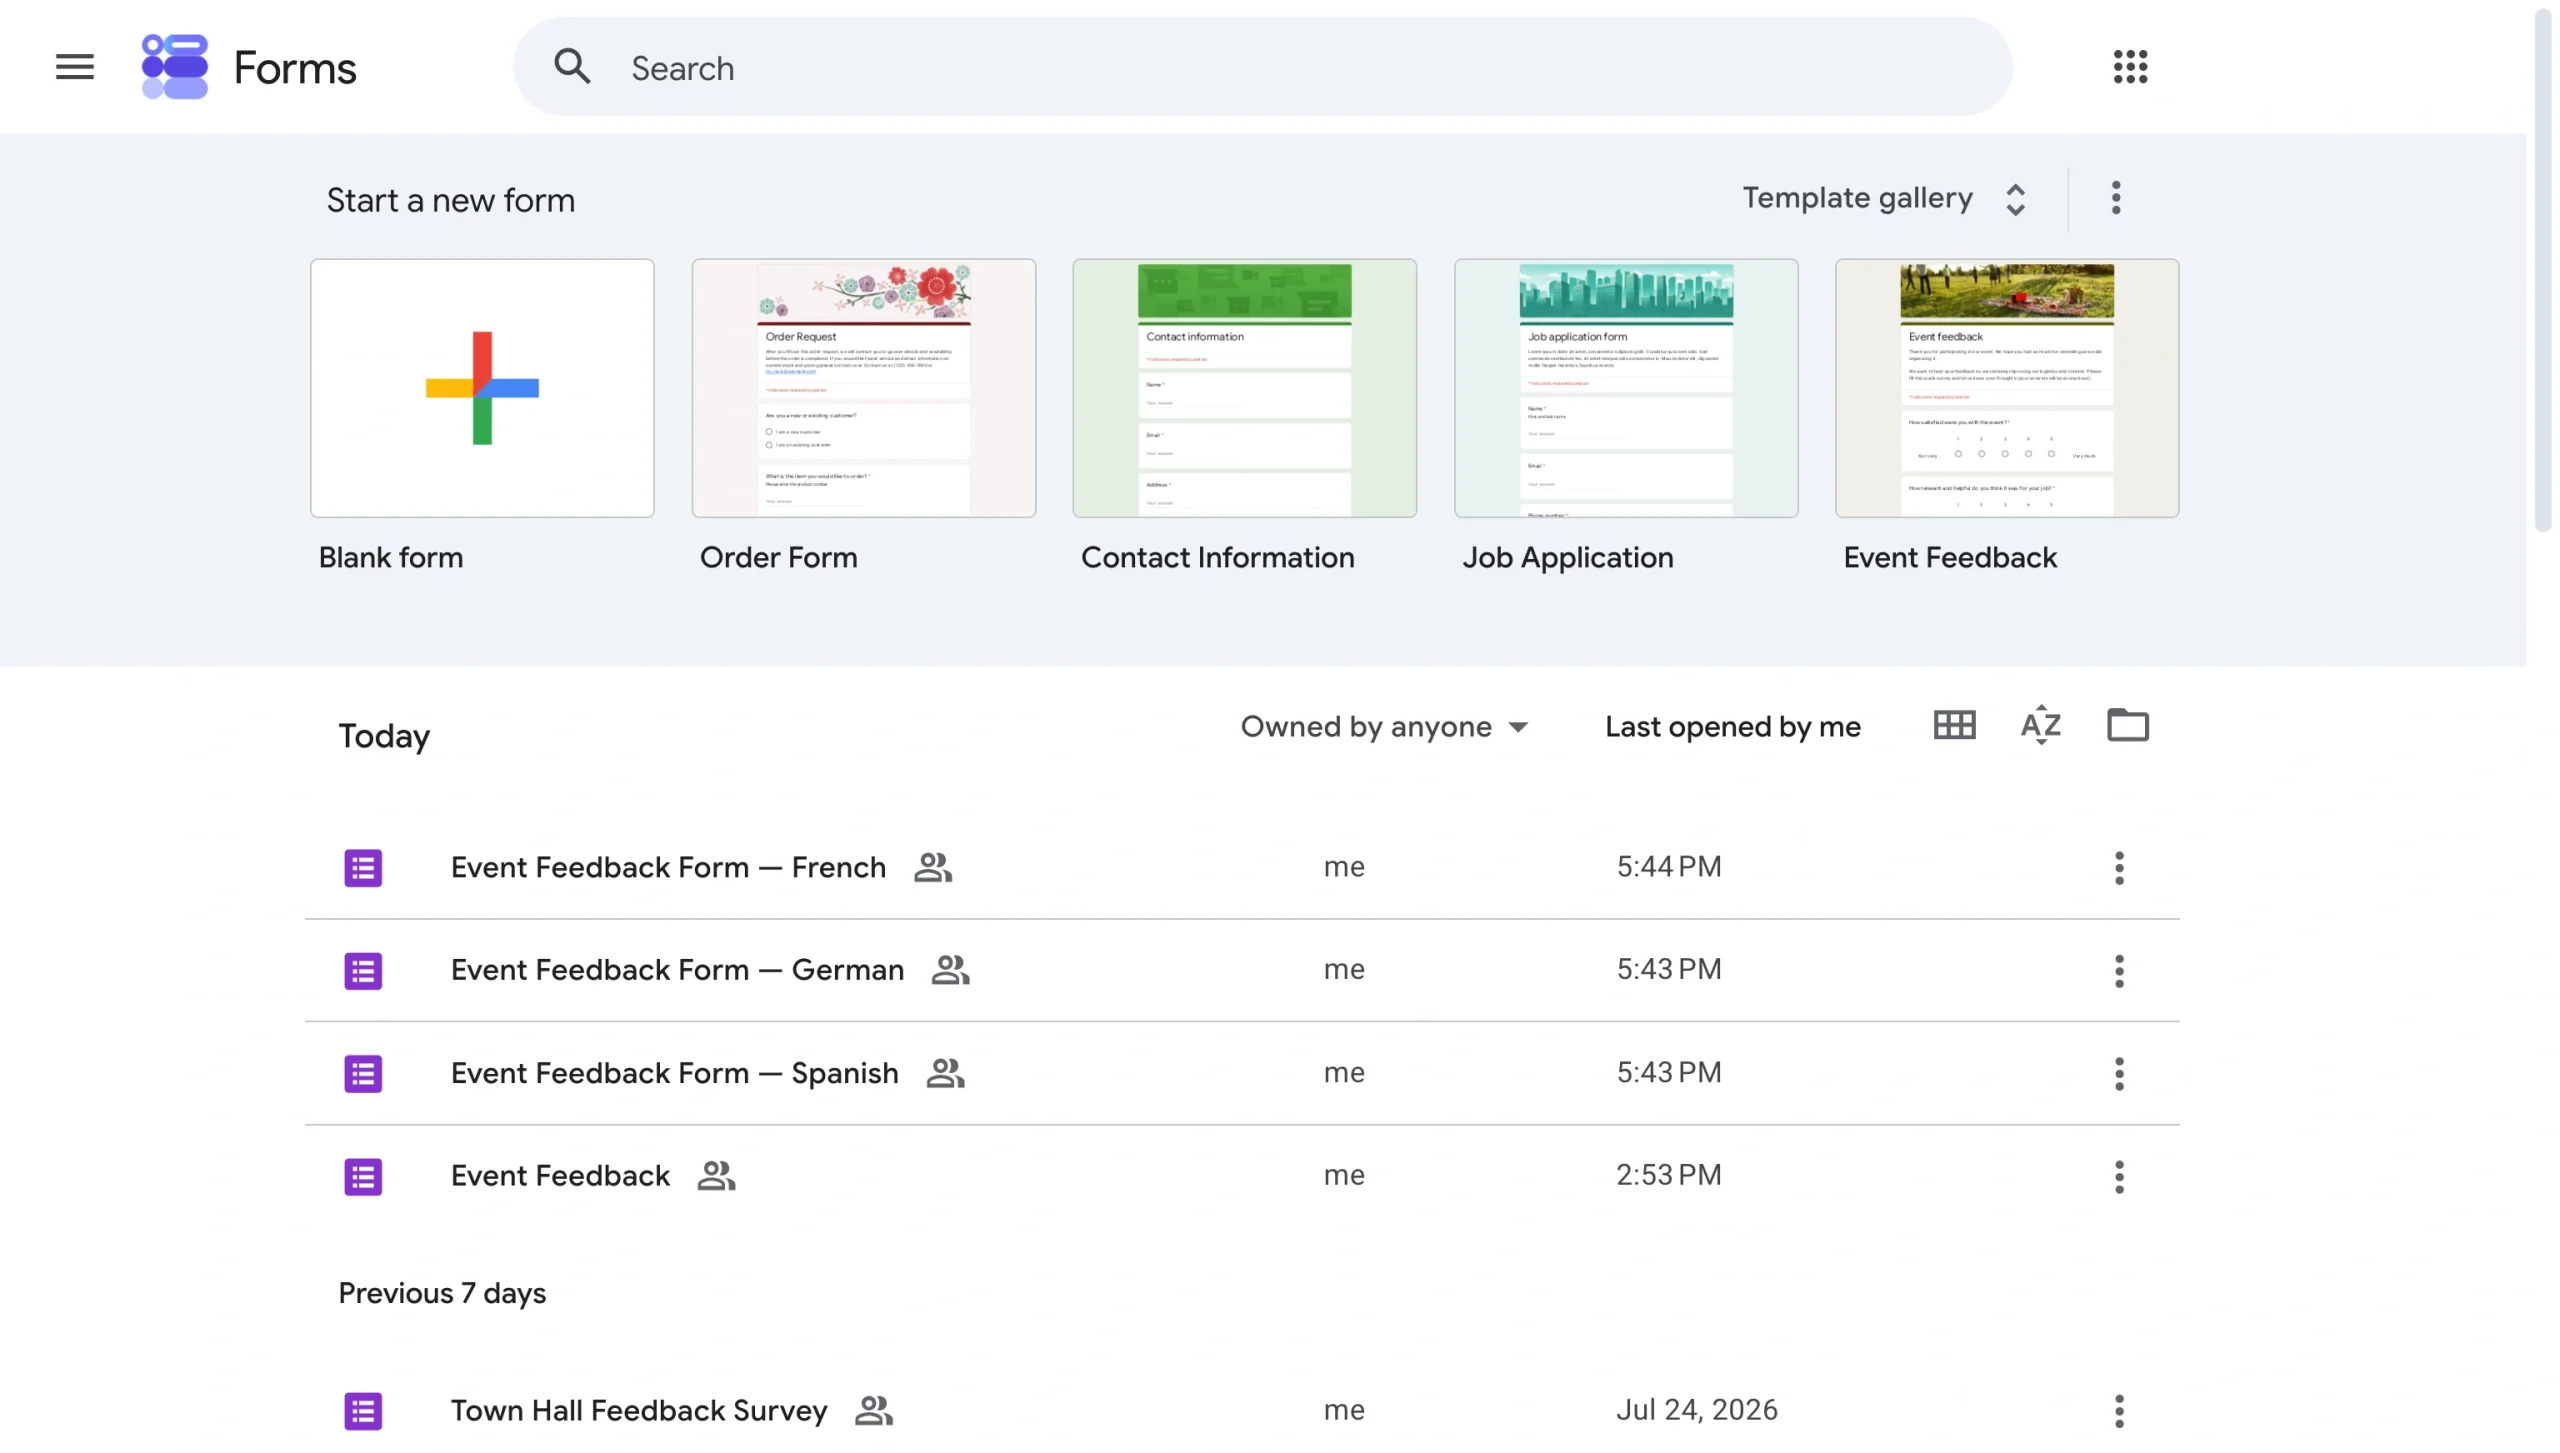
Important note: This method creates one separate Google Form for each language, so you’ll need to manage and combine responses from multiple forms afterward.
Build multilingual forms in Jotform — no workarounds needed
If the Google Forms workarounds above feel like more effort than they’re worth, there’s a better solution in Jotform.
As a Google Forms alternative, Jotform has multilingual support built directly into its form builder — no add-ons, no scripts, and no duplicate forms to manage. Jotform’s translation feature supports over 130 languages, and the whole setup takes just a few clicks.
- Pros: Incredibly easy and fast to create multi-language forms, and the user experience is excellent. For example, Jotform can detect the respondent’s browser language and display the form in that language automatically, and you can send different autoresponder emails depending on which language the respondent used, so a Spanish respondent gets a reply in Spanish.
- Cons: You may hit the ceiling of what’s free on Jotform. You can create five forms for free; after that, you need to choose a suitable package.
Here’s how to use Jotform to create multilingual forms:
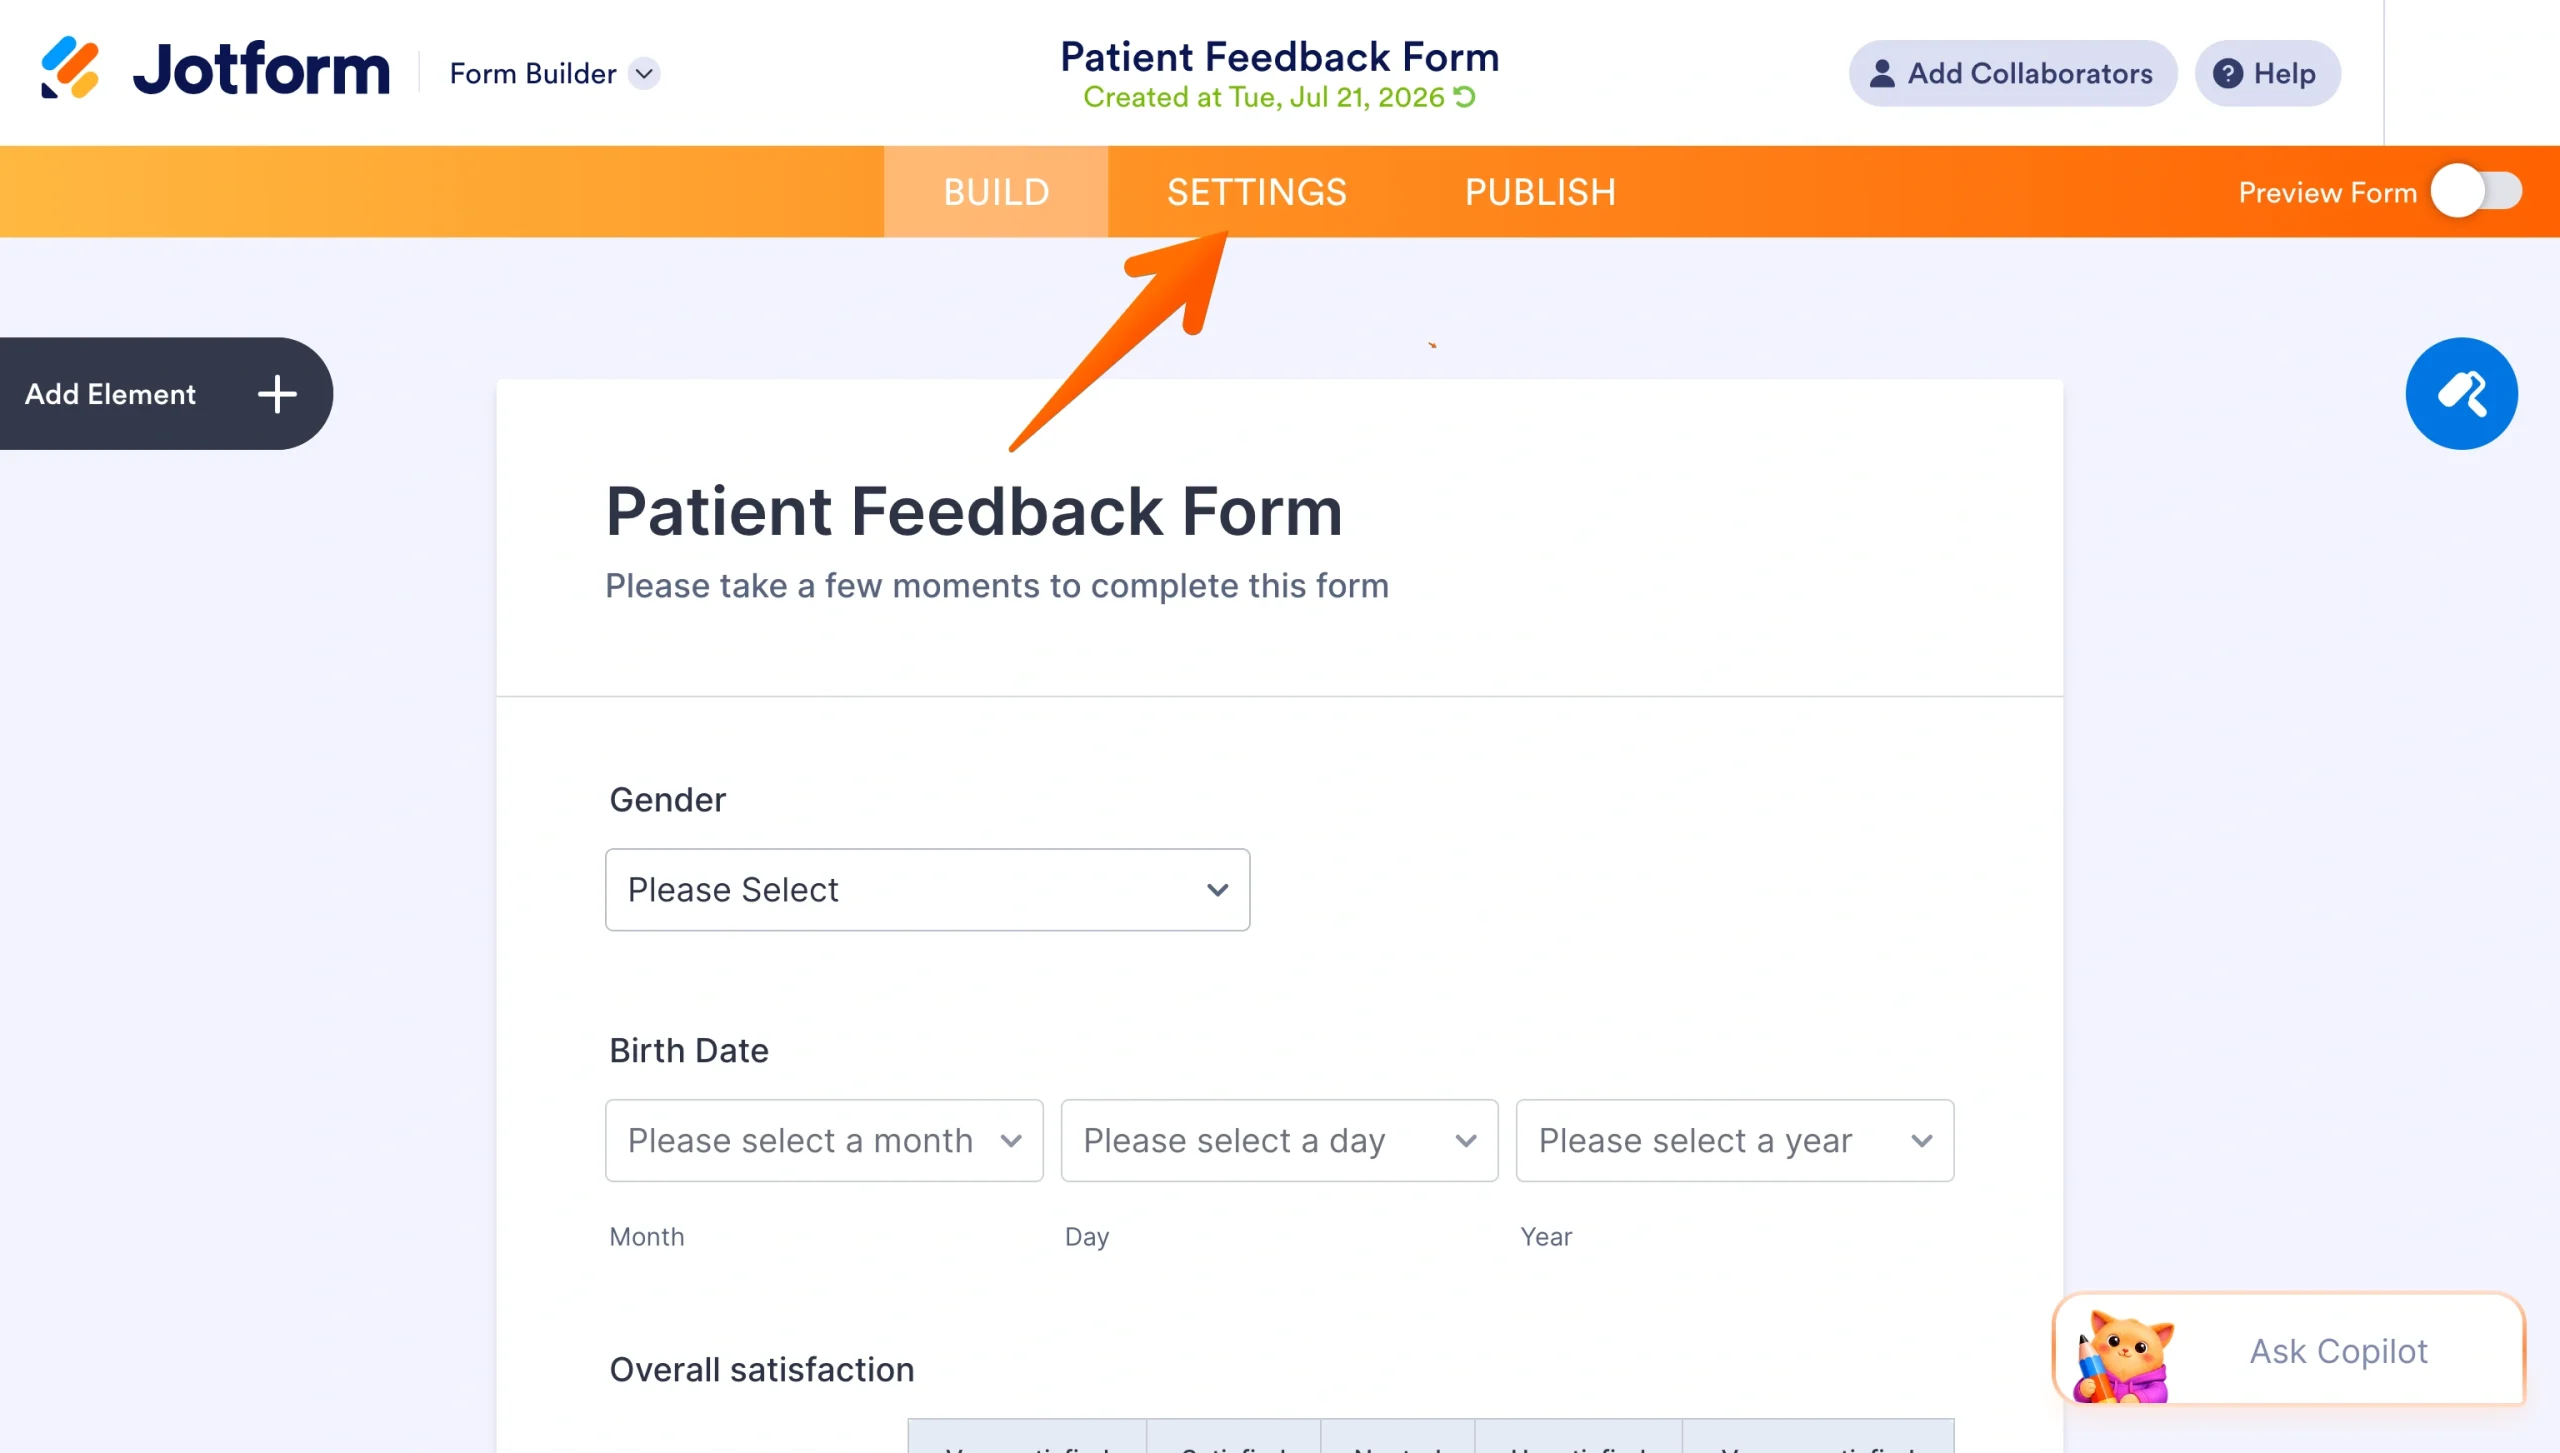
- Open your form in Jotform’s Form Builder and click Settings in the orange navigation bar at the top of the page.
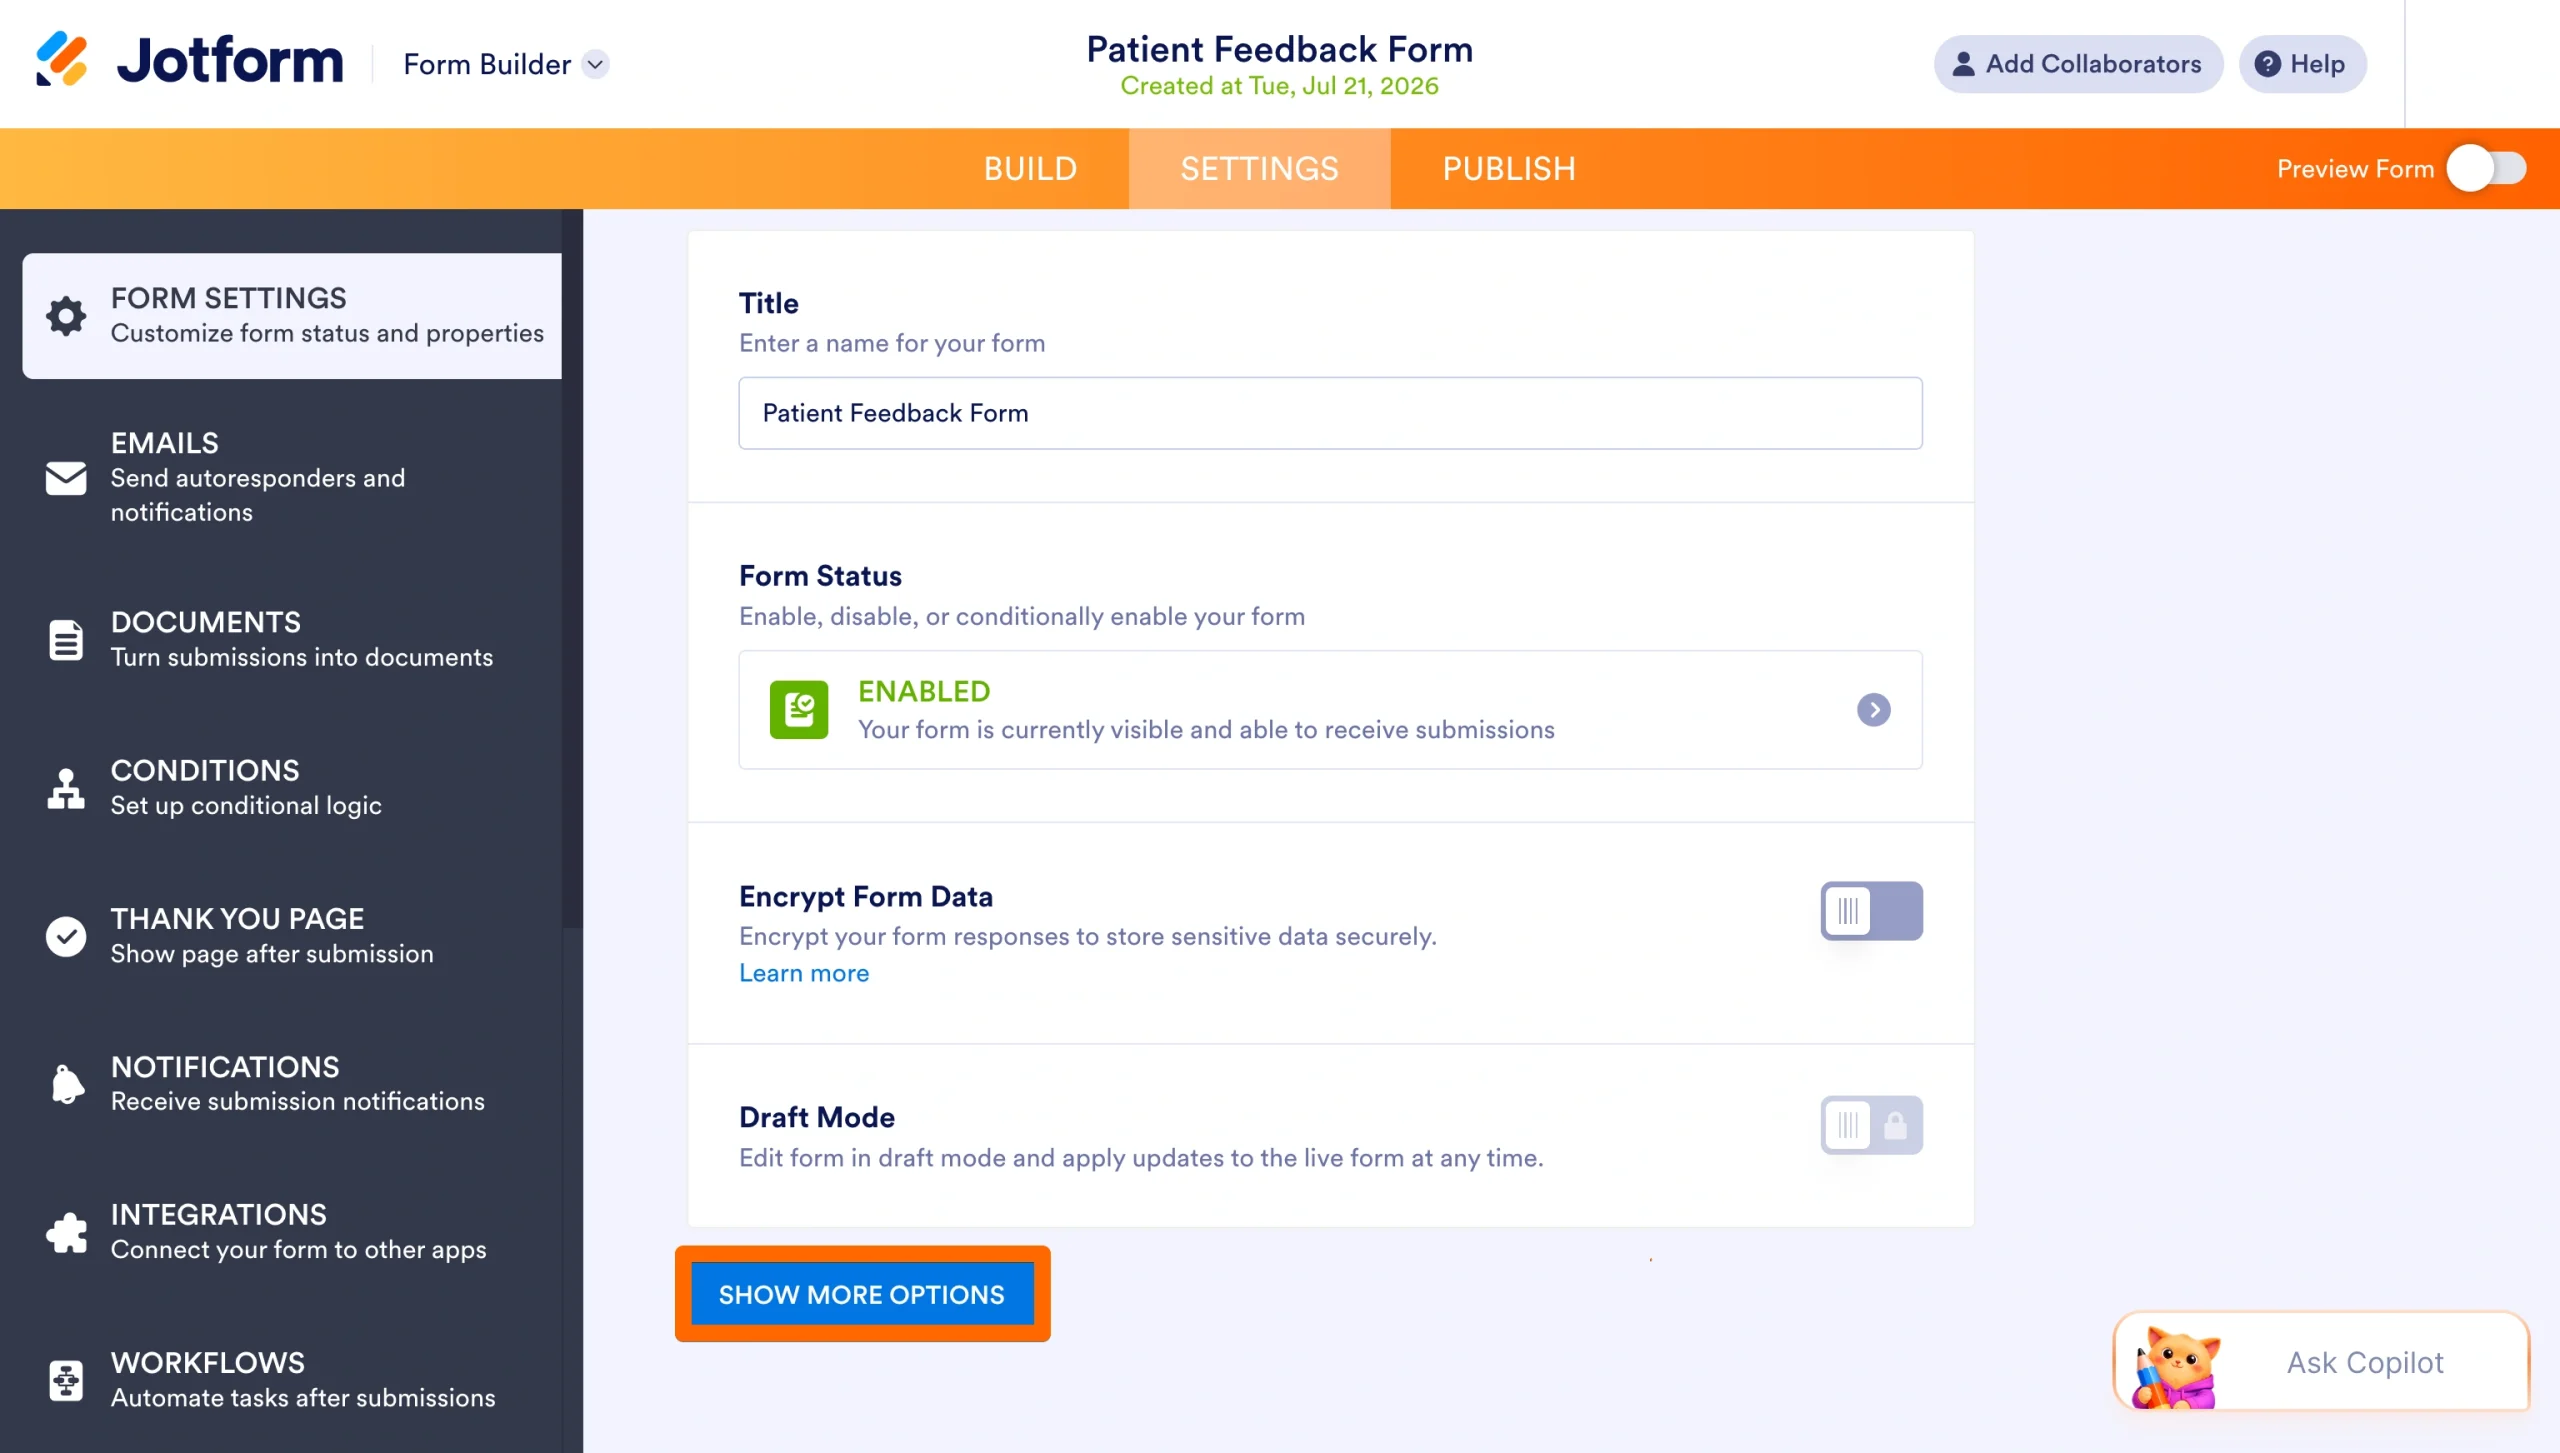
- In the Form Settings panel, click Show More Options.
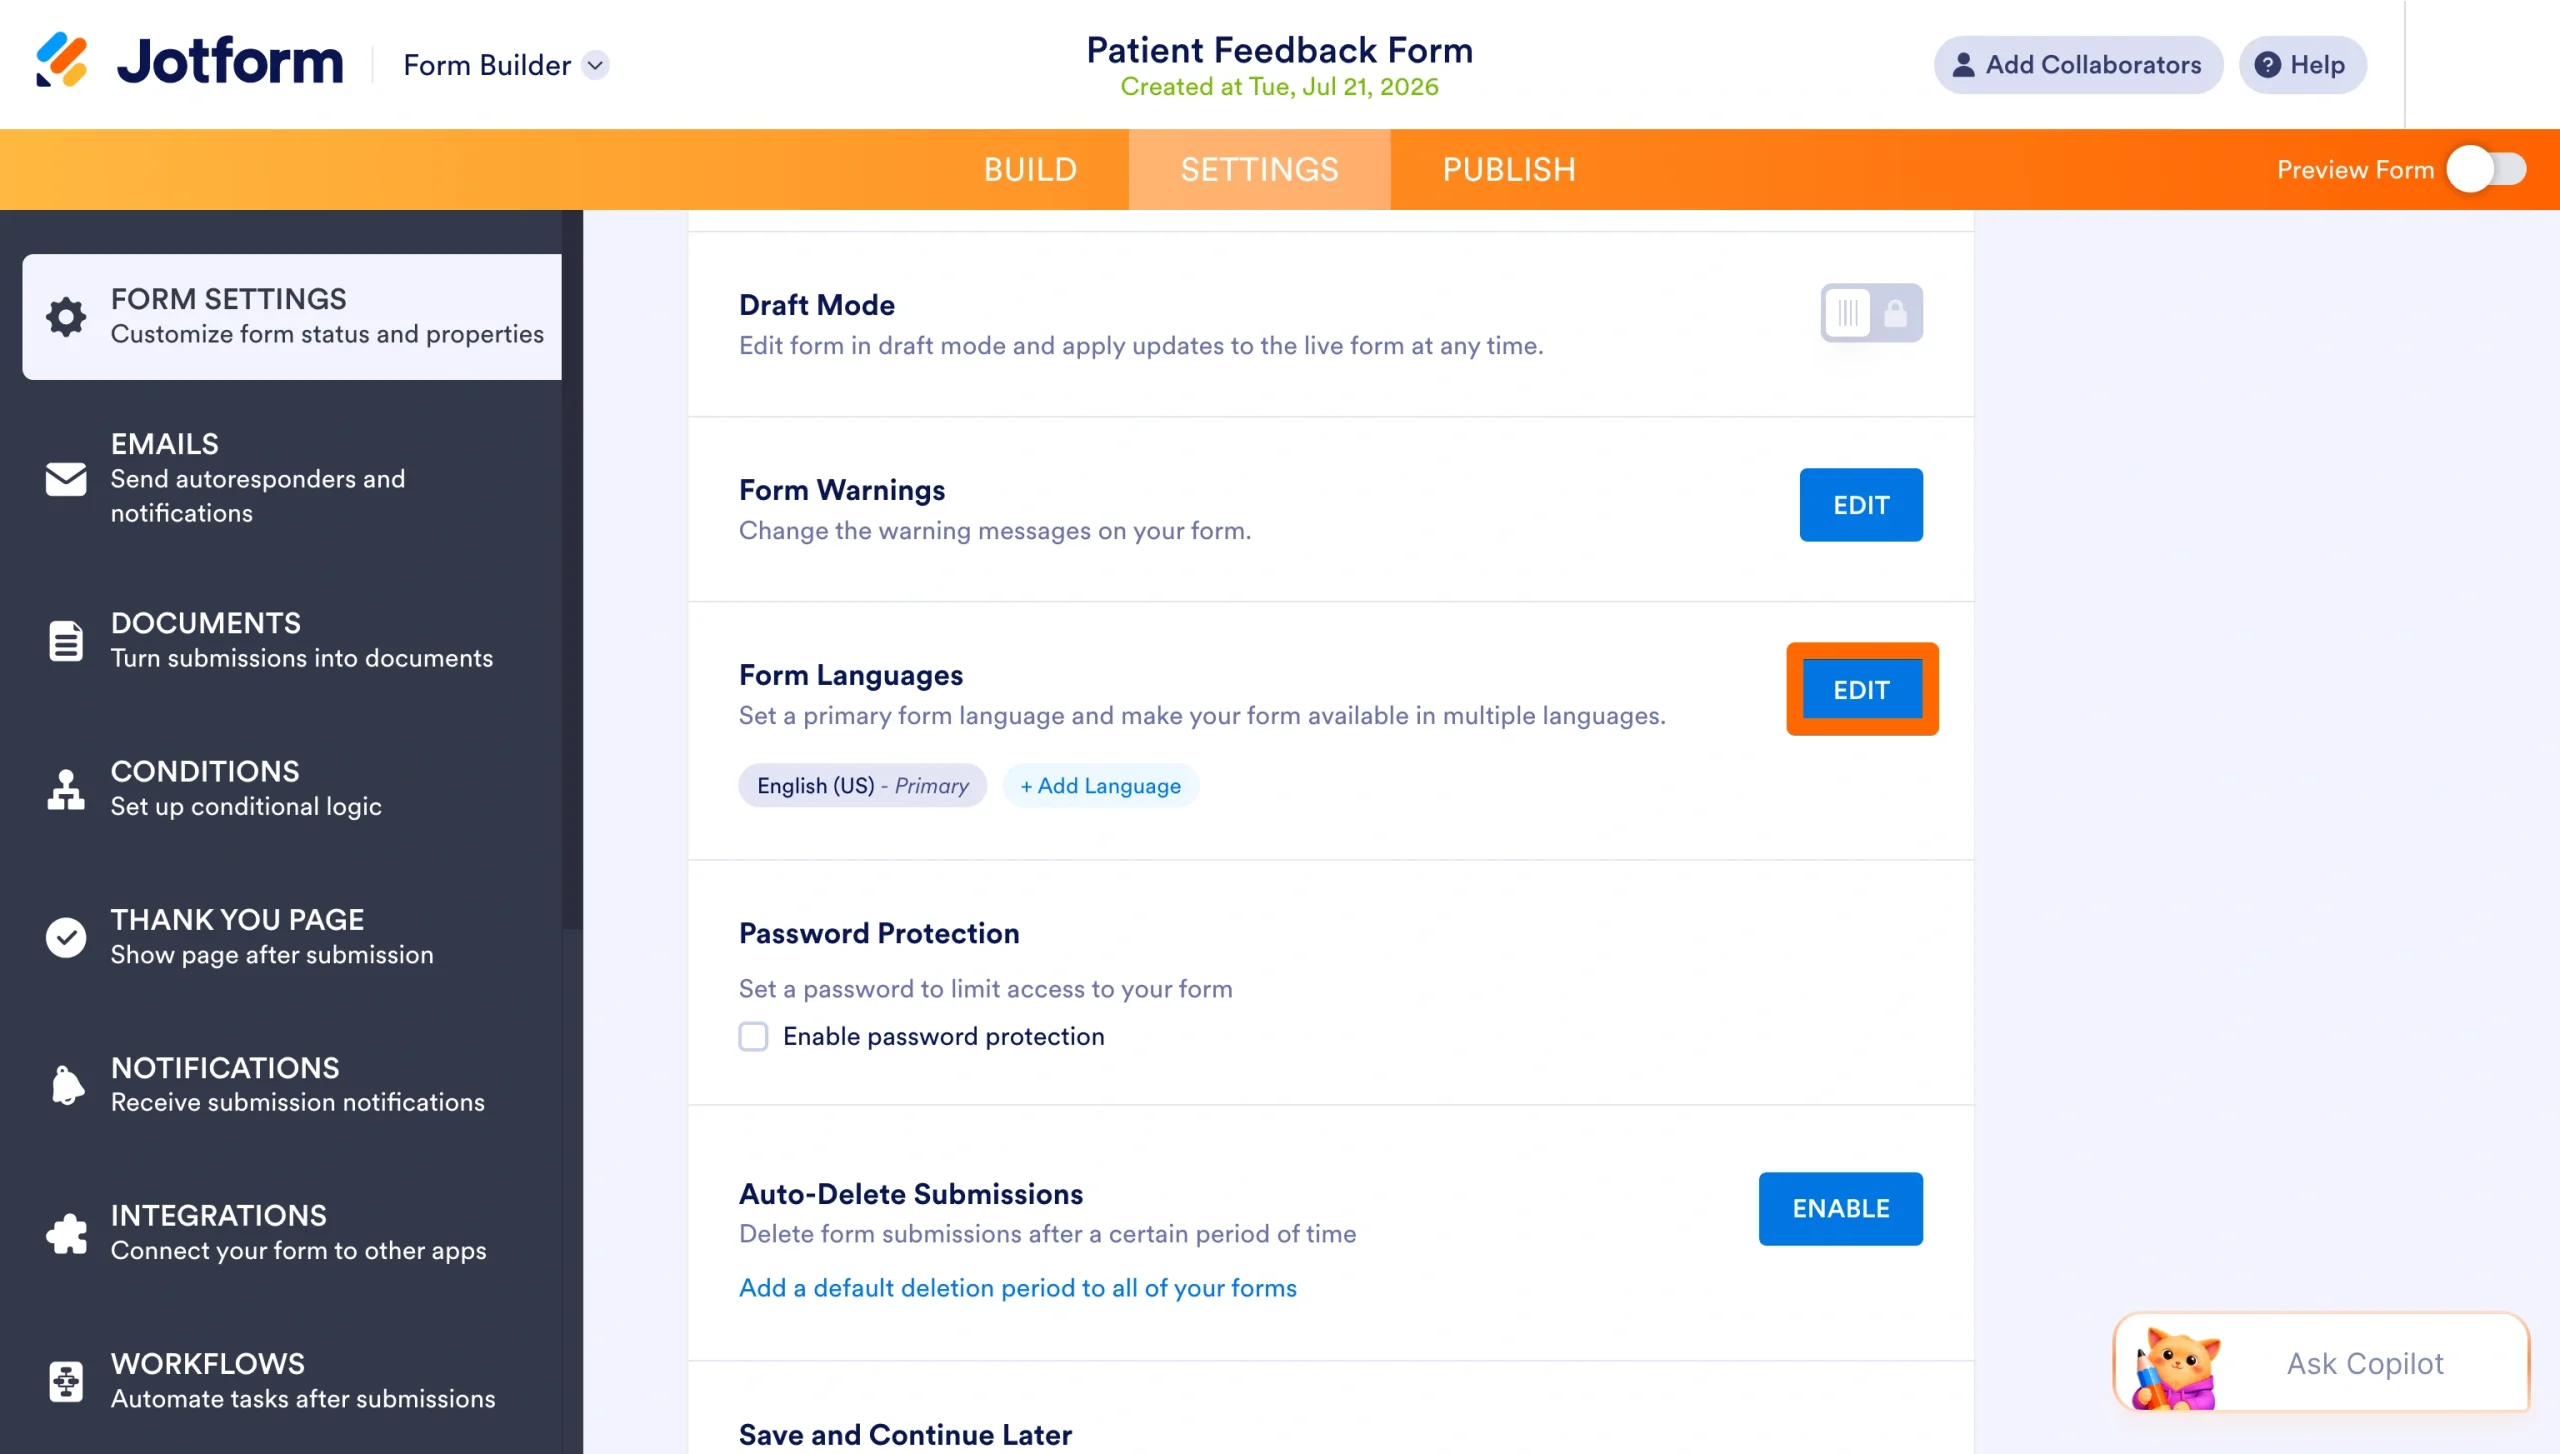
- Scroll down to the Form Languages section and select Edit. Choose your form’s default language from the dropdown.
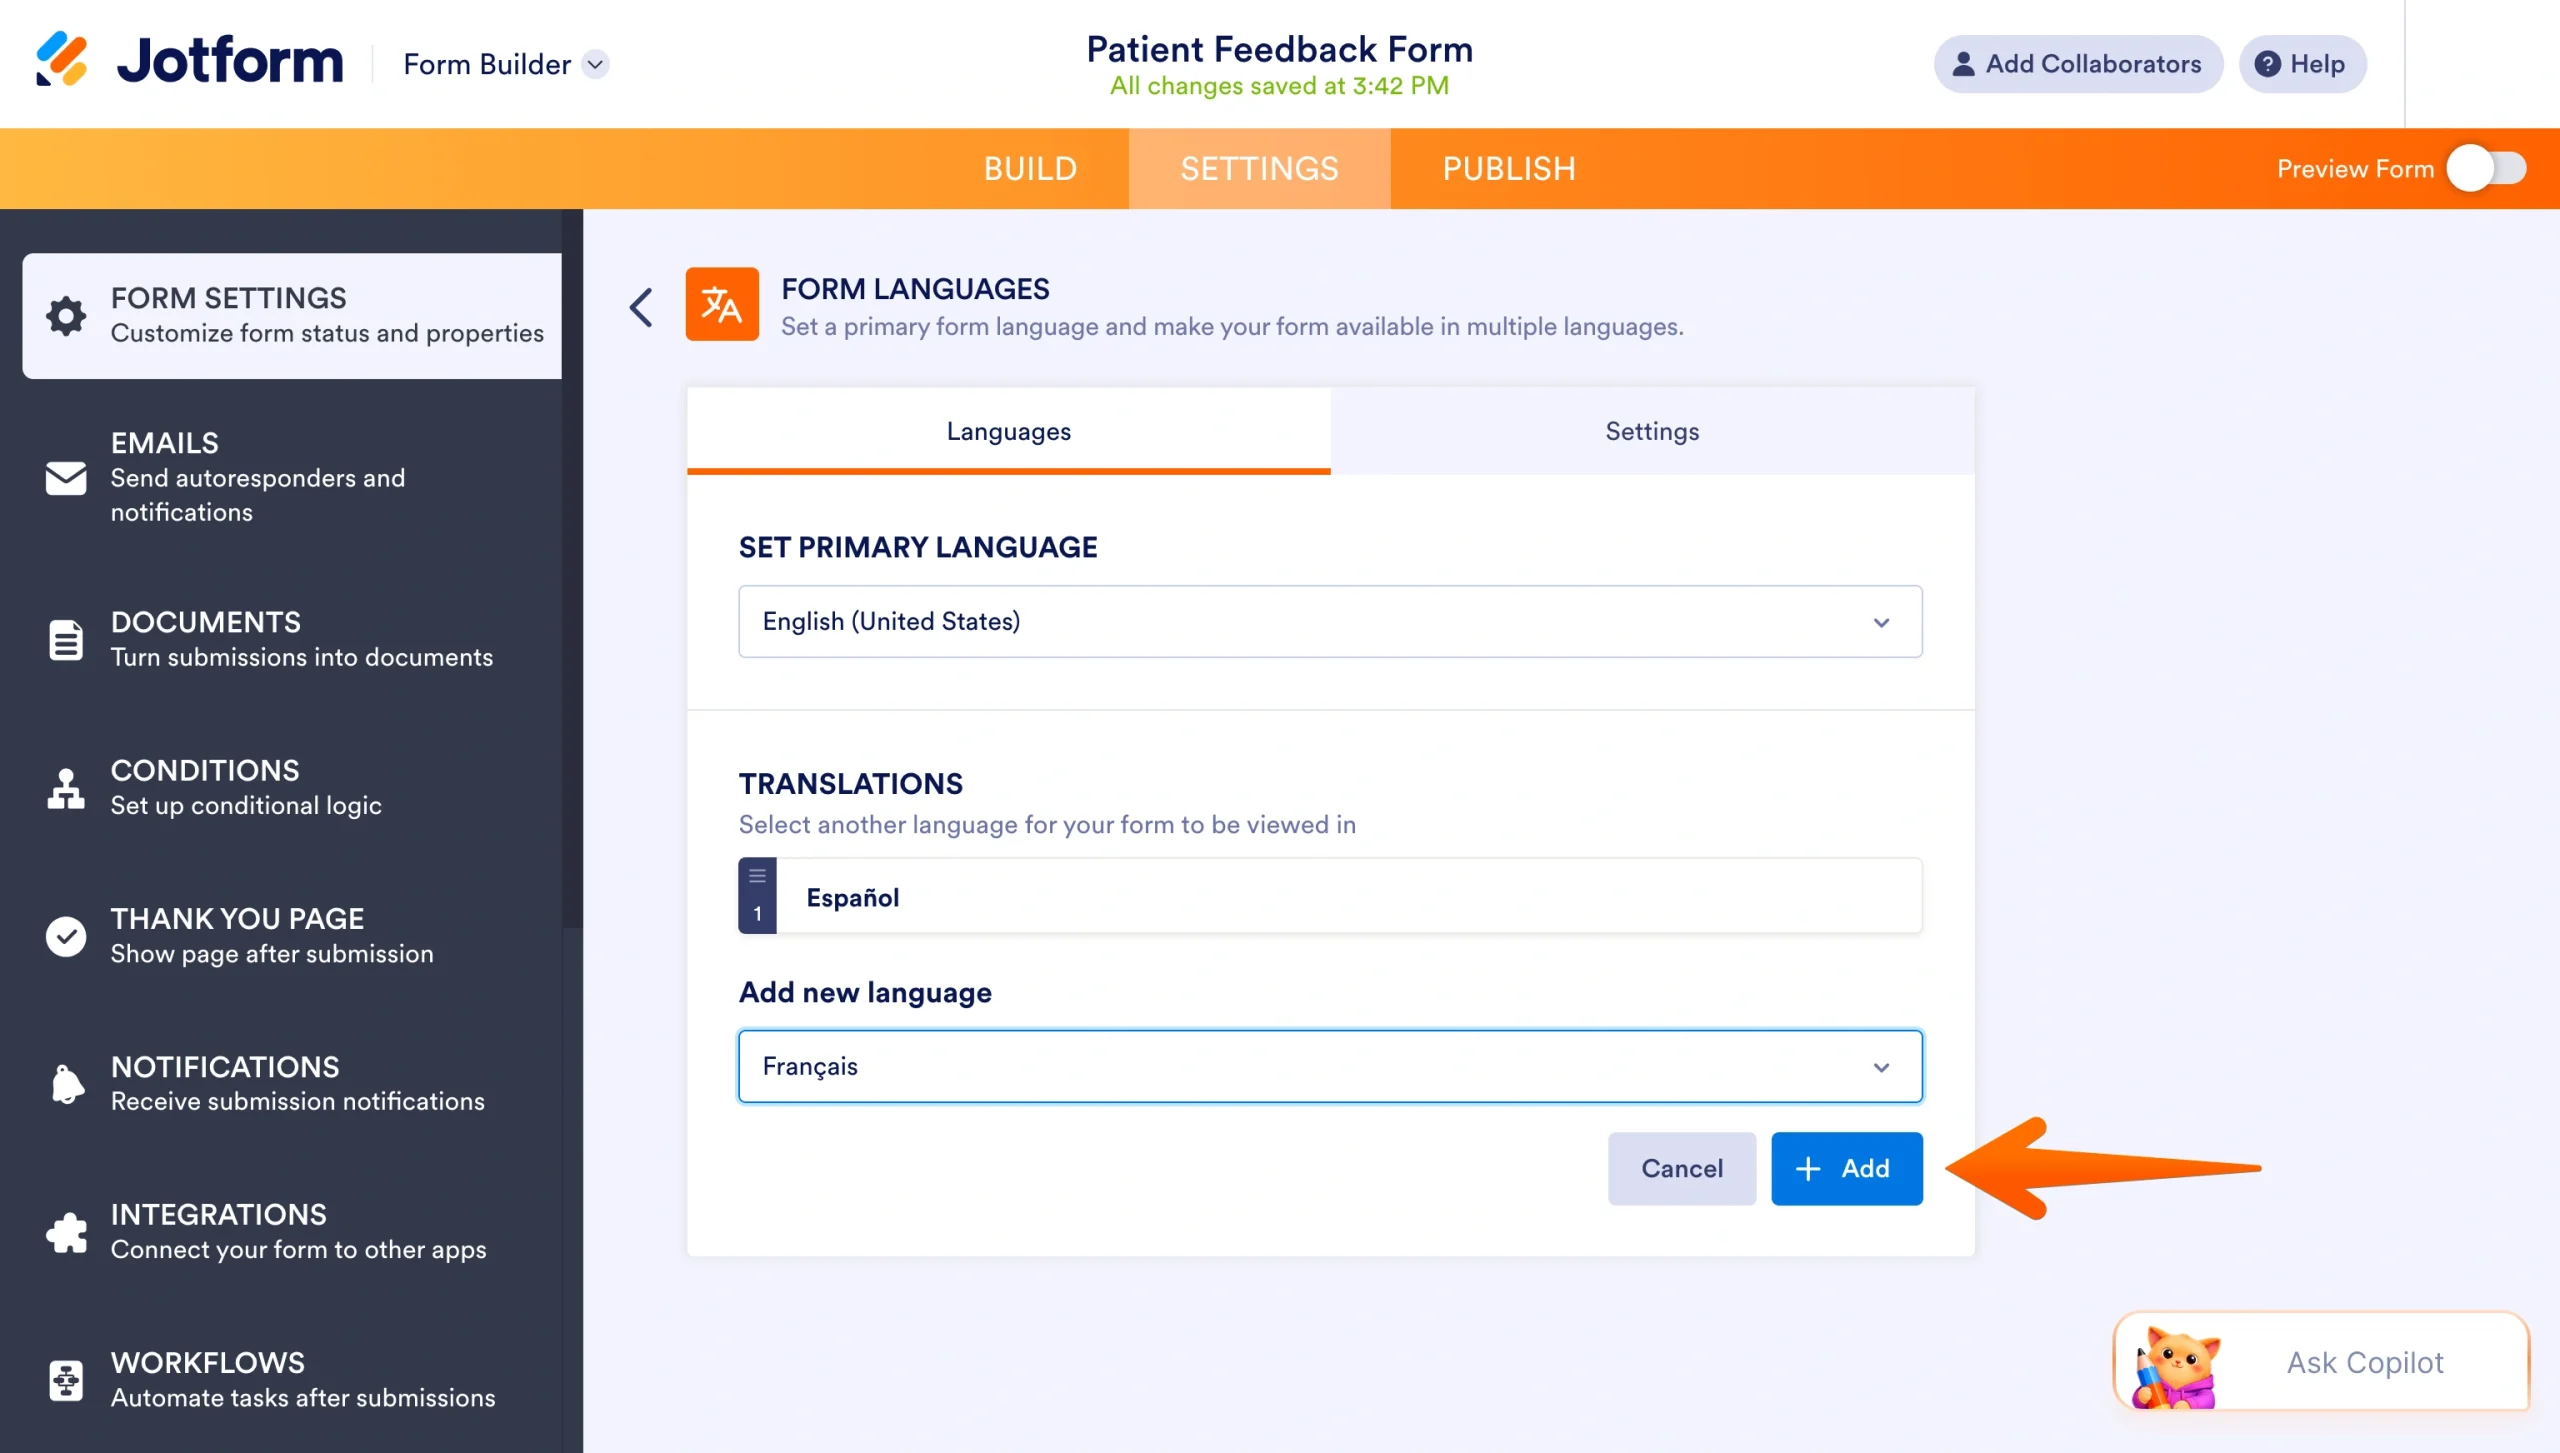
- Next to Translations, click Edit and then click Add Language. Use the search bar or browse the dropdown to find the language you want to add, then click Add.
- Review the translations across the Field Translations and Form Warnings tabs. Jotform will auto-populate many fields, so check and customize anything that needs adjusting. Changes are saved automatically.
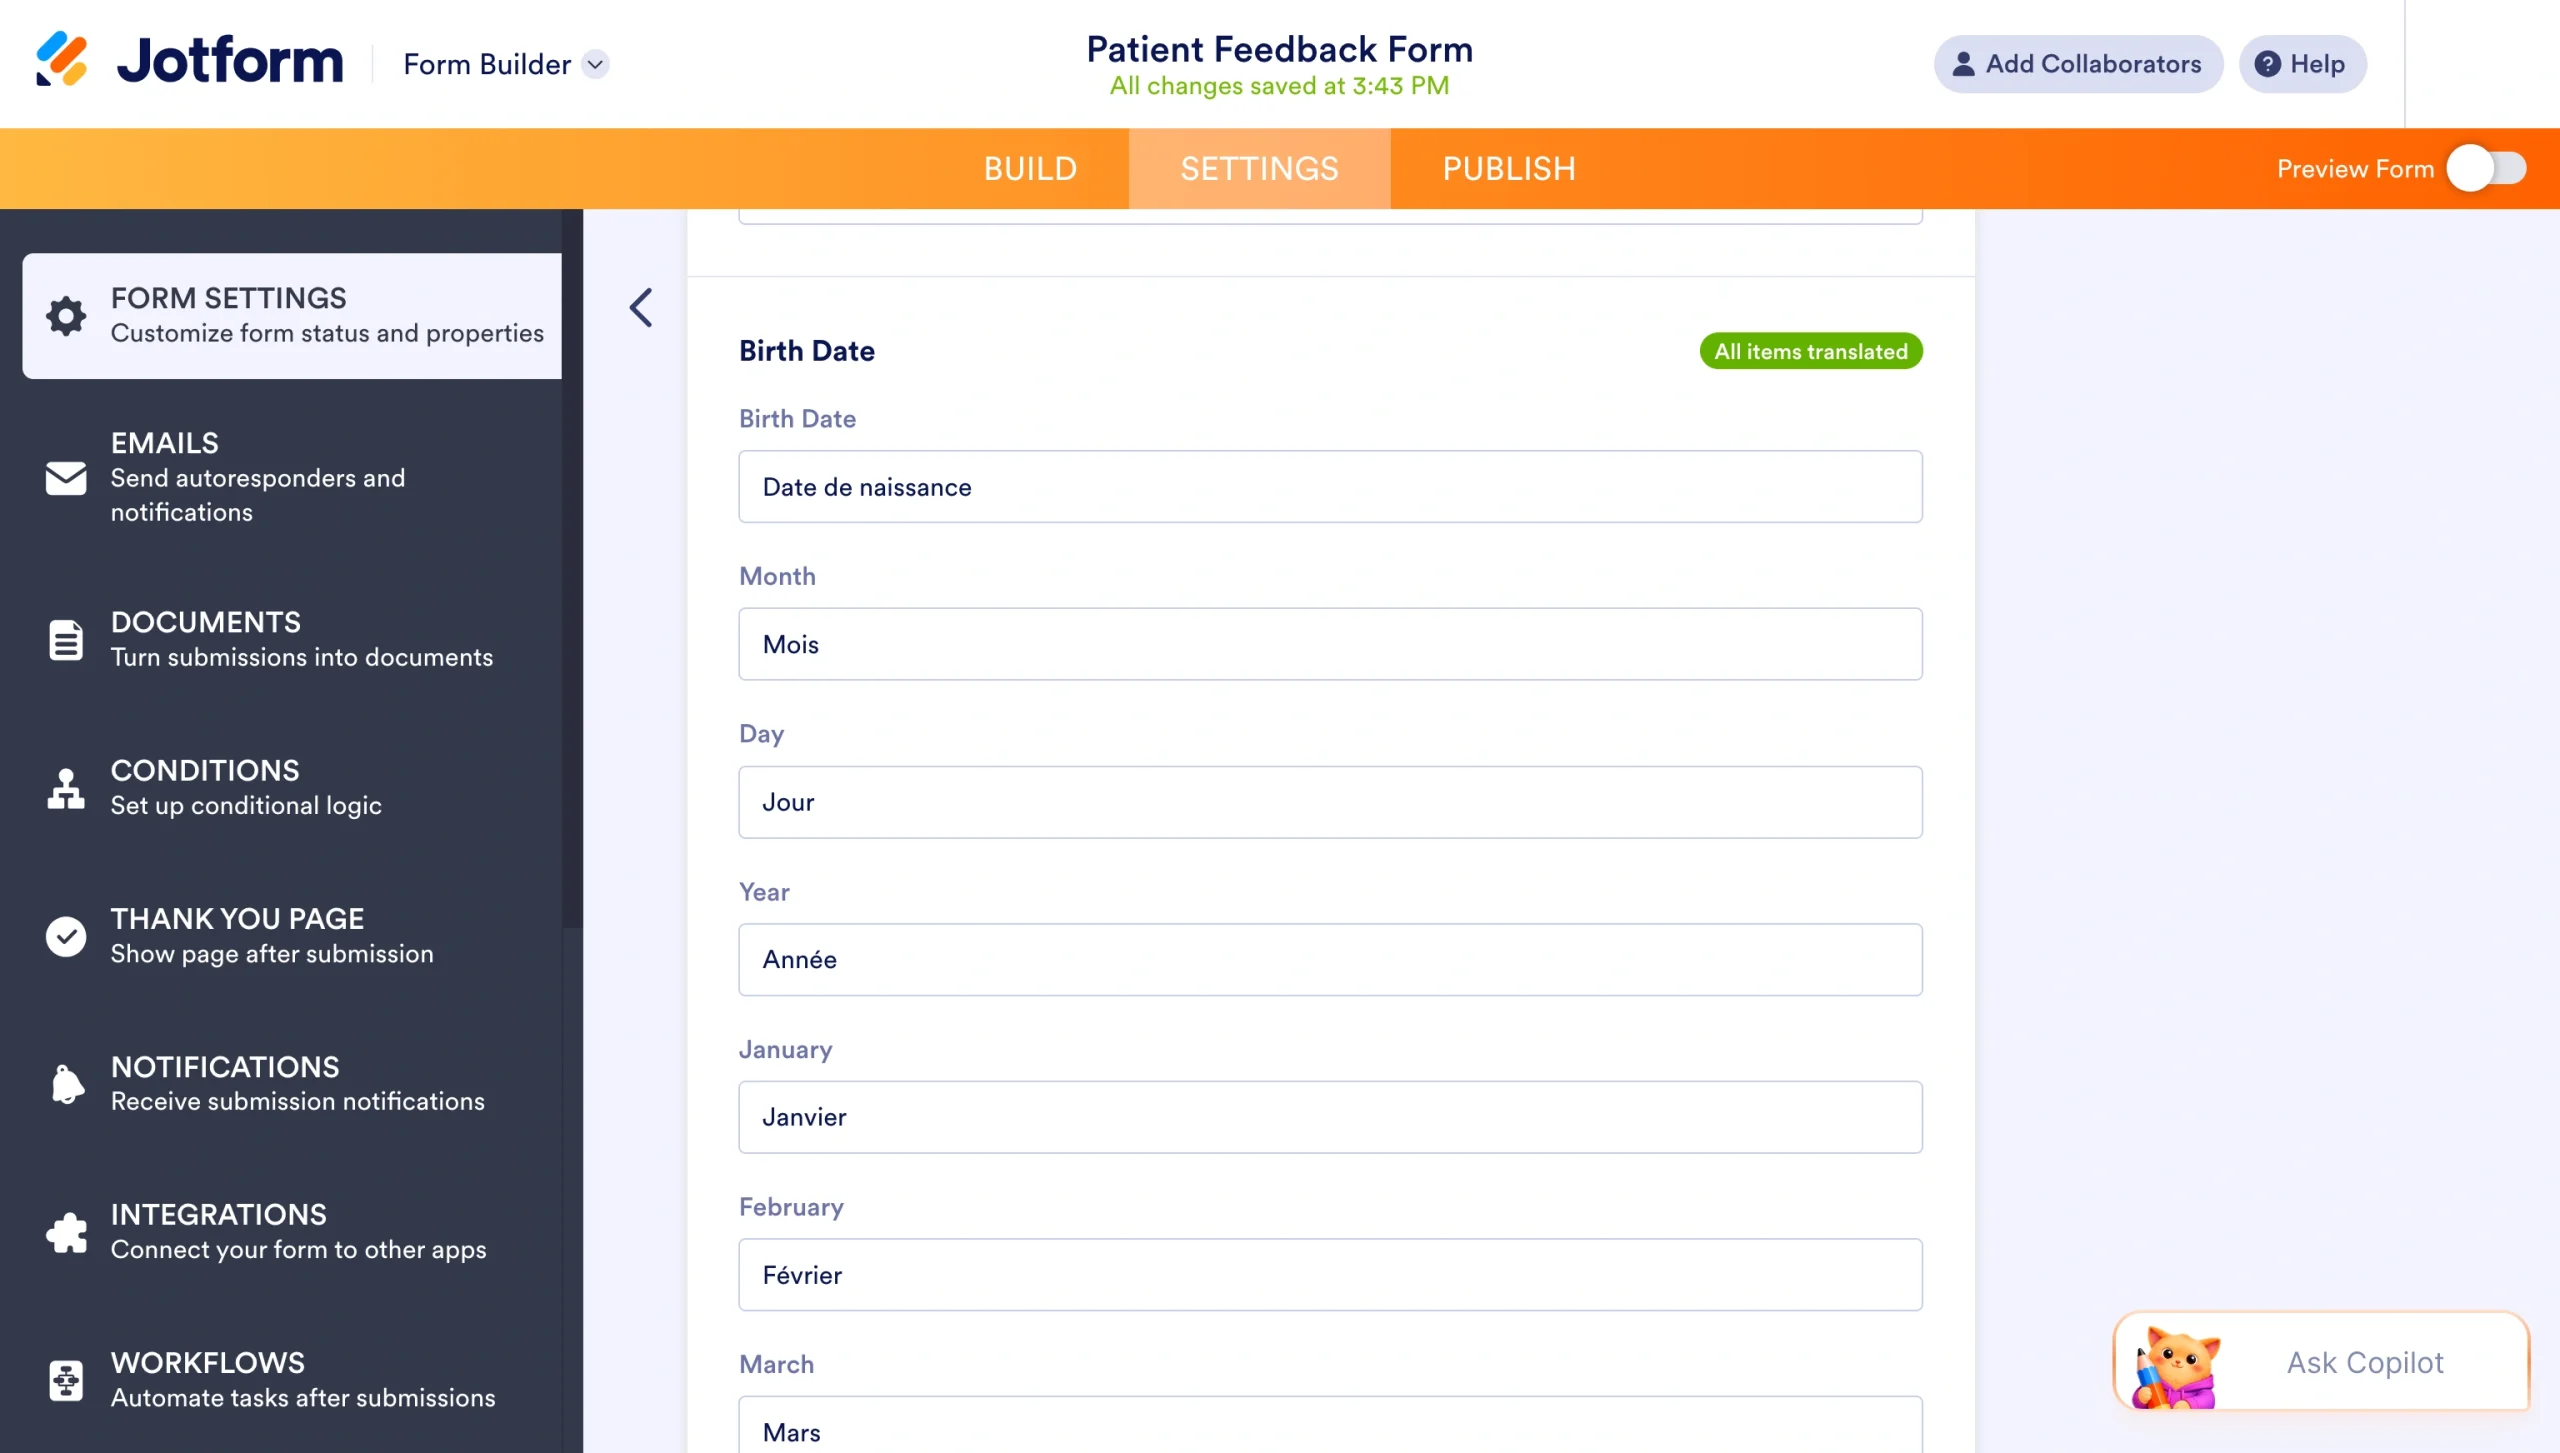
Once set up, a language selector appears in the top-right corner of your form, letting respondents switch to their preferred language at any time. You can also enable “Detect Language” to automatically match the respondent’s browser language when they open the form.
Migrate your Google Forms to Jotform with a single click
Try Jotform now for free if you’re looking for a simpler way to create multilingual forms for a global audience, along with advanced features like
- Conditional logic
- 150-plus form integrations
- 20,000-plus ready-to-use form templates
The best part is that you don’t have to start from scratch. You can migrate your existing Google Forms to Jotform in just a few minutes, with all your questions and structure carried across automatically.
FAQs about multiple languages in Google Forms
Google Forms has no built-in translation feature, which is why a workaround method is required. That said, third-party app Pretty Forms Designer brings Google Translate into the workflow.
Jotform is the simplest way to create multi-language forms. Its built-in translation feature supports more than 130 languages and takes just a few clicks to set up.
You can also translate a Google Form by following the steps in this guide or simply make contact forms in other languages using Jotform directly.
This article is for small business owners, educators, marketers, and operations teams who need to collect responses from multilingual audiences using Google Forms or are looking for easier multilingual form solutions.































































































Send Comment: