
Key takeaways
- Google Forms lets users review response summaries, check individual answers, share a results summary with respondents, and move response data into Google Sheets.
- Sharing in Google Forms depends on the workflow. Respondents can see a summary only if the form owner enables it, collaborators can edit the form only if they get editor access, and teammates usually need the linked spreadsheet if they need raw response data.
- Jotform is a better fit for the teams that need live dashboards, branded reports, flexible permissions, or easier collaboration.
You can share Google Form responses by viewing summaries, reviewing individual answers, sharing a summary with respondents, or sharing the raw data with teammates. You can also export results for your own in-depth analysis.
This article gives you a step-by-step guide for every sharing option.
I’ve also included a shout-out to Jotform because it’s a better, more visual solution — complete with workflows for reports that are quick to generate and guaranteed to impress.

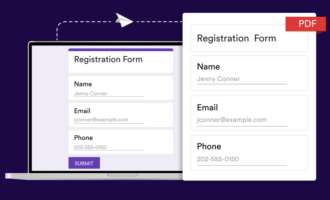
Looking for the best alternative to Google Forms?
Jotform’s full-featured form-building solution is mobile-friendly and has the most integrations in the industry. Use it to collect payments, automate workflows, gather leads, and more.
How to share Google Form responses with others
How you share a Google Form depends on what you’re sharing and with whom. Below, I’ve created workflows (with images) for five scenarios.
If you’ve not created your first form yet, read how to use Google Forms and then come back to this page.
Share a summary with respondents
You can allow respondents to see a summary of all previous responses after they’ve submitted their own. It’s the simplest way to give people visibility into results with no extra steps on your end.
To enable it, follow these steps:
- Open your form in Google Forms.
- Click Settings at the top.
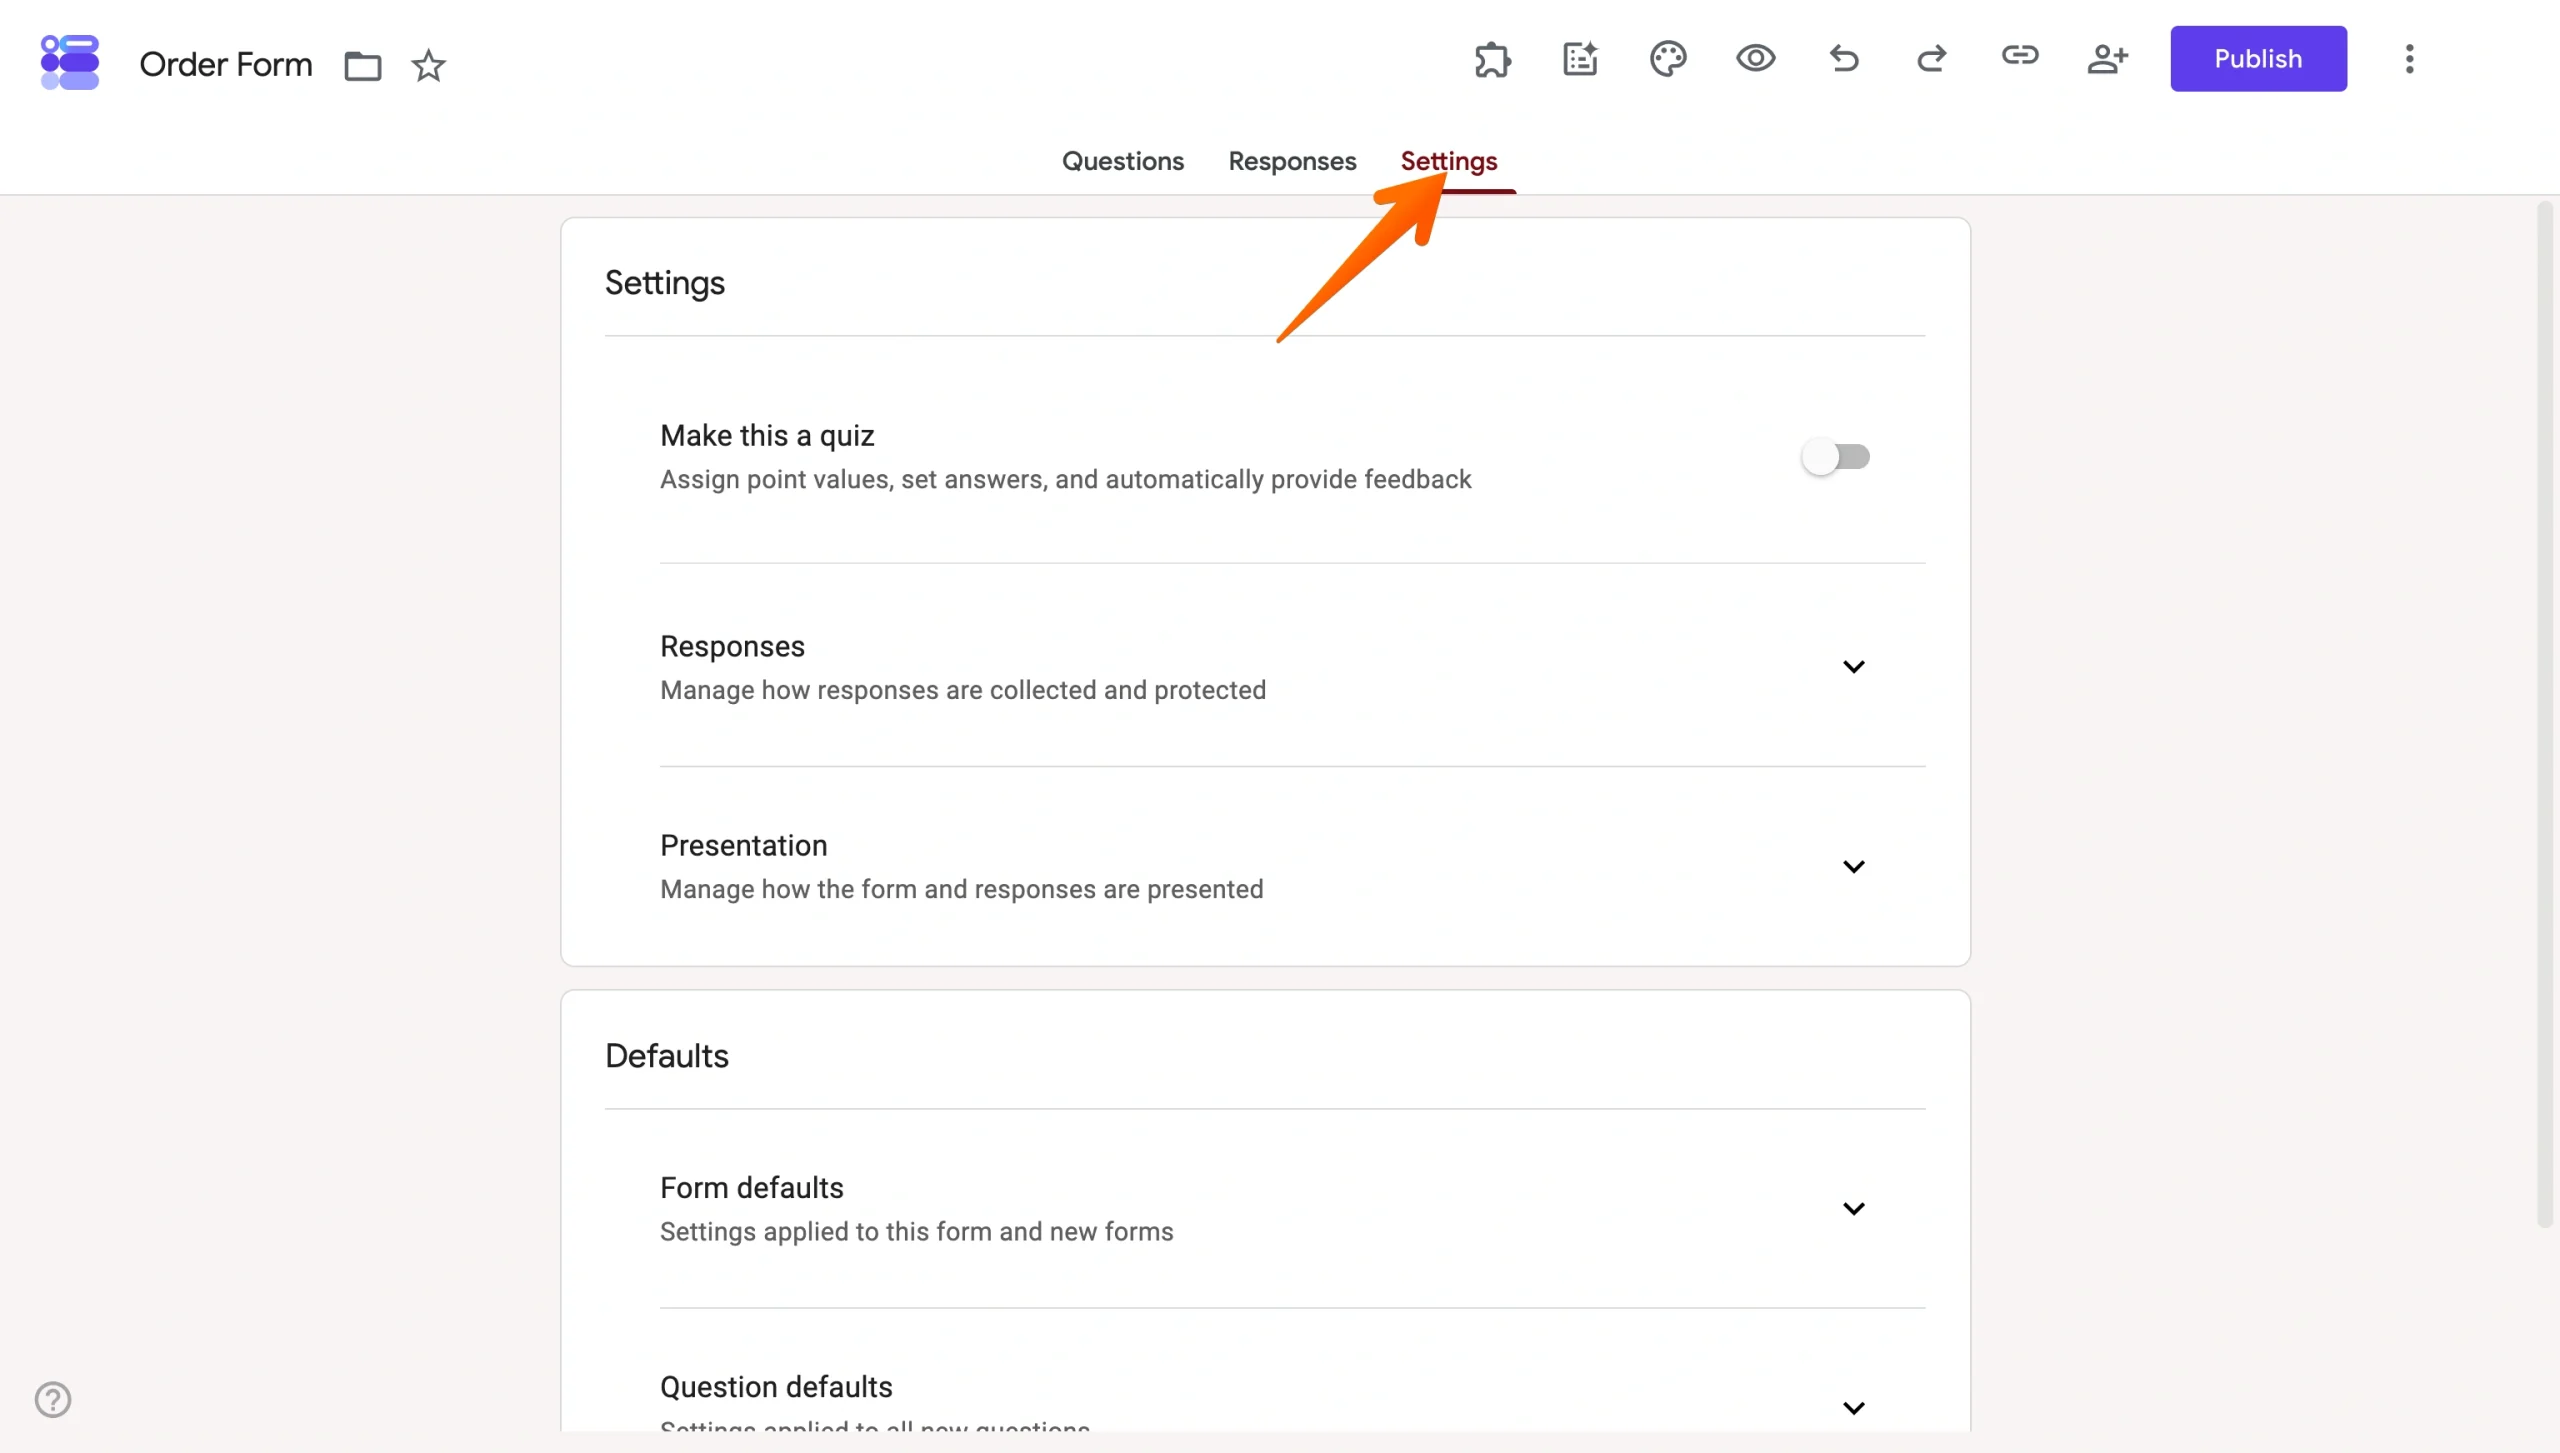
- Next to Presentation, click the down arrow.
- Turn on View results summary.
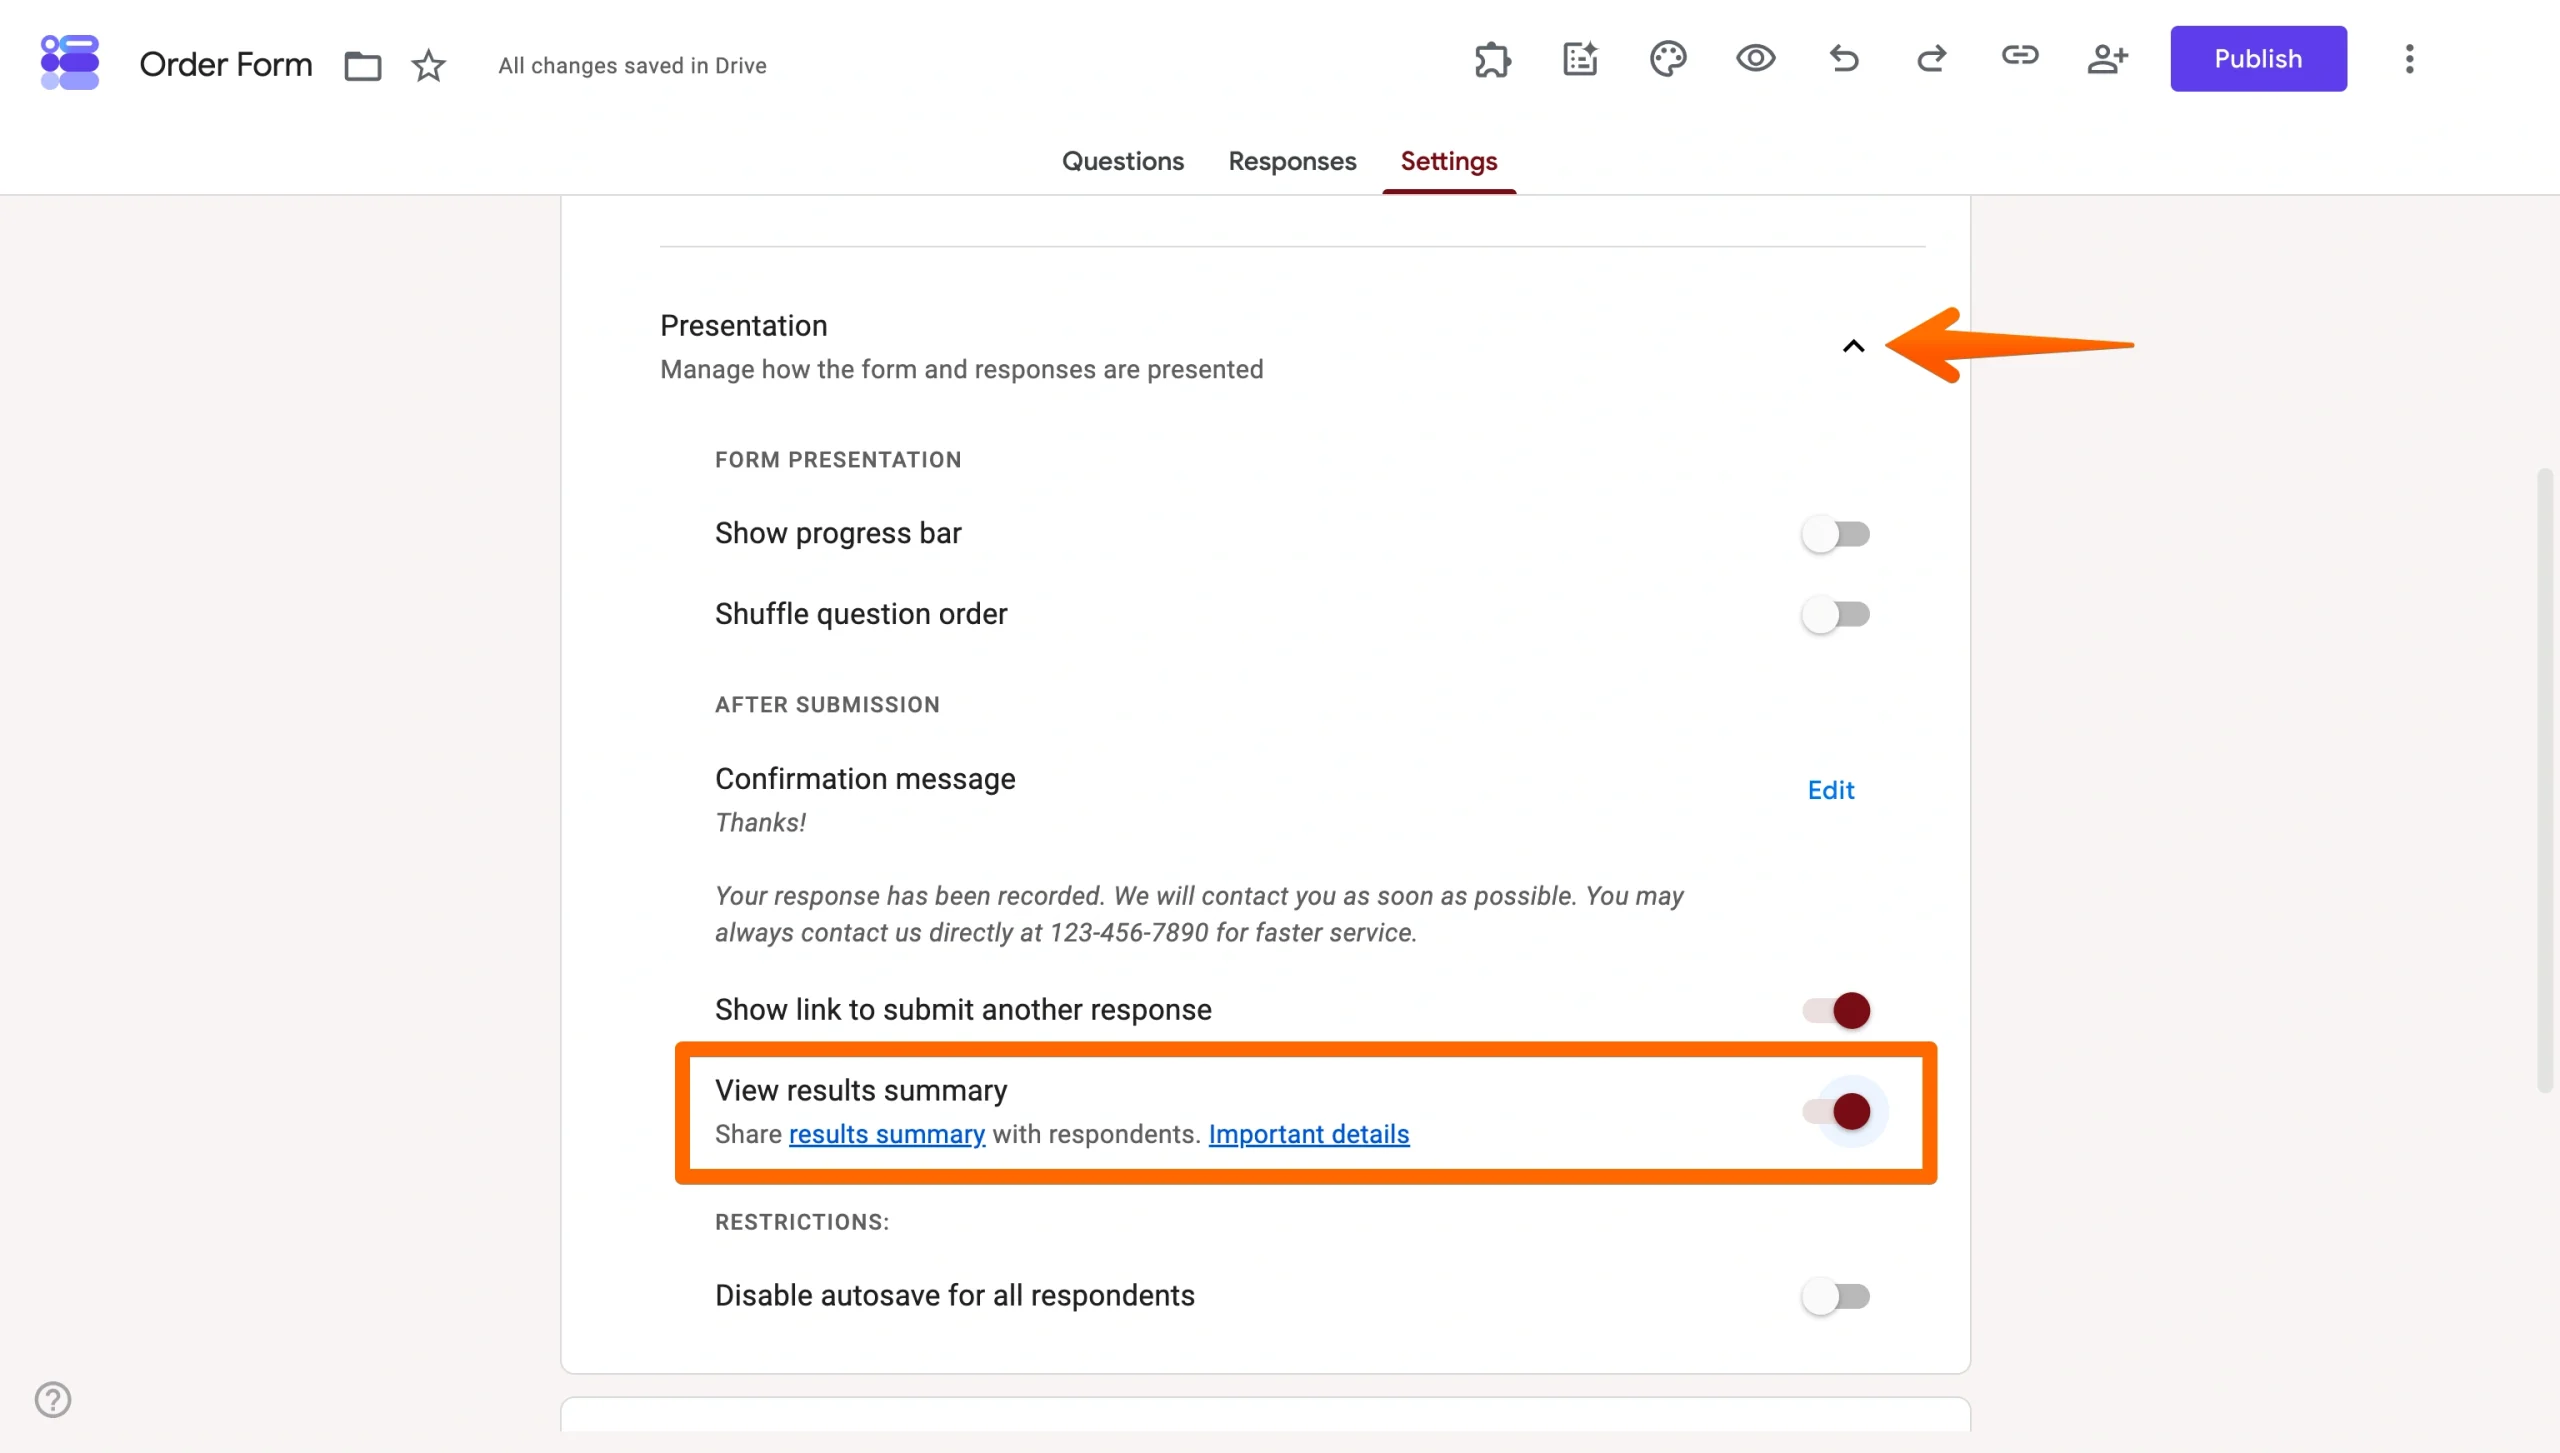
Once enabled, respondents will receive a link to the summary after submitting.
Important note: The summary is visible to anyone who responds to the form, so only enable it if you’re comfortable sharing aggregate results openly.
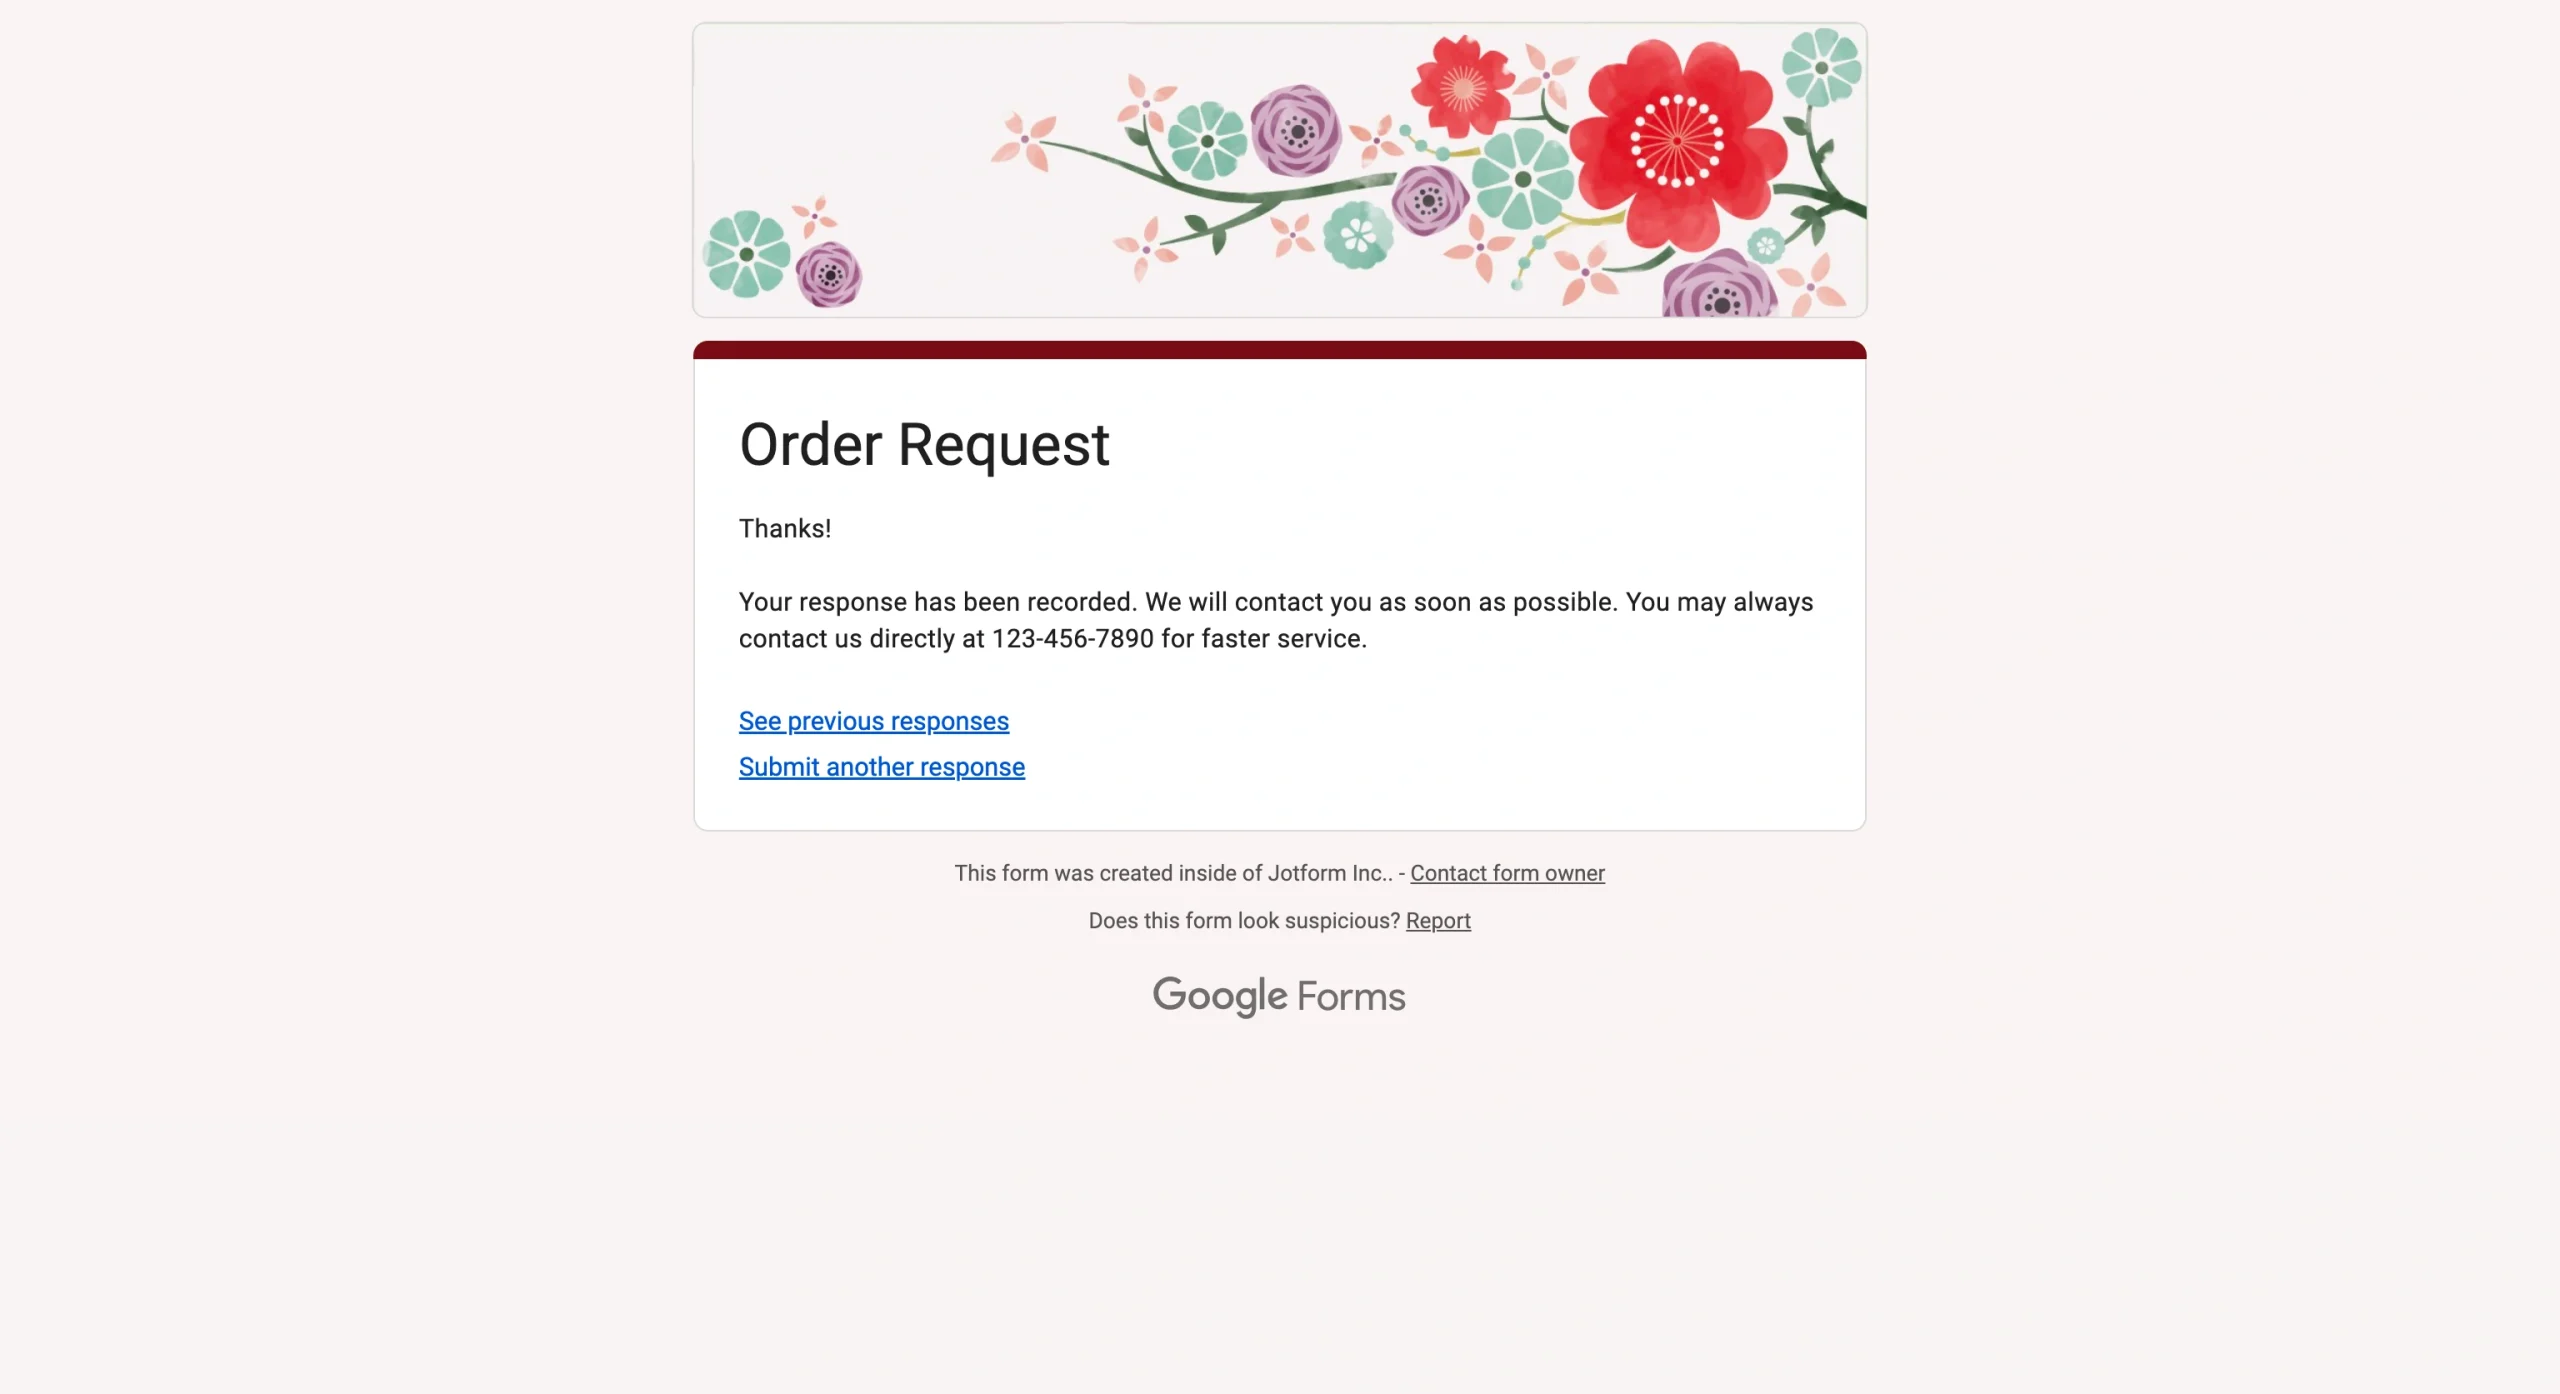
When any respondent completes the form, they reach a screen that includes two links: “See previous responses” and “Submit another response.”
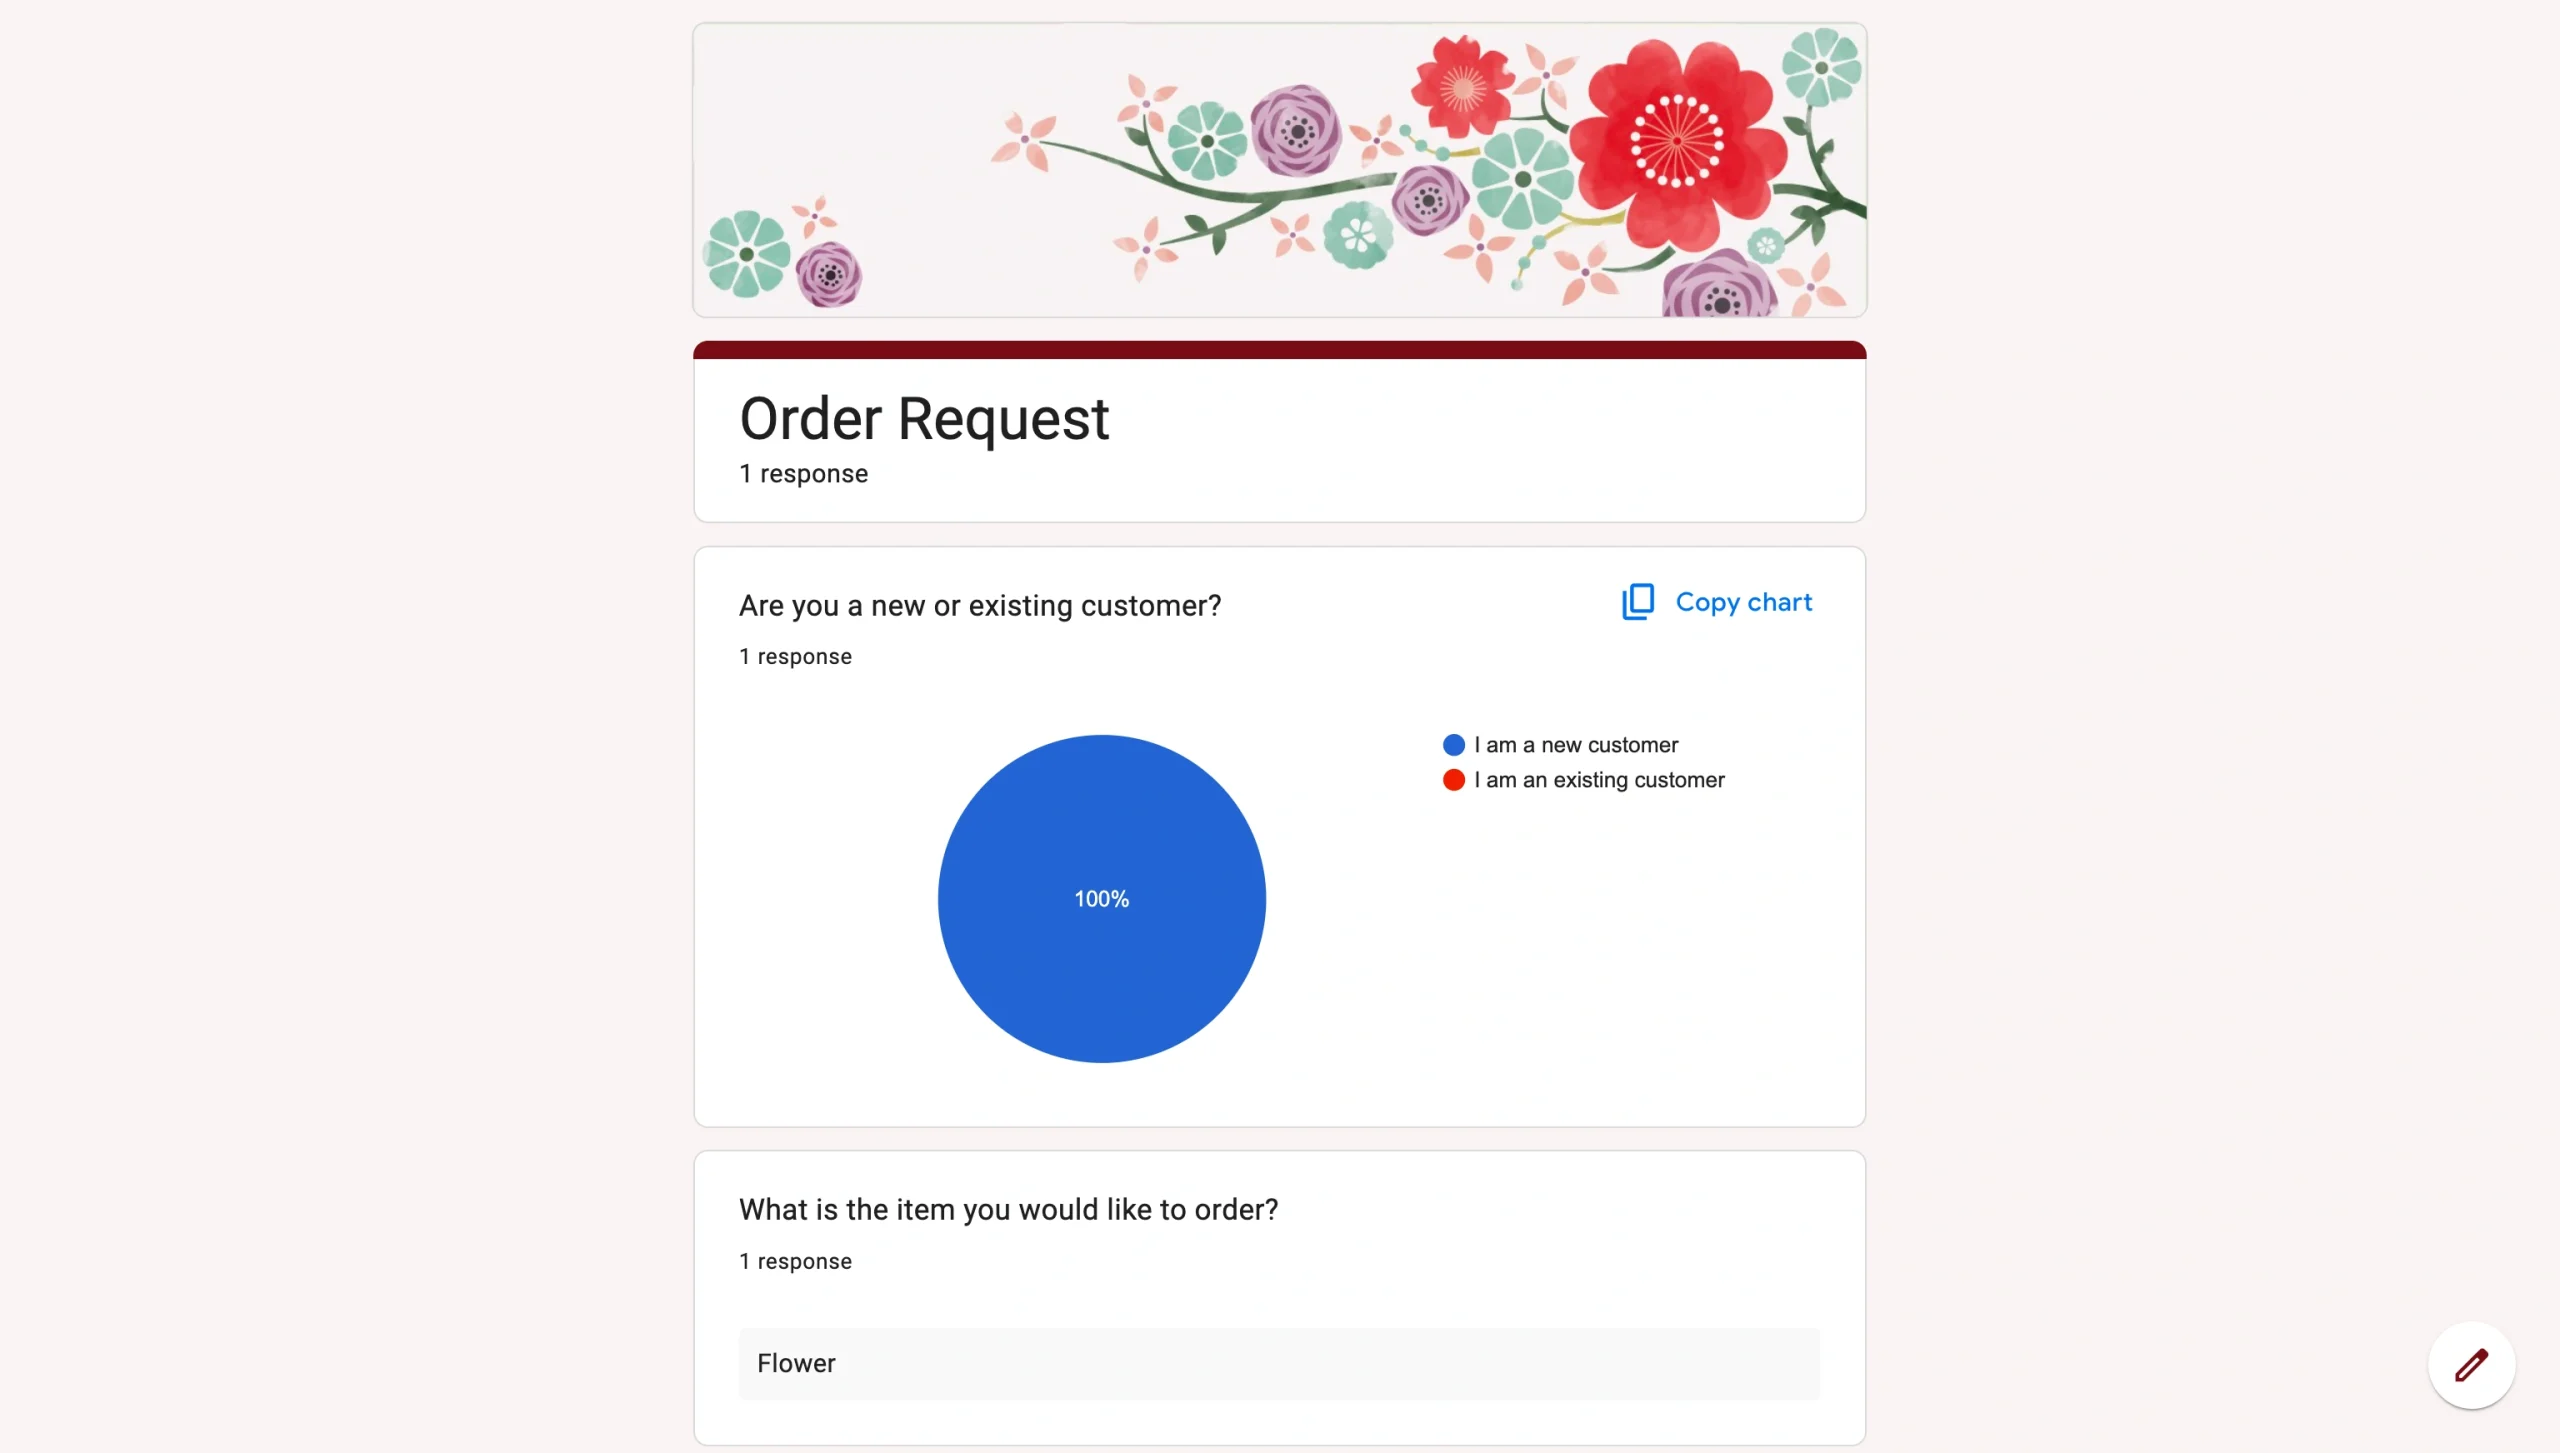
If the respondent clicks “See previous responses,” they’ll see a screen like the following screenshot. It includes response summaries, tables, and question breakdowns.
Pro Tip
If you don’t want every respondent to see the summary, you can simply forward emails to specific people. Google Forms sends you an email for every response by default. While forwarding emails is the simplest and most direct way to share form responses, it’s also the most tedious and time-consuming. But if you just need to share a few responses, this method might be all you need.
Share the linked Google Sheet with teammates
If teammates need access to the raw response data, the linked Google Sheet is the most practical solution. It gives selected teammates a live, filterable view of every submission without access to the form itself. Within the Google Sheet, you can also edit responses from the Google Form.
To link your form to a spreadsheet, follow these steps:
- Open your form and click the Responses tab.
- Click Link to Sheets.
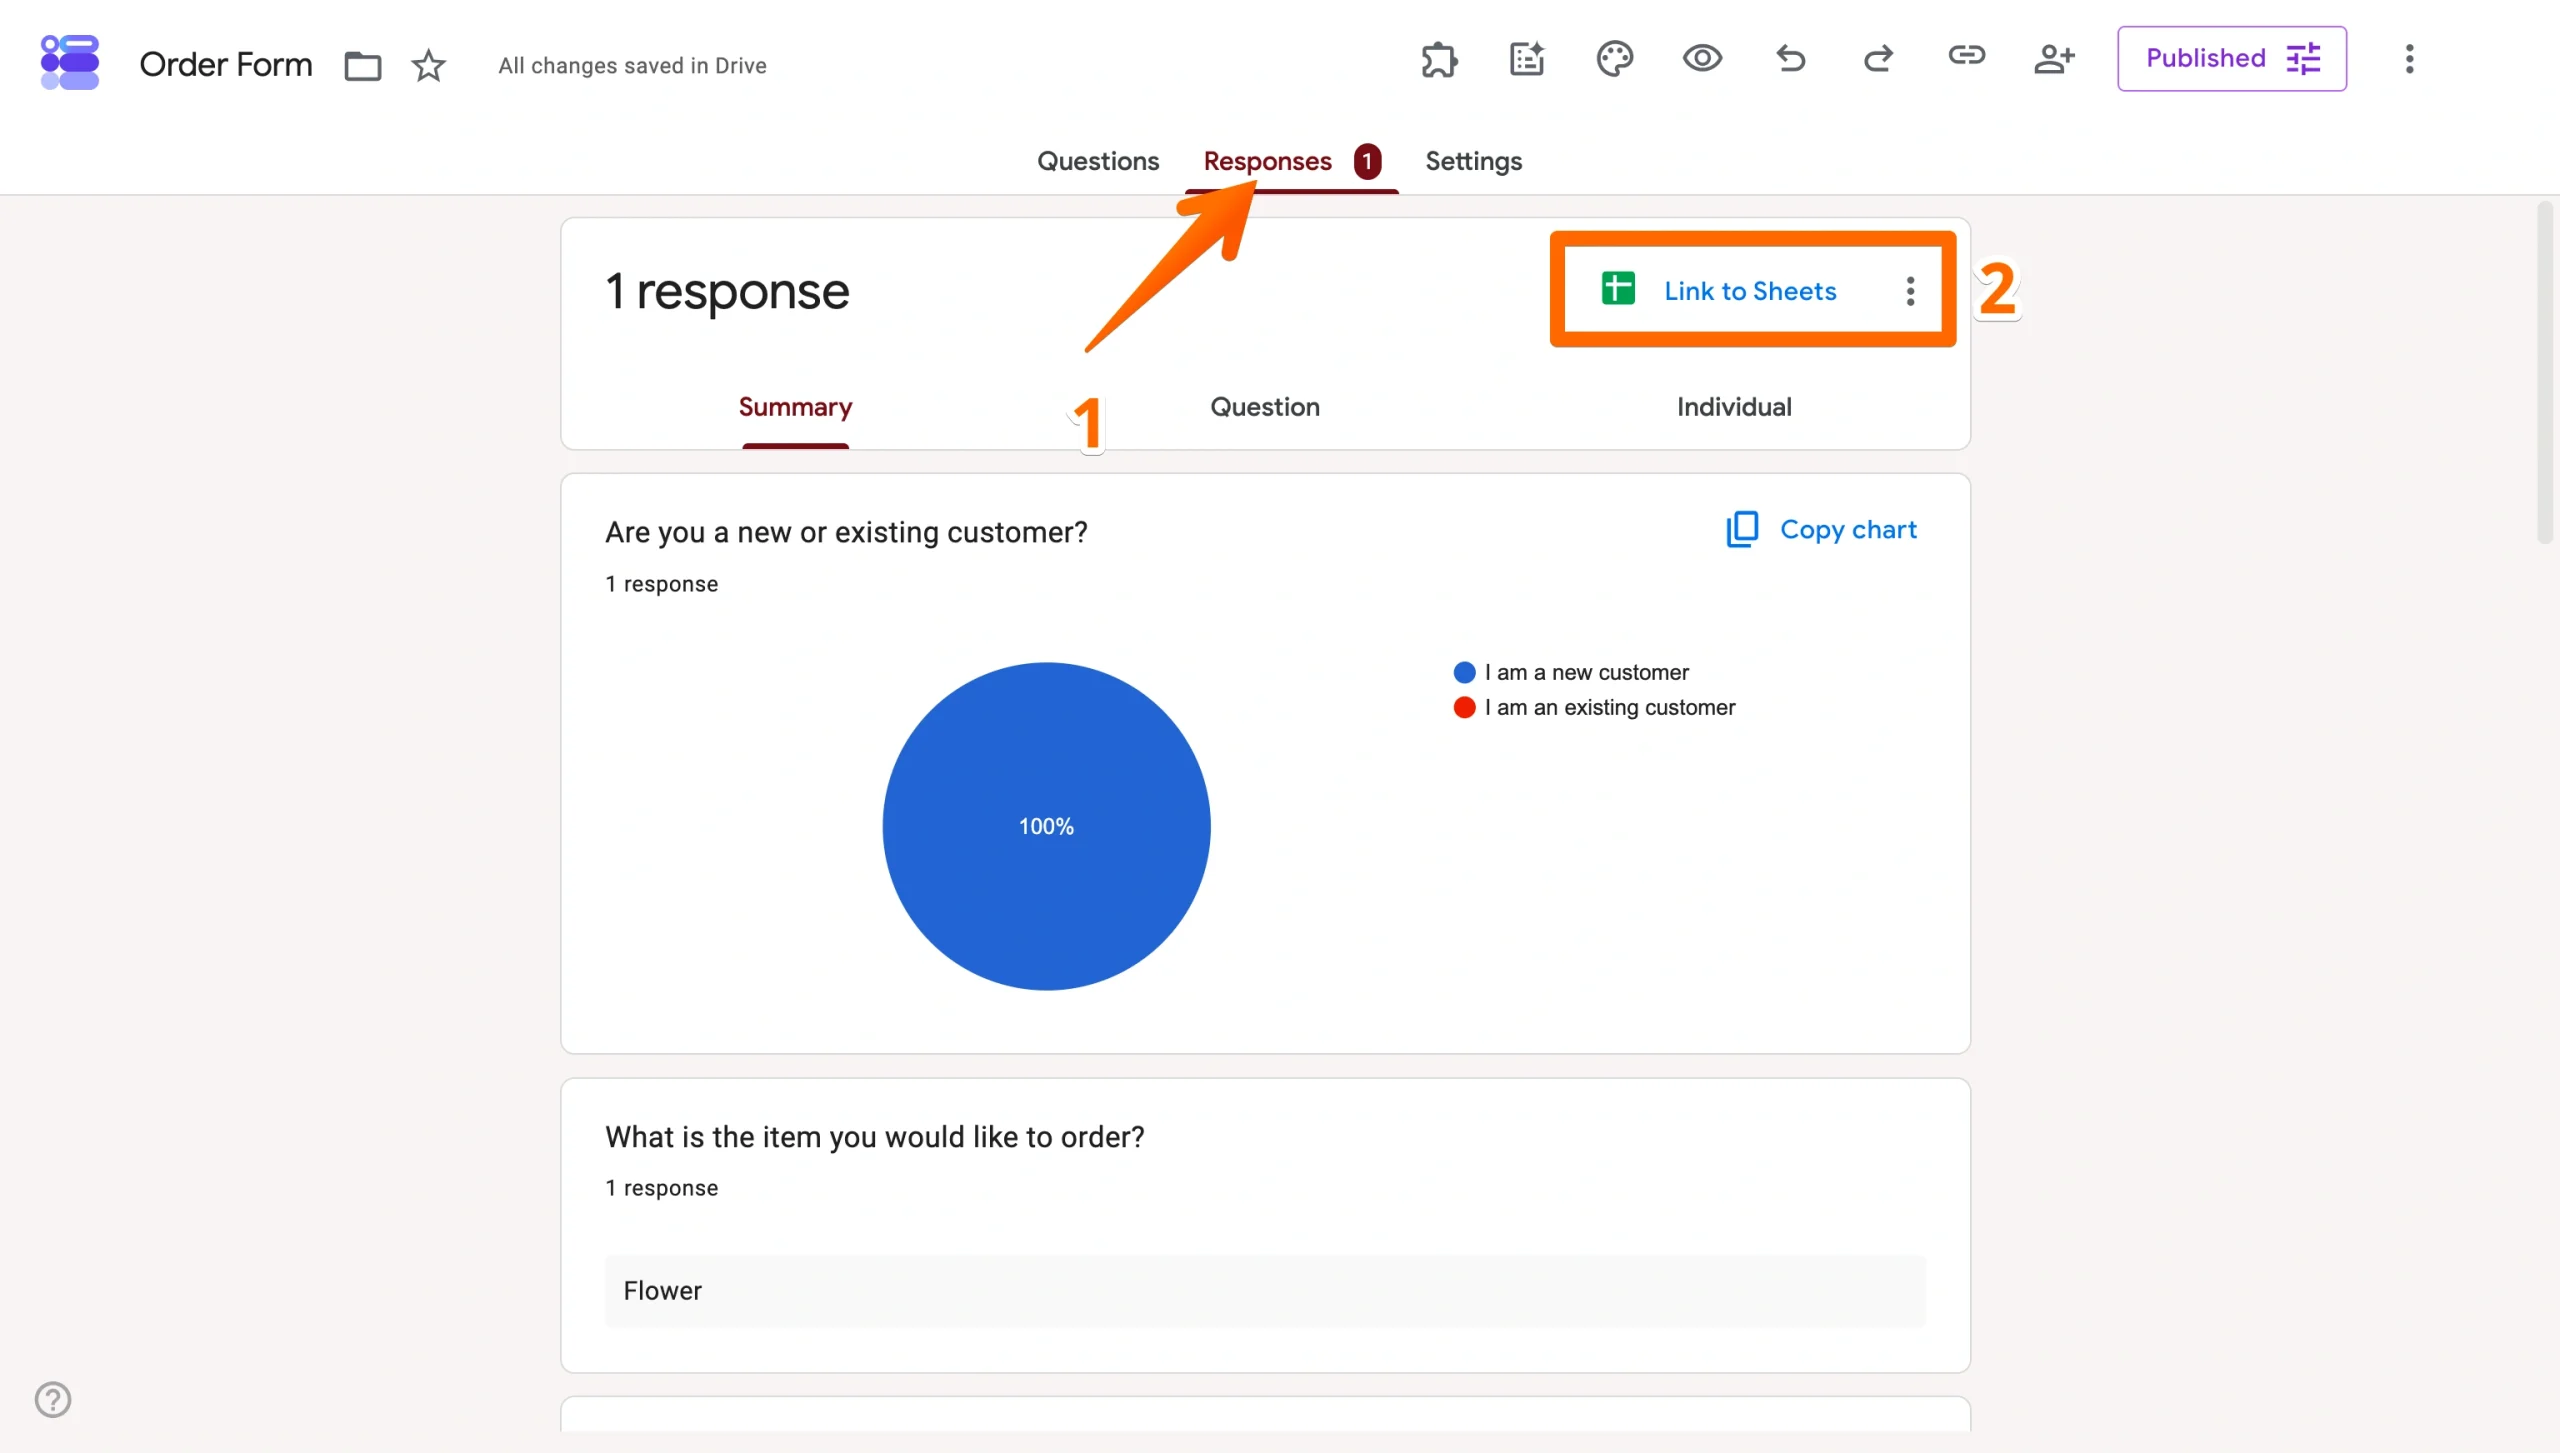
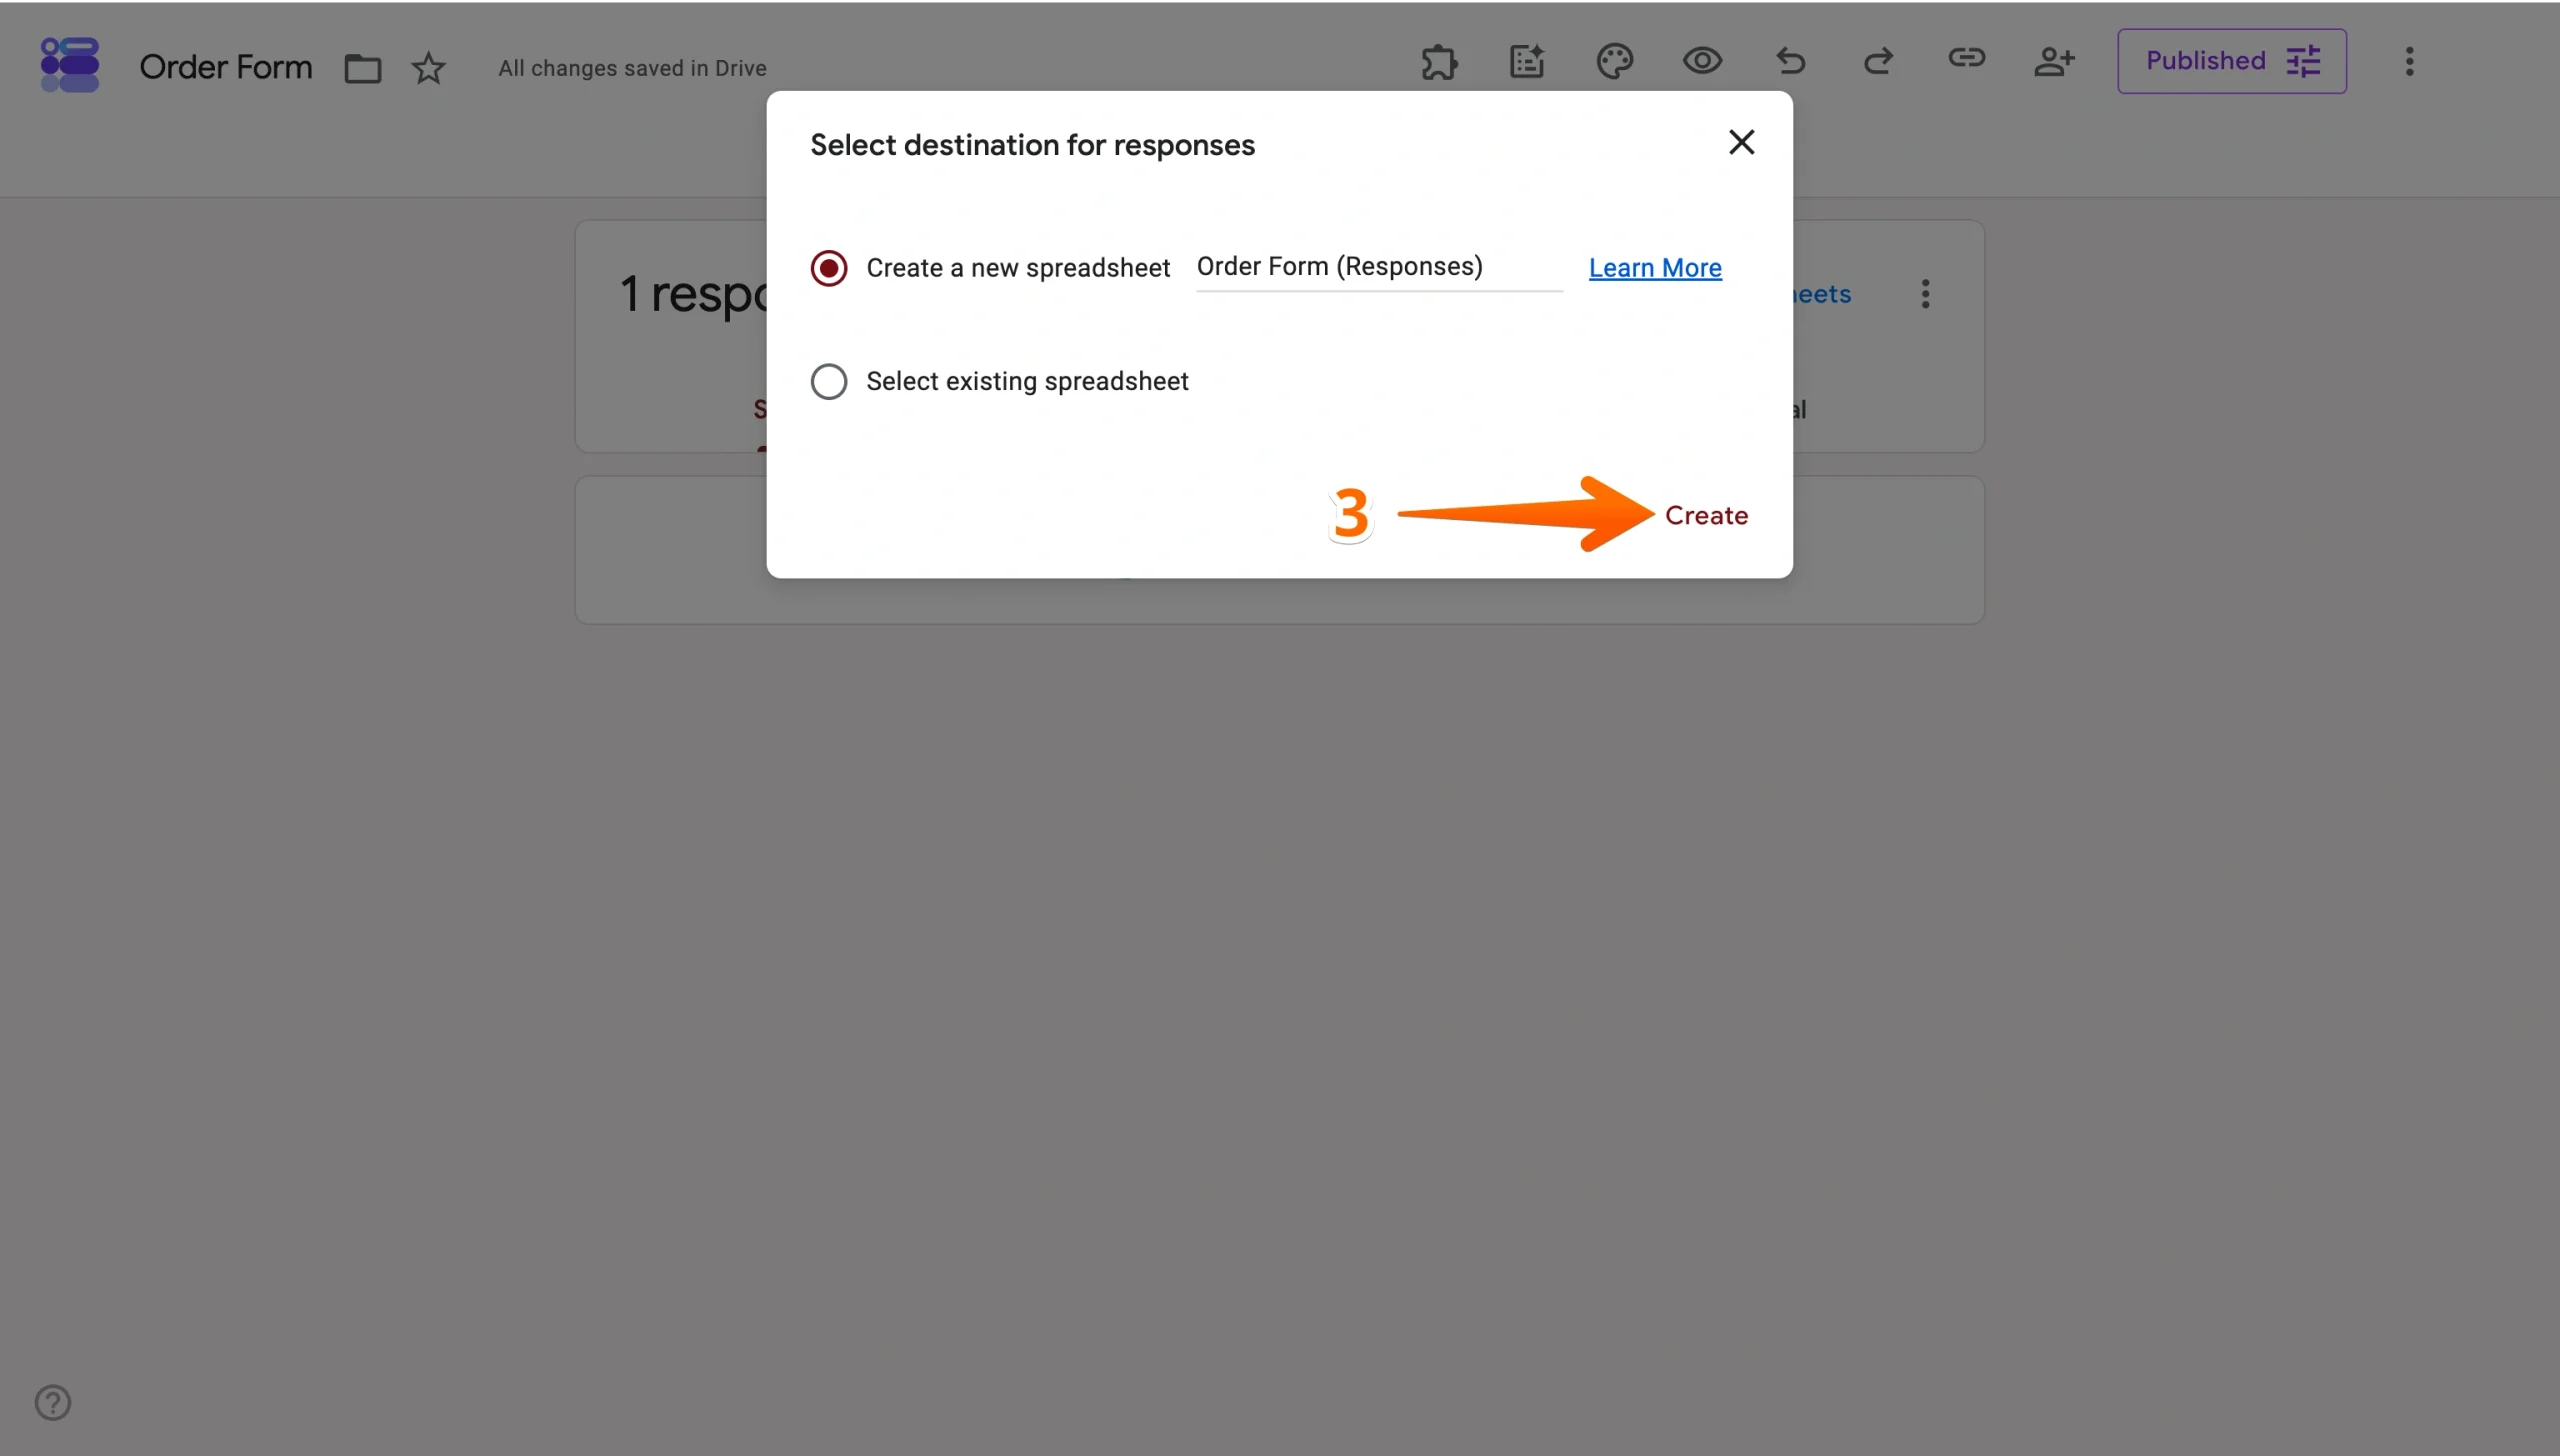
- Choose to create a new spreadsheet or connect to an existing one, then click Create.
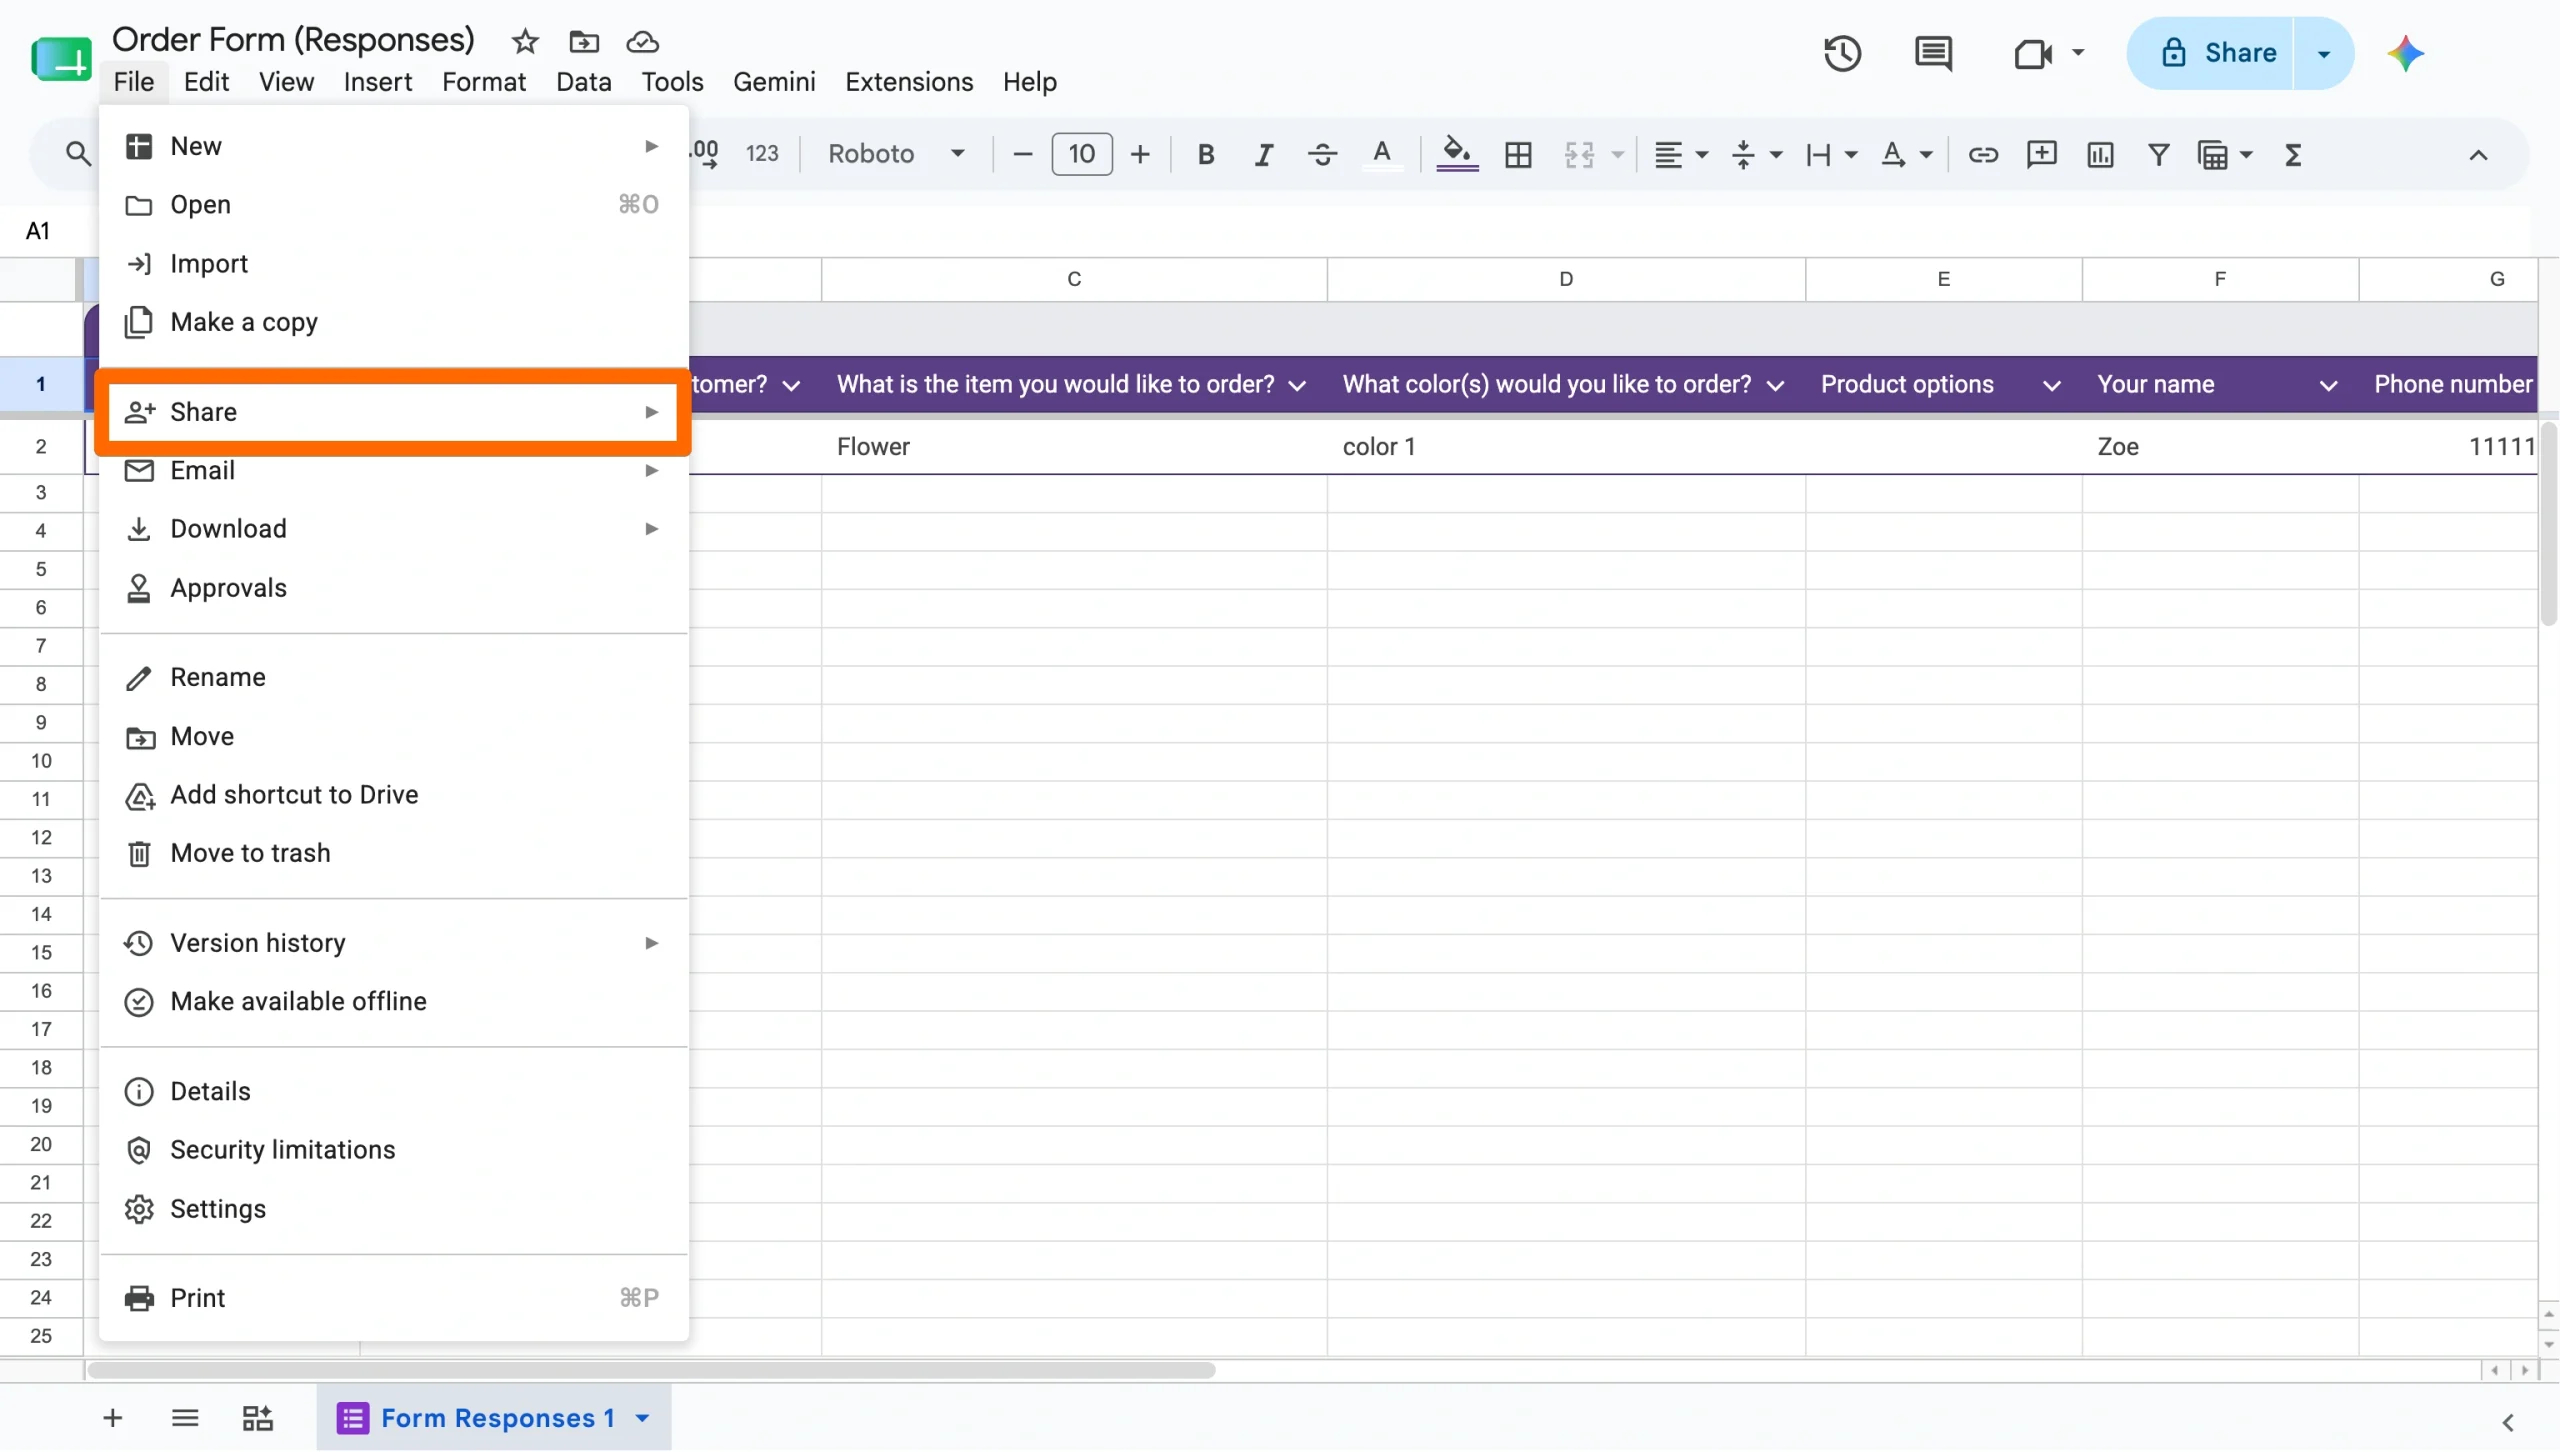
- The linked sheet will open in a new tab. From there, share it like any Google Sheet: Click Share in the top right, add names or email addresses, and set their permission level (viewer, commenter, or editor).
Important note: Permissions on the form and the linked sheet are managed separately. Adding someone as a form collaborator doesn’t automatically give them ongoing sheet access, and vice versa.
Pro Tip
You can use Google Forms export responses to Excel to automatically organize your data into a structured spreadsheet, making it easier to track results, share insights, and streamline reporting.
Add collaborators to the form
To share a Google Form with someone so that they can help build, edit, or manage it, you’ll need to give them editor access directly on the form.
- Open your form in Google Forms.
- Click Share in the top right. It’s the person icon with a plus sign.
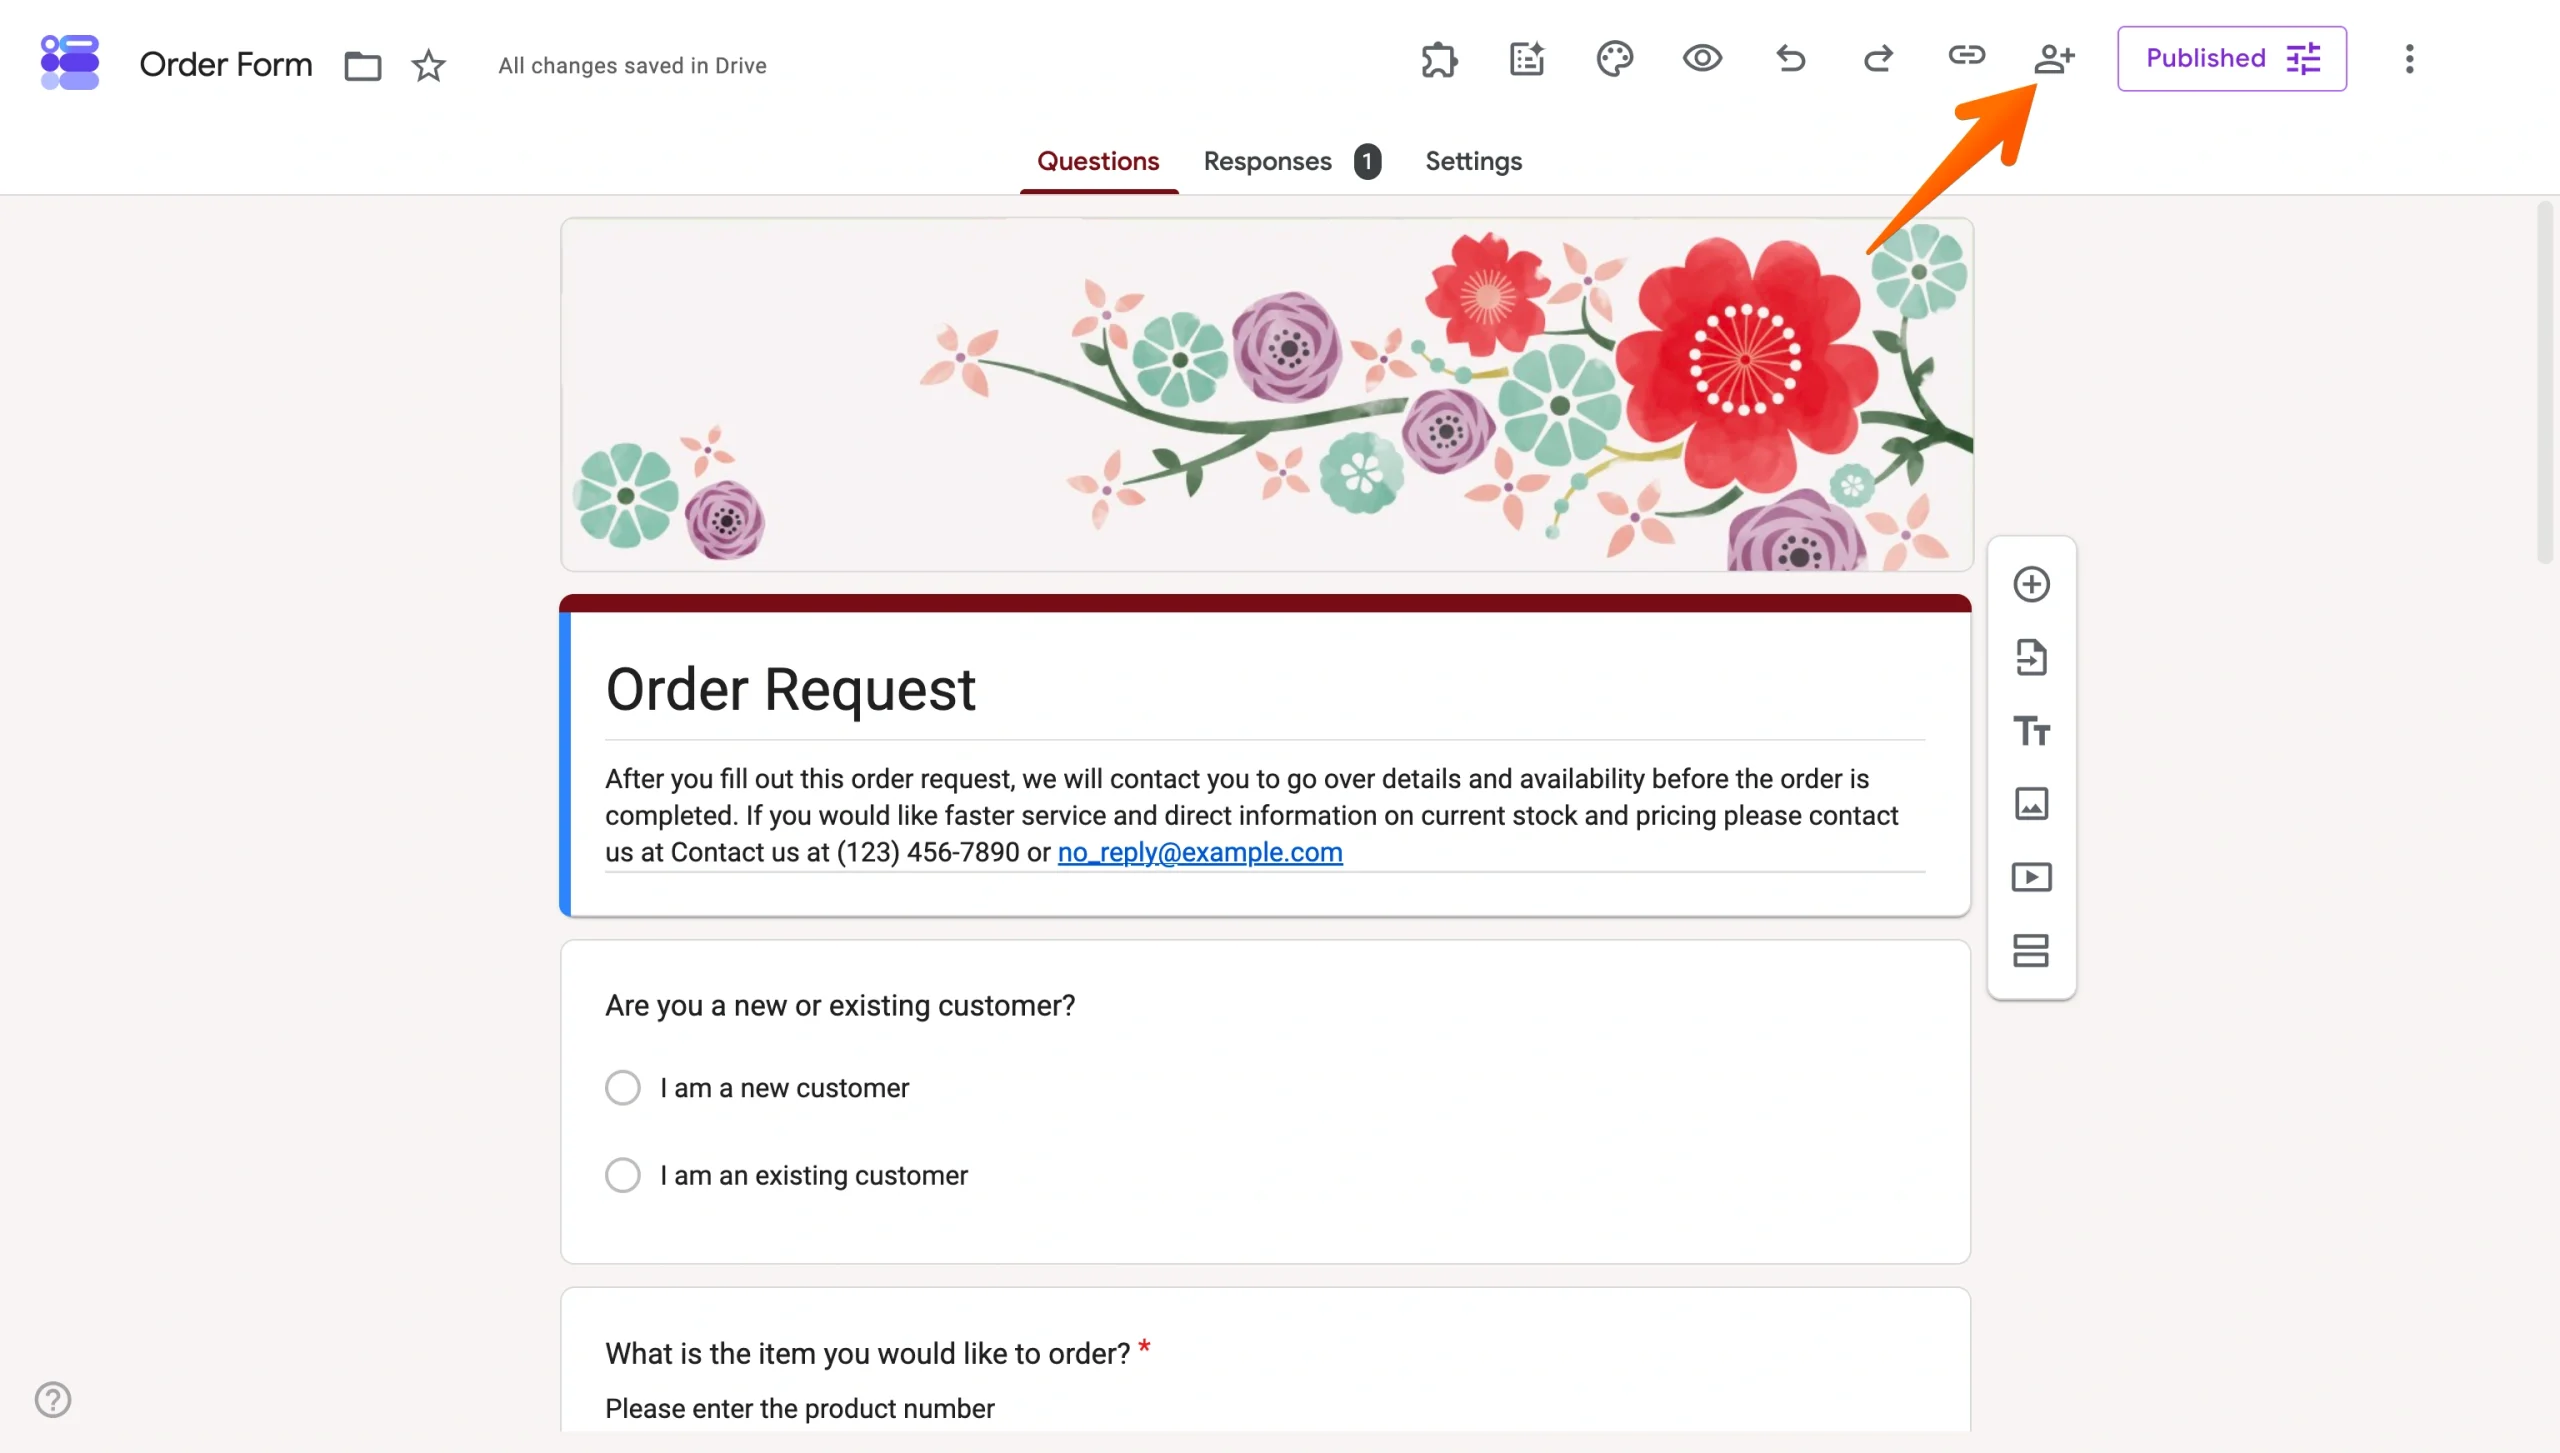
- Enter the names or email addresses of the people you want to add.
- Responders can fill out and submit the form, but they can’t see or edit its structure.
- Editors get full access to build, edit, and manage the form and settings, and they can view all responses.
- “Restricted” access to named people only
- “Anyone with the link” access so anyone can view or edit the form
- “Organization-wide” access for those using Google Workspace
- Add an expiry so that access is granted for a specific period.
- Transfer ownership to hand over full control to another existing editor.
- Remove access to revoke someone’s permissions at any time.
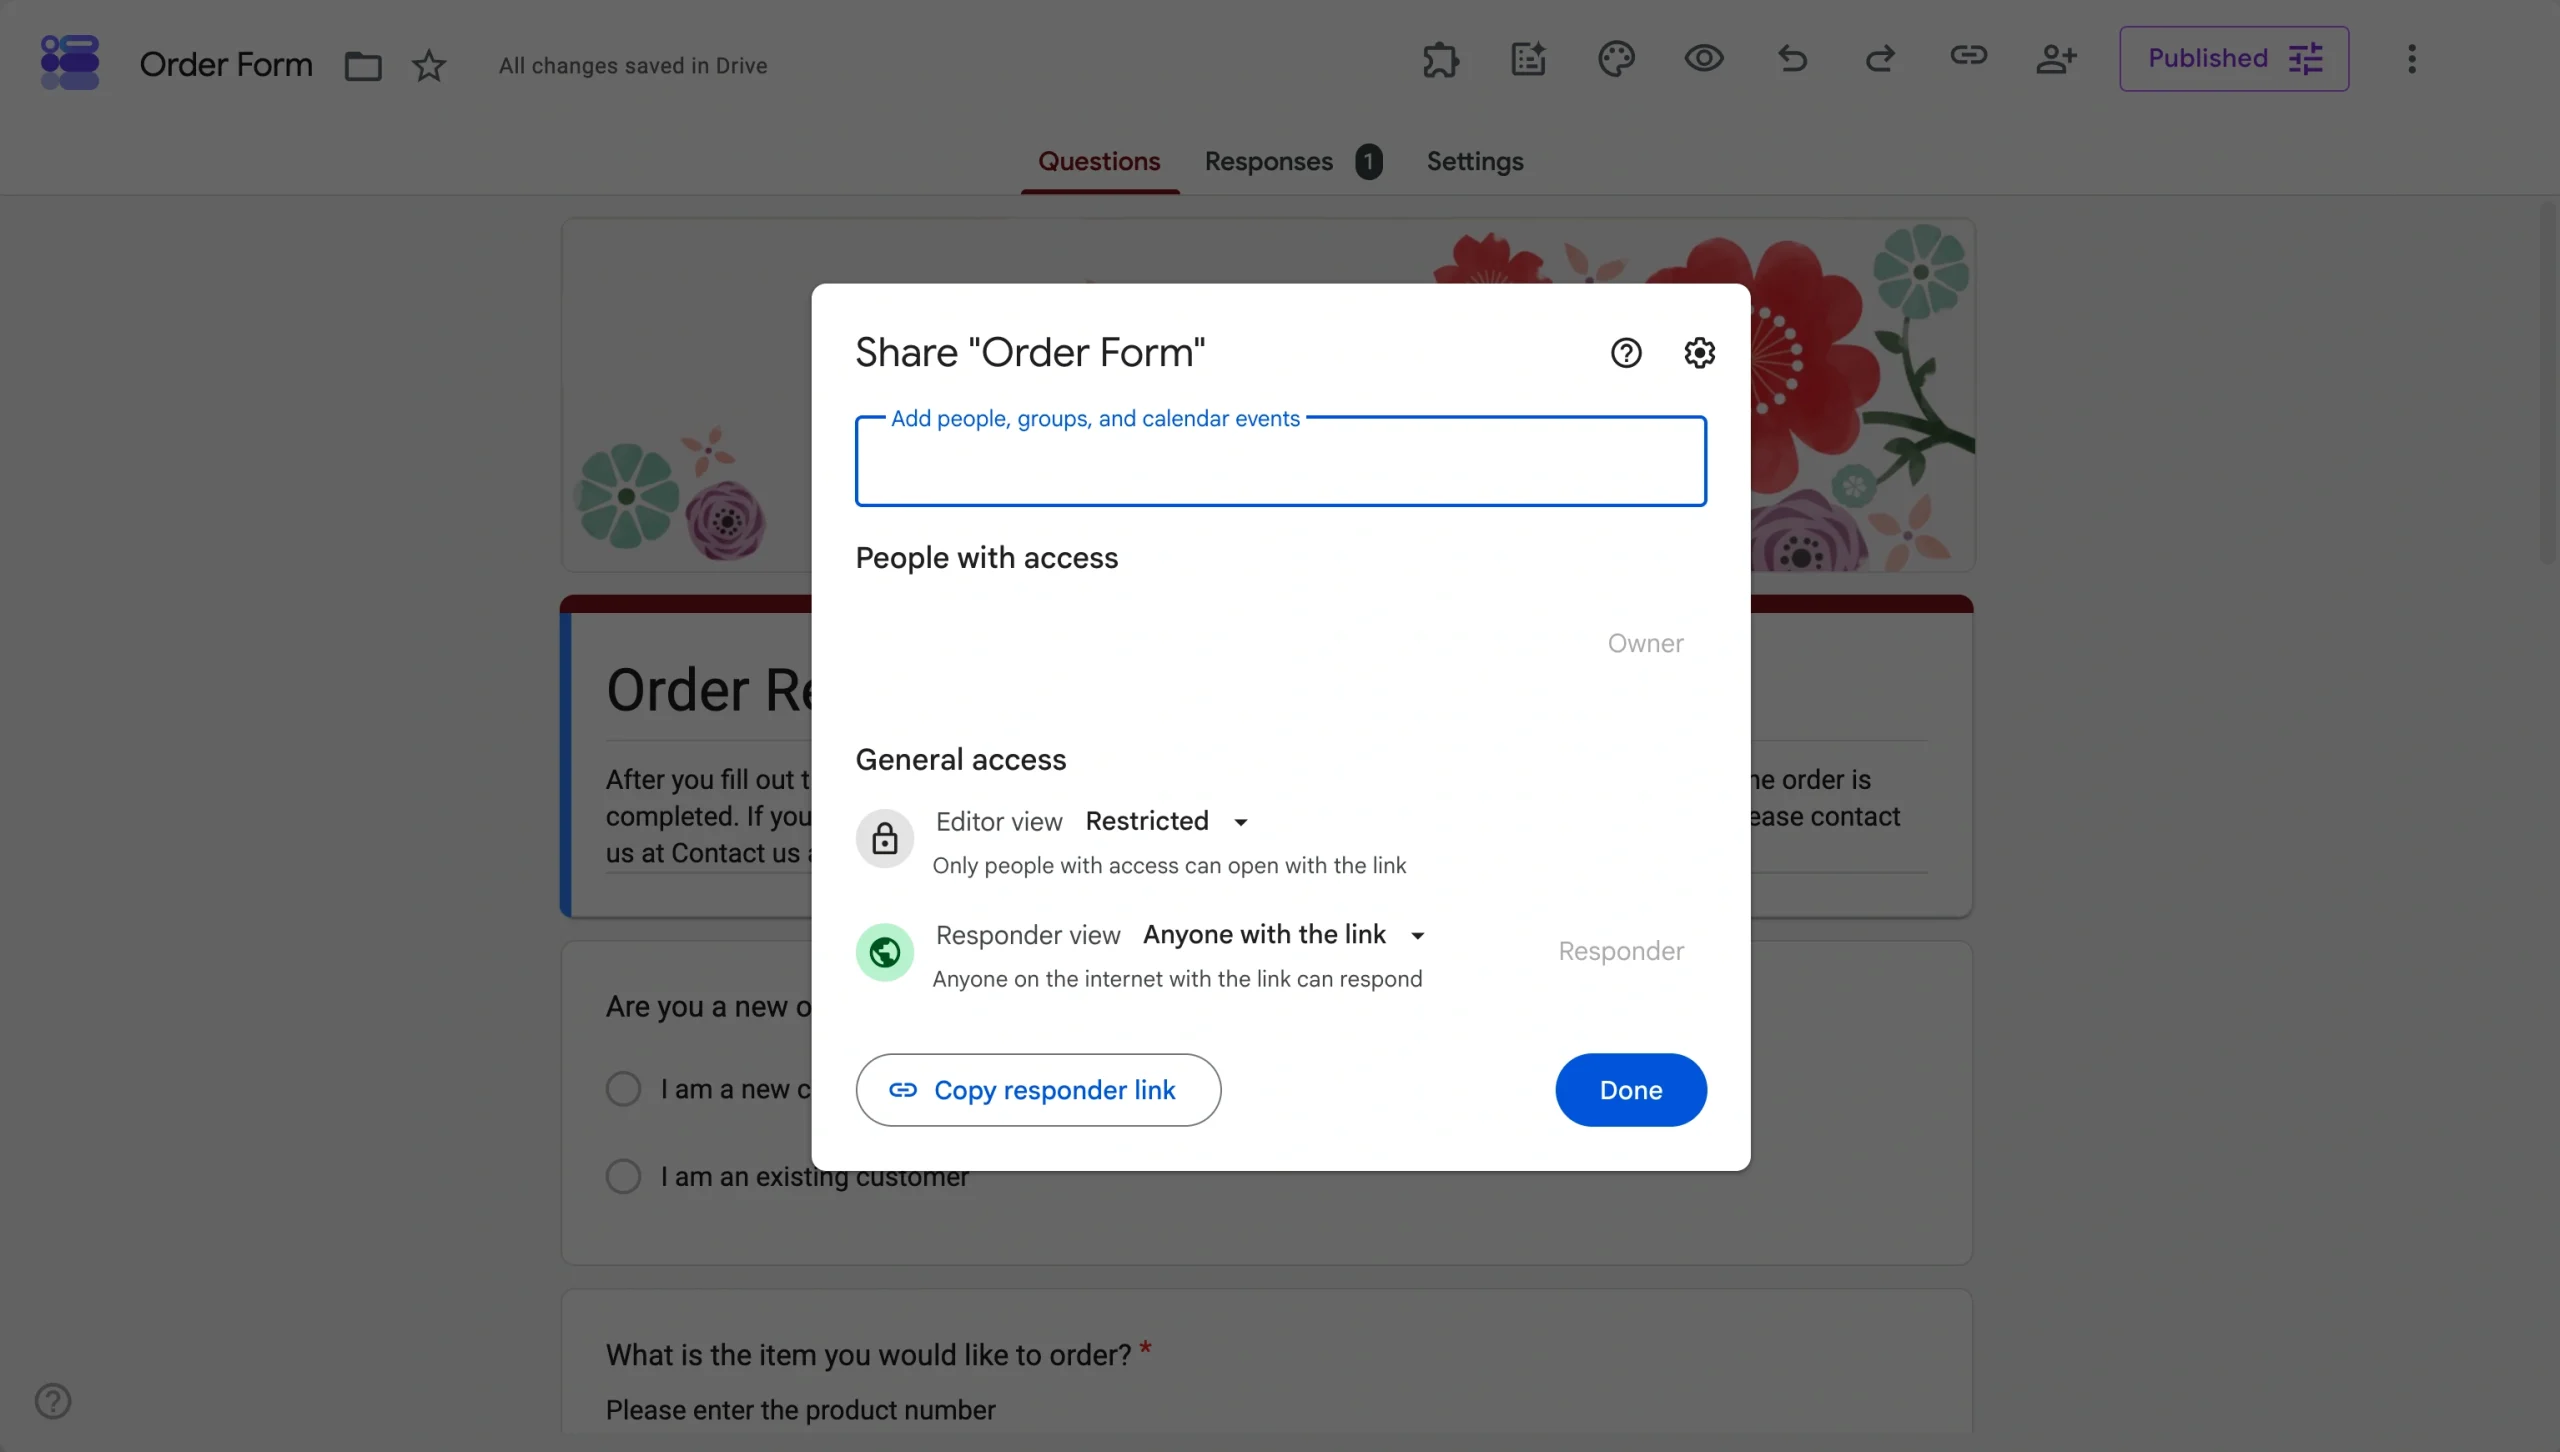
As you enter the person’s name, you can choose to give them responder or editor permissions:
Within the sharing settings, you can also adjust roles in the General access section so that rules apply to all. For example, you can provide
You can also
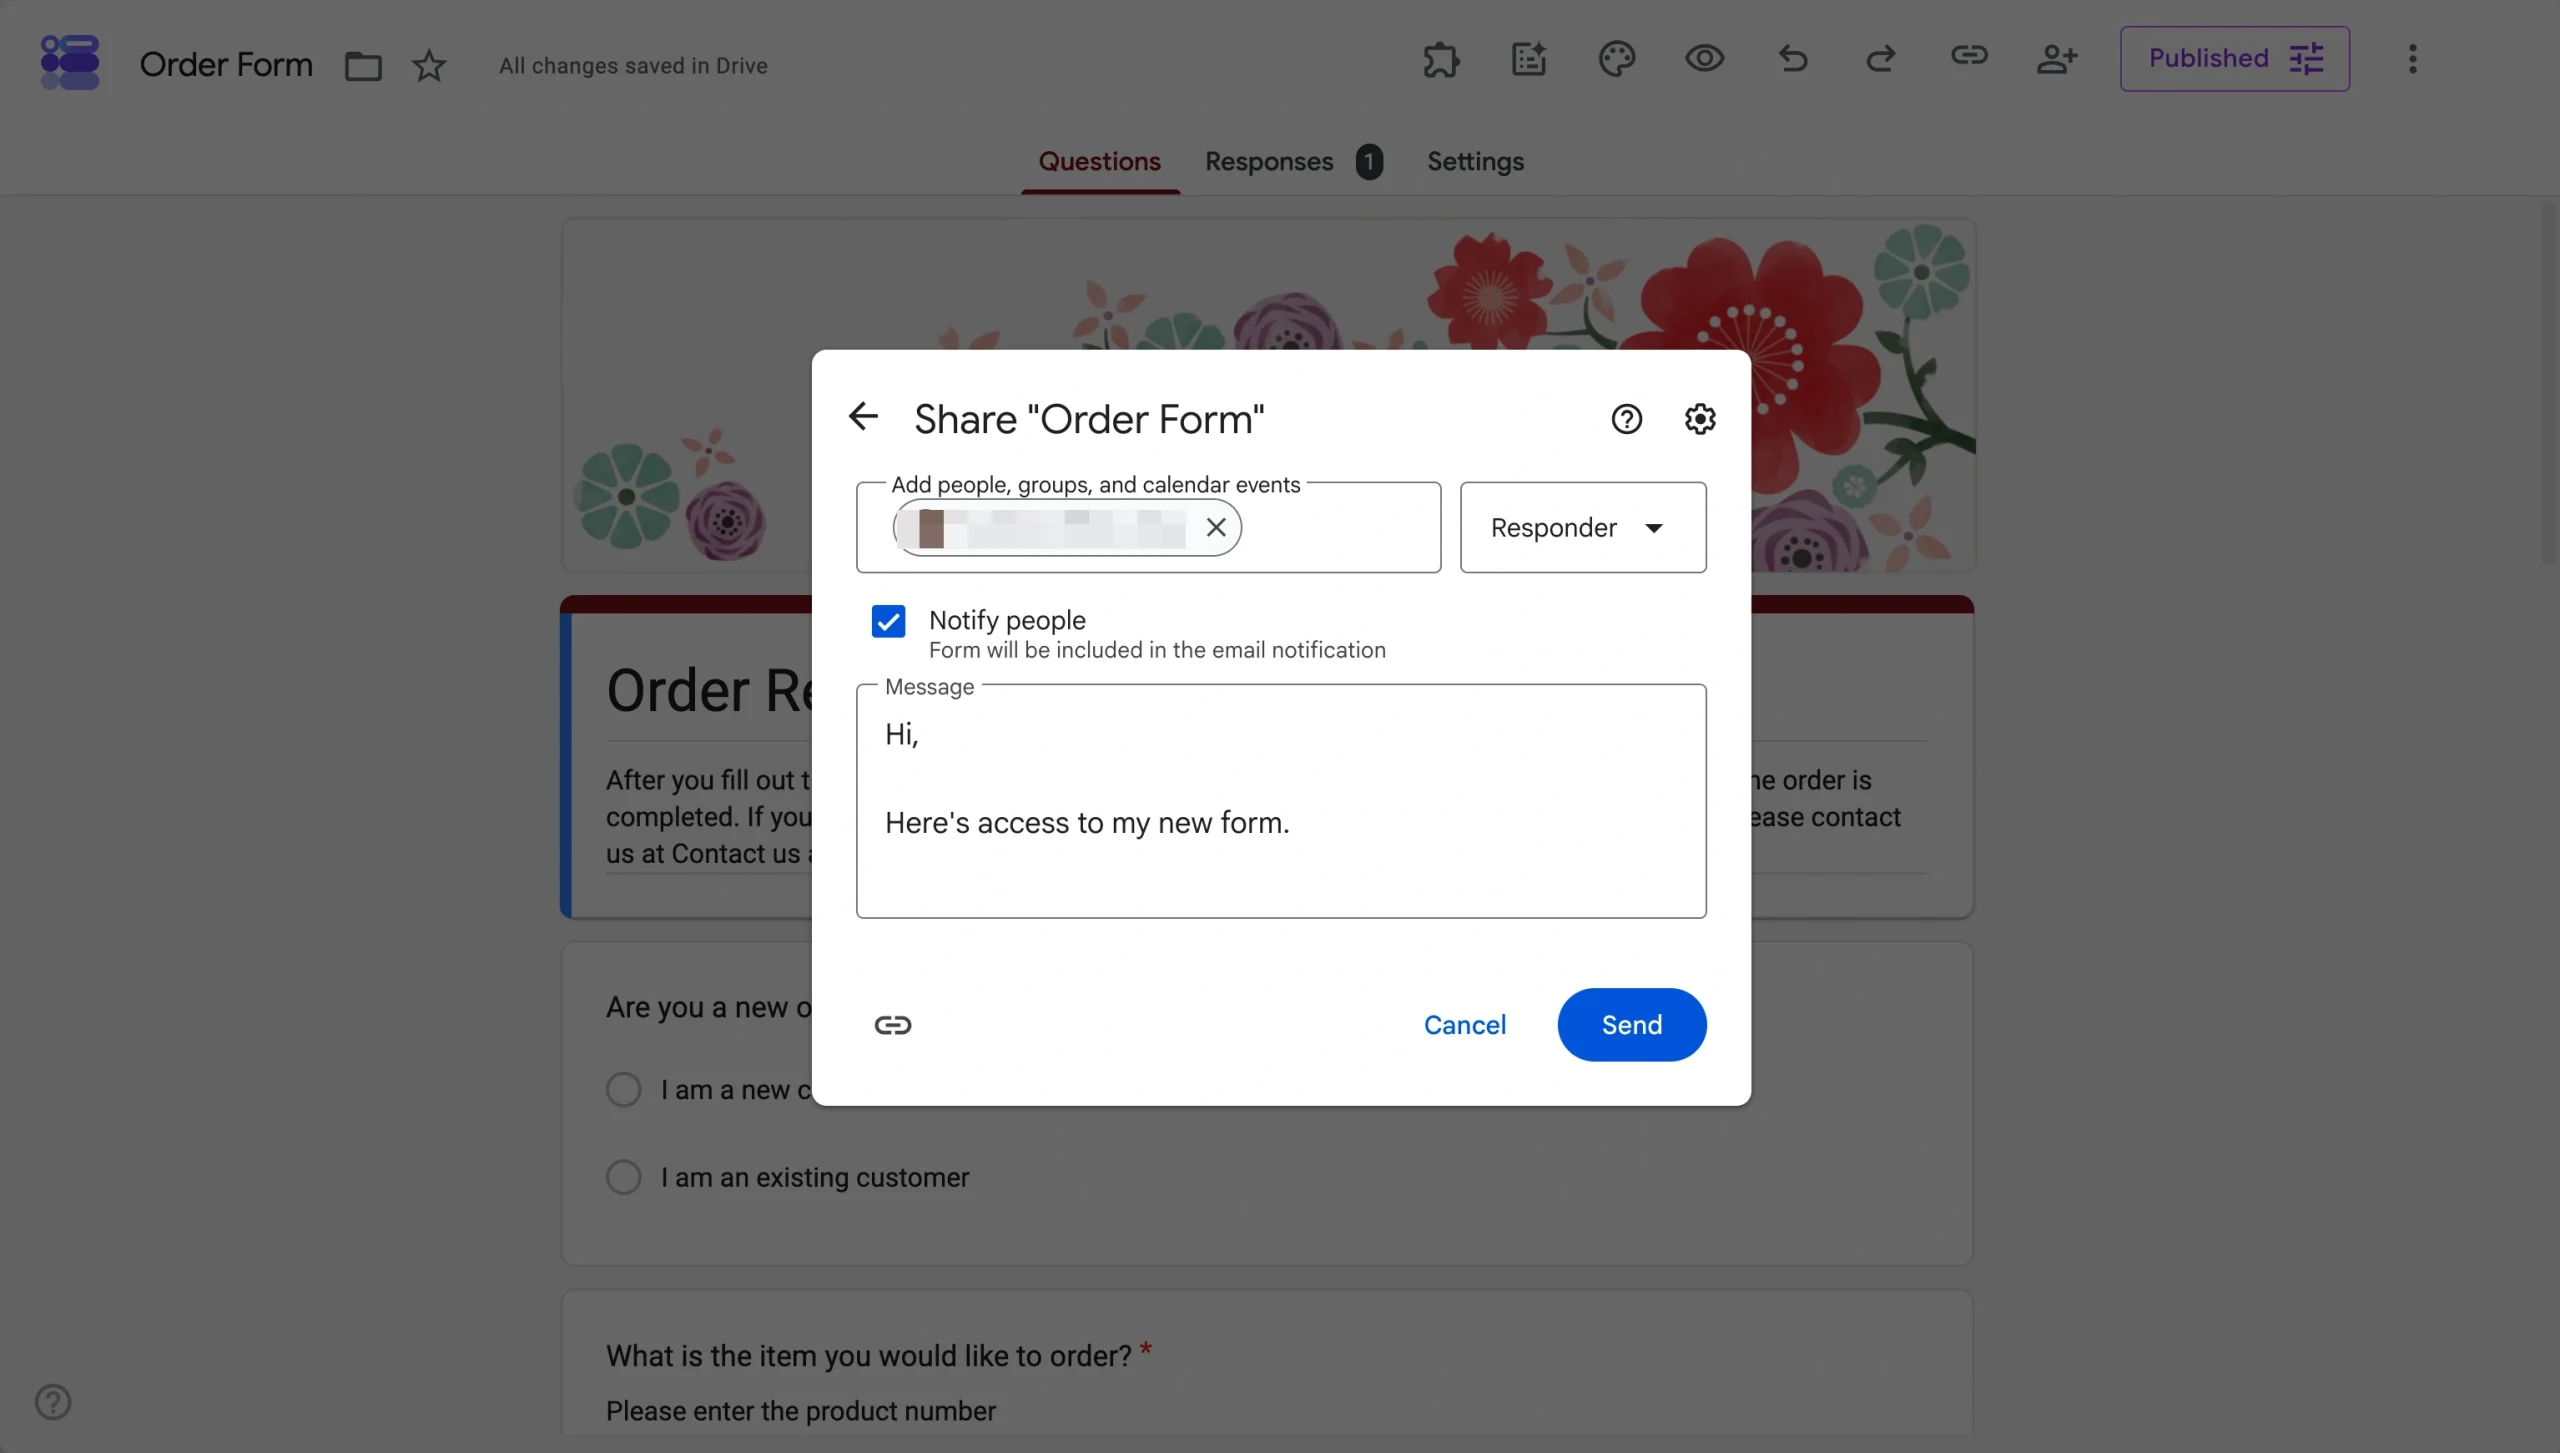
- Once you’ve set up your sharing permissions, you simply click Done.
Collaborators will get an email notification from Google Forms with access to the form. You can optionally add a custom message before sending.
Pro Tip
If you have multiple editors on one form, manage your Google Forms history to see who made changes and when.
Share a Google Form link without edit privileges
It’s a common point of confusion, but “sharing” a form on Google isn’t necessary to get responses.
To send the form to responders, send the responder link. They’ll then be able to fill out the form and nothing else.
Follow the below steps to get your responder link:
- Open your form in Google Forms.
- Click Copy responder link (the chain icon) at the top.
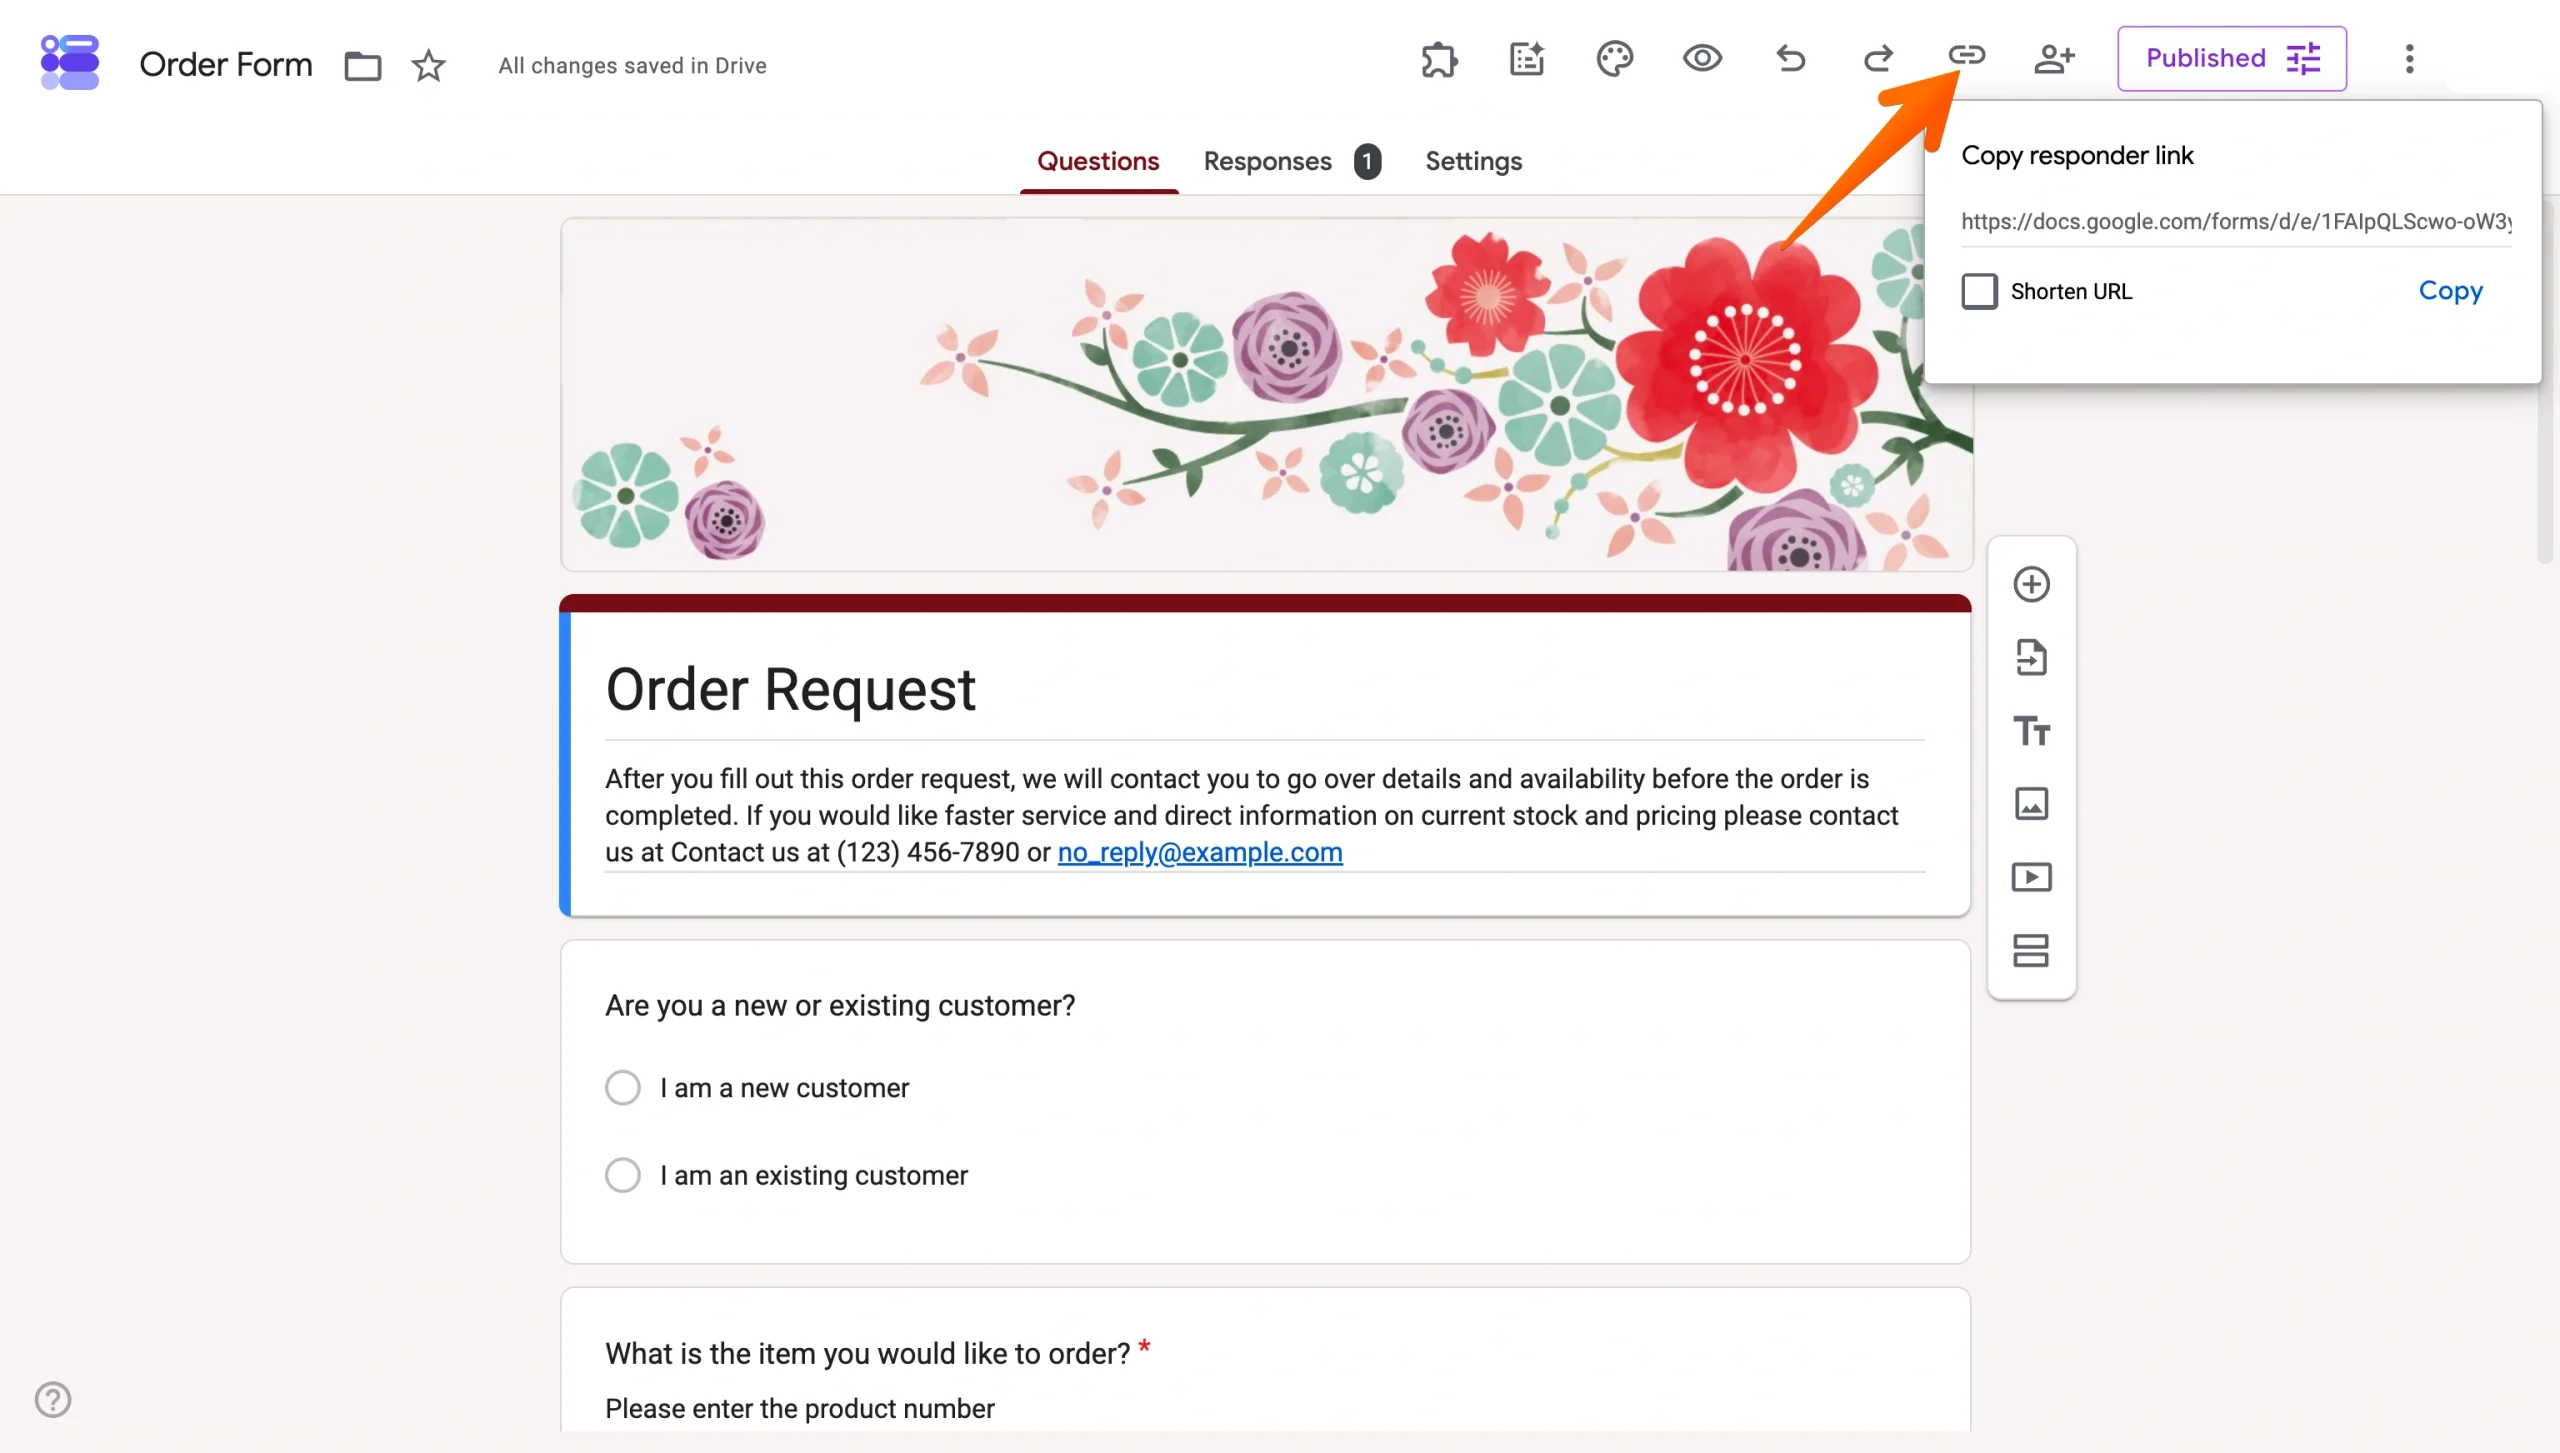
- Send that link to whoever needs to fill out the form.
Who can see response summaries versus raw response data?
Editors and owners are the only people who can see raw response data. If a teammate needs to dig into individual responses, add them as an editor on the form or share the linked Google Sheet directly. Responders can never see raw response data, but if the form’s presentation settings allow, they can view the results summary after responding.
How to see responses on Google Forms
Once responses come in, Google Forms gives you two ways to review them: a visual summary across all submissions, or a closer look at individual responses.
Here’s how to use both. For a more detailed guide, read how to see responses on Google Forms.
View the response summary
- Open your form in Google Forms.
- Click the Responses tab at the top.
- Select Summary.
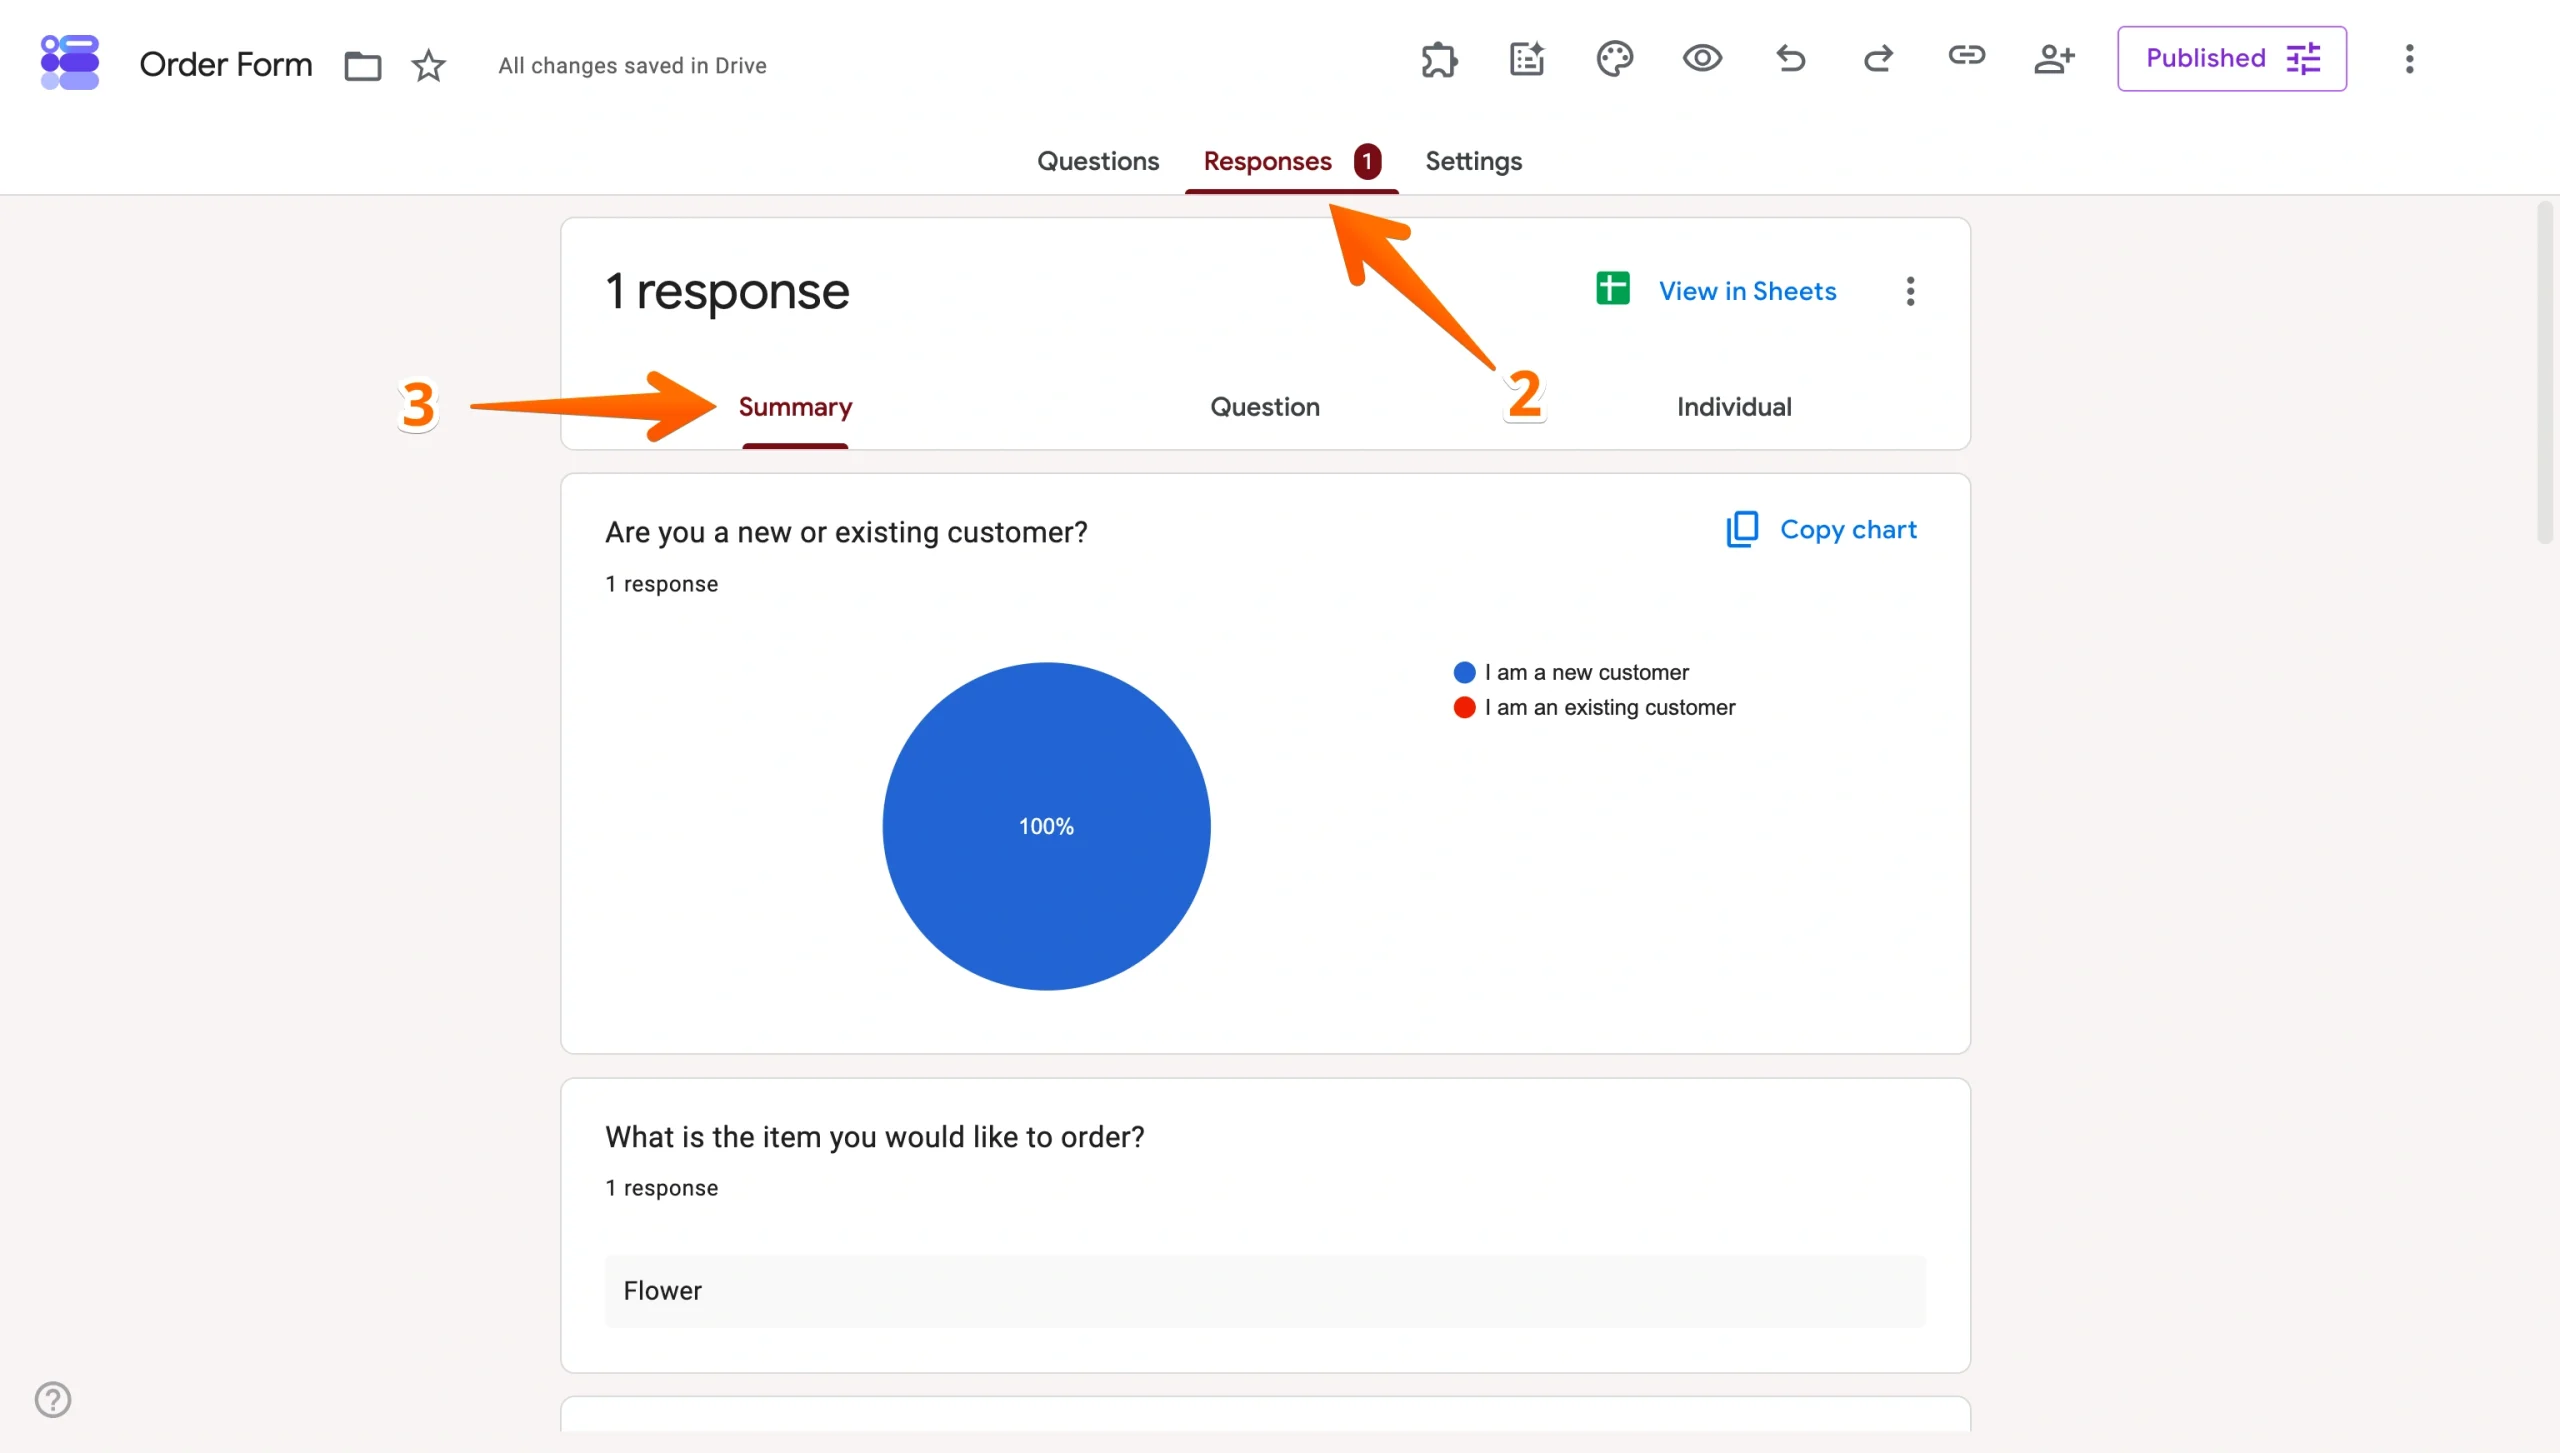
The summary view shows response totals, charts for multiple choice and checkbox questions, and a full breakdown of answers by question. It’s the fastest way to spot patterns across your data at a glance. It’s especially useful for quick, overall reporting or sharing a snapshot of results.
Check individual responses
- Open your form in Google Forms.
- Click the Responses tab.
- Select Individual.
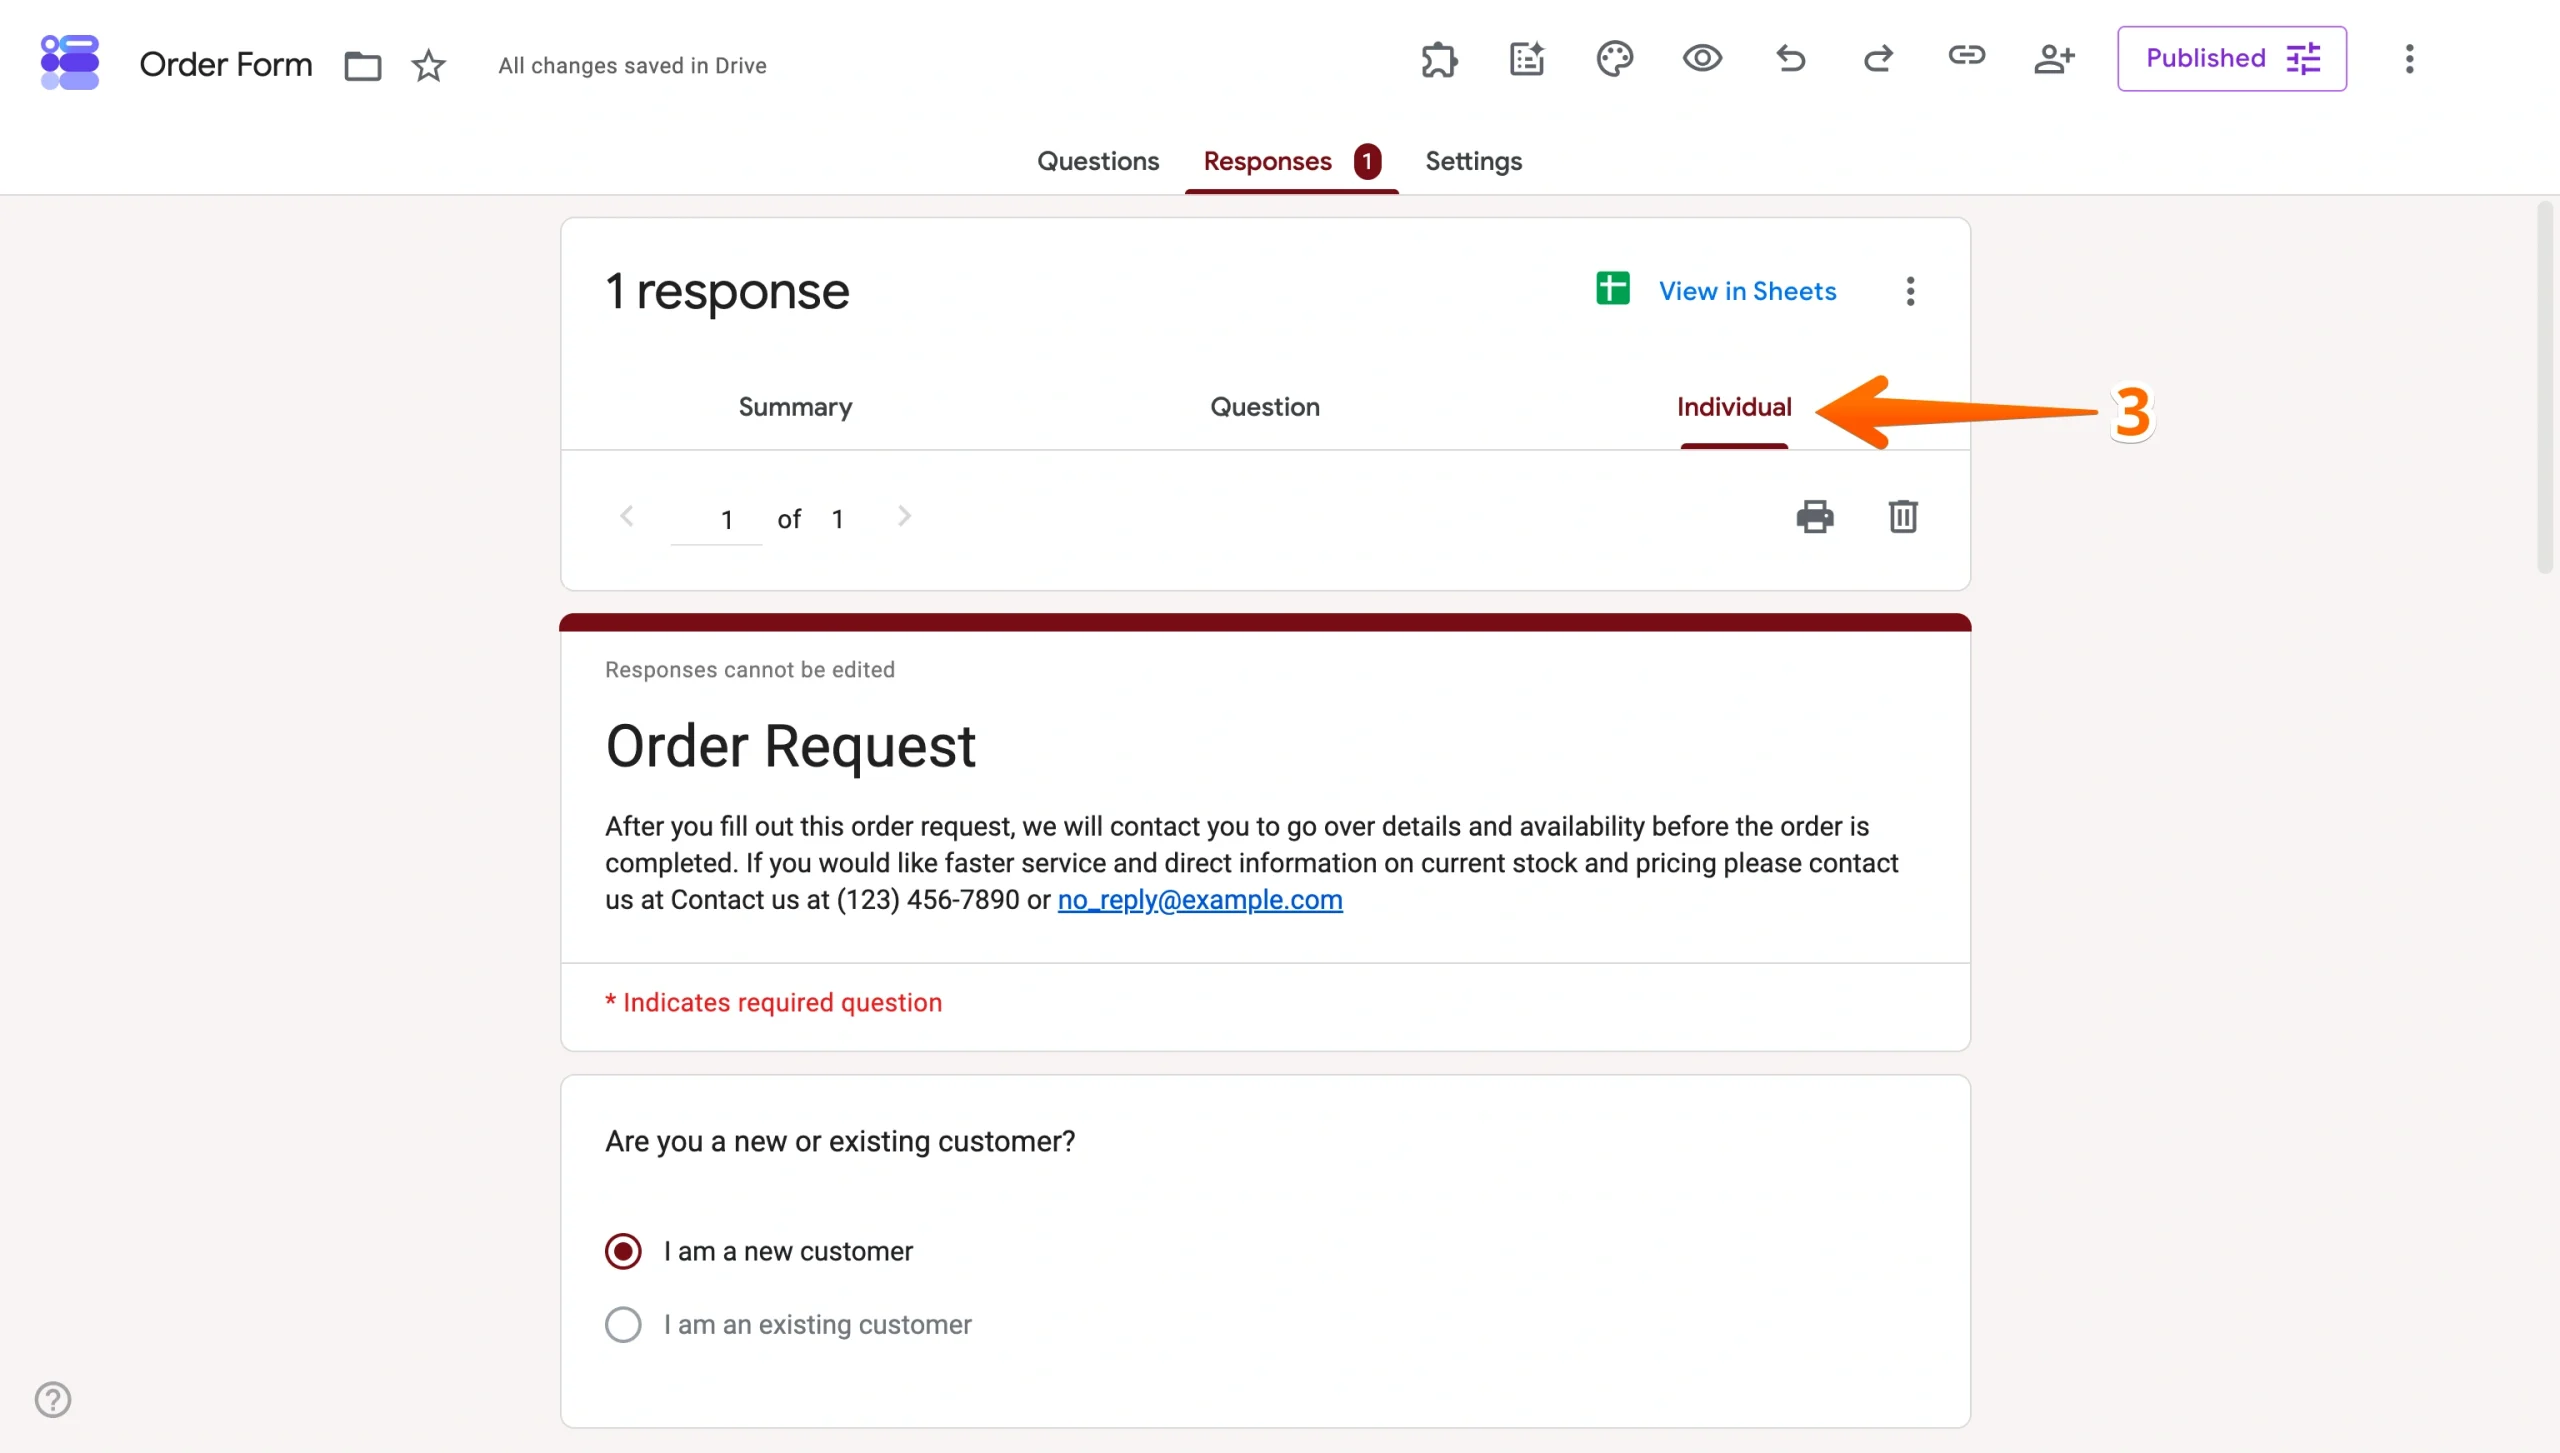
- Use the Previous and Next arrows to move through submissions one at a time.
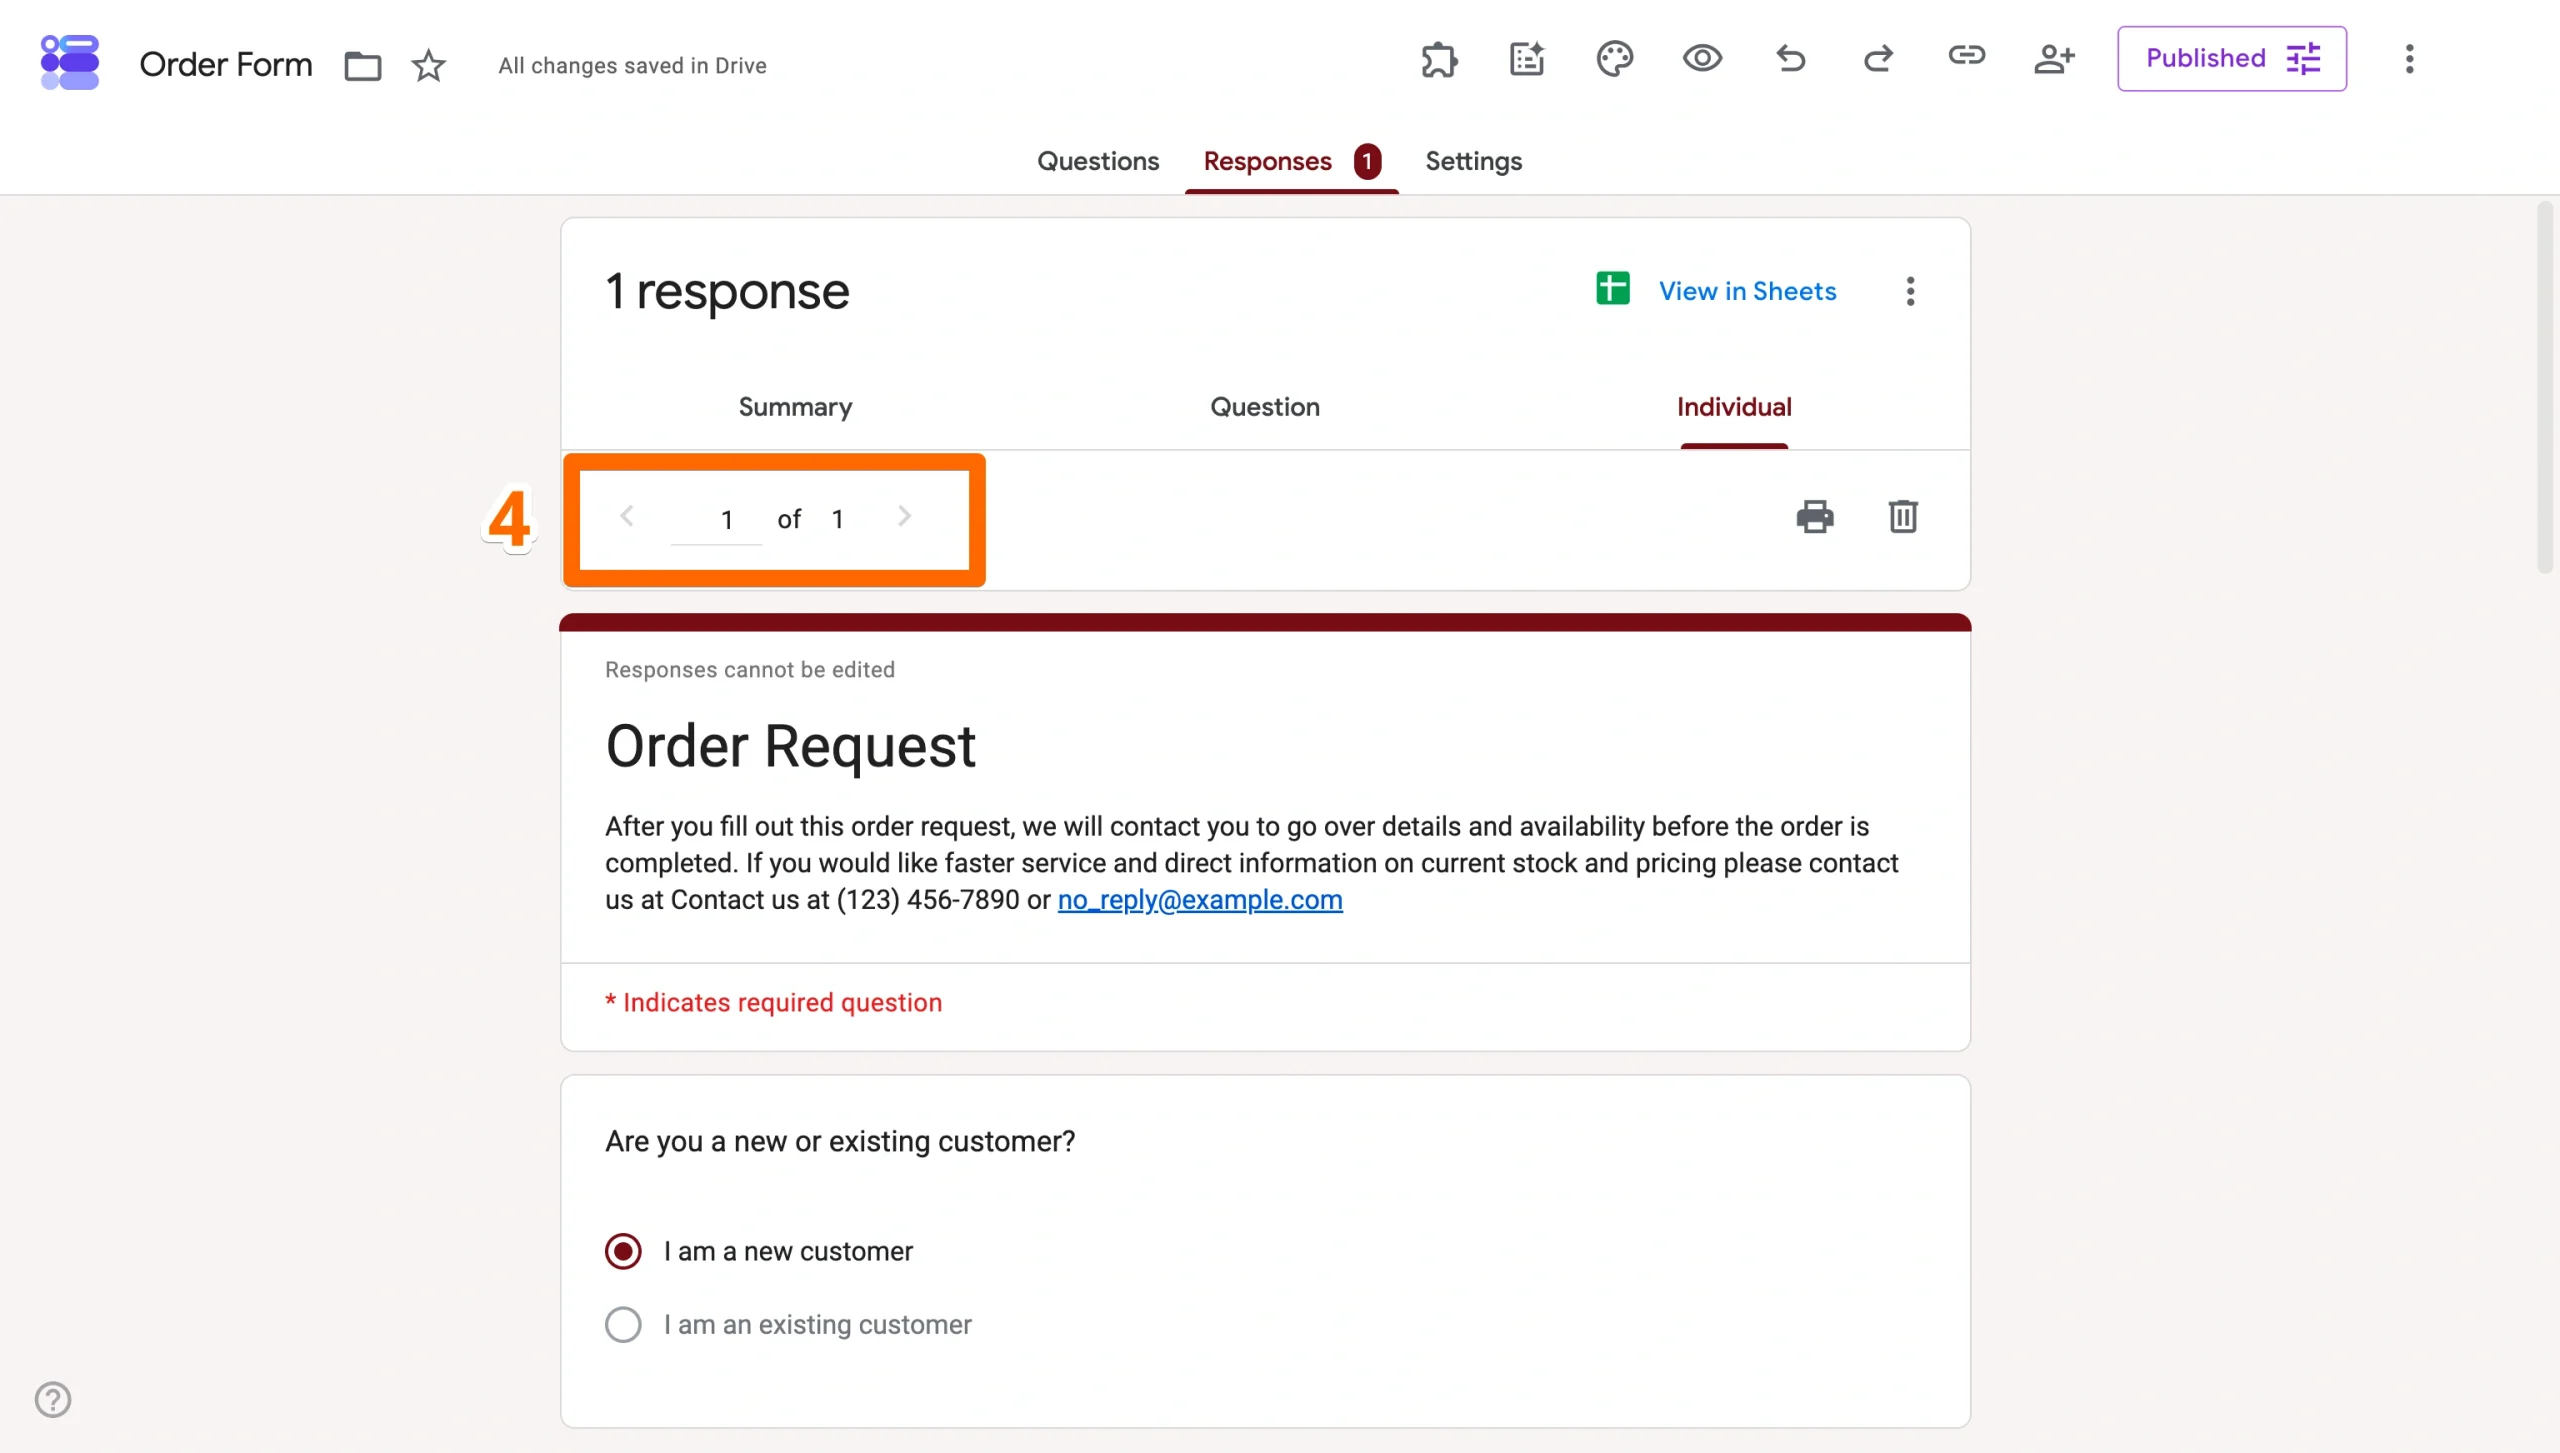
The individual view is better when you need to review a specific submission in full — for example, when responses include open-ended answers that don’t surface clearly in the summary or when you need to follow up with a particular respondent.
Pro Tip
To automate your data sharing, set up a Google Forms Microsoft Outlook integration. This instantly routes real-time form responses directly to specific Outlook folders or shared team lists.
How to export Google Form responses to Excel
Google Forms’ built-in response views work fine for brief analysis, but if you need to manipulate, filter, or share data more flexibly, exporting is the better move.
Below are the two ways to do it.
Open responses in Google Sheets
Opening responses in Google Sheets allows you to analyze responses in real time. Every submission appears as a new row as soon as it’s submitted. Each row has a question mapped in columns and a timestamp for every entry.
- Click the Responses tab.
- Click the View in Sheets icon in the top right.

Note: If you haven’t set the Google Sheet up yet, it will say “Link to Sheets.”
The linked sheet is the natural handoff point between Google Forms’ built-in views and anything more analytical, such as sorting, filtering, building charts, or sharing data with teammates who don’t need access to the form itself.
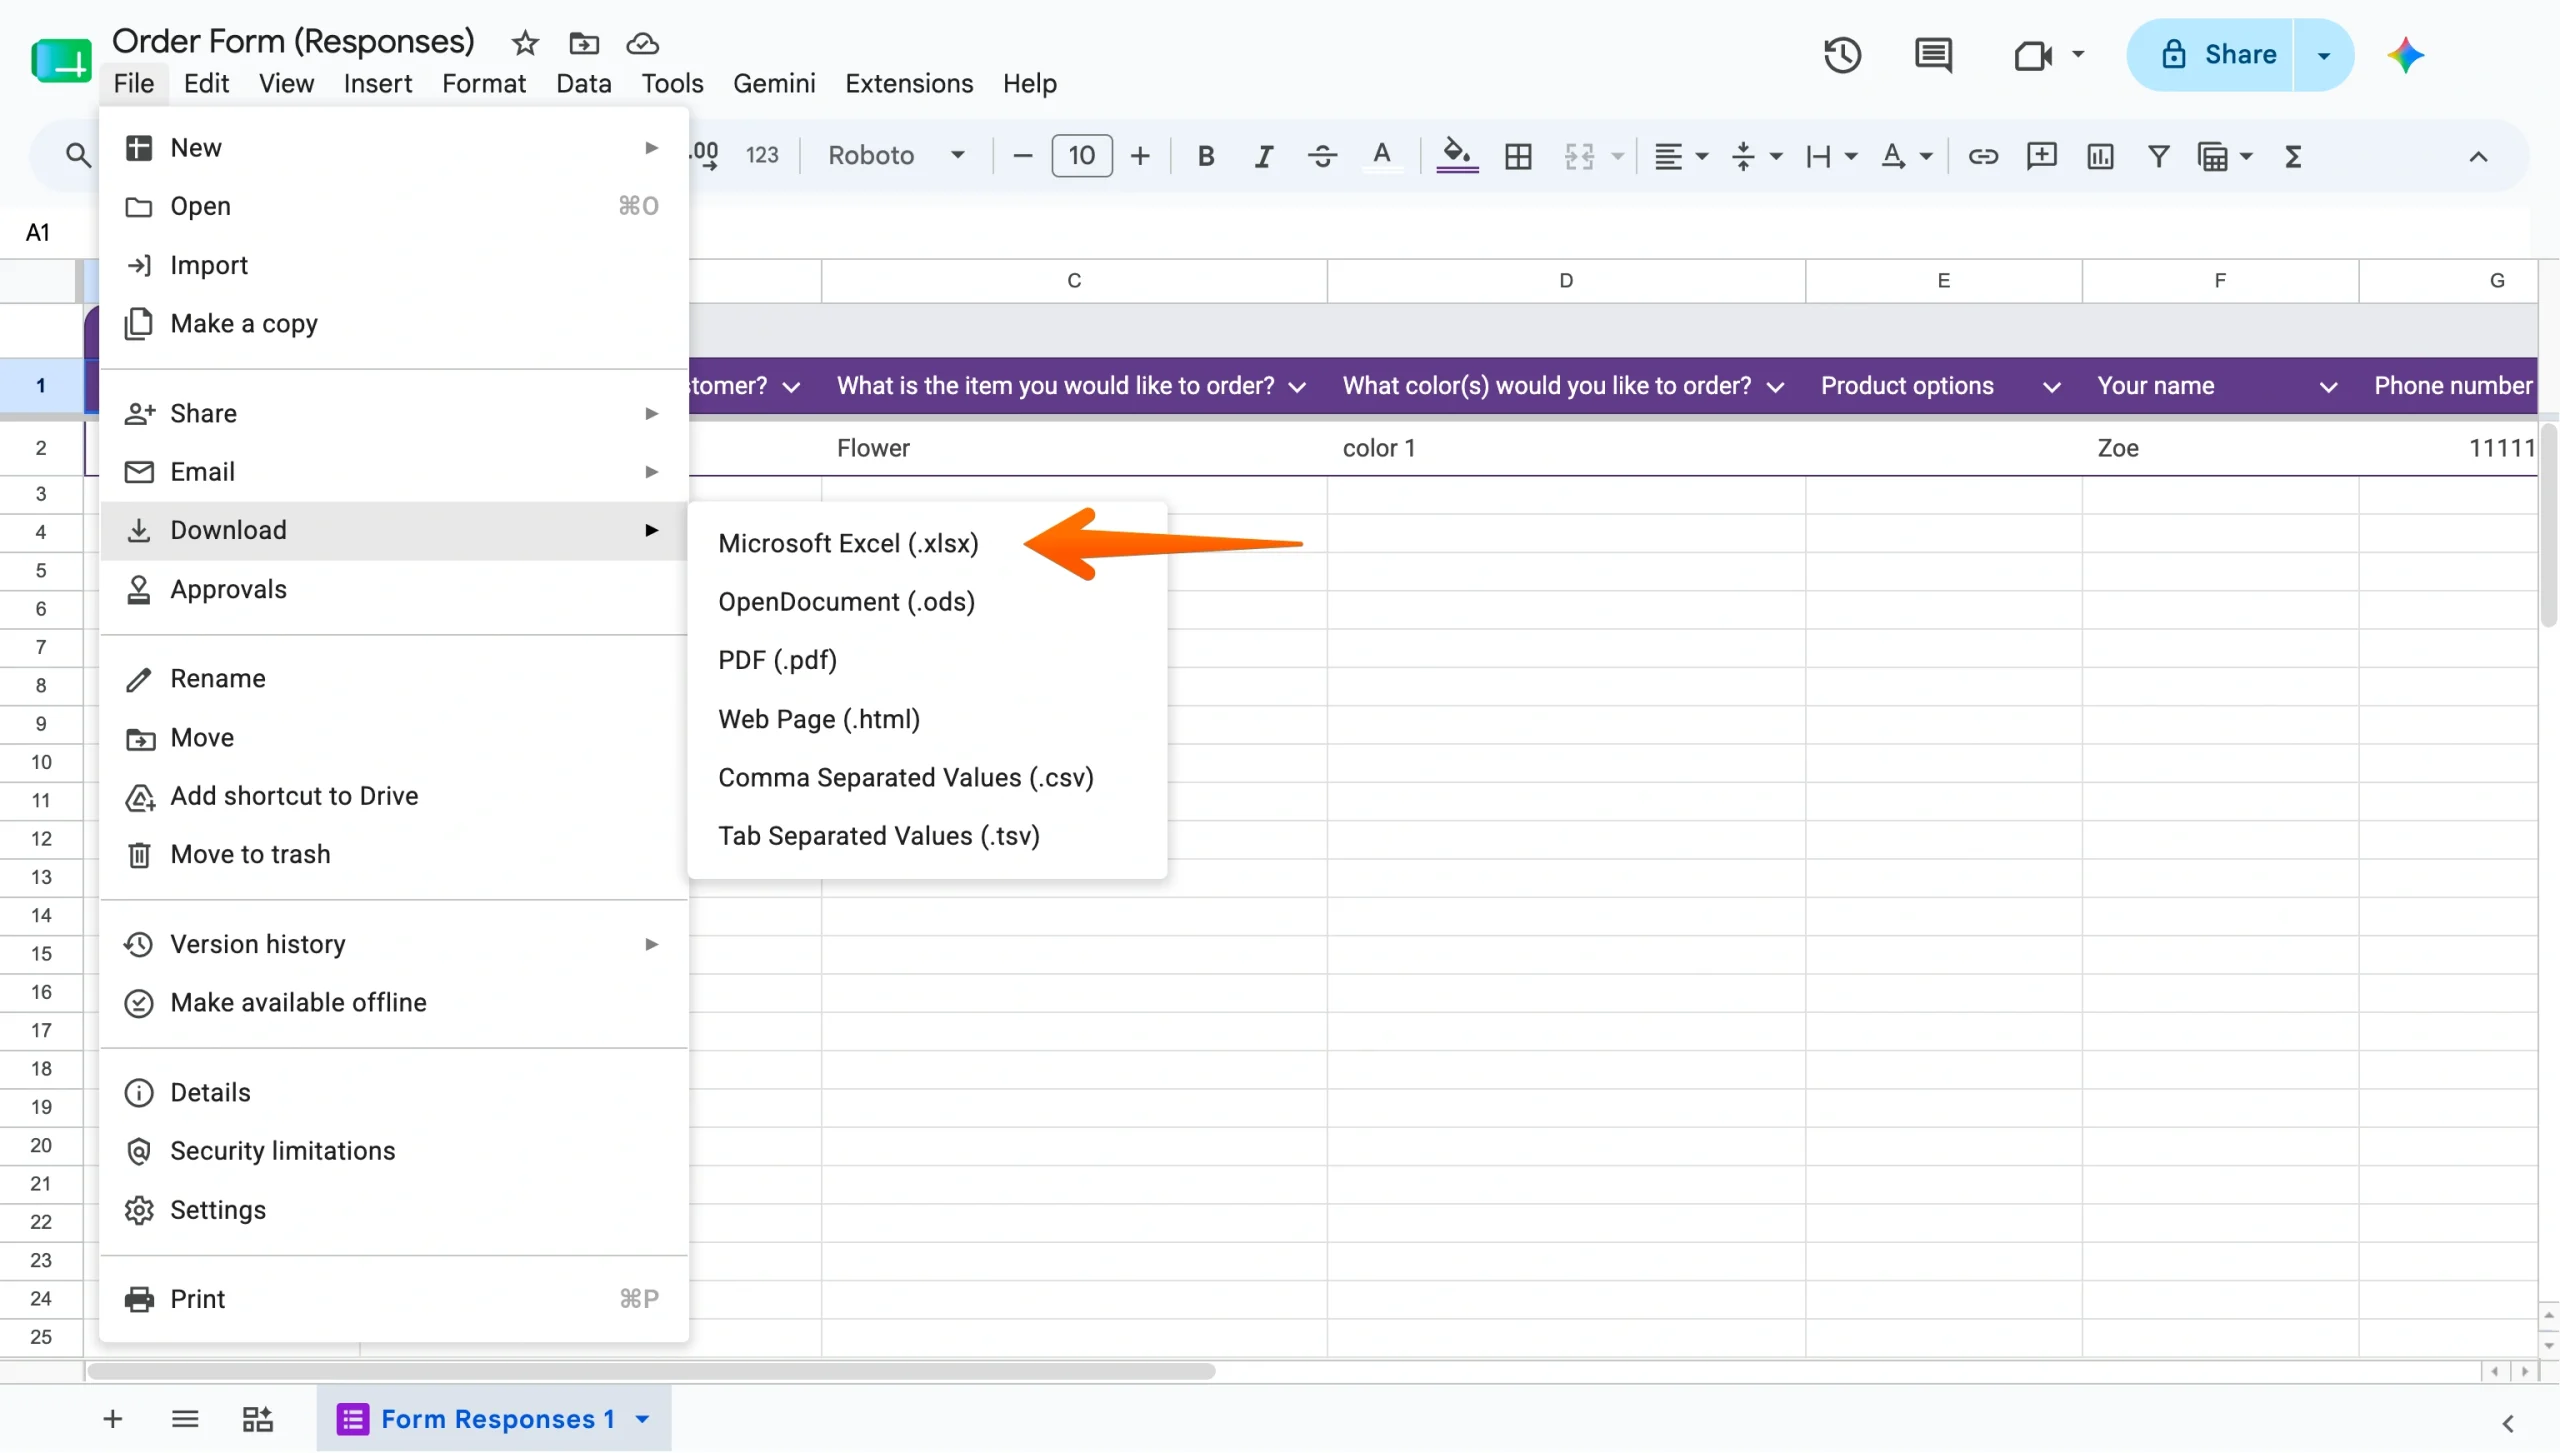
Download the data as an Excel or CSV file
You can download your form responses as an Excel file via Google Sheets or in CSV format via Google Forms.
- An Excel file is good if you need to share a snapshot or analyze data without using Google Sheets. To download an Excel (XLSX) spreadsheet, open the linked Google Sheet, click File > Download > Microsoft Excel (.xlsx).
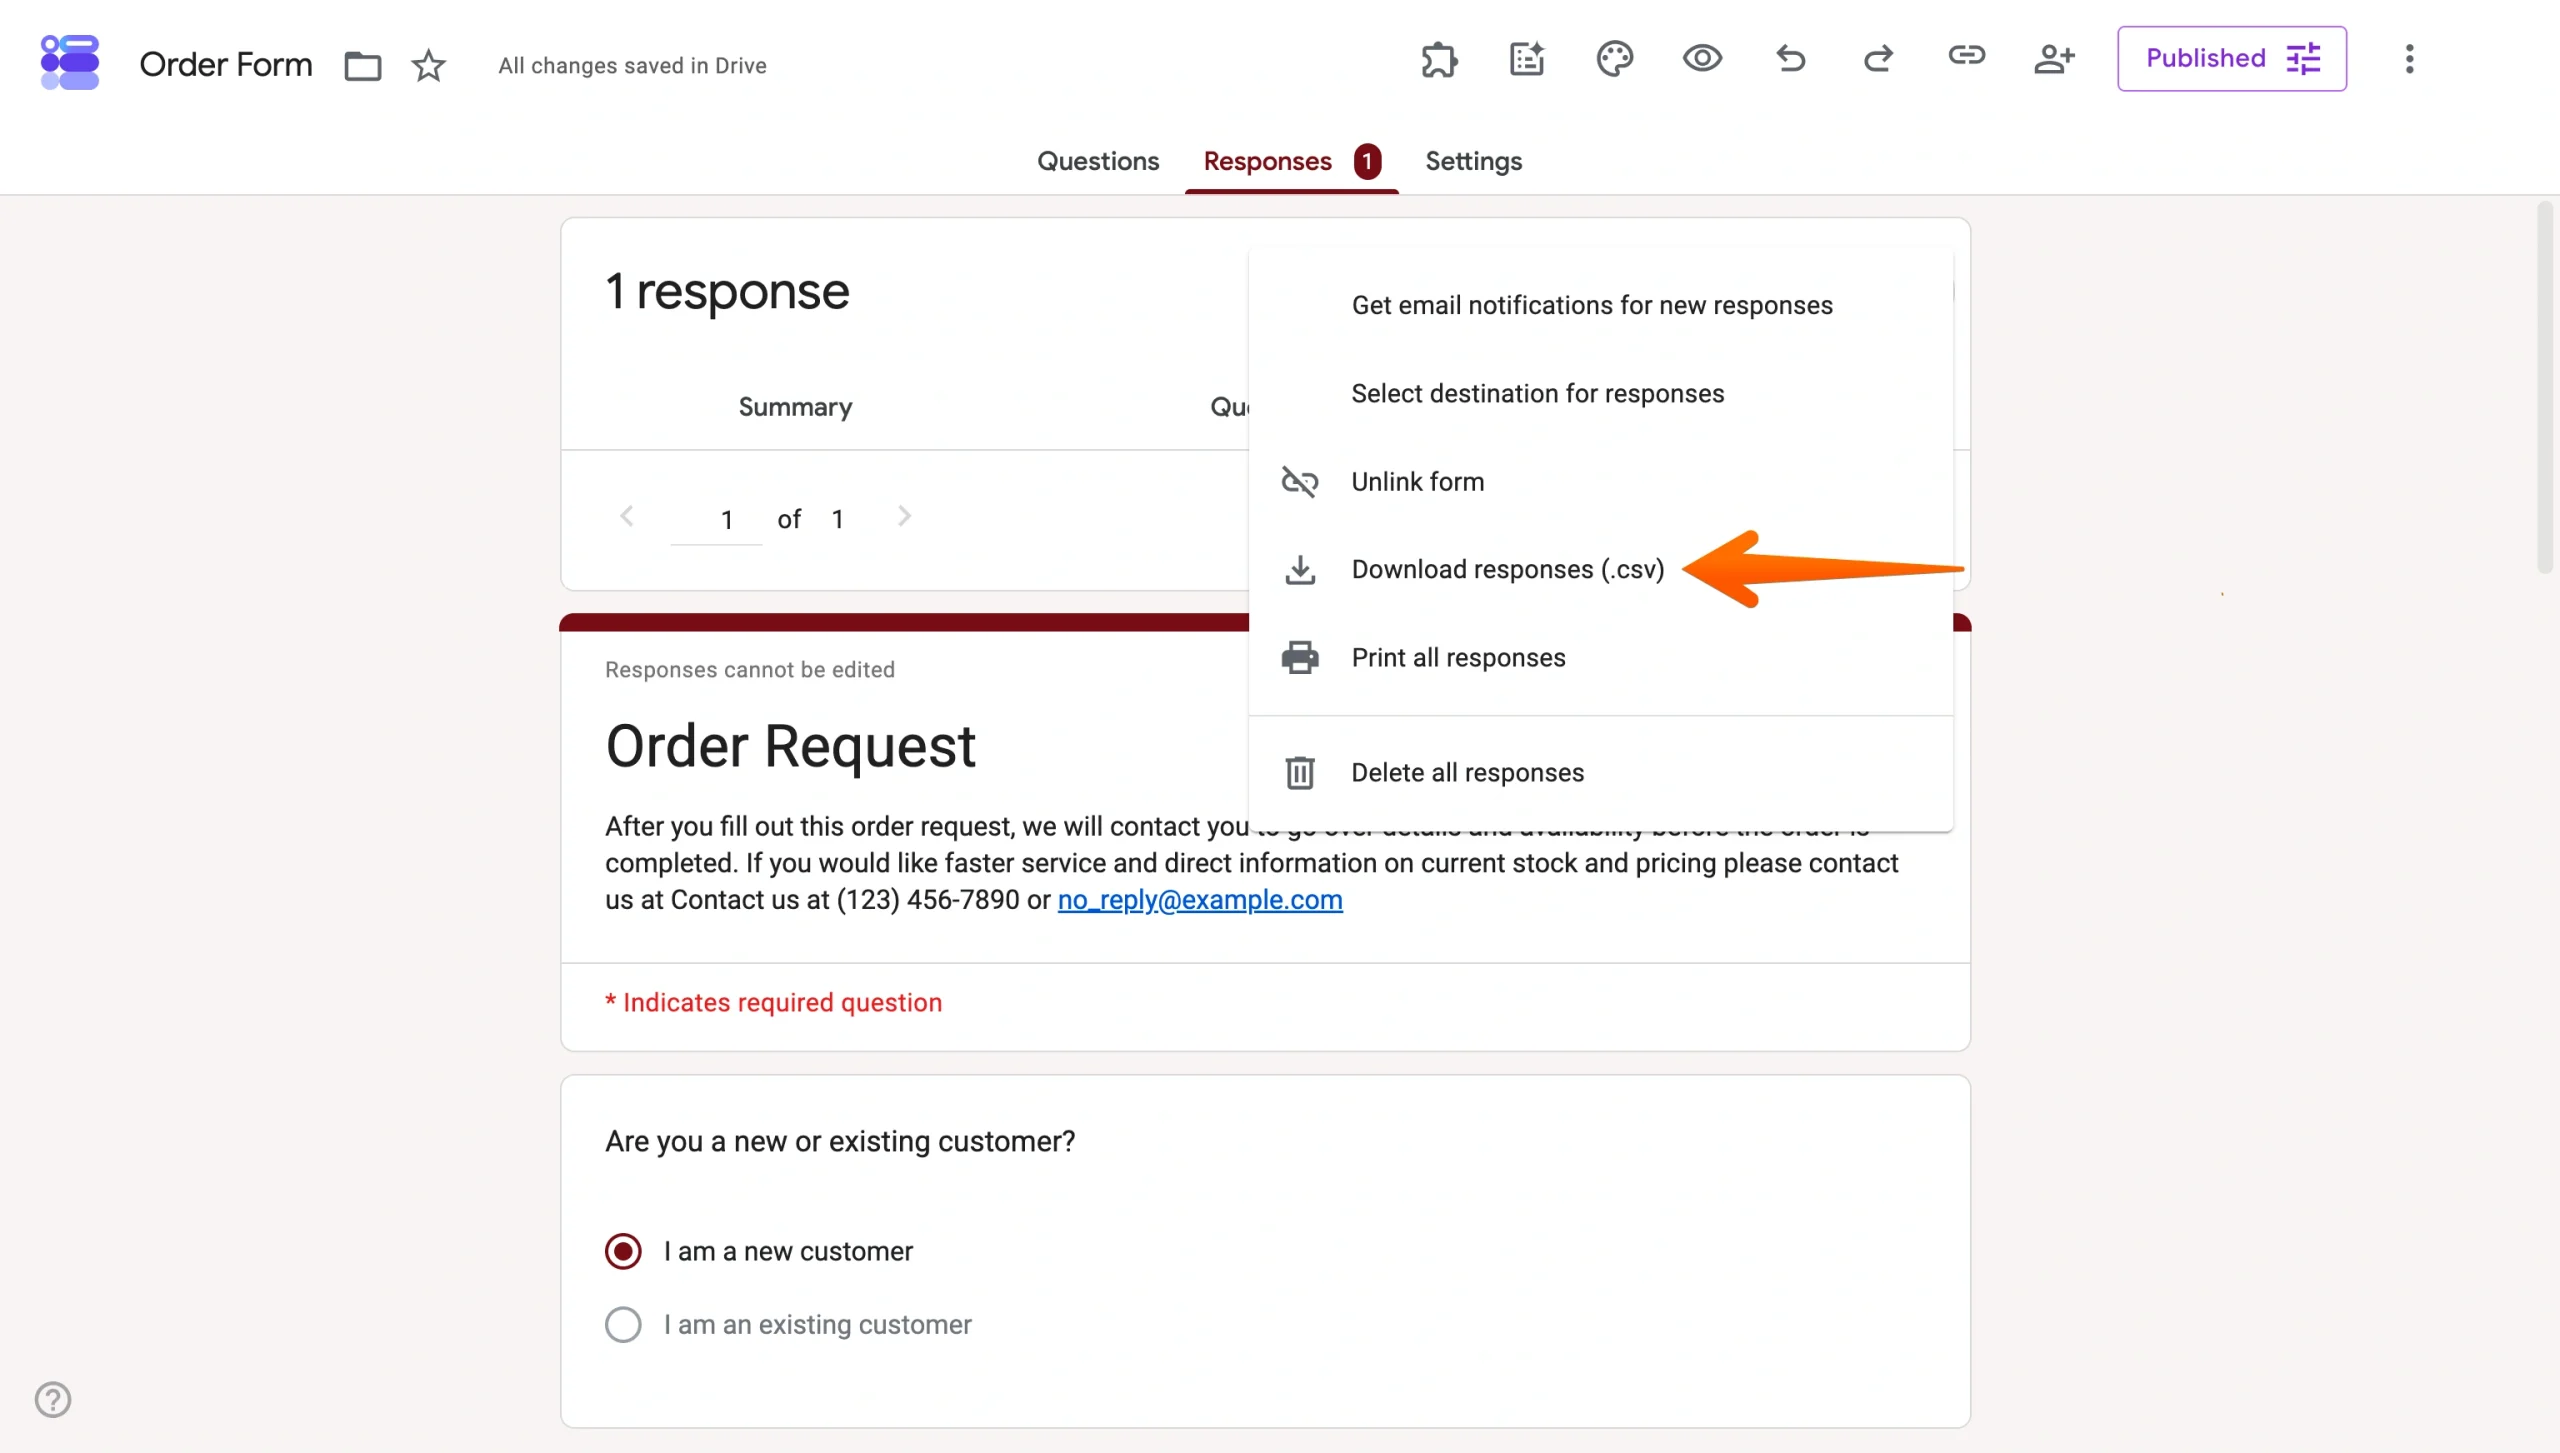
- To export as a CSV file, click the Responses tab in Google Forms, then click the More menu (three dots) and select Download responses (.csv).
When to choose export over sharing in Google Forms
Export becomes the better option than the built-in form responses when you need to
- Filter or sort responses by specific criteria.
- Run formulas or build pivot tables.
- Share data with people outside your Google Workspace.
- Work with responses offline.
- Handle larger data sets.
Google Forms also has hard limits on its built-in views. Once a form exceeds 10,000 responses, the individual and question views stop working. Above 50,000, the summary disappears too. At that scale, the linked sheet or a dedicated reporting tool is the only practical way to work with your data.
Google Forms makes basic response sharing easy, but it’s not built for real reporting
Google Forms is fine when you only need quick summaries, simple sharing, or a spreadsheet export. But if your team needs live dashboards, branded reports, editable submission management, or cleaner collaboration without juggling Sheets permissions, the built-in workflow starts to feel limited fast. That’s where Jotform makes more sense.
Better response reporting starts with Jotform
Google Forms gives you a summary view, a linked Google Sheet, and a CSV export. The summary is functional, but it’s not much to look at (and neither is the form). It has basic charts, no branding, little customization, and no way to share it as a standalone report.
Jotform and Jotform Tables, on the other hand, are built around submission management from the start. Jotform’s form builder gives you more question types, conditional logic, file uploads, and payment fields out of the box. And you can customize it so that it looks entirely like your brand.
Every response lands directly in Tables, a structured, spreadsheet-style interface where you can filter, sort, edit entries, and share views with teammates — all without juggling separate sheet permissions or losing the connection to the original form.
For reporting, Jotform Report Builder turns your response data into live, visual reports that you can share with a link or present directly. Charts update automatically as new submissions come in, and you can brand and customize the layout — something that Google Forms’ summary view doesn’t support at all.
If your team is already set up around spreadsheets and isn’t ready to move away from that workflow, Jotform’s Google Sheets integration keeps everything in sync automatically. New submissions flow straight into your sheet in real time, so you get Jotform’s form-building and reporting strengths without abandoning the tools your team already uses.
Use Google Forms for the basics, and Jotform for better reporting
Google Forms is a solid starting point if you need a quick form, a simple response summary, a spreadsheet export, and little analysis.
The problem? Limitations show up fast once your needs grow. Sharing responses with teammates means managing separate sheet permissions, reports require manual screenshots, and there’s no live dashboard or branded report.
This is where Jotform pulls ahead.
Jotform Tables gives your team a shared, editable view of every submission. Jotform Report Builder turns those submissions into polished, shareable reports that update in real time. And if you want to keep working in spreadsheets, the Google Sheets integration keeps your data in sync with no manual exporting.
Best of all, you can migrate your existing Google Forms into Jotform in less than a minute. Jotform’s Google to Jotform migration tool handles it easily. Give it a try for free today.
This article is for Google Forms users, business owners, team leads, content managers, and anyone who wants to share, review, export, or report on form responses more clearly while understanding when a tool like Jotform may be a better fit.
FAQs about Google Form responses
You can allow respondents to see a summary of Google Form responses in the settings. Go to Settings > Presentation and turn on View results summary. Once active, respondents will receive a link to the summary after submitting.
You can view individual responses in Google Forms by clicking the Responses tab and selecting Individual. Use the Previous and Next arrows to move through submissions one at a time, or use the dropdown to jump to a specific response.
You can export Google Form responses to Excel in two ways. You can open the linked Google Sheet via the Responses tab, then download it as an Excel file from File > Download > Microsoft Excel (.xlsx). Alternatively, go to the Responses tab, click the More menu (three dots), and select Download responses (.csv) for a lighter export you can open in Excel directly.


Send Comment: