
Collecting input is a constant inevitability of office life, and if you work with a remote team, online surveys are an easy way to collect this information. If you’re a Microsoft Outlook user, it’s easy to send surveys via email with the program’s built-in features.
Using Outlook’s integrated poll options, you can quickly gather feedback from team members to make decisions faster without ever leaving your email inbox. Simply create an email, add your poll, click Send, and wait for the responses to roll in.
This integration brings the power of Microsoft Forms, a popular online form solution, directly to your inbox. You don’t have to switch between multiple tabs, which can slow down what should be a straightforward process.
This native integration isn’t the only way to streamline your survey process, though. Here’s how to create a survey in Microsoft Outlook, as well as the ways a powerful alternative like Jotform can seamlessly integrate with your inbox to take your surveys to the next level.
How to create a quick survey in Outlook
Thanks to Outlook’s native integration with the Microsoft 365 suite, adding a Microsoft Forms poll to an email takes only a few minutes.
Before you add a poll to your email, you’ll need to download the Polls app to your Outlook Add-Ins dashboard. This takes only a few seconds using these quick steps:
- Open Microsoft Outlook.
- Click the More Apps button in the Add-Ins tab on the home menu at the top of the screen.
- Click the Get Add-Ins button in the bottom right corner.
- Search for Polls.
- Click the Add button under the app Polls by Microsoft Forms.
Once you have the Polls app installed on your Outlook toolbar, here are the steps you can take to add a survey to your emails:
- Open Microsoft Outlook.
- Click New, then Mail in the top left corner to start a new email.
- In your new message, select the Insert tab, then click Poll. If you’re using the web version of Outlook, you can find the Poll add-in under the More Apps button in either the Message or the Insert tab.
- Once the Poll window opens, type your poll questions and response options into the provided fields.
- If you want to add more options, click the + Add Option button.
- After your poll is complete, you can choose whether respondents can select one or more options by toggling the Multiple Answers button on the right-hand side. If it appears green, multiple answers have been enabled.
If your Microsoft Outlook poll has been successfully added to your email, you’ll see a link to your poll populated in the body text, with your email address pre-populated in the CC line. From there, all you have to do is click Send and wait for your responses.
Although Microsoft Outlook can send simple surveys to collect instant data, this method may not be well suited to complex workflows. Surveys that require response organization, analysis, and corresponding actions will likely be too complicated for basic Outlook tools to handle.
Consider an example scenario: You’re trying to schedule appointments with your internal team for performance reviews. You send out a survey offering time slots and await their responses. If your team comprises only two or three people, scheduling these meetings manually based on response data should be straightforward, but if you work with a team of 20 or more employees, you could struggle to get organized and accommodate everyone’s preferences on your own.
To avoid the hassle of manual data organization, you may consider turning to an automated solution like Jotform. This automated survey solution can take the scheduling data from our previous example and instantly schedule meetings on your Outlook calendar for each submitted response, thanks to its seamless integration.
Pro Tip
Want to skip the process of building a schedule survey altogether? Use Jotform’s Scheduling Poll template instead. This ready-to-use template can be customized in seconds to fit your appointment options so you don’t have to start from scratch.
Jotform Outlook integration for calendar alerts
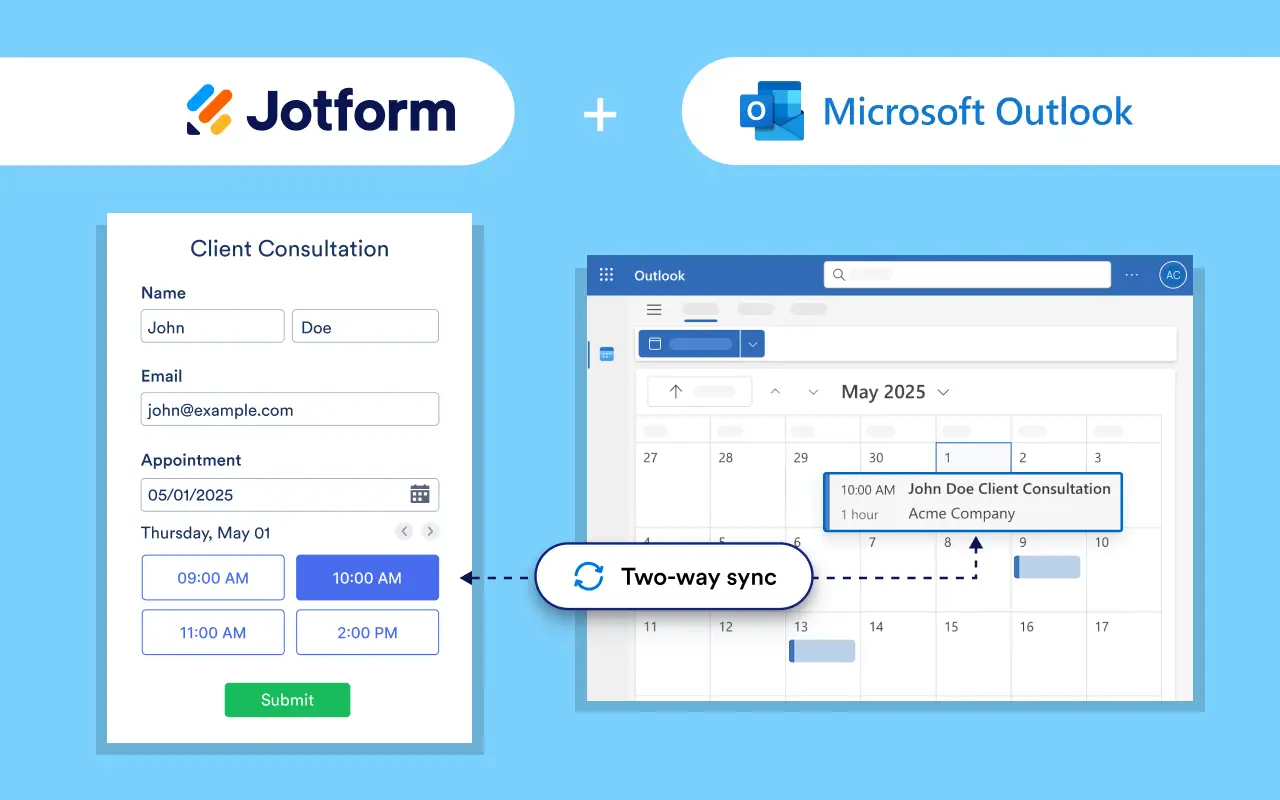
Managing your Outlook survey responses is simple with a no-code online form builder like Jotform, which offers a drag-and-drop interface. With the help of the Jotform Microsoft Outlook Calendar integration, you can streamline many forms management tasks, such as
- Creating a survey
- Scheduling appointments
- Generating contacts
- Sending follow-up emails
Using Jotform’s free online poll maker is effortless, but rather than embedding your polls directly into your emails (which can introduce functionality and security risks), you can use one of the many sharing options available in the Jotform Form Builder. For instance, you can send polls using
- Email invites
- Shareable links
- QR codes
- Social media
- Embedded website forms
Once your forms are sent and responses start to roll in, the Jotform Microsoft Outlook Calendar integration goes to work. Responses to integrated forms automatically send notifications and add events to your calendar, taking your process from hassled to handled in just a few clicks.
So how do you get started with this efficient scheduling integration? Follow these steps to connect your survey form’s appointment field to your Microsoft Outlook calendar:
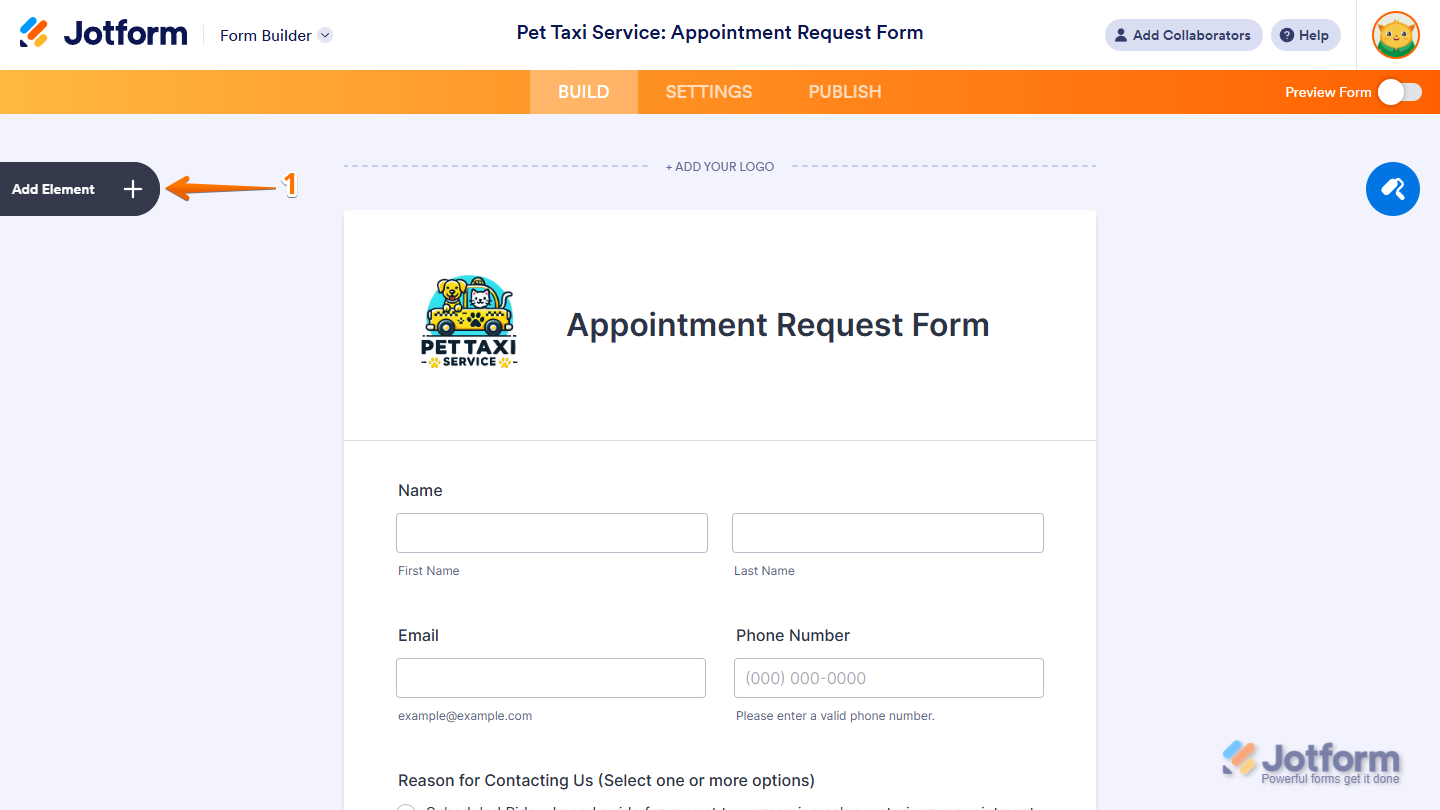
- Open your form in the Form Builder, then click the Add Element button on the left side of the page.
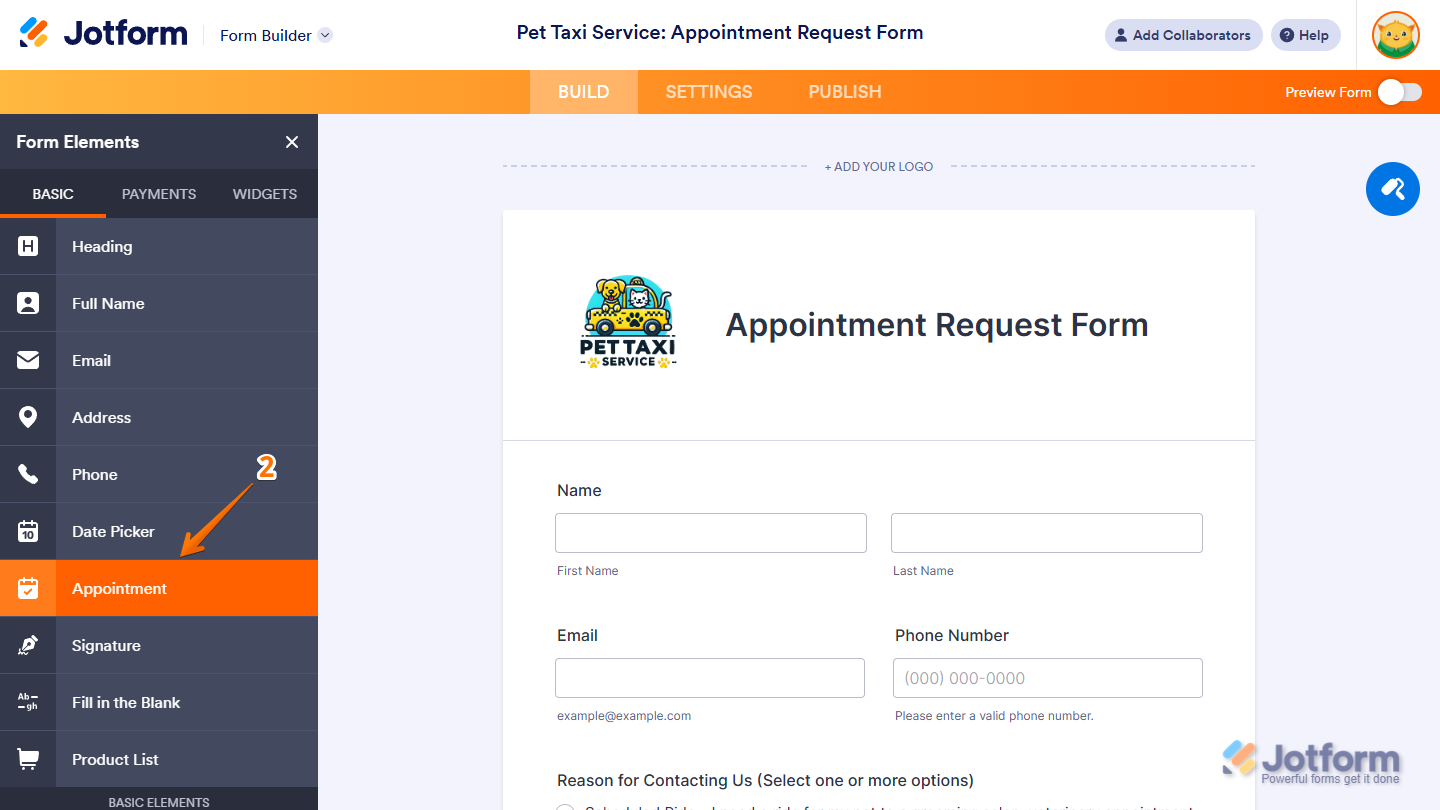
- Under the Form Elements menu, click the Basic tab. Then click on Appointment, or simply drag and drop the Appointment element to where it should be located on your survey.
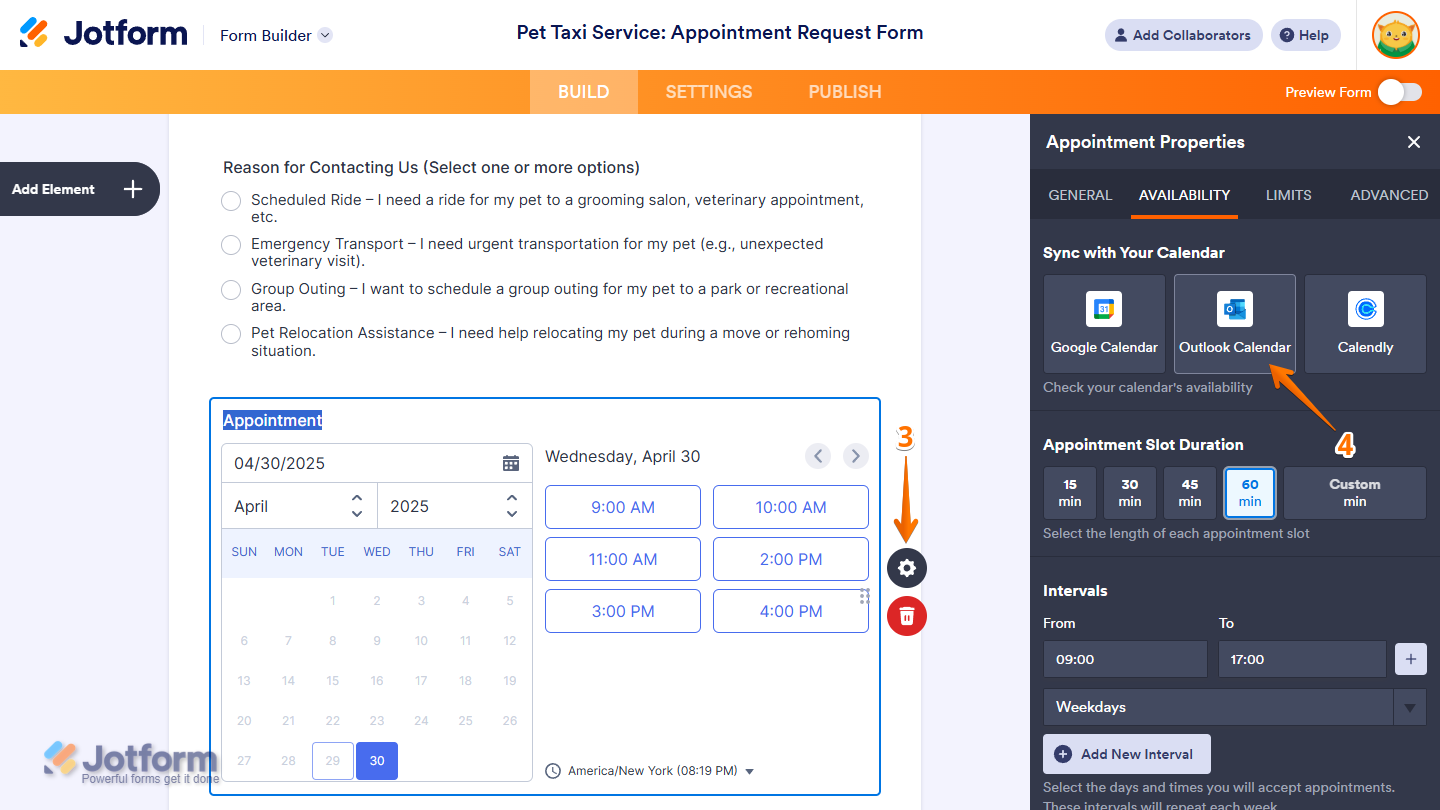
- On the right side of your new Appointment field, click on the gear icon. This will take you to the Appointment Properties menu.
- In the Appointment Properties menu, select the Availability tab. Then click on Outlook Calendar in the Sync with Your Calendar section.
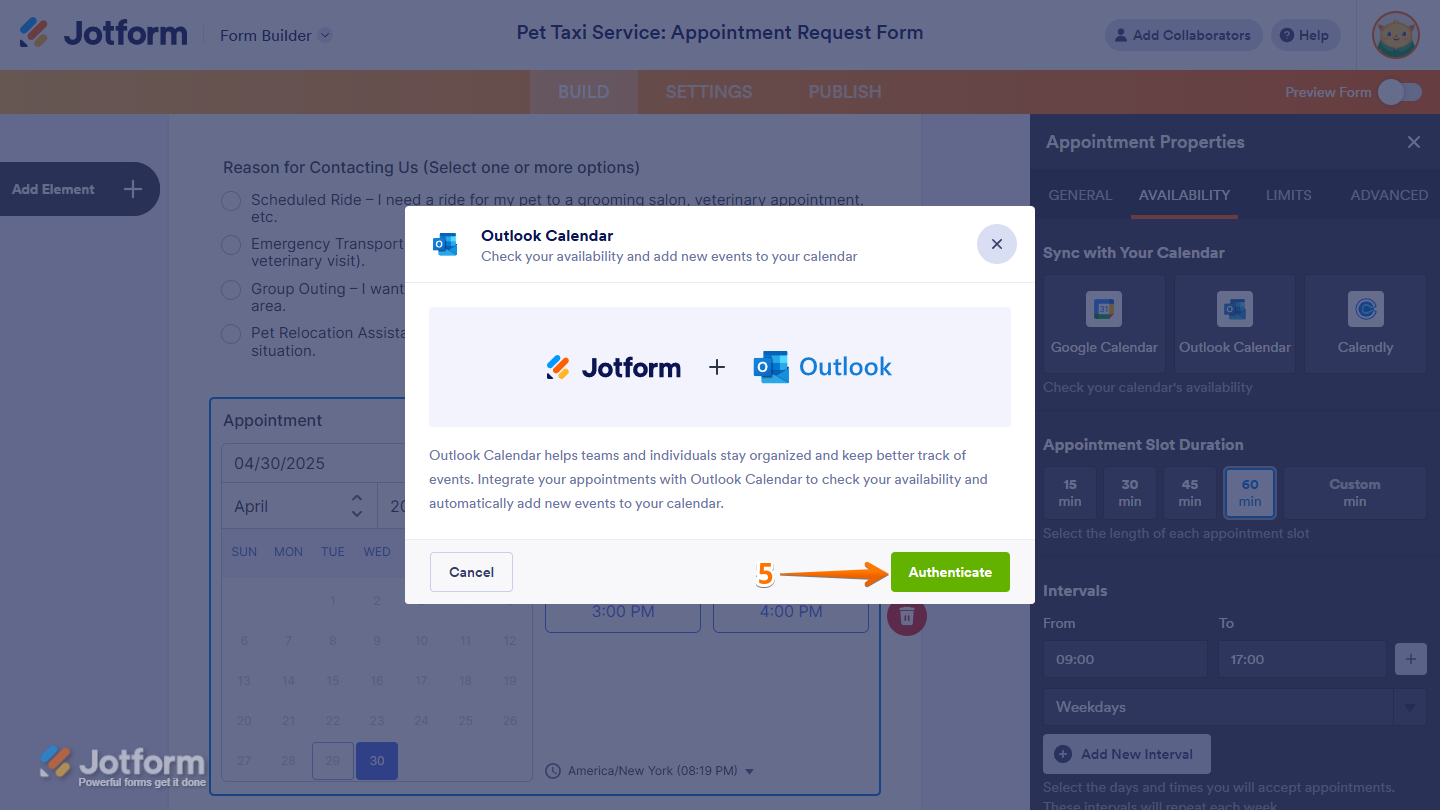
- A window will open, asking you to connect your Outlook Calendar. To sync your calendar, click on the Authenticate button at the bottom of the page. In the pop-up window that opens, log in to Outlook and authorize Jotform to integrate with your Microsoft account.
Pro Tip
If you’ve already synced a Microsoft account with Jotform, you can select your email address from the Select Outlook Calendar Account dropdown, then click the Add Action button to sync your form. If you plan on using another account, click Use Another Account and authorize access.
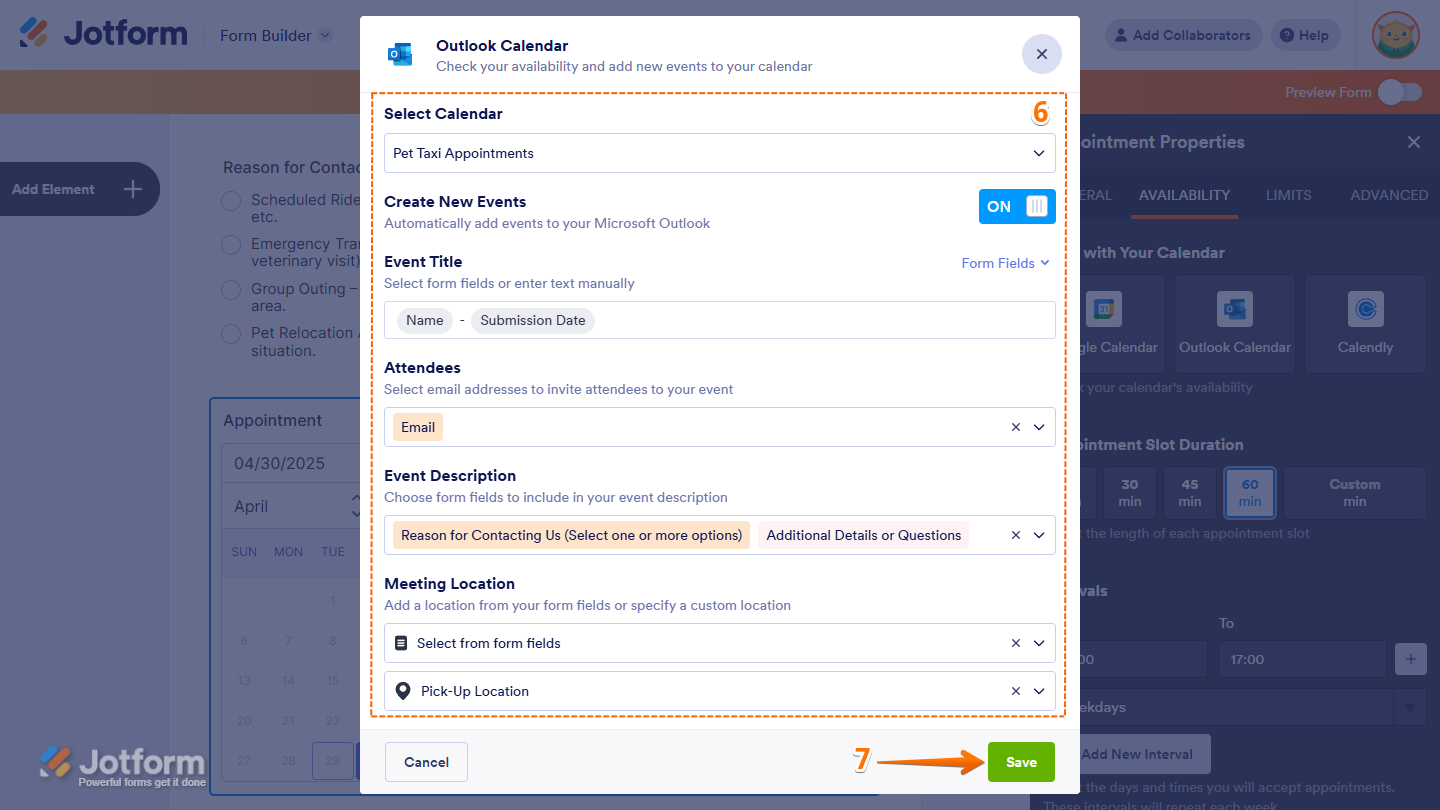
- Once your account is connected, click on the Select Calendar dropdown menu to choose which calendar to sync with your form’s Appointment field. After you’’ve selected your calendar, update the fields, such as event title, attendee email addresses, event description, and meeting location, to match your form and event details.
- When your details are finalized, click the Save button in the bottom right corner.
Now you can share your form. Every time you receive a response, Jotform will automatically create new appointments in your calendar, keeping it up-to-date and avoiding double bookings and manual data entry errors.
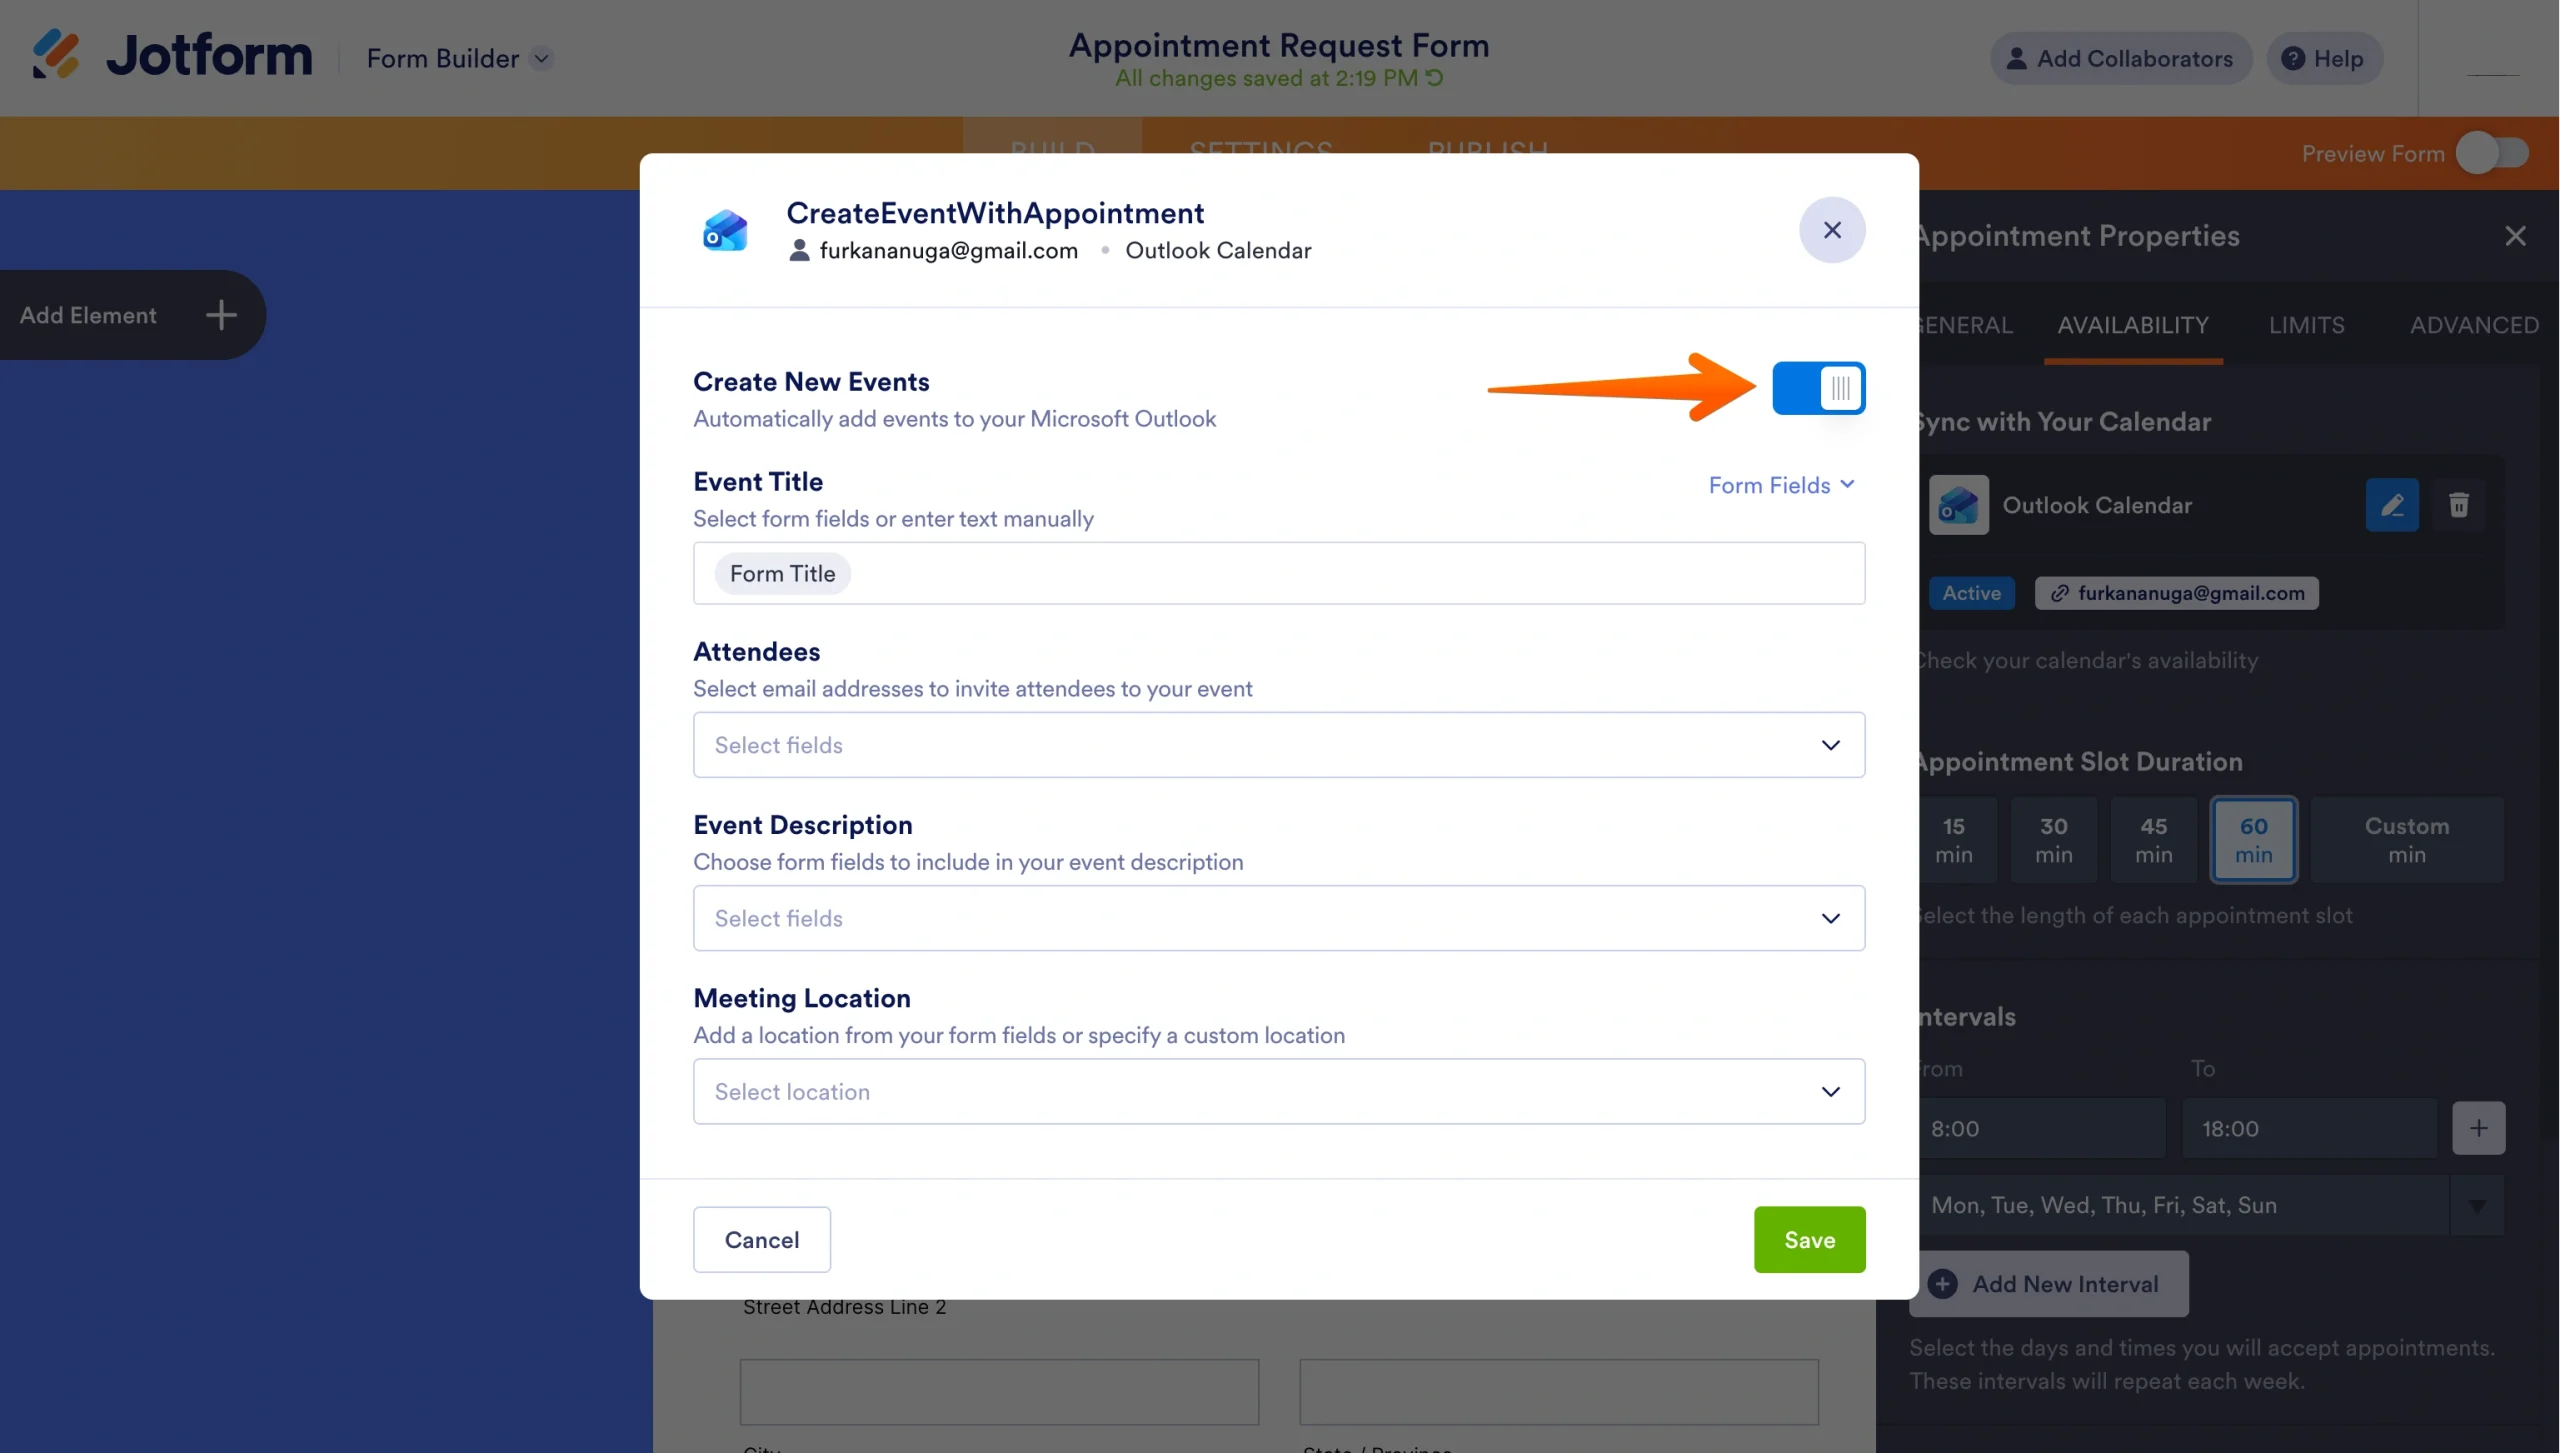
If you want your Outlook survey to stop automatically setting up events, you can go back into your Appointment field’s Outlook settings and toggle the Create New Events button off. Your form will still collect responses, but it will no longer add events to your Microsoft Outlook calendar.
Keep in mind that any email addresses you add to the Attendees list will receive an invitation to fill out your survey from your linked Outlook account. Attendees will also be able to see everyone who was invited to complete the poll.
If you’re trying to schedule appointments for multiple people on your team in a single form, you’ll need to use multiple Appointment fields. Each Appointment field can be connected to its own Microsoft Outlook account, but a single field cannot be used to schedule events for multiple calendars.
Jotform doesn’t just make form management easier with its Microsoft Outlook integration. The full Jotform suite also offers a variety of powerful tools to take your survey skills to the next level.
Jotform AI allow you to build a custom survey in minutes; all it takes is a single prompt. After your form is built, you can supercharge its effectiveness using advanced capabilities such as
While Outlook can make creating a survey seem easy, it can’t offer the same benefits as an integrated Jotform survey. Try Jotform for free today and see how this digital solution can change your approach to surveys.
This article is for Microsoft Outlook users, remote teams, project managers, HR professionals, educators, and small business owners who want to create quick polls and surveys directly inside Outlook emails to collect feedback, votes, or responses efficiently.





































































































Send Comment: