
Steps to save data from a WordPress form to a database
- Create a form with the Jotform Form Builder
- Click the Publish tab
- Select Platforms
- Search for WordPress.com and click on it when it appears
- Click the green Copy Code button
- In your WordPress site’s post, add a Shortcode or Custom HTML block
- Paste your code to add your Jotform form
- To finish the process, click the Update button
- Form submissions will automatically appear in your synced Jotform Table
You’ve taken the time to create an online form that’s just right, and now you’re ready to start gathering valuable data. But where does all that data go? Having an organized database to house the data you collect is just as important as the data itself.
Using the right software may just be what separates you from your competition. Millions rely on WordPress for their website needs, but not all are getting the most out of their form submissions. Pairing WordPress with a spreadsheet tool like Jotform Tables can easily change that.
Keep reading to learn how to embed forms onto your WordPress site, save data from a WordPress form to a database without any hassle, and use Jotform to get the most out of every submission.
Pro Tip
Try Jotform AI Chatbot for WordPress, an AI chatbot plugin embedded in your site, to provide field guidance, answer user questions instantly, and steer visitors through your database-connected forms.
How Jotform can help
You shouldn’t have to work harder to get the most out of your data. With online form builder Jotform and its suite of helpful tools, you can embed forms on your WordPress site (more on that later) and easily keep track of the data you gather with Jotform Tables.
Jotform Tables is an all-in-one solution that can address all your team’s data-collection needs. Its array of integrations lets you supercharge your workflows by connecting to other software tools you use, making it easy to share data automatically. Its features include
- Automatic online form data collection
- Customizable sharing and collaboration capabilities
- Ready-to-use column types to organize data
- 300-plus free table templates to get you started
From online form responses to manually entered data, Jotform Tables has a ready-to-use solution to match your needs.
How to save your WordPress form data to a database with Jotform Tables
Collecting and organizing data can seem demanding, but it doesn’t have to be. Jotform Tables works alongside Jotform’s online forms to take the legwork out of collecting and organizing your data.
With Jotform Tables, your form data is saved automatically in a few simple steps:
- Create a form from scratch or using a form template with the Jotform.
- Embed it on your WordPress website (for step-by-step instructions on this, see below).
- As you receive form submissions, they’ll automatically appear in your synced Jotform Table, which will display data in columns that correspond to your form fields. In your table, you can easily search, filter, and share your data.
As long as you’re using Jotform, you can automatically save your WordPress form data to a database. You can also enter data manually or link new tables and forms to get the most out of your Jotform toolkit.
Once your data has been automatically imported into Jotform Tables from WordPress, you can customize your views, columns, and tabs to organize it. As form submissions come in through your WordPress site, Jotform Tables will automatically update and sort your date into the views you’ve set.
Want to change the way you see your data? Just head back into Jotform Tables and adjust your layout or import your data into a new table.
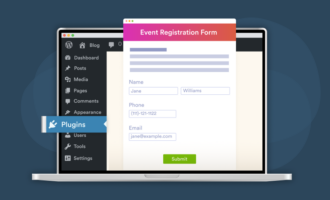
How to embed a Jotform form into your WordPress website
Before you embed a form on your WordPress site to connect to Jotform Tables, you need to make sure your form is designed to collect the information you need. With more than 20,000 form templates to choose from, Jotform can help you create an effective form — no hassle, no fuss.
Once you have your form ready, you can focus on making sure it’s properly embedded in your site and operational. The quickest way to add a form is through Jotform’s WordPress plug-in, but you can just as easily add a form to your WordPress site in a few steps:
- Go to Jotform’s Form Builder and choose the form you want to add to your WordPress website.
- Click the Publish tab.
- In the Publish tab, in the left sidebar, select Platforms.
- Search for WordPress.com and click on it when it appears.
- Click the green Copy Code button.
- In your WordPress site’s post or page editor, add a Shortcode or Custom HTML block and paste your code to add your Jotform form.
- To finish the process, click the Update button at the top to save your changes.
With your Jotform form properly embedded on your WordPress site, you’re ready to start gathering data the right way in Jotform Tables.
How to make data collection simple: Jotform Tables
Data collection shouldn’t be complicated. That’s why maximizing your possibilities while minimizing work with Jotform Tables is the right move for anyone looking to get the most out of their data.


Send Comment: