
Adding calculated fields in Google Forms
- Build a basic storefront with Google Forms.
- Create a spreadsheet from your data.
- Email totals to users with an automation tool or add-on.
Interactive step-by-step tutorial
Need a form? With Google Forms, you can create one in minutes.
But what if you want to run calculations on values from your form submissions? Maybe you want to calculate quiz scores. Or perhaps you want to show your customers a total price for the items they want to buy.
Unfortunately, there’s no built-in way to create calculated fields in Google Forms. But don’t dismiss the tool just yet. There are some available workarounds, starting with using the more flexible and powerful Google Sheets. Read on to learn how.
Pro Tip
Try Jotform’s intuitive form calculation features to discover what makes us the best Google Forms alternative.

Looking for the best alternative to Google Forms?
Jotform’s full-featured form-building solution is mobile-friendly and has the most integrations in the industry. Use it to collect payments, automate workflows, gather leads, and more.
What you can do with calculated fields in Google Forms
Calculated fields allow you to perform calculations based on submitted responses. They give you more flexibility in how you can view and use your data, and they eliminate the need to run calculations after you receive submissions.
When you’re selling customizable products and using Google Forms, calculated fields allow the form to show your customer the total price of their purchase depending on quantity, material, size, and other factors that can affect the cost.
Pro Tip
Use calculated fields to create a simple Google Forms expense tracker that automatically totals submissions and reduces manual work.
Building a basic storefront with Google Forms
This solution may require some technical skills, depending on how detailed you want your form to be, but setting up a simple storefront isn’t too difficult with these steps:
Accessing form data
Google Forms was originally an add-on for Google Sheets. It became a standalone product years ago, but it still plays nicely with Sheets. This tool acts as the foundation for making calculated fields in Google Forms.
To create a spreadsheet from your form, follow these steps:
- Click Responses on the tab bar above your form.
- Click the Create spreadsheet icon that looks like a spreadsheet in the upper-right corner of the screen.
- Select Create a new spreadsheet and name it whatever you want.
- Click Create.
This will open a new browser tab with your newly created spreadsheet. Once you have your spreadsheet, you can set up calculations of your data in the usual way. For example, if you wanted to sum up data from a sales form, you’d start by adding a column for the sales total.
Your formula would look something like this:
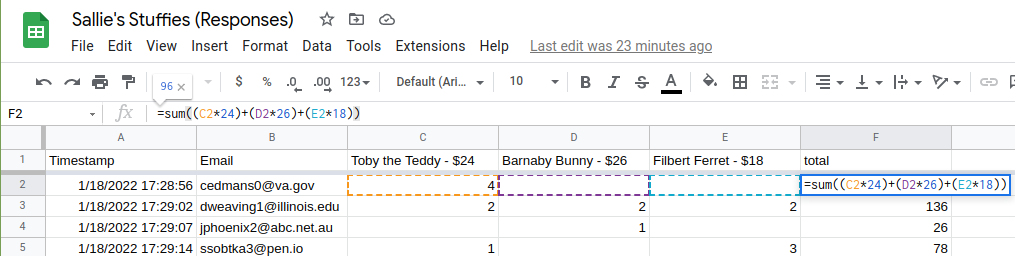
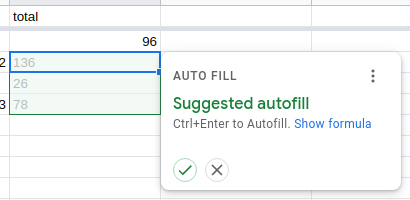
After entering your formula to calculate the total, click the checkmark to autofill the remaining rows in the form.
Now you know how much to charge, but the client still doesn’t know what they can expect to pay or how to pay you.
Getting started with emailing totals to users
This step is a bit tricky, and we’ll only cover the basics here, but it should get you through creating Google Forms calculated fields. You can use an automation tool like Zapier to automatically send an email with a calculated total when someone submits a form. Your Zap (a workflow connecting two apps together) will consist of two parts — a trigger and an action. These are the steps to create a trigger:
- Create a new Zap in Zapier.
- Choose Google Sheets as your trigger software.
- Choose New Spreadsheet Row as your trigger event.
- Click Continue.
- Connect your Google account to Zapier, then continue.
- Select the spreadsheet and worksheet you want to pull data from and continue.
- Test your trigger and continue to the action.
Now fill out the action section:
- Use Gmail for the action app and Send Email for the action, then continue.
- Connect your Gmail account.
In the next section, customize the auto-generated email:
- Click on the To field and select the column from your sheet with the user’s email address — your form will need a field to gather email addresses for this to work.
- Choose your email address from the dropdown in the From field.
- Fill out the subject of the email and add any copy for the body of the email.
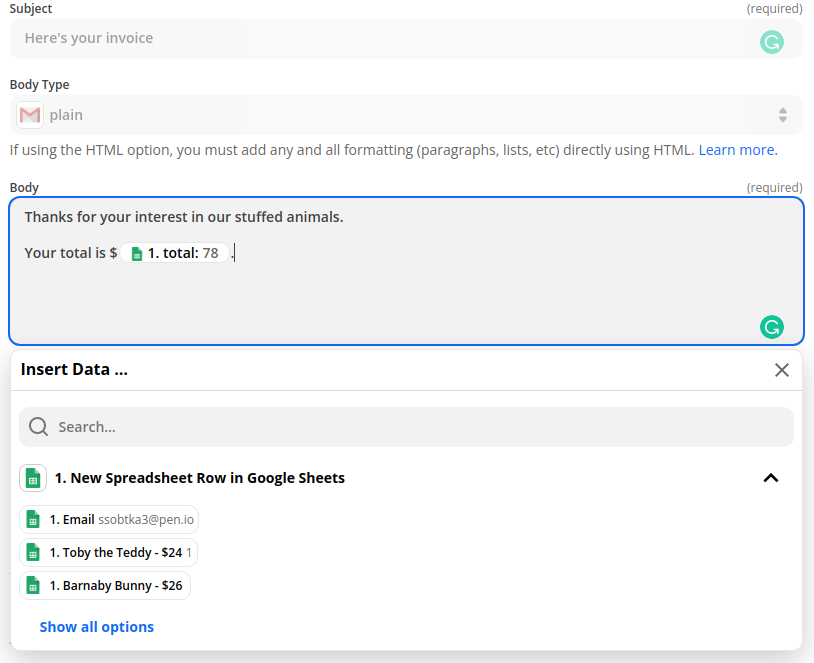
When you fill out the body of the email, you’ll be able to add any data from the new spreadsheet row. You can add the total to your email body by selecting that column. (You might need to click Show all options to see it.)
When the email is sent, all your customer will see is the number, so you can add something like “Your total is $ {1. total: 78},” where the brackets represent the tag for the amount from the “total” column. But your customer will only see “Your total is $78.”
If you add your PayPal, Cash App, or Venmo link to your email, they can pay you directly from there.
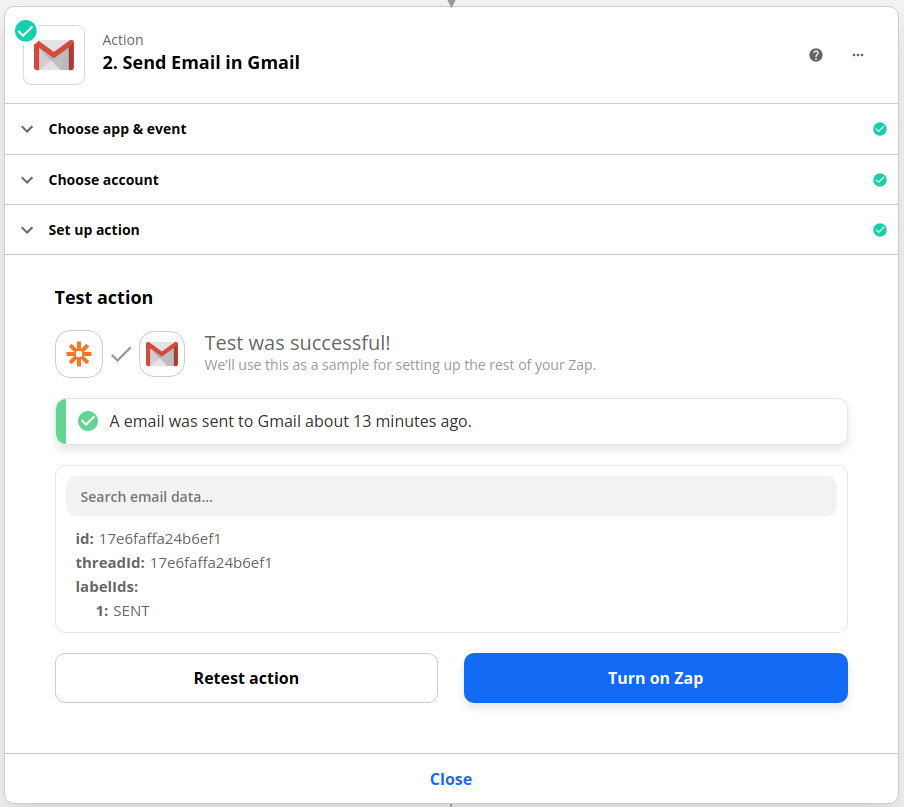
Finish the email form step and test your Zap. If everything looks correct, turn on your Zap.
While this method works to make calculated fields in Google Forms, it takes a lot of effort — and there’s room for mistakes. So there has to be a better solution, right?
Exploring another solution: Using an add-on
Most of the add-ons for Google Forms aren’t focused on giving you the ability to calculate fields. But there is one: Formfacade.
Formfacade works by creating an additional visual layer with more customization options that sits on top of your Google Form. Your visitors will only see Formfacade, not Google Forms itself.
Formfacade gives you a few extra features like calculations. But beyond the additional features and different appearance, Google Forms is still powering your forms.
If you need a form builder in Google Workspace, you can try the Form Builder by Jotform.
Here’s how to get started on the Google Forms side:
- Install Formfacade from Google Workspace Marketplace.
- Open the form you want to add calculations to.
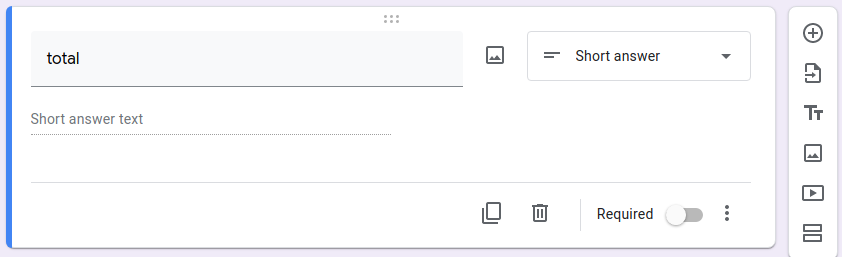
- Add a Short answer field to your form and call it “total.”
Now that everything is set up with Forms, it’s time to configure Formfacade:
- Select the Formfacade add-on from the add-on menu in the upper-right corner of your form.
- Click Customize this form. You may need to sign up for a trial or premium membership before the next step.
- Click Proceed. That will open a new tab.
- From the Formfacade tab, click the gear icon next to your “total” field.
- Inside the settings menu for the field, switch to the Answer tab.
- Set the Appearance dropdown to Read only.
- Then use the Calculate field to add your calculation. (Use * to multiply and / to divide.)
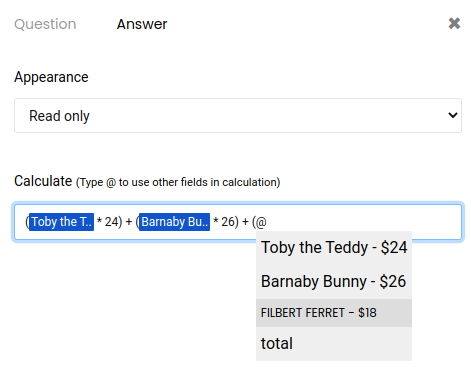
- Don’t forget to hit Save.
That works well enough. It’s certainly easier than using Zapier, and the results will be instantly visible to your visitors.
The problem is Formfacade’s capabilities with Google Forms are essentially maxed out with this method. Calculations are one of the few features Formfacade adds to Google Forms.
You’ll still have to deal with the other shortcomings of Google Forms. For example, you still won’t be able to accept payments, so you’ll probably want a better way to meet your needs.
A better solution for calculating fields
You’re likely familiar with the saying, “Think outside the box.” In this scenario, Google Forms is the box. It’s such a common solution that people try to make it work for all purposes, but it was never meant to fit most use cases.
For example, it’s not the best solution for calculating costs based on distance, fuel costs, and cargo weight for delivery and transportation services. Another industry that uses calculated fields is property rental services, which can charge customers differently based on the number of rooms rented, seasonal demand, and the length of stay.
If you want a tool that offers more advanced features, give Jotform a try.
Getting started with Jotform is easy. It seamlessly integrates with Google Sheets, just like Google Forms does, or you can use Jotform Tables to track your form data. With Jotform, it’s just as easy to build forms as it is using Google Forms. Plus, Jotform offers a free plan that offers access to all of its features.
But what about form calculations? That’s where Jotform really has you covered. It has hundreds of form widgets to help you create any form you need, including one for calculations.
If you want to score a quiz, Jotform can do that too. If you want to create a simple shop, it has tons of payment integrations to collect payments right from your form. Essentially, Jotform is the all-in-one tool for out-of-the-box thinkers.
To learn more about Google Forms, check out Jotform’s comprehensive guide.


Send Comment:
1 Comment:
January 5, 2023
I am doing digging. I am trying to find a solution to digitize the paperwork my employees do. I am trying to build it in google forms, but there is one thing that is hanging me up. When they complete a job, I want them to type the loaded weight in one answer, and the delivered weight in another answer, and have forms automatically compare answers mathematically and give an error if they are too dissimilar. Would jotform have the functionality to mathematically compare 2 answers and generate an error if they type it in wrong? rocketpigtrucking@hotmail.com