
Key takeaways
- You can create a Canvas course with an admin, teacher, or designer account, depending on your institutional settings.
- A new Canvas course starts as an empty course shell unless your institution uses a default course template.
- Add content pages, assignments, calendar items, discussions, and more with similar Canvas page editors, then customize the course and add students through the same settings interface.
- Use Canvas’ Course Setup Checklist to ensure you don’t forget anything before publishing a course.
- Publishing a Canvas course makes it visible to enrolled students, but some institutions control publishing centrally.
- Jotform can help automate the registration and enrollment work that happens before students enter Canvas.
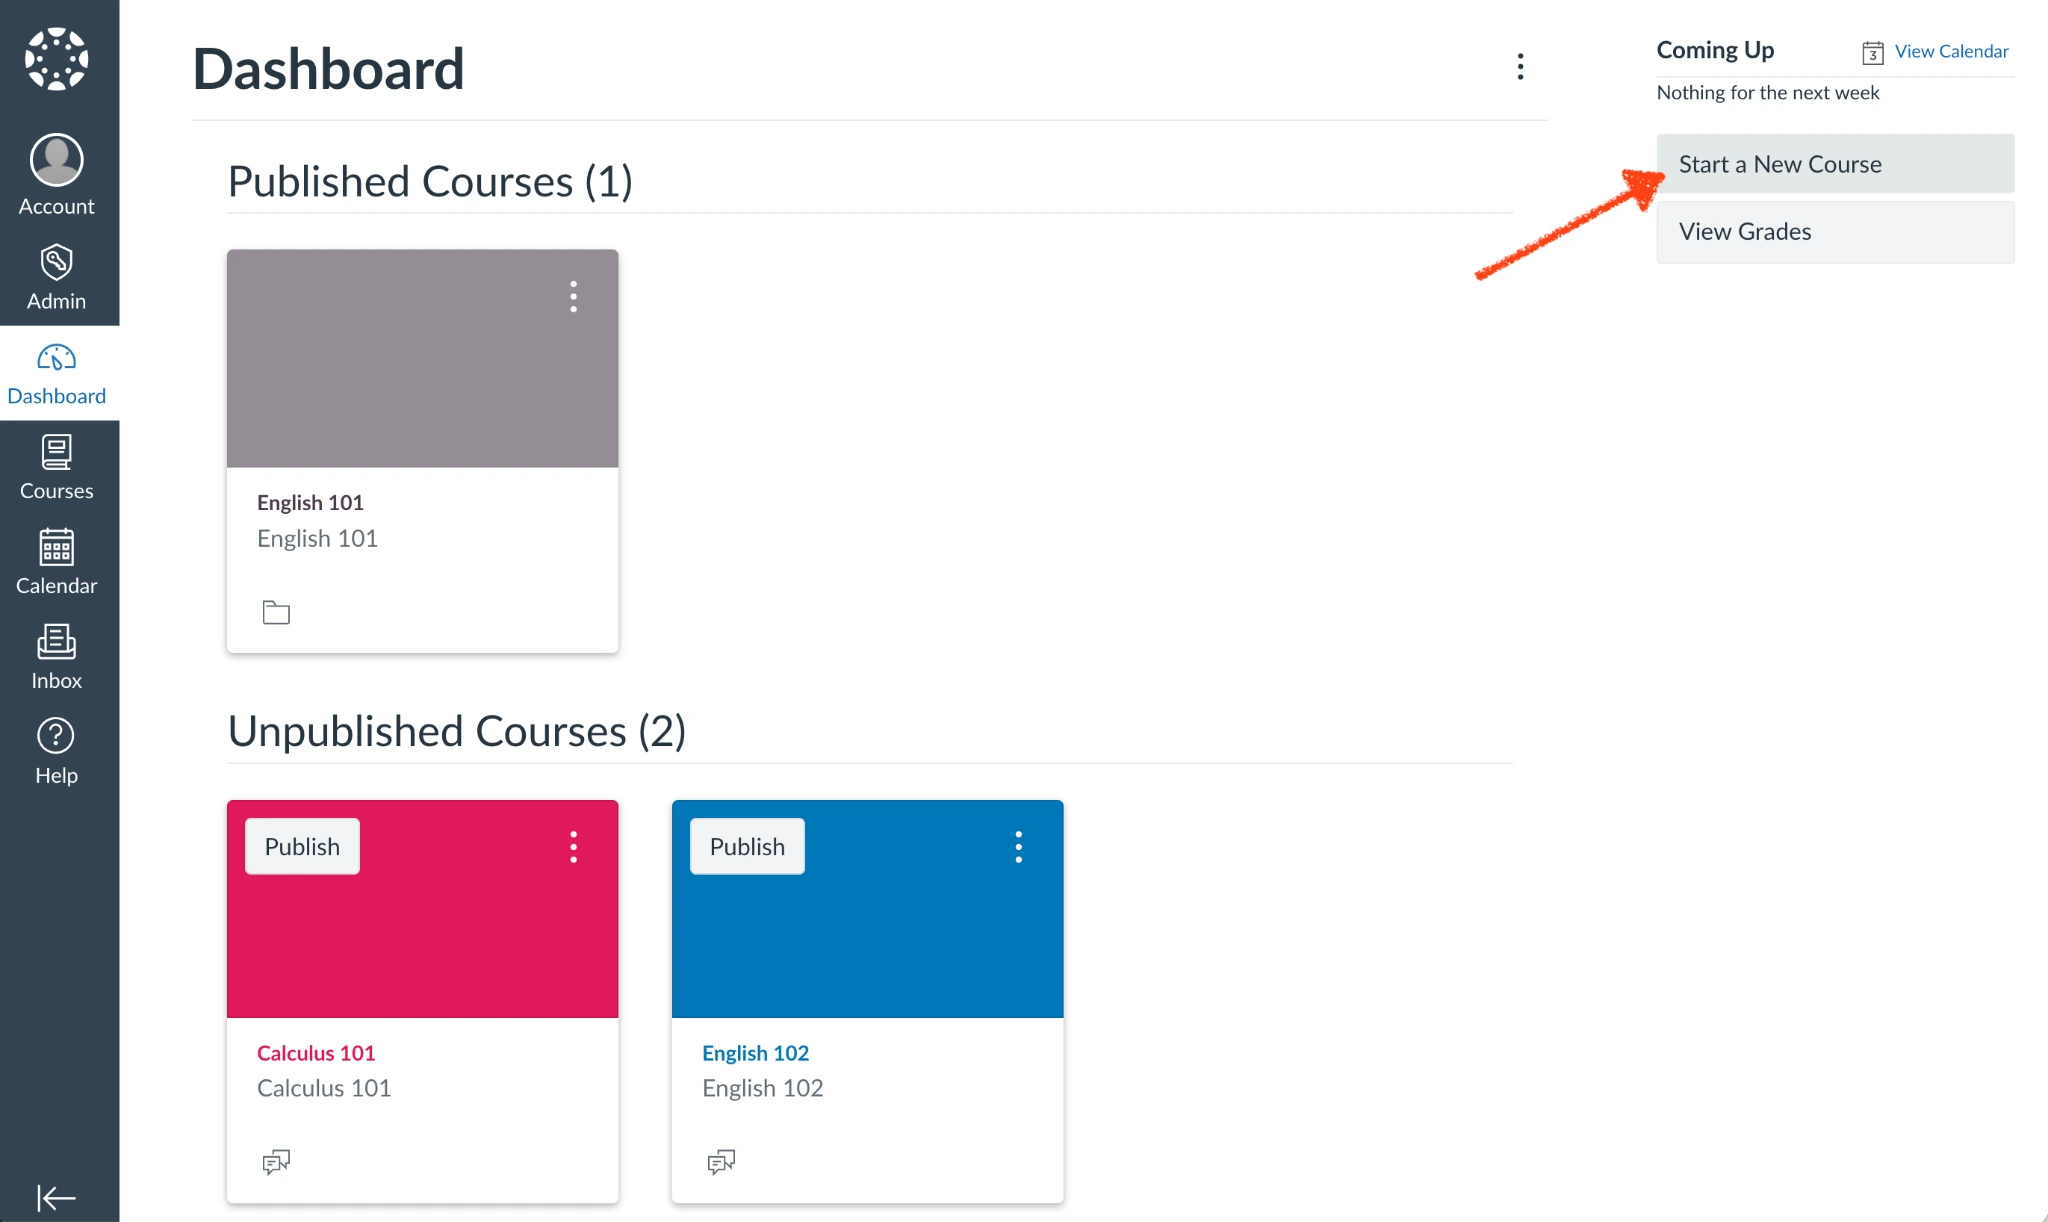
If you see a “Start a New Course” button on the right sidebar when you log into Canvas LMS, you have everything you need to create a new course in Canvas.
One of the most popular learning management systems, Canvas LMS brings classrooms together online with a suite of educational technology tools — acting as a single spot for announcements, discussions, assignments, and more. It’s built for both online courses and as an online companion to in-person instruction. Educational institutions use it to deliver for-credit classes, and corporations and governments use it for training. As long as you’re an admin, teacher, or designer, you can create new courses and edit existing ones in Canvas LMS.
The hardest part of creating a course should be crafting the content. You’re imparting knowledge to students through lessons, slides, and assignments. That’s the actual course. Canvas LMS is there to help you get those materials out to your students.
Before you start, make sure you have
- A Canvas LMS account
- Your institution’s Canvas LMS URL
- Permission to create courses with a teacher, designer, or admin account
- Details about your course — including course name, code, account, and term — along with your course content and, optionally, a template from your institution so that your course will look similar to others in your organization
Each educational institution’s Canvas LMS account may have slightly different permissions and settings, so the easiest way to check whether your Canvas LMS account can create courses is to log in and look for the “Start a New Course” button on the dashboard’s right sidebar. Or open the “Courses” tab, and look for a “+ Course” button along the top. If neither of those appears in your account, contact your organization’s IT support, Canvas LMS admin, or LMS support team.
Once you’re ready, it’s time to begin building your course. In this guide, we’ll walk through how to name a course, add content, organize modules, sign up users, publish the course, and manage it once students start working their way through. We’ll also cover the differences between instructor-created course shells and admin-created courses.
Create a Canvas course from the dashboard
Creating a Canvas course from your Canvas LMS dashboard and adding it to the learning management system is straightforward, and it only requires a few clicks.
- Log in with your Canvas LMS account. Click Start a New Course.
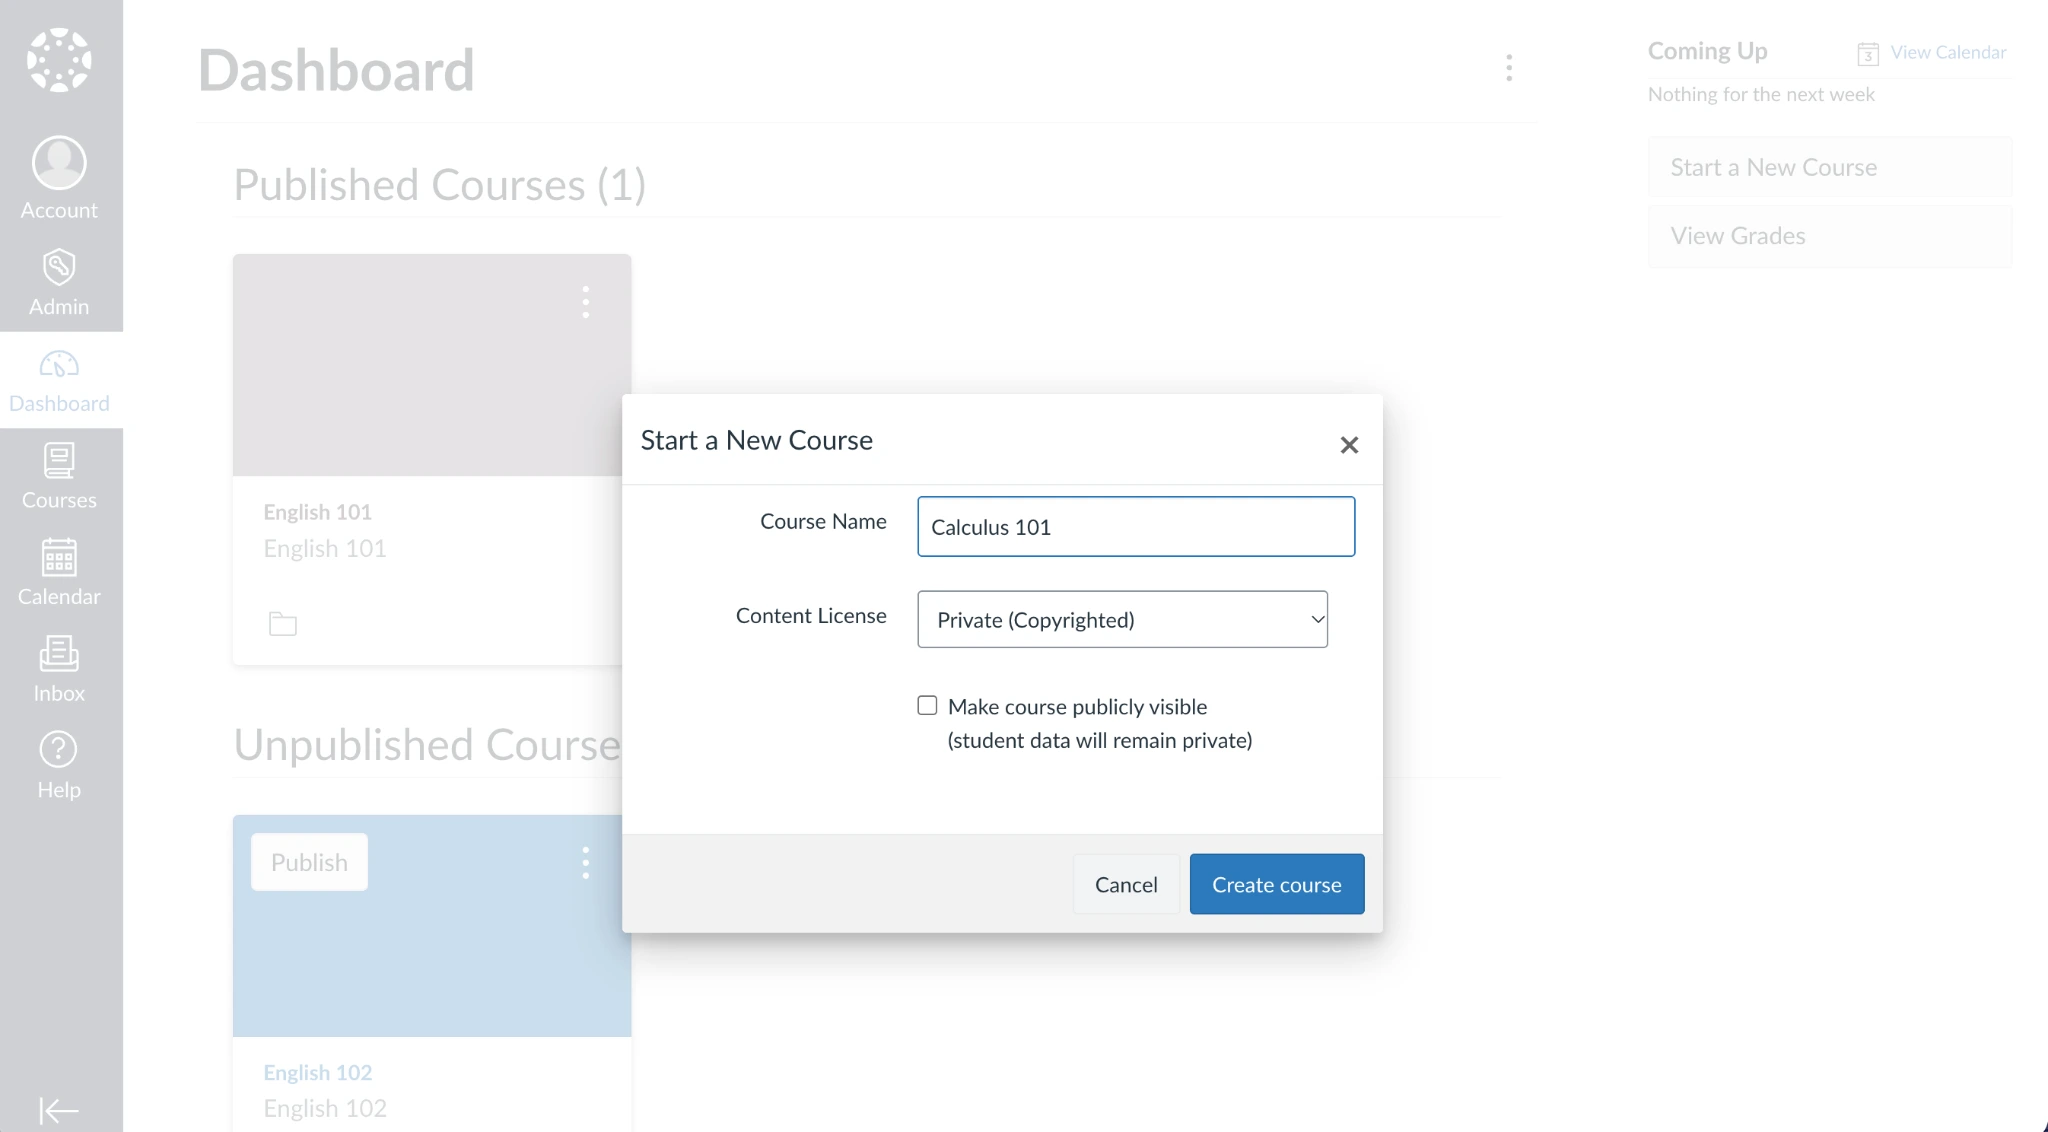
- Enter your course name, set the content license, and choose whether the course should be publicly visible. Typically, you should keep that option unchecked until your course is finalized and ready for students. Click Create course.
That’s it. Canvas LMS will automatically create a new, blank course in your account. You can then import existing content, add modules, or run through your new course setup checklist to ensure you don’t forget anything while building your course.
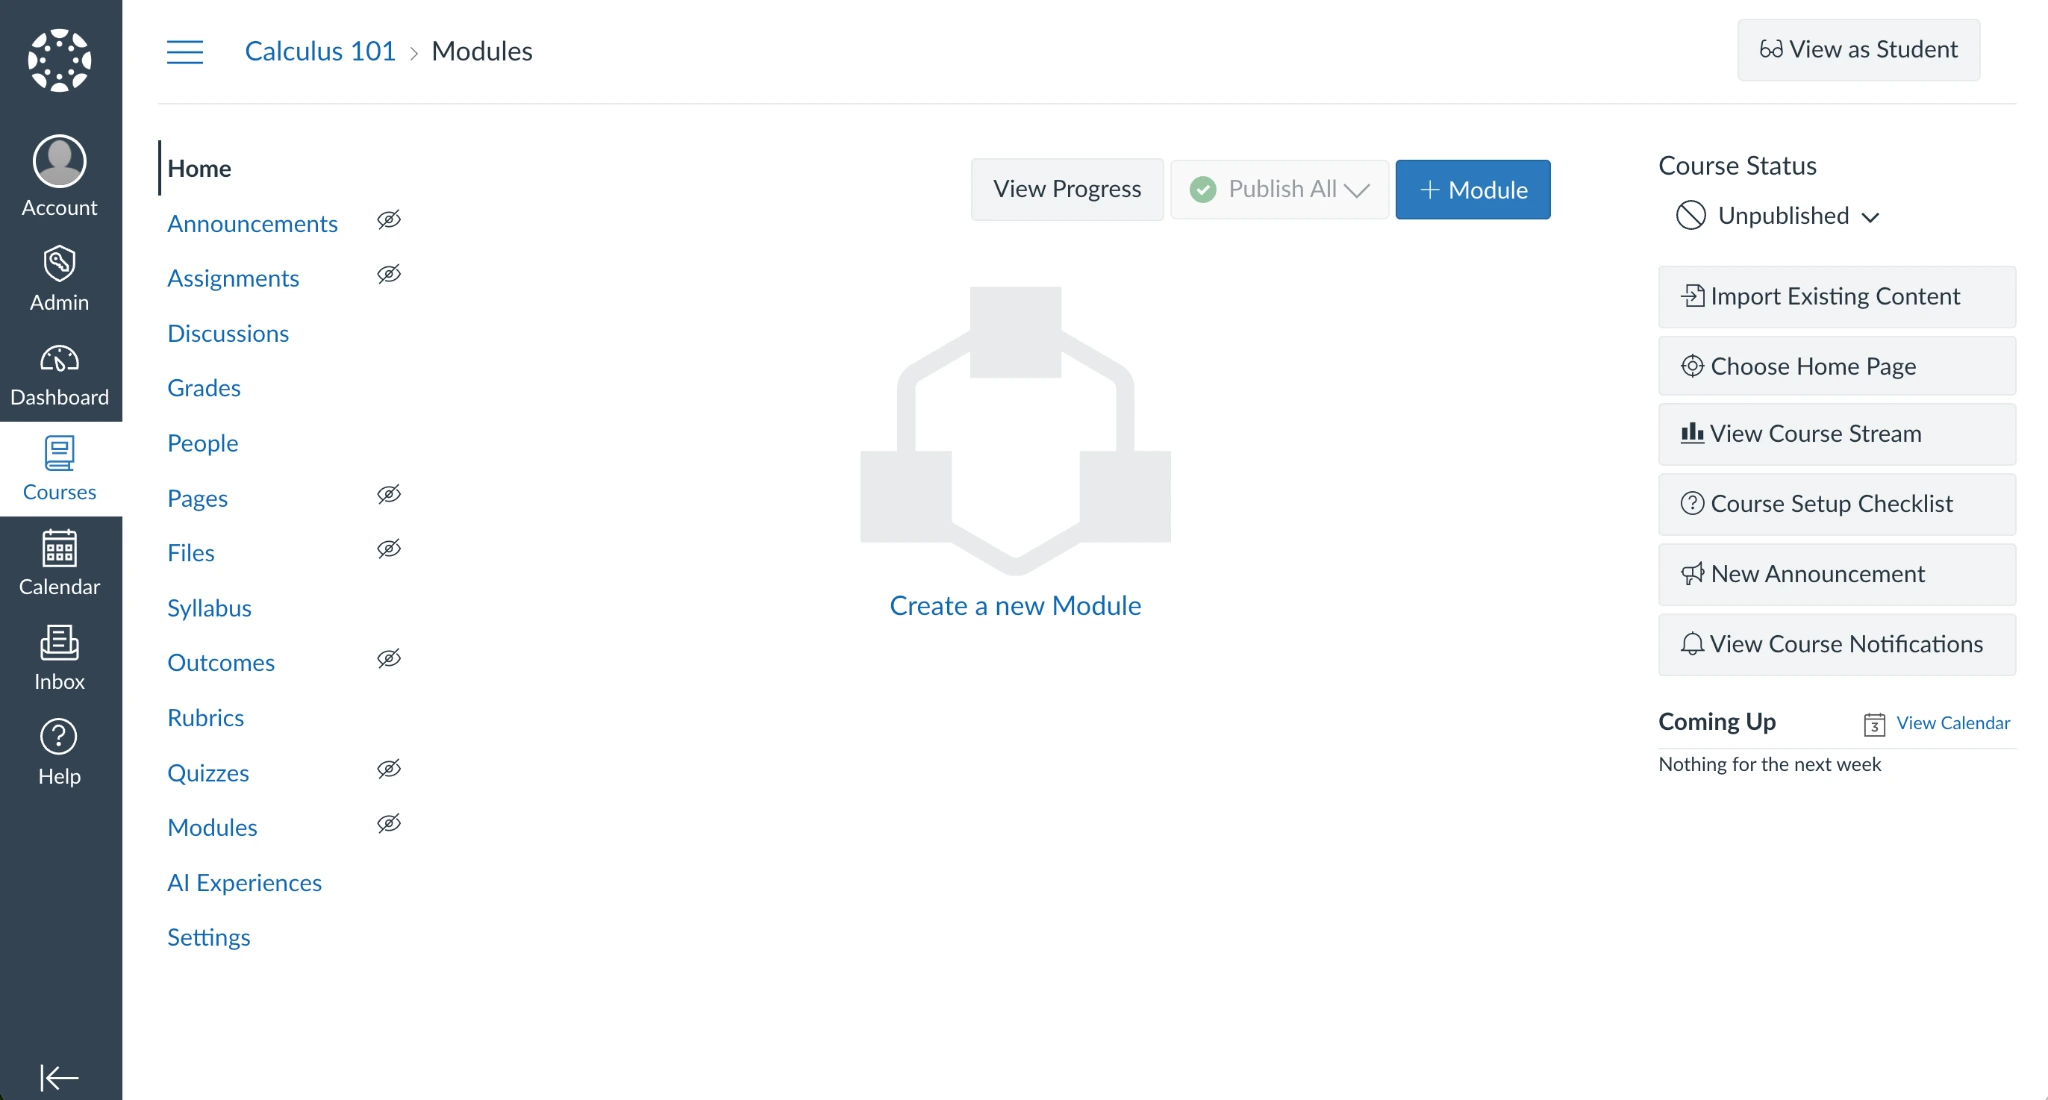
By default, your new course will not include content or students. And, unless you chose otherwise during setup, your course will be private to you and other Canvas LMS admin accounts until you’ve published the course.
Each of the tabs marked with a crossed-out eye icon will remain hidden from students after your course is published; everything without that icon will be visible to all enrolled students. You can verify how the course will look and ensure only the information you want to be seen is visible to students by clicking the View as Student button.
Once you’ve built out your course, added all of the details, and previewed the course as a student, you can publish your course anytime by clicking the Unpublished button under course status. Select Publish to take your course live.
Create a Canvas course as an admin
Alternatively, if you’re a Canvas LMS admin, you can create courses from the Courses pane in the left sidebar.
- Click the Courses button in the left sidebar, and select All Courses to view the courses overview page. There, click the + Course button to create a new course.
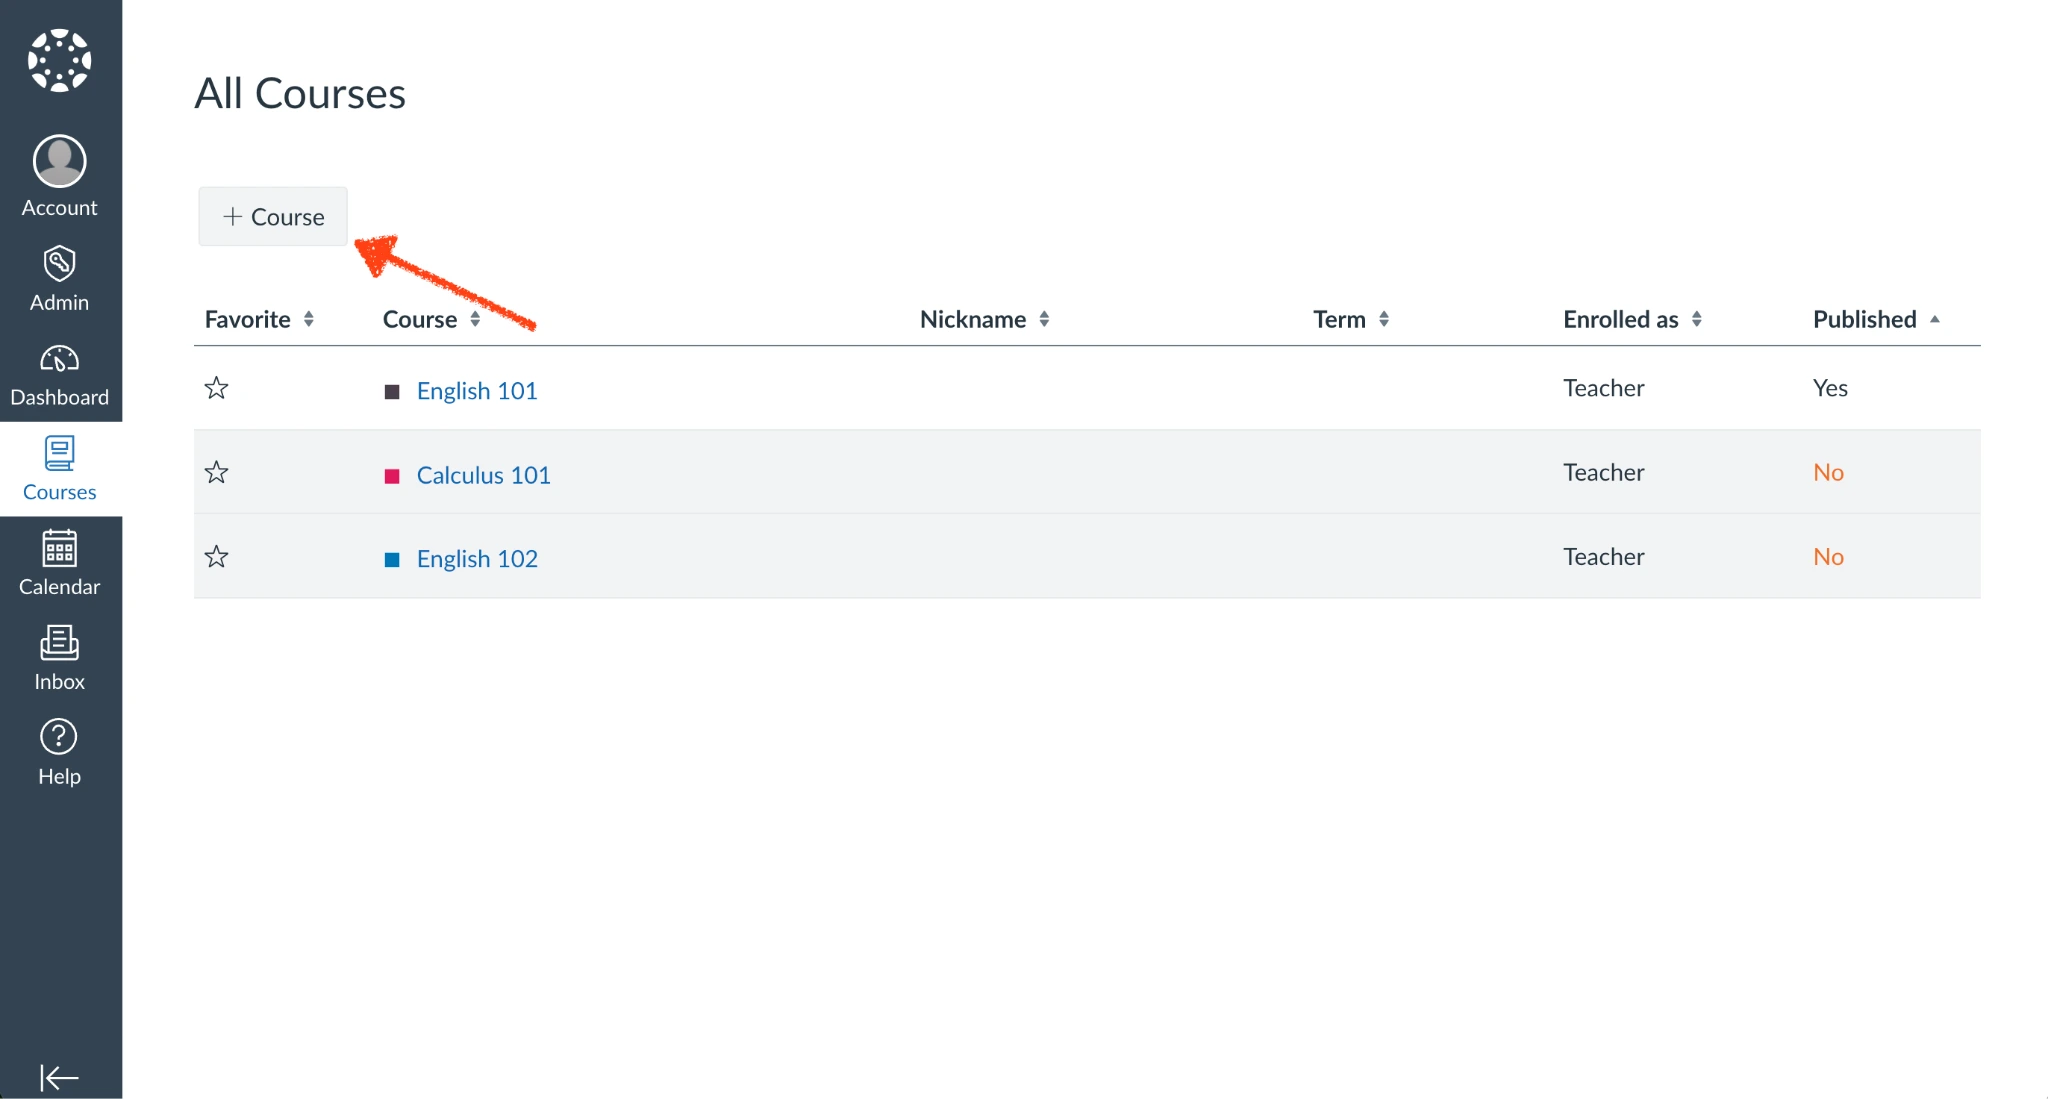
- Add a course name, select the content license, and then choose whether the course should be publicly visible (just as you would when creating a course in the dashboard).
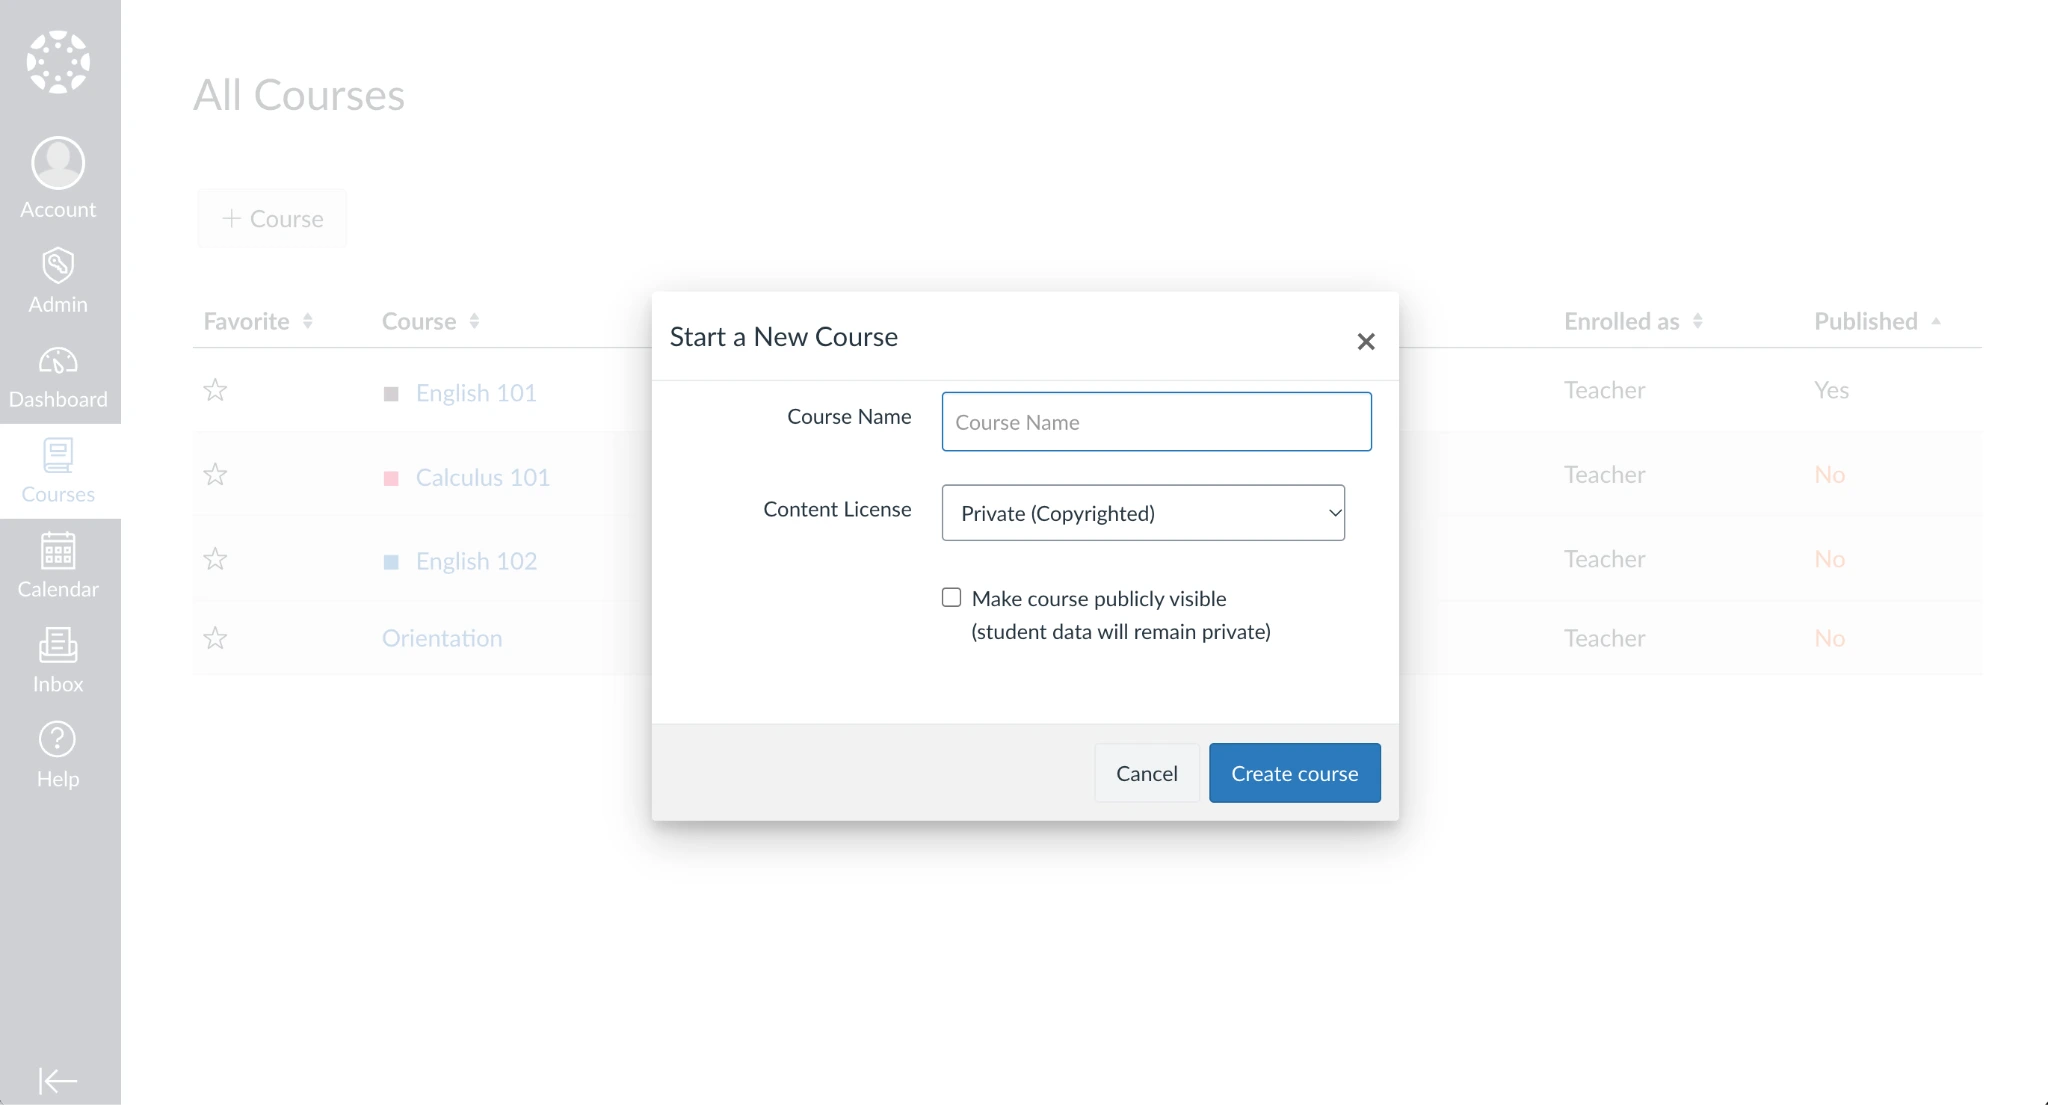
- Proceed to build out the course details. Everything works exactly the same, whether your course is created from the dashboard or from the Courses pane.
Do note, though, that teachers typically can only add courses from the dashboard, while admins can add courses from the Courses pane. Admins will often add a blank template course as a course shell that instructors can customize as needed. Any existing Canvas course can also be turned into a template or copied into a new course.
Depending on your institution’s rules, the same admins who handle your Canvas LMS pricing and deployment may also create course shells for teachers. They can do this manually or through automated imports, linking each shell to SIS IDs so that student enrollment in for-credit classes is managed automatically. That makes it easier to treat Canvas LMS as school management software, with everything in one place and consistently styled courses across every department.
Instructors would then log in with their accounts, check the Courses pane for a new course shell that was created for them, and then proceed to edit the course as though they’d created it themselves. Otherwise, manually created courses will need to have an SIS ID added through the account settings by admins once the content is added to the course and ready to be published.
How to set up your Canvas course content
Creating a course shell is only the first step. With the shell in place, it’s time to fill it out with your course materials.
If you have an existing course that you’d like to use as your starting point, click the Import Existing Content button in your course dashboard. There, you can copy an existing course or import
- Another Canvas course
- A course from a Canvas LMS alternative such as Moodle
- Content in standardized QTI and Common Cartridge class formats
That gives you a starting spot to build out your course more quickly.
Otherwise, start by adding content to fill out your course. Canvas LMS includes a checklist that recommends you add course assignments, create a homepage, list calendar events, upload files, and add TAs and students to the course before publishing it. You can also list a syllabus, add grading rubrics, create assignments and quizzes, organize everything into modules, and open discussions with your students. Rather than needing to reach for the best software for teachers, you’ll have everything in one place to teach, engage, and quiz your students about the topic you’re teaching.
There’s no correct order in which to add items to a Canvas course. You can upload files and then detail them in pages, or you could start out by outlining modules, filling them with assignments, and then writing pages to describe course sections — your call.
Pages
You’ll quickly become familiar with Canvas pages as you create courses. They’re what you’ll use to build the front page that welcomes students into the class, along with where you’ll outline details for class modules and more. The editor interface shows up throughout the app as the core way to add detail to class sections.
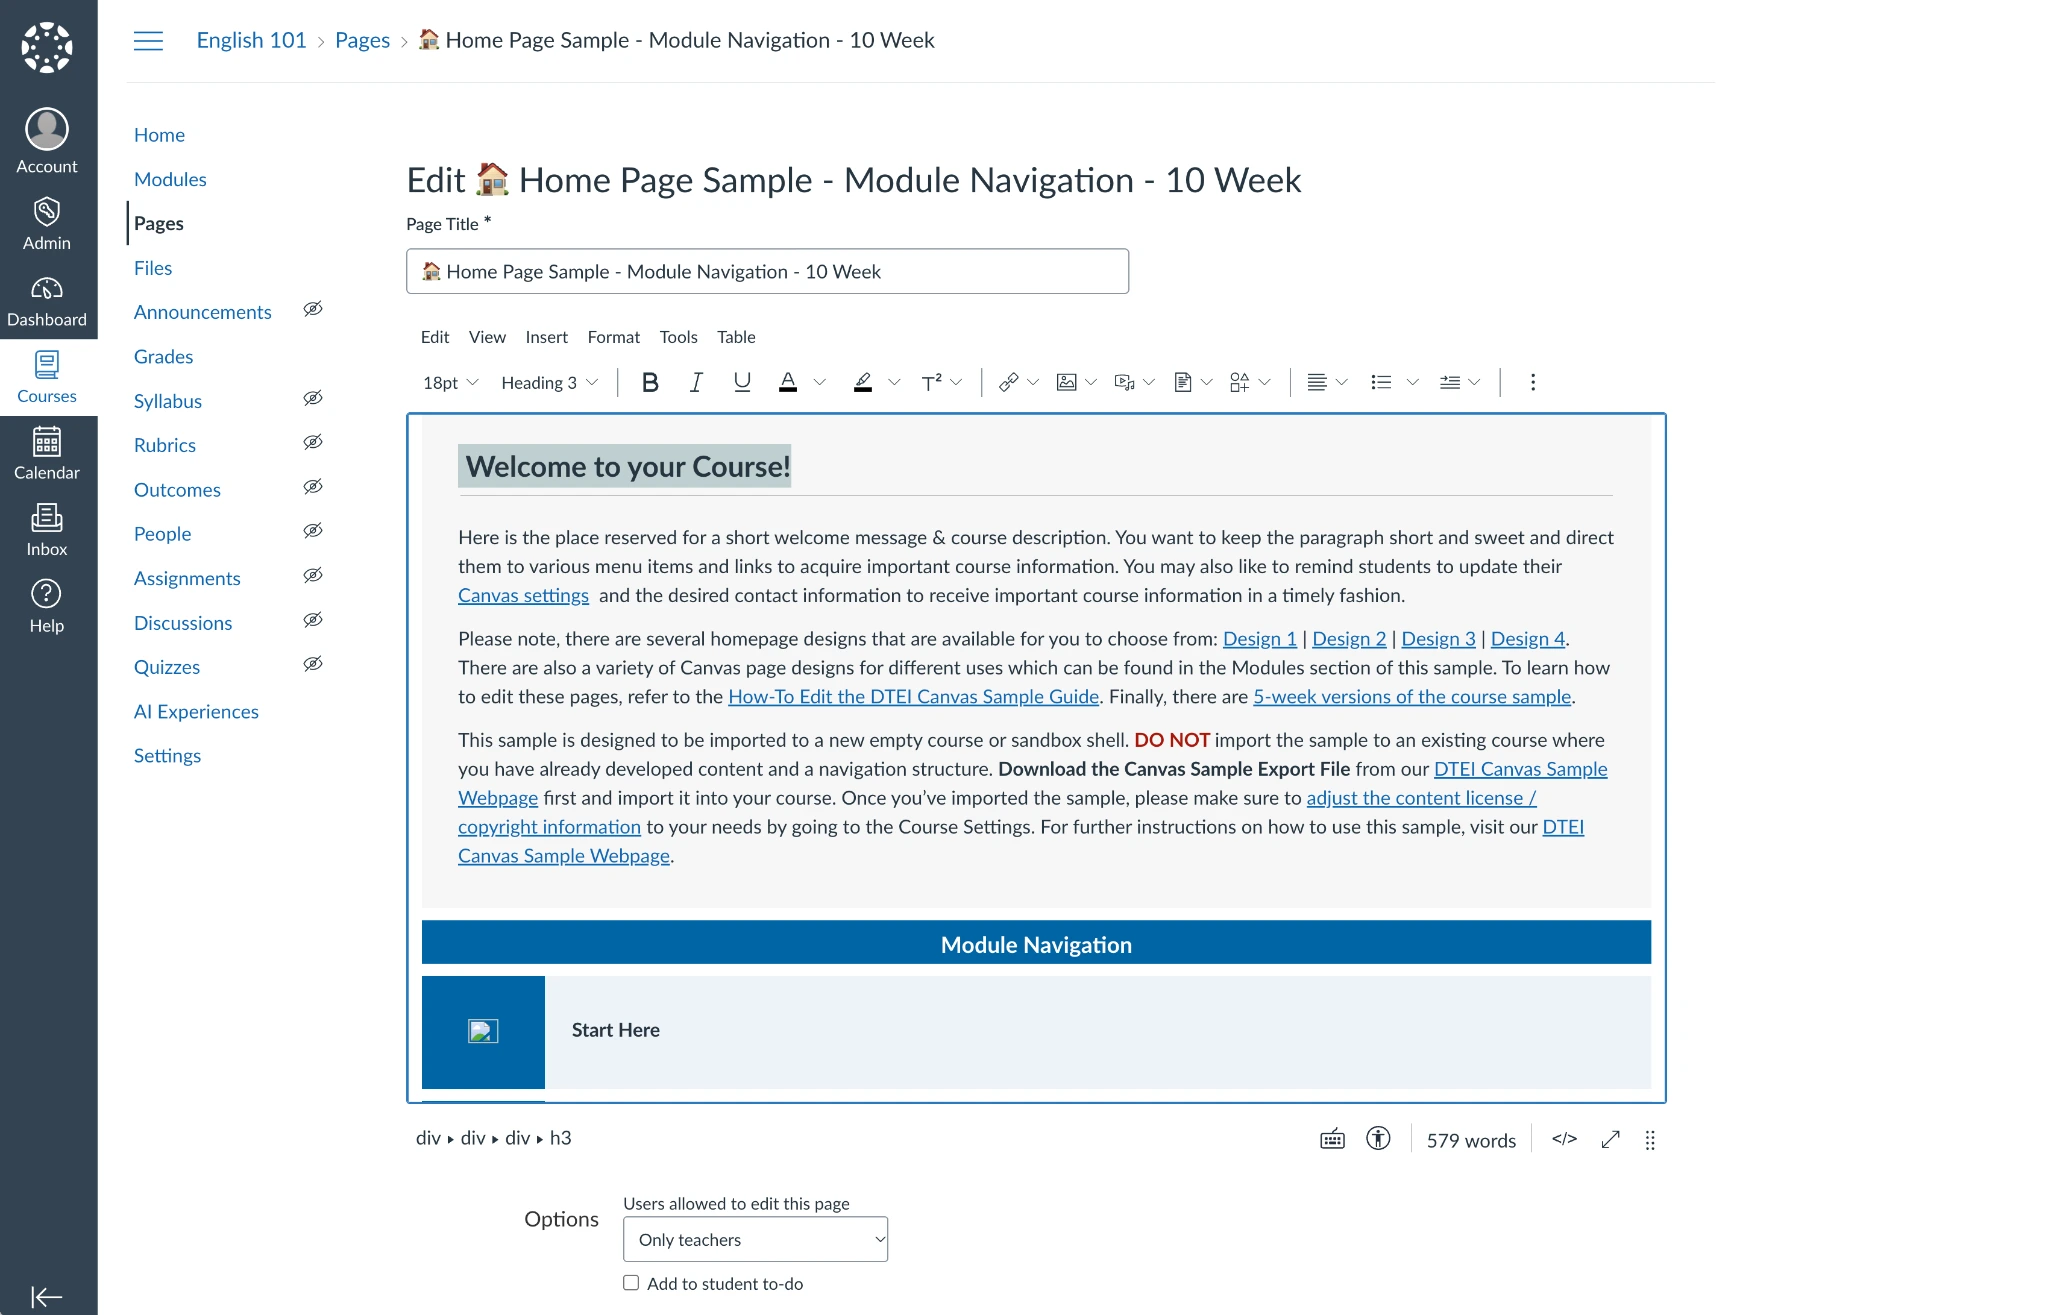
Canvas pages include a rich text editor with standard formatting options to align text, add headings and links, and include tables and embedded content from other apps and sites. You can upload images or include media and documents that have already been uploaded to your course. And if you have technical skills, you can edit the page’s HTML for more customized course designs.
Once a Canvas page is created, you can set it as the front page to introduce students to the course material. Or you can set when the page will be visible — to have some pages only show up after midterms, for example.
Assignments
Assignments share features with pages. They, too, have a rich text editor with options to edit the underlying HTML code if you’d like. But most assignments will need less content than a full page. Outline the assignment requirements and details, and include any information that students will need to successfully complete the homework.
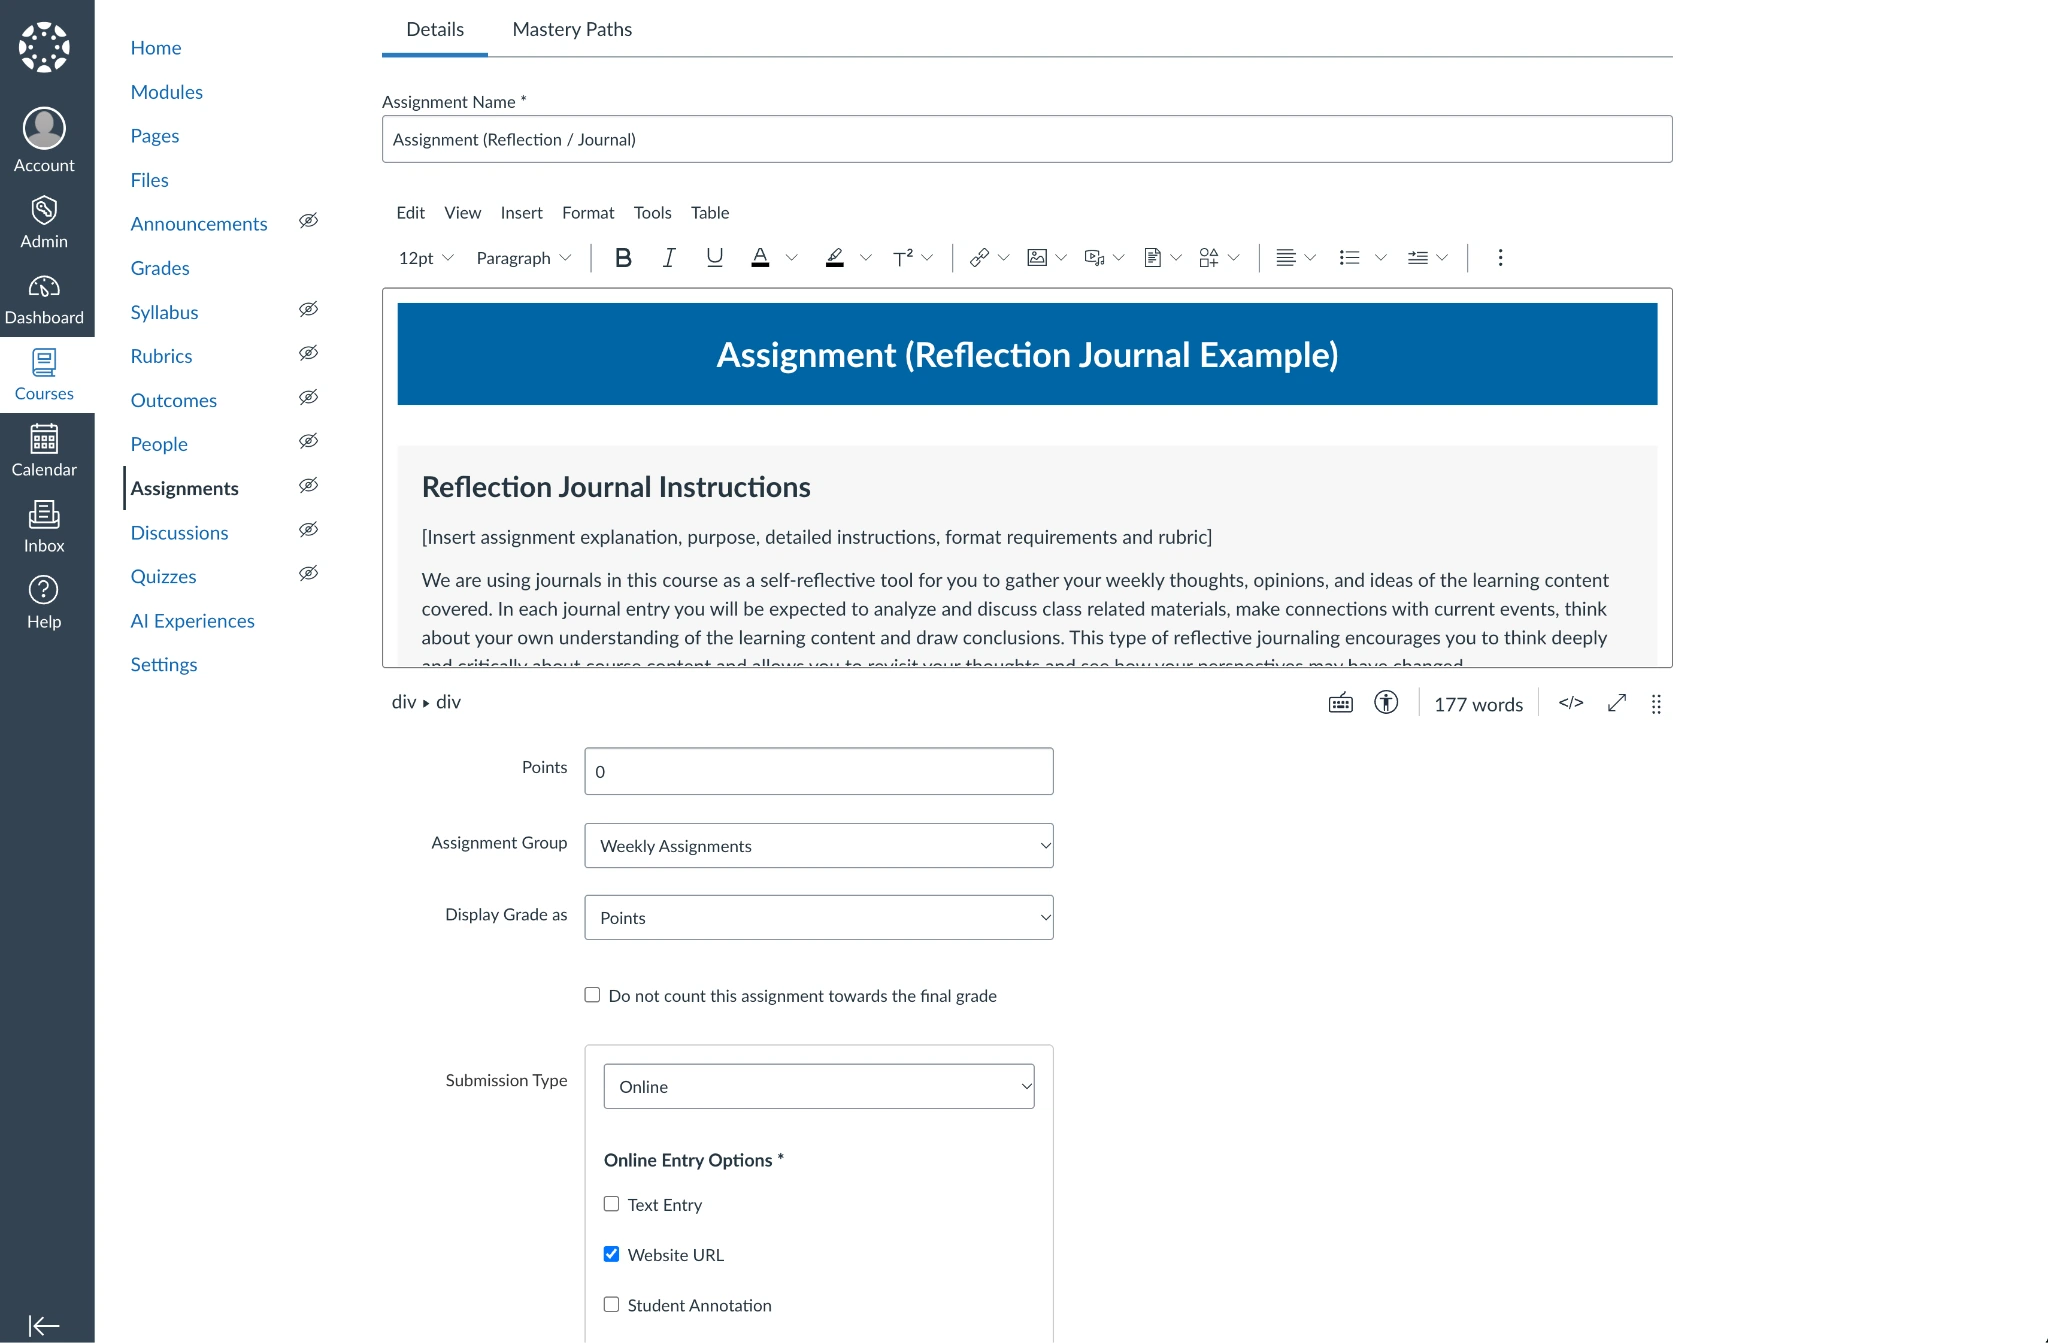
Underneath, add additional details specific to the assignment. You can group assignments, set the number of points or other grading metric that this assignment will use, and choose how many times students can submit assignments. You can have students enter text, upload a file, or share a URL to submit their completed work.
Modules
Modules, then, give you a place to organize pages along with assignments, quizzes, discussions, events, and files that you’ve uploaded to your course. You might start with an introductory module that explains the background and what students will learn in the course, then proceed with one module per week. Or you could break things up any way that works best for you, with one module per month or quarter.
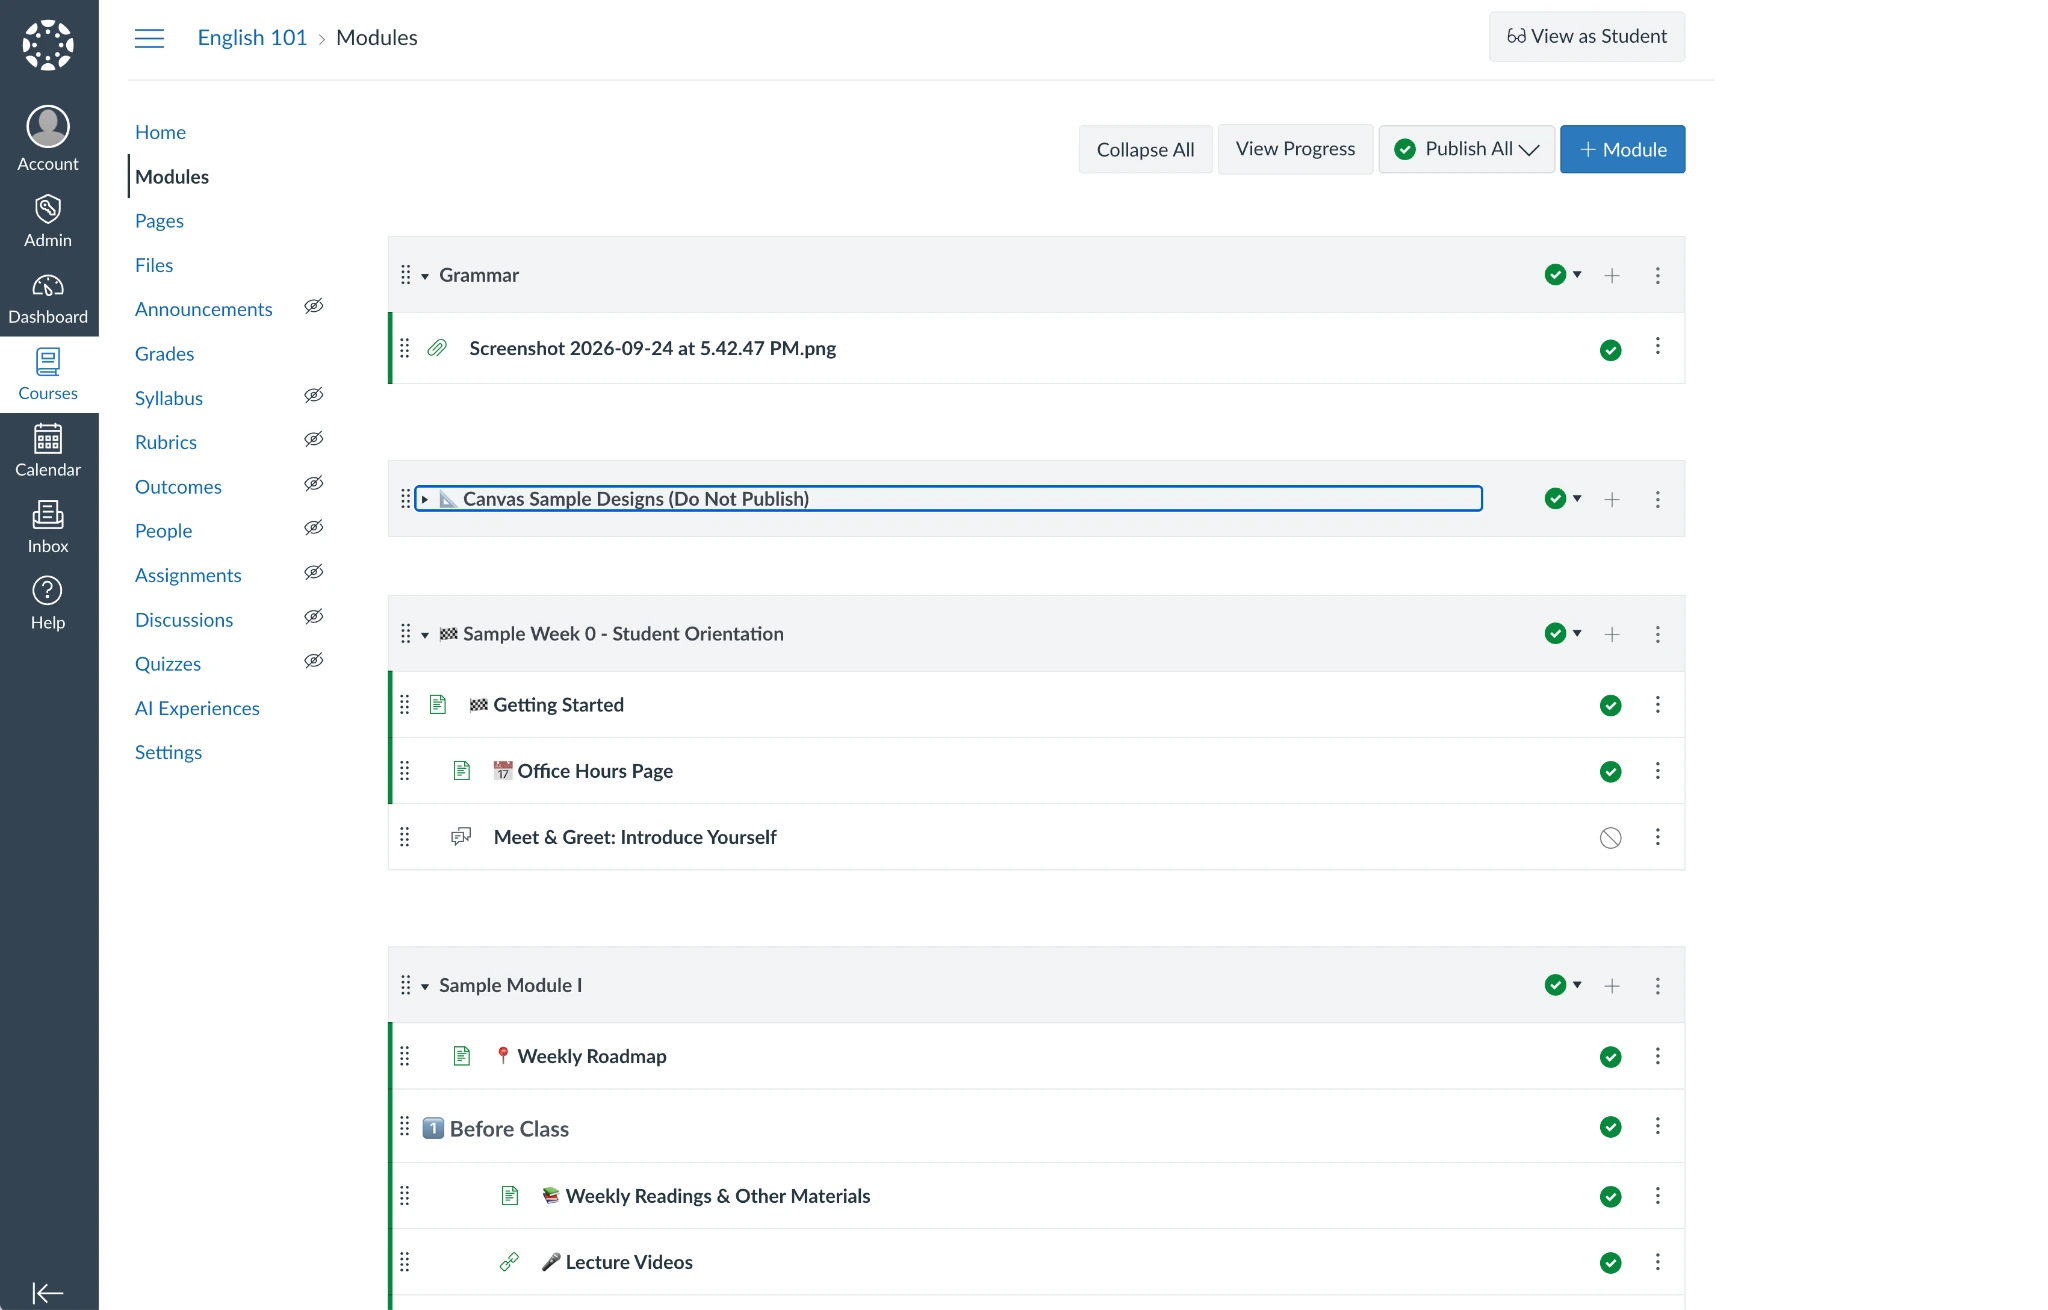
Adding class content to modules is simple. First, add a module section, then click the + button beside that module and add content from your course. You can then reorder module sections so that they show up in a logical order for students.
This is where Canvas LMS’s ever-present View as Student button comes in handy. Click that to see how your course will appear to students as they study, with each module section appearing one after another with Previous and Next buttons on the bottom to quickly jump to the next lesson or back to review older material.
Discussions
Discussions are another spot where viewing the course as a student can be helpful in building out your course. Discussion pages, again, start with the standard Canvas page builder tool, where you can outline the discussion topic and incentivize students to interact.
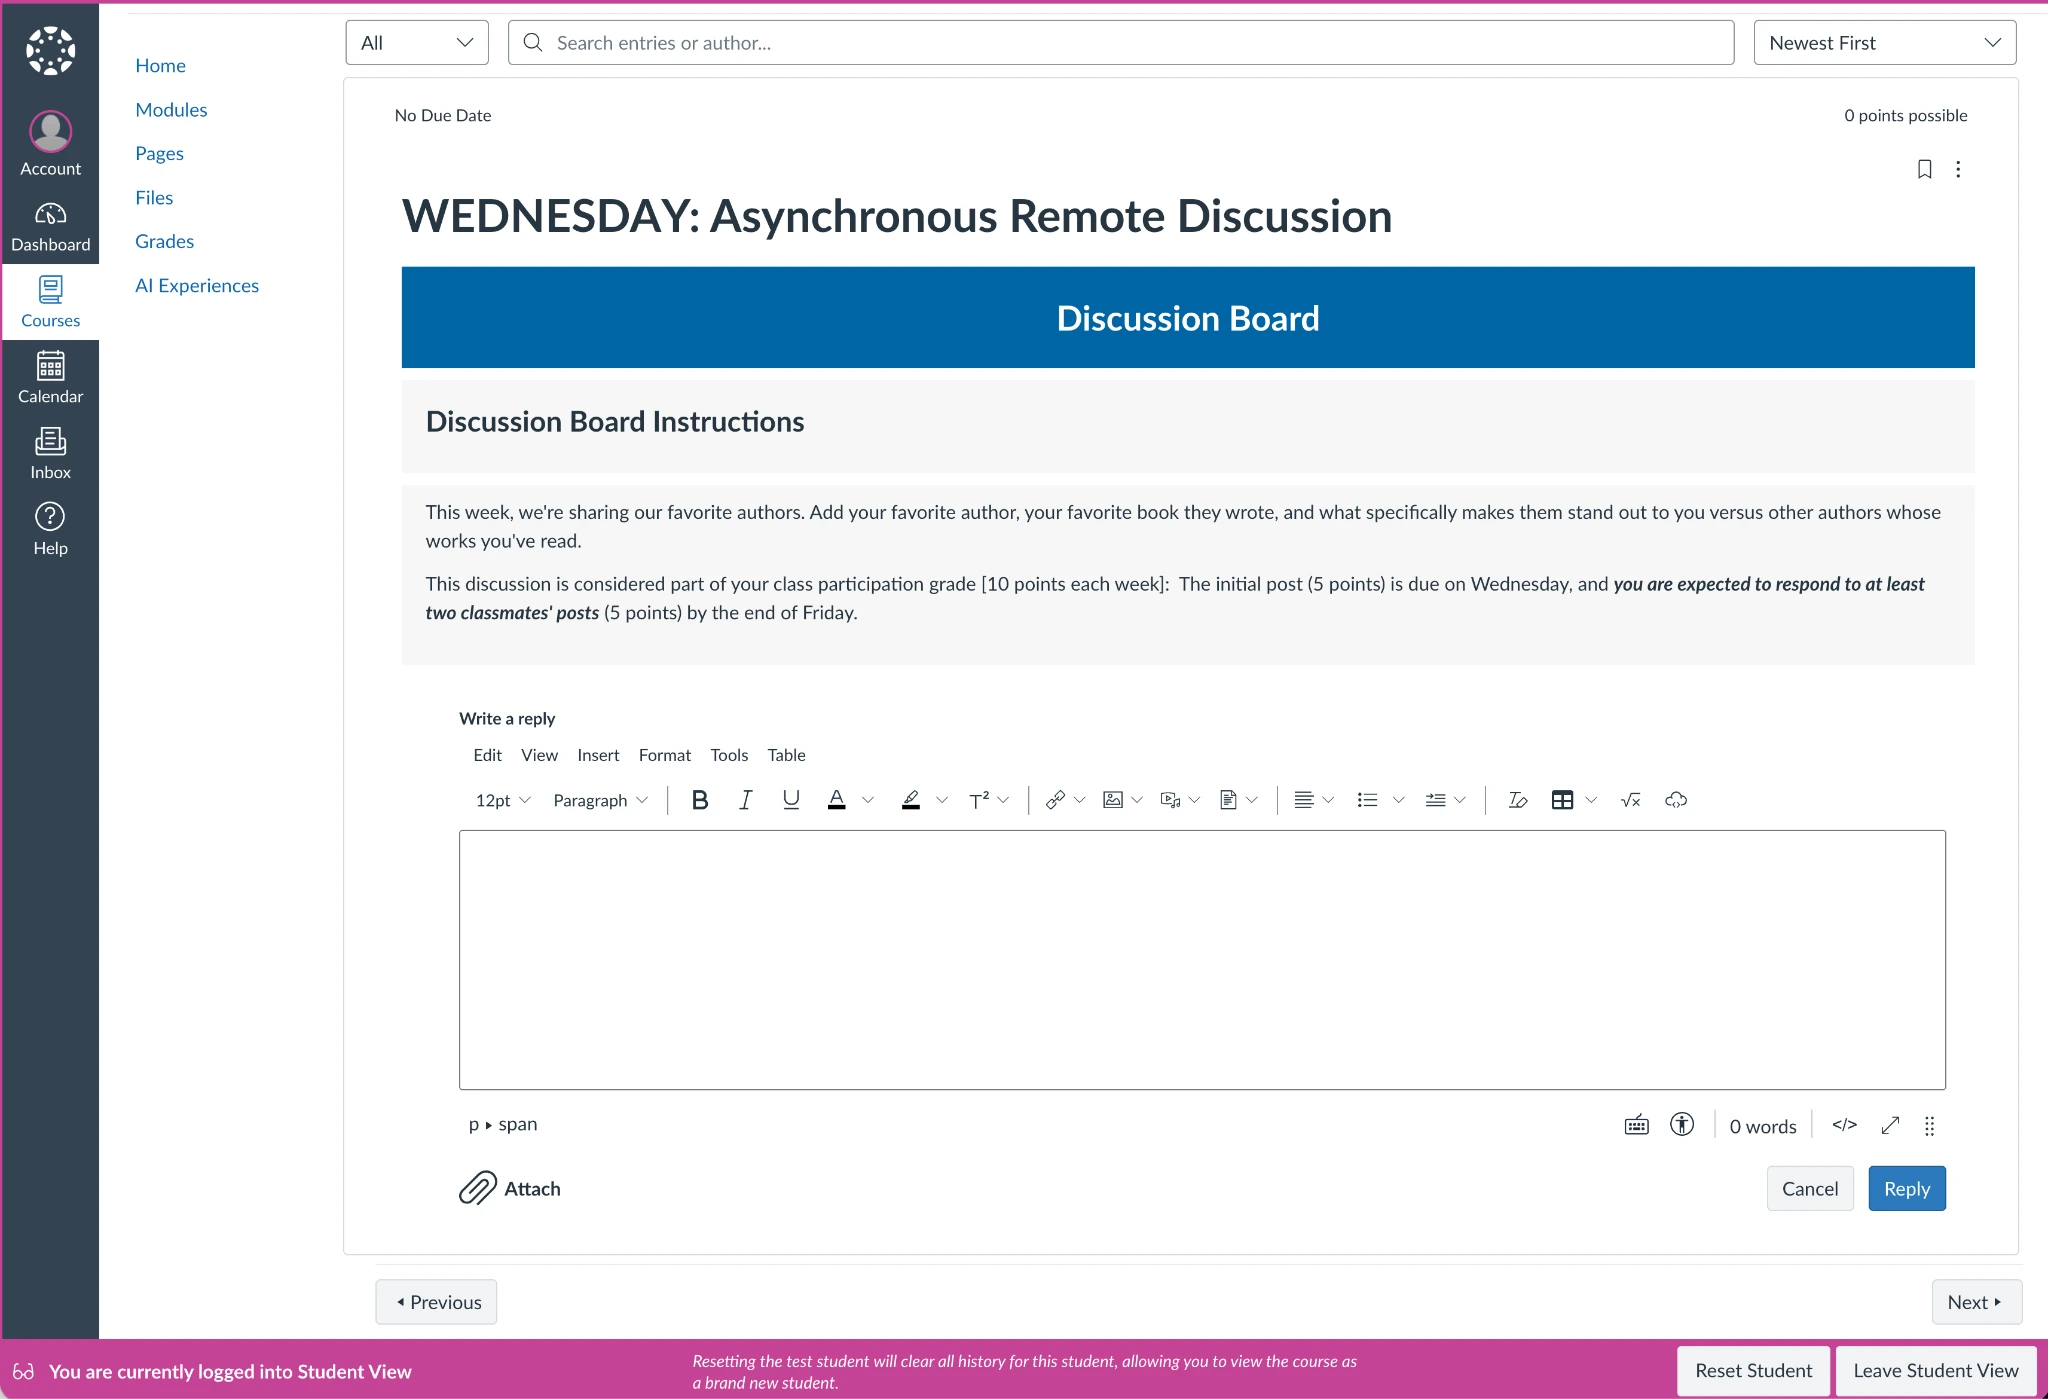
Students will use a similar editor to write their responses and reply to other participants, which you can preview and try out in the student mode.
Back in the admin screen, you can tweak how the discussion works. Canvas LMS lets you require students to reply before letting them view others’ responses, set when the discussion will start and stop, and close the discussion during the course if you’d rather not allow more replies.
Knowledge Chats
Most features in the Canvas LMS course creator work similarly to the page creator. The skills you build when creating pages will transfer to creating discussions, outlining assignments, and so on. But you’ll discover a new interface in the latest Canvas feature: Knowledge Chat, in the AI Experiences tab.
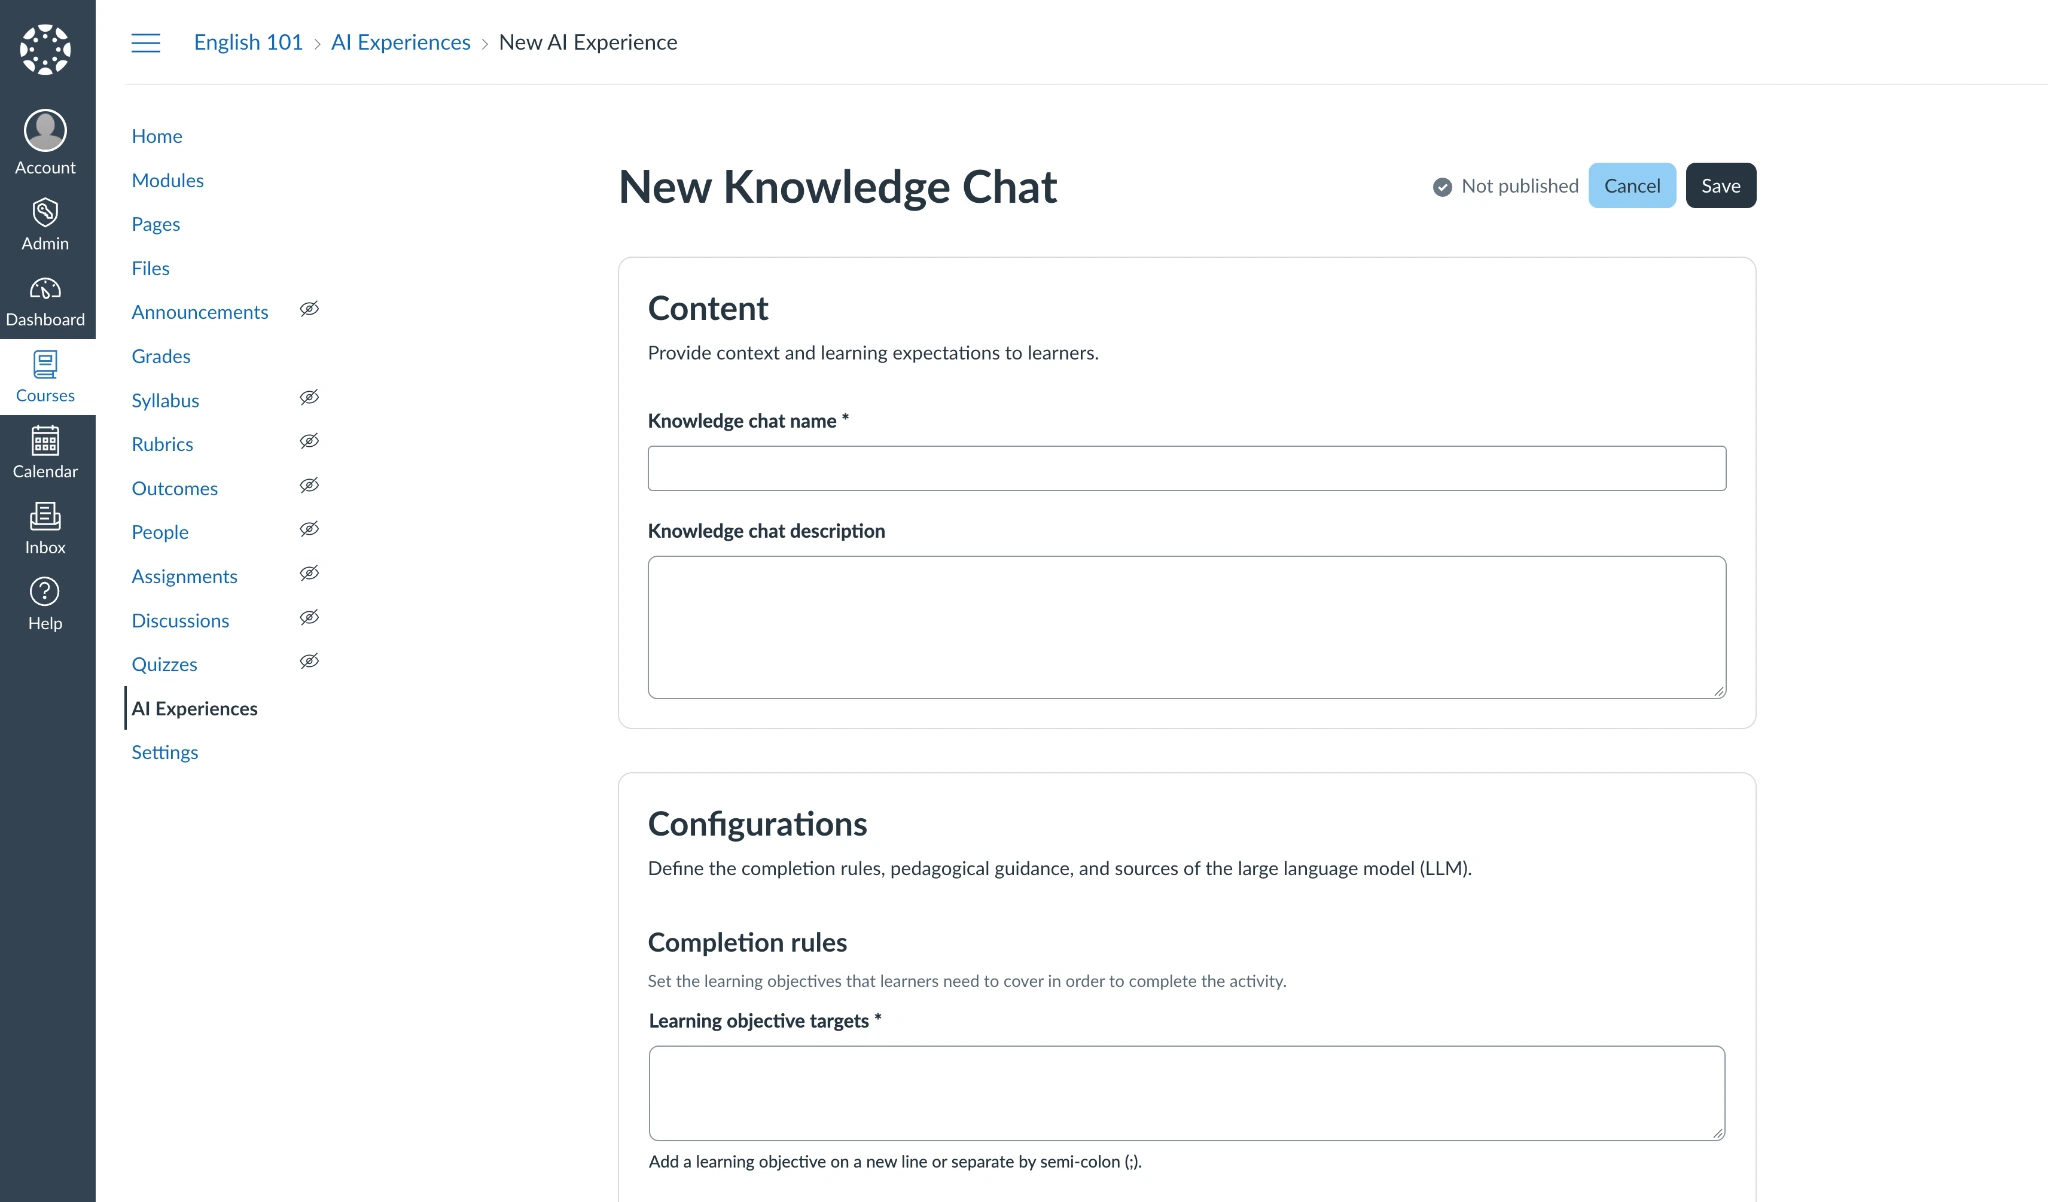
Knowledge Chat uses an OpenAI-powered chat to let students chat with an AI about text sources that you select. First, add a name and description to the chat. Then list your learning objectives and give the AI instructions on how to guide students through the material. Finally, add plain text details, choose existing files in Canvas LMS, or upload up to 10 files to seed the chat with knowledge.
All that’s left to do is check your course settings before releasing your course to students. Add a cover image, course code, time zone, term, start and end dates, default due times, and more. Canvas LMS also includes platform-specific options you can tweak, such as options to disable comments on announcements or let students edit their discussion replies after they’ve been submitted.
Once that’s done, you’re ready to open enrollment.
How to add students and publish your Canvas course
With your course materials built out in Canvas LMS, it’s time to let students in and start studying. First, though, ensure that everything is correct and that your course fits into your institutional standards. Open your course settings and make sure that the course code and SIS ID (if your institution uses one) are correct. Preview the course as a student if you haven’t already to double-check that materials, quizzes, discussions, pages, files, and more are all accessible with the details needed for your course.
Publishing your Canvas course is incredibly easy. Open the course homepage, click the Unpublished button in the top-right corner, and select the Publish option in the dropdown menu. A few moments later, your course will be published and ready for student enrollment.
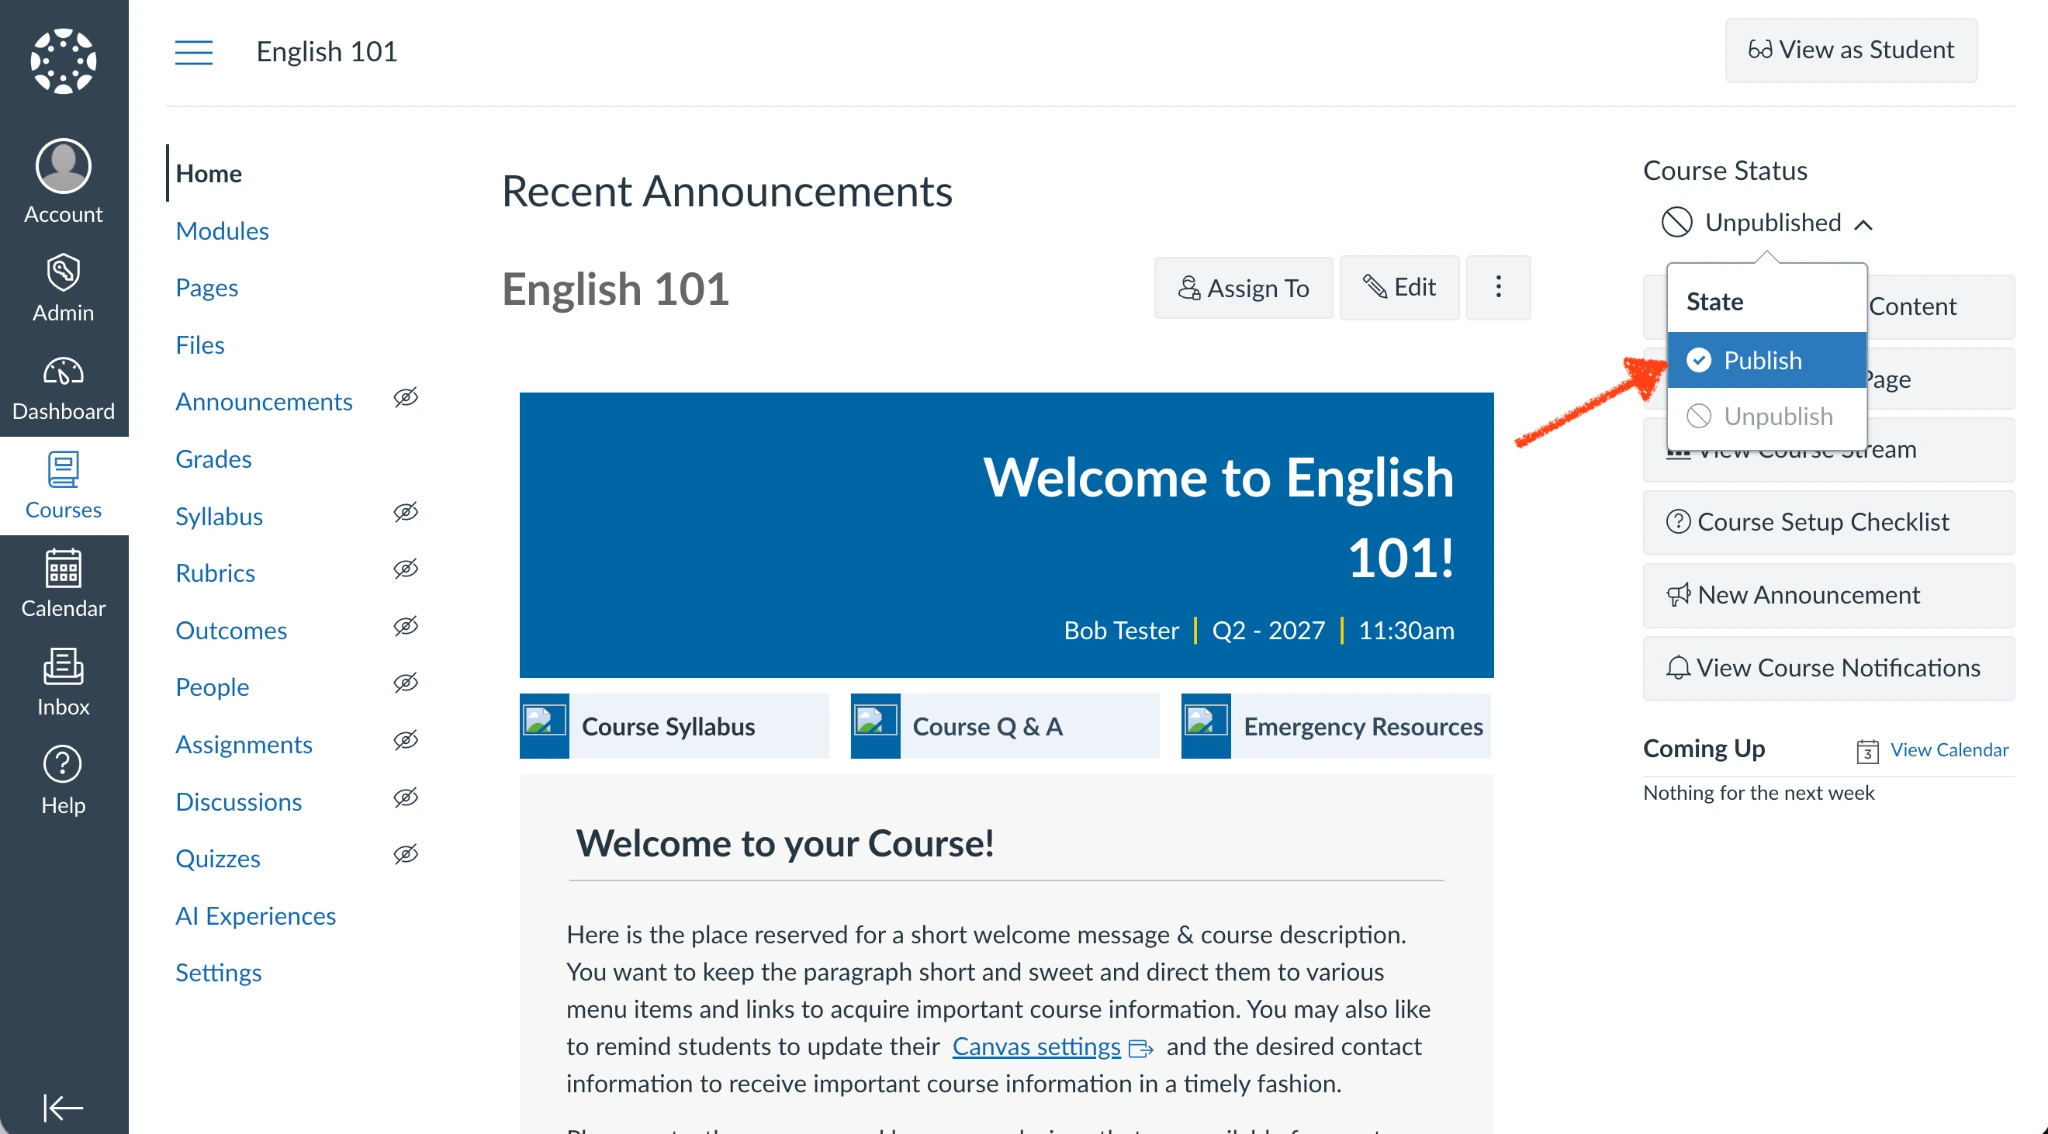
Published Canvas courses are still, by default, only visible to administrators and those with teacher accounts who have been invited to help build out or manage the course. Students have to be added manually. That’s where Canvas LMS switches from being a course-building tool into enrollment management software that can handle your students and grades in one place.
To add students to a Canvas course, open your course settings, click the People tab, then add new students by their email address, Canvas login ID, or their SIS ID from your institution. Set their role as “Student.”
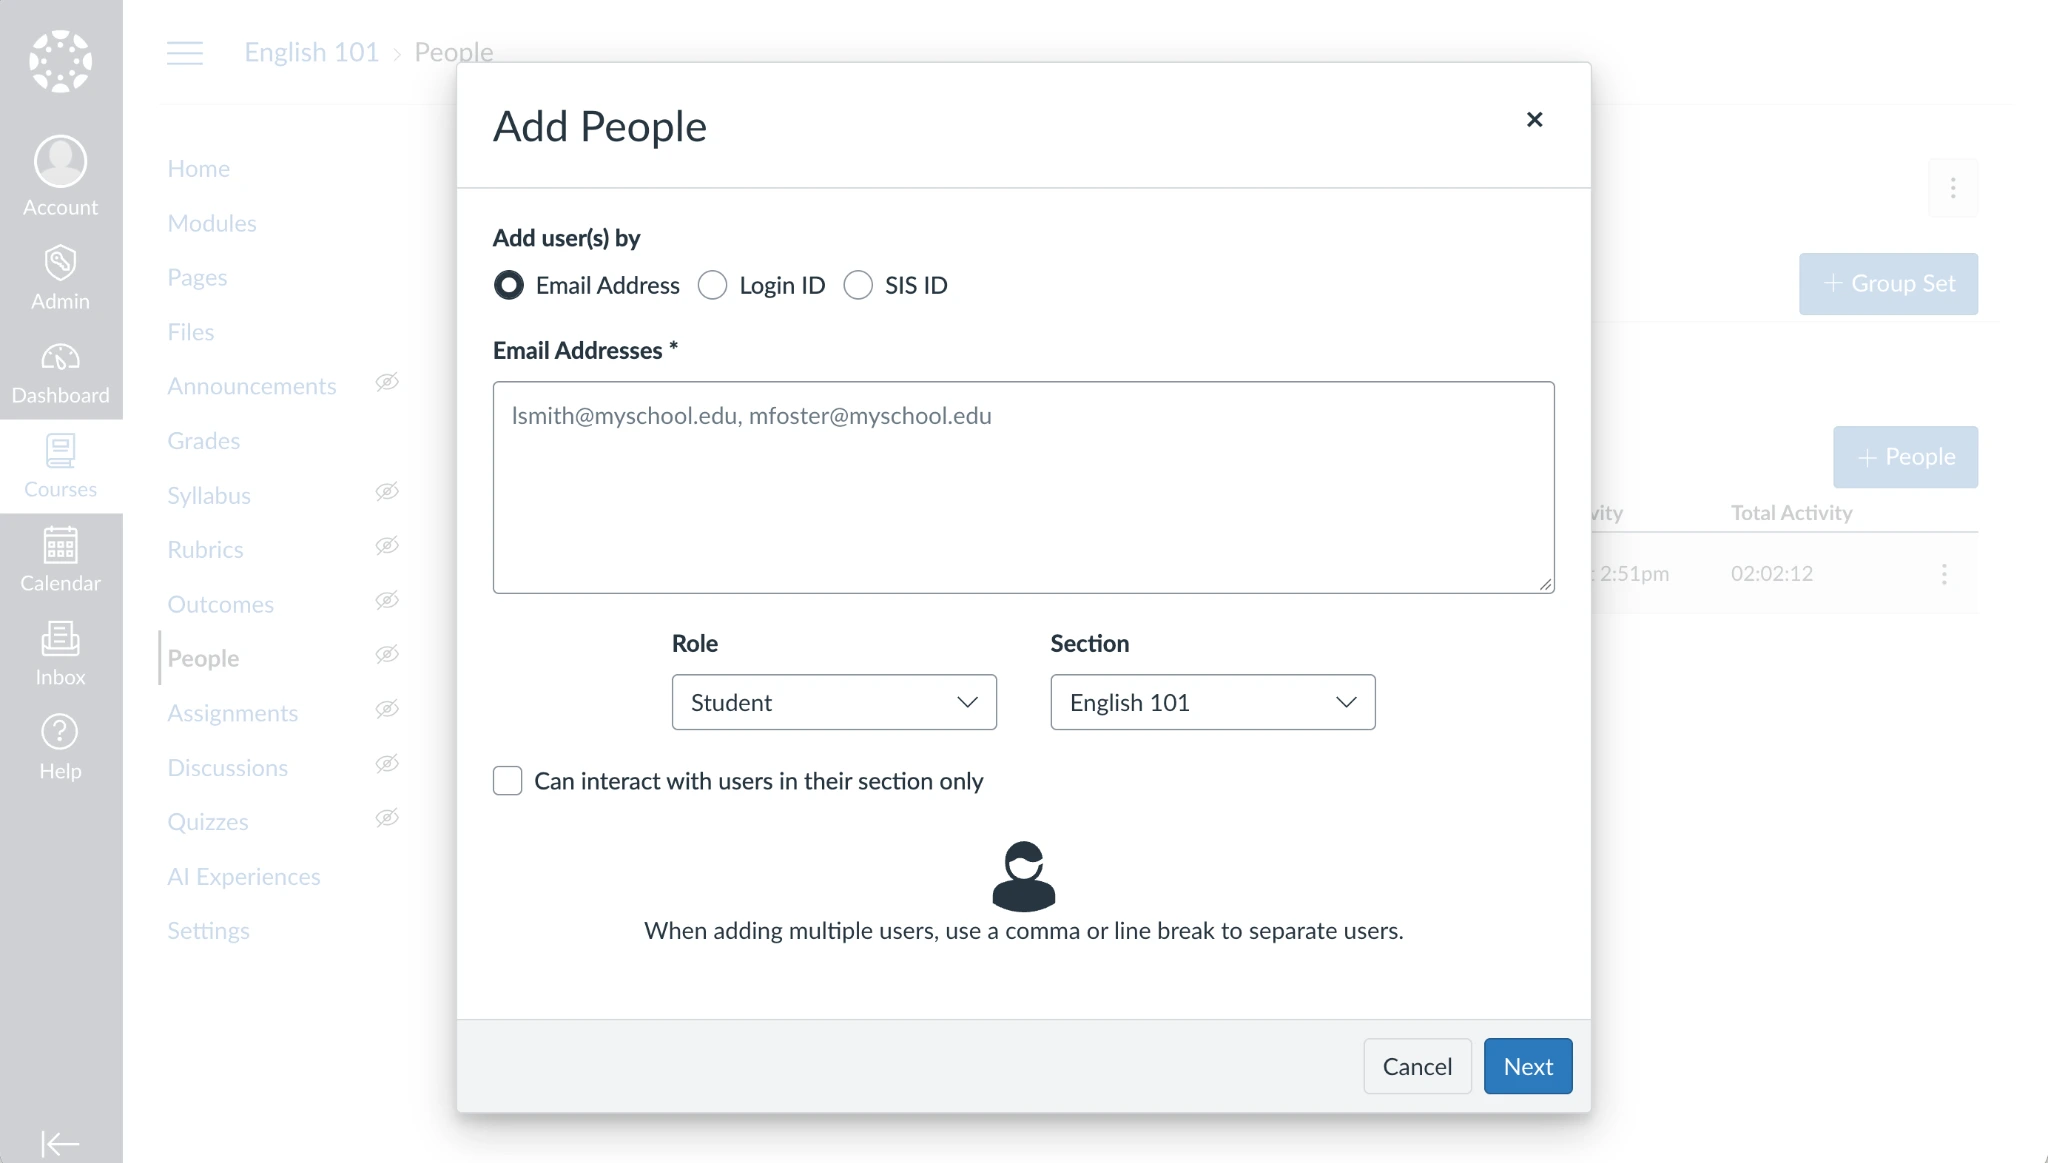
If your class has multiple sections, make sure you’ve selected the correct section for this student, and choose whether they can interact with students from other sections. It’s potentially worth leaving this on as a way to grow group discussions across multiple sections, or turning it off to keep interactions restricted to this one class if their assignments and coursework don’t precisely align.
Canvas LMS will automatically invite any students you add who already have accounts in your organization’s Canvas LMS account. You’ll be asked to check students and add their names, and to create new user accounts for any students without them. Do note that if you don’t check the box beside their email address, they won’t be added to your class.
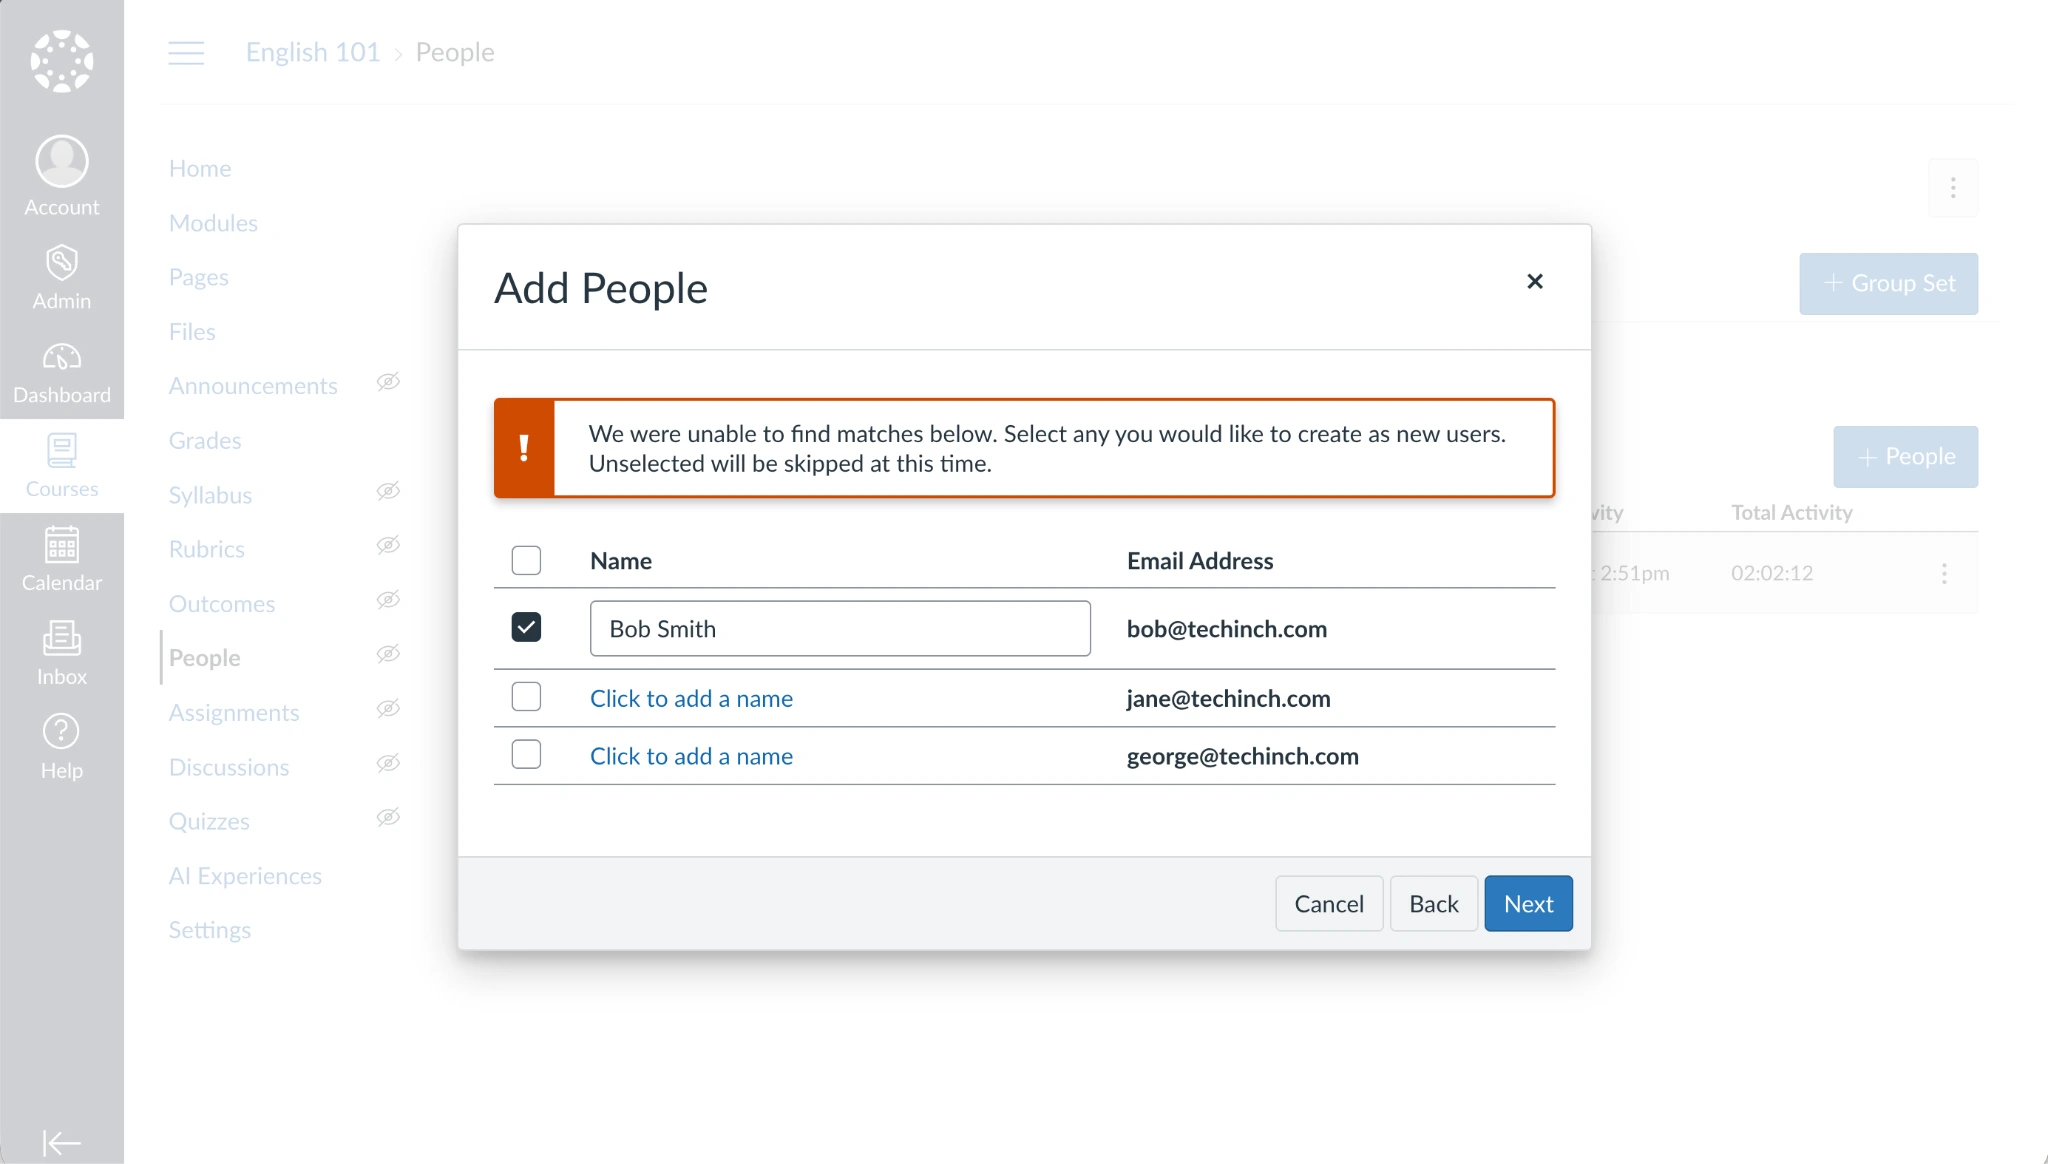
Students will need to verify their email address if they haven’t already, and then they’ll gain access to your class.
With that, you’re ready to get back to teaching, relying on Canvas LMS as the place to interact with students, check quizzes, record grades, and see how many students are progressing successfully through your course.
How to integrate Jotform with Canvas LMS (and why you should do so)
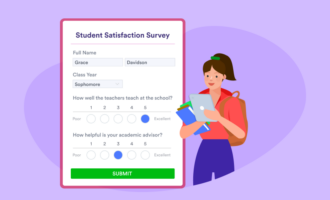
Canvas LMS includes tools to quiz your students, along with assignment features where students can upload files. For more free-form education forms to survey students for feedback, or to automate parts of Canvas LMS such as adding new students automatically, you’ll need an external form and survey builder that works with Canvas LMS.
The easiest way is to integrate Jotform with Canvas LMS. That gives you the power of a full-featured form builder to gather data, alongside the existing Canvas LMS features to manage courses and students, free for up to 10 forms. And with Jotform Education, which includes a 50 percent discount for educational institutions, a paid plan (with 25 forms and 1,000 form submissions per month) starts at only $17 per month when billed annually. If your institution requires HIPAA-enabled features, Jotform’s Gold plan ($49.50 per month, billed annually and with the educational discount applied) lets you build unlimited forms backed by the privacy features required by medical institutions.

Canvas is built to integrate with other software and educational technology, and Jotform is no exception. The simplest method is to first create forms in Jotform and then embed them into Canvas LMS.
Start in Jotform, where you can list questions and build out your form or survey, or use Jotform’s built-in AI to create the form for you. Alternatively, start out with one of Jotform’s thousands of education form templates, which include everything from administrative forms like course registration and scholarship application to quizzes, evaluations, and student survey forms that give you a prebuilt foundation to quickly customize as needed.
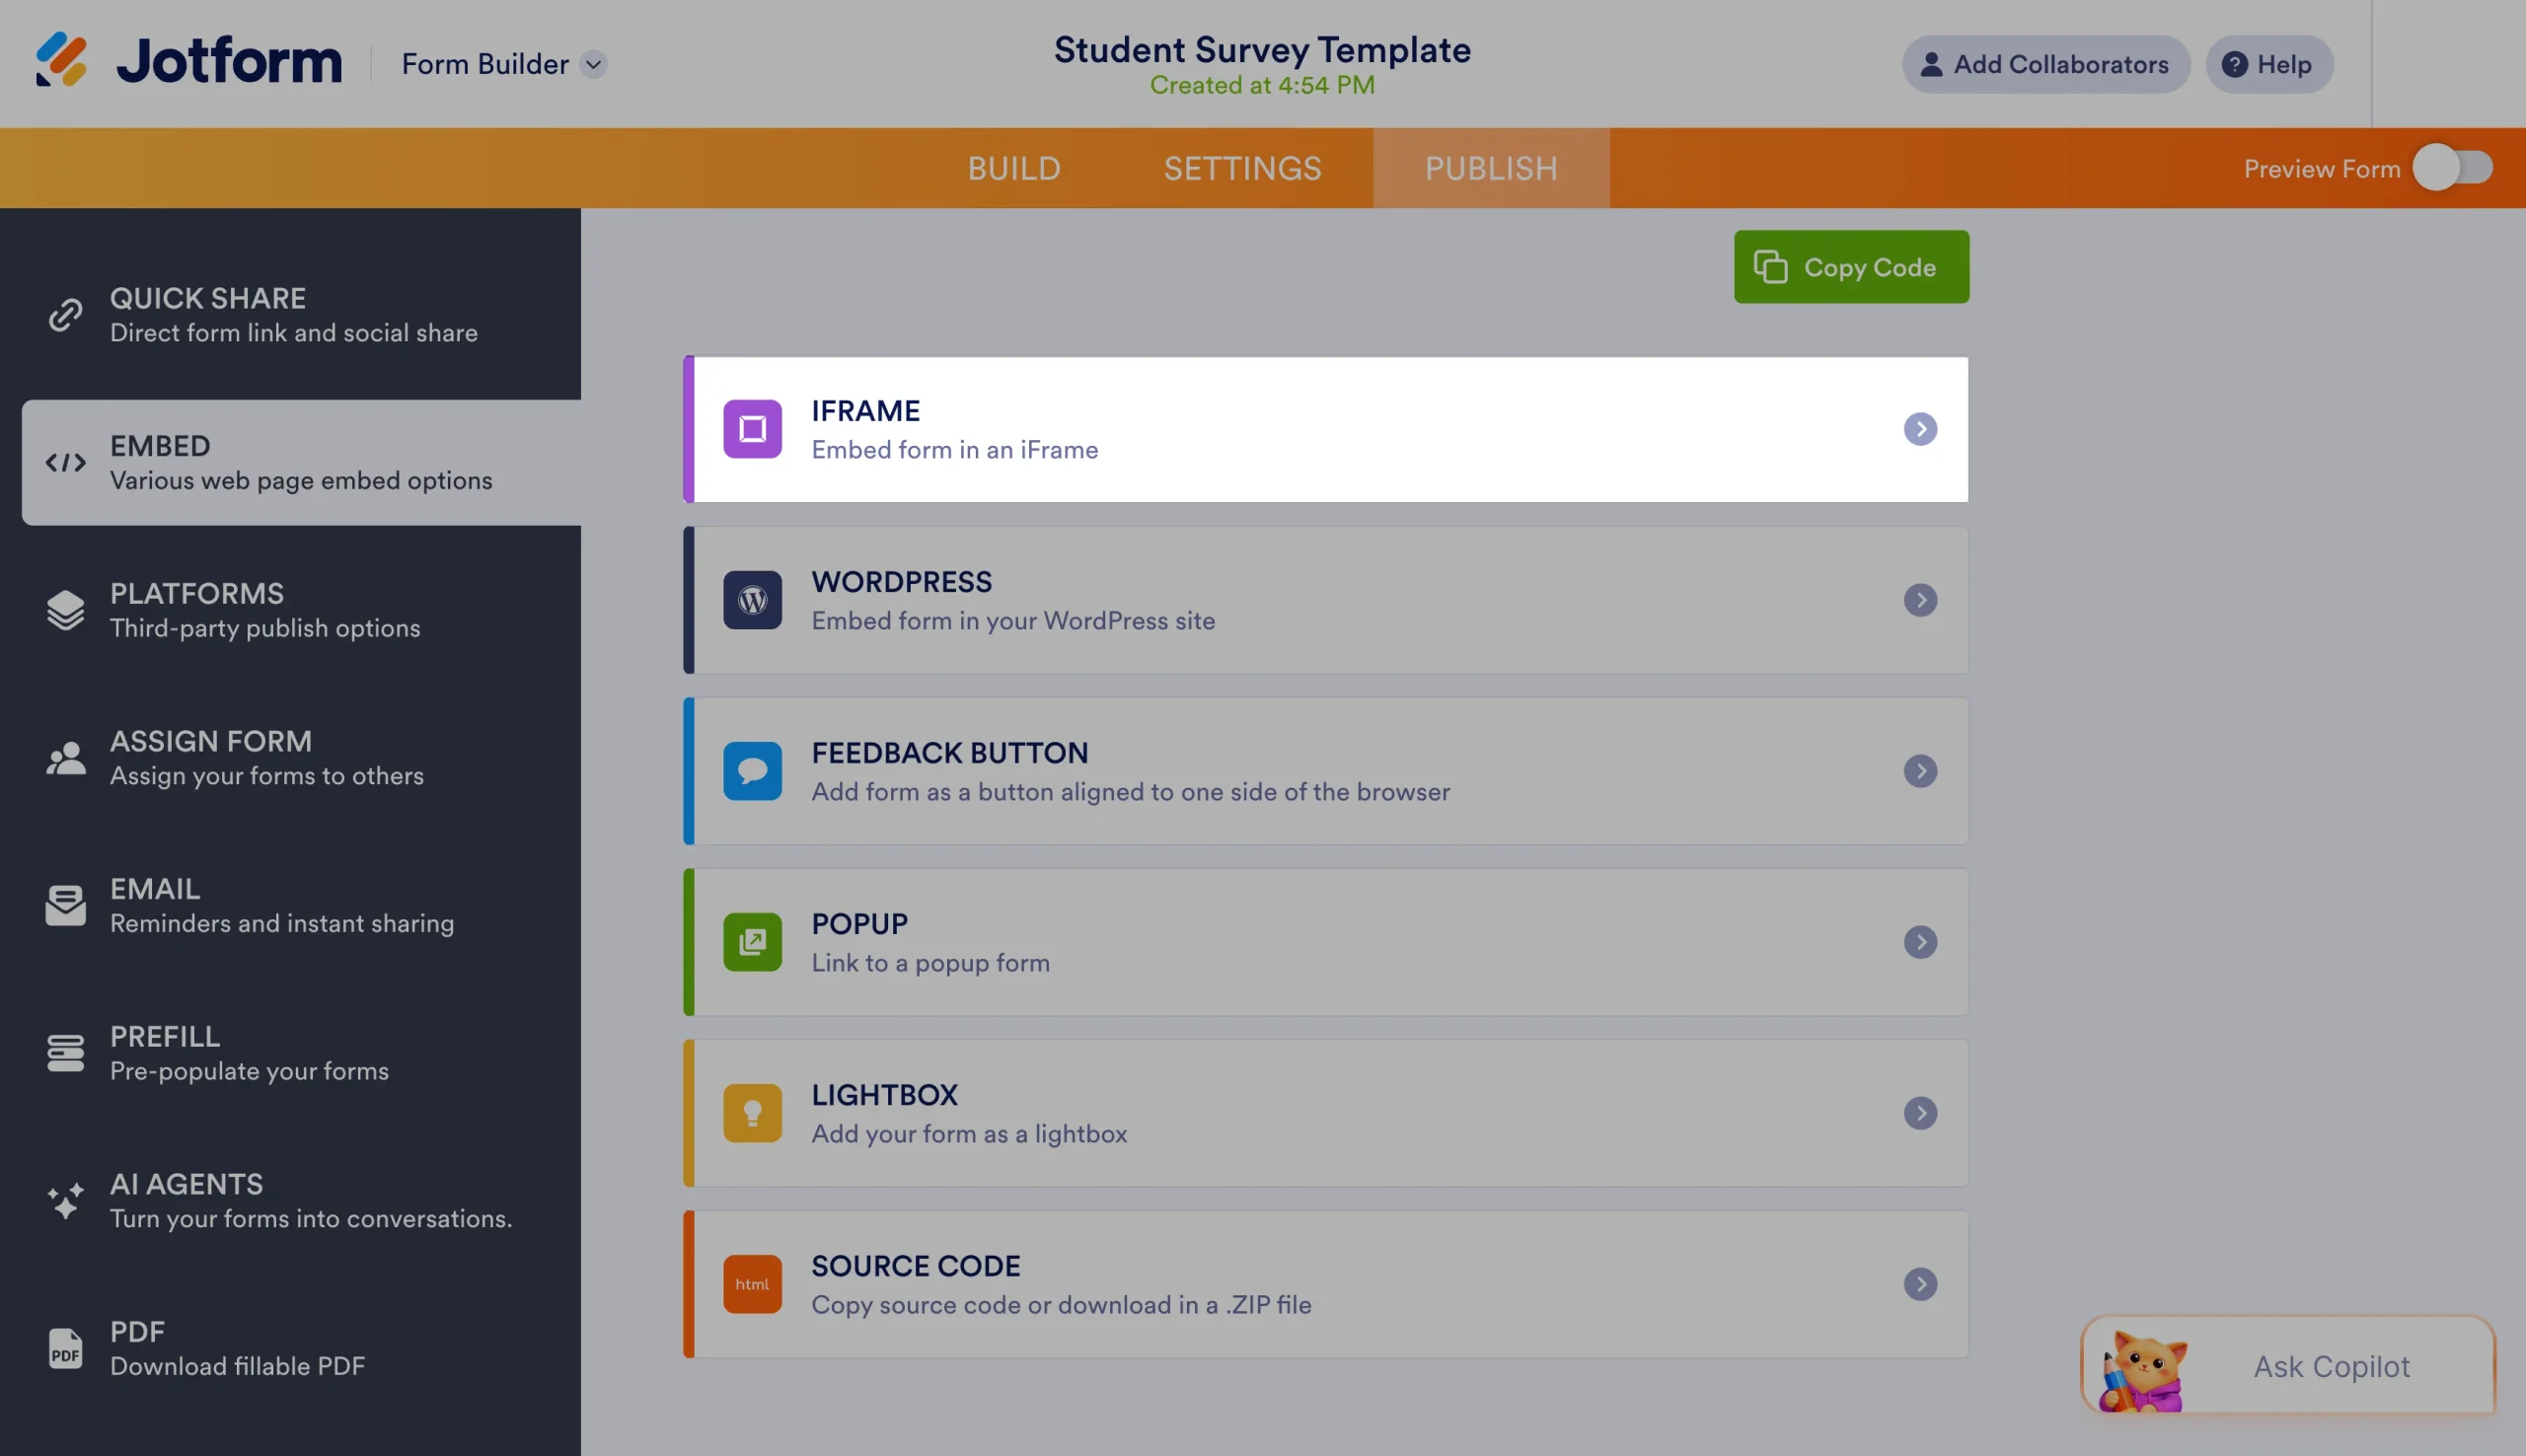
Once you’ve created the form, copy its iFrame embed code (Jotform’s default embed code won’t work in Canvas LMS).
- Select the form you want to embed from your Jotform Workspace.
- Click the Publish option in the toolbar and the Embed tab in the left sidebar.
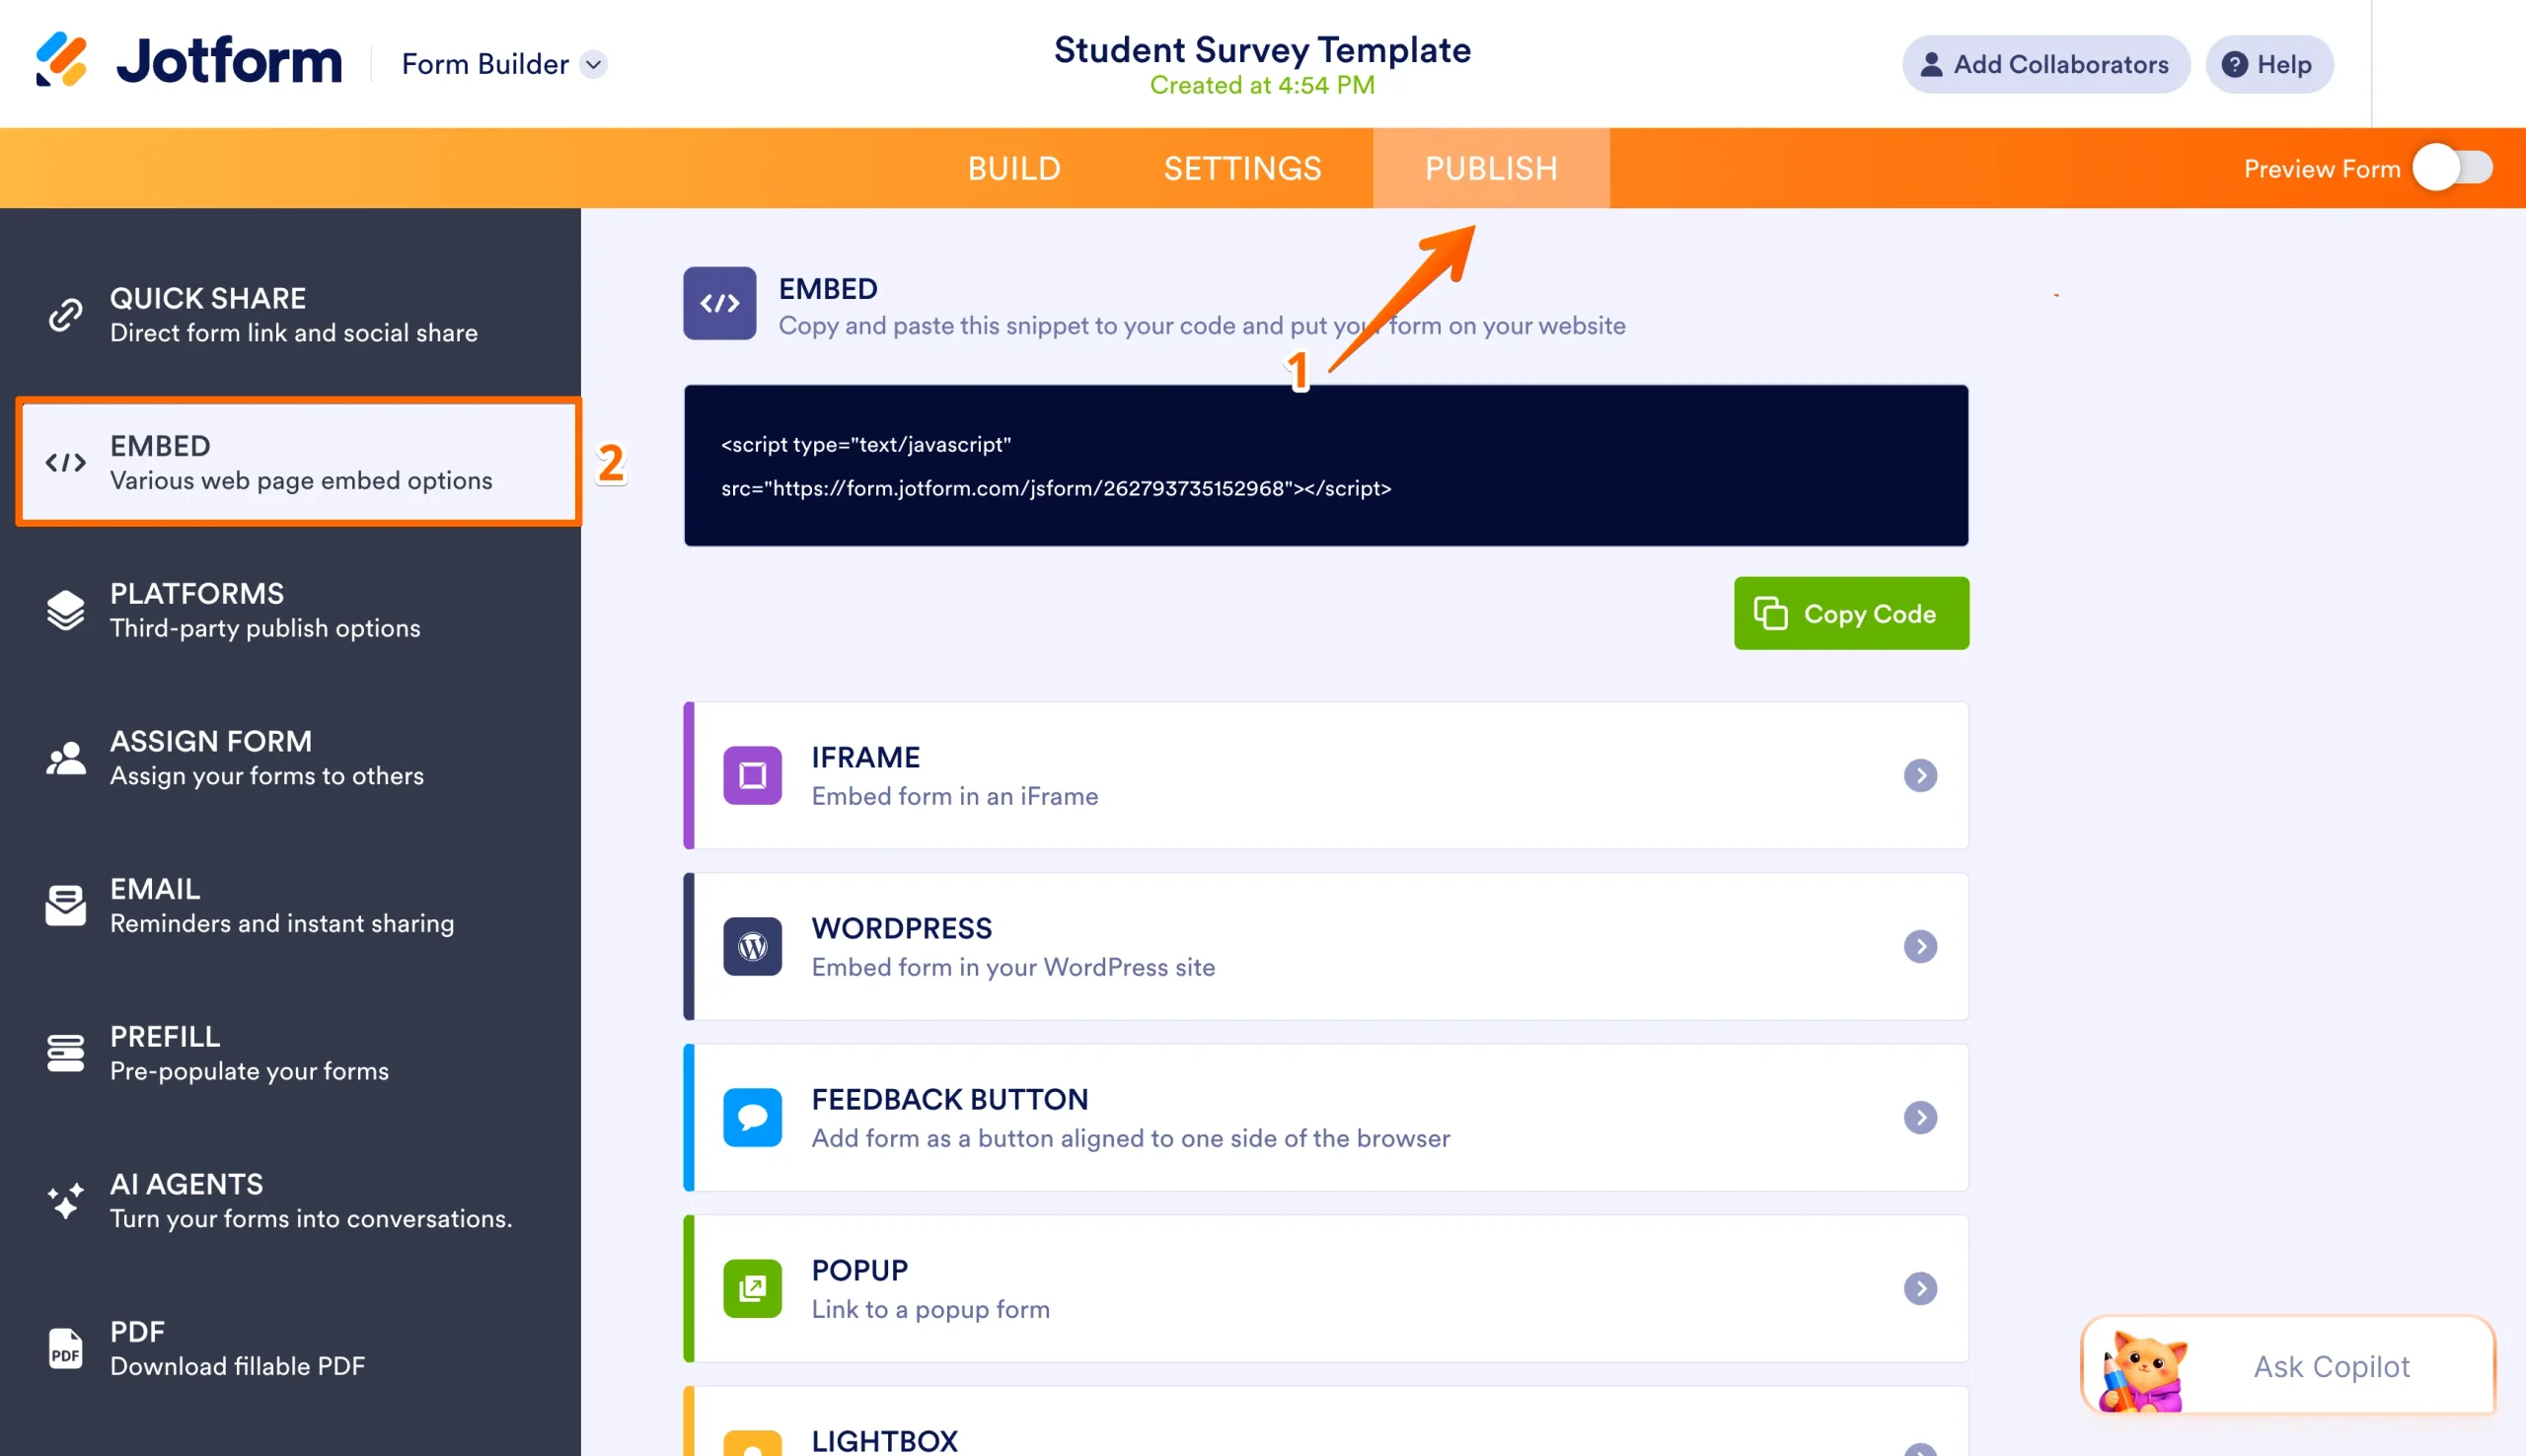
- Click the iFrame entry in the list of embed options, and copy the embed code.
Then, embed your form into your Canvas course pages. You can embed Jotform forms into any part of Canvas LMS where you can use the rich text editor to customize the text and design of a page.
- Open the page’s Edit option.
- Click in the editor where you’d like to embed the form, and click the cloud button on the far right of the toolbar. Depending on your browser window or screen size, you may first need to click the three-dot button on the right of the toolbar, then click the cloud button that opens in the second toolbar row.
- Paste your embed code there, and save the changes.
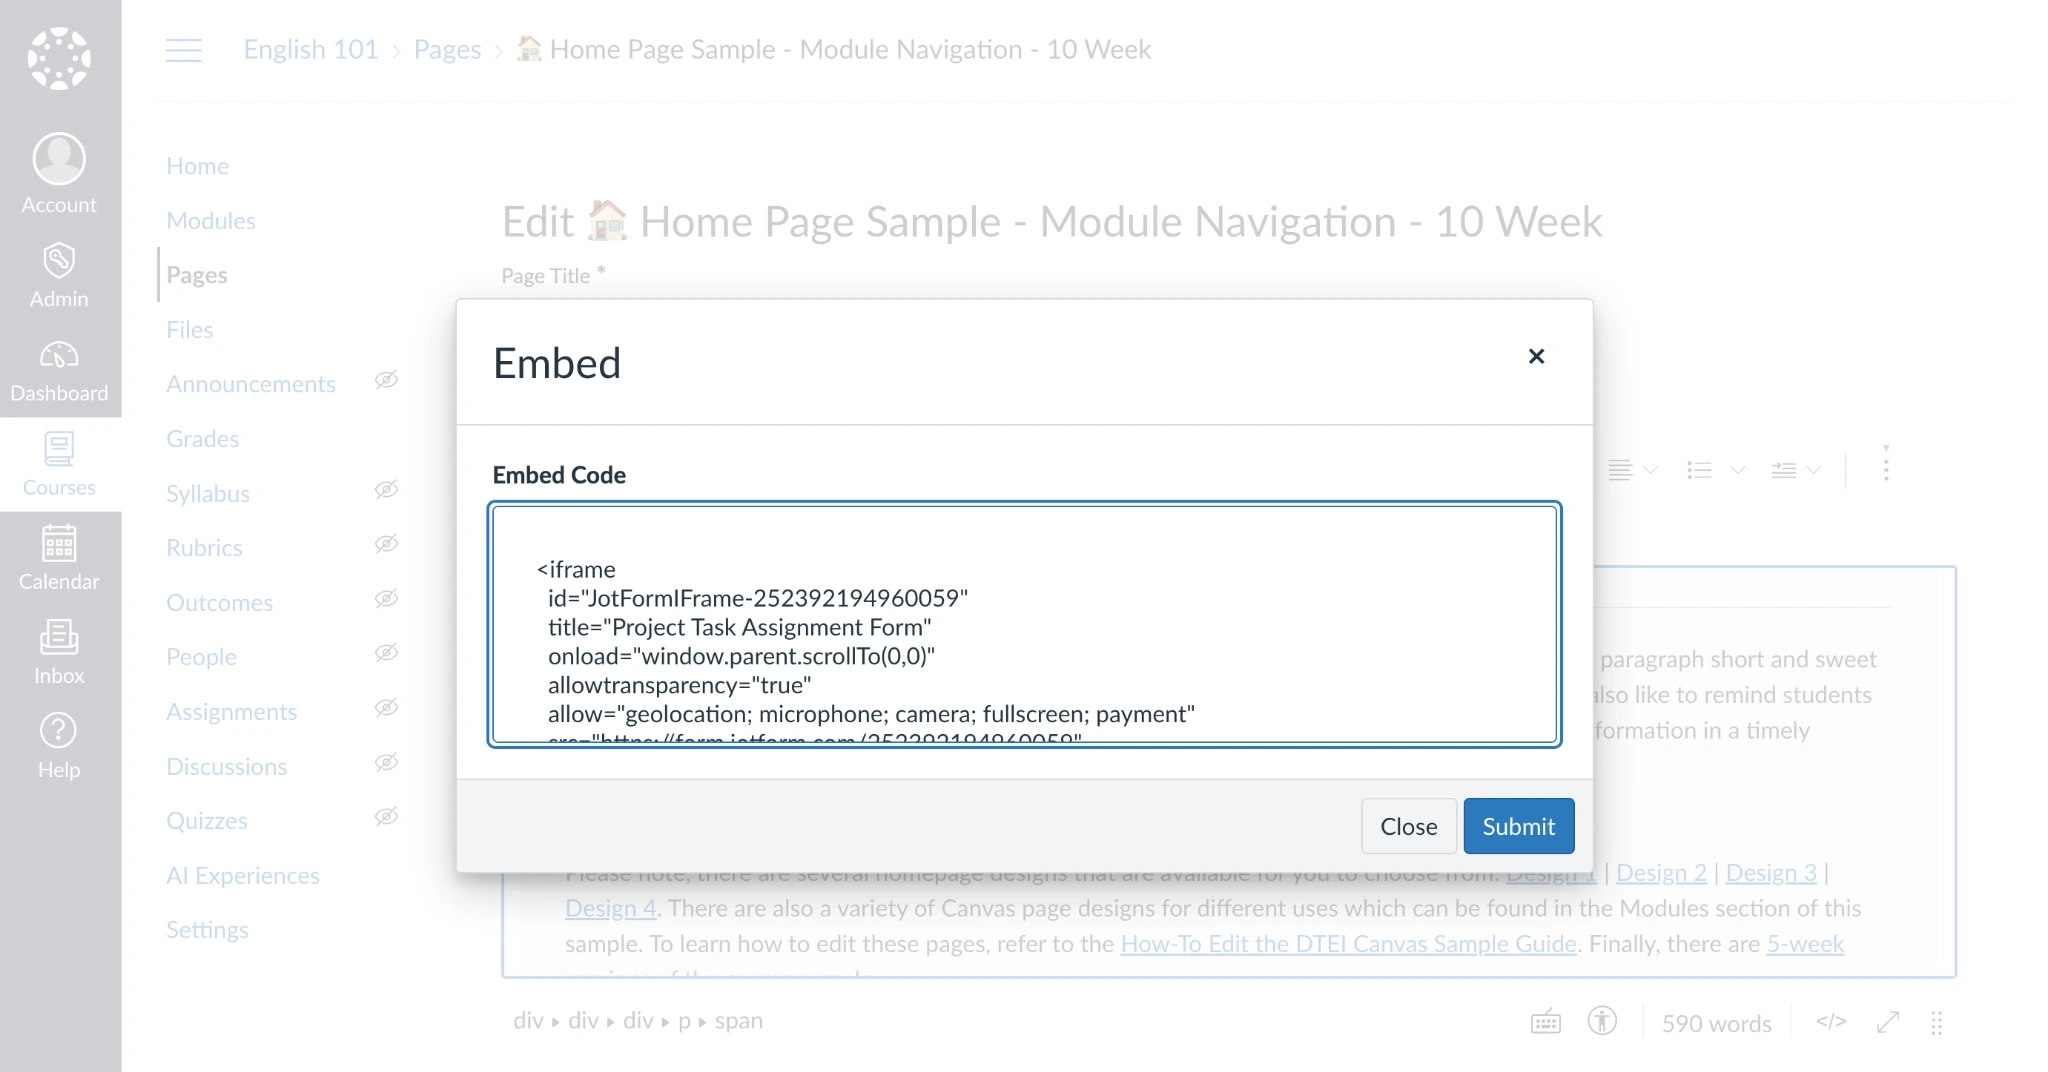
Preview your newly updated page, and you’ll see your Jotform form in place, ready to accept your students’ applications, feedback, and more.
And for an even better way to help teachers save time with tech tools, you can directly integrate your Jotform form with Canvas LMS to create students and enroll them in courses, right from a form. You’ll need to copy your organization’s Canvas URL, client ID, and client secret — all accessible from your account settings. Then when anyone fills out your form, they can be automatically added to a class, keeping you from having to manually invite every new student by email each time you start a new class section.
Start your journey in Canvas LMS, creating a new course, adding pages, building quizzes, and starting discussions. Then sign up for Jotform to handle all your other student-focused data-gathering tasks — from building out class enrollment forms that automatically add students to Canvas LMS, to creating polls to check in on student progress. It’s the form builder that fits perfectly into your Canvas LMS workflow.
FAQs about creating a Canvas course
If you don’t have a Canvas LMS teacher, designer, or admin account, or if your institution settings don’t allow your account to create courses, you won’t see the “Start a New Course” button in your Canvas LMS account. Contact your IT admin or LMS support team for assistance.
A Canvas course shell is an empty course, potentially with a template for the general design and structured data that your institution uses for new courses. It’s what you start with when you create a new course in Canvas LMS. Course shells are not visible to students and instead give instructors a private space to build a new course before finalizing it, publishing it, and opening it for enrollment.
Yes. Open an existing Canvas course, and choose Copy this Course from its settings. Alternatively, open your new Canvas course, click the Import Existing Content button, and choose Copy a Canvas Course from the Select Content Type menu.
Canvas will then ask you to enter the details for the new course, including its name, course code, term, and start and end dates. You can also choose which of the content sections you would like to copy over to the new course. Then, customize the newly copied course with updated content, using the original course’s design and details to speed up course creation.
To add students to a Canvas course, open the course in Canvas LMS, select the People tab, and then click the + People button to add new students by email address, login ID, or SIS ID. You can add more than one student at a time by separating their info with a comma or line break.
Alternatively, you can automatically add students to a Canvas course from a Jotform form with the Canvas LMS integration. This lets form respondents select a course and then automatically adds them to it.
No, students can only see Canvas courses when the courses are published and the student has been enrolled. Private, draft courses are only visible to admins and other teachers and designers with access during the course development process.
Yes. With the Jotform-Canvas integration, Jotform education forms can automatically enroll Canvas users in the classes they choose in the form. Jotform can also create new Canvas LMS student accounts from form submissions. It’s a simple way to build enrollment forms that both sign students up to your organization and enroll them in their selected courses.
This article is for teachers, instructional designers, Canvas admins, training managers, and education teams who need to create a new Canvas course, set up the course shell, add content, and prepare it for students.




























































































Send Comment: