
3 steps to add reCAPTCHA to Contact Form 7
Spam is a pain for anyone running a WordPress site. It’s one of those things that starts off with one weird message and ends up with your team double-checking every form submission.
That’s usually when people start looking at reCAPTCHA in Contact Form 7. It’s already built in, it doesn’t ask visitors to do anything extra, and it knocks out a lot of automated junk right away. It won’t solve spam forever, but it does calm things down. Best of all, nothing new appears in the form, so nothing changes for visitors — it just sits there and judges how each submission behaves.
If you already know how to use WordPress, the setup itself is quick. Here’s a guide to walk you through the basics.
What is Contact Form 7 reCAPTCHA?
Contact Form 7 is a free WordPress plug-in that sends form submissions from point A to point B. You install it, build a form, drop in a shortcode, and messages show up. It’s just not so great at automatically detecting spam.
That’s the reason people add reCAPTCHA to Contact Form 7 in the first place. It’s Google’s way of cutting down automated traffic without forcing every real visitor to prove they’re human.
Instead of relying on one signal, it watches patterns — like how long someone spends on a page, how quickly they fill out a form, and generally whether they “act” like a person. All of that gets rolled into a score.
With Contact Form 7, this usually means reCAPTCHA v3. There’s no checkbox and nothing for visitors to click. Once it’s turned on, it runs across all your Contact Form 7 forms automatically.
| Version | What visitors see | How it works | CF7 support |
|---|---|---|---|
| reCAPTCHA v2 | “I’m not a robot” checkbox (sometimes images) | Users complete a challenge | Needs a plug-in |
| reCAPTCHA v3 | Small badge, no interaction | Scores behavior in the background | Built-in |
| reCAPTCHA Enterprise | Similar to v3 (usually invisible) | Advanced scoring with rule controls | Indirect |
How to add reCAPTCHA to Contact Form 7
Setting up Contact Form 7 reCAPTCHA is straightforward enough, with a few hurdles. One wrong option on Google’s side, or a key that doesn’t match, and everything can look fine in WordPress while submissions quietly fail.
The good news is that, once the keys are correct, Contact Form 7 does most of the work for you. You’re not editing forms, adding CAPTCHA fields everywhere, or touching shortcodes — you’re just connecting two services and letting them do their thing.
Here’s how it works.
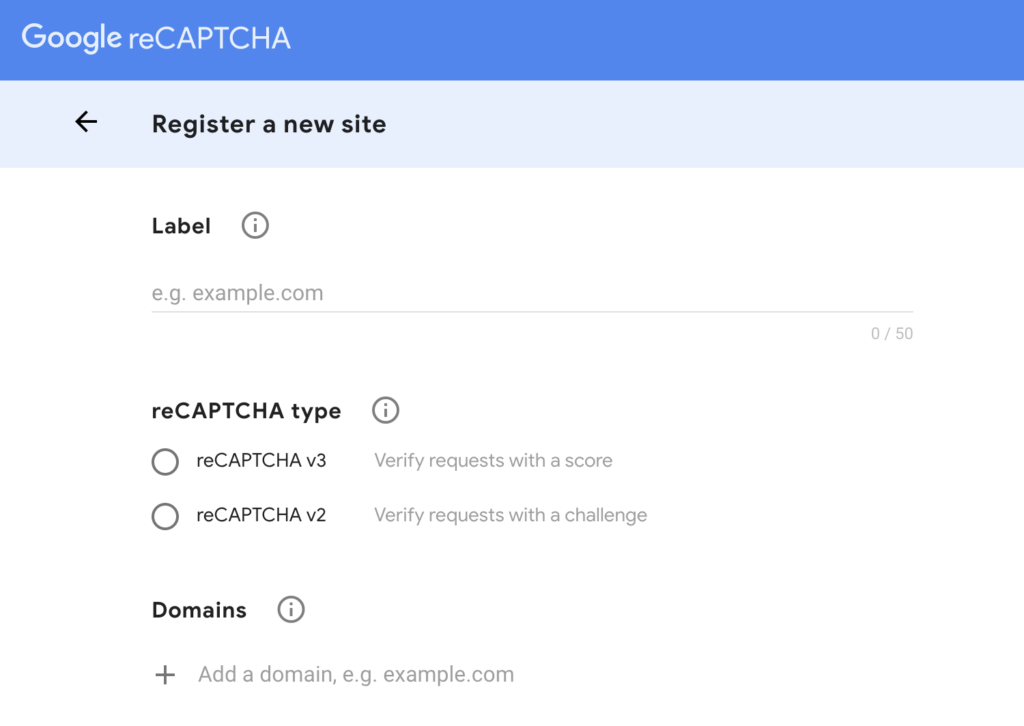
Step 1: Get your reCAPTCHA v3 API keys
To use reCAPTCHA with Contact Form 7, you’ll need a site key and a secret key for reCAPTCHA v3. If you’ve got older keys lying around from v2, they won’t help — even if they’re attached to the same domain.
You’ll need to log into your Google account and register the site again. Give it a name you’ll recognize later (promise me, that matters more than it sounds like it does once you’ve got a few sites under one account). I usually include the domain name and “CF7” so that I know exactly what it’s tied to.
When you get to the version selection, choose reCAPTCHA v3. The checkbox version feels familiar, but Contact Form 7 doesn’t use it anymore unless you add extra plug-ins. Stick with v3.
Add your domain without the protocol. No https://, no paths. Just the domain. Save it, and Google will generate two keys: a site key and a secret key. Copy both somewhere safe.
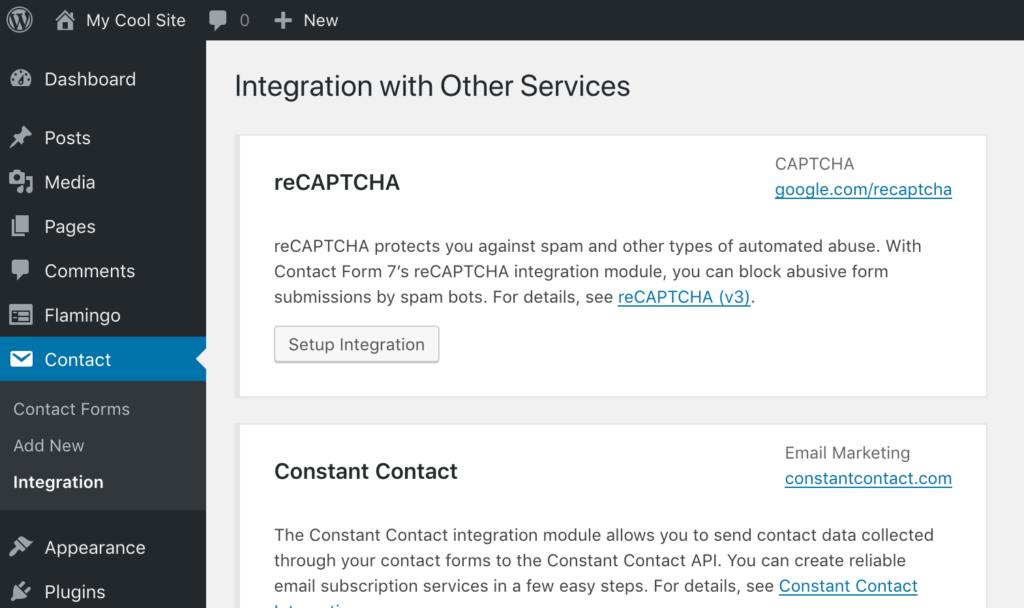
Step 2: Connect reCAPTCHA to Contact Form 7
Once you’ve got the keys, head to the Contact tab on your WordPress dashboard. There’s a reCAPTCHA section sitting there waiting for those keys. Paste them in, save, and you’re technically done.
Nothing actually changes in your forms, so if you want to be safe, it’s worth checking a few things. The easiest starting point is to open a page with a form and scroll to the bottom corner. You should see the reCAPTCHA badge. If it’s not there, the script isn’t loading.
Step 3: Adjust the reCAPTCHA protection level (optional)
After setup, most people leave the default settings alone — and that’s what I’d usually recommend doing at first.
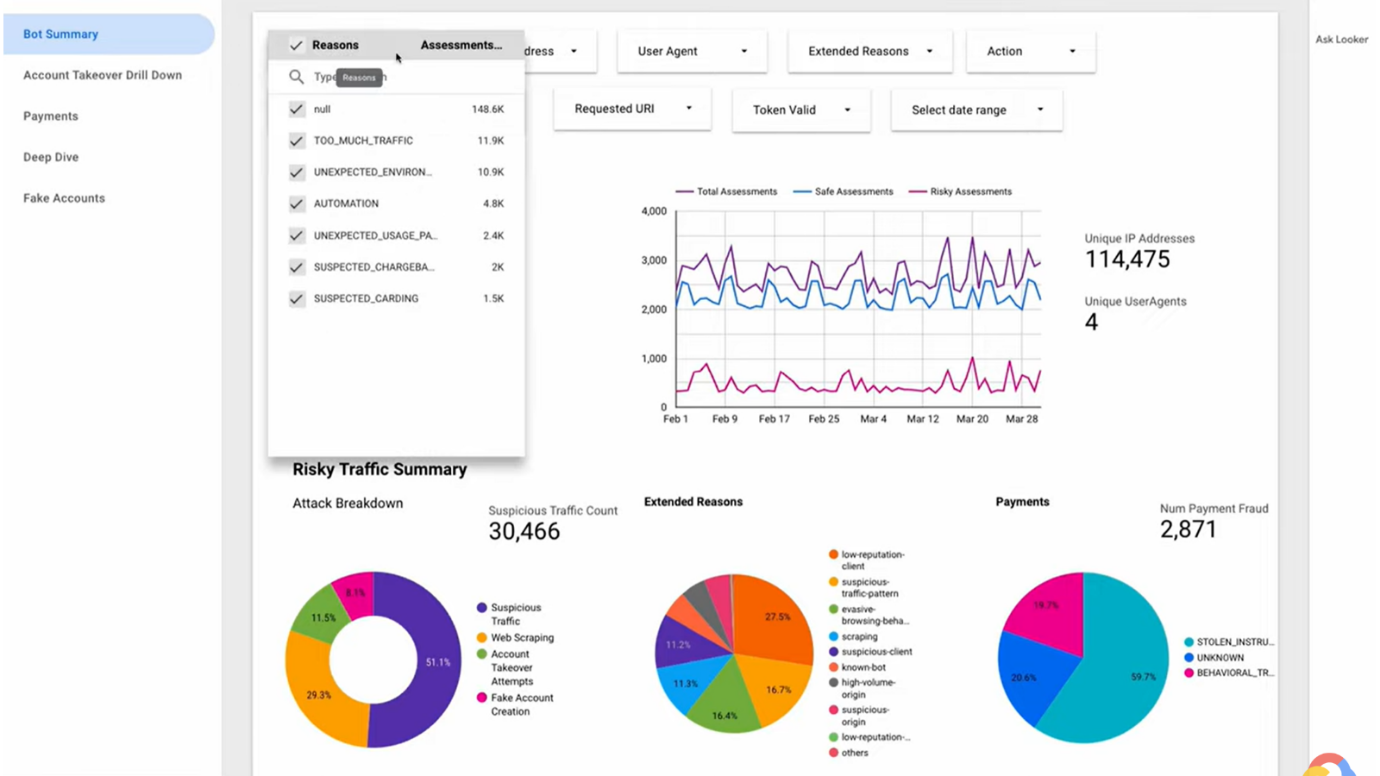
reCAPTCHA v3 doesn’t block submissions outright. It scores them. Contact Form 7 then decides what to do based on how low that score is. The default cutoff sits in the middle, which works fine for a lot of sites.
Where things get tricky is when spam still shows up. The instinct is to turn the protection up immediately. Sometimes that helps, but sometimes it just creates a new problem: stopping automated junk and real enquiries. You then end up with emails from users saying your forms don’t work.
If you adjust the threshold, do it in small steps. Then wait. Watch actual submissions. If complaints come in, roll it back.
The reCAPTCHA dashboard on Google’s side helps here. You can see how submissions are being scored and whether normal traffic is getting flagged. That’s far more useful than guessing.
Jotform: The smart alternative to Contact Form 7 reCAPTCHA
If you’ve been tweaking the Contact Form 7 reCAPTCHA settings and you’re still getting junk (or you start hearing “your form won’t send”), that’s usually a sign you should be thinking about an alternative. Some of the best contact form WordPress plug-ins actually help you build better forms and manage spam with deeper controls. Jotform is the best I’ve found.
With Jotform, you build a custom form in the simple form builder first, then add it to your site through the Jotform WordPress plug-in. That separation helps — you’re not crossing your fingers that a theme script, caching plug-in, or one WordPress update won’t mess with your form’s behavior.
On top of that, Jotform comes with a lot built in. There are over 20,000 free templates, a drag-and-drop builder that doesn’t need code, support for more than 40 payment gateways, and hundreds of widgets for things like signatures or calendars.
It also connects with over 240 other tools, including Google Sheets and HubSpot, and lets you create reports or assign forms to teammates to manage replies. It ends up being one place where all your forms live.
How to add reCAPTCHA to forms with Jotform
This is very straightforward. In fact, there’s a full guide on how to embed Jotform in WordPress using the embed form plug-in that you can use. These are the basic steps.
Step 1: Install the WordPress plug-in
The first step is getting the Jotform plug-in on your WordPress site:
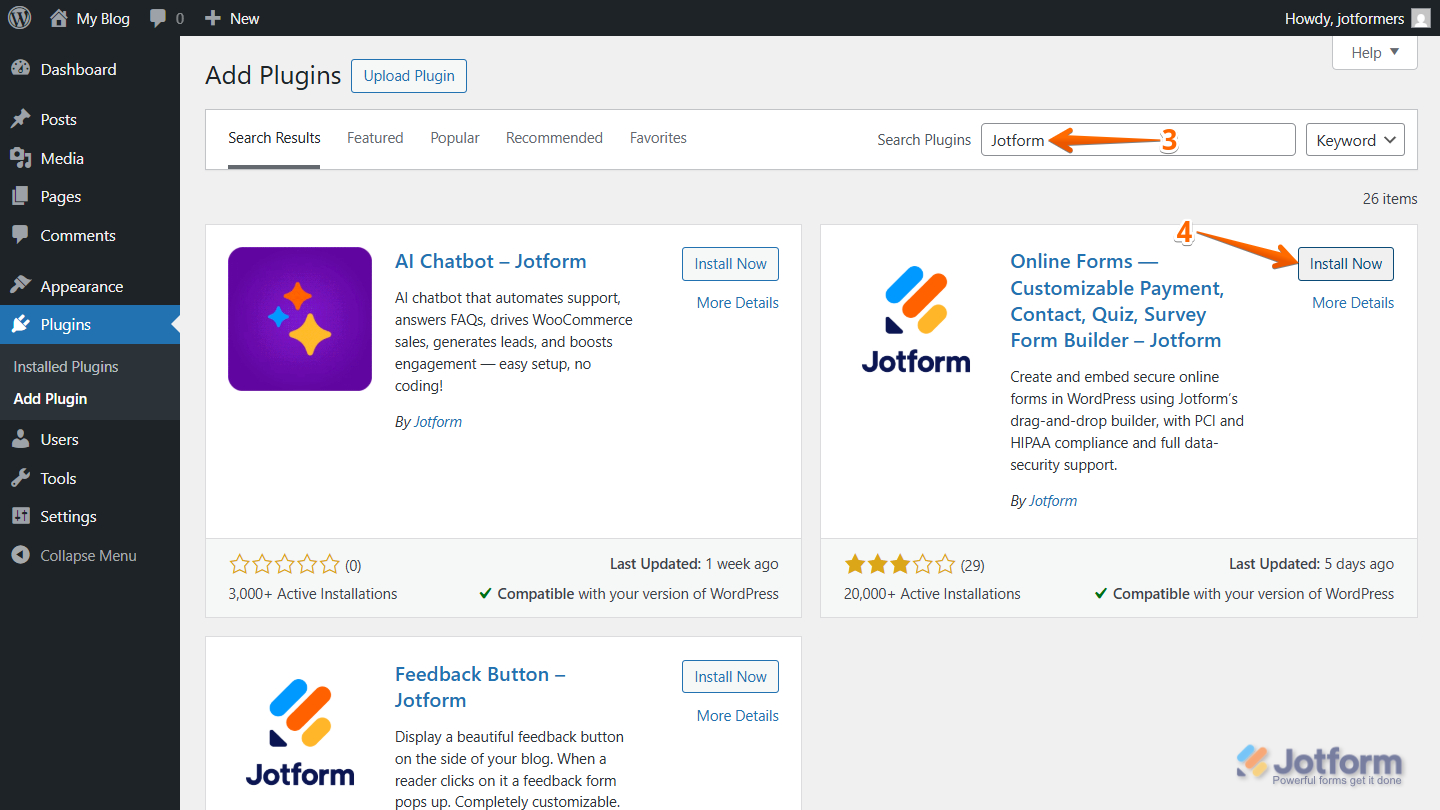
- Log into the backend of your WordPress site and click on Plugins on the left-hand side.
- Click Add Plugin.
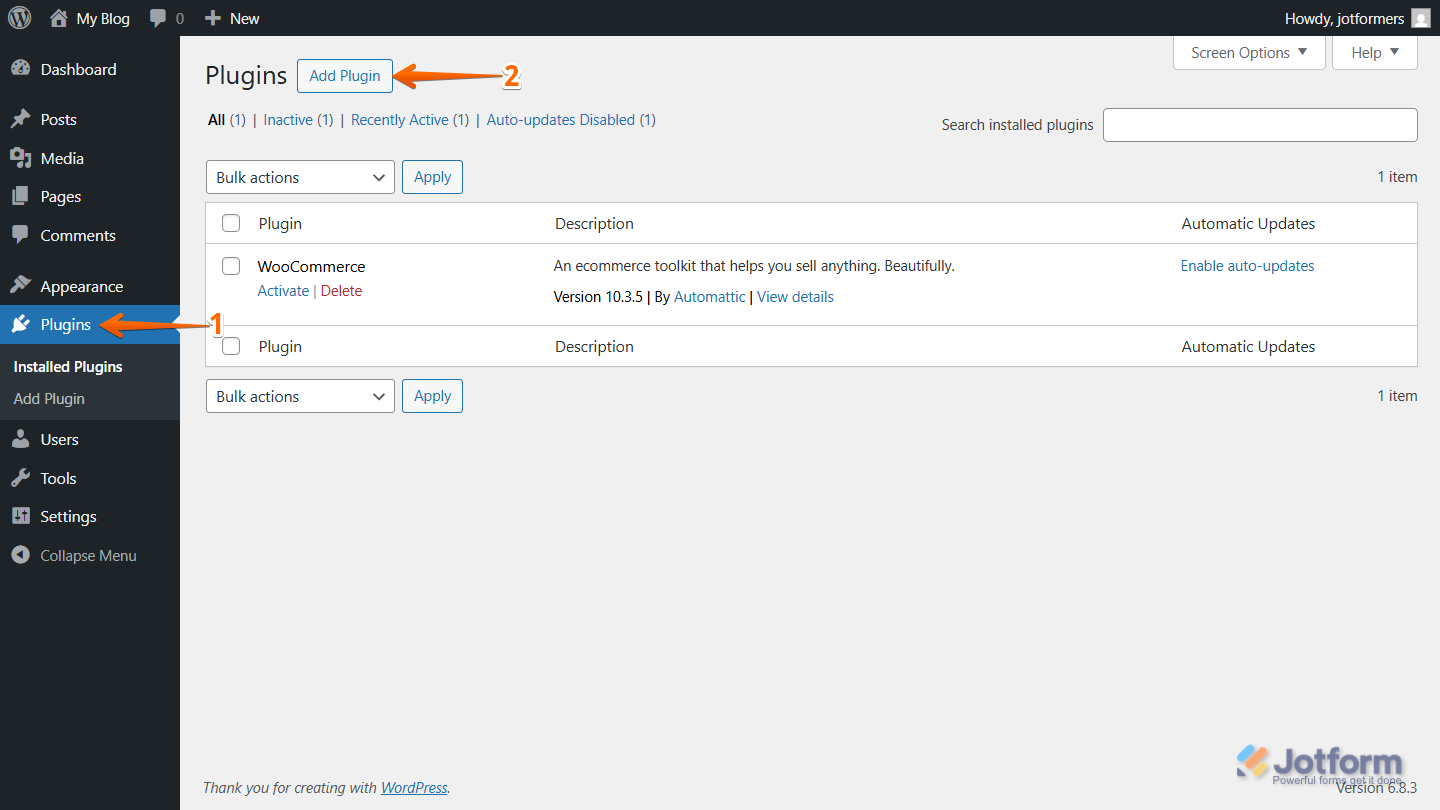
- Search for Jotform and click “Install Now.”
- In the Plugins tab, find Jotform and click Activate.
Step 2: Create your form and add CAPTCHA
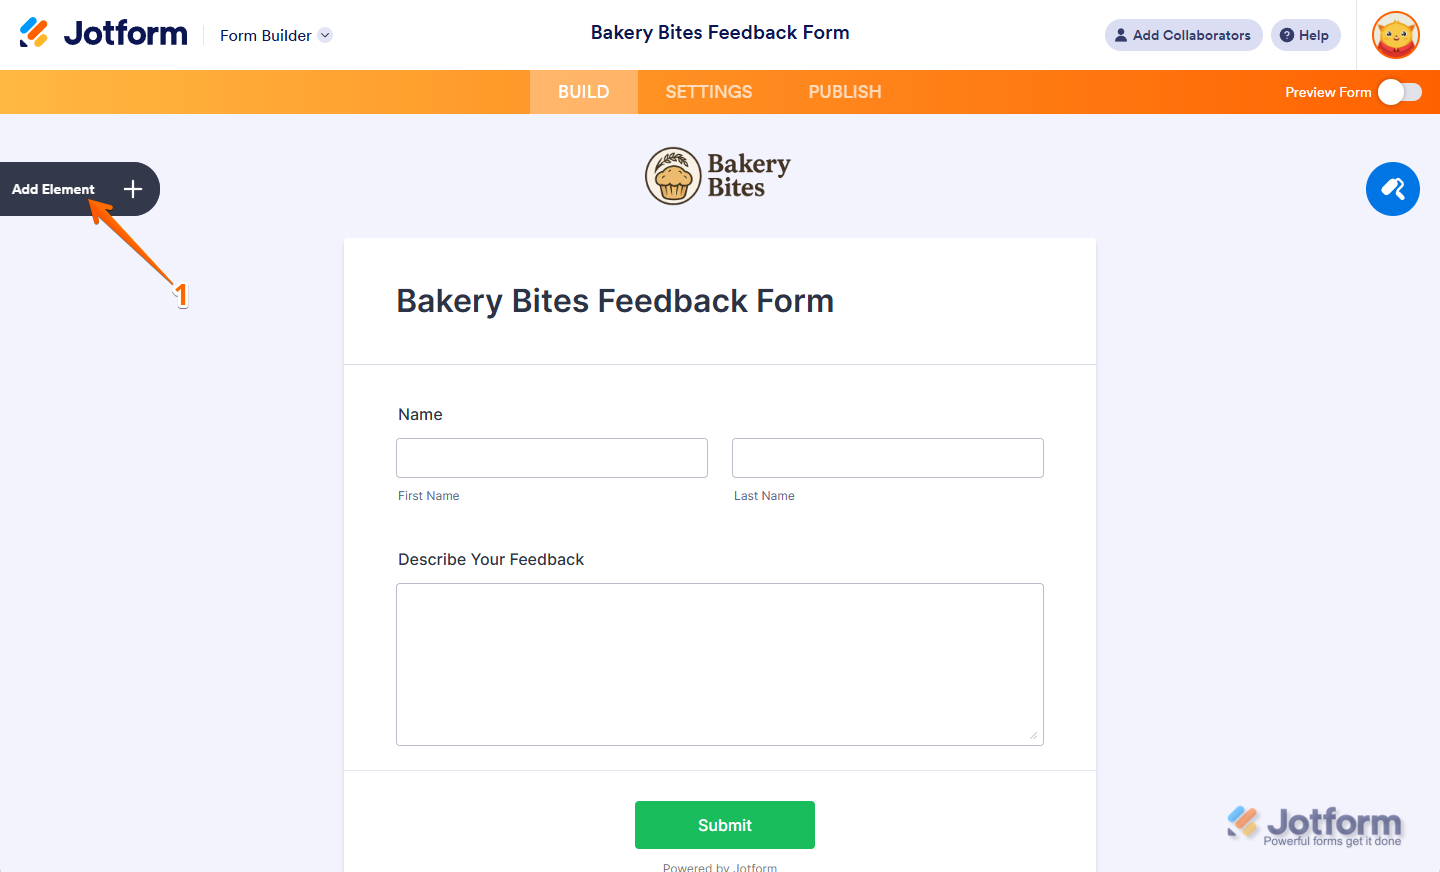
- Log into Jotform to create your custom WordPress forms in the Form Builder. You can choose a template or start fresh.
- In the left panel, open Form Elements. Search for CAPTCHA (or scroll until you see it). Then click to add it to your form — it drops in like any other field. (Use the how to add a CAPTCHA field guidance if you need more help.)
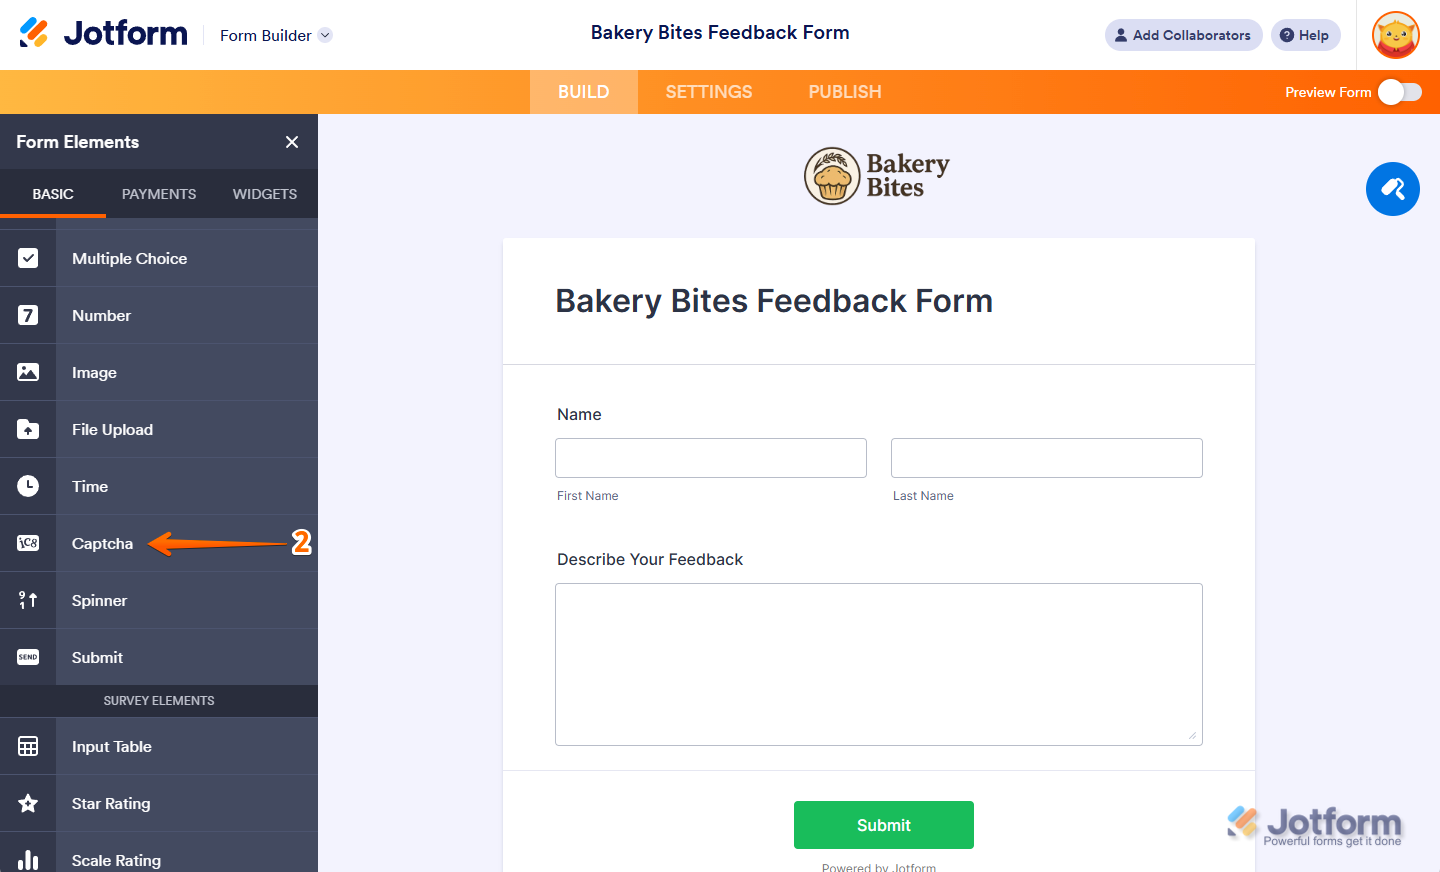
- After that, click the Gear icon next to the CAPTCHA field in your form to adjust the properties. You can tweak the field label, label alignment, and the CAPTCHA type. For the type, you’ll want to choose “reCAPTCHA.”

- Save, then hit Preview and submit a few test entries yourself (do one normal and one fast “bot-like” submission to see how it reacts).
Step 3: Embed your form into WordPress
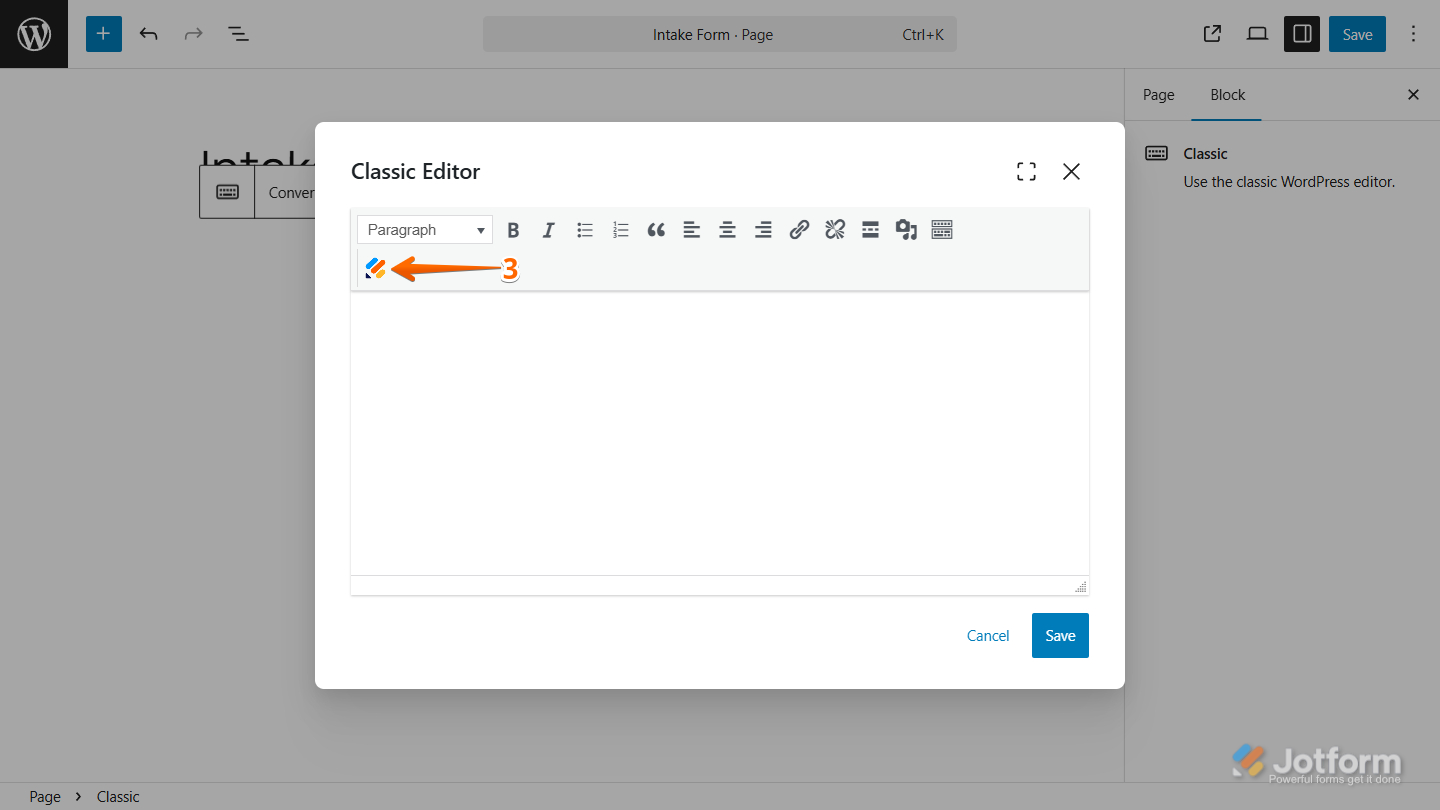
- Next, in WordPress, open the page where the form should appear, and click the Plus icon. Search for “Classic” in the search field that appears.
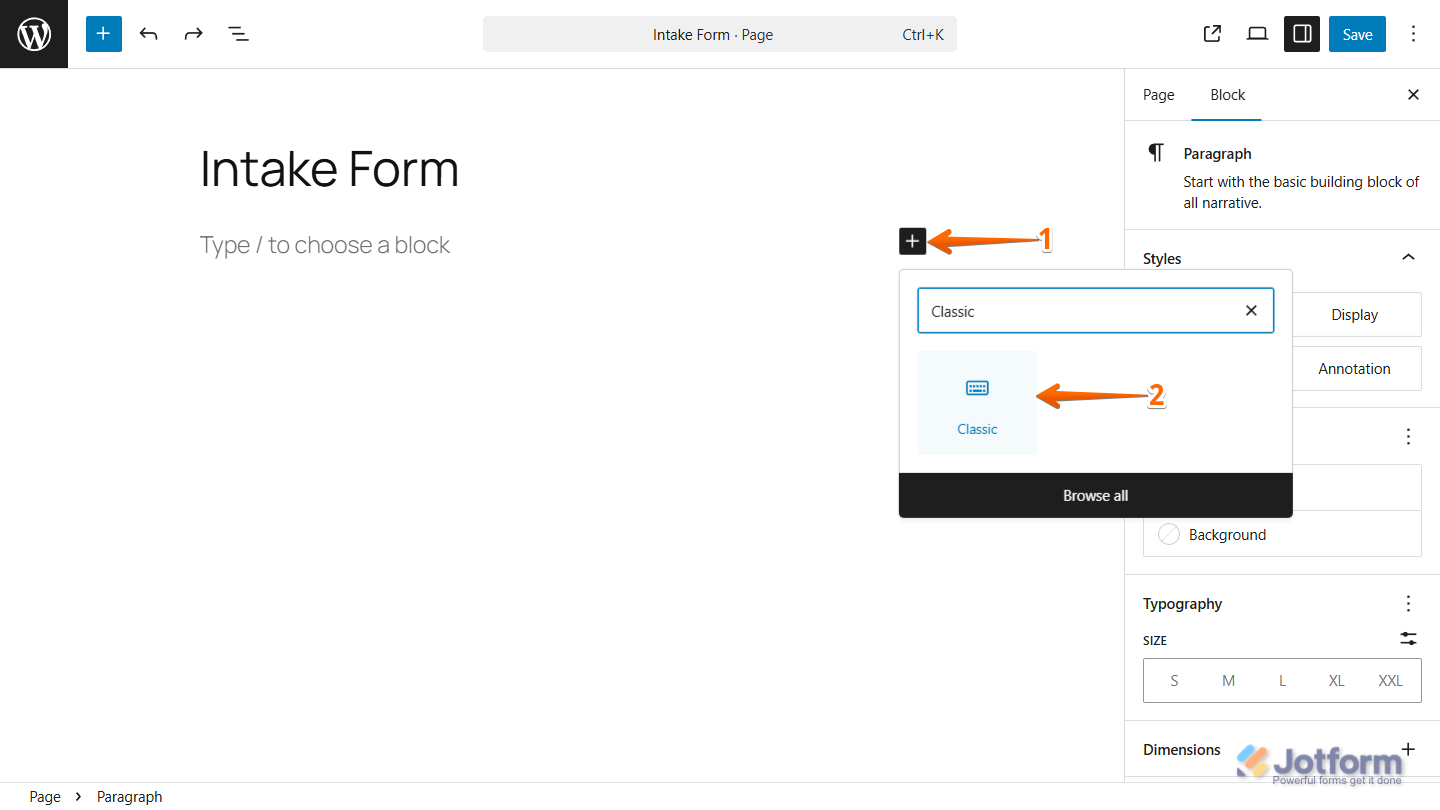
- When the Classic Editor Window opens, click the Jotform icon.
- Choose the form you want to embed from the list that appears.
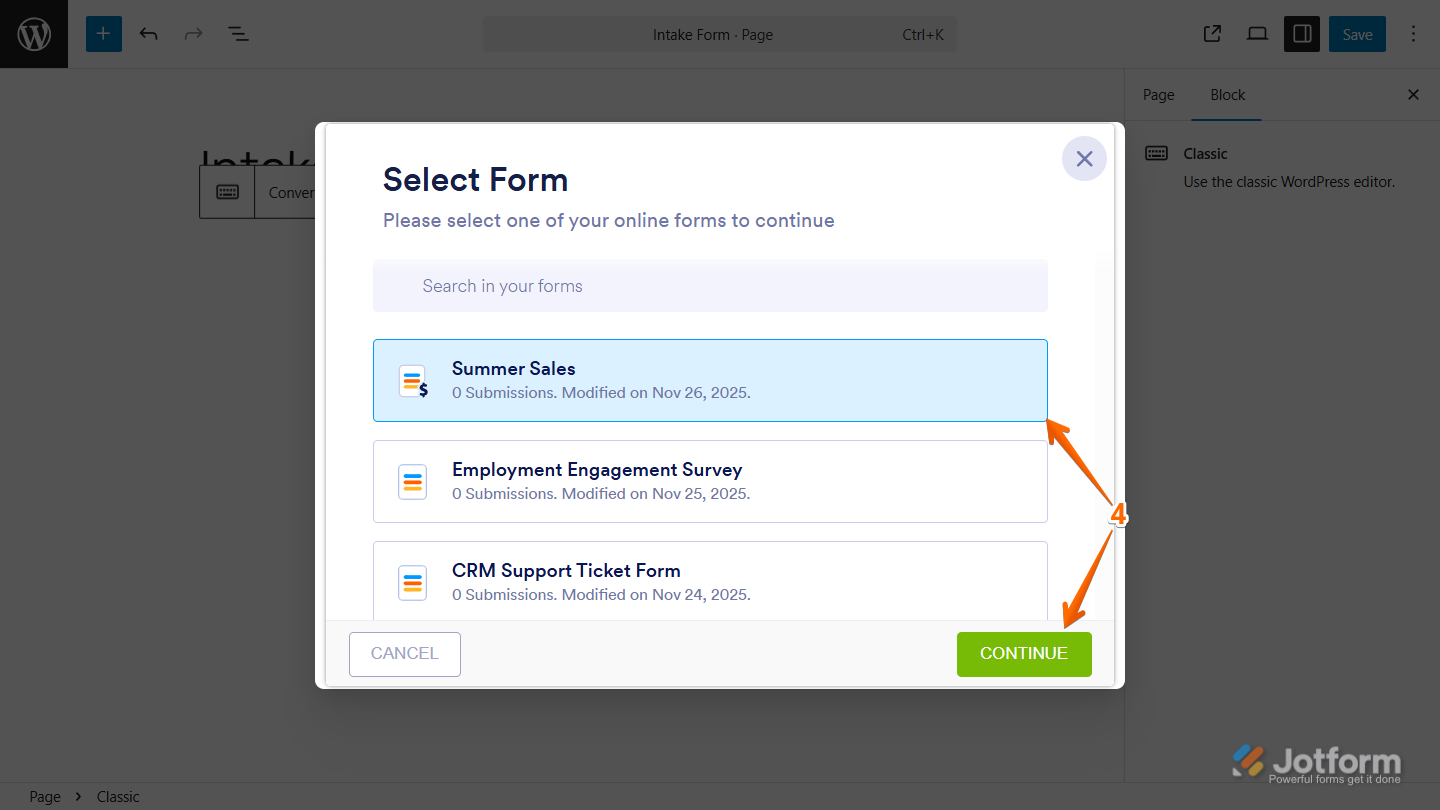
- After you select your form, click Continue, then Save.
That’s all there is to it. Once you’ve set your form up, you can leave it to run and check your reports occasionally to make sure everything’s working smoothly. After that, you might decide to dive deeper into Jotform, exploring more contact form templates or extra options for booking, payment, order, registration, or feedback forms. It’s totally up to you.
Easily add reCAPTCHA to your WordPress forms
If Contact Form 7 has been on your site for years, that’s usually because it hasn’t given you much trouble. It’s straightforward, it doesn’t demand attention, and most days it does exactly what you expect. Adding Contact Form 7 reCAPTCHA helps stretch that setup a bit further by cutting out the obvious junk. For a simple contact form, that can be enough for quite a while.
Problems tend to show up later. Spam changes. A form submission goes missing. Someone tells you they tried twice and gave up. When that starts happening, repeatedly tweaking settings usually isn’t the answer.
That’s where Jotform feels different. You can actually see the CAPTCHA, click through it yourself, and know how the form behaves before anyone else uses it. There’s less guessing involved. Give it a try for free today and see how it supercharges your forms.
FAQs about Contact Form 7 reCAPTCHA
You don’t actually add anything directly. With Contact Form 7, once the keys are connected, the checks happen automatically in the background.
Version three, which means there’s no clicking boxes or taking image-based challenges. The system just scores submissions in the background.
The reason is usually something simple:
- Keys are for the wrong version
- A cache or script plug-in is getting in the way
- The score is set too strict
First thing to check: Is the badge there? If not, fix that first.
This article is for WordPress users, website operators, and content managers who want to secure their Contact Form 7 forms using reCAPTCHA and explore alternative solutions like Jotform for better spam protection and customization.


")


")


")


Send Comment: