
Creating a custom object in Salesforce
- Log in to your Salesforce account and select Setup
- Find the Object Manager tab
- Click Create, then select Custom Object
- Enter a name for your custom object
- Provide the plural form of your custom object’s name
- Select the checkbox that says Launch New Custom Tab Wizard
- Click on Save
- Choose a style for your custom object’s tab
- Click on Next and then Save
Salesforce is a powerful customer relationship management (CRM) platform that allows organizations to streamline their operations and better manage data. One of the key features of Salesforce is the ability to create custom “objects,” or database tables, that are tailored to your organization’s specific needs.
Read on for a breakdown of how to create a custom object in Salesforce. We’ll also show you how to add your custom object to the navigation bar for easy access and how to unlock even more potential by integrating Salesforce with Jotform.
What Salesforce custom objects can help you do
To grasp the concept of a custom object in Salesforce, it’s essential to first understand what objects are in the Salesforce ecosystem. Think of objects as structured containers that help you organize and view data efficiently. There are two types:
- Standard objects are predefined objects that come standard with Salesforce — such as accounts, cases, contacts, and opportunities. They cover general information that most organizations track.
- Custom objects are objects you create to cater to your organization’s unique requirements or industry-specific data. Custom objects extend Salesforce’s functionality, allowing you to store and manage data in a way that makes sense for your business.
Create a new record of a custom Salesforce object from form submissions
DetailsAutomatically create a new record of a specified custom objects in Salesforce based on form submissions. Available in all Jotform plans, including the free, Starter Plan.
How to create a custom object in Salesforce
Now, let’s dive into the process of how to create a custom object in Salesforce. Follow these steps:
- Log in to your Salesforce account and click on the gear icon in the top-right corner. Select Setup from the dropdown menu.
- In the Setup menu, find the Object Manager tab and click on it. This is where you manage all your objects. The Object Manager is a one-stop shop, where you can access all objects and their related settings — such as fields, layouts, record types, buttons, links, and so on.
- On the Object Manager page, click Create in the top-right corner, then select Custom Object.
- In the Label section, enter a name for your custom object. The Object Name and Record Name fields will automatically populate with the name you enter.
- Provide the plural form of your custom object’s name in the Plural Label field.
- Scroll down to the bottom of the page and select the checkbox that says Launch New Custom Tab Wizard after saving this custom object. This will add your custom object as a tab in Salesforce for easy navigation.
- Click the Save button to create your custom object.
- On the New Custom Object Tab page, choose a style for your custom object’s tab by clicking the Tab Style field. This style will determine the icon displayed in the Salesforce user interface for your object.
- Click Next and follow the prompts to configure your custom object further, then click Save to finalize the setup.
How to add your custom object to the navigation bar in Salesforce
Now that you’ve created your custom object, you can make it easily accessible to users by adding it to the Salesforce navigation bar.
- Click the pencil icon located on the Data Cloud main page.
- Next, click Add more items.
- Click All in the left window.
- Select the additional custom object.
- Save your edits.
How integrating Salesforce with Jotform can level up your data management
Now that you’ve created your custom object and made it readily accessible, it’s time to explore how you can make your data management even more powerful by integrating Salesforce with Jotform, a versatile form-building and data-collection solution. Here are a few ways using these two solutions in tandem can augment your CRM capabilities:
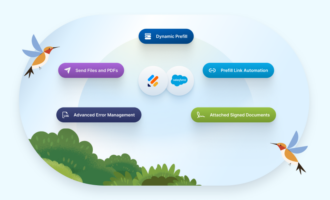
- Seamless data capture: Integrating Jotform with Salesforce allows you to take advantage of Jotform’s powerful form-building capabilities while sending the data you capture from those forms directly to Salesforce. Plus, Jotform offers a suite of advanced features, from thousands of form templates for virtually every industry to dynamic prefill options and e-signature capabilities.
- Enhanced lead generation: Incorporating Jotform forms into your company website, landing pages, or social media platforms enables direct data capture. This data then automatically transfers to Salesforce, empowering the sales team to initiate follow-ups effortlessly.
- Improved data quality: Accurate field mapping and proper integration setup throughout the Jotform app help your sales team get away from manual data entry tasks. Jotform forms also have built-in error correction mechanisms that ensure submitted data is accurate and consistent before it’s entered in the Salesforce database.
- Frictionless user experience: The convenience of integrating Jotform and Salesforce eliminates the need for constant platform switching, streamlining the process for users and saving them time.
After connecting Jotform and Salesforce for seamless data capture, you can elevate your automation even further with Jotform Salesforce Agent. This AI-powered chatbot connects directly to your Salesforce account — no matter whether you’re working with standard or custom objects — to create, update, or look up records in real time. It can handle common workflows like lead capture, case updates, or order tracking, and even pull relevant Salesforce knowledge articles to provide accurate, conversational responses.
With its no-code setup and ready-to-use templates for sales, support, and operations, Jotform Salesforce Agent helps teams automate repetitive CRM tasks and keep data in sync effortlessly. Every interaction is logged for full visibility, ensuring your Salesforce records remain clean, consistent, and up to date. Together with Jotform’s form-building capabilities, the Salesforce Agent transforms your CRM processes into intelligent, always-on workflows that boost efficiency and enhance customer engagement.

Once you know how to create a custom object in Salesforce, you can then personalize the platform to your organization’s specific needs. And when you integrate Salesforce with Jotform, you get access to features that will make managing your Salesforce records even more effective by simplifying data capture, enhancing lead generation, and improving data quality. Combining the two can bolster one of the most important facets of your organization: its customer relationships.


Send Comment: