Jotform’s Notification Emails help you stay on top of form activity by alerting you whenever someone submits a response. Whether you’re managing customer inquiries, registrations, orders, applications, or internal requests, these notifications make it easier for individuals and teams to review submissions, keep the right people informed, and respond without delay.
Notes
- A Notification Email is automatically created when your form has at least one field. You can edit its recipients, content, and settings at any time. Check out our guide on How to Edit Notification and Autoresponder Emails to learn more.
- Accounts on the Starter (Free) plan are limited to one Notification Email and one recipient per form. If you want to add more Notification Emails and up to 10 recipients to each one, check out our guide on How to Upgrade Your Account.
Creating Notification Emails with Email Copilot
Whether you’re building a new form or updating an existing one, you can use Email Copilot to quickly create Notification Emails with AI-generated content based on your prompt and form fields. Here’s how:
- In Form Builder, in the orange navigation bar at the top of the page, click on Settings.
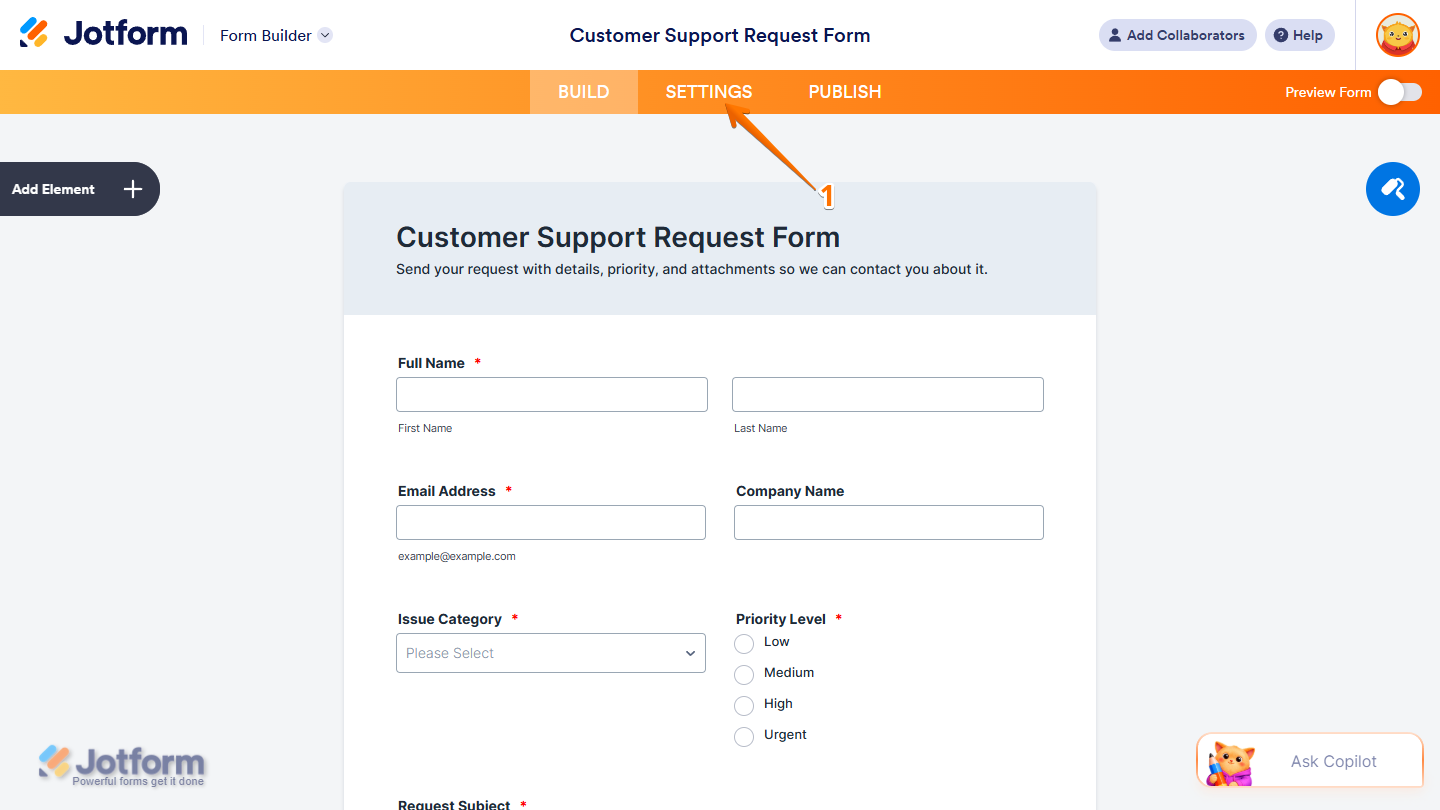
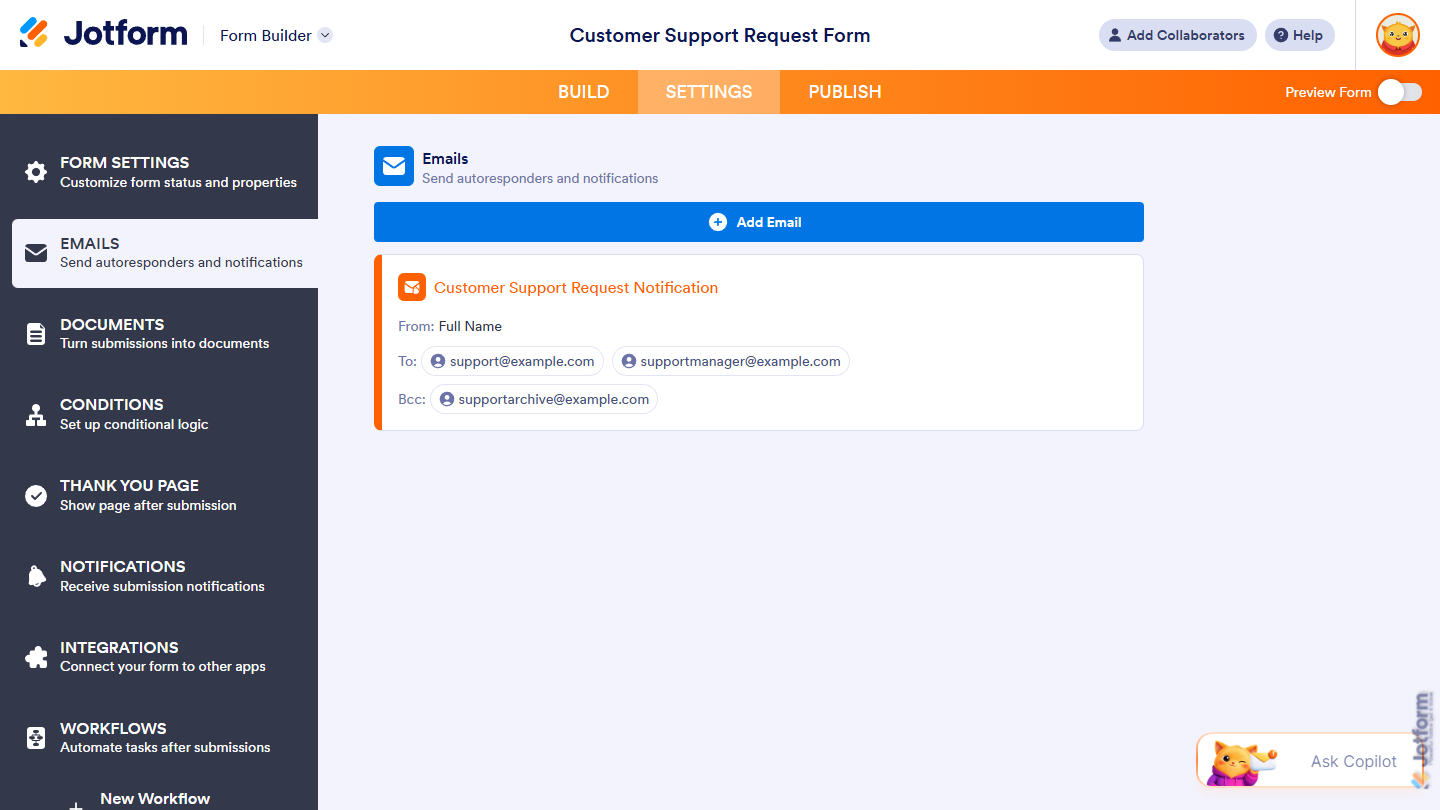
- Now, in the menu on the left side of the page, click on Emails.
- If your form has an existing Notification Email or Autoresponder Email, click on Add Email in the Emails section on the right.
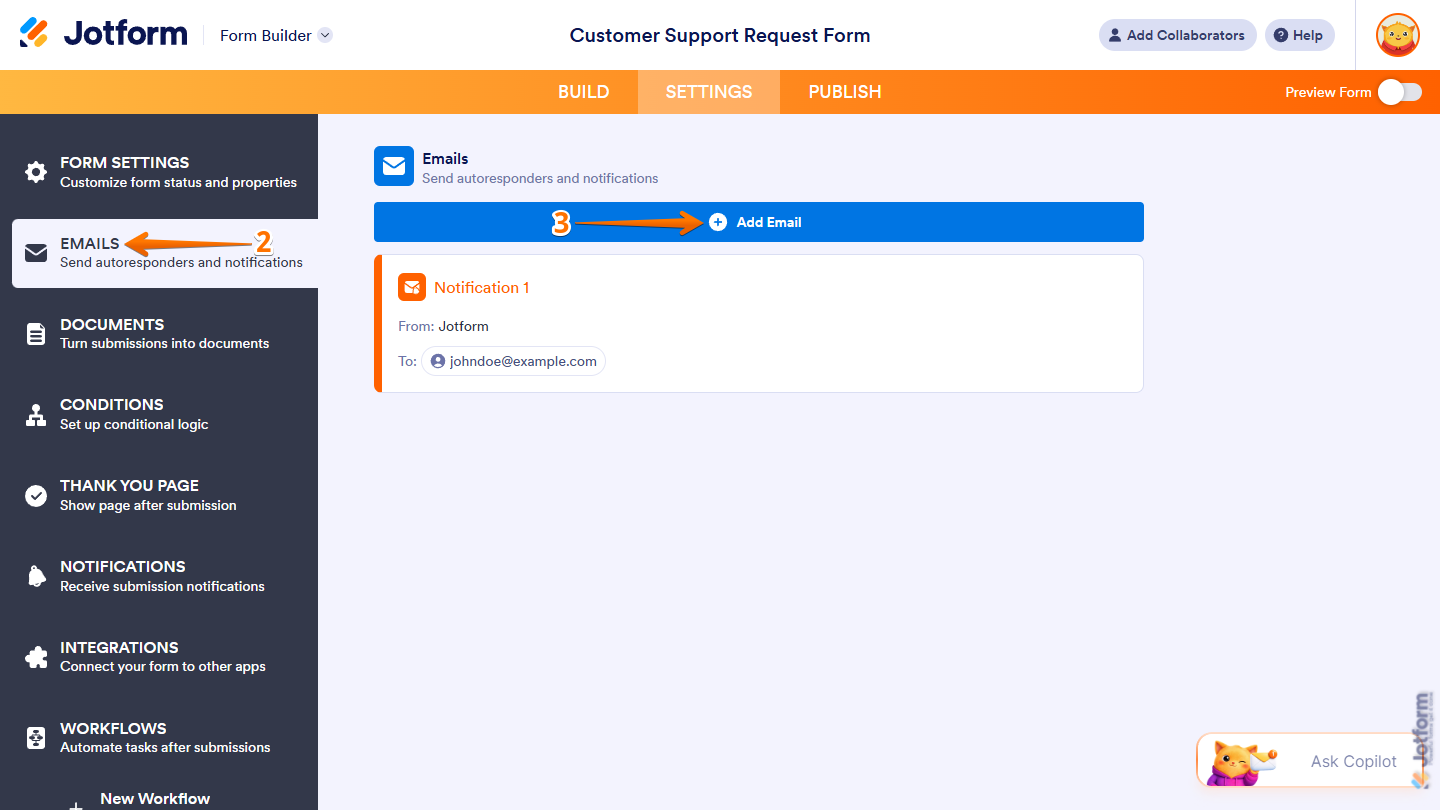
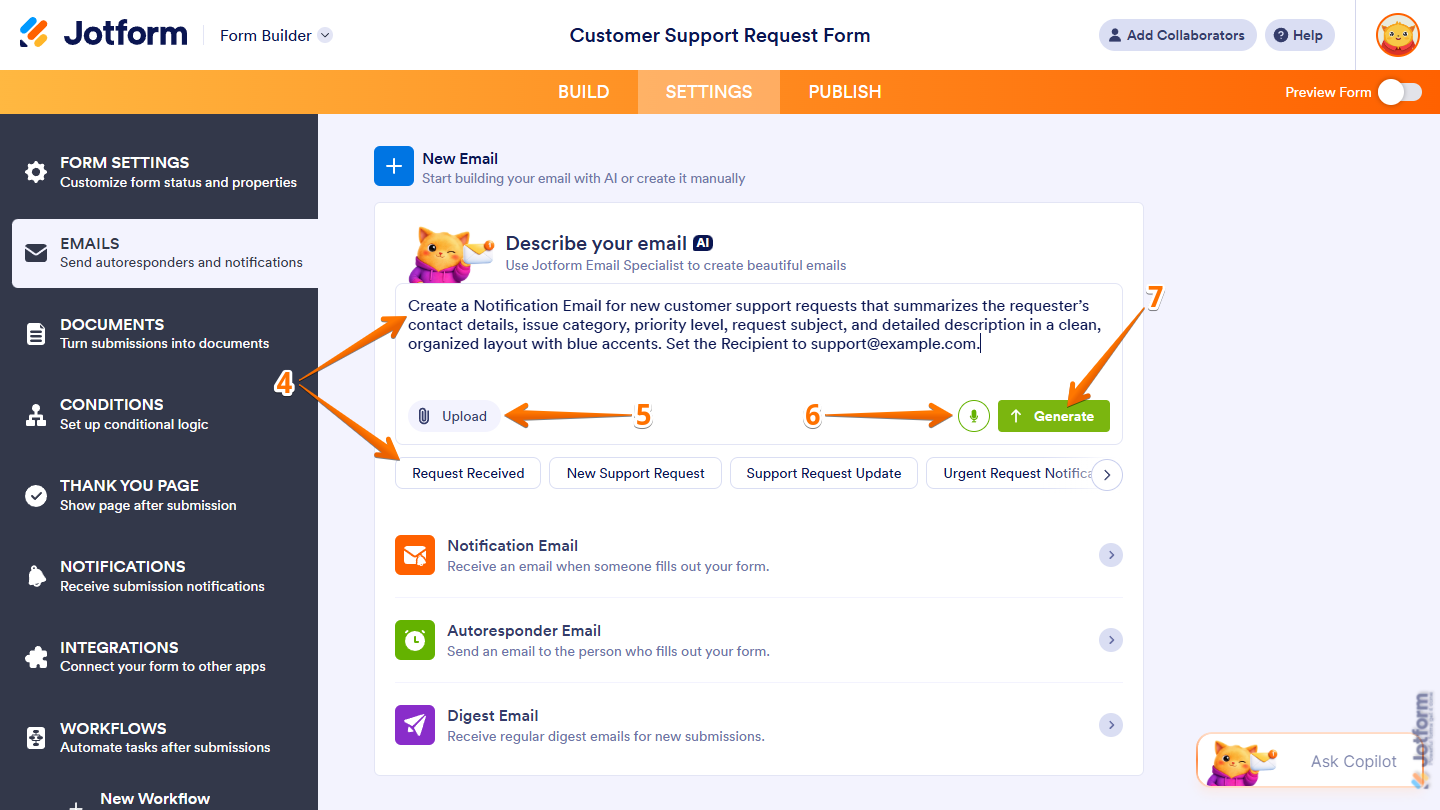
- Then, in the Describe Your Email Prompt box of the New Email section, describe the content, style, format, and other details you want for your Notification Email, or click on one of the buttons below it to use a predefined prompt.
Here are some example prompts:
- Create a Notification Email for new orders that summarizes all submitted responses in a clean, organized layout with blue accents. Set the Recipient to orders@example.com.
- Create a Notification Email for new registrations that summarizes the registrant’s submitted responses in a clear, structured layout with green accents. Set the Email Subject to New Registration Received.
- Create a Notification Email for new applications that summarizes the key responses and uses a simple, modern layout with purple accents and visual dividers. Set the Reply-To Email to the Contact Email Address field.
- To use an image as additional context for your prompt or include it in the notification email, click on Upload in the bottom-left corner of the Prompt box, and then select one from your device.
- If you’d rather use voice for your prompts, click on the Microphone icon on the right side of the Prompt box, and then allow permission for your browser to access your device’s microphone.
Pro Tip
For better results, include the email’s purpose and tone in your prompt. You can also provide details about your website and visual style or upload your logo to help Email Copilot create an email that fits your brand.
- Once you’re done, click on Generate.
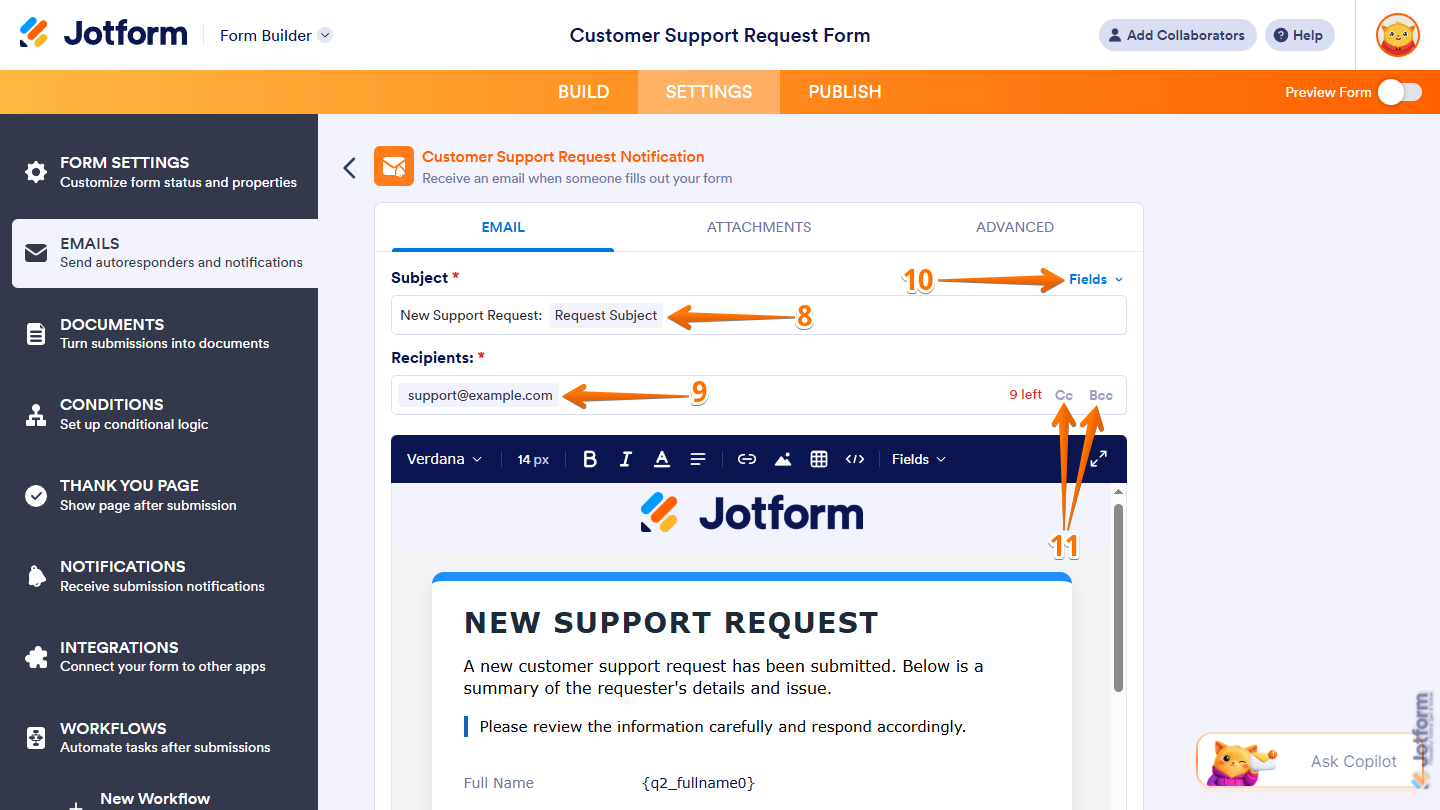
- Now, under the Email tab of the generated Notification Email, in the Subject field, enter the subject line you want for the notification emails.
- Next, in the Recipients field, enter the email address you want the Notification Emails sent to.
- To include a field value in the subject line, click on Fields on the right of the Subject field, and then select a supported field.
- To set up who’ll get the emails, click on CC or BCC on the right side of the Recipients field.
- Then, enter the recipient email address in either the CC or BCC field. CC sends the email with all email addresses visible, while BCC hides them from one another.
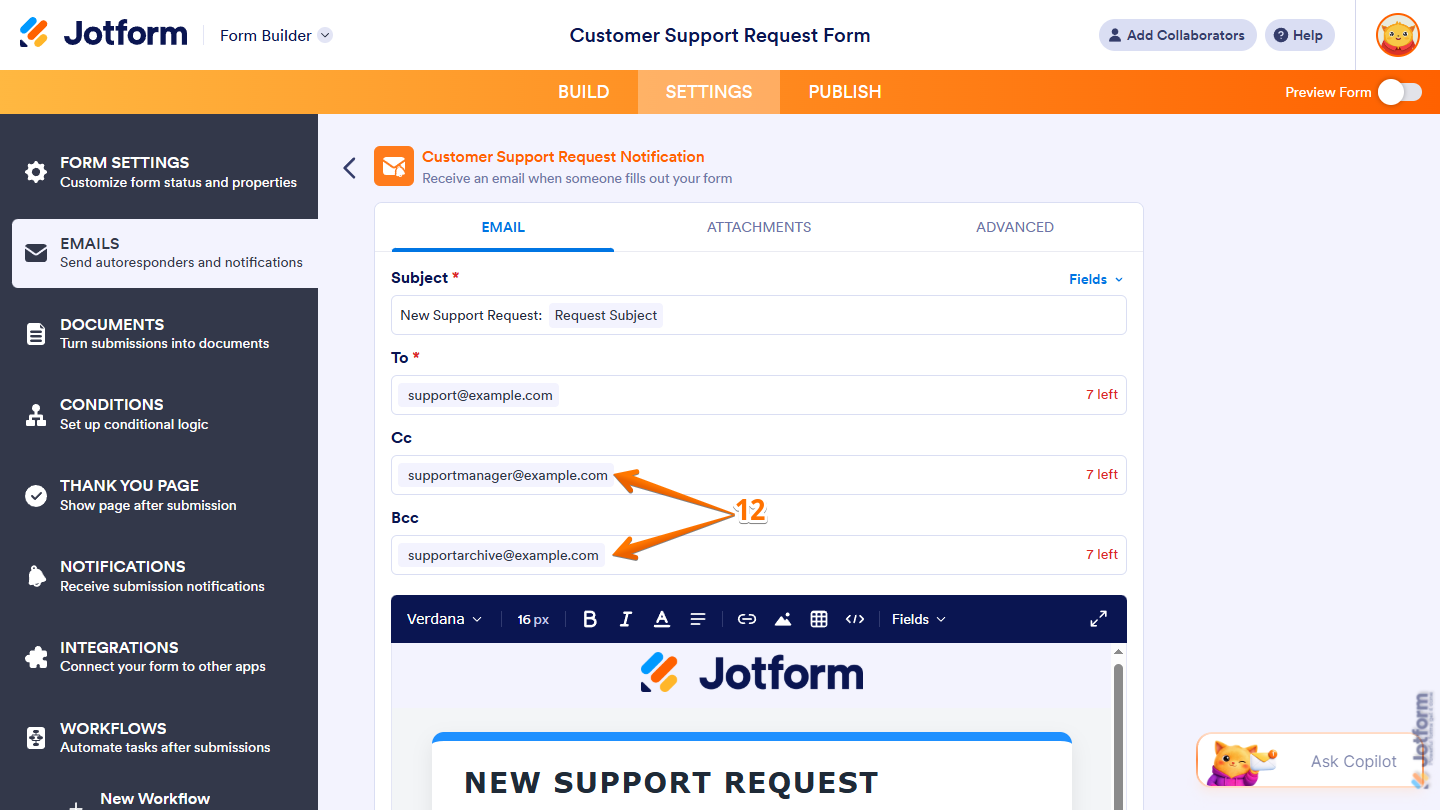
Note
With a paid account, you can add up to 10 recipients in total to a Notification Email. Check out our guide on How to Send Email Notifications to Multiple Recipients for more details.
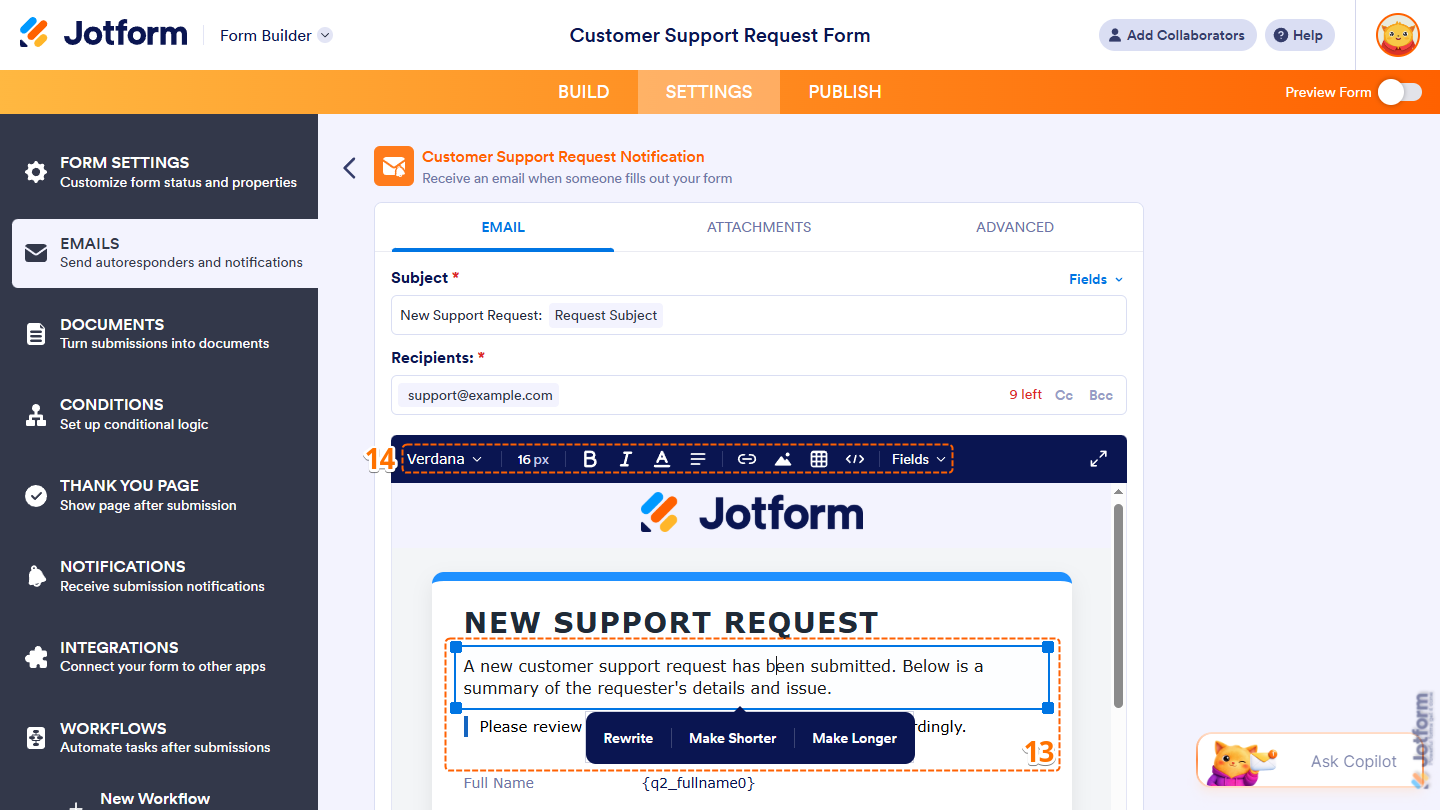
- In the email editor, click on the heading, sentence, or paragraph you want to change, then in the menu that appears below it, select one of these options:
- Rewrite — This generates a new version of the selected text while keeping its meaning.
- Make Shorter — This generates a shorter version of the selected text.
- Make Longer — This generates a longer version of the selected text with more detail.
- To manually customize the email content, use the tools at the top of the editor to format and align text, add links, images, or tables, insert form field values, or edit the HTML source.
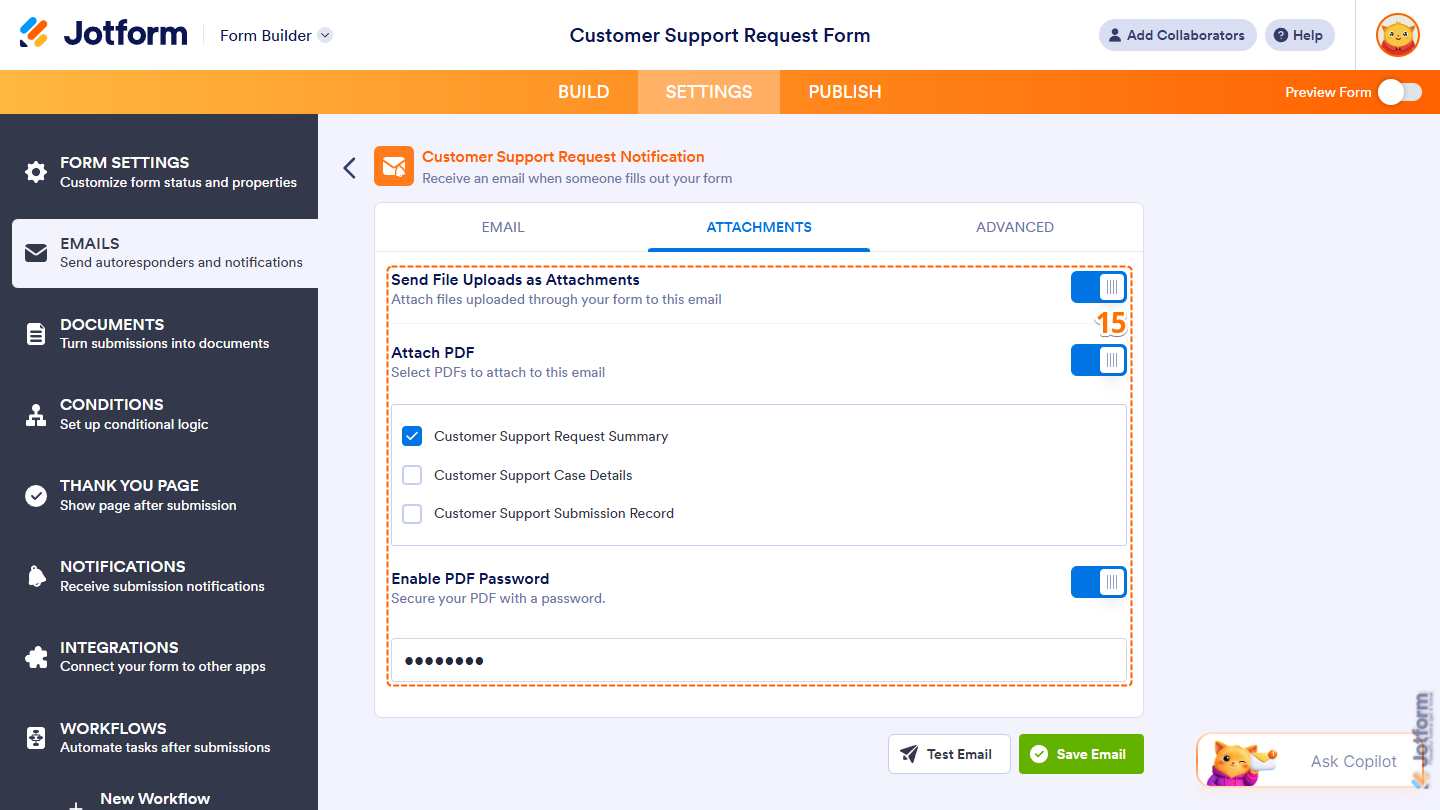
- Now, under the Attachments tab, configure these settings:
- Send File Uploads as Attachments — Toggle this on to attach files uploaded through your form to the notification emails.
- Attach PDF — Toggle this on, then below it, tick the box next to a PDF Document option to attach that PDF version of the submission to the notification emails, or tick the box next to Select All to attach every available version.
- Enable PDF Password — When Attach PDF is enabled, toggle this on and then below it, enter the password you want to set for the attached PDFs.
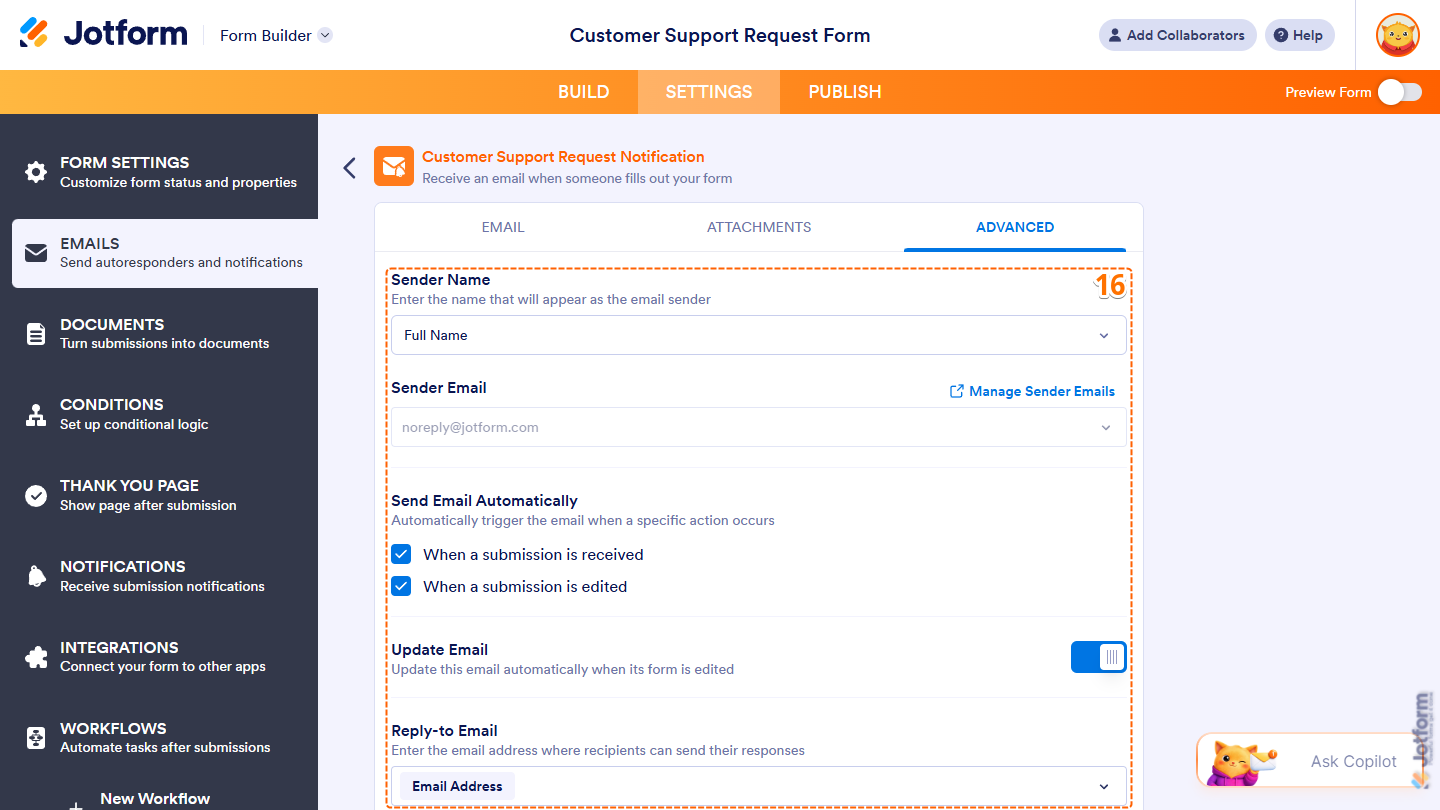
- Then, under the Advanced tab, set up these settings:
- Sender Name — Click on the Downward Arrow icon, and then in the Dropdown menu, select a supported field to have its value appear as the sender of the notification emails.
- Sender Email — Keep the default sender email selected, or click on the Downward Arrow icon and, in the Dropdown menu, select a custom sender email you’ve already set up for your account. You can also click on Manage Sender Emails on the right to open your Account Settings in a new browser tab to set one up. Check out our guide on How to Set Up a Custom Sender Email with SMTP to learn more.
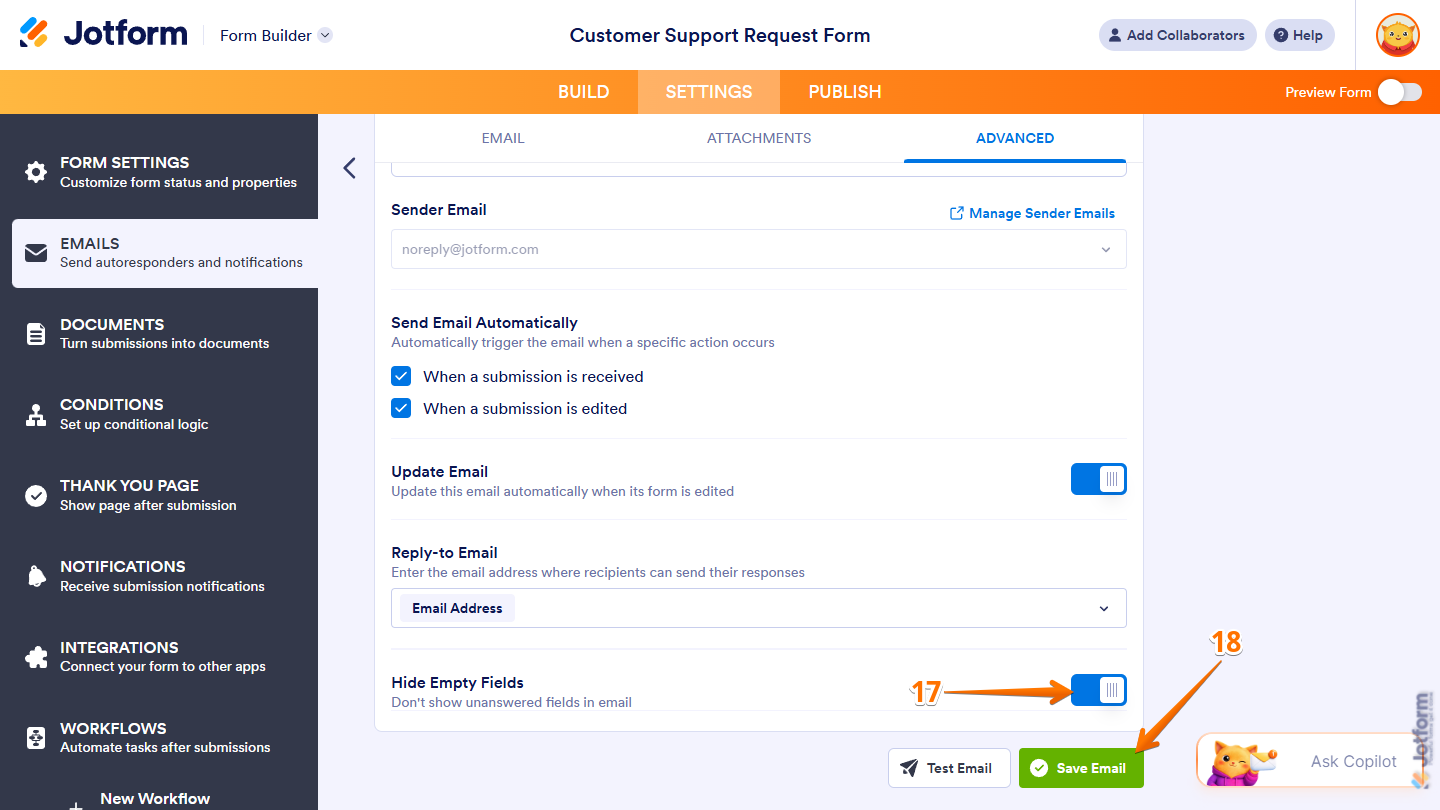
- Send Email Automatically — Untick the box next to When a Submission Is Received or When a Submission Is Edited to stop sending notification emails for that event.
- Update Email — Toggle this off to prevent the email content from updating automatically when you edit the form.
- Reply-To Email — Click on the Downward Arrow icon, and then in the Dropdown menu, select an Email field to use its submitted value as the default reply-to email address for the notification emails.
- Next, scroll down to Hide Empty Fields and toggle it off to include unanswered form fields in the notification emails.
- Once everything’s set, click on Save Email.
That’s it! You’ve successfully created and configured your Notification Email with AI-generated content based on your prompt and form fields.
Creating Notification Emails Manually
Whether you’re building a new form or updating an existing one, you can manually create Notification Emails and configure their recipients, content, and settings. Here’s what to do:
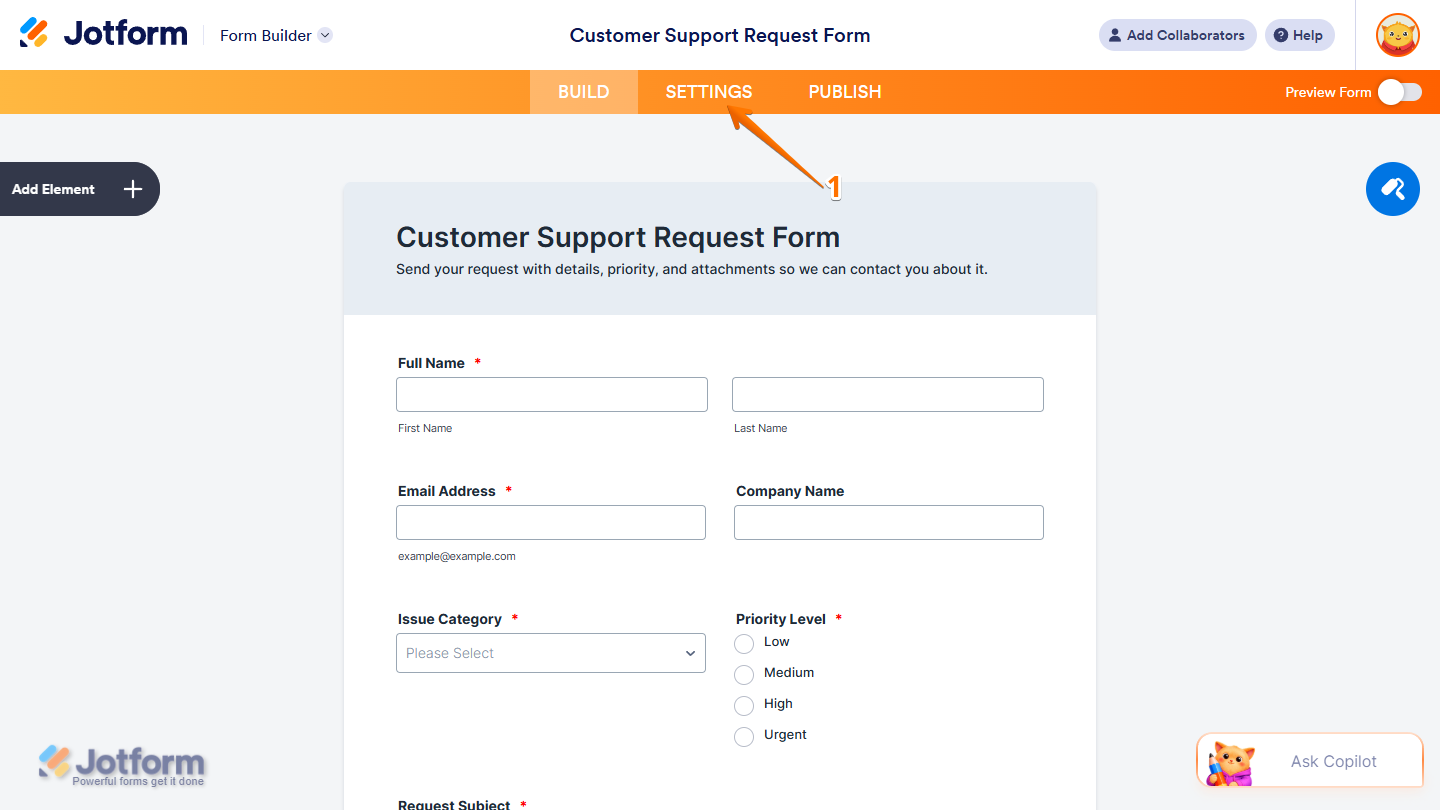
- In Form Builder, in the orange navigation bar at the top of the page, click on Settings.
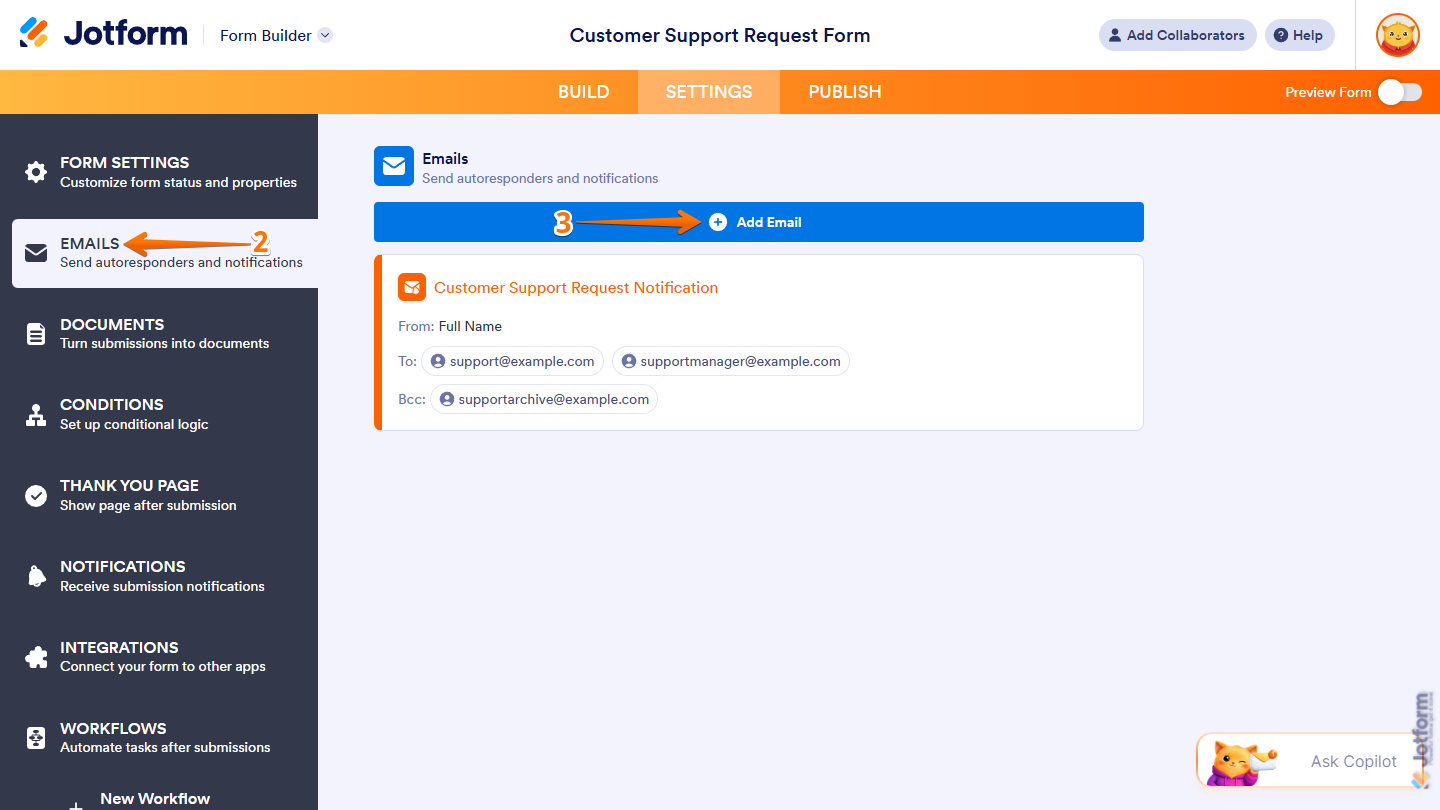
- Now, in the menu on the left side of the page, click on Emails.
- If your form has an existing Notification Email or Autoresponder Email, click on Add Email in the Emails section on the right.
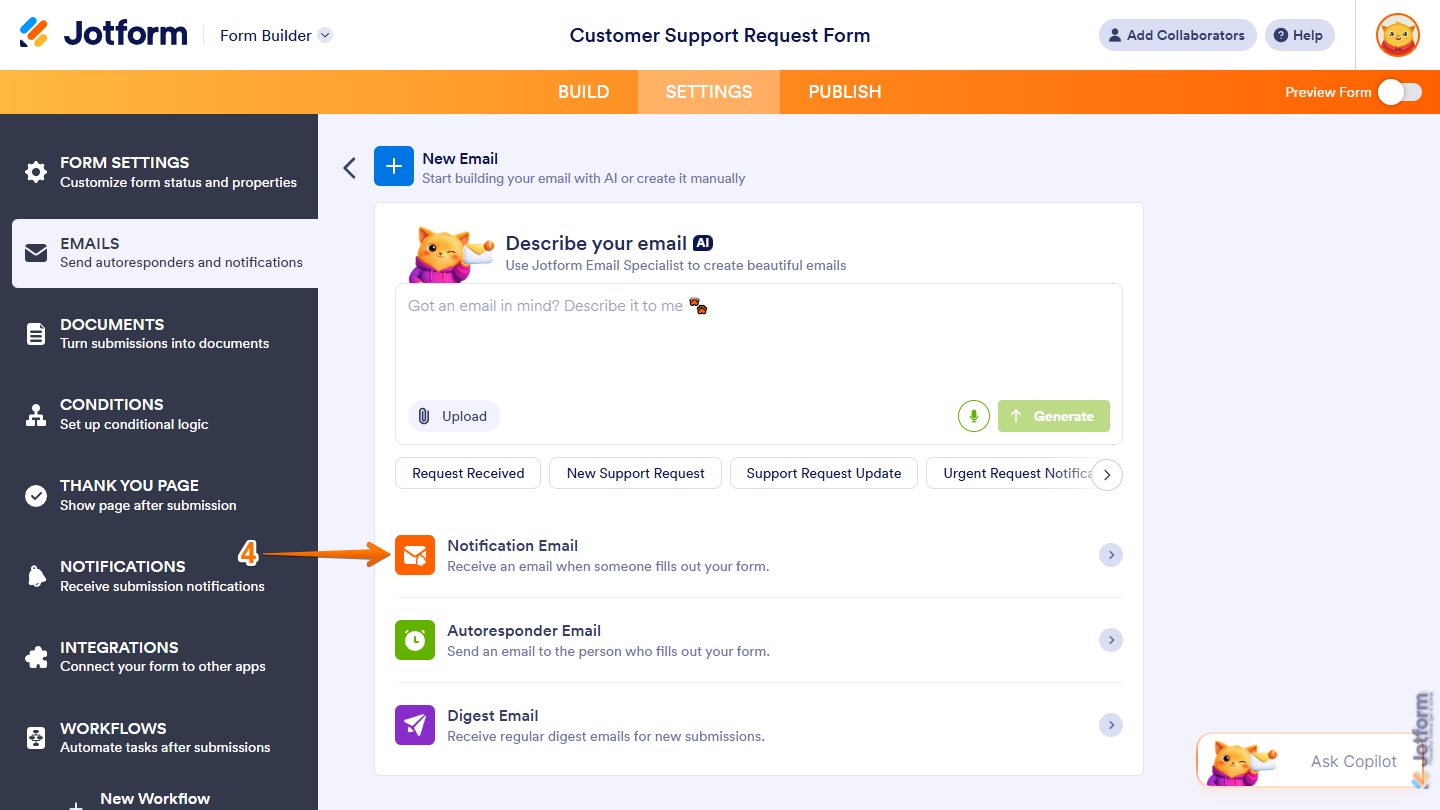
- Then, in the New Email section, click on Notification Email.
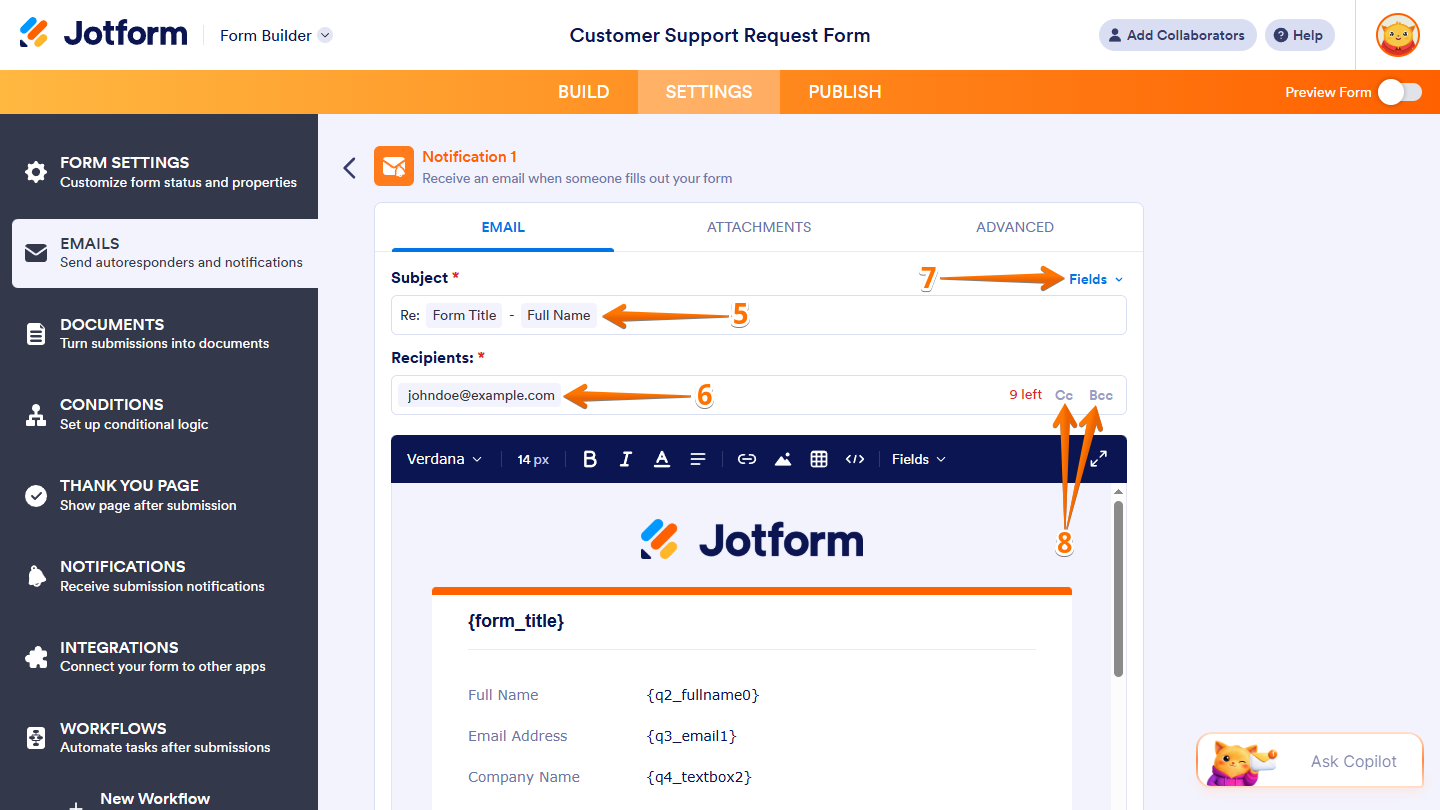
- Now, under the Email tab of the new Notification Email, in the Subject field, enter the subject line you want for the notification emails.
- Next, in the Recipients field, enter the email address you want the Notification Emails sent to.
- To include a field value in the subject line, click on Fields on the right of the Subject field, and then select a supported field.
- To set up who’ll get the emails, click on CC or BCC on the right side of the Recipients field.
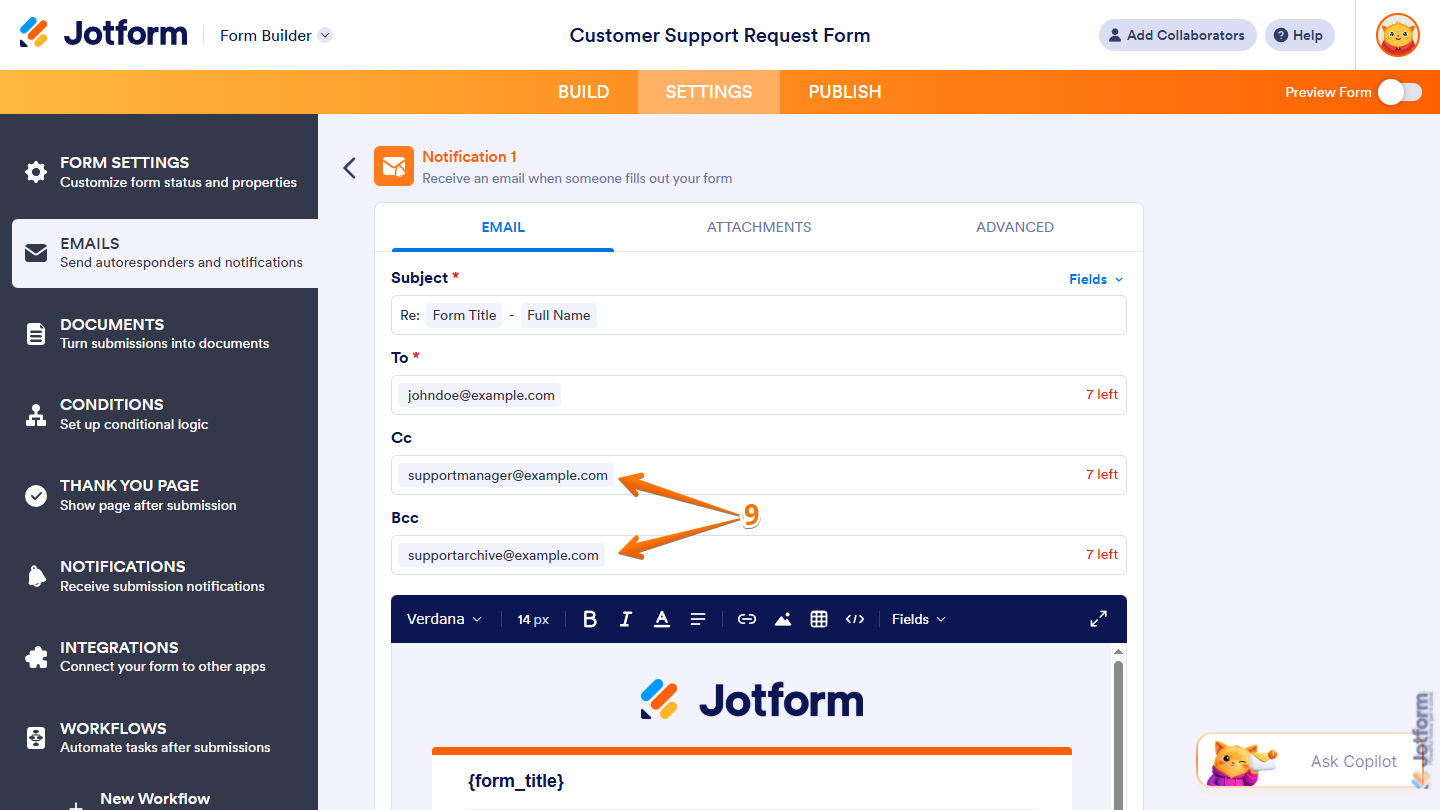
- Then, enter the recipient email address in either the CC or BCC field. CC sends the email with all email addresses visible, while BCC hides them from one another.
Note
With a paid account, you can add up to 10 recipients in total to a Notification Email. Check out our guide on How to Send Email Notifications to Multiple Recipients for more details.
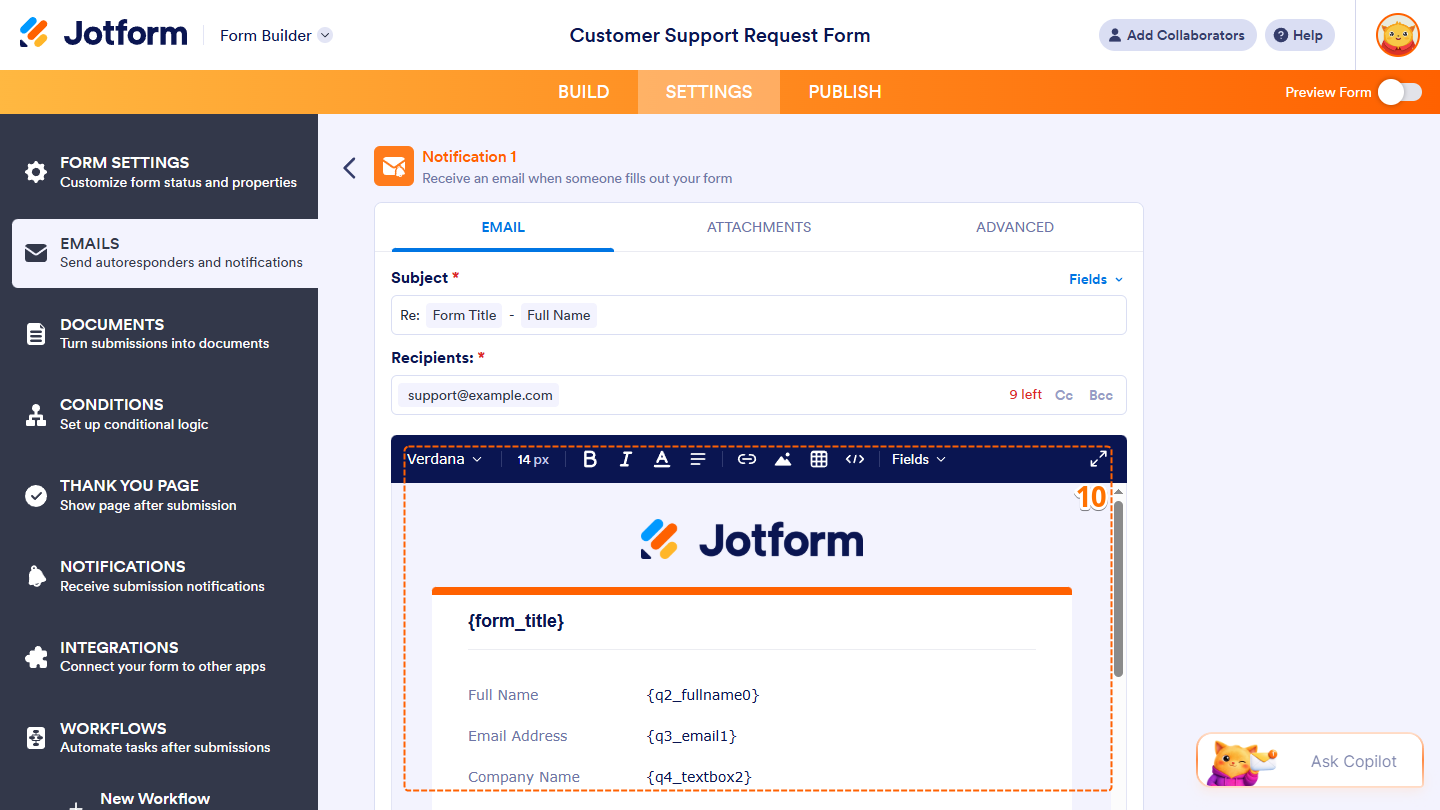
- In the email editor, customize the content of the notification emails. You can use the tools at the top to format and align text, add links, images, or tables, insert form field values, or edit the HTML source.
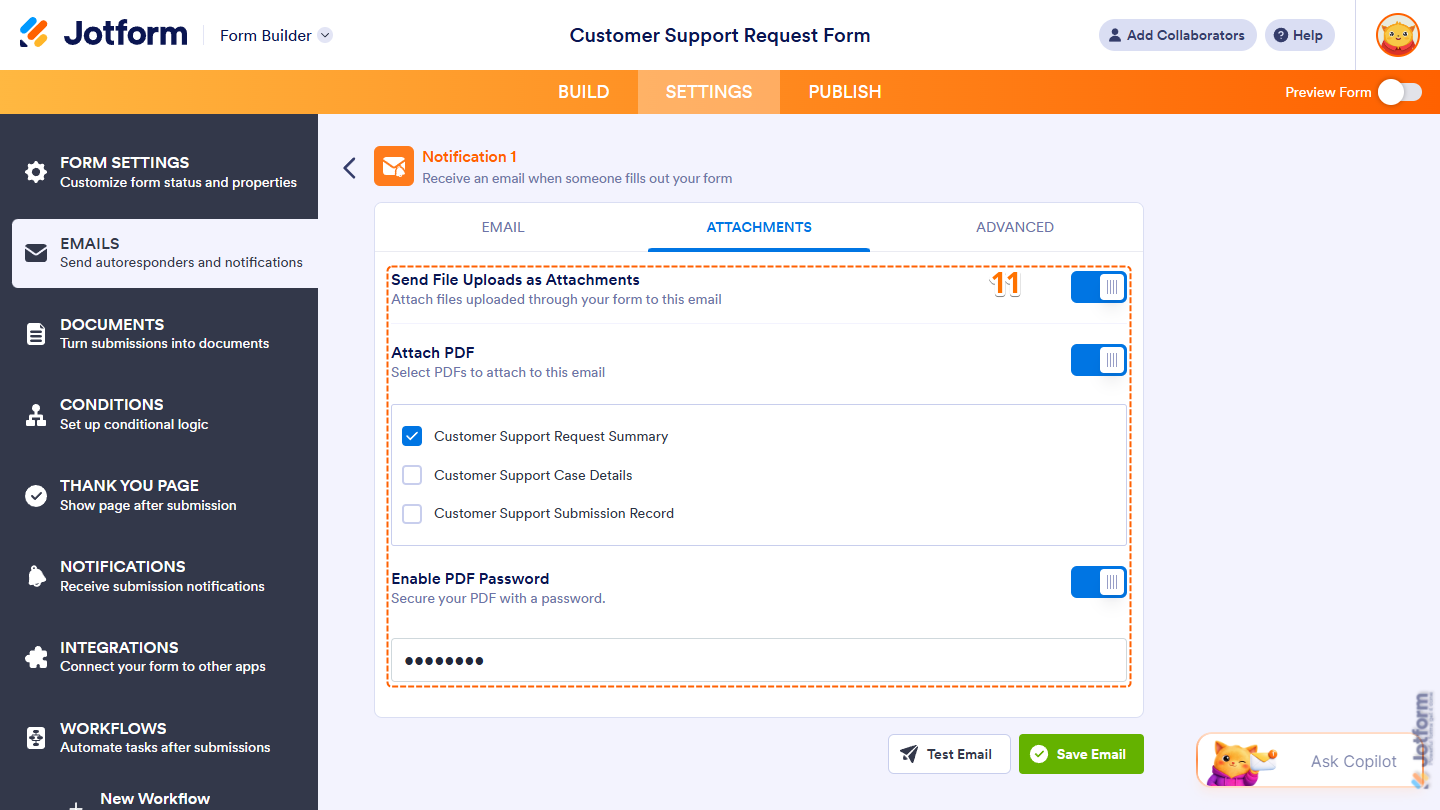
- Now, under the Attachments tab, configure these settings:
- Send File Uploads as Attachments — Toggle this on to attach files uploaded through your form to the notification emails.
- Attach PDF — Toggle this on, then below it, tick the box next to a PDF Document option to attach that PDF version of the submission to the notification emails, or tick the box next to Select All to attach every available version.
- Enable PDF Password — When Attach PDF is enabled, toggle this on and then below it, enter the password you want to set for the attached PDFs.
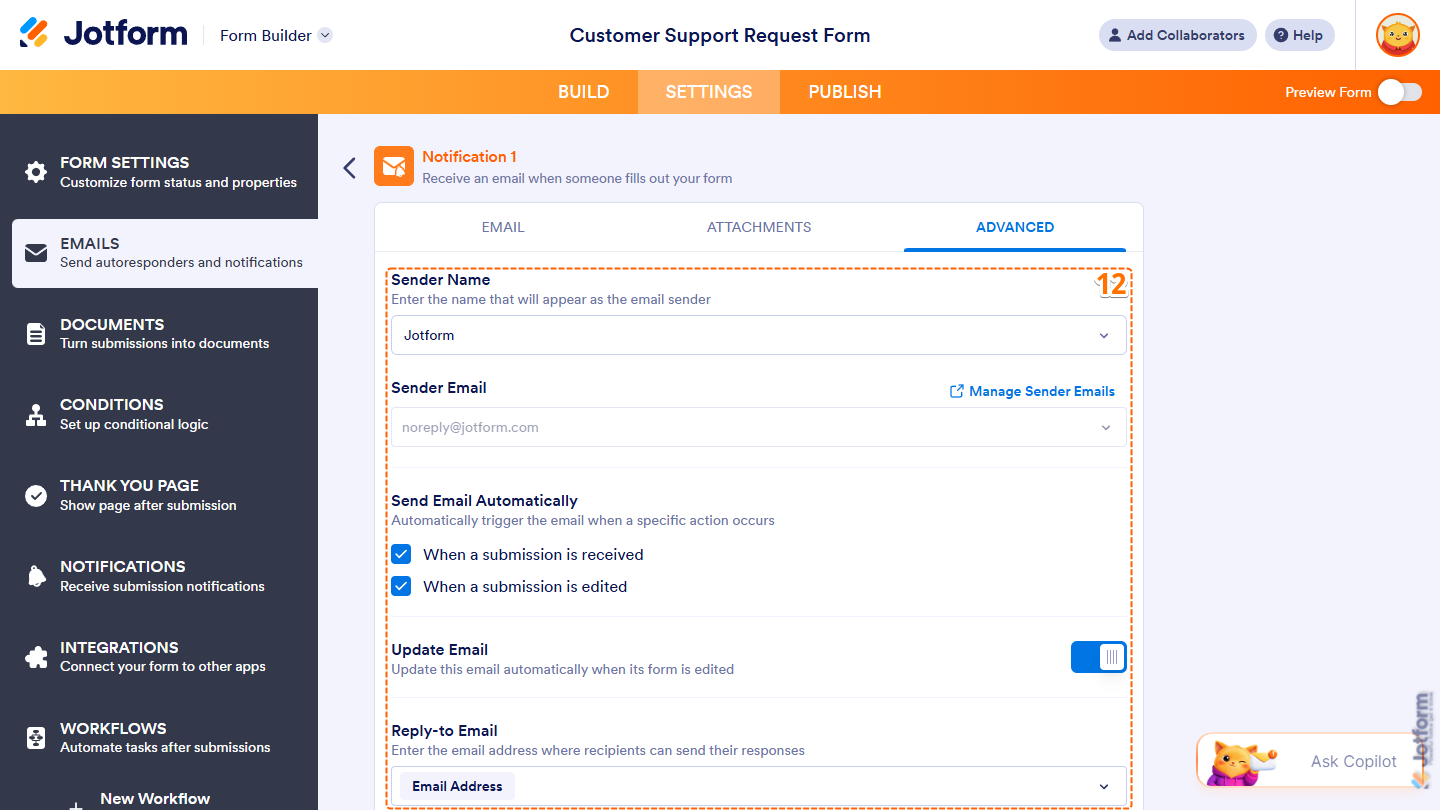
- Then, under the Advanced tab, set up these settings:
- Sender Name — Click on the Downward Arrow icon, and then in the Dropdown menu, select a supported field to have its value appear as the sender of the notification emails.
- Sender Email — Keep the default sender email selected, or click on the Downward Arrow icon and, in the Dropdown menu, select a custom sender email you’ve already set up for your account. You can also click on Manage Sender Emails on the right to open your Account Settings in a new browser tab to set one up. Check out our guide on How to Set Up a Custom Sender Email with SMTP to learn more.
- Send Email Automatically — Untick the box next to When a Submission Is Received or When a Submission Is Edited to stop sending notification emails for that event.
- Update Email — Toggle this off to prevent the email content from updating automatically when you edit the form.
- Reply-To Email — Click on the Downward Arrow icon, and then in the Dropdown menu, select an Email field to use its submitted value as the default reply-to email address for the notification emails.
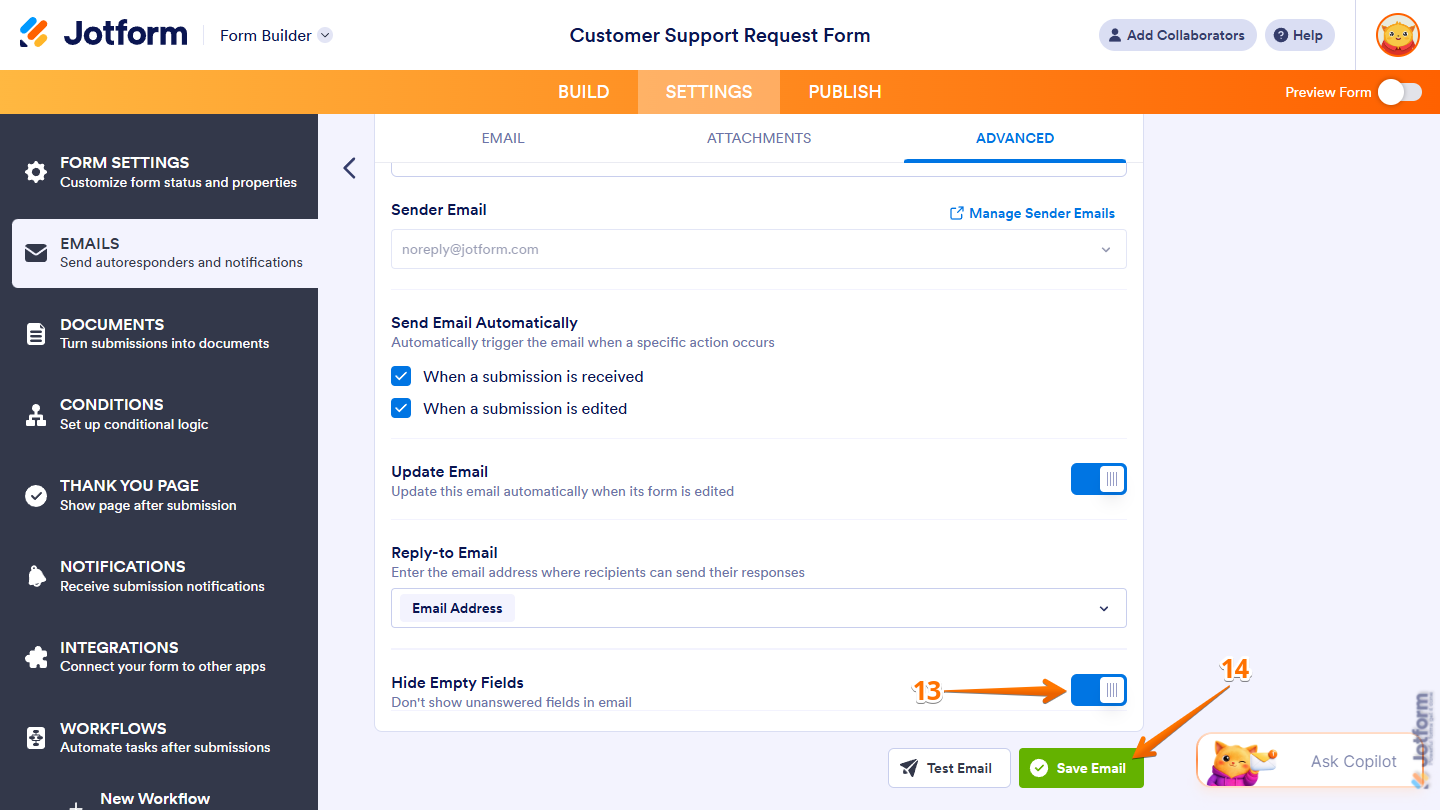
- Next, scroll down to Hide Empty Fields and toggle it off to include unanswered form fields in the notification emails.
- Once you’re done, click on Save Email.
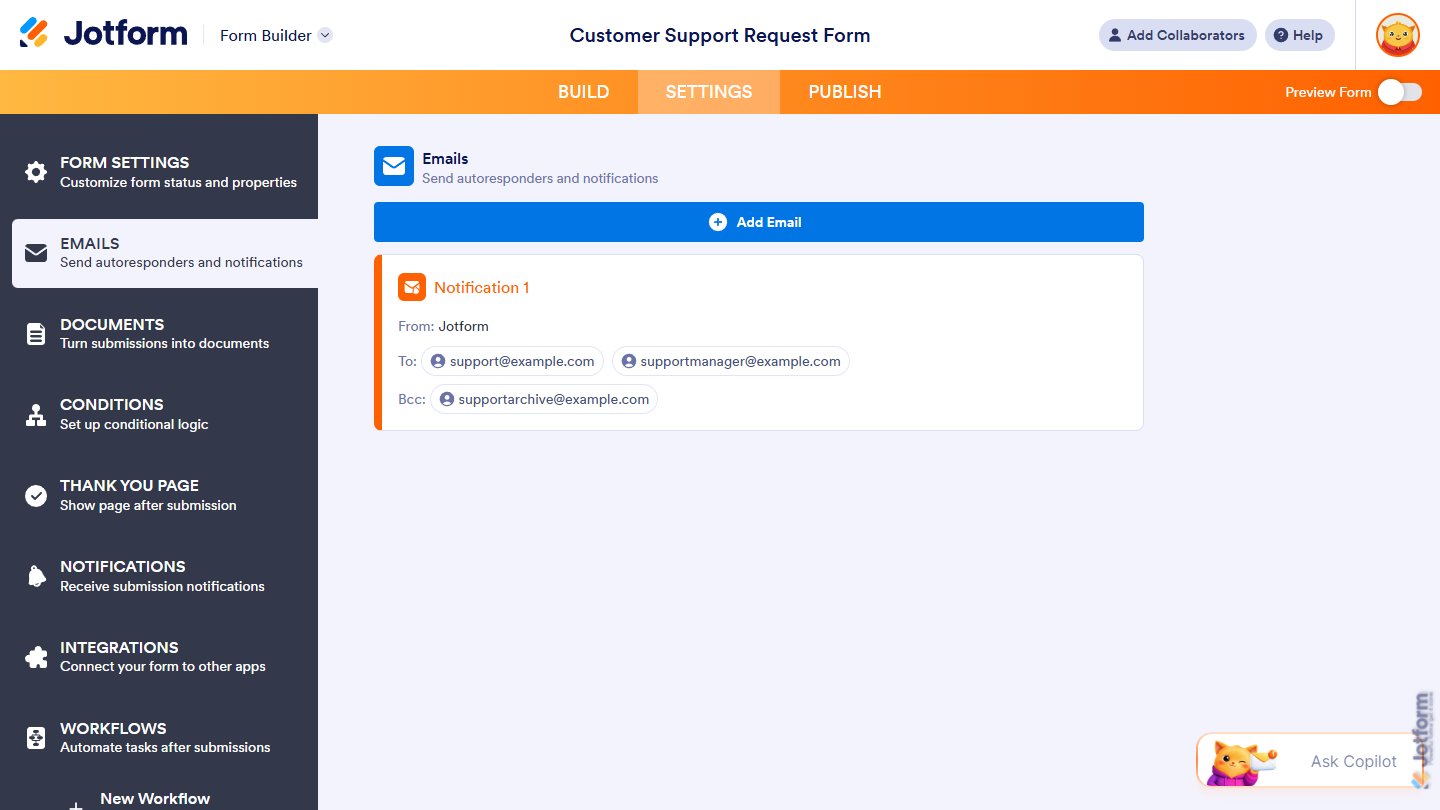
That’s it! You’ve successfully created and configured your Notification Email, including its recipients, content, and settings.


Send Comment:
209 Comments:
June 13, 2026
Does this work on Jotform Sign Builder too or only Jotform Form Builder? I would like the Sign Builder to look like the emails are from me.
October 30, 2025
I need assistance in getting each form sent as a separate email rather then a stream of forms linked on the same email. For instance. A form filled out at 10am, is also in the same email as on at 8am and 2pm. I would like each to be a separate email. how can i fix this
May 29, 2025
I'm using the email field in all of my Jotform tables, but that field is not "actionable." When an address like xxxcxxx@abc.com is entered, you cannot click on that email address in the table and have it invoke the native email program you use. All other databases have this feature including Airtable. PLEASE Help!!
January 18, 2025
How do I make it stop notifying me each time a form is sent. Since it already emails me the actual form I do not need 2 notifications.
September 13, 2024
I don't see a Notification to edit in the "Email" section of my form. There's only the Autoresponder that I customized. As a free user, can I not turn off the automatic notification?
August 16, 2024
Can we have an notification email sent when the form has a sync error? I can't see this option but it would be great to have this standardised.
May 27, 2024
Is it possible to set an email notificatiom daily? I'm a data manager and I would like to.remaimd daily to all my clients that their data report is done
November 30, 2023
unable to save the email setting because the error msg is " more than 65k characters." please help.
August 30, 2023
I can not send a test email. It says "You're not authorized". Why am I not authorized to send a test email from Notifications etc.
May 7, 2023
Hello: Did I miss something? Might there be a way to "add SMS notification" to completed and submitted forms, in addition to email notifications?
February 17, 2023
What is the minimum paid level to send the form submission email to 2 people?
February 12, 2023
Hey
I am still wondering why it doesn't explain why the info is in curly brackets {}
October 12, 2022
I have different Managers (Recipients) that would need to be notified for the one Form. They don't need a notification to view all completed forms of that same form; only to view from particular Supervisors. Is there a way to filter out the notification emails so they can only receive from certain individuals rather than receiving from all?
e.g. if one of the fields in my form was titled 'Division' and the answers when completing the form were preset to A B C or D - the email mapping would be 'Division' > A > enter recipients OR 'Division' > B > enter recipients.
Grouping recipients to only receive completed forms from A B C or D rather than all would be a great addition.
If it already does this would love to know how to do action
August 26, 2022
We use jotforms for our users to request to be contacted...we use to have the ability to see name/email/phone number/question when the submission was sent to our emails, but now those fields are hidden...what happened and can we change it back.
August 18, 2022
Doesn't explain why the info is in curly brackets {}
August 11, 2022
We would like to use the internal messaging feature on a form to communicate with the person filling out the form. How can we set up a notification that lets us know when someone has sent a message or reply, and also notifies them when we have sent a message or reply?
August 4, 2022
When someone fills out my form I get an email notification, then when another person sends an email I get another notification as a continuation to the previous email. Is there a way that I can get separate emails for each submission?
July 13, 2022
I don't want any backround colour in the email notification I receive on form submission. How to remove it?
July 12, 2022
Hi Jotform,
I am unsure how to set up/ why it is not happening that completed forms are sent to my email address. Is this possible? Please help
April 25, 2022
How do you remove the "edit this submission" option.
Once people submit an order I do not want them to be able to edit it.
April 20, 2022
We have a questionnaire for our employees to fill out and we want them to put in the email of their supervisor so that when they hit submit it will send the email directly to their supervisor. Is there a way to do setup the Notification so that the "recipient email" looks at the "supervisor email" for where to send it. Right now it looks like we have to manually type it in. We have too many variables here to use the dropdown method. Please advise.
April 9, 2022
Is there a limit to the email notification? I have a long form. When I create the email template, it does not recognize many of the last fields.
April 8, 2022
I can’t get into the account. The forgot password doesn’t come to me...
March 1, 2022
hello! how do I receive the results. from the jot form? once the person clicks "submit" where does it go?
February 23, 2022
Recipient Email - how I can send an the entire form, not just the data submitted?