
A WordPress popup is a message that appears over your page to put an offer in front of visitors — like a discount before checkout or a free guide in exchange for an email address.
Get the offer right, and people will sign up. Omnisend analyzed 1.24 billion popup displays and found that 2.1 percent converted into email signups in 2025. You can also give visitors some breathing room — use a delay, wait until they’ve scrolled, or show an exit-intent offer when they seem ready to leave.
If you’re looking to add one to your site, you should know that WordPress supplies the page, but you’ll have to bring the popup. The native Gutenberg editor has no built-in block for these advanced triggers, so you’ll need custom code, a plug-in, or a hosted widget.
We’ll walk through the latter two options below.


Option 1: Install a dedicated WordPress popup plug-in
Start in your WordPress dashboard. For this walkthrough, we’ll use Pop-up by Inisev, which connects your site to the MyPopUps builder. Other plug-ins are available.
Be aware that a free plug-in still comes with a hosting catch. On WordPress.com, you’ll need a paid plan to install it. If you host your WordPress site with a different provider, though, you can skip the upgrade.
- Find your plug-in: Open Plugins and search for “pop up.” In the standard WP Admin interface, select Add New Plugin first. Choose Pop-up by Inisev.
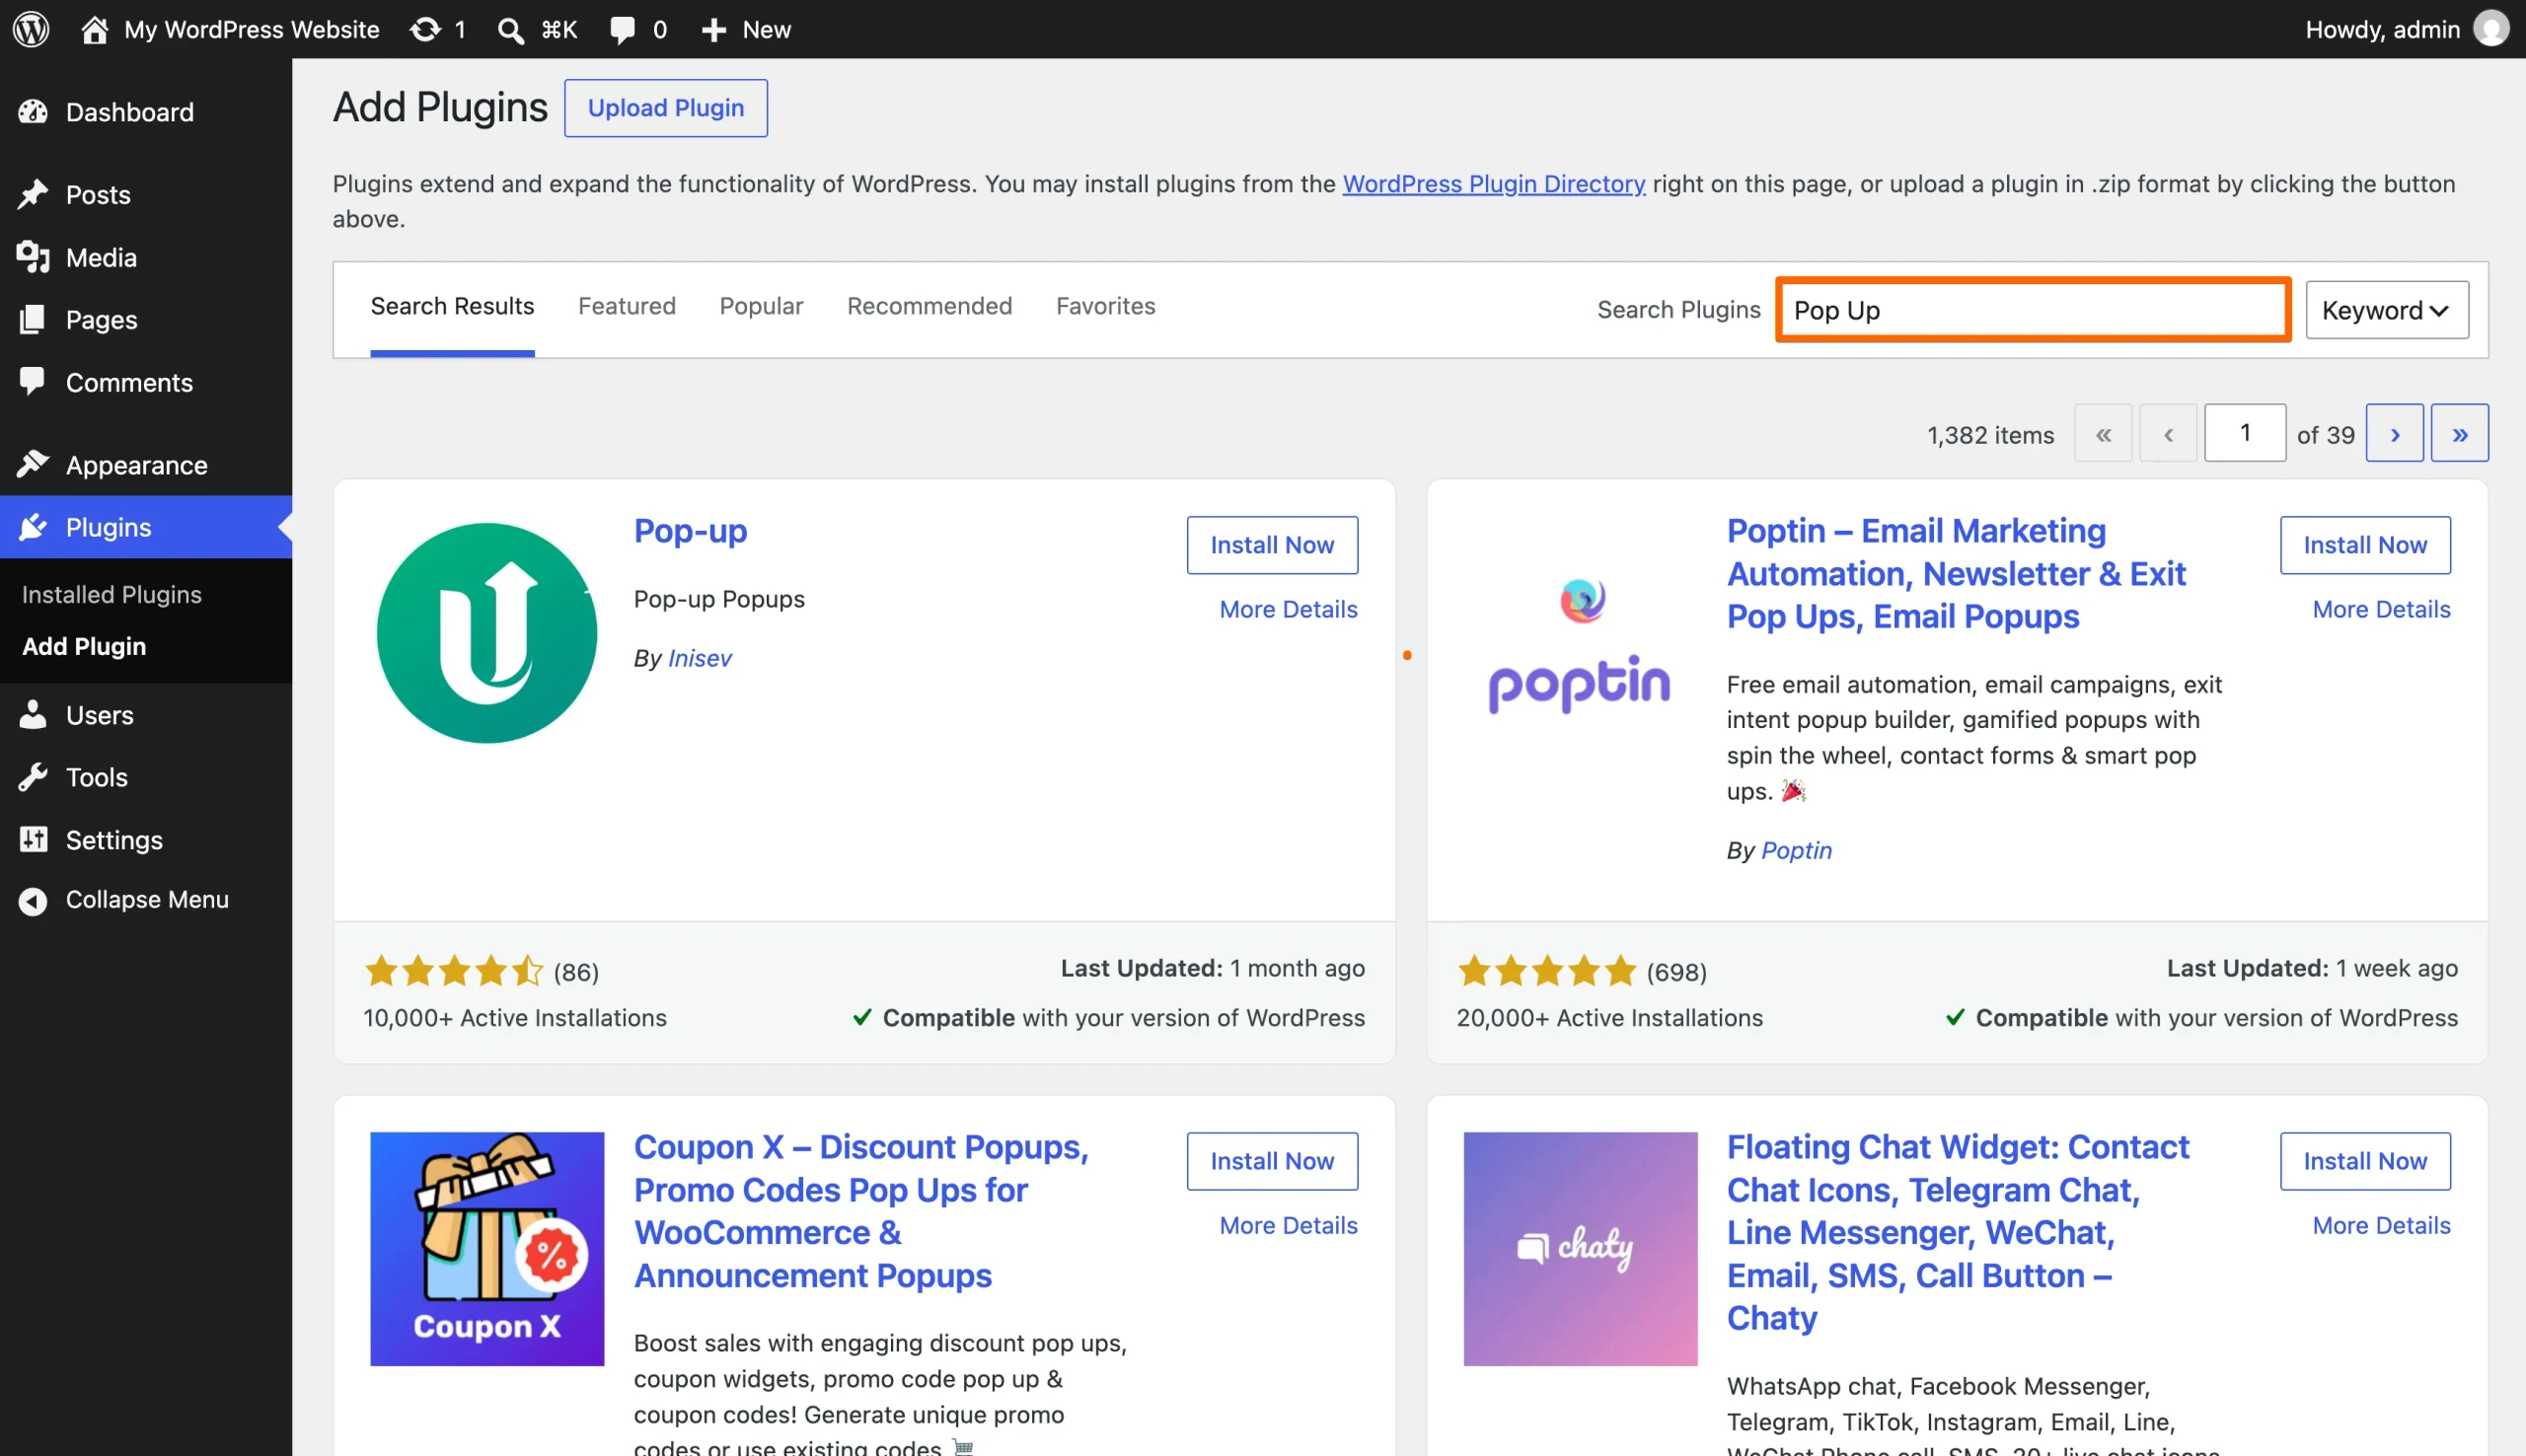
- Install and activate it: Check the plug-in’s recent updates and WordPress compatibility, then install and activate it.
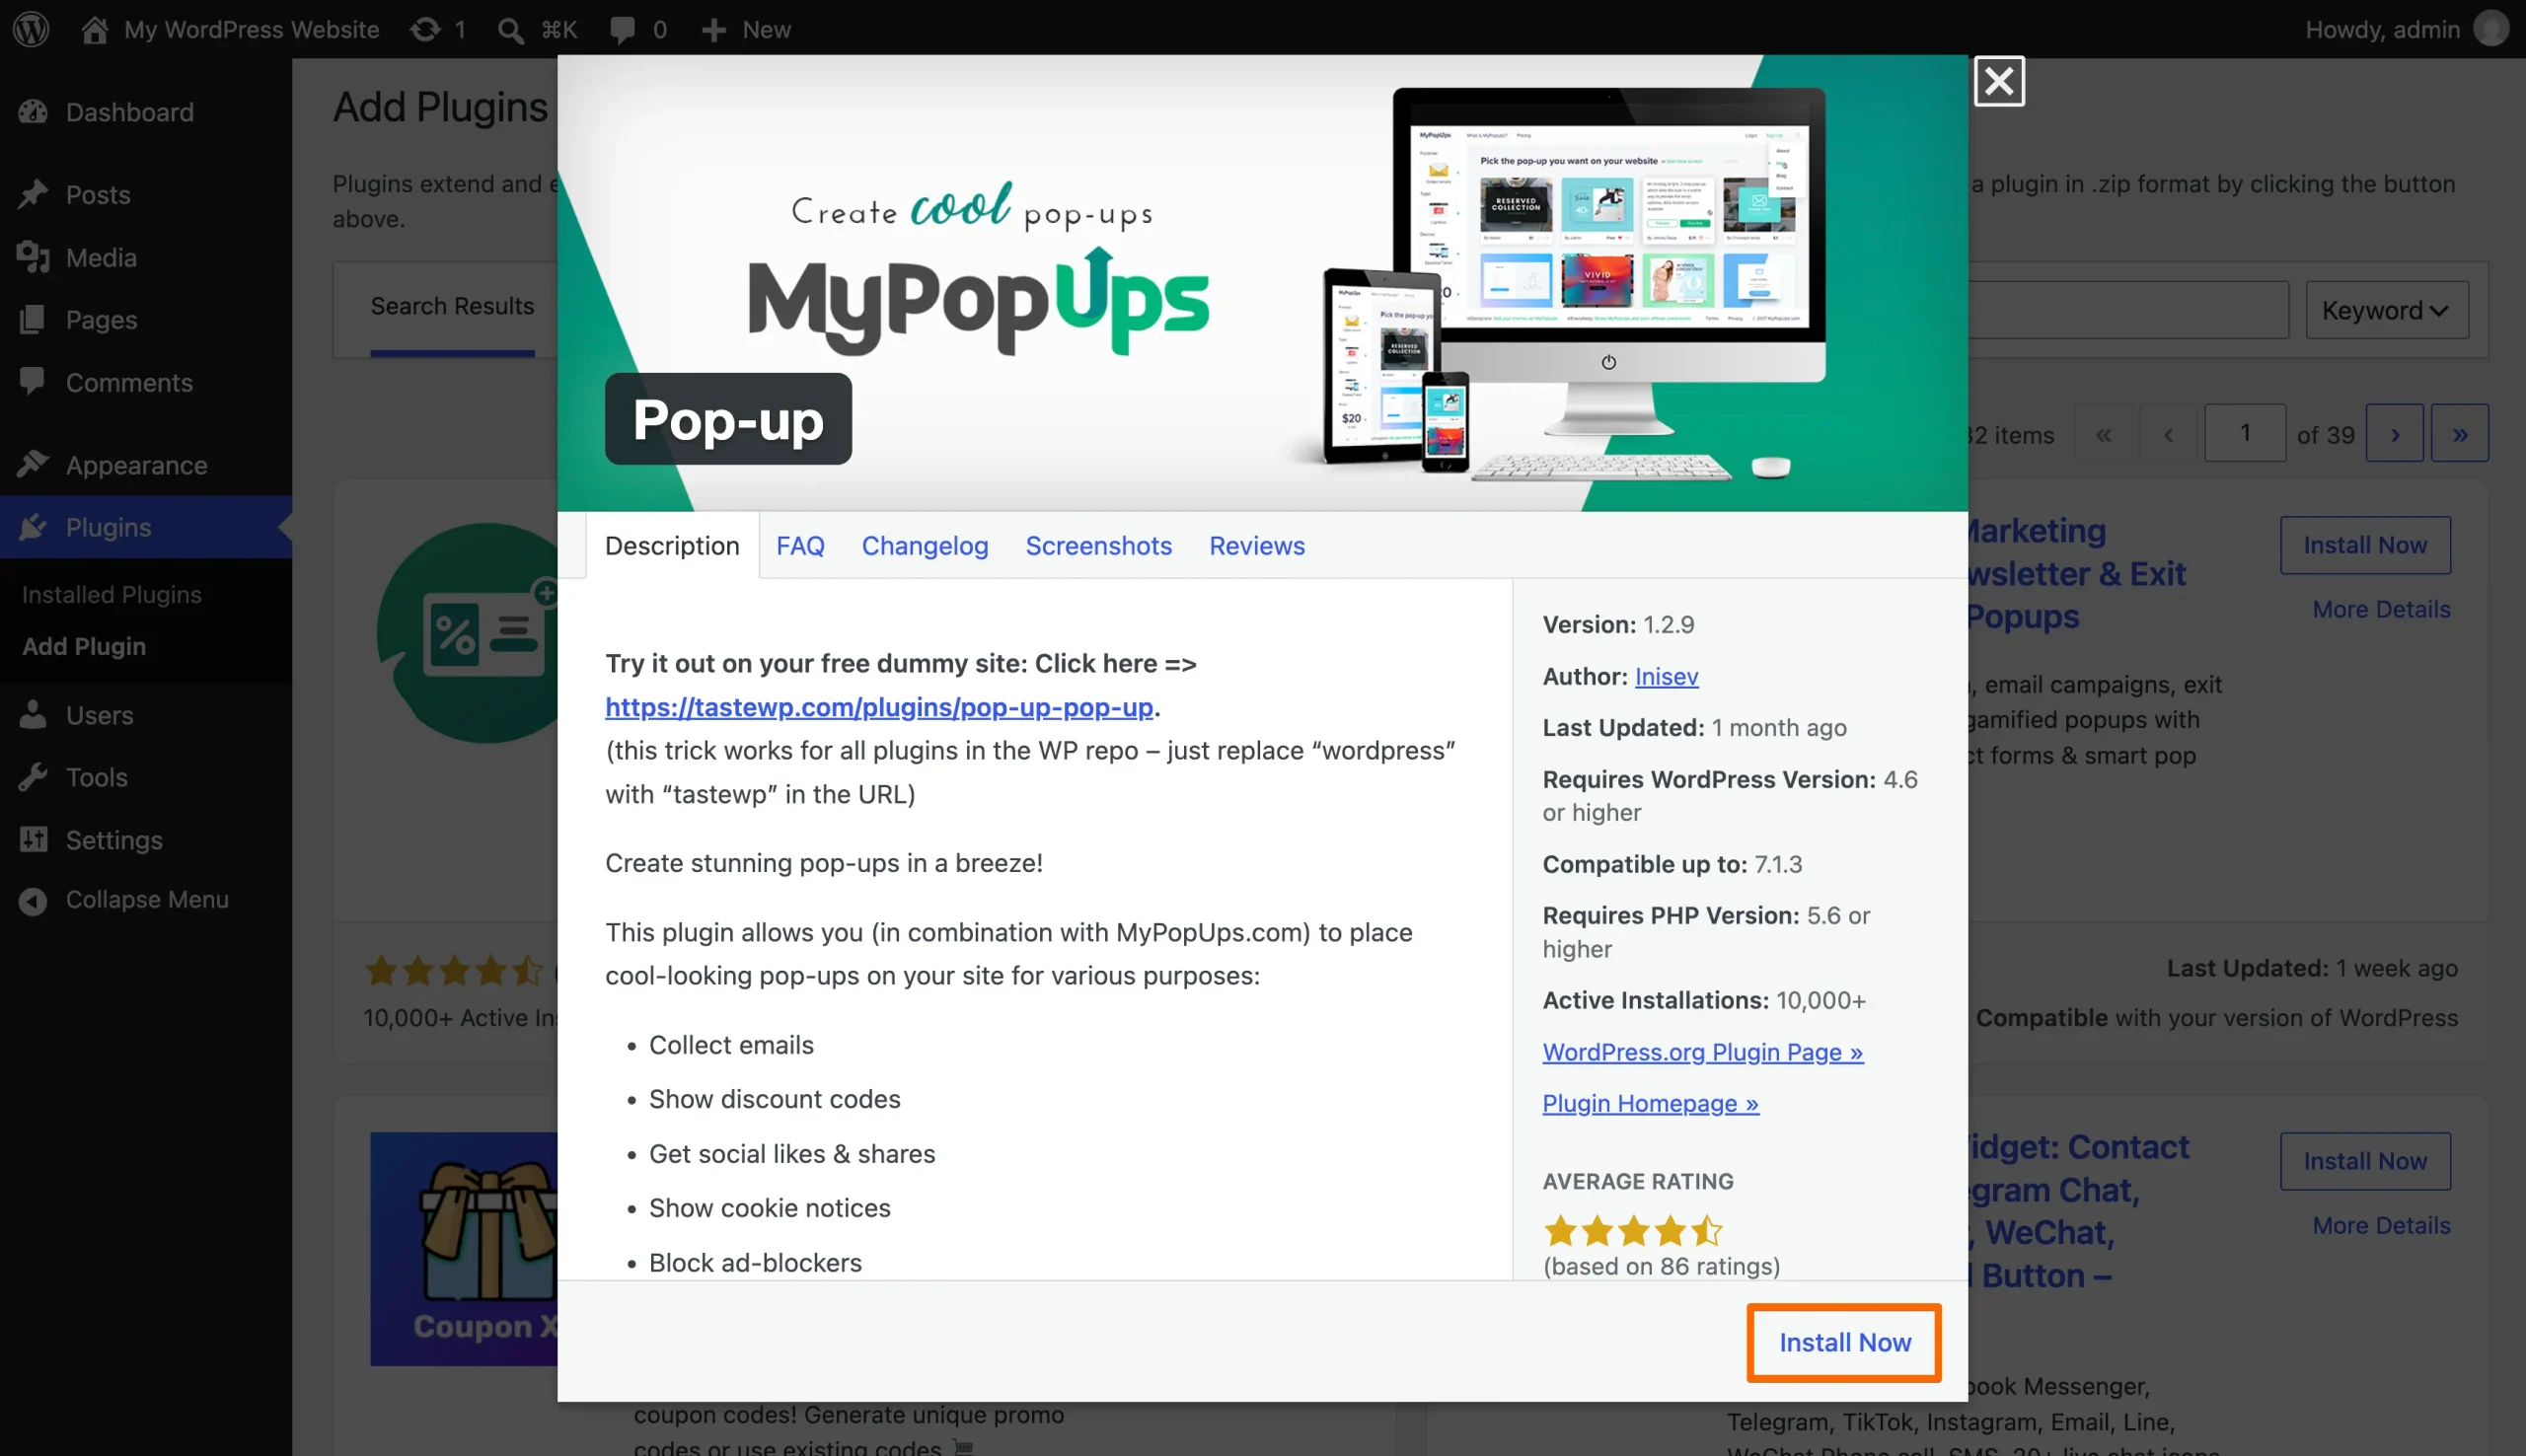
- Connect to MyPopUps: Open the plug-in’s settings and select Yes when prompted to connect to MyPopUps. You’ll create your popup using that service’s builder.
- Build your popup: Follow the link to MyPopUps and create your design.
- Launch and check it: Launch your popup on MyPopUps, then return to the plug-in screen in WordPress and click Refresh. You can activate or disable your popups from there.
The popup may be finished, but the plug-in still needs looking after. Patchstack’s 2026 WordPress security report found that 91 percent of the 11,334 new vulnerabilities identified in 2025 were in plug-ins.
For a popup announcing an occasional sale, you might prefer a smaller maintenance commitment. That brings us to…
Option 2: Add a free, interactive popup widget
The Jotform Popup Widget lets you build your popup outside WordPress and add it with an embed code.
For WordPress.com sites, you’ll need a paid plan with hosting features activated to run the embed, even if the popup appears in your editor preview.
Here’s how to get started:
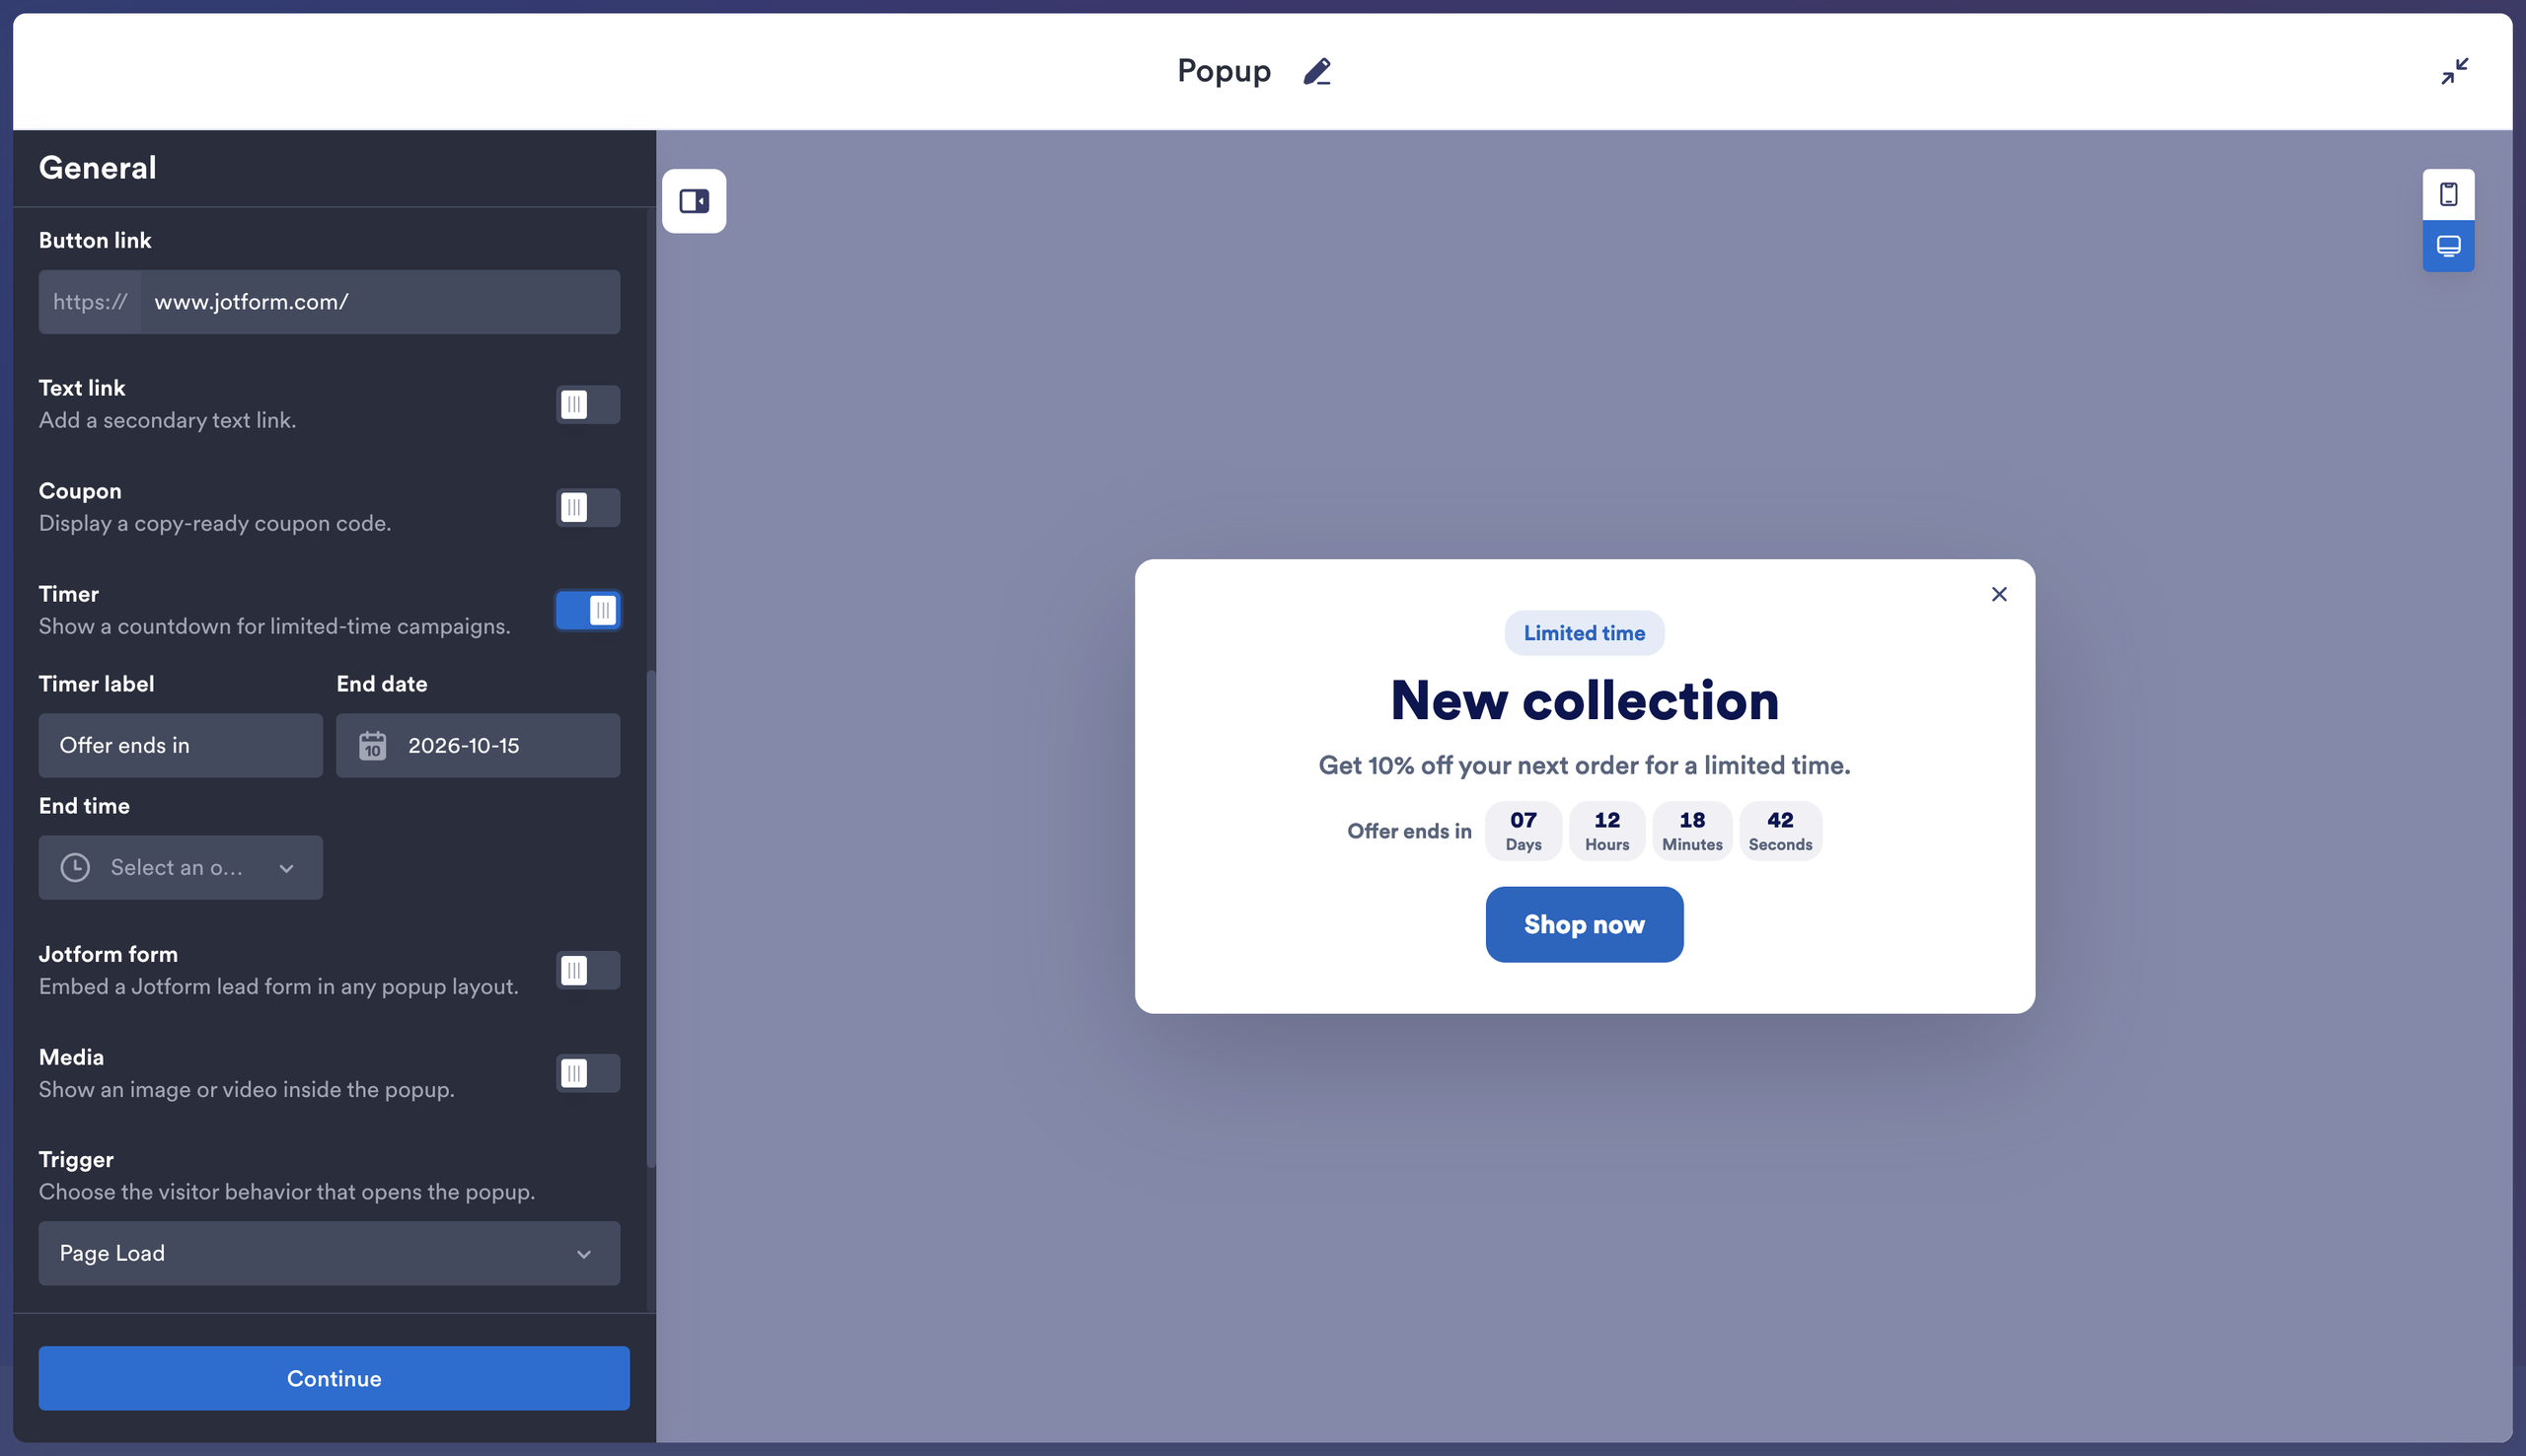
- Write your offer: Under General, edit the heading and description. I kept Badge enabled to put “Limited time” above the headline, then used “Shop now” when I enabled the CTA button option. Add your destination URL under Button link. You can also enable Coupon, Timer, or Jotform form. Click Continue.
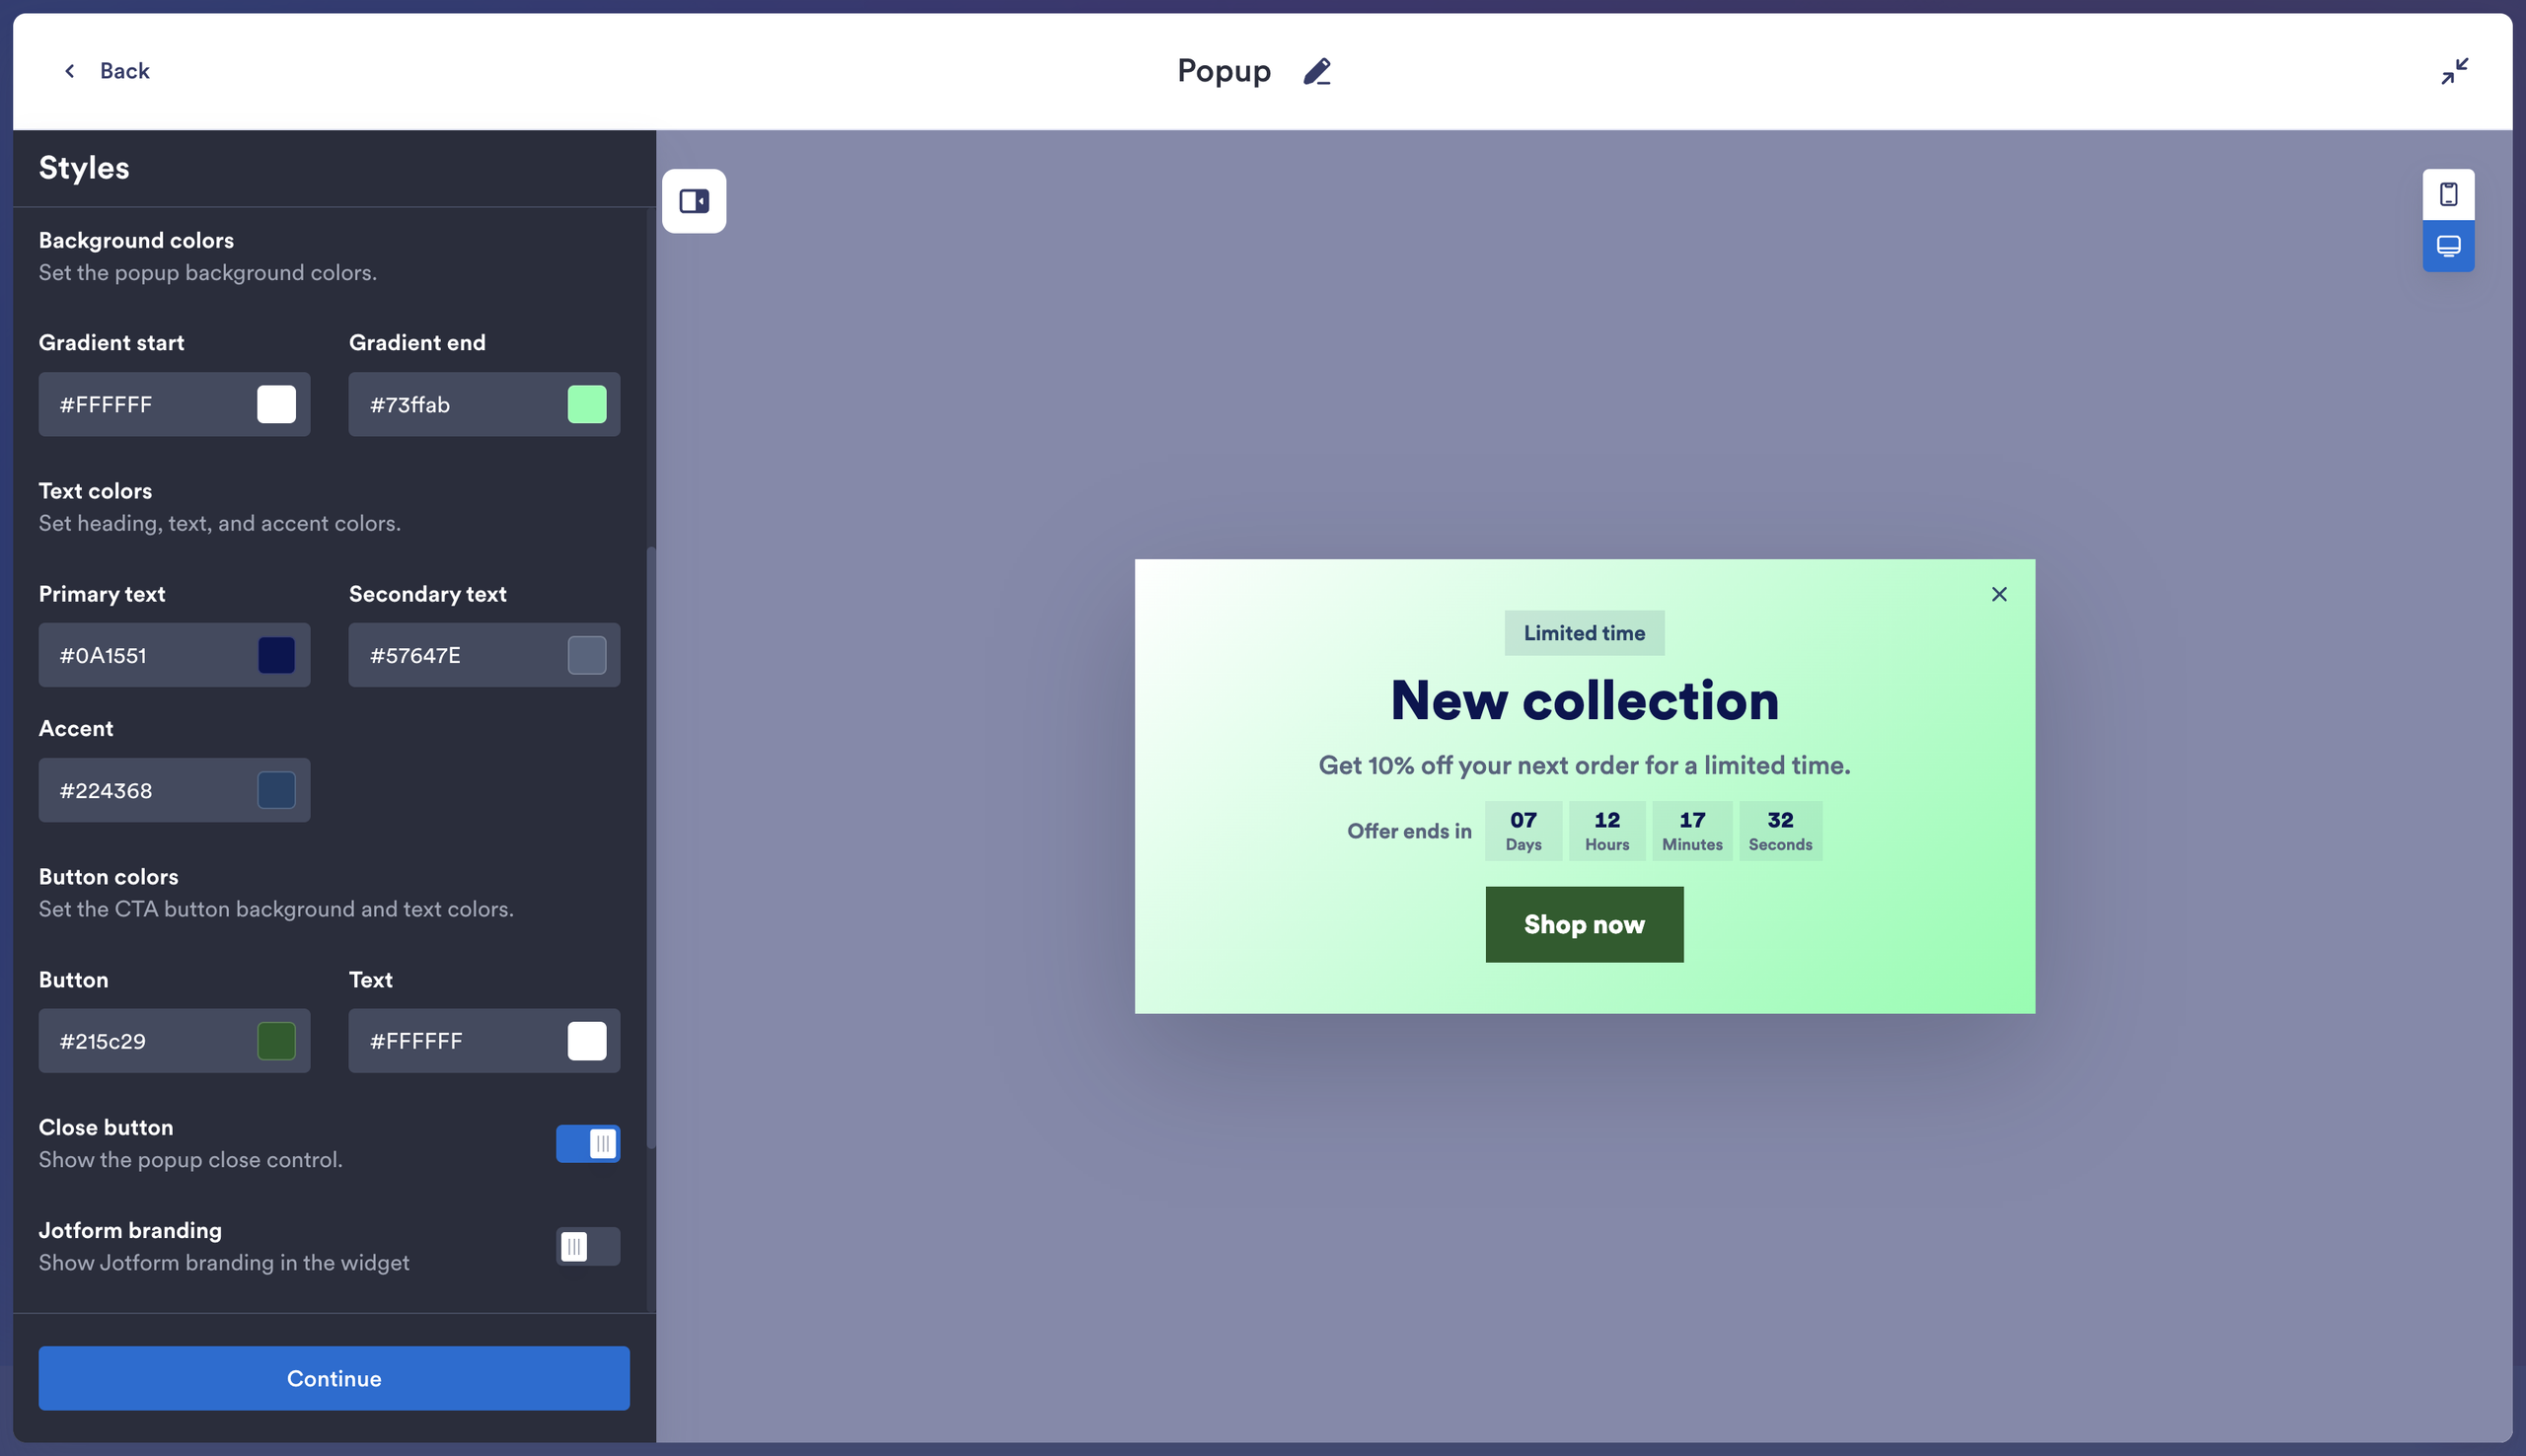
- Style it for your site: Under Styles, I chose rounded corners and the light theme, with Overlay enabled to make the offer stand out against the page. I also switched off Jotform branding to keep the focus on the offer. Click Continue.
- Choose the layout and behavior: Under Layout, I selected Center for both the popup’s position and its content. I enabled Open links in new tab so that the offer page opens without replacing the page visitors were reading. My favorite control here is the Reopen button — it leaves an “Open offer” button available after dismissal.
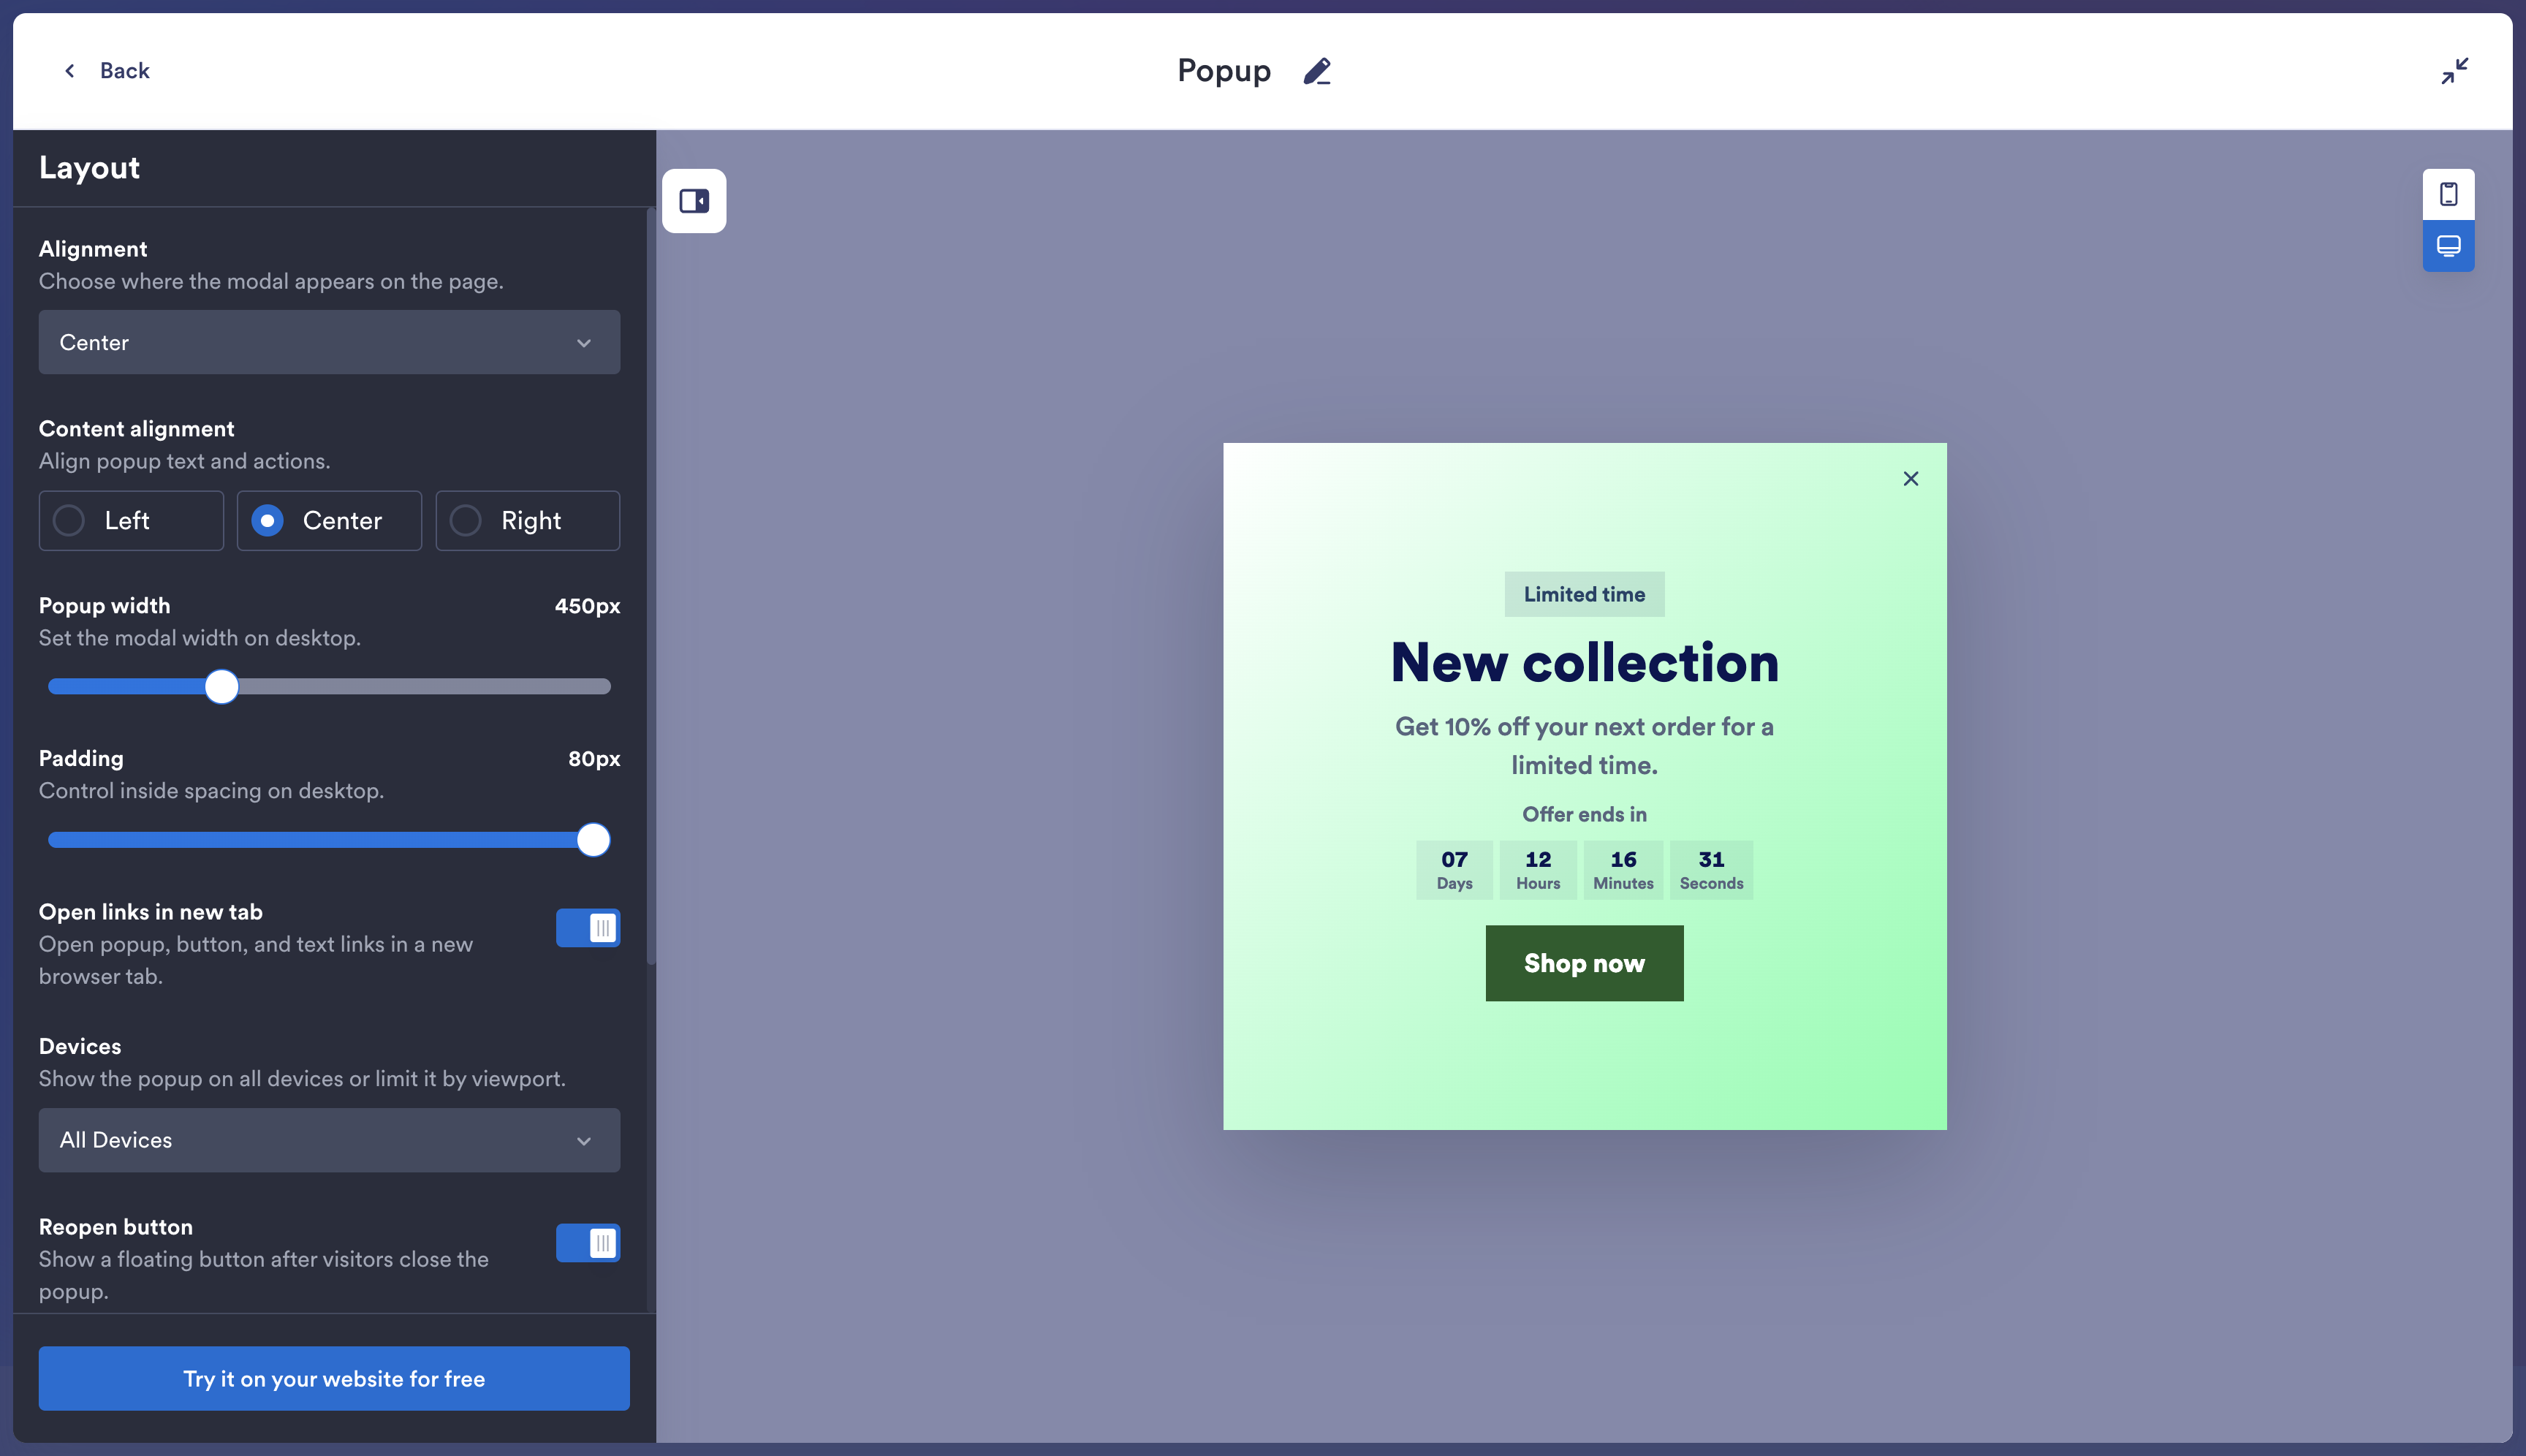
- Copy your embed code: Click Try it on your website for free, then Copy Code.
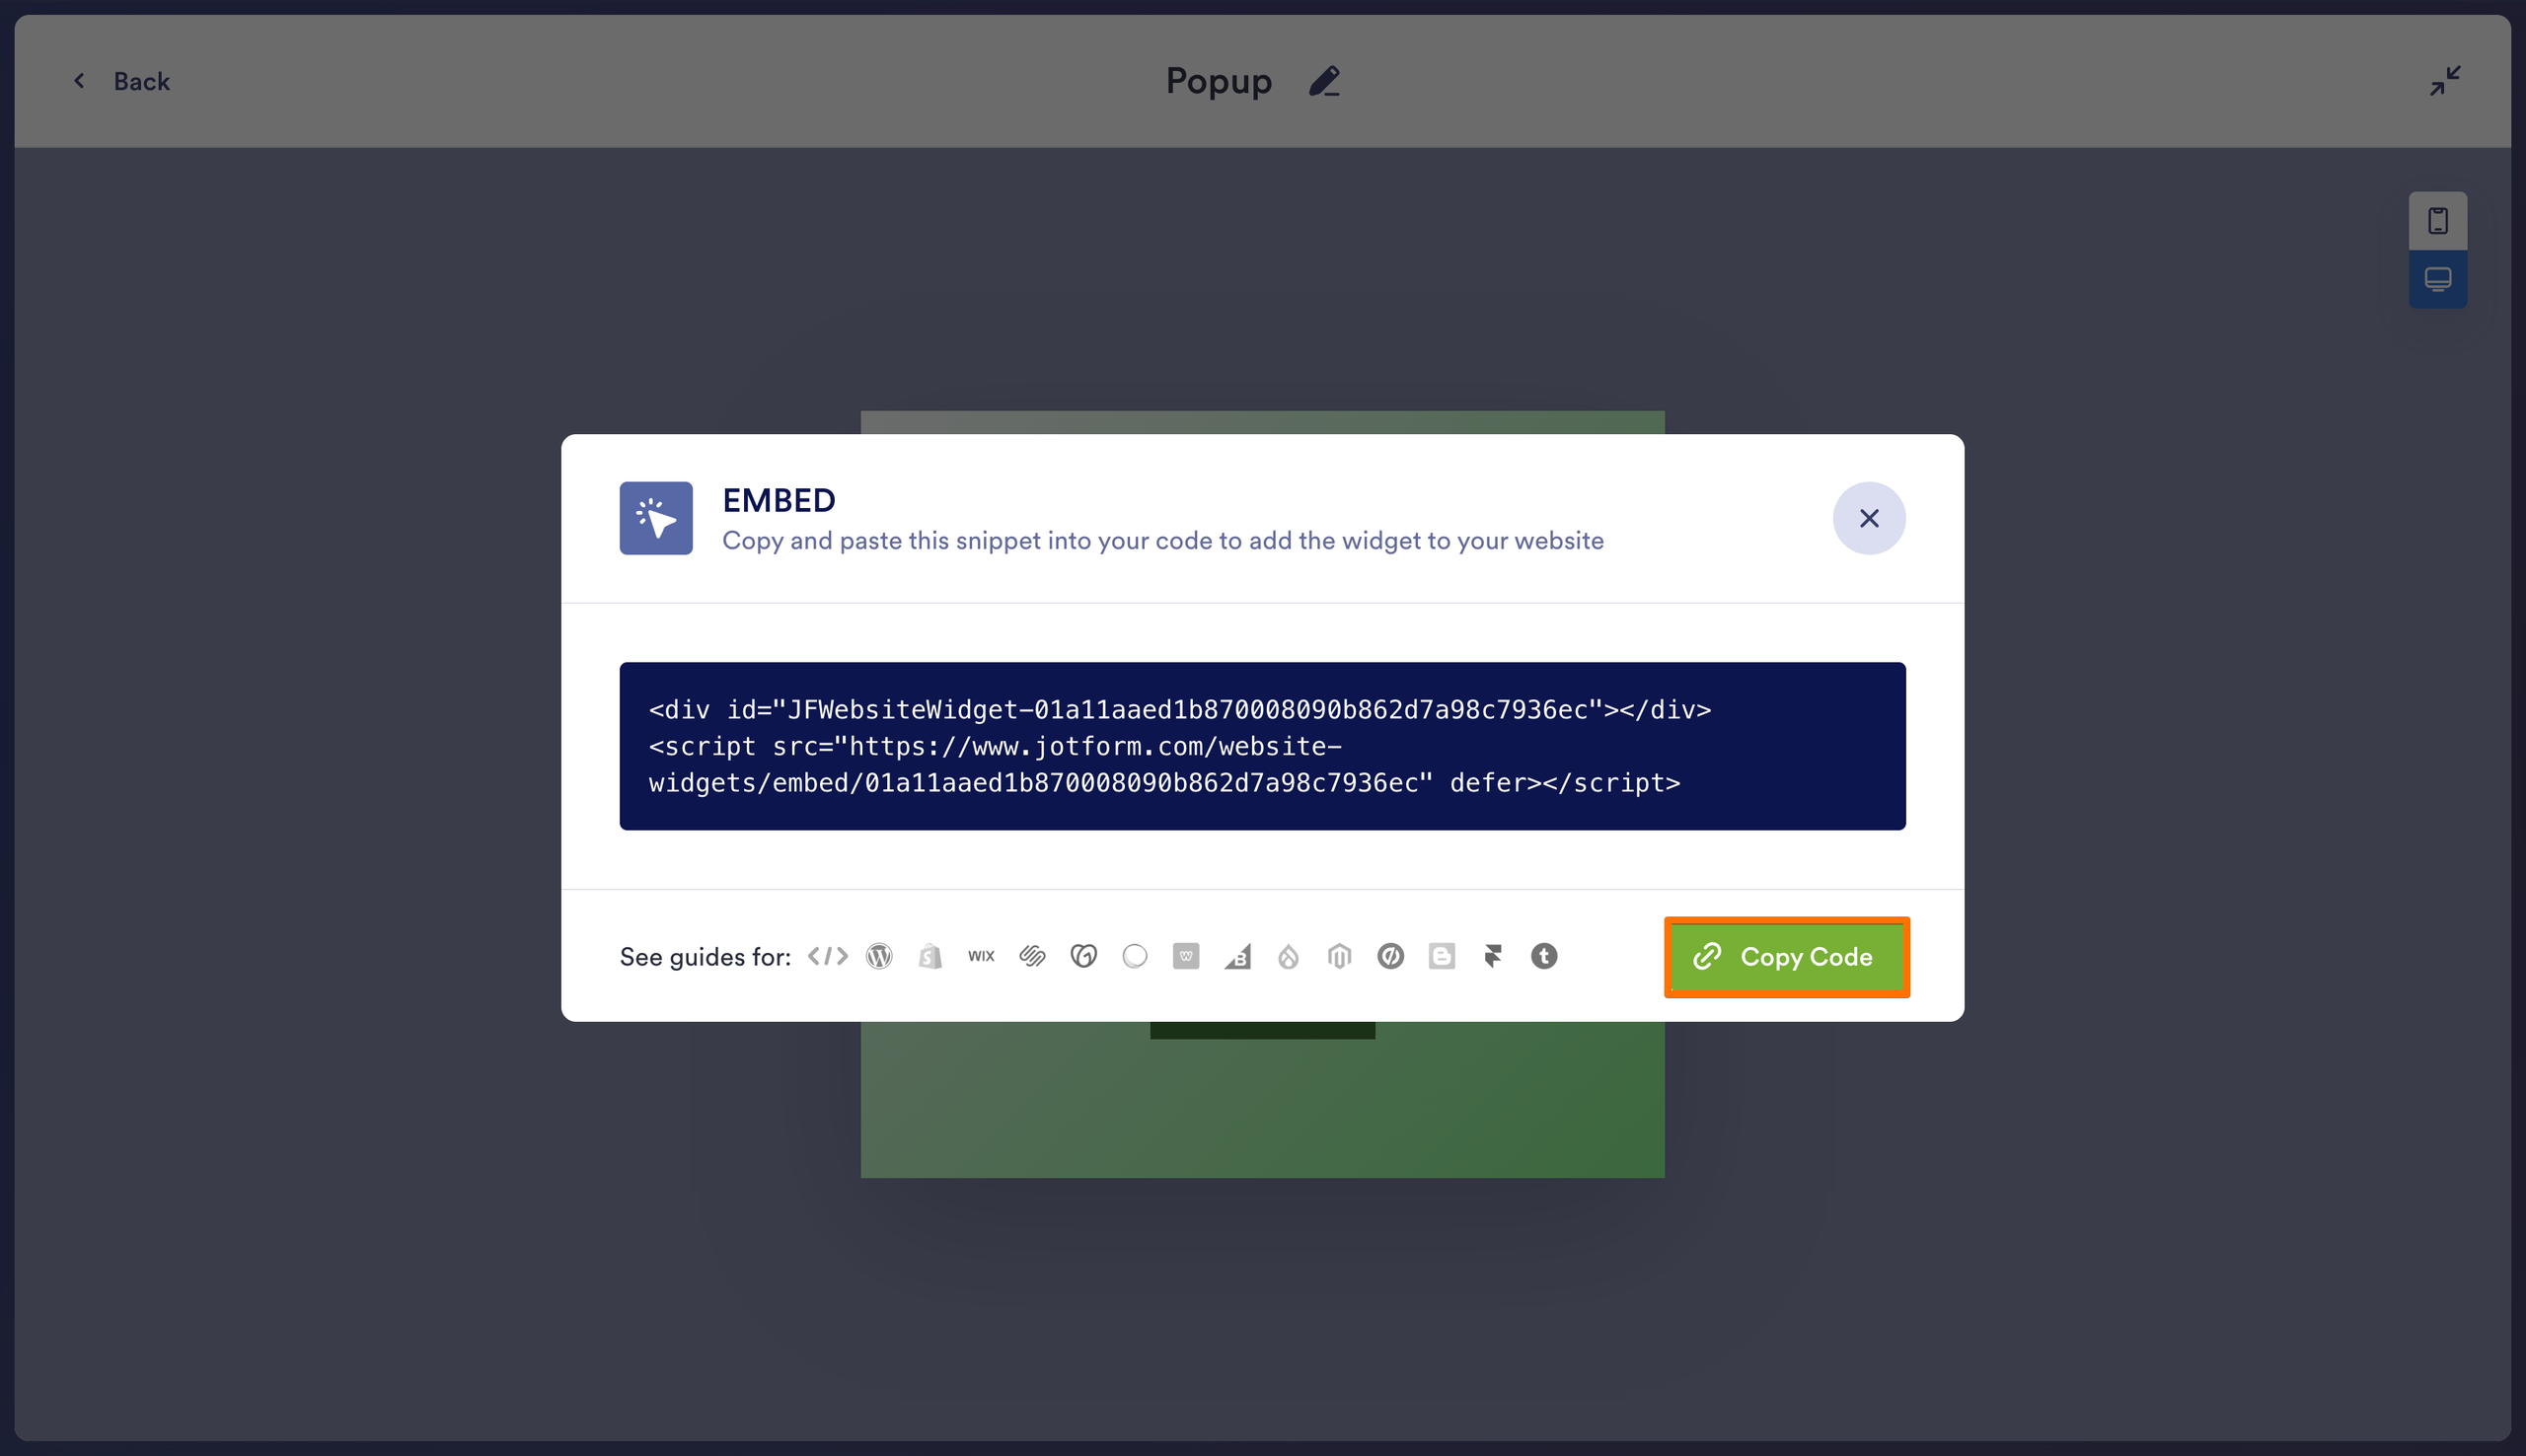
Now let’s add the popup to WordPress.
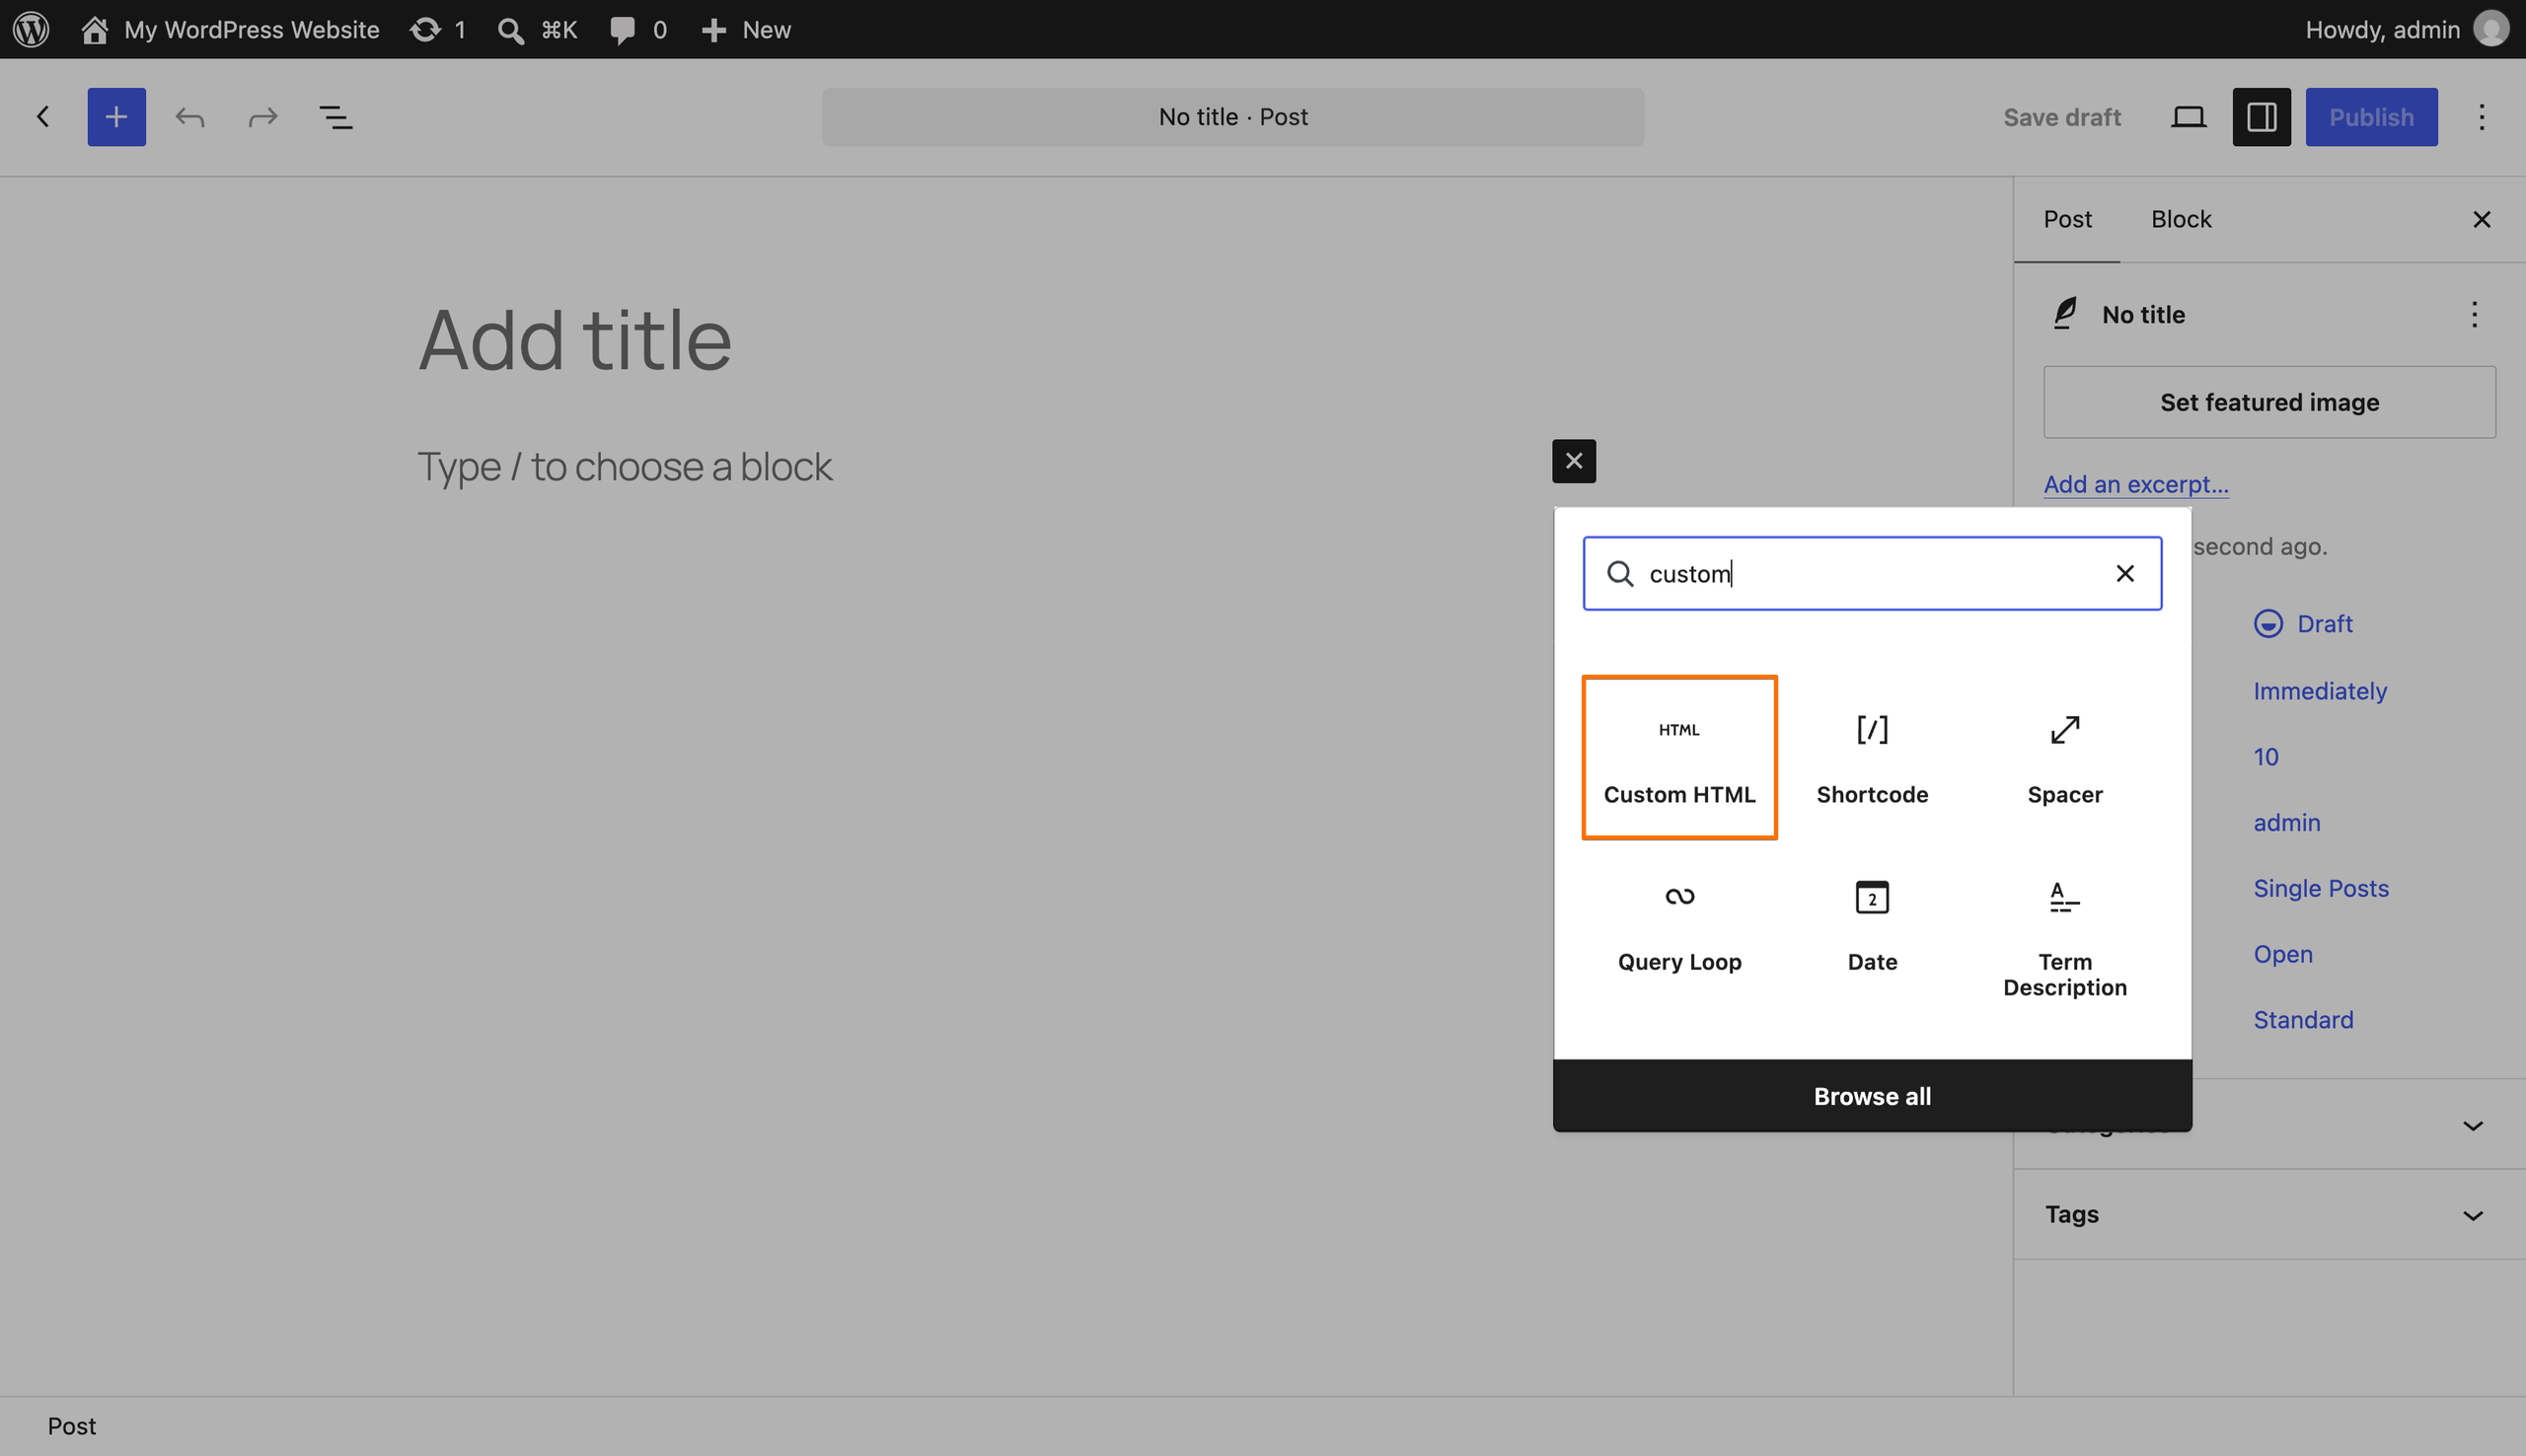
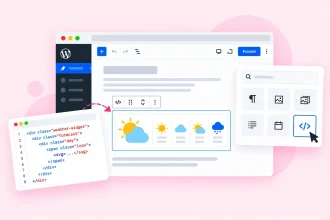
- Add a Custom HTML block: Go to Appearance > Widgets and select a widget area. Click +, search for “Custom HTML,” and add the block. For a popup on a specific post or page, add the same block directly in that post’s or page’s editor.
- Paste and save: Select Edit HTML and paste the complete snippet from Jotform. You’ll see a preview beside the code. Click Update, then save your changes in the Widgets editor.
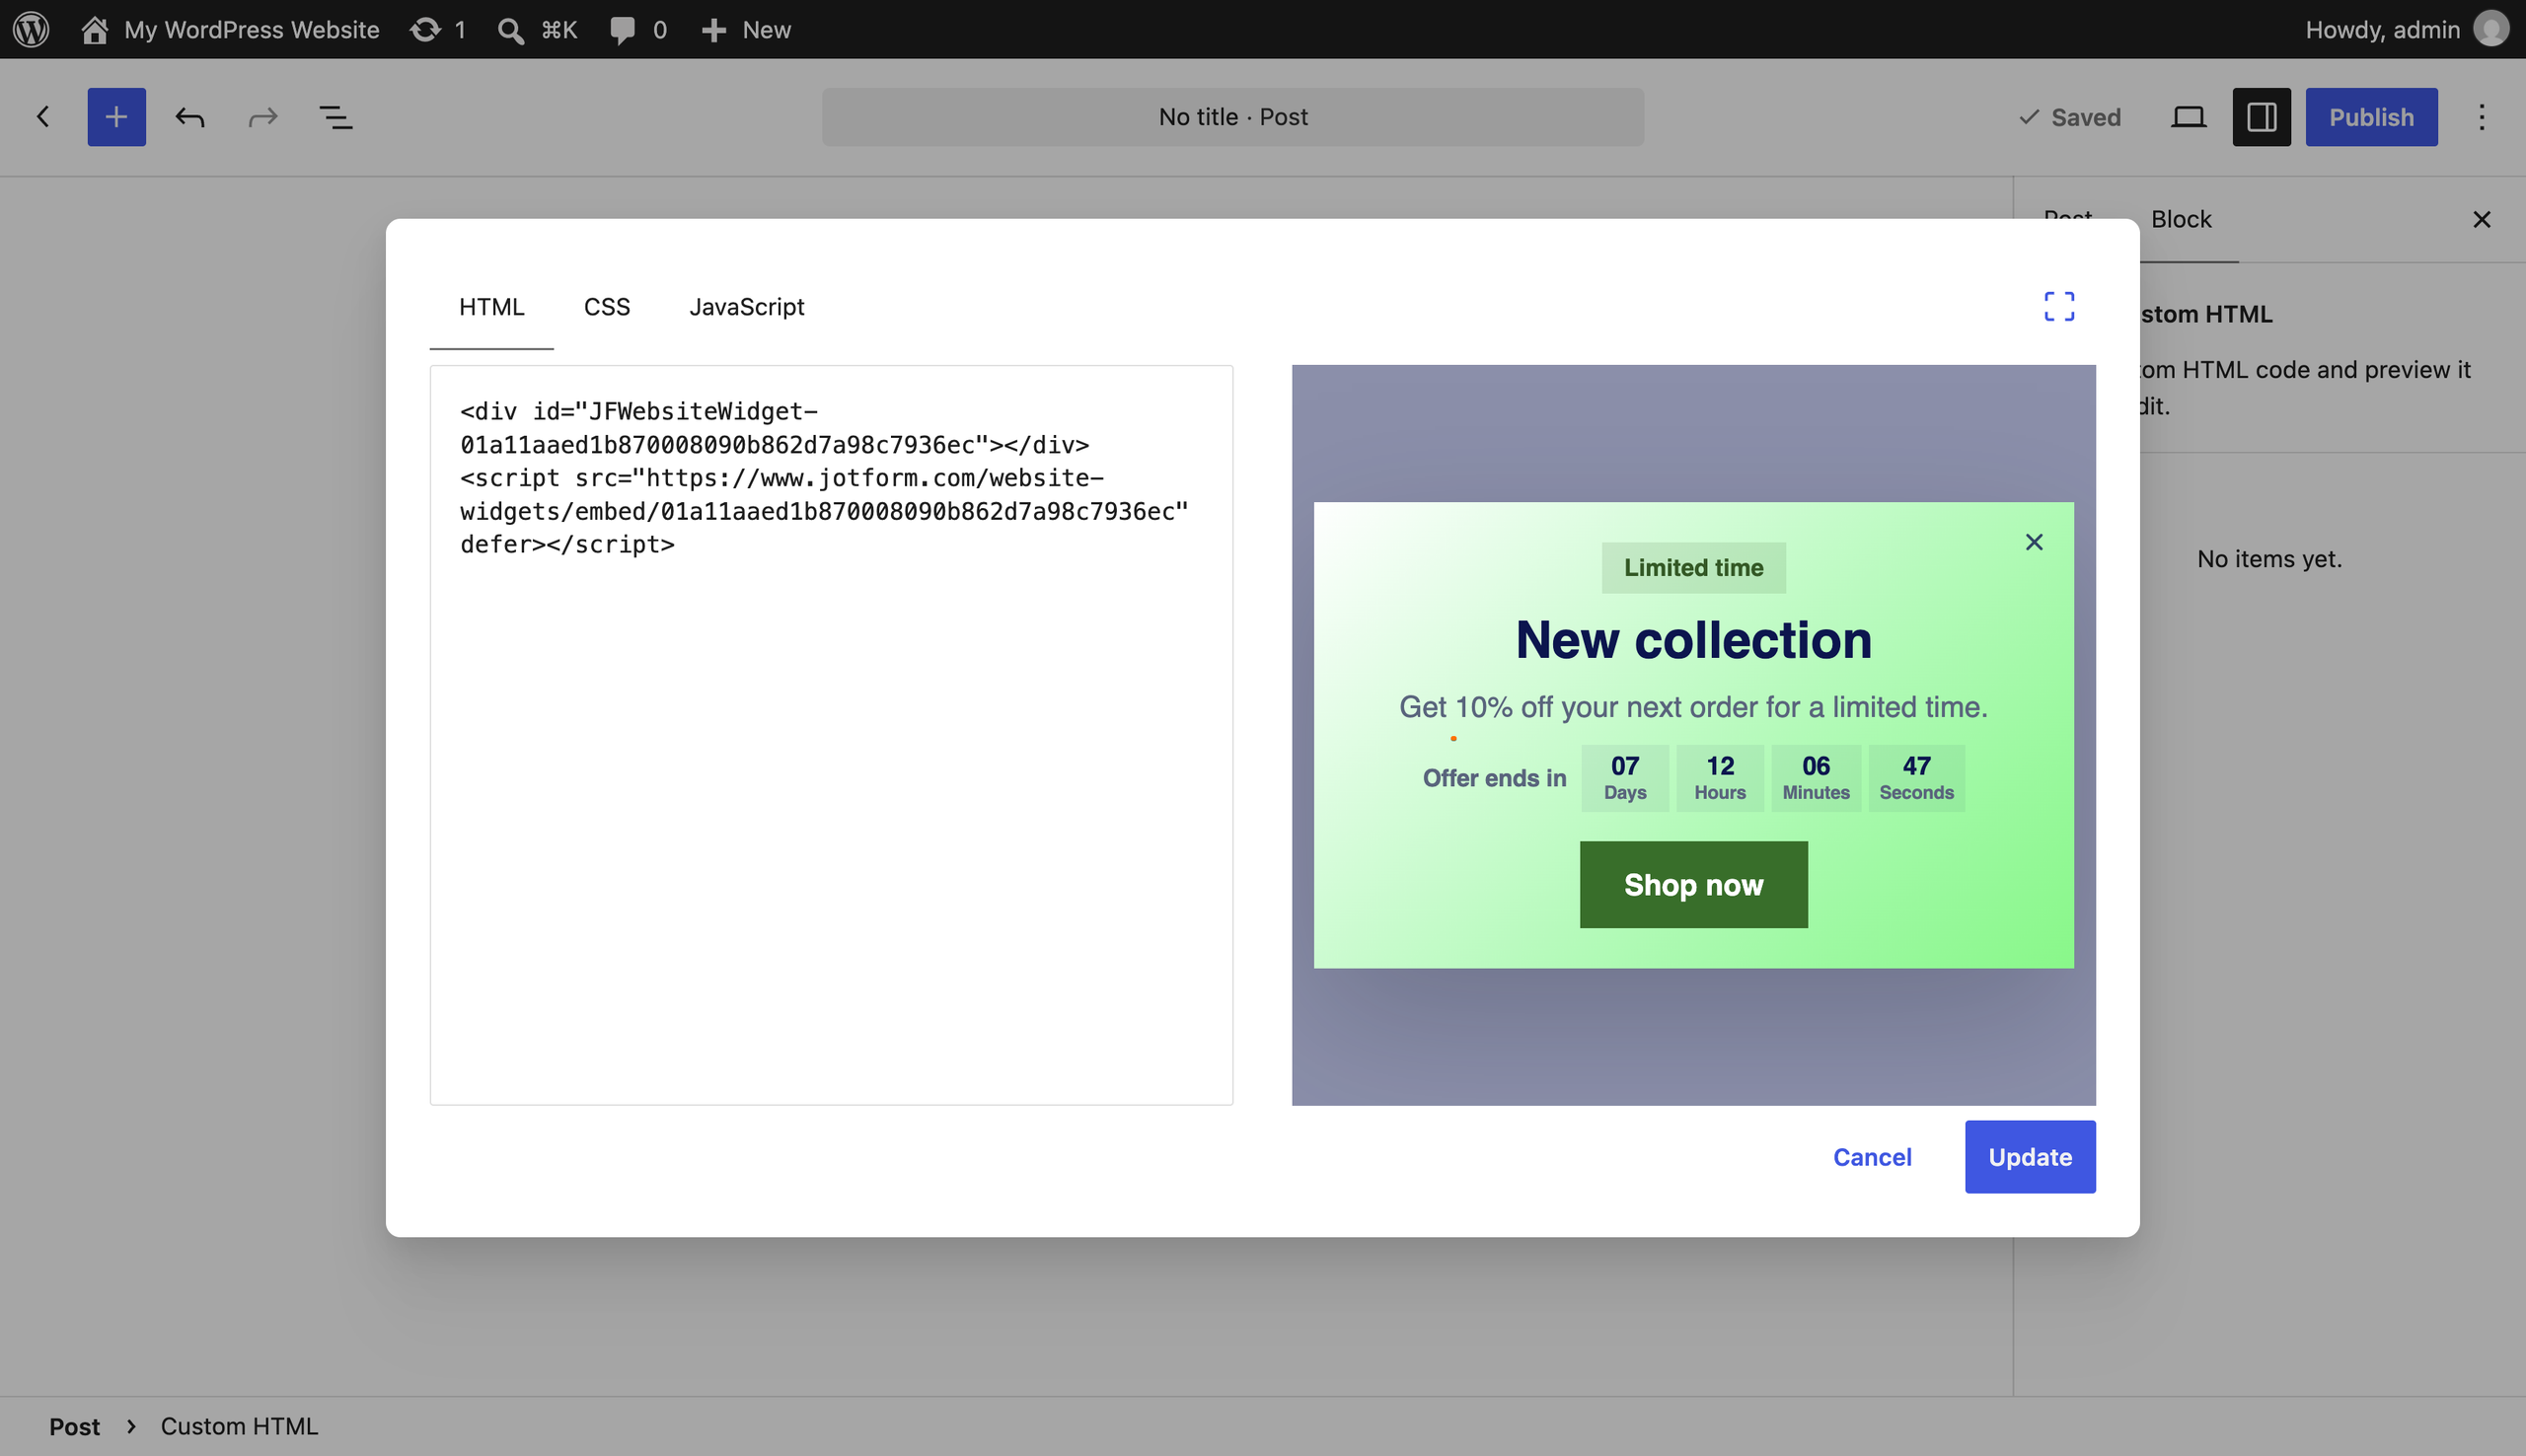
That’s it. That’s the popup sorted, without adding another plug-in to your WordPress housekeeping.
Put Jotform to work beyond the popup
I’d give the rest of the page a quick once-over before calling this finished. Those who click your offer may still want to know whether you accept returns or ship to their ZIP code.
That’s where the Jotform Website Widgets directory, with its tons of free website widgets, comes in. Here are a few additions to consider:
- An FAQ Widget for questions you’re tired of answering by email: Put delivery details, refund terms, or course requirements on the relevant page, with search enabled if the list gets long.
- A Google Reviews Widget beside a booking or inquiry section: You’ve made your case; let previous customers have a word.
- A Flipbook Widget for catalogs, menus, or digital magazines: Let visitors turn the pages on your site before deciding what to order.
Then give visitors somewhere to respond. Use Jotform’s WordPress embed form plugin to embed WordPress forms for quote requests, registrations, or newsletter signups. For step-by-step instructions, see our guide to embedding forms for WordPress users.
Jotform Website Widgets are free with unlimited access to all features until January 2027. Try a few before forking over money for WordPress plug-ins.
How to add a popup on WordPress FAQs
There’s no default Popups menu or native Gutenberg popup block. Where you edit your popups depends on the tool. Check your plug-in’s dashboard menu, or return to the hosted builder if you used an embed.
For help finding your way around WordPress, see our guide to how to use WordPress.
I’d choose based on the controls you need. For example, Popup Maker supports click and time-delay triggers for free; exit-intent and scroll triggers require Pro.
If you want a WordPress exit-intent alternative that doesn’t require installing a plug-in, the Jotform Popup Widget supports that trigger through an embed.
This article is for WordPress site owners, bloggers, marketers, and WooCommerce merchants who want to embed high-converting popups with advanced triggers (like exit intent) without relying on heavy plugins or writing custom code.
































































































Send Comment: